fbcp ili9341
1.0.0
ยุคของ FBCP-ILI9341 สิ้นสุดลงแล้ว FBCP-ILI9341 ถูกสร้างขึ้นที่ด้านบนของ Videocore API Videocore ของ Raspberry Pi
อย่างไรก็ตาม API นี้ได้รับการคัดค้านโดยมูลนิธิ Raspberry Pi มาระยะหนึ่งแล้วและในที่สุดก็ล้าสมัย (= ไม่พร้อมใช้งาน) บน Raspberry Pi 5 และต่อไป
Raspberry Pi distros ในภายหลังไม่ได้มีการใช้งานโดยค่าเริ่มต้นอีกต่อไปแม้กระทั่งสำหรับ PI0-PI4 แต่ Raspberry Pi ได้ย้ายไปที่สแต็กนักแต่งเพลง KMS รุ่นใหม่ซึ่งมีนามธรรมที่แตกต่างกันสำหรับการรวมไดรเวอร์แสดง SPI คนอื่น ๆ กำลังพัฒนาไดรเวอร์การแสดงผล SPI สำหรับ PI ที่เข้ากันได้กับ KMS Stack มุ่งหน้าไปที่กระทู้ฟอรัม Raspberry Pi นี้เพื่อเรียนรู้เพิ่มเติม
พื้นที่เก็บข้อมูลนี้เป็นสิ่งที่ดีที่จะได้รับการพิจารณาว่าเป็นสิ่งที่เก็บถาวร/ค้างแม้ว่าฉันจะไม่ได้ทำเครื่องหมายไว้โดยใช้คุณสมบัติ GitHub เนื่องจากคุณลักษณะนั้นเห็นได้ชัดว่าจะทำให้การติดตามปัญหาอ่านอย่างเดียว อย่าลังเลที่จะพูดคุยเกี่ยวกับปัญหาเกี่ยวกับตัวติดตามต่อไป
ที่เก็บนี้ใช้ไดรเวอร์สำหรับจอ LCD ที่ใช้ SPI บางตัวสำหรับ Raspberry Pi A, B, 2, 3, 4 และศูนย์

งานนี้ได้รับแรงบันดาลใจจากความอยากรู้อยากเห็นหลังจากดูวิดีโอชุดนี้ในช่อง Retromancave YouTube:
ในวิดีโอเหล่านี้รถบัส SPI (GPIO) ถูกเรียกว่าเป็นคอขวด การอัปเดตการแสดงผลตาม SPI ผ่านบัสข้อมูลอนุกรมส่งสัญญาณหนึ่งบิตต่อรอบนาฬิกาบนบัส หน้าจอ 320x240x16bpp ดังนั้นจึงต้องใช้อัตรานาฬิกาบัส SPI 73.728MHz เพื่อให้ได้ความถี่การรีเฟรช 60fps เต็มรูปแบบ คอนโทรลเลอร์ SPI LCD ไม่กี่ตัวที่สามารถสื่อสารได้อย่างรวดเร็วในทางปฏิบัติ แต่ถูก จำกัด ให้อยู่ที่ความเร็วนาฬิกาบัส SPI 16-50MHz ด้วยอัตราการอัปเดตสูงสุดอย่างมีนัยสำคัญ เราสามารถทำอะไรเกี่ยวกับเรื่องนี้ได้หรือไม่?
โครงการ FBCP-ILI9341 เริ่มต้นเป็นไดรเวอร์การแสดงผลสำหรับ Adafruit 2.8 "320x240 TFT w/ หน้าจอสัมผัสสำหรับจอแสดงผล Raspberry Pi ที่ใช้คอนโทรลเลอร์ ILI9341 บนจอแสดงผล FBCP-ILI9341 ที่กำลังแสดง
ระบุว่ารถบัส SPI สามารถถูก จำกัด บนแบนด์วิดท์ได้อย่างไร FBCP-ILI9341 ดูเหมือนว่าจะสามารถอัปเดตได้สูงสุด 60fps? วิธีการนี้เกิดขึ้นได้จากสิ่งที่เรียกว่า การอัปเดตสตรีมแบบปรับตัวแบบปรับตัว แทนที่จะอัปโหลดแต่ละพิกเซลในแต่ละรอบการรีเฟรชการแสดงผลเฉพาะพิกเซลที่เปลี่ยนแปลงจริงบนหน้าจอจะถูกส่งไปยังจอแสดงผล สิ่งนี้สามารถทำได้เนื่องจากคอนโทรลเลอร์ ILI9341 ซึ่งเป็นตัวควบคุมยอดนิยมอื่น ๆ อีกมากมายมีฟังก์ชั่นอินเทอร์เฟซการสื่อสารที่อนุญาตให้ระบุการอัปเดตหน้าจอบางส่วนลงไปยัง subrectangles หรือแม้แต่ระดับพิกเซลแต่ละระดับ สิ่งนี้จะช่วยให้การตีขีด จำกัด แบนด์วิดท์: ตัวอย่างเช่นในแผ่นดินไหวแม้ว่าจะเป็นเกมที่รวดเร็วโดยเฉลี่ยประมาณ 46% ของพิกเซลทั้งหมดบนหน้าจอเปลี่ยนแต่ละเฟรมที่แสดงผล บางส่วนเช่น UI จะคงที่ในทางปฏิบัติในหลายเฟรม
การเพิ่มประสิทธิภาพอื่น ๆ ยังใช้เพื่อบีบประสิทธิภาพให้มากขึ้น:
#define NO_INTERLACING ในไฟล์ config.h )ผลที่ได้คือบัส SPI สามารถเก็บไว้ใกล้กับความอิ่มตัว 100% โดยปกติ ~ 94-97% เพื่อเพิ่มอัตราการใช้งานของบัสสูงสุดในขณะที่ส่งผ่านจำนวนน้อยที่สุดของไบต์ที่จำเป็นในการอธิบายเฟรมใหม่แต่ละเฟรม
คนขับได้รับการตรวจสอบการทำงาน (อย่างน้อยบางจุดในอดีต) ในระบบต่อไปนี้:
แม้ว่าบอร์ดทั้งหมดจะไม่ได้รับการทดสอบอย่างแข็งขันดังนั้น YMMV โดยเฉพาะบนบอร์ดเก่า (ยินดีต้อนรับการแก้ไขข้อผิดพลาดใช้ https://elinux.org/rpi_hardwarehistory เพื่อระบุว่าคุณกำลังใช้งานบอร์ดใด)
จอแอลซีดีต่อไปนี้ได้รับการทดสอบแล้ว:
ตรวจสอบส่วนต่อไปนี้เพื่อตั้งค่าไดรเวอร์
ไดรเวอร์นี้ไม่ได้ใช้ไดรเวอร์ Notro/FBTFT Framebuffer ดังนั้นจึงต้องปิดใช้งานหากใช้งานอยู่ นั่นคือถ้าไฟล์ /boot/config.txt ของคุณมีบรรทัดที่มีลักษณะเหมือน dtoverlay=pitft28r, ... , dtoverlay=waveshare32b, ... หรือ dtoverlay=flexfb, ... , ควรลบออก
โปรแกรมนี้ไม่ได้ใช้ไดรเวอร์ SPI เริ่มต้นดังนั้นบรรทัดเช่น dtparam=spi=on /boot/config.txt ควรถูกลบออกเพื่อที่จะไม่ทำให้เกิดความขัดแย้ง
ในทำนองเดียวกันหากคุณมี DToverLays ที่เกี่ยวข้องกับคอนโทรลเลอร์แบบสัมผัสใด ๆ เช่น dtoverlay=ads7846,... หรืออะไรก็ตามที่มี penirq= directive สิ่งเหล่านั้นควรถูกลบออกเพื่อหลีกเลี่ยงความขัดแย้ง เป็นไปได้ที่จะเพิ่มการสนับสนุนการสัมผัสให้กับ FBCP-ILI9341 หากมีคนต้องการแทงมัน
รันในคอนโซลของ Raspberry Pi ของคุณ:
sudo apt-get install cmake
cd ~
git clone https://github.com/juj/fbcp-ili9341.git
cd fbcp-ili9341
mkdir build
cd build
cmake [options] ..
make -j
sudo ./fbcp-ili9341
หมายเหตุโดยเฉพาะจุดสองจุด .. บนบรรทัด CMake ซึ่งแสดงว่า "UP One Directory" ในกรณีนี้ (แทนที่จะอ้างถึง "รายการเพิ่มเติมไปที่นี่")
ดูส่วนถัดไปเพื่อดูว่าจะป้อนอะไรภายใต้ [ตัวเลือก]
หากคุณใช้ไดรเวอร์ fbcp ที่มีอยู่แล้วตรวจสอบให้แน่ใจว่าได้ลบ EG นั้นผ่าน sudo pkill fbcp ก่อน (ในขณะที่ทำงานในพรอมต์ SSH หรือเชื่อมต่อกับจอแสดงผล HDMI) ทั้งสองไม่สามารถทำงานได้ในเวลาเดียวกัน if /etc/rc.local หรือ /etc/init.d มีรายการเพื่อเริ่มต้น fbcp ที่บูตคำสั่งนั้นควรถูกลบ
โดยทั่วไปมีสองวิธีในการกำหนดค่าตัวเลือกการสร้างที่บรรทัดคำสั่ง cmake และในไฟล์ config.h
ในบรรทัดคำสั่ง cmake ตัวเลือกต่อไปนี้สามารถกำหนดค่าได้:
เมื่อใช้หนึ่งในจอแสดงผลที่สแต็กที่อยู่ด้านบนของ PI ที่ได้รับการยอมรับจาก FBCP-ILI9341 คุณไม่จำเป็นต้องระบุการกำหนดพิน GPIO แต่รหัส FBCP-ILI9341 มีอยู่แล้ว ผ่านหนึ่งในคำสั่ง cmake ต่อไปนี้สำหรับหมวก:
-DADAFRUIT_ILI9341_PITFT=ON : ถ้าคุณกำลังทำงานบน Adafruit 2.8 "320x240 TFT w/ หน้าจอสัมผัสสำหรับ Raspberry Pi (หรือ Adafruit Pitft 2.2" Hat Mini Kit - 320x240 2.2 " ธง.-DADAFRUIT_HX8357D_PITFT=ON : หากคุณมี Adafruit Pitft - ประกอบ 480x320 3.5 "TFT+หน้าจอสัมผัสสำหรับจอแสดงผล Raspberry Pi เพิ่มบรรทัดนี้-DFREEPLAYTECH_WAVESHARE32B=ON : หากคุณกำลังทำงานบนอุปกรณ์ FreePlay CM3 หรือ Zero ให้ส่งธงนี้ (นี่ไม่ใช่หมวก แต่ยังคงได้รับการกำหนดไว้ล่วงหน้า)-DWAVESHARE35B_ILI9486=ON : หากระบุให้กำหนดเป้าหมาย WAVESHARE 3.5 "480X320 ILI9486-DTONTEC_MZ61581=ON : หากคุณกำลังทำงานบนหน้าจอแสดงผล LCD TONTEC 3.5 "320X480 LCD ให้ผ่านสิ่งนี้-DPIRATE_AUDIO_ST7789_HAT=ON : หากระบุให้กำหนดเป้าหมาย A Audio Pirate Audio 240x240, 1.3 นิ้ว IPS LCD Display Hat สำหรับ Raspberry Pi ด้วย ST7789 Display Controller-DWAVESHARE_ST7789VW_HAT=ON : หากระบุให้กำหนดเป้าหมายหมวกจอแสดงผล LCD IPS LCD ขนาด 240x240, 1.3 นิ้วสำหรับ Raspberry Pi พร้อมตัวควบคุมการแสดงผล ST7789VW-DWAVESHARE_ST7735S_HAT=ON : หากระบุให้กำหนดเป้าหมาย 128x128, 1.44inch LCD Display Hat สำหรับ Raspberry Pi พร้อมตัวควบคุมการแสดงผล ST7735S-DKEDEI_V63_MPI3501=ON : หากระบุให้กำหนดเป้าหมาย Kedei 3.5 นิ้ว SPI TFTLCD 480*320 16 บิต/18 บิตเวอร์ชัน 6.3 2018/4/9 จอแสดงผลด้วย MPI3501 คอนโทรลเลอร์แสดงผล หากคุณเชื่อมต่อสายไฟโดยตรงบน PI แทนที่จะใช้หมวกจากรายการด้านบนคุณจะต้องใช้คำสั่งการกำหนดค่าด้านล่าง นอกเหนือจากการระบุการแสดงผลคุณจะต้องบอก FBCP-ILI9341 ว่า GPIO ใดที่คุณเชื่อมต่อการเชื่อมต่อ ในการกำหนดค่าคอนโทรลเลอร์แสดงผลให้ผ่านหนึ่งใน:
-DILI9341=ON : หากคุณกำลังทำงานบนจอแสดงผล ILI9341 ทั่วไปอื่น ๆ หรือบนจอแสดงผล Waveshare32B ที่เป็นสแตนด์อโลนและไม่ได้อยู่บนอุปกรณ์ฟรีเพลย์เทค CM3/ศูนย์ส่งธงนี้-DILI9340=ON : หากคุณมีจอแสดงผล ILI9340 ให้ผ่านคำสั่งนี้ ชิปเซ็ต ILI9340 และ ILI9341 มีความคล้ายคลึงกันมาก แต่ ILI9340 ไม่รองรับคุณสมบัติทั้งหมดใน ILI9341 และพวกเขาจะถูกปิดใช้งานหรือปรับลดระดับ-DHX8357D=ON : หากคุณมีจอแสดงผล HX8357D ให้ผ่านคำสั่งนี้-DSSD1351=ON : หากคุณมีจอแสดงผล SSD1351 OLED ให้ใช้สิ่งนี้-DST7735R=ON : หากคุณมีหน้าจอ ST7735R ให้ใช้สิ่งนี้-DST7789=ON : หากคุณมีจอแสดงผล ST7789 ให้ใช้สิ่งนี้-DST7789VW=ON : หากคุณมีหน้าจอ ST7789VW ให้ใช้สิ่งนี้-DST7735S=ON : หากคุณมีจอแสดงผล ST7735S ให้ใช้สิ่งนี้-DILI9486=ON : หากคุณมีจอแสดงผล ILI9486 ให้ผ่านคำสั่งนี้-DILI9486L=ON : หากคุณมีจอแสดงผล ILI9486L ให้ผ่านคำสั่งนี้ โปรดทราบว่า ILI9486 และ ILI9486L นั้นแตกต่างกันมากและชิปคอนโทรลเลอร์ที่เข้ากันไม่ได้ซึ่งกันและกันดังนั้นโปรดระวังที่นี่เพื่อระบุว่าคุณมีอันไหน (หรือเพียงแค่ลองทั้งสองอย่างไม่ควรทำลายถ้าคุณระบุผิด)-DILI9488=ON : หากคุณมีจอแสดงผล ILI9488 ให้ผ่านคำสั่งนี้-DMPI3501=ON : หากระบุให้กำหนดเป้าหมายการแสดงผลด้วยคอนโทรลเลอร์แสดงผล MPI3501และนอกจากนี้ให้ผ่านสิ่งต่อไปนี้เพื่อปรับแต่งการกำหนด GPIO PIN ที่คุณใช้:
-DGPIO_TFT_DATA_CONTROL=number : ระบุ/แทนที่ซึ่ง GPIO PIN ที่จะใช้สำหรับสายข้อมูล/ควบคุม (DC) ในการสื่อสาร SPI 4 สาย หมายเลขพินนี้ระบุไว้ในหมายเลขพิน BCM หากคุณมีจอแสดงผล SPI 3 สายที่ไม่มีสายข้อมูล/ควบคุม ให้ตั้งค่านี้เป็น -1 คือ -DGPIO_TFT_DATA_CONTROL=-1 เพื่อบอก FBCP-ILI9341 เพื่อกำหนดเป้าหมาย 3-wire ("9-bit" SPI) การสื่อสาร.-DGPIO_TFT_RESET_PIN=number : ระบุ/แทนที่ GPIO PIN ใดที่จะใช้สำหรับบรรทัดรีเซ็ตการแสดงผล หมายเลขพินนี้ระบุไว้ในหมายเลขพิน BCM หากละเว้นจะสันนิษฐานว่าจอแสดงผลไม่มีพินรีเซ็ตและเปิดอยู่เสมอ-DGPIO_TFT_BACKLIGHT=number : ระบุ/แทนที่ที่ GPIO PIN ที่จะใช้สำหรับบรรทัดแบ็คไลท์แสดงผล หมายเลขพินนี้ระบุไว้ในหมายเลขพิน BCM หากละเว้นจะสันนิษฐานว่าจอแสดงผลไม่มีหมุดแบ็คไลท์ที่ควบคุมโดย GPIO และเปิดอยู่เสมอ หากตั้งค่าสิ่งนี้ให้ดูตัวเลือก #define BACKLIGHT_CONTROL ใน config.hFBCP-ILI9341 ใช้พอร์ตฮาร์ดแวร์ SPI0 เสมอดังนั้น MISO, MOSI, CLK และ CE0 จะเหมือนกันเสมอและไม่สามารถเปลี่ยนแปลงได้ พินมิโซะไม่ได้ใช้จริง (อย่างน้อยในขณะนี้) ดังนั้นคุณสามารถข้ามการเชื่อมต่อนั้นได้ หากจอแสดงผลของคุณเป็นเครื่องโกงที่ไม่สนใจสายเปิดใช้งานชิปคุณสามารถละเว้นการเชื่อมต่อได้เช่นกันหรืออาจจะสามารถหนีไปได้ด้วยการเชื่อมต่อกับพื้นถ้าคุณกดยากเพื่อให้การเดินสายง่ายขึ้น (ขึ้นอยู่กับจอแสดงผล)
เพื่อให้ได้ประสิทธิภาพที่ดีจากจอแสดงผลคุณจะผลักดันจอแสดงผลที่อยู่ไกลเกินกว่าข้อกำหนดความเร็วที่กำหนดไว้ (รายละเอียดที่จัดอันดับจะให้ประมาณ ~ 10fps ขึ้นอยู่กับหน้าจอ) ด้วยเหตุนี้คุณจะต้องกำหนดค่าความเร็วเป้าหมายอย่างชัดเจนที่คุณต้องการขับเคลื่อนจอแสดงผลเนื่องจากเนื่องจากความแปรปรวนของการผลิตแต่ละชุดแสดงผลที่แสดงถึงความเร็วสูงสุดที่แตกต่างกัน ไม่มี "ความเร็วเริ่มต้น" ที่ FBCP-ILI9341 จะใช้ การตั้งค่าความเร็วทำได้ผ่านตัวเลือก
-DSPI_BUS_CLOCK_DIVISOR=even_number : ตั้งค่าหมายเลขตัวหารนาฬิกาซึ่งพร้อมกับ PI CORE_FREQ = ตัวเลือกใน /boot/config.txt ระบุความเร็วโดยรวม SPI_frequency = core_freq/divisor SPI_BUS_CLOCK_DIVISOR จะต้องเป็นหมายเลขคู่ ค่าเริ่มต้น PI 3B และศูนย์ W core_freq คือ 400MHz และโดยทั่วไปค่า -DSPI_BUS_CLOCK_DIVISOR=6 ดูเหมือนจะดีที่สุดที่การแสดงผล ILI9341 สามารถทำได้ ลองใช้ค่าที่มากขึ้นหากจอแสดงผลแสดงผลลัพธ์ที่เสียหายหรือค่าที่เล็กกว่าเพื่อให้ได้แบนด์วิดท์ที่สูงขึ้น ดู ILI9341.H และ WAVESHARE35B.H สำหรับจุดข้อมูลเกี่ยวกับการปรับประสิทธิภาพ SPI สูงสุด ค่าเริ่มต้นที่ปลอดภัยอาจเป็นเช่น -DSPI_BUS_CLOCK_DIVISOR=30 มีตัวเลือกสองสามตัวที่จะพูดอย่างชัดเจนว่า PI Board ใดที่คุณต้องการกำหนดเป้าหมาย สิ่งเหล่านี้ควรได้รับการตรวจสอบอัตโนมัติสำหรับคุณและไม่จำเป็นโดยทั่วไป แต่เช่นถ้าคุณกำลังรวบรวมบอร์ด PI อื่นจากระบบอื่นหรือต้องการชัดเจนคุณสามารถลอง:
-DSINGLE_CORE_BOARD=ON : ส่งผ่านตัวเลือกนี้หากคุณทำงานบน PI ที่มีเธรดฮาร์ดแวร์เพียงหนึ่งเดียว (PI Model A, PI Model B, Module Compute 1, PI Zero/Zero W) หากไม่ได้อยู่ให้ใช้งานอัตโนมัติ-DARMV6Z=ON : ส่งตัวเลือกนี้เพื่อเพิ่มประสิทธิภาพโดยเฉพาะสำหรับชุดคำสั่ง ARMV6Z (PI 1A, 1A+, 1B, 1B+, ZERO, ZERO W) หากไม่ได้อยู่ให้ใช้งานอัตโนมัติ-DARMV7A=ON : ส่งตัวเลือกนี้เพื่อเพิ่มประสิทธิภาพโดยเฉพาะสำหรับชุดคำสั่ง ARMV7-A (PI 2B <Rev 1.2) หากไม่ได้อยู่ให้ใช้งานอัตโนมัติ-DARMV8A=ON : ส่งตัวเลือกนี้เพื่อเพิ่มประสิทธิภาพโดยเฉพาะสำหรับชุดคำสั่ง ARMV8-A (PI 2B> = Rev. 1.2, 3B, 3B+, CM3, CM3 Lite, 4B, CM4, PI400) หากไม่ได้อยู่ให้ใช้งานอัตโนมัติ ตัวเลือกการสร้างต่อไปนี้เป็นเรื่องทั่วไปสำหรับการแสดงทั้งหมดและบอร์ด PI พวกเขาปรับแต่งบิลด์เพิ่มเติม:
-DBACKLIGHT_CONTROL=ON : ถ้าตั้งค่าเปิดใช้งาน FBCP-ILI9341 เพื่อควบคุมการแสดงแบ็คไลท์ในพินแบ็คไลท์ที่กำหนด จอแสดงผลจะเข้าสู่การนอนหลับหลังจากไม่มีการใช้งานบนหน้าจอ ถ้าไม่ได้แบ็คไลท์จะไม่สัมผัส-DDISPLAY_CROPPED_INSTEAD_OF_SCALING=ON : หากตั้งค่าและเฟรมวิดีโอต้นทางมีขนาดใหญ่กว่าความละเอียดวิดีโอ SPI แสดงวิดีโอแหล่งที่มาจะถูกนำเสนอบนจอแสดงผล SPI โดยการครอบตัดชิ้นส่วนของมันในทุกทิศทางแทนที่จะปรับขนาดให้พอดี-DDISPLAY_BREAK_ASPECT_RATIO_WHEN_SCALING=ON : เมื่อปรับขนาดวิดีโอต้นทางไปยังการแสดงผล SPI การปรับสเกลจะดำเนินการตามค่าเริ่มต้นตามอัตราส่วนภาพรวมการเพิ่มกล่องจดหมาย/กล่องเสาตามต้องการ หากตั้งค่านี้การยืดจะทำอัตราส่วนการแตกหัก-DSTATISTICS=number : ระบุระดับสถิติการซ้อนทับเพื่อแสดงบนหน้าจอ 0: ปิดการใช้งาน, 1: เปิดใช้งาน, 2: เปิดใช้งานและแสดงกราฟช่วงช่วงอัตราเฟรมเช่นกัน ค่าเริ่มต้นคือ 1 (เปิดใช้งาน)-DUSE_DMA_TRANSFERS=OFF : หากระบุให้ปิดการใช้งานโดยใช้การถ่ายโอน DMA (ด้วยค่าใช้จ่ายที่ยอดเยี่ยมของการใช้งาน CPU ที่หายไป) ผ่านคำสั่งนี้หาก DMA ให้ปัญหาบางอย่างเช่นเป็นขั้นตอนการแก้ไขปัญหาหากบางสิ่งไม่ถูกต้อง-DDMA_TX_CHANNEL=<num> : ระบุหมายเลขช่อง DMA เพื่อใช้สำหรับคำสั่ง SPI ส่งคำสั่ง เปลี่ยนสิ่งนี้หากคุณพบความขัดแย้งของช่อง DMA-DDMA_RX_CHANNEL=<num> : ระบุหมายเลขช่อง DMA เพื่อใช้สำหรับคำสั่ง SPI รับ เปลี่ยนสิ่งนี้หากคุณพบความขัดแย้งของช่อง DMA-DDISPLAY_SWAP_BGR=ON : หากผ่านตัวเลือกนี้ช่องสีแดงและสีน้ำเงินจะถูกย้อนกลับ (RGB <-> BGR) SWAP จอแสดงผลบางตัวมีเค้าโครงย่อยแผงสีตรงข้ามที่คอนโทรลเลอร์แสดงผลไม่ได้บัญชีโดยอัตโนมัติดังนั้นกำหนดสิ่งนี้ถ้าสีน้ำเงินและสีแดงผสมกัน-DDISPLAY_INVERT_COLORS=ON : ถ้าตัวเลือกนี้ผ่านการตีความค่าสีพิกเซลจะกลับด้าน (สีขาว = 0, ดำ = 31/63) ค่าเริ่มต้น: ดำ = 0, ขาว = 31/63 ผ่านตัวเลือกนี้หากภาพที่แสดงดูเหมือนเป็นค่าลบสีของสีจริง-DDISPLAY_ROTATE_180_DEGREES=ON : ถ้าตั้งค่าจอแสดงผลจะหมุน 180 องศา สิ่งนี้ไม่ส่งผลกระทบต่อเอาต์พุต HDMI เฉพาะเอาต์พุต SPI Display-DLOW_BATTERY_PIN=<num> : ระบุพิน GPIO ที่สามารถสำรวจได้เพื่อรับสถานะแบตเตอรี่ โดยค่าเริ่มต้นเมื่อตั้งค่านี้ไอคอนแบตเตอรี่ต่ำจะปรากฏขึ้นหาก PIN ถูกดึงต่ำ (ดู config.h สำหรับวิธีที่สามารถปรับแต่งได้) นอกเหนือจากคำสั่ง CMake ข้างต้นแล้วยังมีการกำหนดที่หลากหลายที่กระจัดกระจายไปรอบ ๆ codebase ซึ่งส่วนใหญ่อยู่ใน config.h ซึ่งควบคุมตัวเลือกรันไทม์ที่แตกต่างกัน แก้ไขสิ่งเหล่านั้นโดยตรงเพื่อปรับพฤติกรรมของโปรแกรมต่อไป โดยเฉพาะอย่างยิ่งหลังจากที่คุณติดตั้งเสร็จแล้วคุณอาจต้องการสร้างด้วย -DSTATISTICS=0 ตัวเลือกในสายการกำหนดค่า CMake
นี่คือตัวอย่างเต็มรูปแบบของสิ่งที่จะพิมพ์และเรียกใช้หากคุณมี Adafruit 2.8 "320x240 TFT w/ หน้าจอสัมผัสสำหรับ Raspberry Pi ด้วยคอนโทรลเลอร์ ILI9341:
 cd ~
sudo apt-get install cmake
git clone https://github.com/juj/fbcp-ili9341.git
cd fbcp-ili9341
mkdir build
cd build
cmake -DSPI_BUS_CLOCK_DIVISOR=6 -DADAFRUIT_ILI9341_PITFT=ON ..
make -j
sudo ./fbcp-ili9341
หากข้างต้นใช้งานไม่ได้ลองระบุ -DSPI_BUS_CLOCK_DIVISOR=8 หรือ =10 เพื่อให้การแสดงผลทำงานช้าลงเล็กน้อยหรือลองด้วย -DUSE_DMA_TRANSFERS=OFF เพื่อแก้ไขปัญหาหาก DMA อาจเป็นปัญหา หากคุณใช้คอนโทรลเลอร์จอแสดงผลอื่นมากกว่า ILI9341 โดยใช้ค่าที่สูงกว่ามากเช่น 30 หรือ 40 อาจจำเป็นต้องใช้ เมื่อเปลี่ยนตัวเลือก CMAKE คุณสามารถออกบรรทัด CMAKE Directive ใหม่ได้โดยไม่ต้อง reclone หรือสร้างไดเรกทอรี build ใหม่ อย่างไรก็ตามคุณอาจต้องลบไฟล์ cmakecache.txt ด้วยตนเองระหว่างการเปลี่ยนตัวเลือกเพื่อหลีกเลี่ยง cmake ที่จดจำการตั้งค่าเก่า
หากคุณต้องการทำการสร้างใหม่อย่างเต็มรูปแบบตั้งแต่เริ่มต้นคุณสามารถ rm -rf build เพื่อลบไดเรกทอรี Build และสร้างใหม่เพื่อสร้างใหม่ให้สะอาดตั้งแต่เริ่มต้น ไม่มีอะไรพิเศษเกี่ยวกับชื่อหรือที่ตั้งของไดเรกทอรีนี้มันเป็นเพียงการประชุมปกติของฉัน นอกจากนี้คุณยังสามารถสร้างในไดเรกทอรีอื่น ๆ ที่เกี่ยวข้องกับไดเรกทอรี FBCP-ILI9341 หากคุณต้องการ
ในการตั้งค่าไดรเวอร์เพื่อเปิดตัวเมื่อเริ่มต้นแก้ไขไฟล์ /etc/rc.local ในโหมด sudo และเพิ่มบรรทัด
sudo /path/to/fbcp-ili9341/build/fbcp-ili9341 & จนถึงที่สุด จดบันทึกแอมป์แซนด์ที่จำเป็น & ในตอนท้ายของบรรทัดนั้น
ตัวอย่างเช่นหากคุณใช้ขั้นตอนบรรทัดคำสั่งที่ระบุไว้ข้างต้นเพื่อสร้างไฟล์ /etc/rc.local จะได้รับบรรทัด
sudo /home/pi/fbcp-ili9341/build/fbcp-ili9341 & หากชื่อผู้ใช้ของการติดตั้ง Raspberry Pi ของคุณเป็นอย่างอื่นนอกเหนือจาก pi เริ่มต้นให้เปลี่ยนไดเรกทอรีตามลำดับเพื่อชี้ไปที่ไดเรกทอรีบ้านของผู้ใช้ (ใช้ pwd เพื่อค้นหาไดเรกทอรีปัจจุบันในเทอร์มินัล)
systemd อีกทางเลือกหนึ่งแทนที่จะแก้ไข /etc/rc.local ให้ใช้ไฟล์หน่วย systemd ที่ให้ไว้ด้านล่าง:
sudo install -m 0644 -t /etc fbcp-ili9341.conf
sudo install -m 0644 -t /etc/systemd/system fbcp-ili9341.service
sudo systemctl daemon-reload
sudo systemctl enable fbcp && sudo systemctl start fbcp หากขนาดของ HDMI Output /dev/fb0 Framebuffer เริ่มต้นแตกต่างจากความละเอียดของจอแสดงผลขนาดวิดีโอต้นทางจะถูกลดขนาดเพื่อปรับขนาดให้พอดีกับขนาดของจอแสดงผล SPI FBCP-ILI9341 จะจัดการการตั้งค่าการ rescaling นี้หากจำเป็นและจะทำโดย GPU ดังนั้นประสิทธิภาพจึงไม่ควรได้รับผลกระทบมากเกินไป อย่างไรก็ตามหากการแก้ปัญหาไม่ตรงกันข้อความขนาดเล็กอาจจะดูไม่ได้ การปรับขนาดจะทำในลักษณะการรักษามุมมองดังนั้นหากอัตราส่วนอสังหาริมทรัพย์ไม่ตรงกับเส้นขอบสีดำแนวนอนหรือแนวตั้งจะปรากฏบนจอแสดงผล หากคุณไม่ได้ใช้เอาต์พุต HDMI เลยอาจเป็นการดีที่สุดที่จะกำหนดค่าเอาต์พุต HDMI เพื่อให้ตรงกับขนาดการแสดงผล SPI เพื่อไม่ต้องใช้การ rescaling สามารถทำได้โดยการตั้งค่าบรรทัดต่อไปนี้ใน /boot/config.txt :
 hdmi_group=2
hdmi_mode=87
hdmi_cvt=320 240 60 1 0 0 0
hdmi_force_hotplug=1
หากจอแสดงผล SPI ของคุณมีความละเอียดที่แตกต่างจาก 320x240 ให้เปลี่ยนส่วน 320 240 เป็นเช่น 480 320
บรรทัดเหล่านี้บอกใบ้แอปพลิเคชันดั้งเดิมเกี่ยวกับโหมดการแสดงผลเริ่มต้นและให้พวกเขาแสดงความละเอียดดั้งเดิมของการแสดงผล TFT อย่างไรก็ตามสิ่งนี้สามารถป้องกันการใช้ตัวเชื่อมต่อ HDMI หากจอแสดงผลที่เชื่อมต่อ HDMI ไม่รองรับความละเอียดเล็ก ๆ หากมีการประนีประนอมหากทั้งจอแสดงผล HDMI และ SPI ต้องการใช้ในเวลาเดียวกันสามารถใช้ความละเอียดที่เข้ากันได้อื่น ๆ เช่น 640x480 ดูเอกสารประกอบ Raspberry Pi HDMI สำหรับตัวเลือกที่มีอยู่ในการทำเช่นนี้
ความเร็วในการรีเฟรชของจอแสดงผลถูกกำหนดโดยความเร็วสัญญาณนาฬิกาของบัส SPI ที่จอแสดงผลเชื่อมต่อกับ เนื่องจากวิธีการใช้ชิป BCM2835 ในการทำงานของ Raspberry Pi จึงไม่มีตัวเลือก Simple speed=xxx Mhz ที่สามารถตั้งค่าเพื่อกำหนดความเร็วบัสได้ แต่ความเร็วบัส SPI นั้นได้มาจากพารามิเตอร์สองแบบแยกกัน: ความถี่หลักของ BCM2835 SOC โดยทั่วไป ( core_freq in /boot/config.txt ) และการตั้งค่า SPI อุปกรณ์ต่อพ่วง CDIV (ตัวแบ่งนาฬิกา) ด้วยการคำนวณความเร็วของบัส SPI ที่เกิดขึ้นด้วยสูตร SPI_speed=core_freq/CDIV
เพื่อเพิ่มประสิทธิภาพการแสดงผลให้ทำงานให้เร็วที่สุดเท่าที่จะทำได้
ปรับค่า CDIV โดยผ่าน Directive -DSPI_BUS_CLOCK_DIVISOR=number ในบรรทัดคำสั่ง CMAKE ค่าที่เป็นไปได้คือตัวเลข 2 , 4 , 6 , 8 , ... โปรดทราบว่าเนื่องจาก CDIV ปรากฏในตัวส่วนในสูตรสำหรับ SPI_speed ค่าที่เล็กกว่าส่งผลให้ความเร็วบัสสูงขึ้นในขณะที่ค่าที่สูงขึ้นทำให้การแสดงผลช้าลง เริ่มแรกเมื่อคุณไม่ทราบว่าการแสดงผลของคุณสามารถทำงานได้เร็วแค่ไหนลองเริ่มต้นด้วยการตั้งค่าสูงอย่างปลอดภัยเช่น -DSPI_BUS_CLOCK_DIVISOR=30 และทำงานให้กับตัวเลขที่เล็กลงเพื่อค้นหาความเร็วสูงสุดที่จอแสดงผลสามารถรับมือได้ ดูตารางที่ส่วนท้ายของ readMe สำหรับความเร็วบัสสูงสุดที่สังเกตได้เฉพาะสำหรับจอแสดงผลที่แตกต่างกัน
ตรวจสอบความเร็วของเทอร์โบ นี่เป็นสิ่งสำคัญสำหรับอัตราเฟรมที่ดี ในรุ่น Raspberry Pi 3 B Core BCM2835 ทำงานโดยค่าเริ่มต้นที่ 400MHz (ส่งผลให้ความเร็ว 400/CDIV MHz SPI) หาก มีพลังงานเพียงพอที่จะให้กับ PI และหากอุณหภูมิ CPU ไม่เกินขีด จำกัด ทางความร้อน หาก CPU ไม่ได้ใช้งานหรือแรงดันไฟฟ้าต่ำ BCM2835 Core จะกลับไปเป็นสถานะที่ไม่ใช่เทอร์โบ 250MHz แทนที่จะส่งผลให้ความเร็ว 250/CDIV MHz SPI เอฟเฟกต์ของความเร็วเทอร์โบต่อประสิทธิภาพนี้มีความสำคัญเนื่องจาก 400MHz เทียบกับไม่ใช่เทอร์โบ 250MHz ออกมาถึง +60% ของแบนด์วิดท์มากขึ้น การได้รับ 60fps ในแผ่นดินไหว Sonic หรือ Tyrian มักจะต้องใช้ความถี่เทอร์โบนี้ แต่เช่น NES และ C64 เกมที่เลียนแบบมักจะถึง 60fps แม้จะมีสต็อก 250MHz หากด้วยเหตุผลบางอย่างการป้องกันแรงดันไฟฟ้าต่ำกว่ากำลังเตะแม้ว่าจะมีกำลังเพียงพอคุณสามารถบังคับให้ใช้เทอร์โบที่เปิดใช้งานได้เมื่อมีแรงดันไฟฟ้าต่ำโดยการตั้งค่า avoid_warnings=2 ในไฟล์ /boot/config.txt
บางทีอาจเป็นเรื่องยาก ที่จะล็อค แกนกลาง การตั้งค่าความถี่หลัก ที่เล็กกว่า เทอร์โบเริ่มต้น 400MHz เริ่มต้นสามารถเปิดใช้งานได้โดยใช้ตัวแบ่งนาฬิกาขนาดเล็กเพื่อให้ได้ความเร็วบัส SPI ที่สูงขึ้น ตัวอย่างเช่นหากมีค่าเริ่มต้น core_freq=400 spi CDIV=8 งาน ( core_freq=360 ผลให้ความเร็วบัส SPI 400MHz/8=50MHz ) แต่ CDIV=6 ไม่ได้ ( 400MHz/6=66.67MHz มากเกินไป) core_freq=360 และตั้งค่า CDIV=6 เพื่อให้ได้ความเร็วบัส SPI ที่มีประสิทธิภาพ 360MHz/6=60MHz ซึ่งเป็นจุดศูนย์กลางระหว่างสองอันที่อาจใช้งานได้ ตัวเลือกการปรับสมดุล core_freq= และ CDIV ช่วยให้หนึ่งสามารถค้นหาความเร็วบัส SPI สูงสุดได้ถึงไม่กี่ kHz สุดท้ายที่คอนโทรลเลอร์แสดงผลสามารถทนได้ เราสามารถลองทิศทางตรงกันข้ามและโอเวอร์คล็อกได้ แต่แน่นอนว่ามีปัญหาทั้งหมดที่เกิดขึ้นเมื่อโอเวอร์คล็อก Underclocking มีข้อเสียเปรียบที่ทำให้การทำงานของ PI ช้าลงโดยรวมดังนั้นนี่จึงเป็นการแลกเปลี่ยนอย่างแน่นอน
ในทางกลับกันเป็นที่พึงปรารถนาที่จะควบคุมระยะเวลา CPU FBCP-ILI9341 ได้รับอนุญาตให้ใช้ การตั้งค่าบิลด์เริ่มต้นจะถูกปรับเพื่อเพิ่มอัตราการรีเฟรชการแสดงผลสูงสุดโดยค่าใช้จ่ายในการใช้พลังงานใน PI 3B บน Pi Zero สิ่งที่ตรงกันข้ามจะทำเช่นค่าเริ่มต้นไดรเวอร์จะปรับให้เหมาะสมสำหรับการประหยัดแบตเตอรี่แทนความเร็วการอัปเดตการแสดงผลสูงสุด ตัวเลือกต่อไปนี้สามารถควบคุมเพื่อความสมดุลระหว่างสองนี้:
ตัวเลือกหลักในการควบคุมการใช้งาน CPU เทียบกับประสิทธิภาพการทำงานคือตัวเลือก #define ALL_TASKS_SHOULD_DMA ใน config.h การเปิดใช้งานตัวเลือกนี้จะช่วยลดการใช้งาน CPU ได้อย่างมาก หากตัวเลือกนี้ถูกปิดใช้งานการใช้ SPI Bus จะถูกขยายให้ใหญ่สุด แต่การใช้งาน CPU สามารถสูงถึง 80%-120% เมื่อเปิดใช้งานตัวเลือกนี้การใช้งาน CPU โดยทั่วไปจะสูงถึงประมาณ 15%-30% การใช้งาน CPU สูงสุดเกิดขึ้นเมื่อดูวิดีโอหรือเล่นเกมที่เคลื่อนไหวเร็ว หากไม่มีการเปลี่ยนแปลงบนหน้าจอการบริโภค CPU ของผู้ขับขี่ควรลดลงใกล้กับ 0-5% โดยค่าเริ่มต้น #define ALL_TASKS_SHOULD_DMA เปิดใช้งานสำหรับ Pi Zero แต่ปิดใช้งานสำหรับ Pi 3B
ตัวเลือก cmake -DUSE_DMA_TRANSFERS=ON ควรเปิดใช้งานสำหรับการใช้งาน CPU ต่ำที่ดี หากการถ่ายโอน DMA ถูกปิดใช้งานไดรเวอร์จะทำงานในโหมด Polled SPI ซึ่งโดยทั่วไปจะใช้แกนกลางเดียวของเวลา CPU โดยเฉพาะ หากการถ่ายโอน DMA เป็นสาเหตุให้ลองปรับ DMA Send และรับแชนเนลเพื่อใช้สำหรับการสื่อสาร SPI ด้วย -DDMA_TX_CHANNEL=<num> และ -DDMA_RX_CHANNEL=<num> ตัวเลือก CMake
การซ้อนทับสถิติพิมพ์ข้อมูลโดยละเอียดเกี่ยวกับสถานะการดำเนินการ การปิดใช้งานการซ้อนทับด้วย -DSTATISTICS=0 ตัวเลือกเพื่อ CMake ช่วยปรับปรุงประสิทธิภาพและลดการใช้งาน CPU หากคุณต้องการเก็บสถิติการพิมพ์คุณสามารถลองเพิ่มช่วงเวลาด้วย #define STATISTICS_REFRESH_INTERVAL <timeInMicroseconds> ตัวเลือกใน config.h
การเปิดใช้งาน #define USE_GPU_VSYNC ช่วยลดการใช้ CPU แต่เนื่องจาก RaspberryPi/Userland #440 สามารถทำให้เกิดการพูดติดอ่าง การปิดใช้งาน #defined USE_GPU_VSYNC ทำให้เกิดการพูดติดอ่างน้อยลง แต่เนื่องจาก RaspberryPi/Userland #440 เพิ่มการใช้พลังงาน CPU
ตัวเลือก #define SELF_SYNCHRONIZE_TO_GPU_VSYNC_PRODUCED_NEW_FRAMES สามารถใช้ร่วมกับ #define USE_GPU_VSYNC เพื่อพยายามหาพื้นกลางระหว่าง RASPBERRYPI/USERLAND #440 ลองทดลองใช้หรือปิดการใช้งานการตั้งค่านี้
มีตัวเลือก #define SAVE_BATTERY_BY_x จำนวนหนึ่งใน config.h ซึ่งเป็นค่าเริ่มต้นทั้งหมดที่จะเปิดใช้งาน สิ่งเหล่านี้ควรปลอดภัยที่จะใช้เสมอโดยไม่มีการแลกเปลี่ยน หากคุณกำลังประสบปัญหาเวลาแฝงหรือปัญหาที่เกี่ยวข้องกับประสิทธิภาพคุณสามารถพยายามสลับสิ่งเหล่านี้เพื่อแก้ไขปัญหา
ตัวเลือก #define DISPLAY_FLIP_ORIENTATION_IN_SOFTWARE ทำให้เกิดการใช้งาน CPU เพิ่มเติมเล็กน้อยดังนั้นการปิดการใช้งานจะทำให้ CPU โหลดขึ้นเล็กน้อย
หากบัสแสดงผล SPI ของคุณสามารถทำงานได้อย่างรวดเร็วเมื่อเทียบกับขนาดของจอแสดงผลและปริมาณของเนื้อหาที่เปลี่ยนแปลงบนหน้าจอคุณสามารถลองเปิดใช้งาน #define UPDATE_FRAMES_IN_SINGLE_RECTANGULAR_DIFF ใน config.h เพื่อลดการใช้งาน CPU จำนวนไบต์ที่ส่งผ่านรถบัส สิ่งนี้ได้รับการสังเกตว่ามีผลอย่างมากต่อ Pi Zero ดังนั้นควรตรวจสอบโดยเฉพาะอย่างยิ่งที่นั่น
หากบัสแสดงผล SPI สามารถทำงานได้เร็วจริงๆ (หรือคุณไม่สนใจอัตราเฟรม แต่เพียงแค่การใช้งาน CPU ต่ำ) คุณสามารถลองเปิดใช้งาน #define UPDATE_FRAMES_WITHOUT_DIFFING ตัวเลือกใน config.h ตัวเลือกทั้งหมด สิ่งนี้จะเปลี่ยนกลับเป็นการอัปเดต Full Frame ที่ไร้เดียงสาสำหรับการใช้งาน CPU โดยรวมขั้นต่ำอย่างแน่นอน
ตัวเลือก #define RUN_WITH_REALTIME_THREAD_PRIORITY สามารถเปิดใช้งานเพื่อให้ไดรเวอร์ทำงานตามลำดับความสำคัญของกระบวนการเรียลไทม์ สิ่งนี้สามารถล็อคระบบ แต่ยังคงมีให้สำหรับการทดลองขั้นสูง
ใน display.h มีตัวเลือก #define TARGET_FRAME_RATE <number> การตั้งค่าสิ่งนี้เป็นค่าที่น้อยลงเช่น 30 จะแลกเปลี่ยนอัตราการรีเฟรชเพื่อลดการใช้ CPU
แง่มุมที่น่าพึงพอใจของ FBCP-ILI9341 คือมันแนะนำค่าใช้จ่ายแฝงน้อยมาก: บนจอแสดงผล ILI9341 ที่รีเฟรช 119Hz, FBCP-ILI9341 ได้รับพิกเซลเป็นการตอบสนองจากอินพุต GPIO ไปยังหน้าจอ ฉันมีกล้องบันทึก 120fps เท่านั้นดังนั้นจึงไม่สามารถวัดความล่าช้าได้อย่างง่ายดายกว่านั้น แต่ประมาณการทางสถิติคร่าวๆของวิดีโอวิดีโอการเคลื่อนไหวช้าแสดงให้เห็นว่าการหน่วงเวลานี้อาจต่ำถึง 2-3 msecs ของ ILI9341
นี่ไม่ได้หมายความว่าอินพุตโดยรวมเพื่อแสดงความล่าช้าในเกมจะเกิดขึ้นทันที การทดสอบเกมที่เลียนแบบ NES ใน Retropie สั้น ๆ แสดงให้เห็นถึงความล่าช้าทั้งหมดประมาณ 60-80 msecs เวลาแฝงนี้เกิดจาก NES Game Emulator ค่าใช้จ่ายและเวลาแฝงพิเศษที่เพิ่มโดย Linux, Discmanx และ GPU การแสดงผลและ GPU Framebuffer Snapshotting (ถ้าคุณเรียกใช้ FBCP-ILI9341 เป็นห้องสมุดคงที่ข้าม DispManx และสแต็ก GPU เชื่อมโยงอินพุต GPIO ของคุณโดยตรงและตรรกะแอปพลิเคชันเข้ากับ FBCP-ILI9341 เหนือวิดีโออินพุต GPIO)
ที่น่าสนใจ FBCP-ILI9341 นั้นเร็วกว่าจอแสดงผล Kedei HDMI ราคาถูก ~ 33msecs ประมาณ 33msecs ฉันไม่ทราบว่านี่เป็นผลมาจากการแสดง Kedei HDMI โดยเฉพาะการแนะนำแฝงพิเศษหรือหาก HDMI ทั้งหมดที่เชื่อมต่อกับ PI ค่าใช้จ่ายในการแฝง
น่าเสียดายที่ข้อ จำกัด ของจอแสดงผลที่เชื่อมต่อ SPI คือสัญญาณ VSYNC ไม่สามารถใช้งานได้ในคอนโทรลเลอร์จอแสดงผลเมื่อพวกเขาทำงานในโหมด SPI ดังนั้นจึงเป็นไปไม่ได้ที่จะทำการอัปเดต VSYNC แม้ว่าแบนด์วิดธ์บัส SPI บนหน้าจอจะเร็วพอ . For example, the 4 ILI9341 displays I have can all be run faster than 75MHz so SPI bus bandwidth-wise all of them would be able to update a full frame in less than a vsync interval, but it is not possible to synchronize the updates to vsync since the display controllers do not report it. (If you do know of a display that does actually expose a vsync clock signal even in SPI mode, you can try implementing support to locking on to it)
You can however choose between two distinct types of tearing artifacts: straight line tearing and diagonal tearing . Whichever looks better is a bit subjective, which is why both options exist. I prefer the straight line tearing artifact, it seems to be less intrusive than the diagonal tearing one. To toggle this, edit the option #define DISPLAY_FLIP_ORIENTATION_IN_SOFTWARE in config.h . When this option is enabled, fbcp-ili9341 produces straight line tearing, and consumes a tiny few % more CPU power. By default Pi 3B builds with straight line tearing, and Pi Zero with the faster diagonal tearing. Check out the video Latency and tearing test #2: GPIO input to display latency in fbcp-ili9341 and tearing modes to see in slow motion videos how these two tearing modes look like.
Another option that is known to affect how the tearing artifact looks like is the internal panel refresh rate. For ILI9341 displays this refresh rate can be adjusted in ili9341.h , and this can be set to range between ILI9341_FRAMERATE_61_HZ and ILI9341_FRAMERATE_119_HZ (default). Slower refresh rates produce less tearing, but have higher input-to-display latency, whereas higher refresh rates will result in the opposite. Again visually the resulting effect is a bit subjective.
To get tearing free updates, you should use a DPI display, or a good quality HDMI display. Beware that cheap small 3.5" HDMI displays such as KeDei do also tear - that is, even if they are controlled via HDMI, they don't actually seem to implement VSYNC timed internal operation.
Having no vsync is not all bad though, since with the lack of vsync, SPI displays have the opportunity to obtain smoother animation on content that is not updating at 60Hz. It is possible that content on the SPI display will stutter even less than what DPI or HDMI displays on the Pi can currently provide (although I have not been able to test this in detail, except for the KeDei case above).
The main option that affects smoothness of display updates is the #define USE_GPU_VSYNC line in config.h . If this is enabled, then the internal Pi GPU HDMI vsync clock is used to drive frames onto the display. The Pi GPU clock runs at a fixed rate that is independent of the content. This rate can be discovered by running tvservice -s on the Pi console, and is usually 59Hz or 60Hz. If your application renders at this rate, animation will look smooth, but if not, there will be stuttering. For example playing a PAL NES game that updates at 50Hz with HDMI clock set at 60Hz will cause bad microstuttering in video output if #define USE_GPU_VSYNC is enabled.
If USE_GPU_VSYNC is disabled, then a busy spinning GPU frame snapshotting thread is used to drive the updates. This will produce smoother animation in content that does not maintain a fixed 60Hz rate. Especially in OpenTyrian, a game that renders at a fixed 36fps and has slowly scrolling scenery, the stuttering caused by USE_GPU_VSYNC is particularly visible. Running on Pi 3B without USE_GPU_VSYNC enabled produces visually smoother looking scrolling on an Adafruit 2.8" ILI9341 PiTFT set to update at 119Hz, compared to enabling USE_GPU_VSYNC on the same setup. Without USE_GPU_VSYNC , the dedicated frame polling loop thread "finds" the 36Hz update rate of the game, and then pushes pixels to the display at this exact rate. This works nicely since SPI displays disregard vsync - the result is that frames are pushed out to the SPI display immediately as they become available, instead of pulling them at a fixed 60Hz rate like HDMI does.
A drawback is that this kind of polling consumes more CPU time than the vsync option. The extra overhead is around +34% of CPU usage compared to the vsync method. It also requires using a background thread, and because of this, it is not feasible to be used on a single core Pi Zero. If this polling was unnecessary, this mode would also work on a Pi Zero, and without the added +34% CPU overhead on Pi 3B. See the Known Issues section below for more details.

There are two other main options that affect frame delivery timings, #define SELF_SYNCHRONIZE_TO_GPU_VSYNC_PRODUCED_NEW_FRAMES and #define SAVE_BATTERY_BY_PREDICTING_FRAME_ARRIVAL_TIMES . Check out the video fbcp-ili9341 frame delivery smoothness test on Pi 3B and Adafruit ILI9341 at 119Hz for a detailed side by side comparison of these different modes. The conclusions drawn from the four tested scenarios in the video are:
1. vc_dispmanx_vsync_callback() (top left) , set #define USE_GPU_VSYNC and unset #define SELF_SYNCHRONIZE_TO_GPU_VSYNC_PRODUCED_NEW_FRAMES :
This mode uses the DispmanX HDMI vsync signal callback to drive frames to the display.
ข้อดี:
จุดด้อย:
2. vc_dispmanx_vsync_callback() + self synchronization (top right) , set #define USE_GPU_VSYNC and #define SELF_SYNCHRONIZE_TO_GPU_VSYNC_PRODUCED_NEW_FRAMES :
This mode uses the GPU vsync signal, but also aims to find and synchronize to the edge trigger when content is producing frames. This is the default build mode on Pi Zero.
ข้อดี:
จุดด้อย:
3. gpu polling thread + sleep heuristic (bottom left) , unset #define USE_GPU_VSYNC and set #define SAVE_BATTERY_BY_PREDICTING_FRAME_ARRIVAL_TIMES :
This mode runs a dedicated background thread that drives frames from the GPU to the SPI display. This is the default build mode on Pi 3B.
ข้อดี:
จุดด้อย:
4. gpu polling thread without sleeping (bottom right) , unset #define USE_GPU_VSYNC and unset #define SAVE_BATTERY_BY_PREDICTING_FRAME_ARRIVAL_TIMES :
This mode runs the dedicated GPU thread as fast as possible, without attempting to sleep CPU.
ข้อดี:
จุดด้อย:
Be aware of the following limitations:
vc_dispmanx_snapshot() API, and the obtained pixels are then routed on to the SPI-based display. This kind of polling is performed, since there does not exist an event-based mechanism to get new frames from the GPU as they are produced. The result is inefficient and can easily cause stuttering, since different applications produce frames at different paces. Ideally the code would ask the VideoCore API to receive finished frames in callback notifications immediately after they are rendered , but this kind of functionality does not exist in the current GPU driver stack. In the absence of such event delivery mechanism, the code has to resort to polling snapshots of the display framebuffer using carefully timed heuristics to balance between keeping latency and stuttering low, while not causing excessive power consumption. These heuristics keep continuously guessing the update rate of the animation on screen, and they have been tuned to ensure that CPU usage goes down to 0% when there is no detected activity on screen, but it is certainly not perfect. This GPU limitation is discussed at raspberrypi/userland#440. If you'd like to see fbcp-ili9341 operation reduce latency, stuttering and power consumption, please throw a (kind!) comment or a thumbs up emoji in that bug thread to share that you care about this, and perhaps Raspberry Pi engineers might pick the improvement up on the development roadmap. If this issue is resolved, all of the #define USE_GPU_VSYNC , #define SAVE_BATTERY_BY_PREDICTING_FRAME_ARRIVAL_TIMES and #define SELF_SYNCHRONIZE_TO_GPU_VSYNC_PRODUCED_NEW_FRAMES hacks from the previous section could be deleted from the driver, hopefully leading to a best of all worlds scenario without drawbacks. /boot/config.txt and configure all applications to never change that at runtime. 400/250=+60% as well. Therefore when choosing the SPI CDIV value to use, one has to pick one that works for both idle and turbo clock speeds. Conversely, the BCM core reverts to non-turbo speed when there is only light CPU load active, and this slows down the display, so if an application is graphically intensive but light on CPU, the SPI display bus does not get a chance to run at maximum speeds. A way to work around this is to force the BCM core to always stay in its turbo state with force_turbo=1 option in /boot/config.txt , but this has an unfortunate effect of causing the ARM CPU to always run in turbo speed as well, consuming excessive amounts of power. At the time of writing, there does not yet exist a good solution to have both power saving and good performance. This limitation is being discussed in more detail at raspberrypi/firmware#992. For more known issues and limitations, check out the bug tracker, especially the entries marked retired , for items that are beyond current scope.
By default fbcp-ili9341 builds with a statistics overlay enabled. See the video fbcp-ili9341 ported to ILI9486 WaveShare 3.5" (B) SpotPear 320x480 SPI display to find details on what each field means. Build with CMake option -DSTATISTICS=0 to disable displaying the statistics. You can also try building with CMake option -DSTATISTICS=2 to show a more detailed frame delivery timings histogram view, see screenshot and video above.
The fbcp part in the name means framebuffer copy ; specifically for the ILI9341 controller. fbcp-ili9341 is not actually a framebuffer copying driver, it does not create a secondary framebuffer that it would copy bytes across to from the primary framebuffer. It is also no longer a driver only for the ILI9341 controller. A more appropriate name might be userland-raspi-spi-display-driver or something like that, but the original name stuck.
Yes, it does, although not quite as well as on Pi 3B. If you'd like it to run better on a Pi Zero, leave a thumbs up at raspberrypi/userland#440 - hard problems are difficult to justify prioritizing unless it is known that many people care about them.
Edit the file config.h and comment out the line #define DISPLAY_OUTPUT_LANDSCAPE . This will make the display output in portrait mode, effectively rotating it by 90 degrees. Note that this only affects the pixel memory reading mode of the display. It is not possible to change the panel scan order to run between landscape and portrait, the SPI displays typically always scan in portrait mode. The result is that it will change the panel vsync tearing mode from "straight line tearing" over to "diagonal tearing" (see the section About Tearing above).
If you do not want to have diagonal tearing, but would prefer straight line tearing, then additionally enable the option #define DISPLAY_FLIP_ORIENTATION_IN_SOFTWARE in config.h . That will restore straight line tearing, but it will also increase overall CPU consumption.
Enable the option #define DISPLAY_ROTATE_180_DEGREES in config.h . This should rotate the SPI display to show up the other way around, while keeping the HDMI connected display orientation unchanged. Another option is to utilize a /boot/config.txt option display_rotate=2, which rotates both the SPI output and the HDMI output.
Note that the setting DISPLAY_ROTATE_180_DEGREES only affects the pixel memory reading mode of the display. It is not possible to flip the panel scan to run inverted by 180 degrees. This means that adjusting these settings will also have effects of changing the visual appearance of the vsync tearing artifact. If you have the ability to mount the display 180 degrees around in your project, it is recommended to do that instead of using the DISPLAY_ROTATE_180_DEGREES option.
Edit the file config.h in a text editor (a command line one such as pico , vim , nano , or SSH map the drive to your host), and find the appropriate line in the file. Add comment lines // in front of that text to disable the option, or remove the // characters to enable it.
After having edited and saved the file, reissue make -j in the build directory and restart fbcp-ili9341.
Some options are passed to the build from the CMake configuration script. You can run with make VERBOSE=1 to see which configuration items the CMake build is passing. See the above Configuring Build Options section to customize the CMake configure items. For example, to remove the statistics overlay, pass -DSTATISTICS=0 directive to CMake.
Building requires CMake to be installed on the Pi: try sudo apt-get install cmake .
Try deleting CMakeCache.txt between changing CMake settings.
Yes, both work fine. For linux command line terminal, the /dev/tty1 console should be set to output to Linux framebuffer 0 ( /dev/fb0 ). This is the default mode of operation and there do not exist other framebuffers in a default distribution of Raspbian, but if you have manually messed with the con2fbmap command in your installation, you may have inadvertently changed this configuration. Run con2fbmap 1 to see which framebuffer the /dev/tty1 console is outputting to, it should print console 1 is mapped to framebuffer 0 . Type con2fbmap 1 0 to reset console 1 back to outputting to framebuffer 0.
Likewise, the X windowing system should be configured to render to framebuffer 0. This is by default the case. The target framebuffer for X windowing service is usually configured via the FRAMEBUFFER environment variable before launching X. If X is not working by default, you can try overriding the framebuffer by launching X with FRAMEBUFFER=/dev/fb0 startx instead of just running startx .
I don't know, I don't currently have any to test. Perhaps the code does need some model specific configuration, or perhaps it might work out of the box. I only have Pi 3B, Pi 3B+, Pi Zero W and a Pi 3 Compute Module based systems to experiment on. Pi 2 B has been reported to work by users (#17).
If the display controller is one of the currently tested ones (see the list above), and it is wired up to run using 4-line SPI, then it should work. Pay attention to configure the Data/Control GPIO pin number correctly, and also specify the Reset GPIO pin number if the device has one.
If the display controller is not one of the tested ones, it may still work if it is similar to one of the existing ones. For example, ILI9340 and ILI9341 are practically the same controller. You can just try with a specific one to see how it goes.
If fbcp-ili9341 does not support your display controller, you will have to write support for it. fbcp-ili9341 does not have a "generic SPI TFT driver routine" that might work across multiple devices, but needs specific code for each. If you have the spec sheet available, you can ask for advice, but please do not request to add support to a display controller "blind", that is not possible.
บางที. This is a more recent experimental feature that may not be as stable, and there are some limitations, but 3-wire ("9-bit") SPI display support is now available. If you have a 3-wire SPI display, ie one that does not have a Data/Control (DC) GPIO pin to connect, configure it via CMake with directive -DGPIO_TFT_DATA_CONTROL=-1 to tell fbcp-ili9341 that it should be driving the display with 3-wire protocol.
Current limitations of 3-wire communication are:
ALL_TASKS_SHOULD_DMA is currently not supported, there is an issue with DMA chaining that prevents this from being enabled. As result, CPU usage on 3-wire displays will be slightly higher than on 4-wire displays.OFFLOAD_PIXEL_COPY_TO_DMA_CPP is currently not supported. As a result, 3-wire displays may not work that well on single core Pis like Pi Zero.No. Those are completely different technologies altogether. It should be possible to port the driver algorithm to work on I2C however, if someone is interested.
At the moment one cannot utilize the XPT2046/ADS7846 touch controllers while running fbcp-ili9341, so touch is mutually incompatible with this driver. In order for fbcp-ili9341 to function, you will need to remove all dtoverlay s in /boot/config.txt related to touch.
I have done close to everything possible to my displays - cut power in middle of operation, sent random data and command bytes, set their operating voltage commands and clock timings to arbitrary high and low values, tested unspecified and reserved command fields, and driven the displays dozens of MHz faster than they managed to keep up with, and I have not yet done permanent damage to any of my displays or Pis.
Easiest way to do permanent damage is to fail at wiring, eg drive 5 volts if your display requires 3.3v, or short a connection, or something similar.
The one thing that fbcp-ili9341 stays clear off is that it does not program the non-volatile memory areas of any of the displays. Therefore a hard power off on a display should clear all performed initialization and reset the display to its initial state at next power on.
That being said, if it breaks, you'll get to purchase a new shiny one to replace it.
Yes, fbcp-ili9341 shows the output of the HDMI display on the SPI screen, and both can be attached at the same time. A HDMI display does not have to be connected however, although fbcp-ili9341 operation will still be affected by whatever HDMI display mode is configured. Check out tvservice -s on the command line to check what the current DispmanX HDMI output mode is.
At the moment fbcp-ili9341 has been developed to only display the contents of the main DispmanX GPU framebuffer over to the SPI display. That is, the SPI display will show the same picture as the HDMI output does. There is no technical restriction that requires this though, so if you know C/C++ well, it should be a manageable project to turn fbcp-ili9341 to operate as an offscreen display library to show a completely separate (non-GPU-accelerated) image than what the main HDMI display outputs. For example you could have two different outputs, eg a HUD overlay, a dashboard for network statistics, weather, temps, etc. showing on the SPI while having the main Raspberry Pi desktop on the HDMI.
In this kind of mode, you would probably strip the DispmanX bits out of fbcp-ili9341, and recast it as a static library that you would link to in your drawing application, and instead of snapshotting frames, you can then programmatically write to a framebuffer in memory from your C/C++ code.
Unfortunately there are a number of things to go wrong that all result in a white screen. This is probably the hardest part to diagnose. Some ideas:
This suggests that the power line or the backlight line might not be properly connected. Or if the backlight connects to a GPIO pin on the Pi (and not a voltage pin), then it may be that the pin is not in correct state for the backlight to turn on. Most of the LCD TFT displays I have immediately light up their backlight when they receive power. The Tontec one has a backlight GPIO pin that boots up high but must be pulled low to activate the backlight. OLED displays on the other hand seem to stay all black even after they do get power, while waiting for their initialization to be performed, so for OLEDs it may be normal for nothing to show up on the screen immediately after boot.
If the backlight connects to a GPIO pin, you may need to define -DGPIO_TFT_BACKLIGHT=<pin> in CMake command line or config.h , and edit config.h to enable #define BACKLIGHT_CONTROL .
fbcp-ili9341 runs a clear screen command at low speed as first thing after init, so if that goes through, it is a good sign. Try increasing -DSPI_BUS_CLOCK_DIVISOR= CMake option to a higher number to see if the display driving rate was too fast. Or try disabling DMA with -DUSE_DMA_TRANSFERS=OFF to see if this might be a DMA conflict.
This suggests same as above, increase SPI bus divisor or troubleshoot disabling DMA. If DMA is detected to be the culprit, try changing up the DMA channels. Double check that /boot/config.txt does not have any dtoverlay s regarding other SPI display drivers or touch screen controllers, and that it does NOT have a dtparam=spi=on line in it - fbcp-ili9341 does not use the Linux kernel SPI driver.
Make sure other fbcp programs are not running, or that another copy of fbcp-ili9341 is not running on the background.
This is likely caused by the program resizing the video resolution at runtime, which breaks DispmanX. See raspberrypi/userland#461 for more details.
Check that the Pi is powered off of a power supply that can keep up with the voltage, and the low voltage icon is not showing up. (remove any avoid_warnings=1/2 directive from /boot/config.txt if that was used to get rid of warnings overlay, to check that voltage is good) It has been observed that if there is not enough power supplied, the display can be the first to starve, while the Pi might keep on running fine. Try removing turbo settings or lowering the clock speed if you have overclocked to verify that the display crash is not power usage related.
Also try lowering SPI bus speed to a safe lower value, eg half of the maximum speed that the display was able to manage.
Double check the Data/Command (D/C) GPIO pin physically, and in CMake command line. Whenever fbcp-ili9341 refers to pin numbers, they are always specified in BCM pin numbers. Try setting a higher -DSPI_BUS_CLOCK_DIVISOR= value to CMake. Make sure no other fbcp programs or SPI drivers or dtoverlays are enabled.
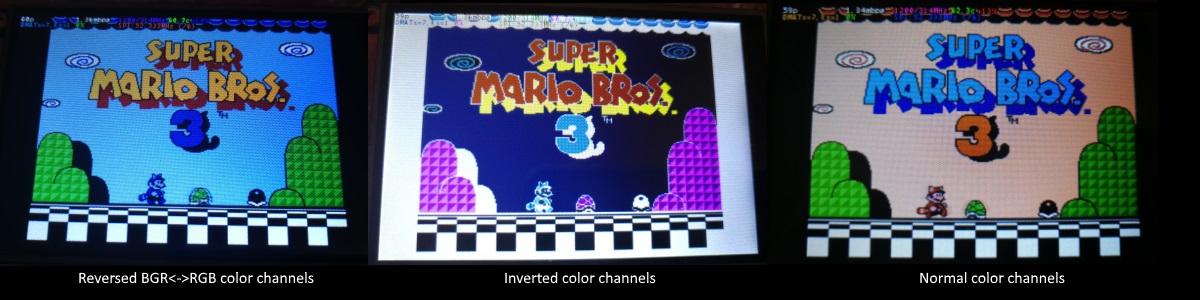
If the color channels are mixed (red is blue, blue is red, green is green) like shown on the left image, pass the CMake option -DDISPLAY_SWAP_BGR=ON to the build.
If the color intensities look wrong (white is black, black is white, color looks like a negative image) like seen in the middle image, pass the CMake option -DDISPLAY_INVERT_COLORS=ON to the build.
If the colors looks off in some other fashion, it is possible that the display is just being driven at a too high SPI bus speed, in which case try making the display run slower by choosing a higher -DSPI_BUS_CLOCK_DIVISOR= option to CMake. Especially on ILI9486 displays it has been observed that the colors on the display can become distorted if the display is run too fast beyond its maximum capability.
fbcp-ili9341 needs a few megabytes of GPU memory to function if DMA transfers are enabled. The gpu_mem boot config option dictates how much of the Pi's memory area is allocated to the GPU. By default this is 64MB, which has been observed to not leave enough memory for fbcp-ili9341 if HDMI is run at 1080p. If this error happens, try increasing GPU memory to eg 128MB by adding a line gpu_mem=128 in /boot/config.txt .
As the number of supported displays, Raspberry Pi device models, Raspbian/Retropie/Lakka OS versions, accompanied C++ compiler versions and fbcp-ili9341 build options have grown in number, there is a combinatorial explosion of all possible build modes that one can put the codebase through, so it is not easy to keep every possible combo tested all the time. Something may have regressed or gotten outdated. Stay calm, and report a bug.
You can also try looking through the commit history to find changes related to your configuration combo, to see if there's a mention of a known good commit in time that should work for your case. If you get an odd compiler error on cmake or make lines, those will usually be very easy to fix, as they are most of the time a result of some configurational oversight.
First, make sure the display is a 4-wire SPI and not a 3-wire one. A display is 4-wire SPI if it has a Data/Control (DC) GPIO line that needs connecting. Sometimes the D/C pin is labeled RS (Register Select). Support for 3-wire SPI displays does exist, but it is experimental and not nearly as well tested as 4-wire displays.
Second is the consideration about display speed. Below is a performance chart of the different displays I have tested. Note that these are sample sizes of one, I don't know how much sample variance there exists. Also I don't know if it is likely that there exists big differences between displays with same controller from different manufacturers. At least the different ILI9341 displays that I have are all quite consistent on performance, whether they are from Adafruit or WaveShare or from BuyDisplay.com.
| Vendor | ขนาด | ปณิธาน | ผู้ควบคุม | Rated SPI Bus Speed | Obtained Bus Speed | Frame Rate |
|---|---|---|---|---|---|---|
| Adafruit PiTFT | 2.8" | 240x320 | ILI9341 | 10MHz | 294MHz/4=73.50MHz | 59.81 fps |
| Adafruit PiTFT | 2.2" | 240x320 | ILI9340 | 15.15MHz | 338MHz/4=84.50MHz | 68.76 fps |
| Adafruit PiTFT | 3.5" | 320x480 | HX8357D | 15.15MHz | 314MHz/6=52.33MHz | 21.29 fps |
| Adafruit OLED | 1.27" | 128x96 | SSD1351 | 20MHz | 360MHz/20=18.00MHz | 91.55 fps |
| Waveshare RPi LCD (B) IPS | 3.5" | 320x480 | ILI9486 | 15.15MHz | 255MHz/8=31.88MHz | 12.97 fps |
| maithoga TFT LCD | 3.5" | 320x480 | ILI9486L | 15.15MHz | 400MHz/8=50.00MHz | 13.56 fps* |
| BuyDisplay.com SPI TFT copy #1 | 3.2" | 240x320 | ILI9341 | 10MHz | 310MHz/4=77.50MHz | 63.07 fps |
| BuyDisplay.com SPI TFT copy #2 | 3.2" | 240x320 | ILI9341 | 10MHz | 300MHz/4=75.00MHz | 61.03 fps |
| Arduino A000096 LCD | 1.77" | 128x160 | ST7735R | 15.15MHz | 355MHz/6=59.16MHz | 180.56 fps |
| Tontec MZ61581-PI-EXT 2016.1.28 | 3.5" | 320x480 | MZ61581 | 128MHz | 280MHz/2=140.00MHz | 56.97 fps |
| Adafruit 240x240 Wide Angle TFT | 1.54" | 240x240 | ST7789 | - | 340MHz/4=85.00MHz | 92.23 fps |
| WaveShare 240x240 Display HAT | 1.3" | 240x240 | ST7789VW | 62.5MHz | 338MHz/4=84.50MHz | 91.69 fps |
| WaveShare 128x128 Display HAT | 1.44" | 128x128 | ST7735S | 15.15MHz | (untested) | (untested) |
| KeDei v6.3 | 3.5" | 320x480 | MPI3501 | - | 400MHz/12=33.333MHz | 4.8fps ** |
In this list, Rated SPI Bus Speed is the maximum clock speed that the display controller is rated to run at. The Obtained Bus Speed column lists the fastest SPI bus speed that was achieved in practice, and the core_freq BCM Core speed and SPI Clock Divider CDIV setting that was used to achieve that rate. Note how most display controllers can generally be driven much faster than what they are officially rated at in their spec sheets.
The Frame Rate column shows the worst case frame rate when full screen updates are being performed. This occurs for example when watching fullscreen video (that is not a flat colored cartoon). Because fbcp-ili9341 only sends over the pixels that have changed, displays such as HX8357D and ILI9486 can still be used to play many games at 60fps. Retro games work especially well.
All the ILI9341 displays work nice and super fast at ~70-80MHz. My WaveShare 3.5" 320x480 ILI9486 display runs really slow compared to its pixel resolution, ~32MHz only. See fbcp-ili9341 ported to ILI9486 WaveShare 3.5" (B) SpotPear 320x480 SPI display for a video of this display in action. Adafruit's 320x480 3.5" HX8357D PiTFTs is ~64% faster in comparison.
The ILI9486L controller based maithoga display runs a bit faster than ILI9486 WaveShare, 50MHz versus 31.88MHz, ie +56.8% bandwidth increase. However fps-wise maithoga reaches only 13.56 vs WaveShare 12.97 fps, because the bandwidth advantage is fully lost in pixel format differences: ILI9486L requires transmitting 24 bits per each pixel (R6G6B6 mode), whereas ILI9486 supports 16 bits per pixel R5G6B5 mode. This is reflected in the above chart refresh rate for the maithoga display (marked with a star).
If manufacturing variances turn out not to be high between copies, and you'd like to have a bigger 320x480 display instead of a 240x320 one, then it is recommended to avoid ILI9486, they indeed are slow.
The KeDei v6.3 display with MPI3501 controller takes the crown of being horrible, in all aspects imaginable. It is able to run at 33.33 MHz, but due to technical design limitations of the display (see #40), effective bus speed is halved, and only about 72% utilization of the remaining bus rate is achieved. DMA cannot be used, so CPU usage will be off the charts. Even though fbcp-ili9341 supports this display, level of support is expected to be poor, because the hardware design is a closed secret without open documentation publicly available from the manufacturer. Stay clear of KeDei or MPI3501 displays.
The Tontec MZ61581 controller based 320x480 3.5" display on the other hand can be driven insanely fast at up to 140MHz! These seem to be quite hard to come by though and they are expensive. Tontec seems to have gone out of business and for example the domain itontec.com from which the supplied instructions sheet asks to download original drivers from is no longer registered. I was able to find one from eBay for testing.
Search around, or ask the manufacturer of the display what the maximum SPI bus speed is for the device. This is the most important aspect to getting good frame rates, but unfortunately most web links never state the SPI speed rating, or they state it ridiculously low like in the spec sheets. Try and buy to see, or ask in some community forums from people who already have a particular display to find out what SPI bus speed it can achieve.
One might think that since Pi Zero is slower than a Pi 3, the SPI bus speed might not matter as much when running on a Pi Zero, but the effect is rather the opposite. To get good framerates on a Pi Zero, it should be paired with a display with as high SPI bus speed capability as possible. This is because the higher the SPI bus speed is, the more autonomously a DMA controller can drive it without CPU intervention. For the same reason, the interlacing technique does not (currently at least) perform well on a Pi Zero, so it is disabled there by default. ILI9341s run well on Pi Zero, ILI9486 on the other hand is quite difficult to combine with a Pi Zero.
Ultimately, it should be noted that parallel displays (DPI) are the proper method for getting fast framerates easily. SPI displays should only be preferred if display form factor is important and a desired product might only exist as SPI and not as DPI, or the number of GPIO pins that are available on the Pi is scarce that sacrificing dozens of pins to RGB data is not feasible.
Hardware-wise, there are six different ways to connect displays to the Pi. Here are the pros and cons of each:
Displays are generally manufactured to utilize one specific interfacing method, with the exception that some displays have a both I²C and SPI modes that can be configured via soldering.
Fbcp-ili9341 driver is about interfacing with SPI displays. If your display utilizes some other connection mechanism, fbcp-ili9341 will not apply.
Software-wise, there are two possible alternatives to fbcp-ili9341:
The following links proved helpful when writing this:
If you would like to help push Raspberry Pi SPI display support further, there are always more things to do in the project. Here is a list of ideas and TODOs for recognized work items to contribute, roughly rated in order of increasing difficulty.
top / htop , or with a power meter off the wall and report the results.SPI_3WIRE_PROTOCOL + ALL_TASKS_SHOULD_DMA to work together, or 3) fix up SPI_3WIRE_PROTOCOL + OFFLOAD_PIXEL_COPY_TO_DMA_CPP to work together.ALL_TASKS_SHOULD_DMA mode to be always superior in performance and CPU usage so that the non- ALL_TASKS_SHOULD_DMA path can be dropped from the codebase. (probably requires the above chaining to function efficiently)This driver is licensed under the MIT License. See LICENSE.txt. In nonlegal terms, it's yours for both free and commercial projects, DIY packages, kickstarters, Etsys and Ebays, and you don't owe back a dime. Feel free to apply and derive as you wish.
If you found fbcp-ili9341 useful, it makes me happy to hear back about the projects it found a home in. If you did a build or a project where fbcp-ili9341 worked out, it'd be great to see a video or some photos or read about your experiences.
I hope you build something you enjoy!
Best way to discuss the driver is to open a GitHub issue. You may also be able to find me over at sudomod.com Discord channel.


