archgw
release 0.1.5 ?
Arch เป็นพร็อกซีแบบกระจายอัจฉริยะ 7 ที่ออกแบบมาเพื่อปกป้องสังเกตและปรับแต่งตัวแทน AI ด้วย API ของคุณ
ออกแบบมาด้วย LLM ที่สร้างขึ้นโดยมีวัตถุประสงค์ Arch จัดการงานที่สำคัญ แต่ไม่แตกต่างที่เกี่ยวข้องกับการจัดการและการประมวลผลของการแจ้งรวมถึงการตรวจจับและปฏิเสธความพยายามในการแหกคุกเรียกใช้ APIs "แบ็กเอนด์" อย่างชาญฉลาดเพื่อตอบสนองคำขอของผู้ใช้
Arch ถูกสร้างขึ้นบน (และโดยผู้สนับสนุนหลักของ) ตัวแทนทูตด้วยความเชื่อที่ว่า:
พรอมต์เป็นคำขอของผู้ใช้ที่เหมาะสมและทึบแสงซึ่งต้องการความสามารถเช่นเดียวกับคำขอ HTTP แบบดั้งเดิมรวมถึงการจัดการที่ปลอดภัยการกำหนดเส้นทางอัจฉริยะความสามารถในการสังเกตที่แข็งแกร่งและการรวมเข้ากับระบบแบ็กเอนด์ (API) สำหรับการปรับเปลี่ยนส่วนบุคคล
คุณสมบัติหลัก :
ข้ามไปที่เอกสารของเรา เพื่อเรียนรู้วิธีการใช้ Arch เพื่อปรับปรุงความเร็วความปลอดภัยและการปรับเปลี่ยนแอพ Genai ของคุณ
สำคัญ
วันนี้ฟังก์ชั่นการเรียก LLM (arch-function) ที่ออกแบบมาสำหรับสถานการณ์ตัวแทนและ RAG เป็นเจ้าภาพโดยไม่เสียค่าใช้จ่ายในภูมิภาคสหรัฐอเมริกากลาง เพื่อเสนอเวลาแฝงและปริมาณงานที่สอดคล้องกันและเพื่อจัดการค่าใช้จ่ายของเราเราจะเปิดใช้งานการเข้าถึงเวอร์ชันที่โฮสต์ผ่านปุ่มนักพัฒนาในเร็ว ๆ นี้และให้ตัวเลือกในการเรียกใช้ LLM นั้นในพื้นที่ สำหรับรายละเอียดเพิ่มเติมดูปัญหานี้ #258
หากต้องการติดต่อกับเราโปรดเข้าร่วมเซิร์ฟเวอร์ Discord ของเรา เราจะติดตามสิ่งนั้นอย่างแข็งขันและให้การสนับสนุนที่นั่น
ทำตามคำแนะนำนี้เพื่อเรียนรู้วิธีการตั้งค่า ARCH และรวมเข้ากับแอปพลิเคชัน AI Generative ของคุณอย่างรวดเร็ว
ก่อนที่คุณจะเริ่มตรวจสอบให้แน่ใจว่าคุณมีสิ่งต่อไปนี้:
Docker & Python ติดตั้งในระบบของคุณAPI Keys สำหรับผู้ให้บริการ LLM (หากใช้ LLM ภายนอก)CLI ของ Arch ช่วยให้คุณจัดการและโต้ตอบกับประตูโค้งได้อย่างมีประสิทธิภาพ ในการติดตั้ง CLI เพียงเรียกใช้คำสั่งต่อไปนี้: เคล็ดลับ: เราขอแนะนำให้นักพัฒนาสร้างสภาพแวดล้อมเสมือนจริง Python ใหม่เพื่อแยกการพึ่งพาก่อนติดตั้งซุ้มประตู สิ่งนี้ทำให้มั่นใจได้ว่า ArchGW และการพึ่งพาของมันจะไม่รบกวนแพ็คเกจอื่น ๆ ในระบบของคุณ
ตรวจสอบให้แน่ใจว่าคุณได้ติดตั้งยูทิลิตี้ต่อไปนี้ก่อนดำเนินการต่อไป
$ python -m venv venv
$ source venv/bin/activate   # On Windows, use: venvScriptsactivate
$ pip install archgwARCH ทำงานตามไฟล์กำหนดค่าที่คุณสามารถกำหนดผู้ให้บริการ LLM, เป้าหมายพรอมต์, ร่องรอย ฯลฯ ด้านล่างเป็นตัวอย่างการกำหนดค่าเพื่อให้คุณเริ่มต้น:
 version : v0.1
listener :
  address : 127.0.0.1
  port : 8080 # If you configure port 443, you'll need to update the listener with tls_certificates
  message_format : huggingface

# Centralized way to manage LLMs, manage keys, retry logic, failover and limits in a central way
llm_providers :
  - name : OpenAI
    provider : openai
    access_key : $OPENAI_API_KEY
    model : gpt-3.5-turbo
    default : true

# default system prompt used by all prompt targets
system_prompt : |
  You are a network assistant that helps operators with a better understanding of network traffic flow and perform actions on networking operations. No advice on manufacturers or purchasing decisions.

prompt_targets :
    - name : device_summary
      description : Retrieve network statistics for specific devices within a time range
      endpoint :
        name : app_server
        path : /agent/device_summary
      parameters :
        - name : device_ids
          type : list
          description : A list of device identifiers (IDs) to retrieve statistics for.
          required : true  # device_ids are required to get device statistics
        - name : days
          type : int
          description : The number of days for which to gather device statistics.
          default : " 7 "
    - name : reboot_devices
      description : Reboot a list of devices
      endpoint :
        name : app_server
        path : /agent/device_reboot
      parameters :
        - name : device_ids
          type : list
          description : A list of device identifiers (IDs).
          required : true
        - name : days
          type : int
          description : A list of device identifiers (IDs)
          default : " 7 "

# Arch creates a round-robin load balancing between different endpoints, managed via the cluster subsystem.
endpoints :
  app_server :
    # value could be ip address or a hostname with port
    # this could also be a list of endpoints for load balancing
    # for example endpoint: [ ip1:port, ip2:port ]
    endpoint : host.docker.internal:18083
    # max time to wait for a connection to be established
connect_timeout : 0.005sโทรออกไปทาง Arch
 from openai import OpenAI

# Use the OpenAI client as usual
client = OpenAI (
  # No need to set a specific openai.api_key since it's configured in Arch's gateway
  api_key = '--' ,
  # Set the OpenAI API base URL to the Arch gateway endpoint
  base_url = "http://127.0.0.1:12000/v1"
)

response = client . chat . completions . create (
    # we select model from arch_config file
    model = "--" ,
    messages = [{ "role" : "user" , "content" : "What is the capital of France?" }],
)
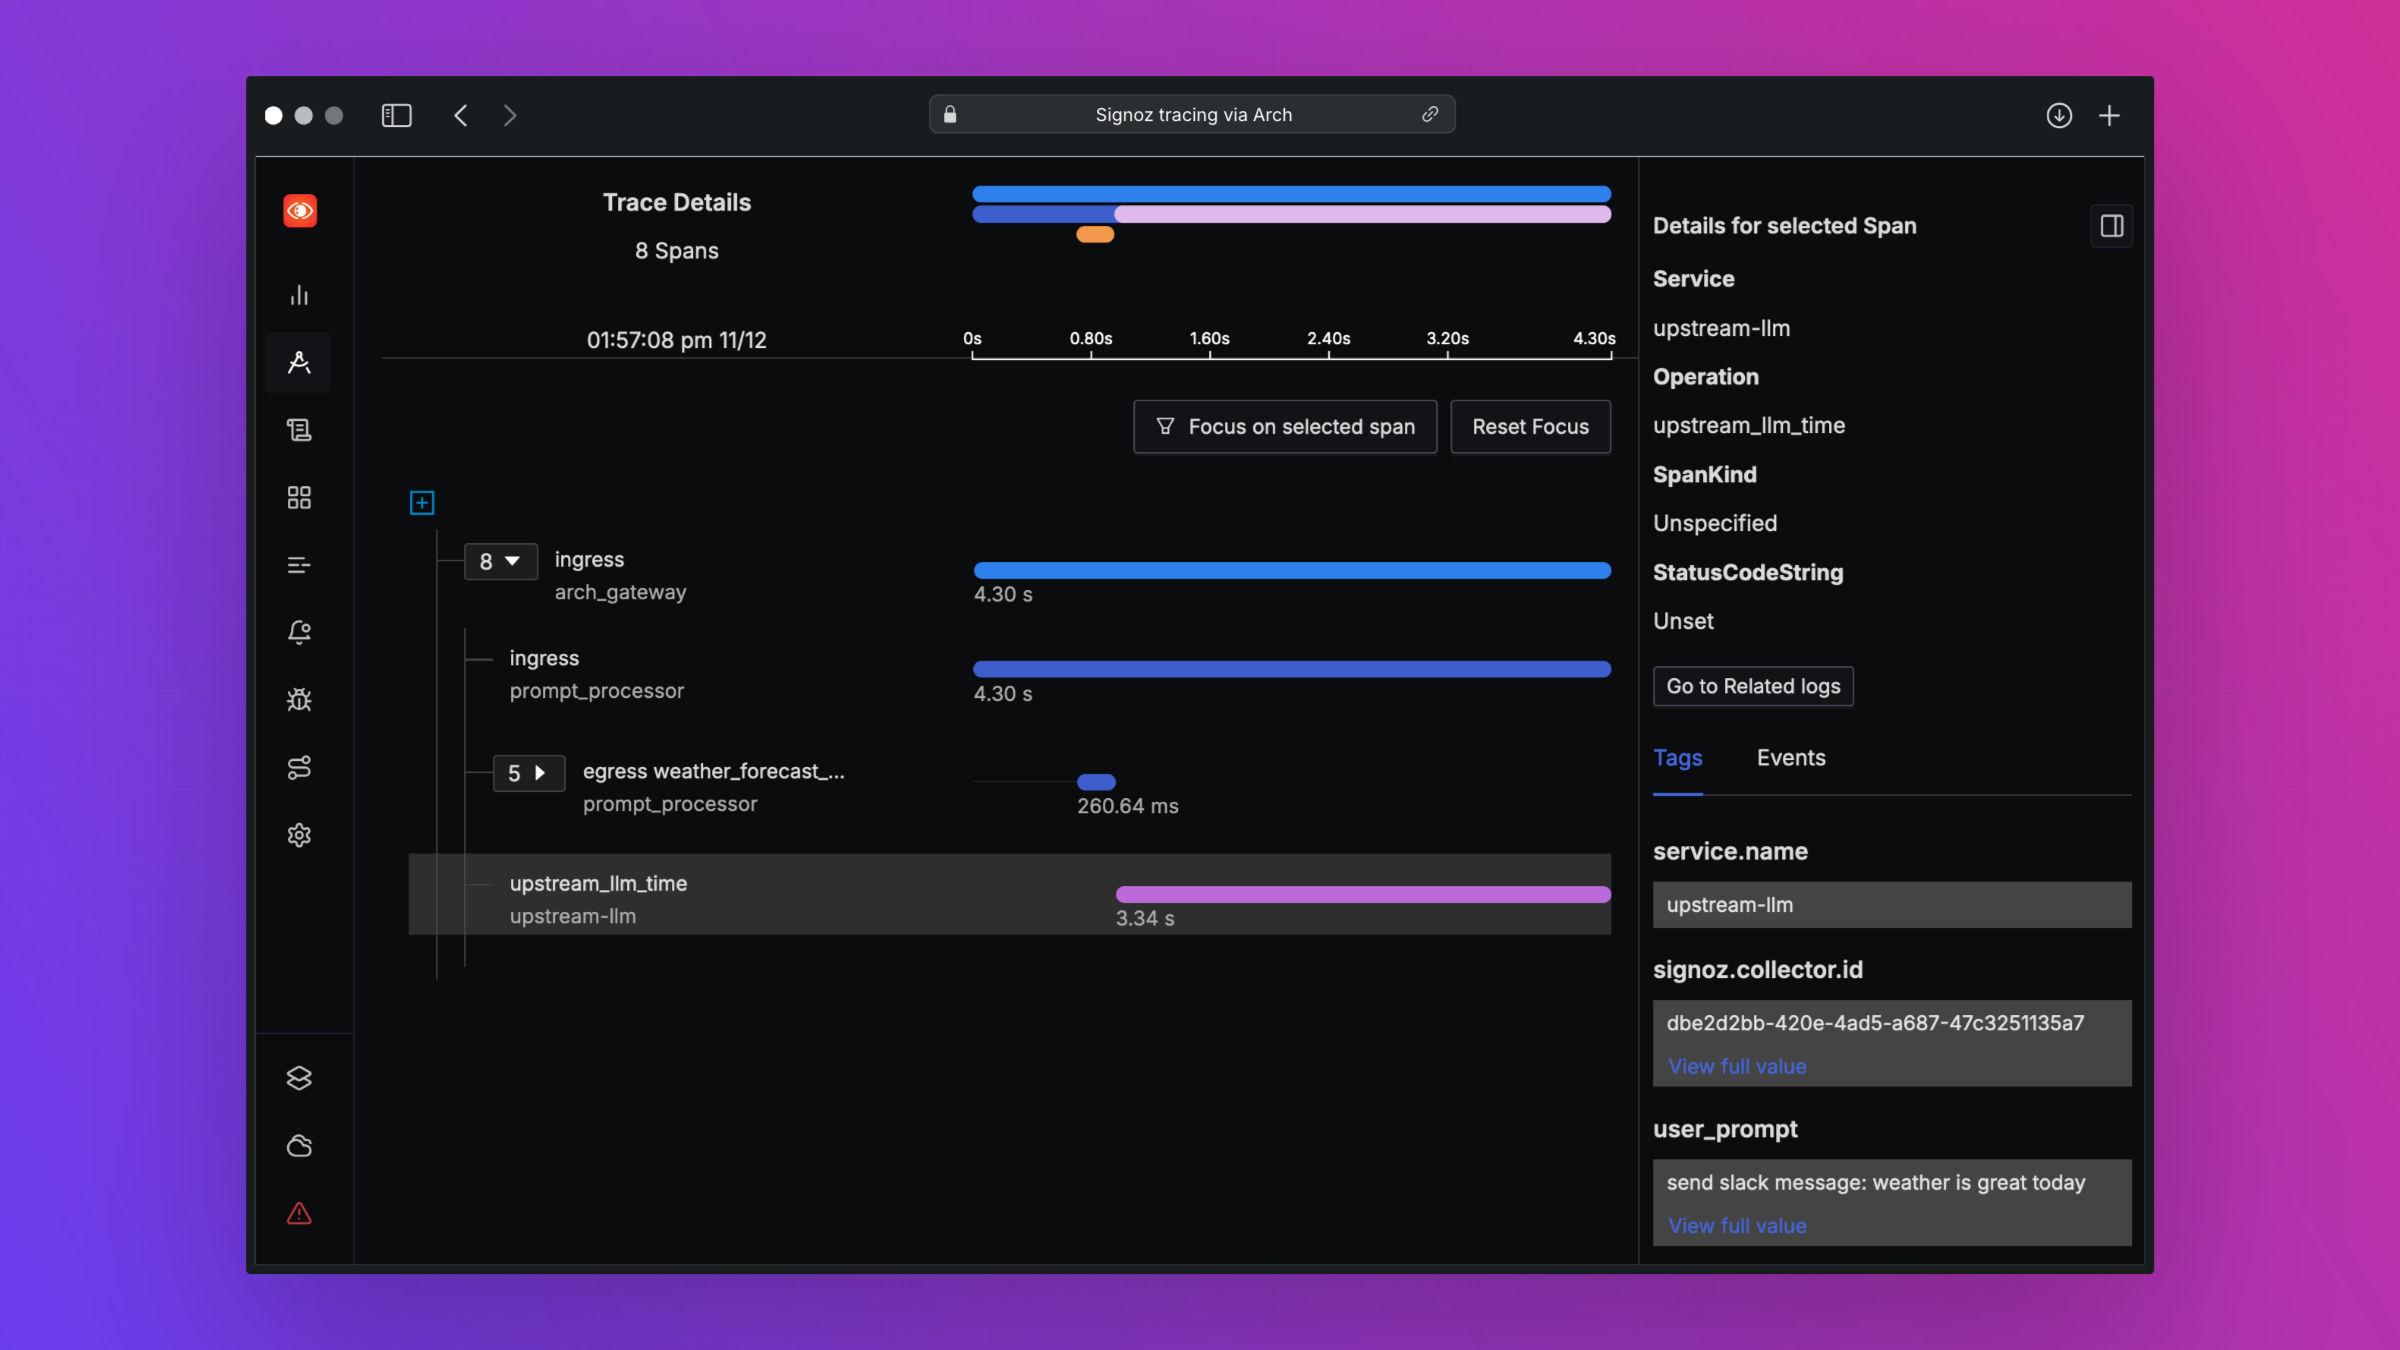
print ( "OpenAI Response:" , response . choices [ 0 ]. message . content )Arch ได้รับการออกแบบมาเพื่อรองรับความสามารถในการสังเกตชั้นเรียนที่ดีที่สุดโดยรองรับมาตรฐานแบบเปิด โปรดอ่านเอกสารของเราเกี่ยวกับความสามารถในการสังเกตสำหรับรายละเอียดเพิ่มเติมเกี่ยวกับการติดตามการวัดและบันทึก
เราจะรักข้อเสนอแนะเกี่ยวกับแผนงานของเราและเรายินดีต้อนรับการมีส่วนร่วมของ Arch ! ไม่ว่าคุณจะแก้ไขข้อบกพร่องการเพิ่มคุณสมบัติใหม่การปรับปรุงเอกสารหรือการสร้างแบบฝึกหัดความช่วยเหลือของคุณจะได้รับการชื่นชมมาก กรุณาเยี่ยมชมคู่มือการบริจาคของเราสำหรับรายละเอียดเพิ่มเติม


