Yesterday, a friend asked how to deploy the express project. So I compiled this article, which mainly talks about how to deploy a server program developed based on nodejs for the reference of friends in need.
The article contains several parts:
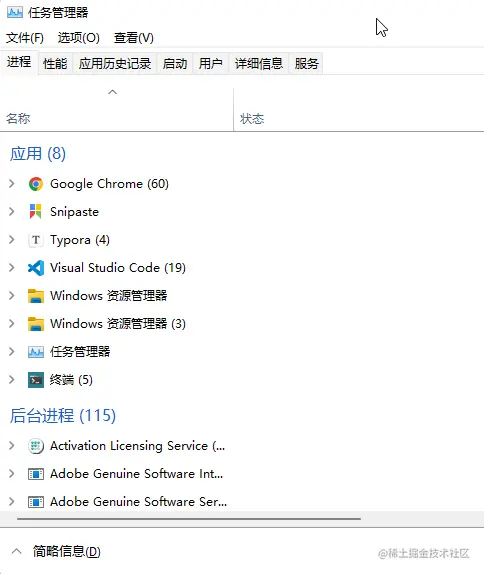
Process (process) is the computer operating system allocation and The basic unit of scheduling tasks . Open the task manager and you can see that there are actually many programs running in the background of the computer, and each program is a process.
Modern browsers basically have a multi-process architecture. Taking the Chrome browser as an example, open "More Tools" - "Task Manager" and you can see the process information of the current browser. One of the pages is a process, except for In addition, there are network processes, GPU processes, etc.
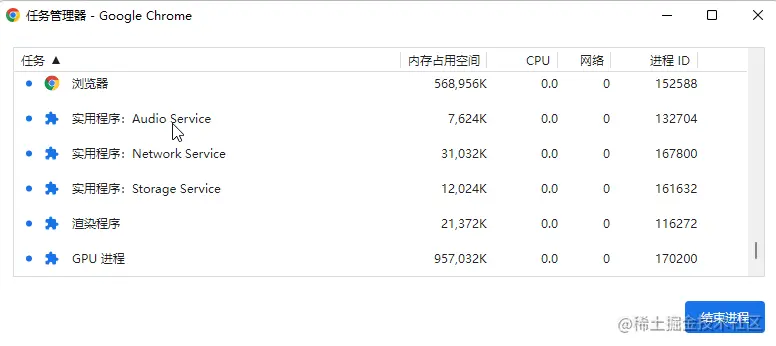
The multi-process architecture ensures more stable operation of the application. Taking the browser as an example, if all programs run in one process, if there is a network failure or page rendering error, it will cause the entire browser to crash. Through the multi-process architecture, even if the network process crashes, it will not affect the display of existing pages, and at worst, it will be temporarily unable to access the network.
A thread is the smallest unit that the operating system can perform computing scheduling . It is included in the process and is the actual operating unit in the process. For example, a program is like a company with multiple departments, which are processes; the cooperation of each department allows the company to run normally, and the threads are the employees, the people who do the specific work.
We all know that JavaScript is a single-threaded language. This design is because in the early days, JS was mainly used to write scripts and was responsible for realizing the interactive effects of the page. If it is designed as a multi-threaded language, firstly, it is not necessary, and secondly, multiple threads jointly operate a DOM node, then whose advice should the browser listen to? Of course, with the development of technology, JS now also supports multi-threading, but it is only used to handle some logic unrelated to DOM operations.
Single threads and single processes bring a serious problem. Once the main thread of a running node.js program hangs up, the process will also hang up, and the entire application will also hang up. Furthermore, most modern computers have multi-core CPUs, with four cores and eight threads, and eight cores and sixteen threads, which are very common devices. As a single-process program, node.js wastes the performance of multi-core CPUs.
In response to this situation, we need a suitable multi-process model to transform a single-process node.js program into a multi-process architecture.
There are two common solutions for implementing multi-process architecture in Node.js, both of which use native modules, namely the child_process module and the cluster module.
child_process is a built-in module of node.js. You can guess from the name that it is responsible for things related to child processes.
We will not elaborate on the specific usage of this module. In fact, it only has about six or seven methods, which are still very easy to understand. We use one of the fork methods to demonstrate how to implement multiple processes and communication between multiple processes.
Let’s first look at the directory structure of the prepared demonstration case:
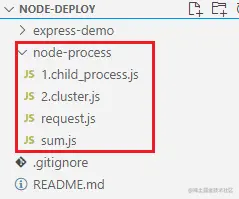
We use the http module to create an http server. When a /sum request comes in, a child process will be created through the child_process module and the child process will be notified to perform the calculation logic. At the same time, the parent process must also listen to the messages sent by the child process:
/ /child_process.js

const http = require('http')
const { fork } = require('child_process')

const server = http.createServer((req, res) => {
  if (req.url == '/sum') {
    // The fork method receives a module path, then starts a child process, and runs the module in the child process // childProcess represents the created child process let childProcess = fork('./sum.js')

    //Send a message to the child process childProcess.send('The child process starts calculating')

    // Monitor the messages of the child process in the parent process childProcess.on('message', (data) => {
      res.end(data + '')
    })

    //Listen to the closing event of the child process childProcess.on('close', () => {
      // If the child process exits normally or reports an error and hangs up, it will go here console.log('child process closes')
      childProcess.kill()
    })

    //Listen to the error event of the child process childProcess.on('error', () => {
      console.log('child process error')
      childProcess.kill()
    })
  }

  if (req.url == '/hello') {
    res.end('hello')
  }

  // Simulate the parent process to report an error if (req.url == '/error') {
     throw new Error('Parent process error')
     res.end('hello')
   }
})
server.listen(3000, () => {
  console.log('Server is running on 3000')
})
sum.js is used to simulate the tasks to be performed by the child process. The child process listens to the messages sent by the parent process, processes the calculation tasks, and then sends the results to the parent process:
// sum.js

function getSum() {
  let sum = 0
  for (let i = 0; i < 10000 * 1000 * 100; i++) {
    sum += 1
  }

  return sum
}

// process is a global object in node.js, representing the current process. Here it is the child process.
// Listen for messages sent by the main process process.on('message', (data) => {
  console.log('Message from the main process:', data)

  const result = getSum()
  //Send the calculation results to the parent process process.send(result)
})
Open the terminal and run the command node 1.child_process :

Visit the browser:
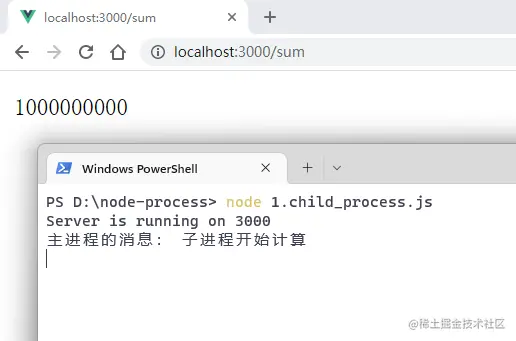
Next, simulate the situation where the child process reports an error:
// sum.js

function getSum() {
  // ....
}

// After the child process runs for 5 seconds, the simulation process hangs up setTimeout(() => {
   throw new Error('error report')
 }, 1000 * 5)

process.on('message', (data) => {
  // ...
})
Visit the browser again and observe the console after 5 seconds:
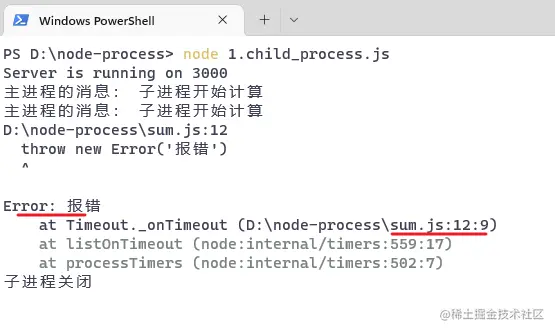
The child process has died, and then accesses another url: /hello ,
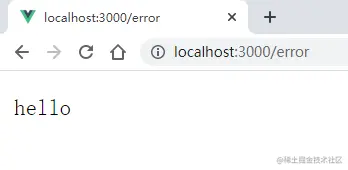
It can be seen that the parent process can still handle the request correctly, indicating that the error reported by the child process will not affect the operation of the parent process .
Next, we will simulate the scenario where the parent process reports an error, comment out the simulated error report of the sum.js module, then restart the service, and access /error with the browser:
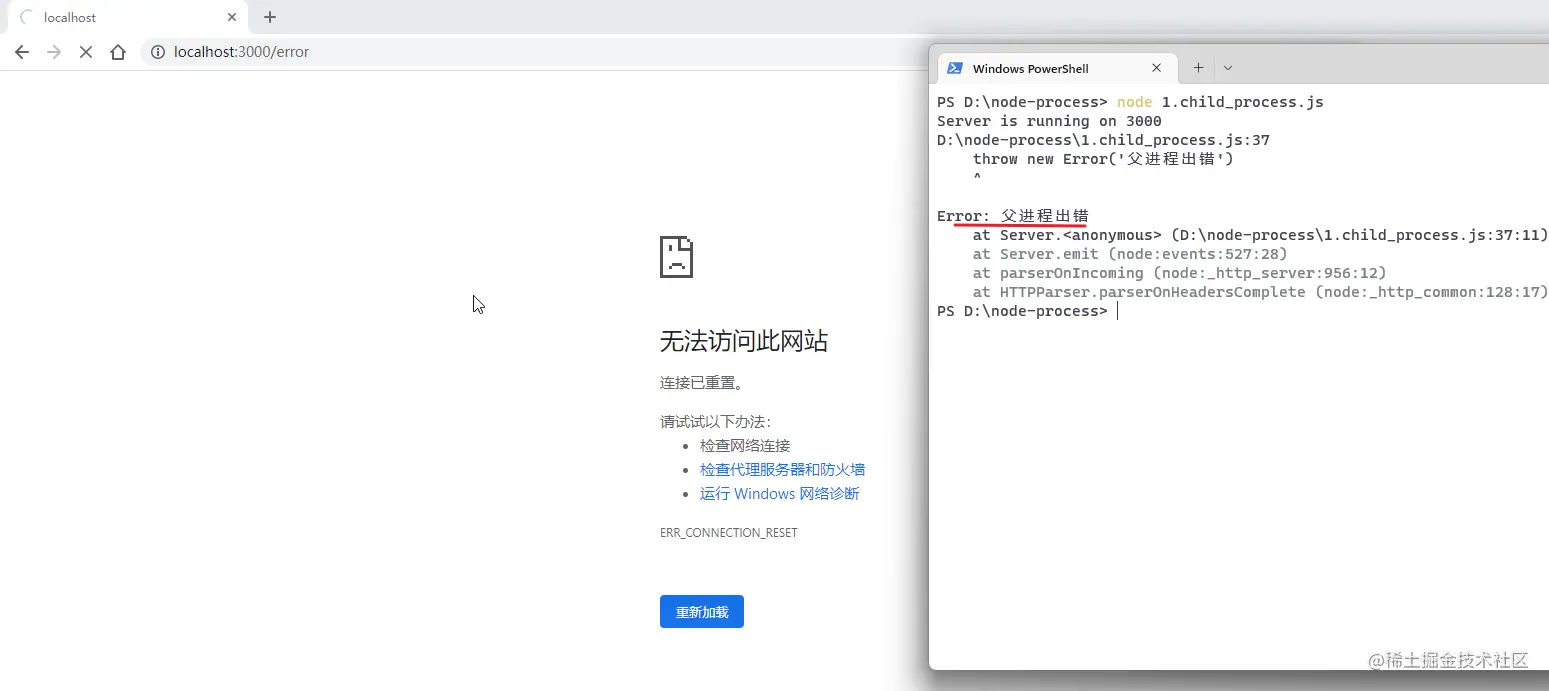
After discovering that the parent process hung up, the entire node.js program automatically exited, and the service completely collapsed, leaving no room for recovery.
It can be seen that it is not complicated to implement the multi-process architecture of node.js through fork method of child_process . Inter-process communication is mainly through send and on methods. From this naming, we can also know that the bottom layer should be a publish-subscribe model.
But it has a serious problem. Although the child process does not affect the parent process, once the parent process makes an error and hangs up, all the child processes will be "killed in one pot." Therefore, this solution is suitable for forking some complex and time-consuming operations into a separate sub-process . To be more precise, this usage is used to replace the implementation of multi-threading, not multi-processing.
uses the child_process module to implement multi-process, which seems to be useless. Therefore, it is generally recommended to use the cluster module to implement the multi-process model of node.js.
cluster means cluster. I believe everyone is familiar with this term. For example, in the past, the company only had one front desk, and sometimes it was too busy to receive visitors in time. Now the company has allocated four front desks. Even if three are busy, there is still one that can receive new visitors. Clustering roughly means this. For the same thing, it is reasonably assigned to different people to do it, so as to ensure that the thing can be done best.
The use of the cluster module is also relatively simple. If the current process is the main process, create an appropriate number of sub-processes based on the number of CPU cores, and listen to the exit event of the sub-process. If a sub-process exits, re-fork the new sub-process. If it is not a child process, the actual business is processed.
const http = require('http')
const cluster = require('cluster')
const cpus = require('os').cpus()

if (cluster.isMaster) {
  // When the program starts, it first goes here and creates multiple sub-processes according to the number of CPU cores for (let i = 0; i < cpus.length; i++) {
    //Create a child process cluster.fork()
  }

  // When any child process hangs up, the cluster module will emit the 'exit' event. At this point, the process is restarted by calling fork again.
  cluster.on('exit', () => {
    cluster.fork()
  })
} else {
  // The fork method executes to create a child process, and the module will be executed again. At this time, the logic will come here const server = http.createServer((req, res) => {
    console.log(process.pid)
    res.end('ok')
  })

  server.listen(3000, () => {
    console.log('Server is running on 3000', 'pid: ' + process.pid)
  })
}
Start the service:
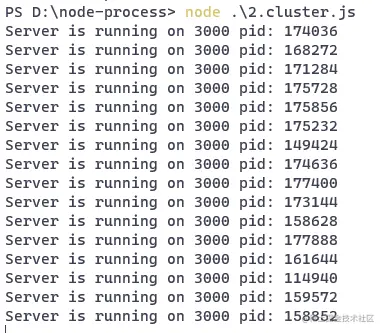
As you can see, the cluster module has created a lot of child processes, and it seems that each child process is running the same web service.
It should be noted that these child processes are not listening to the same port at this time. The server created by the createServer method is still responsible for port monitoring and forwards requests to each child process.
Let's write a request script to request the above service and see the effect.
// request.js

const http = require('http')

for (let i = 0; i < 1000; i++) {
  http.get('http://localhost:3000')
}
The http module can not only create an http server, but can also be used to send http requests. Axios supports browser and server environments. On the server side, the http module is used to send http requests.
Use node command to execute the file and look at the original console:

The process IDs of different sub-processes that specifically handle the request are printed.
This is the multi-process architecture of nodd.js implemented through the cluster module.
Of course, when we deploy node.js projects, we will not write and use the cluster module so dryly. There is a very useful tool called PM2 , which is a process management tool based on the cluster module. Its basic usage will be introduced in subsequent chapters.
So far, we have spent a part of the article introducing the knowledge of multi-process in node.js. In fact, we just want to explain why we need to use pm2 to manage node.js applications . Due to the limited space of this article and the lack of accurate/detailed description, this article only gives a brief introduction. If this is the first time you come into contact with this content, you may not understand it very well, so don’t worry, there will be a more detailed article later.
This article has prepared a sample program developed using express, click here to access.
It mainly implements an interface service. When accessing /api/users , mockjs is used to simulate 10 pieces of user data and return a user list. At the same time, a timer will be started to simulate an error situation:
const express = require('express')
const Mock = require('mockjs')

const app = express()

app.get("/api/users", (req, res) => {
  const userList = Mock.mock({
    'userList|10': [{
      'id|+1': 1,
      'name': '@cname',
      'email': '@email'
    }]
  })

  setTimeout(()=> {
      throw new Error('Server failure')
  }, 5000)

  res.status(200)
  res.json(userList)
})

app.listen(3000, () => {
  console.log("Service started: 3000")
})
Test it locally and execute the command in the terminal:
node server.js
Open the browser and access the user list interface:
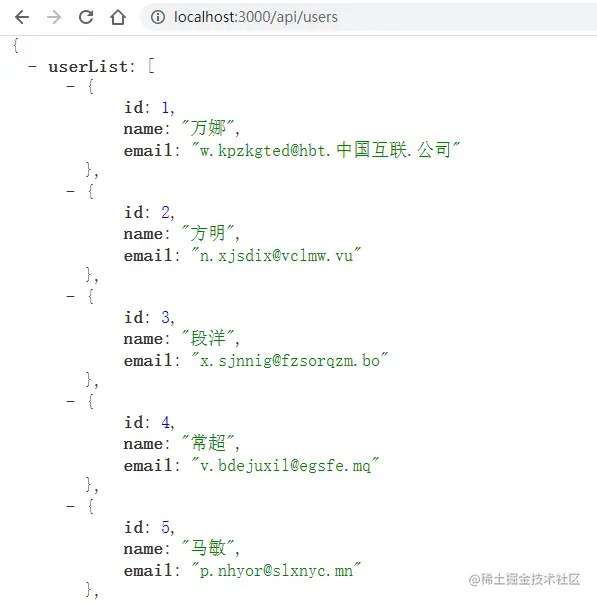
After five seconds, the server will hang:

We can solve this problem later when we use pm2 to manage applications.
Usually after completing a vue/react project, we will package it first and then publish it. In fact, front-end projects need to be packaged mainly because the final running environment of the program is the browser, and the browser has various compatibility issues and performance issues, such as:
.vue , .jsx , .ts files need to be compiledProjects developed using express.js or koa.js do not have these problems. Moreover, Node.js adopts the CommonJS modular specification and has a caching mechanism; at the same time, the module will only be imported when it is used . If you package it into a file, this advantage is actually wasted. So for node.js projects, there is no need to package.
This article uses the CentOS system as an example to demonstrate
In order to facilitate switching node versions, we use nvm to manage nodes.
Nvm (Node Version Manager) is the version management tool of Node.js. Through it, node can be arbitrarily switched between multiple versions, avoiding repeated downloading and installation operations when switching versions is required.
The official repository of Nvm is github.com/nvm-sh/nvm. Because its installation script is stored on the githubusercontent site, it is often inaccessible. So I created a new mirror repository for it on gitee, so that I can access its installation script from gitee.
Download the installation script through the curl command and use bash to execute the script, which will automatically complete the installation of nvm:
# curl -o- https://gitee.com/hsyq/nvm/raw/master/install.sh | bash
When the installation is completed After that, we open a new window to use nvm:
[root@ecs-221238 ~]# nvm
-v0.39.1
can print the version number normally, indicating that nvm has been installed successfully.
Now you can use nvm to install and manage node.
View available node versions:
# nvm ls-remote
Install node:
# nvm install 18.0.0
View installed node versions:
[root@ecs-221238 ~]# nvm list
-> v18.0.0
default -> 18.0.0 (-> v18.0.0)
iojs -> N/A (default)
unstable -> N/A (default)
node -> stable (-> v18.0.0) (default)
stable -> 18.0 (-> v18.0.0) (default)
Select a version to use:
# nvm use 18.0.0
One thing to note is that when using nvm on Windows, you need to use administrator rights to execute the nvm command. On CentOS, I log in as the root user by default, so there is no problem. If you encounter unknown errors when using it, you can search for solutions or try to see if the problem is caused by permissions.
When installing node, npm will be installed automatically. Check the version numbers of node and npm:
[root@ecs-221238 ~]# node -v
v18.0.0

[root@ecs-221238 ~]# npm -v
The default npm image source
in 8.6.0is the official address:
[root@ecs-221238 ~]# npm config get registry
https://registry.npmjs.org/
Switch to the domestic Taobao mirror source:
[root@ecs-221238 ~]# npm config set registry https://registry.npmmirror.com
At this point, the server has installed node The environment and npm are configured.
There are many ways, either downloading to the server from the Github/GitLab/Gitee repository, or uploading locally through the ftp tool. The steps are very simple and will not be demonstrated again.
The demo project is placed in the /www directory:
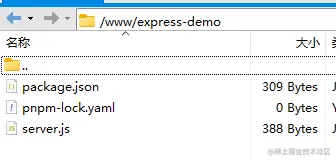
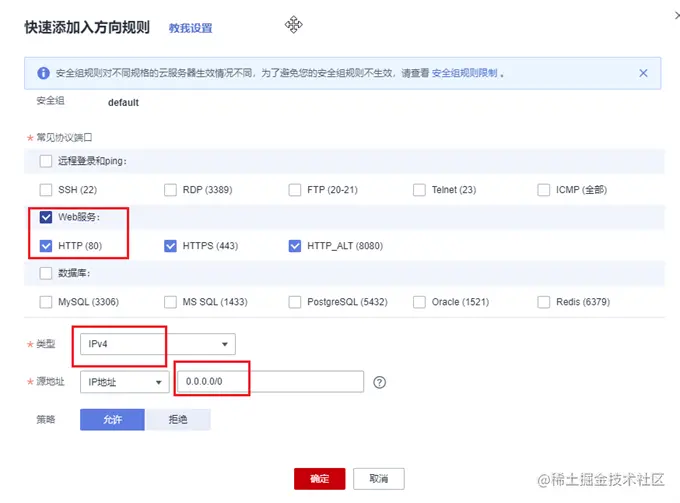
Generally, cloud servers only open port 22 for remote login. Commonly used ports such as 80 and 443 are not open. In addition, the express project we prepared runs on port 3000. So you need to first go to the console of the cloud server, find the security group, add a few rules, and open ports 80 and 3000.
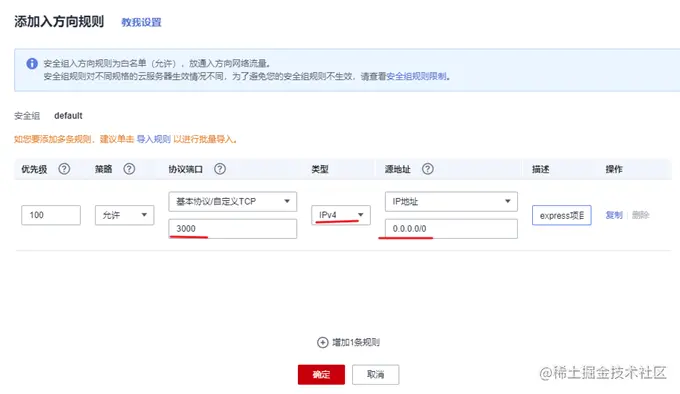
, we can use nodemon for real-time monitoring and automatic restart to improve development efficiency. In a production environment, you need to use the big killer—PM2.
first install pm2 globally:
# npm i -g pm2
Execute the pm2 -v command to check whether the installation is successful:
[root@ecs-221238 ~]# pm2
-v5.2.0
Switch to the project directory and install the dependencies first:
cd /www/express-demo
npm install
and then use the pm2 command to start the application.
pm2 start app.js -i max
// Or pm2 start server.js -i 2
PM2 management application has two modes: fork and cluster. When starting the application, by using the -i parameter to specify the number of instances, the cluster mode will be automatically turned on. At this point, load balancing capabilities are available.
-i: instance, the number of instances. You can write a specific number or configure it to max.
PM2will automatically check the number of available CPUs and then start as many processes as possible.

The application is now started. PM2 will manage the application in the form of a daemon process. This table shows some information about the application running, such as running status, CPU usage, memory usage, etc.
Access the interface in a local browser:
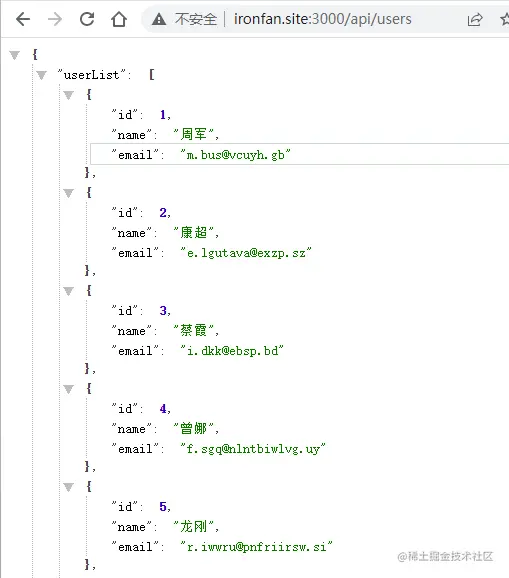
Cluster mode is a multi-process and multi-instance model. When a request comes in, it will be assigned to one of the processes for processing. Just like the usage of cluster module we have seen before, due to the guardianship of pm2, even if a process dies, the process will be restarted immediately.
Return to the server terminal and execute the pm2 logs command to view the pm2 logs:

It can be seen that the application instance with id 1 hangs up, and pm2 will restart the instance immediately. Note that the id here is the id of the application instance, not the process id.
At this point, the simple deployment of an express project is completed. By using the pm2 tool, we can basically ensure that our project can run stably and reliably.
Here is a summary of some commonly used commands of the pm2 tool for reference.
# Fork mode pm2 start app.js --name app # Set the name of the application to app

#Cluster mode# Use load balancing to start 4 processes pm2 start app.js -i 4

# Will start 4 processes using load balancing, depending on available CPU
pm2 start app.js -i 0

# Equivalent to the effect of the above command pm2 start app.js -i max

 # Expand the app with 3 additional processes pm2 scale app +3

# Expand or shrink the app to 2 processes pm2 scale app 2

# View application status # Display the status of all processes pm2 list

# Print the list of all processes in raw JSON format pm2 jlist

# Use beautified JSON to print the list of all processes pm2 prettylist

# Display all information about a specific process pm2 describe 0

# Use the dashboard to monitor all processes pm2 monit

#Log management# Display all application logs pm2 logs in real time

# Display app application logs in real time pm2 logs app

# Use json format to display logs in real time, do not output old logs, only output newly generated logs pm2 logs --json

#Application management# Stop all processes pm2 stop all

# Restart all processes pm2 restart all
# Stop the process with the specified ID pm2 stop 0

# Restart the process with the specified ID pm2 restart 0

# Delete process pm2 with ID 0 delete 0

# Delete all processes pm2 delete all
You can try each command yourself to see the effect.
Here is a special demonstration of the monit command, which can launch a panel in the terminal to display the running status of the application in real time. All applications managed by pm2 can be switched through the up and down arrows:
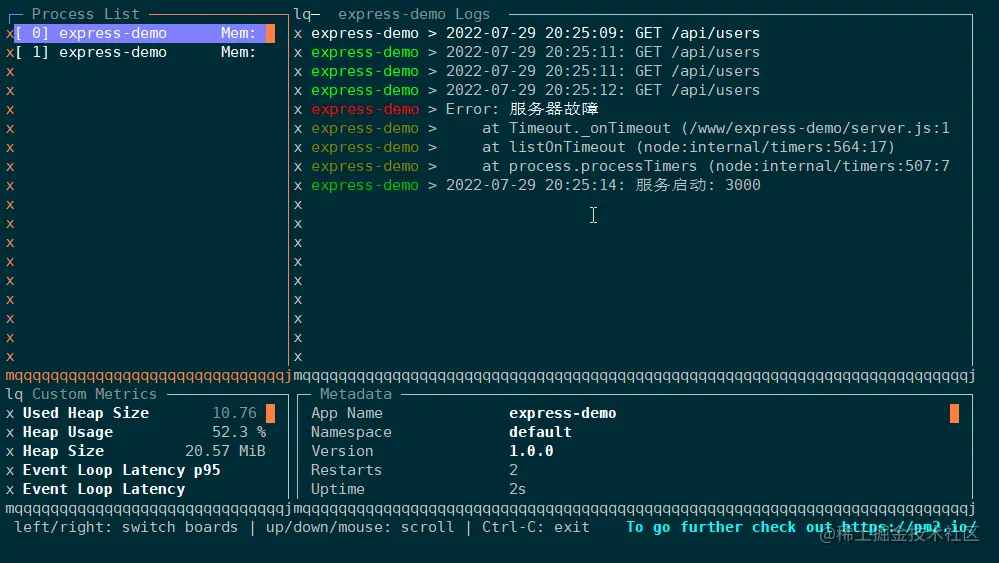
PM2 has very powerful functions, far more than the above commands. In real project deployment, you may also need to configure log files, watch mode, environment variables, etc. It would be very tedious to type commands by hand every time, so pm2 provides configuration files to manage and deploy applications.
You can generate a configuration file through the following command:
[root@ecs-221238 express-demo]# pm2 init simple
File /www/express-demo/ecosystem.config.js generated
will generate an ecosystem.config.js file:
module.exports = {
  apps : [{
    name: "app1",
    script : "./app.js"
  }]
}
You can also create a configuration file yourself, such as app.config.js :
const path = require('path')

module.exports = {
  // One configuration file can manage multiple node.js applications at the same time // apps is an array, each item is the configuration of an application apps: [{
    //Application name: "express-demo",

    // Application entry file script: "./server.js",

    // There are two modes for starting the application: cluster and fork. The default is fork.
    exec_mode: 'cluster',

    // Number of application instances to create instances: 'max',

    // Turn on monitoring and automatically restart the application when the file changes watch: true,

    //Ignore changes to some directory files.
    // Since the log directory is placed in the project path, it must be ignored, otherwise the application will generate logs when it is started. PM2 will restart when it monitors the changes. If it restarts and generates logs, it will enter an infinite loop ignore_watch: [
      "node_modules",
      "logs"
    ],
    // Error log storage path err_file: path.resolve(__dirname, 'logs/error.log'),

    //Print log storage path out_file: path.resolve(__dirname, 'logs/out.log'),

    //Set the date format in front of each log in the log file log_date_format: "YYYY-MM-DD HH:mm:ss",
  }]
}
Let pm2 use configuration files to manage node applications:
pm2 start app.config.js
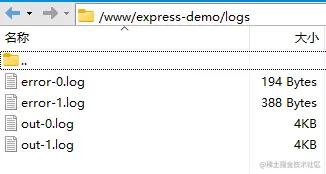
Now the applications managed by pm2 will put the logs in the project directory (the default is in the installation directory of pm2), and can monitor file changes. , automatically restart the service.
