The latest YouTube tutorial released by master Jerry Davos explains in detail how to use Comfy UI to change the lighting effect of the video and render it. The tutorial covers software installation, workflow, parameter settings, and advanced techniques, and provides detailed steps and screenshots to facilitate user learning and practice. Whether you are a novice or an experienced user, you can benefit a lot from it and quickly master the techniques of Comfy UI video light adjustment to improve the efficiency of video post-production. The tutorial also thoughtfully provides workflow file download links and RunComfy online running addresses, which lowers the learning threshold and allows users to get started easily.
Installation and preparation
First, you need to download the workflow file of Jerry Davos, the link is at the end of the article. After downloading, drag it directly into the Comfy UI and it will prompt you for the missing nodes. Don't worry, use the manager to install it with one click, it's quick and easy.
If you encounter problems during the installation process, Jerry Davos also provides a help link, click to get the solution. The following is a detailed tutorial by Jerry Davos:
Workflow overview
The workflow is cleverly divided into several groups, each with its own unique functionality, from input settings to output saving, all at a glance.
Input settings: including entry ring settings and source video settings.
Animation Difference Group: Used to adjust lighting effects.
Composition group: composition of IC and light mapping.
Case Sampler Group: Controls the number of steps in rendering the image.
Refinementer: Increase rendering resolution.
Prompt for input: Describe your image and new lighting conditions.
Enter settings
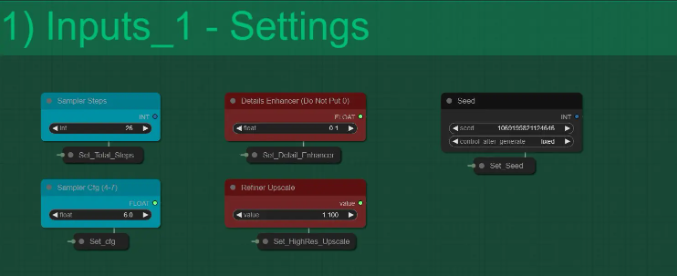
There are 5 settings here:
Sampler steps: It determines the total number of steps taken by KSampler to render the image. It should not be changed. [default 26]
Detail Enhancer: It enhances fine details in the final render. [Use values between 0.1 and 1]
Seed: It controls the generation seed of each KSampler.
Sampler CFG: Controls the CFG value of KSampler.
Refined Upgrade: It works like a high-resolution repair value. [Use 1.1–1.6 for best results]
Prompt for input
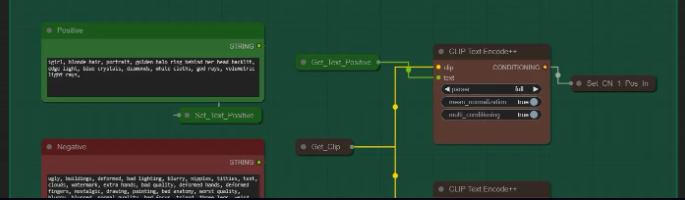
Positive Tip: Enter the tip that best describes the image in the new lighting.
Negative Note: Configured to provide best results. Please feel free to edit.
Clip Text Encoding Node: It helps in encoding text to maximize quality. Leave it as "Full"
Models and Loras
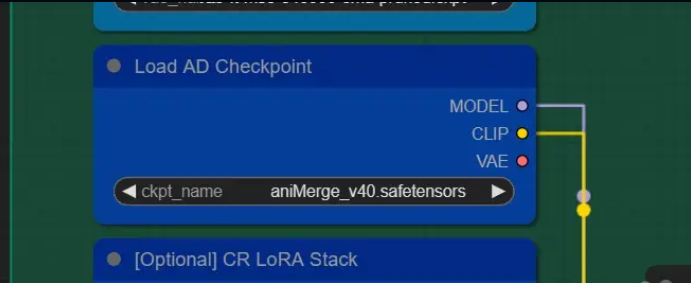
Checkpoint: Choose any realistic SD1.5 model for accurate results. Choose any SD1.5 model for stylized results.
Loras: [optional] If desired, any loras can be selected from the list. Do not use full force. Use around 0.5-0.7 for best results
Basic settings analysis
Each setting has a purpose, such as the Case Sampler steps determining how detailed the rendered image is, and the Detail Enhancer improving small details in the final render.
Seed: Controls the generation seed of each case sampler.
Refinementer: Similar to high-resolution restoration, improves image quality.
Prompt for input: Describe your image, the system is configured for best results.
Model and video selection
Choose your V model, whether it's realistic or cartoony, it doesn't matter. Loras intensity is recommended to be set between 50% and 70% for best results.
Video upload and settings

Upload your source video, making sure the file size does not exceed 100MB and the duration should be within 15 to 20 seconds to avoid insufficient memory.
Light mapping video
Upload your light mapped video, making sure it's no shorter than the source video, otherwise you'll get errors.
Render settings
Adjust the rendering resolution, whether it is landscape or portrait, the maximum resolution will not exceed the set value. It is recommended to use a value between 800 and 1200 for best results.
lightmap

Upload light map: Click and upload the light map video you want.
It will automatically scale to the dimensions of the source video
Make sure it is longer than or equal to the size of the source video, otherwise you will get an error.
Light Map ControlNet: This light map is also used as the Light controlnet using this model
Use a light-based control network model, and be careful not to have the CN intensity value too high to avoid overexposure or too sharp light transitions.
Animation differences

Load Animatediff models: You can use any model to achieve different effects.
Animatediff Other Nodes: You need to know something about animatediff to change other settings [you can find them here]
Settings SMZ: This is the node used to improve the quality of the model pipeline, all settings are predefined to run well.
Lightmap and IC adjustment composition
The top adjustment node above (grey) is used to control the adjustment of the IC light adjustment to reduce contrast and control brightness.
Generate New Background: When disabled, it feeds in the original image and attempts to map similar details to the source video background based on the "background hint" (if present in the positive hint box)

[1girl, sunshine, sunset, white shirt, black shorts, indoor, room]
When Generate New Background is enabled: It will generate new background based on depth

[1 girl, sunlight, sunset, nature in the background, sky]
Additionally, the depth control mesh's strength and end percentage are reduced to 45% to create open areas in the background.

Top Lightmap: When True, the lightmap will be on top of the source video and more dominant; when False, the source will be on top, more dominant and brighter
Theme affected area: 2 blending modes work best
Darken shadow areas based on top or bottom lightmap.
It brightens shadow areas based on the top or bottom lightmap
The blend factor is used for intensity.

Global Adjustments: This controls the brightness, contrast, gamma and hue of the final processed light map from above.
Image Remapping: Use this node to control the overall lightness and darkness of the entire image.
The higher the minimum value, the brighter the scene
A lower maximum will darken the scene and convert lighter areas into morphing objects like QrCode Monster CN
It is common to use a minimum value of 0.1 or 0.2 to brighten the scene slightly.
At a minimum value of 0, black pixels in the lightmap will have pitch black shadows.

KSamplers (original and refined)

IC Raw Ksampler: Unlike other samplers, it starts from step 8 instead of zero due to IC-Light conditions (frames are denoised starting from step 8)
For example, end step 20
Start steps at
0 will have no lightmap effect.
The effect of 5 is 50%
10 means the effect is 100%.
Therefore, around 3-8 is a good value to test.
When generate new background is TRUE you can set the value lower than 5 for better results

Ksampler Refine: Its working principle is similar to the Img2Img Refiner after IC original sampling.
For the end steps of 25
Start steps at
Versions 10 and below will work like the original sampler and will give you morph objects
15 can work like a real refiner
20 not working properly
More than 20 and above will produce confusing results
Therefore, the default of 16 is fine.
Facial restoration

Upgrade to repair the face: If your face is not satisfied after repairing the face, you can upgrade it to about 1.2 to 1.6 to get a better face.
Facial Tip: You can enter a facial tip here. The default setting is "Smile". You can change it.
Face denoising: Use around 0.35–0.45. Incorrect rendering may occur on taller faces, and sliding face issues may also occur.
save

When all frames are rendered, they will be exported to the output folder of the Comfy UI directory. You can adjust the output position and even render longer videos in batches.
Advanced techniques
If you want, you can use Comfy Cloud2 to run this workflow. It has a dedicated workflow page, all documents are complete, and you can run it with one click without installing any nodes or models.
Workflow address:
https://drive.google.com/drive/folders/16Aq1mqZKP-h8vApaN4FX5at3acidqPUv
Run this workflow in RunComfy without setup:
https://www.runcomfy.com/comfyui-workflows/comfyui-ic-light-workflow-for-video-relighting
Original video address: https://www.youtube.com/watch?v=q__YTKxtQAE
I hope this tutorial can help you easily master Comfy UI video light adjustment techniques and create more artistic video works! Remember to follow Jerry Davos to learn more practical skills.