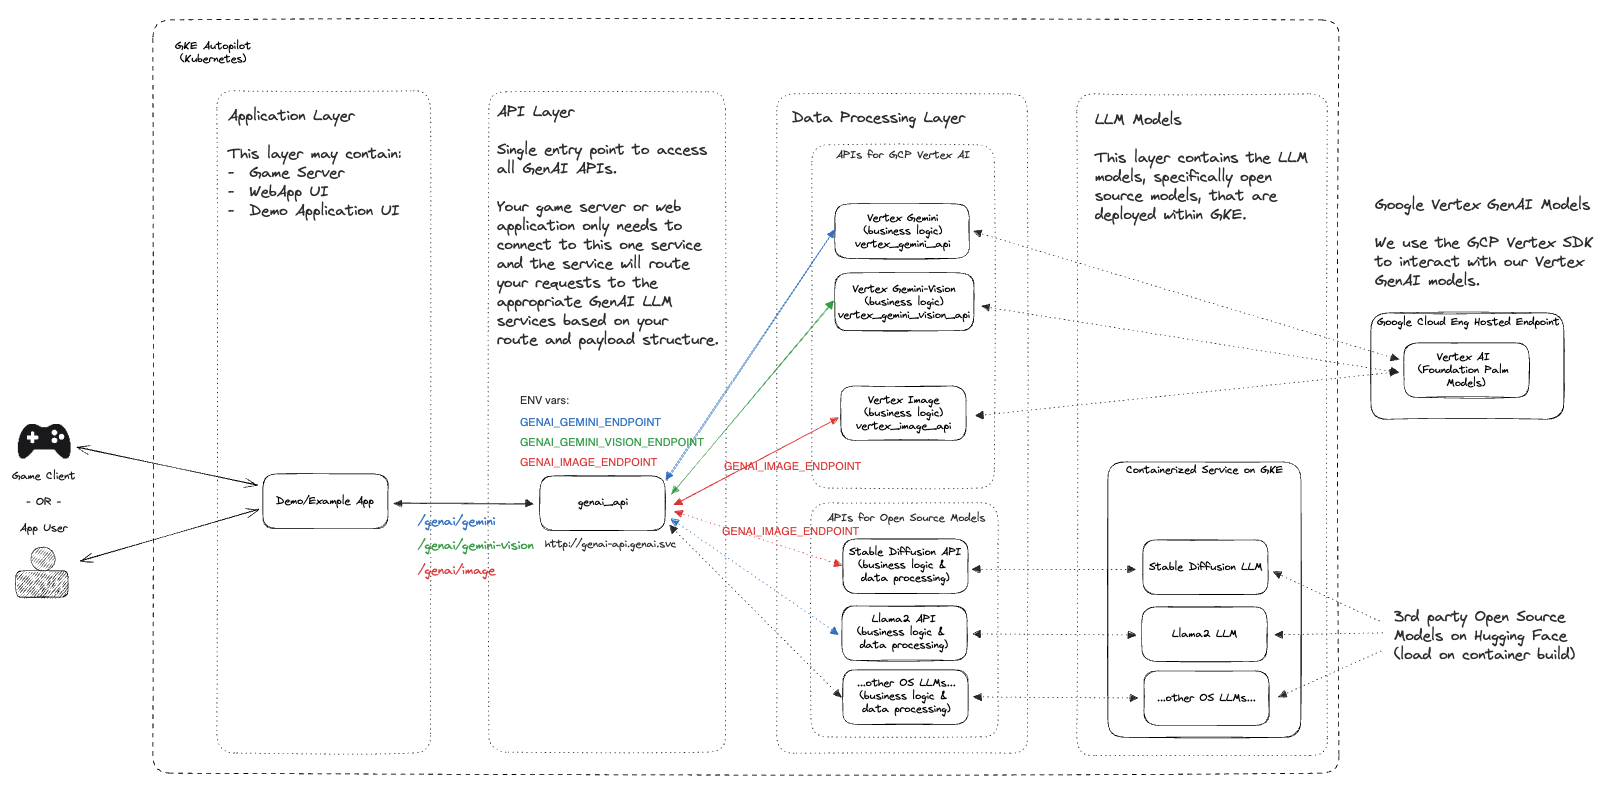
该项目提供了一系列快速入门,旨在使用 Google Cloud 产品和开源游戏解决方案加速实时游戏环境中的 GenAI 集成和个性化。
在当今的游戏行业中,为玩家提供个性化且引人入胜的体验至关重要。该项目为游戏开发者提供了一组快速入门资源,帮助他们将 GenAI 功能集成到他们的实时游戏环境中。通过利用 Google Cloud 产品和开源游戏解决方案,您可以提高玩家参与度,通过生成式 AI 解锁新用例,并创造令人难忘的游戏体验。
注意:这是一个快速发展的存储库,正在针对各种用例进行调整。如果您想贡献或发现任何错误,请提出问题和/或随时提交 PR 供审核。
如果您正在使用该项目,请为该存储库加星标以表达您的兴趣!
| 文件夹 | 描述 |
|---|---|
| 地形 | 基于Terraform的基础设施部署脚本 |
| 例子 | 可以根据您的用例进行测试和部署的单独快速入门 |
| 源代码 | 用作我们快速入门一部分的核心源代码 |

以下步骤将引导您完成GenAI 快速入门的设置指南。该过程将逐步介绍启用正确的Google Cloud API 、通过Terraform创建资源以及部署运行项目所需的Kubernetes 清单。
注意:这些步骤假设您在 Google Cloud 中已有一个正在运行的项目,并且您拥有 IAM 权限可以将资源部署到其中。
 git clone https://github.com/googleforgames/GenAI-quickstart.git

cd GenAI-quickstart
为 Google Cloud 设置唯一的项目 ID
 # To just use your current project
export PROJECT_ID=$(gcloud config list --format 'value(core.project)' 2>/dev/null)

# Otherwise set it to the project you wish to use.
设置 Google Cloud 的默认位置
export LOCATION=us-central1
为了更好地遵循本快速入门指南,请设置CUR_DIR环境变量
export CUR_DIR=$(pwd)
gcloud auth list
检查您的身份验证是否正常以及您的PROJECT_ID是否有效。
gcloud projects describe ${PROJECT_ID:?}
您应该会看到列出的PROJECT_ID状态为ACTIVE 。
 gcloud services enable --project ${PROJECT_ID:?}
  aiplatform.googleapis.com
  artifactregistry.googleapis.com
  cloudbuild.googleapis.com
  cloudresourcemanager.googleapis.com
  compute.googleapis.com
  container.googleapis.com
  containerfilesystem.googleapis.com
  containerregistry.googleapis.com
  iam.googleapis.com
  servicecontrol.googleapis.com
  spanner.googleapis.com
 cd ${CUR_DIR:?}/terraform

cat terraform.example.tfvars | sed -e "s:your-unique-project-id:${PROJECT_ID:?}:g" > terraform.tfvars

terraform init

terraform plan

terraform apply
云资源的部署可能需要 5 - 10 分钟。有关已部署资源的详细视图,请参阅terraform目录中的 README。
使用 Terraform 成功部署云资源后,获取新创建的 GKE 集群凭据。
gcloud container clusters get-credentials genai-quickstart --region us-central1 --project ${PROJECT_ID:?}
测试您的 Kubernetes 客户端凭据。
kubectl get nodes
切换到genai目录并渲染使用您唯一的项目 ID 的通用模板。
 # Find all files named .template.yaml, replace `your-unique-project-id` with PROJECT_ID, and output to .yaml.
cd ${CUR_DIR:?}/genai && find common -type f -name "*.template.yaml" -exec
  bash -c "template_path={}; sed "s:your-unique-project-id:${PROJECT_ID:?}:g" < ${template_path} > ${template_path/%.template.yaml/.yaml} " ;
使用Skaffold构建和运行 GenAI 工作负载
 gcloud auth configure-docker ${LOCATION:?}-docker.pkg.dev

export SKAFFOLD_DEFAULT_REPO=${LOCATION:?}-docker.pkg.dev/${PROJECT_ID:?}/repo-genai-quickstart

cd ${CUR_DIR:?}/genai

# To run all apis and models (requires a GPU node for stable-diffusion)
skaffold run --build-concurrency=0
部署工作负载后,您可以改为使用 GPU 部署:
 # Scale up a 2xL4 Mixtral 8x7B Deployment:
kubectl scale -n genai deployment huggingface-tgi-mixtral-small --replicas=1

# Or scale up a 8xL4 Mixtral 8x7B Deployment:
kubectl scale -n genai deployment huggingface-tgi-mixtral-big --replicas=1

# Scale down CPU Deployment:
kubectl scale -n genai deployment huggingface-tgi-mistral-cpu --replicas=0

# Note that the `huggingface-tgi-api` Service matches all of the huggingface-tgi-*
# Deployments, so if you have multiple replicas running, it will load balance
# between them.
您还可以单独运行各个后端:
 # To run only stable-diffusion (requires a GPU node)
#skaffold run --module stable-diffusion-api-cfg,stable-diffusion-endpt-cfg

# To run only Vertex chat (Vertex AI is required)
#skaffold run --module vertex-chat-api-cfg
访问 API - 您可以从这里测试应用程序和所有 API :)
集群创建内部直通网络负载均衡器 (ILB)。要访问 API,请运行:
kubectl port-forward svc/genai-api -n genai 8080:80
然后在另一个窗口中运行:
 export EXT_IP=localhost:8080
echo "Browse to http://${EXT_IP}/genai_docs to try out the GenAI APIs!"
然后在浏览器中导航到该 URL。
使用curl测试API:
 curl -X 'POST' "http://${EXT_IP}/genai/text"
  -H 'accept: application/json'
  -H 'Content-Type: application/json'
  -d '{"prompt": "Who are the founders of Google?"}'
或者使用集群内的api-caller容器测试 API:
 # See available service endpoints. The `genai` endpoint wraps them all.
kubectl get svc -ngenai

# Start `api-caller` pod interactively
kubectl run -it -ngenai --rm --restart=Never api-caller --image=${SKAFFOLD_DEFAULT_REPO}/api-caller:latest

# Examples:

# See available example scripts
root@api-caller:/app# ls
embeddings.py  genai_api.py  huggingface_tgi.py  npc_chat_api.py  stable_diffusion_api.py  vertex_chat_api.py  vertex_code_api.py  vertex_gemini_api.py  vertex_image_api.py  vertex_text_api.py

# The genai_api script works for text prompts
root@api-caller:/app# python3 genai_api.py --endpoint=http://genai-api/genai/text --prompt "Describe a wombat"
INFO:root:Status Code: 200
INFO:root:Response:    "A wombat is a marsupial native to Australia. [...]"

# To try the Smart NPC, first reset the world data:
root@api-caller:/app# python3 npc_chat_api.py --endpoint http://genai-api/genai/npc_chat/reset_world_data --empty
INFO:root:Status Code: 200
INFO:root:Response:    {"status":"ok"}

# Then you can use the interactive chat:
root@api-caller:/app# python3 npc_chat_api.py --endpoint http://genai-api/genai/npc_chat --chat
>>> hey, how are you?
<<< I am doing my best here at the distribution center. It's a tough situation, but I am staying focused on helping those in need. How about you? How are you holding up?

# You can also interact with the services underneath, e.g.: Hugging Face TGI supports an interactive chat
root@api-caller:/app# python3 huggingface_tgi.py --endpoint=http://huggingface-tgi-api:8080/v1
>>> hello!
INFO:httpx:HTTP Request: POST http://huggingface-tgi-api:8080/v1/chat/completions "HTTP/1.1 200 OK"
<<<  Hello! How can I help you today? If you have any questions or need assistance with something, feel free to ask and I'll do my best to help. If you just want to chat, we can talk about pretty much anything. What's on your mind?
在genai目录中
 cd ${CUR_DIR:?}/genai

skaffold delete
在terraform目录中
 cd ${CUR_DIR:?}/terraform

terraform destroy
如果您没有在 Google Cloud shell 中运行上述项目,请确保您已登录并通过所需项目的身份验证:
 gcloud auth application-default login

gcloud config set project ${PROJECT_ID:?}
并遵循身份验证流程。
整个存储库可以按原样克隆和使用,或者在许多情况下,您可以选择分叉此存储库并保留对您的用例最有用和最相关的代码库。如果您想做出贡献,可以在我们的贡献指南中找到更多信息。