 WoR闪光器
使用 Linux 计算机在 Raspberry Pi SD 卡上安装 Windows 10 或 Windows 11。
在 2020 年,这完全是不可能的。
在 2021 年,这需要遵循复杂的教程。
现在,使用新的 WoR-flasher,这就是小菜一碟。
在 RPi 上运行 WoR-flasher 的最快方法是使用 Raspberry Pi 的 Pi-Apps 应用商店:
从 Pi-Apps 安装 WoR-flasher 有几个优点:它在“开始”菜单中创建了一个方便的按钮,只需单击一下即可卸载,并且可以无缝处理更新。
git clone https://github.com/Botspot/wor-flasher
这会将脚本下载到名为wor-flasher新目录。
依赖关系:无需手动安装软件包。运行脚本将自动安装这些: yad aria2 cabextract wimtools chntpw genisoimage exfat-fuse exfat-utils wget
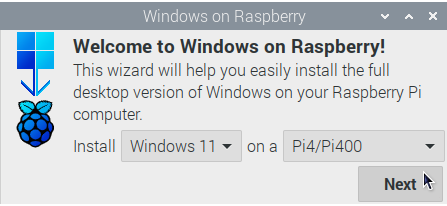
~/wor-flasher/install-wor-gui.sh


install-wor.sh脚本: 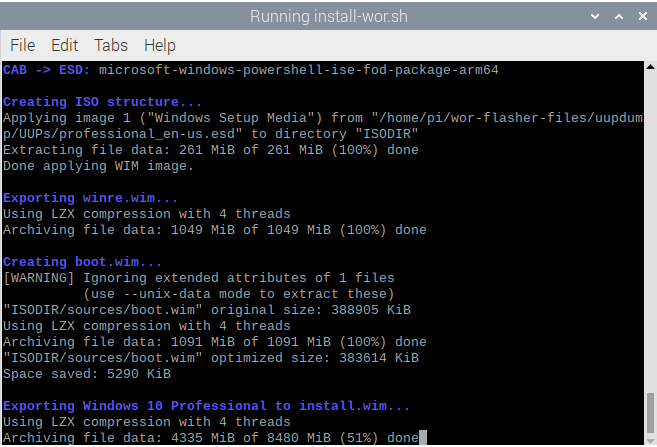
~/wor-flasher/install-wor.sh
$ ~/wor-flasher/install-wor.sh
Choose Windows version:
1) Windows 11
2) Windows 10
3) Custom...
Enter 1, 2 or 3: 1
Choose language: en-us
Choose Raspberry Pi model to deploy Windows on:
1) Raspberry Pi 4 / 400
2) Raspberry Pi 2 rev 1.2 / 3 / CM3
Enter 1 or 2: 1
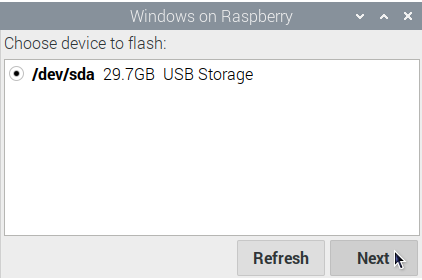
Available devices:
/dev/sdb - 59.5GB - USB Storage
Choose a device to flash the Windows setup files to: /dev/sdb
1) Create an installation drive (minimum 25 GB) capable of installing Windows to itself
2) Create a recovery drive (minimum 7 GB) to install Windows on other >16 GB drives
Choose the installation mode (1 or 2): 1
Input configuration:
DL_DIR: /home/pi/wor-flasher-files
RUN_MODE: cli
RPI_MODEL: 4
DEVICE: /dev/sdb
CAN_INSTALL_ON_SAME_DRIVE: 1
UUID: 6f7de912-4143-431b-b605-924c22ab9b1f
WIN_LANG: en-us
Formatting /dev/sdb
Generating partitions
Generating filesystems
# script output continues... It generates a Windows image legally, downloads all necessary drivers, the BIOS, the bootloader, and the modified kernel. Once done it ejects the drive.
install-wor.sh脚本设计用于在其他较大的 bash 脚本中使用。对于自动化和定制, install-wor.sh将检测并遵守某些环境变量:
DL_DIR :设置此变量以更改默认下载位置。默认情况下,它是~/wor-flasher-files 。BID :设置此变量以选择确切的 Windows 版本 ID。示例值:“ 22631.2861 ”。设置此变量后, install-wor.sh将不会询问用户要使用哪个 Windows 版本。WIN_LANG :设置此变量来选择 Windows 映像的语言。示例值:“ en-us ”。设置此变量后, install-wor.sh将不会询问用户要使用哪种语言。RPI_MODEL :设置此变量以选择 Raspberry Pi 型号。允许值:“ 3 ”、“ 4 ”。设置此变量后, install-wor.sh将不会询问用户要使用哪种 Raspberry Pi 型号。DEVICE :将此变量设置为您要刷新的设备。示例值:“ /dev/sda ”。设置此变量后, install-wor.sh将不会询问用户要使用哪个设备。CAN_INSTALL_ON_SAME_DRIVE :如果设备大于 25GB 并且您希望在其自身上安装 Windows,请将此变量设置为“ 1 ”。否则,将其设置为“ 0 ”。CONFIG_TXT :设置此变量以自定义生成的驱动器的/boot/config.txt 。这通常用于超频或更改 HDMI 设置。这是默认值。RUN_MODE :如果您希望install-wor.sh显示图形错误消息,请将其设置为“ gui ”。DRY_RUN :将此变量设置为“ 1 ”以正常进行设置,但在下载所有内容后退出。这可以防止设备被刷新。用法示例:
DL_DIR=/media/pi/my-big-flash-drive DEVICE=/dev/sdg DRY_RUN=1 UUID=db8ec987-d136-4421-afb8-2ef109396b00 RPI_MODEL=4 WIN_LANG=en-us ~/wor-flasher/install-wor-gui.sh
install-wor.sh脚本设计用于在其他较大的 bash 脚本中使用。为了改进集成, install-wor.sh配备了各种有用的功能,前端脚本(如install-wor-gui.sh可以使用这些功能。
要获取脚本以便函数可用:
source ~/wor-flasher/install-wor.sh source
问题:为什么该命令说“ source ”两次?答案:第一个“ source ”是一个命令,第二个“ source ”是一个命令行标志,传递给脚本以让它知道您正在获取它。一旦获取脚本,这些新命令(也称为函数)就可用:
error - Botspot 在 bash 脚本中使用的一个简单函数,用于警告用户某些操作失败并以失败代码退出脚本。 (1) command-that-downloads-windows || error "Windows failed to download! Check your internet connection and try again."
echo_white - echo命令的简单前端,将您想要的消息显示为白色文本而不是通常的浅灰色。 echo_white "Now, downloading windows... please wait"
package_available - 确定是否可以从 apt 存储库安装软件包 输入:软件包的一个名称 用法: if package_available yad ;then
echo "yad can be installed"
fi
install_packages - 检查并安装引用的软件包列表。 install_packages 'yad aria2 cabextract wimtools chntpw genisoimage exfat-fuse exfat-utils wget'
download_from_gdrive - 从 Google Drive 下载公开共享的大文件。这是我改编的教程。 download_from_gdrive 1WHyHFYjM4WPAAGH2PICGEhT4R5TlxlJC WoR-PE_Package.zip
get_partition - 一种干净、可靠的方法来确定分区的块设备。 get_partition /dev/sda 2
#Assuming partition 2 exists, the above command returns "/dev/sda2"
get_partition /dev/mmcblk0 2
#Assuming partition 2 exists, the above command returns "/dev/mmcblk0p2"
get_partition /dev/mmcblk0 all
#Returns every partition within the drive, each one on a line
get_name - 确定给定存储驱动器的人类可读名称。 get_name /dev/sda
get_size_raw - 确定驱动器的大小(以字节为单位)。 get_size_raw /dev/sda
list_devs - 以人类可读的彩色格式列出可用的存储驱动器。 list_devs
get_bid - 获取 Windows 10 或 Windows 11 的最新 Windows 版本 ID10 ”或“ 11 ” 用法: get_bid 11
get_space_free - 获取文件夹的可用磁盘空间 get_space_free ~/wor-flasher-files
get_os_name - 获取人类可读的操作系统名称。 get_os_name 22631.2861
此代码将以非交互方式将 Windows 11 刷新到/dev/sda并添加超频设置。您可以将代码复制并粘贴到终端中,或将其另存为 shell 脚本。
 # make all variables we set to be visible to the script (only necessary if you run this in a terminal)
set -a

# First, source the script so its functions are available
source ~ /wor-flasher/install-wor.sh source

# Determine the latest Windows 11 update ID using a function
BID= " $( get_bid 11 ) "

# set destination RPi model
RPI_MODEL=4

# choose language
WIN_LANG=en-us

# set the device to flash
DEVICE=/dev/sda

# set a custom config.txt
CONFIG_TXT= " over_voltage=6
arm_freq=2147
gpu_freq=750

# don't change anything below this point #
arm_64bit=1
enable_uart=1
uart_2ndstage=1
enable_gic=1
armstub=RPI_EFI.fd
disable_commandline_tags=1
disable_overscan=1
device_tree_address=0x1f0000
device_tree_end=0x200000
dtoverlay=miniuart-bt "

# indicate that drive is large enough to install Windows to itself
CAN_INSTALL_ON_SAME_DRIVE=1

~ /wor-flasher/install-wor.sh

