

MPIRE是 MultiProcessing Is Very Easy 的缩写,是一个用于多处理的 Python 包。 MPIRE在大多数情况下速度更快,包含更多功能,并且通常比默认的多处理包更用户友好。它结合了multiprocessing.Pool的便捷映射功能和使用multiprocessing.Process的写时复制共享对象的优点,以及易于使用的工作状态、工作洞察、工作初始化和退出函数、超时和进度条功能。
完整文档可在 https://sybrenjansen.github.io/mpire/ 获取。
map / map_unordered / imap / imap_unordered / apply / apply_async函数进行多处理fork )rich和笔记本小部件)daemon选项时允许嵌套工作池MPIRE 在 Linux、macOS 和 Windows 上进行了测试。对于 Windows 和 macOS 用户,有一些已知的小警告,这些警告记录在“故障排除”一章中。
通过点(PyPi):
pip install mpireMPIRE 也可以通过 conda-forge 获得:
conda install -c conda-forge mpire假设您有一个耗时的函数,它接收一些输入并返回其结果。像这样的简单函数被称为“令人尴尬的并行问题”,这些函数几乎不需要甚至不需要任何努力就可以变成并行任务。并行化一个简单的函数就像导入multiprocessing并使用multiprocessing.Pool类一样简单:
 import time
from multiprocessing import Pool

def time_consuming_function ( x ):
    time . sleep ( 1 )  # Simulate that this function takes long to complete
    return ...

with Pool ( processes = 5 ) as pool :
    results = pool . map ( time_consuming_function , range ( 10 ))
MPIRE 几乎可以用作multiprocessing的直接替代品。我们使用mpire.WorkerPool类并调用可用的map函数之一:
 from mpire import WorkerPool

with WorkerPool ( n_jobs = 5 ) as pool :
results = pool . map ( time_consuming_function , range ( 10 ))代码中的差异很小:如果您习惯了普通的multiprocessing ,则无需学习全新的多处理语法。不过,额外的可用功能才是 MPIRE 的与众不同之处。
假设我们想知道当前任务的状态:完成了多少个任务,距离工作准备就绪还有多长时间?就像将progress_bar参数设置为True一样简单:
 with WorkerPool ( n_jobs = 5 ) as pool :
    results = pool . map ( time_consuming_function , range ( 10 ), progress_bar = True )
它会输出一个格式良好的 tqdm 进度条。
MPIRE 还提供了一个仪表板,您需要为其安装额外的依赖项。请参阅仪表板了解更多信息。
注意:写时复制共享对象仅适用于 start 方法fork 。对于threading对象按原样共享。对于其他启动方法,共享对象为每个工作线程复制一次,这仍然比每个任务复制一次要好。
如果您想要在所有工作人员之间共享一个或多个对象,您可以使用 MPIRE 的写时复制shared_objects选项。 MPIRE 只会为每个工作人员传递这些对象一次,而无需复制/序列化。仅当您更改辅助函数中的对象时,它才会开始为该辅助函数复制该对象。
 def time_consuming_function ( some_object , x ):
    time . sleep ( 1 )  # Simulate that this function takes long to complete
    return ...

def main ():
    some_object = ...
    with WorkerPool ( n_jobs = 5 , shared_objects = some_object ) as pool :
        results = pool . map ( time_consuming_function , range ( 10 ), progress_bar = True )
有关更多详细信息,请参阅共享对象。
可以使用worker_init功能来初始化worker。与worker_state一起,您可以加载模型,或设置数据库连接等:
 def init ( worker_state ):
    # Load a big dataset or model and store it in a worker specific worker_state
    worker_state [ 'dataset' ] = ...
    worker_state [ 'model' ] = ...

def task ( worker_state , idx ):
    # Let the model predict a specific instance of the dataset
    return worker_state [ 'model' ]. predict ( worker_state [ 'dataset' ][ idx ])

with WorkerPool ( n_jobs = 5 , use_worker_state = True ) as pool :
results = pool . map ( task , range ( 10 ), worker_init = init )同样,您可以使用worker_exit功能让MPIRE在worker终止时调用函数。你甚至可以让这个退出函数返回结果,稍后可以获得。有关更多信息,请参阅worker_init 和worker_exit 部分。
当您的多处理设置未按您希望的方式运行并且您不知道原因是什么时,可以使用工作人员洞察功能。这将使您深入了解您的设置,但它不会分析您正在运行的函数(还有其他库)。相反,它会记录工作人员的启动时间、等待时间和工作时间。当提供了工作进程初始化和退出函数时,它也会对这些函数进行计时。
也许您正在通过任务队列发送大量数据,这会导致等待时间增加。无论哪种情况,您都可以分别使用enable_insights标志和mpire.WorkerPool.get_insights函数启用并获取见解:
 with WorkerPool ( n_jobs = 5 , enable_insights = True ) as pool :
    results = pool . map ( time_consuming_function , range ( 10 ))
    insights = pool . get_insights ()
请参阅工作人员见解以获取更详细的示例和预期输出。
可以为目标、 worker_init和worker_exit函数单独设置超时。当设置并达到超时时,它将抛出TimeoutError :
 def init ():
    ...

def exit_ ():
    ...

# Will raise TimeoutError, provided that the target function takes longer
# than half a second to complete
with WorkerPool ( n_jobs = 5 ) as pool :
    pool . map ( time_consuming_function , range ( 10 ), task_timeout = 0.5 )

# Will raise TimeoutError, provided that the worker_init function takes longer
# than 3 seconds to complete or the worker_exit function takes longer than
# 150.5 seconds to complete
with WorkerPool ( n_jobs = 5 ) as pool :
    pool . map ( time_consuming_function , range ( 10 ), worker_init = init , worker_exit = exit_ ,
worker_init_timeout = 3.0 , worker_exit_timeout = 150.5 )当使用threading作为启动方法时,MPIRE 将无法中断某些函数,例如time.sleep 。
有关更多详细信息,请参阅超时。
MPIRE 已经在三个不同的基准上进行了基准测试:数值计算、状态计算和昂贵的初始化。有关这些基准的更多详细信息可以在这篇博客文章中找到。这些基准测试的所有代码都可以在此项目中找到。
简而言之,MPIRE 速度更快的主要原因是:
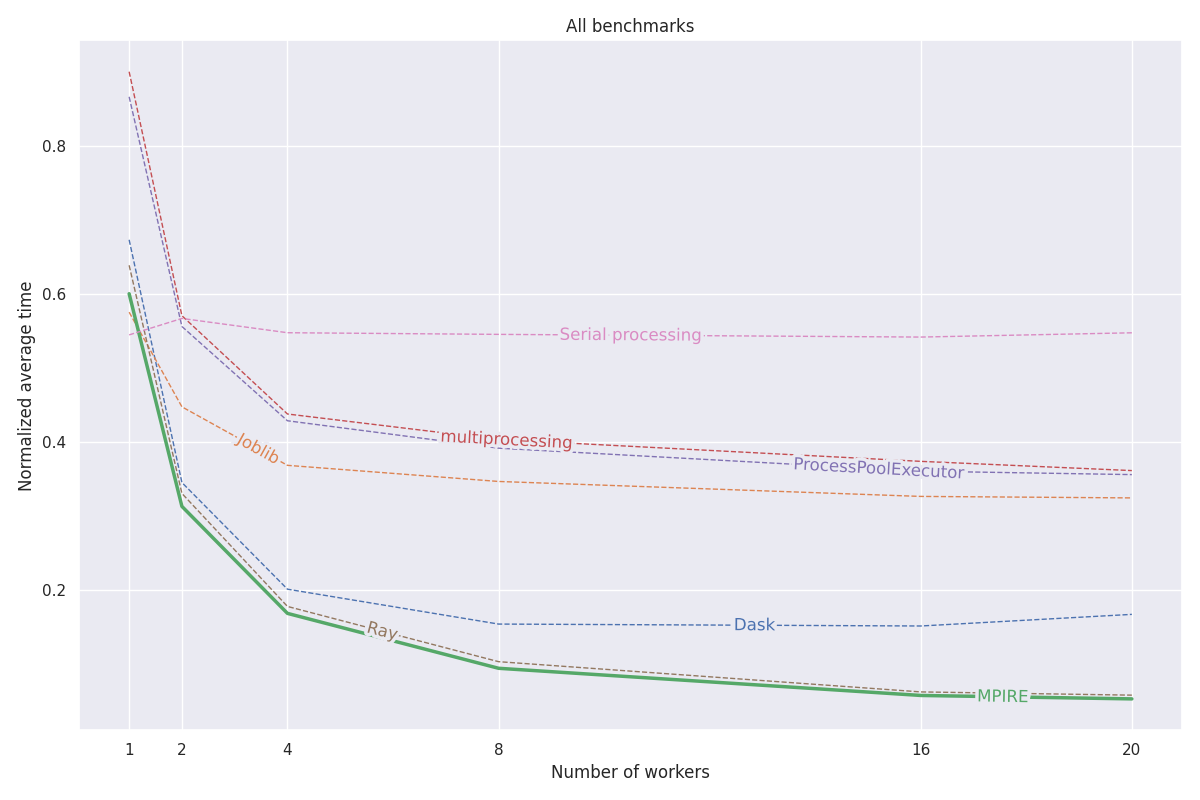
fork可用时,我们可以使用写时复制共享对象,这减少了复制需要在子进程上共享的对象的需要下图显示了所有三个基准的平均标准化结果。各个基准测试的结果可以在博客文章中找到。基准测试在具有 20 个内核、禁用超线程和 200GB RAM 的 Linux 机器上运行。对于每项任务,都使用不同数量的进程/工作人员运行实验,并对 5 次运行的结果进行平均。
有关 MPIRE 所有其他功能的信息,请参阅 https://sybrenjansen.github.io/mpire/ 上的完整文档。
如果您想自己构建文档,请通过执行以下命令安装文档依赖项:
pip install mpire[docs]或者
pip install .[docs]然后可以使用 Python <= 3.9 并执行以下命令来构建文档:
python setup.py build_docs还可以直接从docs文件夹构建文档。在这种情况下,应该安装MPIRE并在您当前的工作环境中可用。然后执行:
make html在docs夹中。


