ai chat accelerator
1.0.0
使用 AWS 上的 AI 聊天应用程序快速启动并运行,该应用程序提供了构建基础。
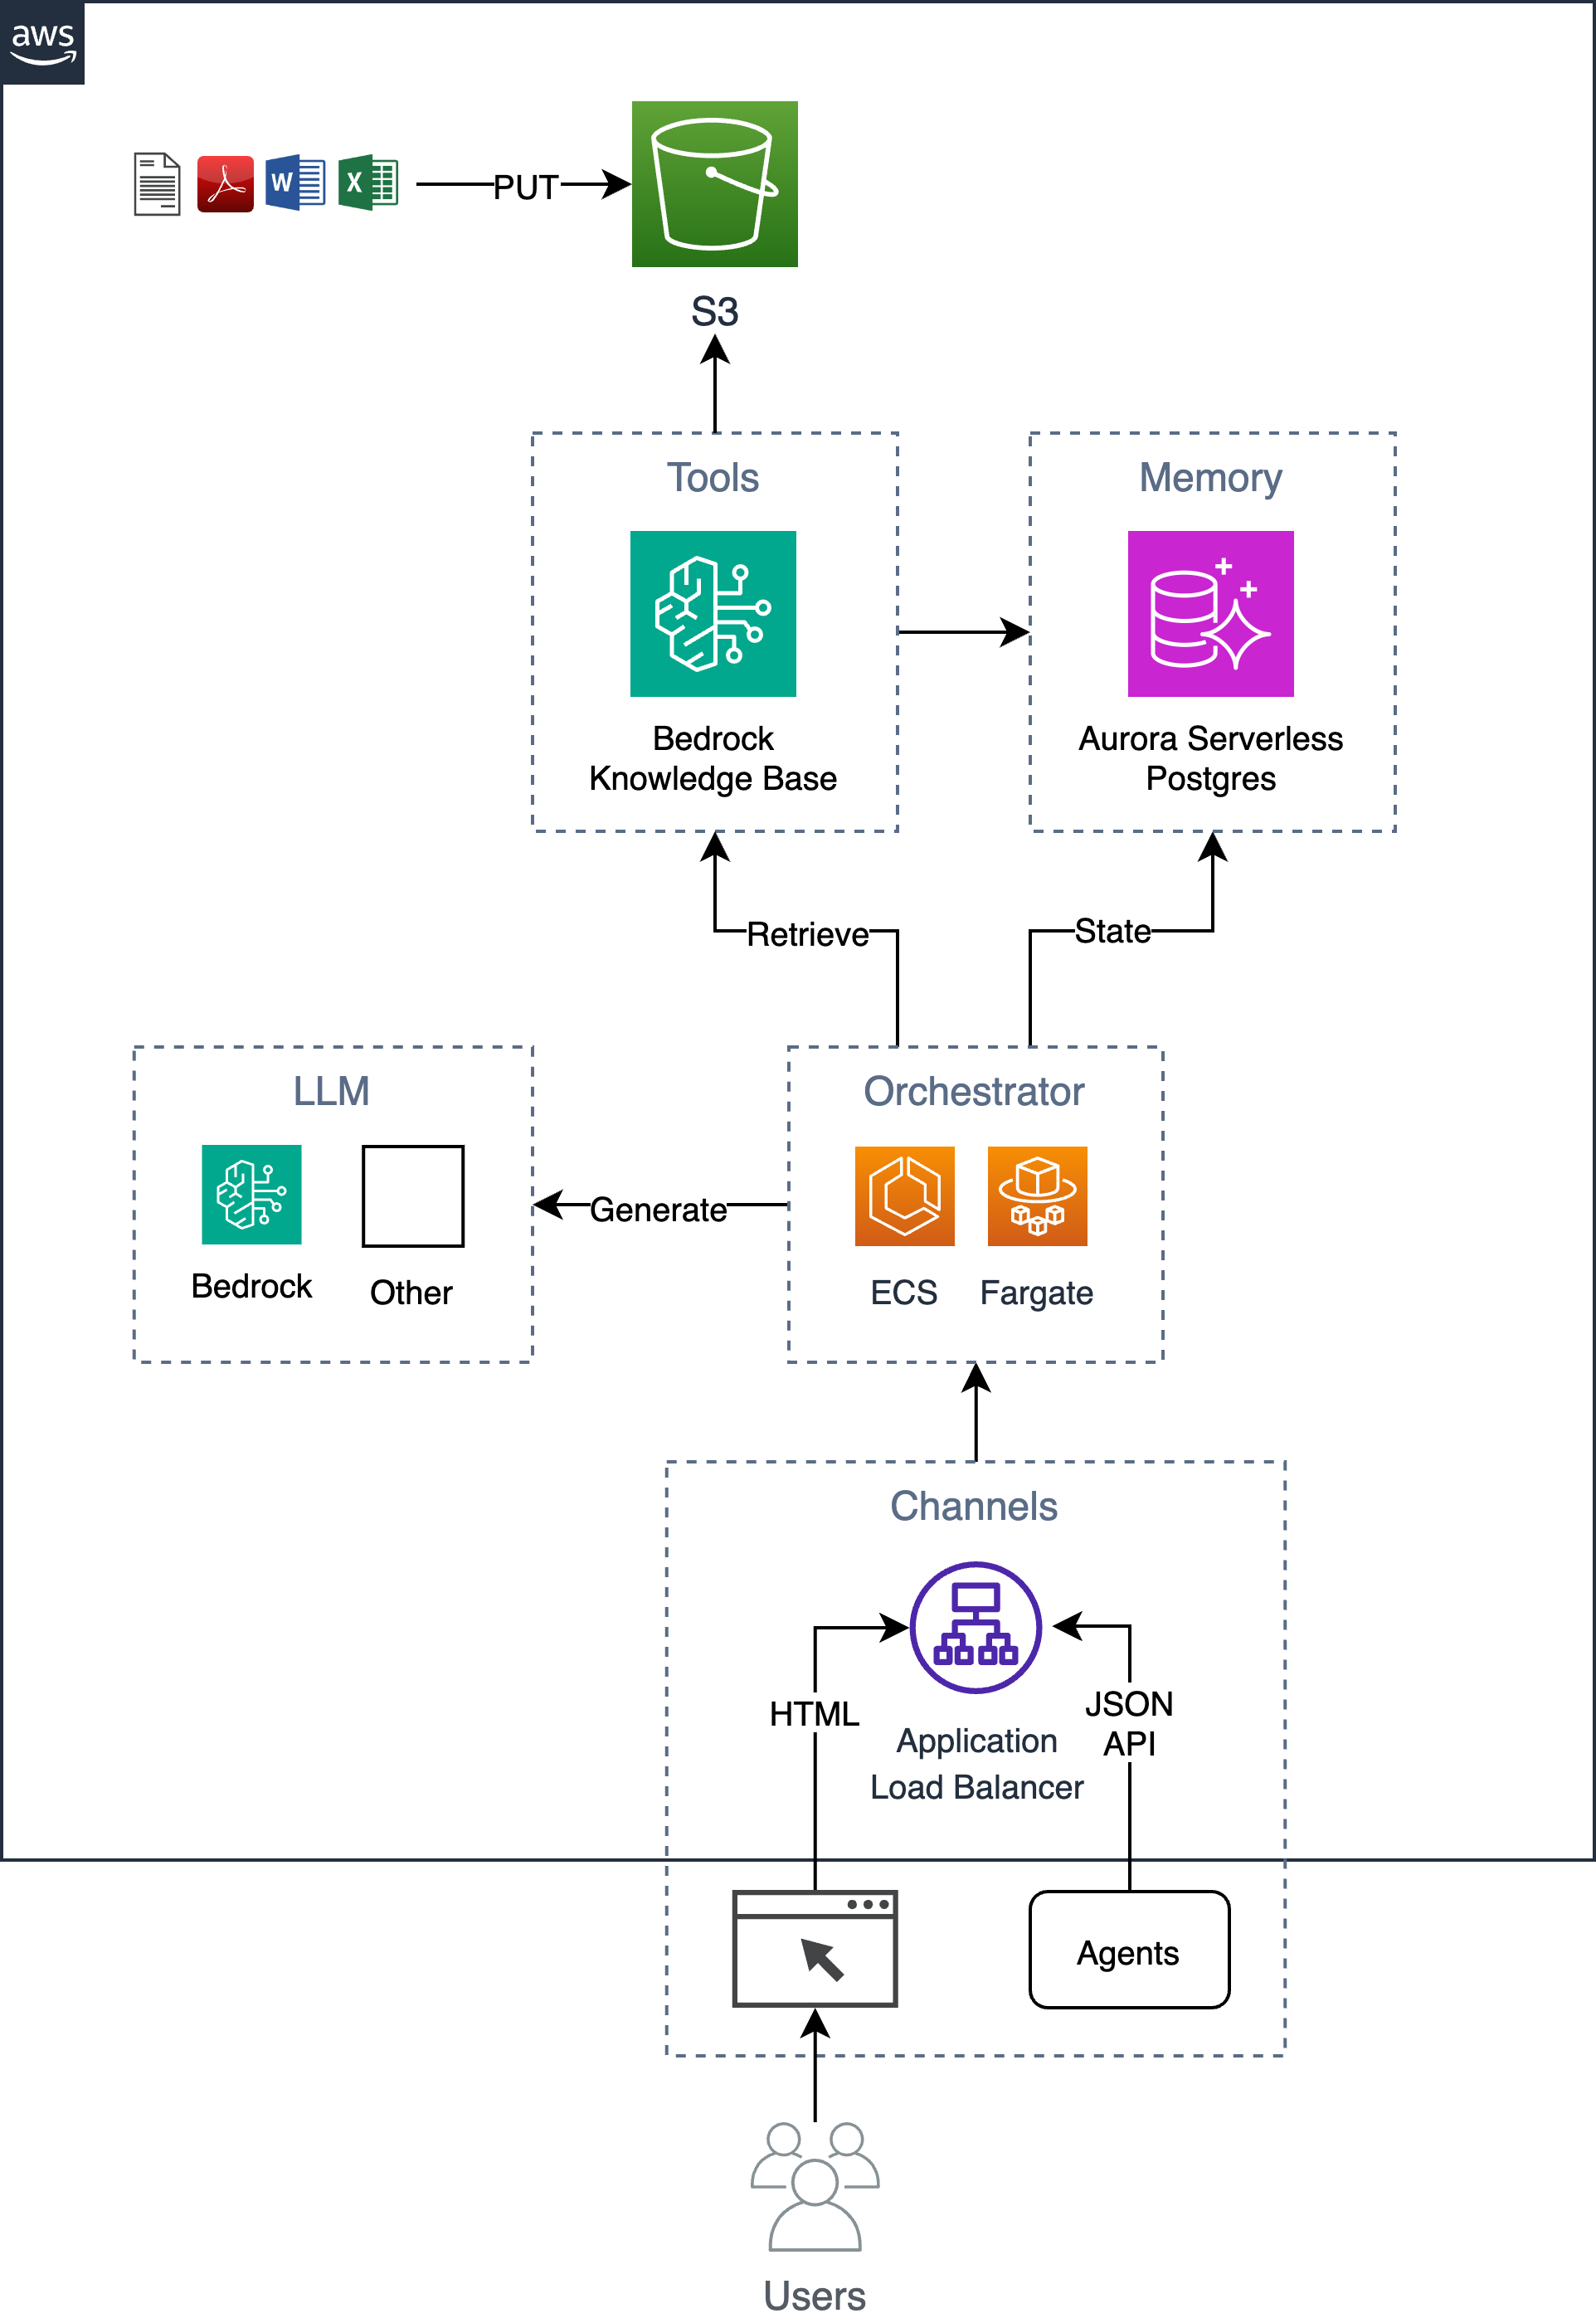
这是一个简单但可扩展、企业级聊天机器人的示例,它实现检索增强生成 (RAG) 模式,而不依赖于任何 Python 框架/库。它使用 Bedrock 知识库提取 S3 存储桶中的文档,并将索引向量存储在 Aurora Serverless 托管的 Postgres 数据库中。该数据库还用作存储用户对话历史等信息的应用程序数据库。该应用程序实现了 Web GUI 和 HTTP JSON API,并作为容器托管在 ECS Fargate 上,并以 ALB 为前端。该应用程序是使用 Flask 和 HTMX 构建的。
请按照以下 6 个步骤流程将此解决方案部署到您的 AWS 账户中。
导出所需的环境变量。
 export AWS_REGION= $( aws configure get region || echo " us-east-1 " )
export ACCOUNT= $( aws sts get-caller-identity --query Account --output text )
export BUCKET=tf-state- ${ACCOUNT}
或者,创建一个 s3 存储桶来存储 terraform 状态(建议这样做,因为初始数据库密码将存储在状态中)。如果您已有 s3 存储桶,则可以使用存储桶的名称更新BUCKET变量(例如, export BUCKET=my-s3-bucket )。
aws s3 mb s3:// ${BUCKET}设置模板输入参数,例如terraform.tfvars中的应用程序name 。
 cd iac
cat << EOF > terraform.tfvars
name = "ai-chatbot"
tags = {
  app = "ai-chatbot"
}
EOF
使用 terraform 进行部署。
terraform init -backend-config= " bucket= ${BUCKET} " -backend-config= " key=ai-chatbot.tfstate "
terraform apply现在基础设施已经部署完毕,您可以构建应用程序容器并将其部署在基础设施之上。
如果您将应用程序名称从ai-chatbot更改为其他名称,则需要使用app参数将其传递给 make 命令(或在Makefile顶部更改它)。
在部署之前,您应该考虑更改系统和用户提示以满足您的特定要求。
第一次部署时,您可以运行以下命令来一起构建基础映像和应用程序映像。
 cd ../
make baseimage && make deploy
初始部署后,您只需重建代码层并重新部署即可更快地迭代代码更改。
make deploy
# OR
# make deploy app=my-cool-chatbot cd iac
export DOCS_BUCKET= $( terraform output -raw s3_bucket_name )
aws s3 cp /path/to/docs/ s3:// ${DOCS_BUCKET} / --recursive cd iac
make sync请注意,此脚本调用bedrock-agent start-ingestion-job API。这项工作需要成功完成,聊天机器人才能回答有关您的文档的问题。
open $( terraform output -raw endpoint ) 除了简单的 HTMX GUI 之外,还有一个支持以下操作的 HTTP JSON API。
export endpoint= $( terraform output -raw endpoint )提出问题并得到答案。
curl -s -X POST -H " Content-Type: application/json " $endpoint /api/ask
-d ' { "question": "Who are you?" } ' | jq{
"answer" : " ... " ,
"conversationId" : " 46ac5045-49b4-487c-b3a0-64d82462ad76 "
}要在对话中提出后续问题,请在 URL 中包含对话 ID。
curl -s -X POST -H " Content-Type: application/json " $endpoint /api/ask/46ac5045-49b4-487c-b3a0-64d82462ad76 -d ' { "question": What are you capable of?" } ' | jq{
"answer" : " ... " ,
"conversationId" : " 46ac5045-49b4-487c-b3a0-64d82462ad76 "
}返回最近10条对话
curl -s $endpoint /api/conversations | jq[
{
  "conversationId" : " d61e143c-a32d-4b4f-aa4e-a0fe94082e77 " ,
  "created" : " 2024-04-10T22:04:36.813819+00:00 " ,
  "questions" : [
    {
      "a" : " ... " ,
      "created" : " 2024-04-10 22:04:40.657402+00:00 " ,
      "q" : " ... "
    }
  ],
  "userId" : " 1 "
},
{
"conversationId" : " aaddc6aa-7c51-4b0a-800d-53e72b05524f " ,
"created" : " 2024-04-10T22:01:16.071982+00:00 " ,
"questions" : [
{
"a" : " ... " ,
"created" : " 2024-04-10 22:01:18.500971+00:00 " ,
"q" : " ... "
},
{
"a" : " ... " ,
"created" : " 2024-04-10 22:01:27.328482+00:00 " ,
"q" : " ... "
}
],
"userId" : " 1 "
}
]返回指定会话的信息
curl -s $endpoint /api/conversations/d61e143c-a32d-4b4f-aa4e-a0fe94082e77 | jq{
"conversationId" : " d61e143c-a32d-4b4f-aa4e-a0fe94082e77 " ,
"created" : " 2024-04-10T22:04:36.813819+00:00 " ,
"questions" : [
{
"a" : " ... " ,
"created" : " 2024-04-10 22:04:40.657402+00:00 " ,
"q" : " ... "
}
],
"userId" : " 1 "
}返回用户最近 10 条对话
curl -s $endpoint /api/conversations/users/1 | jq[
{
"conversationId" : " d61e143c-a32d-4b4f-aa4e-a0fe94082e77 " ,
"created" : " 2024-04-10T22:04:36.813819+00:00 " ,
"questions" : [
{
"a" : " ... " ,
"created" : " 2024-04-10 22:04:40.657402+00:00 " ,
"q" : " ... "
}
],
"userId" : " 1 "
},
{
"conversationId" : " aaddc6aa-7c51-4b0a-800d-53e72b05524f " ,
"created" : " 2024-04-10T22:01:16.071982+00:00 " ,
"questions" : [
{
"a" : " ... " ,
"created" : " 2024-04-10 22:01:18.500971+00:00 " ,
"q" : " ... "
},
{
"a" : " ... " ,
"created" : " 2024-04-10 22:01:27.328482+00:00 " ,
"q" : " ... "
}
],
"userId" : " 1 "
}
] Choose a make command to run
init run this once to initialize a new python project
install install project dependencies
start run local project
baseimage build base image
deploy build and deploy container
up run the app locally using docker compose
down stop the app
start-docker run local project using docker compose
为了在本地运行应用程序,请使用以下变量创建一个名为.env的本地文件。变量KNOWLEDGE_BASE_ID来自 Terraform 输出( cd iac && terraform output )。
POSTGRES_DB=postgres
POSTGRES_USER=postgres
POSTGRES_PASSWORD=xyz
KNOWLEDGE_BASE_ID=设置.env文件后,您可以在 docker 中本地运行应用程序,以迭代代码更改,然后再部署到 AWS。在本地运行该应用程序时,它会与本地 postgres 数据库通信并使用远程 Amazon Bedrock 知识库 API。确保您拥有有效的 AWS 凭证。运行make up命令将启动一个 postgres 数据库实例和一个 Web 容器。
make up要停止环境,只需运行:
make down

