rtkbase
Release 2.6.2
|  |
|  |
|  |
|
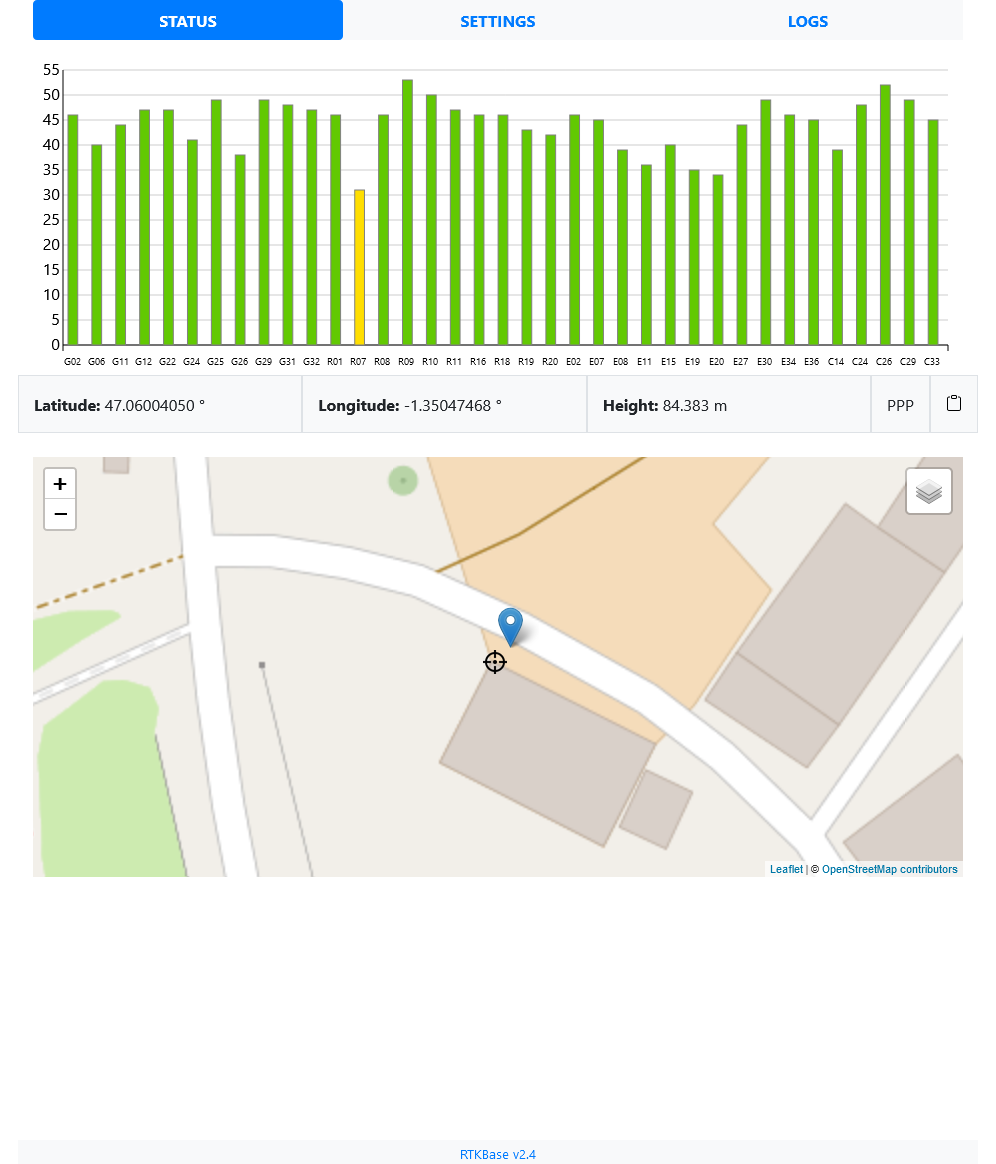
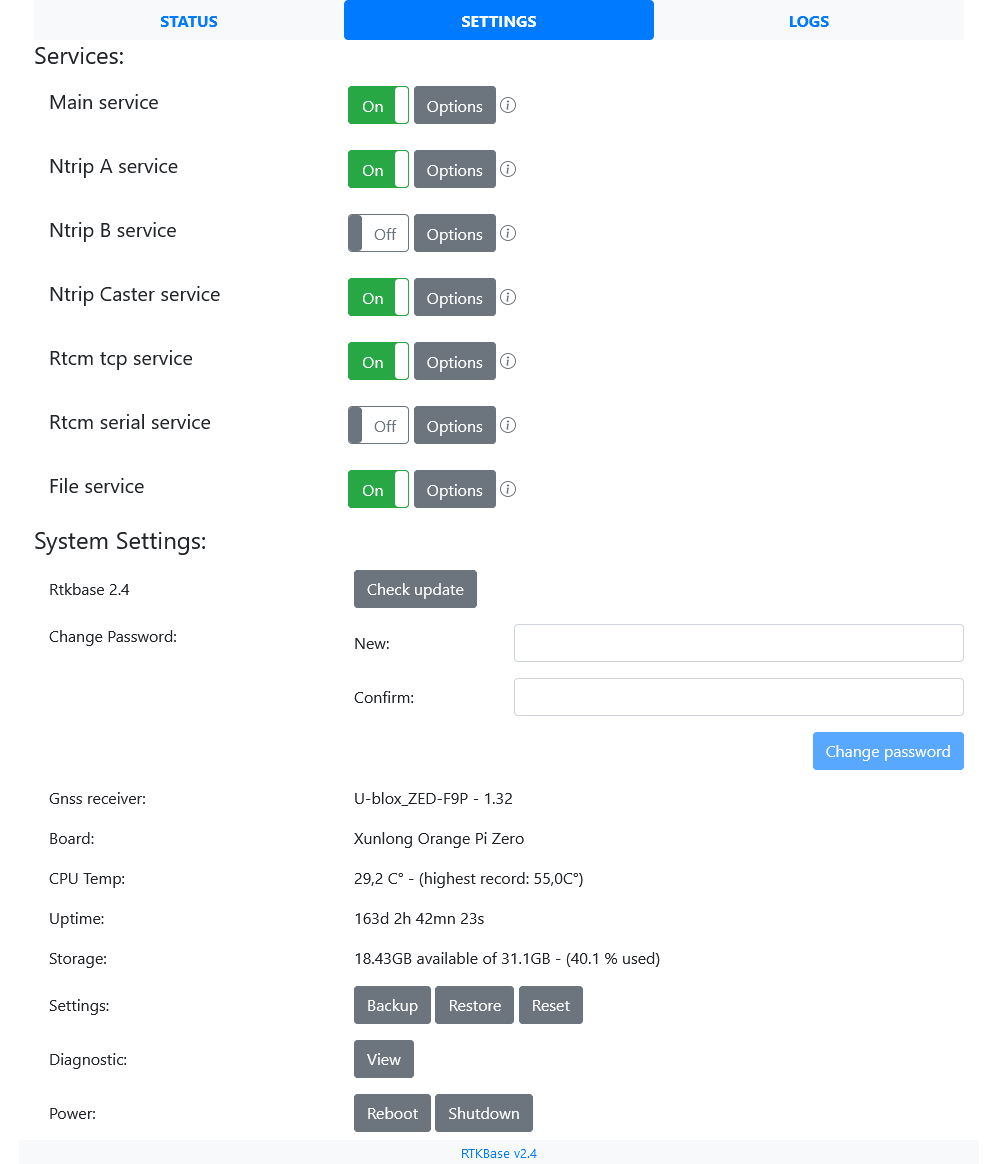
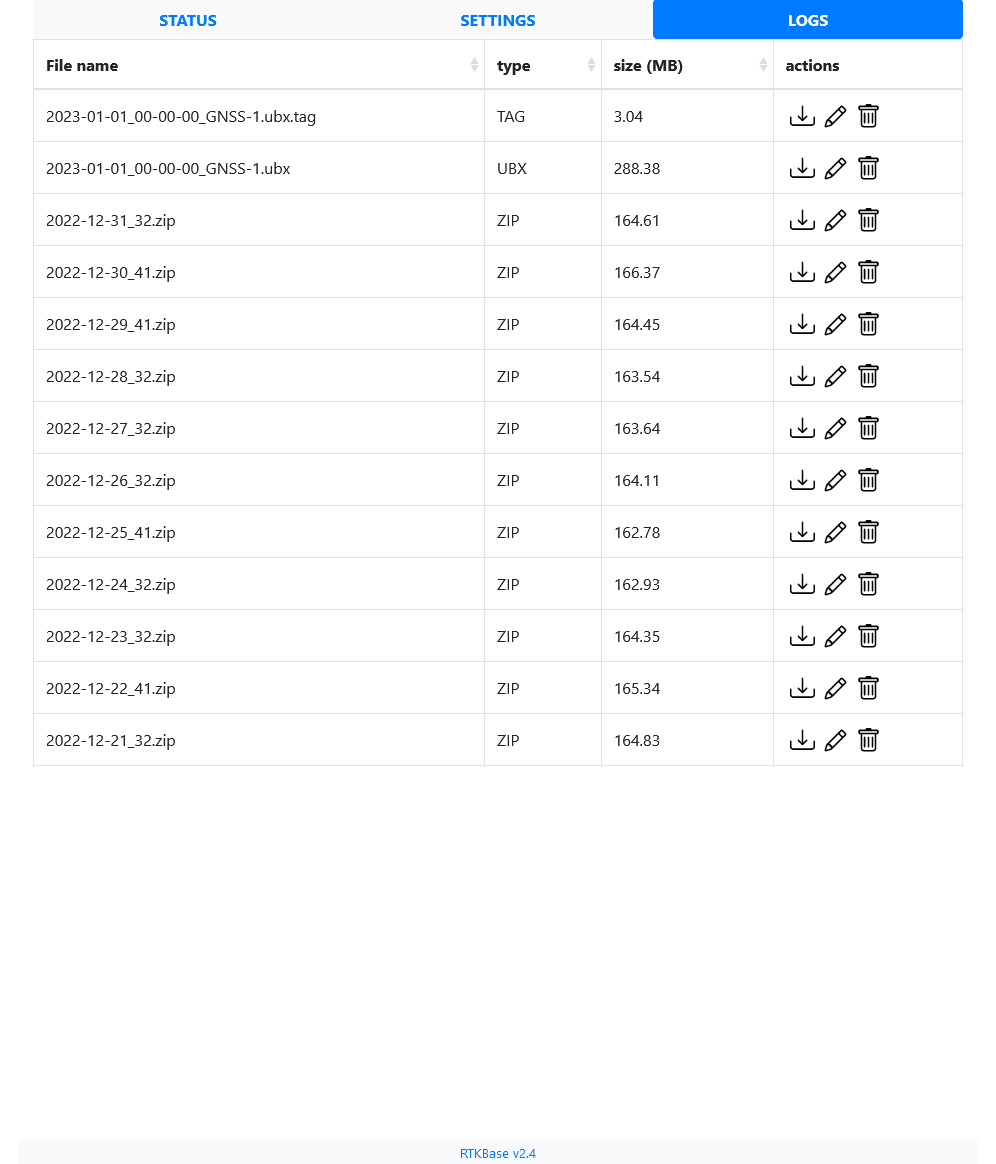
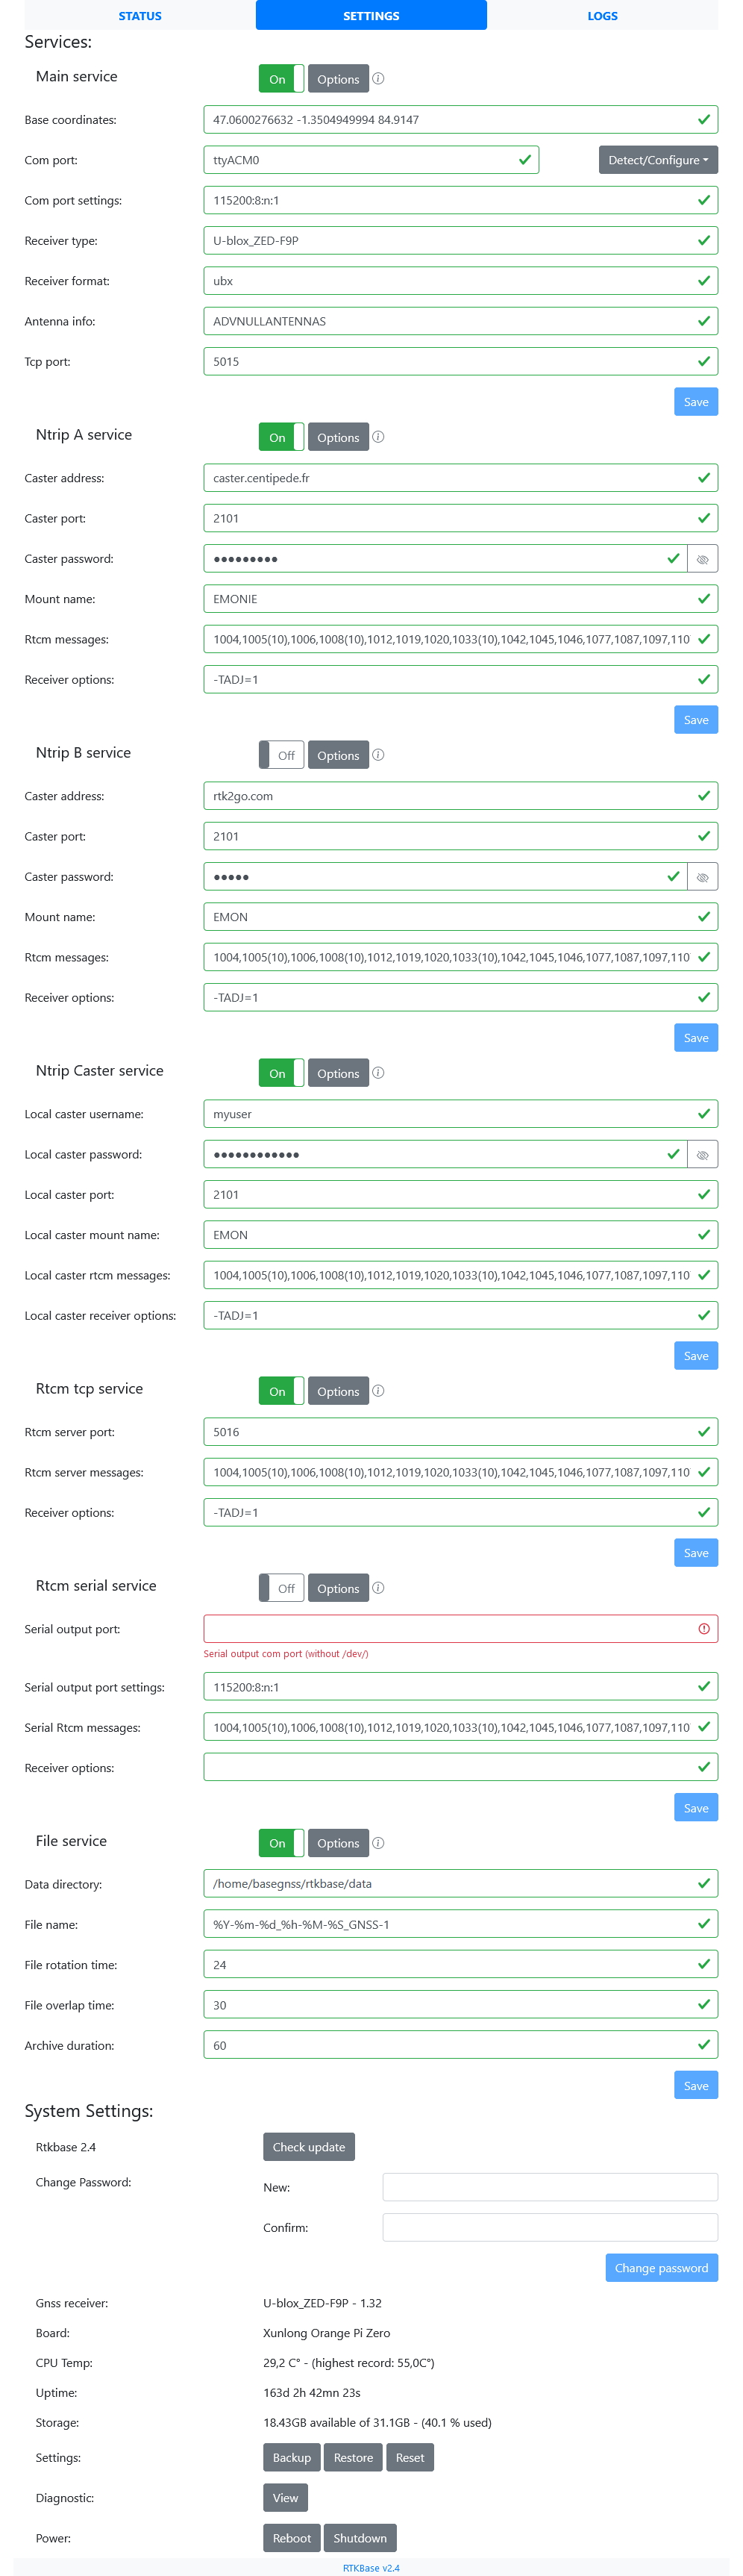
前端的主要特点是:
其他图像位于 ./images 文件夹中。
适用于 Orange Pi Zero、Orange Pi Zero 2、Orange Pi Zero 3 SBC 的准备闪存映像:Armbian_RTKBase
如果您使用 Raspberry Pi,感谢 jancelin,您可以在此处下载准备刷新的 iso 文件。
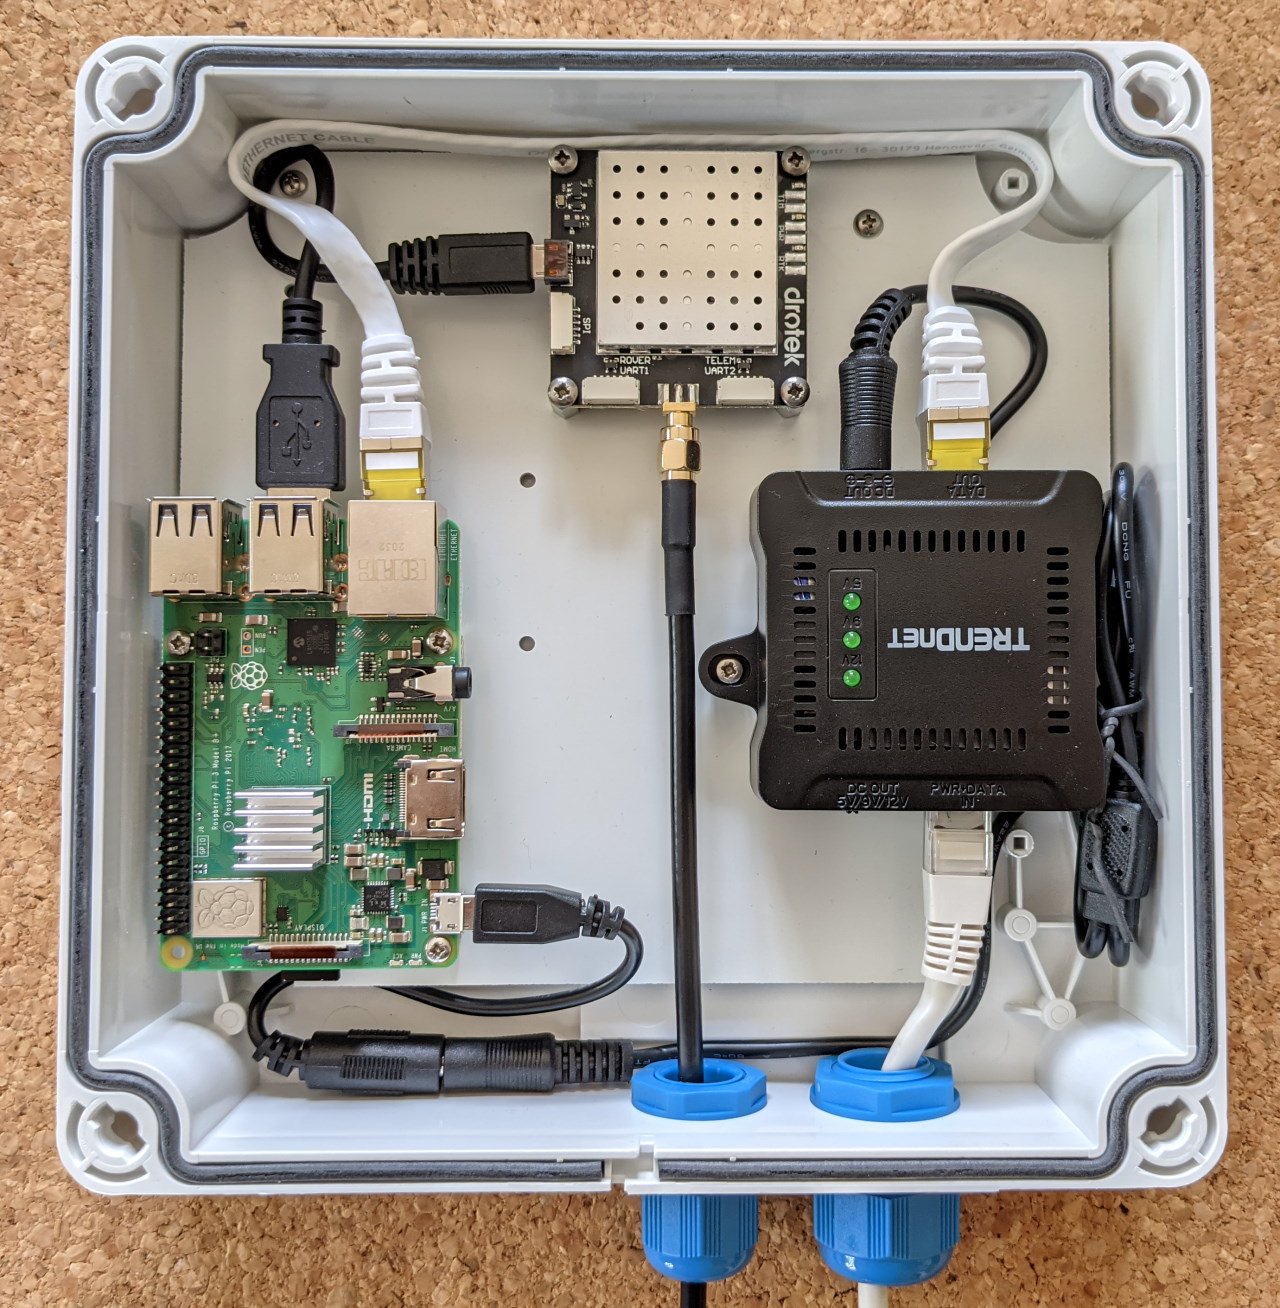
将您的 gnss 接收器连接到树莓派/orange pi/....
打开终端并:
 cd ~
wget https://raw.githubusercontent.com/Stefal/rtkbase/master/tools/install.sh -O install.sh
chmod +x install.sh
sudo ./install.sh --all release
去喝杯咖啡吧,需要一段时间。该脚本将安装所需的软件,如果您使用 USB 连接的 U-Blox ZED-F9P 接收器,它将被检测到并设置为作为基站工作。如果您不使用 F9P,则必须手动配置接收器(请参阅手动安装中的步骤 7),并从设置页面选择正确的端口。
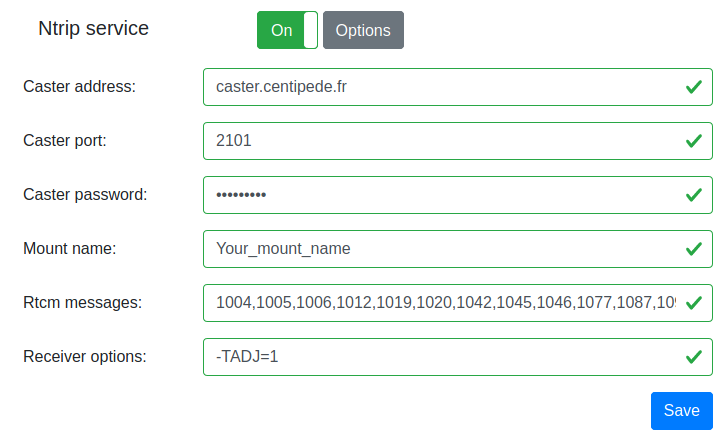
打开 Web 浏览器访问http://ip_of_your_sbc (脚本将尝试向您显示此 IP 地址)。默认密码是admin 。设置页面允许您输入自己的基本坐标、ntrip 凭据等设置...
如果您还不知道基本精确坐标,那么是时候阅读以下教程之一:
可以在不使用--all选项的情况下使用install.sh脚本,将安装过程分为几个不同的步骤:
    ################################
    RTKBASE INSTALLATION HELP
    ################################
    Bash scripts to install a simple gnss base station with a web frontend.


    * Before install, connect your gnss receiver to raspberry pi/orange pi/.... with usb or uart.
    * Running install script with sudo

    Easy installation: sudo ./install.sh --all release

    Options:
            -a | --all <rtkbase source>
                             Install all you need to run RTKBase : dependencies, RTKlib, last release of Rtkbase, services,
                             crontab jobs, detect your GNSS receiver and configure it.
                             <rtkbase source> could be:
                                 release  (get the latest available release)
                                 repo     (you need to add the --rtkbase-repo argument with a branch name)
                                 url      (you need to add the --rtkbase-custom-source argument with an url)
                                 bundled  (available if the rtkbase archive is bundled with the install script)

            -u | --user
                             Use this username as User= inside service unit and for path to rtkbase:
                             --user=john will install rtkbase in /home/john/rtkbase

            -d | --dependencies
                             Install all dependencies like git build-essential python3-pip ...

            -r | --rtklib
                             Get RTKlib 2.4.3b34g from github and compile it.
                             https://github.com/rtklibexplorer/RTKLIB/tree/b34g

            -b | --rtkbase-release
                             Get last release of RTKBase:
                             https://github.com/Stefal/rtkbase/releases

            -i | --rtkbase-repo <branch>
                             Clone RTKBASE from github with the <branch> parameter used to select the branch.

            -j | --rtkbase-bundled
                             Extract the rtkbase files bundled with this script, if available.

            -f | --rtkbase-custom <source>
                             Get RTKBASE from an url.

            -t | --unit-files
                             Deploy services.

            -g | --gpsd-chrony
                             Install gpsd and chrony to set date and time
                             from the gnss receiver.

            -e | --detect-gnss
                             Detect your GNSS receiver. It works only with receiver like ZED-F9P.

            -n | --no-write-port
                             Doesn'''t write the detected port inside settings.conf.
                             Only relevant with --detect-gnss argument.

            -c | --configure-gnss
                             Configure your GNSS receiver.

            -s | --start-services
                             Start services (rtkbase_web, str2str_tcp, gpsd, chrony)

            -h | --help
                              Display this help message.
因此,如果您确实想要它,让我们进行手动安装并进行一些说明:
使用sudo ./install.sh --dependencies安装依赖项,或者手动安装:
 sudo apt update
sudo apt install -y git build-essential pps-tools python3-pip python3-dev python3-setuptools python3-wheel libsystemd-dev bc dos2unix socat zip unzip pkg-config psmisc使用sudo ./install.sh --rtklib安装 RTKLIB ,或者:
获取RTK库
 cd ~
wget -qO - https://github.com/rtklibexplorer/RTKLIB/archive/refs/tags/b34j.tar.gz | tar -xvz
编译并安装str2str:
或者,您可以编辑 RTKLIB/app/str2str/gcc 中 makefile 中的 CTARGET 行
 cd RTKLIB/app/str2str/gcc
nano makefile
对于 Orange Pi Zero SBC,我使用:
CTARGET = -mcpu=cortex-a7 -mfpu=neon-vfpv4 -funsafe-math-optimizations
然后就可以编译并安装str2str了:
make
sudo make install编译/安装rtkrcv和convbin方式与str2str相同。
获取最新的 rtkbase 版本sudo ./install.sh --rtkbase-release ,或者:
wget https://github.com/stefal/rtkbase/releases/latest/download/rtkbase.tar.gz -O rtkbase.tar.gz
tar -xvf rtkbase.tar.gz
如果您愿意,可以克隆此存储库以获取最新代码。
安装 rtkbase 要求:
python3 -m pip install --upgrade pip setuptools wheel  --extra-index-url https://www.piwheels.org/simple
python3 -m pip install -r rtkbase/web_app/requirements.txt  --extra-index-url https://www.piwheels.org/simple
使用sudo ./install.sh --unit-files安装 systemd 服务,或者使用以下命令手动安装:
rtkbase/unit/ )以将{user}替换为您的用户名。archive_and_clean.sh会为你做这件事。默认设置会压缩前一天的数据并删除所有超过 90 天的存档。要自动执行这 2 个任务,请启用rtkbase_archive.timer 。默认值是每天凌晨 04:00 运行脚本。/etc/systemd/system/然后启用 Web 服务器、str2str_tcp 和 rtkbase_archive.timer: sudo systemctl daemon-reload
sudo systemctl enable rtkbase_web
sudo systemctl enable str2str_tcp
sudo systemctl enable rtkbase_archive.timer使用sudo ./install.sh --gpsd-chrony安装并配置 chrony 和 gpsd ,或者:
使用sudo apt install chrony安装 chrony,然后在 chrony conf 文件 (/etc/chrony/chrony.conf) 中添加此参数:
refclock SHM 0 refid GPS precision 1e-1 offset 0.2 delay 0.2
编辑时间单位文件。您应该设置After=gpsd.service
安装 gpsd 版本 >= 3.2,否则它将无法与 F9P 配合使用。其conf文件应包含:
   # Devices gpsd should connect to at boot time.
   # They need to be read/writeable, either by user gpsd or the group dialout.
   DEVICES="tcp://localhost:5015"

   # Other options you want to pass to gpsd
   GPSD_OPTIONS="-n -b"
编辑 gpsd 单元文件。您应该在“[Unit]”部分中有类似这样的内容:
   [Unit]
   Description=GPS (Global Positioning System) Daemon
   Requires=gpsd.socket
   BindsTo=str2str_tcp.service
   After=str2str_tcp.service
   sudo systemctl daemon-reload
   sudo systemctl enable chrony
   sudo systemctl enable gpsd
使用 USB 或 uart 将您的 gnss 接收器连接到 raspberry pi/orange pi/...,并检查它使用哪个 com 端口(ttyS1、ttyAMA0、其他...)。如果它是 U-Blox F9P 接收器(usb 或 uart)或 Septentrio Mosaic-X5 (usb),您可以使用sudo ./install.sh --detect-gnss 。写下结果,稍后您可能需要它。
如果您尚未配置 gnss 接收器,则必须将其设置为输出原始数据:
如果是 U-Blox ZED-F9P(USB 或 uart)或 Septentrio Mosaic-X5(USB),您可以使用
sudo ./install.sh --detect-gnss --configure-gnss如果您需要使用另一台计算机(例如 U-center)的配置工具,您可以使用socat :
sudo socat tcp-listen:128,reuseaddr /dev/ttyS1,b115200,raw,echo=0如果需要,更改 ttyS1 和 115200 值。然后您就可以在U-center中使用基站IP地址和端口n°128的网络连接。
现在您可以使用sudo ./install.sh --start-services启动服务,或者:
sudo systemctl start rtkbase_web
sudo systemctl start str2str_tcp
sudo systemctl start gpsd
sudo systemctl start chrony
sudo systemctl start rtkbase_archive.timer
一切都应该准备就绪,现在您可以打开网络浏览器访问您的基站 IP 地址。
RTKBase 使用多个以run_cast.sh启动的 RTKLIB str2str实例作为 systemd 服务。 run_cast.sh从settings.conf获取其设置
str2str_tcp.service是主实例。它连接到 gnss 接收器并在 TCP 上为所有其他服务广播原始数据。str2str_ntrip_A.service从主实例获取数据,将数据转换为 rtcm 并将其流式传输到 Ntrip 播送器。str2str_ntrip_B.service从主实例获取数据,将数据转换为 rtcm 并将它们流式传输到另一个 Ntrip 播送器。str2str_local_ntrip_caster.service从主实例获取数据,将数据转换为rtcm,并充当本地Ntripcaster。str2str_rtcm_svr.service从主实例获取数据,将数据转换为 rtcm 并将其流式传输到客户端str2str_rtcm_serial.service从主实例获取数据,将数据转换为 rtcm 并将它们流式传输到串行端口(无线电链路或其他外设)str2str_file.service从主实例获取数据,并将数据记录到文件中。 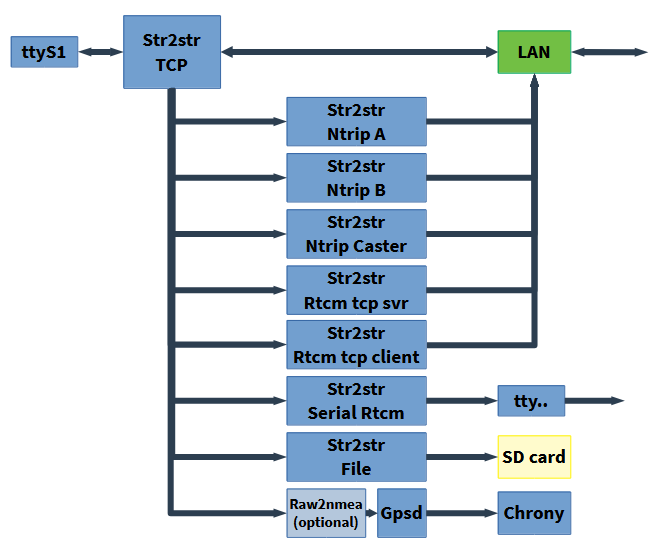
当rtkbase_web服务运行时,Web GUI 可用。
没有 U-Blox 接收器的离线基站,如何获取日期和时间:如果 gpsd 无法理解来自 gnss 接收器的原始数据,您可以启用 raw2nmea 服务。它将原始数据转换为在settings.conf (nmea_port) 中设置的tcp 端口,并且gpsd 将使用它来提供chrony。 systemctl enable --now rtkbase_raw2nmea
航拍图像:默认地图背景是 OpenStreetMap,但如果您有 Maptiler 键,则可以切换到全球航拍图层。要启用此层,请在 Maptiler 上创建一个免费帐户,创建一个密钥并将其添加到[general]部分内的settings.conf中: maptiler_key=your_key
接收器选项:str2str 接受一些与接收器相关的选项。如果您使用 U-Blox,建议使用-TADJ=1参数作为 Rtcm 和 Ntrip 输出中非舍入秒值的解决方法。您可以在设置表单中输入此参数。更多信息请点击这里和这里。
如果你想从 dev 分支安装 RTKBase,你可以使用以下命令来完成:
 cd ~
wget https://raw.githubusercontent.com/Stefal/rtkbase/dev/tools/install.sh -O install.sh
chmod +x install.sh
sudo ./install.sh --all repo --rtkbase-repo dev具有时间脉冲输出的 gnss 接收器是非常精确的 stratum 0 时钟,因此,您的 gnss 基站可以充当本地网络和/或 ntp 池的 stratum 1 ntp 对等点。有几个步骤可以做到这一点:
将时间脉冲输出 + GND 连接到 SBC 上的一些 GPIO 输入。
在操作系统中将此输入配置为 PPS。
树莓派示例:
dtoverlay=pps-gpio,gpiopin=18 。 “18”是用于时间脉冲的输入。pps-gpio (如果尚不存在)。Orange Pi Zero 示例,位于 /boot/armbianEnv.txt 内:
pps-gpio添加到overlays线。param_pps_pin=PA19 <- 将 'PA19' 更改为您的输入。设置 gpsd 和 chrony 以使用 PPS
gpsd:注释/etc/defaut/gpsd中的DEVICE行并取消注释#DEVICES="tcp:\127.0.0.1:5015 devpps0 。如果使用 rtkbase_raw2nmea 服务,请编辑端口。
chrony:在/etc/chrony/chrony.conf中取消注释 refclock pps 行并将 noselect 添加到“refclock SHM 0”。你应该有这样的东西:
   refclock SHM 0 refid GPS precision 1e-1 offset 0 delay 0.2 noselect
   refclock PPS /dev/pps0 refid PPS lock GPS
chronyc sources -v的结果你应该读到类似这样的内容,注意“PPS”之前的“*”: basegnss@orangepizero:~$ chronyc sources -v
210 Number of sources = 6
.-- Source mode '^' = server, '=' = peer, '#' = local clock.
/ .- Source state '*' = current synced, '+' = combined , '-' = not combined,
| / '?' = unreachable, 'x' = time may be in error, '~' = time too variable.
|| .- xxxx [ yyyy ] +/- zzzz
|| Reachability register (octal) -. | xxxx = adjusted offset,
|| Log2(Polling interval) --. | | yyyy = measured offset,
|| | | zzzz = estimated error.
|| | |
MS Name/IP address Stratum Poll Reach LastRx Last sample
===============================================================================
#? GPS 0 4 377 17 +64ms[ +64ms] +/- 200ms
#* PPS 0 4 377 14 +363ns[ +506ns] +/- 1790ns
^- ntp0.dillydally.fr 2 6 177 16 -12ms[ -12ms] +/- 50ms
^? 2a01:e35:2fba:7c00::21 0 6 0 - +0ns[ +0ns] +/- 0ns
^- 62-210-213-21.rev.poneyt> 2 6 177 17 -6488us[-6487us] +/- 67ms
^- kalimantan.ordimatic.net 3 6 177 16 -27ms[ -27ms] +/- 64ms
Debian 基础发行版 >= 11 (Bullseye) Python >= 3.8
查看变更日志
RTKBase 根据 AGPL 3 获得许可(请参阅许可证文件)。
RTKBase使用了其他软件的一些部分:
RTKBase 使用 OpenStreetMap 切片。感谢所有贡献者!


