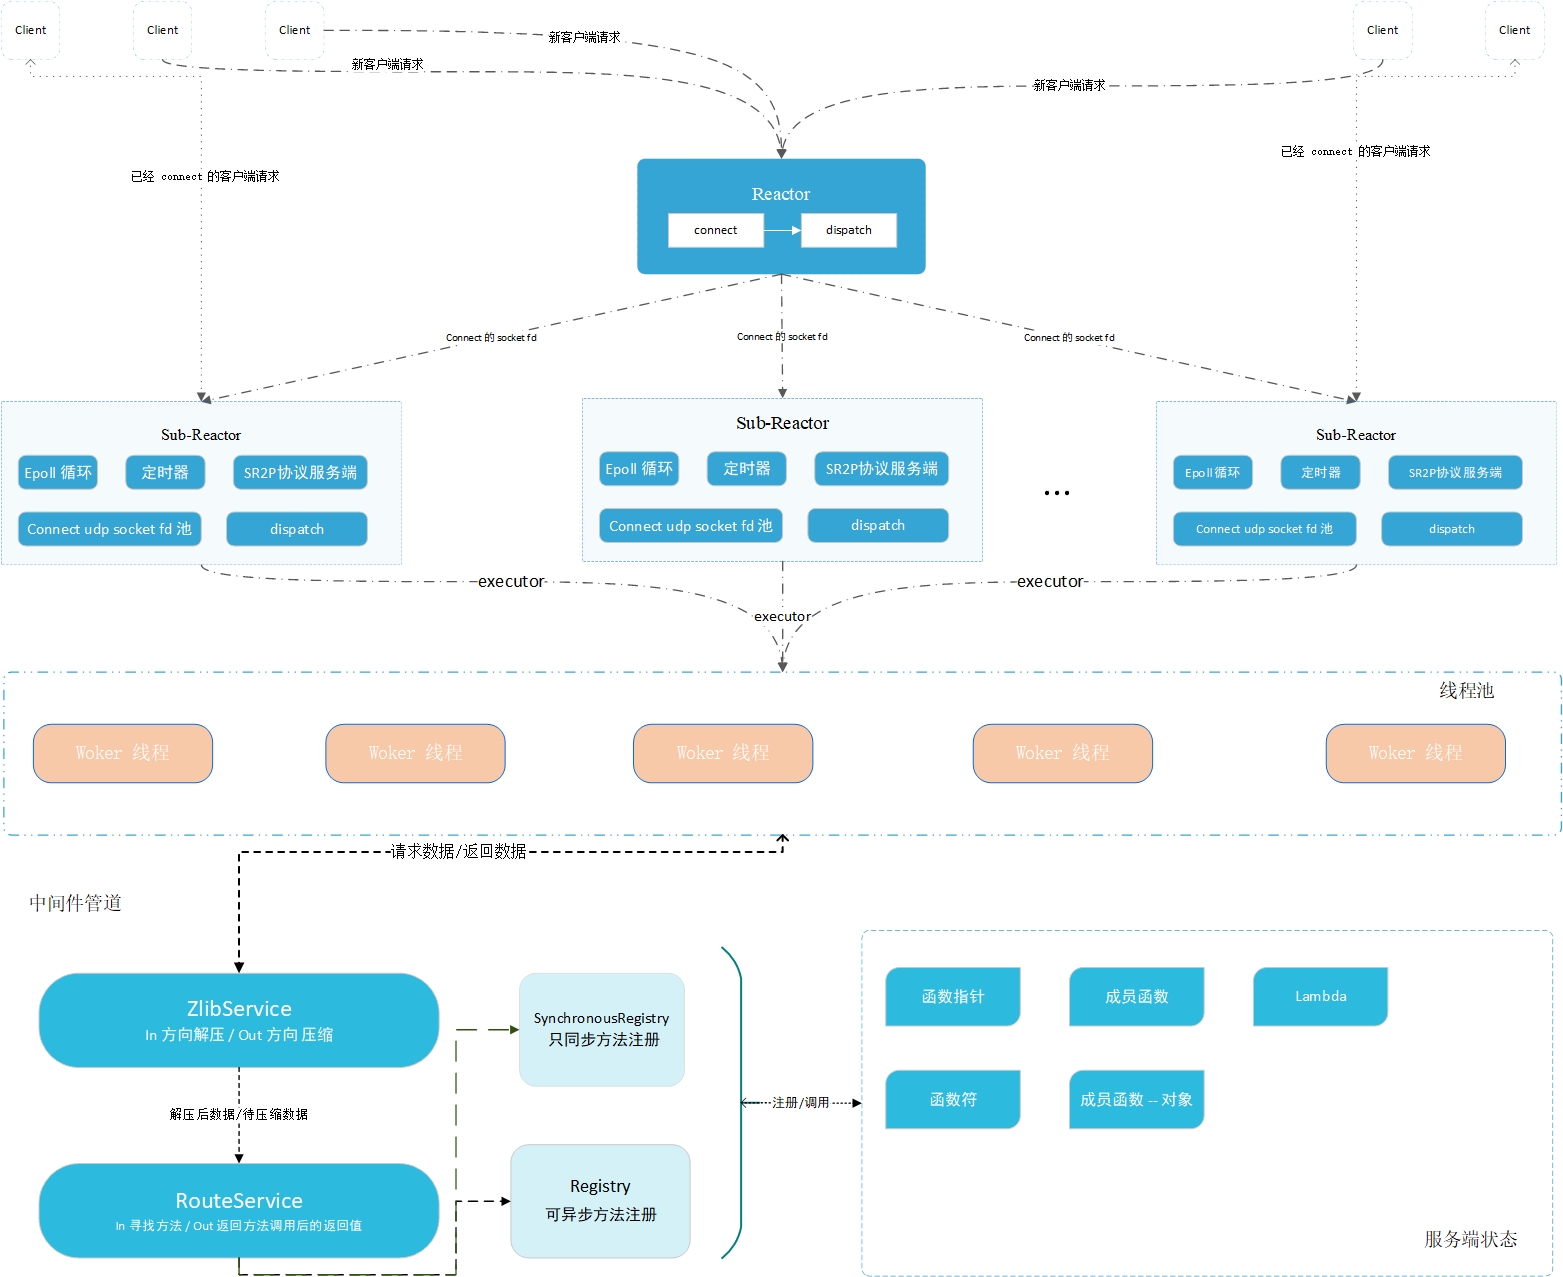
介绍: 基于 Connect UDP 和自定义网络协议(简单请求响应协议) 、Reactor 网络模型(one loop per thread + 线程池) 的轻量RPC框架!
C++ 17 标准内存池千级访问并发无问题!内网穿透 !留言 咨询。目前使用方法:
# 需要提前安装zlib库
# 本人开发环境  GCC 11.3  CMake 3.25 clion ubuntu 22.04
git clone [email protected]:sorise/muse-rpc.git
cd muse-rpc
cmake -S . -B build
cmake --build
cd build
./muse #启动架构图:

基本配置内容如下所示
int main() {
    // 启动配置
    // 4 设置 线程池最小线程数
    // 4 设置 线程池最大线程数
    // 4096 线程池任务缓存队列长度
    // 3000ms; 动态线程空闲时间 3 秒
    // 日志目录
    // 是否将日志打印到控制台
    muse::rpc::Disposition::Server_Configure(4, 4, 4096, 3000ms, "/home/remix/log", true);
        //绑定方法的例子
    Normal normal(10, "remix"); //用户自定义类
    // 同步,意味着这个方法一次只能由一个线程执行,不能多个线程同时执行这个方法
    muse_bind_sync("normal", &Normal::addValue, &normal); //绑定成员函数
    muse_bind_async("test_fun1", test_fun1); // test_fun1、test_fun2 是函数指针
    muse_bind_async("test_fun2", test_fun2);


    // 开一个线程启动反应堆,等待请求
    // 绑定端口 15000, 启动两个从反应堆,每个反应堆最多维持 1500虚链接
    // ReactorRuntimeThread::Asynchronous 指定主反应堆新开一个线程运行,而不是阻塞当前线程
    Reactor reactor(15000, 2, 1500, ReactorRuntimeThread::Asynchronous);

    try {
        //开始运行
        reactor.start();
    }catch (const ReactorException &ex){
        SPDLOG_ERROR("Main-Reactor start failed!");
    }
    /*
     * 当前线程的其他任务
     * */
    //程序结束
    spdlog::default_logger()->flush(); //刷新日志
}
启动后:

使用宏 muse_bind_sync 和 muse_bind_async。前者是调用 SynchronousRegistry 后者是调用 Registry ,原型如下所示。
#include <iostream>
#include "rpc/rpc.hpp"

using namespace muse::rpc;
using namespace muse::pool;
using namespace std::chrono_literals;

//绑定方法的例子
Normal normal(10, "remix");

// 绑定类的成员函数、使用 只同步方法 绑定
muse_bind_sync("normal", &Normal::addValue, &normal);
// 绑定函数指针
muse_bind_async("test_fun1", test_fun1);
// 绑定 lambda 表达式
muse_bind_async("lambda test", [](int val)->int{
    printf("why call me n");
    return 10 + val;
});
在服务端注册方法需要使用到 Registry 和 SynchronousRegistry 对象,
SynchronousRegistry 解释:value 是一个用于记录有多少客户端请求了 addValue方法的字段,如果1000个客户端请求了 addValue,采用Registry 注册,value的值可能不是1000,因为对 value的访问不是线程安全的,如果采用 SynchronousRegistry 注册,则一定是 1000。
class Counter{
public:
    Counter():value(0){}

    void addValue(){
        this->value++;
    }
private:
    long value;
};
注册方法 : 两个宏的定义如下所示
#define muse_bind_async(...)
    Singleton<Registry>()->Bind(__VA_ARGS__);

//同步方法,一次只能一个线程执行此方法
#define muse_bind_sync(...)
Singleton<SynchronousRegistry>()->Bind(__VA_ARGS__);客户端使用 Client 对象,它会返回一个 Outcome<R> 对象 ,isOK方法将指示是否返回成功!如果返回false,其成员protocolReason将指示是否是网络出现异常,response成员将会指示是否是rpc请求,响应错误。
#include "rpc/rpc.hpp"
#include "rpc/client/client.hpp"

using namespace muse::rpc;
using namespace muse::timer;
using namespace std::chrono_literals;

int main{
    ////启动客户端配置
    muse::rpc::Disposition::Client_Configure();
    //MemoryPoolSingleton 返回一个 std::shared_ptr<std::pmr::synchronized_pool_resource>
    //你可以自己定一个内存池

    //传入 服务器地址和服务端端口号、一个C++ 17 标准内存池
    Client remix("127.0.0.1", 15000, MemoryPoolSingleton());

    //调用远程方法
    Outcome<std::vector<double>> result = remix.call<std::vector<double>>("test_fun2",scores);

    std::cout << result.value.size() << std::endl;

    //调用 无参无返回值方法
    Outcome<void> result =remix.call<void>("normal");
    if (result.isOK()){
        std::printf("successn");
    }else{
        std::printf("failedn");
    }

    //调用
    auto ri = remix.call<int>("test_fun1", 590);

    std::cout << ri.value << std::endl; // 600
};
错误处理: 正常情况下你只需要关注 isOk方法是否为真即可,如果你需要知道错误的细节,那么可以采用如下方法,两个枚举对象FailureReason和RpcFailureReason分别指出网络错误和RPC请求错误。
auto resp = remix.call<int>("test_fun1", 590);

if (resp.isOK()){
    //调用成功
    std::cout <<"request successn" << std::endl; // 600
    std::cout << ri.value << std::endl; // 600
}else{
	//调用失败
    if (resp.protocolReason == FailureReason::OK){
      	//错误原因是RPC错误
        std::printf("rpc errorn");
        std::cout << resp.response.getReason() << std::endl;
        //返回 int 值对应 枚举 RpcFailureReason
    }else{
      	//错误原因是网络通信过程中的错误
        std::printf("internet errorn");
        std::cout << (short)resp.protocolReason << std::endl; //错误原因
    }
}

//resp.protocolReason() 返回 枚举FailureReason
enum class FailureReason: short {
    OK, //没有失败
    TheServerResourcesExhausted, //服务器资源耗尽,请勿链接
    NetworkTimeout, //网络连接超时
    TheRunningLogicOfTheServerIncorrect, //服务器运行逻辑错误,返回的报文并非所需
};

//resp.response.getReason() 返回值 是 int
enum class RpcFailureReason:int{
    Success = 0, // 成功
    ParameterError = 1, // 参数错误,
    MethodNotExist = 2, // 指定方法不存在
    ClientInnerException = 3, // 客户端内部异常,请求还没有到服务器
    ServerInnerException = 4, // 服务器内部异常,请求到服务器了,但是处理过程有异常
    MethodExecutionError = 5, // 方法执行错误
    UnexpectedReturnValue = 6, //返回值非预期
};非阻塞请求的意思是你只需设定好请求任务,注册一个回调函数用于处理请求结果即可,发送过程由Transmitter对象来处理,这样就不会因为网络原因和处理过程阻塞当前线程, 非阻塞将会基于回调来处理,可以用于处理大量请求的情况,这里我们需要一个 Transmitter 对象、发送任务通过TransmitterEvent来设置!
注意: 单个Transmitter同时发送的任务数量应该在100以下,如果发送的请求任务超过100,需要增加超时时间,可以调用如下接口设置操作时间
void test_v(){
    //启动客户端配置
    muse::rpc::Disposition::Client_Configure();

    Transmitter transmitter(14500);

    //transmitter.set_request_timeout(1500); //设置请求阶段的等待超时时间
    //transmitter.set_response_timeout(2000); //设置响应阶段的等待超时时间

    //测试参数
    std::vector<double> score = {
            100.526,95.84,75.86,99.515,6315.484,944.5,98.2,99898.26,
            9645.54,484.1456,8974.4654,4894.156,89,12,0.56,95.56,41
    };

    std::string name {
        "asdasd54986198456h487s1as8d7as5d1w877y98j34512g98ad"
        "sf3488as31c98aasdasd54986198sdasdasd456h487s1as8d7a"
        "s5d1w877y98j34512g98ad"
    };

    for (int i = 0; i < 1000; ++i) {
        TransmitterEvent event("127.0.0.1", 15000); //指定远程IP 、Port
        event.call<int>("read_str", name,score);    //指定方法
        event.set_callBack([](Outcome<int> t){      //设置回调
            if (t.isOK()){
                printf("OK lambda %d n", t.value);
            }else{
                printf("fail lambdan");
            }
        });
        transmitter.send(std::move(event));
    }
    //异步启动发射器,将会新开一个线程持续发送
    transmitter.start(TransmitterThreadType::Asynchronous);

    //停止发射器,这是个阻塞方法,如果发送器还有任务没有处理完,将会等待
    transmitter.stop();
    //如果想直接停止可以使用 transmitter.stop_immediately()方法
}支持配置核心线程数、最大线程数、和任务缓存队列长度、动态线程空闲时间!
ThreadPoolSetting::MinThreadCount = 4;  //设置 核心线程数
ThreadPoolSetting::MaxThreadCount = 4;  //设置 核心线程数
ThreadPoolSetting::TaskQueueLength = 4096;    //设置 任务缓存队列长度
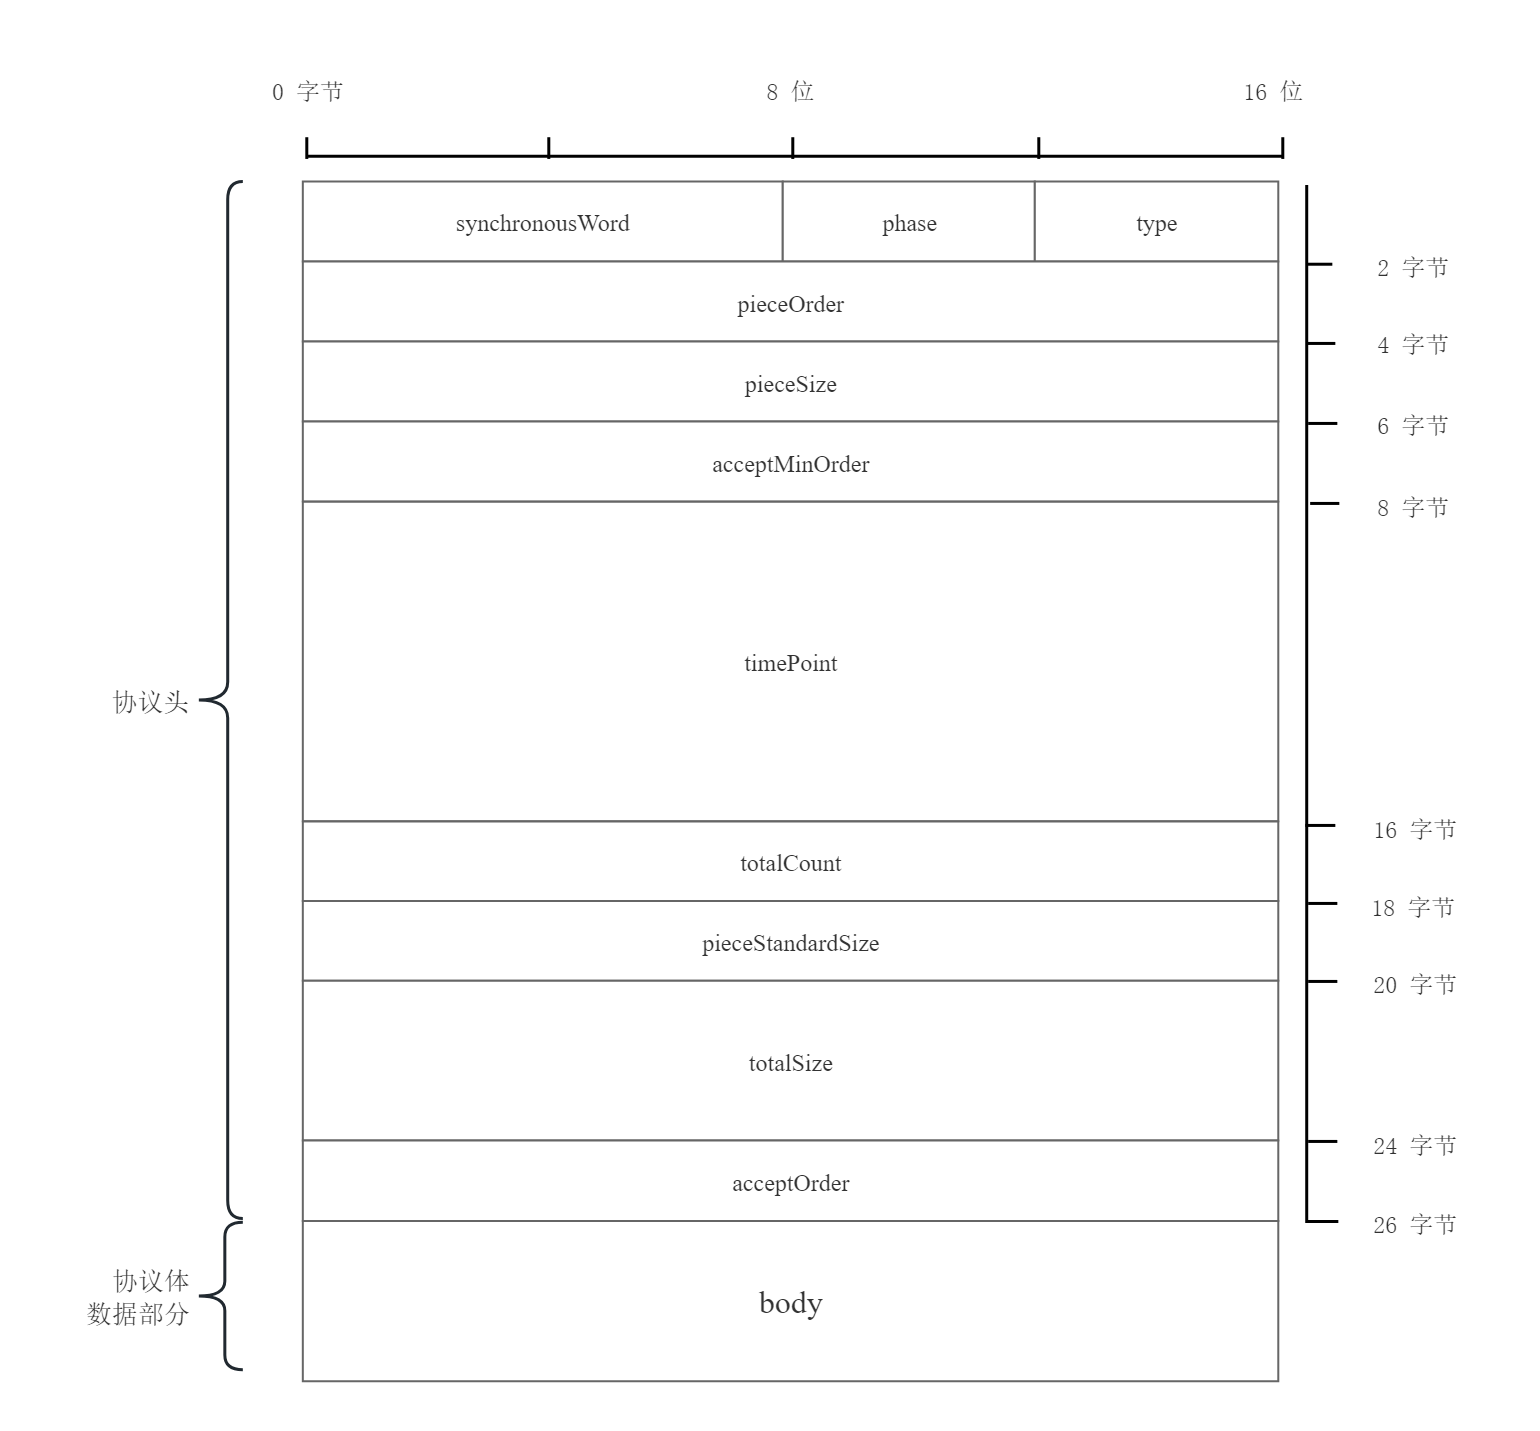
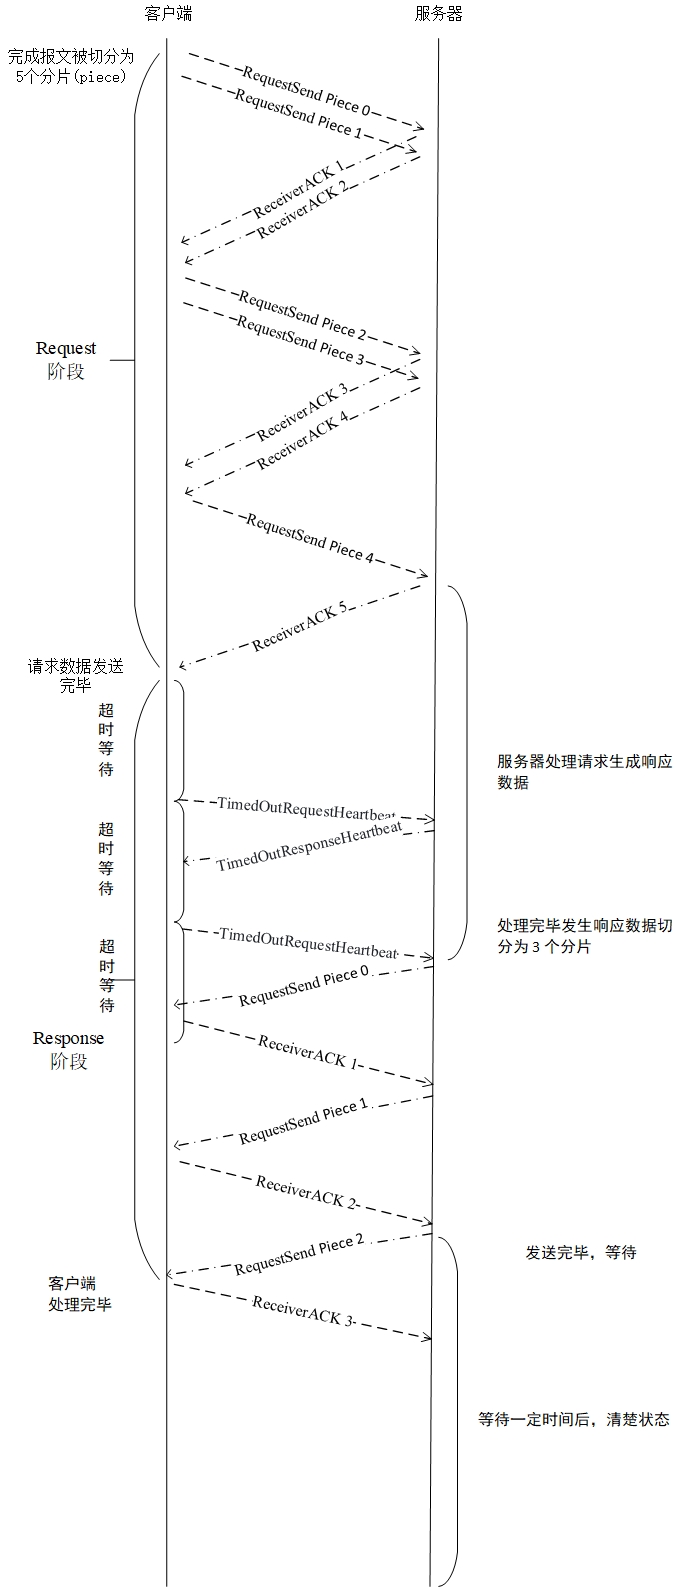
ThreadPoolSetting::DynamicThreadVacantMillisecond = 3000ms; //动态线程空闲时间介绍:简单请求响应协议(SR2P 协议),是一种两阶段协议,专门为 RPC 定制,分为请求和响应两个阶段不需要建立链接。
协议字段如下所示,协议头是26字节,字段字节序采用大端序,数据部分是小端序,由于MTU的限制,网络标准MTU为576,数据部分最大为522字节,更多请看 Protocol.pdf。

11110000,一个字节。SR2P协议会根据发生数据的多少决定每次发生几个数据报,下面以一次2个为例,在基本正常情况下的请求流程图:

其他情况的处理过程详细请查看 Protocol.pdf 文档