igel
v1.0.0
一个令人愉快的机器学习工具,让您无需编写代码即可训练/拟合、测试和使用模型
笔记
我还在根据人们的要求为 igel 开发 GUI 桌面应用程序。您可以在 Igel-UI 下找到它。
目录
该项目的目标是为每个人(包括技术用户和非技术用户)提供机器学习。
有时我需要一个工具,我可以用它来快速创建机器学习原型。是否构建一些概念验证、创建快速草稿模型来证明观点或使用自动机器学习。我发现自己经常陷入编写样板代码并思考太多从哪里开始。因此,我决定创建这个工具。
igel 构建在其他机器学习框架之上。它提供了一种使用机器学习的简单方法,无需编写任何代码。 Igel 是高度可定制的,但前提是您愿意。 Igel 不会强迫您定制任何东西。除了默认值之外,igel 还可以使用自动机器学习功能来找出可以很好地处理您的数据的模型。
您所需要的只是一个yaml (或json )文件,您需要在其中描述您要执行的操作。就是这样!
Igel 支持回归、分类和聚类。 Igel 支持自动机器学习功能,例如 ImageClassification 和 TextClassification
Igel 支持数据科学领域最常用的数据集类型。例如,您的输入数据集可以是您要获取的 csv、txt、excel 工作表、json 甚至 html 文件。如果您使用自动机器学习功能,那么您甚至可以将原始数据提供给 igel,它会找出如何处理它。稍后将在示例中详细介绍这一点。
$ pip install -U igel Igel支持的型号:
 +--------------------+----------------------------+-------------------------+
|      regression    |        classification      |        clustering       |
+--------------------+----------------------------+-------------------------+
|   LinearRegression |         LogisticRegression |                  KMeans |
|              Lasso |                      Ridge |     AffinityPropagation |
|          LassoLars |               DecisionTree |                   Birch |
| BayesianRegression |                  ExtraTree | AgglomerativeClustering |
|    HuberRegression |               RandomForest |    FeatureAgglomeration |
|              Ridge |                 ExtraTrees |                  DBSCAN |
|  PoissonRegression |                        SVM |         MiniBatchKMeans |
|      ARDRegression |                  LinearSVM |    SpectralBiclustering |
|  TweedieRegression |                      NuSVM |    SpectralCoclustering |
| TheilSenRegression |            NearestNeighbor |      SpectralClustering |
|    GammaRegression |              NeuralNetwork |               MeanShift |
|   RANSACRegression | PassiveAgressiveClassifier |                  OPTICS |
|       DecisionTree |                 Perceptron |                KMedoids |
|          ExtraTree |               BernoulliRBM |                    ---- |
|       RandomForest |           BoltzmannMachine |                    ---- |
|         ExtraTrees |       CalibratedClassifier |                    ---- |
|                SVM |                   Adaboost |                    ---- |
|          LinearSVM |                    Bagging |                    ---- |
|              NuSVM |           GradientBoosting |                    ---- |
|    NearestNeighbor |        BernoulliNaiveBayes |                    ---- |
|      NeuralNetwork |      CategoricalNaiveBayes |                    ---- |
|         ElasticNet |       ComplementNaiveBayes |                    ---- |
|       BernoulliRBM |         GaussianNaiveBayes |                    ---- |
|   BoltzmannMachine |      MultinomialNaiveBayes |                    ---- |
|           Adaboost |                       ---- |                    ---- |
|            Bagging |                       ---- |                    ---- |
|   GradientBoosting |                       ---- |                    ---- |
+--------------------+----------------------------+-------------------------+
对于汽车机器学习:
help 命令对于检查支持的命令和相应的参数/选项非常有用
$ igel --help您还可以运行子命令的帮助,例如:
$ igel fit --helpIgel 是高度可定制的。如果您知道自己想要什么并且想要手动配置模型,请查看接下来的部分,它将指导您如何编写 yaml 或 json 配置文件。之后,您只需告诉 igel 要做什么以及在哪里可以找到您的数据和配置文件。这是一个例子:
$ igel fit --data_path ' path_to_your_csv_dataset.csv ' --yaml_path ' path_to_your_yaml_file.yaml '但是,您也可以使用 auto-ml 功能,让 igel 为您完成所有工作。一个很好的例子是图像分类。假设您已经有一个原始图像数据集存储在名为images 的文件夹中
您所要做的就是运行:
$ igel auto-train --data_path ' path_to_your_images_folder ' --task ImageClassification就是这样! Igel 将从目录中读取图像,处理数据集(转换为矩阵、重新缩放、分割等)并开始训练/优化适合您的数据的模型。正如您所看到的,这非常简单,您只需提供数据的路径和要执行的任务即可。
笔记
这一功能的计算成本很高,因为 igel 会尝试许多不同的模型并比较它们的性能,以便找到“最佳”模型。
您可以运行帮助命令来获取说明。您还可以运行子命令的帮助!
$ igel --help第一步是提供 yaml 文件(如果需要,也可以使用 json)
您可以通过创建 .yaml 文件(按照惯例称为 igel.yaml,但您可以随意命名)并自行编辑来手动执行此操作。但是,如果您很懒(您可能像我一样:D),您可以使用 igel init 命令快速入门,这将为您即时创建一个基本配置文件。
 """
igel init --help


Example:
If I want to use neural networks to classify whether someone is sick or not using the indian-diabetes dataset,
then I would use this command to initialize a yaml file n.b. you may need to rename outcome column in .csv to sick:

$ igel init -type " classification " -model " NeuralNetwork " -target " sick "
"""
$ igel init
运行该命令后,将在当前工作目录中为您创建一个 igel.yaml 文件。如果需要,您可以查看并修改它,否则您也可以从头开始创建所有内容。
 # model definition
model :
    # in the type field, you can write the type of problem you want to solve. Whether regression, classification or clustering
    # Then, provide the algorithm you want to use on the data. Here I'm using the random forest algorithm
    type : classification
    algorithm : RandomForest     # make sure you write the name of the algorithm in pascal case
    arguments :
        n_estimators : 100   # here, I set the number of estimators (or trees) to 100
        max_depth : 30       # set the max_depth of the tree

# target you want to predict
# Here, as an example, I'm using the famous indians-diabetes dataset, where I want to predict whether someone have diabetes or not.
# Depending on your data, you need to provide the target(s) you want to predict here
target :
    - sick
在上面的示例中,我使用随机森林根据数据集中的某些特征对某人是否患有糖尿病进行分类,我在本示例中使用了著名的印度糖尿病(印度糖尿病数据集)
请注意,我将n_estimators和max_depth作为附加参数传递给模型。如果您不提供参数,则将使用默认值。您不必记住每个模型的参数。您始终可以在终端中运行igel models ,这将使您进入交互模式,系统将提示您输入要使用的模型并输入要解决的问题。然后,Igel 将向您显示有关模型的信息以及一个链接,您可以点击该链接来查看可用参数列表以及如何使用这些参数。
在终端中运行此命令来拟合/训练模型,您可以在其中提供数据集的路径和yaml 文件的路径
$ igel fit --data_path ' path_to_your_csv_dataset.csv ' --yaml_path ' path_to_your_yaml_file.yaml '
# or shorter
$ igel fit -dp ' path_to_your_csv_dataset.csv ' -yml ' path_to_your_yaml_file.yaml '
"""
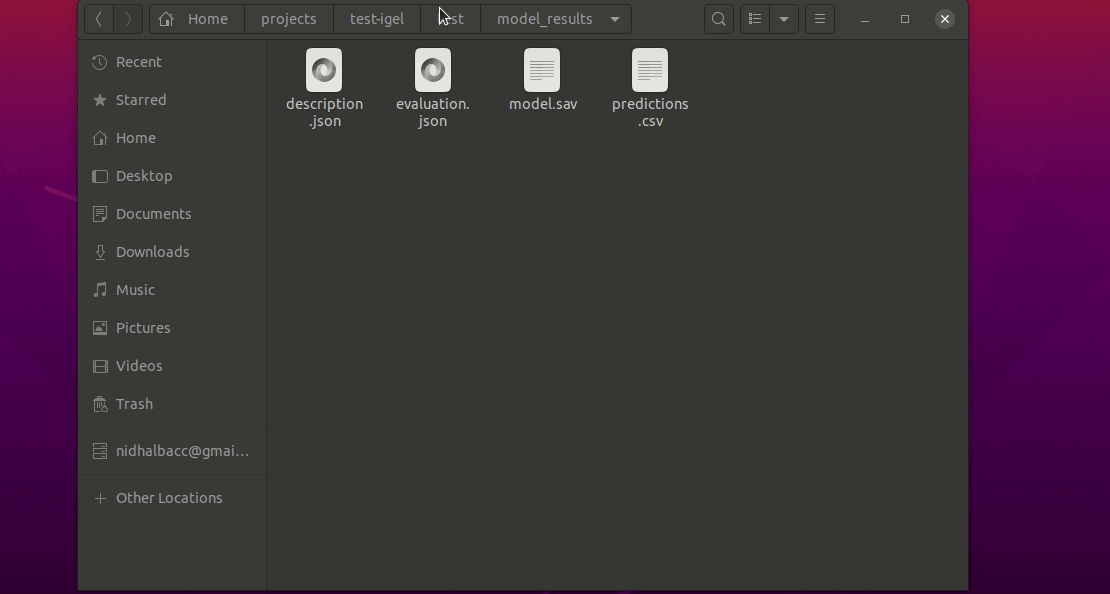
That's it. Your "trained" model can be now found in the model_results folder
(automatically created for you in your current working directory).
Furthermore, a description can be found in the description.json file inside the model_results folder.
"""
然后,您可以评估经过训练/预拟合的模型:
$ igel evaluate -dp ' path_to_your_evaluation_dataset.csv '
"""
This will automatically generate an evaluation.json file in the current directory, where all evaluation results are stored
"""
最后,如果您对评估结果感到满意,则可以使用经过训练/预拟合的模型进行预测:
$ igel predict -dp ' path_to_your_test_dataset.csv '
"""
This will generate a predictions.csv file in your current directory, where all predictions are stored in a csv file
"""
您可以使用一个名为实验的命令来组合训练、评估和预测阶段:
$ igel experiment -DP " path_to_train_data path_to_eval_data path_to_test_data " -yml " path_to_yaml_file "

"""
This will run fit using train_data, evaluate using eval_data and further generate predictions using the test_data
"""
您可以将经过训练/预拟合的 sklearn 模型导出到 ONNX 中:
$ igel export -dp " path_to_pre-fitted_sklearn_model "

"""
This will convert the sklearn model into ONNX
""" from igel import Igel
Igel ( cmd = "fit" , data_path = "path_to_your_dataset" , yaml_path = "path_to_your_yaml_file" )
"""
check the examples folder for more
"""下一步是在生产中使用您的模型。 Igel 也通过提供服务命令来帮助您完成此任务。运行serve命令将告诉igel为您的模型提供服务。准确地说,igel 将自动构建 REST 服务器并在特定主机和端口上为您的模型提供服务,您可以通过将这些作为 cli 选项传递来进行配置。
最简单的方法是运行:
$ igel serve --model_results_dir " path_to_model_results_directory "请注意,igel 需要--model_results_dir或简短的 -res_dir cli 选项才能加载模型并启动服务器。默认情况下,igel 将在localhost:8000上为您的模型提供服务,但是,您可以通过提供主机和端口 cli 选项轻松覆盖此设置。
$ igel serve --model_results_dir " path_to_model_results_directory " --host " 127.0.0.1 " --port 8000Igel 使用 FastAPI 创建 REST 服务器,这是一个现代高性能框架,并使用 uvicorn 在后台运行它。
此示例是使用预训练模型(通过运行 igel init --target起病类型分类创建的)和示例/数据下的印度糖尿病数据集完成的。原始 CSV 中的列标题为“preg”、“plas”、“pres”、“skin”、“test”、“mass”、“pedi”和“age”。
卷曲:
$ curl -X POST localhost:8080/predict --header " Content-Type:application/json " -d ' {"preg": 1, "plas": 180, "pres": 50, "skin": 12, "test": 1, "mass": 456, "pedi": 0.442, "age": 50} '

Outputs: {"prediction":[[0.0]]}$ curl -X POST localhost:8080/predict --header " Content-Type:application/json " -d ' {"preg": [1, 6, 10], "plas":[192, 52, 180], "pres": [40, 30, 50], "skin": [25, 35, 12], "test": [0, 1, 1], "mass": [456, 123, 155], "pedi": [0.442, 0.22, 0.19], "age": [50, 40, 29]} '
Outputs: {"prediction":[[1.0],[0.0],[0.0]]}注意事项/限制:
Python 客户端的使用示例:
 from python_client import IgelClient

# the client allows additional args with defaults:
# scheme="http", endpoint="predict", missing_values="mean"
client = IgelClient ( host = 'localhost' , port = 8080 )

# you can post other types of files compatible with what Igel data reading allows
client . post ( "my_batch_file_for_predicting.csv" )

Outputs : < Response 200 > : { "prediction" :[[ 1.0 ],[ 0.0 ],[ 0.0 ]]}igel 的主要目标是为您提供一种无需编写代码即可训练/拟合、评估和使用模型的方法。相反,您所需要的只是在一个简单的 yaml 文件中提供/描述您想要执行的操作。
基本上,您在 yaml 文件中提供描述或更确切地说配置作为键值对。以下是所有支持的配置的概述(目前):
 # dataset operations
dataset :
    type : csv  # [str] -> type of your dataset
    read_data_options : # options you want to supply for reading your data (See the detailed overview about this in the next section)
        sep :  # [str] -> Delimiter to use.
        delimiter :  # [str] -> Alias for sep.
        header :     # [int, list of int] -> Row number(s) to use as the column names, and the start of the data.
        names :  # [list] -> List of column names to use
        index_col : # [int, str, list of int, list of str, False] -> Column(s) to use as the row labels of the DataFrame,
        usecols :    # [list, callable] -> Return a subset of the columns
        squeeze :    # [bool] -> If the parsed data only contains one column then return a Series.
        prefix :     # [str] -> Prefix to add to column numbers when no header, e.g. ‘X’ for X0, X1, …
        mangle_dupe_cols :   # [bool] -> Duplicate columns will be specified as ‘X’, ‘X.1’, …’X.N’, rather than ‘X’…’X’. Passing in False will cause data to be overwritten if there are duplicate names in the columns.
        dtype :  # [Type name, dict maping column name to type] -> Data type for data or columns
        engine :     # [str] -> Parser engine to use. The C engine is faster while the python engine is currently more feature-complete.
        converters : # [dict] -> Dict of functions for converting values in certain columns. Keys can either be integers or column labels.
        true_values : # [list] -> Values to consider as True.
        false_values : # [list] -> Values to consider as False.
        skipinitialspace : # [bool] -> Skip spaces after delimiter.
        skiprows : # [list-like] -> Line numbers to skip (0-indexed) or number of lines to skip (int) at the start of the file.
        skipfooter : # [int] -> Number of lines at bottom of file to skip
        nrows : # [int] -> Number of rows of file to read. Useful for reading pieces of large files.
        na_values : # [scalar, str, list, dict] ->  Additional strings to recognize as NA/NaN.
        keep_default_na : # [bool] ->  Whether or not to include the default NaN values when parsing the data.
        na_filter : # [bool] -> Detect missing value markers (empty strings and the value of na_values). In data without any NAs, passing na_filter=False can improve the performance of reading a large file.
        verbose : # [bool] -> Indicate number of NA values placed in non-numeric columns.
        skip_blank_lines : # [bool] -> If True, skip over blank lines rather than interpreting as NaN values.
        parse_dates : # [bool, list of int, list of str, list of lists, dict] ->  try parsing the dates
        infer_datetime_format : # [bool] -> If True and parse_dates is enabled, pandas will attempt to infer the format of the datetime strings in the columns, and if it can be inferred, switch to a faster method of parsing them.
        keep_date_col : # [bool] -> If True and parse_dates specifies combining multiple columns then keep the original columns.
        dayfirst : # [bool] -> DD/MM format dates, international and European format.
        cache_dates : # [bool] -> If True, use a cache of unique, converted dates to apply the datetime conversion.
        thousands : # [str] -> the thousands operator
        decimal : # [str] -> Character to recognize as decimal point (e.g. use ‘,’ for European data).
        lineterminator : # [str] -> Character to break file into lines.
        escapechar : # [str] ->  One-character string used to escape other characters.
        comment : # [str] -> Indicates remainder of line should not be parsed. If found at the beginning of a line, the line will be ignored altogether. This parameter must be a single character.
        encoding : # [str] -> Encoding to use for UTF when reading/writing (ex. ‘utf-8’).
        dialect : # [str, csv.Dialect] -> If provided, this parameter will override values (default or not) for the following parameters: delimiter, doublequote, escapechar, skipinitialspace, quotechar, and quoting
        delim_whitespace : # [bool] -> Specifies whether or not whitespace (e.g. ' ' or '    ') will be used as the sep
        low_memory : # [bool] -> Internally process the file in chunks, resulting in lower memory use while parsing, but possibly mixed type inference.
        memory_map : # [bool] -> If a filepath is provided for filepath_or_buffer, map the file object directly onto memory and access the data directly from there. Using this option can improve performance because there is no longer any I/O overhead.

    random_numbers : # random numbers options in case you wanted to generate the same random numbers on each run
        generate_reproducible :  # [bool] -> set this to true to generate reproducible results
        seed :   # [int] -> the seed number is optional. A seed will be set up for you if you didn't provide any

    split :  # split options
        test_size : 0.2  # [float] -> 0.2 means 20% for the test data, so 80% are automatically for training
        shuffle : true   # [bool] -> whether to shuffle the data before/while splitting
        stratify : None  # [list, None] -> If not None, data is split in a stratified fashion, using this as the class labels.

    preprocess : # preprocessing options
        missing_values : mean    # [str] -> other possible values: [drop, median, most_frequent, constant] check the docs for more
        encoding :
            type : oneHotEncoding  # [str] -> other possible values: [labelEncoding]
        scale :  # scaling options
            method : standard    # [str] -> standardization will scale values to have a 0 mean and 1 standard deviation  | you can also try minmax
            target : inputs  # [str] -> scale inputs. | other possible values: [outputs, all] # if you choose all then all values in the dataset will be scaled


# model definition
model :
    type : classification    # [str] -> type of the problem you want to solve. | possible values: [regression, classification, clustering]
    algorithm : NeuralNetwork    # [str (notice the pascal case)] -> which algorithm you want to use. | type igel algorithms in the Terminal to know more
    arguments :          # model arguments: you can check the available arguments for each model by running igel help in your terminal
    use_cv_estimator : false     # [bool] -> if this is true, the CV class of the specific model will be used if it is supported
    cross_validate :
        cv : # [int] -> number of kfold (default 5)
        n_jobs :   # [signed int] -> The number of CPUs to use to do the computation (default None)
        verbose : # [int] -> The verbosity level. (default 0)
    hyperparameter_search :
        method : grid_search   # method you want to use: grid_search and random_search are supported
        parameter_grid :     # put your parameters grid here that you want to use, an example is provided below
            param1 : [val1, val2]
            param2 : [val1, val2]
        arguments :  # additional arguments you want to provide for the hyperparameter search
            cv : 5   # number of folds
            refit : true   # whether to refit the model after the search
            return_train_score : false   # whether to return the train score
            verbose : 0      # verbosity level

# target you want to predict
target :  # list of strings: basically put here the column(s), you want to predict that exist in your csv dataset
    - put the target you want to predict here
- you can assign many target if you are making a multioutput prediction 笔记
igel 在底层使用 pandas 来读取和解析数据。因此,您也可以在 pandas 官方文档中找到此数据可选参数。
下面给出了您可以在 yaml(或 json)文件中提供的配置的详细概述。请注意,您当然不需要数据集的所有配置值。它们是可选的。一般来说,igel 会弄清楚如何读取你的数据集。
但是,您可以通过使用此 read_data_options 部分提供额外字段来帮助它。例如,我认为有用的值之一是“sep”,它定义了 csv 数据集中的列如何分隔。一般来说,csv数据集是用逗号分隔的,这也是这里的默认值。但是,在您的情况下,它可能用分号分隔。
因此,您可以在 read_data_options 中提供它。只需添加sep: ";"在 read_data_options 下。
| 范围 | 类型 | 解释 |
|---|---|---|
| 九月 | str,默认 ',' | 要使用的分隔符。如果 sep 为 None,则 C 引擎无法自动检测分隔符,但 Python 解析引擎可以,这意味着将使用后者并通过 Python 内置的嗅探工具 csv.Sniffer 自动检测分隔符。另外,长度超过1个字符且与's+'不同的分隔符将被解释为正则表达式,也会强制使用Python解析引擎。请注意,正则表达式分隔符很容易忽略引用的数据。正则表达式示例:“rt”。 |
| 分隔符 | 默认无 | 九月的别名 |
| 标头 | int,int列表,默认'infer' | 用作列名称的行号以及数据的开头。默认行为是推断列名称:如果未传递名称,则行为与 header=0 相同,并且从文件的第一行推断列名称,如果显式传递列名称,则行为与 header=None 相同。显式传递 header=0 以便能够替换现有名称。标头可以是整数列表,用于指定列上多索引的行位置,例如 [0,1,3]。未指定的中间行将被跳过(例如,本例中的 2 行将被跳过)。请注意,如果skip_blank_lines=True,该参数会忽略注释行和空行,因此header=0表示数据的第一行而不是文件的第一行。 |
| 名字 | 类似数组,可选 | 要使用的列名称列表。如果文件包含标题行,则应显式传递 header=0 来覆盖列名称。此列表中不允许有重复项。 |
| 索引列 | int、str、int / str 序列或 False,默认 None | 用作 DataFrame 行标签的列,以字符串名称或列索引给出。如果给出 int / str 序列,则使用 MultiIndex。注意:index_col=False 可用于强制 pandas 不使用第一列作为索引,例如,当您的文件格式错误且每行末尾带有分隔符时。 |
| 使用列 | 类似列表或可调用,可选 | 返回列的子集。如果是类似列表,则所有元素必须是位置元素(即文档列中的整数索引)或与用户在名称中提供的列名称或从文档标题行推断出的列名称相对应的字符串。例如,有效的类似列表的 usecols 参数将为 [0, 1, 2] 或 ['foo', 'bar', 'baz']。元素顺序被忽略,因此 usecols=[0, 1] 与 [1, 0] 相同。要从保留元素顺序的数据实例化 DataFrame,请对 ['foo', 'bar' 中的列使用 pd.read_csv(data, usecols=['foo', 'bar'])[['foo', 'bar']] '] 顺序或 pd.read_csv(data, usecols=['foo', 'bar'])[['bar', 'foo']] 为 ['bar', 'foo'] 顺序。如果可调用,则将根据列名称评估可调用函数,返回可调用函数评估为 True 的名称。有效的可调用参数的一个示例是 ['AAA', 'BBB', 'DDD'] 中的 lambda x: x.upper()。使用此参数会导致更快的解析时间和更低的内存使用量。 |
| 挤 | 布尔值,默认 False | 如果解析的数据仅包含一列,则返回一个系列。 |
| 前缀 | 字符串,可选 | 无标题时添加到列号的前缀,例如“X”表示 X0、X1... |
| mangle_dupe_cols | 布尔值,默认 True | 重复的列将被指定为“X”、“X.1”、...“X.N”,而不是“X”...“X”。如果列中存在重复名称,则传入 False 将导致数据被覆盖。 |
| 数据类型 | {'c', 'python'},可选 | 要使用的解析器引擎。 C 引擎速度更快,而 python 引擎目前功能更完整。 |
| 转换器 | 字典,可选 | 用于转换某些列中的值的函数字典。键可以是整数或列标签。 |
| 真实值 | 列表,可选 | 视为 True 的值。 |
| 假值 | 列表,可选 | 视为 False 的值。 |
| 跳过初始空间 | 布尔值,默认 False | 跳过分隔符后的空格。 |
| 跳行 | 类似列表、int 或可调用、可选 | 文件开头要跳过的行号(从 0 开始索引)或要跳过的行数 (int)。如果可调用,则将根据行索引评估可调用函数,如果应跳过该行则返回 True,否则返回 False。有效的可调用参数的一个示例是 lambda x: x in [0, 2]。 |
| 跳页脚 | 整数,默认0 | 文件底部要跳过的行数(引擎='c'不支持)。 |
| 行数 | 整数,可选 | 要读取的文件行数。对于读取大文件很有用。 |
| na_值 | 标量、str、类列表或字典,可选 | 识别为 NA/NaN 的其他字符串。如果 dict 通过,则特定的每列 NA 值。默认情况下,以下值被解释为 NaN:''、'#N/A'、'#N/AN/A'、'#NA'、'-1.#IND'、'-1.#QNAN'、 '-NaN'、'-nan'、'1.#IND'、'1.#QNAN'、'<NA>'、'N/A'、'NA'、'NULL'、 “NaN”、“n/a”、“nan”、“null”。 |
| 保留默认值na | 布尔值,默认 True | 解析数据时是否包含默认 NaN 值。根据是否传入 na_values,行为如下:如果 keep_default_na 为 True,并且指定了 na_values,则 na_values 会附加到用于解析的默认 NaN 值。如果 keep_default_na 为 True,并且未指定 na_values,则仅使用默认 NaN 值进行解析。如果 keep_default_na 为 False,并且指定了 na_values,则仅使用 na_values 指定的 NaN 值进行解析。如果 keep_default_na 为 False,并且未指定 na_values,则不会将任何字符串解析为 NaN。请注意,如果 na_filter 作为 False 传入,则 keep_default_na 和 na_values 参数将被忽略。 |
| na_过滤器 | 布尔值,默认 True | 检测缺失值标记(空字符串和 na_values 的值)。在没有任何NA的数据中,传递na_filter=False可以提高读取大文件的性能。 |
| 冗长的 | 布尔值,默认 False | 指示放置在非数字列中的 NA 值的数量。 |
| 跳过空白行 | 布尔值,默认 True | 如果为 True,则跳过空白行而不是解释为 NaN 值。 |
| 解析日期 | bool 或 int 列表或名称列表或列表列表或 dict,默认 False | 行为如下:布尔值。如果 True -> 尝试解析索引。 int 或名称列表。例如,如果 [1, 2, 3] -> 尝试将第 1、2、3 列分别解析为单独的日期列。列表的列表。例如,如果 [[1, 3]] -> 合并第 1 列和第 3 列并解析为单个日期列。 dict, 例如 {'foo' : [1, 3]} -> 将列 1, 3 解析为日期并调用结果 'foo' 如果列或索引无法表示为日期时间数组,例如由于不可解析的值或时区的混合,列或索引将作为对象数据类型返回不变。 |
| 推断日期时间格式 | 布尔值,默认 False | 如果启用 True 和 parse_dates,pandas 将尝试推断列中日期时间字符串的格式,如果可以推断,则切换到更快的解析方法。在某些情况下,这可以将解析速度提高 5-10 倍。 |
| 保留日期列 | 布尔值,默认 False | 如果 True 且 parse_dates 指定组合多个列,则保留原始列。 |
| 日期解析器 | 功能,可选 | 用于将字符串列序列转换为日期时间实例数组的函数。默认使用 dateutil.parser.parser 进行转换。 Pandas 将尝试以三种不同的方式调用 date_parser,如果发生异常,则前进到下一个: 1) 传递一个或多个数组(由 parse_dates 定义)作为参数; 2) 将 parse_dates 定义的列中的字符串值连接(按行)到单个数组中并传递; 3) 使用一个或多个字符串(对应于 parse_dates 定义的列)作为参数,为每一行调用一次 date_parser 。 |
| 第一天 | 布尔值,默认 False | DD/MM 格式日期、国际和欧洲格式。 |
| 缓存日期 | 布尔值,默认 True | 如果为 True,则使用唯一的已转换日期的缓存来应用日期时间转换。解析重复的日期字符串时,尤其是具有时区偏移量的字符串时,可能会产生显着的加速。 |
| 数千 | 字符串,可选 | 千位分隔符。 |
| 小数 | str,默认“.” | 识别为小数点的字符(例如,使用“,”表示欧洲数据)。 |
| 行终止符 | str(长度1),可选 | 将文件分成行的字符。仅对 C 解析器有效。 |
| 转义字符 | str(长度1),可选 | 用于转义其他字符的单字符字符串。 |
| 评论 | 字符串,可选 | 指示不应解析该行的其余部分。如果在行的开头找到,则该行将被完全忽略。 |
| 编码 | 字符串,可选 | 读取/写入时用于 UTF 的编码(例如“utf-8”)。 |
| 方言 | str 或 csv.Dialect,可选 | 如果提供,此参数将覆盖以下参数的值(默认或非默认):分隔符、双引号、转义字符、skiinitialspace、quotechar 和引用 |
| 低内存 | 布尔值,默认 True | 在内部以块的形式处理文件,从而在解析时减少内存使用,但可能会混合类型推断。为了确保没有混合类型,请设置 False,或使用 dtype 参数指定类型。请注意,无论如何,整个文件都会读入单个 DataFrame, |
| 内存映射 | 布尔值,默认 False | 将文件对象直接映射到内存并直接从那里访问数据。使用此选项可以提高性能,因为不再有任何 I/O 开销。 |
本节提供了完整的端到端解决方案来证明igel的功能。如前所述,您需要创建一个 yaml 配置文件。这是一个使用决策树算法预测某人是否患有糖尿病的端到端示例。数据集可以在示例文件夹中找到。
 model :
    type : classification
    algorithm : DecisionTree

target :
    - sick
$ igel fit -dp path_to_the_dataset -yml path_to_the_yaml_file就是这样,igel 现在将为您拟合模型并将其保存在当前目录的 model_results 文件夹中。
评估预拟合模型。 Igel 将从 model_results 目录加载预拟合模型并为您进行评估。您只需运行评估命令并提供评估数据的路径。
$ igel evaluate -dp path_to_the_evaluation_dataset就是这样! Igel 将评估模型并将统计信息/结果存储在 model_results 文件夹内的evaluation.json文件中
使用预先拟合的模型来预测新数据。这是由 igel 自动完成的,您只需提供要使用预测的数据的路径。
$ igel predict -dp path_to_the_new_dataset就是这样! Igel 将使用预拟合模型进行预测并将其保存在 model_results 文件夹内的predictions.csv文件中
您还可以通过在 yaml 文件中提供来执行一些预处理方法或其他操作。下面是一个示例,其中数据分为 80% 用于训练,20% 用于验证/测试。此外,数据在分割时也会被打乱。
此外,通过用平均值替换缺失值来对数据进行预处理(您也可以使用中位数、众数等)。检查此链接以获取更多信息
 # dataset operations
dataset :
    split :
        test_size : 0.2
        shuffle : True
        stratify : default

    preprocess : # preprocessing options
        missing_values : mean    # other possible values: [drop, median, most_frequent, constant] check the docs for more
        encoding :
            type : oneHotEncoding  # other possible values: [labelEncoding]
        scale :  # scaling options
            method : standard    # standardization will scale values to have a 0 mean and 1 standard deviation  | you can also try minmax
            target : inputs  # scale inputs. | other possible values: [outputs, all] # if you choose all then all values in the dataset will be scaled

# model definition
model :
    type : classification
    algorithm : RandomForest
    arguments :
        # notice that this is the available args for the random forest model. check different available args for all supported models by running igel help
        n_estimators : 100
        max_depth : 20

# target you want to predict
target :
    - sick
然后,您可以通过运行 igel 命令来拟合模型,如其他示例所示
$ igel fit -dp path_to_the_dataset -yml path_to_the_yaml_file用于评估
$ igel evaluate -dp path_to_the_evaluation_dataset用于生产
$ igel predict -dp path_to_the_new_dataset 在存储库的示例文件夹中,您将找到一个数据文件夹,其中存储了著名的 indian-diabetes、iris 数据集和 linnerud(来自 sklearn)数据集。此外,每个文件夹内都有端到端示例,其中有脚本和 yaml 文件可以帮助您入门。
indian-diabetes-example 文件夹包含两个示例来帮助您入门:
iris-example 文件夹包含一个逻辑回归示例,其中对目标列进行一些预处理(一种热编码),以向您展示 igel 的更多功能。
此外,多输出示例包含多输出回归示例。最后,cv-example 包含一个使用交叉验证的 Ridge 分类器的示例。
您还可以在该文件夹中找到交叉验证和超参数搜索示例。
我建议您尝试一下示例和 igel cli。但是,如果需要,您也可以直接执行 fit.py、evaluate.py 和 Predict.py。
首先,创建或修改根据图像标签/类分类为子文件夹的图像数据集。例如,如果您有狗和猫图像,那么您将需要 2 个子文件夹:
假设这两个子文件夹包含在一个名为 images 的父文件夹中,只需将数据提供给 igel:
$ igel auto-train -dp ./images --task ImageClassificationIgel 将处理从数据预处理到优化超参数的所有事务。最后,最佳模型将存储在当前工作目录中。
首先,创建或修改根据文本标签/类分类为子文件夹的文本数据集。例如,如果您有正面和负面反馈的文本数据集,那么您将需要 2 个子文件夹:
假设这两个子文件夹包含在一个名为 texts 的父文件夹中,只需将数据提供给 igel:
$ igel auto-train -dp ./texts --task TextClassificationIgel 将处理从数据预处理到优化超参数的所有事务。最后,最佳模型将存储在当前工作目录中。
如果您不熟悉终端,也可以运行 igel UI。只需如上所述在您的计算机上安装 igel 即可。然后在终端中运行这个命令
$ igel gui这将打开 GUI,使用起来非常简单。在此处查看 GUI 的外观以及如何使用它的示例:https://github.com/nidhaloff/igel-ui
您可以先从 docker hub 拉取镜像
$ docker pull nidhaloff/igel然后使用它:
$ docker run -it --rm -v $( pwd ) :/data nidhaloff/igel fit -yml ' your_file.yaml ' -dp ' your_dataset.csv '您可以通过首先构建映像来在 docker 内运行 igel:
$ docker build -t igel .然后运行它并将当前目录(不需要是 igel 目录)作为 /data (工作目录)附加到容器内:
$ docker run -it --rm -v $( pwd ) :/data igel fit -yml ' your_file.yaml ' -dp ' your_dataset.csv ' 如果您遇到任何问题,请随时提出问题。此外,您可以与作者联系以获取更多信息/问题。
你喜欢伊格尔吗?您始终可以通过以下方式帮助该项目的开发:
您认为这个项目很有用,并且想要带来新想法、新功能、错误修复、扩展文档?
随时欢迎您的贡献。请务必先阅读指南
麻省理工学院许可证
版权所有 (c) 2020 年至今,Nidhal Baccouri


