comfyui层样式
中文说明点这里
商务合作请联系电子邮件[email protected]。
有关业务合作,请联系电子邮件[email protected]。
一组comfyui节点,可以复合层并掩盖以实现Photoshop之类的功能。
它将Photoshop的一些基本功能迁移到ComfyUI,旨在集中工作流程并降低软件切换的频率。
*此工作流(title_example_workflow.json)在工作流目录中。
示例工作流程
workflow目录中的一些JSON Workflow文件,这是如何在Comfyui中使用这些节点的示例。
如何安装
(以comfyui官方便携式软件包和Aki comfyui软件包为例,请修改其他comfyui环境的依赖关系环境目录)
安装插件
安装依赖软件包
对于comfyui官方便携式软件包,请双击插件目录中的install_requirements.bat ,在插件目录中的install_requirements_aki.bat上aki comfyui软件包双击插件目录中,并等待安装完成。
或安装依赖项软件包,打开comfyui_layerstyle插件目录中的CMD窗口,例如ComfyUIcustom_ NodesComfyUI_LayerStyle然后输入以下命令,
对于Comfyui官方便携式软件包,类型:
 ......python_embededpython.exe -s -m pip install .whldocopt-0.6.2-py2.py3-none-any.whl
......python_embededpython.exe -s -m pip install .whlhydra_core-1.3.2-py3-none-any.whl
......python_embededpython.exe -s -m pip install -r requirements.txt
.repair_dependency.bat
对于Aki comfyui软件包,类型:
 ....pythonpython.exe -s -m pip install .whldocopt-0.6.2-py2.py3-none-any.whl
....pythonpython.exe -s -m pip install .whlhydra_core-1.3.2-py3-none-any.whl
....pythonpython.exe -s -m pip install -r requirements.txt
.repair_dependency.bat
下载模型文件
来自Baidunetdisk的中国国内用户和其他用户来自huggingface.co/chflame163/comfyui_layerstyle
下载所有文件,然后将它们复制到ComfyUImodels文件夹。此链接提供了此插件所需的所有模型文件。或根据每个节点的说明下载模型文件。
常见问题
如果节点无法正确加载或使用过程中存在错误,请检查Comfyui终端窗口中的错误消息。以下是常见错误及其解决方案。
警告:找不到xxxx.ini,使用默认xxxx。
此警告消息表明无法找到INI文件,也不会影响使用。如果您不想查看这些警告,请在插件目录中修改所有*.ini.example文件为*.ini 。
ModulenotFoundError:无模块名为'psd_tools'
此错误是psd_tools未正确安装。
解决方案:
- 关闭comfyui并打开插件目录中的终端窗口并执行以下命令:
../../../python_embeded/python.exe -s -m pip install psd_tools如果在安装psd_tool期间发生错误,例如ModuleNotFoundError: No module named 'docopt' ,请下载Docopt的WHL并进行手册安装。在终端窗口中执行以下命令: ../../../python_embeded/python.exe -s -m pip install path/docopt-0.6.2-py2.py3-none-any.whl path是路径名称WHL文件。
无法从“ cv2.ximgproc”导入名称为'guidederfilter'
此错误是由opencv-contrib-python软件包的不正确版本引起的,或者该软件包由其他OpenCV软件包覆盖。
名称:未定义的名称“引导”
问题的原因与上述相同。
无法从“变形金刚”导入“ vitmatteimageProcessor”名称
此错误是由低版本的transformers软件包引起的。
Insightface加载非常慢
此错误是由protobuf软件包的低版本引起的。
有关上述三个依赖项软件包的问题,请双击repair_dependency.bat (对于官方comfyui progable)或repair_dependency_aki.bat (对于comfyui-aki-v1.x)中的插件文件夹中,以自动修复它们。
设置了OnnxRuntime :: Python :: createexecutionProviderInstance cuda_path,但无法加载cuda。请按照GPU需求页面上提到的正确版本的CUDA和CUDNN安装正确的版本
解决方案:重新安装onnxruntime依赖关系软件包。
错误加载模型xxx:我们无法连接到huggingface.co ...
检查网络环境。如果您无法在中国访问huggingface.co,请尝试修改HuggingFace_Hub软件包以强制使用HF_MIRROR。
ValueError:Trimap不包含前景值(xxxx ...)
此错误是由于掩模区域使用PyMatting方法来处理掩模边缘时太大或太小。
解决方案:
- 请调整参数以更改口罩的有效区域。或使用其他方法处理边缘。
requests.exceptions.proxyerror:httpsconnectionpool(xxxx ...)
发生此错误时,请检查网络环境。
unboundlocalerror:分配前引用的本地变量“ clip_processor”
unboundlocalerror:分配前引用的本地变量'text_model'
如果执行JoyCaption2节点时发生此错误,并且已确认模型文件已放置在正确的目录中,请检查transformers依赖关系软件包版本至少为4.43.2或更高。如果transformers版本高于或等于4.45.0,并且也有错误消息:
 Error loading models: De️️scriptors cannot be created directly.
If this call came from a _pb2.py file, your generated code is out of date and must be regenerated with protoc >= 3.19.0.
......
请尝试将protobuf依赖关系软件包降级到3.20.3,或设置环境变量: PROTOCOL_BUFFERS_PYTHON_IMPLEMENTATION=python 。
更新
**如果更新后的依赖项包错误,请双击repair_dependency.bat (对于官方comfyui progable)或repair_dependency_aki.bat (对于Comfyui-Aki-v1.x)(用于Comfyui-Aki-v1.x)中的插件文件夹中,以重新安装依赖项包。
提交Benultra和LoadBenModel节点。这两个节点是在Comfyui中实施Pramallc/Ben项目。
从huggingface或baidunetdisk下载BEN_Base.pth和config.json然后复制到ComfyUI/models/BEN文件夹。
合并Jimlee2048提交的PR,添加LoadBirefNetModelV2节点,并支持加载RMBG 2.0型号。
从huggingface或baidunetdisk下载模型文件,然后将其复制到ComfyUI/models/BiRefNet/RMBG-2.0文件夹。
Florence2 Nodes支持基本promptgen-v2.0和大promptgen-v2.0,下载base-PromptGen-v2.0和large-PromptGen-v2.0两个来自huggingface或baidunetdisk的两个文件夹,然后复制到ComfyUI/models/florence2 。
sam2ultra和对象电源节点支持图像批次。
SAM2ULTRA和SAM2Videoultra节点增加了对SAM2.1模型的支持,包括Kijai的FP16型号。从baidunetdisk或huggingface.co/kijai/sam2-safetensors下载模型文件,然后复制到ComfyUI/models/sam2文件夹。
提交JoyCaption2Split和LoadJoyCaption2Model节点,在多个JoyCaption2节点上共享该模型可提高效率。
sementanythingultra和SemenmanyThingulTrav2添加cache_model选项,易于灵活地管理VRAM使用情况。
由于transformers的Llamavision节点的高版本要求,这会影响一些较旧的第三方插件的加载,因此LayerStyle插件已将默认要求降低到4.43.2。如果您需要运行Llamavision,请自己升级到4.45.0或更高。
提交JoyCaption2和JoyCaption2ExtraOptions节点。需要安装新的依赖软件包。将JoyCaption-Alpha-Two模型用于本地推理。可用于生成及时的单词。该节点是https://huggingface.co/john6666/joy-caption-alpha-two-cli-mod在comfyui中的实现,谢谢原始作者。 Download models form BaiduNetdisk and BaiduNetdisk , or huggingface/Orenguteng and huggingface/unsloth , then copy to ComfyUI/models/LLM , Download models from BaiduNetdisk or huggingface/google , and copy to ComfyUI/models/clip , Donwload the cgrkzexw-599808 folder from Baidunetdisk或HuggingFace/john6666,然后复制到ComfyUI/models/Joy_caption 。
提交Llamavision节点,使用Llama 3.2视觉模型进行局部推论。可用于生成及时的单词。该节点代码的一部分来自comfyui-pixtralllamolmolmolmolmolmovision,谢谢原始作者。要使用此节点, transformers需要升级到4.45.0或更高。从Baidunetdisk或HuggingFace/Seanscript下载型号,然后复制到ComfyUI/models/LLM 。
提交RandomGeneratorV2节点,添加最小随机范围和种子选项。
提交TextJoinv2节点,在TextJion之上添加定界符选项。
提交Gaussianblurv2节点,参数精度已提高到0.01。
提交user -promptgeneratextimgwithReference节点。
提交GrayValue节点,输出与RGB颜色值相对应的灰度值。
lut应用,textimagev2,textimage,simpletextimage节点支持在commas,semas,emicolons或spaces隔开的resource-dir.ini中定义多个文件夹。同时支持刷新的实时更新。
LUT Apply,TextImageV2,TextImage,SimpleTextImage节点支持定义多目录字体和LUT文件夹,并支持刷新和实时更新。
将人体粉碎节点提交,用于产生人体零件面具。它基于Metal3D/comfyui_human_parts的战机,感谢原始作者。从Baidunetdisk或HuggingFace下载模型文件,然后将其复制到ComfyUImodelsonnxhuman-parts文件夹。
ObjectDetector节点添加按信心选项添加排序。
提交drawbboxmask节点,用于将对象检测器节点输出的Bboxes输出转换为掩码。
提交用户promptgeneratortxtimg和用户promptgeneratorreplacewordword节点,用于生成文本和图像提示并替换提示内容。
提交Phiprompt节点,使用Microsoft Phi 3.5文本和视觉模型进行本地推理。可用于生成及时的单词,过程提示单词或从图像中推断出提示单词。运行此模型需要至少16GB的视频内存。
从baidunetdisk或huggingface.co/microsoft/phi-3.5-vision-instruct and huggingface.co/microsoft/phi-3.5-mini-Instruct下载模型文件,然后将其复制到ComfyUImodelsLLM folder。
提交GetMainColors节点,它可以获得图像的5个主要颜色。提交colorname节点,它可以获得输入颜色值的颜色名称。
将亮度和对比节点复制为BrightnessContrastV2,Shadow&Emhtlight节点的颜色为ColorofShadowHighlight,以及Shadow&Highlight Mask to Shadow&Emake to Shadow亮点蒙版V2,以避免comfyui工作流的错误在节点名称中由“&”字符造成的“&”字符。
提交VQAPROMPT和LOADVQAMODEL节点。
从baidunetdisk或huggingface.co/salesforce/blip-vqa-capfilt-large and huggingface.co/salesforce/blip-vqa-base下载型号,然后复制到ComfyUImodelsVQA folder。
florence2ultra,florence2image2prompt和loadFlorence2Model节点支持Miaoshouai/Florence-2-Large-Promptgen-V1.5和Miaoshouai/Florence-2-Base-base-base-promptgen-v1.5模型。
从baidunetdisk或huggingface.co/miaoshouai/florence-2-large-promptgen-v1.5和huggingface.co/miaoshouai/florence-2-base-2-base-promptgen-v1.5下载ComfyUImodelsflorence2文件。 。
提交Birefnetultrav2和LoadBirefnetModel节点,这些节点支持最新的Birefnet模型的使用。从Baidunetdisk或GoogleDrive下载型号文件,名为BiRefNet-general-epoch_244.pth到ComfyUI/Models/BiRefNet/pth文件夹。您还可以下载更多的Birefnet型号并将其放在此处。
ExtendCanvasv2节点支持负值输入,这意味着图像将被裁剪。
节点的默认标题颜色已更改为蓝绿色,并以层,外行,外行,外行,层次,层次和LayerFilter为单位的节点以不同的颜色区分。
对象检测器节点添加了Sort Bbox选项,该选项允许从左到右,从上到下以及大到小,使对象选择更加直观和方便。昨天发布的节点已被放弃,请用新版本节点手动替换它(对不起)。
提交SAM2ultra,SAM2Videoultra,ObjectDetectorFL2,ObjectDetectoryOloworld,ObjectDetectoryOlo8,ObjectDetectoremask和BboxJoin节点。从baidunetdisk或huggingface.co/kijai/sam2-safetensors下载型号,然后复制到ComfyUI/models/sam2文件夹,从baidunetdisk或googledrive下载型号,然后复制到ComfyUI/models/yolo-world文件夹。此更新引入了新的依赖项,请重新安装依赖项软件包。
提交随机发电机节点,用于在指定范围内生成随机数,并具有INT,float和boolean的输出,从而通过图像批处理支持批处理生成不同的随机数。
提交EVF-SAMULTRA节点,它是Comfyui中EVF-SAM的实现。请从Baidunetdisk或HuggingFace/EVF-SAM2,HuggingFace/evf-SAM下载模型文件,以ComfyUI/models/EVF-SAM文件夹(将型号保存在其各自的子目录中)。由于引入了新的依赖项软件包,插件升级后,请重新安装依赖项软件包。
提交ImagetAggerSave和ImageAutocroPV3节点。用于实现训练集的自动修剪和标记工作流(工作流image_tagger_save.json位于工作流目录中)。
提交CheckMaskV2节点,添加了更快地检测掩码的simple方法。
将ImagereEl和ImagereElComposite节点提交到画布上的多个图像。
NumberCalculatorV2和NumberCalculator添加min方法和max方法。
优化节点加载速度。
Florence2Image2Prompt增加了对thwri/CogFlorence-2-Large-Freeze和thwri/CogFlorence-2.1-Large模型的支持。请从Baidunetdisk或HuggingFace/Cogflorence-2-Large-Freeze和HuggingFace/Cogflorence-2.1 Large下载模型文件,然后将其复制到ComfyUI/models/florence2文件夹。
合并小丑沙尔(Clownsharkbatwing)的分支“使用GPU进行颜色混合模式”,某些层混合物的速度超过十倍。
提交florence2ultra,florence2image2prompt和loadFlorence2Model节点。
透明背景杜特拉节点添加新的模型支持。请根据说明下载模型文件。
提交Segformerultrav2,SegfromerFashionPipeline和SegformerClothespeline节点,用于分割服装。请根据说明下载模型文件。
commit install_requirements.bat and install_requirements_aki.bat ,单击解决方案以安装依赖项软件包。
提交透明背景节点,它根据透明背景模型删除背景。
将Ultra节点的Vitmatte模型更改为本地调用。请下载所有Vitmatte模型的文件到ComfyUI/models/vitmatte夹。
getColortonev2节点将mask方法添加到“颜色选择”选项中,该选项可以准确地获得蒙版内的主要颜色和平均颜色。
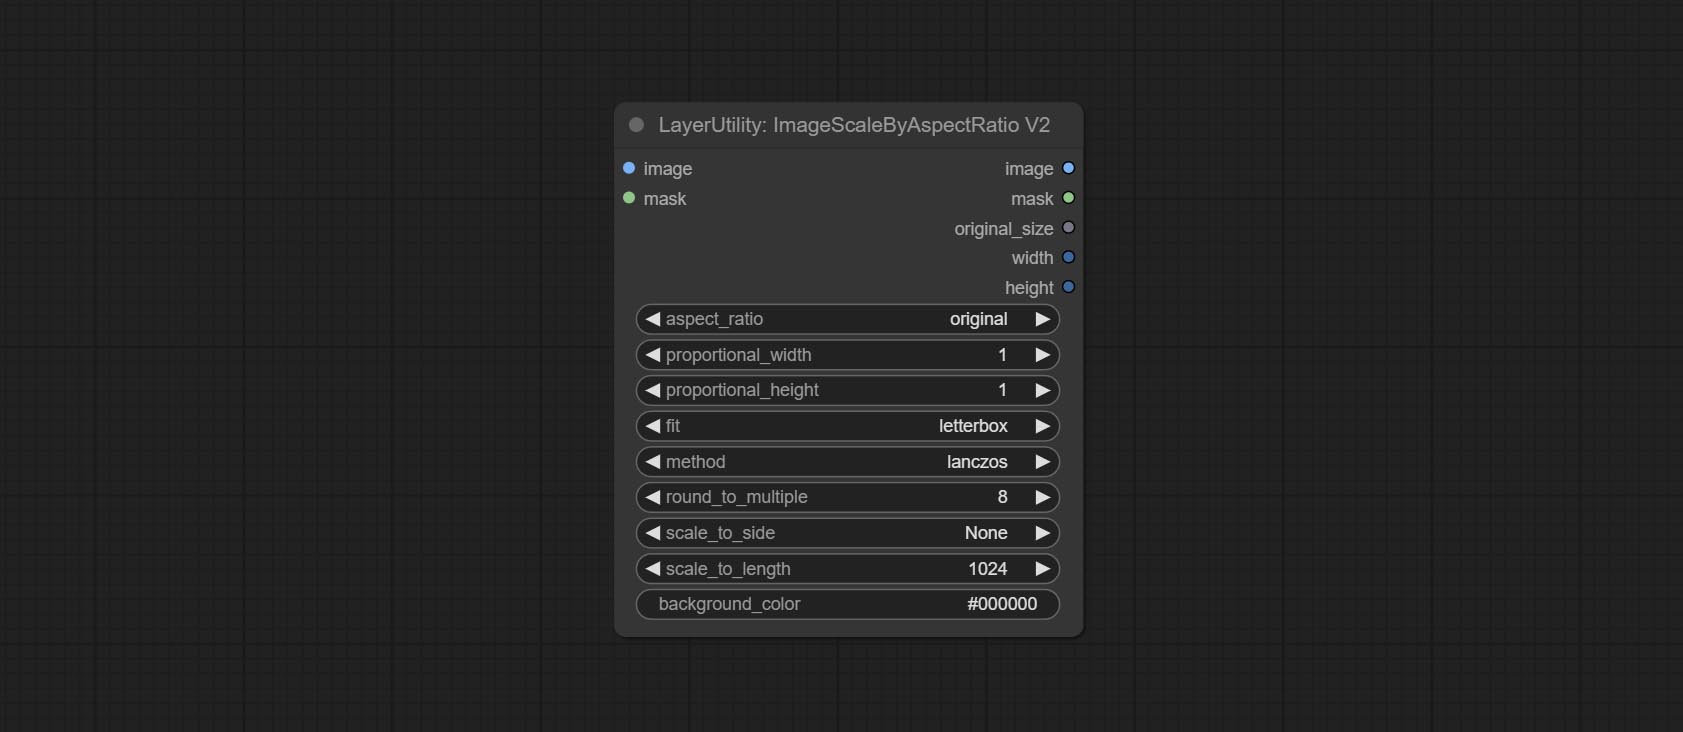
imagescalebyaspectratiov2节点添加“ background_color”选项。
LUT应用添加“强度”选项。
提交AutoAdjustv2节点,添加可选的掩码输入,并为多种自动颜色调整模式提供支持。
由于即将在Gemini-Pro Vision Services的停用,PressTagger和Pressembellish添加了“ Gemini-1.5-Flash” API继续使用它。
Ultra节点添加了在CUDA设备上运行VitMatte选项,从而增加了5倍的运行速度。
提交Queuestop节点,用于终止队列操作。
在处理大尺寸图像时,优化了对超节点的VitMate方法的性能。
cropbyMaskV2添加选项,以通过倍数绕切割尺寸。
提交CheckMask节点,它检测掩模是否包含足够的有效区域。提交HSVVALUE节点,它将颜色值转换为HSV值。
booleanoperatorv2,numberCalculatorV2,Integer,float,boolean节点添加了字符串输出,以输出该值,作为字符串,可与SwitchCase一起使用。
提交交换机节点,根据匹配字符串切换输出。可用于任何类型的数据切换。
提交字符串节点,用于输出字符串。这是文本框简化节点。
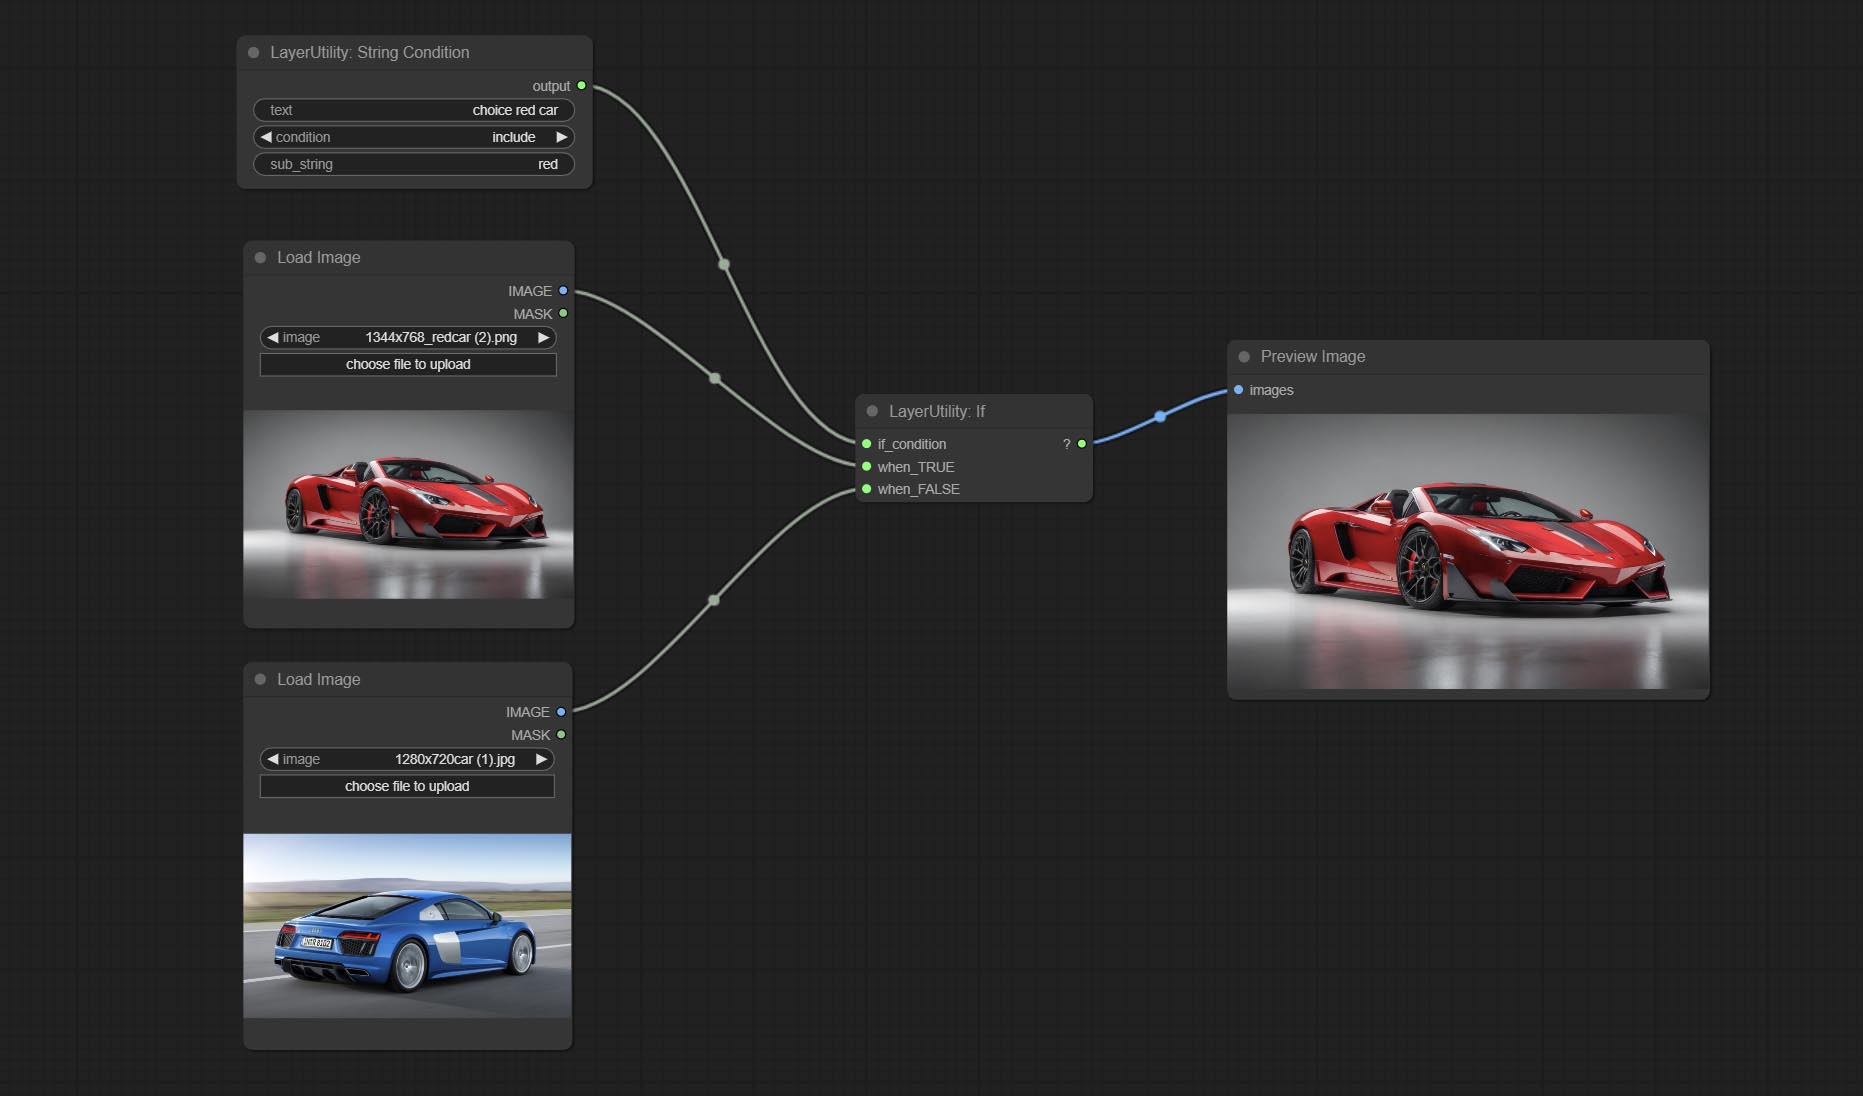
提交如果节点,则基于布尔条件输入的开关输出。可用于任何类型的数据切换。
提交字符串条件节点,确定文本是否包含子字符串。
提交numberCalculatorv2节点,添加第n个根操作。提交booleanoperatorv2节点,增加/少于更大/少,超过或等于或平等的逻辑判断。这两个节点可以访问数字输入,并且可以在节点内输入数字值。注意:数字输入优先。当有输入时,节点中的值将无效。
提交SD3NegativeConditioning节点,将SD3中负条件的四个节点封装到一个单独的节点中。
ImageRemoveAlpha节点添加可选掩码输入。
使用低频滤波和高频保存来恢复图像详细信息,融合效果更好。
提交Addgrain和MaskGrain节点,向图片或掩码添加噪声。
提交filmv2节点,基于上一个速度的添加fastgrain方法,噪声速度的速度快10倍。
提交ImagetOmask节点,可以将图像转换为掩码。支持将实验室,RGBA,YUV和HSV模式中的任何通道转换为口罩,同时提供色标调整。支持蒙版可选输入以获取仅包含有效零件的掩码。
某些节点中的黑点和WhitePoint选项已更改为滑块调整以进行更直观的显示。包括MaskEdgeultradetailv2,Sengemanthingultrav2,rmbgultrav2,phrommaskultrav2,birefnetultra,segformerB2Clothesultra,BlendifMask和Levels。
imagescalerestorev2和imagescalebyaspectratiov2节点添加了total_pixel方法以扩展图像。
提交MediaPipeFaciaL节点,用于细分面部特征,包括左和右眉,眼睛,嘴唇和牙齿。
提交批处理节点,用于从批处理图像或掩码中检索指定的图像或掩码。
分层创建新的子目录,例如Systemio,数据和提示。一些节点分为子目录。
提交MaskByColor节点,根据所选颜色生成掩码。
提交LOADPSD节点,它读取PSD格式和输出层图像。请注意,该节点需要安装psd_tools依赖项软件包,如果在安装psd_tool期间发生错误,例如ModuleNotFoundError: No module named 'docopt' ,请下载docopt的WHL并手动安装它。
提交segformerb2clothesultra节点,用于细分角色衣服。多亏了原始作者,模型分割代码是源自Starthua的。
SaveImagePlus节点将输出工作流程添加到JSON函数,支持%date和embeddint日期或时间的%time ,并添加预览开关。
提交SaveImagePlus节点,它可以自定义保存图片的目录,在文件名中添加时间戳,选择保存格式,设置图像压缩率,设置是否保存工作流程,并选择将无形的水印添加到图片中。
提交Addblindwatermark,Showblindwatermark节点,在图片中添加隐形水印和解码水印。 COMMIT CREATEQRCODE,DECODEQRCODE节点,它可以生成二维代码图片并解码二维代码。
imagescalerestorev2,imagescalebyaspectratiov2,ImageAutocroPV2节点添加了width和height的选项,可以将宽度或高度指定为固定值。
提交purgevram节点,清理vram an ram。
提交自动调节节点,它可以自动调整图像对比度和白平衡。
提交RGBVALUE节点以将颜色值作为R,G,B的单个小数值输出。这个想法来自Vxinhao,谢谢。
提交种子节点以输出种子值。 ImageMaskScaleas,ImagescaleByspectratio,ImagescaleByspectratiov2,Imagescalestore,ImagesCalerestorev2节点增加了width , height输出。
提交级别节点,它可以实现与photoshop.sharp&soft添加“无”选项的相同颜色级别调整功能。
提交BlendifMask节点,该节点与imgaeblendv2或ImageBlendAdadVanceV2合作以实现与Photoshop的功能相同的混合物。
提交彩色和色平衡节点,用于调整图片的色温和色彩平衡。
在图像之间添加新型的混合模式V2。现在最多支持30个混合模式。新的混合模式可用于所有支持混合模式节点的V2版本,包括ImageBlend V2,ImageBlendAdadVance V2,Dropshadow V2,Innershadow V2,Outerglow V2,Interglow V2,Interglow V2,Stroke V2,Stroke V2,Coloroverlay V2,Coliloverlay V2,GradientOverlay V2。
BlendMode V2代码的一部分来自Comfyui的Virtuoso节点。感谢原始作者。
提交yolov8detect节点。
提交QWENIMAGE2PROMPT节点,此节点是Comfyui_vlm_nodes的UForm-Gen2 Qwen Node的重新包装,这要归功于原始作者。
提交布尔亚器,编号量表,文本框,整数,float,booleannodes。这些节点可以执行数学和逻辑操作。
提交ExtendCanvasv2节点,支持颜色值输入。
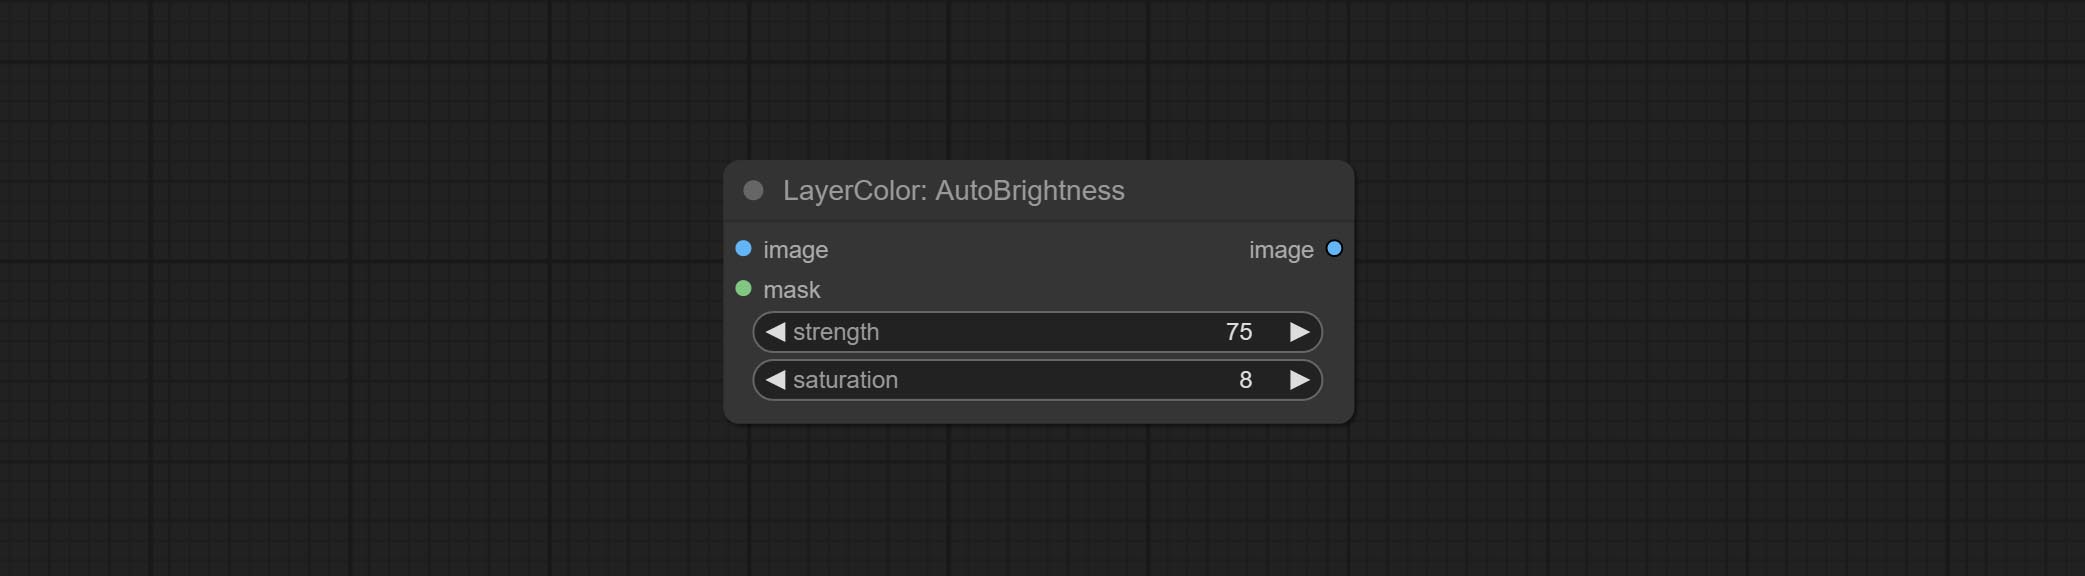
提交AutoBrightness节点,它可以自动调整图像的亮度。
CreateGradientMask节点添加center选项。
提交GetColortOnev2节点,可以为背景或主体选择主要和平均颜色。
提交ImageWardFilter节点,可以滤除质量差的图片。
Ultra Nodes添加VITMatte(local)方法,如果您之前已经下载了该模型,则可以选择此方法以避免访问HuggingFace.co。
提交HDR效应节点,它增强了输入图像的动态范围和视觉吸引力。该节点是HDR效果的重新包装(Superbeasts.ai)。
提交cropboxresolve节点。
提交Birefnetultra节点,它使用Birefnet模型去除背景具有更好的识别能力和超高边缘的详细信息。
提交ImageAutocroPV2节点,它可以选择不删除背景,支持掩码输入,并长时间或短侧尺寸扩展。
提交ImageHub节点,最多支持9组映像和掩码开关输出,并支持随机输出。
提交textjoin节点。
提交expssembellish节点。它输出抛光的及时单词,并支持将图像作为引用。
超节点已完全升级到V2版本,并添加了Vitmatte Edge Processing方法,该方法适用于处理半透明区域。包括MaskEdgeultradetailv2,SementanyThingulTrav2,rmbgultrav2和shormmaskultrav2节点。
提交阴影和高光节点的颜色,它可以分开调整深色和明亮部分的颜色。提交阴影并突出显示面膜节点,它可以输出黑暗和明亮区域的掩码。
在原始节点的基础上提交CropByMaskV2节点,它支持crop_box输入,从而方便切割相同尺寸的层。
提交SimpleTextImage节点,它从文本中生成简单的排版图像和掩码。该节点引用了Zho-zho-zho/comfyui-text_image-composite的一些功能和代码。
提示提示节点节点,推断基于图像的提示。它可以替换提示的密钥单词(需要应用Google Studio API密钥)。升级ColorimageV2和渐变ImimageV2,支持用户自定义预设尺寸和size_as输入。
提交喇嘛节点,它可以基于掩码从图像中删除对象。该节点是重新包装的。
提交ImageMoveAlpha和ImageCombinealpha节点,可以删除或合并图像的α通道。
提交Imagesscalerestorev2和ImagessCalebyAspectratiov2节点,支持缩放图像到指定的长边或短边尺寸。
提交shoremaskultra节点,生成肖像脸,头发,身体皮肤,衣服或配饰的口罩。该节点的模型代码来自A-Person掩膜生成器。
提交Lightleak节点,该过滤器模拟了膜的光泄漏效果。
提交薄膜节点,该滤镜模拟了胶片的谷物,深边缘和模糊的边缘,支持输入深度图以模拟散焦。它是重组和封装数字约翰/comfyui-Propost的。
提交ImageAutrocrop节点,该节点旨在生成用于训练模型的图像材料。
提交ImagesscalebyAspectratio节点,可以根据框架比率将图像缩放或掩盖。
修复LUT中的颜色级别的错误应用节点渲染,现在该节点支持对日志颜色空间。 *请为日志色彩空间图像加载专用的日志LUT文件。
提交CreateGradientMask节点。提交layerimagetransform和layermaskTransform节点。
提交MaskEdgeUltradetail节点,它将粗糙的掩码处理到超细边缘。
提交尖锐而柔软的节点,它可以增强或平滑图像细节。提交MaskByDiverent节点,它比较两个图像并输出掩码。提交sementanythingultra节点,提高面膜边缘的质量。 *如果未安装分段,则需要手动下载该模型。
所有节点均具有完全支持的批处理图像,为视频创建提供了便利。 (CropbyMask节点仅支持相同大小的剪切。如果输入批处理bast_for_crop,则将使用第一张表中的数据。)
提交REMBGULTRA和PIXELSPREAD节点可显着提高掩模质量。 *REMBGULTRA需要手动模型下载。
提交textimage节点,它生成文本图像和掩码。
在图像之间添加新型的混合模式。现在支持多达19个混合模式。添加color_burn,color_dodge,linear_burn,linear_dodge,Overlay,soft_light,hard_light,vivid_light,pin_light,linear_light和hard_mix 。新添加的混合模式适用于支持混合模式的所有节点。
提交colormap滤镜节点以创建伪彩色热图效应。
提交水彩和皮肤节点。这些是产生水彩和皮肤光滑效果的图像过滤器。
提交ImageShift节点以移动图像并输出位移接缝掩码,从而方便创建连续纹理。
提交ImageMaskScaleas节点以根据参考图像调整图像或掩码大小。
提交Imagesscalerestore节点与CropbyMask合作进行本地高档和维修工作。
提交CropByMask和RestoreCropbox节点。这两个的组合可以在恢复图像之前部分裁剪并重新绘制图像。
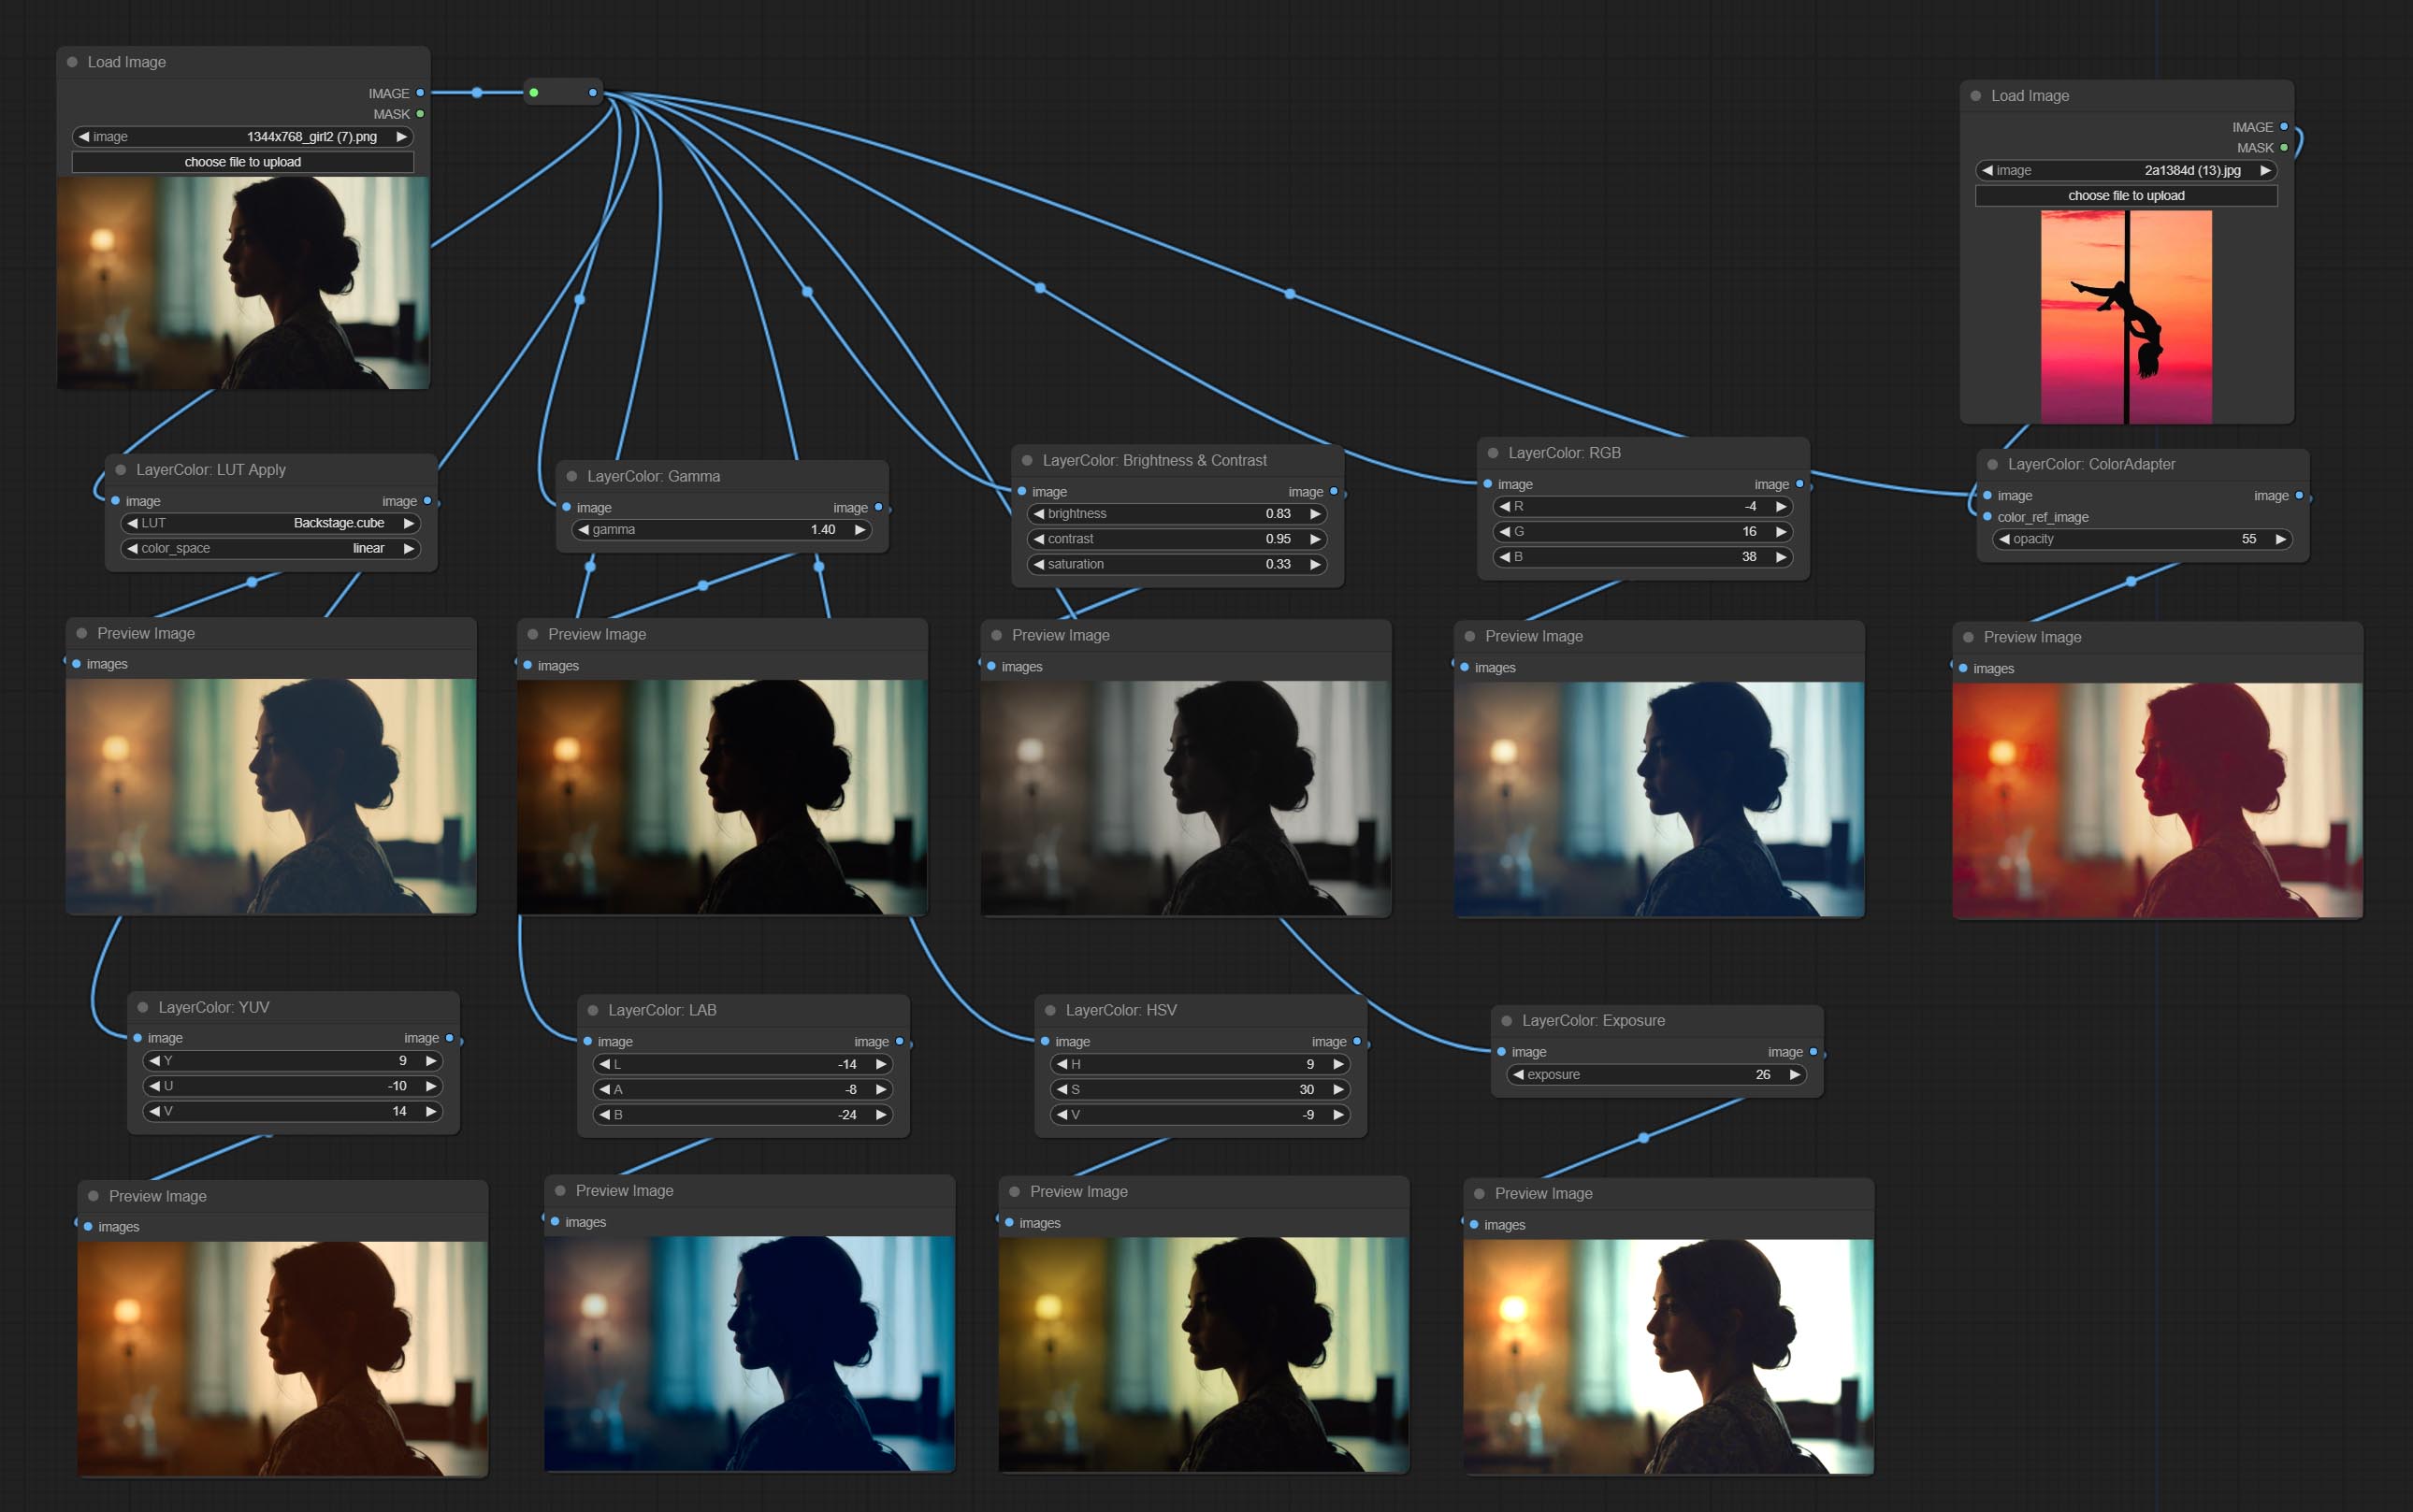
提交Coloradapter节点,可以自动调整图像的色调。
提交MaskStroke节点,它可以生成Mask Contour Strokes。
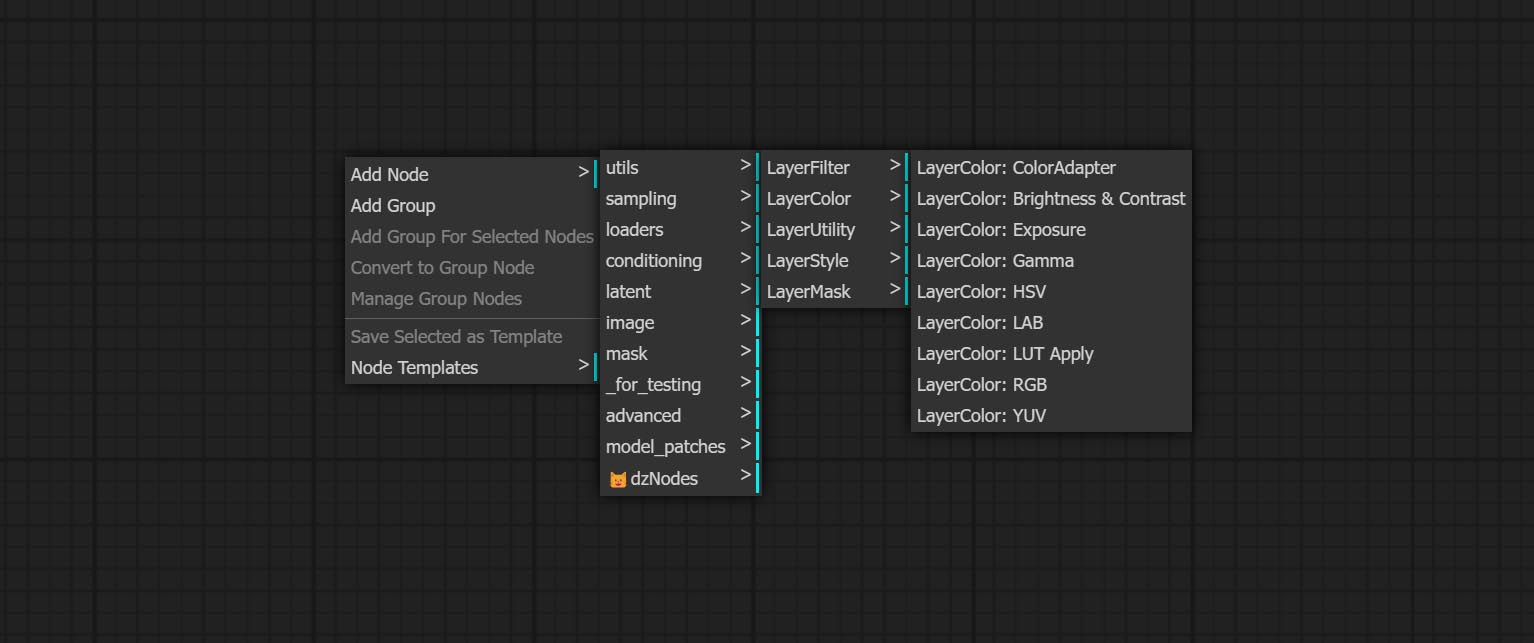
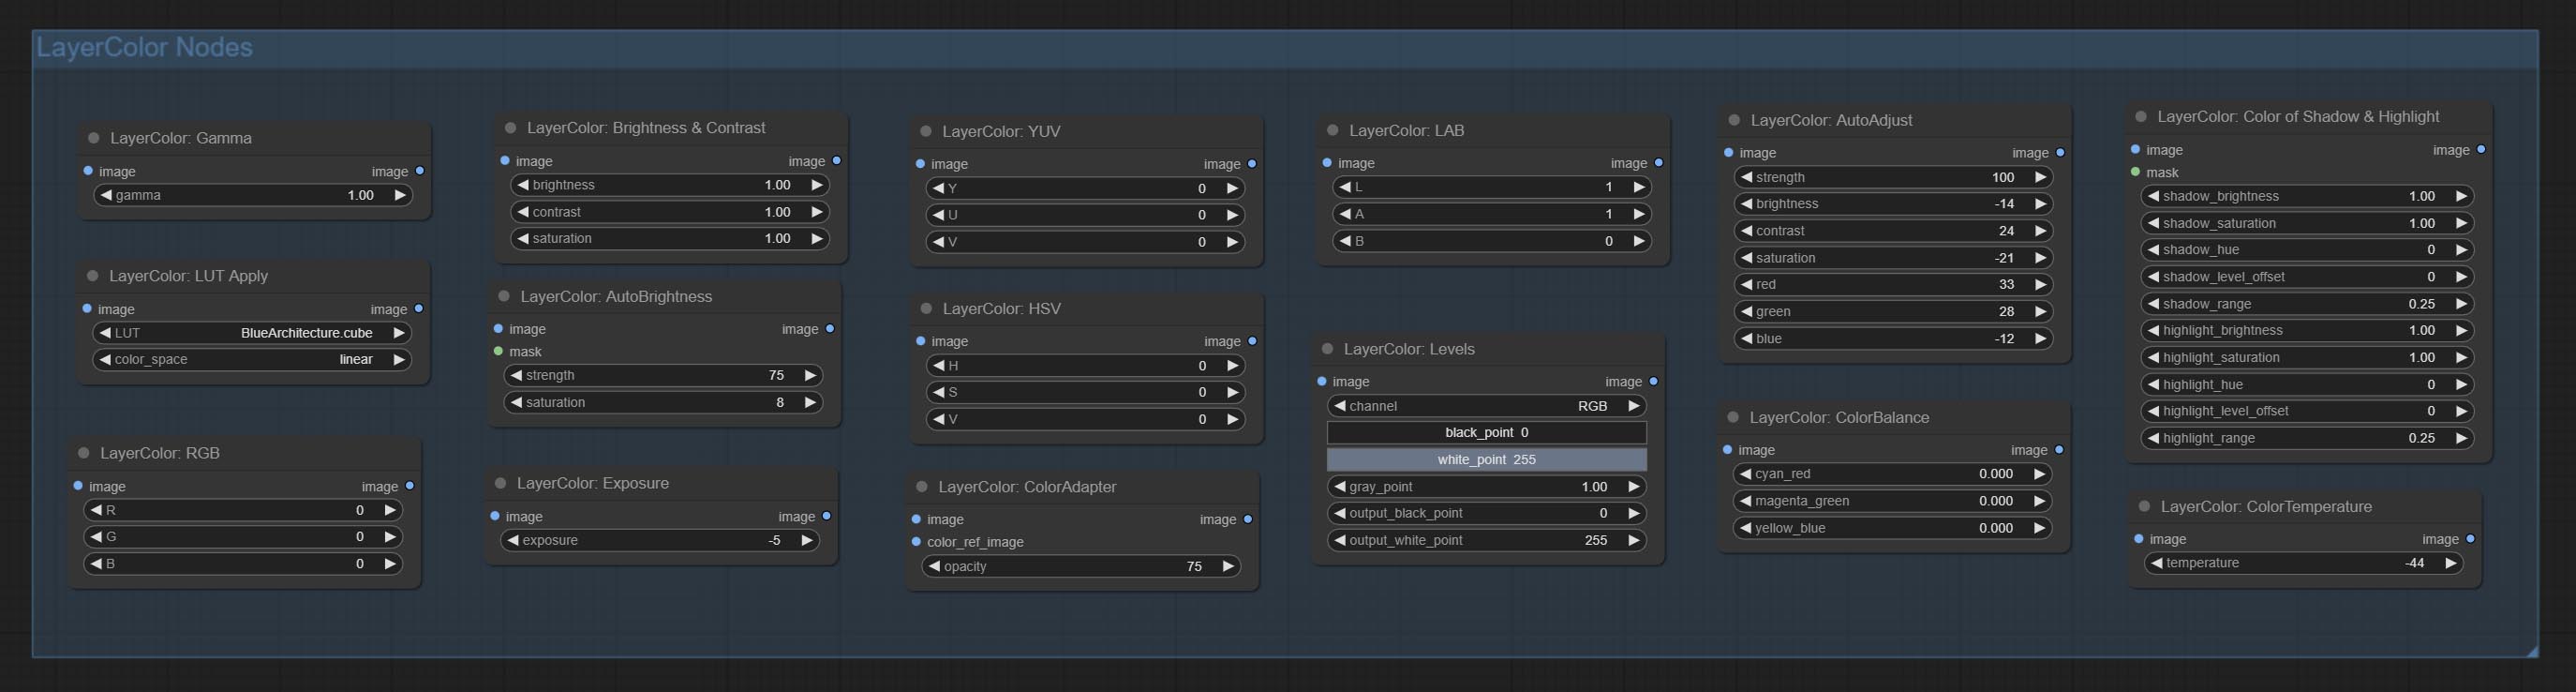
添加用于调整图像颜色的LayerColor节点组。它包括LUT应用,伽玛,亮度和对比度,RGB,YUV,实验室ADN HSV。
提交ImageChannelsplit和ImageChannelmerge节点。
提交MaskMotionBlur节点。
提交软灯节点。
COMMAL CHANNELSHAKE节点(即过滤器)可以产生与Tiktok徽标相似的通道位错效应。
提交蒙版节点可以在掩码中创建梯度。
提交getColortone节点,可以获得图像的主要颜色或平均颜色。提交MaskGrow和MaskEdgeshrink节点。
提交MaskBoxDetect节点,该节点可以自动通过掩码检测位置并将其输出到复合节点。将XY提交为百分比节点,以将绝对坐标转换为百分比坐标。提交高斯布鲁尔节点。提交getImagesize节点。
提交ExtendCanvas节点。
提交ImageBlendAdvance节点。该节点允许综合背景图像和不同大小的层,提供更自由的综合体验。将PrintInfo节点作为工作流程调试辅助。
提交比色像和梯度图像节点,用于生成固体和梯度颜色图像。
提交渐变连续层和色彩播放节点。添加无效的掩码输入判断,并在输入无效的掩码时忽略它。
提交Innerglow,Innershadow和MotionBlur节点。
重命名所有完整的节点,将节点分为4组:层材料,layermask,层级,层,层。需要用新版本节点手动替换包含旧版本节点的工作流程。
Outerglow节点通过添加亮度, Light_Color和Glow_Color的选项进行了重大修改。
提交MaskInvert节点。
提交colorPick节点。
提交冲程节点。
提交MaskPreview节点。
提交ImageOpacity节点。
layer_mask现在不是强制输入。允许使用具有不同形状的层和口罩,但大小必须保持一致。
提交ImageBlend节点。
提交OuterGlow节点。
提交Dropshadow节点。
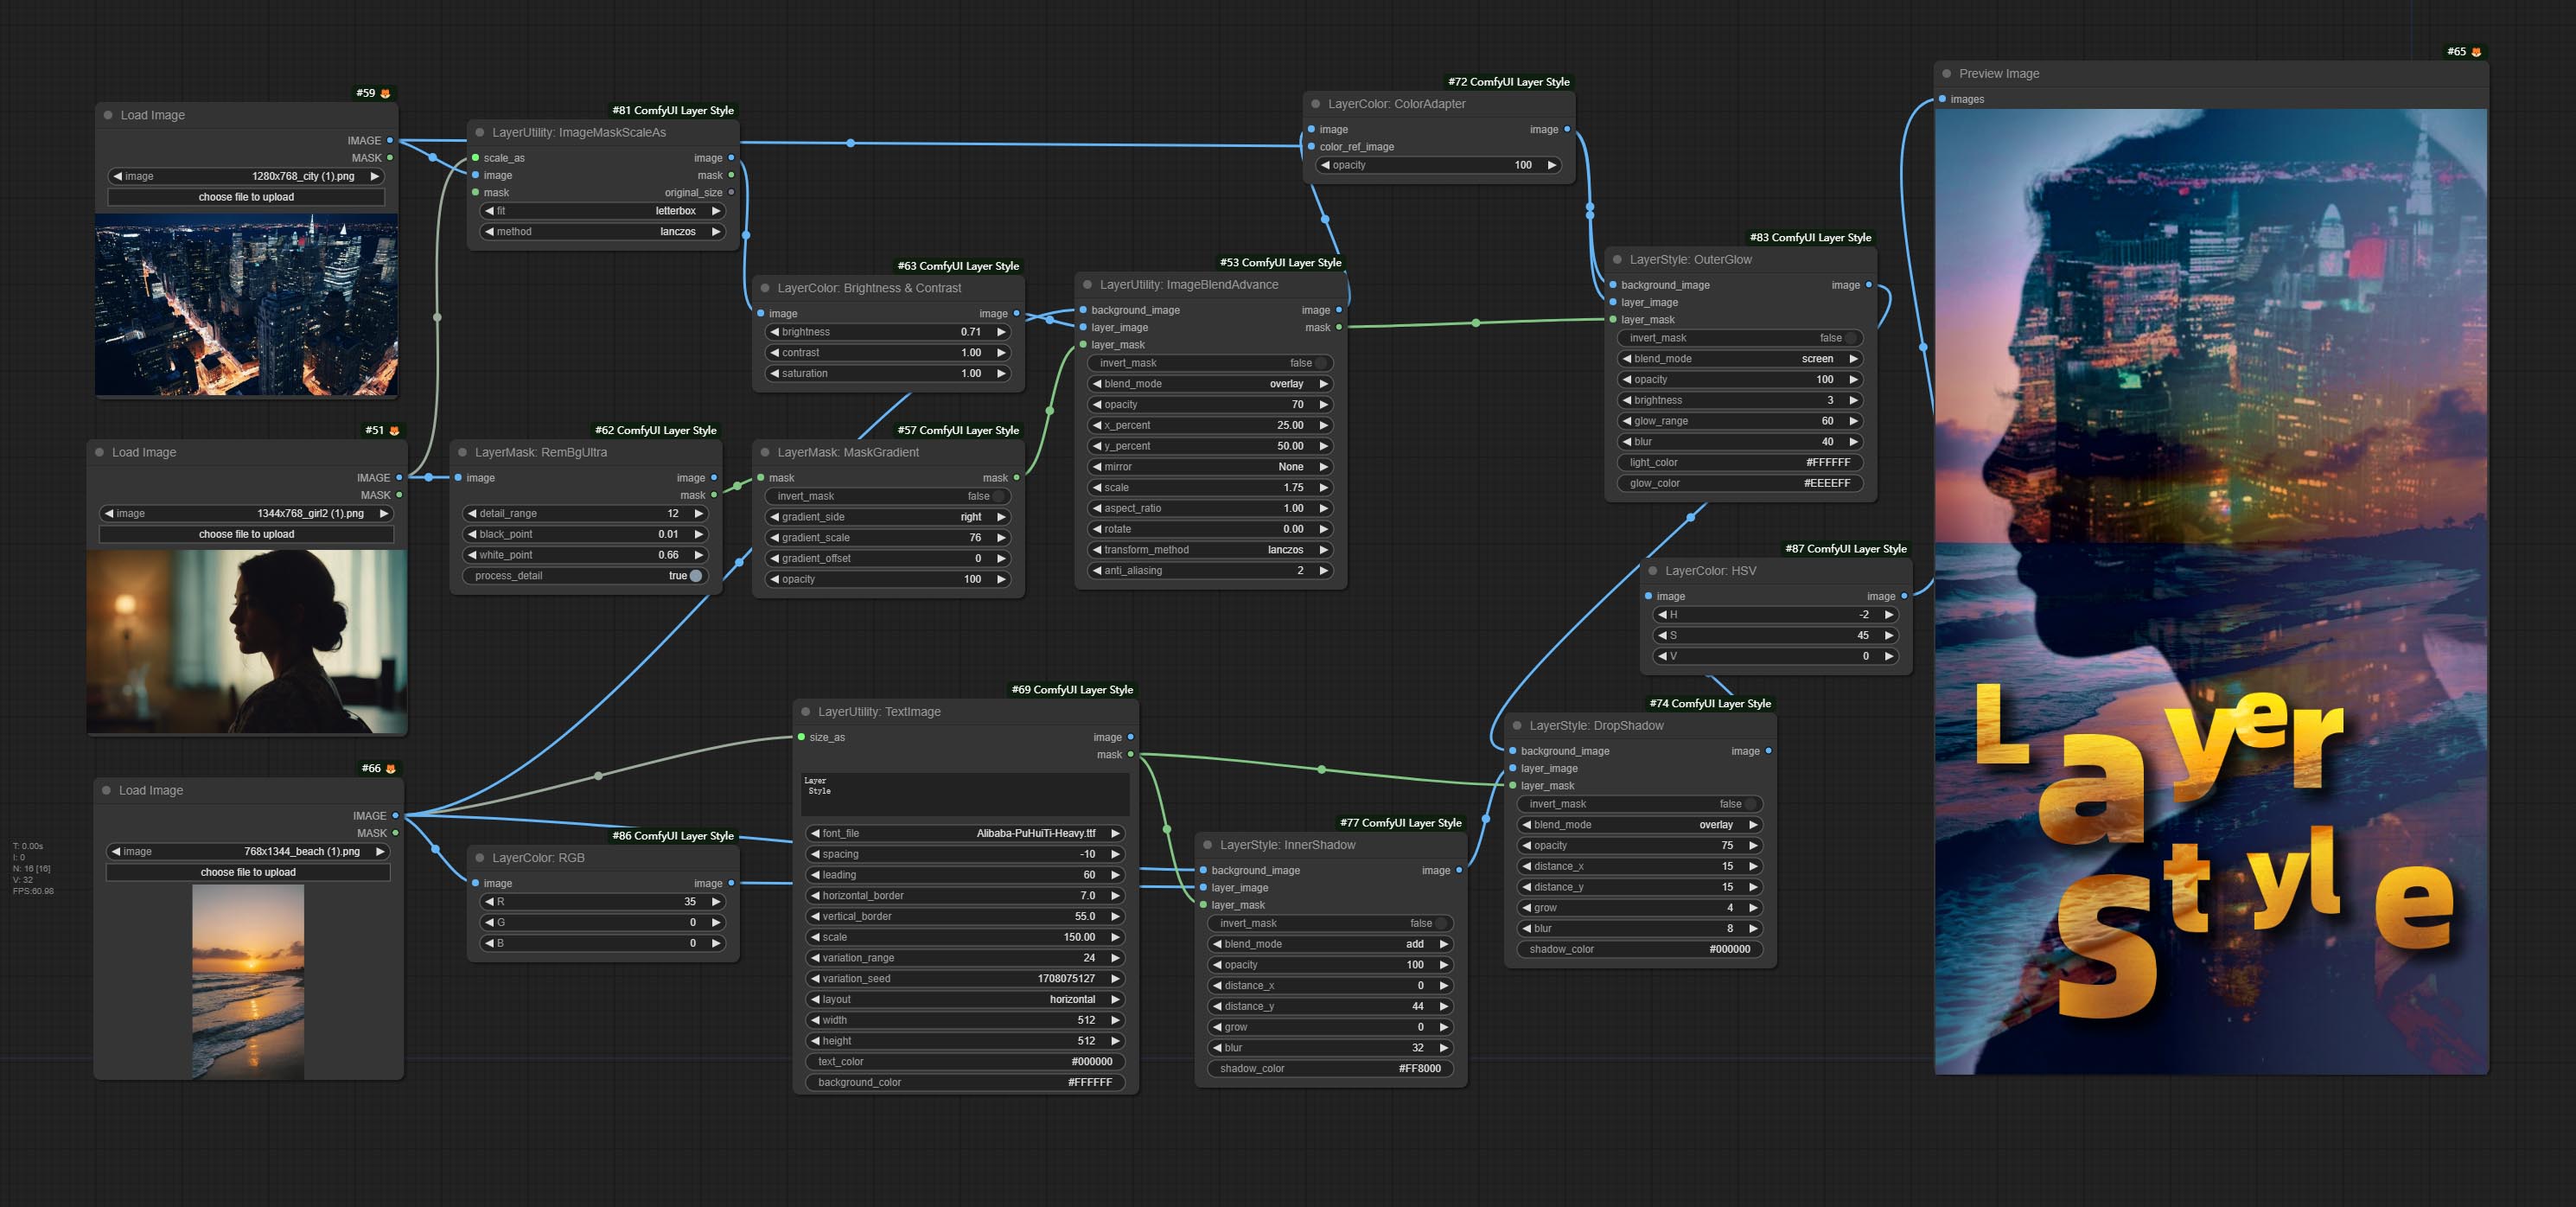
描述
节点根据它们的功能分为5组:层,外行,外行词,分层和层式滤波器。
- layerstyle节点提供模仿Adobe Photoshop的图层样式。

- LayerColor节点组提供颜色调整功能。
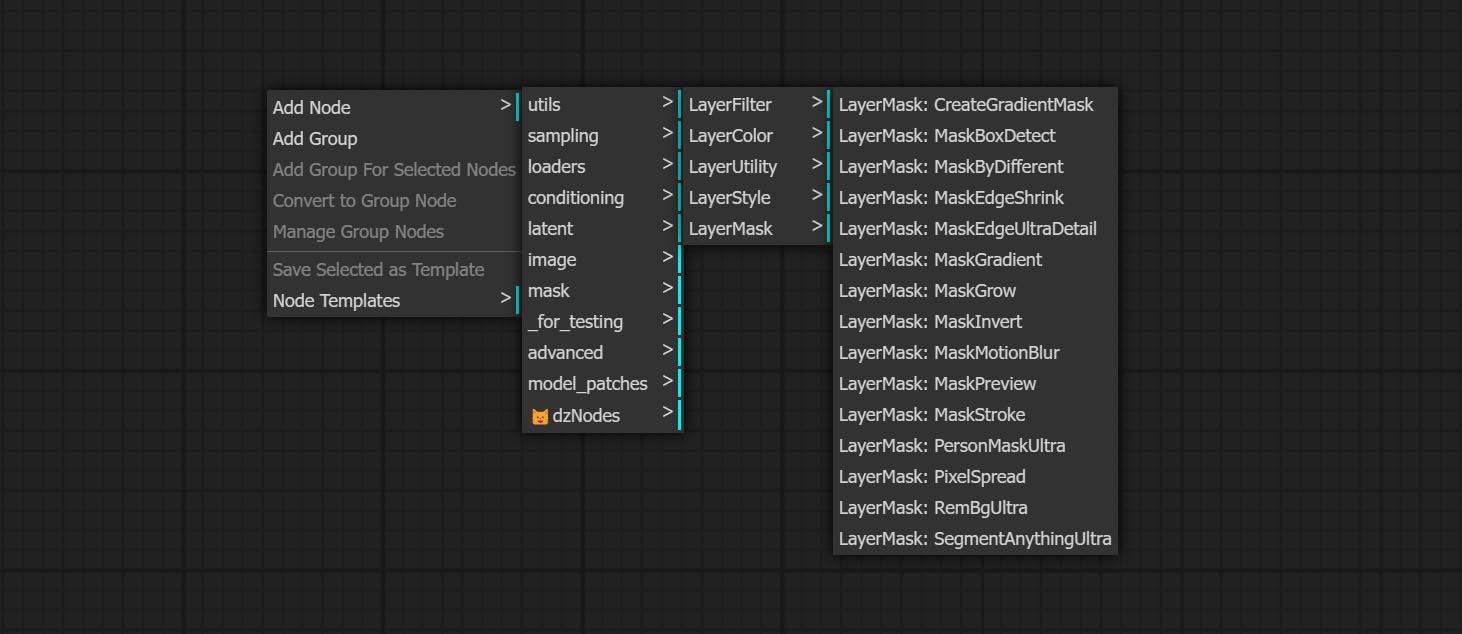
- Layermask节点提供掩模辅助工具。
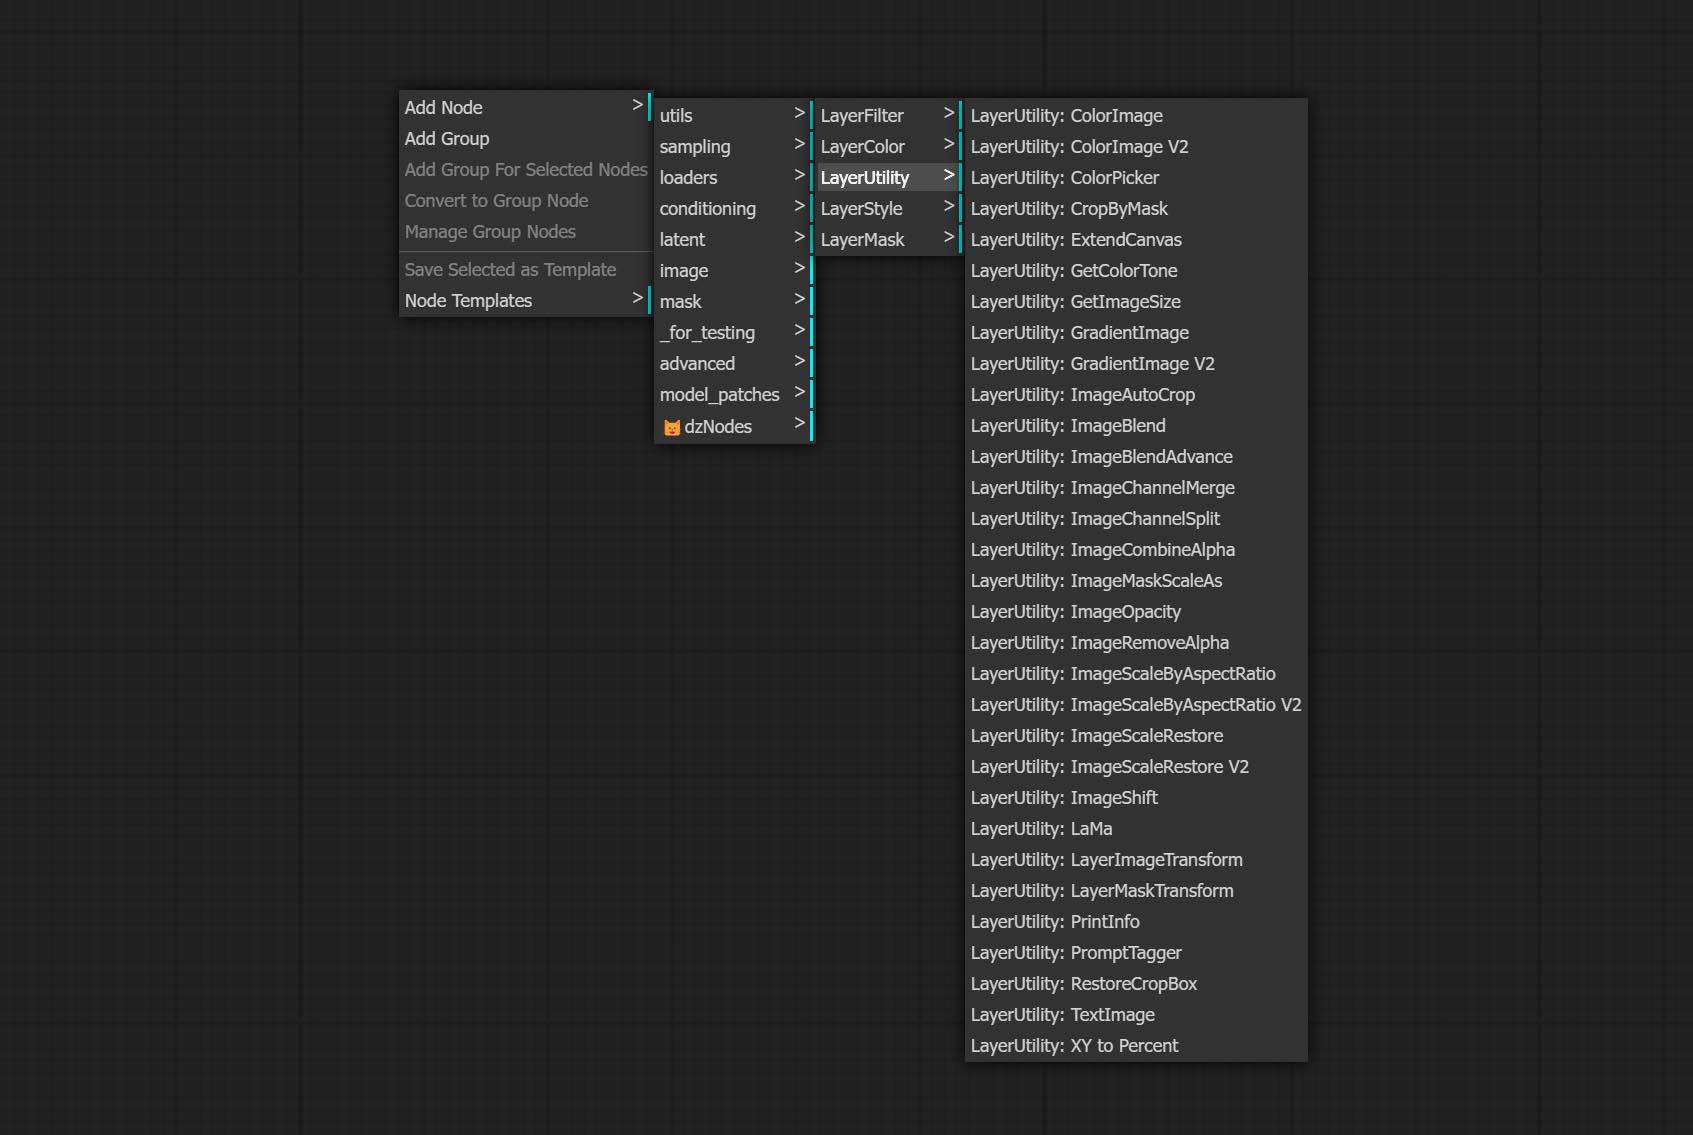
- 分层节点提供与层合成工具和工作流有关的辅助节点。
- LayerFilter节点提供图像效应过滤器。
层
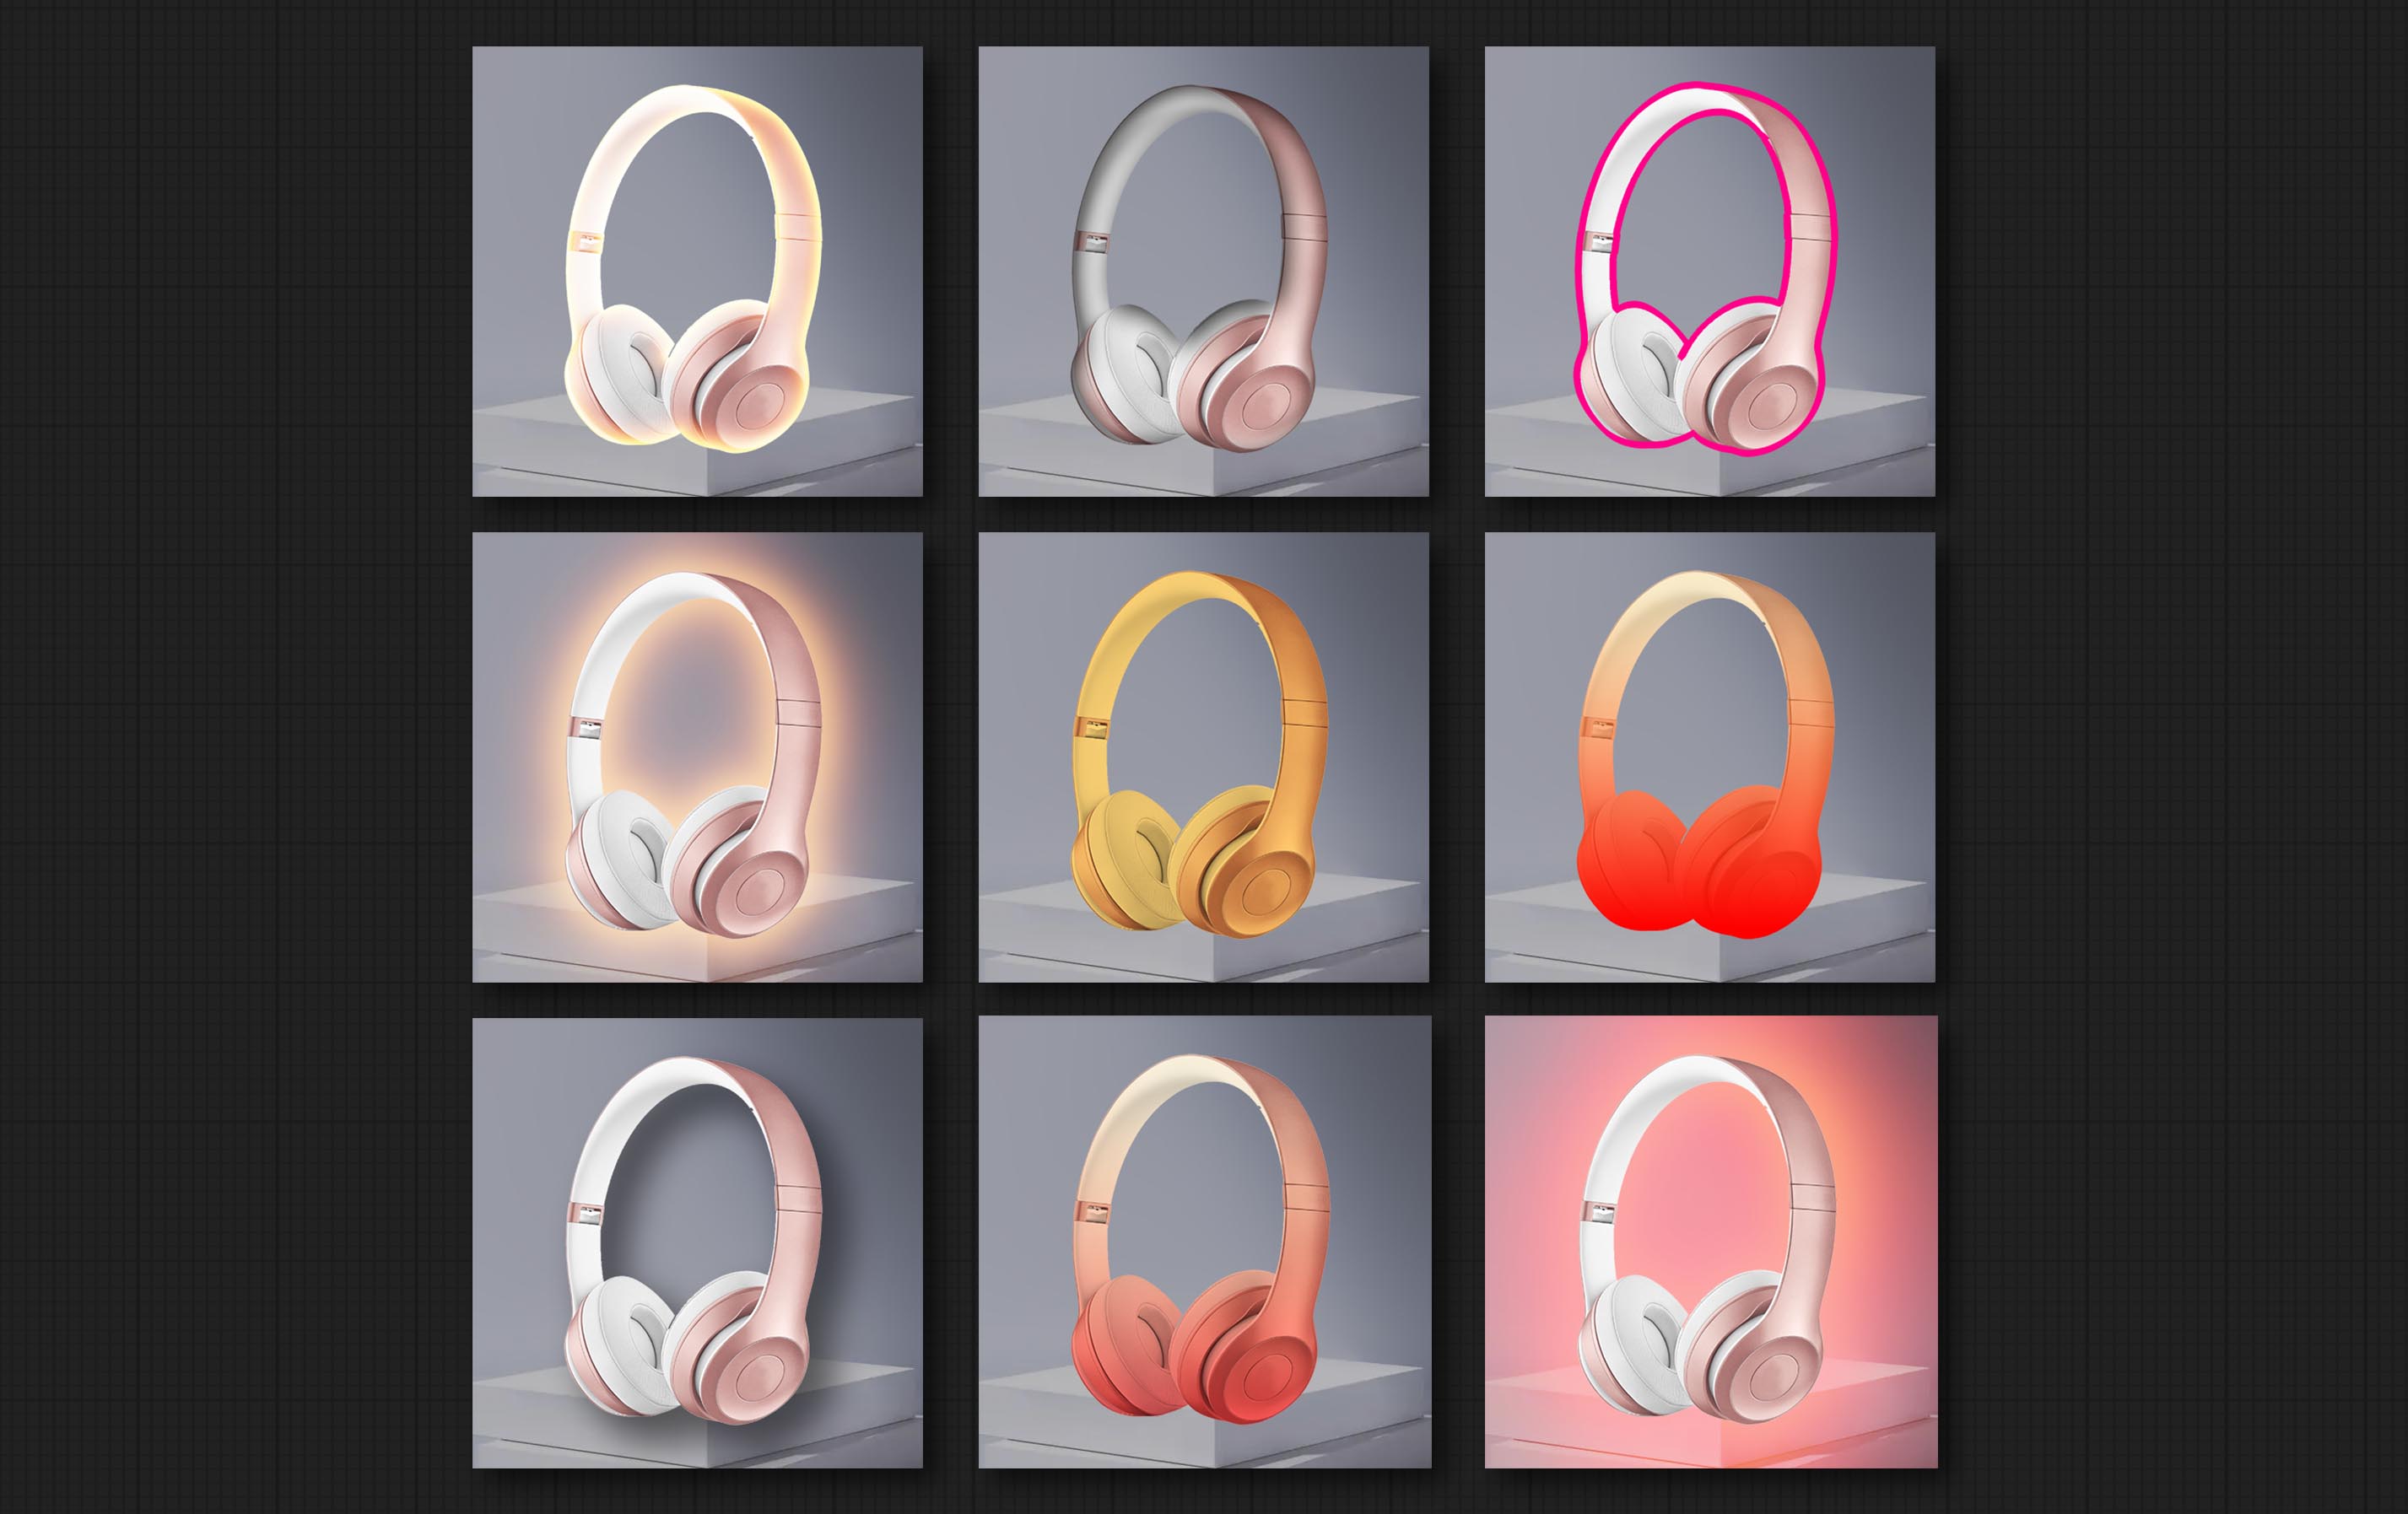
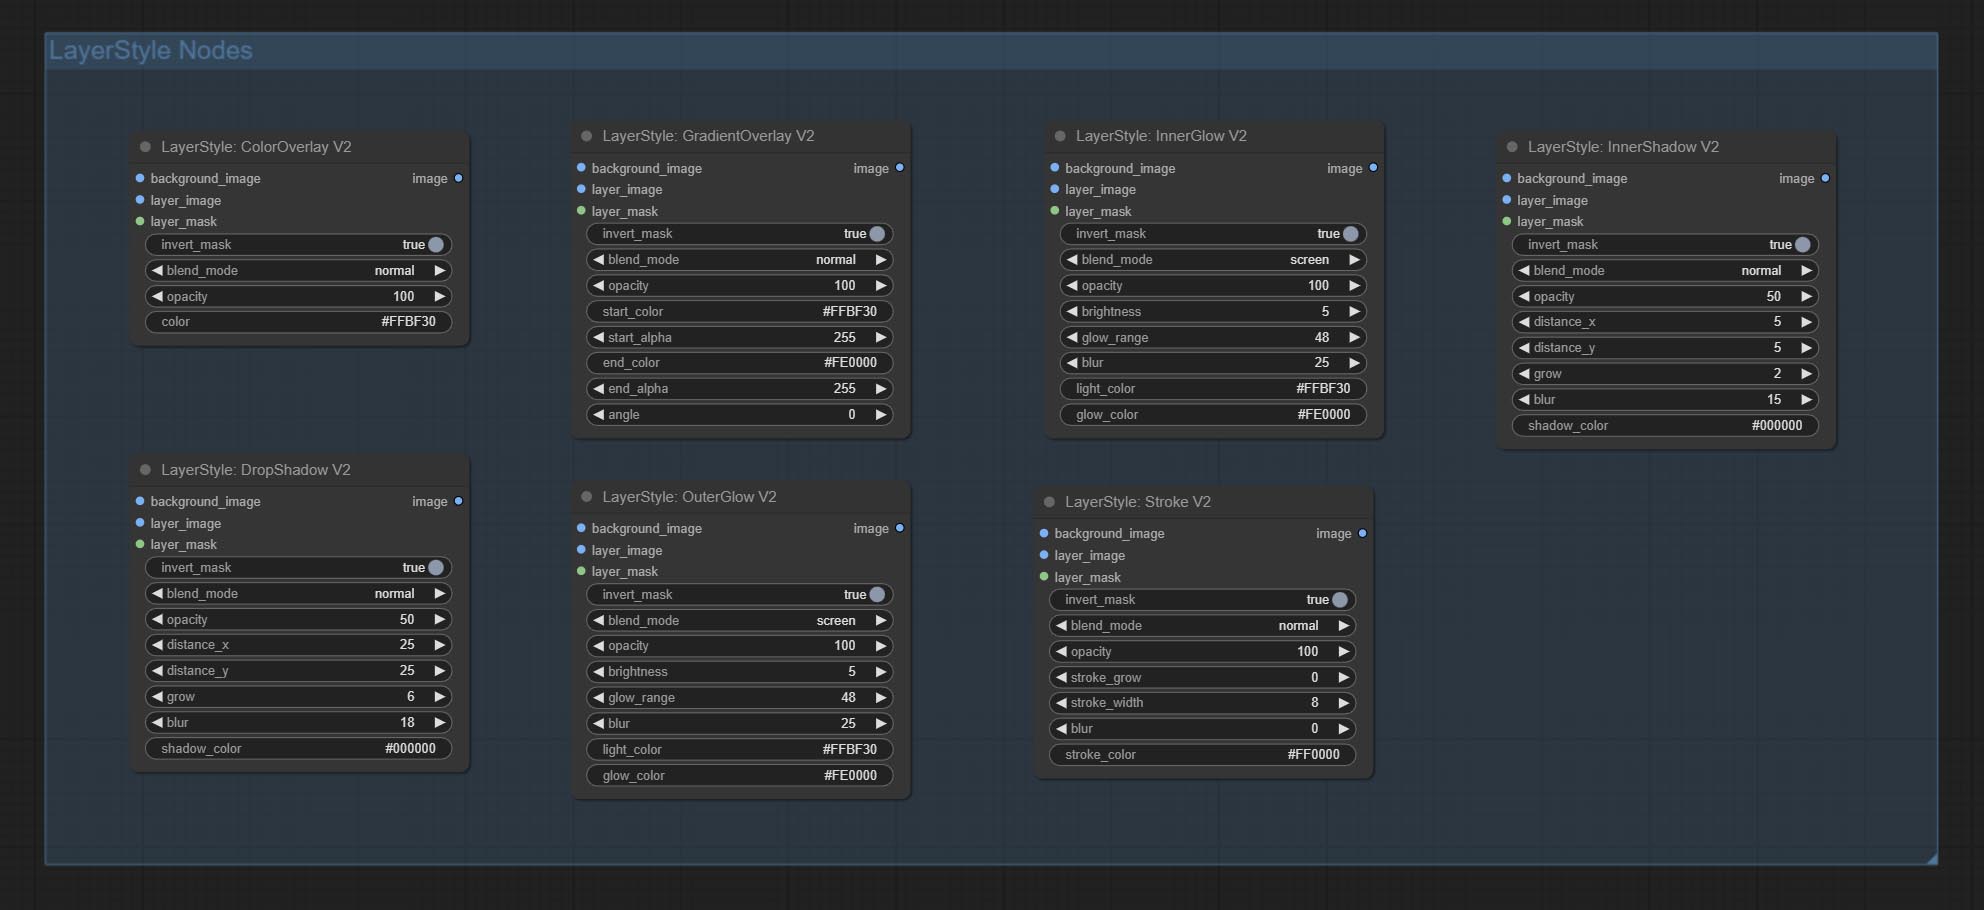
Dropshadow
产生阴影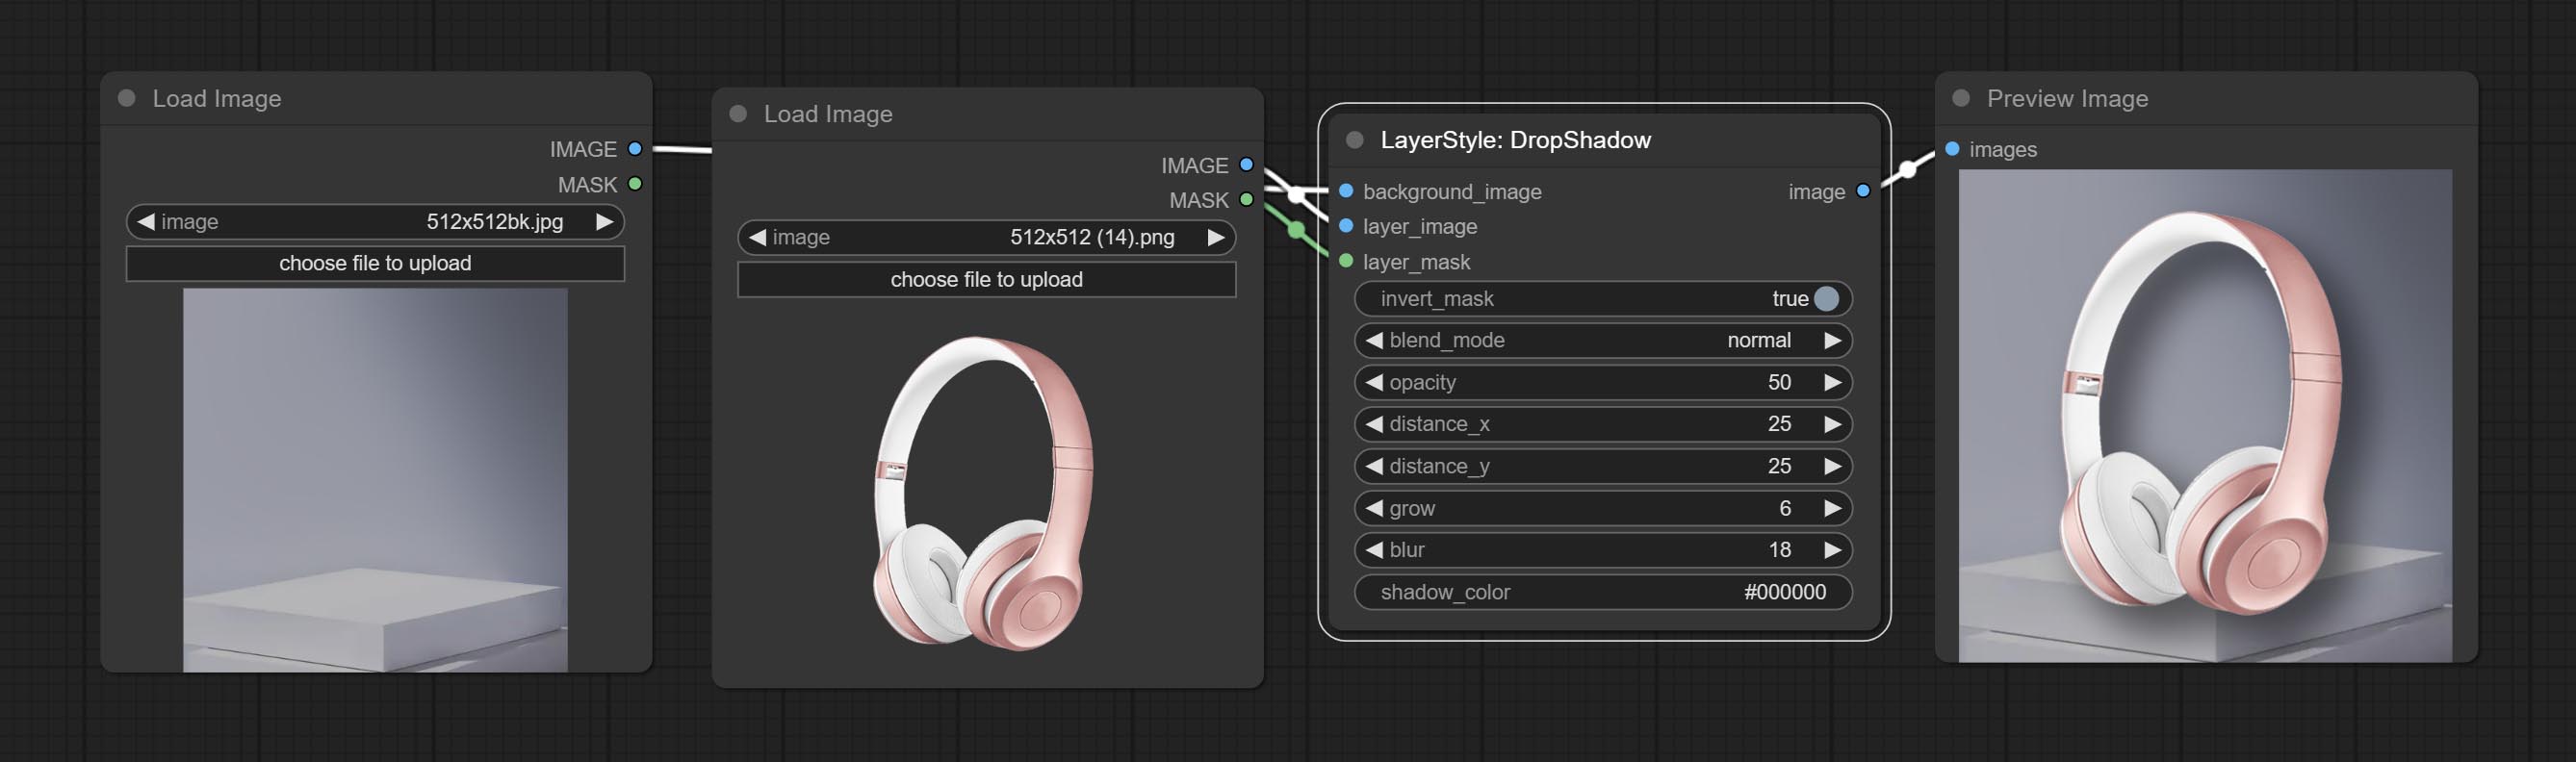
节点选项: 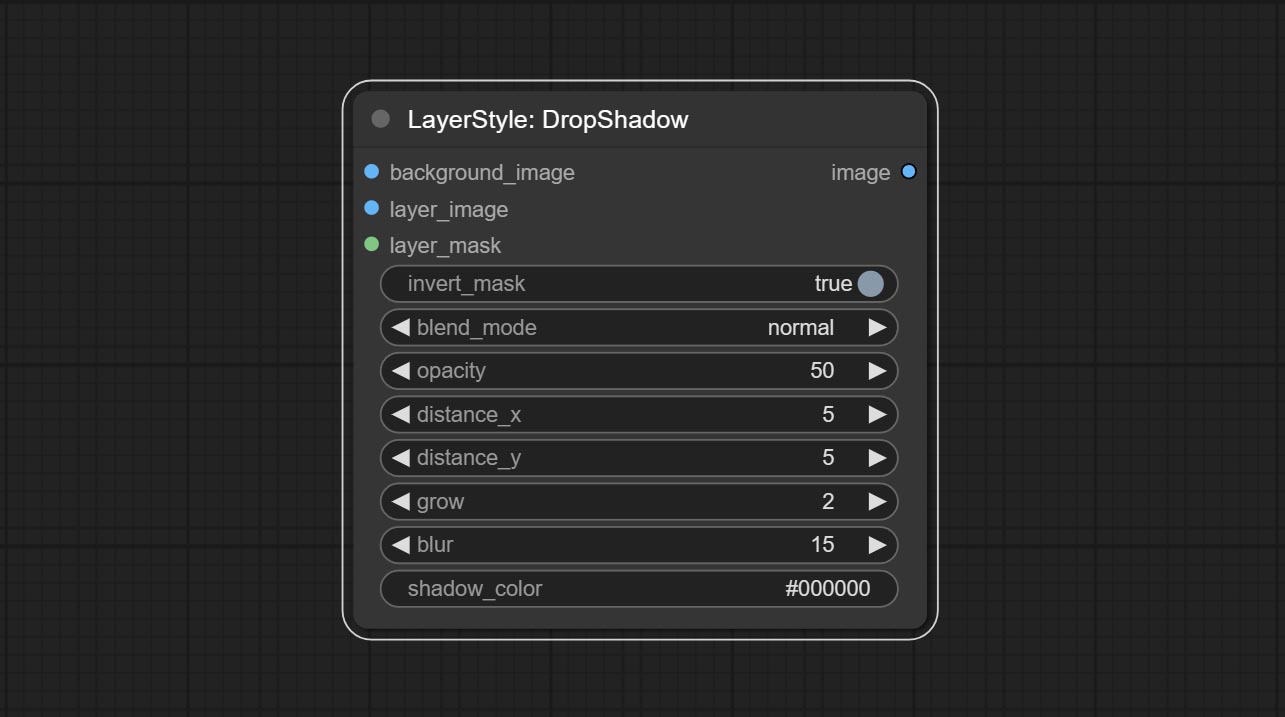
- 背景_IMAGE 1 :背景图像。
- layer_image 1 :复合图层图像。
- layer_mask 1,2 :层掩码,用于layer_image,阴影是根据其形状生成的。
- invert_mask:是否要反转面膜。
- Blend_mode 3 :阴影的混合模式。
- 不透明:阴影的不透明度。
- decter_x:阴影的水平偏移。
- decter_y:阴影的垂直偏移。
- 成长:阴影膨胀幅度。
- 模糊:阴影模糊级别。
- Shadow_color 4 :阴影颜色。
- 笔记
Outerglow
产生外部光芒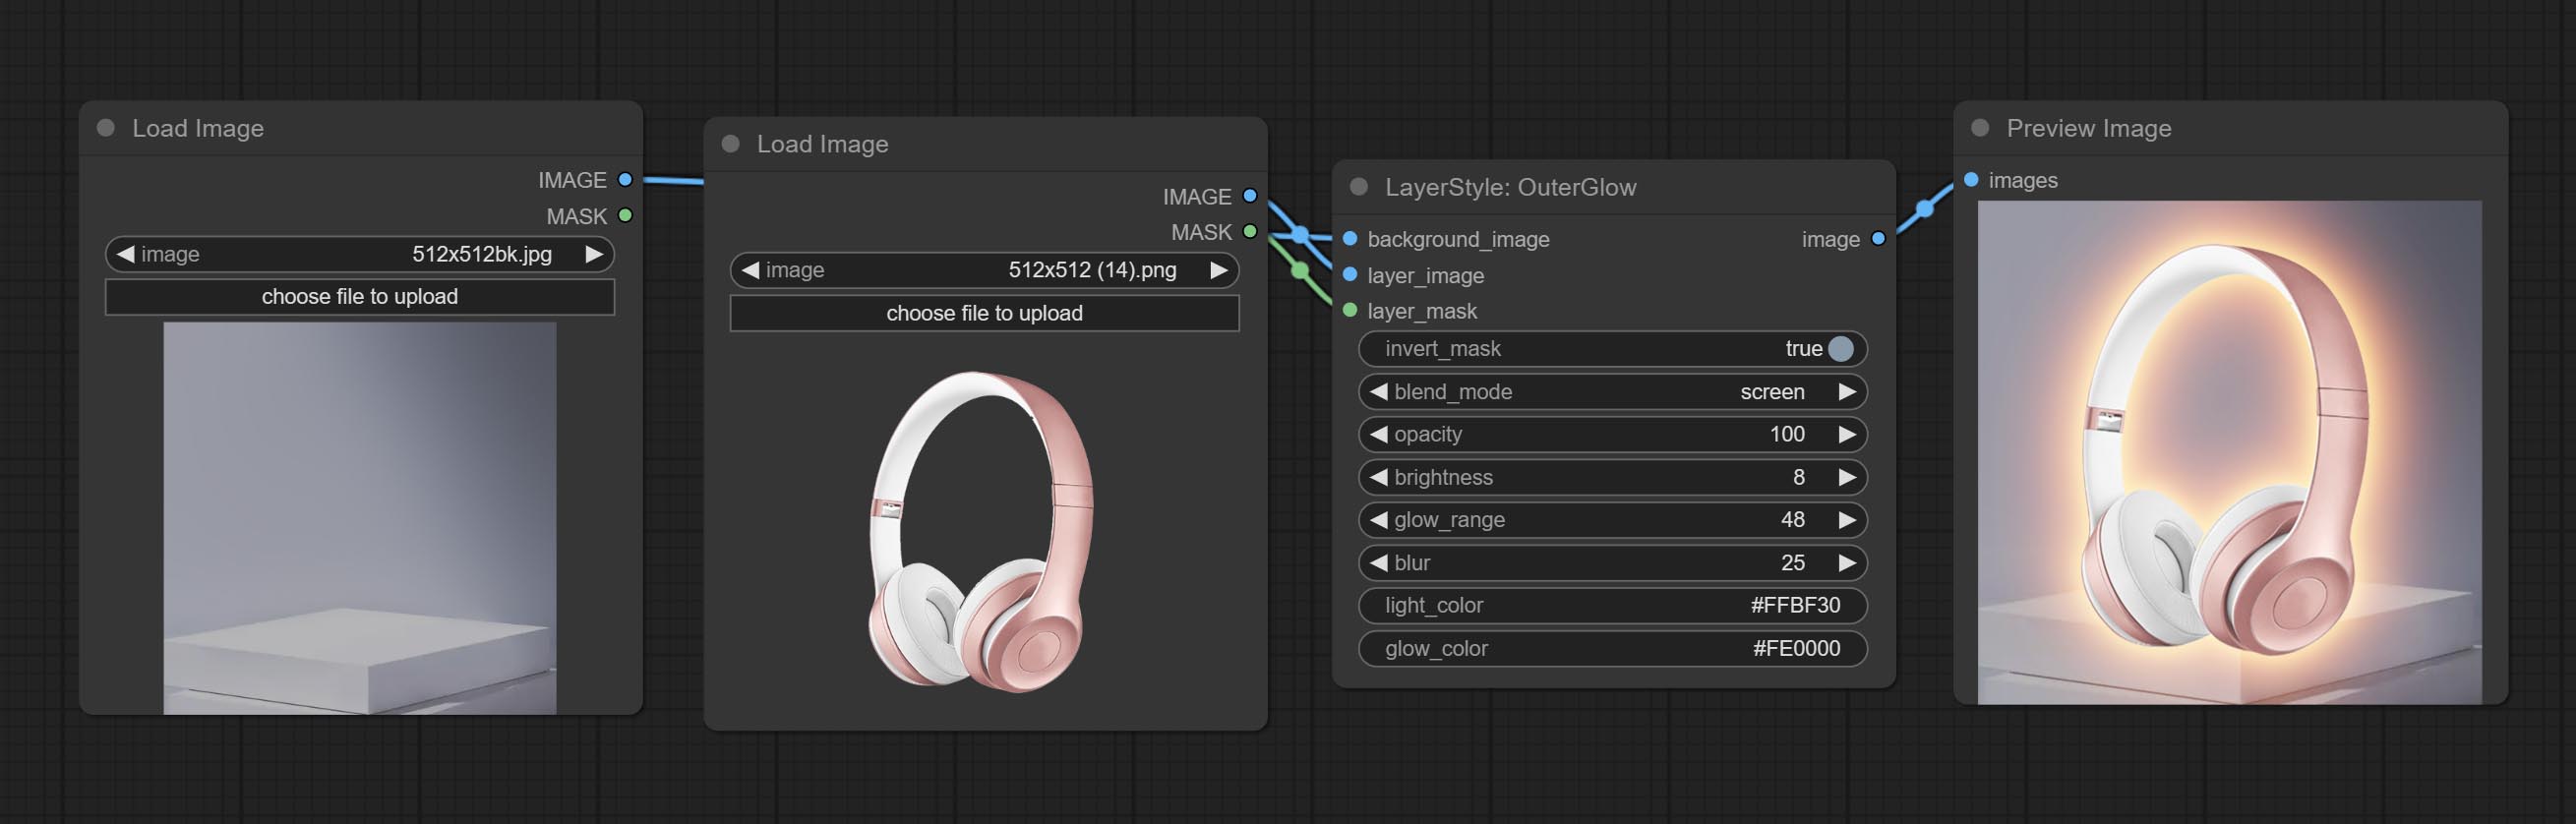
节点选项: 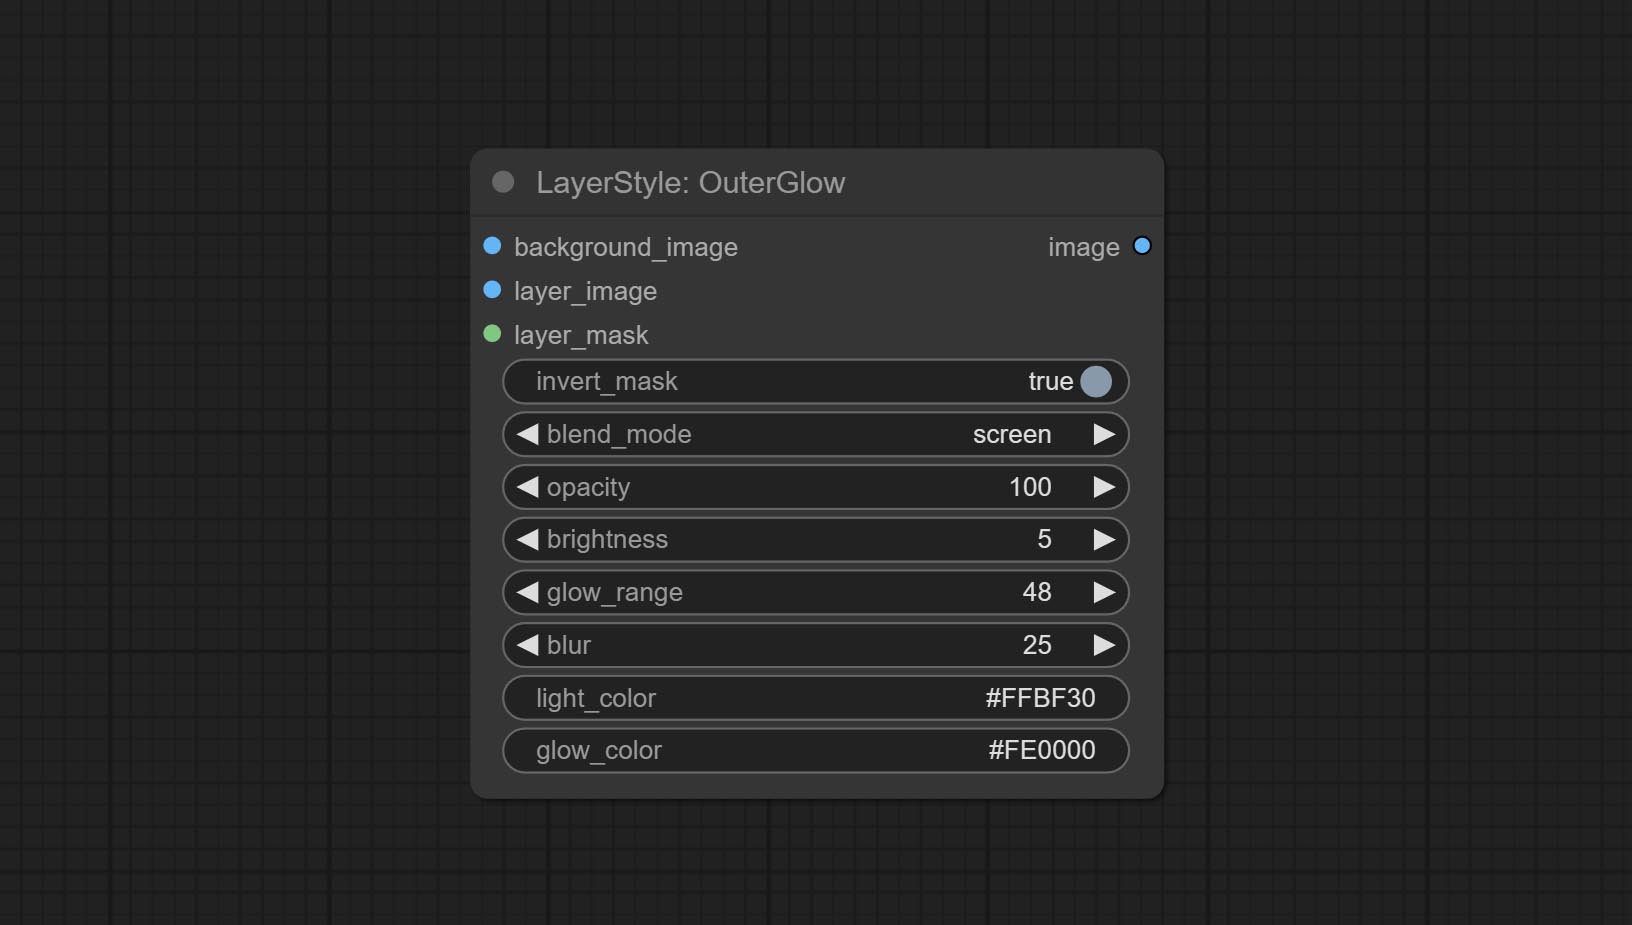
- 背景_IMAGE 1 :背景图像。
- layer_image 1 :复合图层图像。
- layer_mask 1,2 :layer_image的掩码,根据其形状生成生长。
- invert_mask:是否要反转面膜。
- Blend_mode 3 :汇总模式。
- 不透明度:光泽的不透明度。
- 亮度:光的亮度。
- Glow_range:闪光范围。
- 模糊:光泽的模糊。
- Light_color 4 :辉光的中心部分颜色。
- GLOW_COLOR 4 :GLOW的边缘零件颜色。
- 笔记
Innershadow
产生内在阴影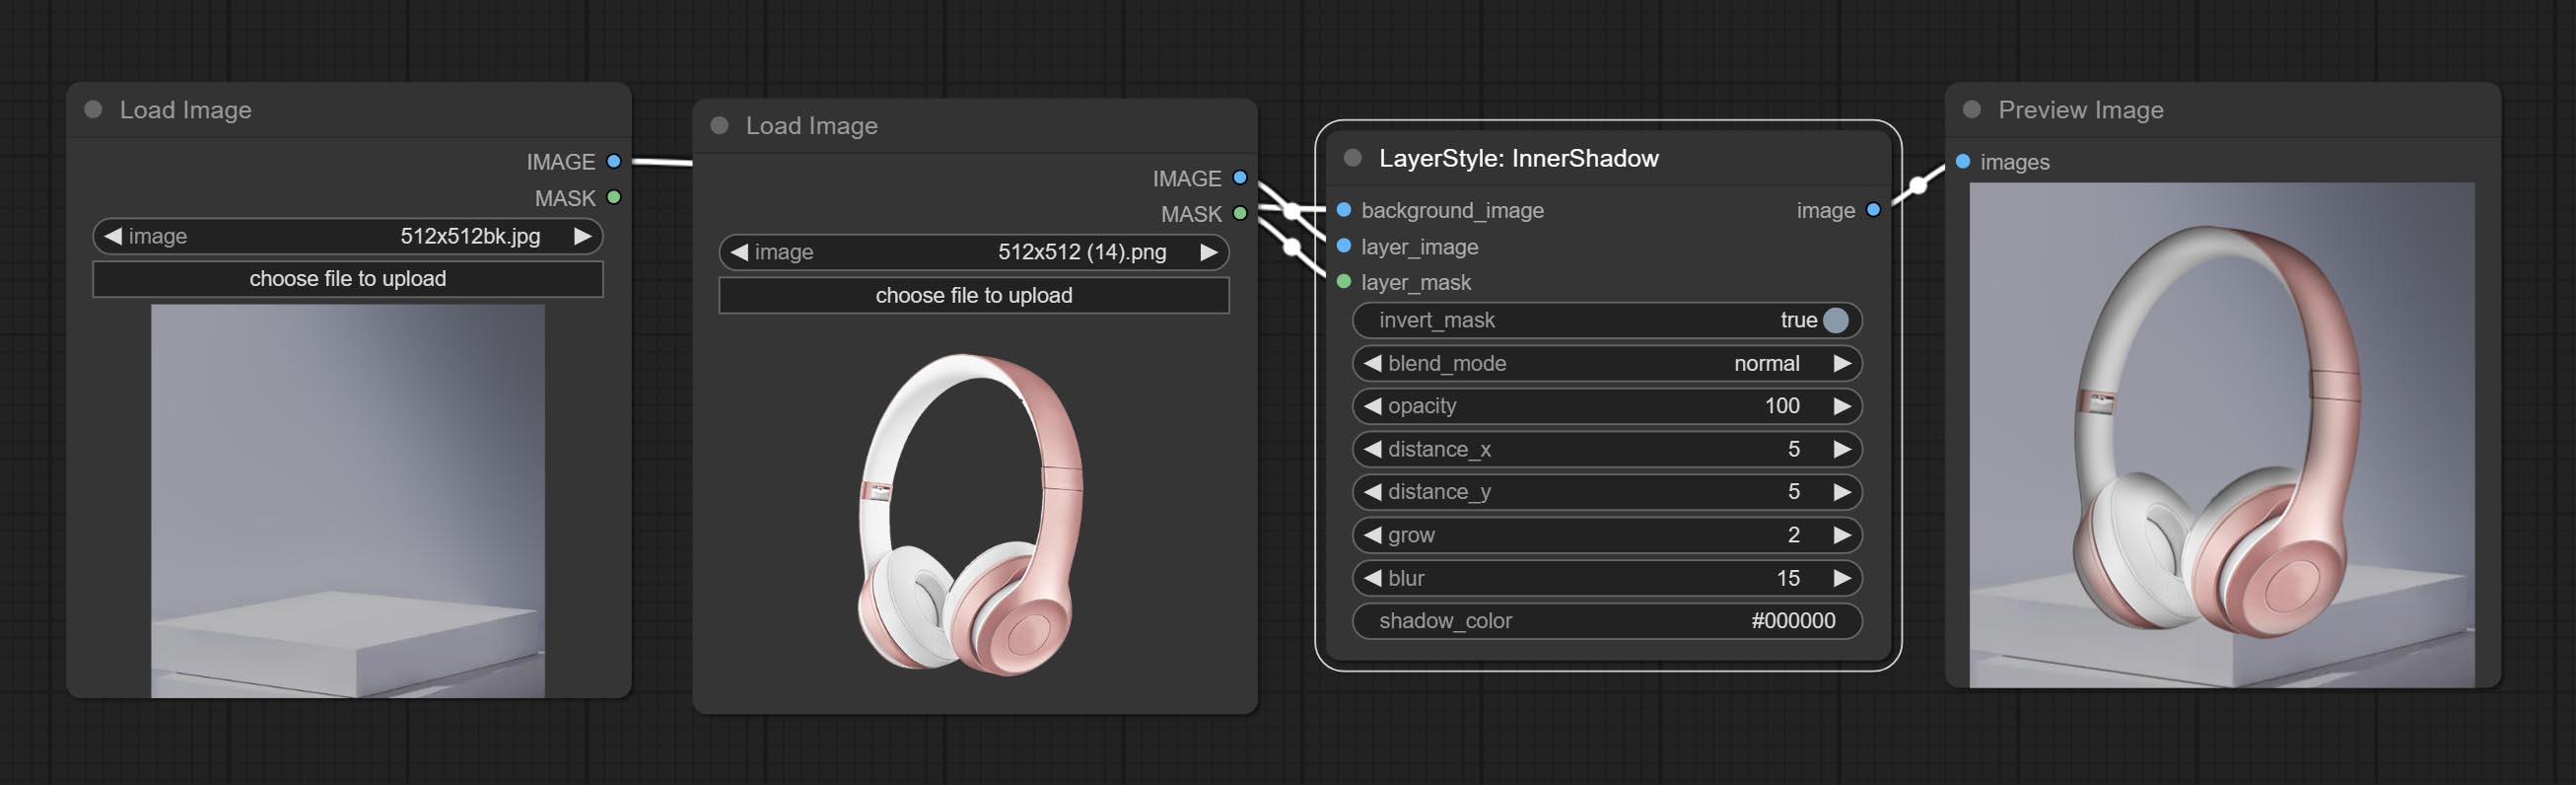
节点选项: 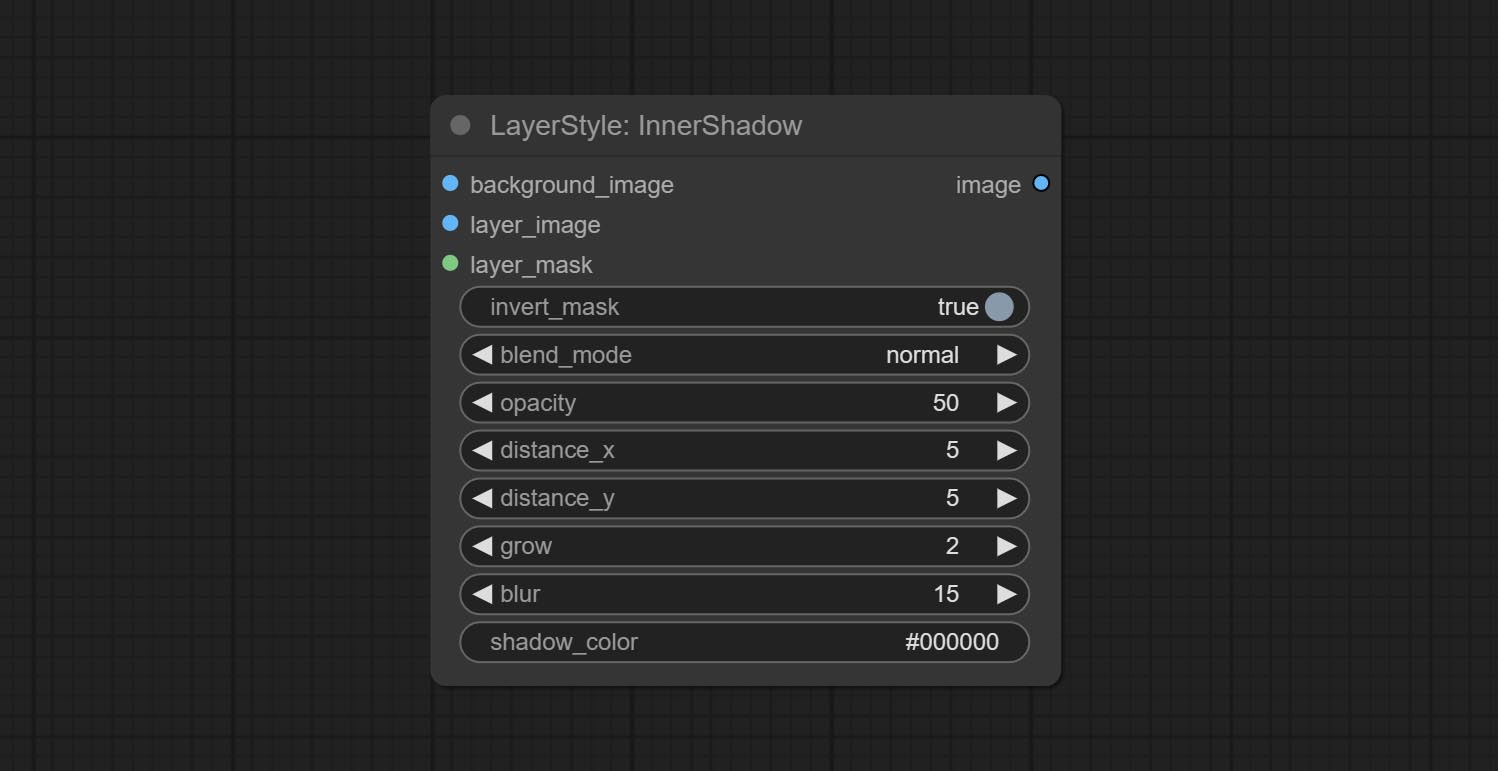
- 背景_IMAGE 1 :背景图像。
- layer_image 1 :复合图层图像。
- layer_mask 1,2 :层掩码,用于layer_image,阴影是根据其形状生成的。
- invert_mask:是否要反转面膜。
- Blend_mode 3 :阴影的混合模式。
- 不透明:阴影的不透明度。
- decter_x:阴影的水平偏移。
- decter_y:阴影的垂直偏移。
- 成长:阴影膨胀幅度。
- 模糊:阴影模糊级别。
- Shadow_color 4 :阴影颜色。
- 笔记
innerglow
产生内部光芒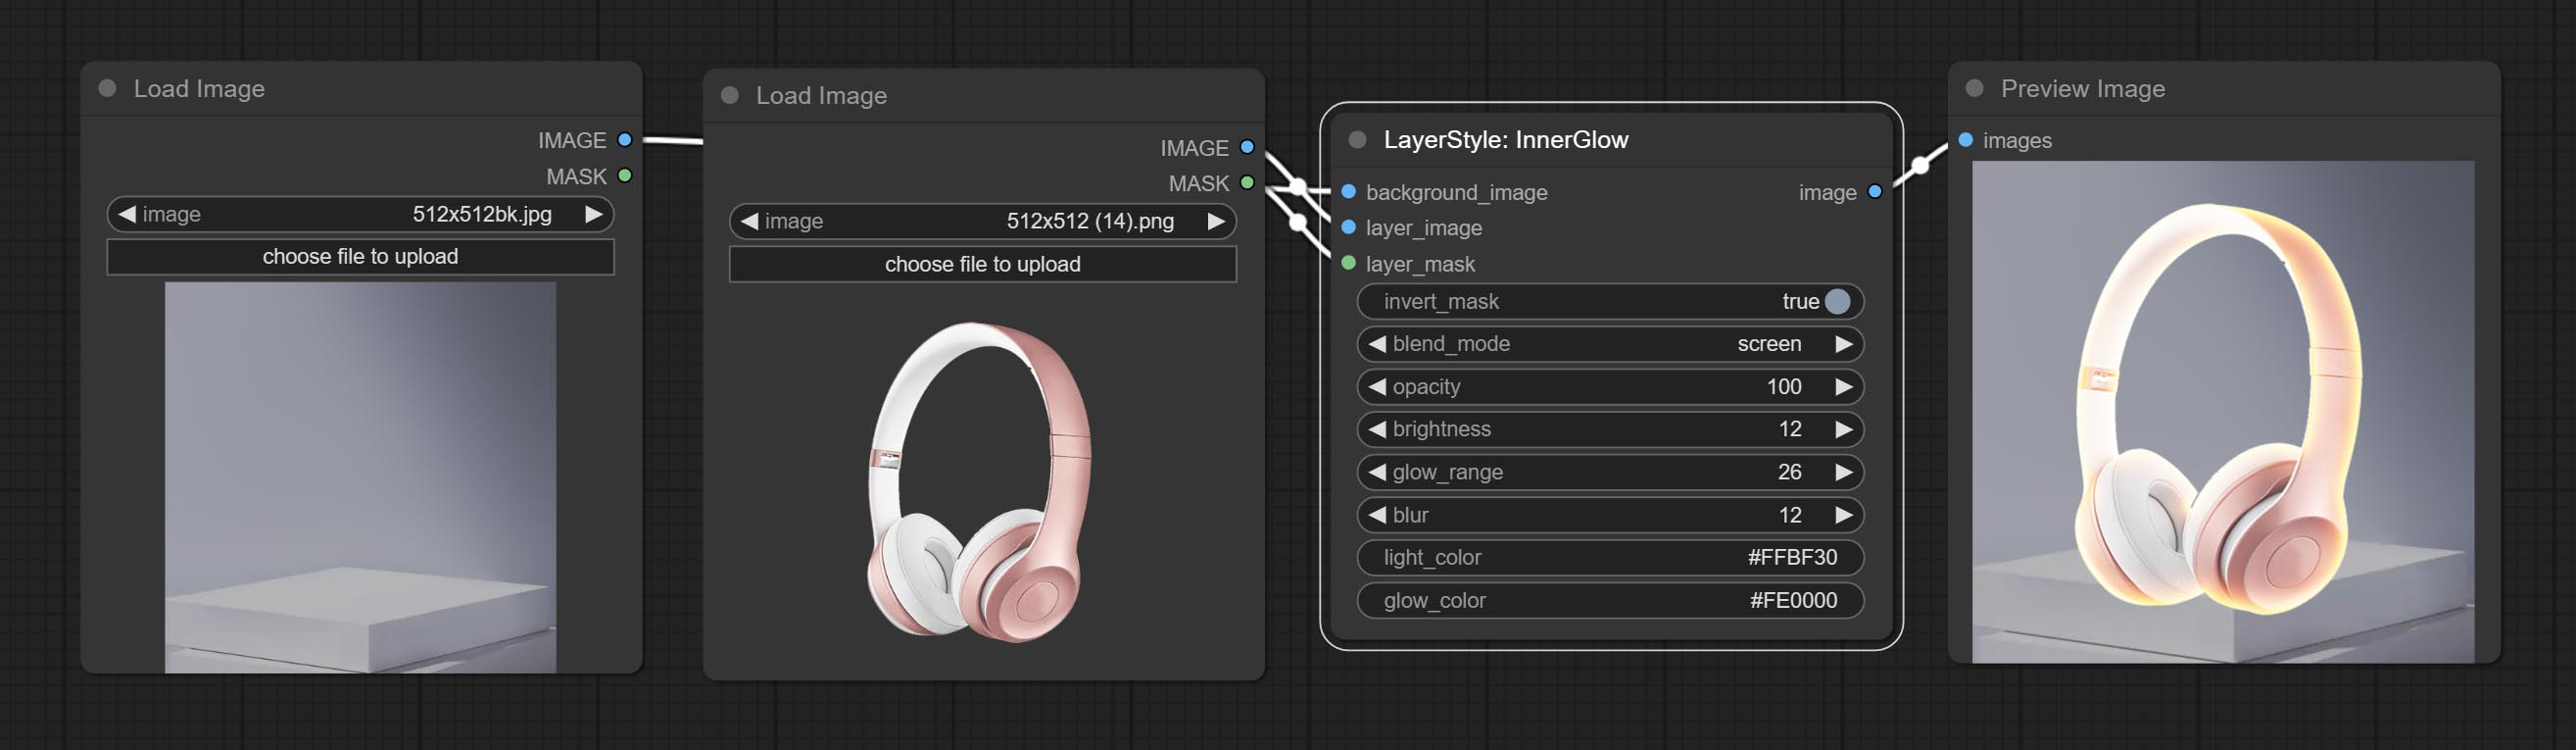
节点选项:
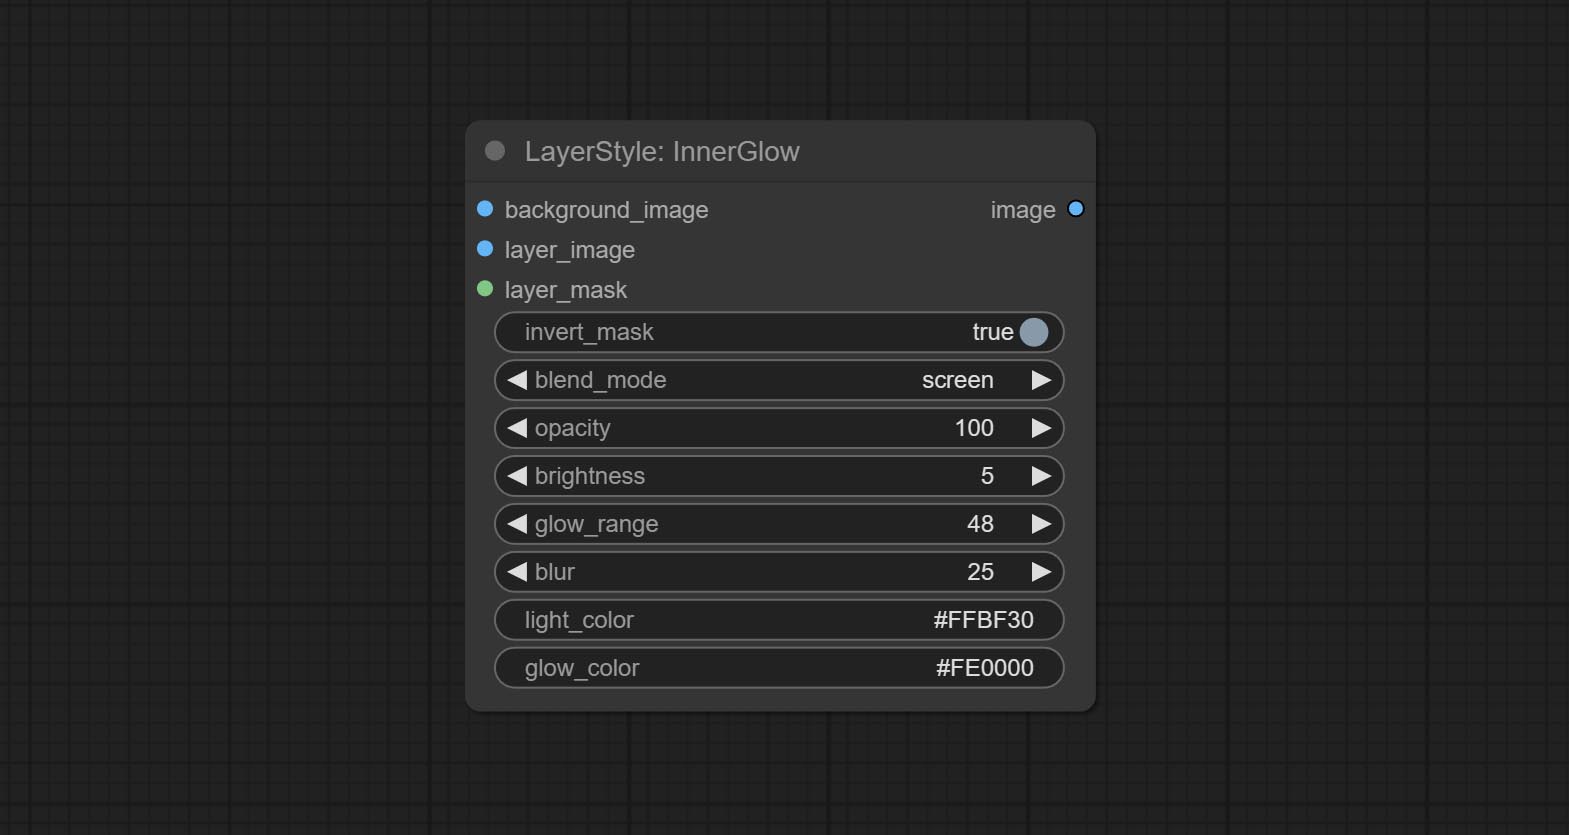
- 背景_IMAGE 1 :背景图像。
- layer_image 1 :复合图层图像。
- layer_mask 1,2 :layer_image的掩码,根据其形状生成生长。
- invert_mask:是否要反转面膜。
- Blend_mode 3 :汇总模式。
- 不透明度:光泽的不透明度。
- 亮度:光的亮度。
- Glow_range:闪光范围。
- 模糊:光泽的模糊。
- Light_color 4 :辉光的中心部分颜色。
- GLOW_COLOR 4 :GLOW的边缘零件颜色。
- 笔记
中风
产生层。 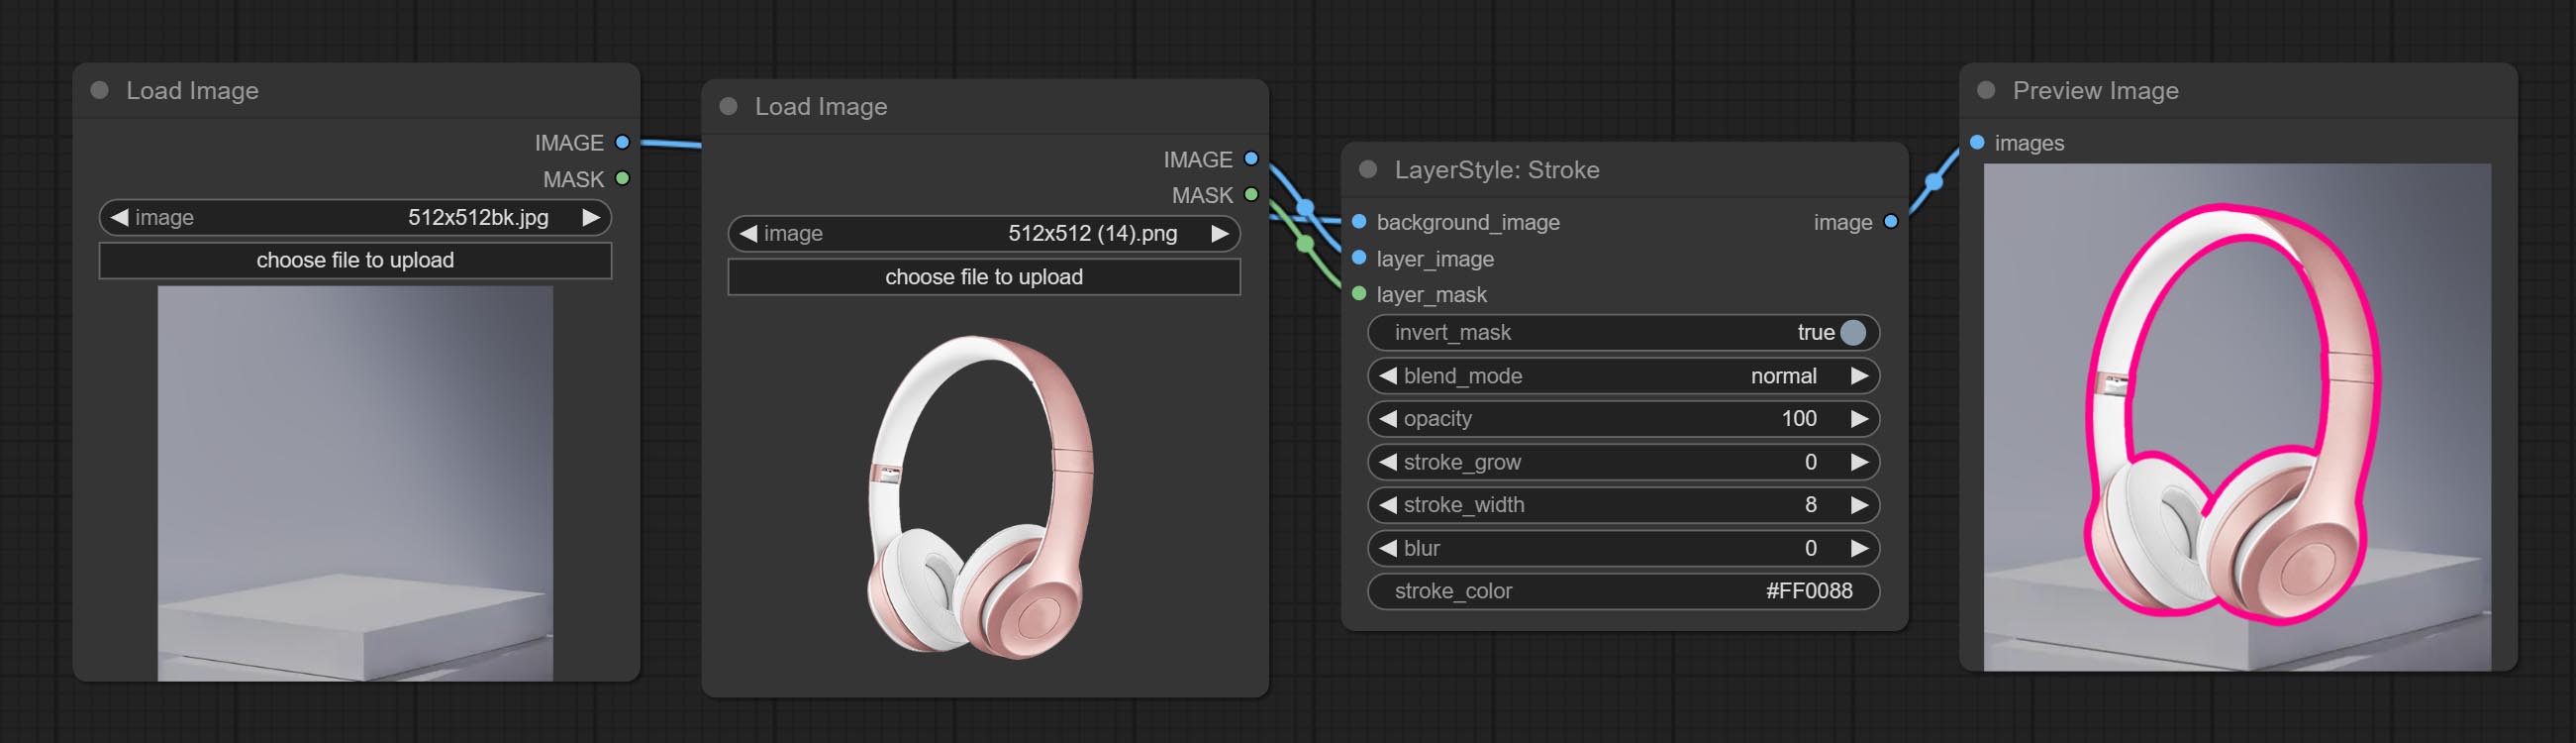
节点选项:
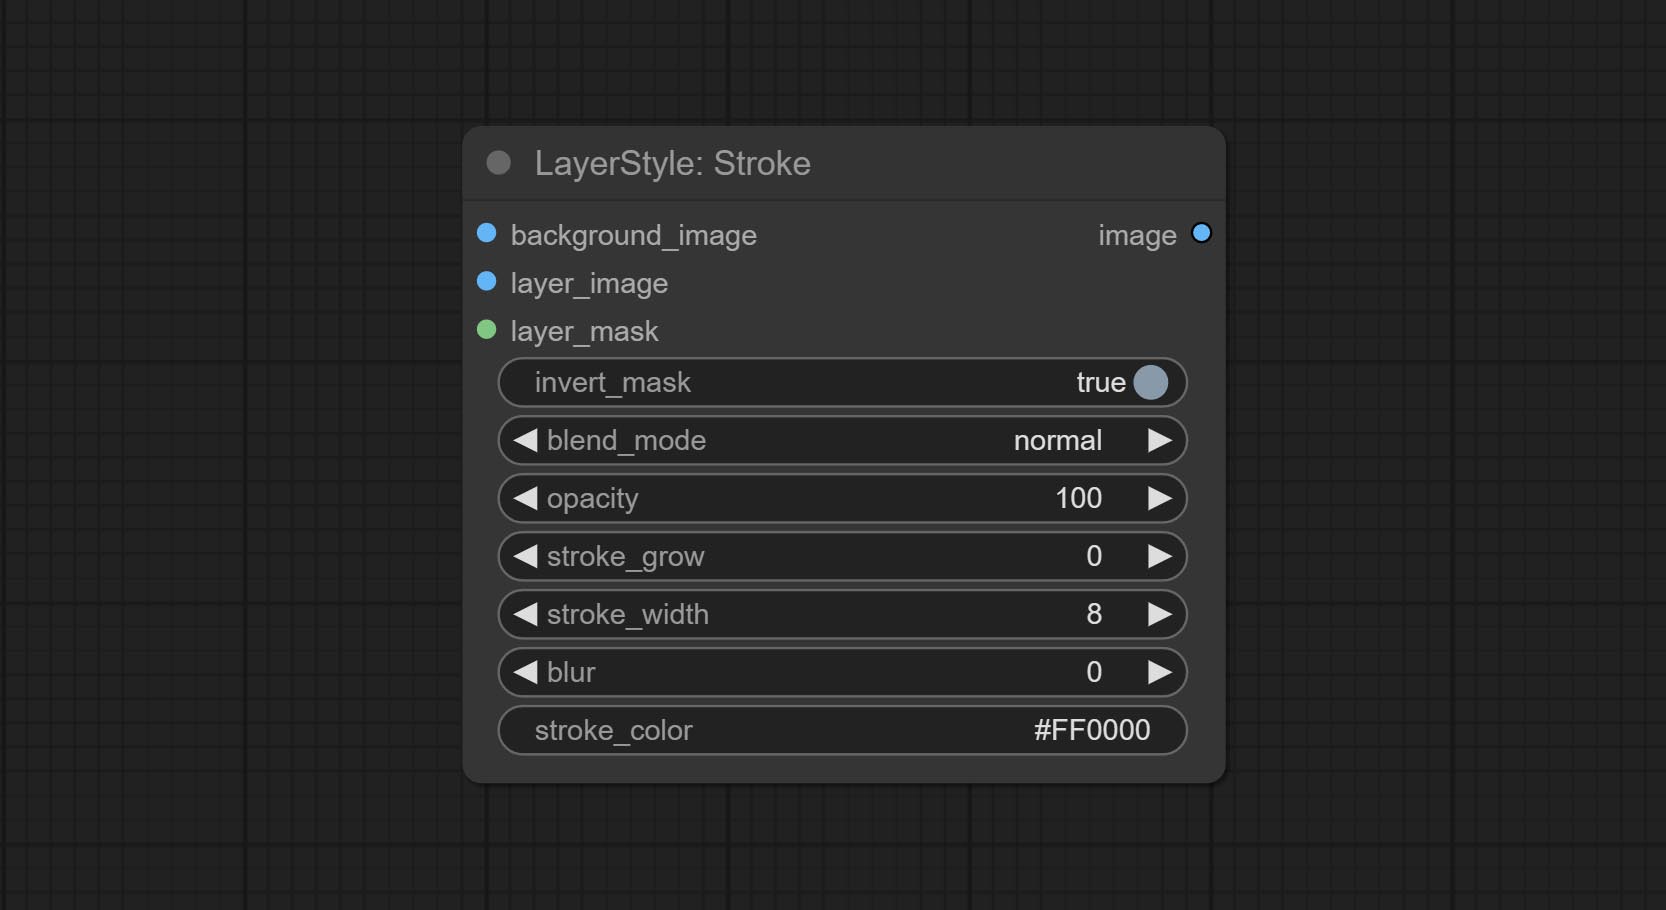
- 背景_IMAGE 1 :背景图像。
- layer_image 1 :复合图层图像。
- layer_mask 1,2 :层蒙版,用于layer_image,按照其形状生成中风。
- invert_mask:是否要反转面膜。
- Blend_mode 3 :中风的混合模式。
- 不透明:中风的不透明度。
- Stroke_grow:中风膨胀/收缩幅度,正值表明膨胀和负值表示收缩。
- stroke_width:中风宽度。
- 模糊:中风的模糊。
- Stroke_color 4 :中风颜色,以十六进制RGB格式描述。
- 笔记
渐变lay
生成梯度覆盖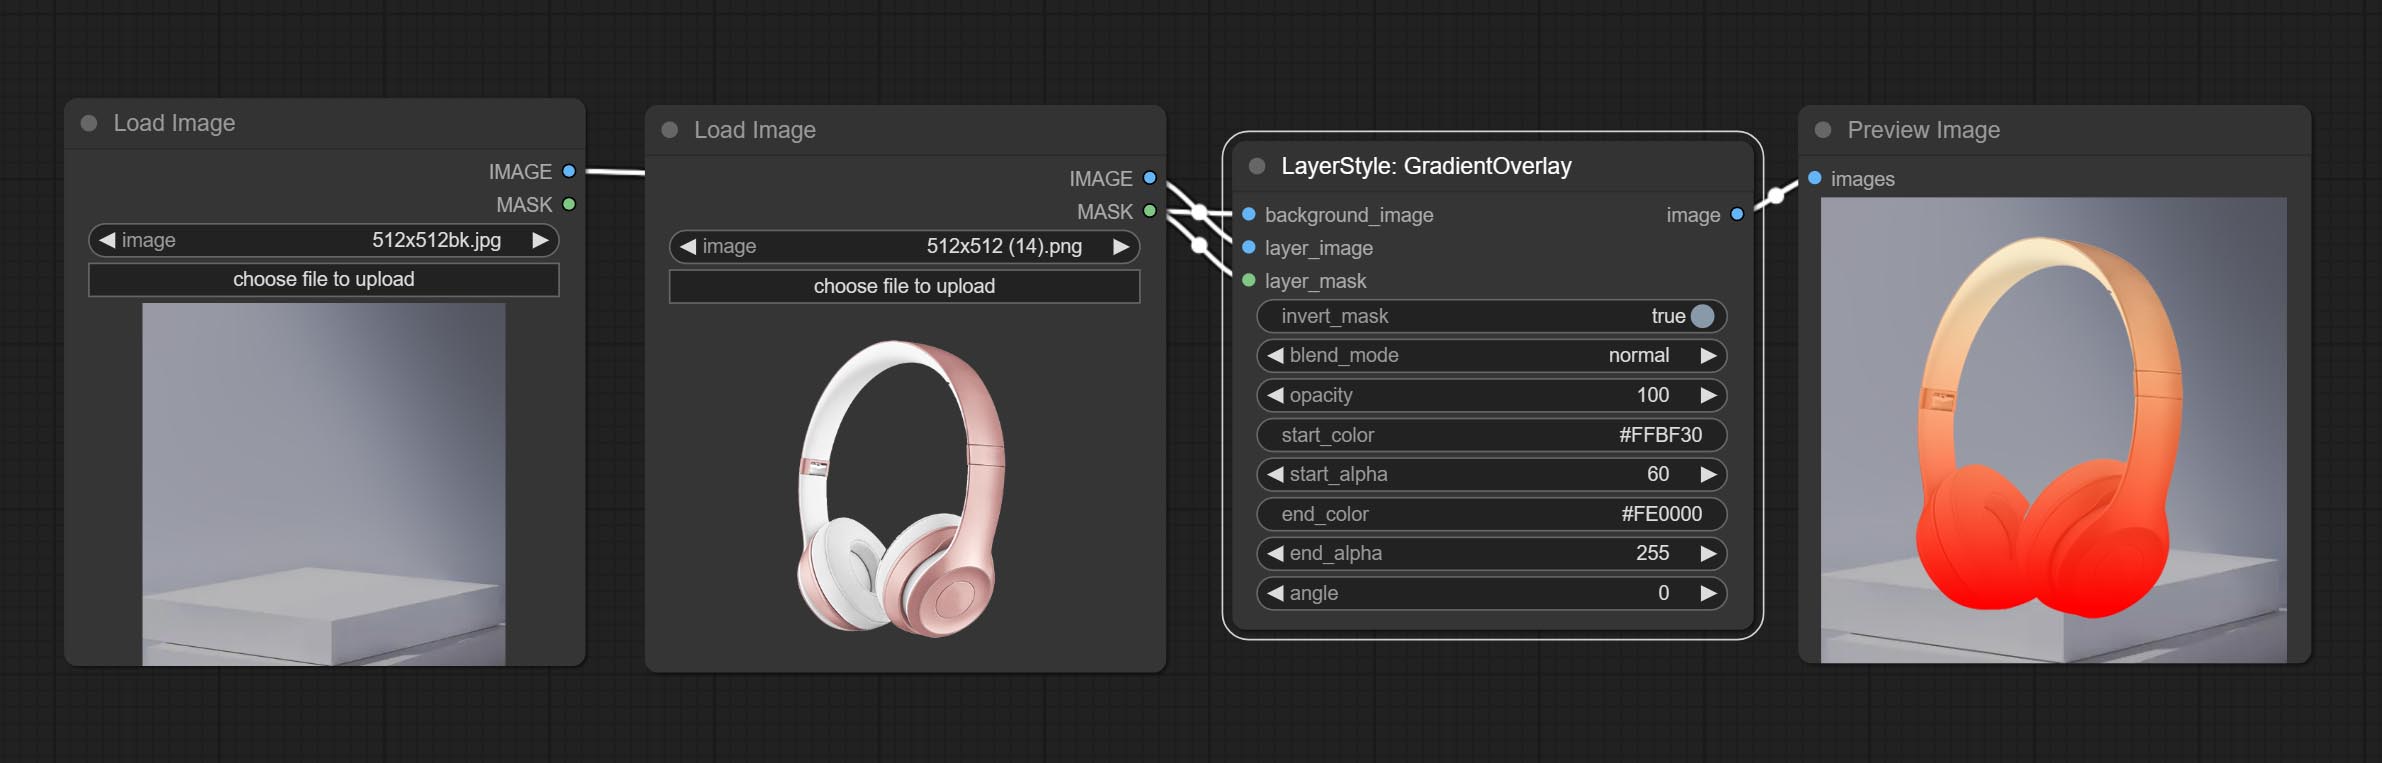
节点选项:
- 背景_IMAGE 1 :背景图像。
- layer_image 1 :复合图层图像。
- layer_mask 1,2 :layer_image的掩码。
- invert_mask:是否要反转面膜。
- Blend_mode 3 :梯度的混合模式。
- 不透明:中风的不透明度。
- start_color:渐变开头的颜色。
- start_alpha:梯度开头的透明度。
- end_color:渐变末端的颜色。
- end_alpha:梯度末端的透明度。
- 角度:梯度旋转角度。
- 笔记
色彩播放
生成颜色叠加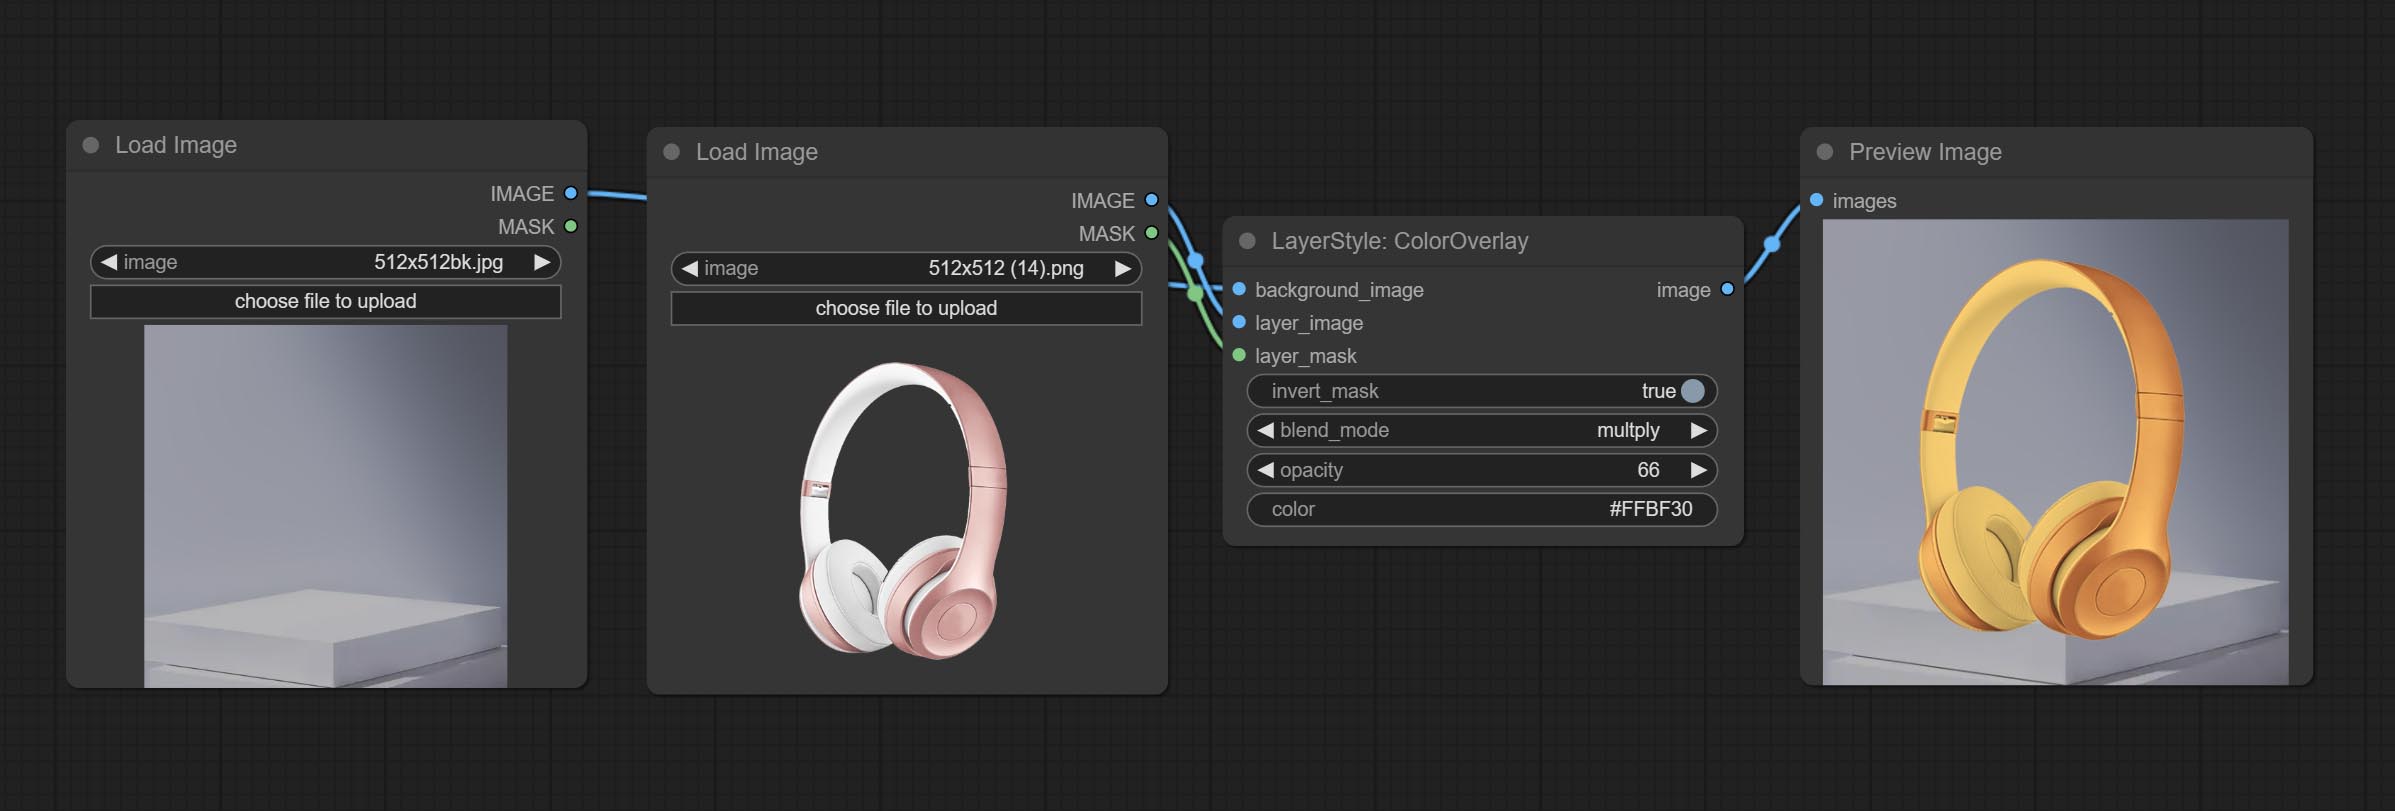
节点选项: 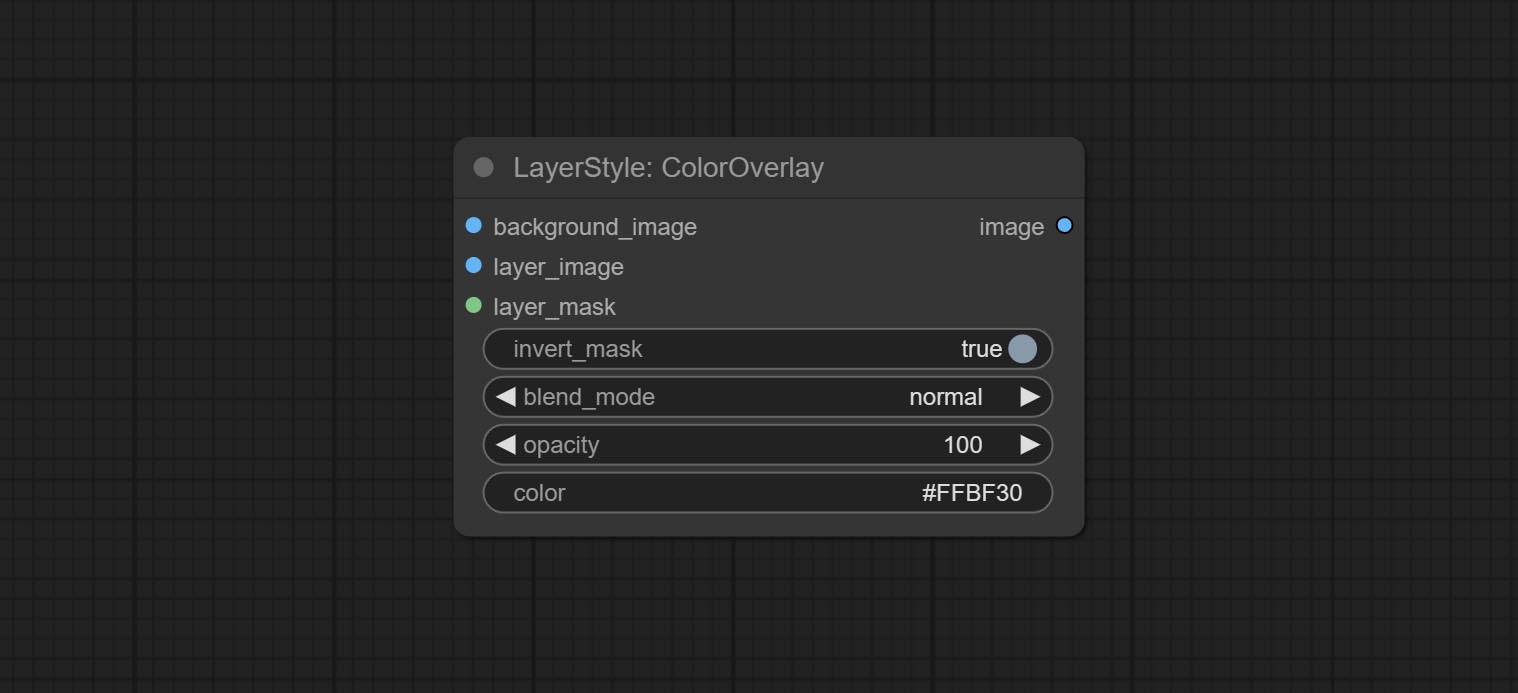
- 背景_IMAGE 1 :背景图像。
- layer_image 1 :复合图层图像。
- layer_mask 1,2 :layer_image的掩码。
- invert_mask:是否要反转面膜。
- Blend_mode 3 :颜色的混合模式。
- 不透明:中风的不透明度。
- 颜色:覆盖的颜色。
- 笔记
外行
lut申请
将LUT应用于图像。仅支持.cube格式。 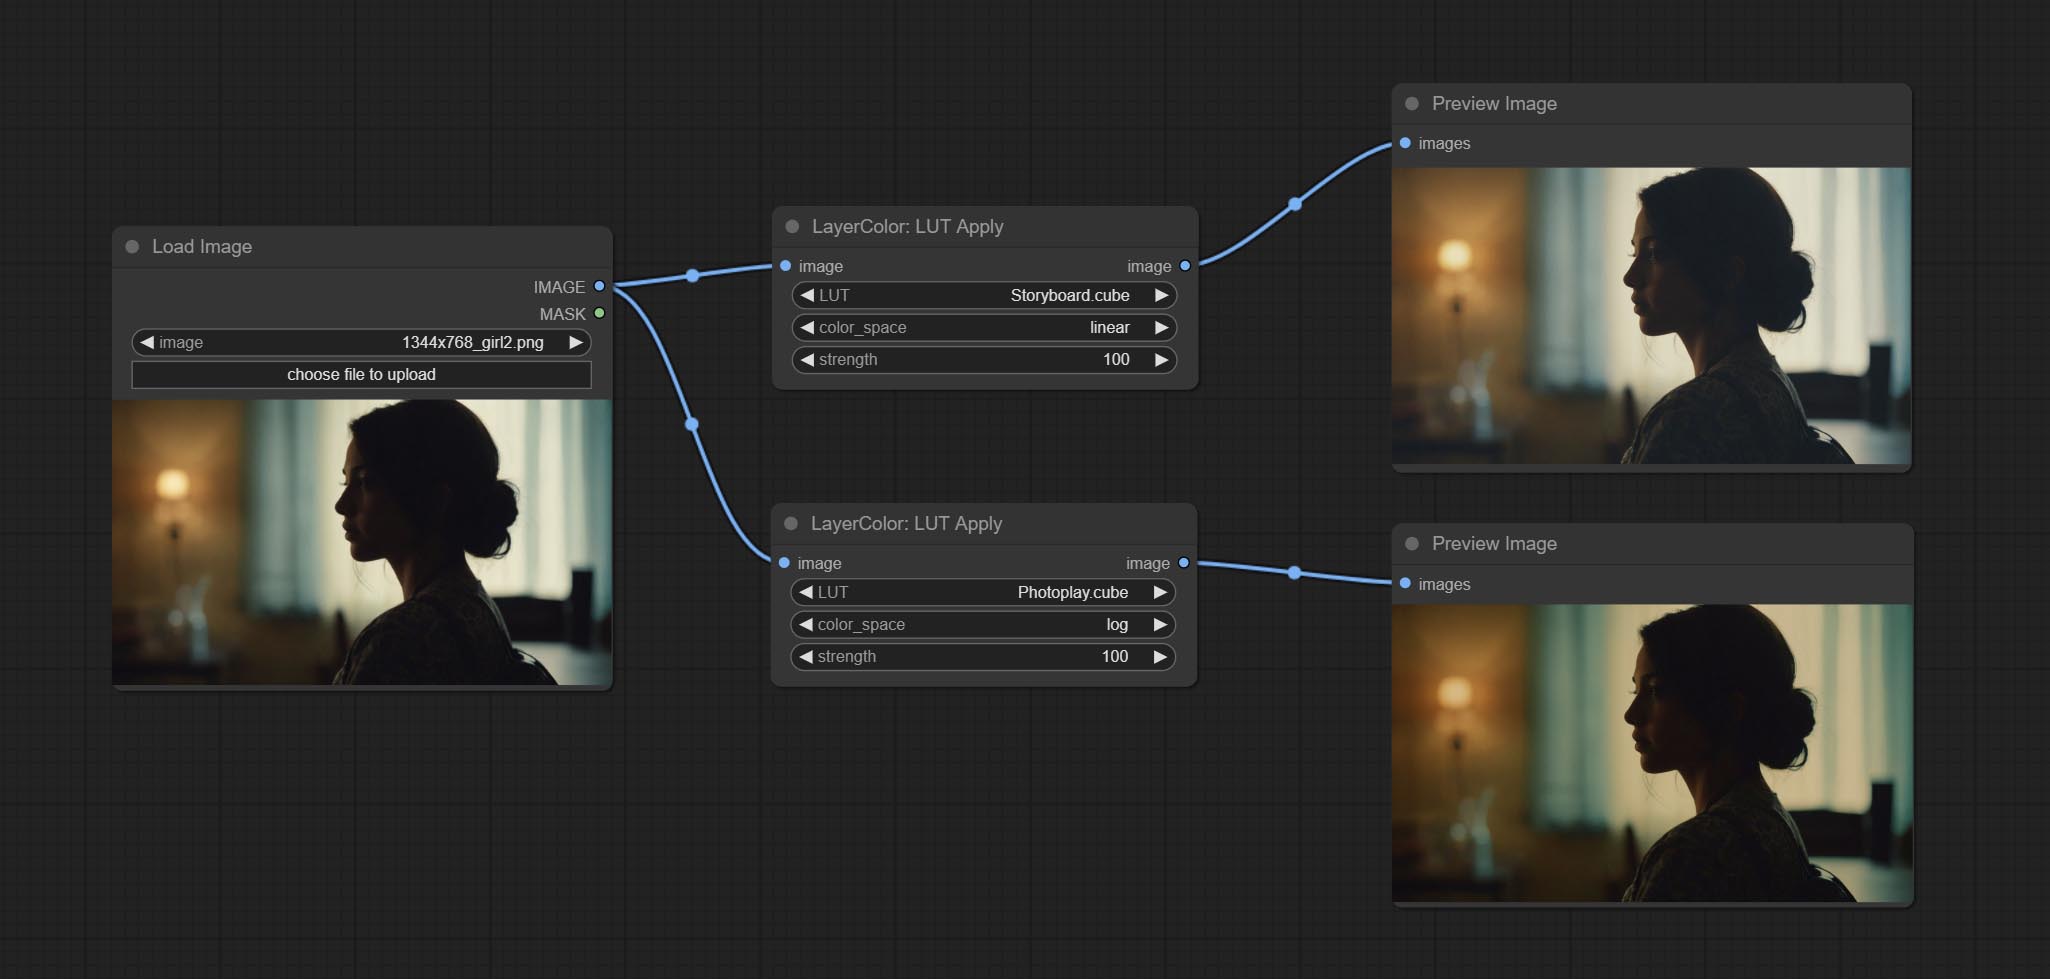
节点选项:

- LUT * :这是可用的列表。 LUT文件夹中的立方体文件,所选的LUT文件将应用于图像。
- color_space:有关常规图像,请选择线性,以获取日志色彩空间中的图像,请选择日志。
- 强度:范围0〜100,LUT应用强度。值越大,与原始图像的差异越大,并且值越小,与原始图像的距离越近。
* lut文件夹在resource_dir.ini中定义,此文件位于插件的根目录中,默认名称为resource_dir.ini.example 。要首次使用此文件,您需要将文件后缀更改为.ini 。打开文本编辑软件,并以“ lut_dir =”之后找到该行,“ =”,输入自定义文件夹路径名。支持在resource-dir.ini中定义多个文件夹,并由逗号,半隆或空格隔开。该文件夹中的所有.Cube文件将在Comfyui初始化期间收集并显示在节点列表中。如果INI中设置的文件夹无效,则将启用插件随附的LUT文件夹。
自动调整
自动调整图像的亮度,对比度和白平衡。提供一些手动调整选项,以补偿自动调整的缺点。 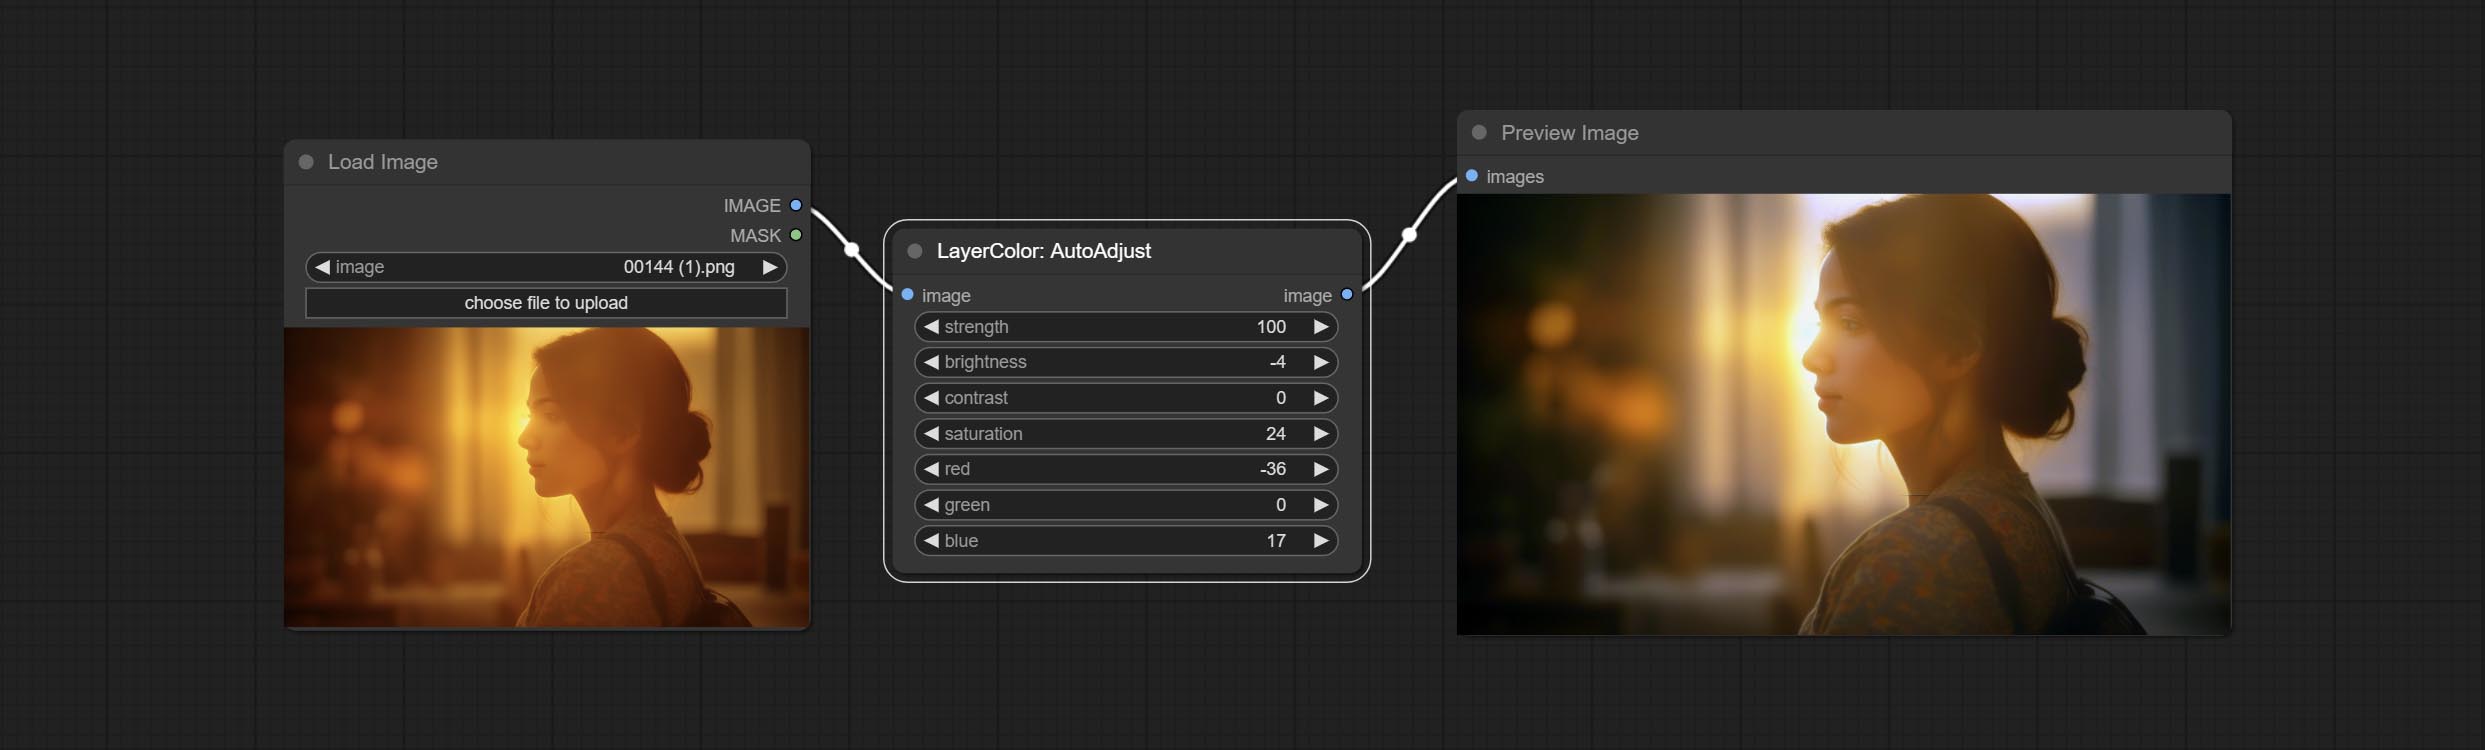
节点选项:
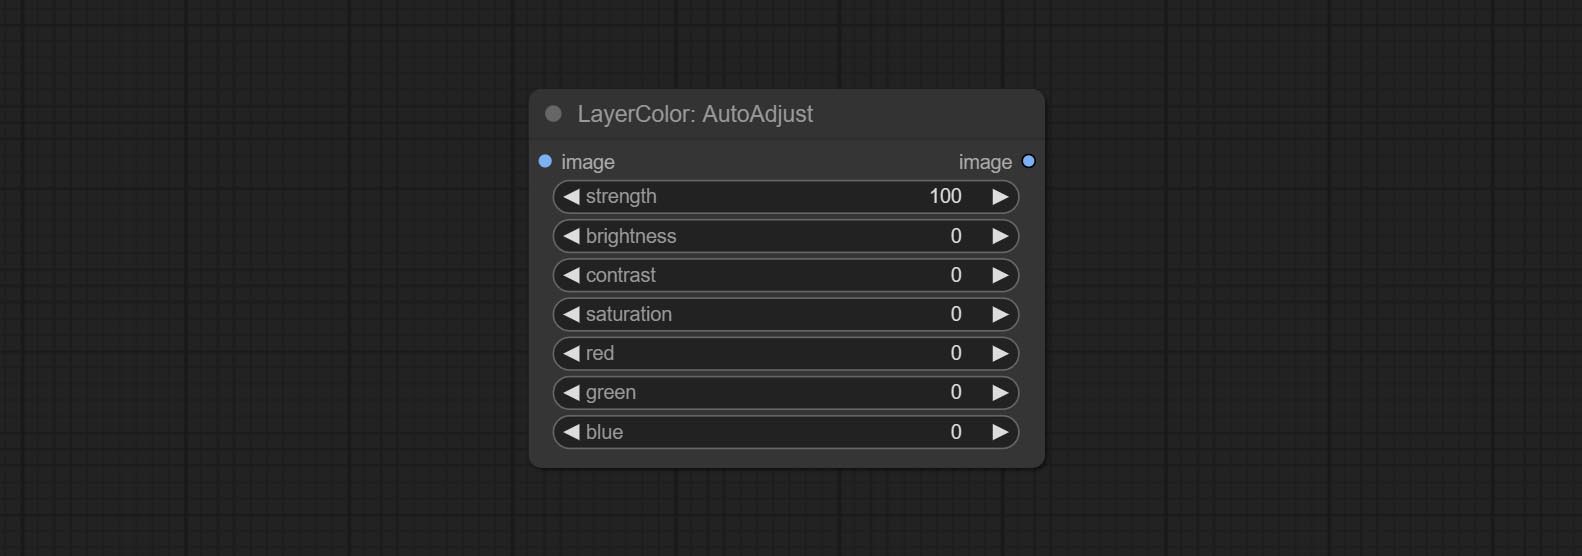
- 强度:调整强度。值越大,与原始图像的差异越大。
- 亮度:亮度的手动调整。
- 对比:对比度的手动调整。
- 饱和:手动调整饱和度。
- 红色:红色通道的手动调整。
- 绿色:绿色通道的手动调整。
- 蓝色:蓝色通道的手动调整。
autoAdjustv2
根据自动调整,添加蒙版输入,并仅计算掩码内的内容以进行自动调整。添加多个自动调整模式。 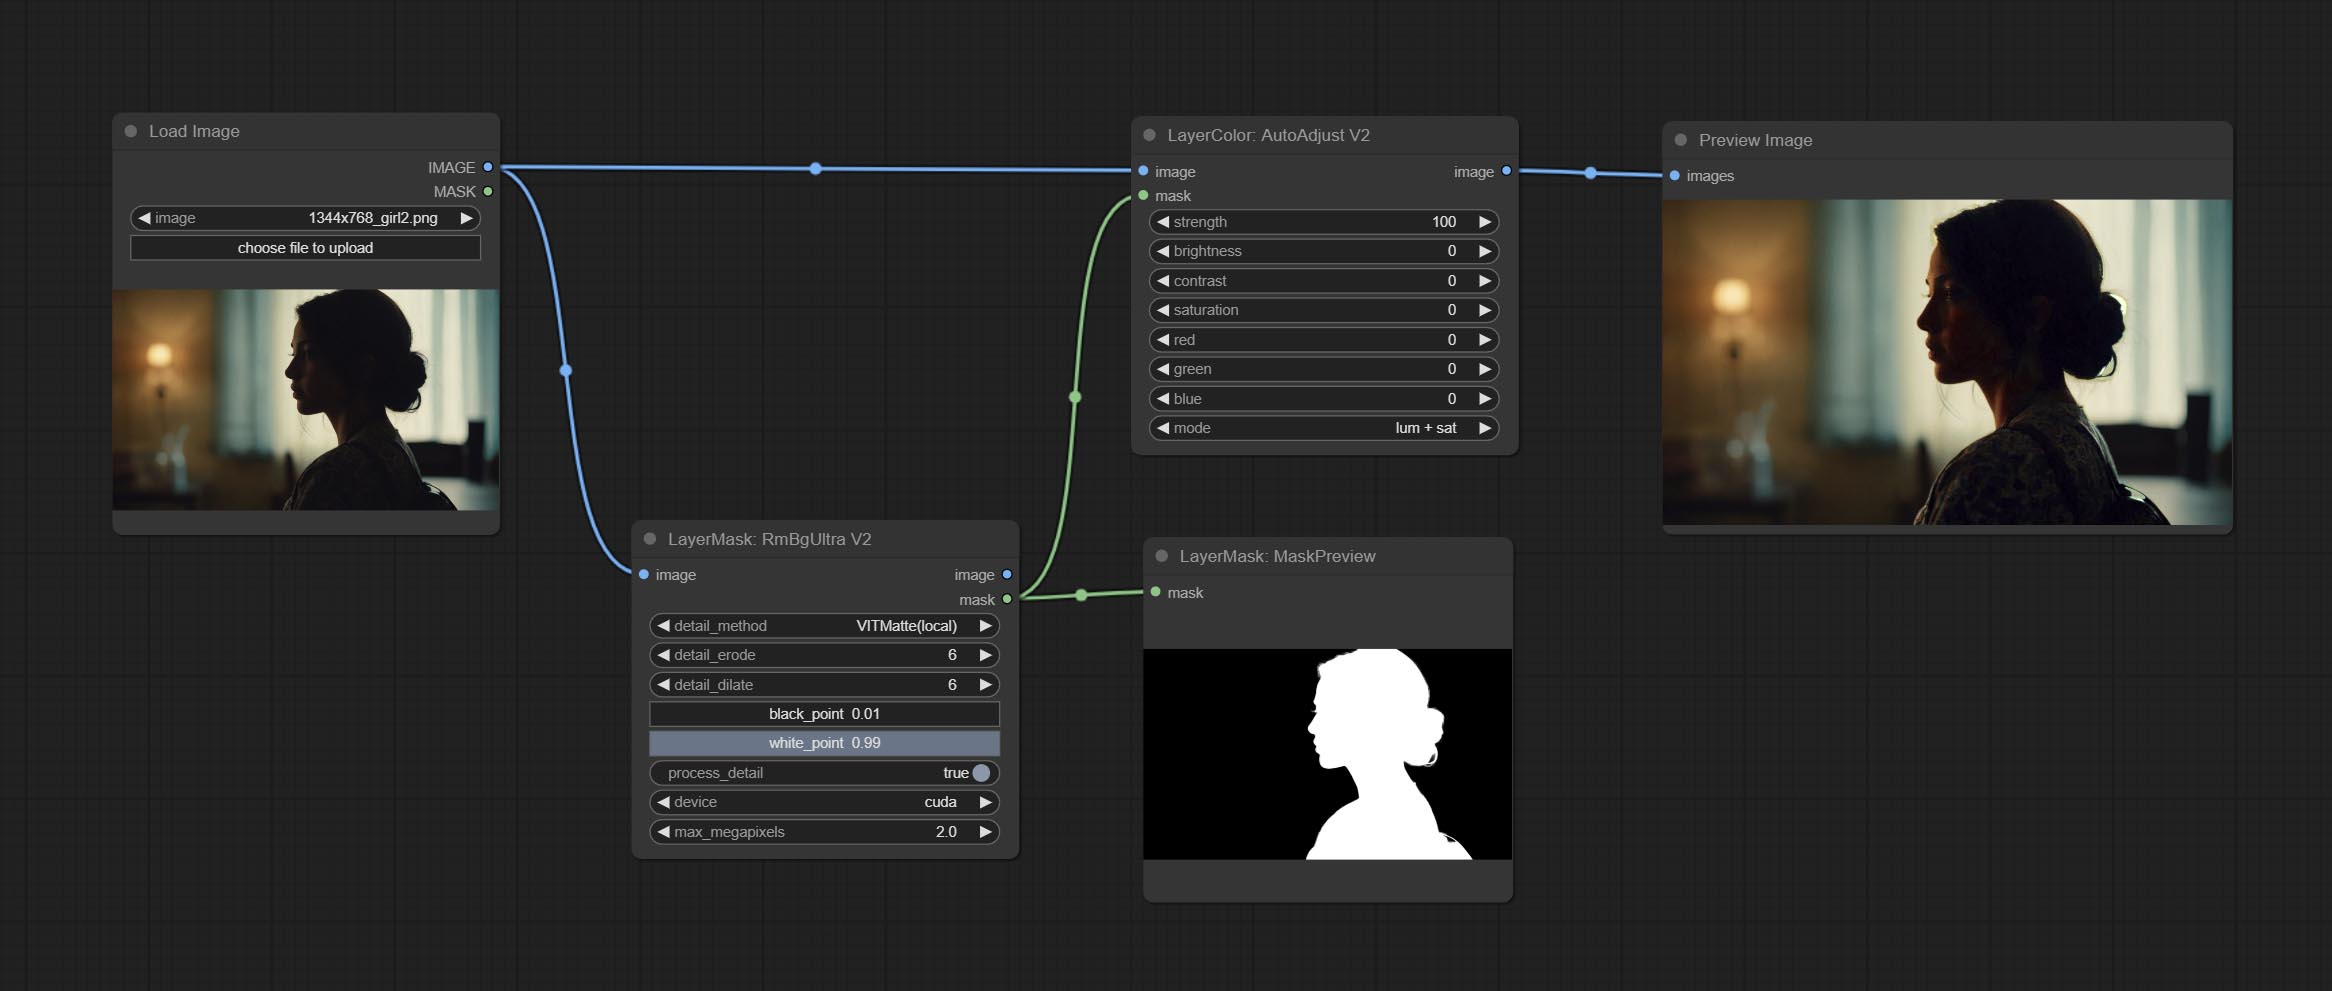
基于自动调节已进行以下更改: 
- 蒙版:可选的掩码输入。
- 模式:自动调整模式。 “ RGB”会根据RGB的三个通道自动调整,“ Lum + SAT”自动根据亮度和饱和度自动调整“亮度”,“亮度”会根据亮度自动调整,“饱和度”会根据饱和度自动调整,并自动调整“ Mono”。根据灰度和输出单色。
自动赛
自动调节太黑或太亮的图像以至于适度亮度,并支持掩盖输入。当掩盖输入时,仅将掩码部分的内容用作自动亮度的数据源。输出仍然是整个调整后的图像。 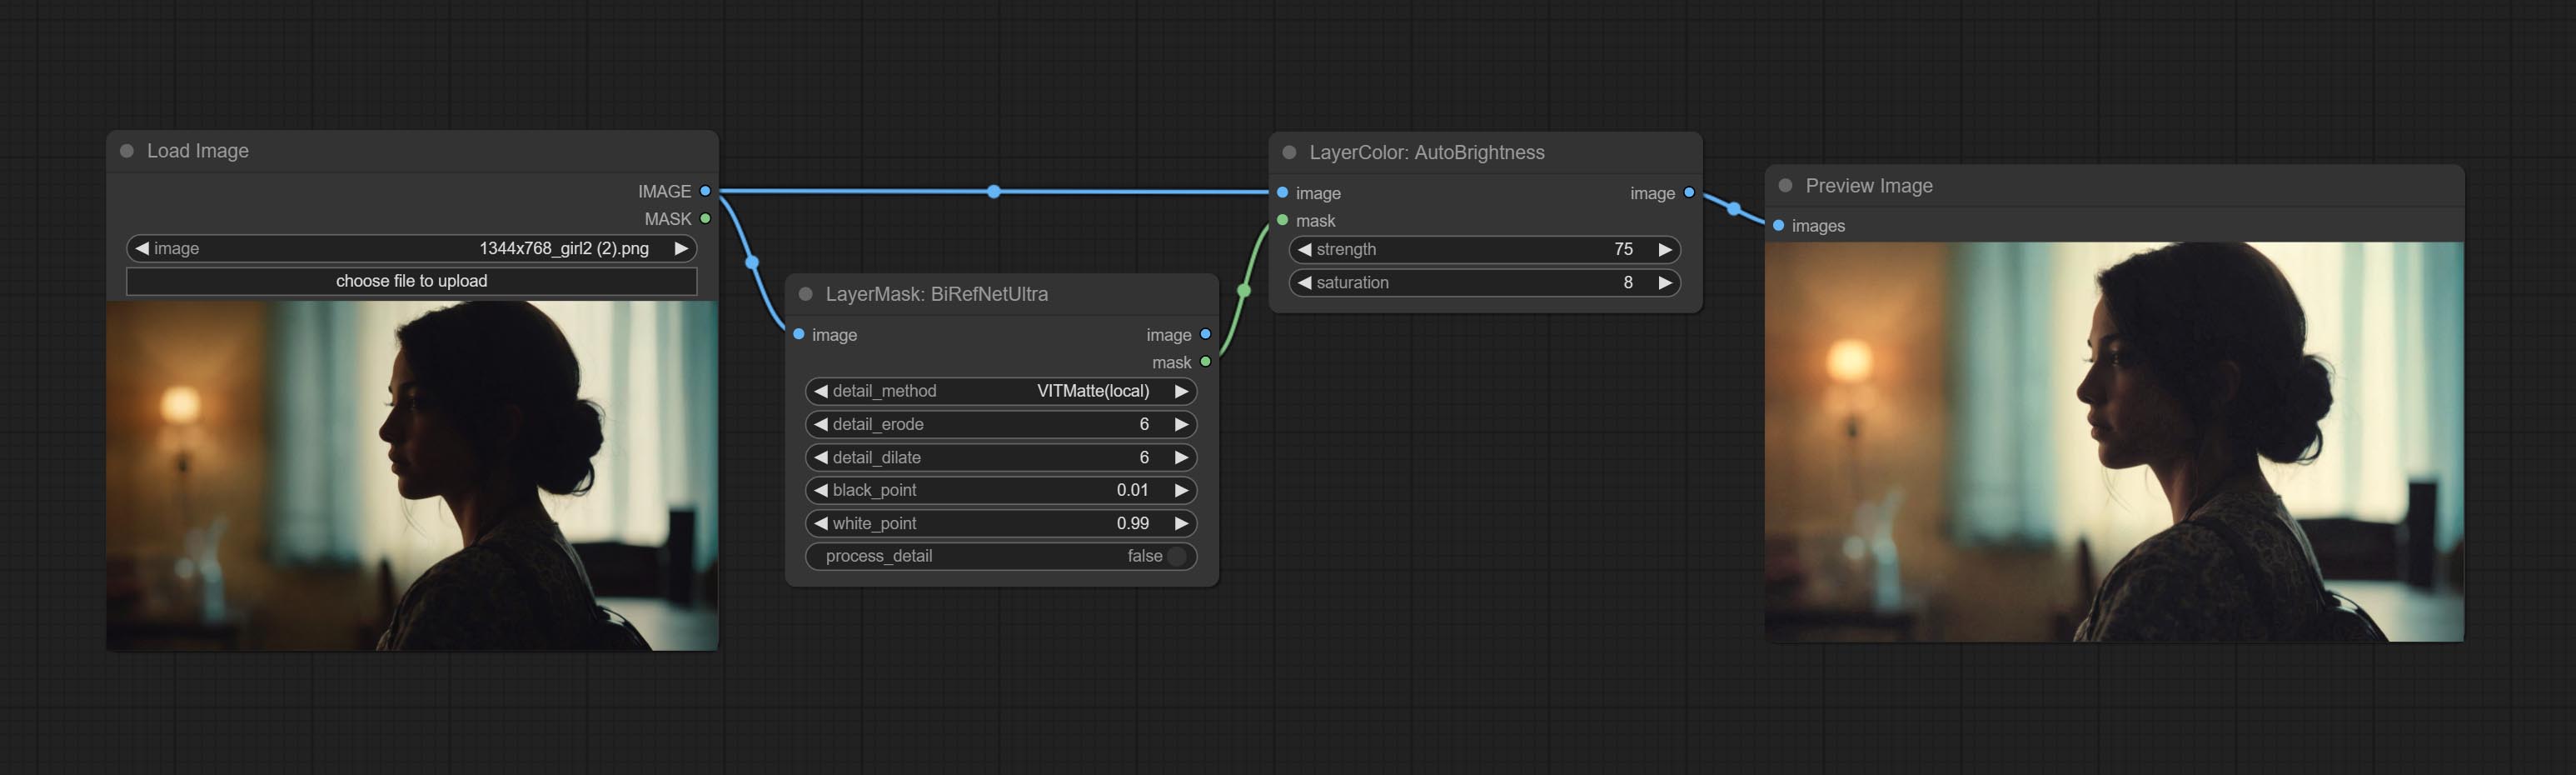
节点选项:
- 强度:自动调节亮度的强度。值越大,对中间值的偏见就越大,与原始图片的差异越大。
- 饱和:颜色饱和。亮度的变化通常会导致色彩饱和度的变化,并在可以调整适当的补偿处。
科罗拉多克
自动调整图像的色调以类似于参考图像。 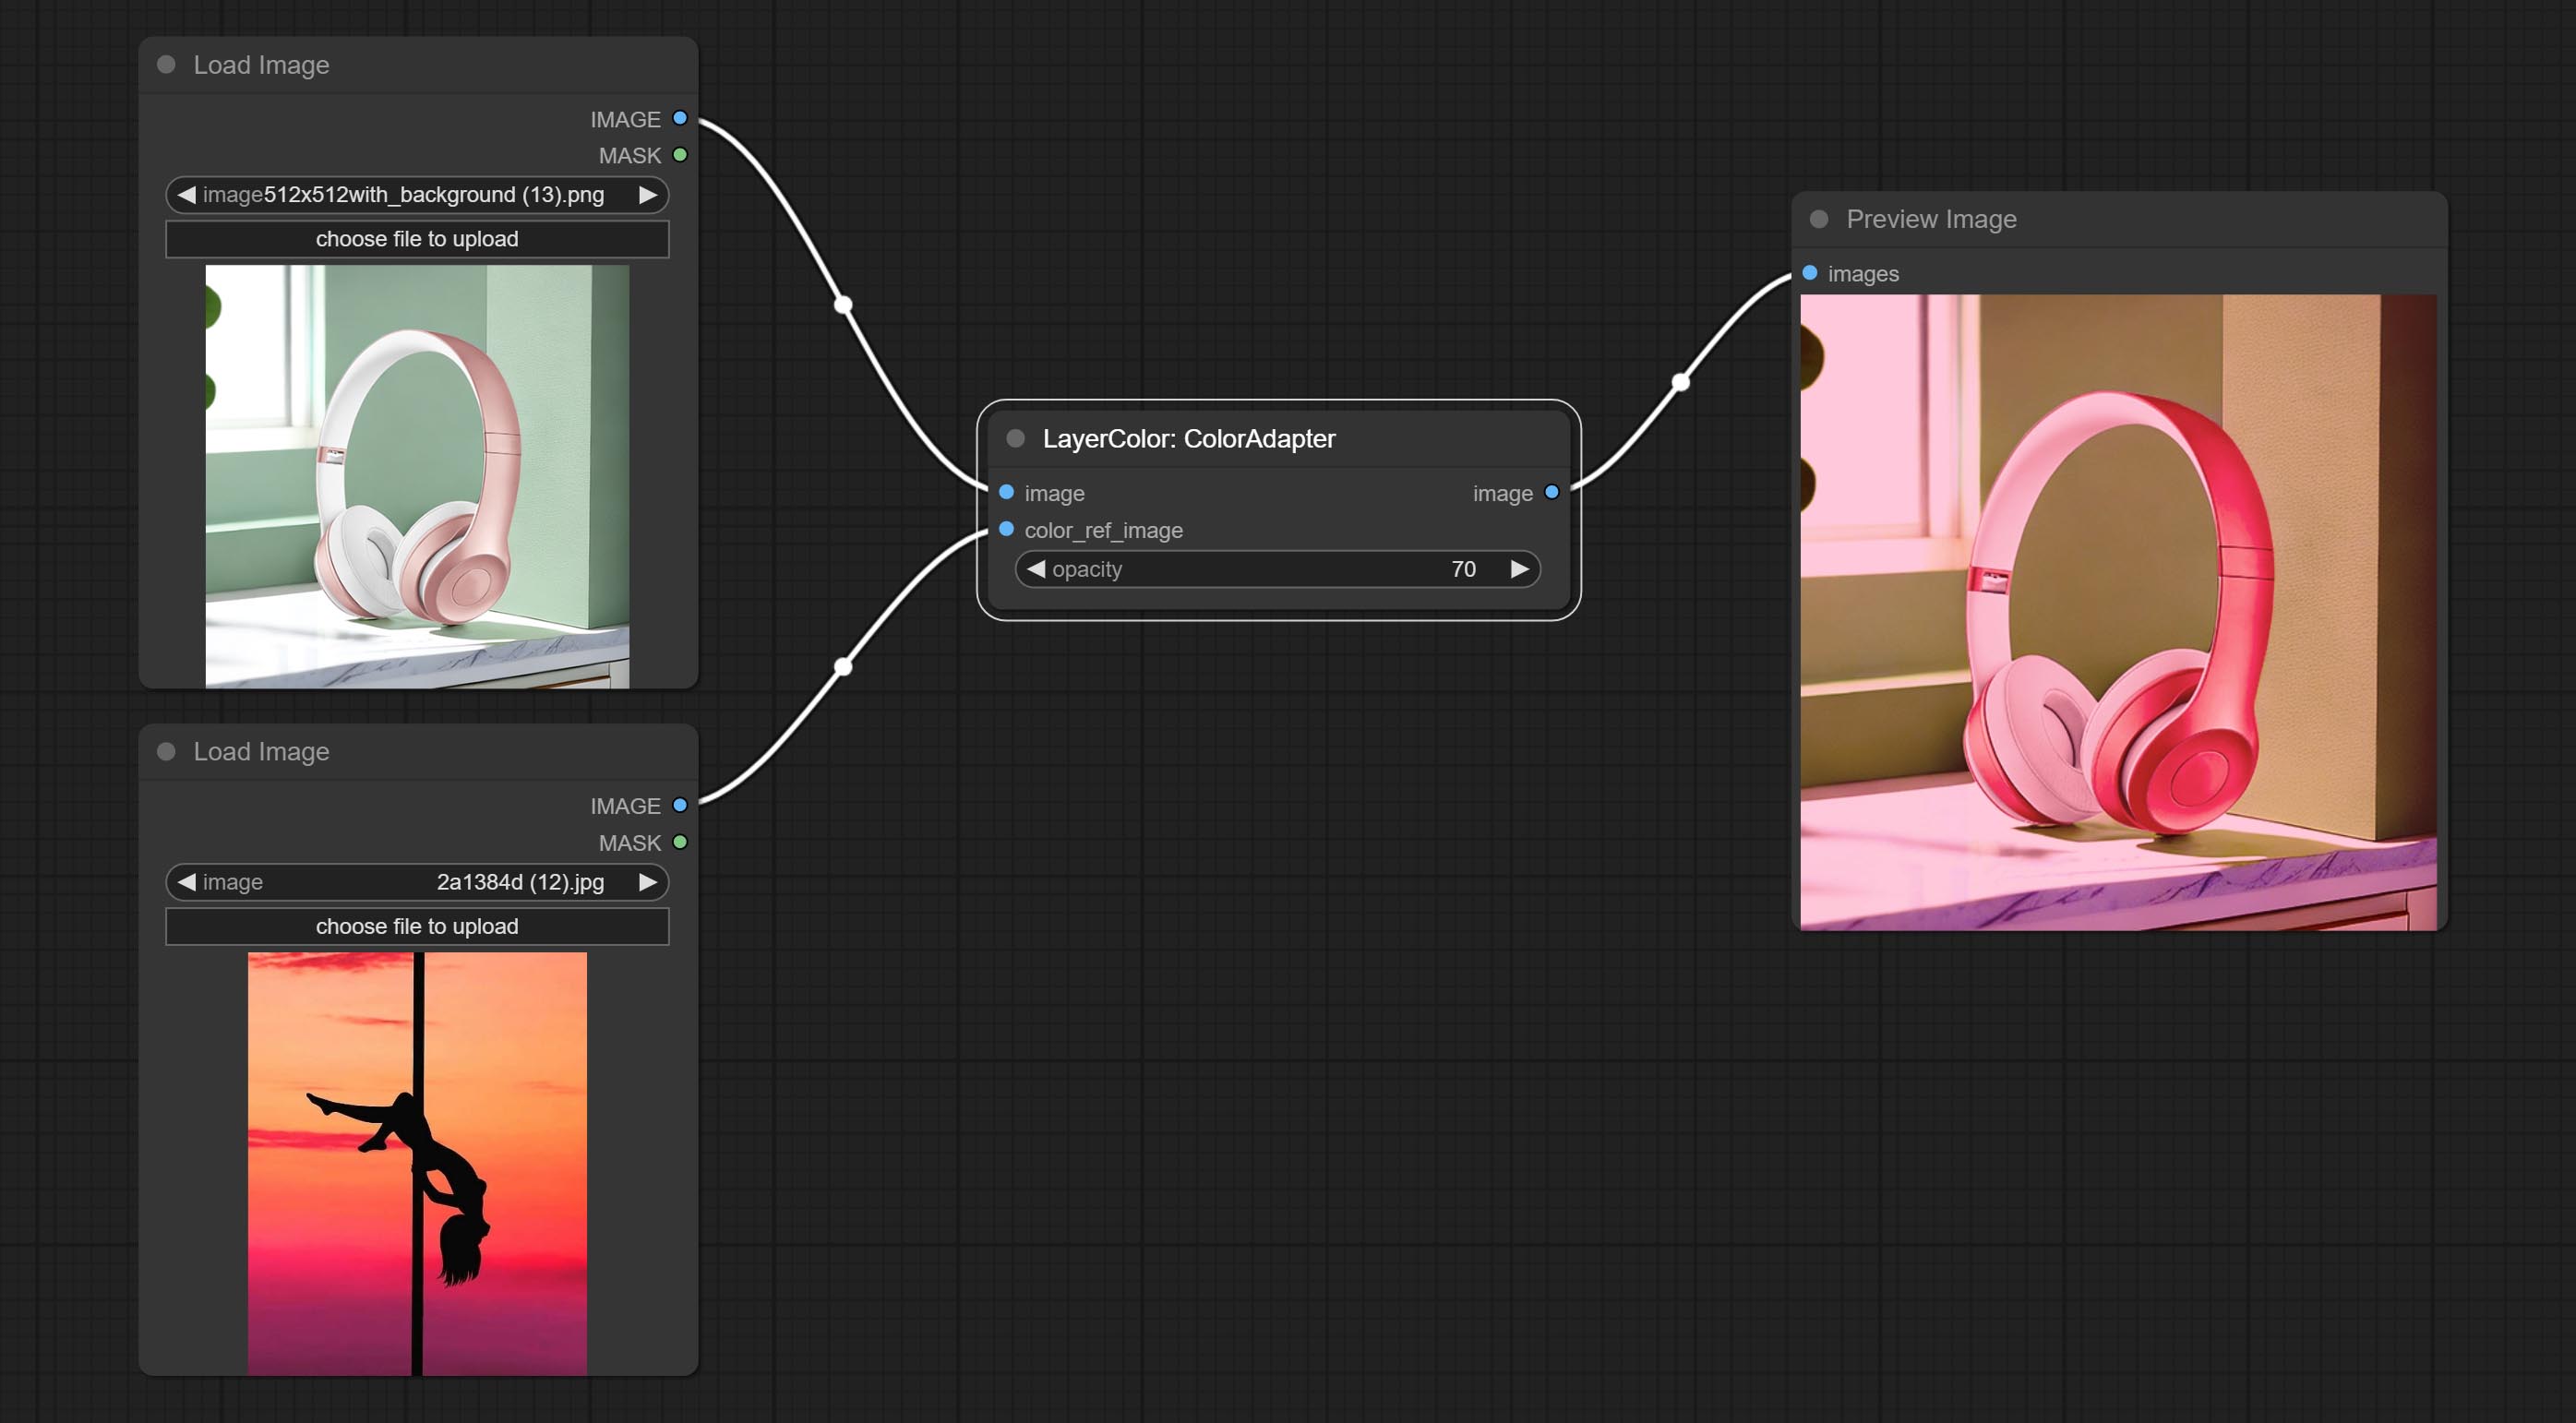
节点选项:

- opacity: The opacity of an image after adjusting its color tone.
接触
Change the exposure of the image. 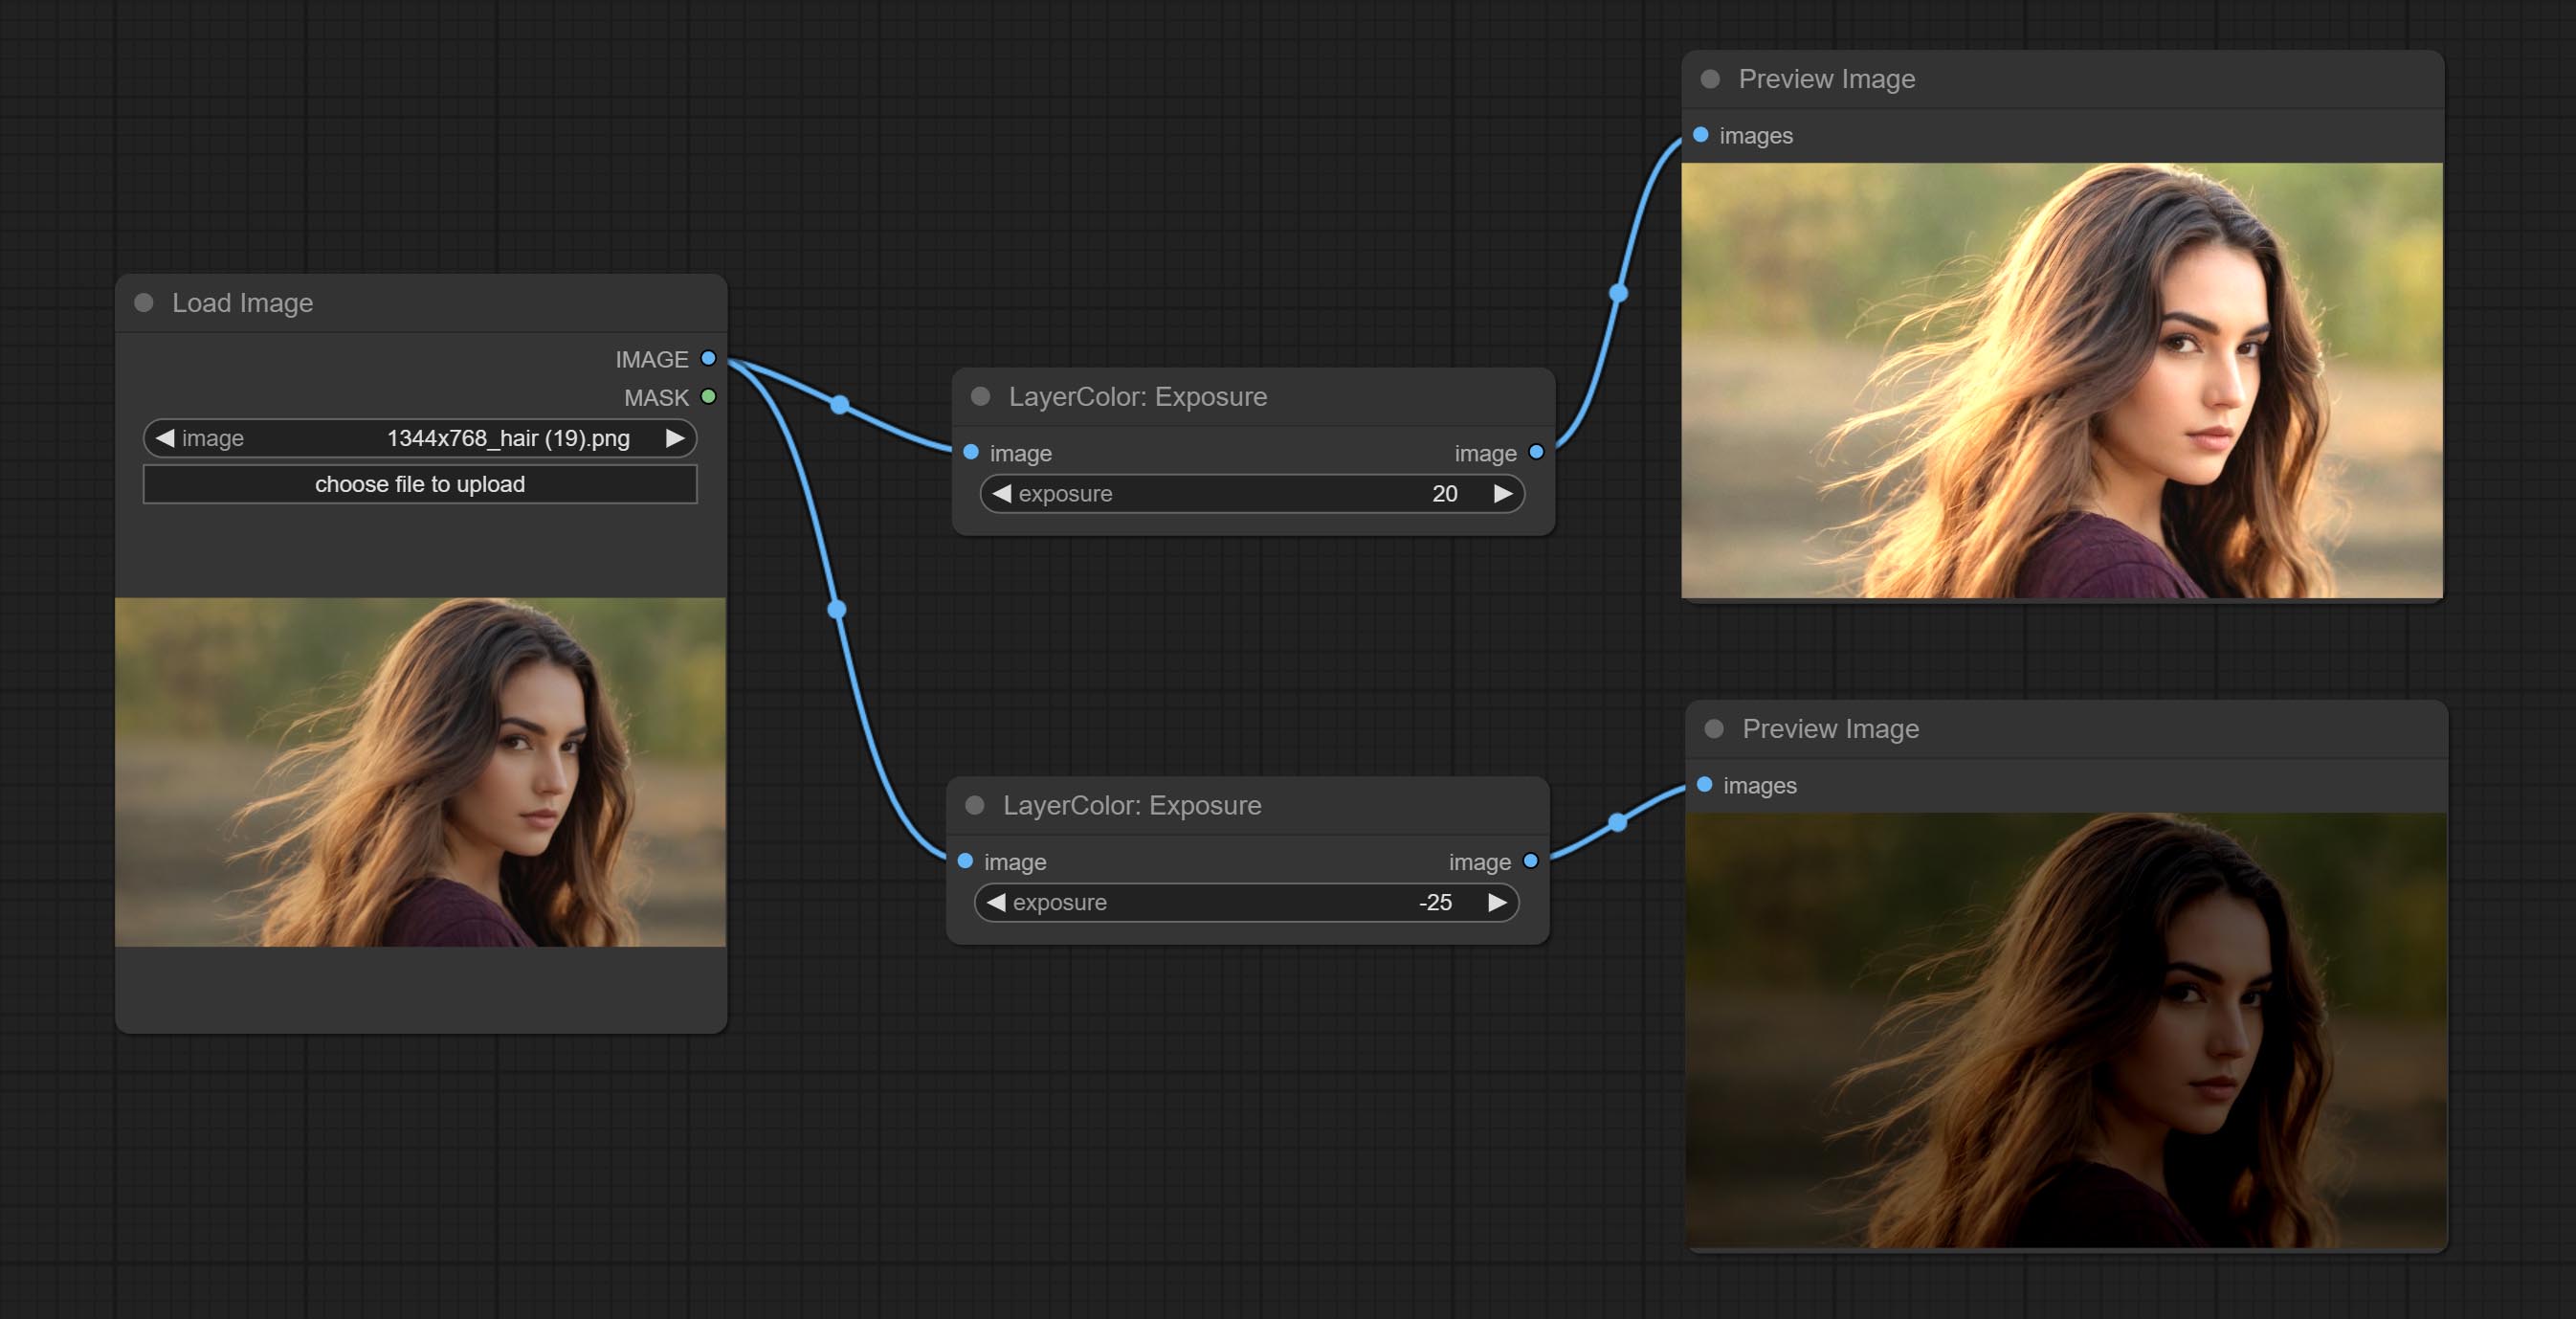
Color of Shadow & Highlight
Adjust the color of the dark and bright parts of the image. 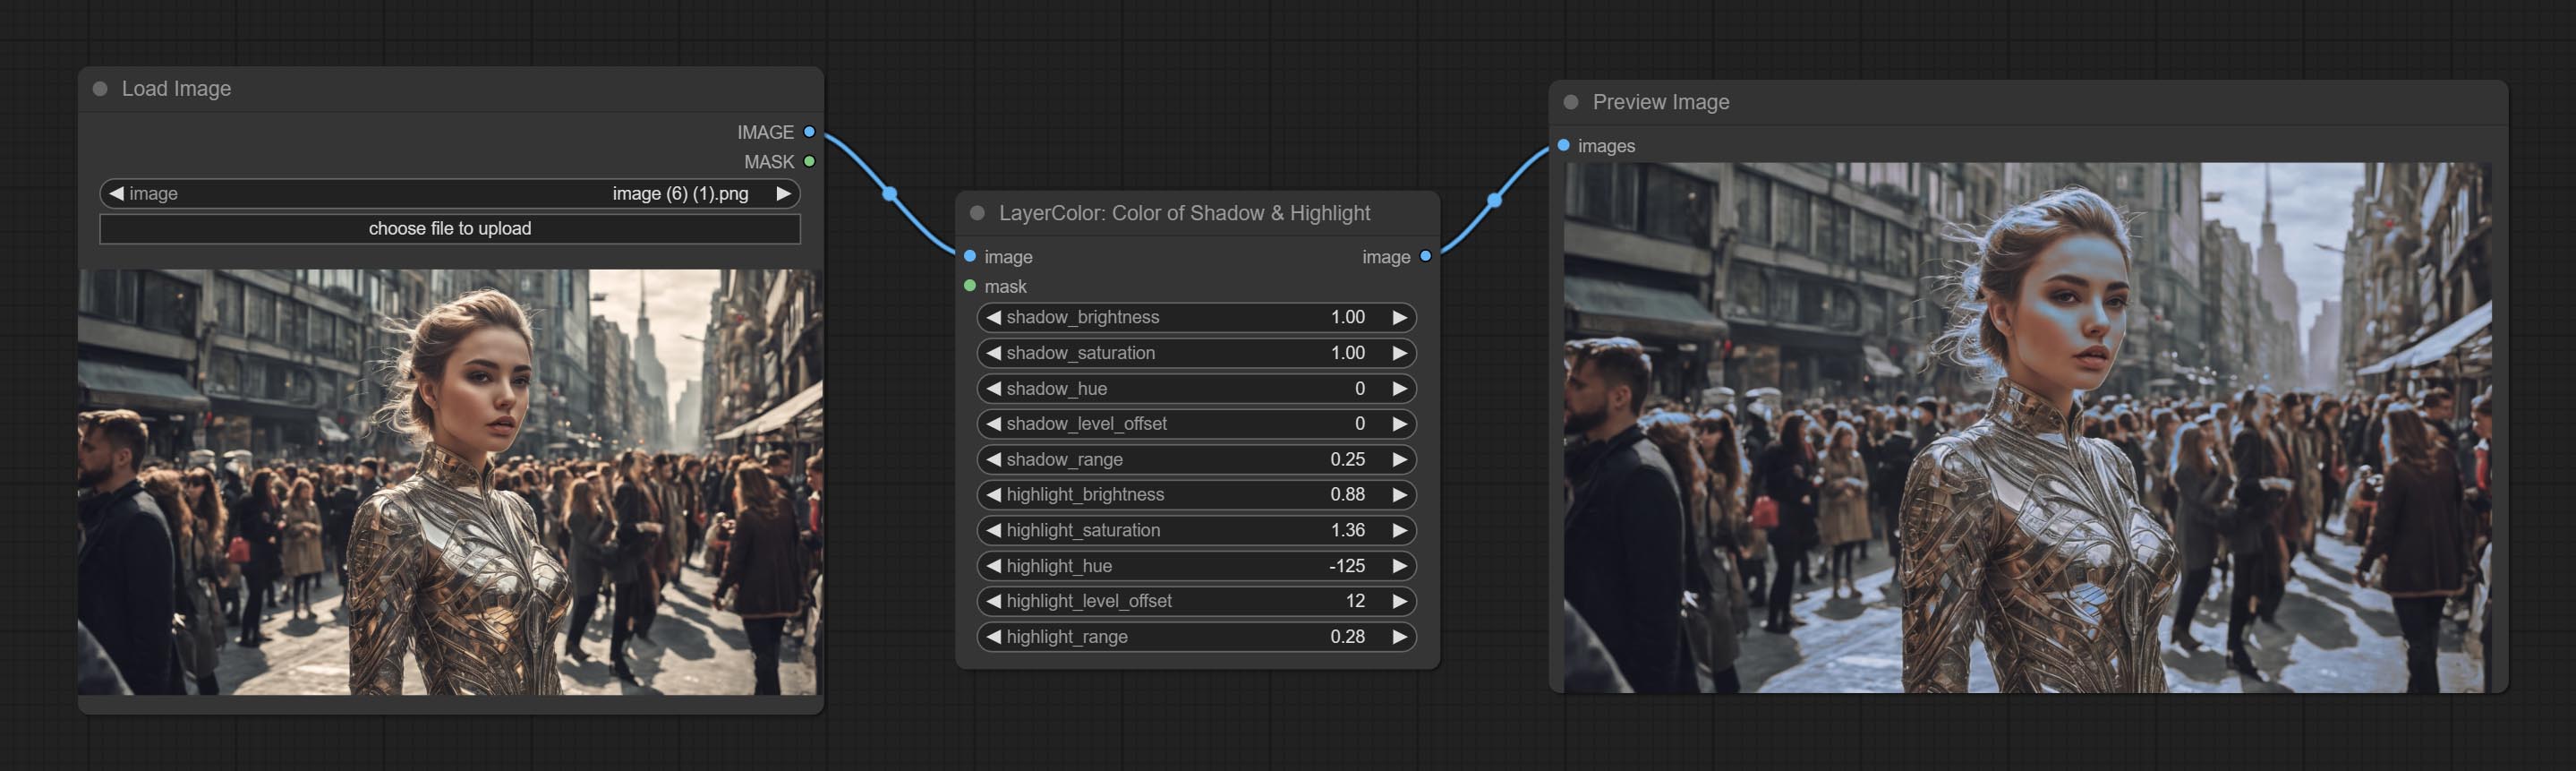
Node options:
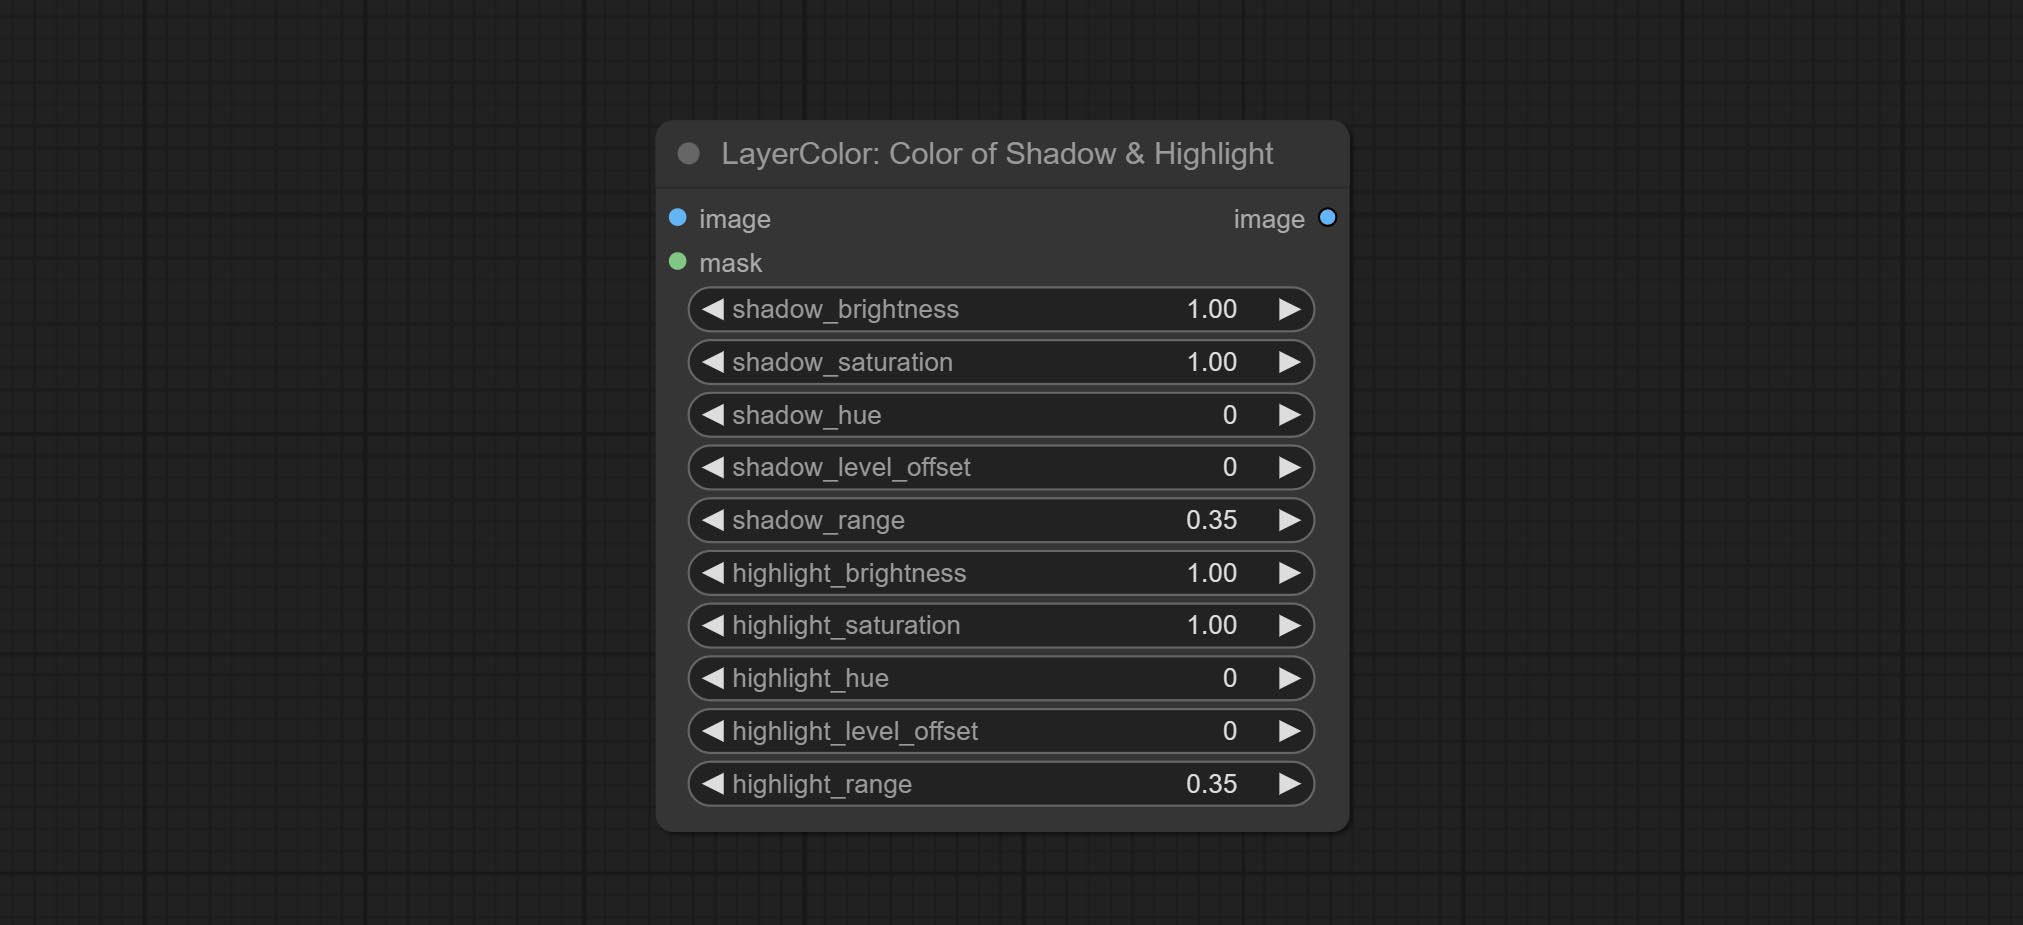
- image: The input image.
- mask: Optional input. if there is input, only the colors within the mask range will be adjusted.
- shadow_brightness: The brightness of the dark area.
- shadow_saturation: The color saturation in the dark area.
- shadow_hue: The color hue in the dark area.
- shadow_level_offset: The offset of values in the dark area, where larger values bring more areas closer to the bright into the dark area.
- shadow_range: The transitional range of the dark area.
- highlight_brightness: The brightness of the highlight area.
- highlight_saturation: The color saturation in the highlight area.
- highlight_hue: The color hue in the highlight area.
- highlight_level_offset: The offset of values in the highlight area, where larger values bring more areas closer to the dark into the highlight area.
- highlight_range: The transitional range of the highlight area.
Node option:
- exposure: Exposure value. Higher values indicate brighter image.
Color of Shadow HighlightV2
A replica of the Color of Shadow & Highlight node, with the "&" character removed from the node name to avoid ComfyUI workflow parsing errors.
ColorTemperature

Change the color temperature of the image.
节点选项:
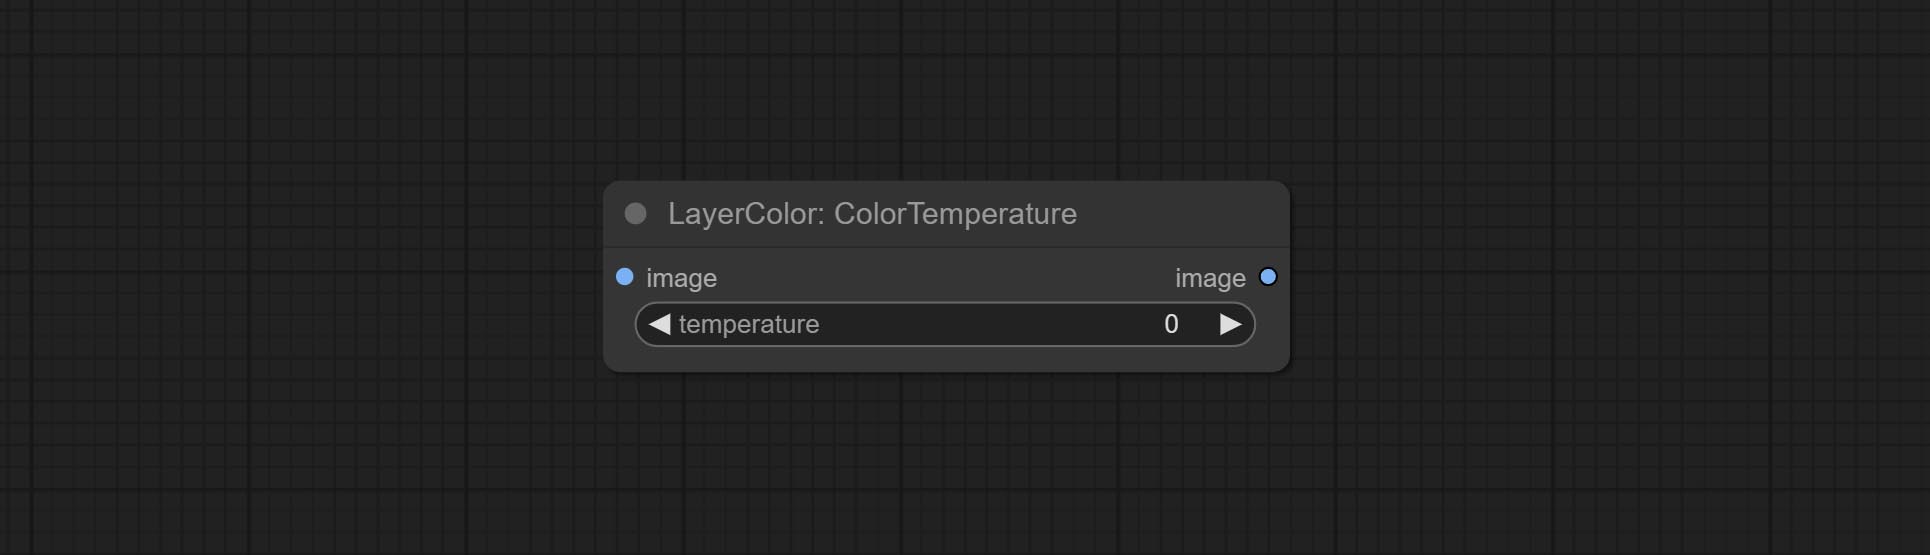
- temperature: Color temperature value. Range between-100 and 100. The higher the value, the higher the color temperature (bluer); The lower the color temperature, the lower the color temperature (yellowish).
水平
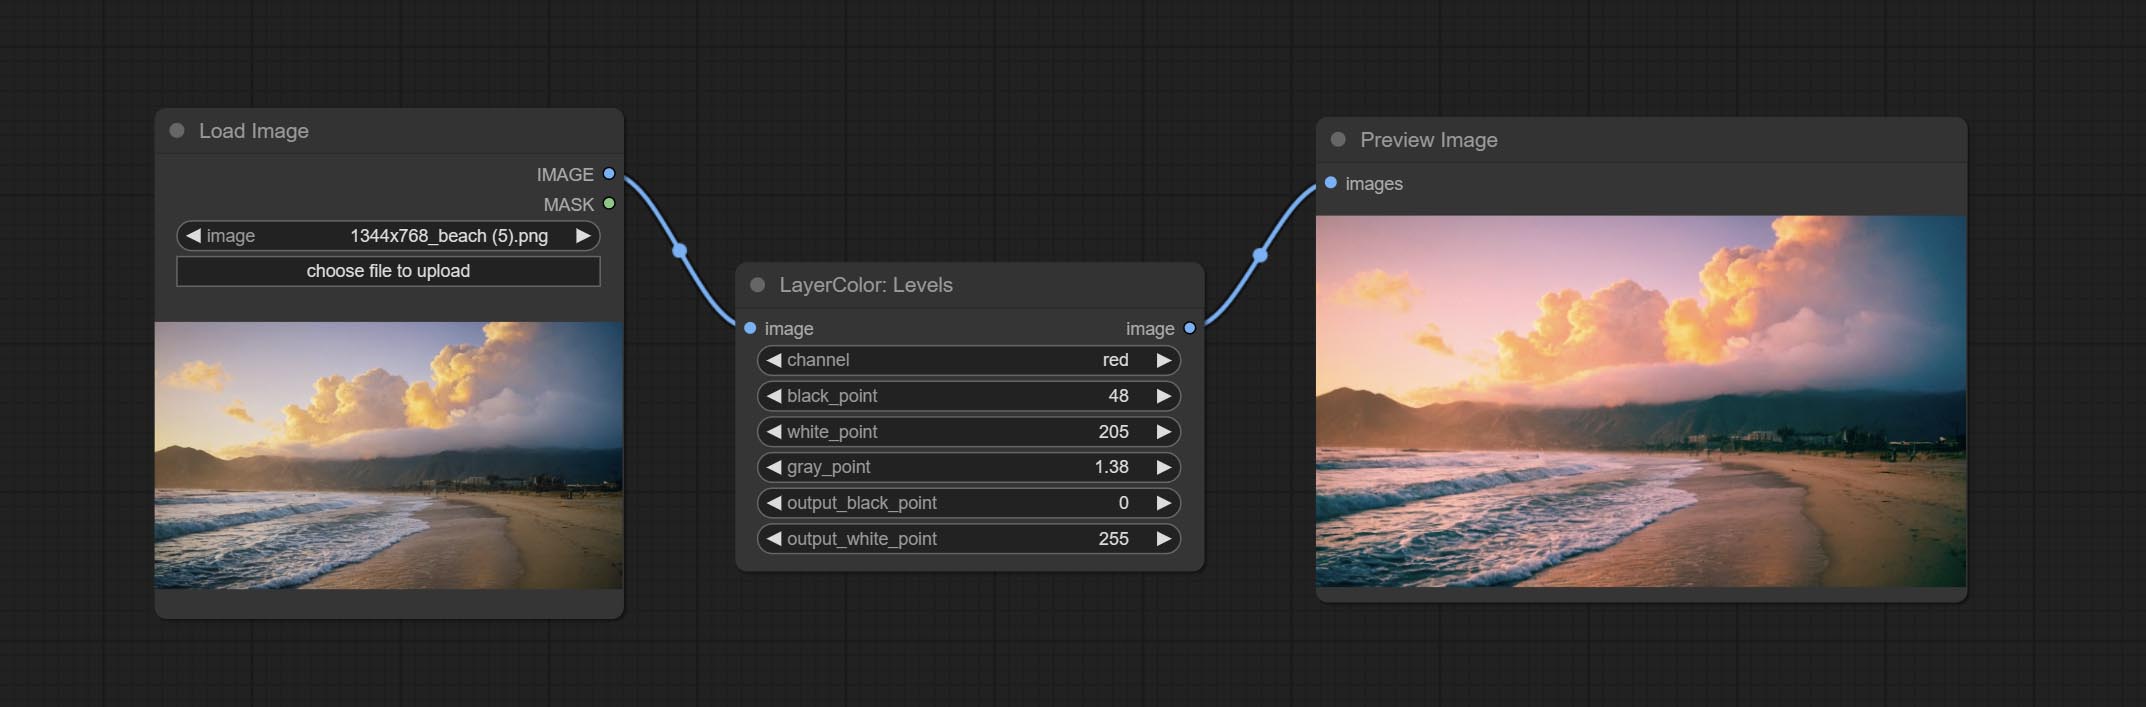
Change the levels of image.
节点选项:
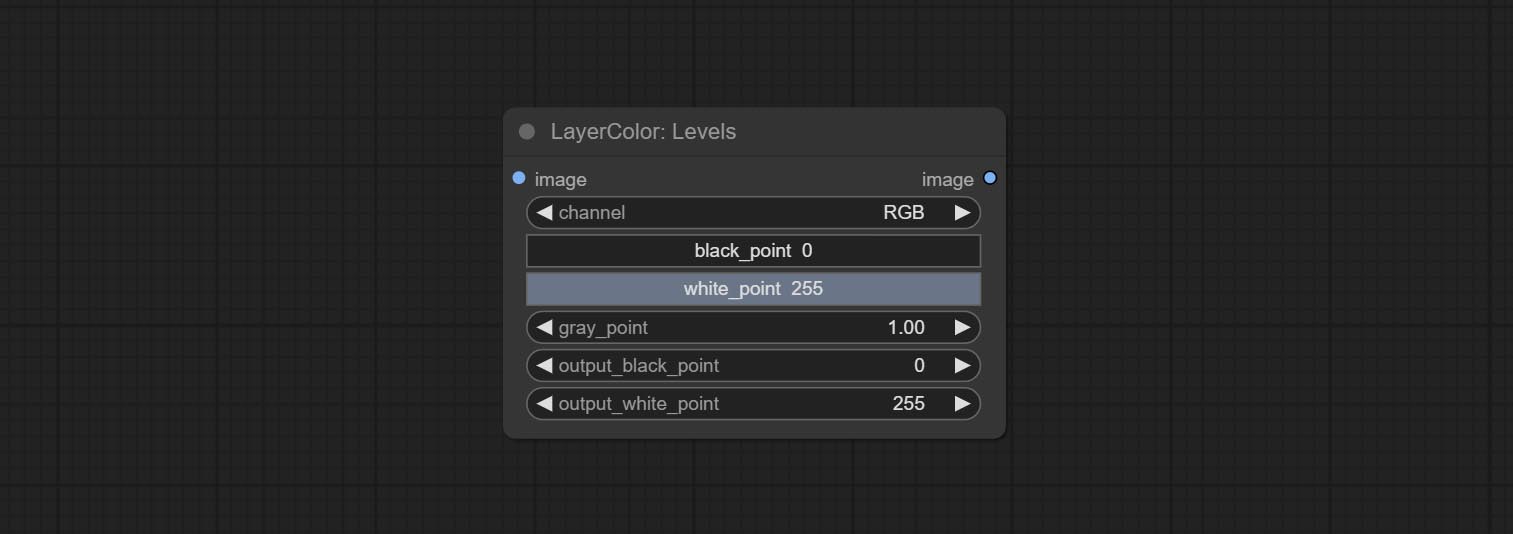
- channel: Select the channel you want to adjust. Available in RGB, red, green, blue.
- black_point * : Input black point value. Value range 0-255, default 0.
- white_point * : Input white point value. Value range 0-255, default 255.
- gray_point: Input grey point values. Value range 0.01-9.99, default 1.
- output_black_point * : Output black point value. Value range 0-255, default 0.
- output_white_point * : Output white point value. Value range 0-255, default 255.
* If the black_point or output_black_point value is greater than white_point or output_white_point, the two values are swapped, with the larger value used as white_point and the smaller value used as black_point.
ColorBalance
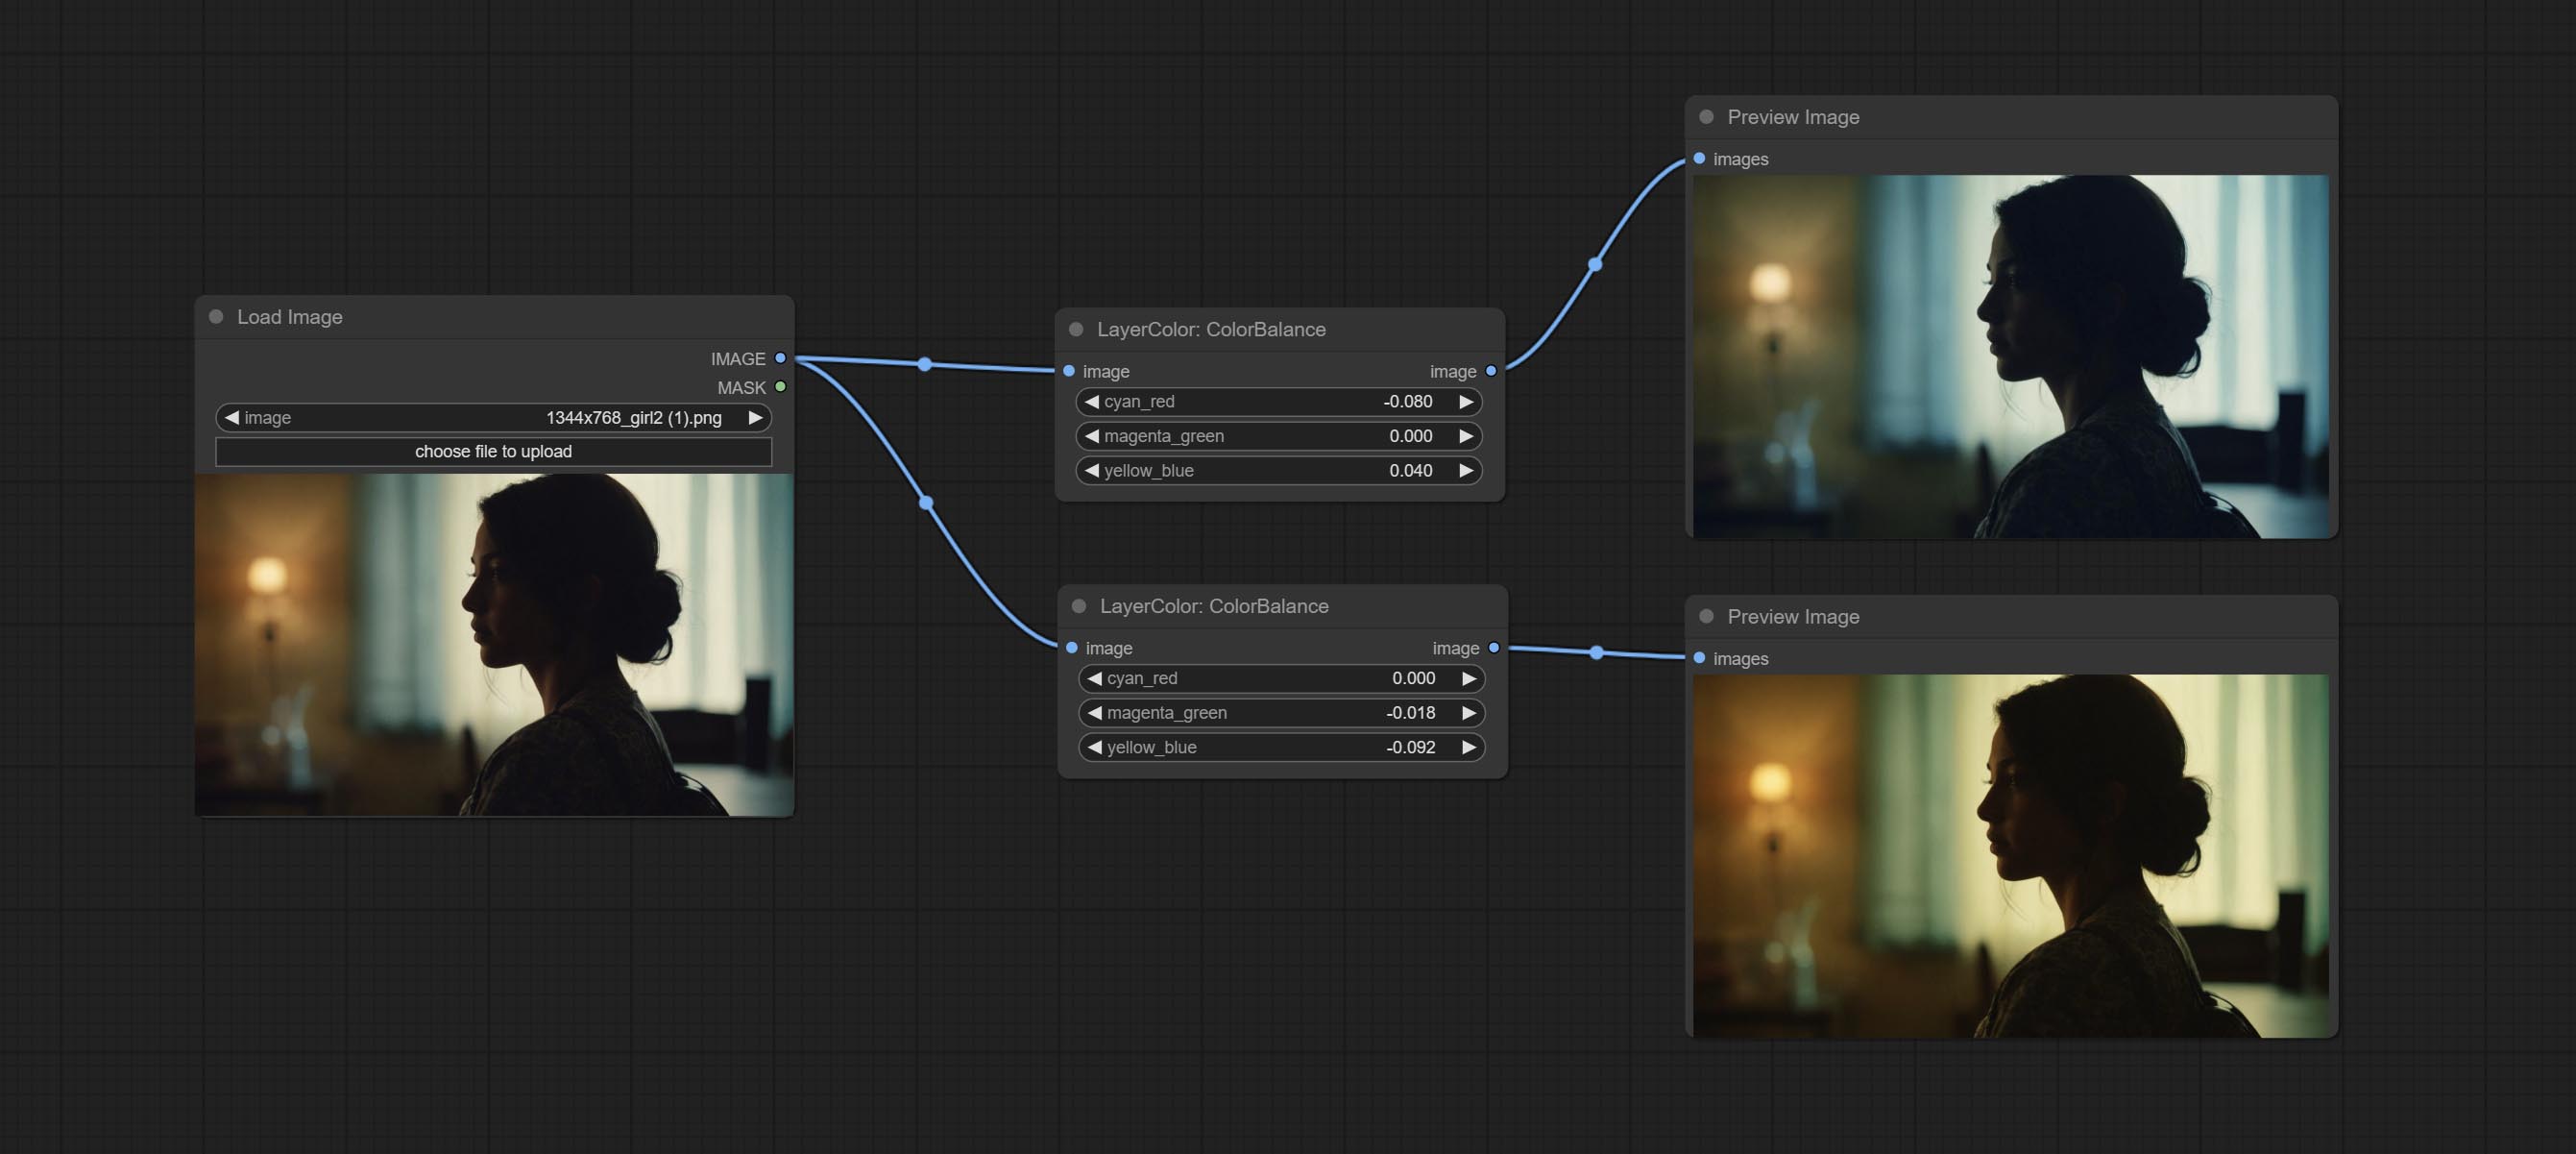
Change the color balance of an image.
节点选项:
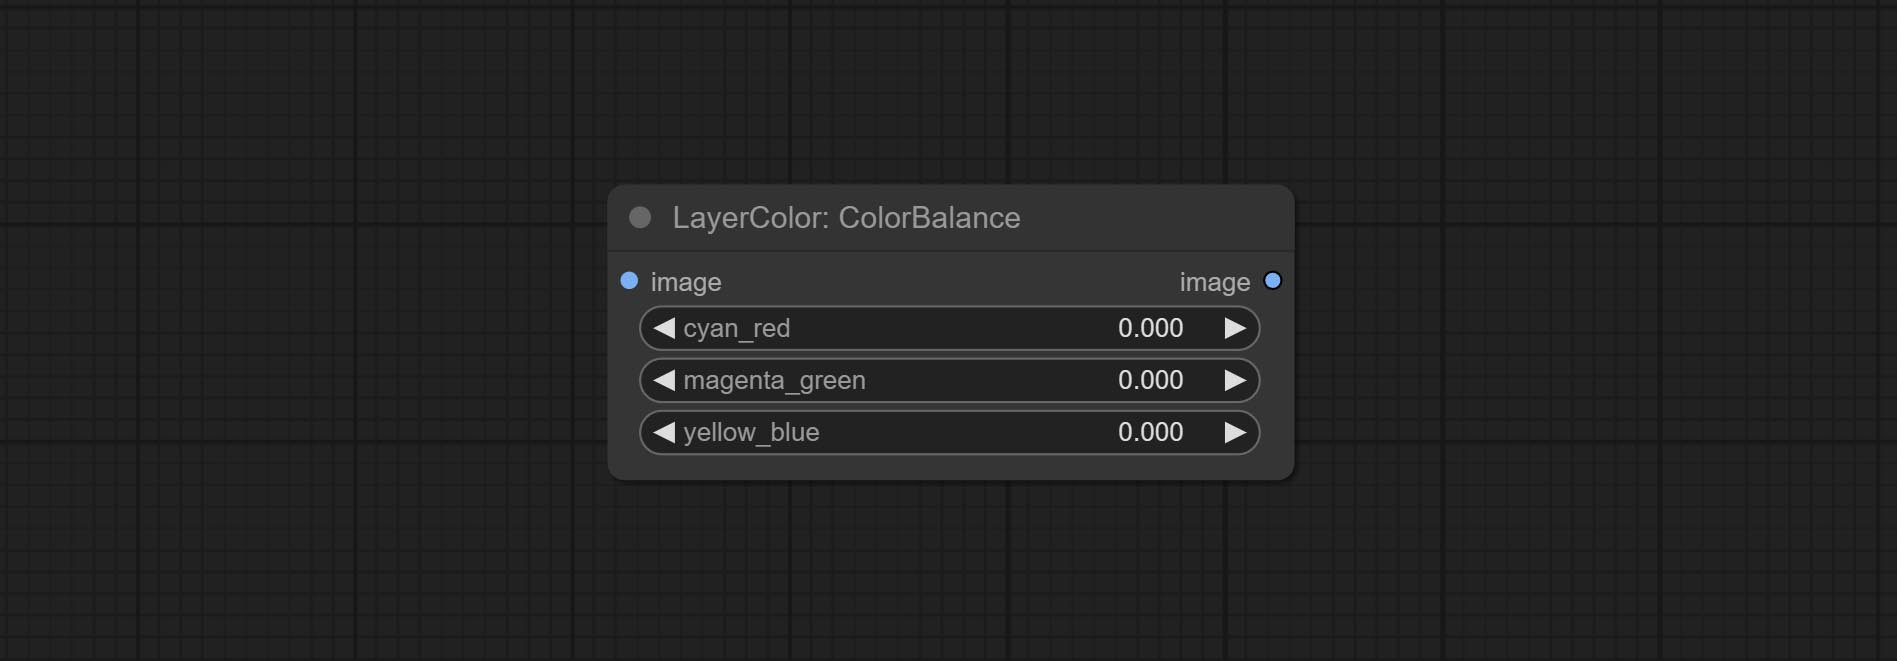
- cyan_red: Cyan-Red balance. negative values are leaning cyan, positive values are leaning red.
- magenta_green: Megenta-Green balance. negative values are leaning megenta, positive values are leaning green.
- yellow_blue: Yellow-Blue balance. negative values are leaning yellow, positive values are leaning blue.
伽玛
Change the gamma value of the image.
Node options:
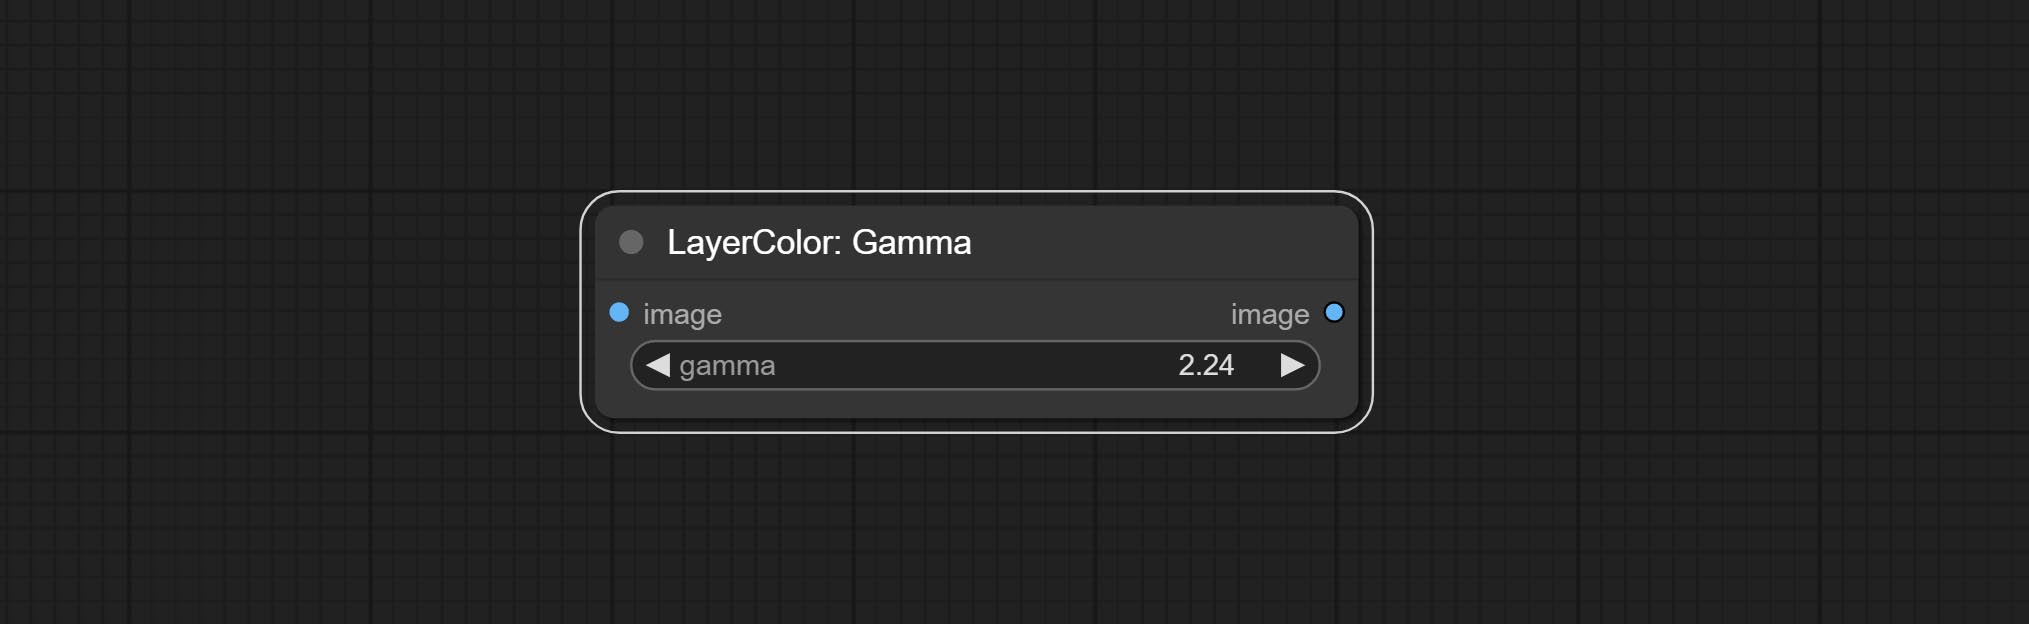
- gamma: Value of the Gamma.
Brightness & Contrast
Change the brightness, contrast, and saturation of the image.
Node options:
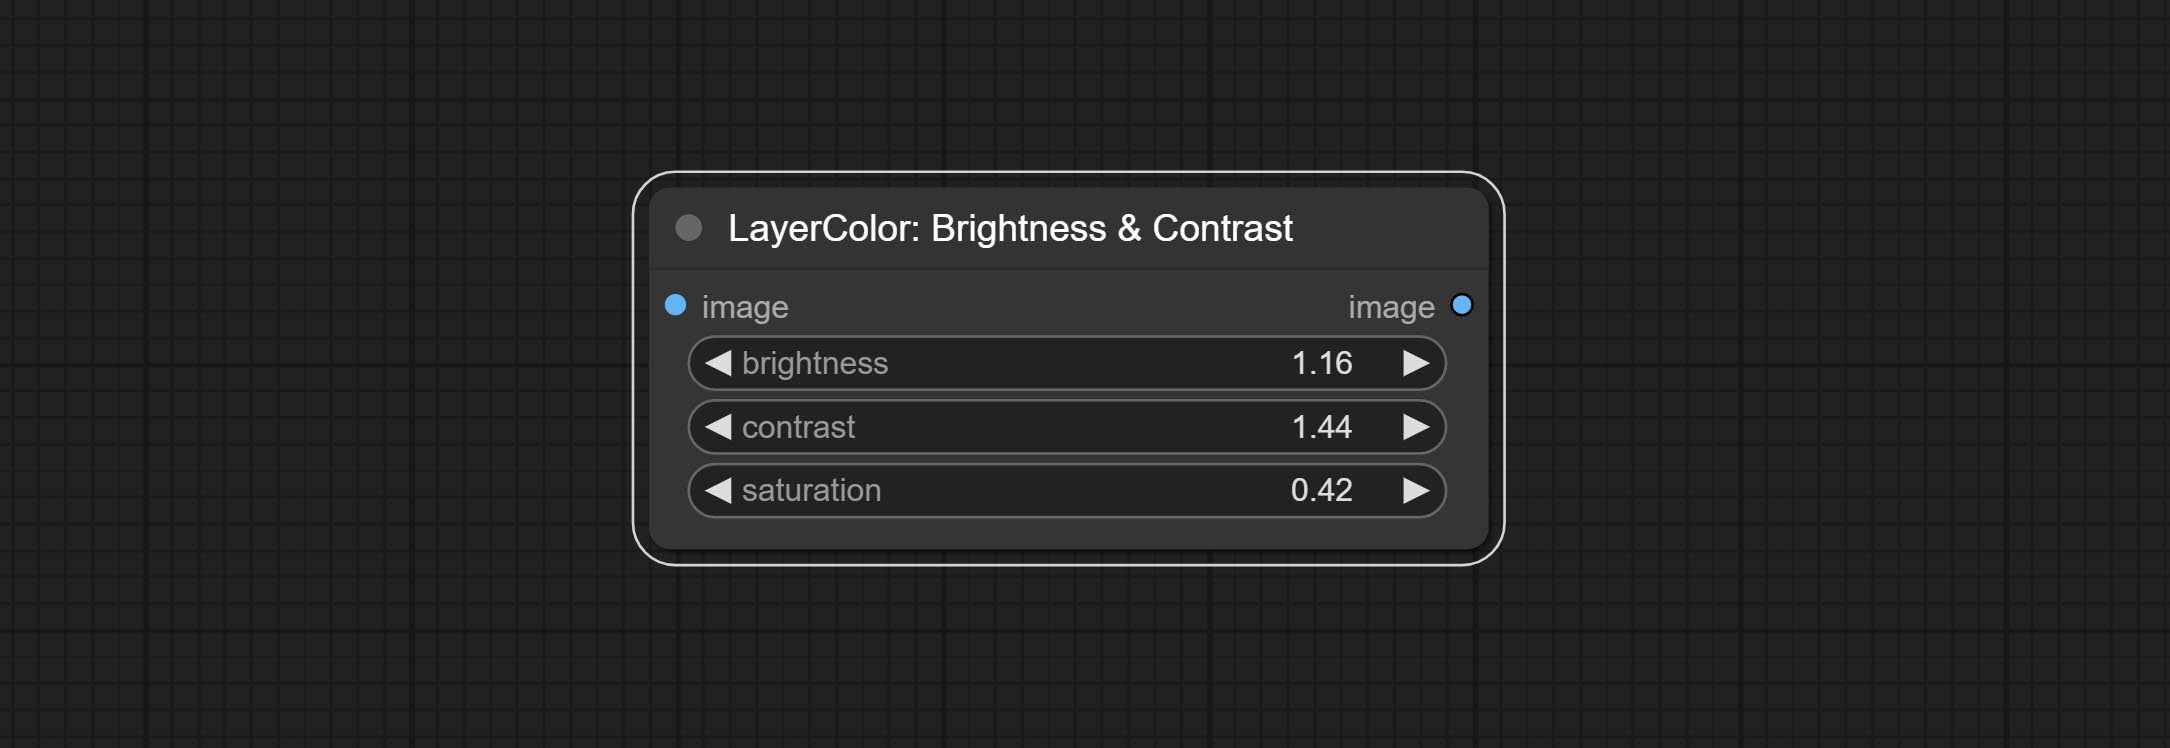
- brightness: Value of brightness.
- contrast: Value of contrast.
- saturation: Value of saturation.
BrightnessContrastV2
A replica of the Brightness & Contrast node, with the "&" character removed from the node name to avoid ComfyUI workflow parsing errors.
RGB
Adjust the RGB channels of the image.
Node options:

- R: R channel.
- G: G channel.
- B: B channel.
是的
Adjust the YUV channels of the image.
Node options:
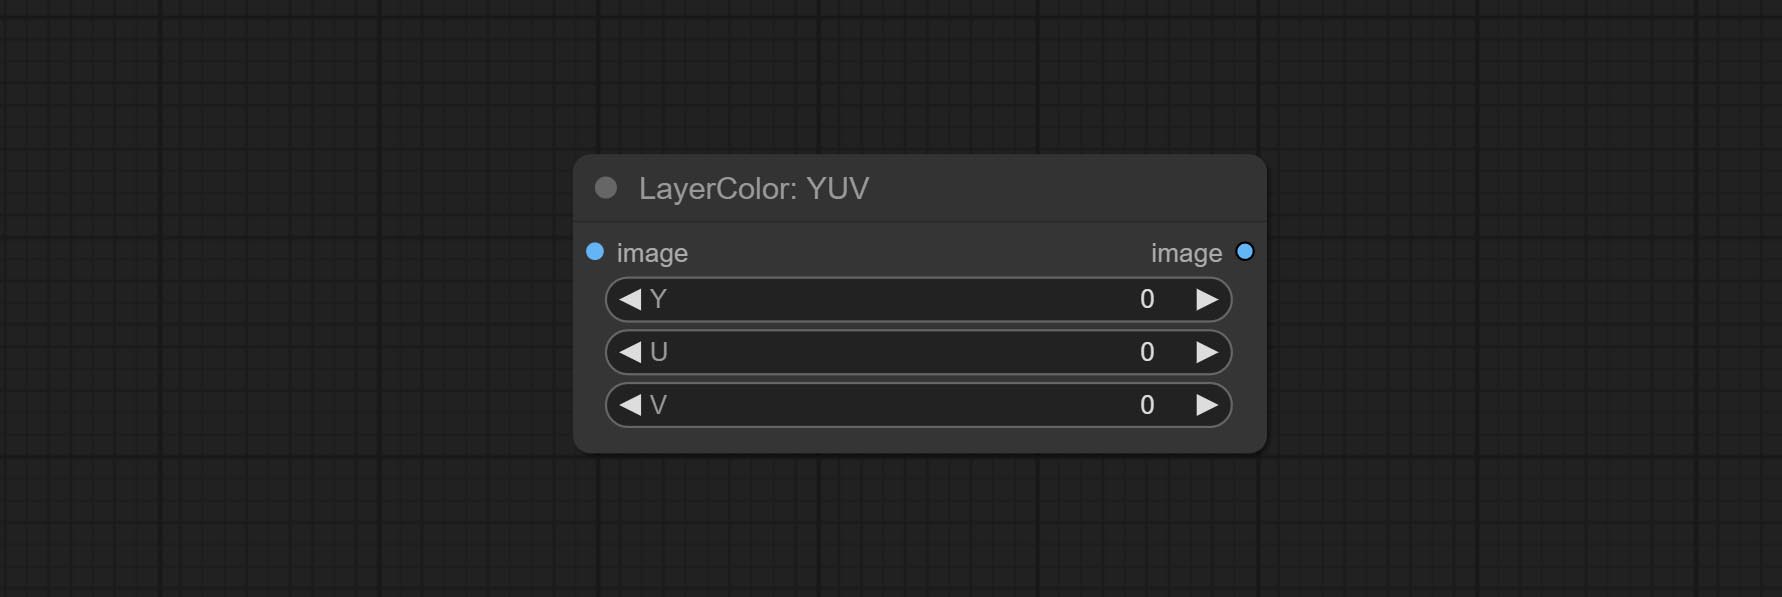
- Y: Y channel.
- U: U channel.
- V: V channel.
实验室
Adjust the LAB channels of the image.
Node options:
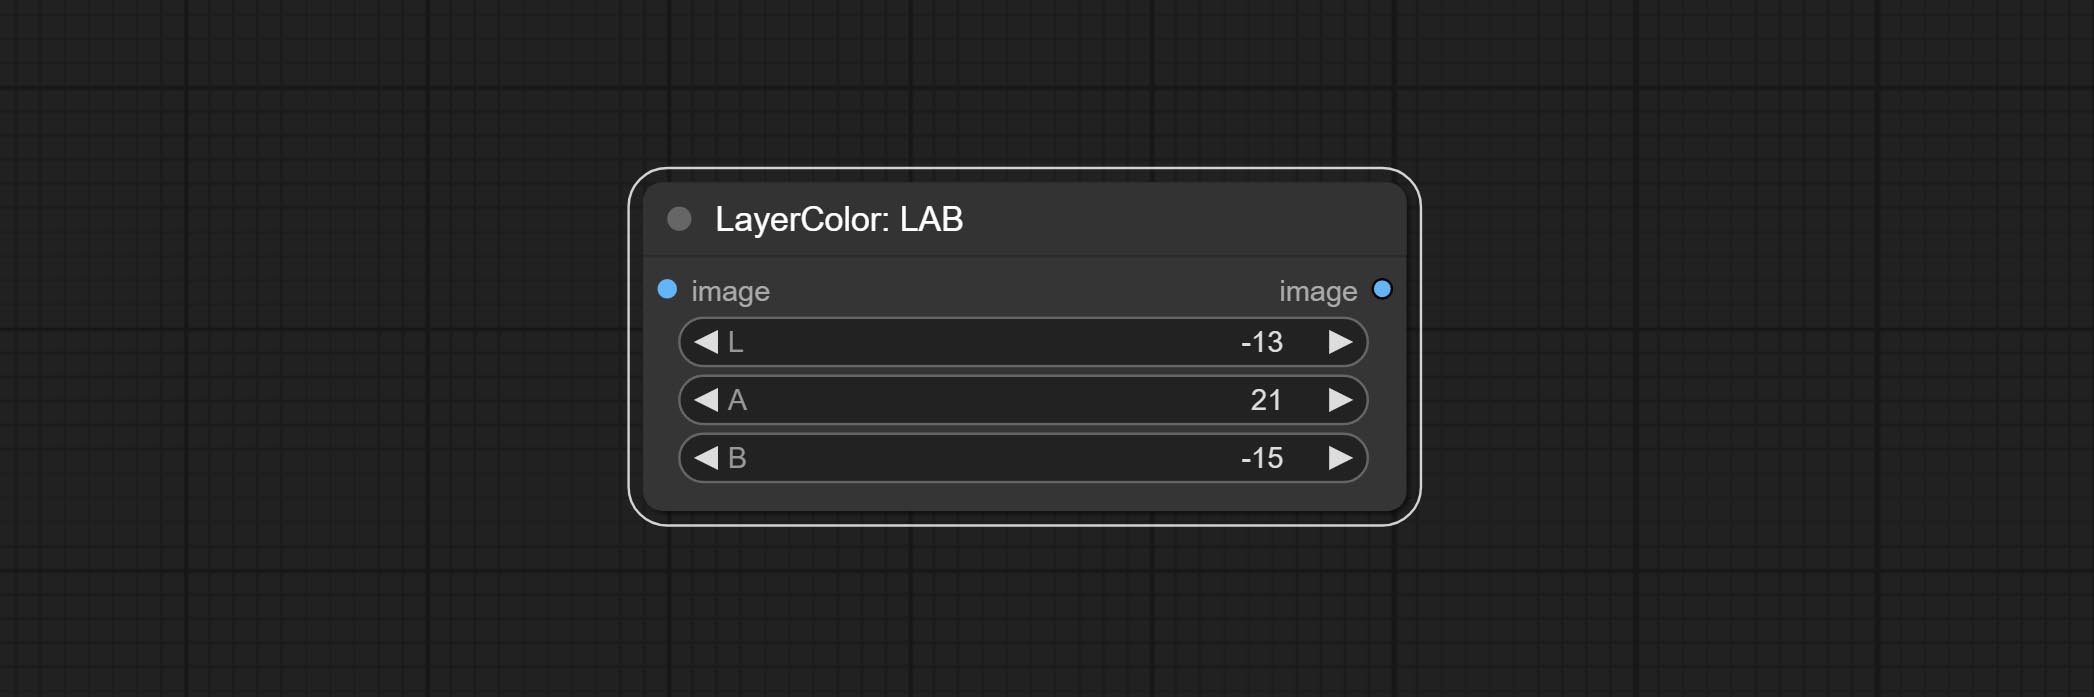
- L: L channel.
- A: A channel.
- B: B channel.
HSV
Adjust the HSV channels of the image.
Node options:
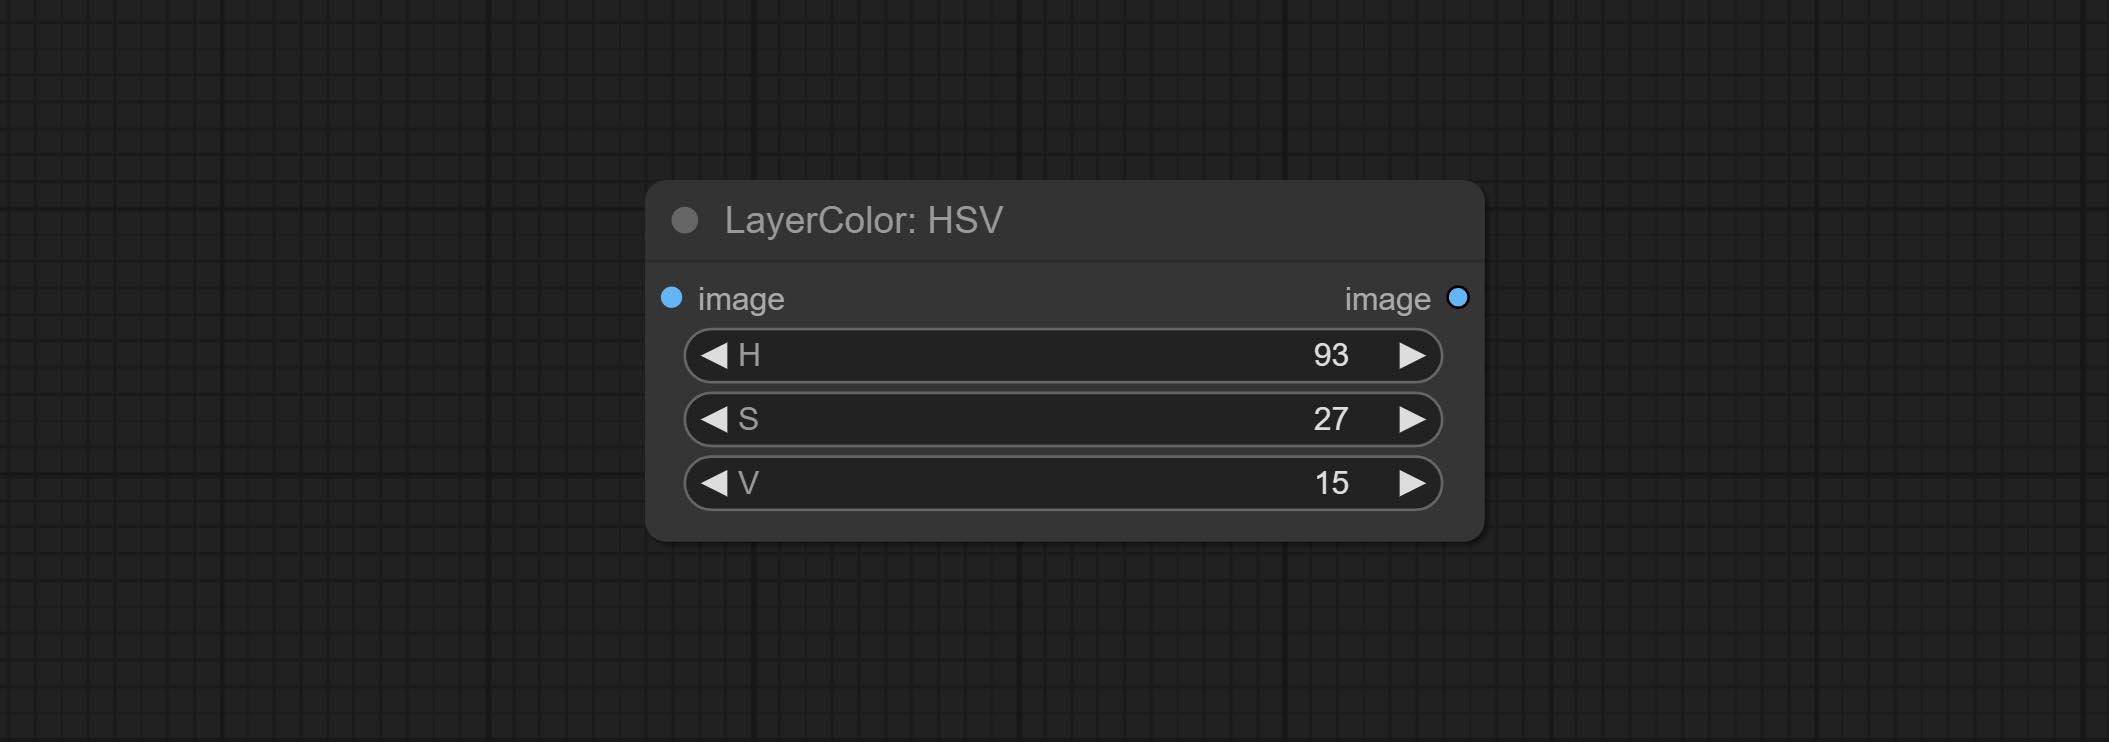
- H: H channel.
- S: S channel.
- V: V channel.
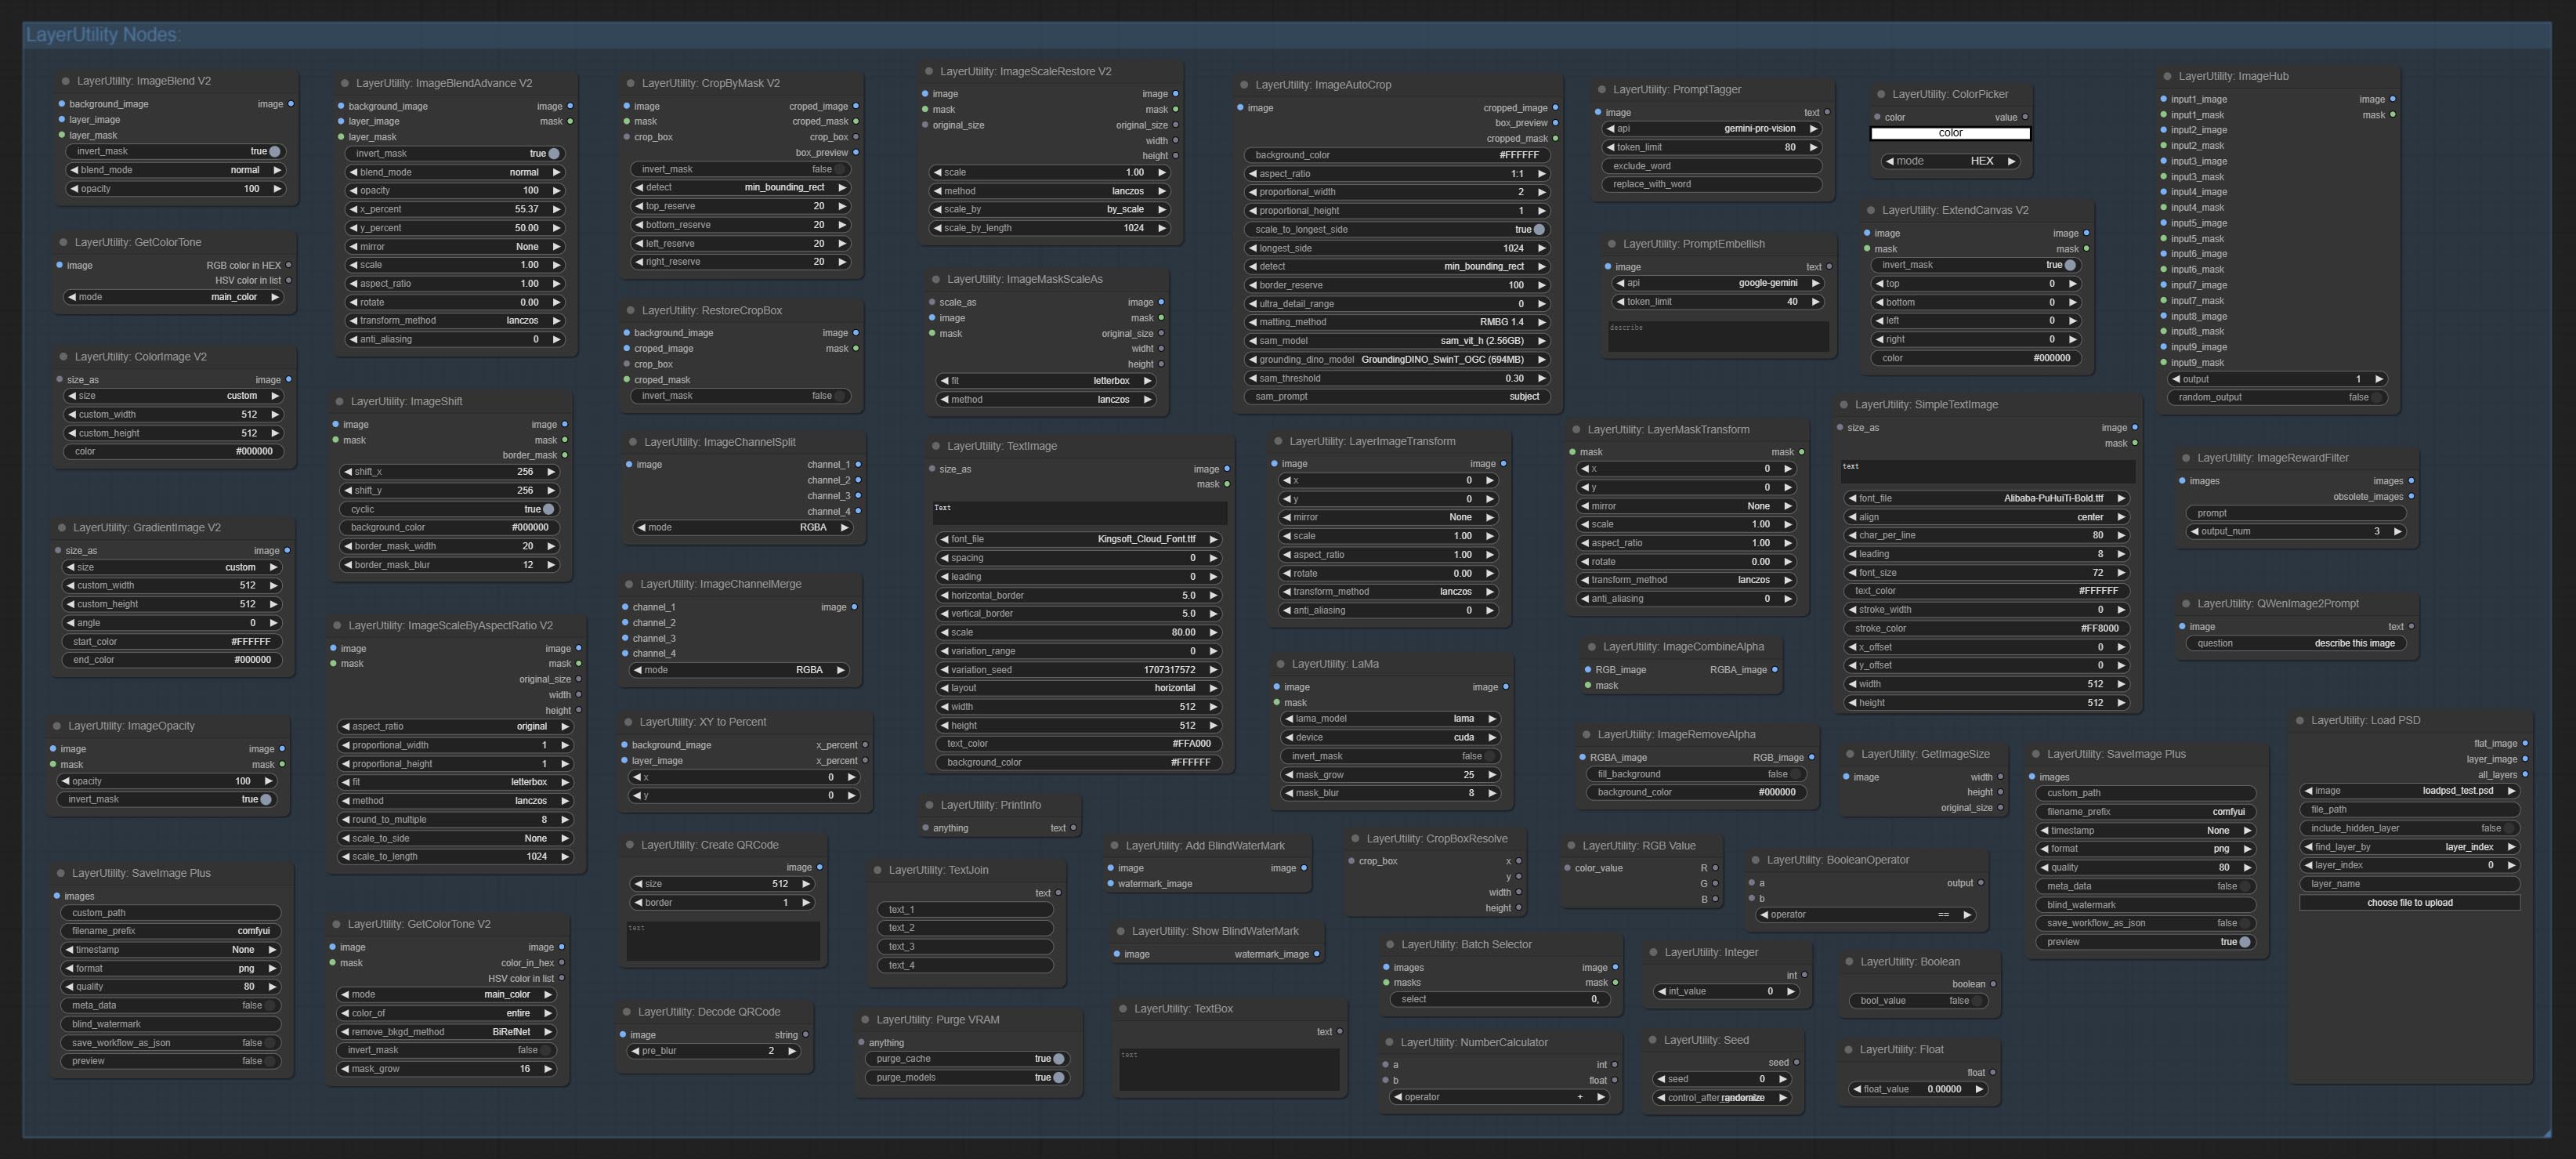
LayerUtility
ImageBlendAdvance
Used for compositing layers, allowing for compositing layer images of different sizes on the background image, and setting positions and transformations. multiple mixing modes are available for selection, and transparency can be set.
The node provide layer transformation_methods and anti_aliasing options. helps improve the quality of synthesized images.
The node provides mask output that can be used for subsequent workflows. 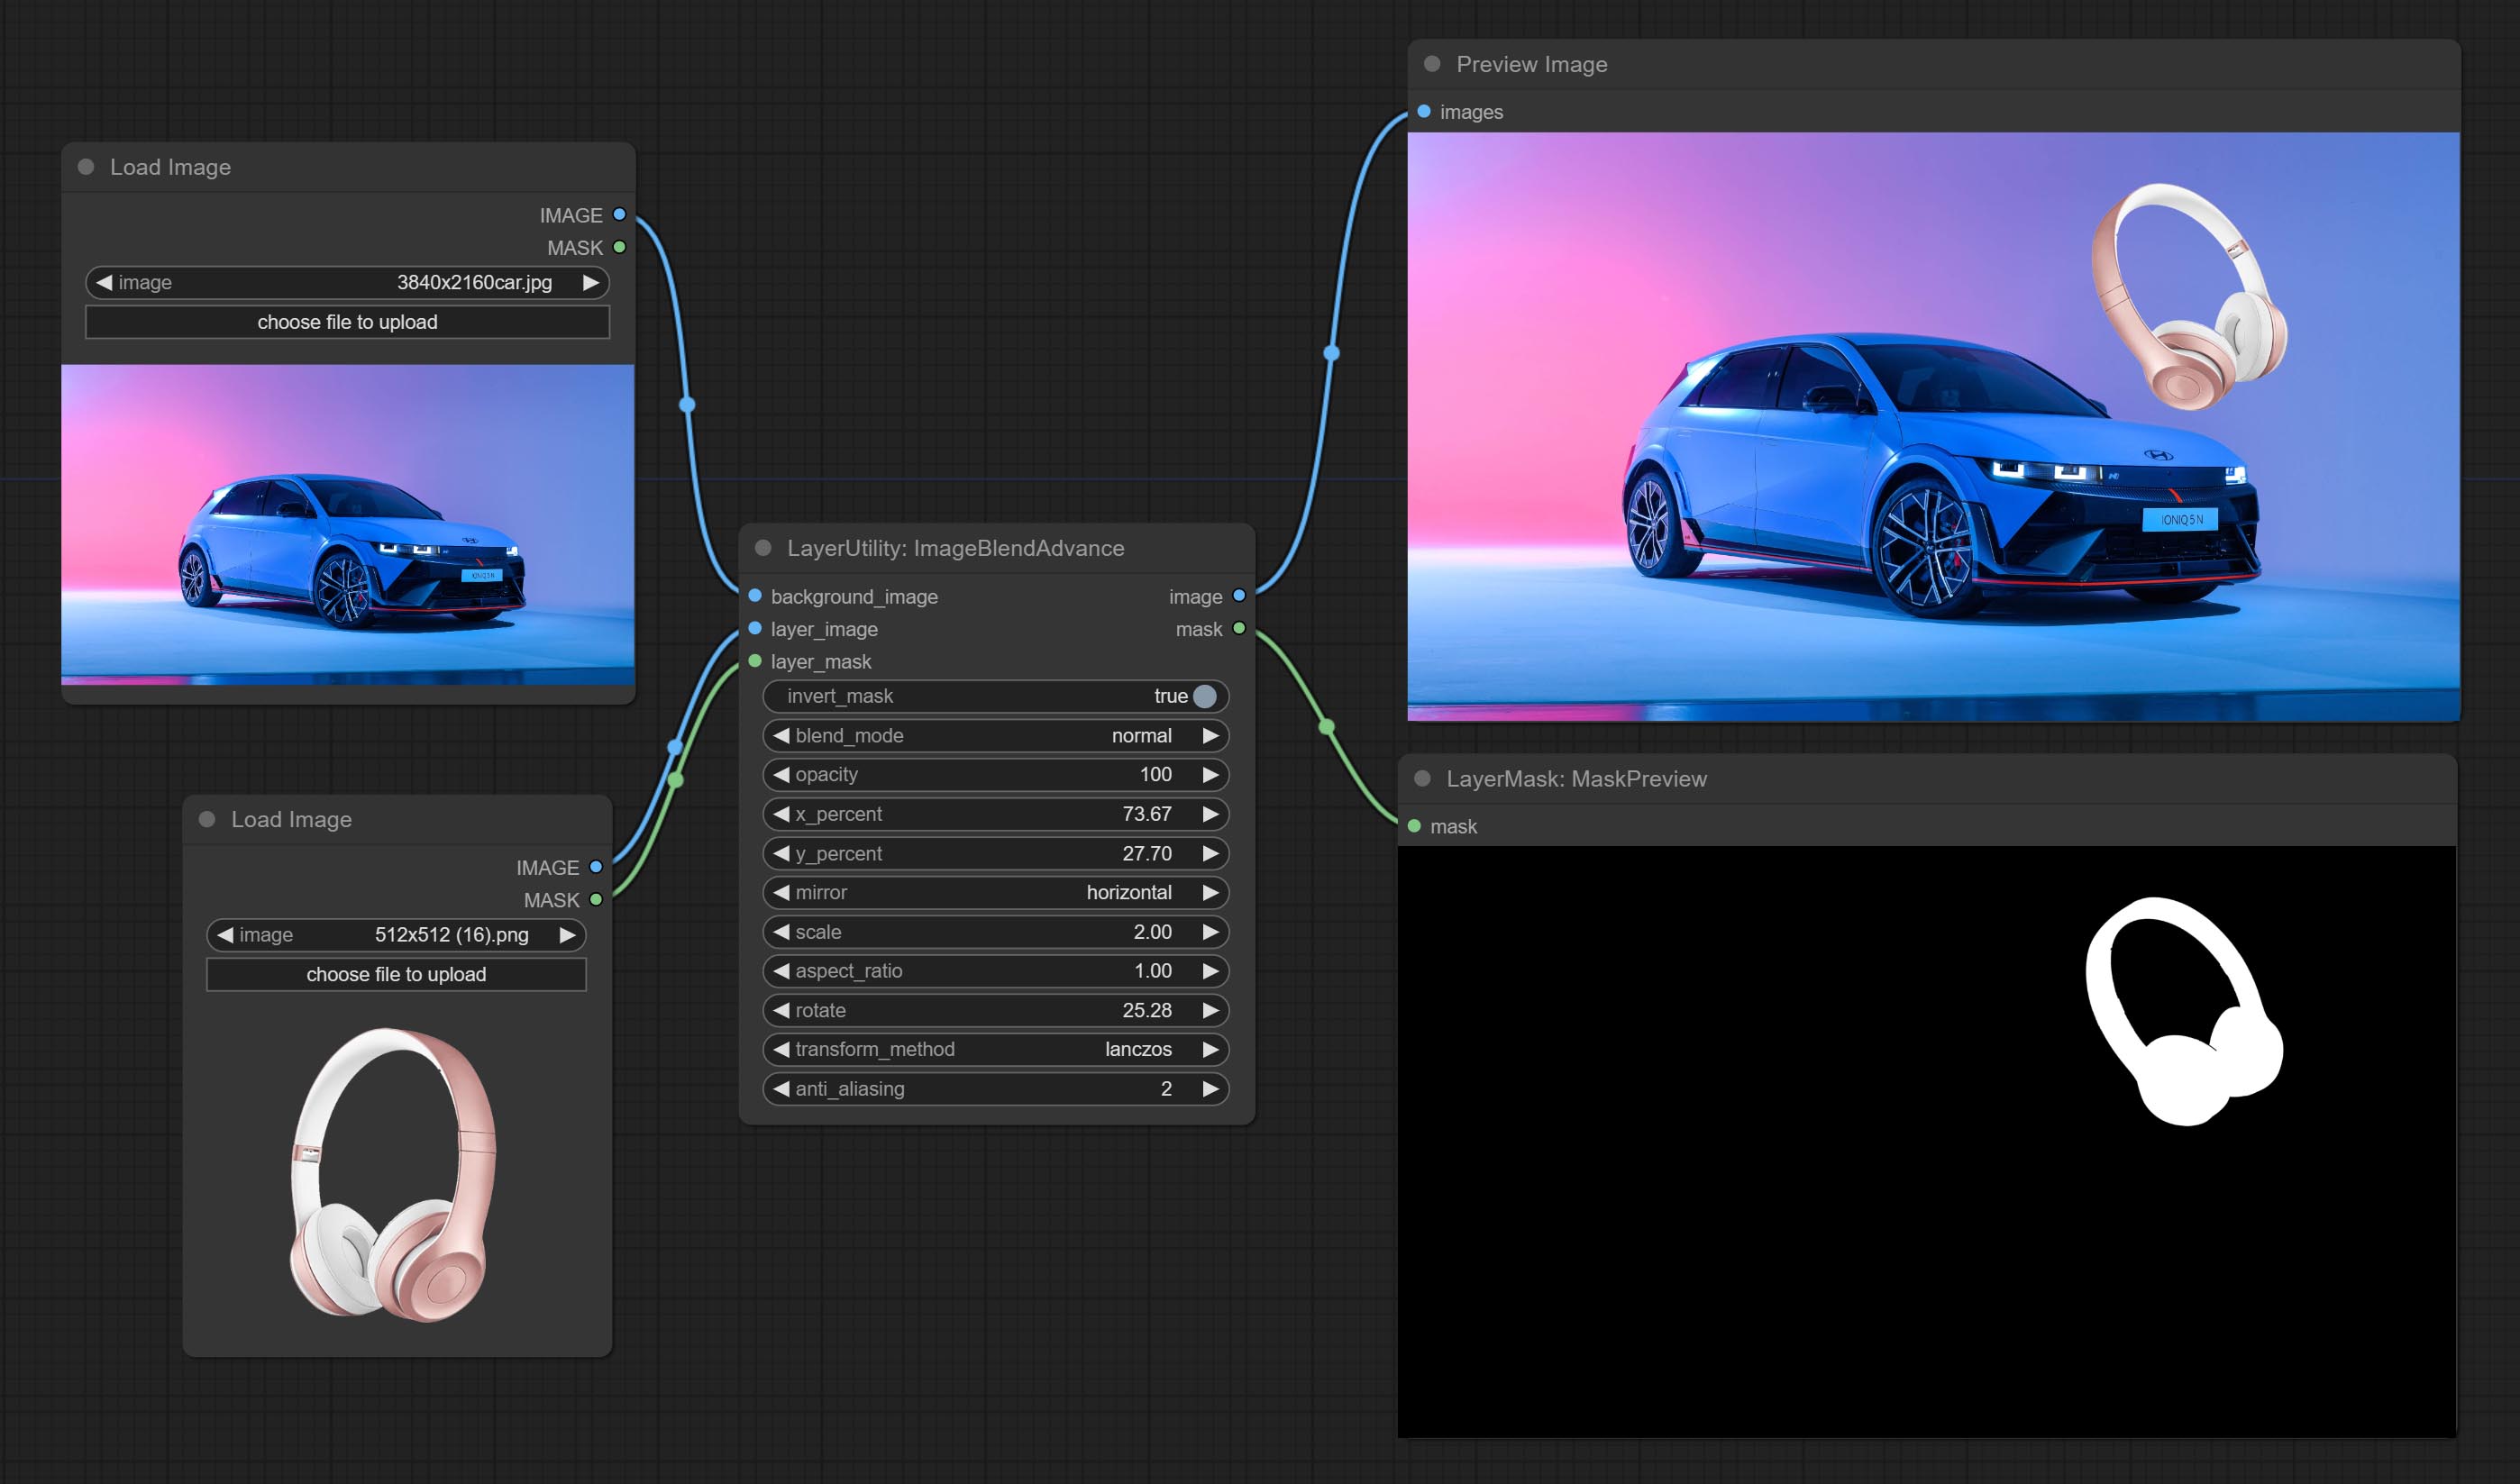
Node options:
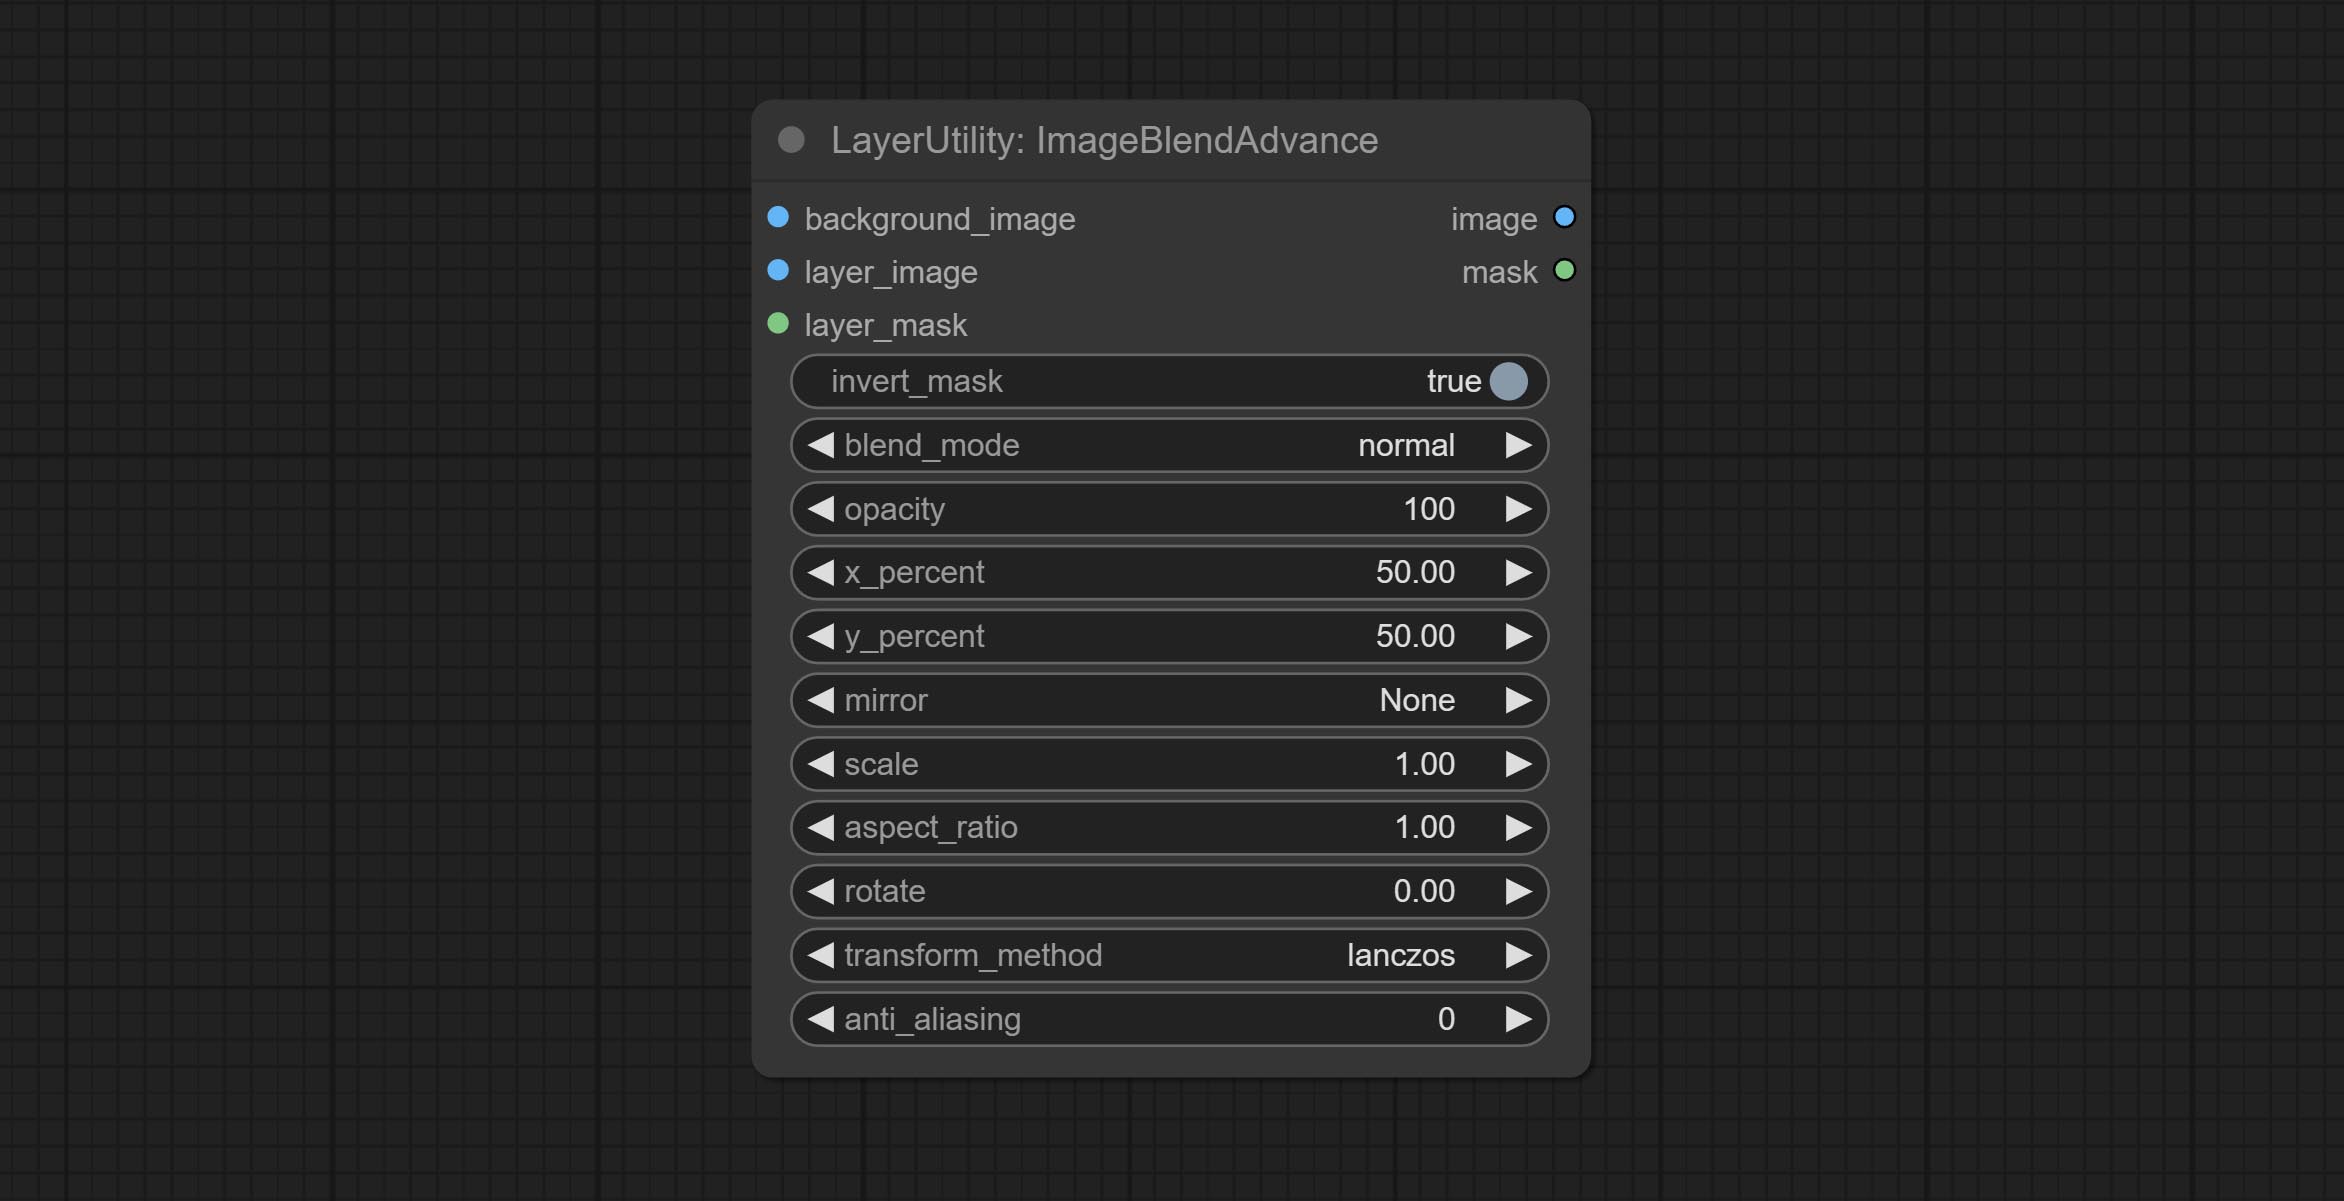
- background_image: The background image.
- layer_image 5 : Layer image for composite.
- layer_mask 2,5 : Mask for layer_image.
- invert_mask: Whether to reverse the mask.
- blend_mode 3 : Blending mode.
- opacity: Opacity of blend.
- x_percent: Horizontal position of the layer on the background image, expressed as a percentage, with 0 on the far left and 100 on the far right. It can be less than 0 or more than 100, indicating that some of the layer's content is outside the screen.
- y_percent: Vertical position of the layer on the background image, expressed as a percentage, with 0 on the top and 100 on the bottom. For example, setting it to 50 indicates vertical center, 20 indicates upper center, and 80 indicates lower center.
- mirror: Mirror flipping. Provide two flipping modes, horizontal flipping and vertical flipping.
- scale: Layer magnification, 1.0 represents the original size.
- aspect_ratio: Layer aspect ratio. 1.0 is the original ratio, a value greater than this indicates elongation, and a value less than this indicates flattening.
- rotate: Layer rotation degree.
- Sampling methods for layer enlargement and rotation, including lanczos, bicubic, hamming, bilinear, box and nearest. Different sampling methods can affect the image quality and processing time of the synthesized image.
- anti_aliasing: Anti aliasing, ranging from 0 to 16, the larger the value, the less obvious the aliasing. An excessively high value will significantly reduce the processing speed of the node.
- 笔记
CropByMask
Crop the image according to the mask range, and set the size of the surrounding borders to be retained. This node can be used in conjunction with the RestoreCropBox and ImageScaleRestore nodes to crop and modify upscale parts of image, and then paste them back in place. 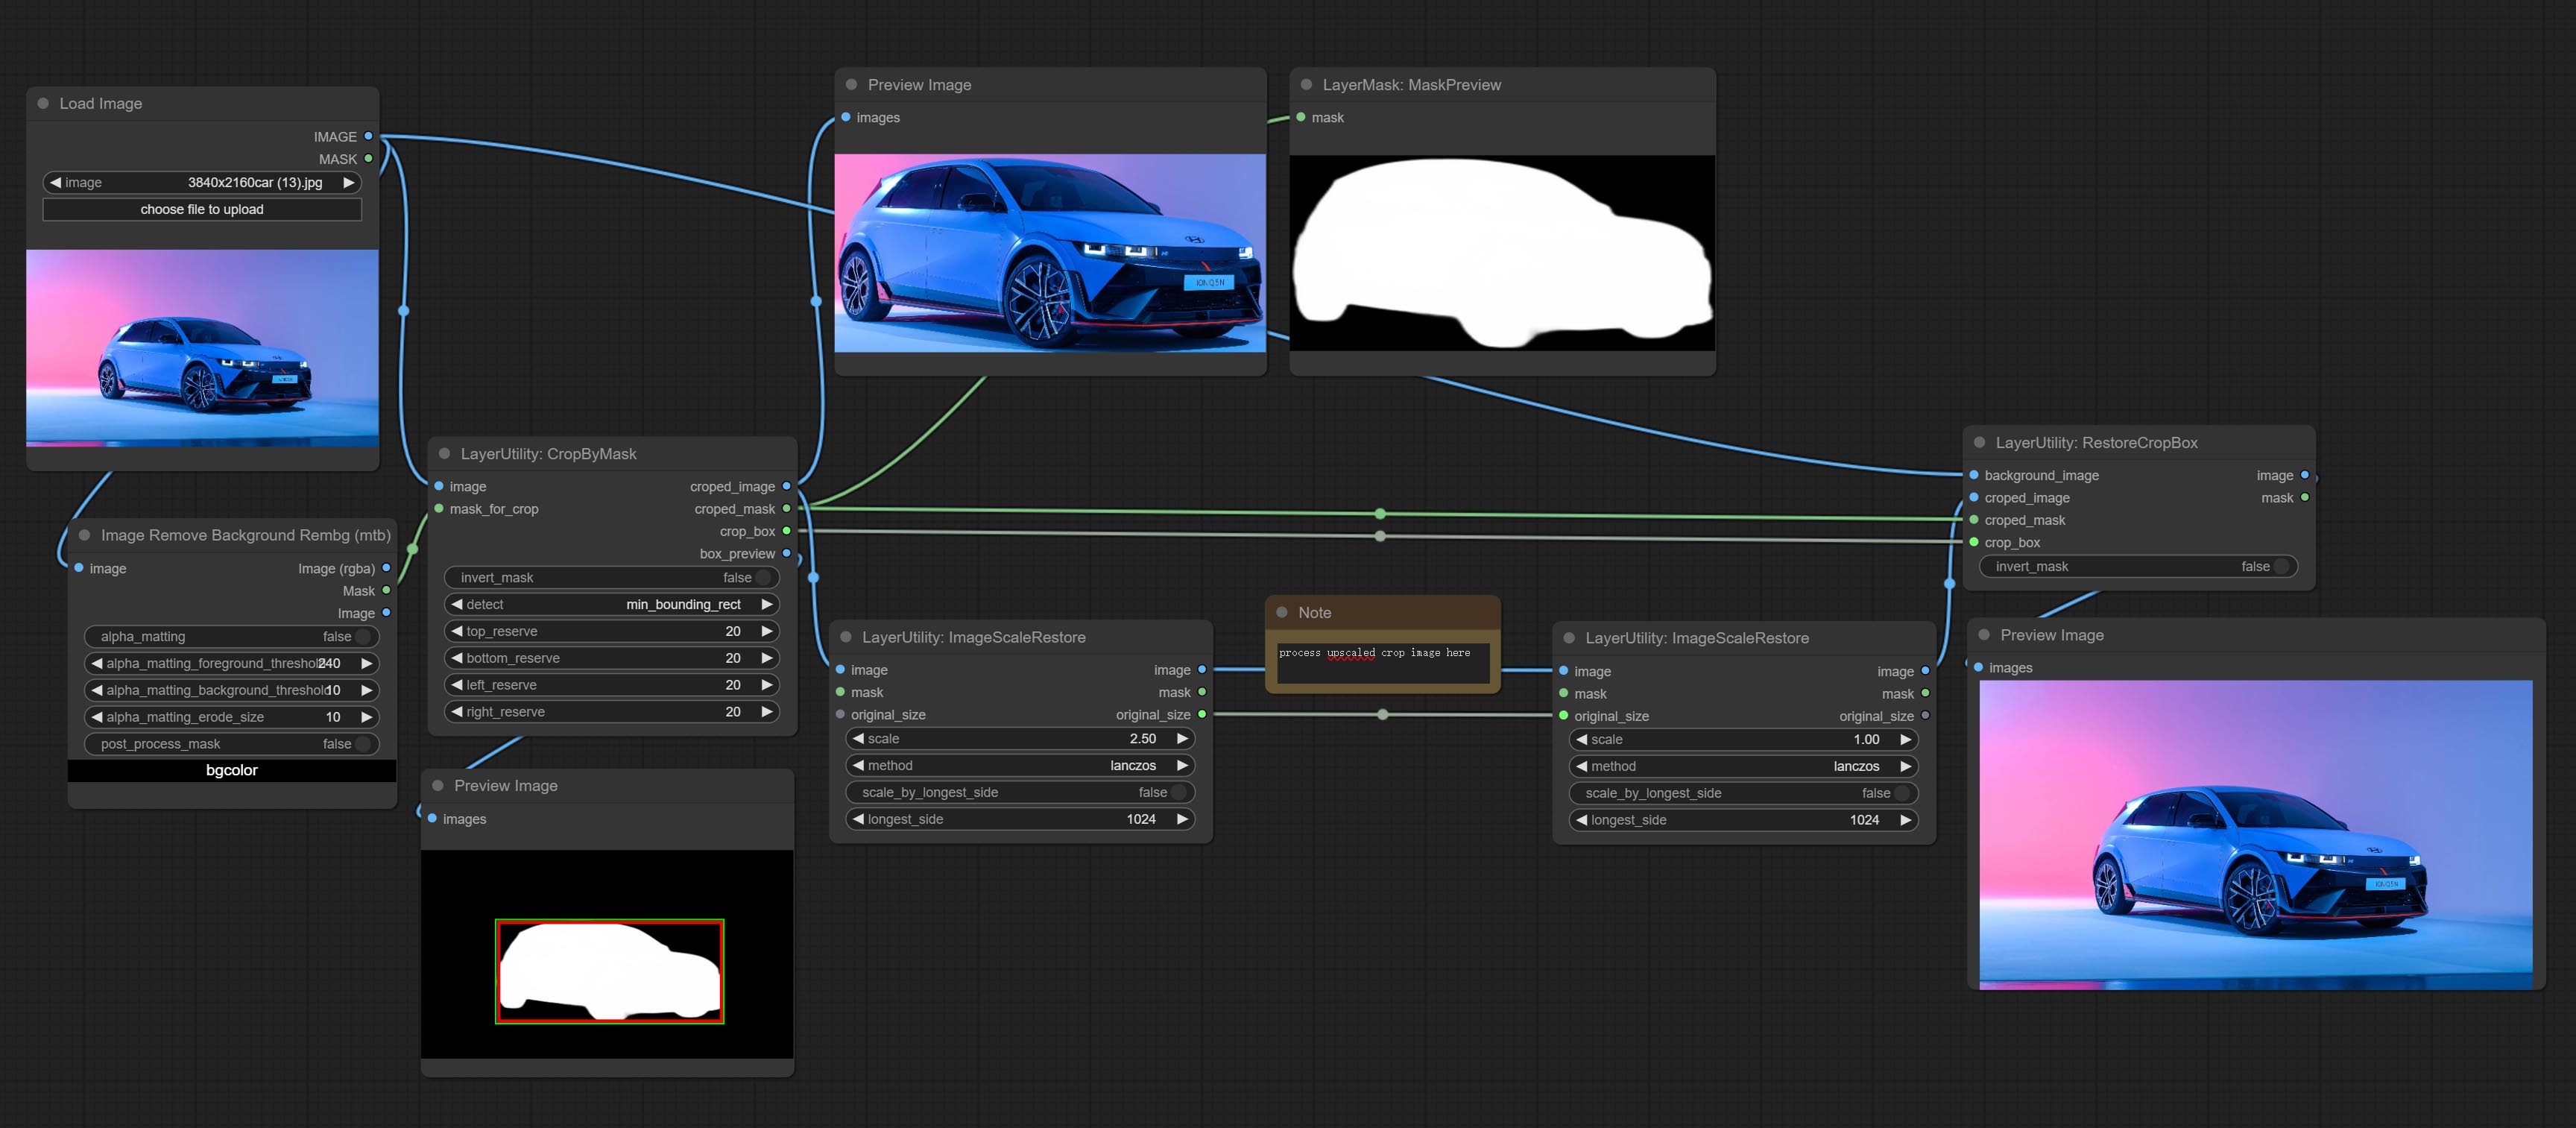
Node options:
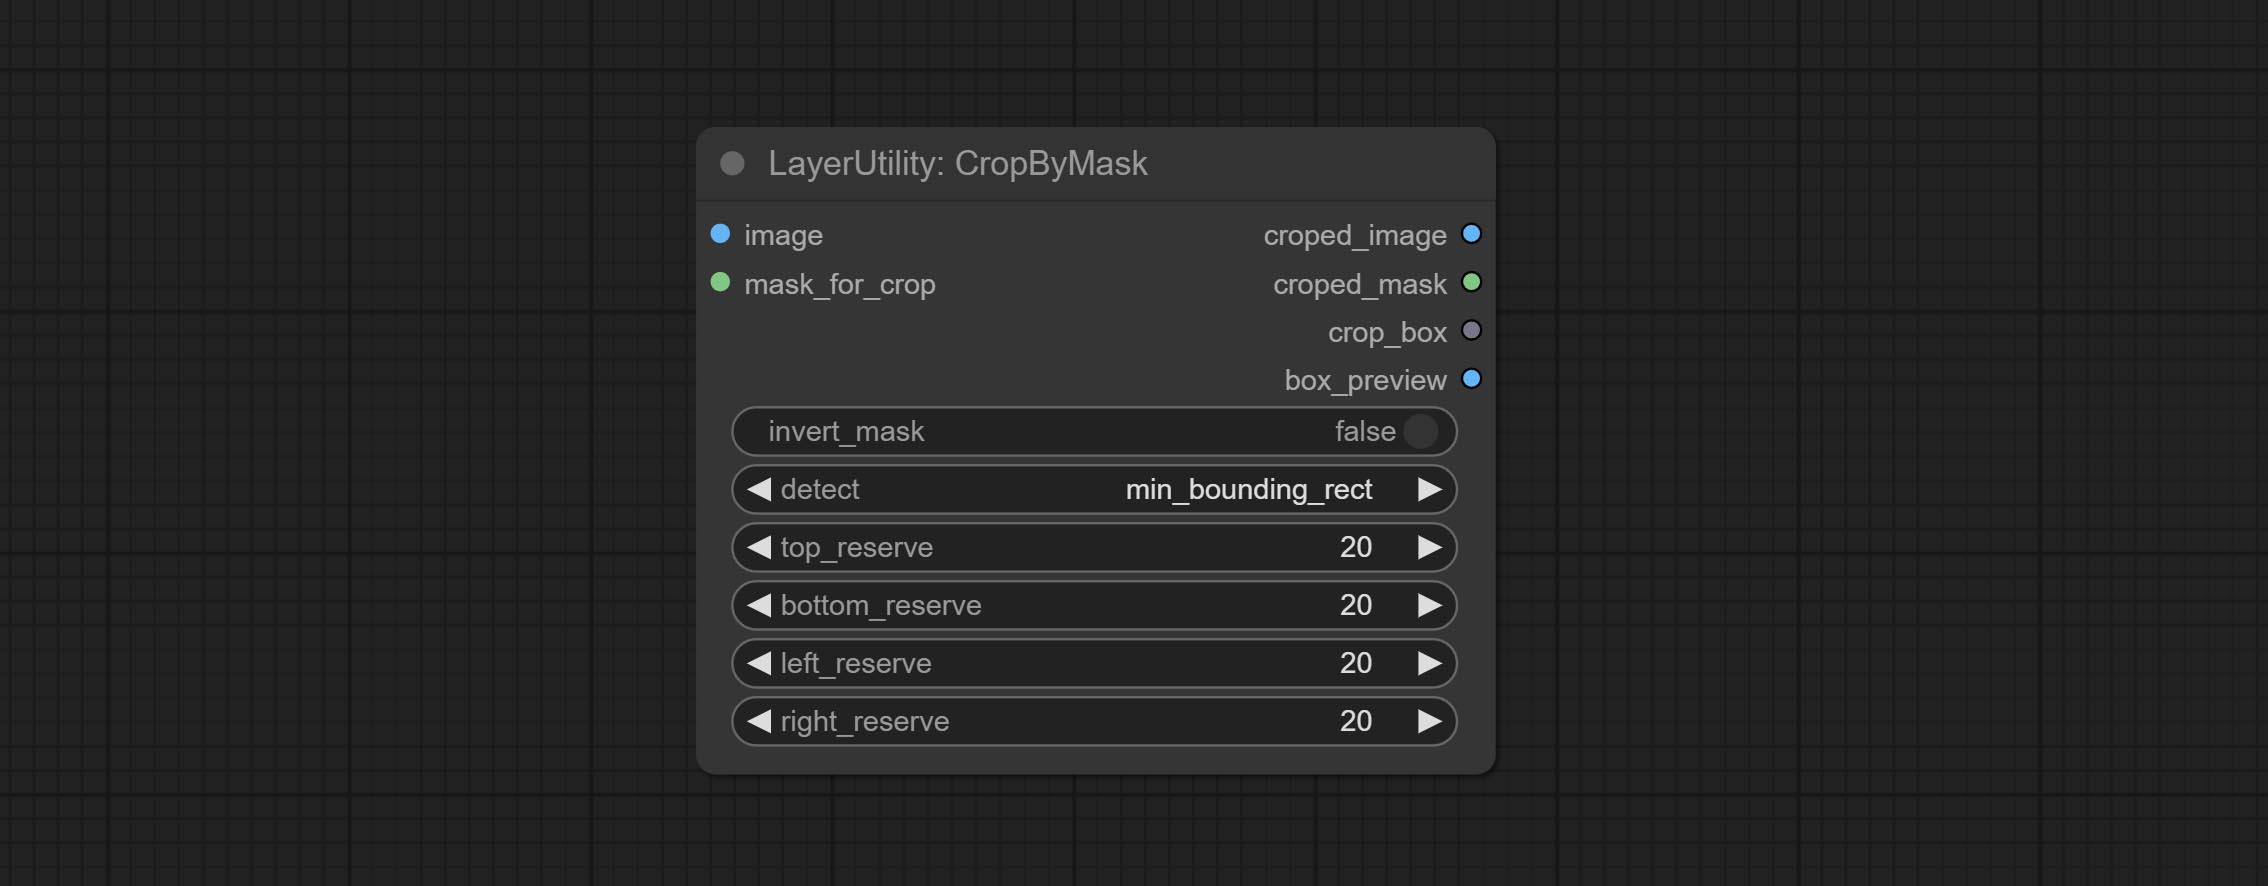
- image 5 : The input image.
- mask_for_crop 5 : Mask of the image, it will automatically be cut according to the mask range.
- invert_mask: Whether to reverse the mask.
- detect: Detection method,
min_bounding_rect is the minimum bounding rectangle of block shape, max_inscribed_rect is the maximum inscribed rectangle of block shape, and mask-area is the effective area for masking pixels. - top_reserve: Cut the top to preserve size.
- bottom_reserve: Cut the bottom to preserve size.
- left_reserve: Cut the left to preserve size.
- right_reserve: Cut the right to preserve size.
- 笔记
输出:
- croped_image: The image after crop.
- croped_mask: The mask after crop.
- crop_box: The trimmed box data is used when restoring the RestoreCropBox node.
- box_preview: Preview image of cutting position, red represents the detected range, and green represents the cutting range after adding the reserved border.
CropByMaskV2
The V2 upgraded version of CropByMask. Supports crop_box input, making it easy to cut layers of the same size.
The following changes have been made based on CropByMask: 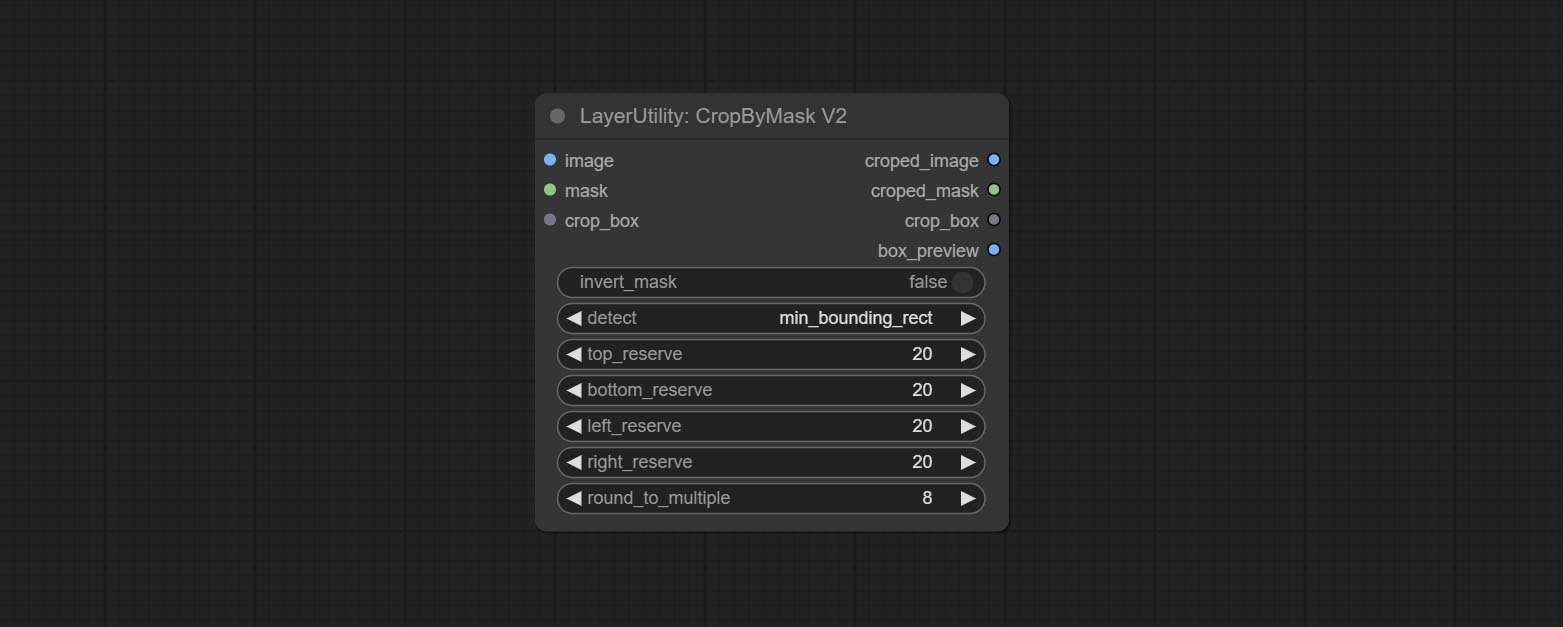
- The input
mask_for_crop reanme to mask 。 - Add optional inputs to the
crop_box . If there are inputs here, mask detection will be ignored and this data will be directly used for cropping. - Add the option
round_to_multiple to round the trimming edge length multiple. For example, setting it to 8 will force the width and height to be multiples of 8.
RestoreCropBox
Restore the cropped image to the original image by CropByMask.
Node options:
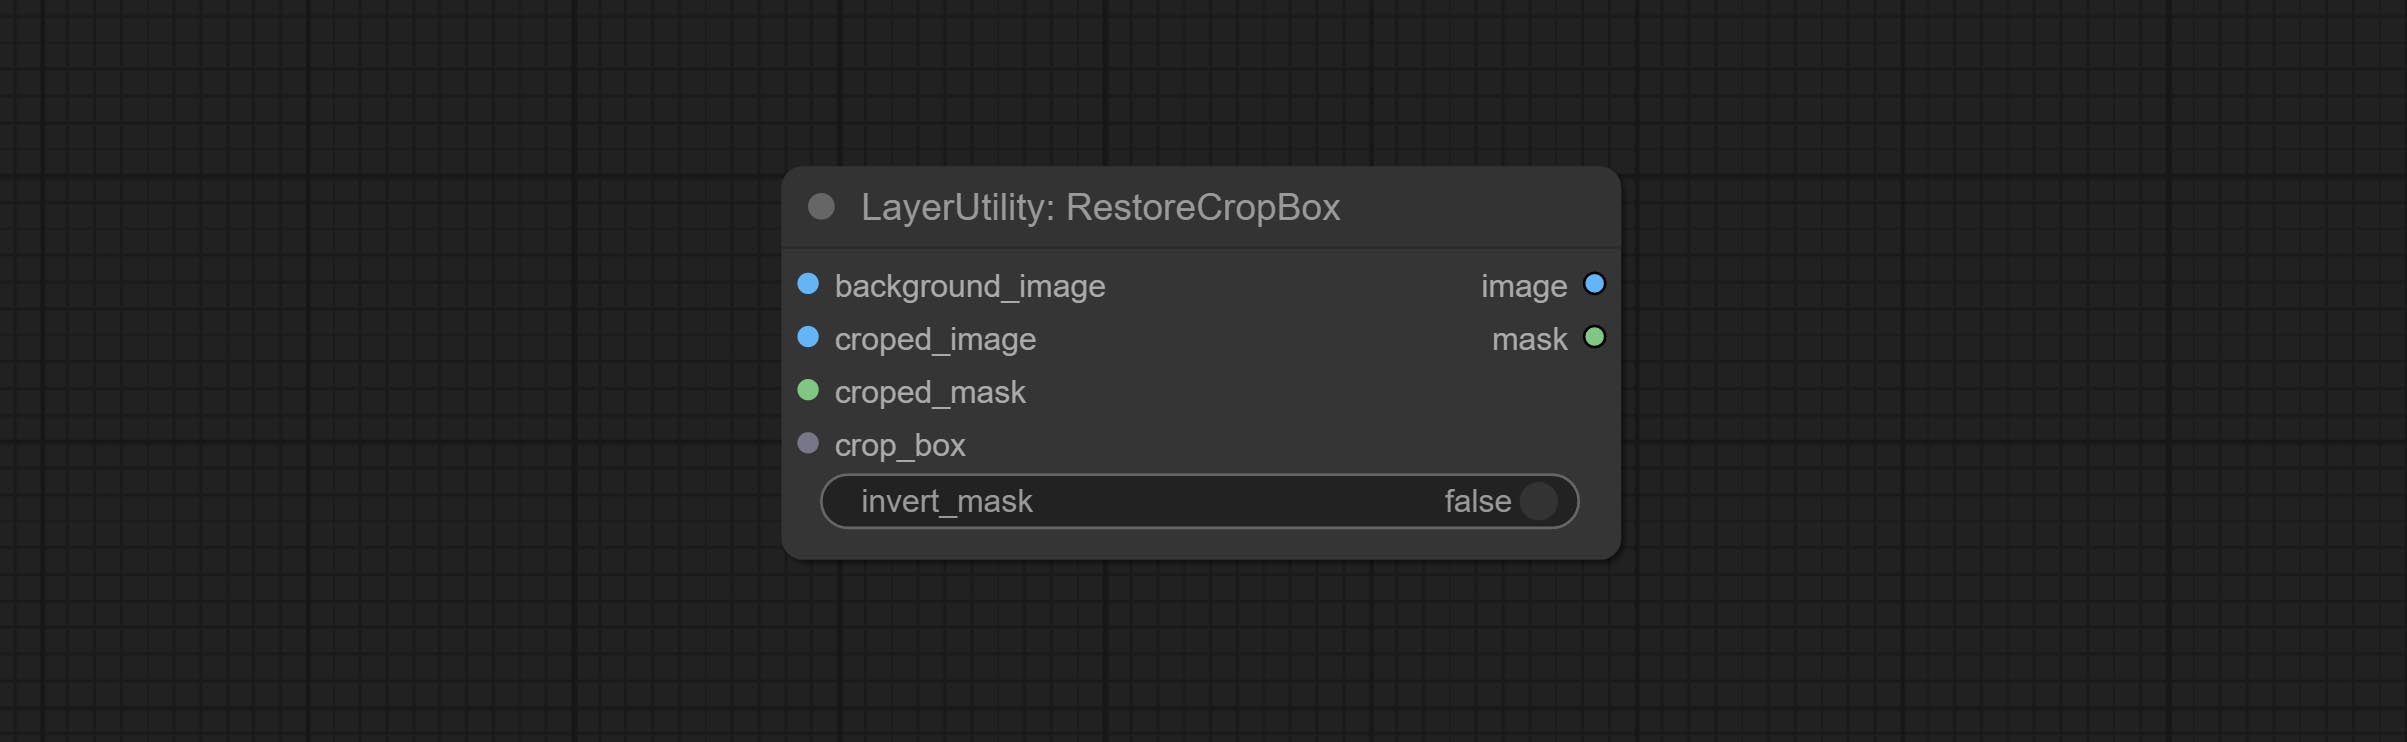
- background_image: The original image before cutting.
- croped_image 5 : The cropped image. If the middle is enlarged, the size needs to be restored before restoration.
- croped_mask 5 : The cut mask.
- crop_box: Box data during cutting.
- invert_mask: Whether to reverse the mask.
- 笔记
CropBoxResolve
Parsing the corp_box to x , y , width , height . 
ImageScaleRestore
Image scaling. when this node is used in pairs, the image can be automatically restored to its original size on the second node. 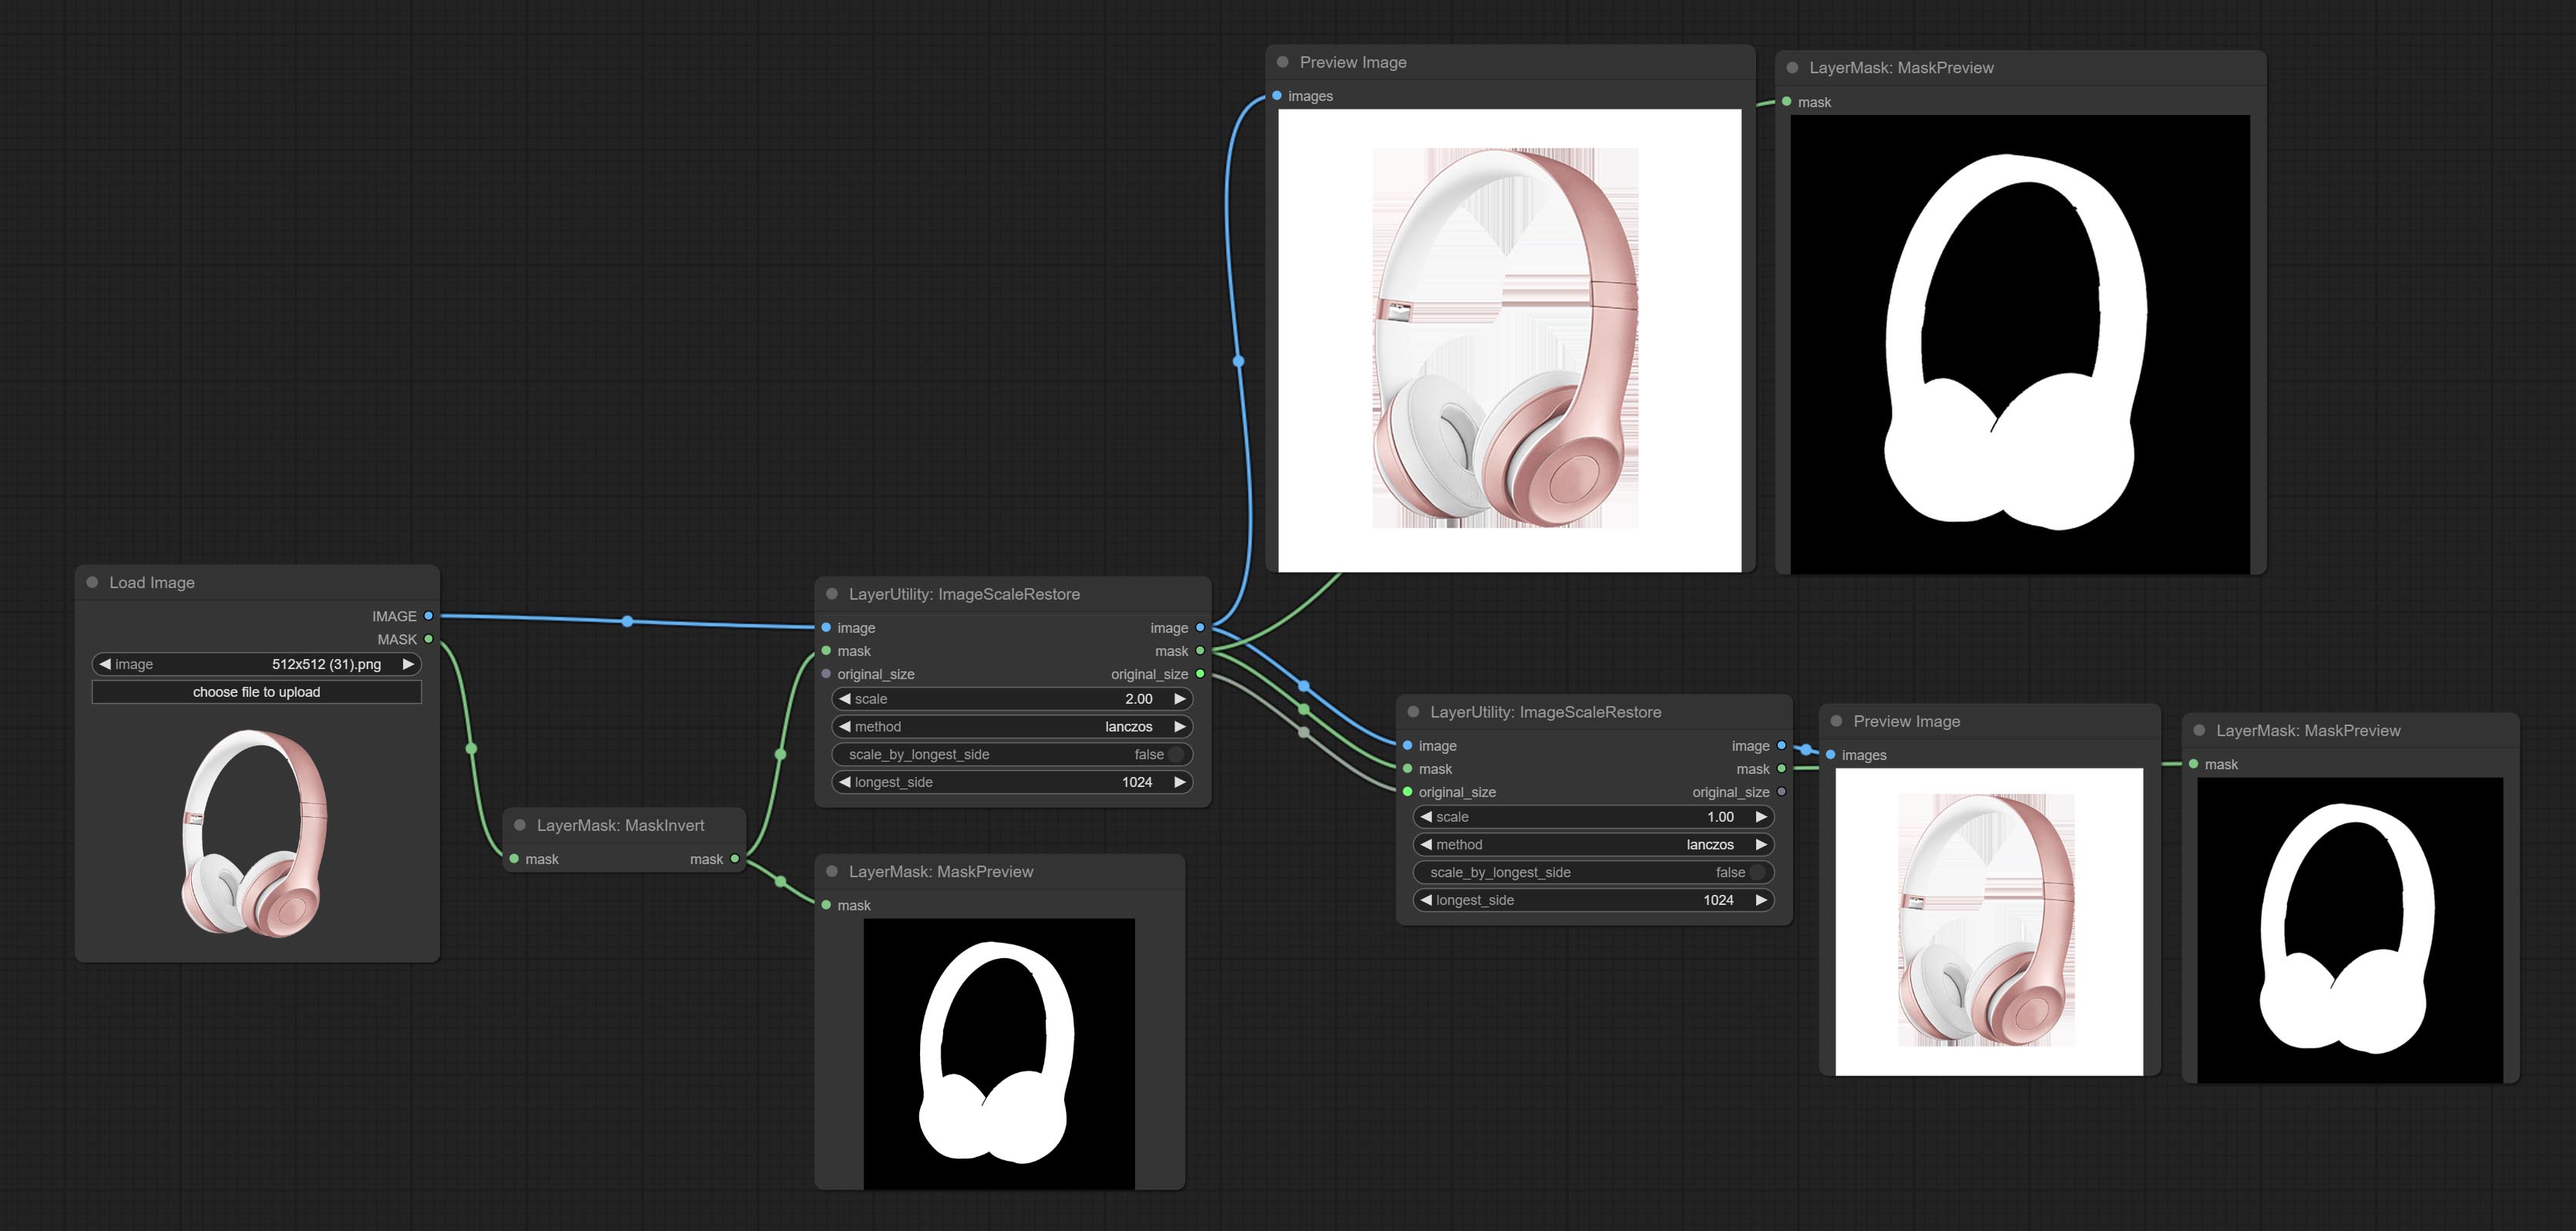
Node options:
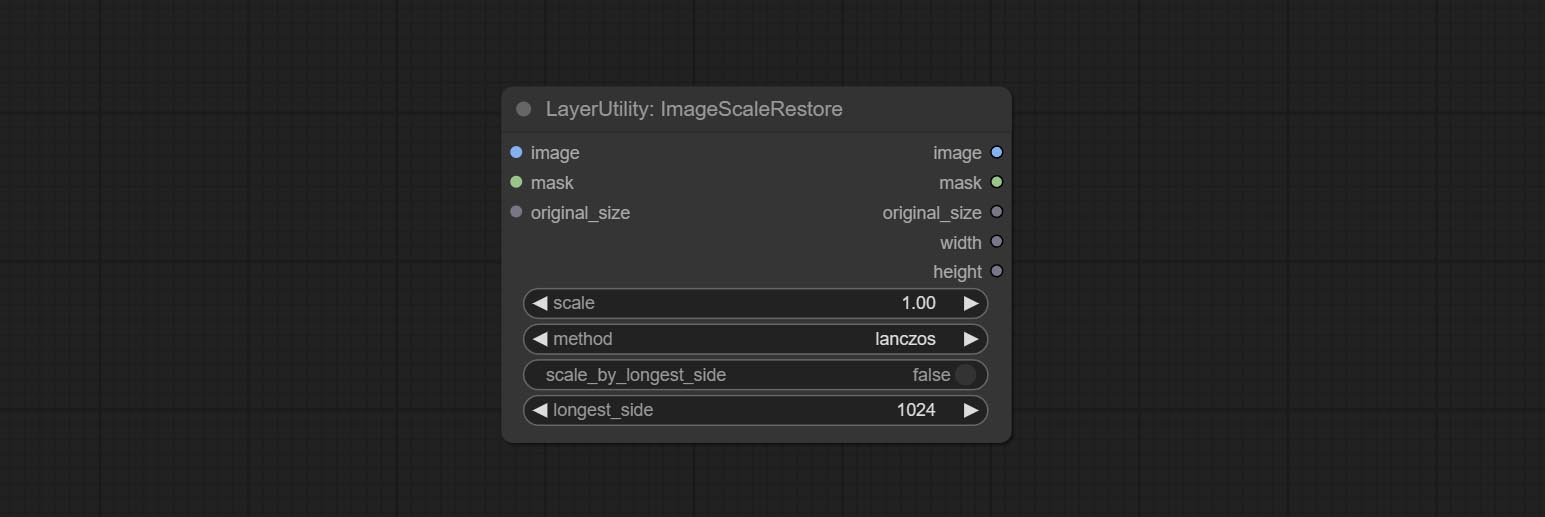
- image 5 : The input image.
- mask 2,5 : Mask of image.
- original_size: Optional input, used to restore the image to its original size.
- scale: Scale ratio. when the original_size have input, or scale_ by_longest_side is set to True, this setting will be ignored.
- scale_by_longest_side: Allow scaling by long edge size.
- longest_side: When the scale_by_longest_side is set to True, this will be used this value to the long edge of the image. when the original_size have input, this setting will be ignored.
输出:
- image: The scaled image.
- mask: If have mask input, the scaled mask will be output.
- original_size: The original size data of the image is used for subsequent node recovery.
- width: The output image's width.
- height: The output image's height.
ImageScaleRestoreV2
The V2 upgraded version of ImageScaleRestore.
Node options:
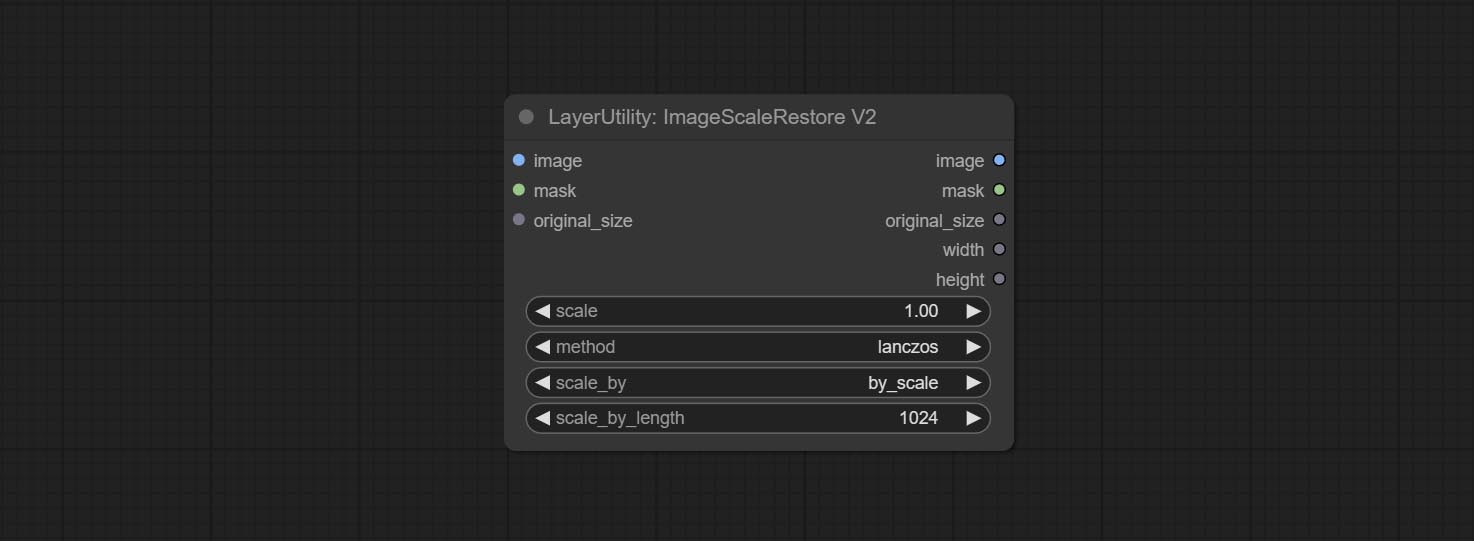
The following changes have been made based on ImageScaleRestore:
- scale_by: Allow scaling by specified dimensions for long, short, width, height, or total pixels. When this option is set to by_scale, use the scale value, and for other options, use the scale_by_length value.
- scale_by_length: The value here is used as
scale_by to specify the length of the edge.
ImageMaskScaleAs
Scale the image or mask to the size of the reference image (or reference mask). 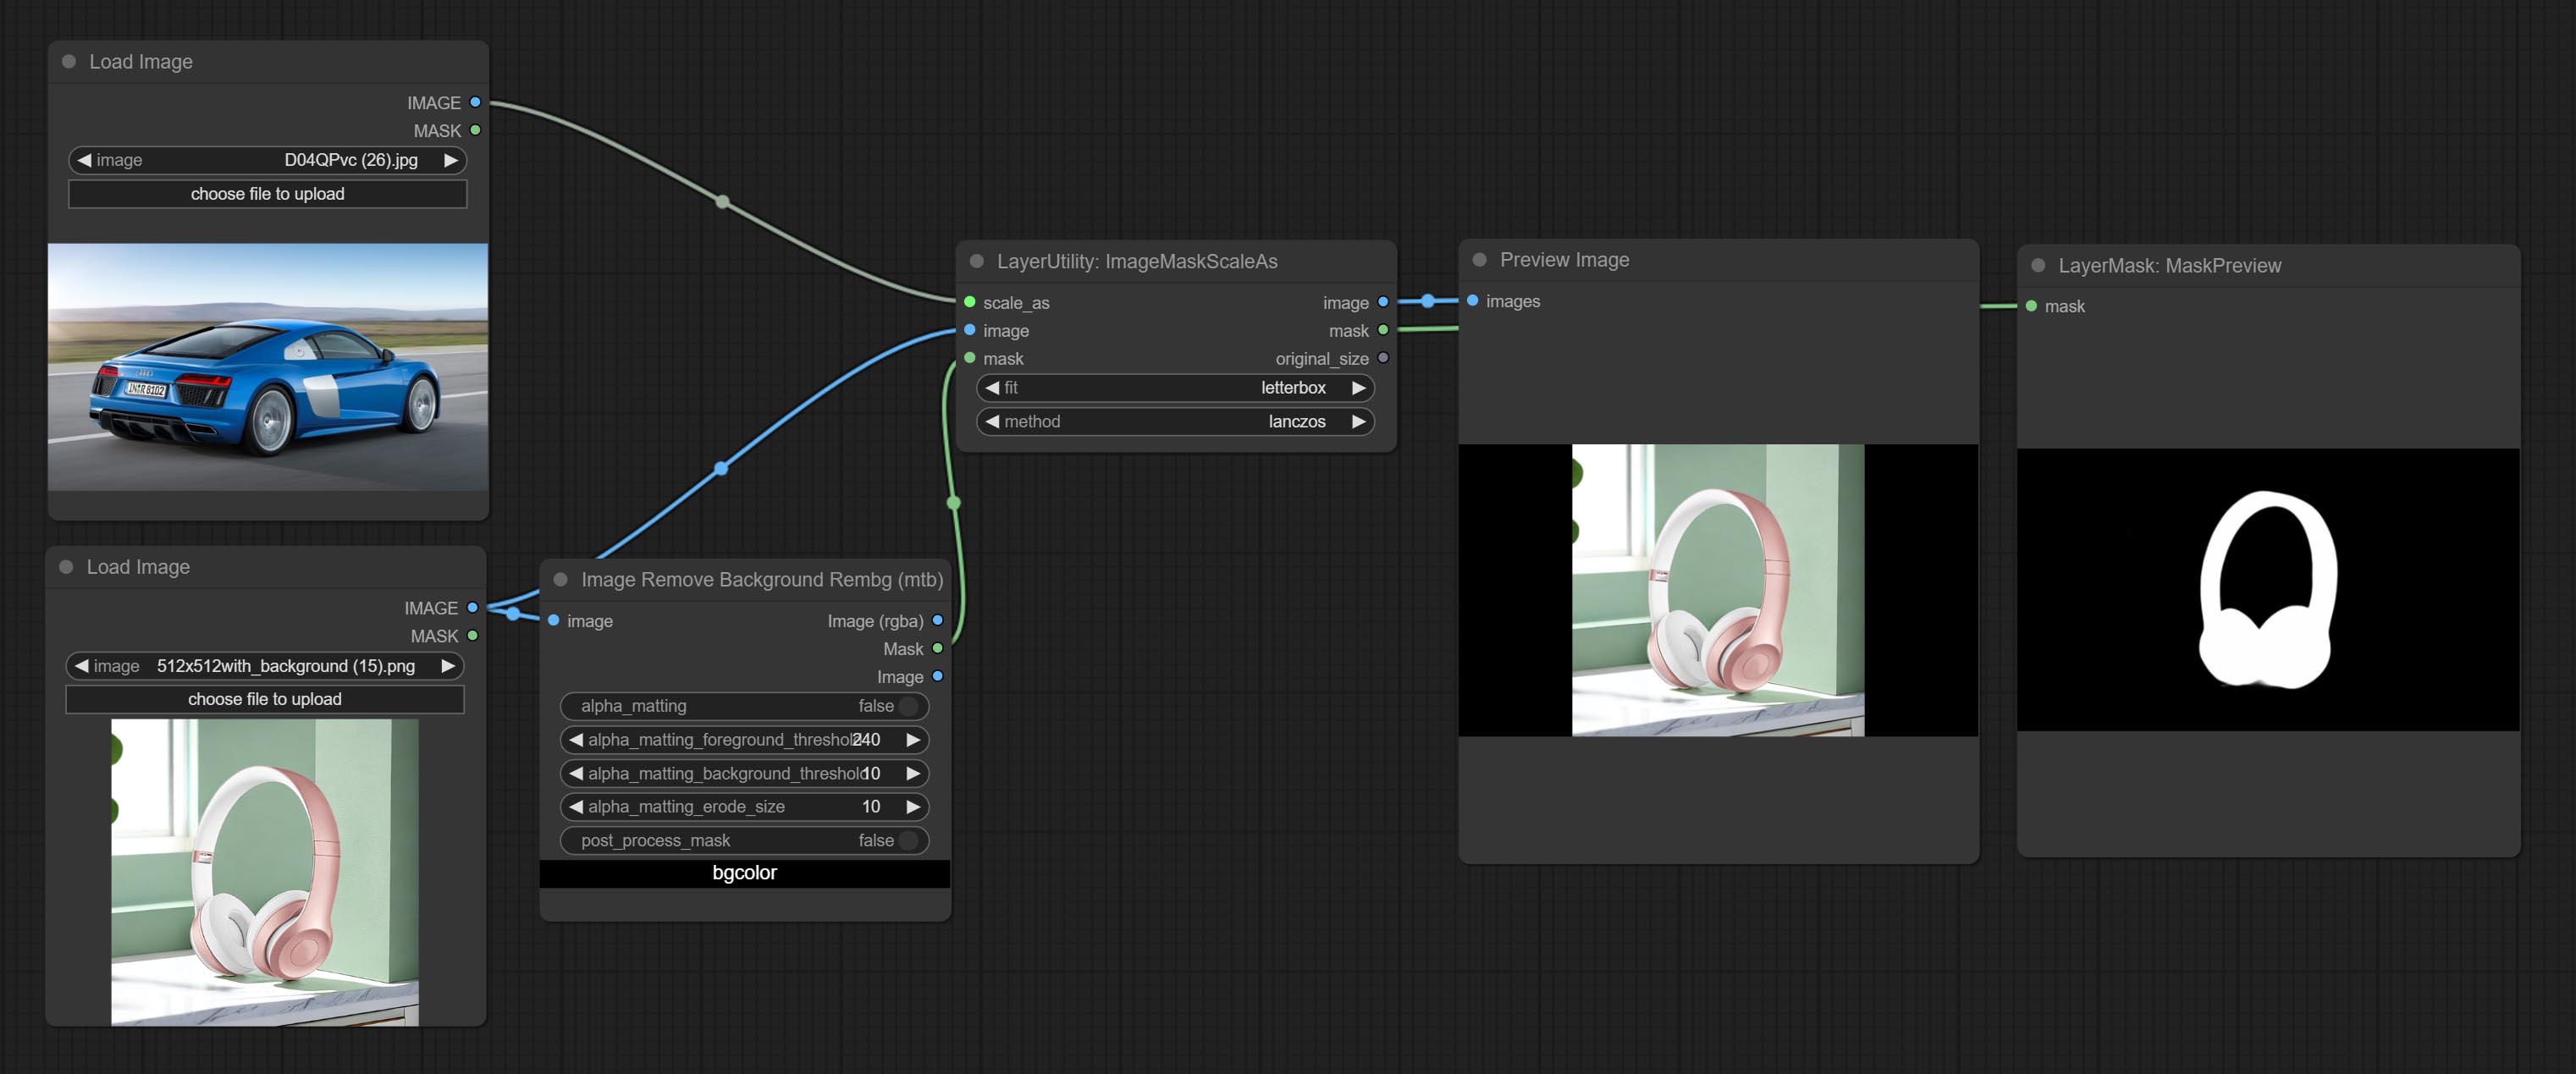
Node options: 
- scale_as * : Reference size. It can be an image or a mask.
- image: Image to be scaled. this option is optional input. if there is no input, a black image will be output.
- mask: Mask to be scaled. this option is optional input. if there is no input, a black mask will be output.
- fit: Scale aspect ratio mode. when the width to height ratio of the original image does not match the scaled size, there are three modes to choose from, The letterbox mode retains the complete frame and fills in the blank spaces with black; The crop mode retains the complete short edge, and any excess of the long edge will be cut off; The fill mode does not maintain frame ratio and fills the screen with width and height.
- method: Scaling sampling methods, including lanczos, bicubic, hamming, bilinear, box, and nearest.
* Only limited to input images and masks. forcing the integration of other types of inputs will result in node errors.
输出:
- image: If there is an image input, the scaled image will be output.
- mask: If there is a mask input, the scaled mask will be output.
- original_size: The original size data of the image is used for subsequent node recovery.
- width: The output image's width.
- height: The output image's height.
ImageScaleByAspectRatio
Scale the image or mask by aspect ratio. the scaled size can be rounded to a multiple of 8 or 16, and can be scaled to the long side size. 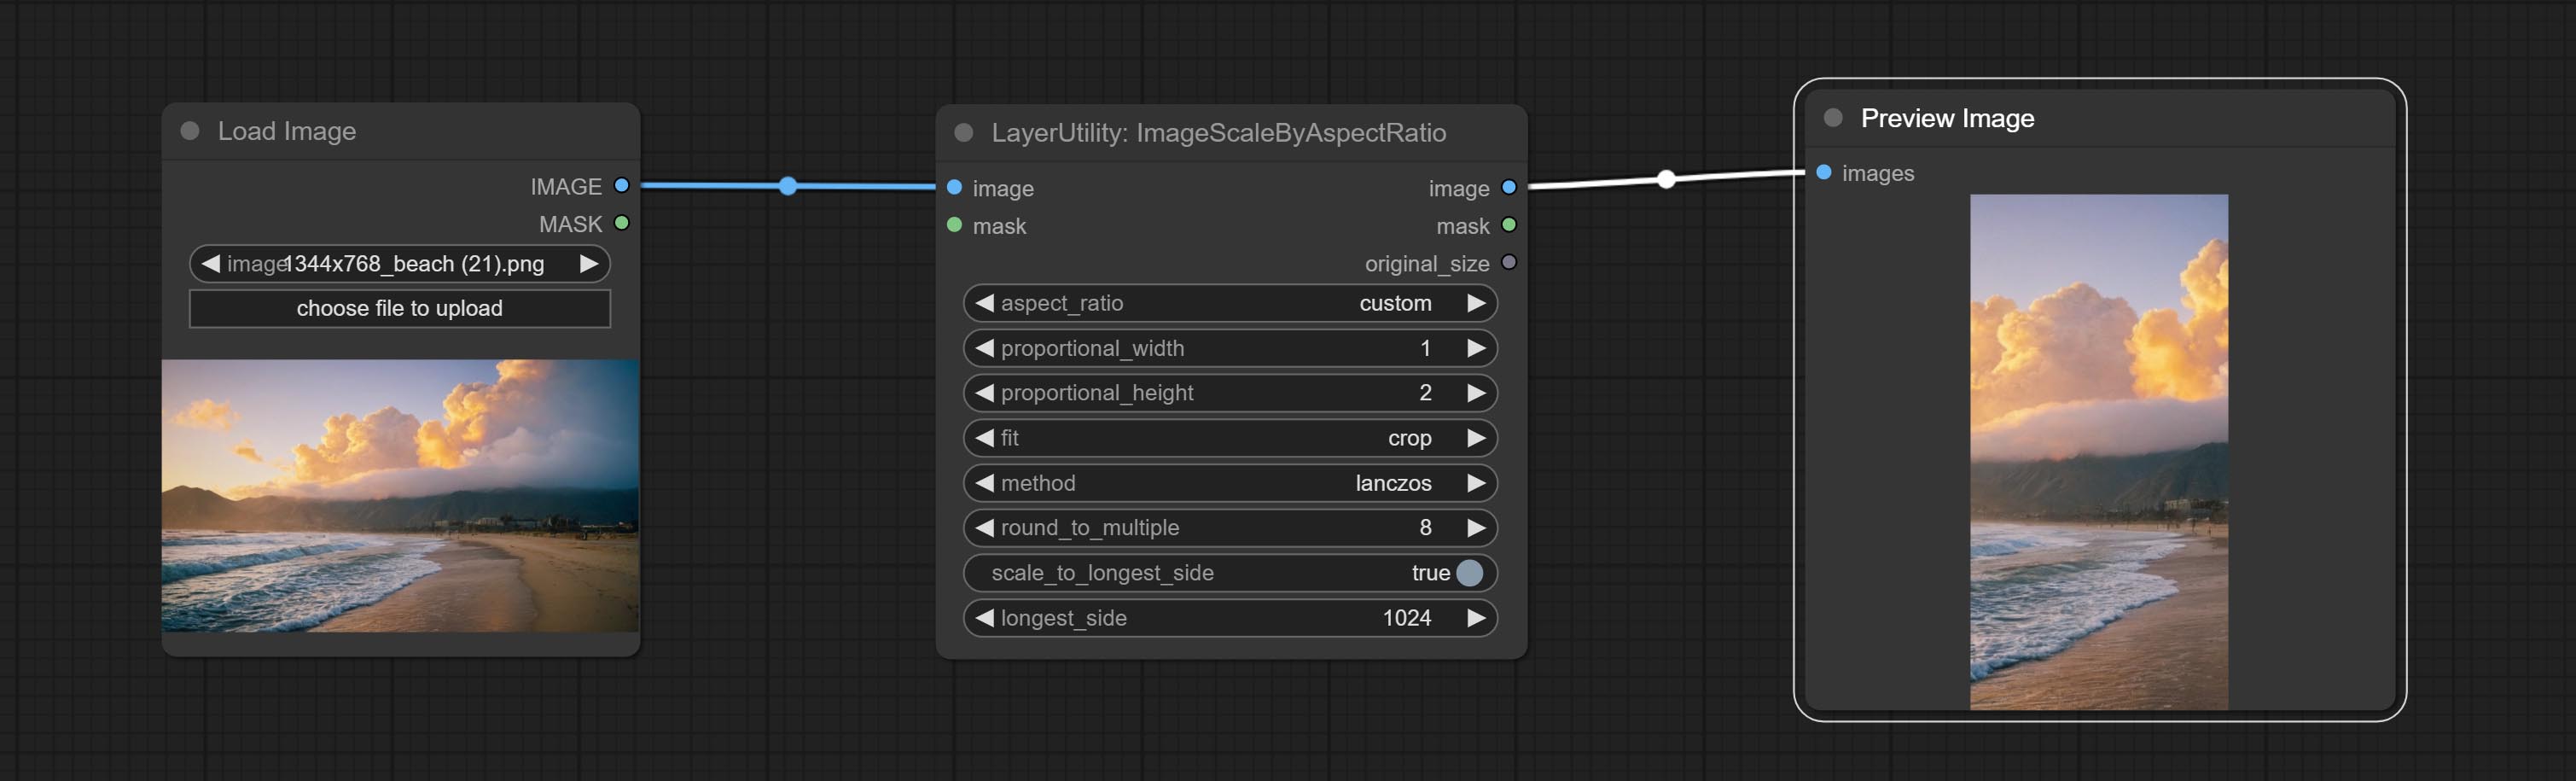
Node options:
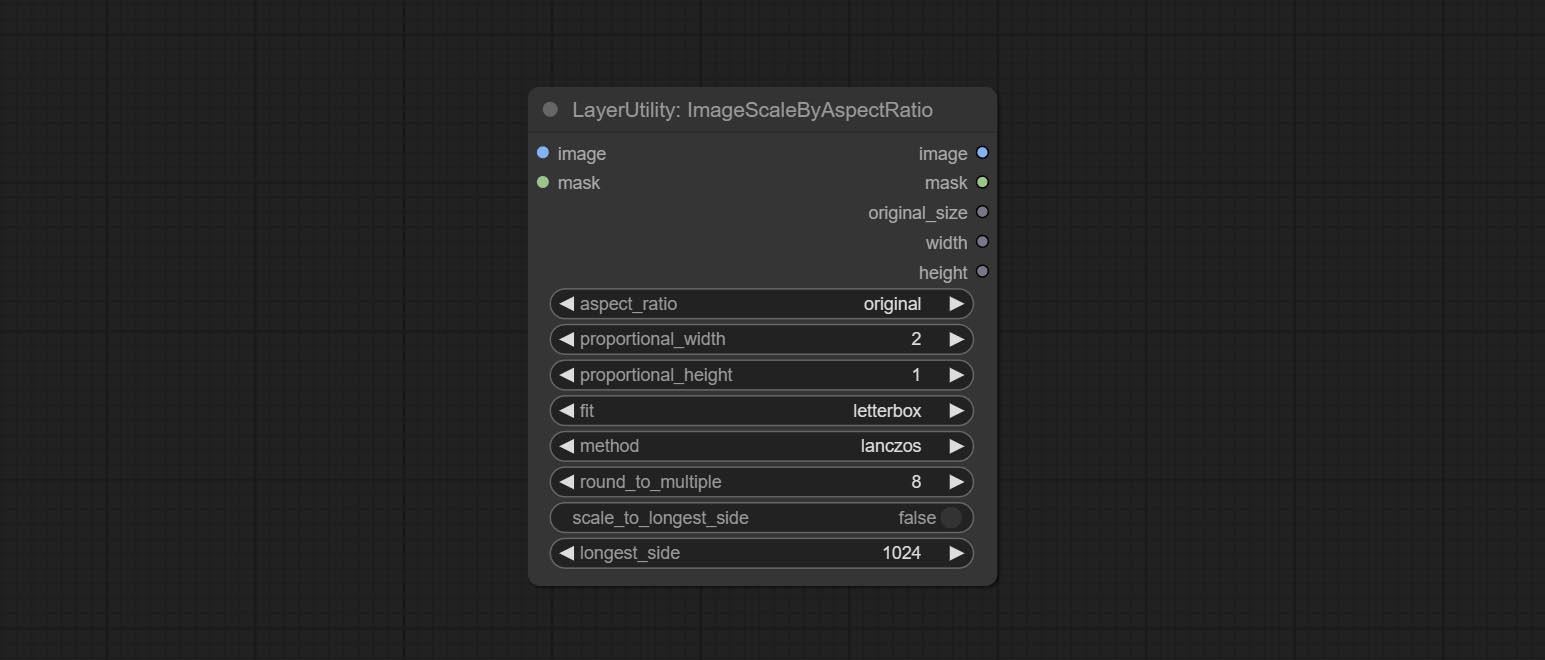
- aspect_ratio: Here are several common frame ratios provided. alternatively, you can choose "original" to keep original ratio or customize the ratio using "custom".
- proportional_width: Proportional width. if the aspect ratio option is not "custom", this setting will be ignored.
- proportional_height: Proportional height. if the aspect ratio option is not "custom", this setting will be ignored.
- fit: Scale aspect ratio mode. when the width to height ratio of the original image does not match the scaled size, there are three modes to choose from, The letterbox mode retains the complete frame and fills in the blank spaces with black; The crop mode retains the complete short edge, and any excess of the long edge will be cut off; The fill mode does not maintain frame ratio and fills the screen with width and height.
- method: Scaling sampling methods, including lanczos, bicubic, hamming, bilinear, box, and nearest.
- round_to_multiple: Round multiples. for example, setting it to 8 will force the width and height to be multiples of 8.
- scale_by_longest_side: Allow scaling by long edge size.
- longest_side: When the scale_by_longest_side is set to True, this will be used this value to the long edge of the image. when the original_size have input, this setting will be ignored.
输出:
- image: If have image input, the scaled image will be output.
- mask: If have mask input, the scaled mask will be output.
- original_size: The original size data of the image is used for subsequent node recovery.
- width: The output image's width.
- height: The output image's height.
ImageScaleByAspectRatioV2
V2 Upgraded Version of ImageScaleByAspectRatio
Node options:
The following changes have been made based on ImageScaleByAspectRatio:
- scale_to_side: Allow scaling by specified dimensions for long, short, width, height, or total pixels.
- scale_to_length: The numerical value here serves as the length of the specified edge or the total pixels (kilo pixels) for scale_to_side.
- background_color 4 : The color of the background.
QWenImage2Prompt
Inference the prompts based on the image. this node is repackage of the ComfyUI_VLM_nodes's UForm-Gen2 Qwen Node , thanks to the original author. Download model files from huggingface or Baidu Netdisk to ComfyUI/models/LLavacheckpoints/files_for_uform_gen2_qwen folder.
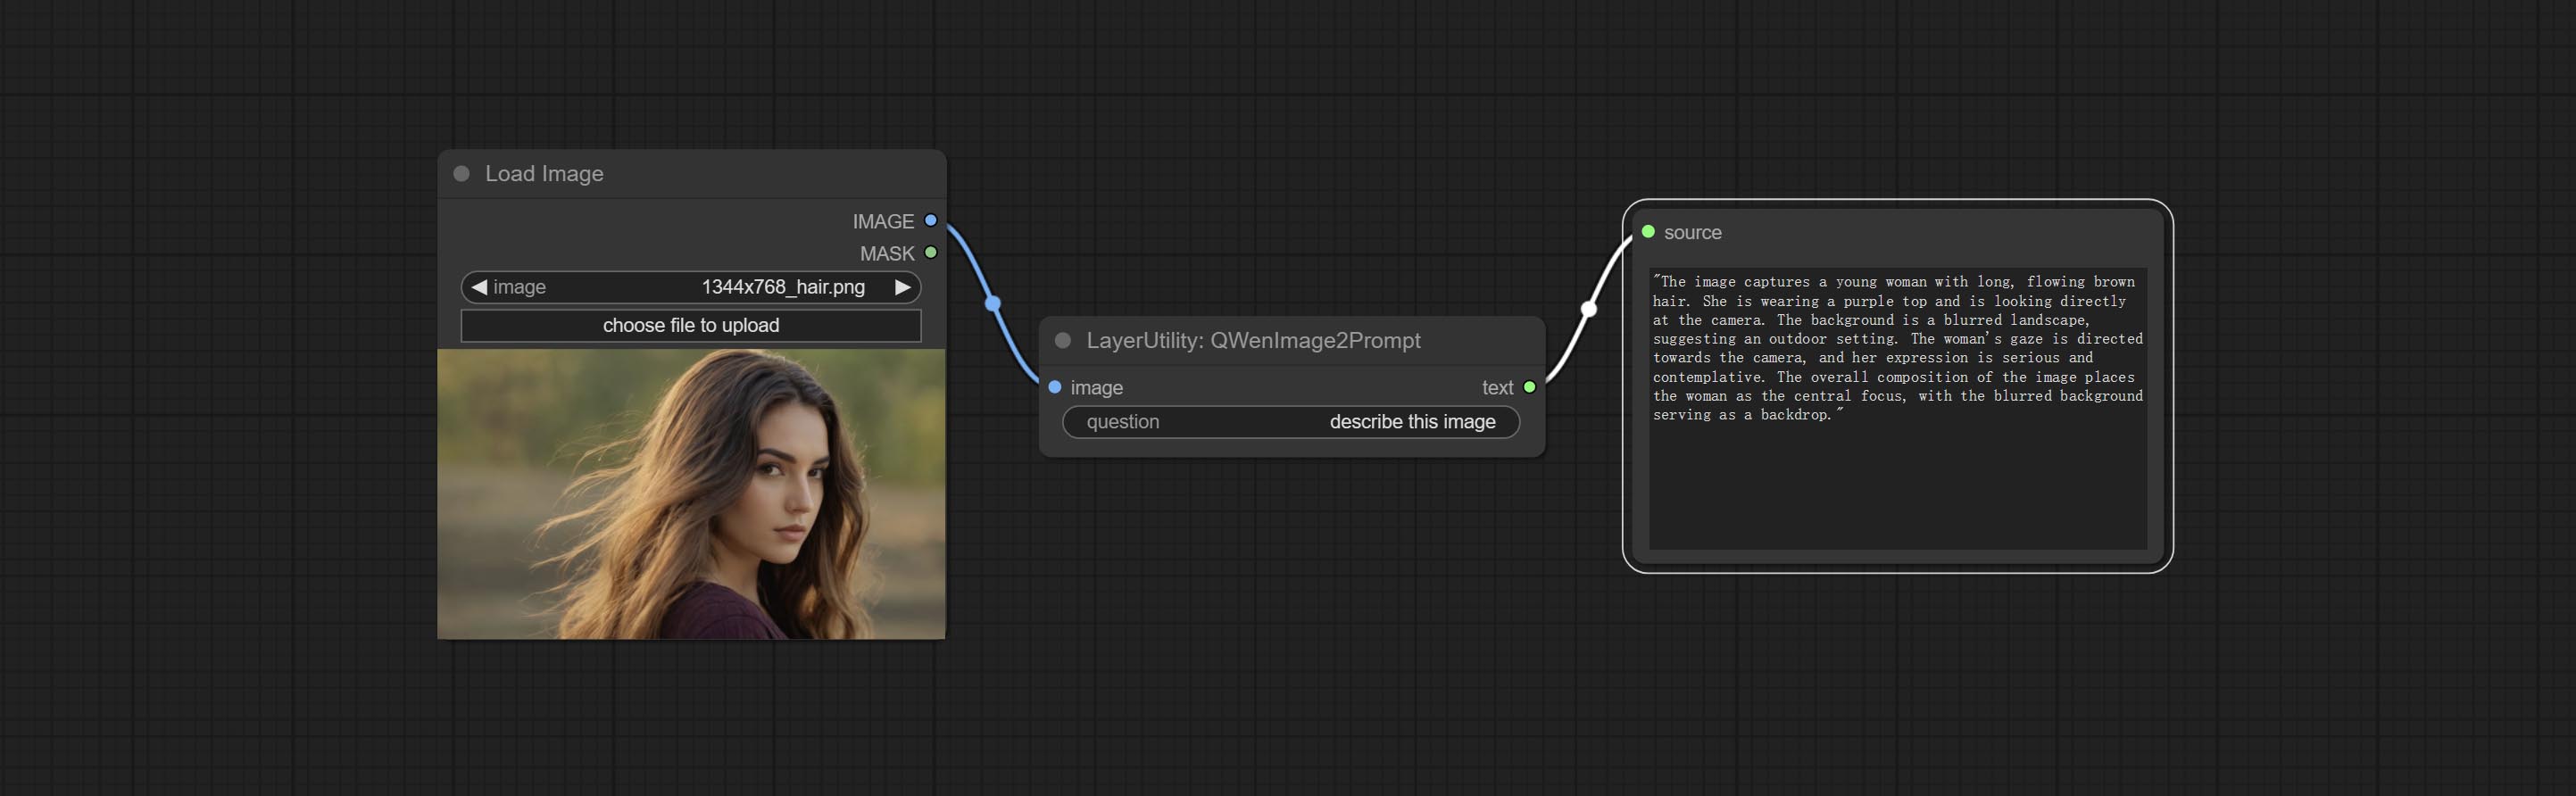
节点选项:
- question: Prompt of UForm-Gen-QWen model.
LlamaVision
Use the Llama 3.2 vision model for local inference.可用于生成及时的单词。 part of the code for this node comes from ComfyUI-PixtralLlamaMolmoVision, thank you to the original author. To use this node, the transformers need upgraded to 4.45.0 or higher. Download models from BaiduNetdisk or huggingface/SeanScripts , and copy to ComfyUI/models/LLM . 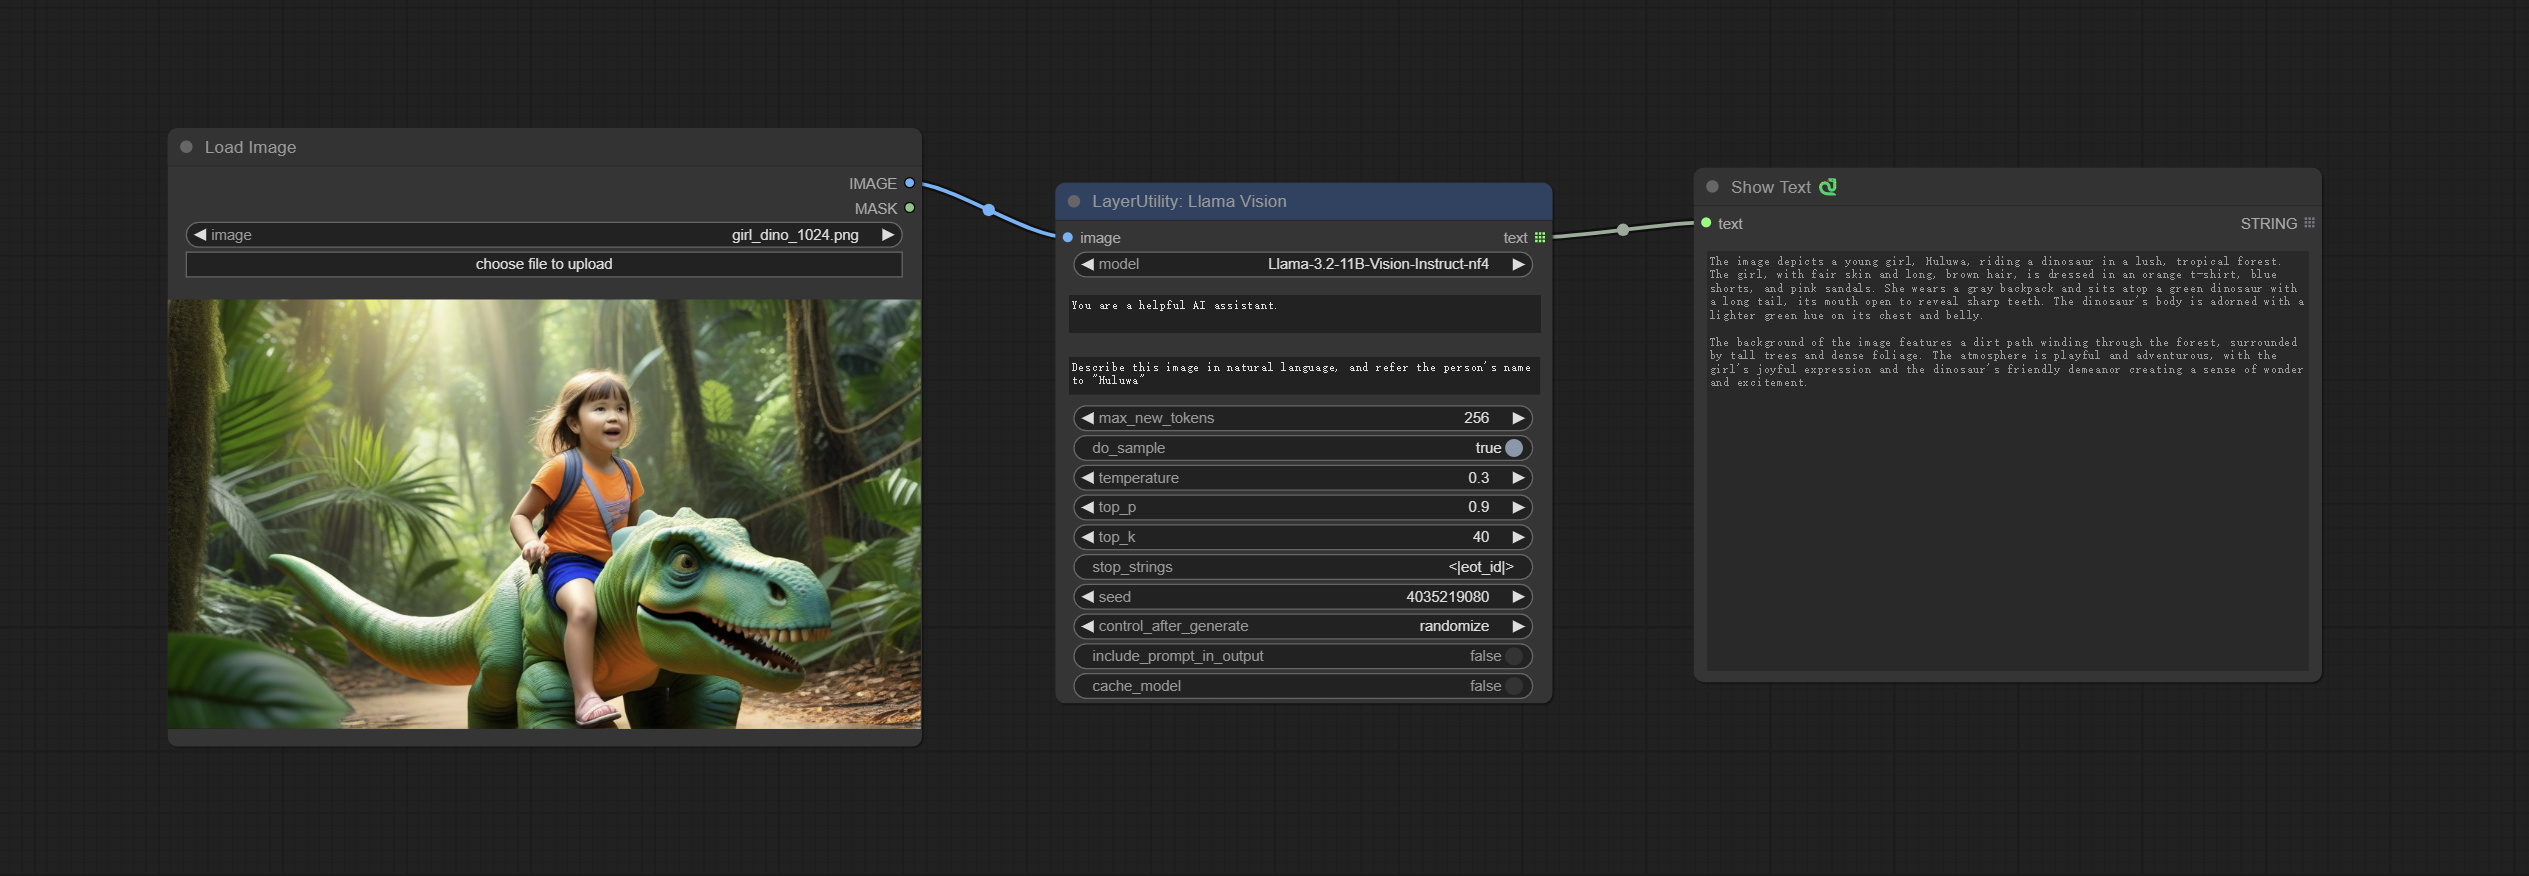
节点选项:
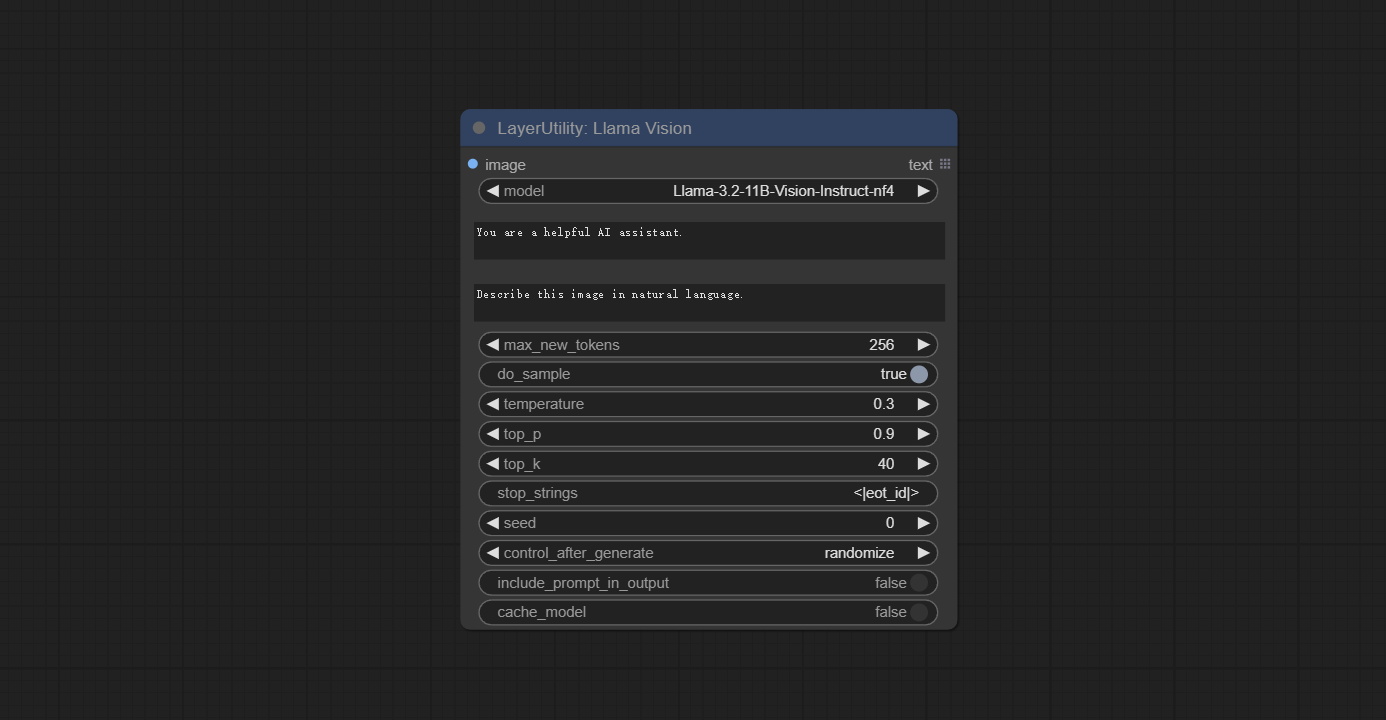
- 图像:图像输入。
- model: Currently, only the "Llama-3.2-11B-Vision-Instruct-nf4" is available.
- system_prompt: System prompt words for LLM model.
- USER_PROMPT:LLM模型的用户提示单词。
- max_new_tokens: max_new_tokens for LLM model.
- do_sample: do_sample for LLM model.
- top-p: top_p for LLM model.
- top_k: top_k for LLM model.
- stop_strings: The stop strings.
- seed: The seed of random number.
- control_after_generate:种子更改选项。如果此选项已固定,则生成的随机数将始终相同。
- include_prompt_in_output:输出包含提示单词吗?
- cache_model:是否要缓存模型。
JOYCAPTION2
将JoyCaption-Alpha-Two模型用于本地推理。可用于生成及时的单词。该节点是https://huggingface.co/john6666/joy-caption-alpha-two-cli-mod在comfyui中的实现,谢谢原始作者。 Download models form BaiduNetdisk and BaiduNetdisk , or huggingface/Orenguteng and huggingface/unsloth , then copy to ComfyUI/models/LLM , Download models from BaiduNetdisk or huggingface/google , and copy to ComfyUI/models/clip , Donwload the cgrkzexw-599808 folder from BaiduNetdisk or huggingface/John6666 , and copy to ComfyUI/models/Joy_caption 。 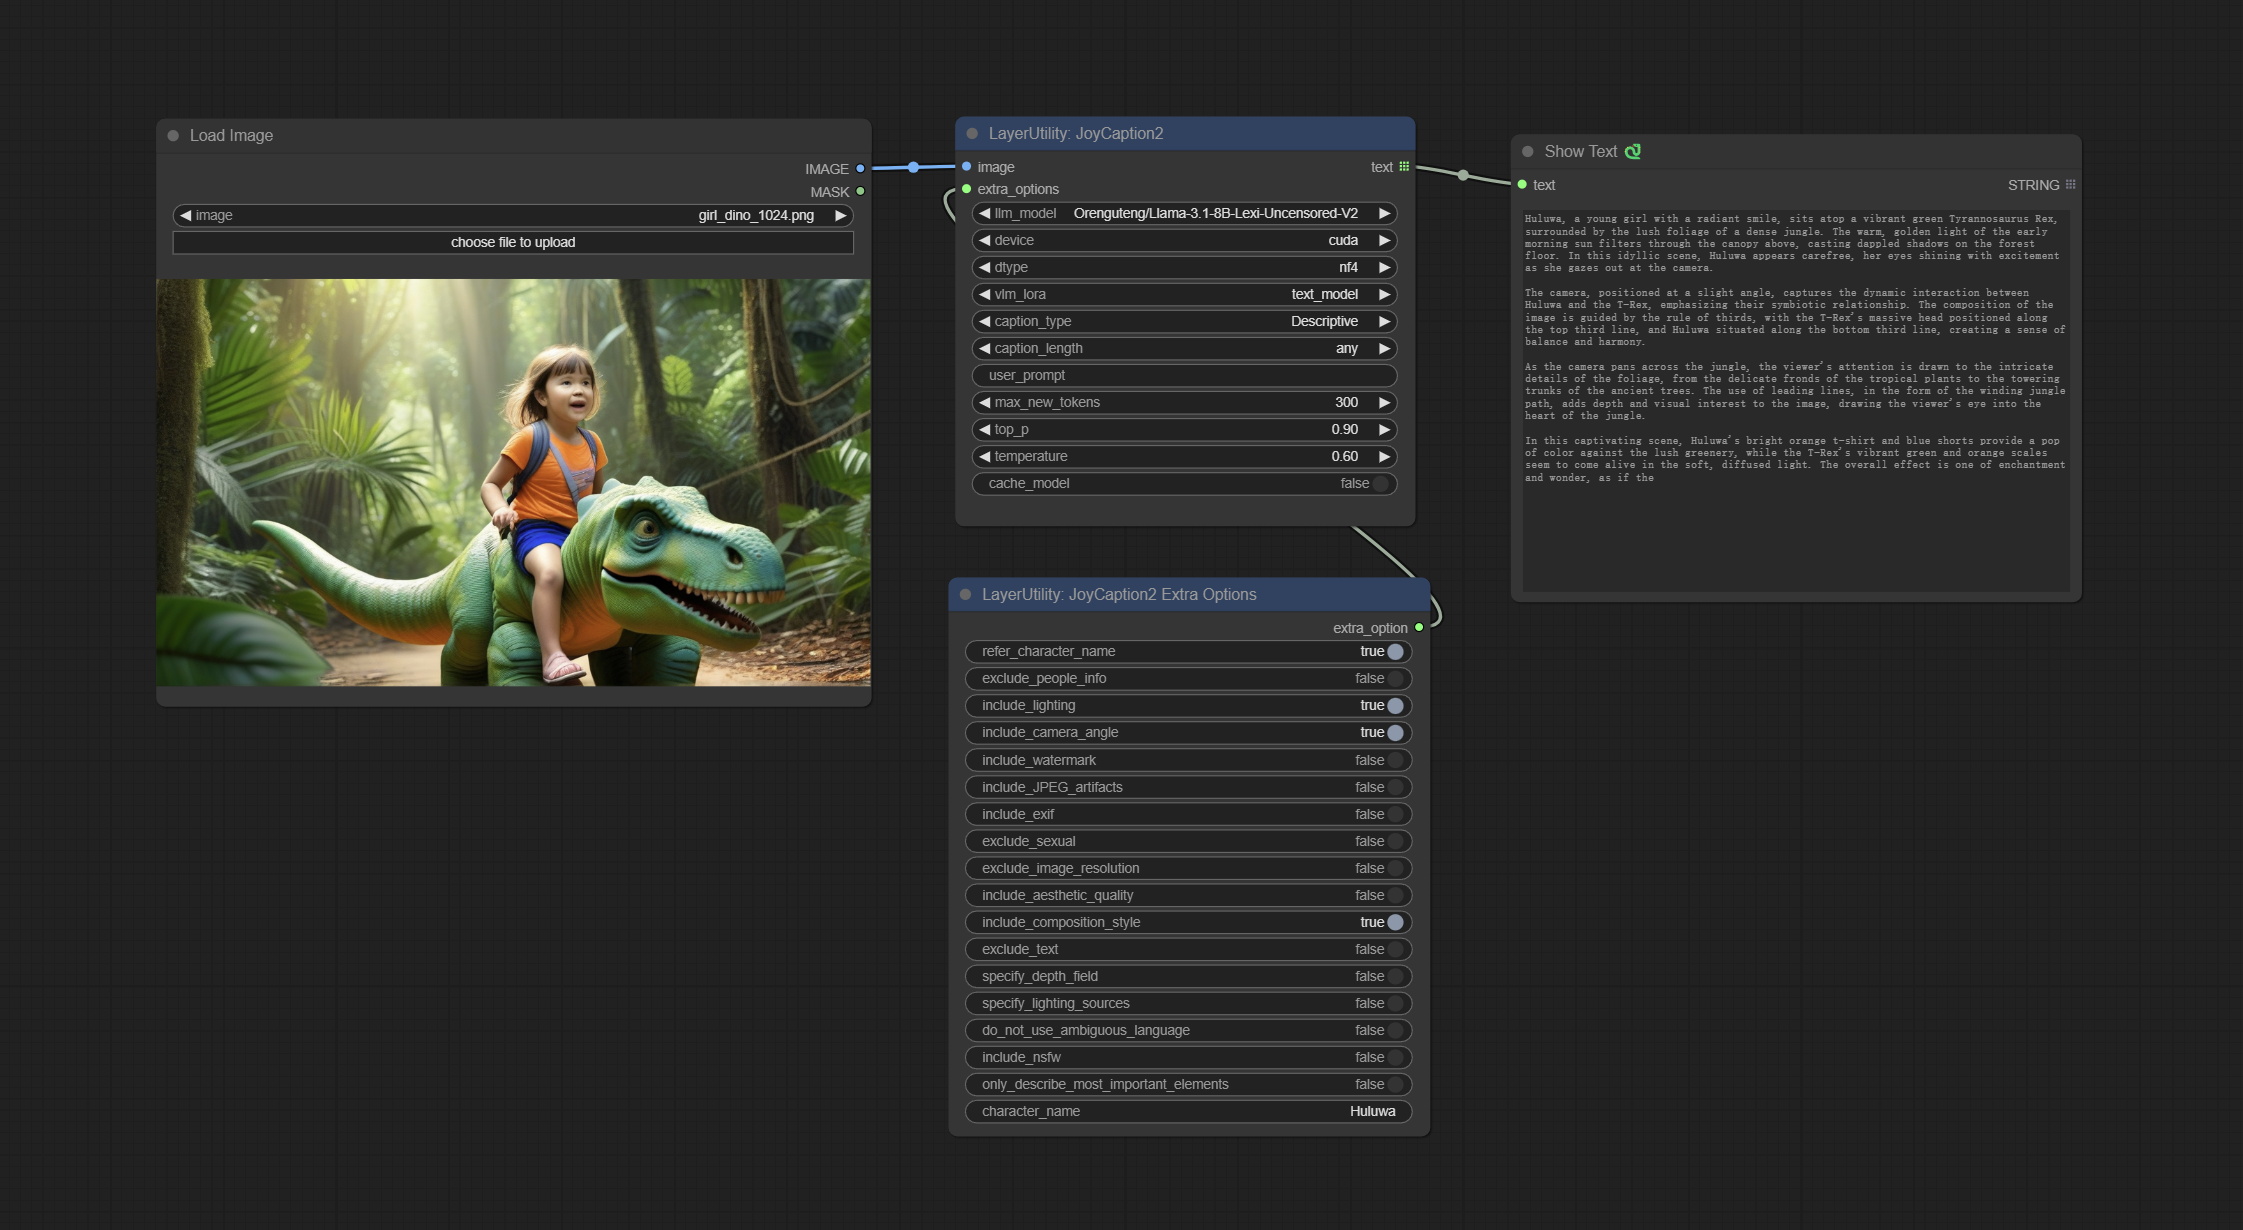
节点选项:

- 图像:图像输入。
- extra_options:输入extra_options。
- llm_model:有两种LLM型号可供选择,Orenguteng/llama-3.1-8b-lix-lim-unceserored-v2和unsaph/meta-llama-3.1-8b-Instruct。
- 设备:型号加载设备。目前,仅支持CUDA。
- DTYPE:模型精度,NF4和BF16。
- VLM_LORA:是否加载text_madel。
- catchion_type:字幕类型选项,包括:“描述性”,“描述性(非正式)”,“训练提示”,“ Midjourney”,“ Booru标签列表”,“ BOORU类似标签列表”,“艺术评论家”,“产品清单” “,”社交媒体帖子。
- catchion_length:标题长度。
- USER_PROMPT:LLM模型的用户提示单词。如果这里有内容,它将覆盖catch_type和extra_options的所有设置。
- MAX_NEW_TOKENS:LLM的MAX_NEW_TOKEN参数。
- do_sample:llm的do_sample参数。
- TOP-P:LLM的TOP_P参数。
- 温度:LLM的温度参数。
- cache_model:是否要缓存模型。
JOYCAPTION2SPLIT
JoyCaption2的节点单独的模型加载和推理,当使用多个JoyCaption2节点时,可以共享模型以提高效率。
节点选项:
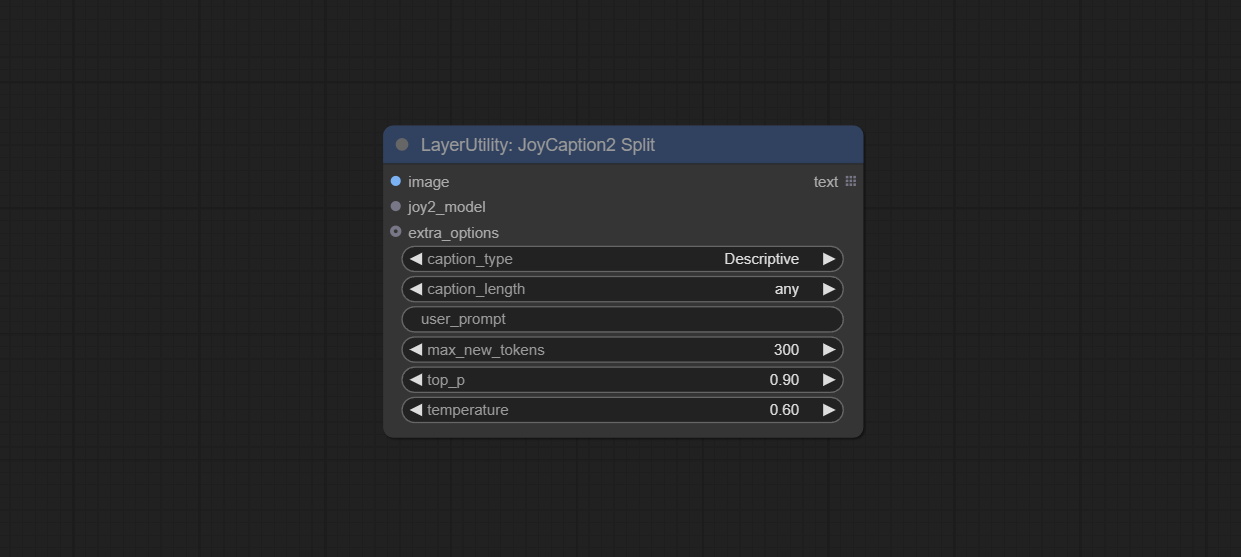
- 图像:图像输入。
- JOY2_MODEL:JOYCAPTION模型输入。
- extra_options:输入extra_options。
- catchion_type:字幕类型选项,包括:“描述性”,“描述性(非正式)”,“训练提示”,“ Midjourney”,“ Booru标签列表”,“ BOORU类似标签列表”,“艺术评论家”,“产品清单” “,”社交媒体帖子。
- catchion_length:标题长度。
- USER_PROMPT:LLM模型的用户提示单词。如果这里有内容,它将覆盖catch_type和extra_options的所有设置。
- MAX_NEW_TOKENS:LLM的MAX_NEW_TOKEN参数。
- do_sample:llm的do_sample参数。
- TOP-P:LLM的TOP_P参数。
- 温度:LLM的温度参数。
LoadJoyCaption2Model
JoyCaption2's model loading node, used in conjunction with JoyCaption2Split.
节点选项:
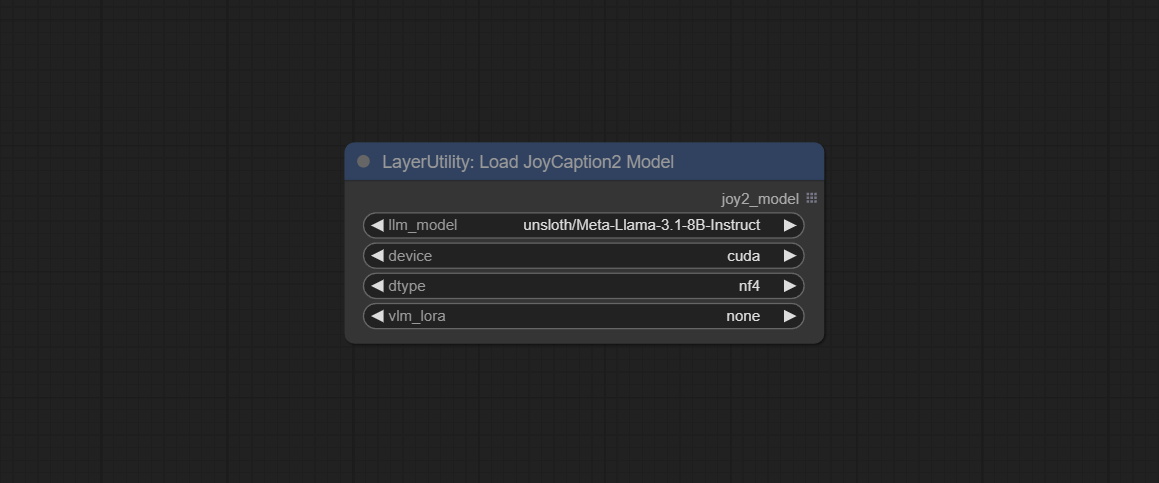
- llm_model:有两种LLM型号可供选择,Orenguteng/llama-3.1-8b-lix-lim-unceserored-v2和unsaph/meta-llama-3.1-8b-Instruct。
- 设备:型号加载设备。目前,仅支持CUDA。
- DTYPE:模型精度,NF4和BF16。
- VLM_LORA:是否加载text_madel。
JoyCaption2ExtraOptions
The extra_options parameter node of JoyCaption2.
节点选项:
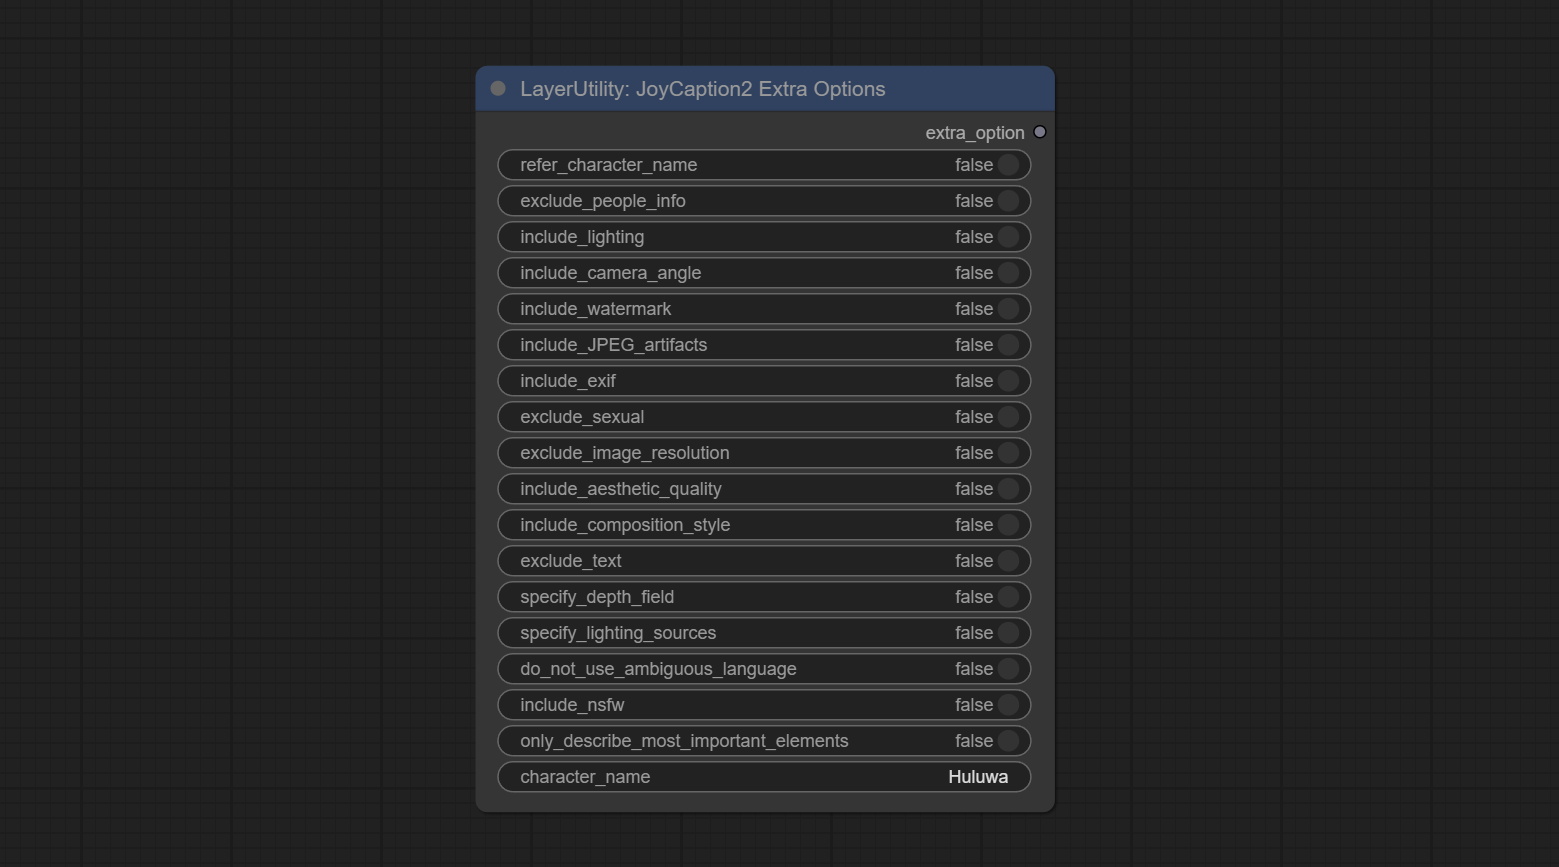
- refer_character_name:如果图像中有一个人/角色,则必须称为{name}。
- Dubl_people_info:不包含有关无法更改的人/角色的信息(例如种族,性别等),但仍然包含可变的属性(例如发型)。
- include_lighting:包括有关照明的信息。
- 包括_camera_angle:包括有关摄像机角度的信息。
- 包括_watermark:包括有关是否有水印的信息。
- 包括_jpeg_artifacts:包括有关是否有JPEG文物的信息。
- include_exif:如果是照片,则必须包括有关使用哪些相机的信息以及光圈,快门速度,ISO等。
- dubl_sexual:不要包括任何性别;保持PG。
- Dubl_image_resolution:不要提及图像的分辨率。
- include_aesthetic_quality: You MUST include information about the subjective aesthetic quality of the image from low to very high.
- include_composition_style: Include information on the image's composition style, such as leading lines, rule of thirds, or symmetry.
- exclude_text: Do NOT mention any text that is in the image.
- specify_depth_field: Specify the depth of field and whether the background is in focus or blurred.
- specify_lighting_sources: If applicable, mention the likely use of artificial or natural lighting sources.
- do_not_use_ambiguous_language: Do NOT use any ambiguous language.
- include_nsfw: Include whether the image is sfw, suggestive, or nsfw.
- only_describe_most_important_elements: ONLY describe the most important elements of the image.
- character_name: Person/Character Name, if choice
refer_character_name .
PhiPrompt
Use Microsoft Phi 3.5 text and visual models for local inference. Can be used to generate prompt words, process prompt words, or infer prompt words from images. Running this model requires at least 16GB of video memory. Download model files from BaiduNetdisk or huggingface.co/microsoft/Phi-3.5-vision-instruct and huggingface.co/microsoft/Phi-3.5-mini-instruct and copy to ComfyUImodelsLLM folder. 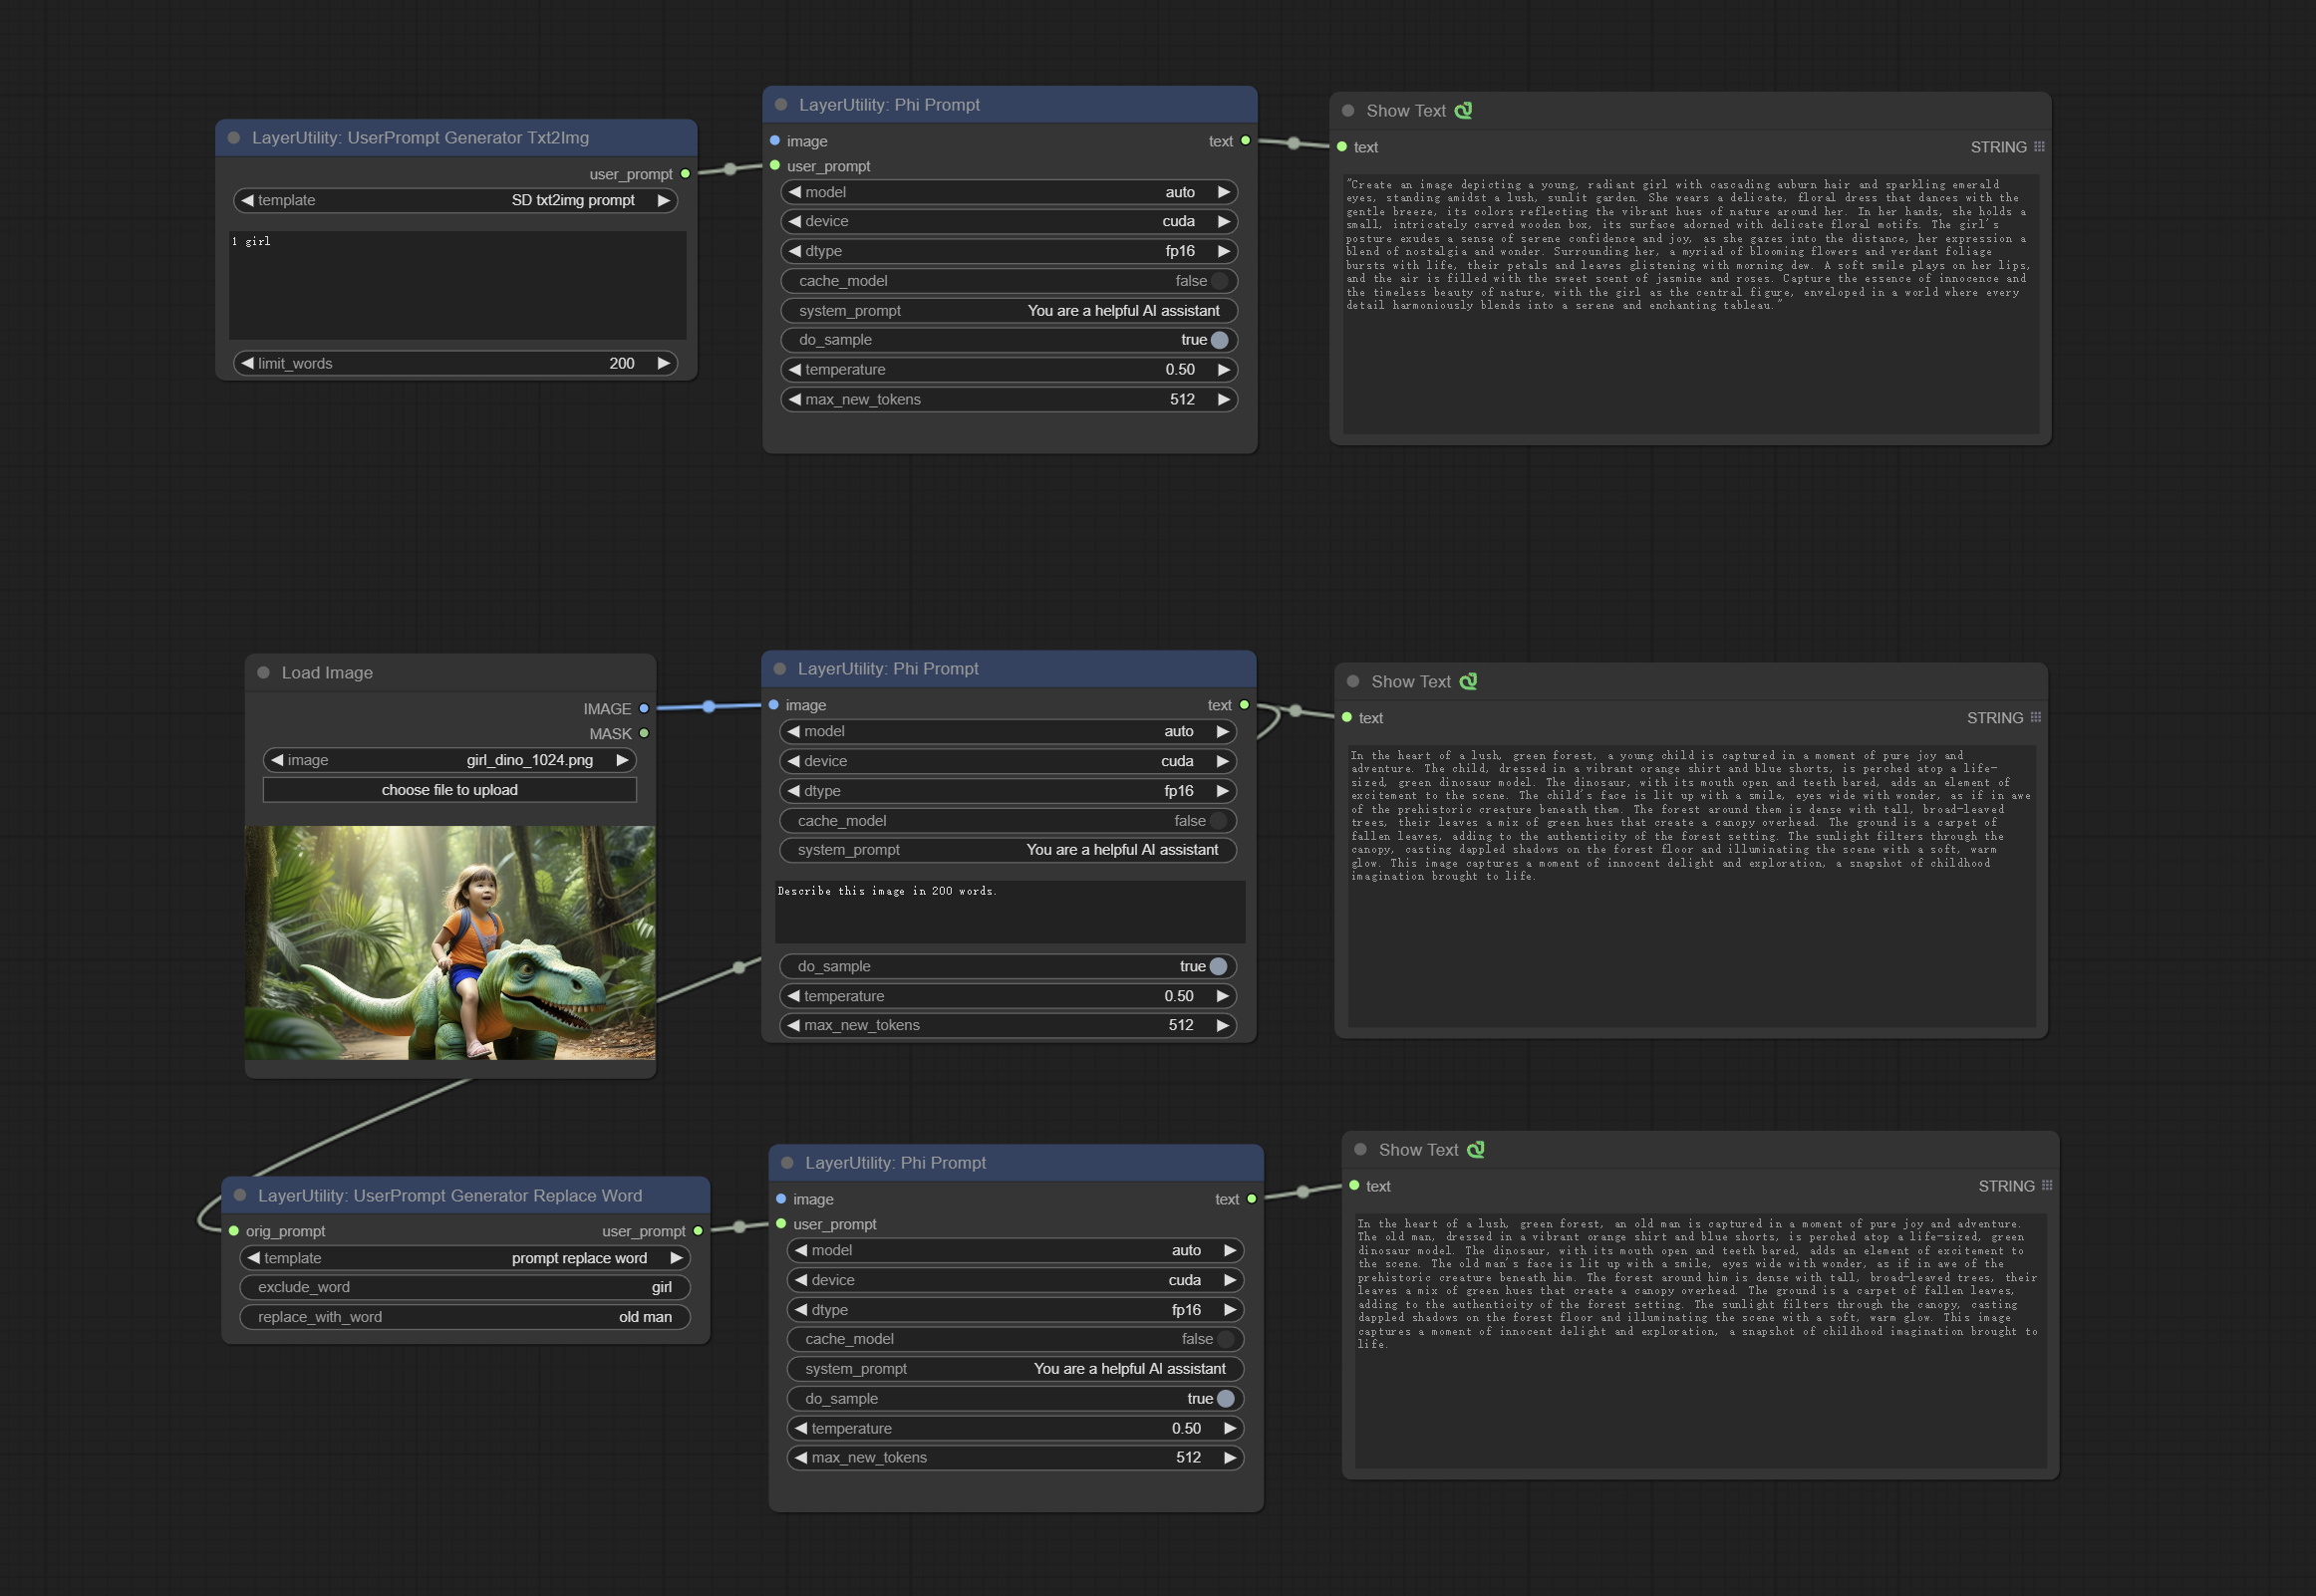
节点选项:
- image: Optional input. The input image will serve as the input for Phi-3.5-vision-instruct.
- model: Selectable to load Phi-3.5-vision-instruct or Phi-3.5-mini-instruct model. The default value of auto will automatically load the corresponding model based on whether there is image input.
- 设备:型号加载设备。 Supports CPU and CUDA.
- DTYPE:模型加载精度具有三个选项:FP16,BF16和FP32。
- cache_model:是否要缓存模型。
- System_prompt:PHI-3.5-MINI-Instruct的系统提示。
- USER_PROMPT:LLM模型的用户提示单词。
- do_sample:llm默认为true的do_sample参数。
- 温度:LLM默认值的温度参数为0.5。
- MAX_NEW_TOKENS:LLM默认值为512的MAX_NEW_TOKEN参数。
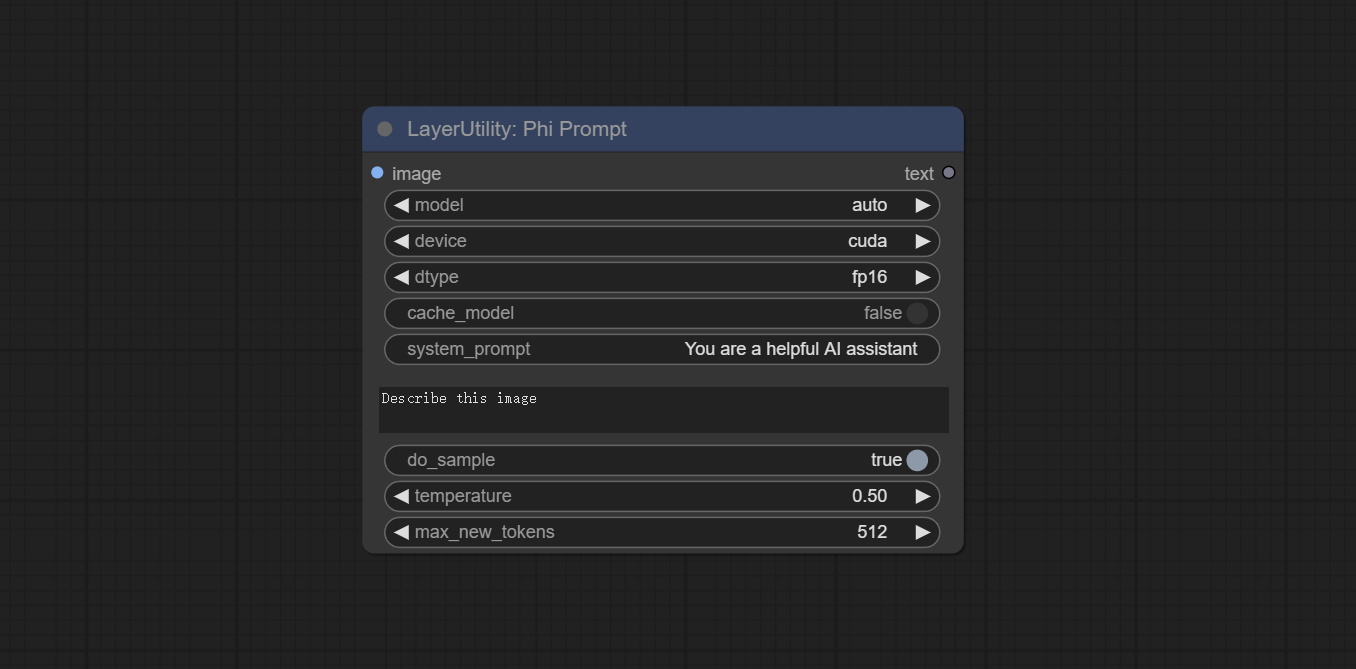
UserPromptGeneratorTxtImg
UserPrompt preset for generating SD text to image prompt words.
Node options:
- template: Prompt word template. Currently, only the 'SD txt2img prompt' is available.
- describe: Prompt word description. Enter a simple description here.
- limit_word: Maximum length limit for output prompt words. For example, 200 means that the output text will be limited to 200 words.
UserPromptGeneratorTxtImgWithReference
UserCompt preset for generating SD text to image prompt words based on input content.
Node options:
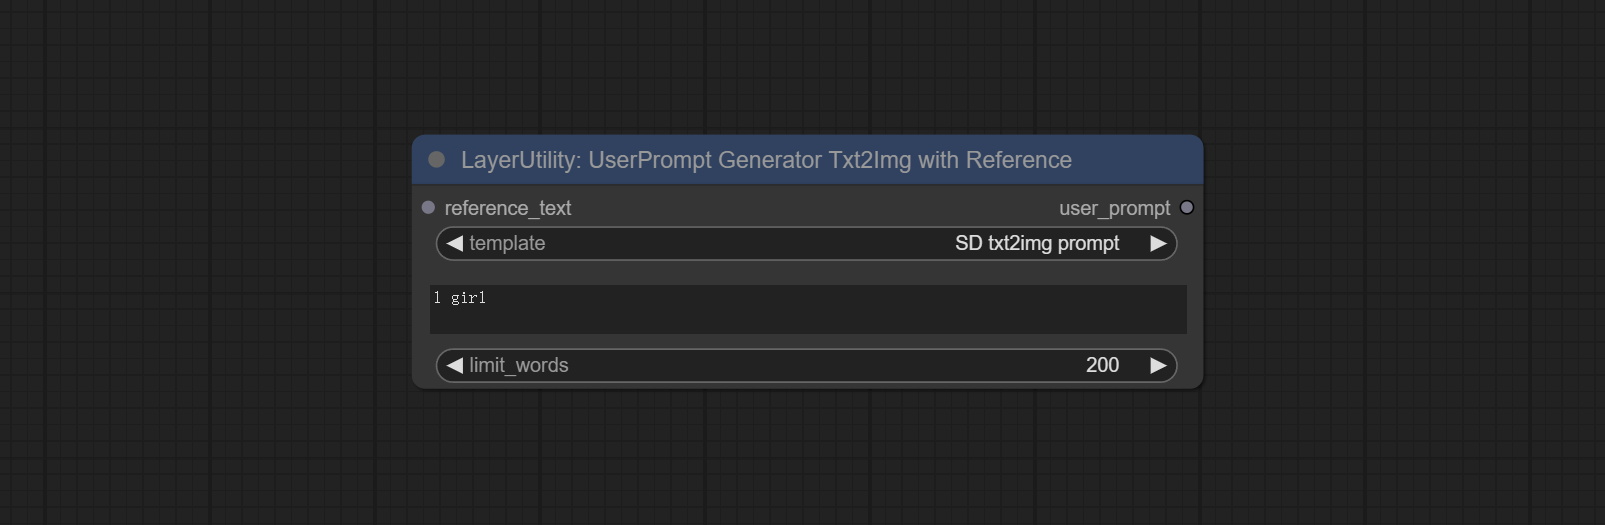
- reference_text: Reference text input. Usually it is a style description of the image.
- template: Prompt word template. Currently, only the 'SD txt2img prompt' is available.
- describe: Prompt word description. Enter a simple description here.
- limit_word: Maximum length limit for output prompt words. For example, 200 means that the output text will be limited to 200 words.
UserPromptGeneratorReplaceWord
UserPrompt preset used to replace a keyword in text with different content. This is not only a simple replacement, but also a logical sorting of the text based on the context of the prompt words to achieve the rationality of the output content.
Node options:
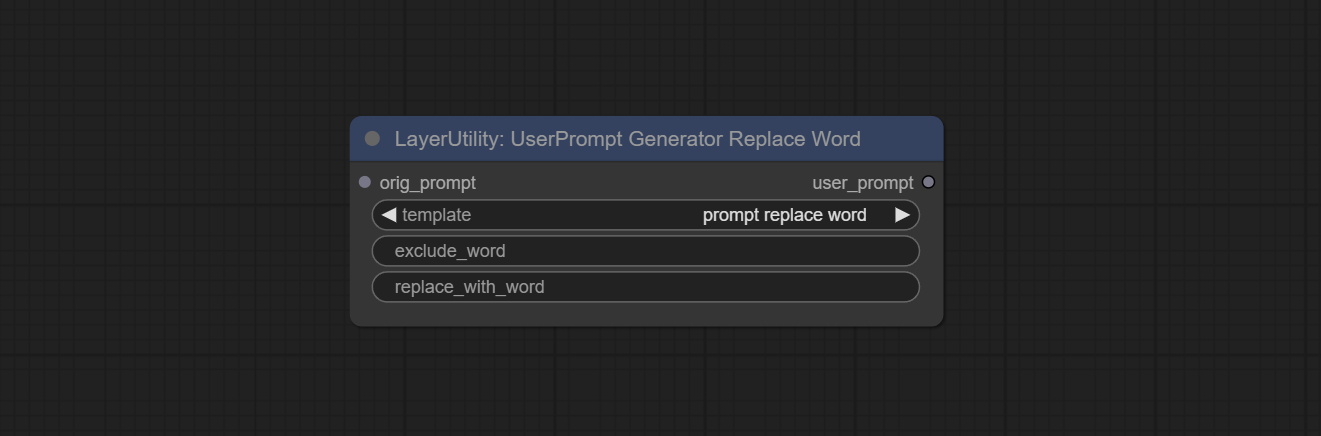
- orig_prompt: Original prompt word input.
- template: Prompt word template. Currently, only 'prompt replace word' is available.
- exclude_word: Keywords that need to be excluded.
- replace_with_word: That word will replace the exclude_word.
PromptTagger
Inference the prompts based on the image. it can replace key word for the prompt. This node currently uses Google Gemini API as the backend service. Please ensure that the network environment can use Gemini normally. Please apply for your API key on Google AI Studio, And fill it in api_key.ini , this file is located in the root directory of the plug-in, and the default name is api_key.ini.example . to use this file for the first time, you need to change the file suffix to .ini . Open it using text editing software, fill in your API key after google_api_key= and save it. 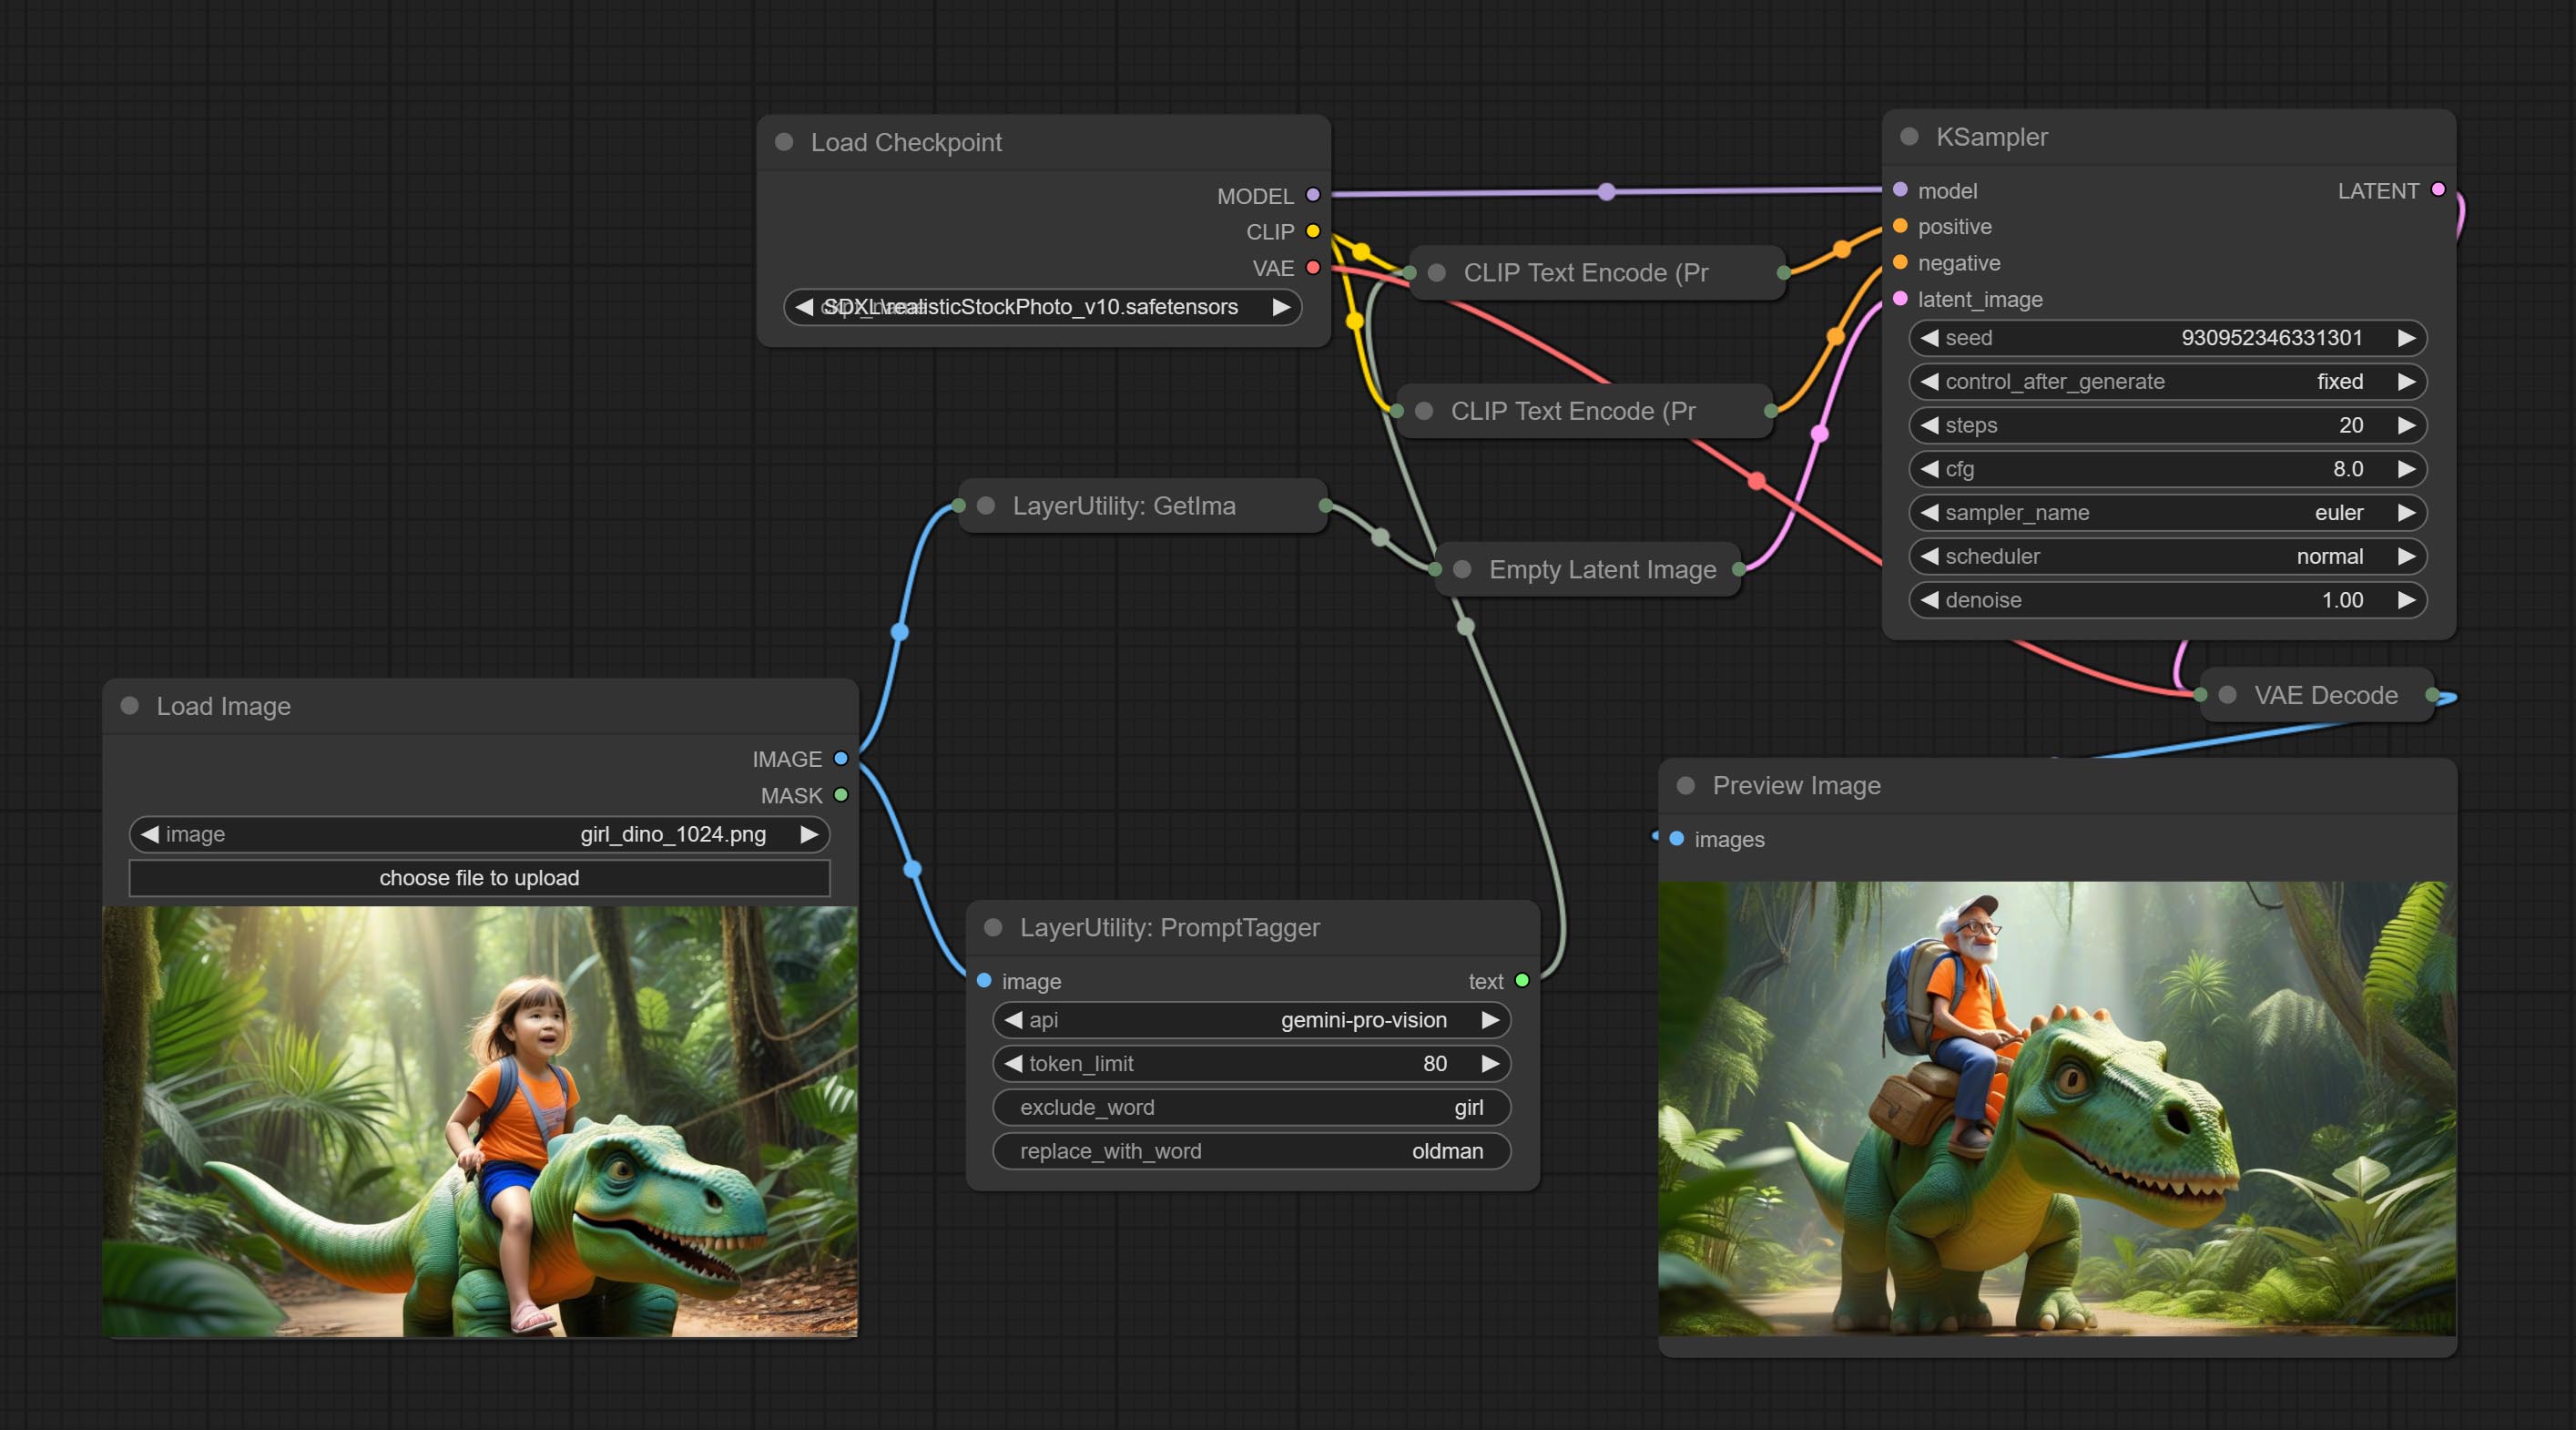
Node options:
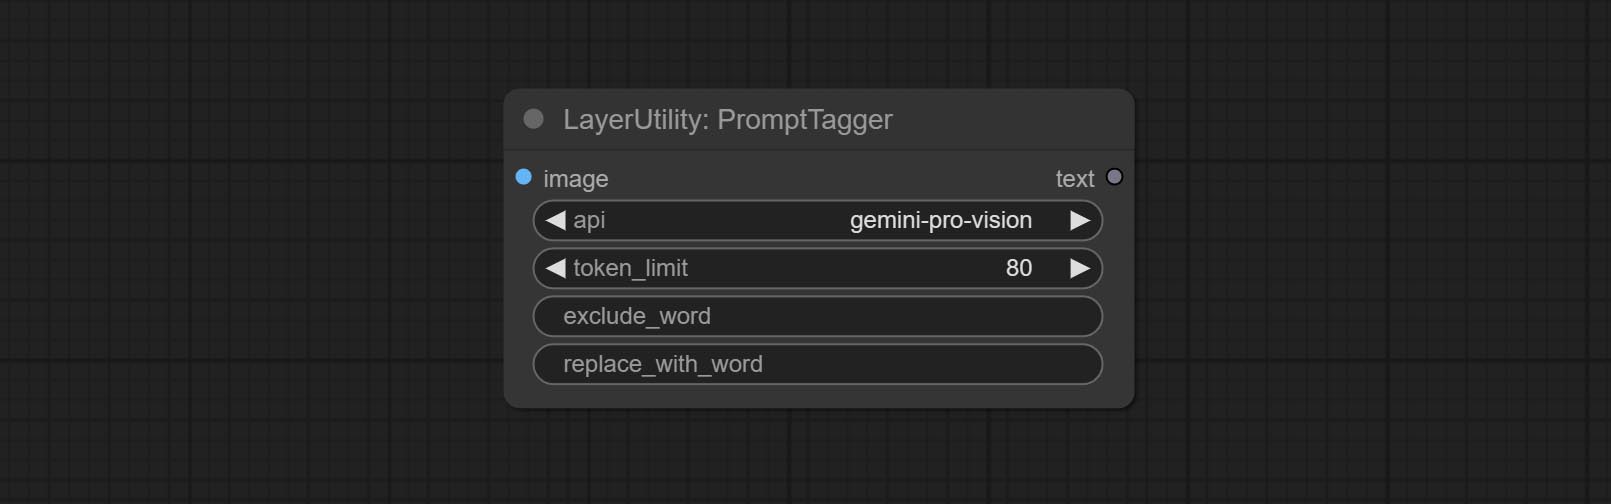
- api: The Api used. At present, there are two options "gemini-1. 5-flash" and "google-gemini".
- token_limit: The maximum token limit for generating prompt words.
- exclude_word: Keywords that need to be excluded.
- replace_with_word: That word will replace the exclude_word.
PromptEmbellish
Enter simple prompt words, output polished prompt words, and support inputting images as references, and support Chinese input. This node currently uses Google Gemini API as the backend service. Please ensure that the network environment can use Gemini normally. Please apply for your API key on Google AI Studio, And fill it in api_key.ini , this file is located in the root directory of the plug-in, and the default name is api_key.ini.example . to use this file for the first time, you need to change the file suffix to .ini . Open it using text editing software, fill in your API key after google_api_key= and save it. 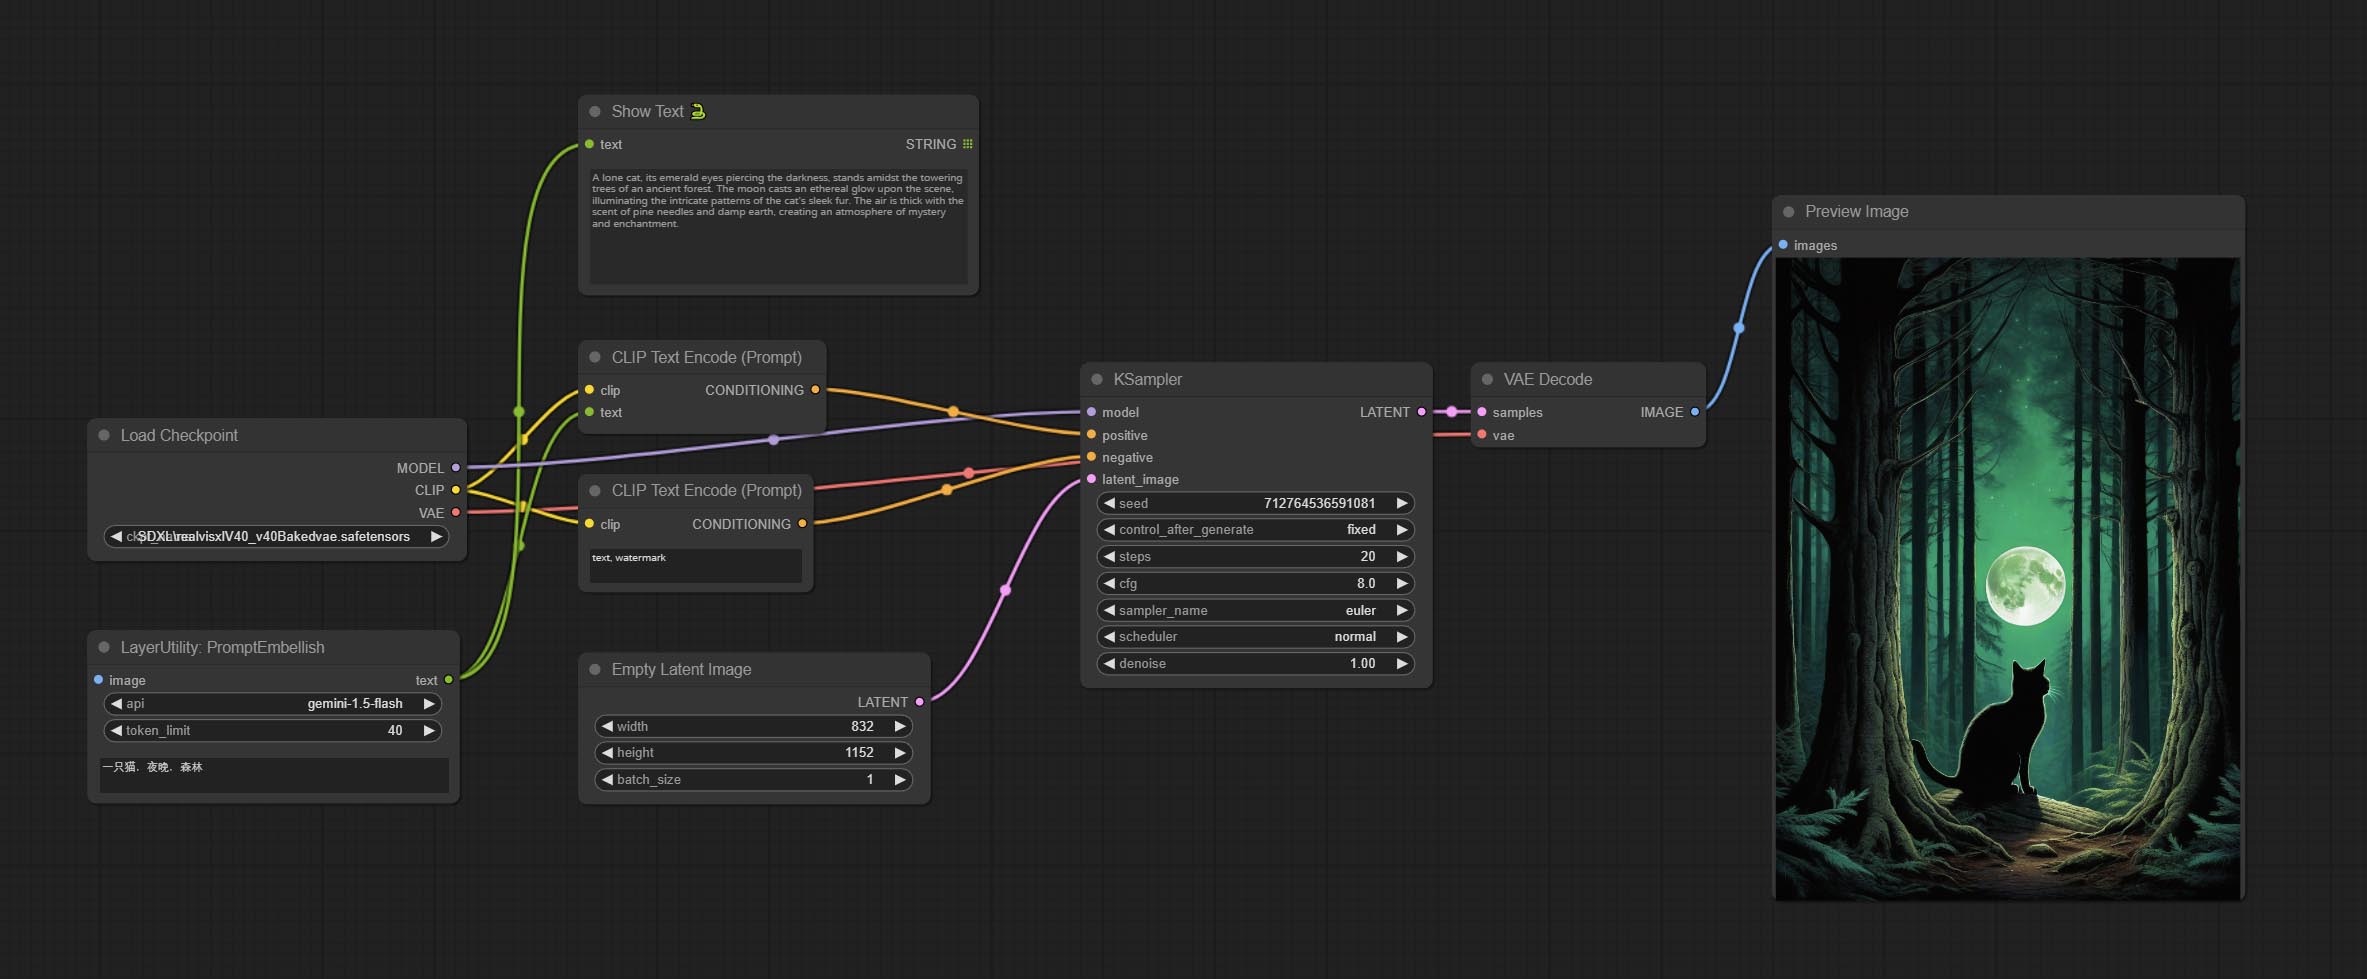
Node options:
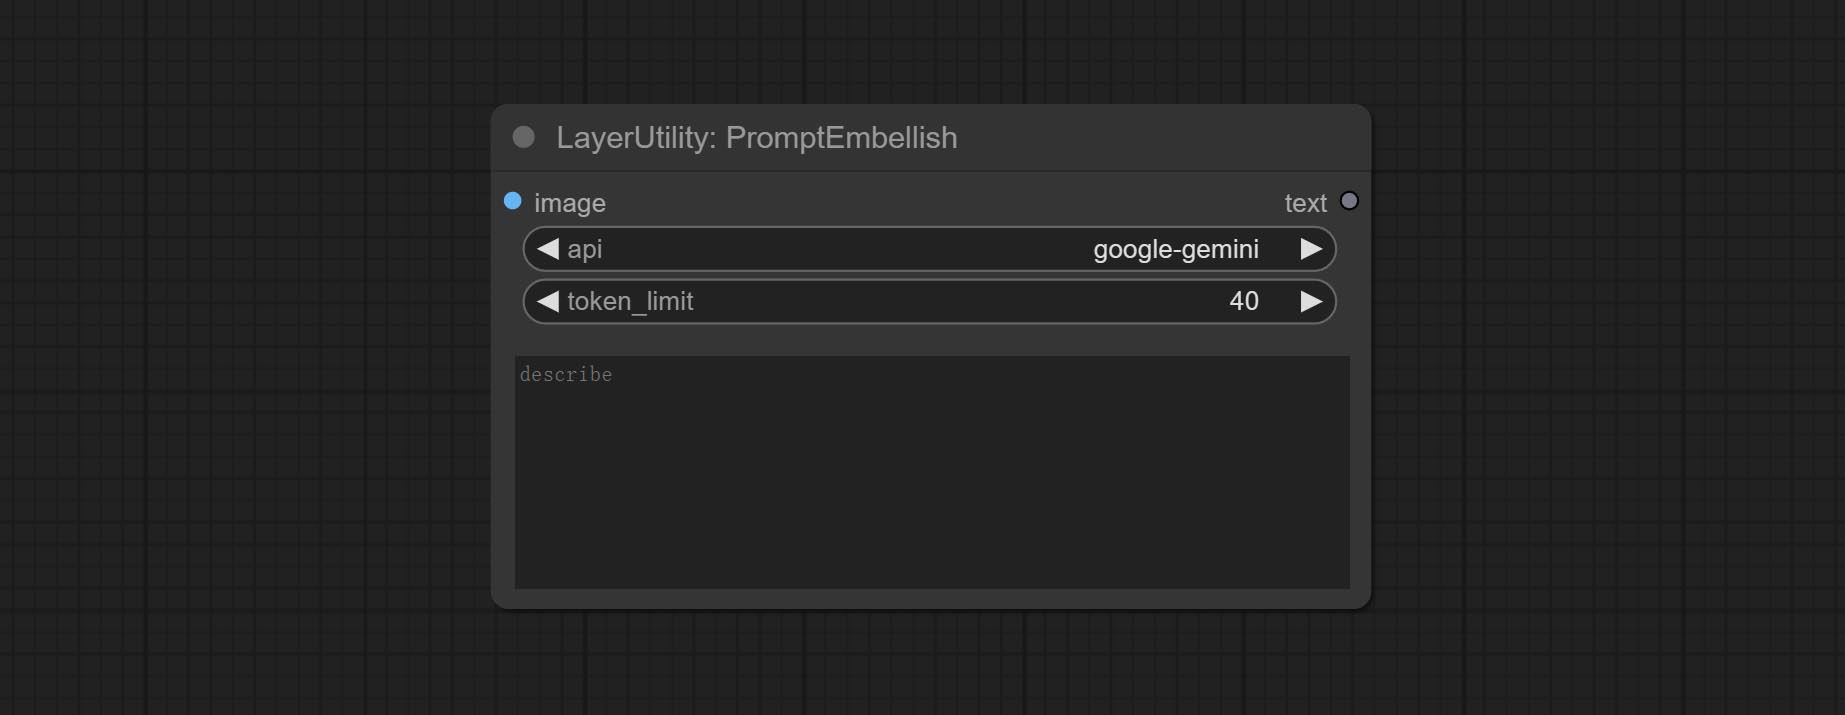
- image: Optional, input image as a reference for prompt words.
- api: The Api used. At present, there are two options "gemini-1. 5-flash" and "google-gemini".
- token_limit: The maximum token limit for generating prompt words.
- discribe: Enter a simple description here. supports Chinese text input.
Florence2Image2Prompt
Use the Florence 2 model to infer prompt words. The code for this node section is fromyiwangsimple/florence_dw, thanks to the original author. *When using it for the first time, the model will be automatically downloaded. You can also download the model file from BaiduNetdisk to ComfyUI/models/florence2 folder. 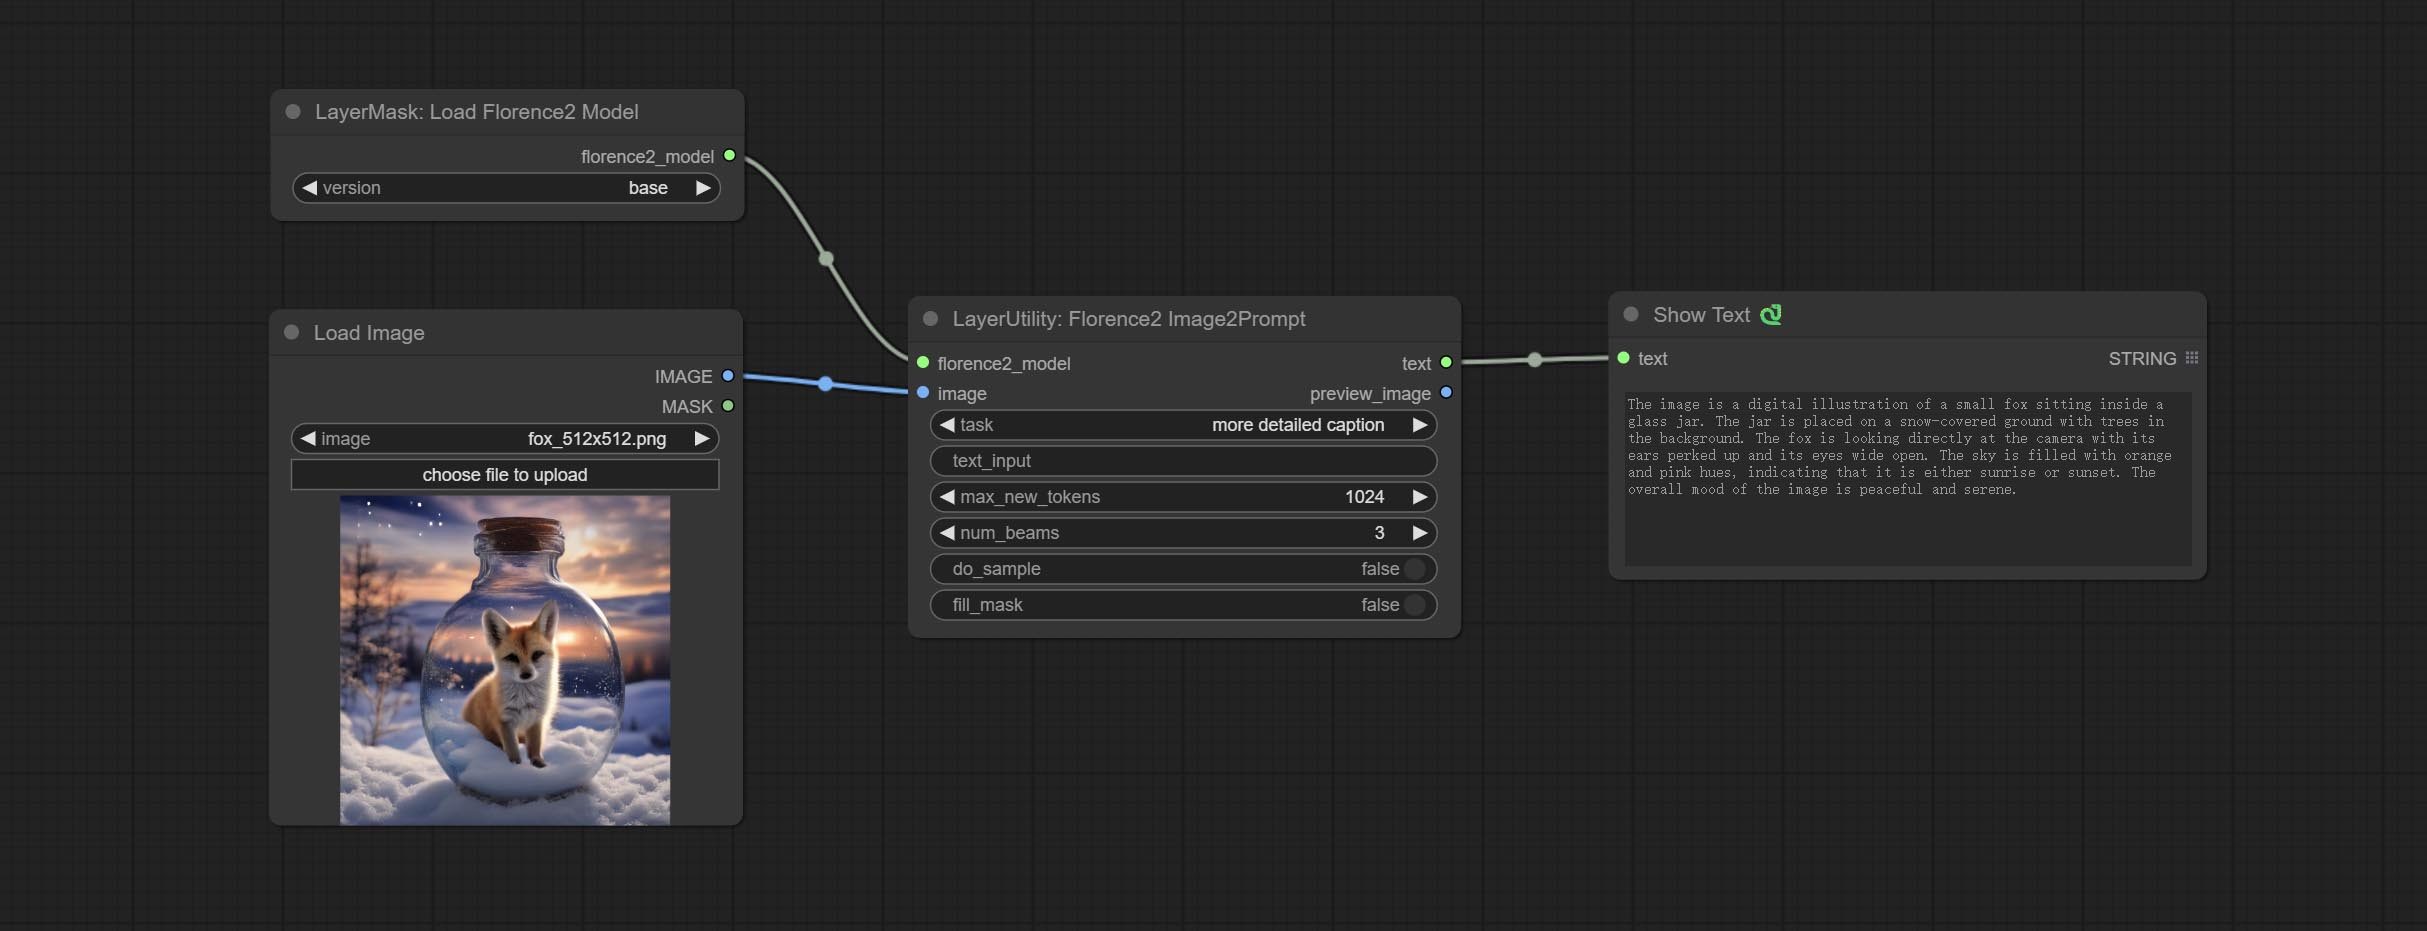
节点选项: 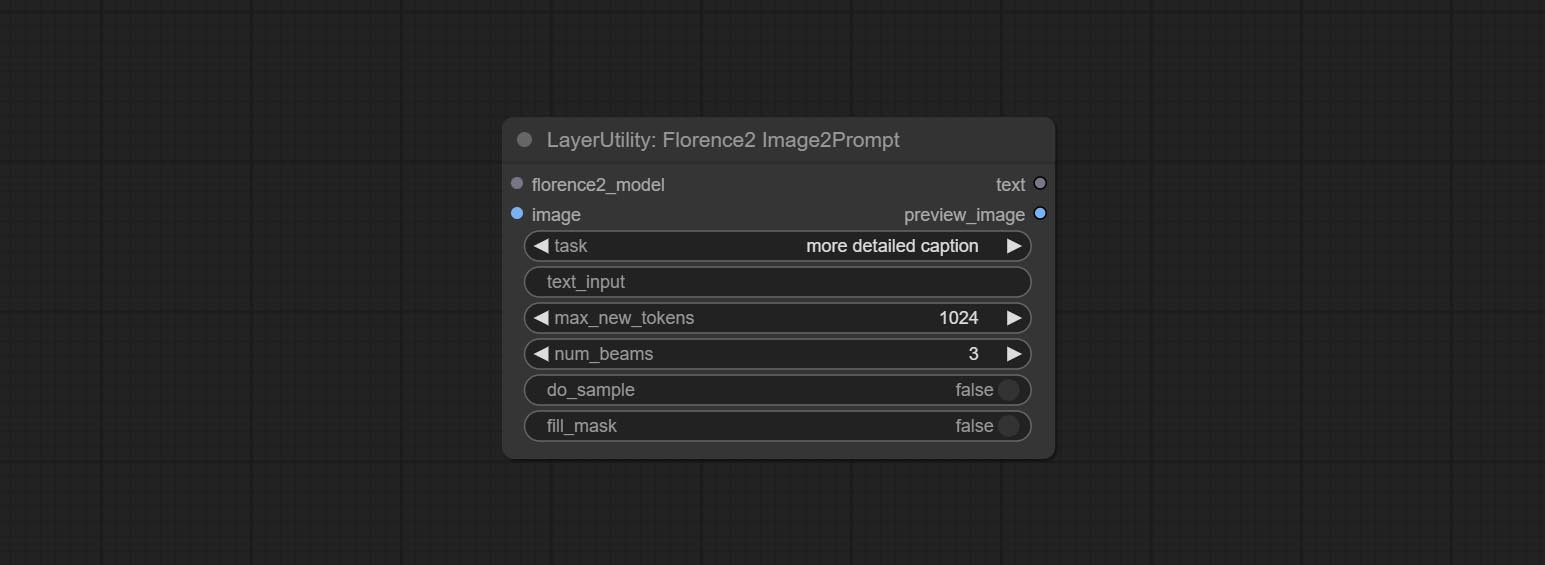
- florence2_model: Florence2 model input.
- 图像:图像输入。
- task: Select the task for florence2.
- text_input: Text input for florence2.
- max_new_tokens: The maximum number of tokens for generating text.
- num_beams: The number of beam searches that generate text.
- do_sample: Whether to use text generated sampling.
- fill_mask: Whether to use text marker mask filling.
VQAPrompt
Use the blip-vqa model for visual question answering. Part of the code for this node is referenced from celoron/ComfyUI-VisualQueryTemplate, thanks to the original author.
*Download model files from BaiduNetdisk or huggingface.co/Salesforce/blip-vqa-capfilt-large and huggingface.co/Salesforce/blip-vqa-base and copy to ComfyUImodelsVQA folder.
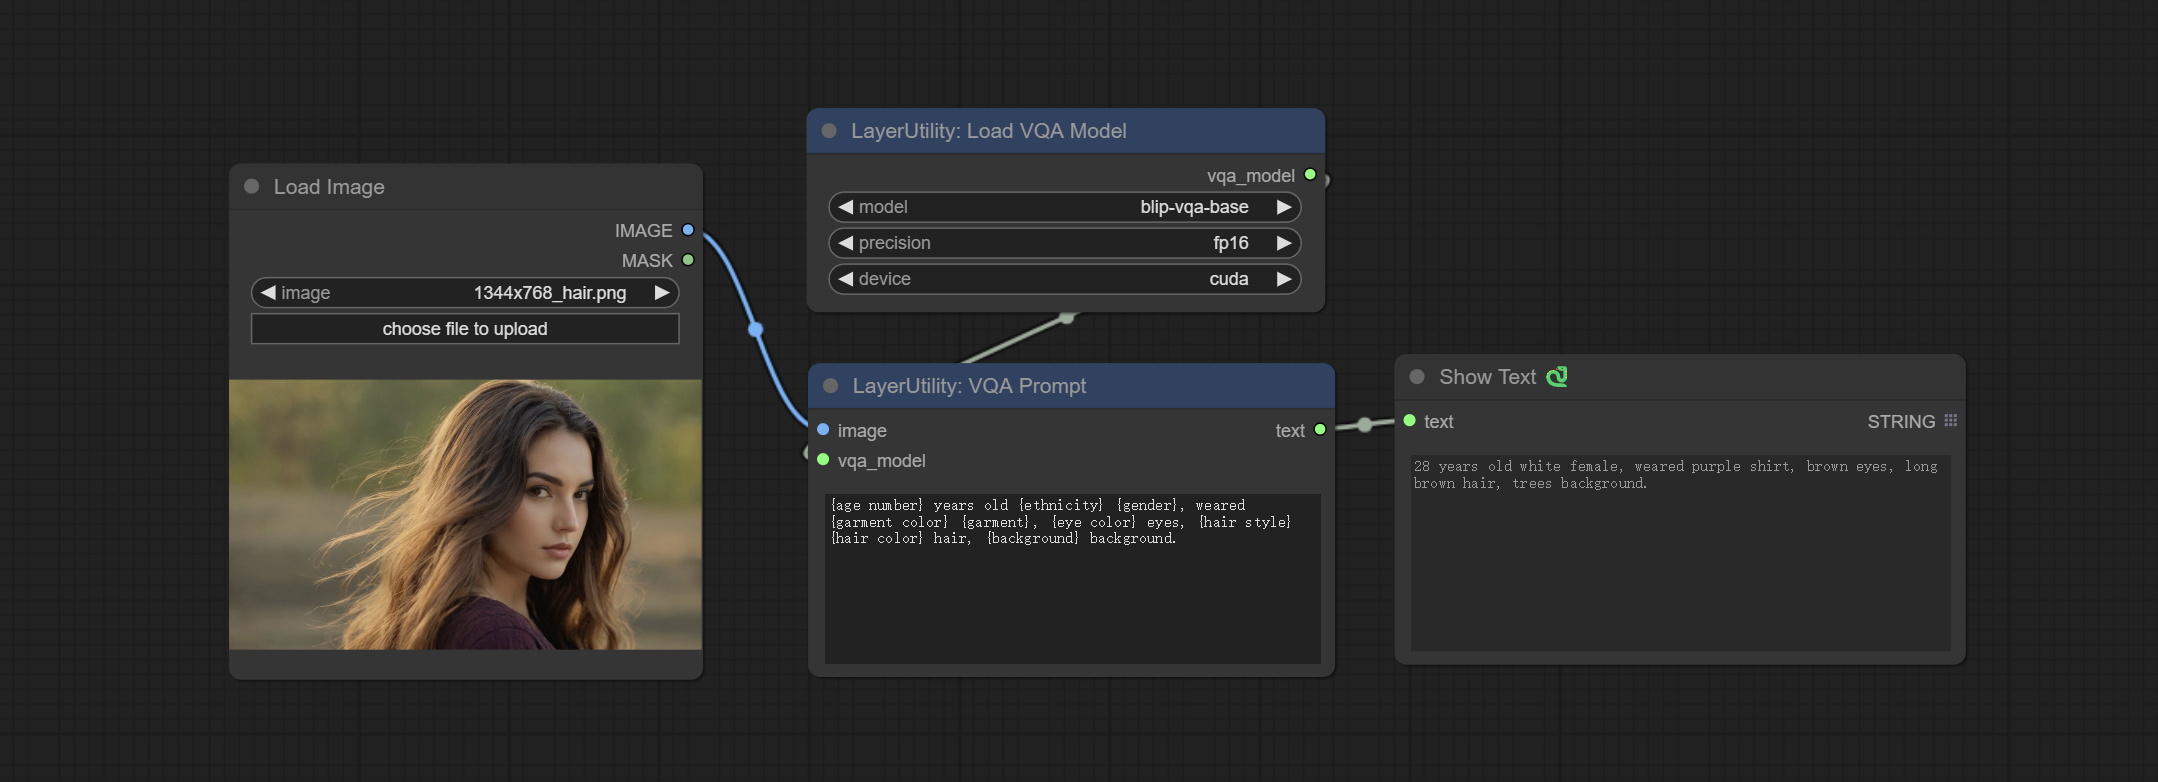
节点选项: 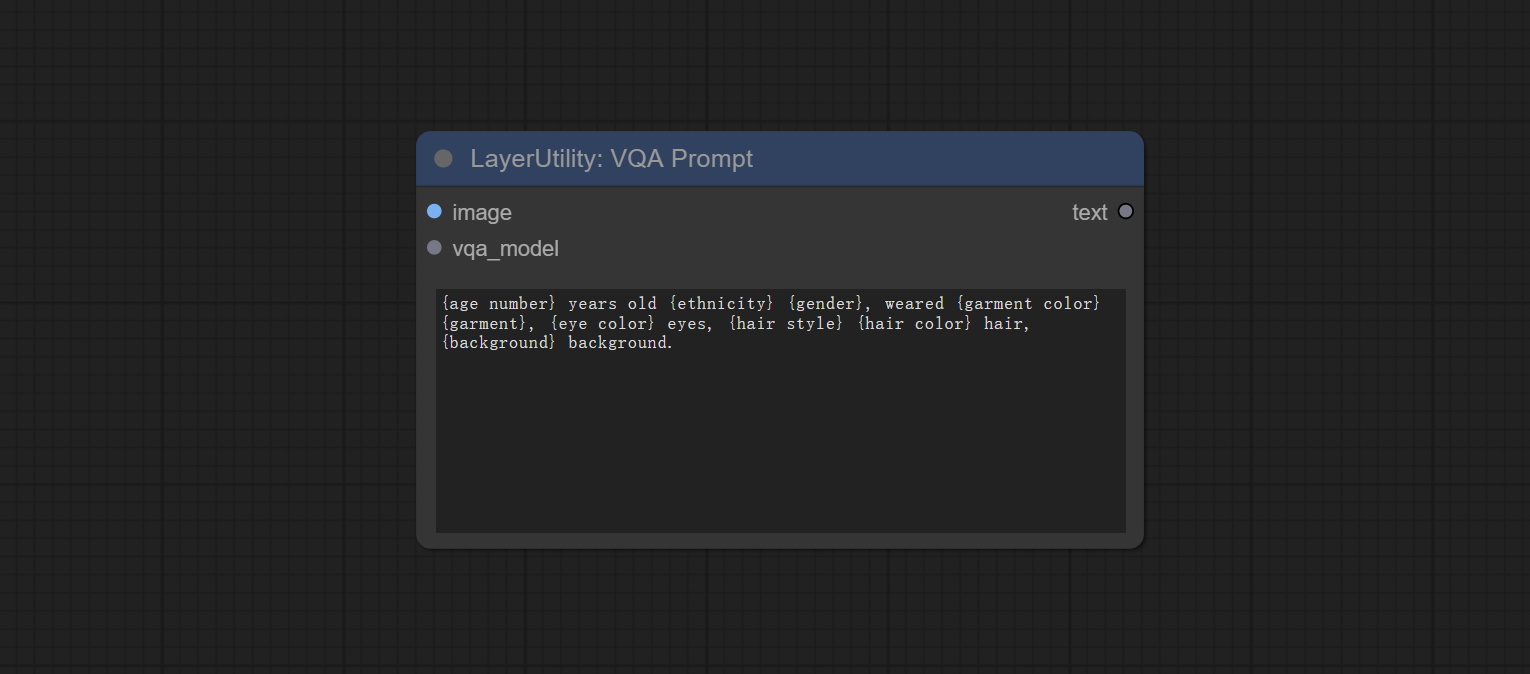
- image: The image input.
- vqa_model: The vqa model input, it from LoadVQAModel node.
- question: Task text input. A single question is enclosed in curly braces "{}", and the answer to the question will be replaced in its original position in the text output. Multiple questions can be defined using curly braces in a single Q&A. For example, for a picture of an item placed in a scene, the question is:"{object color} {object} on the {scene}".
LoadVQAModel
Load the blip-vqa model.
节点选项: 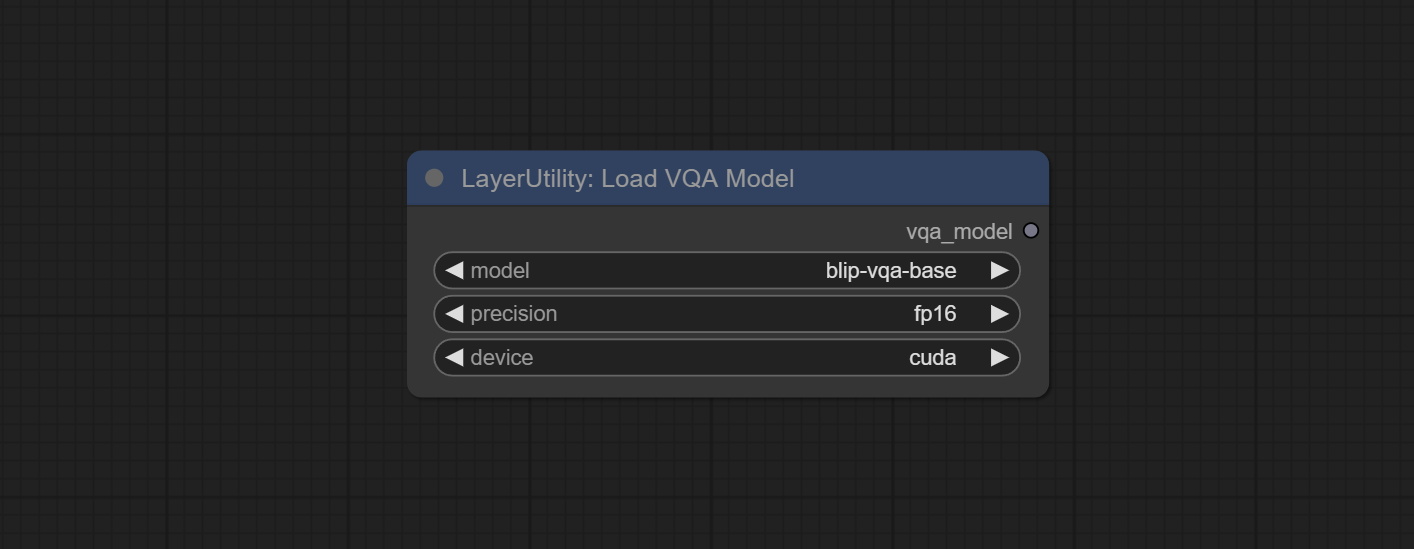
- model: There are currently two models to choose from "blip-vqa-base" and "blip-vqa-capfilt-large".
- precision: The model accuracy has two options: "fp16" and "fp32".
- device: The model running device has two options: "cuda" and "cpu".
ImageShift
Shift the image. this node supports the output of displacement seam masks, making it convenient to create continuous textures. 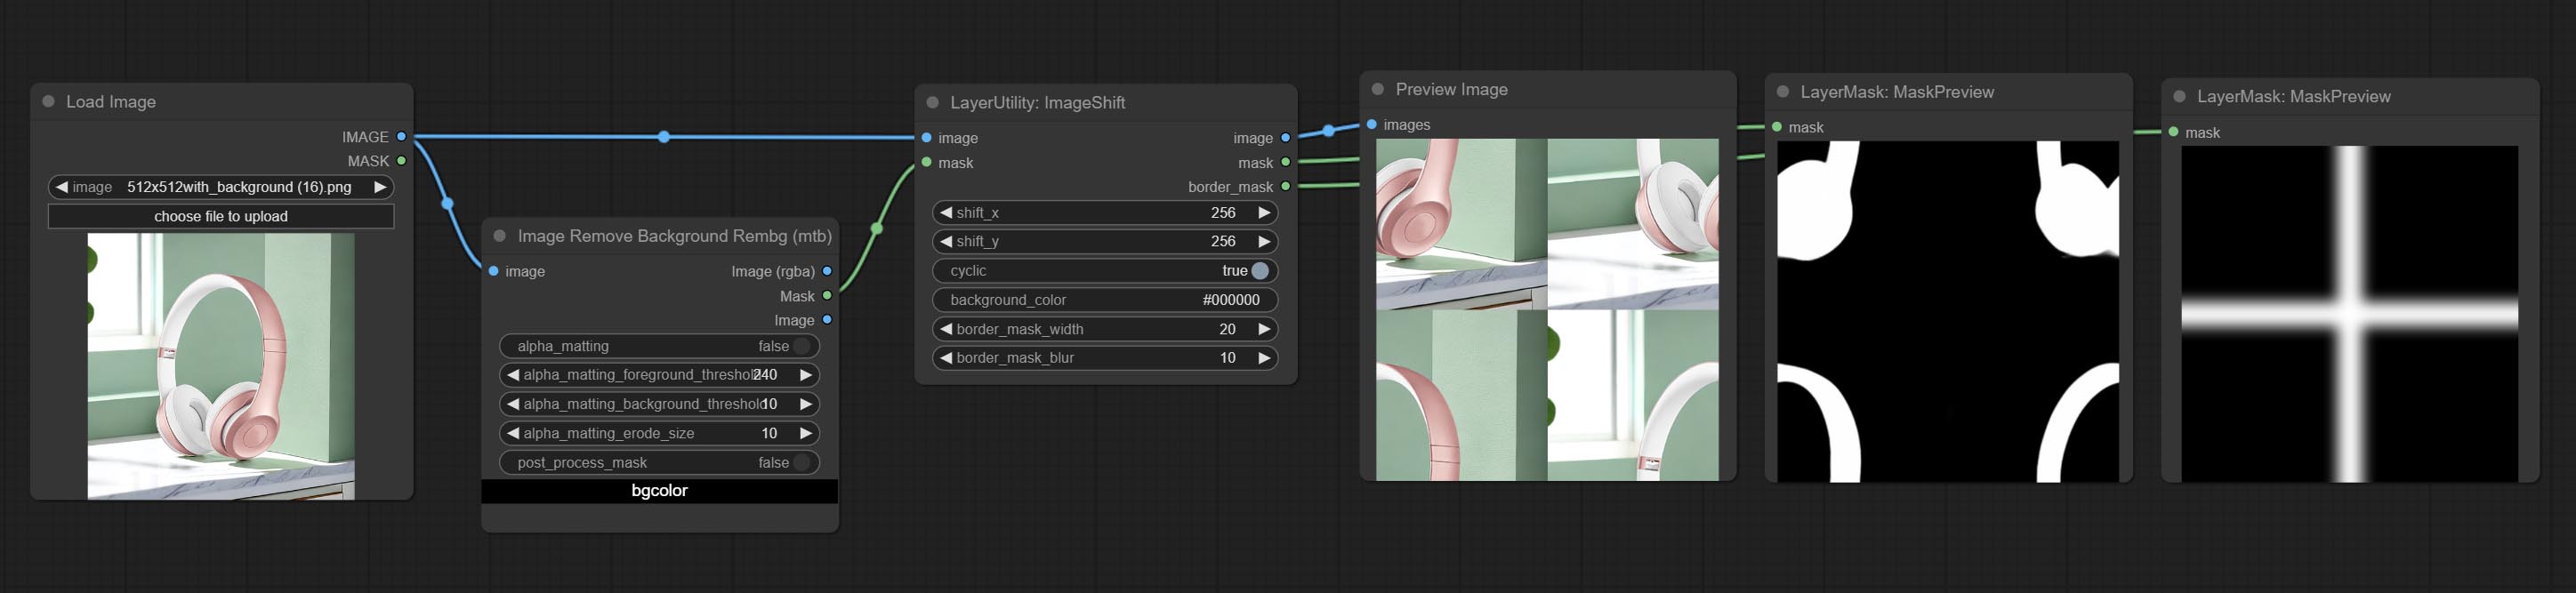
Node options:
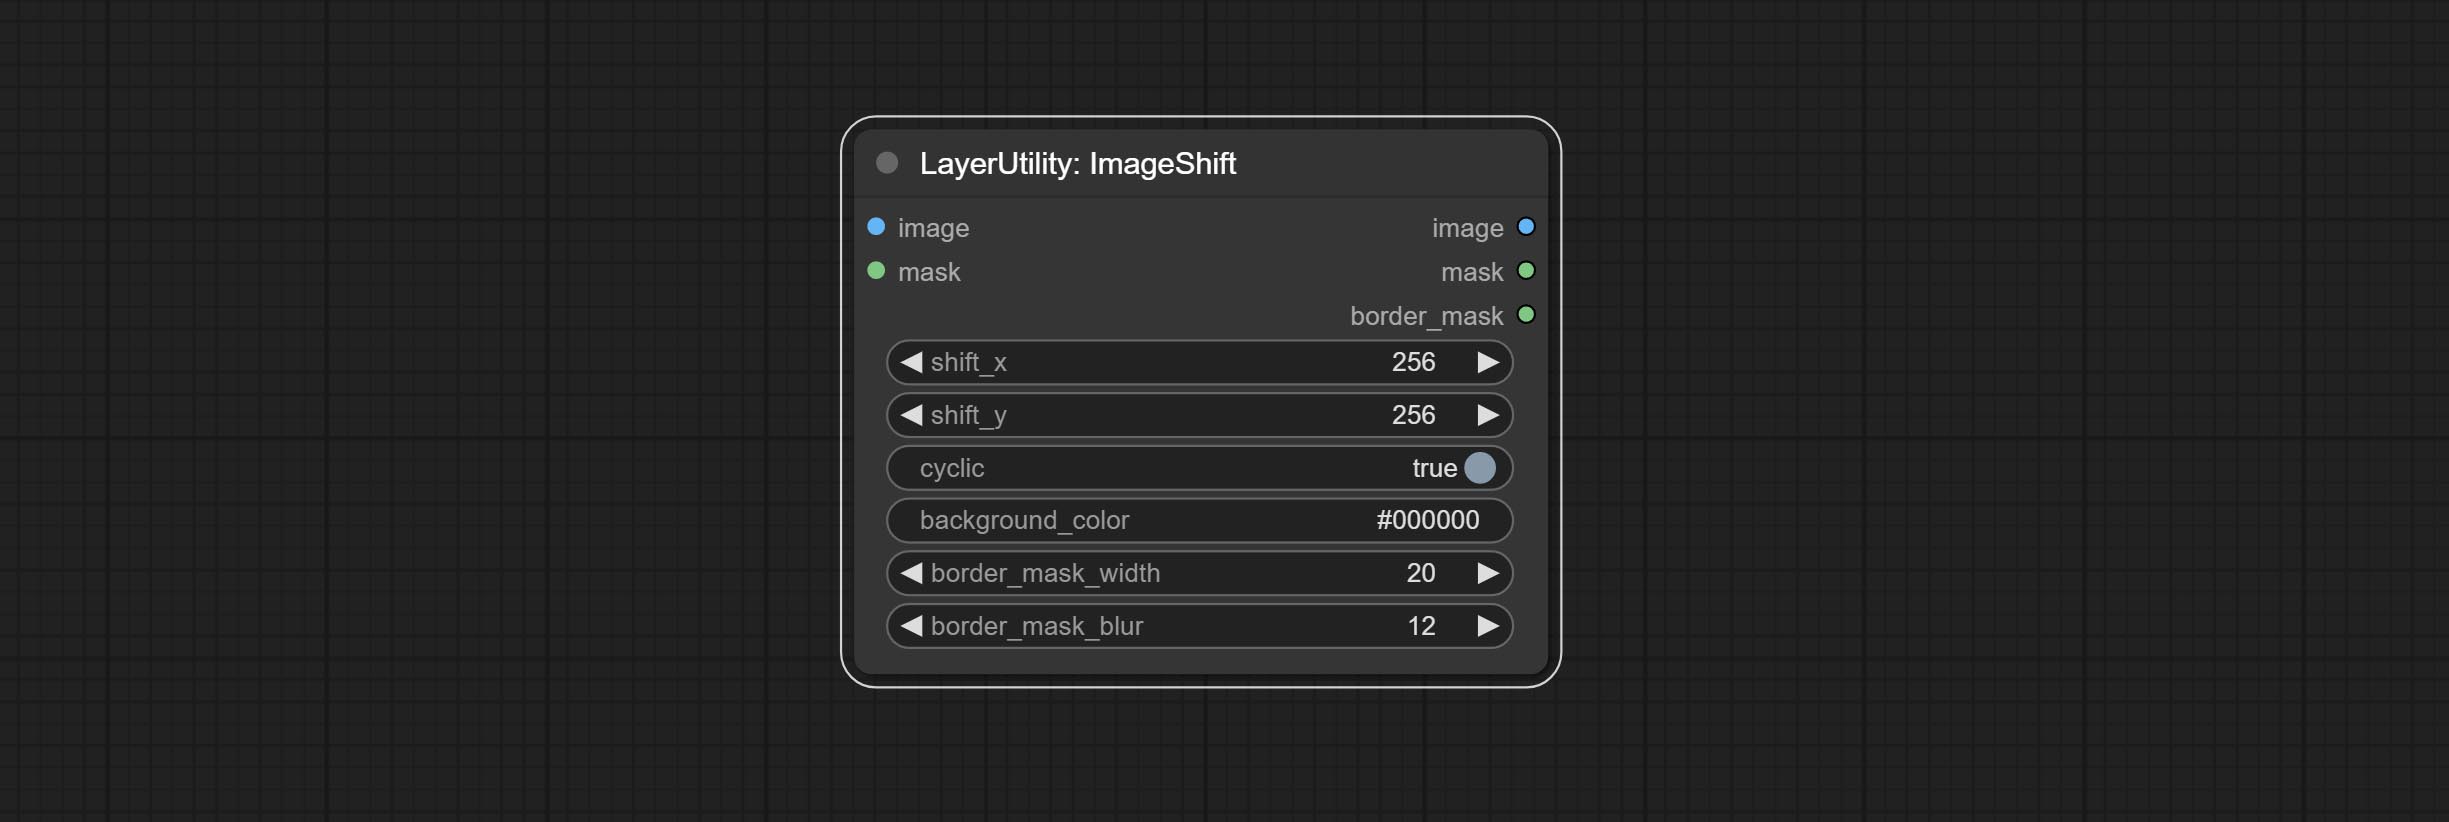
- image 5 : The input image.
- mask 2,5 : The mask of image.
- shift_x: Horizontal distance of shift.
- shift_y: Vertical distance of shift.
- cyclic: Is the part of displacement that is out of bounds cyclic.
- background_color 4 : Background color. if cyclic is set to False, the setting here will be used as the background color.
- border_mask_width: Border mask width.
- border_mask_blur: Border mask blur.
- 笔记
imageBlend
A simple node for composit layer image and background image, multiple blend modes are available for option, and transparency can be set. 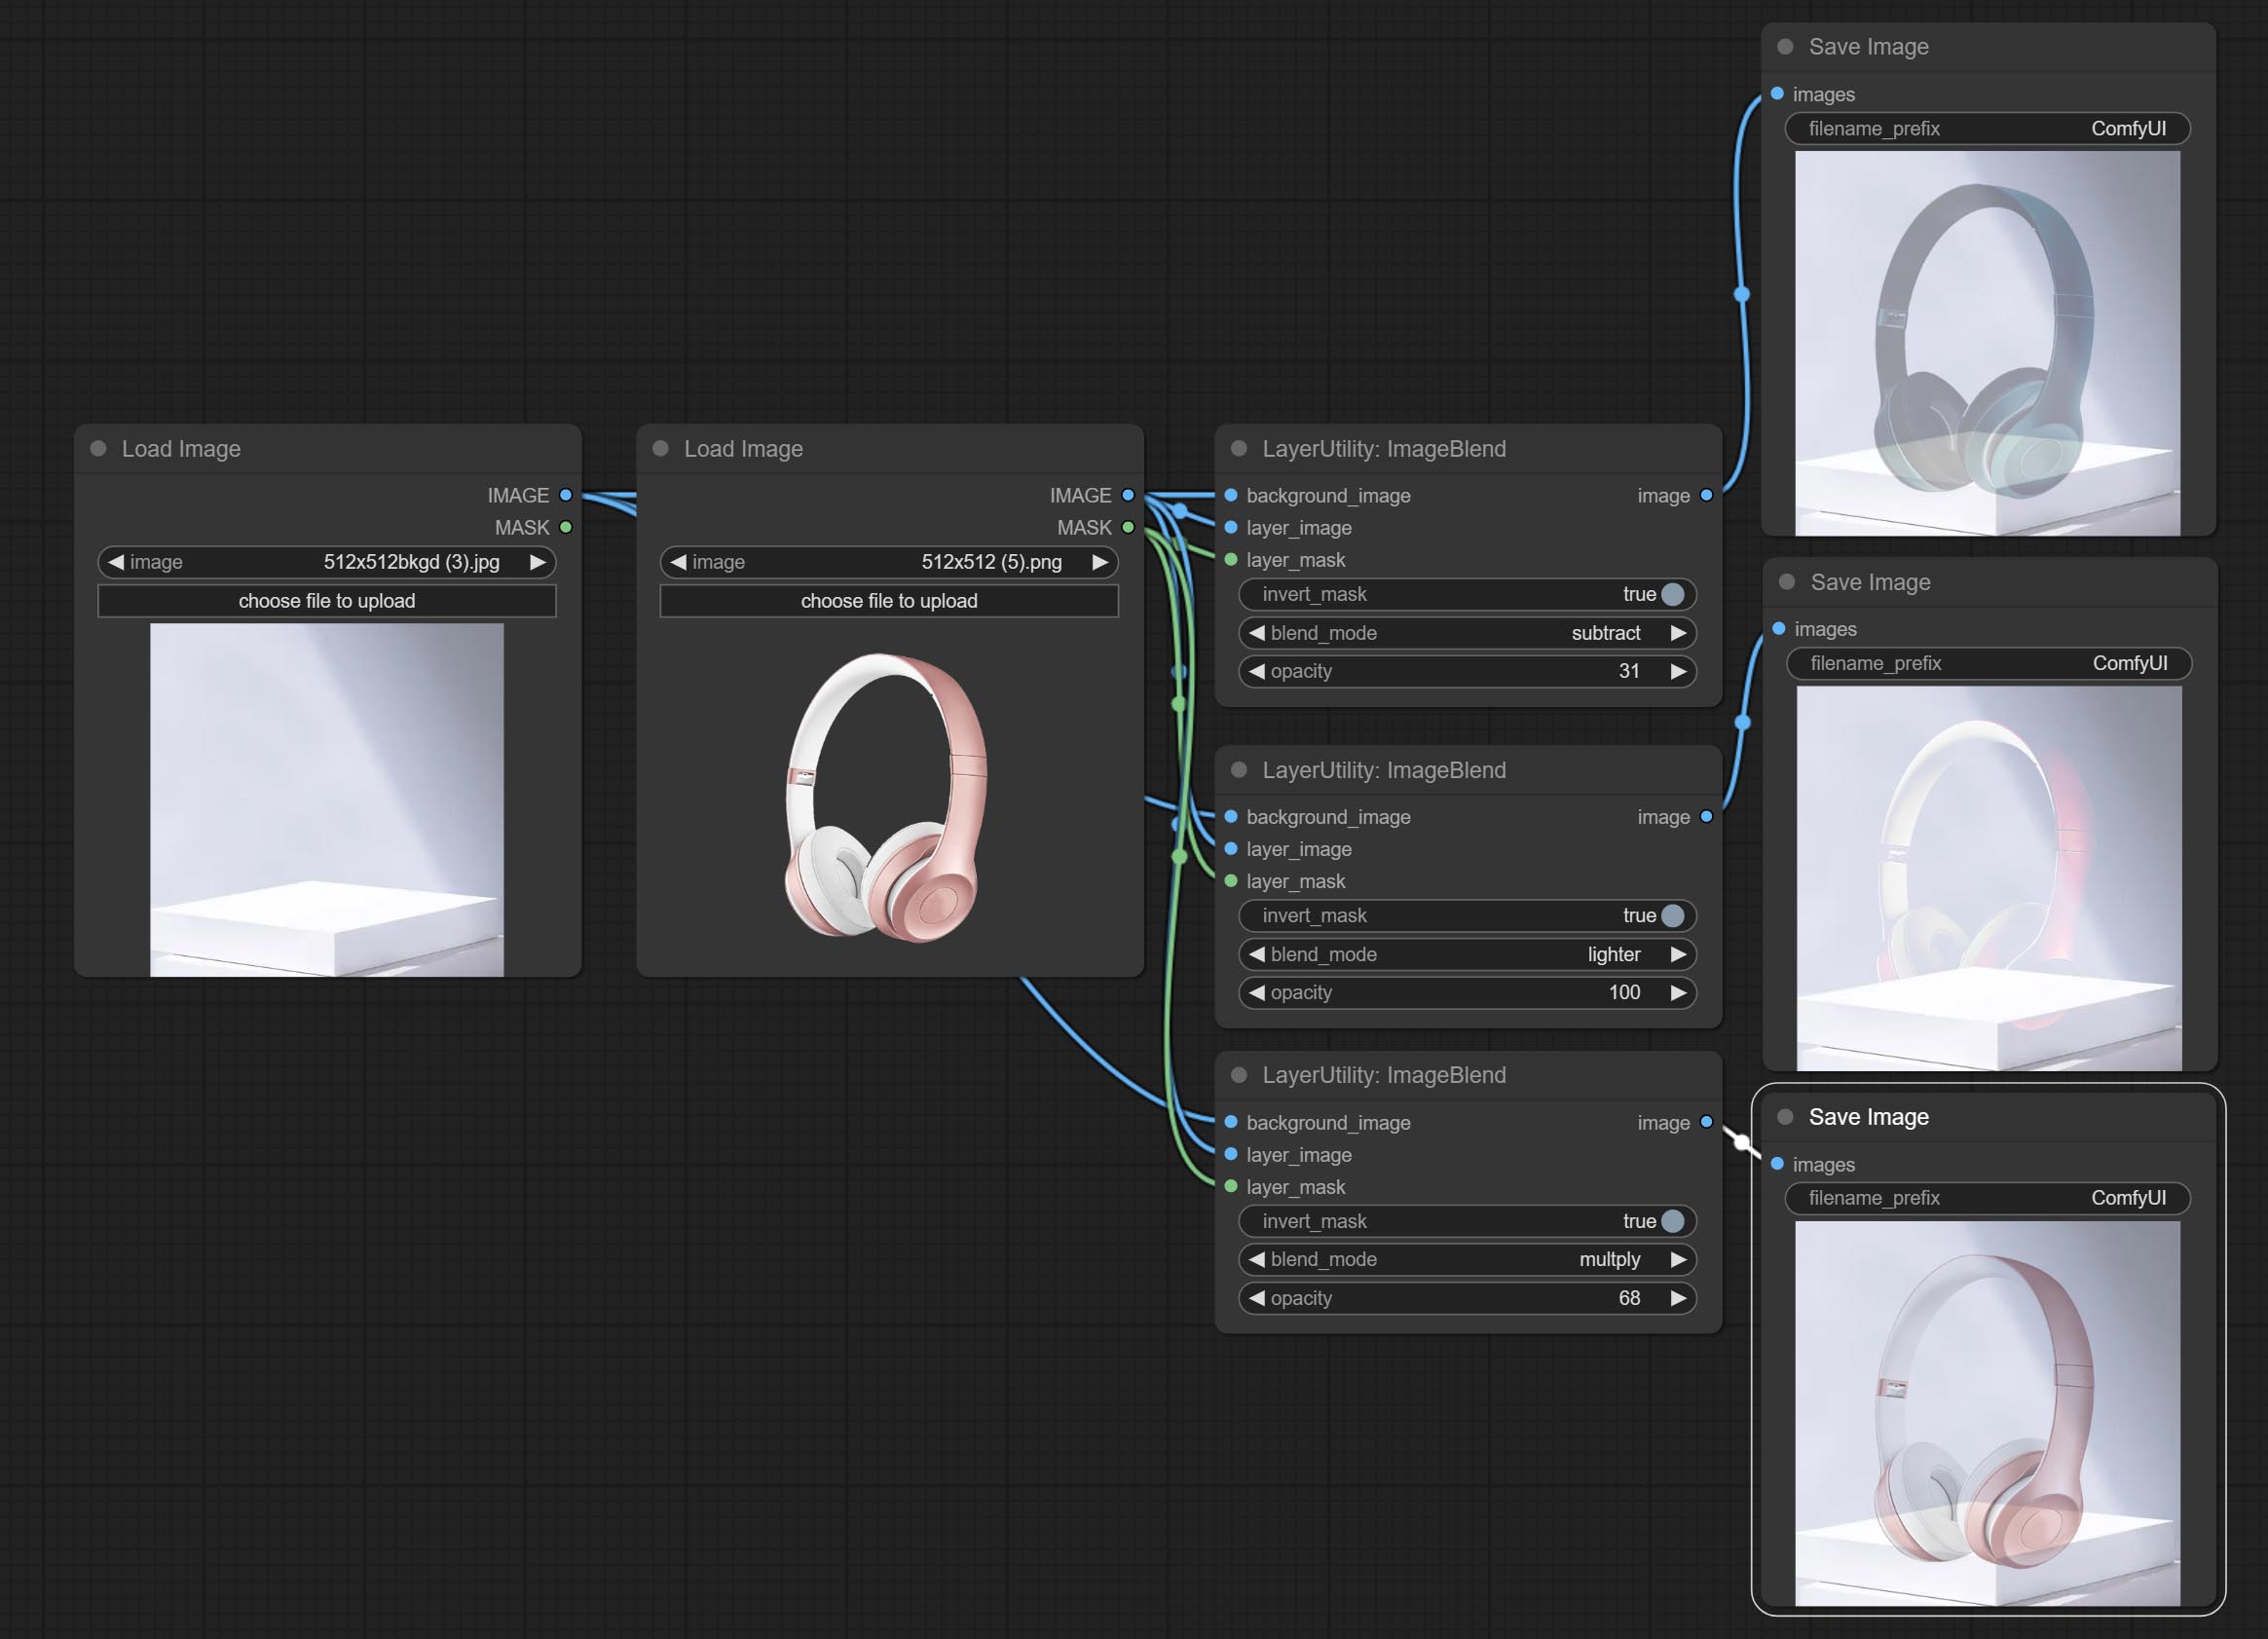
Node options: 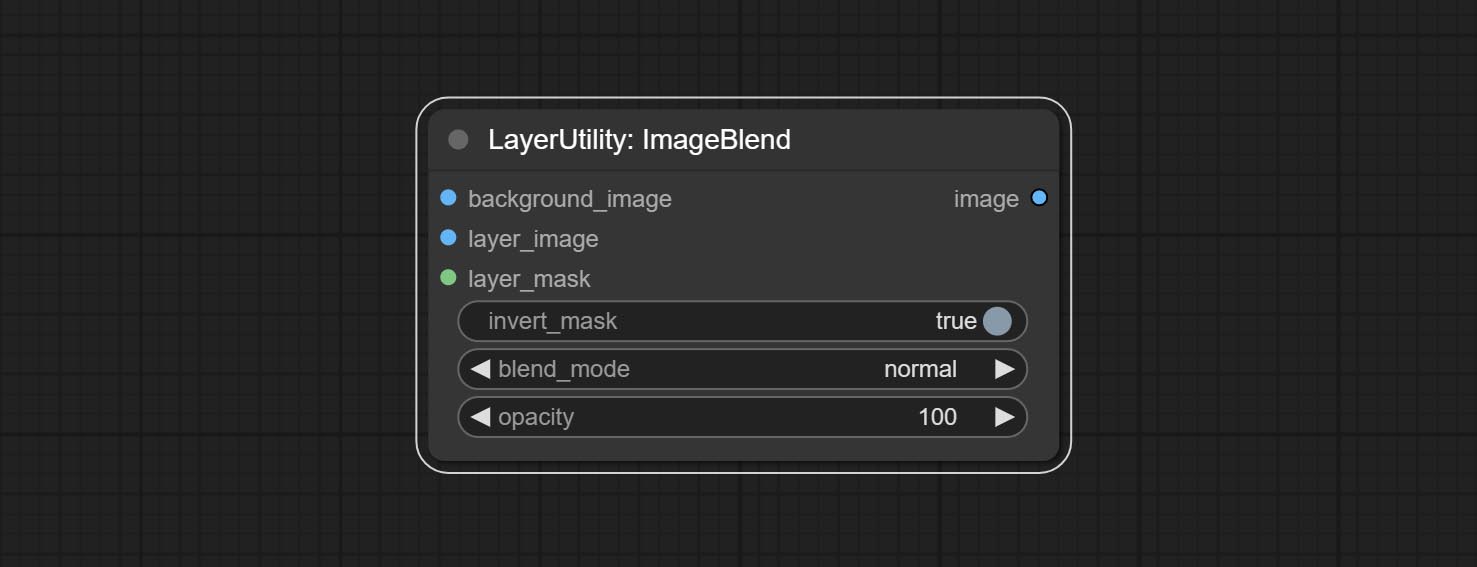
- background_image 1 : The background image.
- layer_image 1 : Layer image for composite.
- layer_mask 1,2 : Mask for layer_image.
- invert_mask: Whether to reverse the mask.
- blend_mode 3 : Blending mode.
- opacity: Opacity of blend.
- 笔记
ImageReel
Display multiple images in one reel. Text annotations can be added to each image in the reel. By using the ImageReelComposite node, multiple reel can be combined into one image. 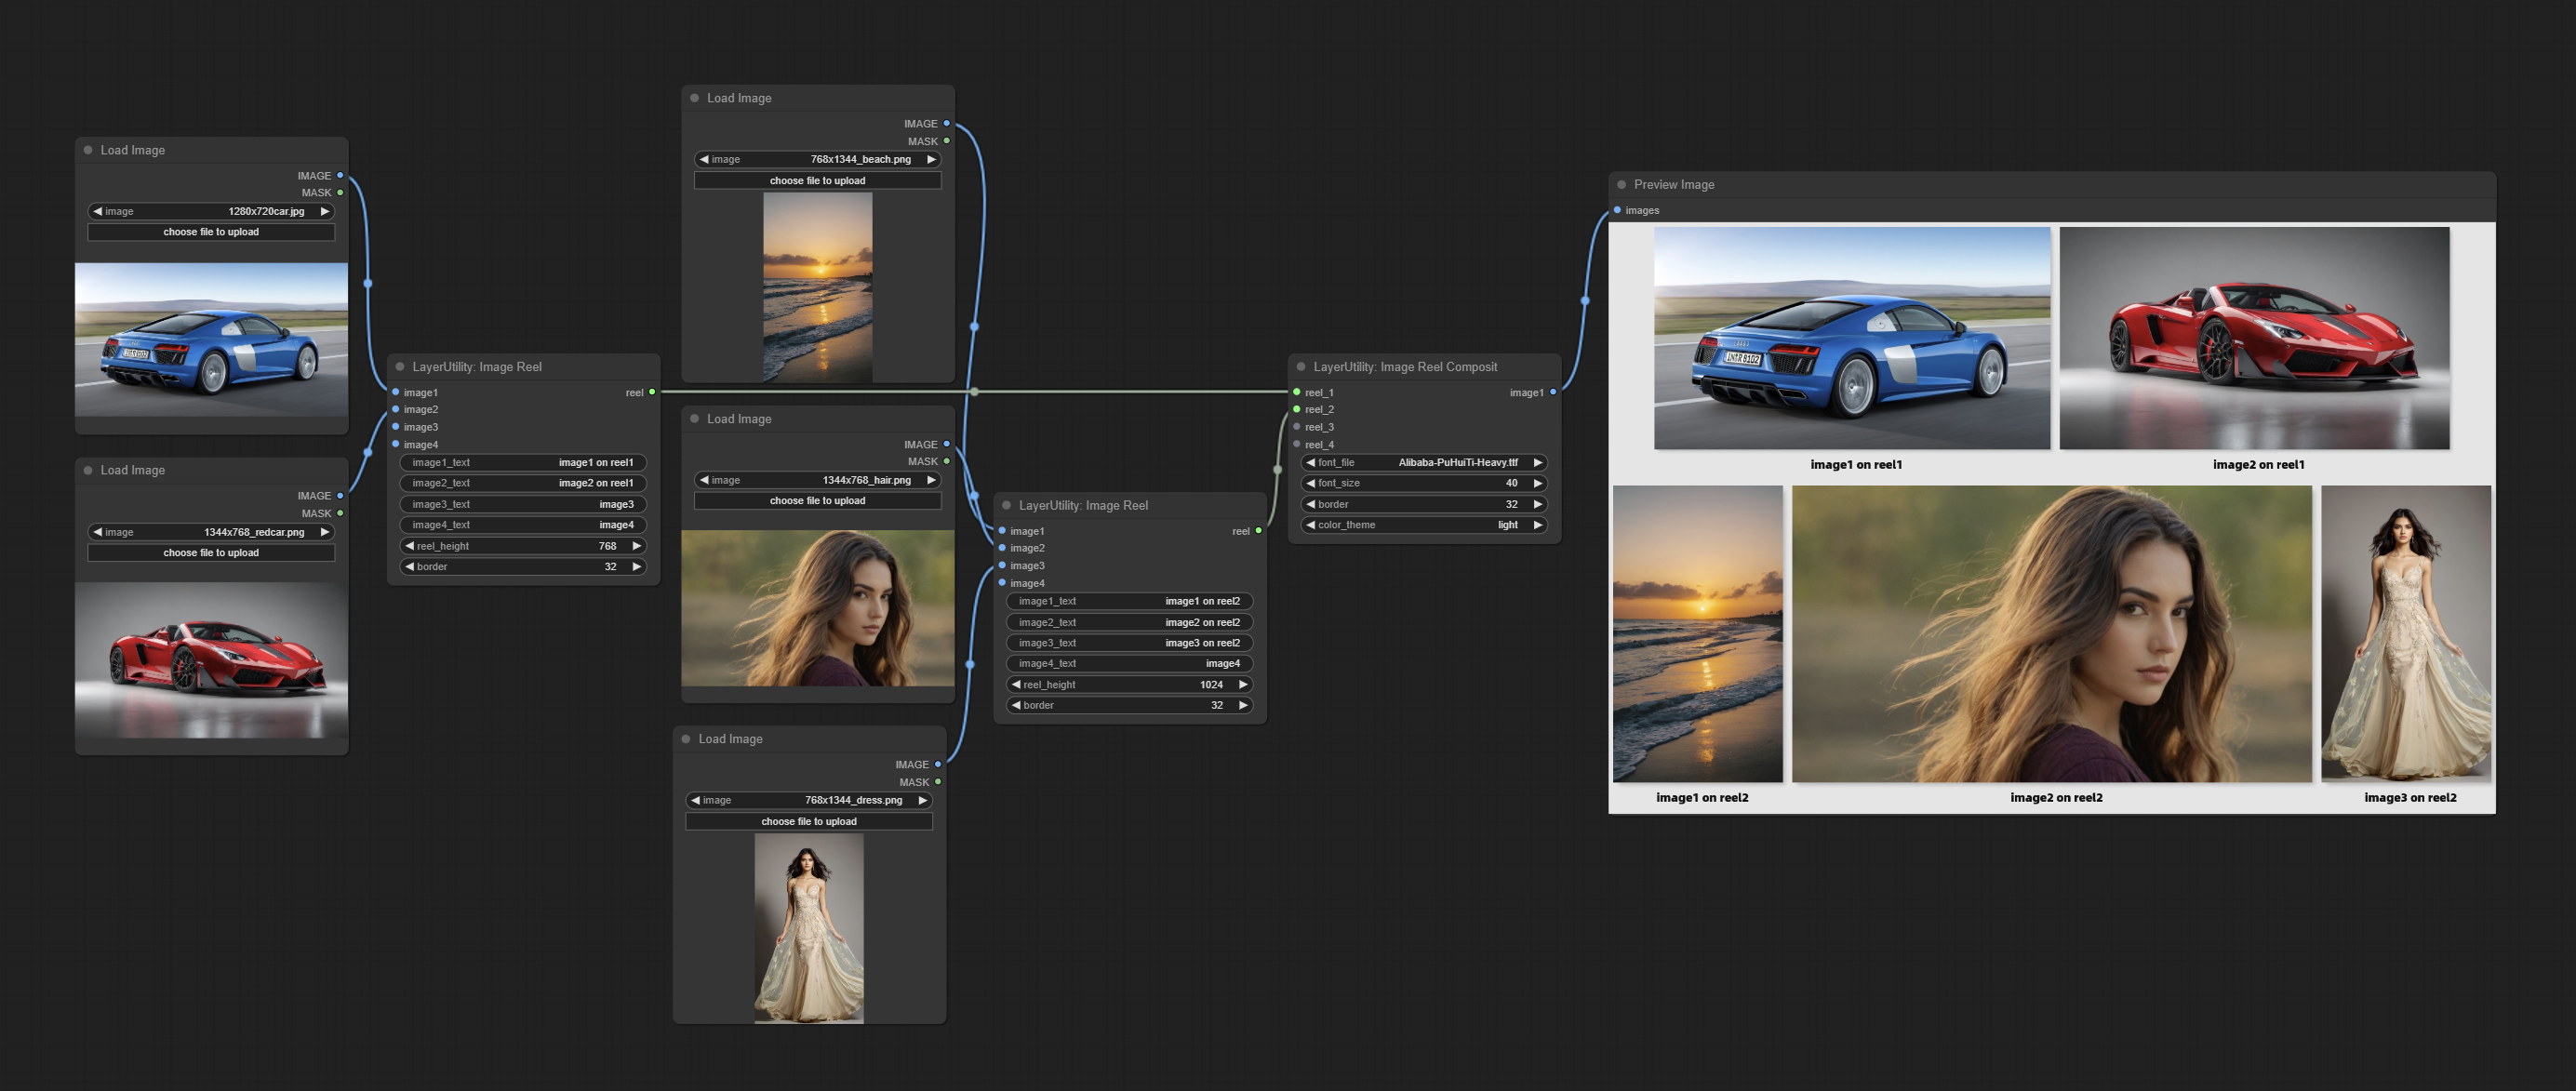
节点选项:
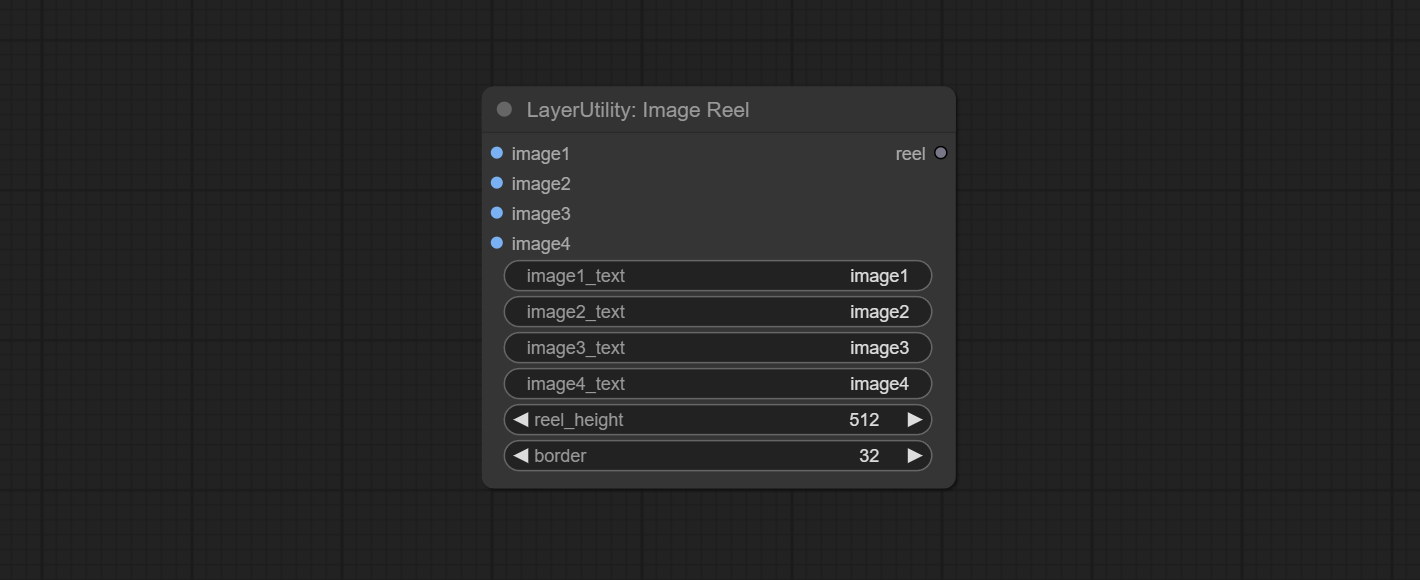
- image1: The first image. it must be input.
- image2: The second image. optional input.
- image3: The third image. optional input.
- image4: The fourth image. optional input.
- image1_text: Text annotation for the first image.
- image2_text: Text annotation for the second image.
- image3_text: Text annotation for the third image.
- image4_text: Text annotation for the fourth image.
- reel_height: The height of reel.
- border: The border width of the image in the reel.
输出:
- reel: The reel of ImageReelComposite node input.
ImageReelComposite
Combine multiple reel into one image.
节点选项: 
- reel_1: The first reel. it must be input.
- reel_2: The second reel. optional input.
- reel_3: The third reel. optional input.
- reel_4: The fourth reel. optional input.
- font_file ** : Here is a list of available font files in the font folder, and the selected font files will be used to generate images.
- border: The border width of the reel.
- color_theme: Theme color for the output image.
* The font folder is defined in resource_dir.ini , this file is located in the root directory of the plug-in, and the default name is resource_dir.ini.example . to use this file for the first time, you need to change the file suffix to .ini . Open the text editing software and find the line starting with "FONT_dir=", after "=", enter the custom folder path name. support defining multiple folders in resource-dir.ini , separated by commas, semicolons, or spaces. all font files in this folder will be collected and displayed in the node list during ComfyUI initialization. If the folder set in ini is invalid, the font folder that comes with the plugin will be enabled.
ImageOpacity
Adjust image opacity 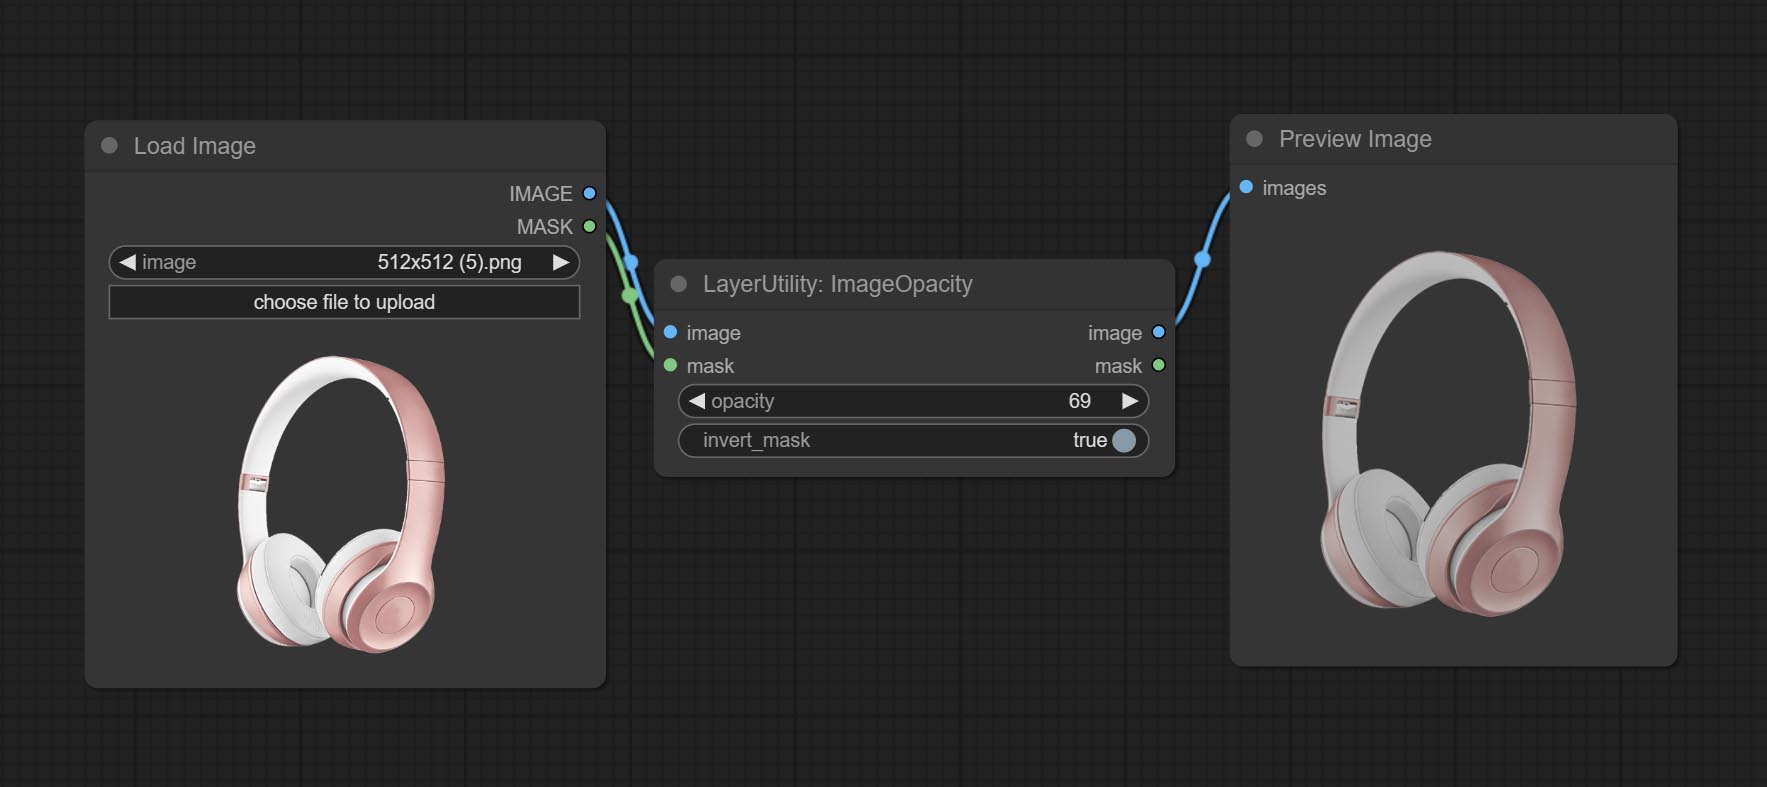
Node option:
- image 5 : Image input, supporting RGB and RGBA. if is RGB, the alpha channel of the entire image will be automatically added.
- mask 2,5 : Mask input.
- invert_mask: Whether to reverse the mask.
- opacity: Opacity of image.
- 笔记
色彩点
Modify web extensions from mtb nodes. Select colors on the color palette and output RGB values, thanks to the original author. 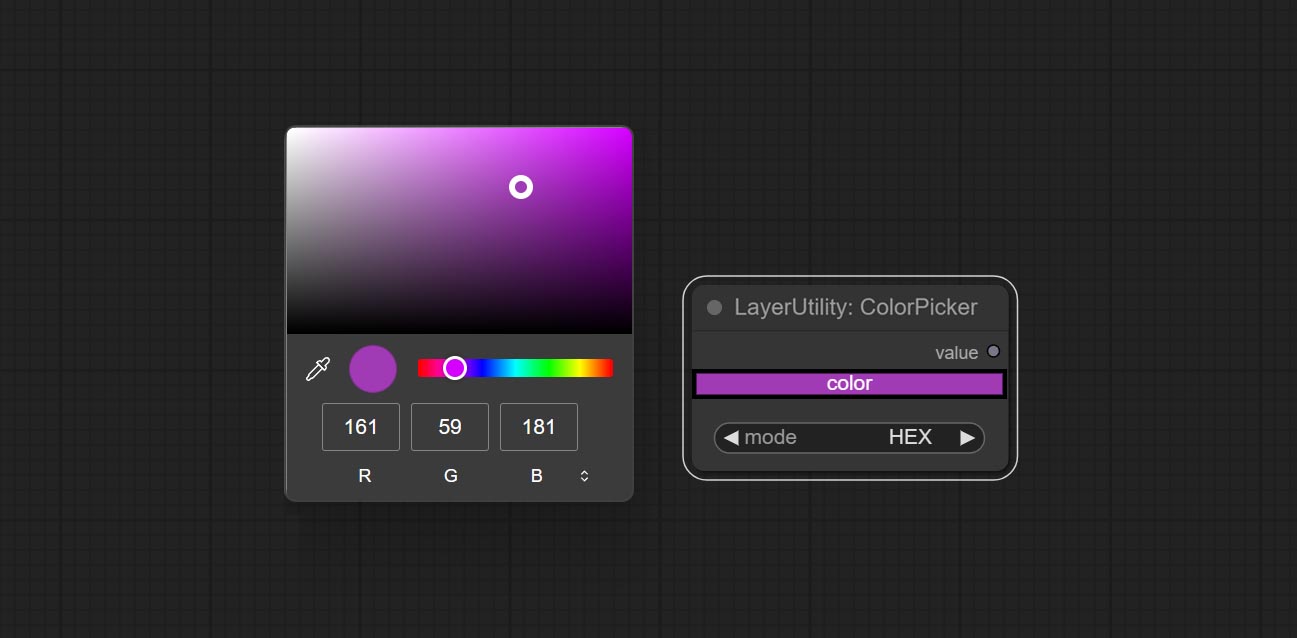
Node options:
- mode: The output format is available in hexadecimal (HEX) and decimal (DEC).
Output type:
RGBValue
Output the color value as a single R, G, B three decimal values. Supports HEX and DEC formats for ColorPicker node output.
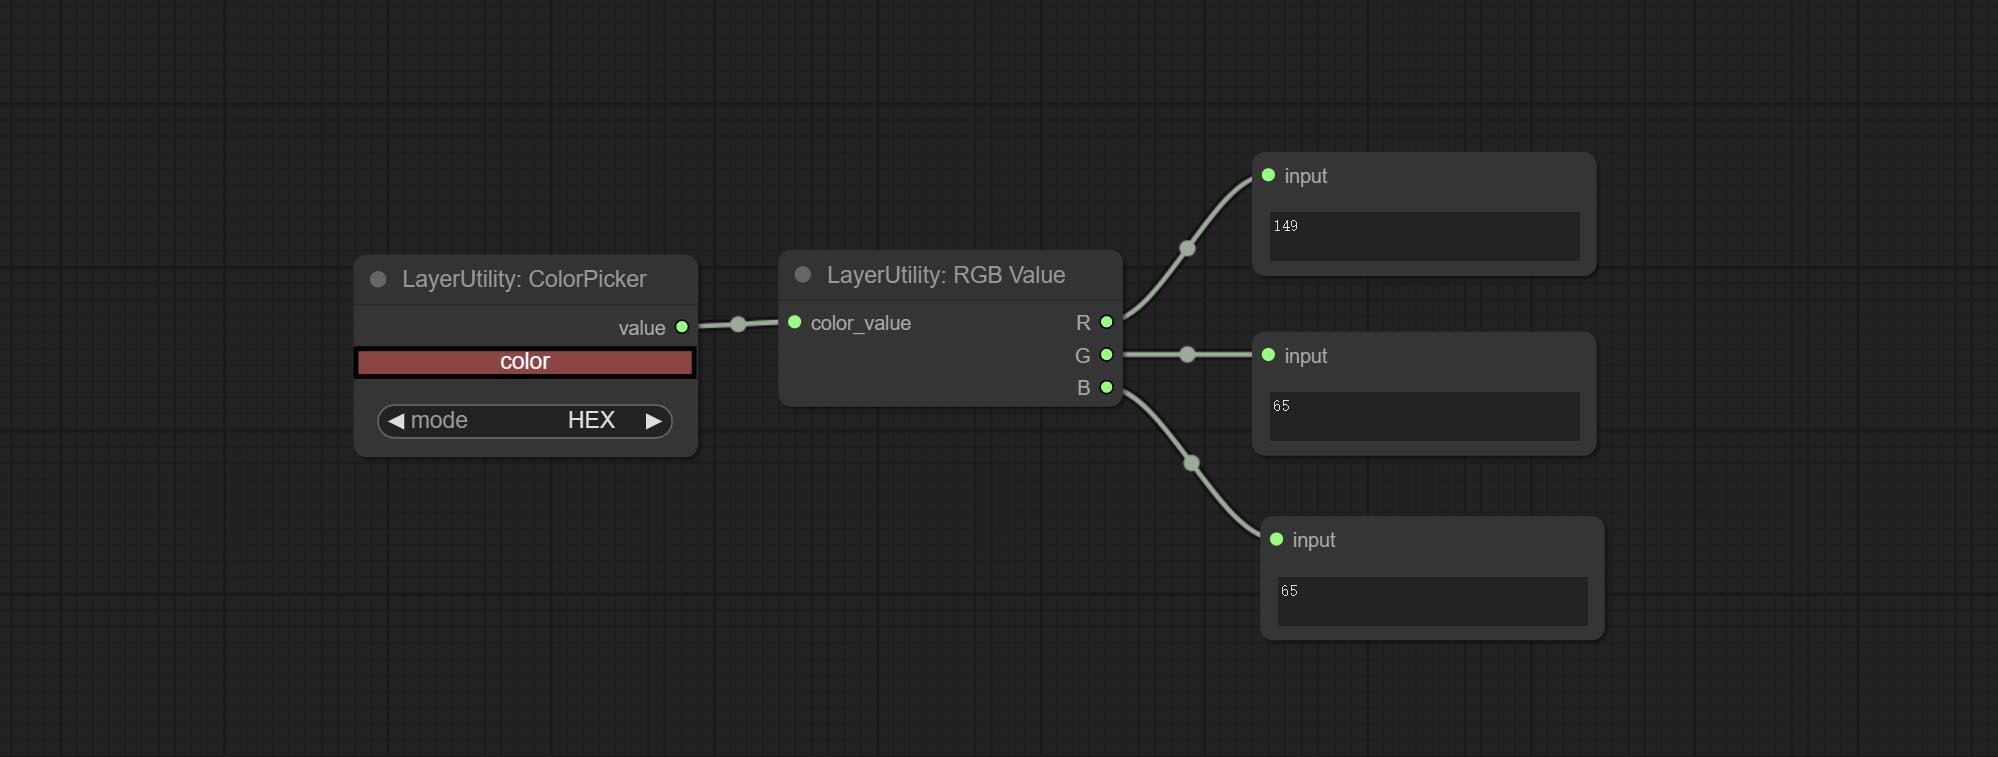
节点选项:
- color_value: Supports hexadecimal (HEX) or decimal (DEC) color values and should be of string or tuple type. Forcing in other types will result in an error.
HSVValue
Output color values as individual decimal values of H, S, and V (maximum value of 255). Supports HEX and DEC formats for ColorPicker node output. 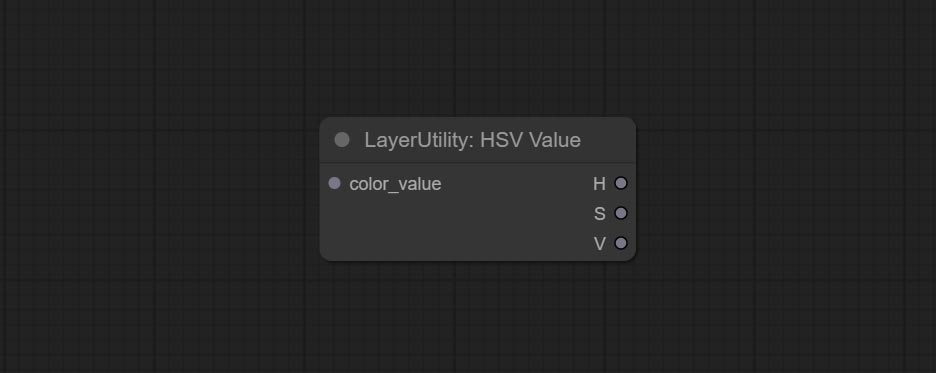
节点选项:
- color_value: Supports hexadecimal (HEX) or decimal (DEC) color values and should be of string or tuple type. Forcing in other types will result in an error.
GrayValue
Output grayscale values based on color values. Supports outputting 256 level and 100 level grayscale values. 
节点选项:
- color_value: Supports hexadecimal (HEX) or decimal (DEC) color values and should be of string or tuple type. Forcing in other types will result in an error.
输出:
- gray(256_level): 256 level grayscale value. Integer type, range 0~255.
- gray(100_level): 100 level grayscale value. Integer type, range 0~100.
GetColorTone
Obtain the main color or average color from the image and output RGB values. 
Node options: 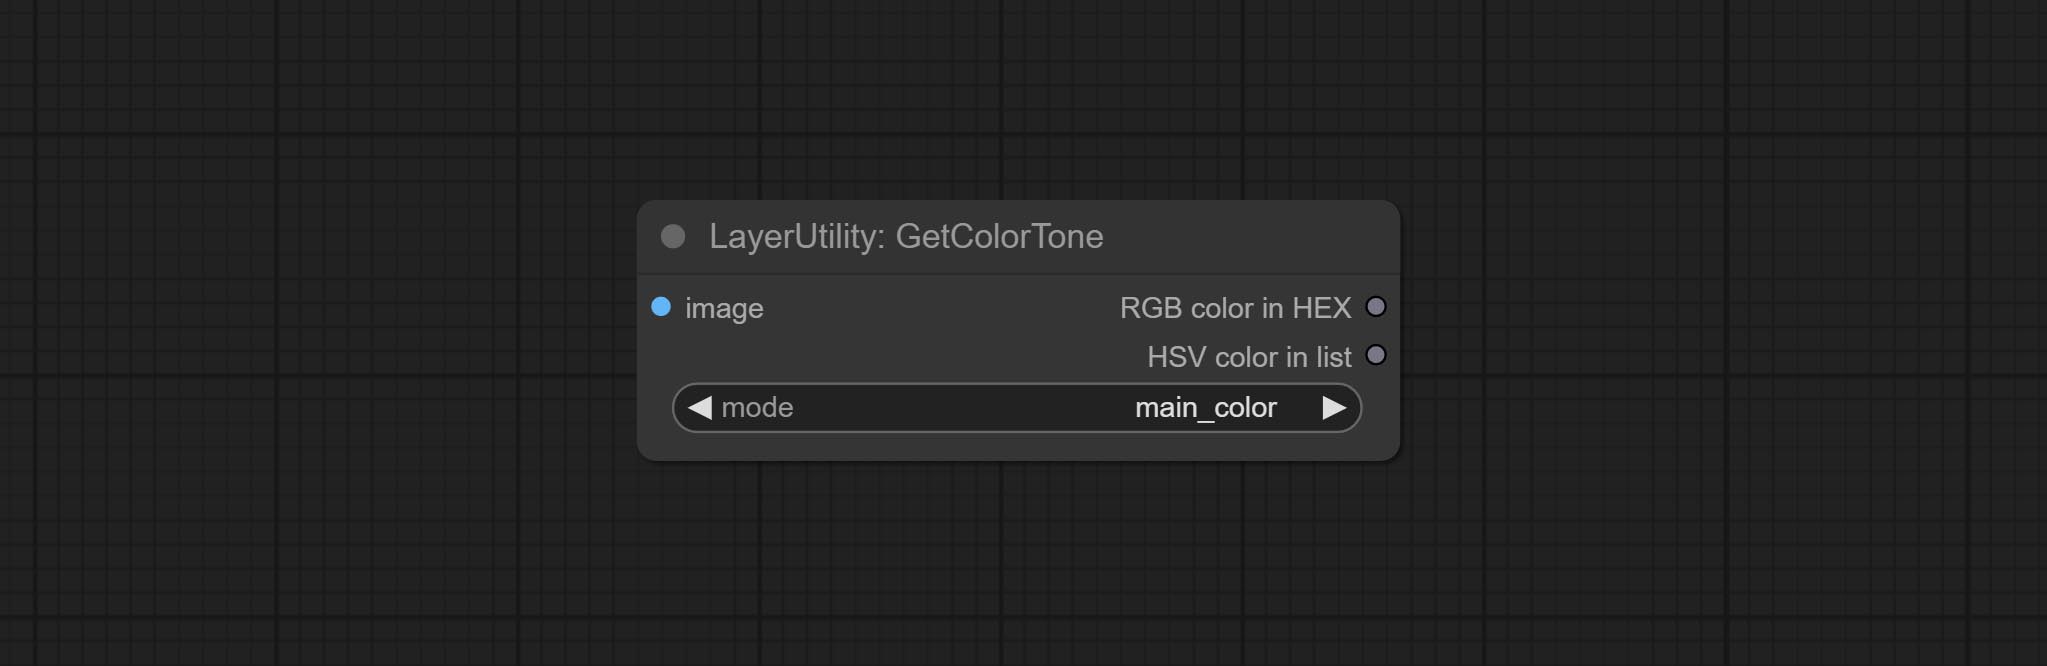
- mode: There are two modes to choose from, with the main color and average color.
Output type:
- RGB color in HEX: The RGB color described by hexadecimal RGB format, like '#FA3D86'.
- HSV color in list: The HSV color described by python's list data format.
GetColorToneV2
V2 upgrade of GetColorTone. You can specify the dominant or average color to get the body or background. 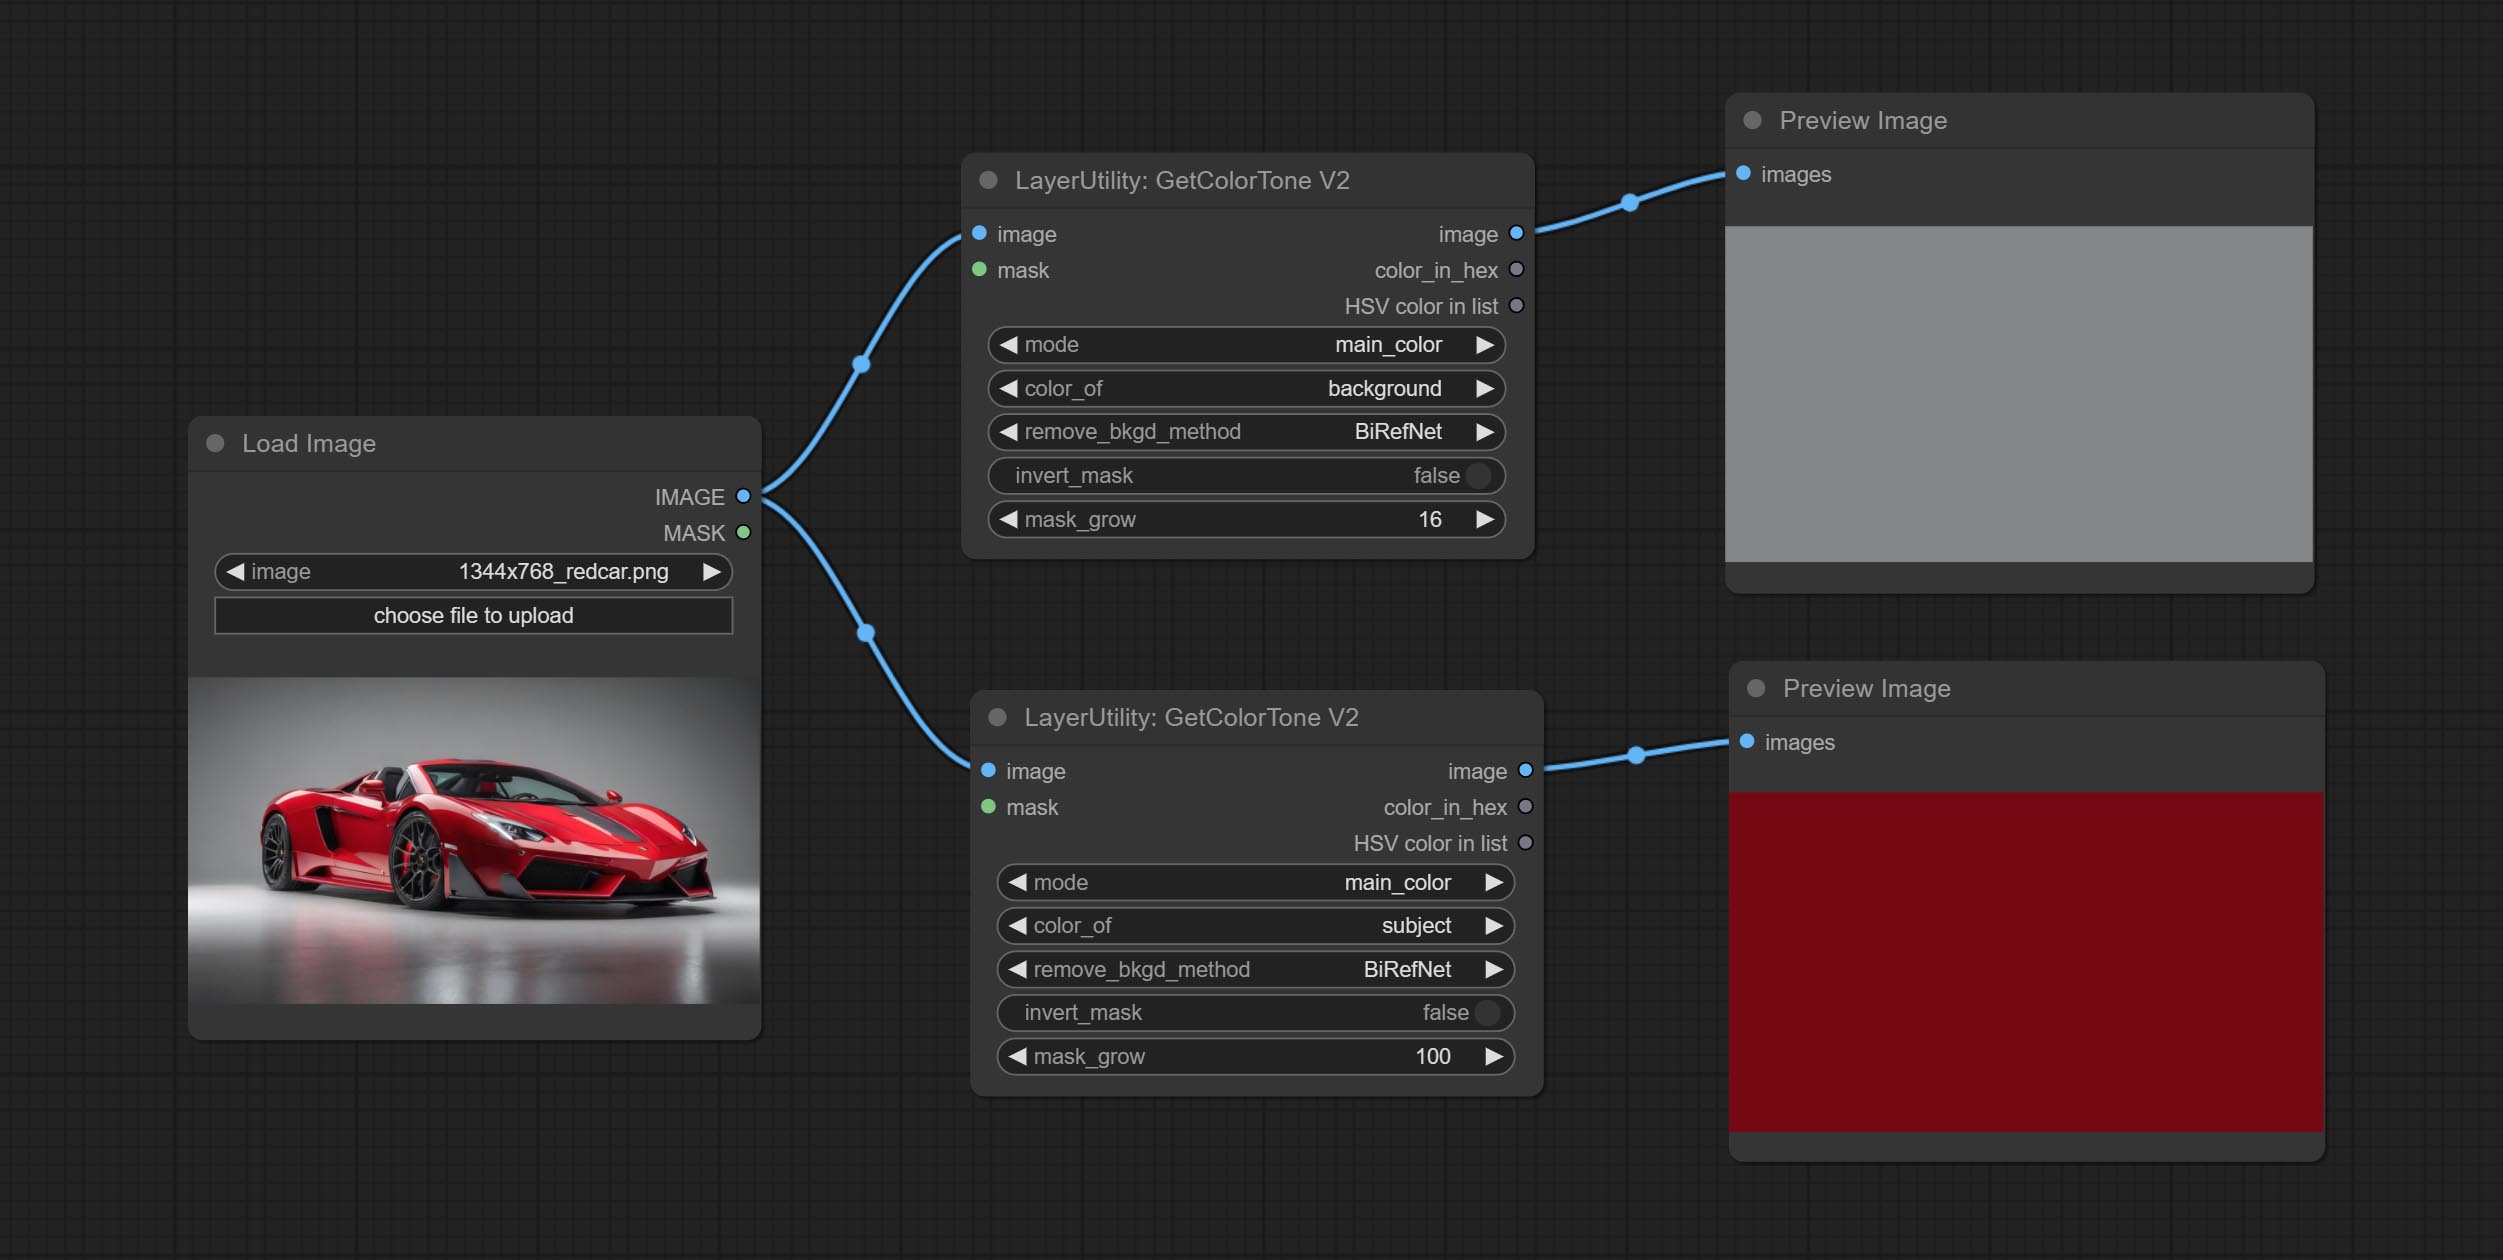
The following changes have been made on the basis of GetColorTong: 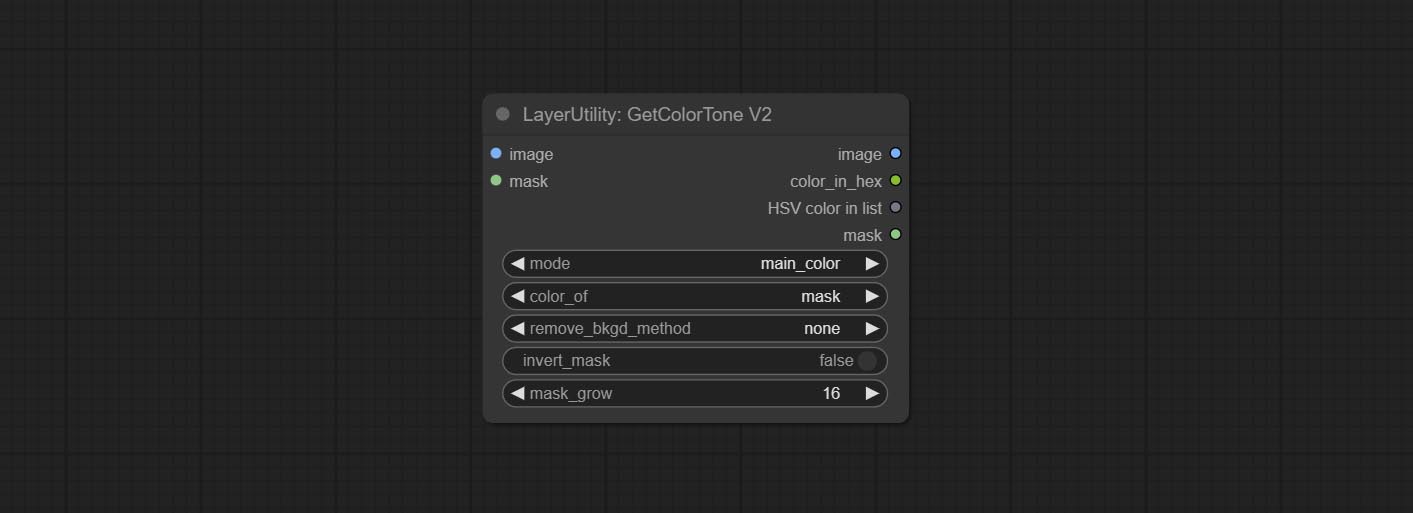
- color_of: Provides 4 options, mask, entire, background, and subject, to select the color of the mask area, entire picture, background, or subject, respectively.
- remove_background_method: There are two methods of background recognition: BiRefNet and RMBG V1.4.
- invert_mask: Whether to reverse the mask.
- mask_grow: Mask expansion. For subject, a larger value brings the obtained color closer to the color at the center of the body.
输出:
- image: Solid color picture output, the size is the same as the input picture.
- mask: Mask output.
GetMainColors
Obtain the main color of the image. You can obtain 5 colors. 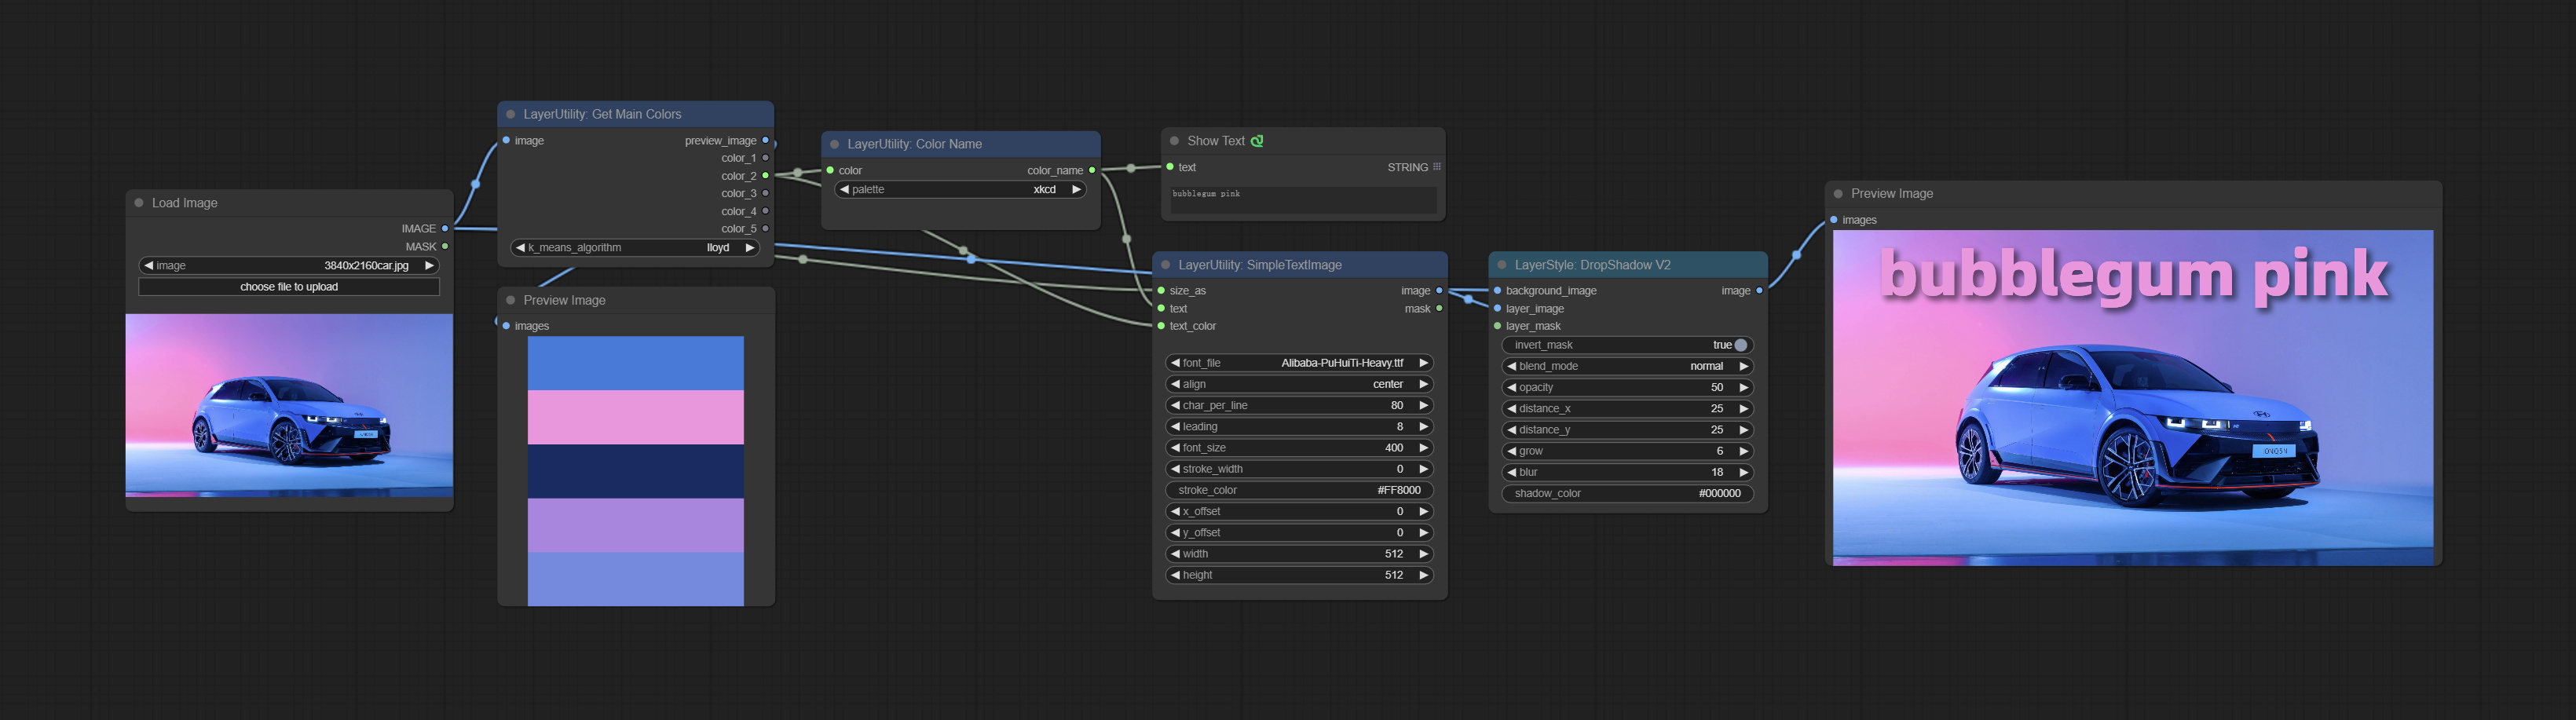
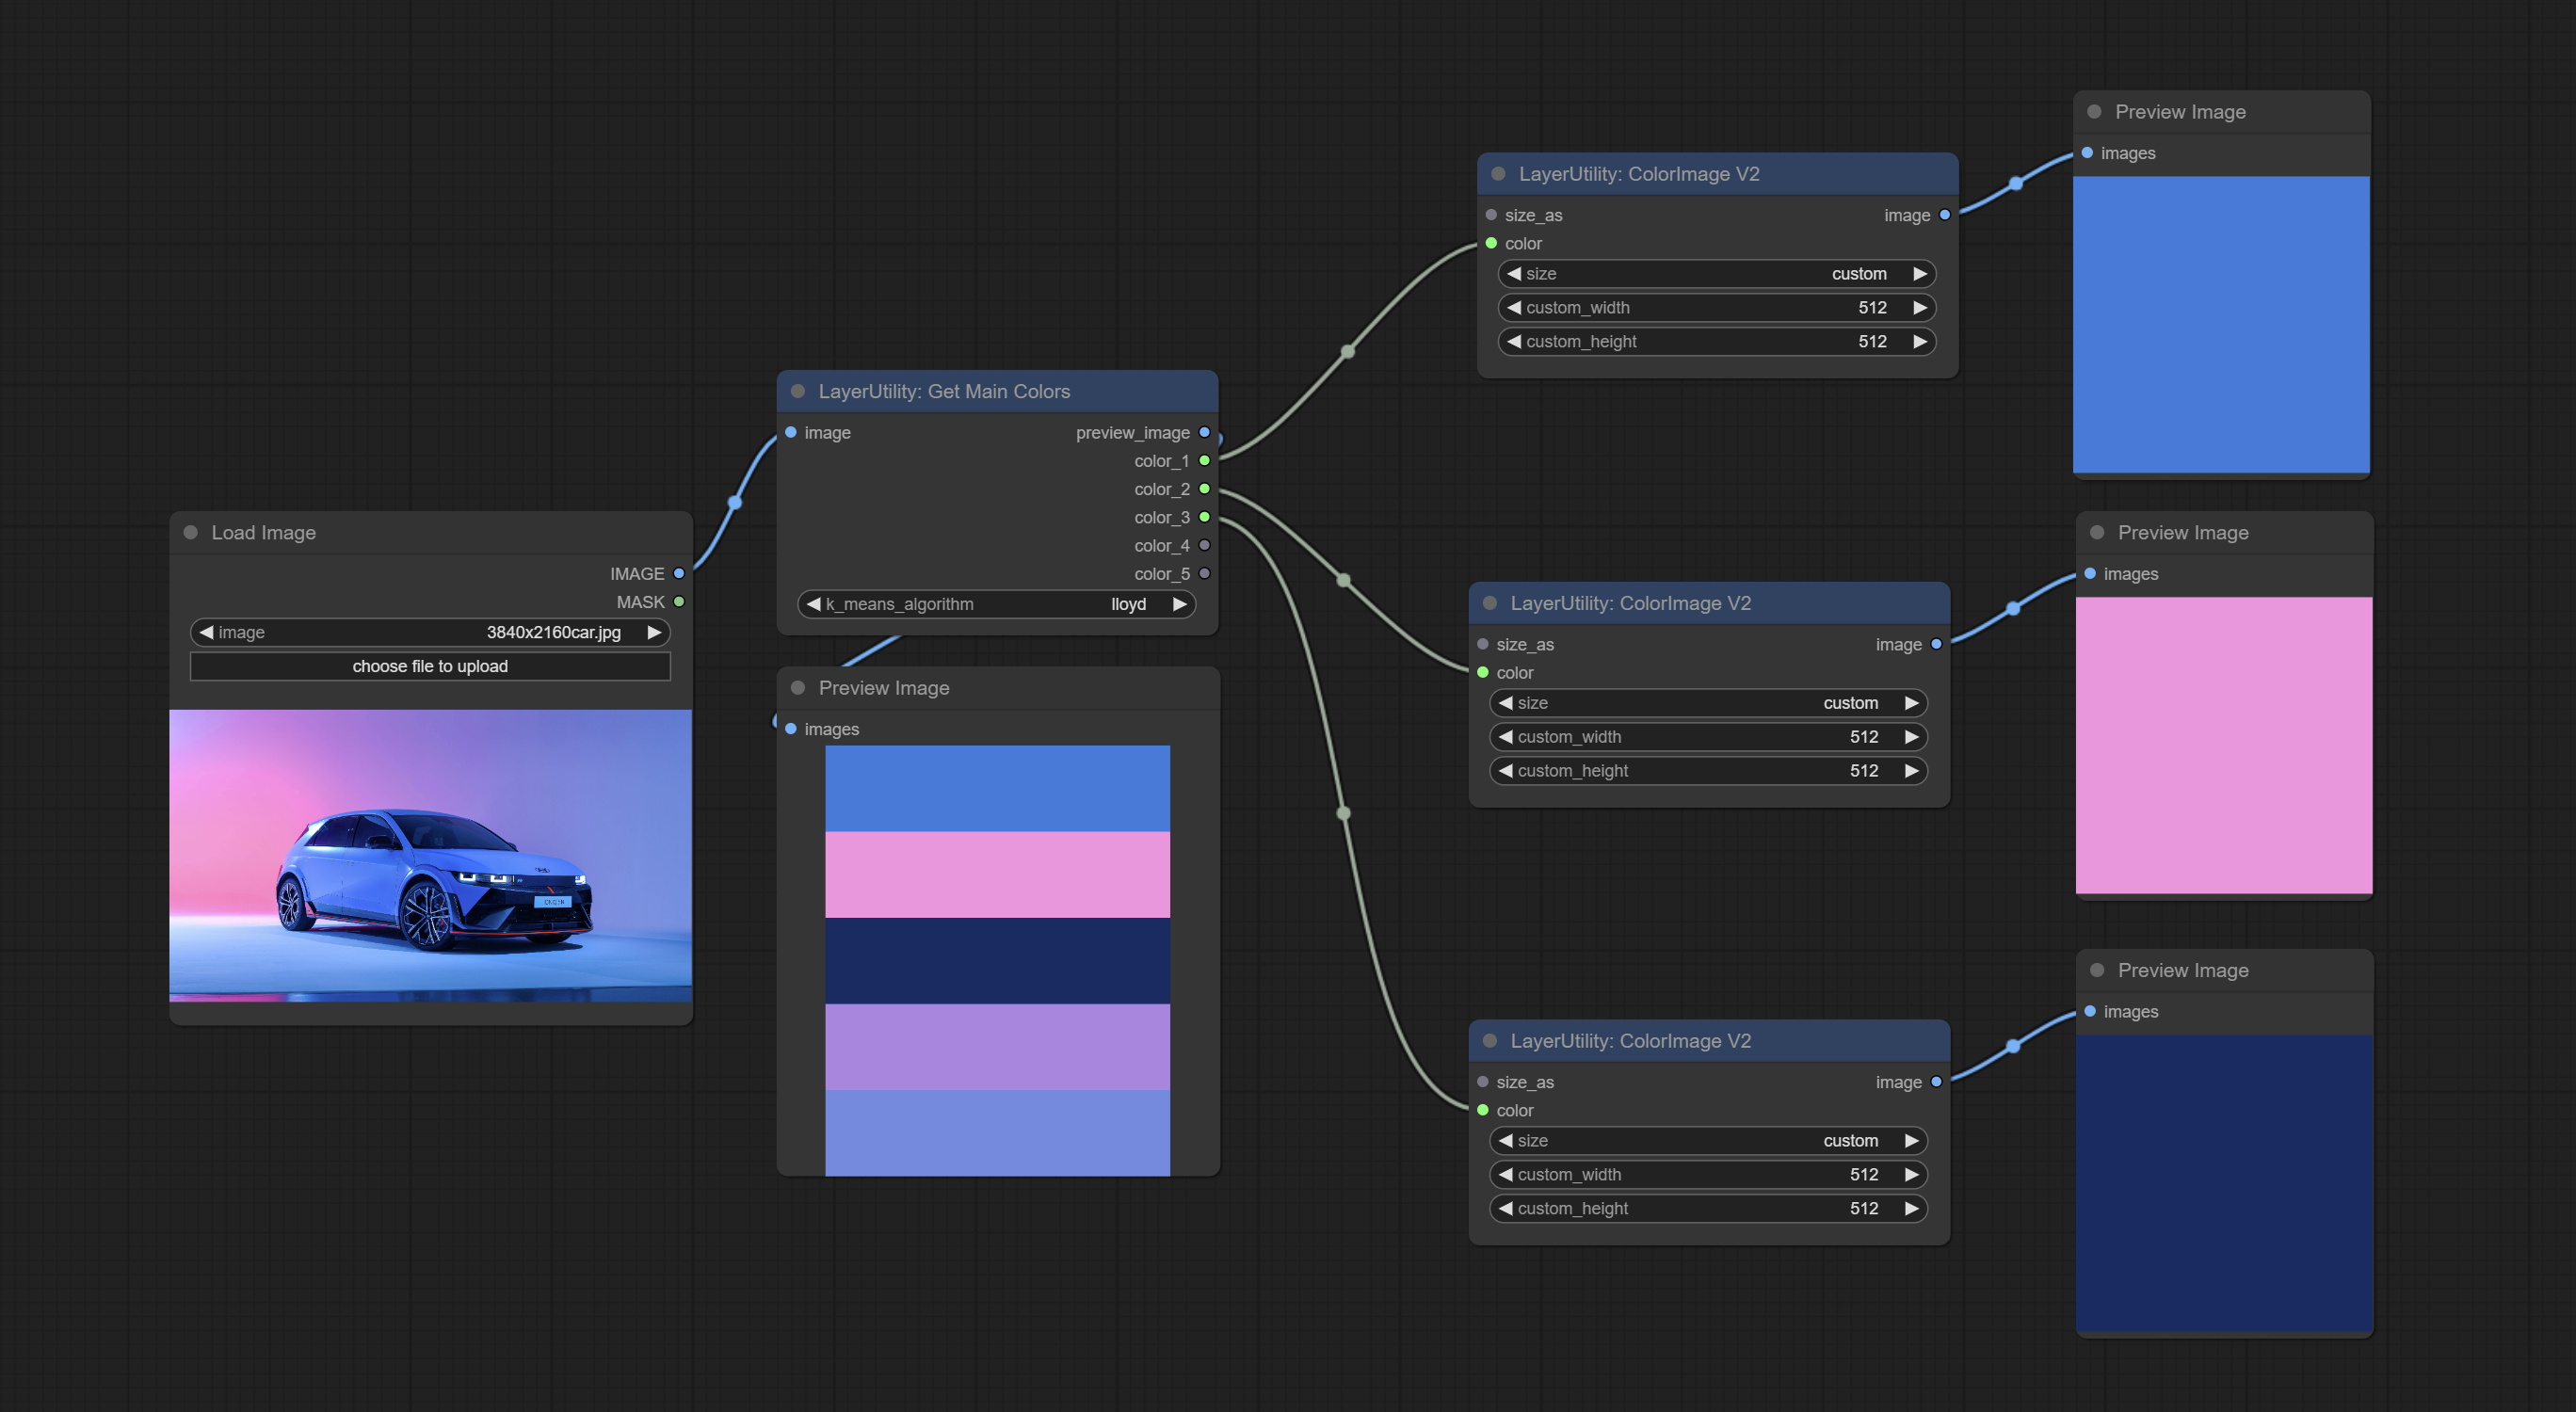
节点选项: 
- image: The image input.
- k_means_algorithm:K-Means algorithm options. "lloyd" is the standard K-Means algorithm, while "elkan" is the triangle inequality algorithm, suitable for larger images.
输出:
- preview_image: 5 main color preview images.
- color_1~color_5: Color value output. Output an RGB string in HEX format.
ColorName
Output the most similar color name in the color palette based on the color value. 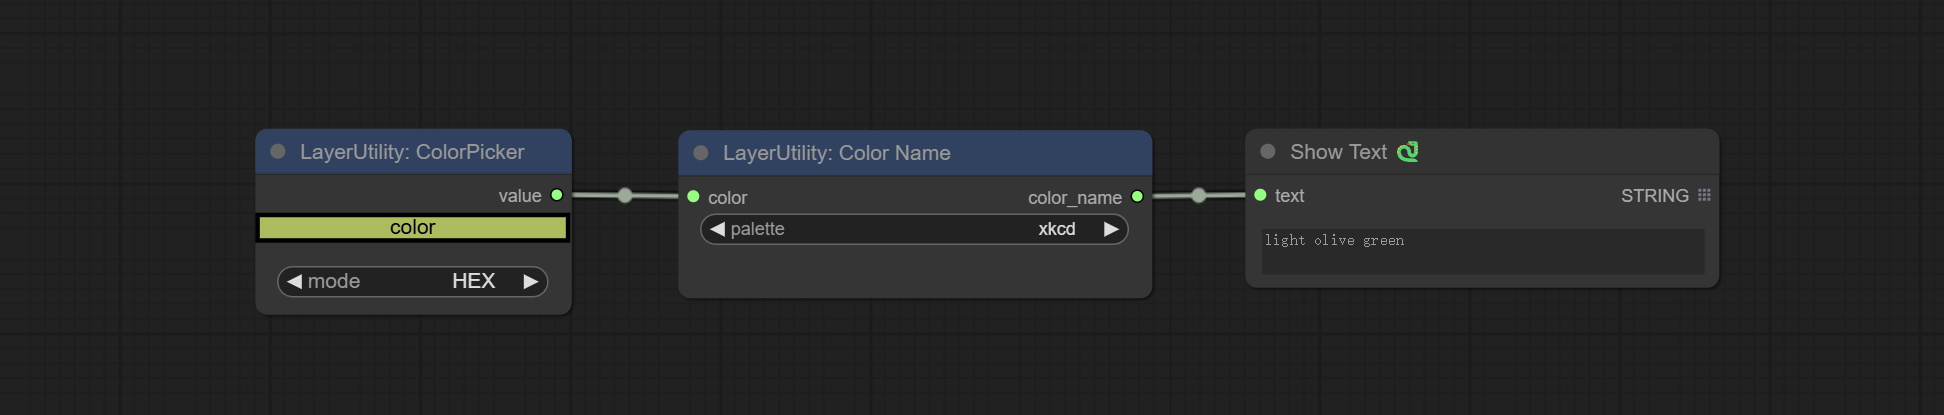
节点选项: 
- color: Color value input, in HEX format RGB string format.
- palette: Color palette.
xkcd includes 949 colors, css3 includes 147 colors, and html4 includes 16 colors.
输出:
- color_name: Color name in string.
ExtendCanvas
Extend the canvas 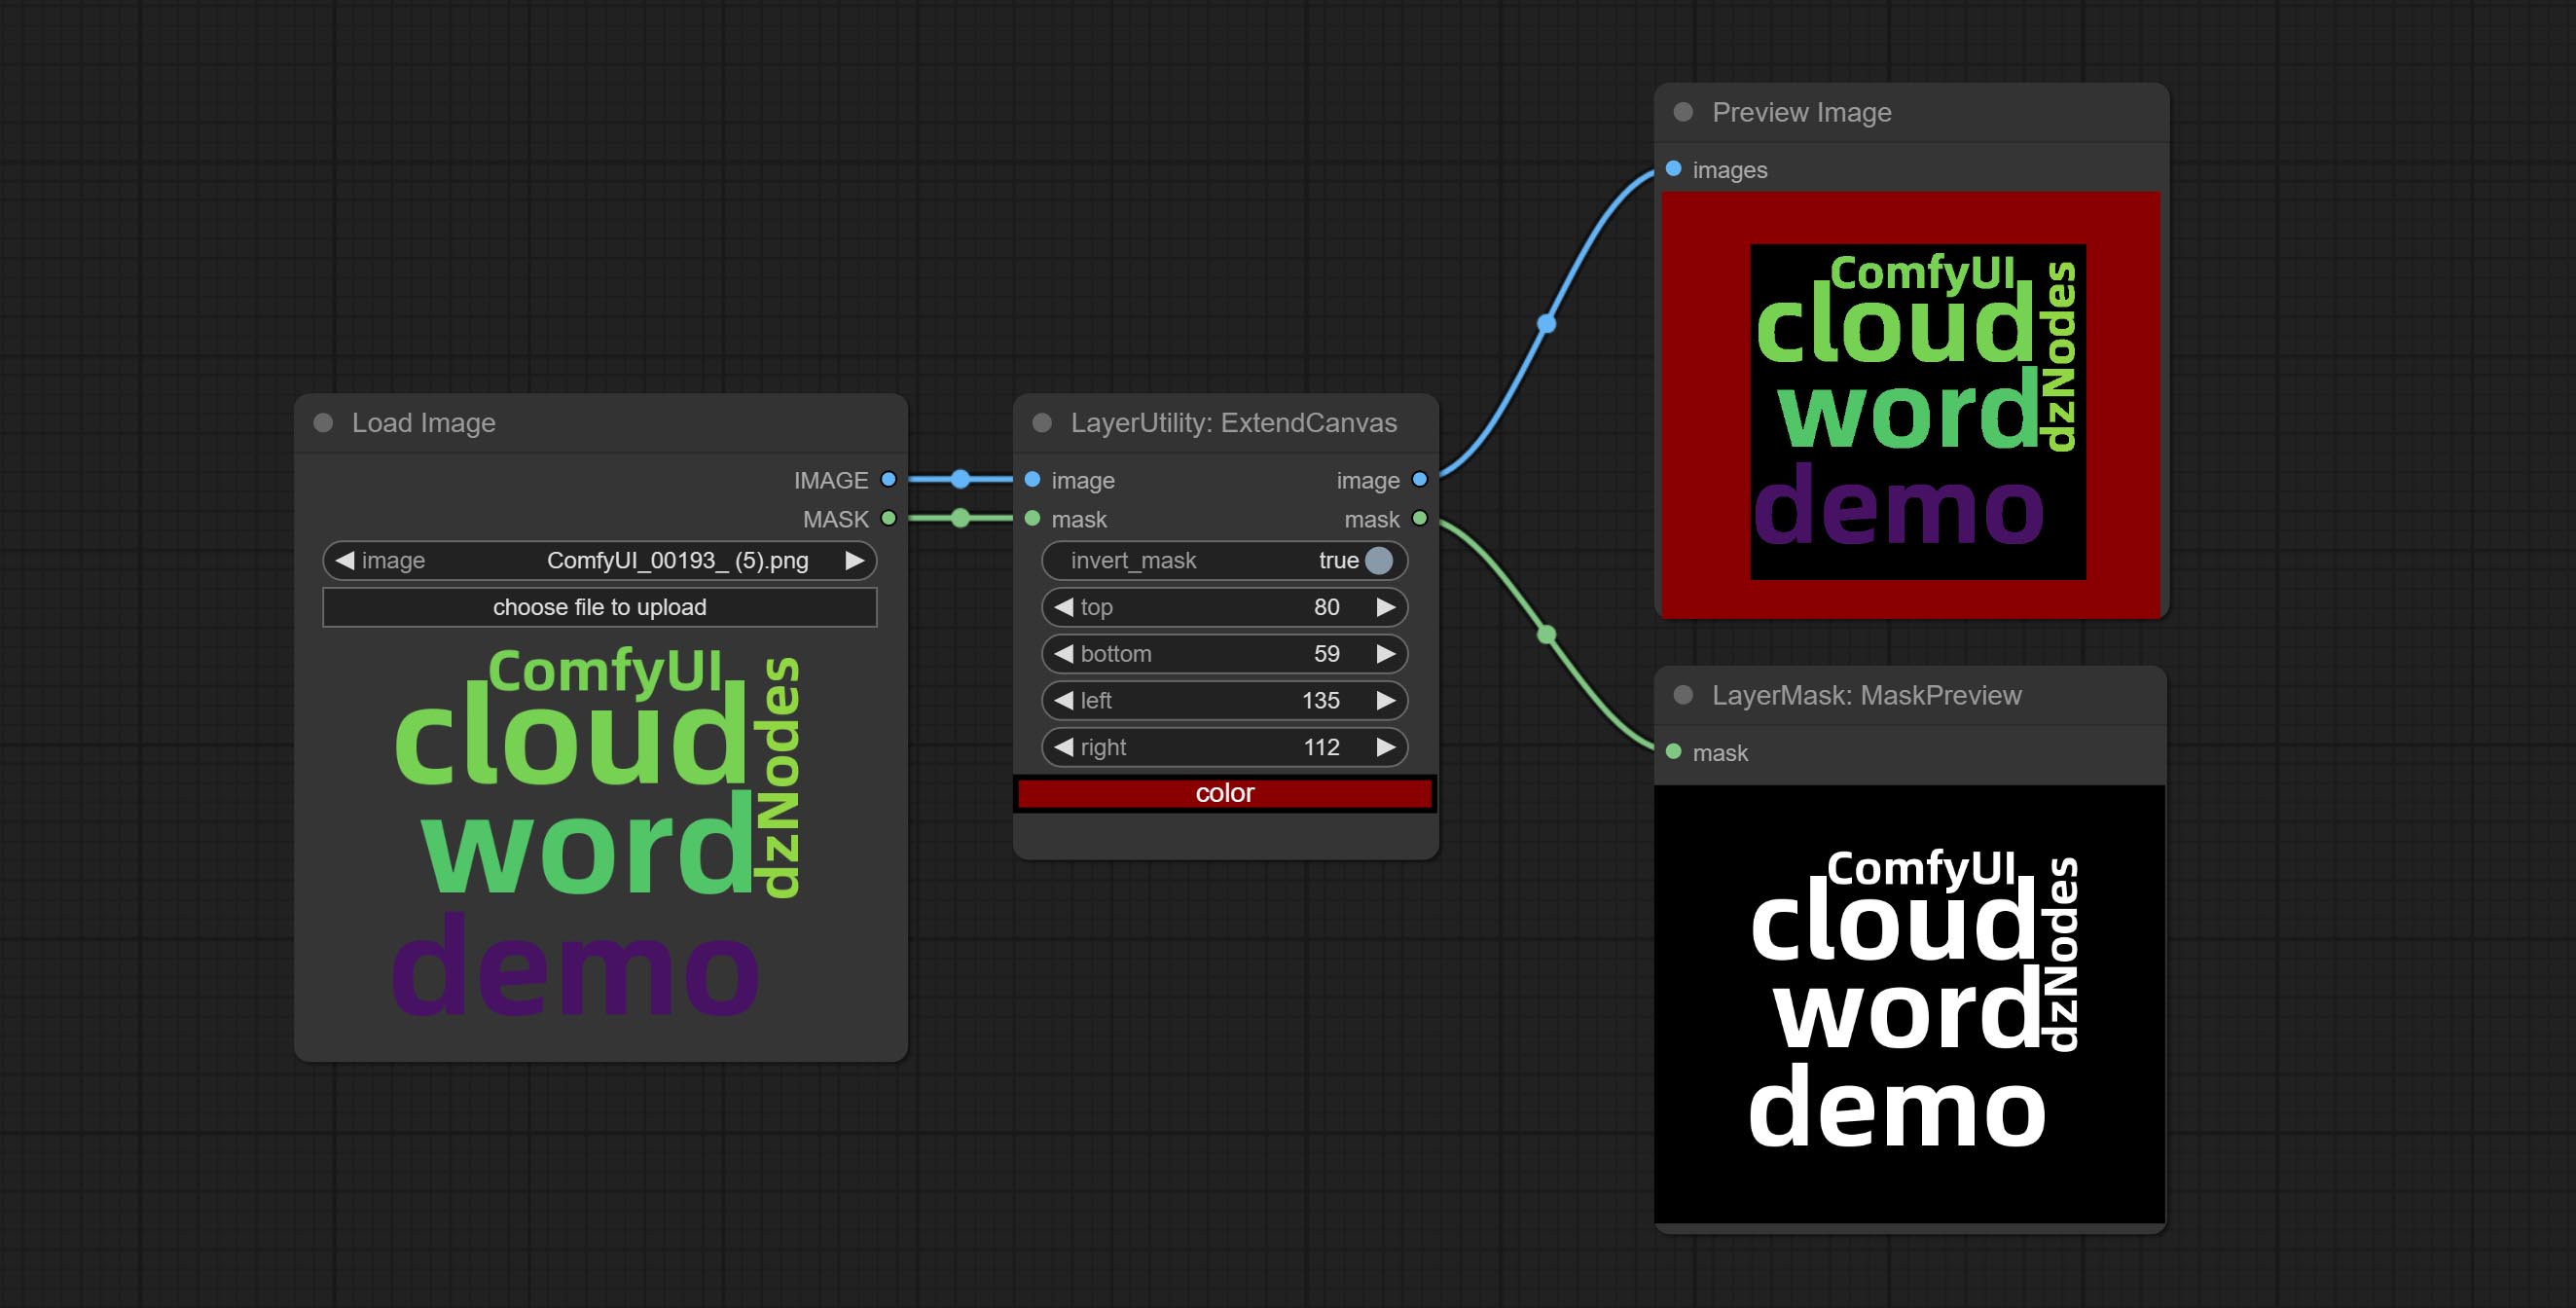
Node options: 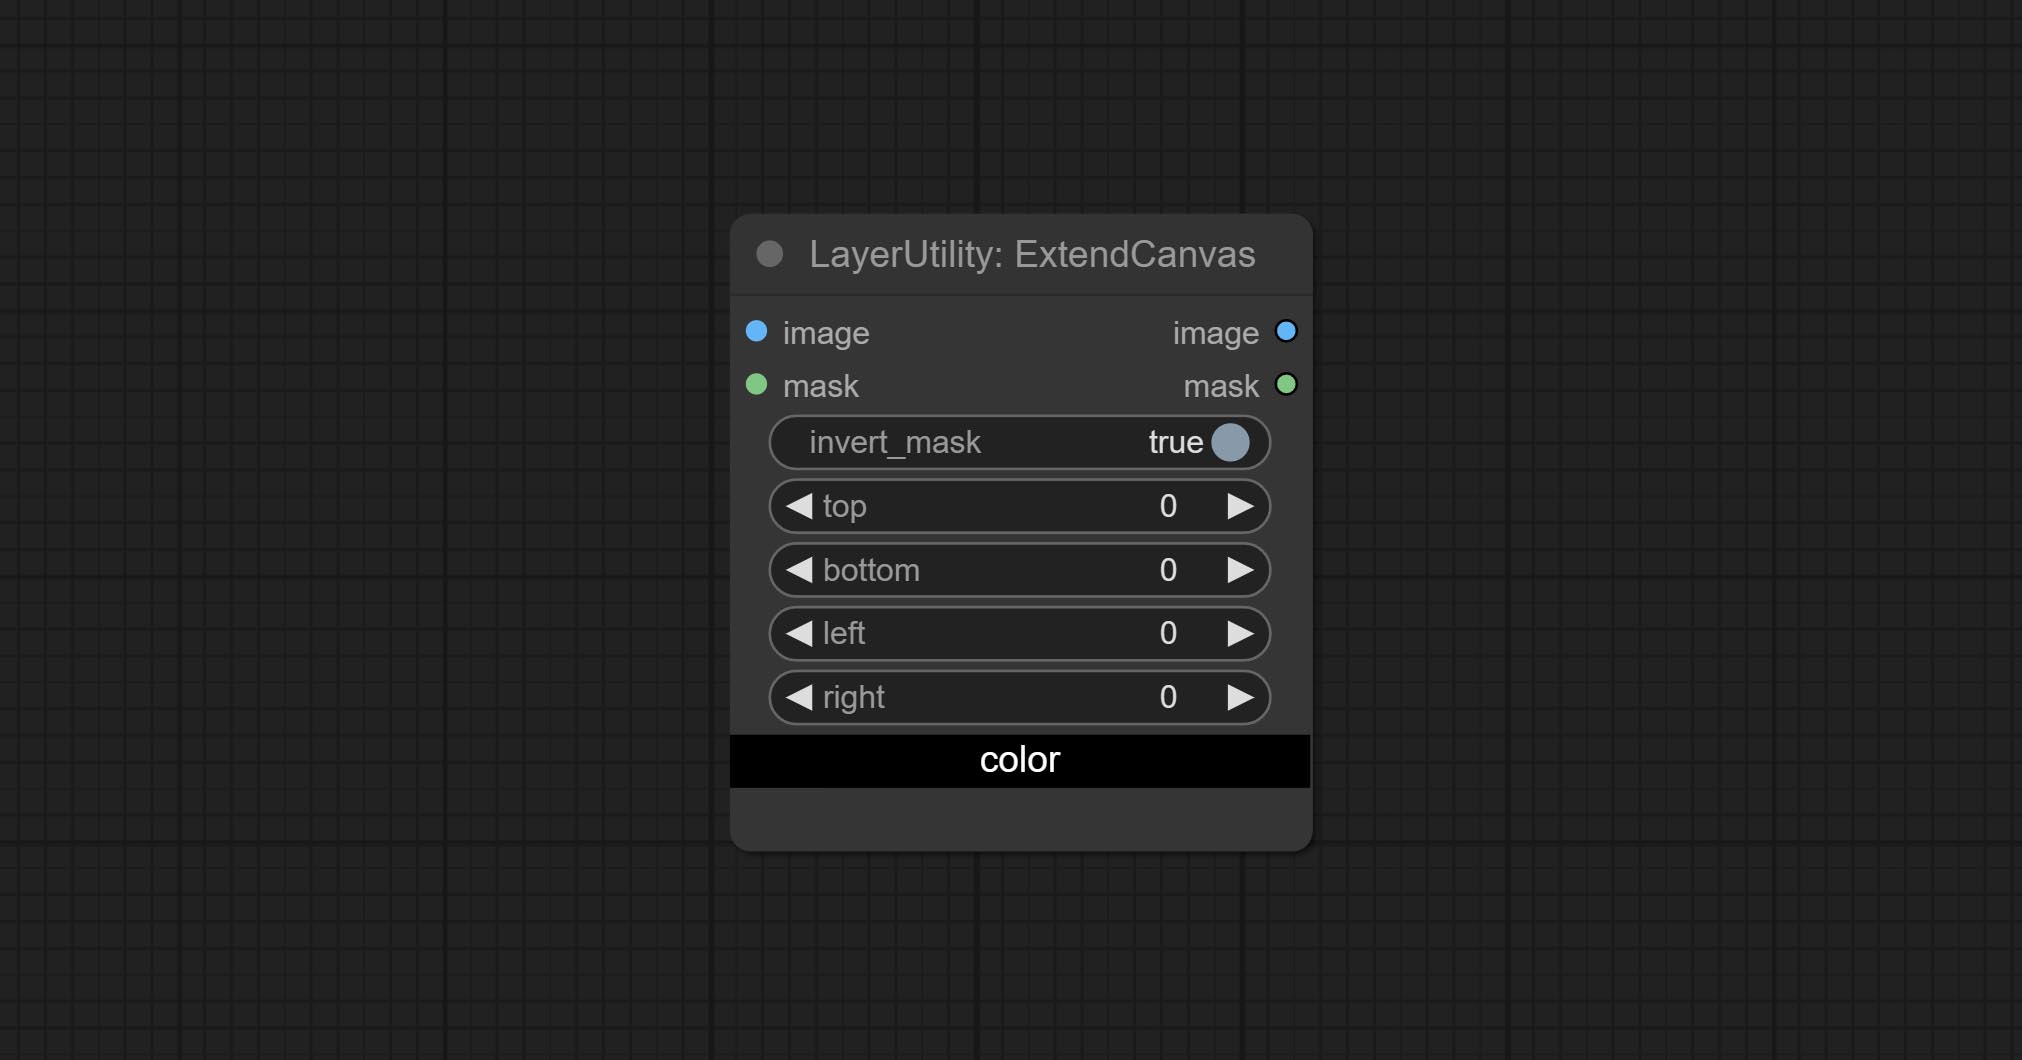
- invert_mask: Whether to reverse the mask.
- top: Top extension value.
- bottom: Bottom extension value.
- left: Left extension value.
- right: Right extension value.
- 颜色; Color of canvas.
ExtendCanvasV2
V2 upgrade to ExtendCanvas.
Based on ExtendCanvas, color is modified to be a string type, and it supports external ColorPicker input, Support negative value input, it means image will be cropped. 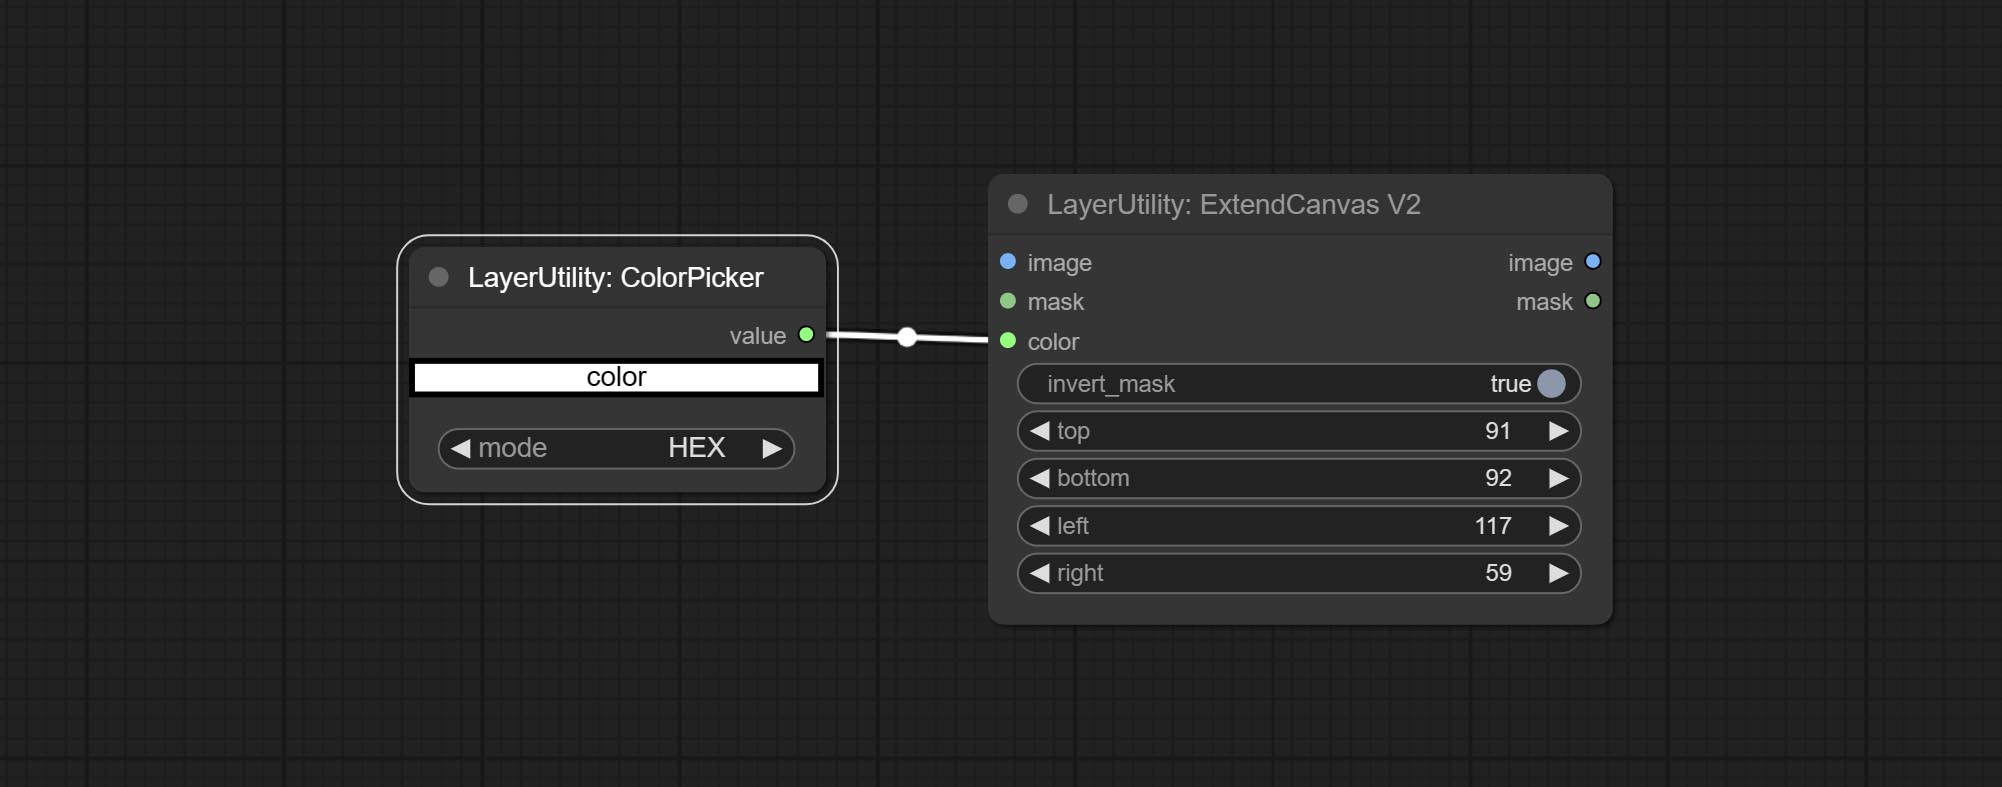
XY to Percent
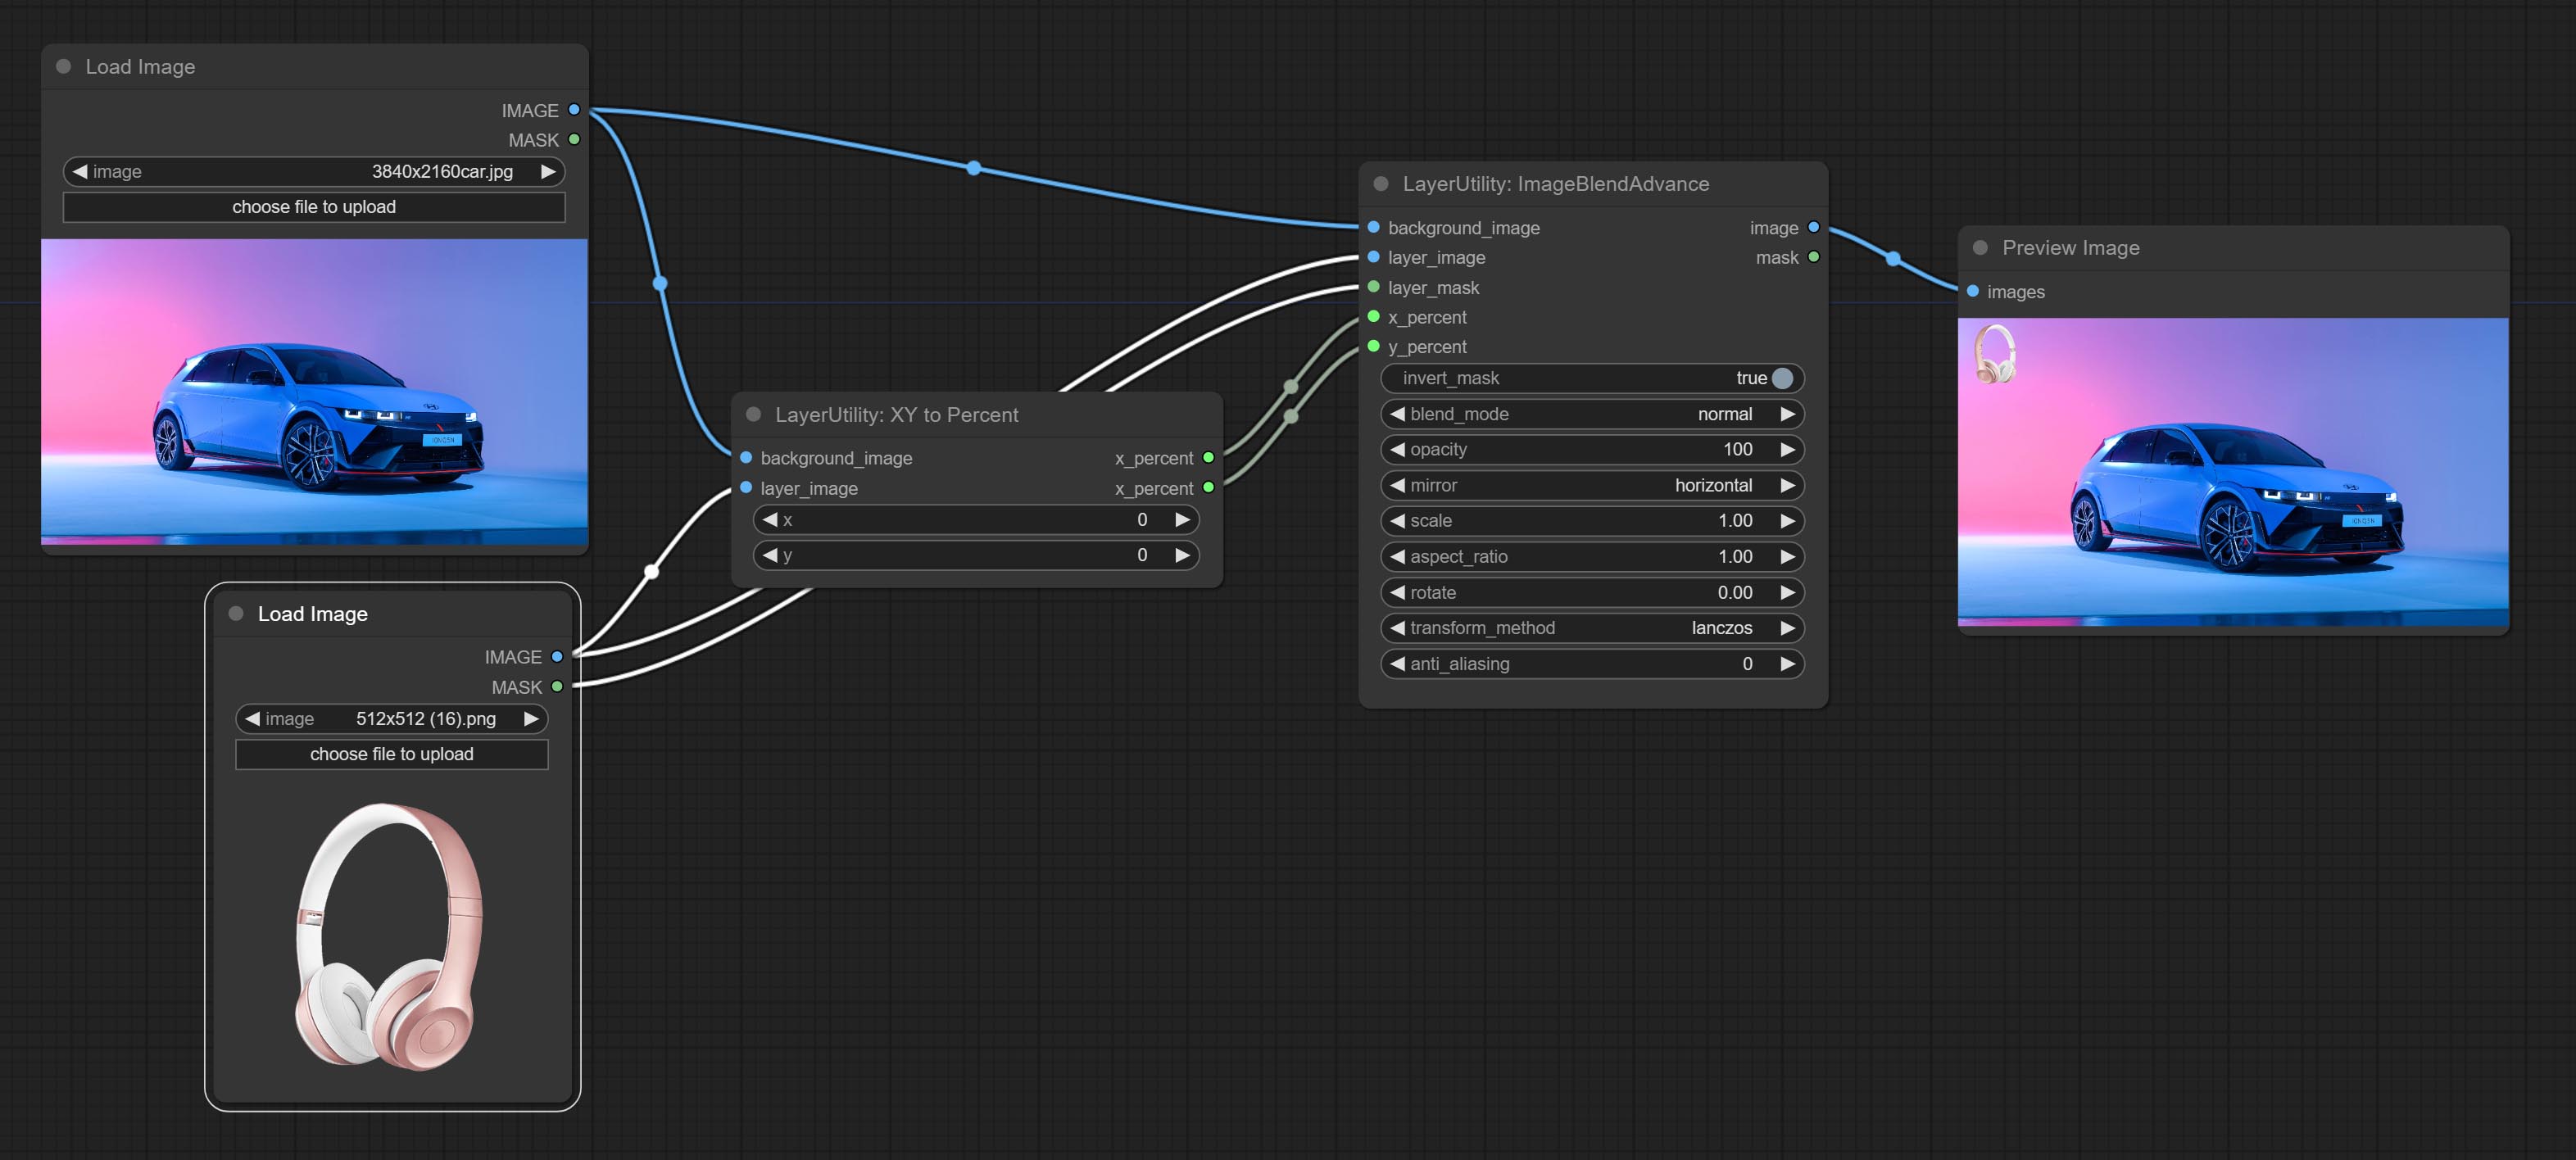
Convert absolute coordinates to percentage coordinates.
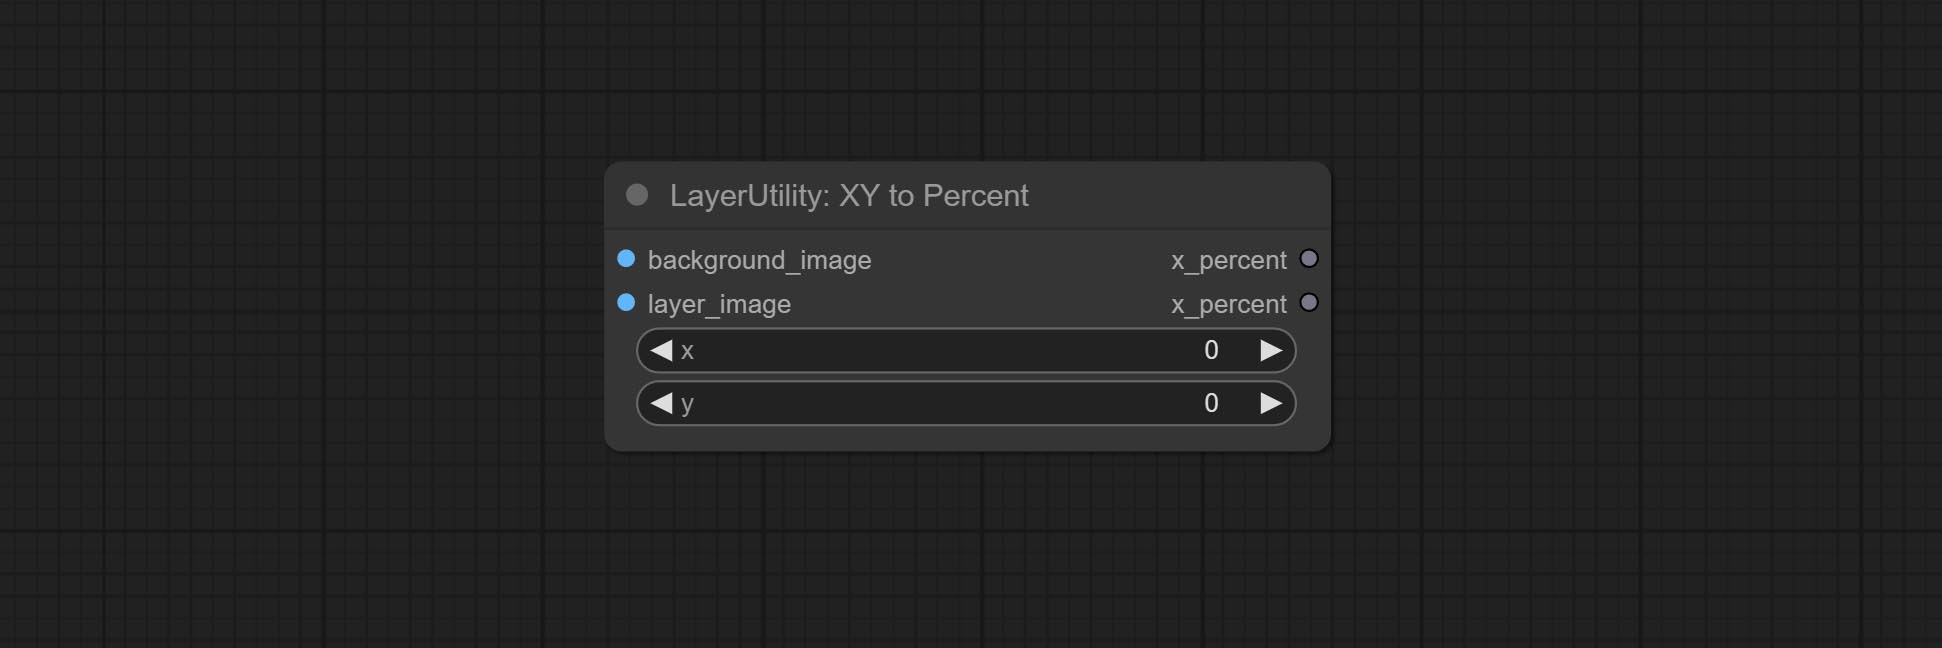
Node options:
- x: Value of X.
- y: Value of Y.
LayerImageTransform
This node is used to transform layer_image separately, which can change size, rotation, aspect ratio, and mirror flip without changing the image size.
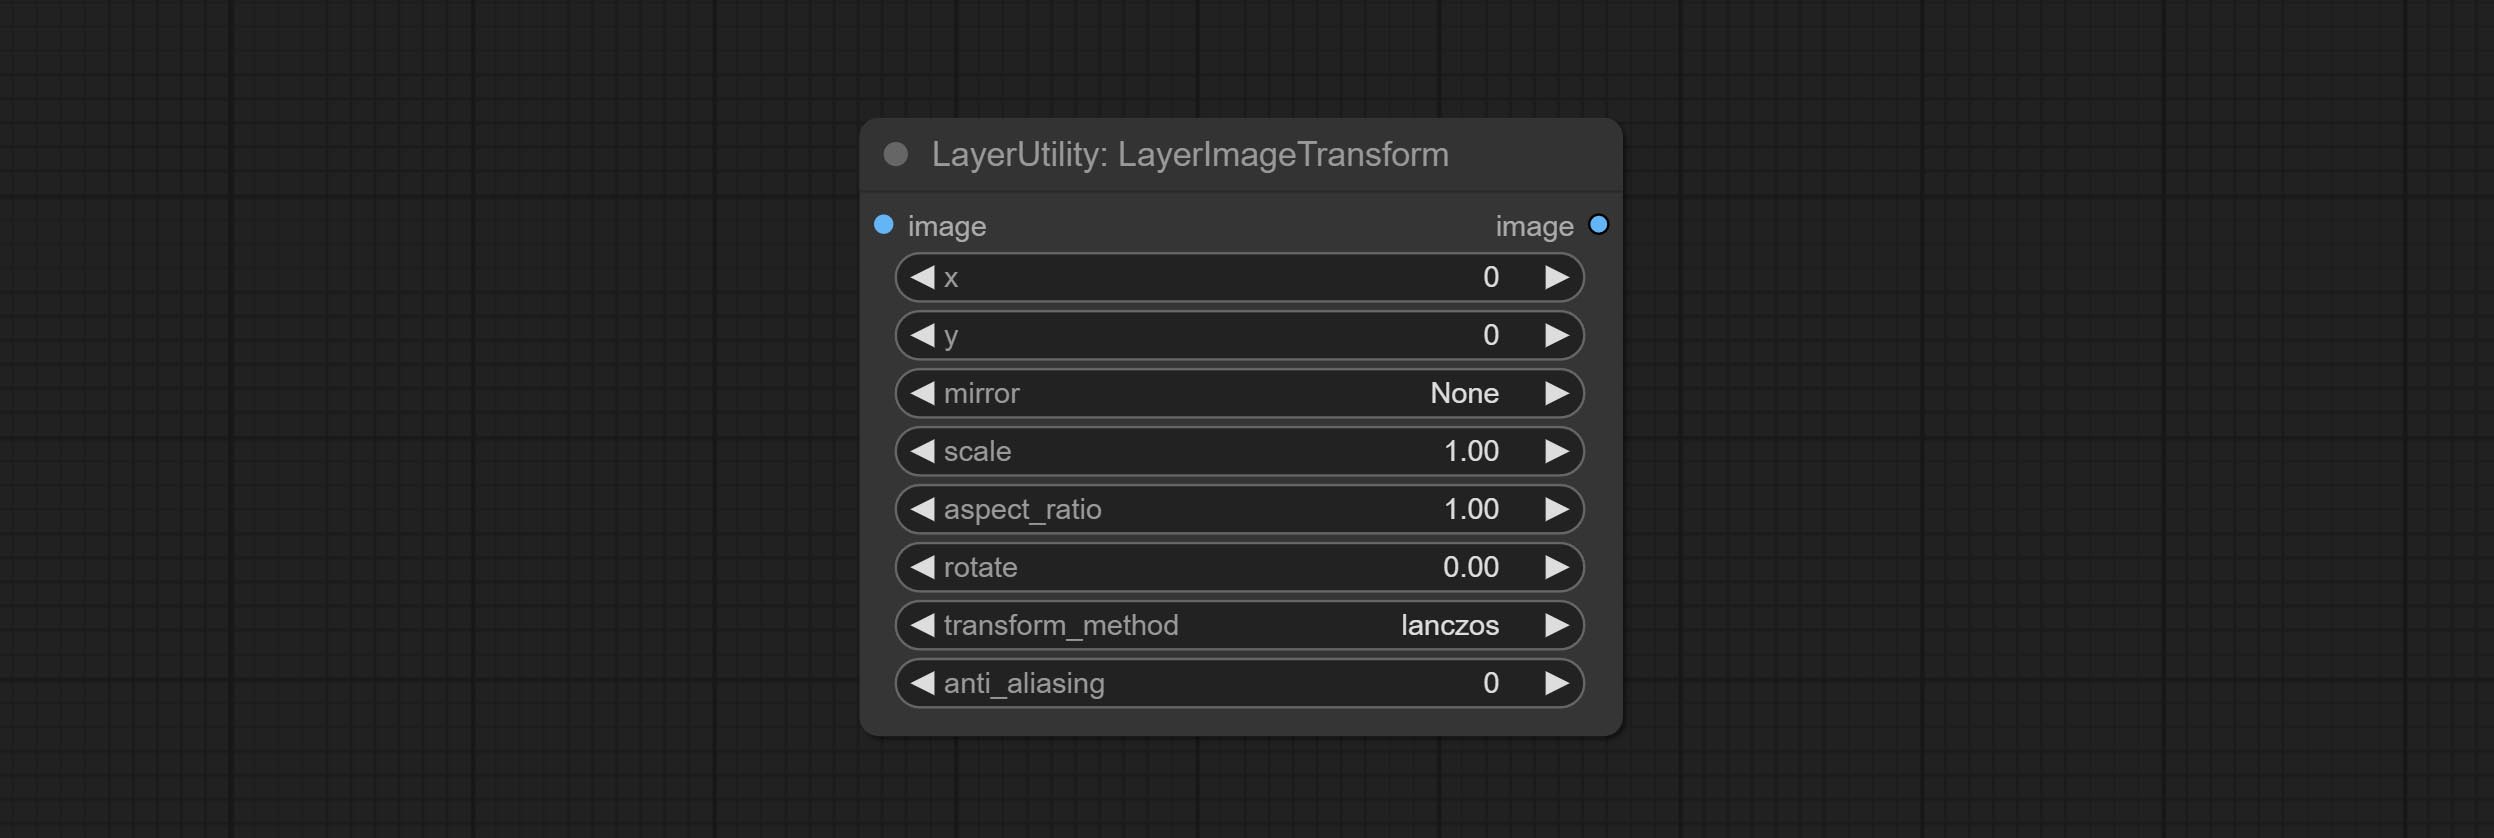
Node options:
- x: Value of X.
- y: Value of Y.
- mirror: Mirror flipping. Provide two flipping modes, horizontal flipping and vertical flipping.
- scale: Layer magnification, 1.0 represents the original size.
- aspect_ratio: Layer aspect ratio. 1.0 is the original ratio, a value greater than this indicates elongation, and a value less than this indicates flattening.
- rotate: Layer rotation degree.
- Sampling methods for layer enlargement and rotation, including lanczos, bicubic, hamming, bilinear, box and nearest. Different sampling methods can affect the image quality and processing time of the synthesized image.
- anti_aliasing: Anti aliasing, ranging from 0 to 16, the larger the value, the less obvious the aliasing. An excessively high value will significantly reduce the processing speed of the node.
LayerMaskTransform
Similar to LayerImageTransform node, this node is used to transform the layer_mask separately, which can scale, rotate, change aspect ratio, and mirror flip without changing the mask size.

Node options:
- x: Value of X.
- y: Value of Y.
- mirror: Mirror flipping. Provide two flipping modes, horizontal flipping and vertical flipping.
- scale: Layer magnification, 1.0 represents the original size.
- aspect_ratio: Layer aspect ratio. 1.0 is the original ratio, a value greater than this indicates elongation, and a value less than this indicates flattening.
- rotate: Layer rotation degree.
- Sampling methods for layer enlargement and rotation, including lanczos, bicubic, hamming, bilinear, box and nearest. Different sampling methods can affect the image quality and processing time of the synthesized image.
- anti_aliasing: Anti aliasing, ranging from 0 to 16, the larger the value, the less obvious the aliasing. An excessively high value will significantly reduce the processing speed of the node.
ColorImage
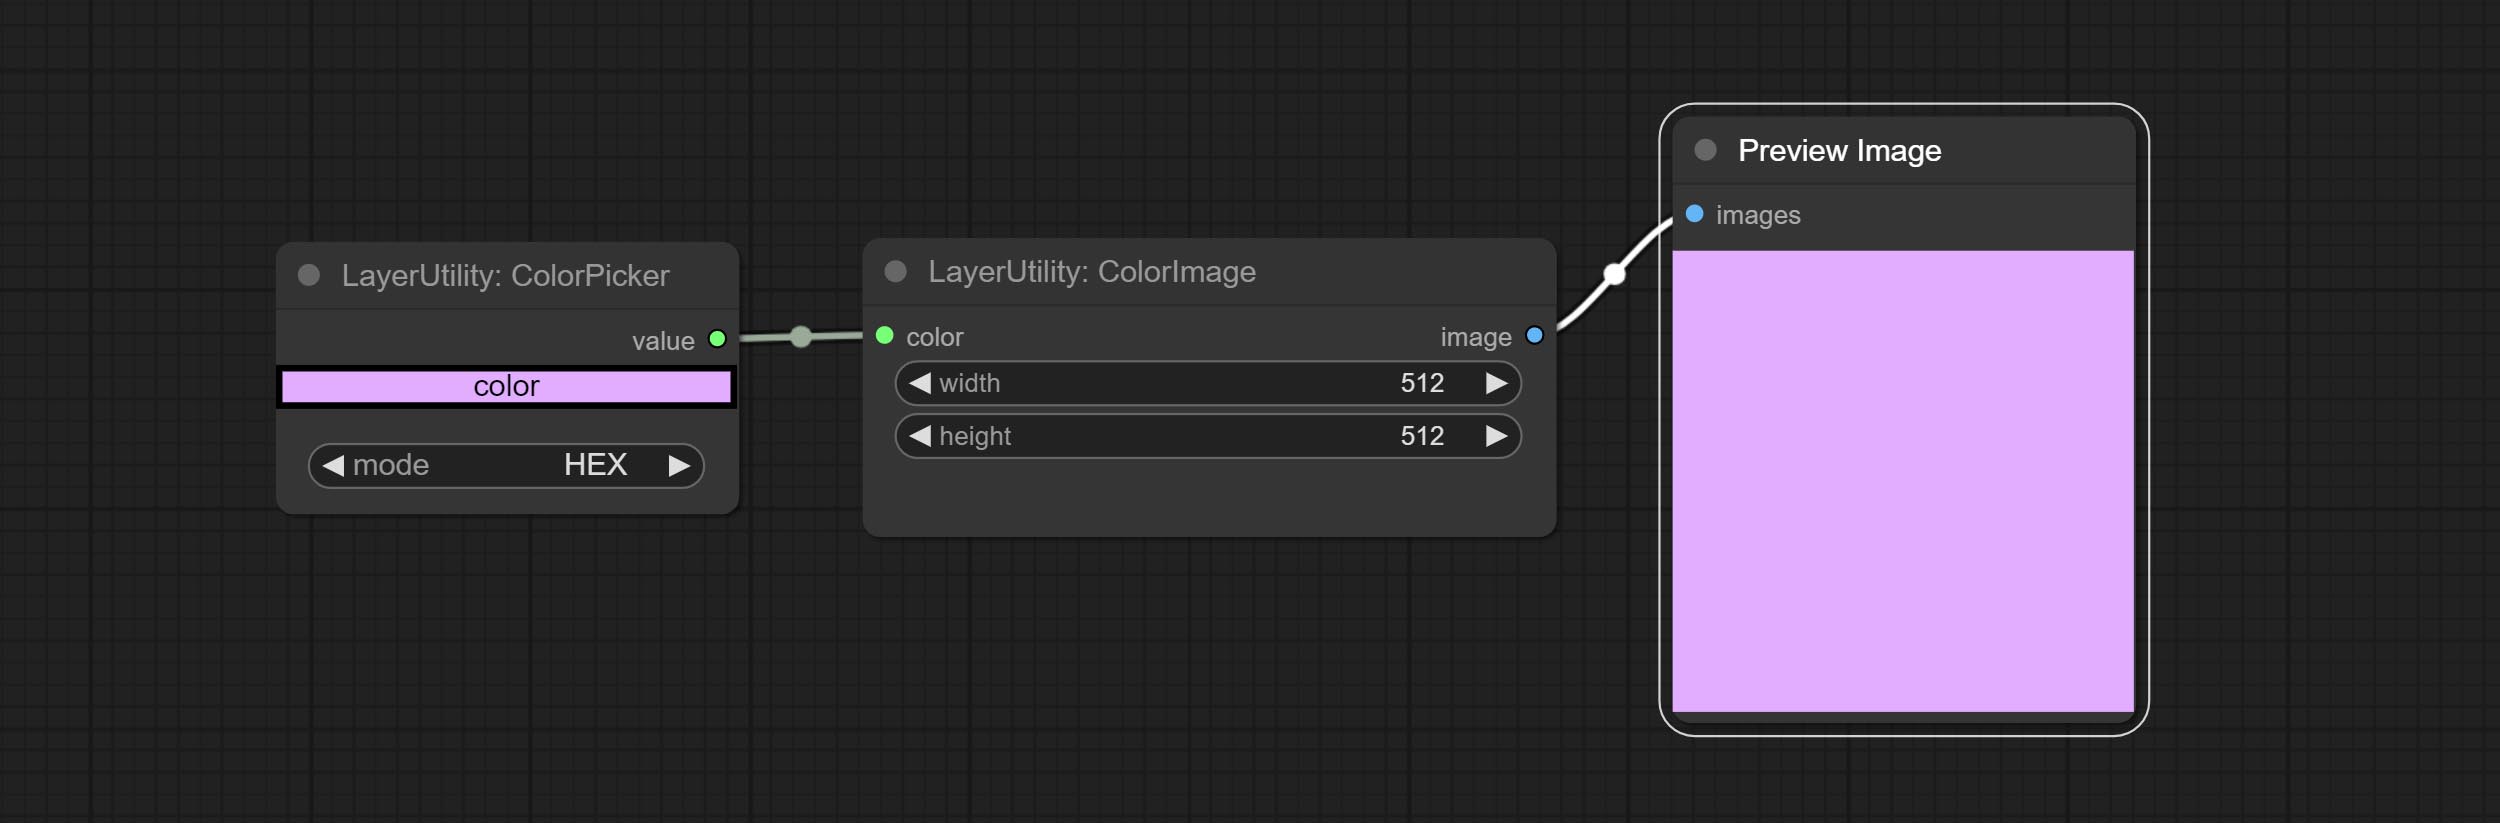
Generate an image of a specified color and size.

Node options:
- width: Width of the image.
- height: Height of the image.
- color 4 : Color of the image.
ColorImageV2
The V2 upgraded version of ColorImage.
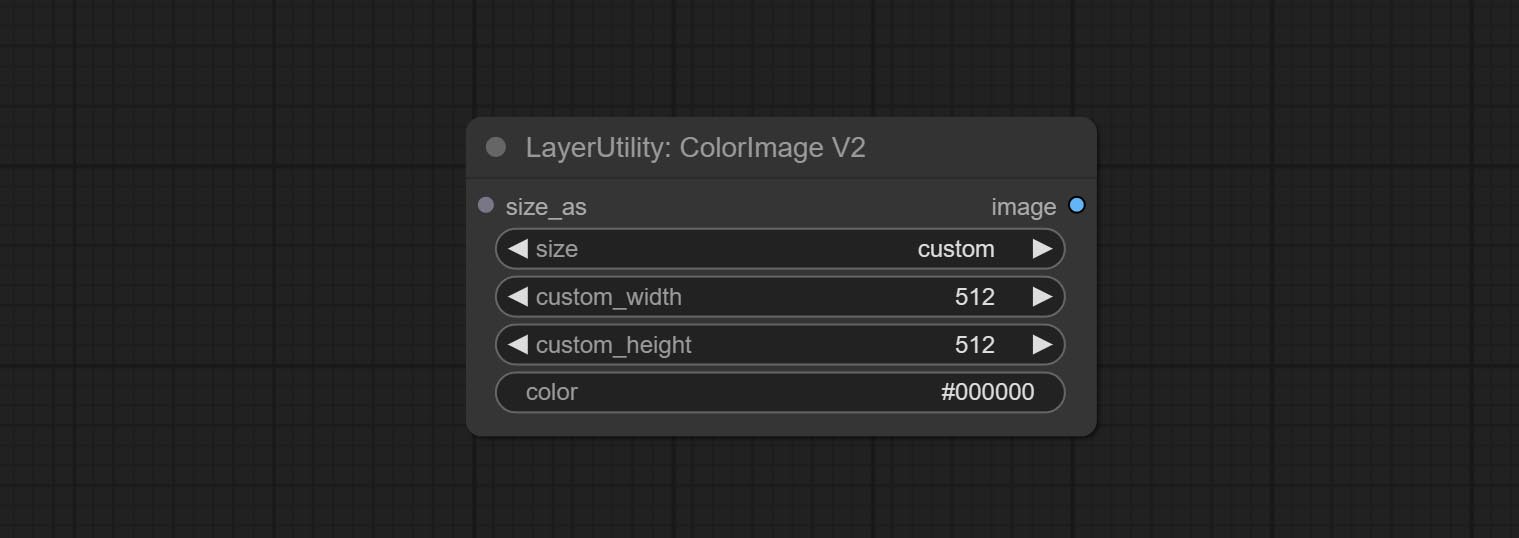
The following changes have been made based on ColorImage:
- size_as * : Input image or mask here to generate image according to its size. Note that this input takes priority over other size settings.
- size ** : Size preset. the preset can be customized by the user. if have size_as input, this option will be ignored.
- custom_width: Image width. it valid when size is set to "custom". if have size_as input, this option will be ignored.
- custom_height: Image height. it valid when size is set to "custom". if have size_as input, this option will be ignored.
* Only limited to input images and masks. forcing the integration of other types of inputs will result in node errors. ** The preset size is defined in custom_size.ini , this file is located in the root directory of the plug-in, and the default name is custom_size.ini.example . to use this file for the first time, you need to change the file suffix to .ini . Open with text editing software. Each row represents a size, with the first value being width and the second being height, separated by a lowercase "x" in the middle. To avoid errors, please do not enter extra characters.
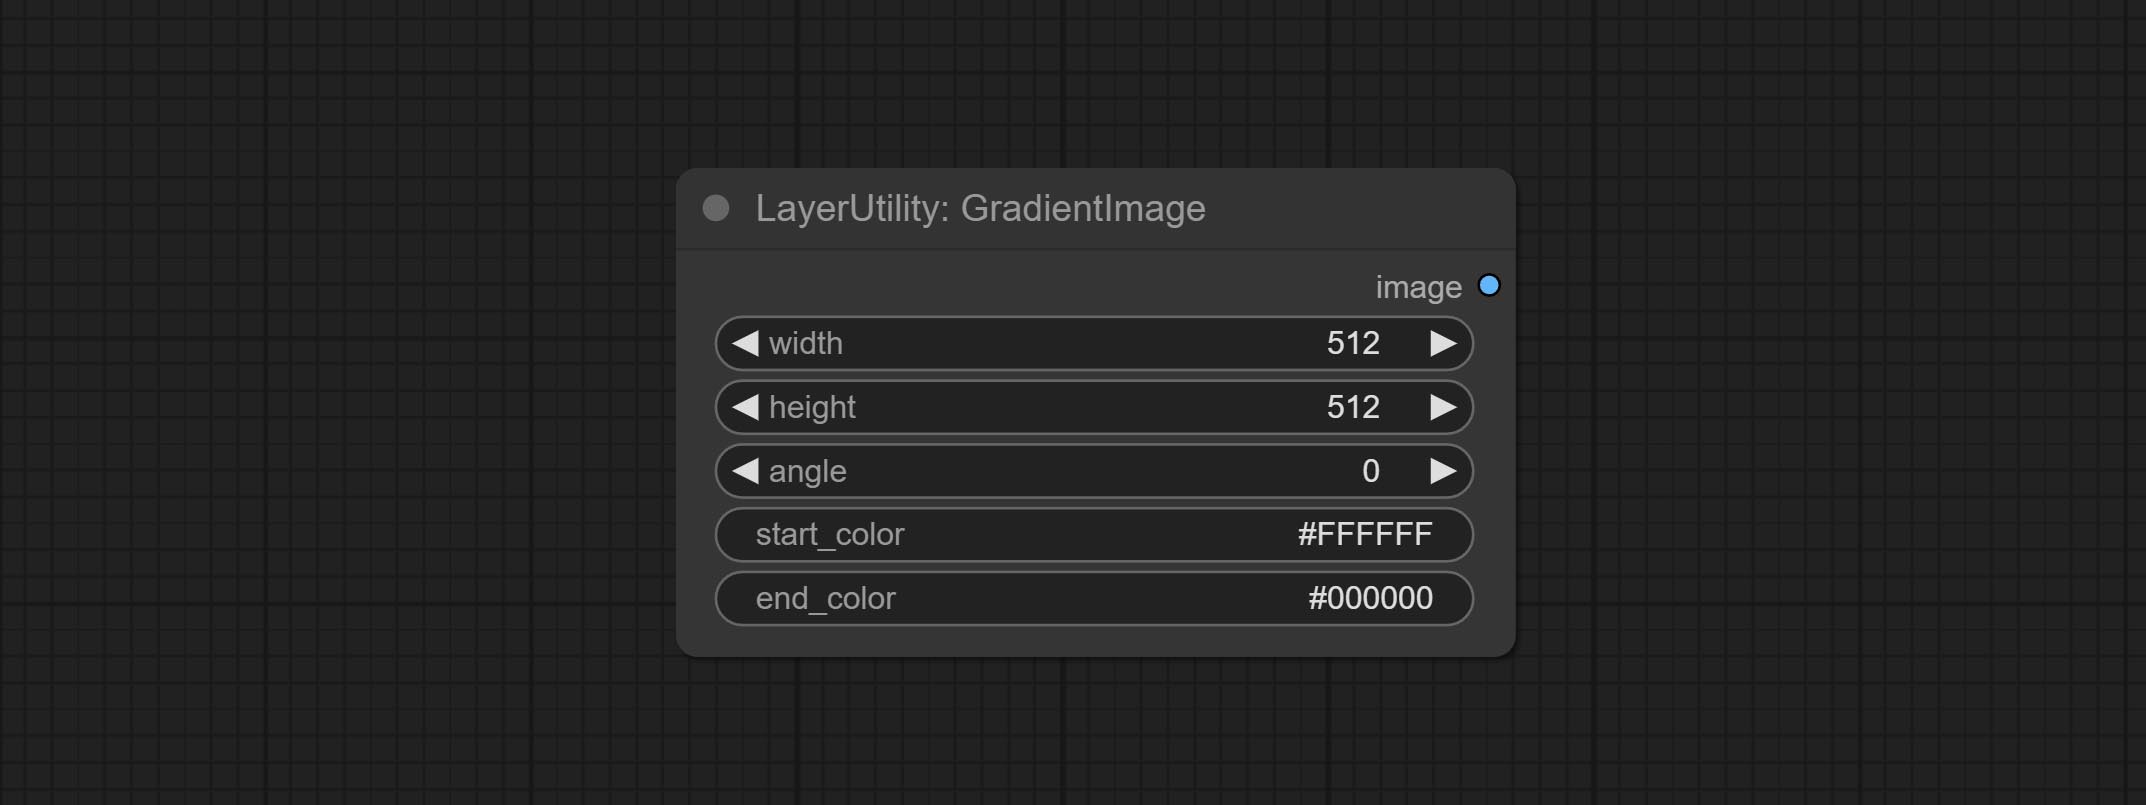
梯度图
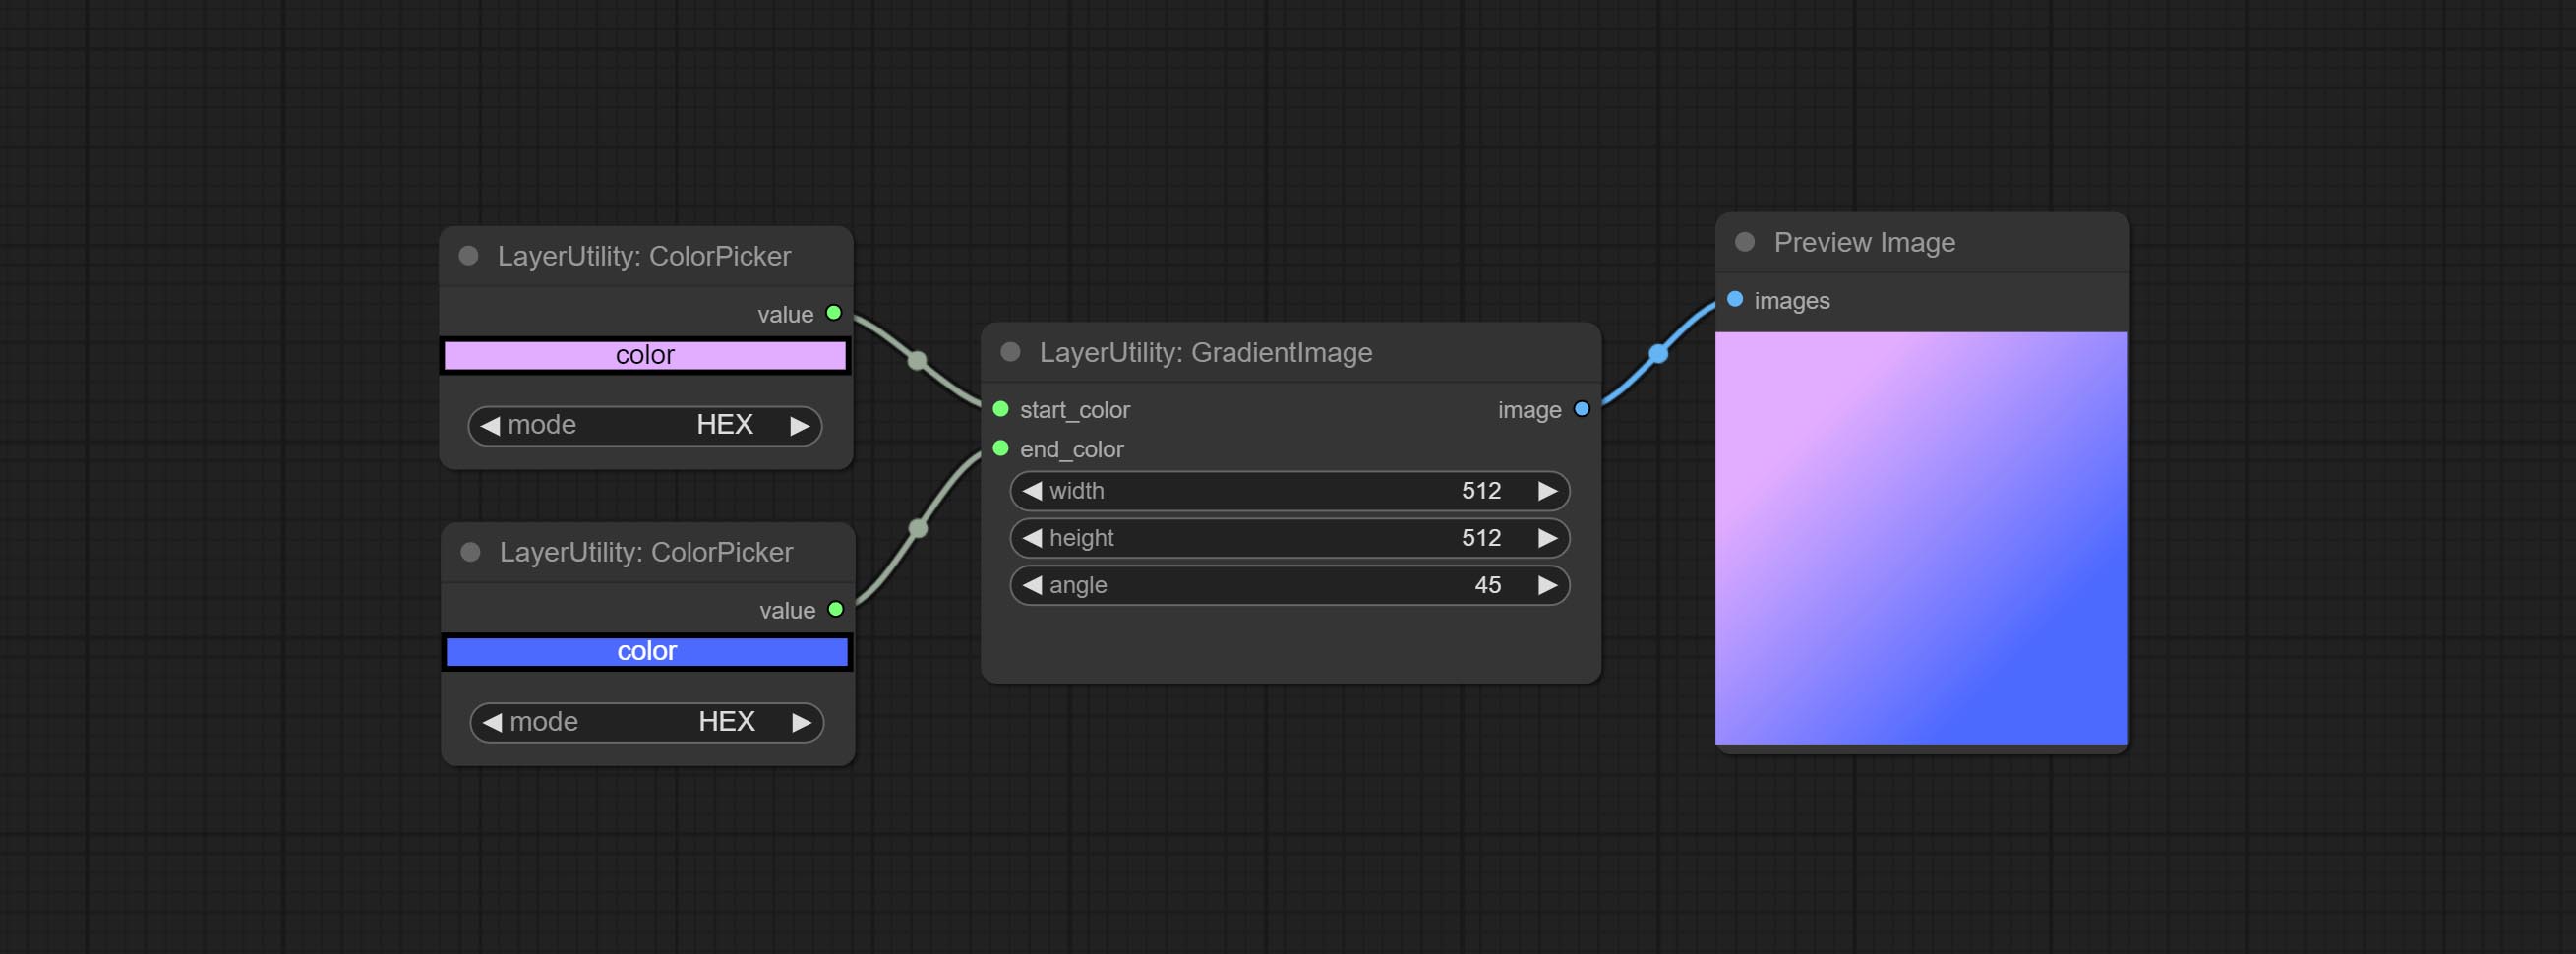
Generate an image with a specified size and color gradient.
Node options:
- width: Width of the image.
- height: Height of the image.
- angle: Angle of gradient.
- start_color 4 : Color of the begging.
- end_color 4 : Color of the ending.
GradientImageV2
The V2 upgraded version of GradientImage.
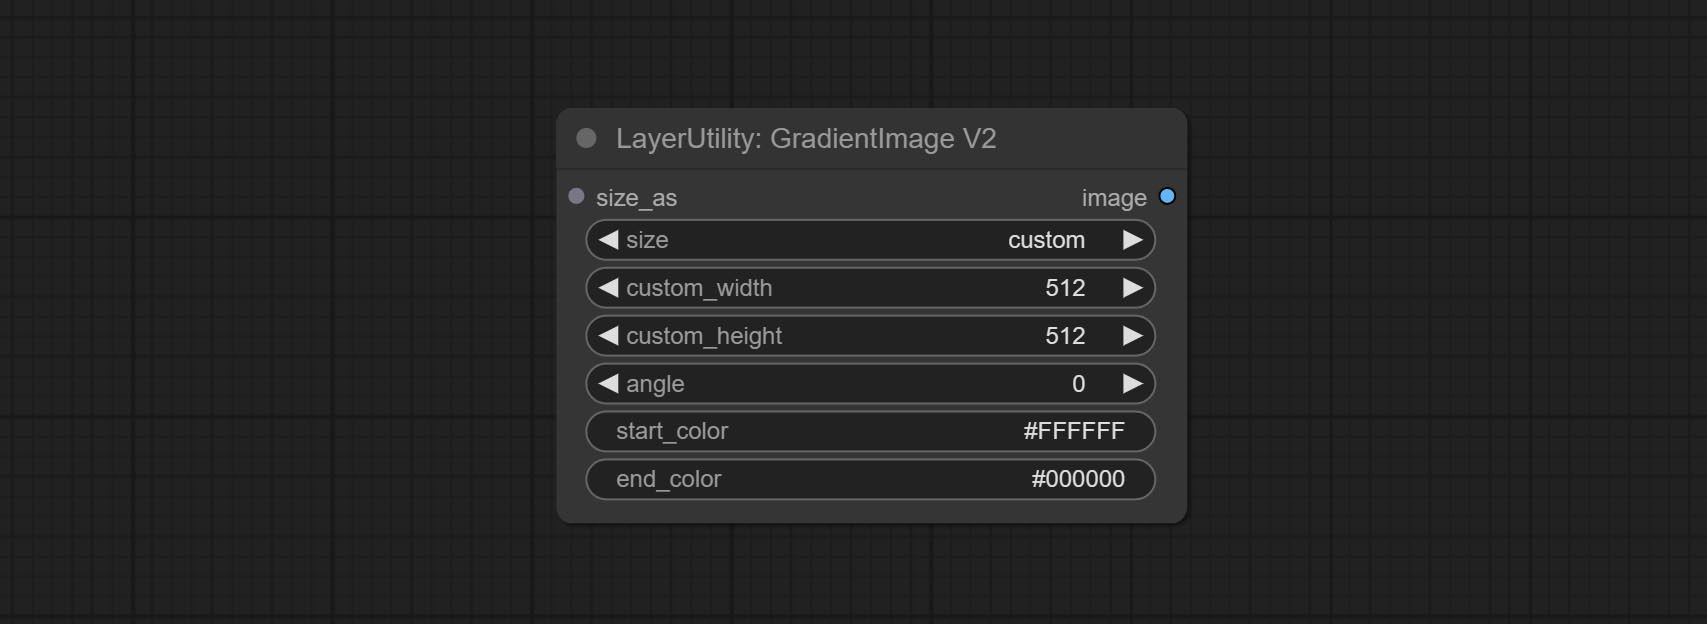
The following changes have been made based on GradientImage:
- size_as * : Input image or mask here to generate image according to its size. Note that this input takes priority over other size settings.
- size ** : Size preset. the preset can be customized by the user. if have size_as input, this option will be ignored.
- custom_width: Image width. it valid when size is set to "custom". if have size_as input, this option will be ignored.
- custom_height: Image height. it valid when size is set to "custom". if have size_as input, this option will be ignored.
* Only limited to input images and masks. forcing the integration of other types of inputs will result in node errors. ** The preset size is defined in custom_size.ini , this file is located in the root directory of the plug-in, and the default name is custom_size.ini.example . to use this file for the first time, you need to change the file suffix to .ini . Open with text editing software. Each row represents a size, with the first value being width and the second being height, separated by a lowercase "x" in the middle. To avoid errors, please do not enter extra characters.
ImageRewardFilter
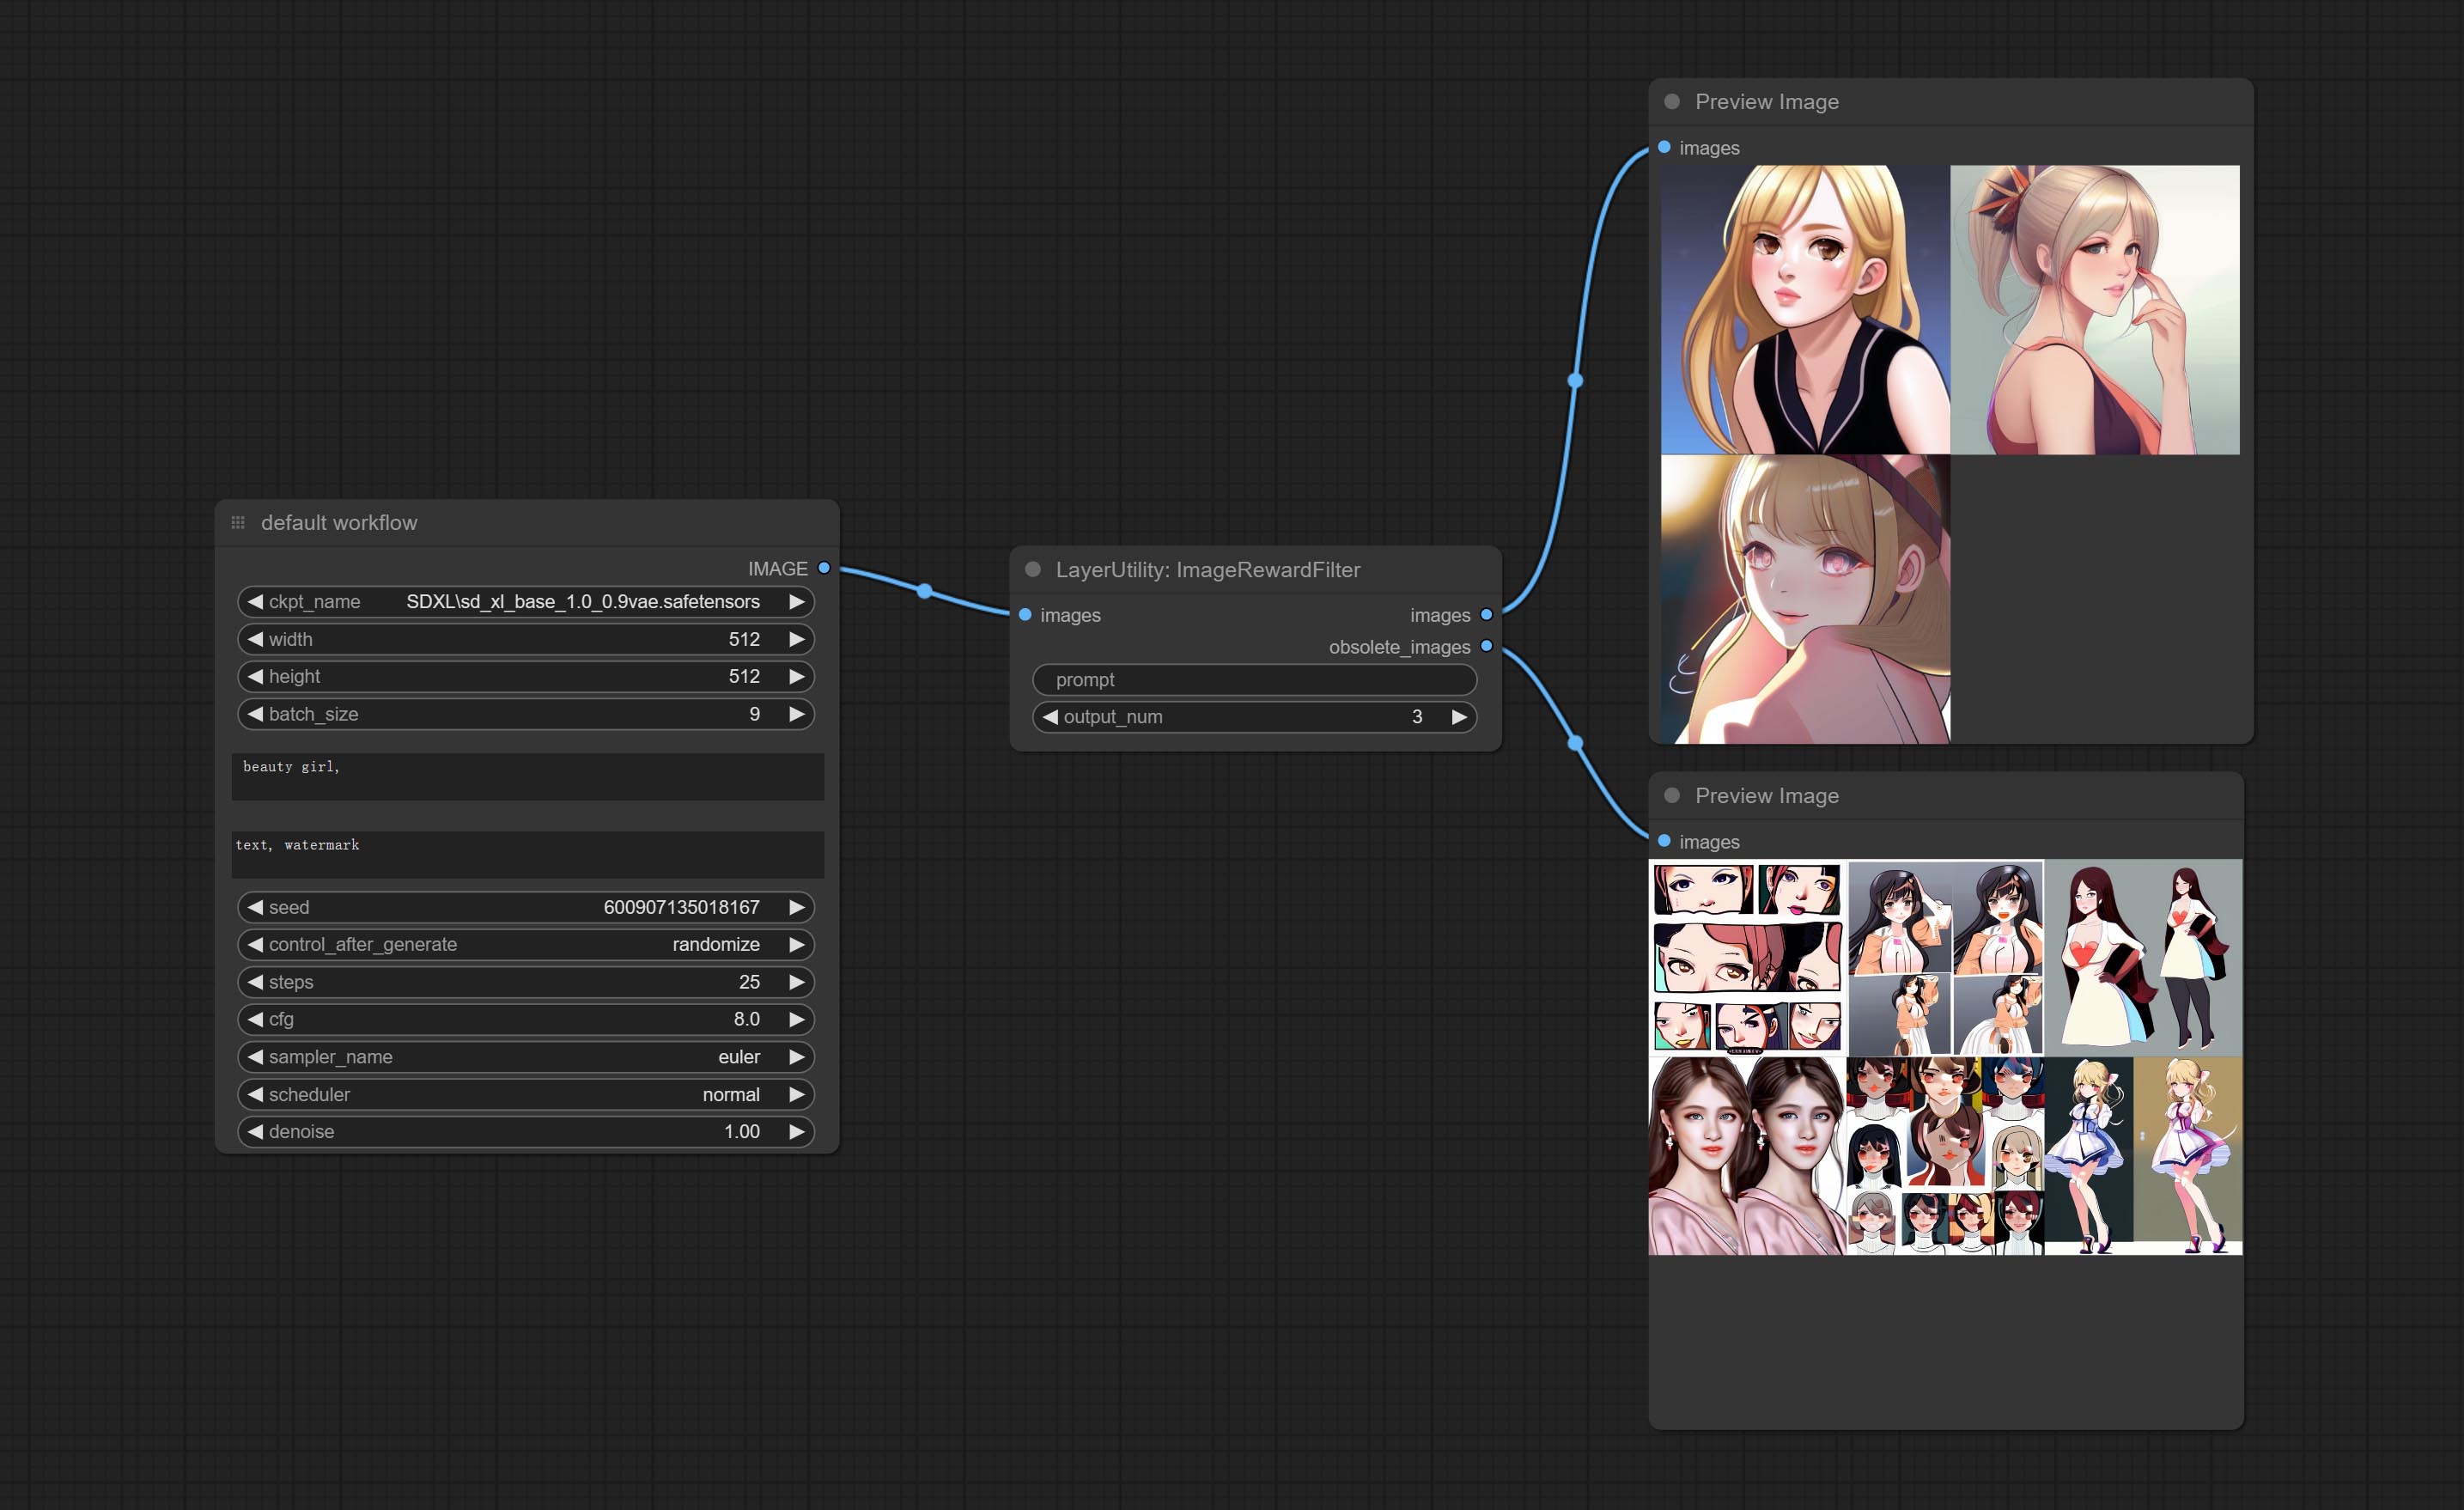
Rating bulk pictures and outputting top-ranked pictures. it used [ImageReward] (https://github.com/THUDM/ImageReward) for image scoring, thanks to the original authors.

Node options:
- prompt: Optional input. Entering prompt here will be used as a basis to determine how well it matches the picture.
- output_nun: Number of pictures outputted. This value should be less than the picture batch.
Outputs:
- images: Bulk pictures output from high to low in order of rating.
- obsolete_images: Knockout pictures. Also output in order of rating from high to low.
SimpleTextImage
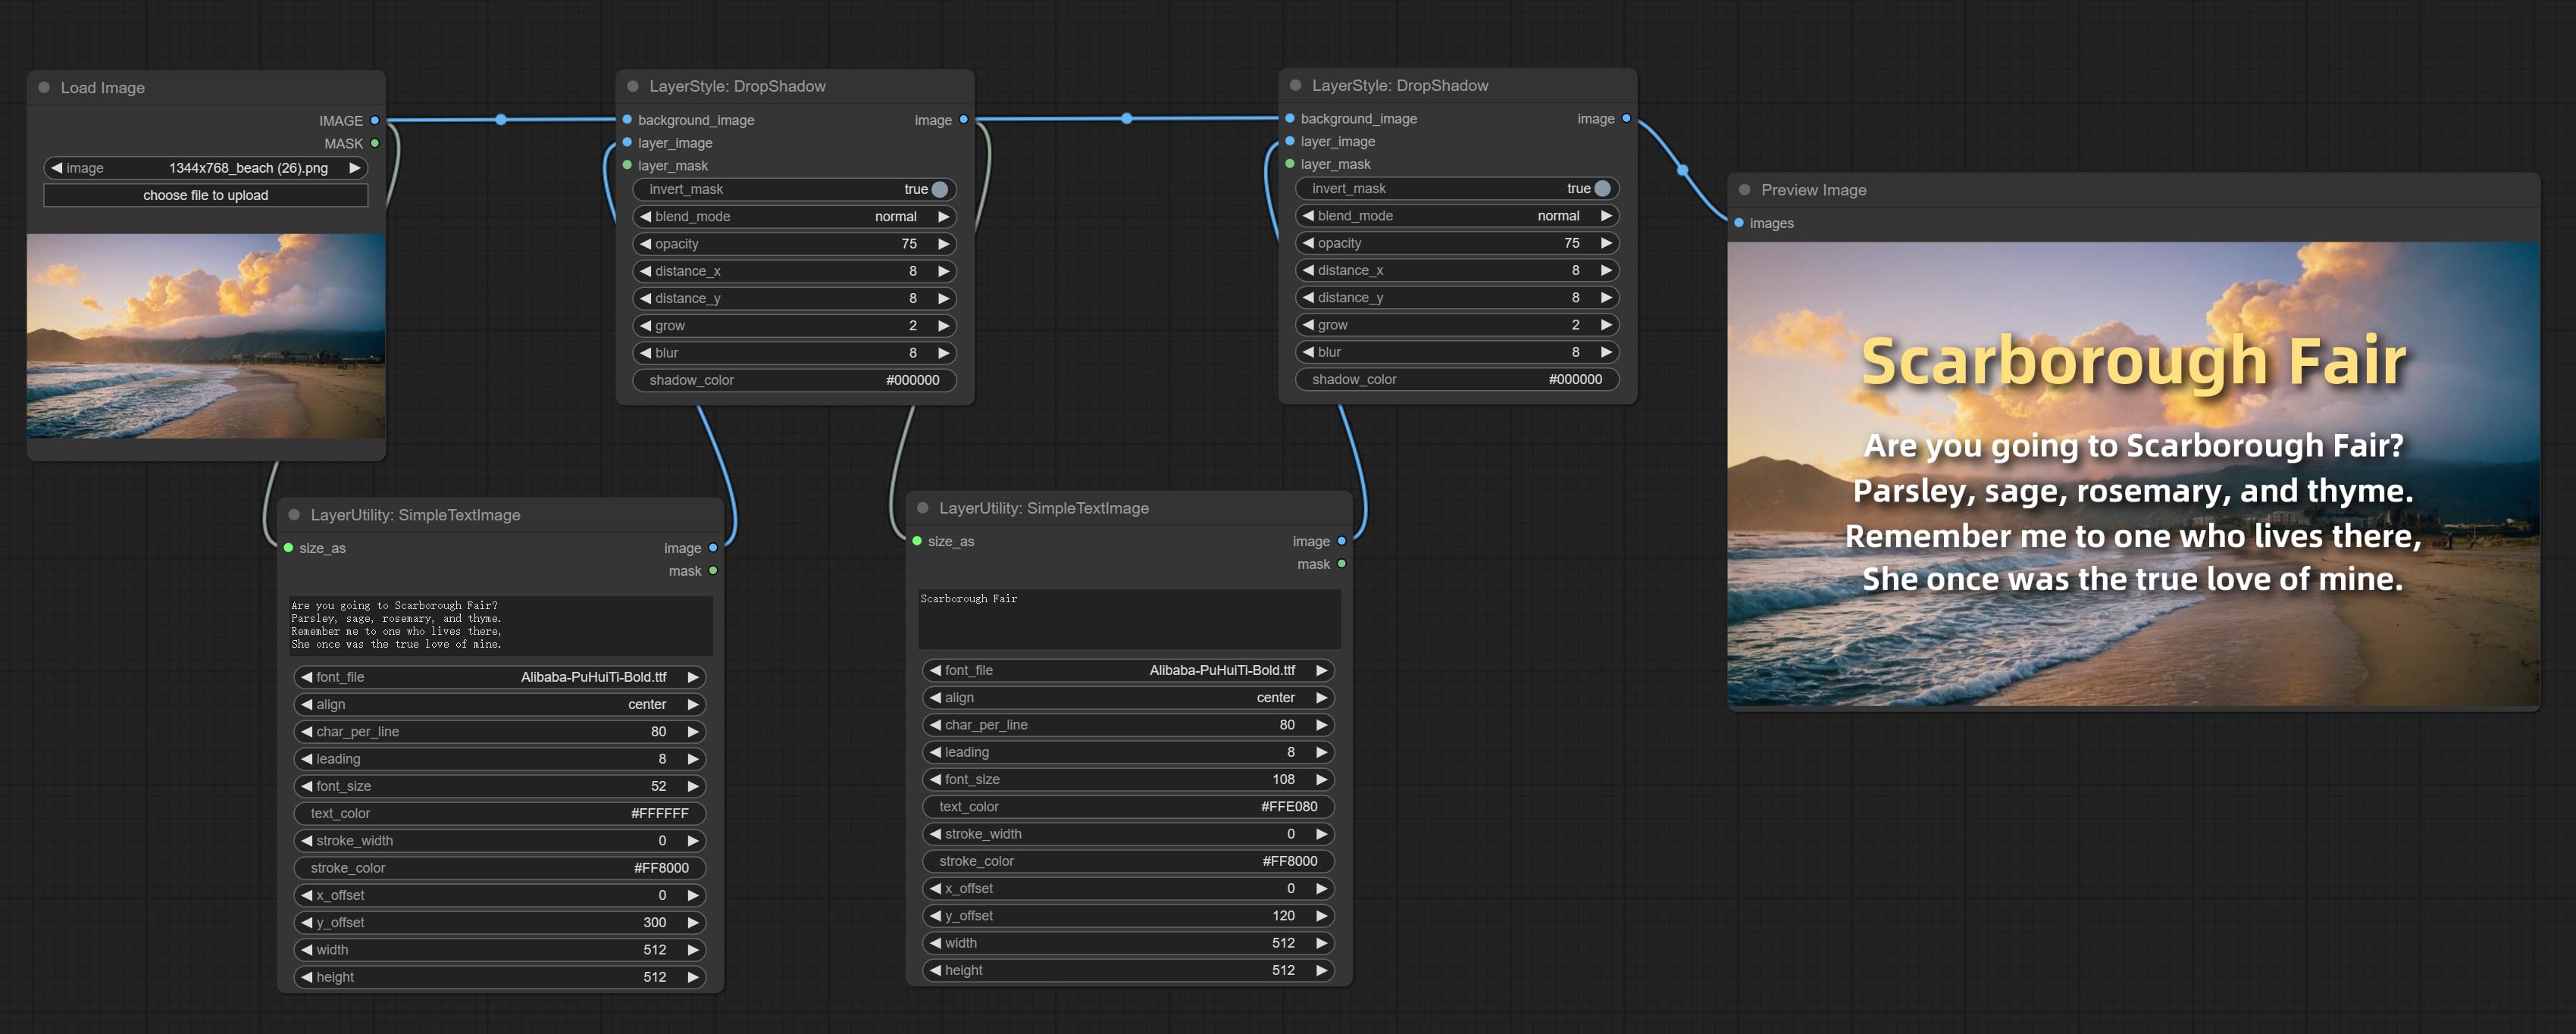
Generate simple typesetting images and masks from text. This node references some of the functionalities and code of ZHO-ZHO-ZHO/ComfyUI-Text_Image-Composite, thanks to the original author.
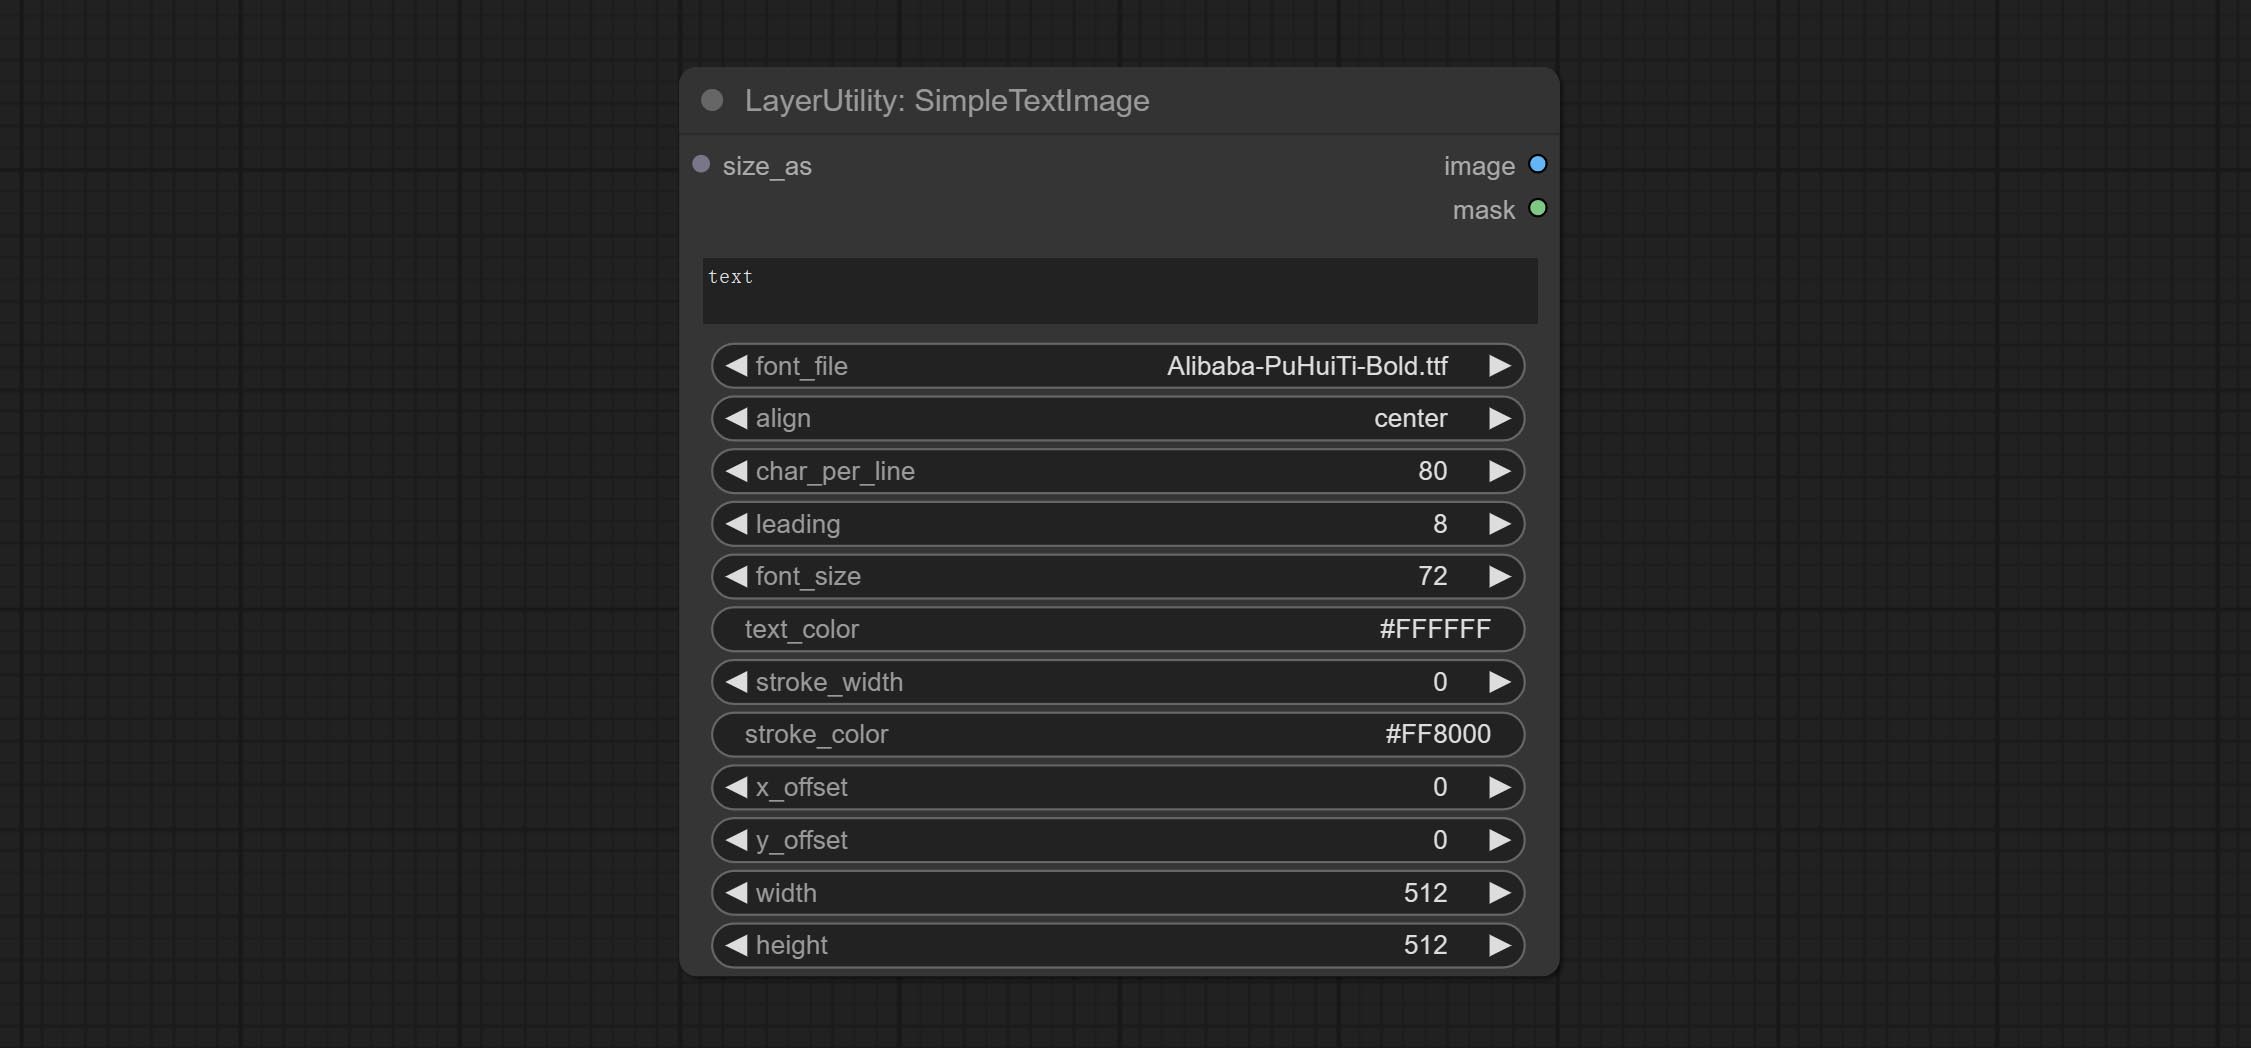
Node options:
- size_as * : The input image or mask here will generate the output image and mask according to their size. this input takes priority over the width and height below.
- font_file ** : Here is a list of available font files in the font folder, and the selected font files will be used to generate images.
- align: Alignment options. There are three options: center, left, and right.
- char_per_line: The number of characters per line, any excess will be automatically wrapped.
- leading: The leading space.
- font_size: The size of font.
- text_color: The color of text.
- stroke_width: The width of stroke.
- stroke_color: The color of stroke.
- x_offset: The horizontal offset of the text position.
- y_offset: The vertical offset of the text position.
- width: Width of the image. If there is a size_as input, this setting will be ignored.
- height: Height of the image. If there is a size_as input, this setting will be ignored.
* Only limited to input image and mask. forcing the integration of other types of inputs will result in node errors.
** The font folder is defined in resource_dir.ini , this file is located in the root directory of the plug-in, and the default name is resource_dir.ini.example . to use this file for the first time, you need to change the file suffix to .ini . Open the text editing software and find the line starting with "FONT_dir=", after "=", enter the custom folder path name. support defining multiple folders in resource-dir.ini , separated by commas, semicolons, or spaces. all font files in this folder will be collected and displayed in the node list during ComfyUI initialization. If the folder set in ini is invalid, the font folder that comes with the plugin will be enabled.
文本图像
Generate images and masks from text. support for adjusting the spacing between words and lines, horizontal and vertical adjustments, it can set random changes in each character, including size and position.
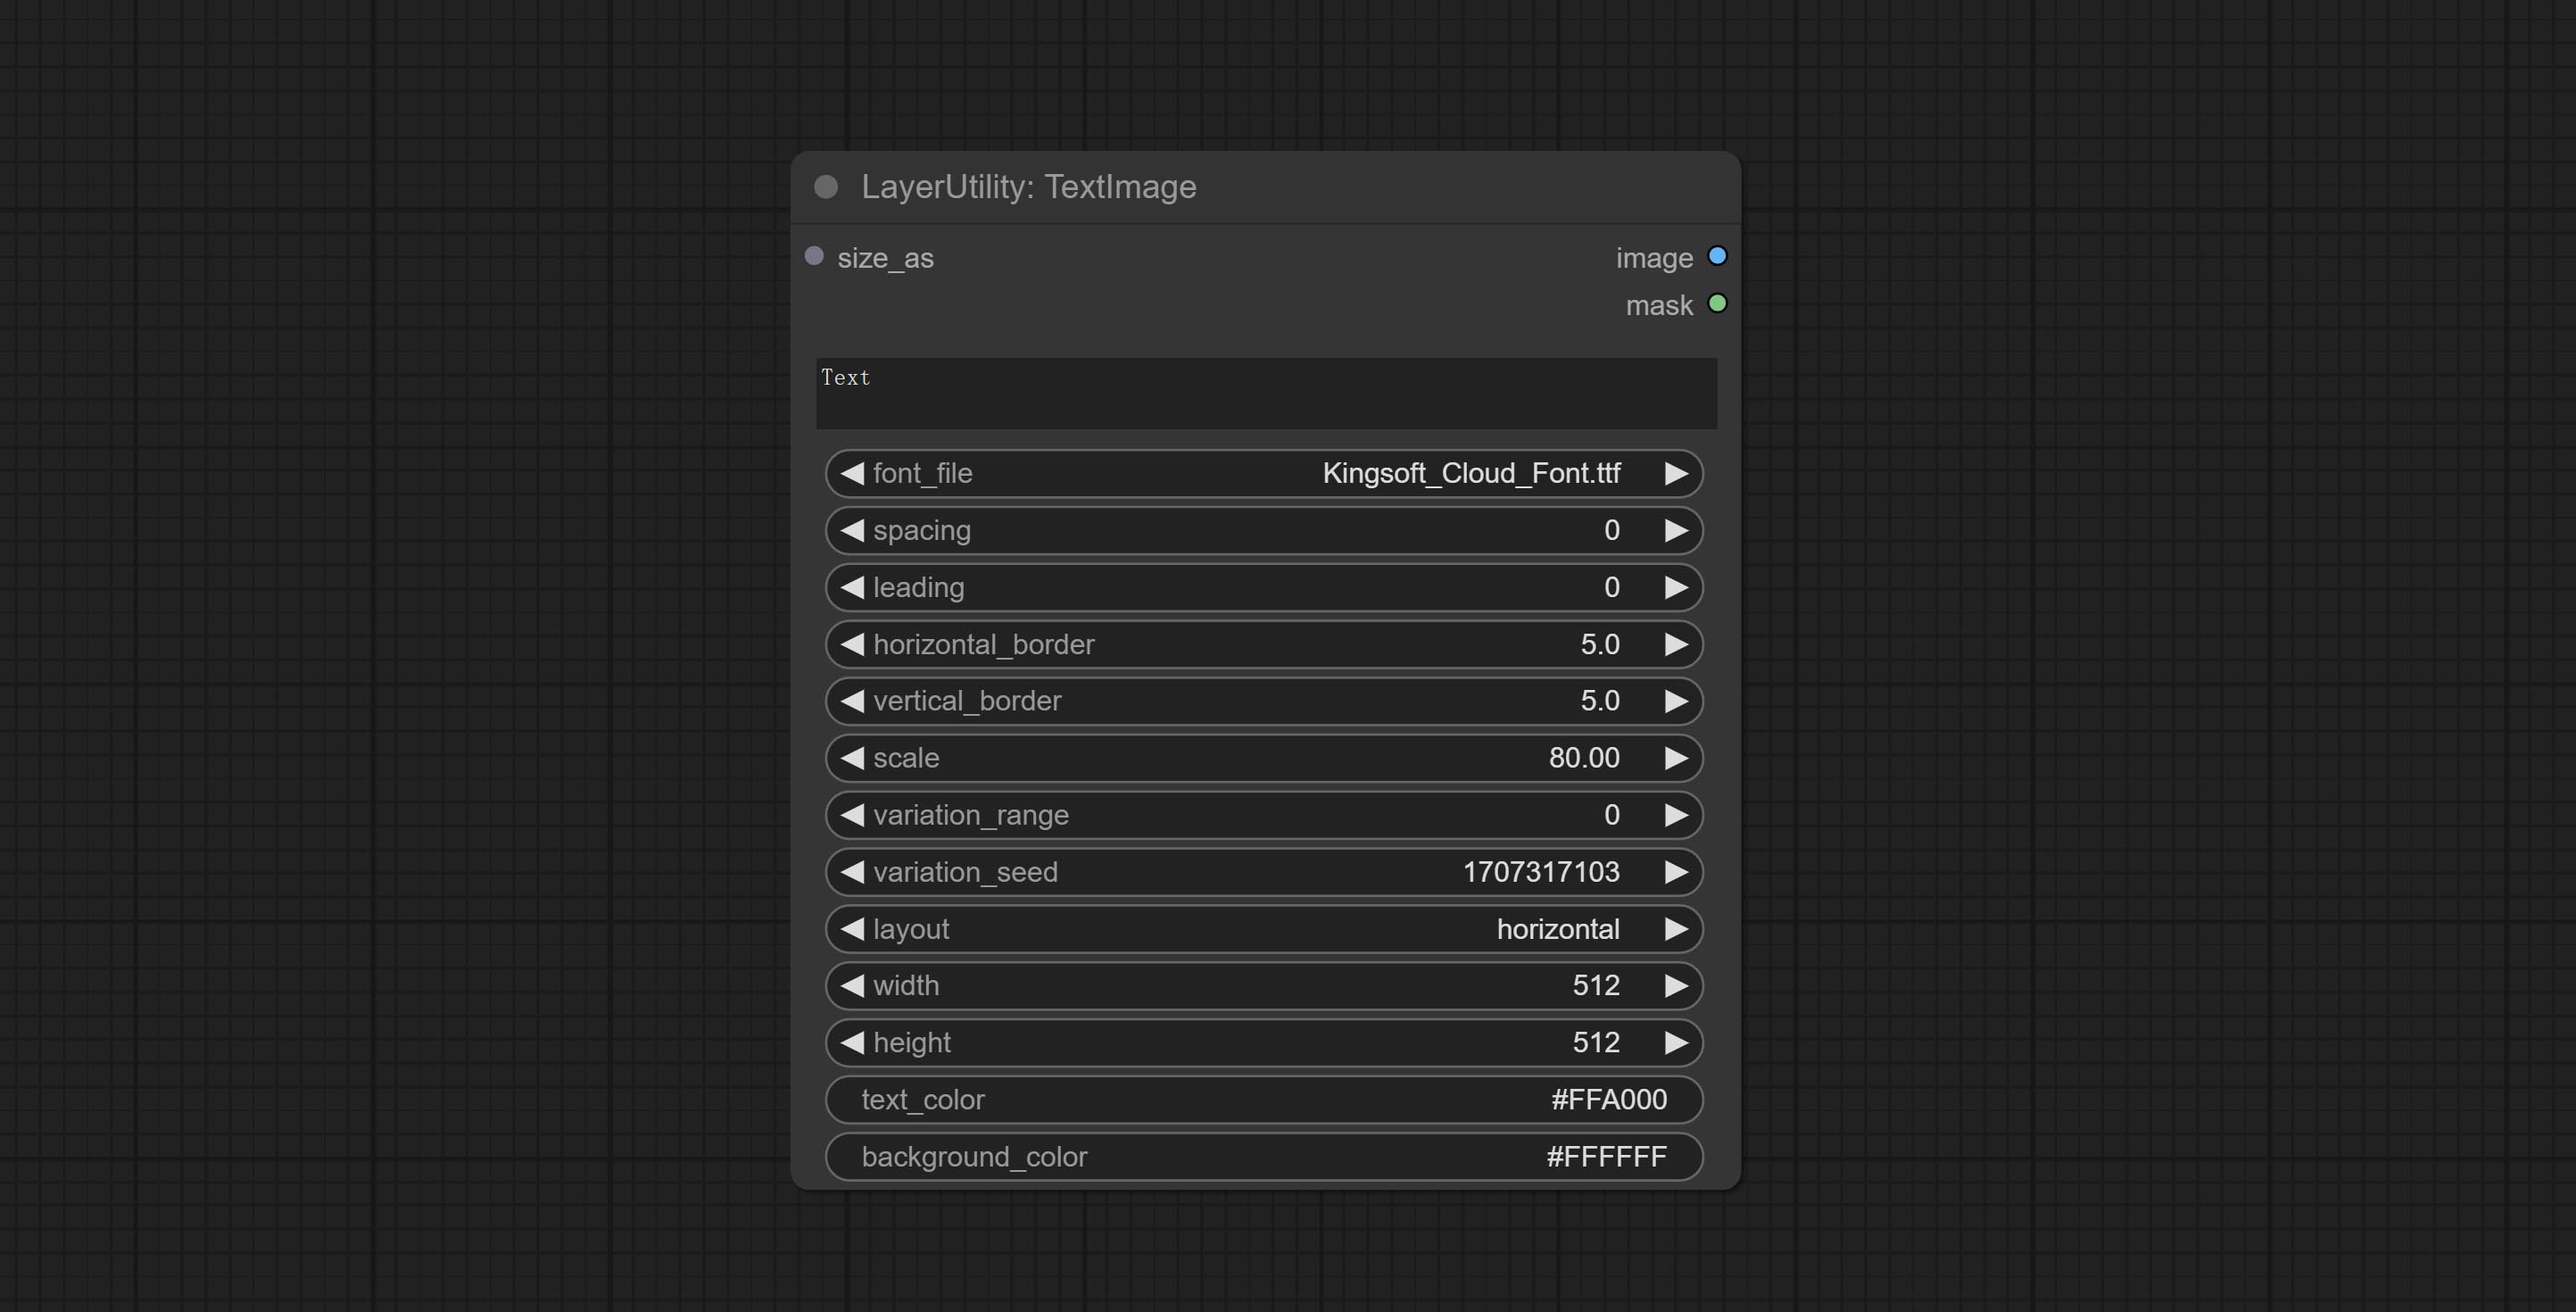
Node options:
- size_as * : The input image or mask here will generate the output image and mask according to their size. this input takes priority over the width and height below.
- font_file ** : Here is a list of available font files in the font folder, and the selected font files will be used to generate images.
- spacing: Word spacing.this value is in pixels.
- leading: Row leading.this value is in pixels.
- horizontal_border: Side margin. If the text is horizontal, it is the left margin, and if it is vertical, it is the right margin. this value is represents a percentage, for example, 50 indicates that the starting point is located in the center on both sides.
- vertical_border: Top margin. this value is represents a percentage, for example, 10 indicates that the starting point is located 10% away from the top.
- scale: The overall size of the text. the initial size of text is automatically calculated based on the screen size and text content, with the longest row or column by default adapting to the image width or height. adjusting the value here will scale the text as a whole. this value is represents a percentage, for example, 60 represents scaling to 60%.
- variation_range: The range of random changes in characters. when this value is greater than 0, the character will undergo random changes in size and position, and the larger the value, the greater the magnitude of the change.
- variation_seed: The seed for randomly. fix this value to individual characters changes generated each time will not change.
- layout: Text layout. there are horizontal and vertical options to choose from.
- width: Width of the image. If there is a size_as input, this setting will be ignored.
- height: Height of the image. If there is a size_as input, this setting will be ignored.
- text_color: The color of text.
- background_color 4 : The color of background.
* Only limited to input image and mask. forcing the integration of other types of inputs will result in node errors.
** The font folder is defined in resource_dir.ini , this file is located in the root directory of the plug-in, and the default name is resource_dir.ini.example . to use this file for the first time, you need to change the file suffix to .ini . Open the text editing software and find the line starting with "FONT_dir=", after "=", enter the custom folder path name. support defining multiple folders in resource-dir.ini , separated by commas, semicolons, or spaces. all font files in this folder will be collected and displayed in the node list during ComfyUI initialization. If the folder set in ini is invalid, the font folder that comes with the plugin will be enabled.
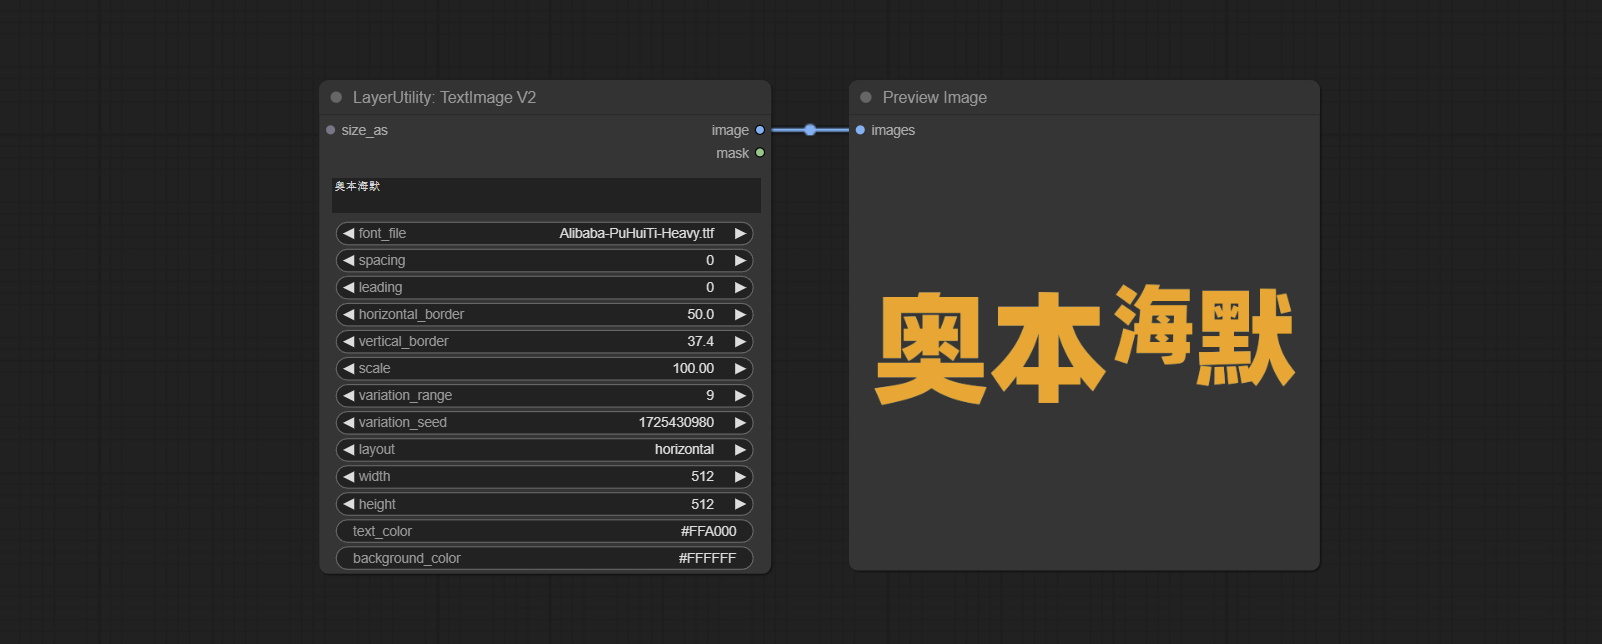
TextImageV2
This node is merged from heshengtao. The PR modifies the scaling of the image text node based on the TextImage node. The font spacing follows the scaling, and the coordinates are no longer based on the top left corner of the text, but on the center point of the entire line of text. Thank you for the author's contribution.
喇嘛
Erase objects from the image based on the mask. this node is repackage of IOPaint, powered by state-of-the-art AI models, thanks to the original author.
It is have LaMa, LDM, ZITS,MAT, FcF, Manga models and the SPREAD method to erase. Please refer to the original link for the introduction of each model.
Please download the model files from lama models(BaiduNetdisk) or lama models(Google Drive) to ComfyUI/models/lama folder.
Node optons: 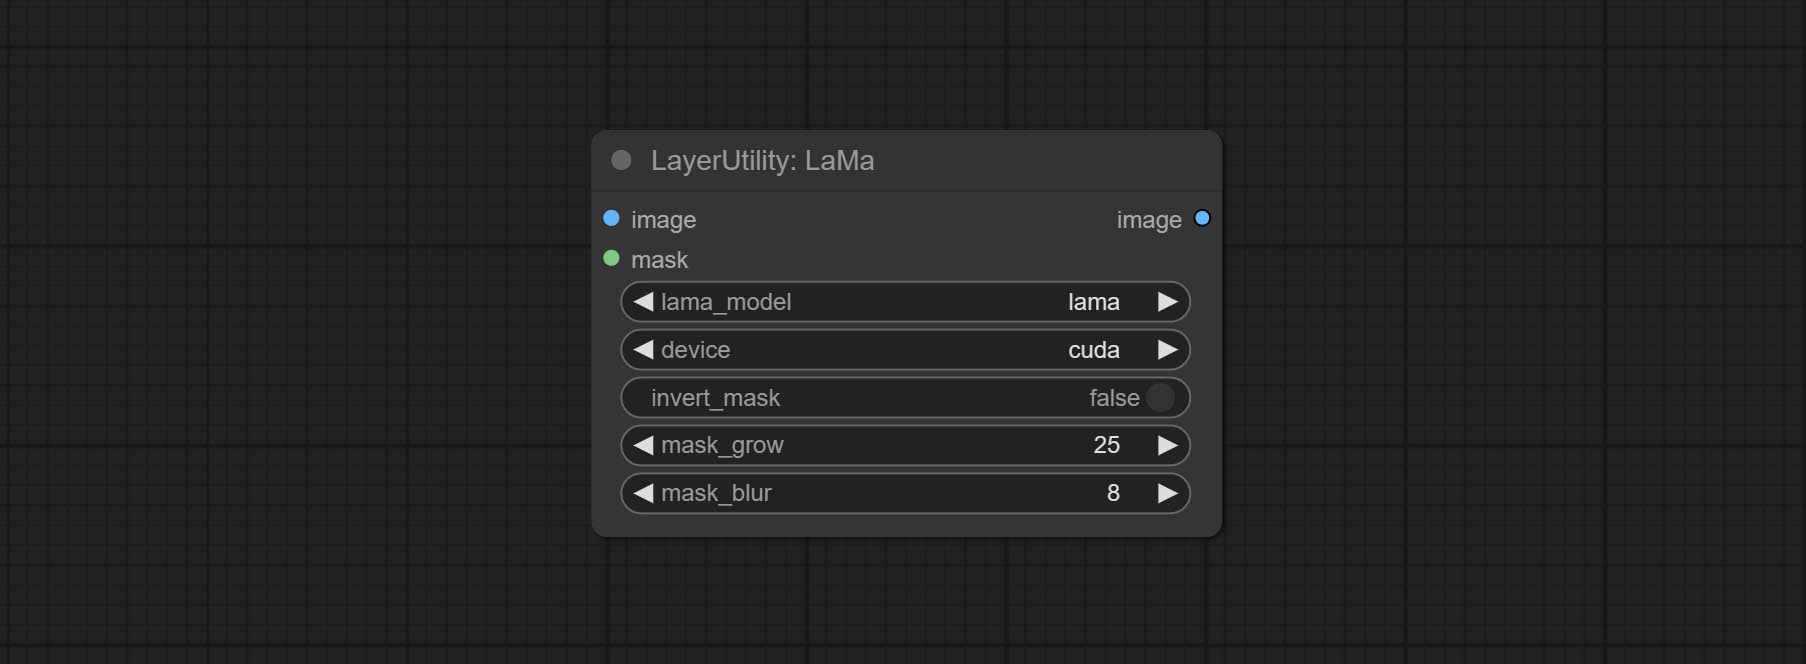
- lama_model: Choose a model or method.
- device: After correctly installing Torch and Nvidia CUDA drivers, using cuda will significantly improve running speed.
- invert_mask: Whether to reverse the mask.
- grow: Positive values expand outward, while negative values contract inward.
- blur: Blur the edge.
ImageChannelSplit
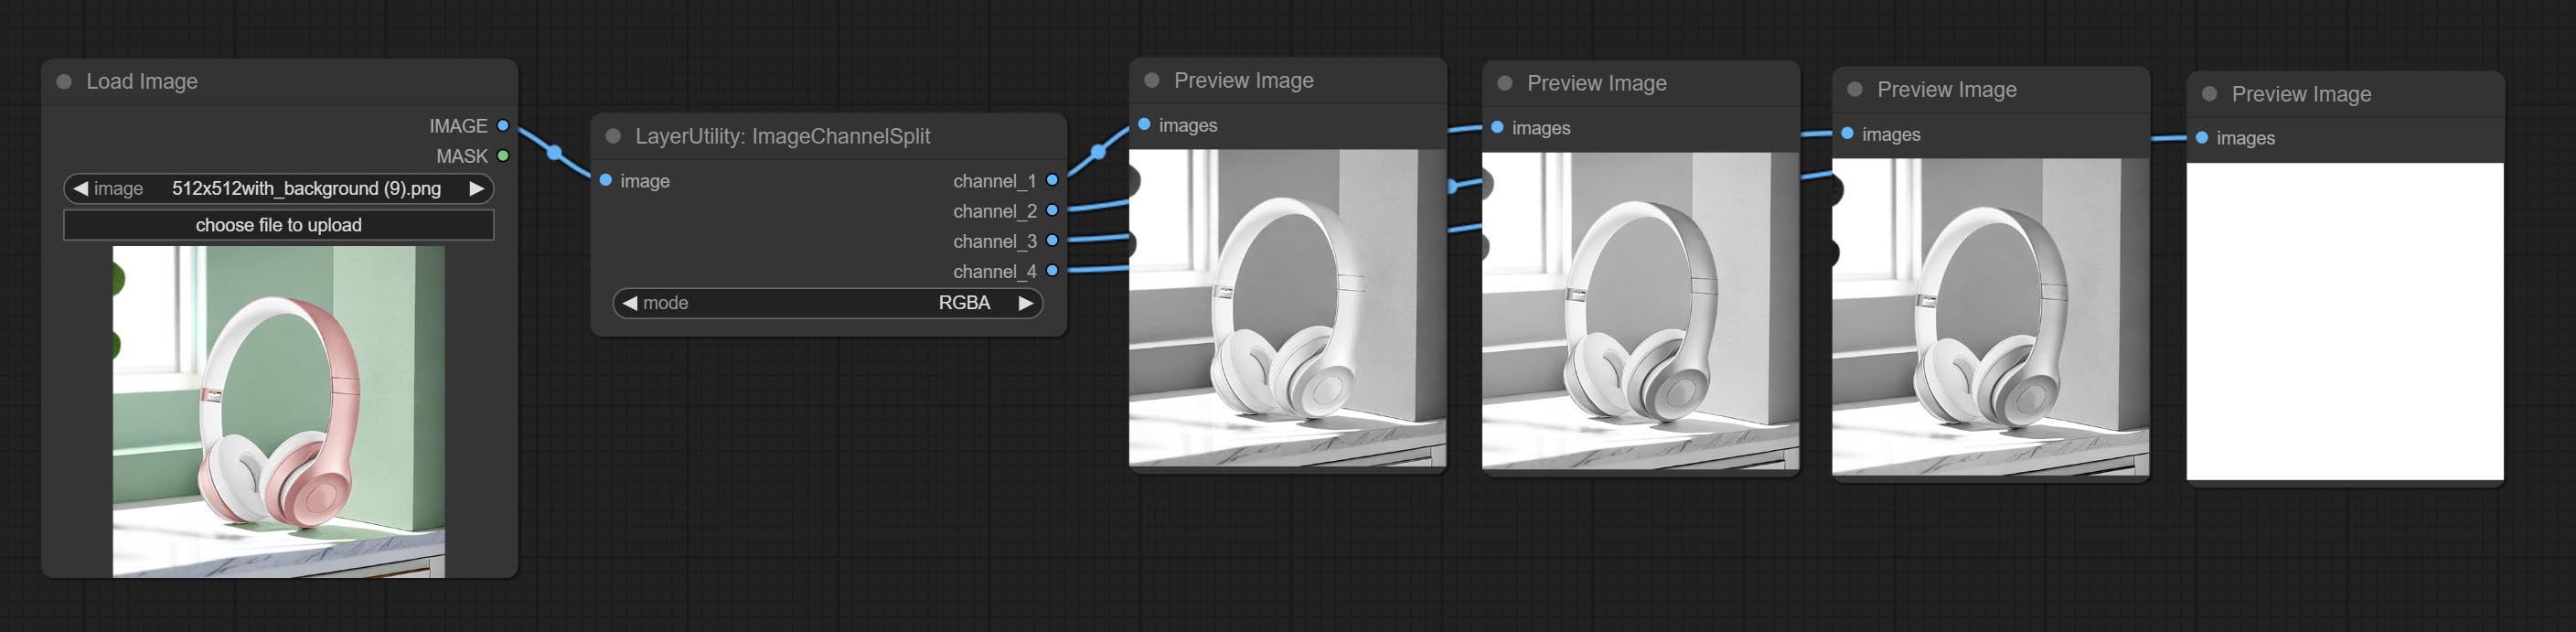
Split the image channel into individual images.
Node options: 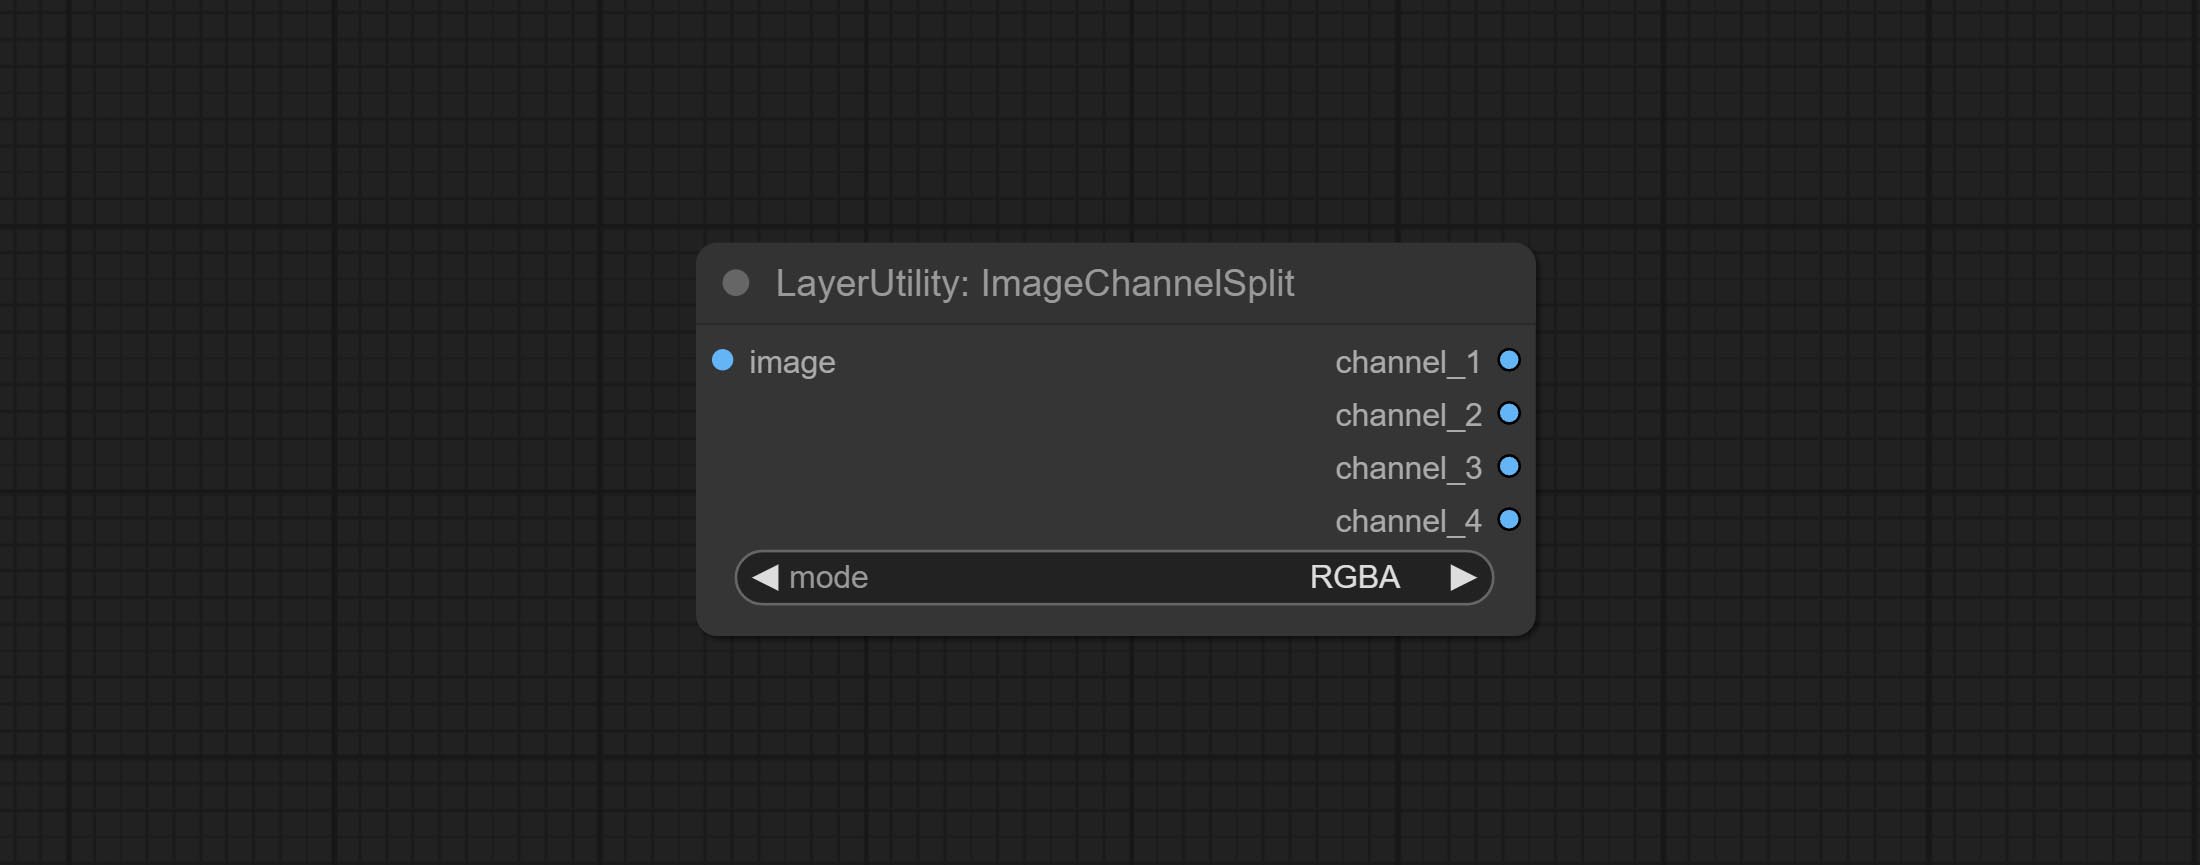
- mode: Channel mode, include RGBA, YCbCr, LAB adn HSV.
ImageChannelMerge
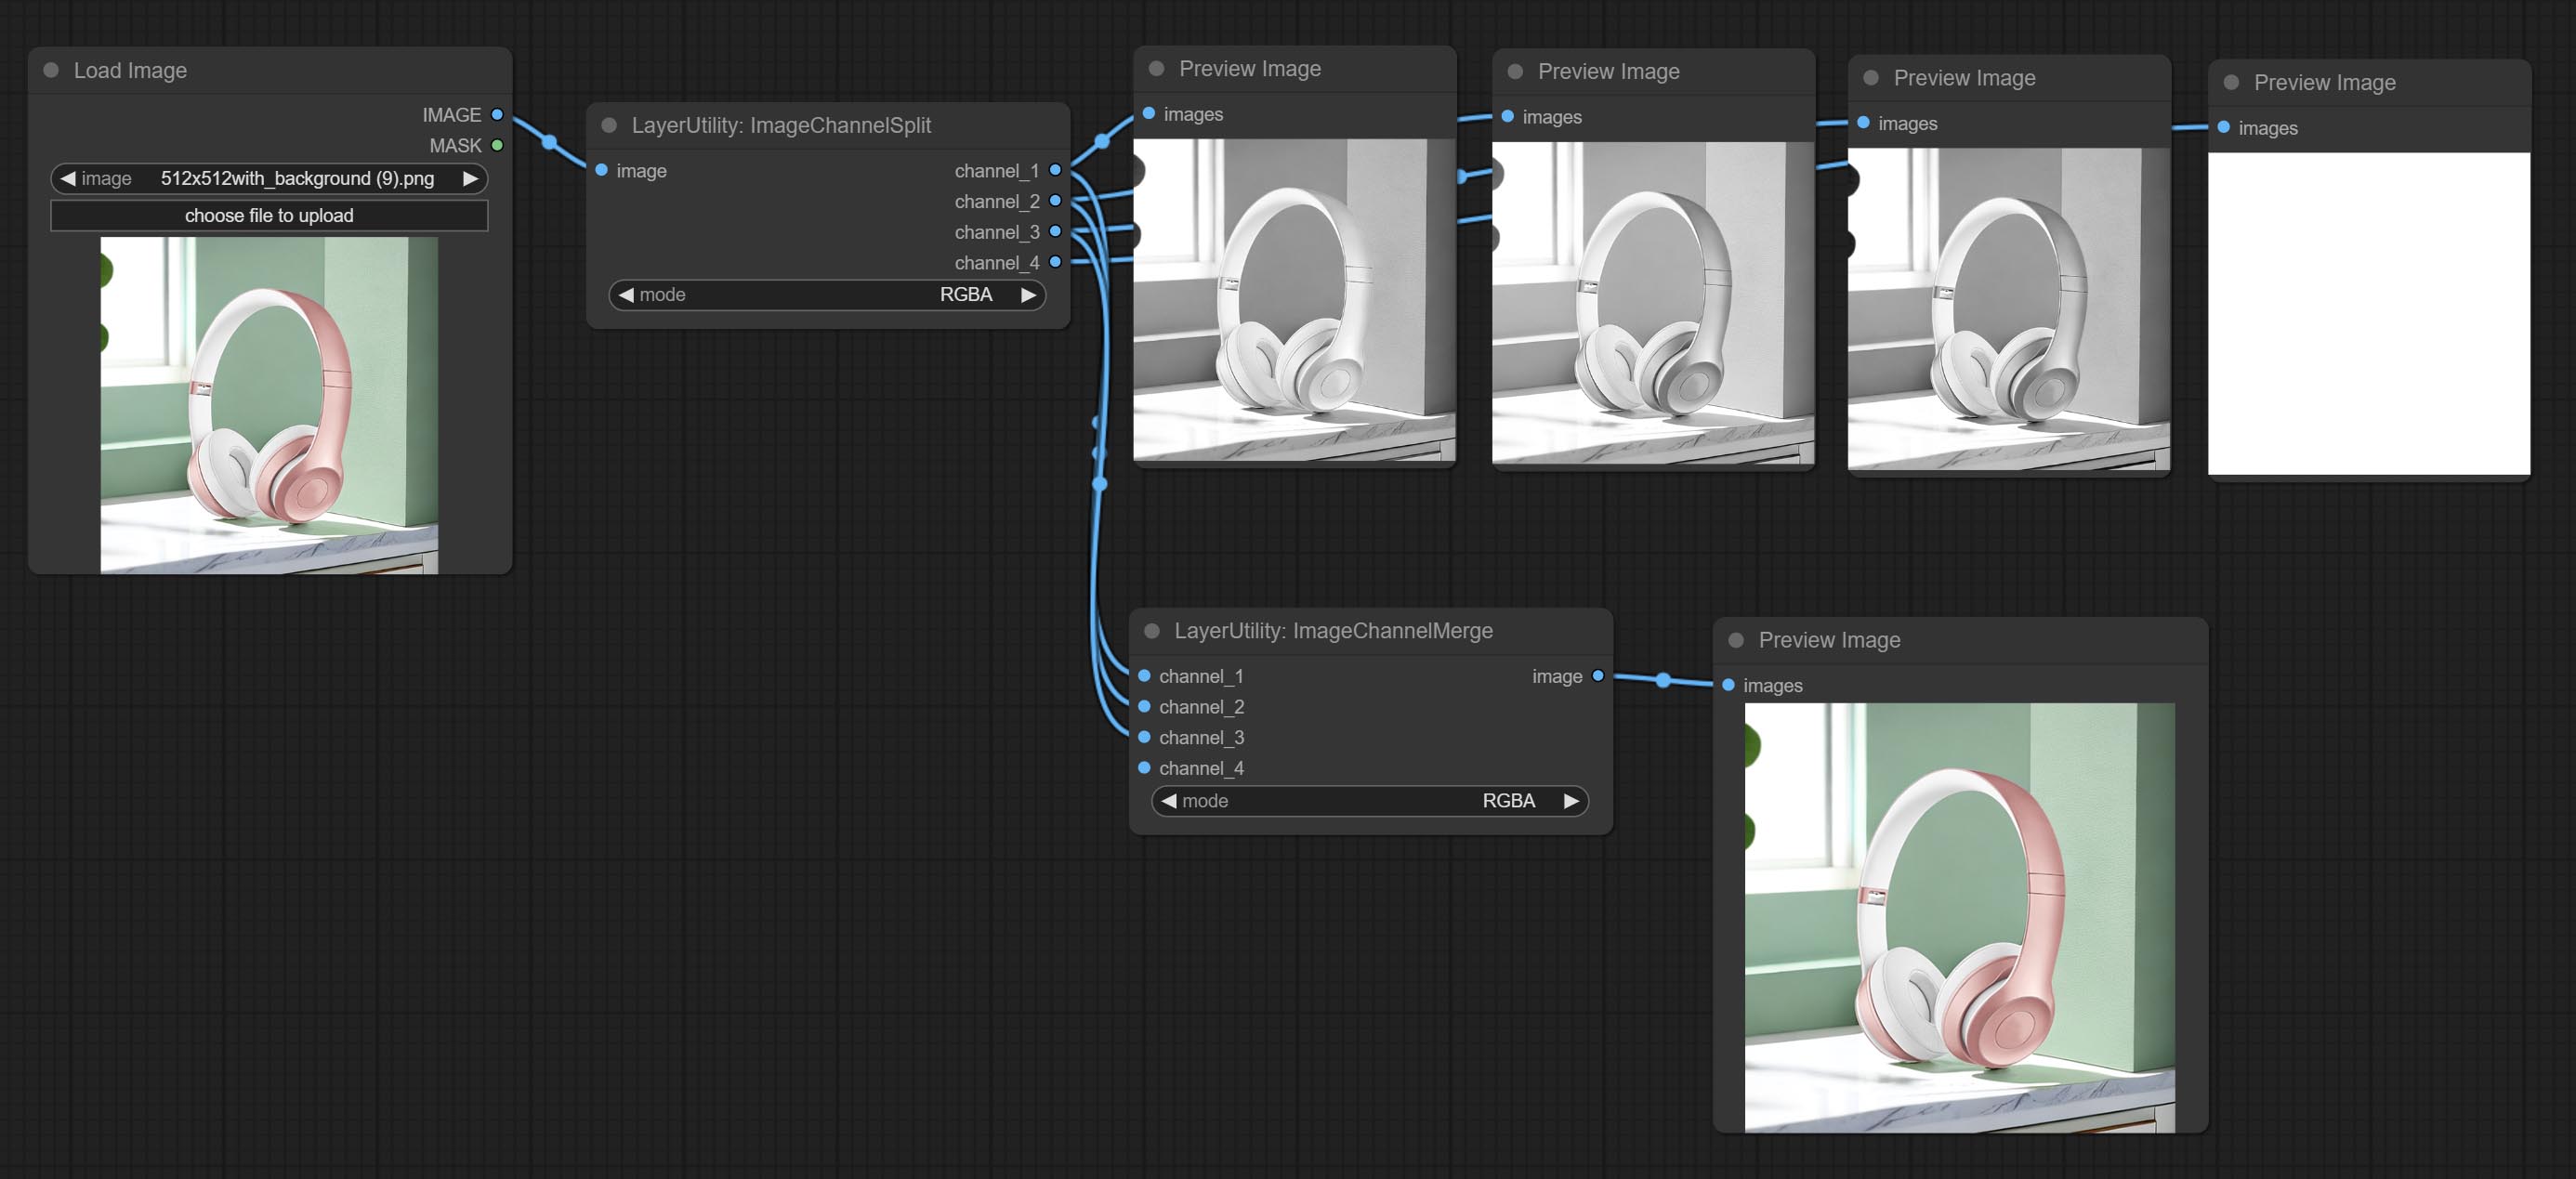
Merge each channel image into one image.
Node options: 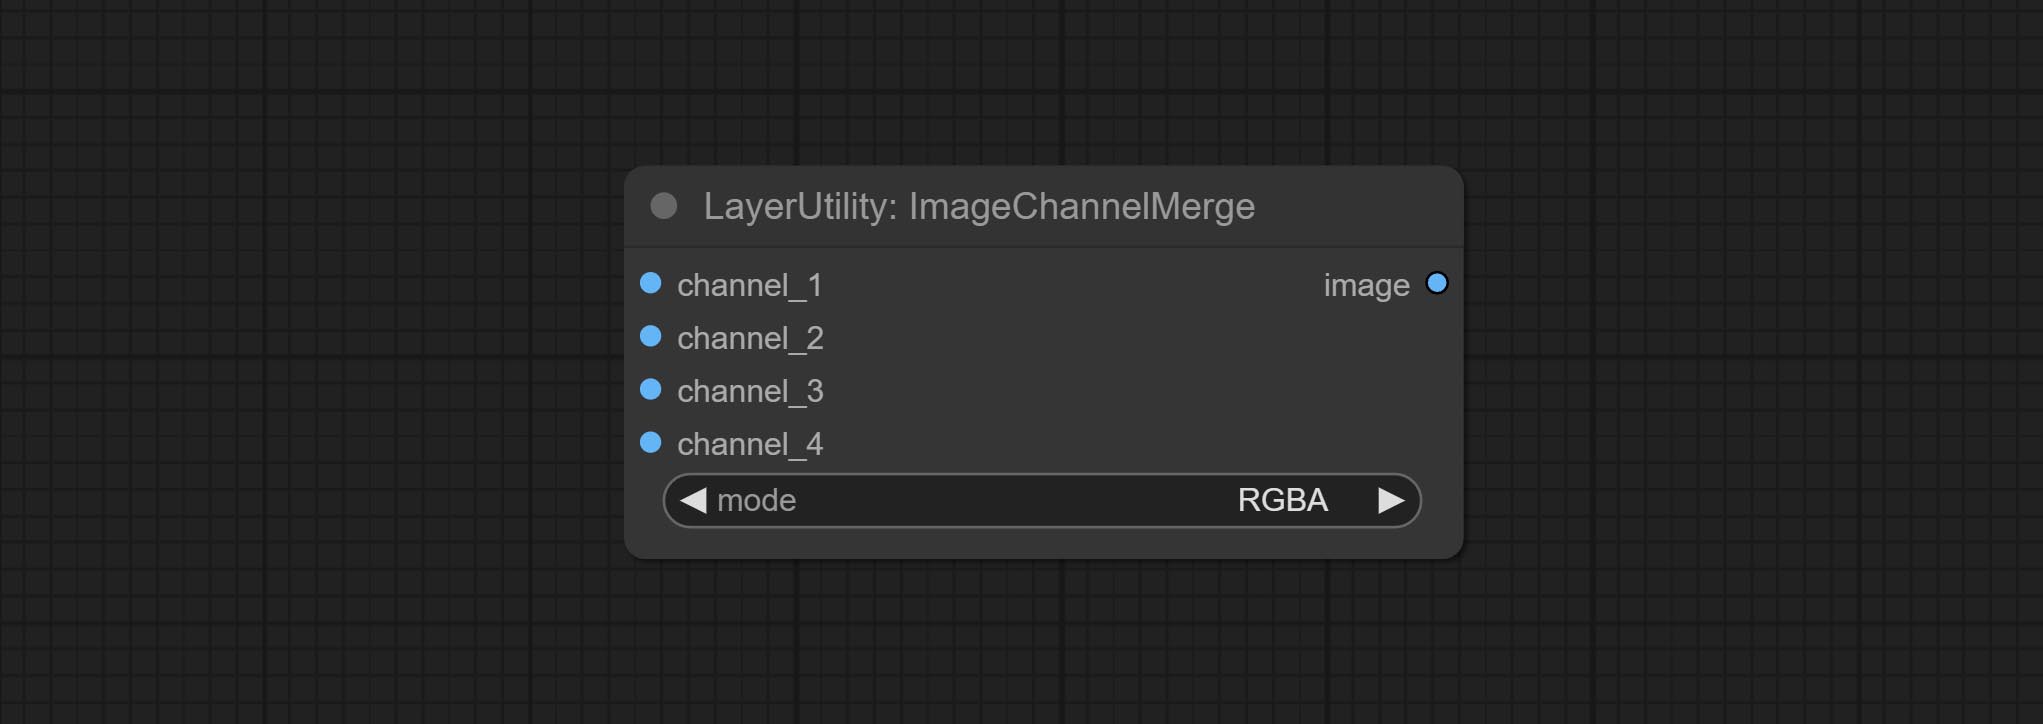
- mode: Channel mode, include RGBA, YCbCr, LAB adn HSV.
ImageRemoveAlpha
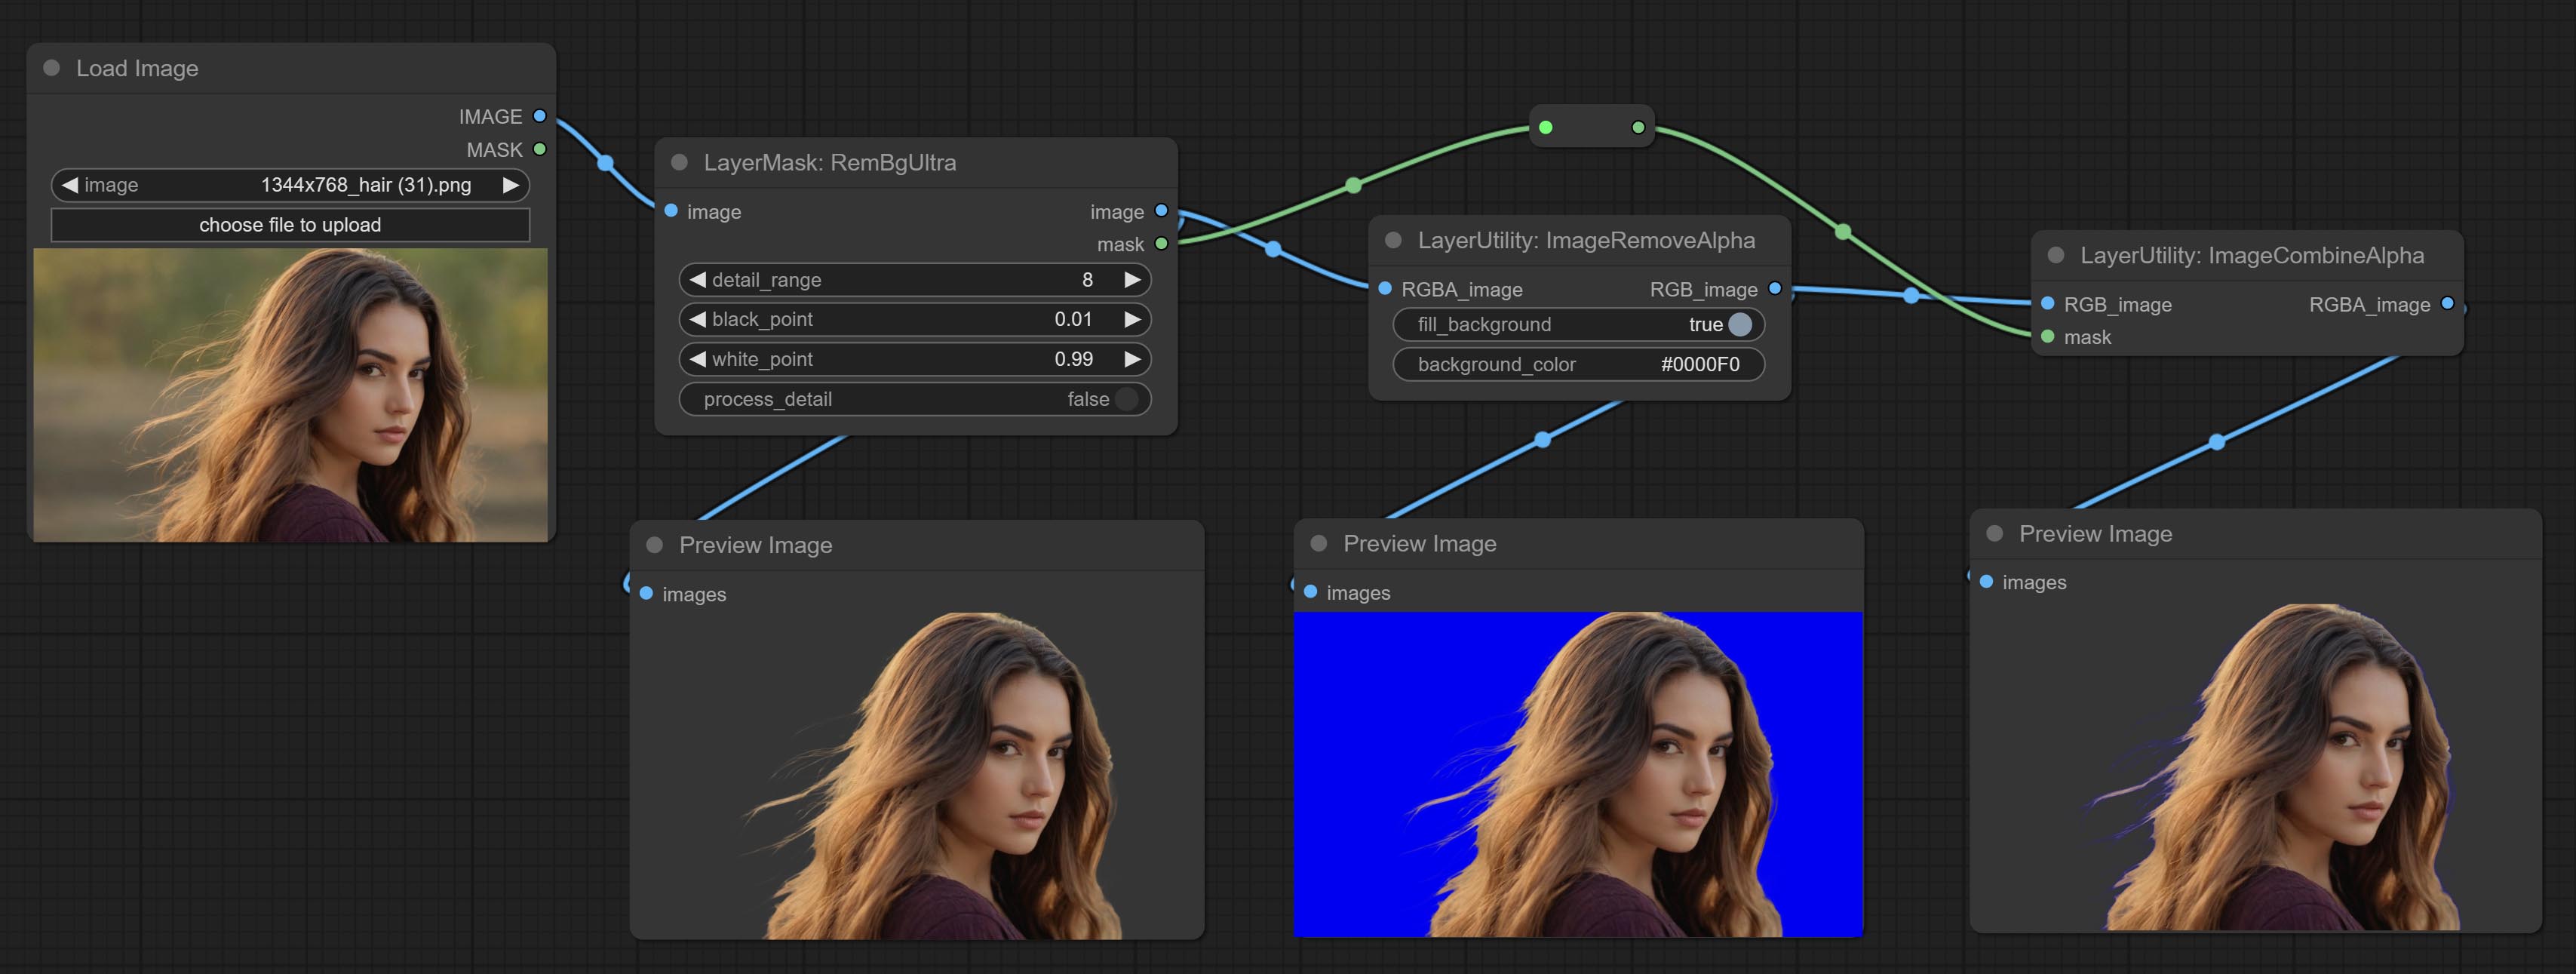
Remove the alpha channel from the image and convert it to RGB mode. you can choose to fill the background and set the background color.
Node options: 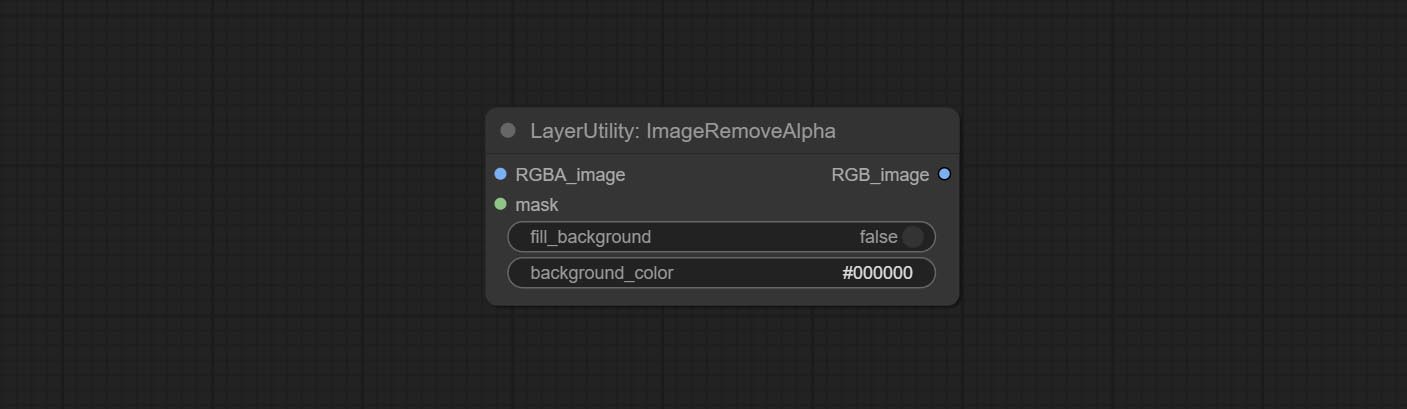
- RGBA_image: The input image supports RGBA or RGB modes.
- mask: Optional input mask. If there is an input mask, it will be used first, ignoring the alpha that comes with RGBA_image.
- fill_background: Whether to fill the background.
- background_color 4 : Color of background.
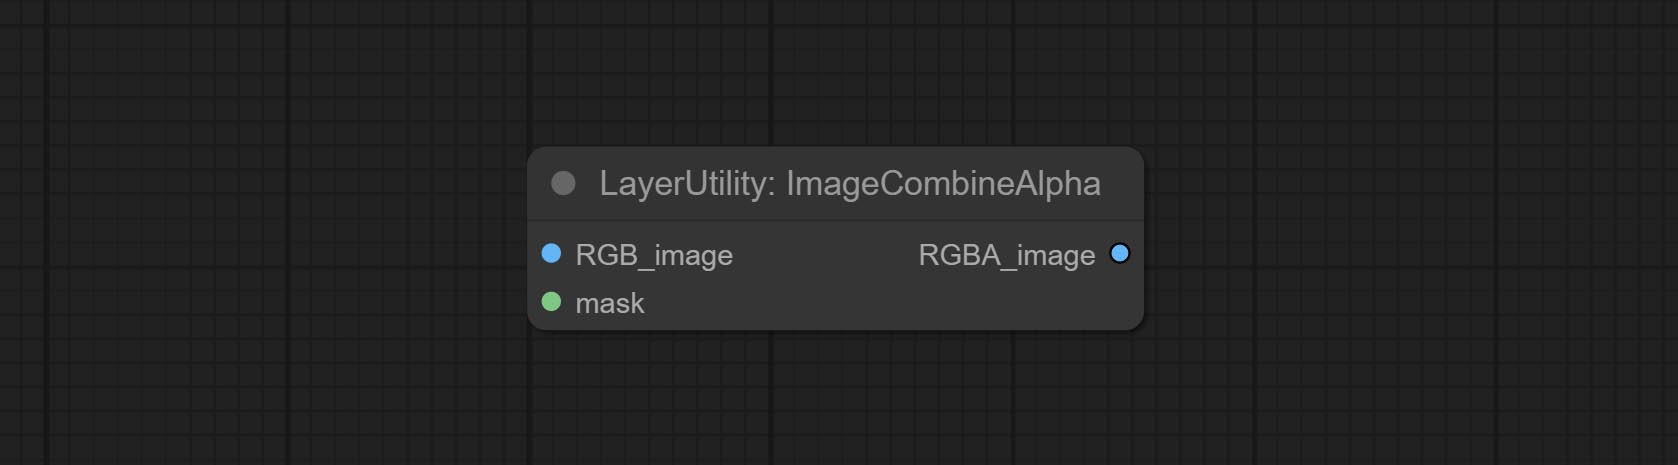
ImageCombineAlpha
Merge the image and mask into an RGBA mode image containing an alpha channel.
ImageAutoCrop
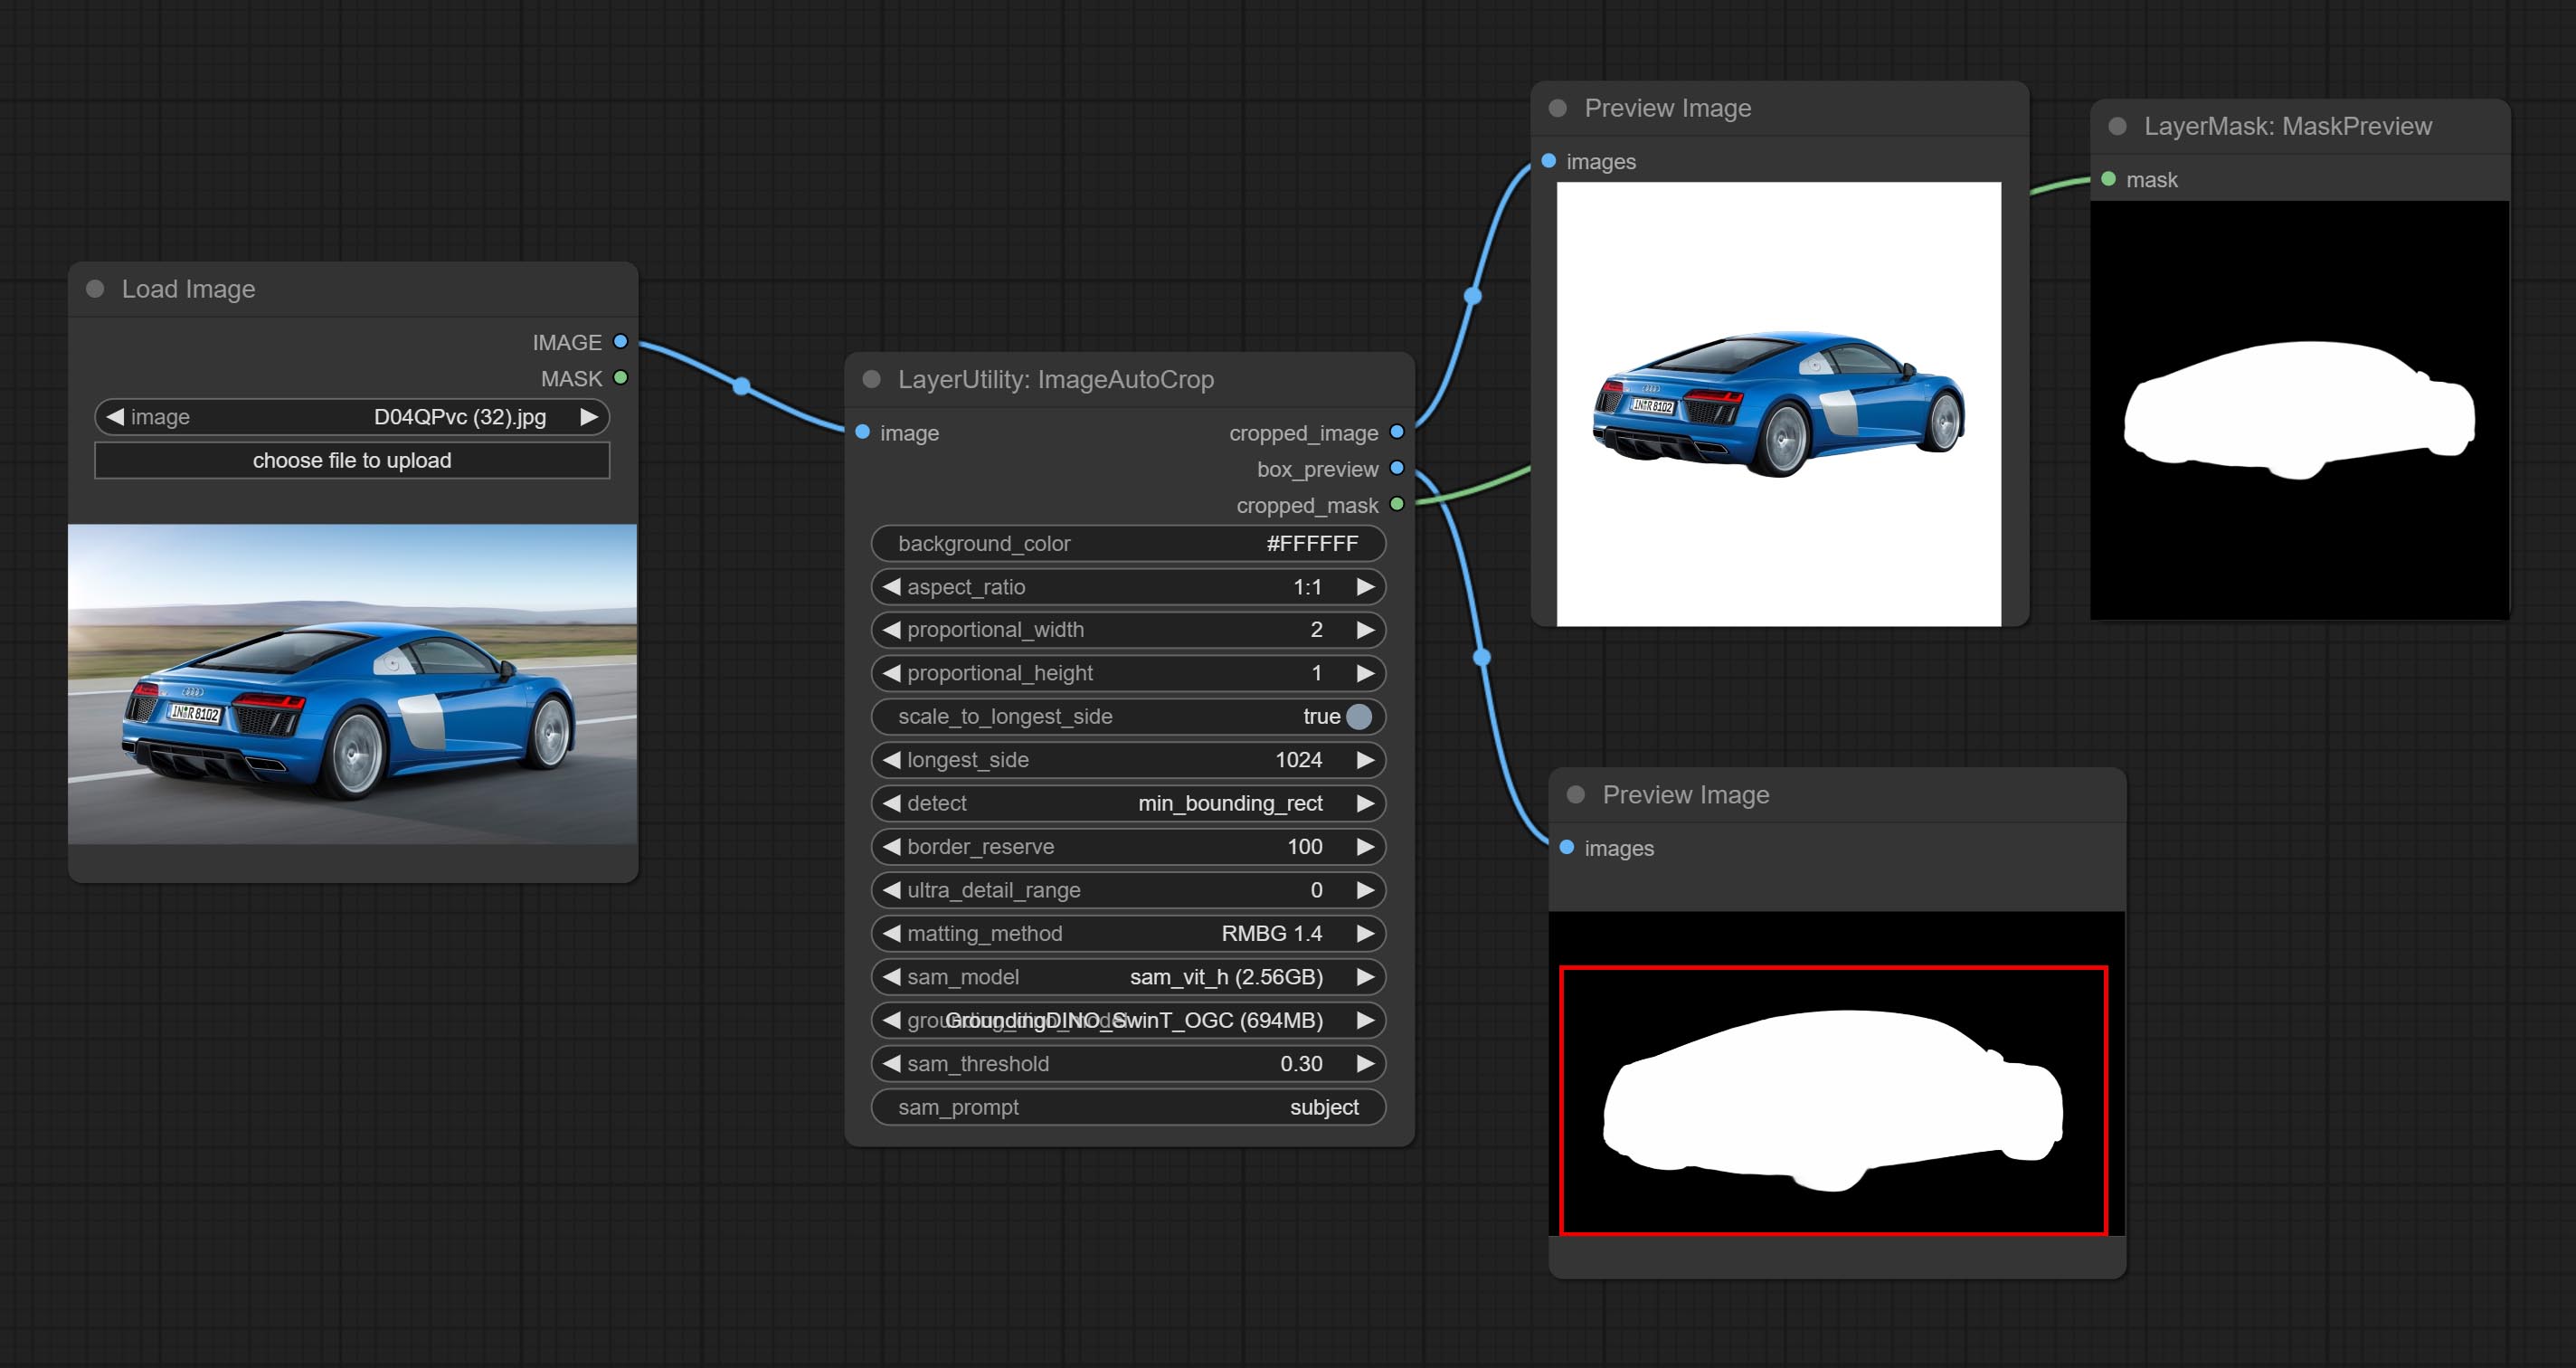
Automatically cutout and crop the image according to the mask. it can specify the background color, aspect ratio, and size for output image. this node is designed to generate the image materials for training models.
*Please refer to the model installation methods for SegmentAnythingUltra and RemBgUltra.
Node options: 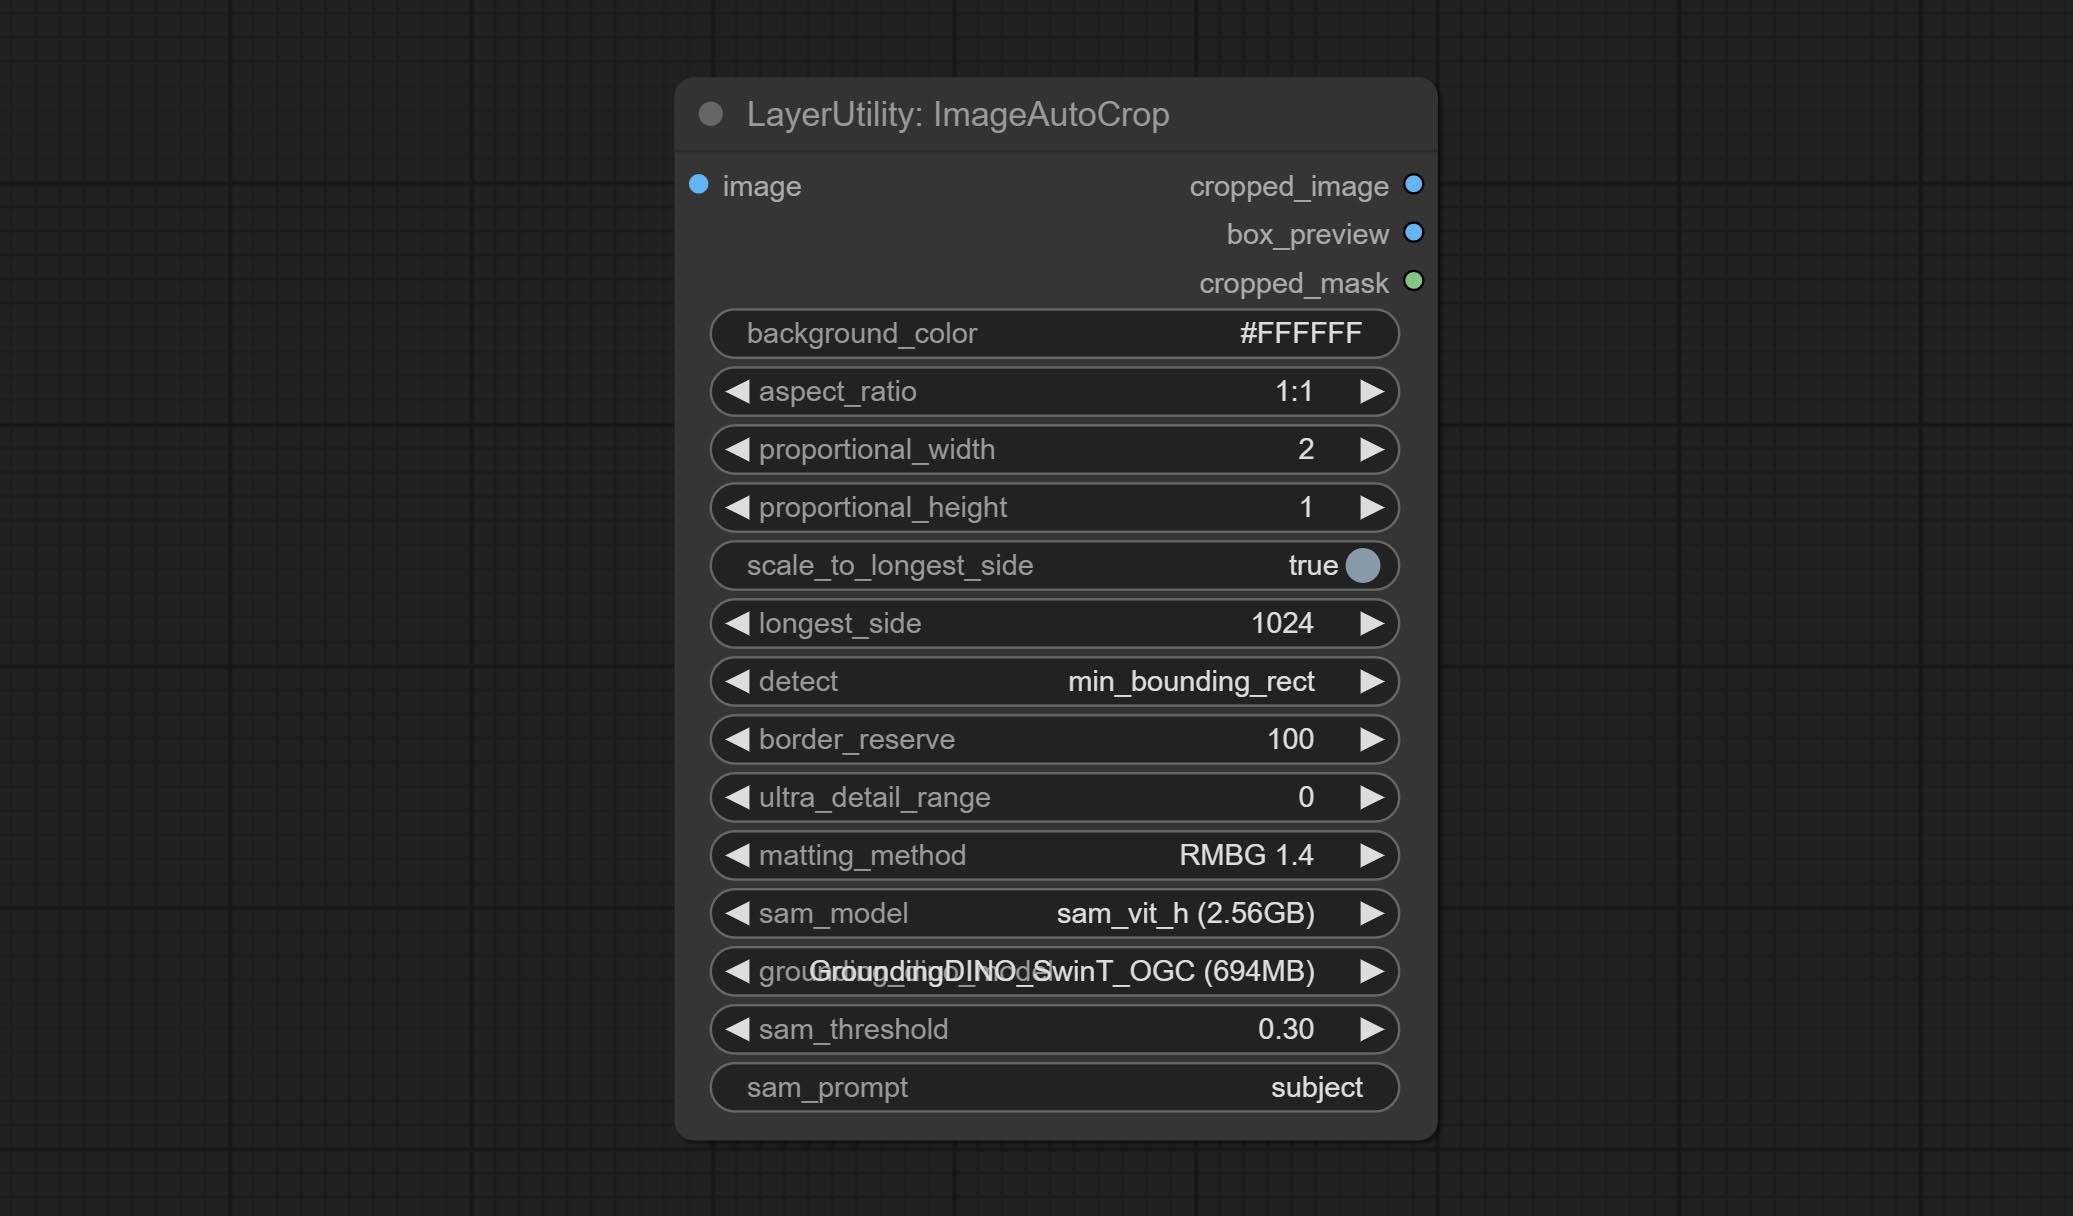
- background_color 4 : The background color.
- aspect_ratio: Here are several common frame ratios provided. alternatively, you can choose "original" to keep original ratio or customize the ratio using "custom".
- proportional_width: Proportional width. if the aspect ratio option is not "custom", this setting will be ignored.
- proportional_height: Proportional height. if the aspect ratio option is not "custom", this setting will be ignored.
- scale_by_longest_side: Allow scaling by long edge size.
- longest_side: When the scale_by_longest_side is set to True, this will be used this value to the long edge of the image. when the original_size have input, this setting will be ignored.
- detect: Detection method, min_bounding_rect is the minimum bounding rectangle, max_inscribed_rect is the maximum inscribed rectangle.
- border_reserve: Keep the border. expand the cutting range beyond the detected mask body area.
- ultra_detail_range: Mask edge ultra fine processing range, 0 is not processed, which can save generation time.
- matting_method: The method of generate masks. There are two methods available: Segment Anything and RMBG 1.4. RMBG 1.4 runs faster.
- sam_model: Select the SAM model used by Segment Anything here.
- grounding_dino_model: Select the Grounding_Dino model used by Segment Anything here.
- sam_threshold: The threshold for Segment Anything.
- sam_prompt: The prompt for Segment Anything.
Output: cropped_image: Crop and replace the background image. box_preview: Crop position preview. cropped_mask: Cropped mask.
ImageAutoCropV2
The V2 upgrad version of ImageAutoCrop , it has made the following changes based on the previous version: 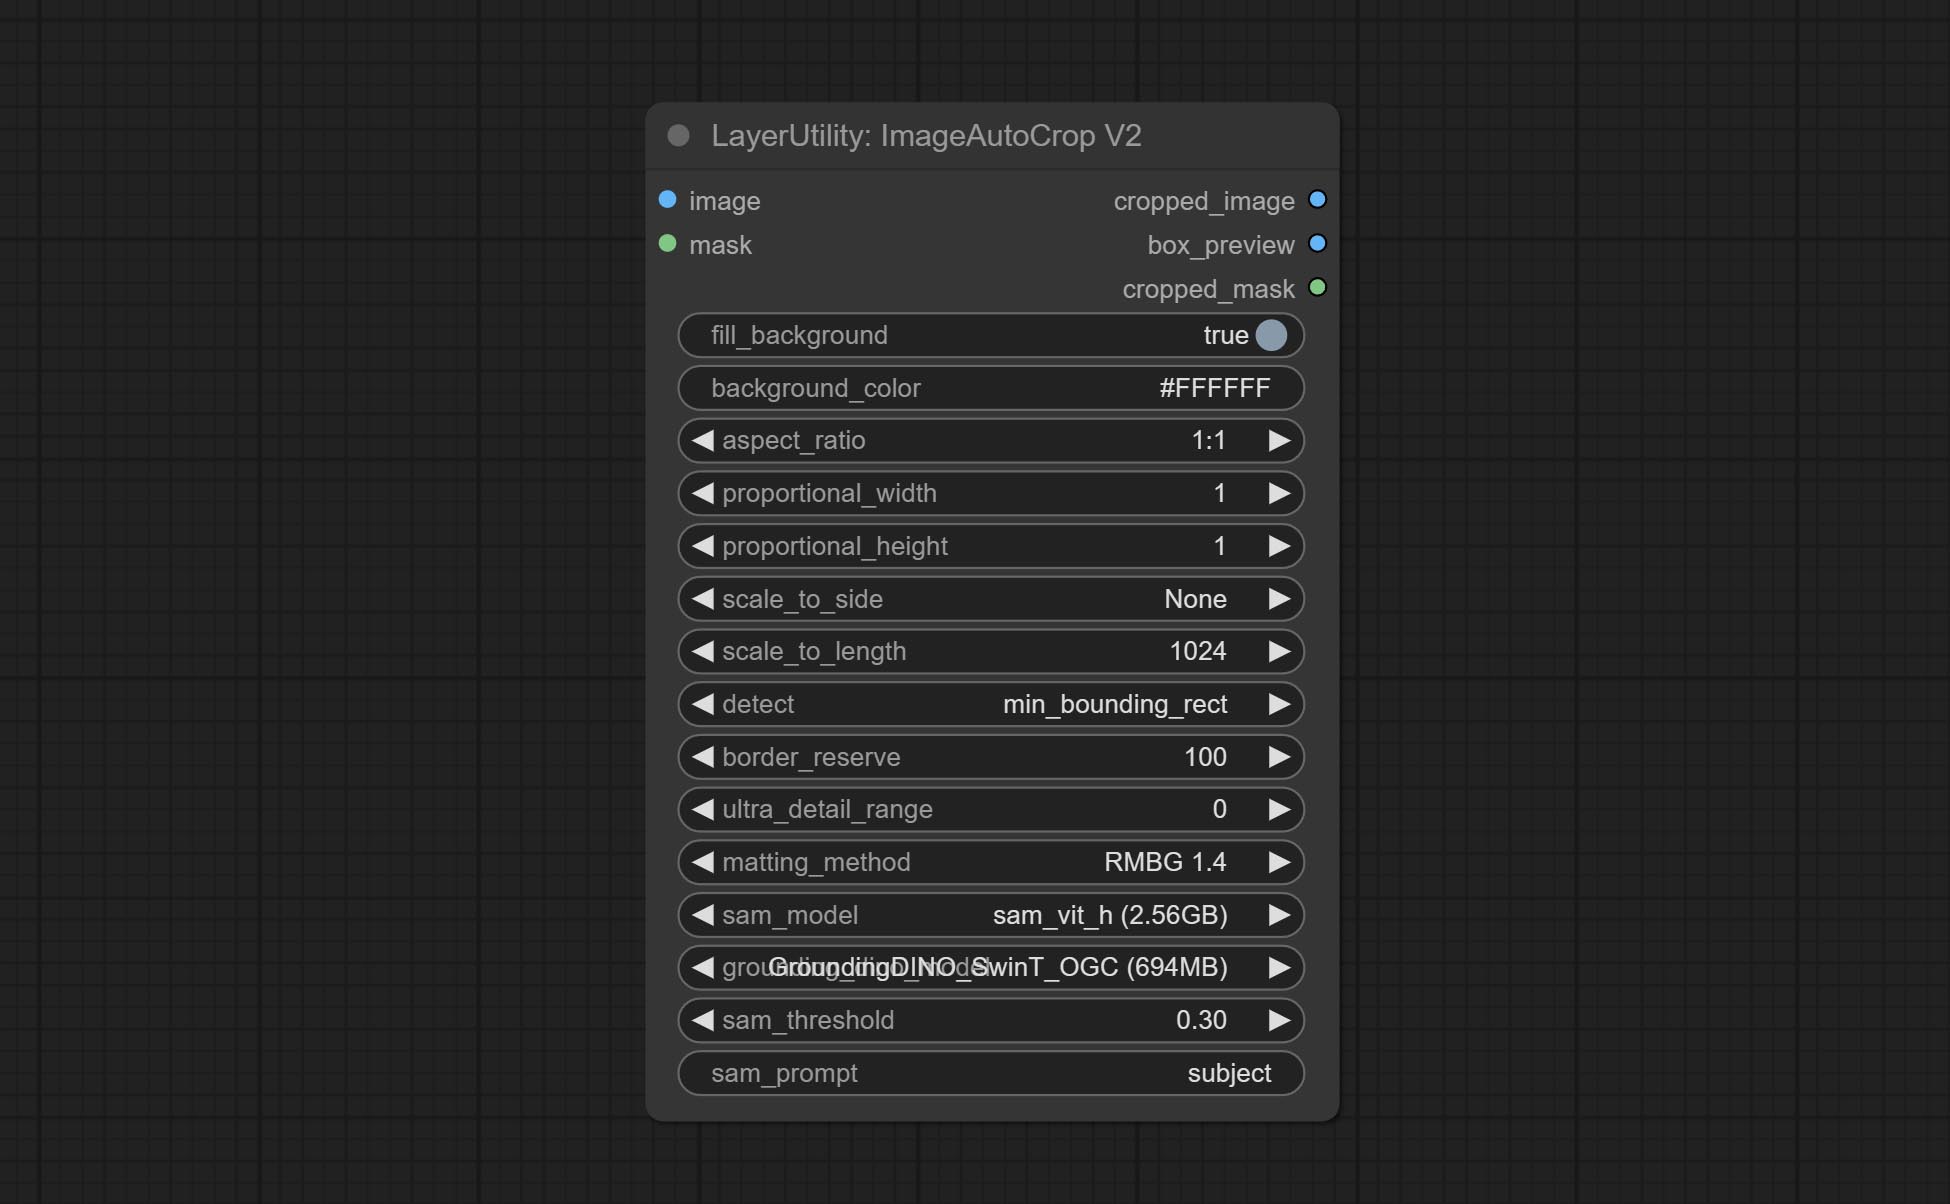
- Add optional input for mask. when there is a mask input, use that input directly to skip the built-in mask generation.
- Add
fill_background . When set to False, the background will not be processed and any parts beyond the frame will not be included in the output range. -
aspect_ratio adds the original option. - scale_by: Allow scaling by specified dimensions for longest, shortest, width, or height.
- scale_by_length: The value here is used as
scale_by to specify the length of the edge.
ImageAutoCropV3
Automatically crop the image to the specified size. You can input a mask to preserve the specified area of the mask. This node is designed to generate image materials for training the model.
节点选项: 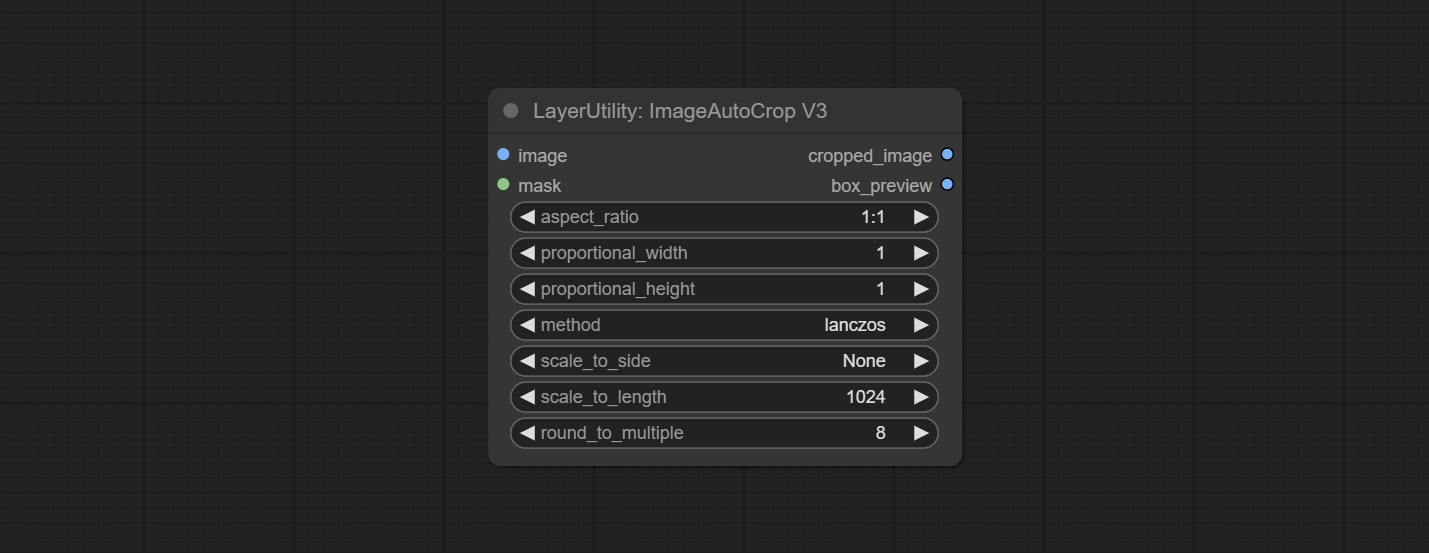
- image: The input image.
- mask: Optional input mask. The masking part will be preserved within the range of the cutting aspect ratio.
- aspect_ratio: The aspect ratio of the output. Here are common frame ratios provided, with "custom" being the custom ratio and "original" being the original frame ratio.
- proportional_width: Proportionally wide. If the aspect_ratio option is not 'custom', this setting will be ignored.
- proportional_height: High proportion. If the aspect_ratio option is not 'custom', this setting will be ignored.
- method: Scaling sampling methods include Lanczos, Bicubic, Hamming, Bilinear, Box, and Nearest.
- scale_to_side: Allow scaling to be specified by long side, short side, width, height, or total pixels.
- scale_to_length: The value here is used as the scale_to-side to specify the length of the edge or the total number of pixels (kilo pixels).
- round_to_multiple: Multiply to the nearest whole. For example, if set to 8, the width and height will be forcibly set to multiples of 8.
Outputs: cropped_image: The cropped image. box_preview: Preview of cutting position.
HLFrequencyDetailRestore
Using low frequency filtering and retaining high frequency to recover image details. Compared to kijai's DetailTransfer, this node is better integrated with the environment while retaining details. 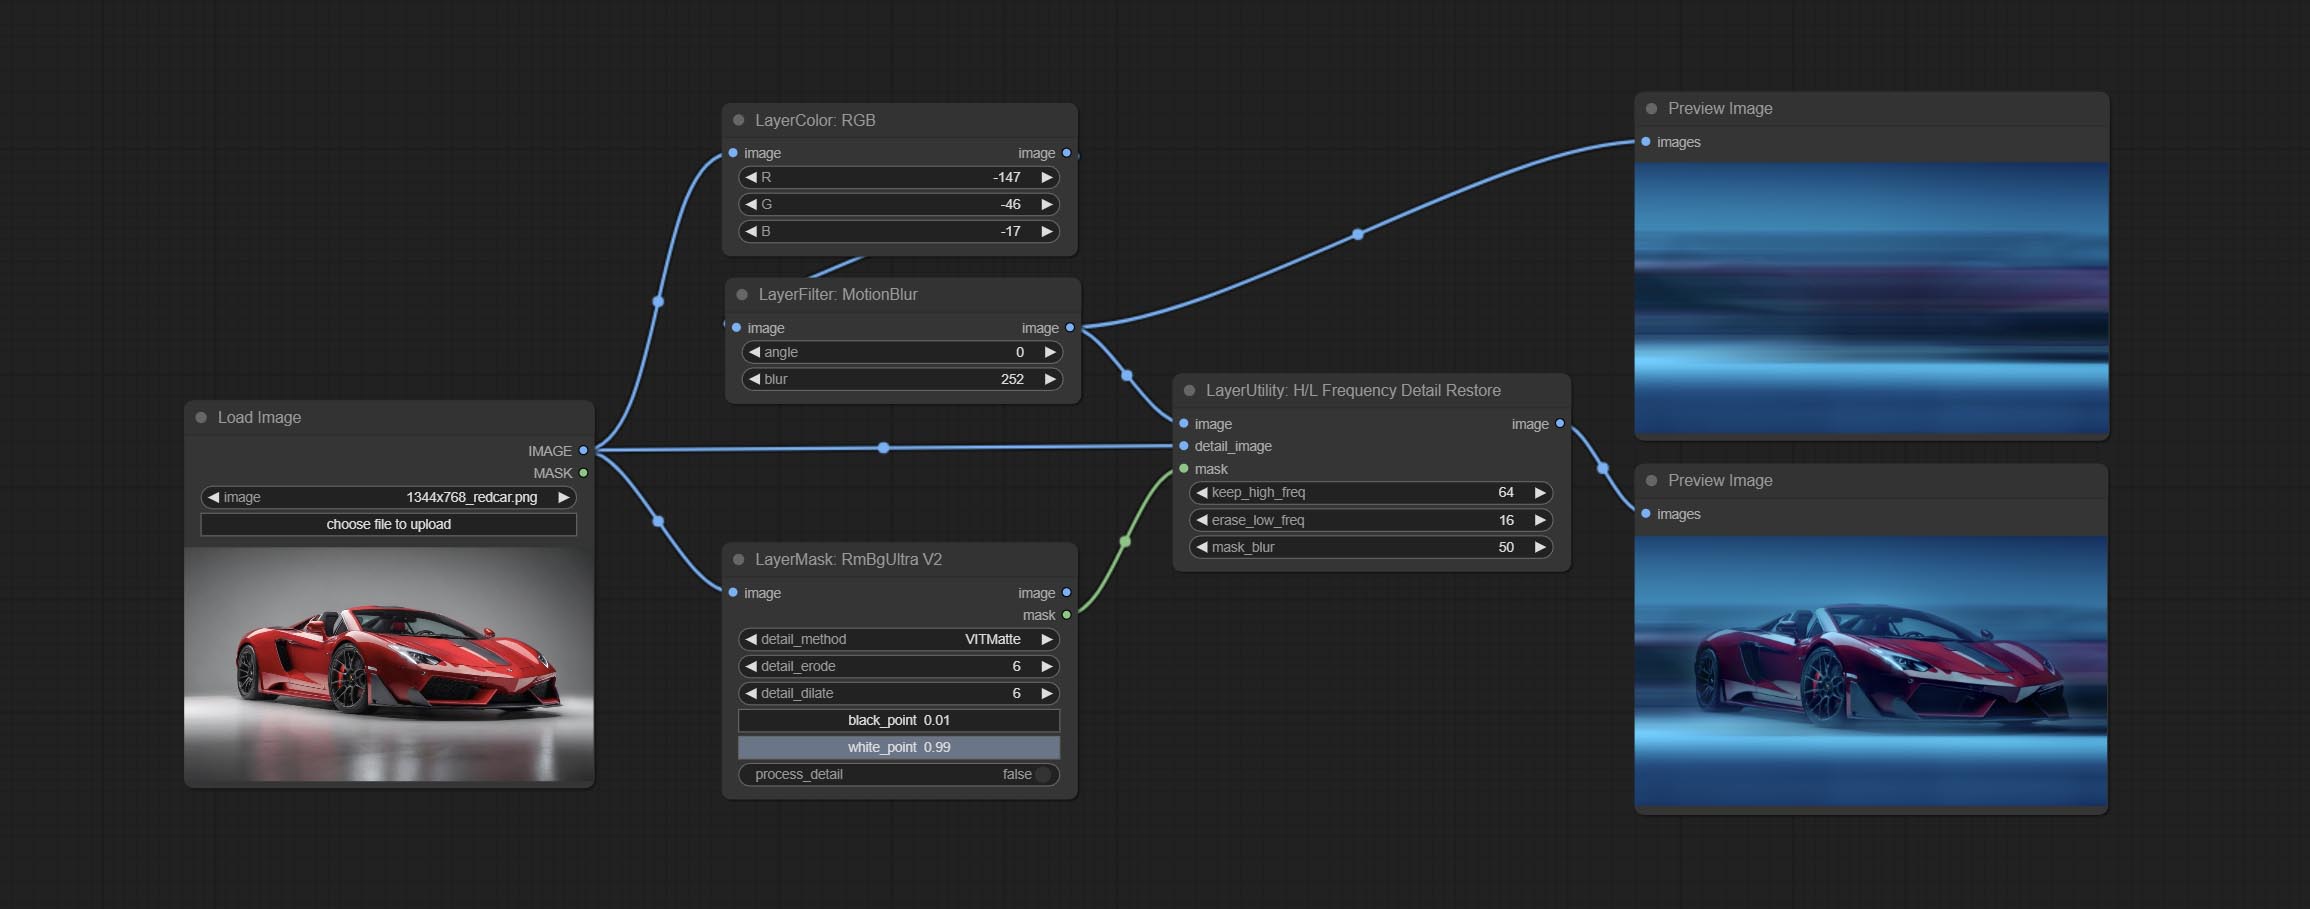
节点选项:
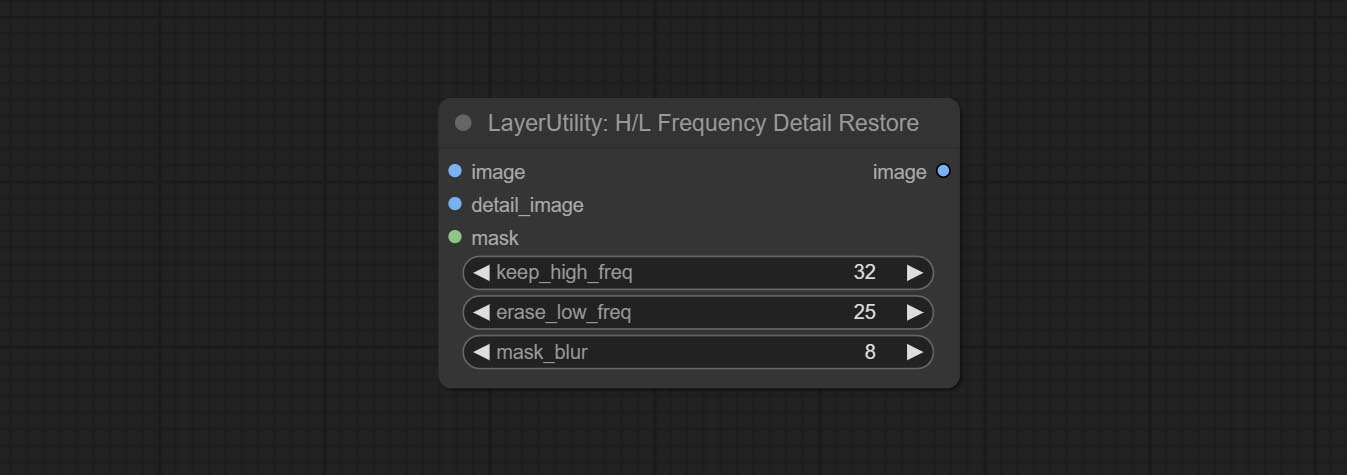
- image: Background image input.
- detail_image: Detail image input.
- mask: Optional input, if there is a mask input, only the details of the mask part are restored.
- keep_high_freq: Reserved range of high frequency parts. The larger the value, the richer the retained high-frequency details.
- erase_low_freq: The range of low frequency parts of the erasure. The larger the value, the more the low frequency range of the erasure.
- mask_blur: Mask edge blur. Valid only if there is masked input.
getimagesize
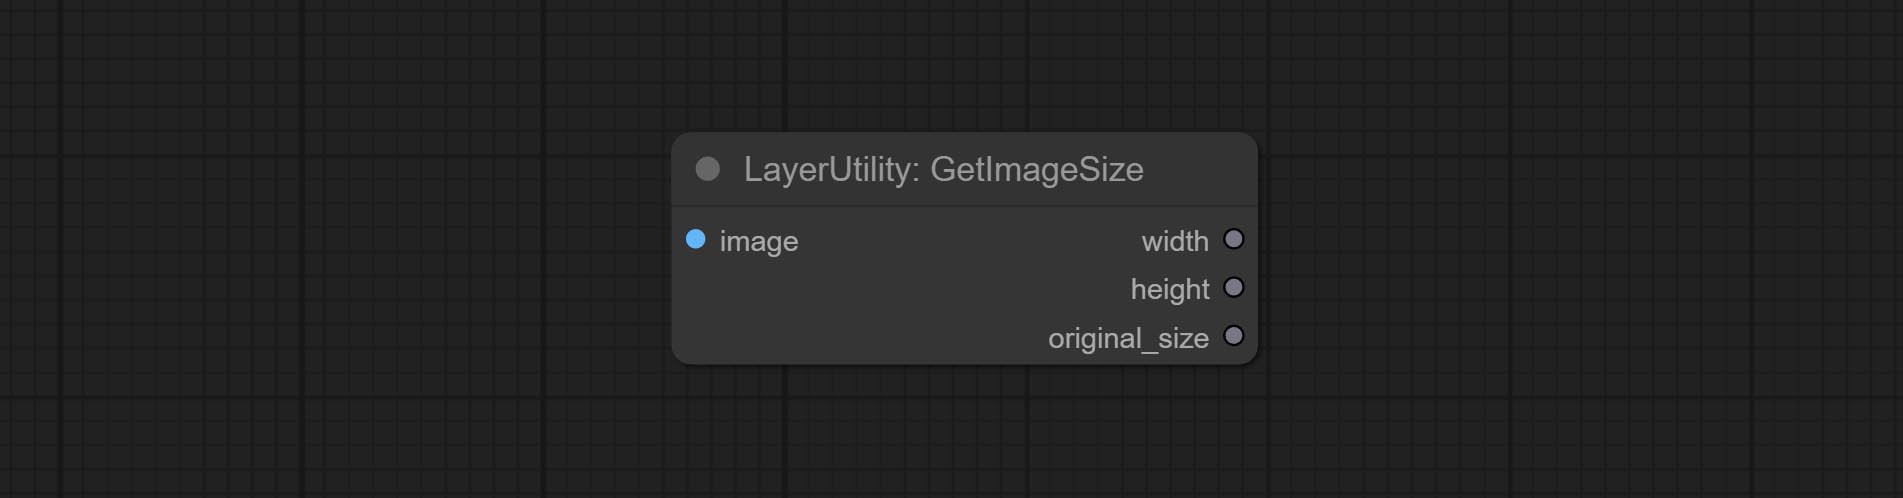
Obtain the width and height of the image.
输出:
- width: The width of image.
- height: The height of image.
- original_size: The original size data of the image is used for subsequent node recovery.
ImageHub
Switch output from multiple input images and masks, supporting 9 sets of inputs. All input items are optional. if there is only image or mask in a set of input, the missing item will be output as None. 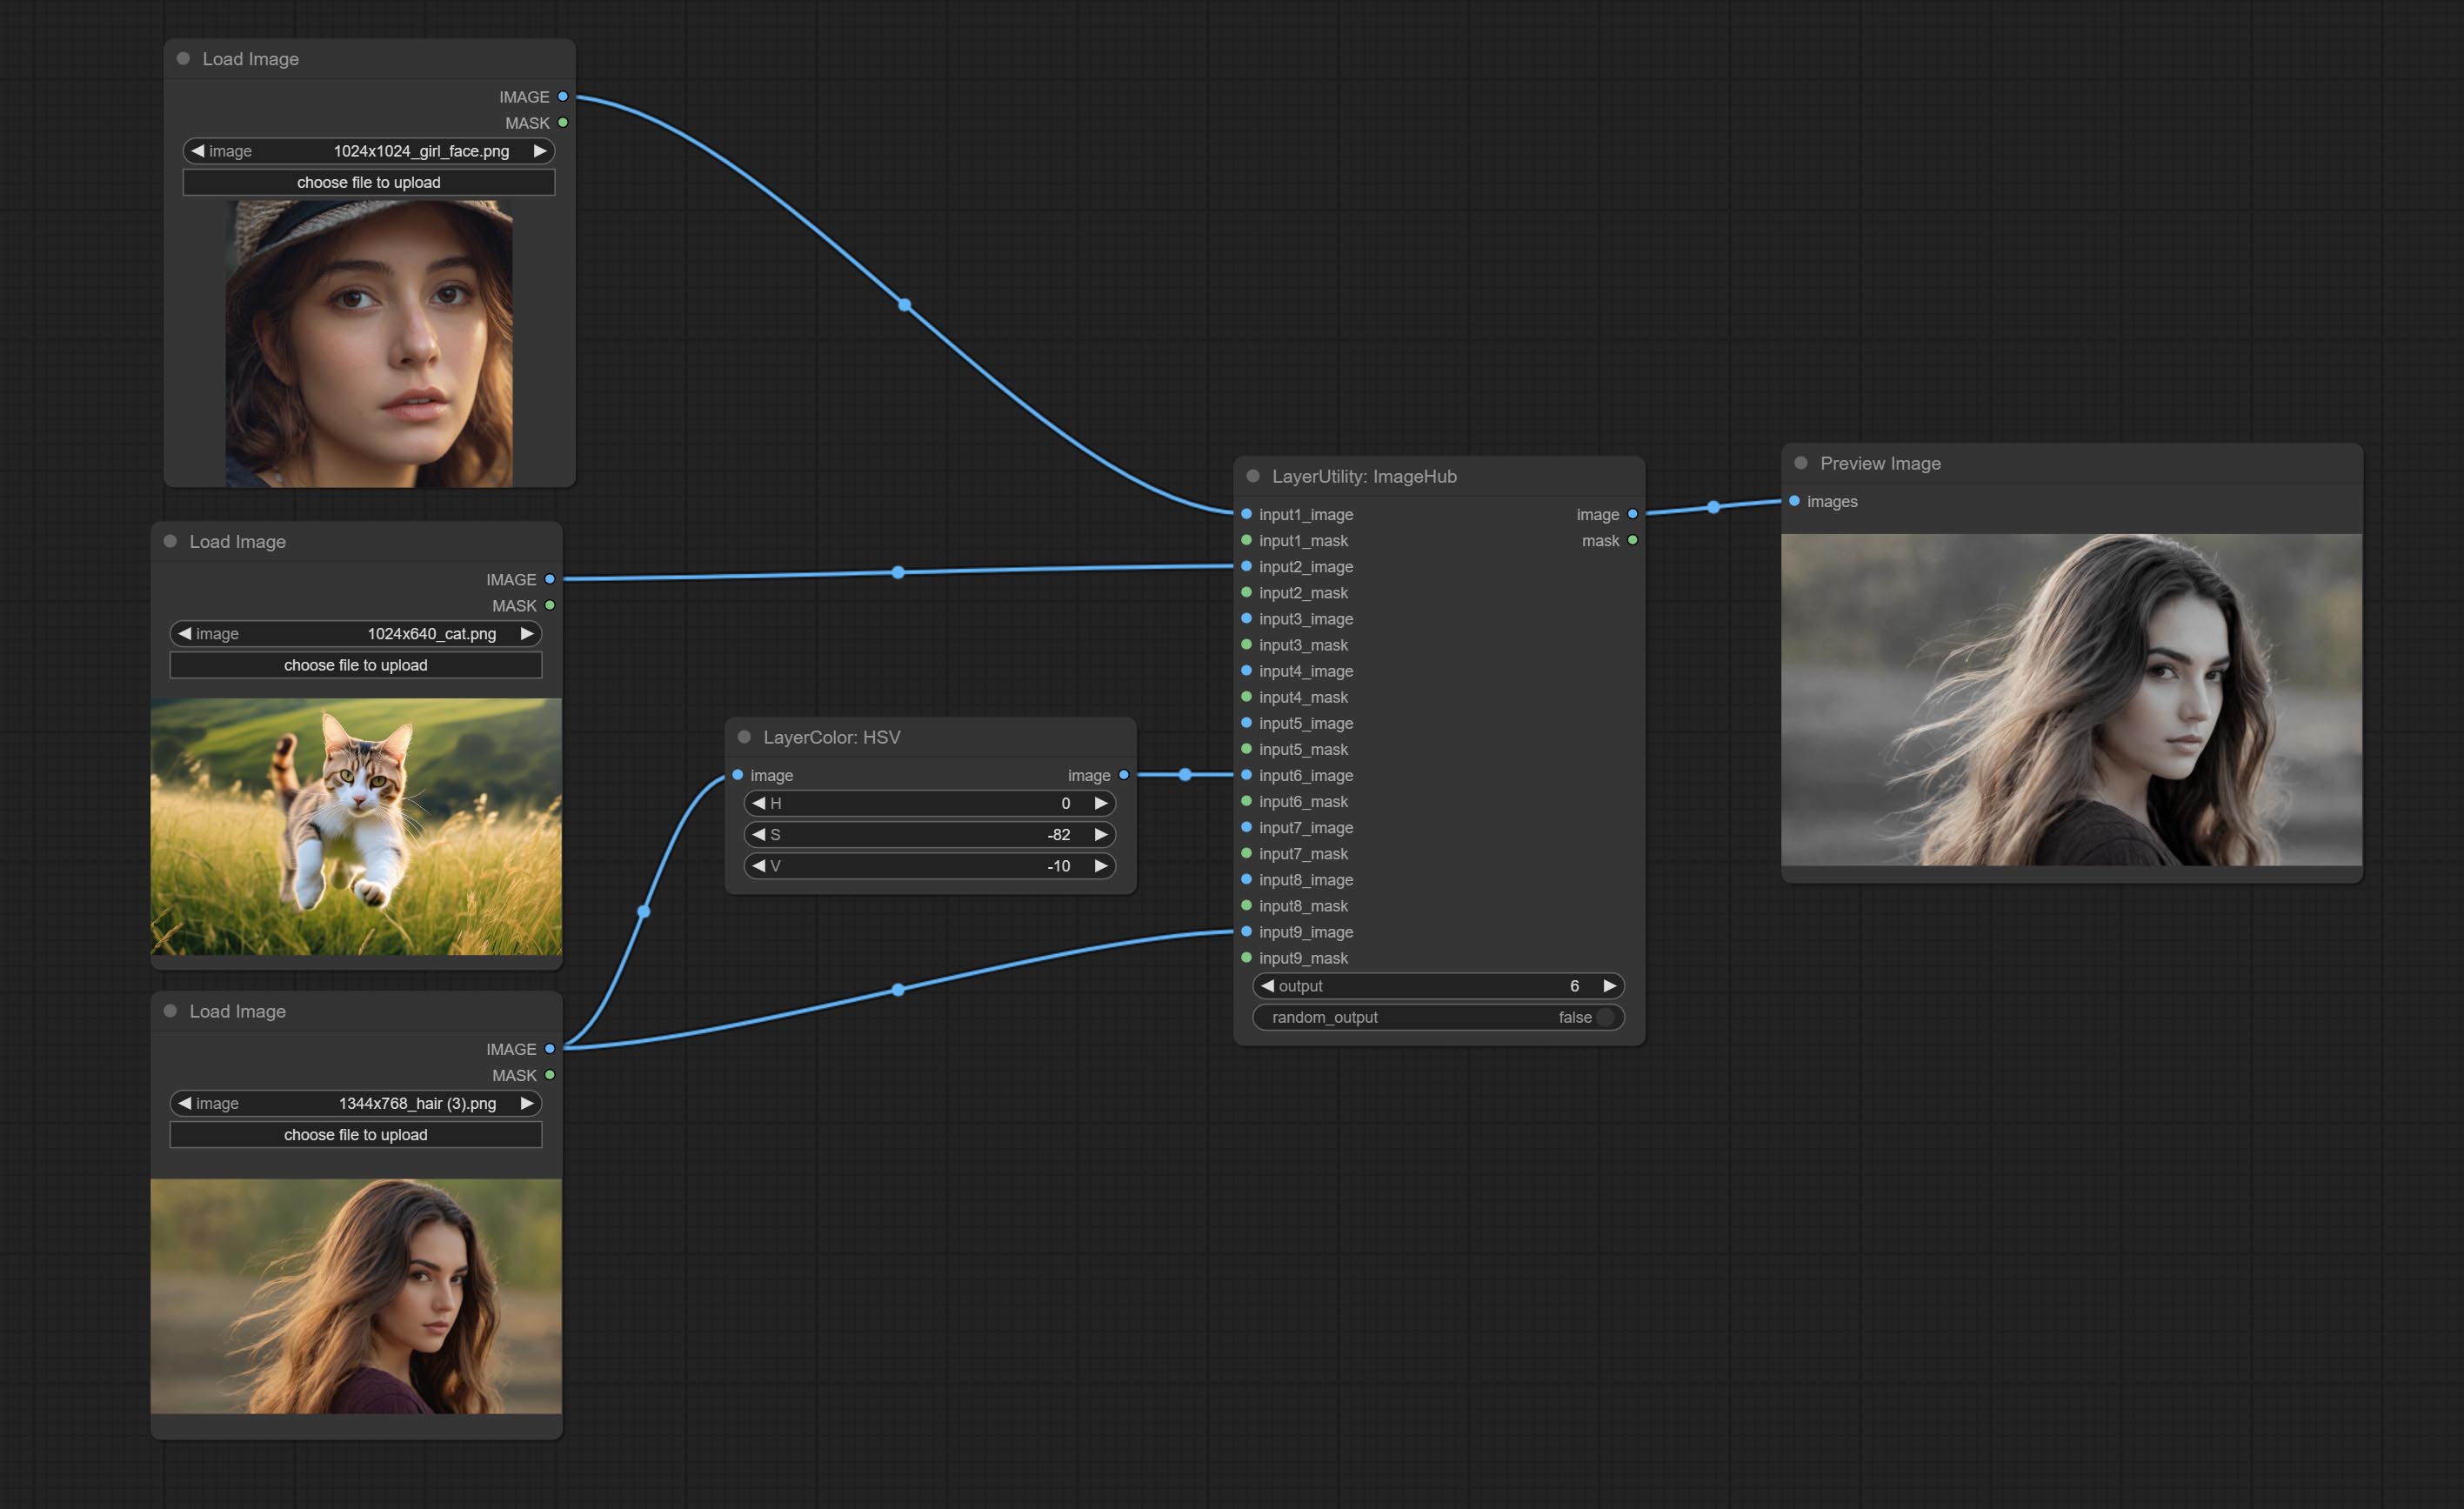
Node options:
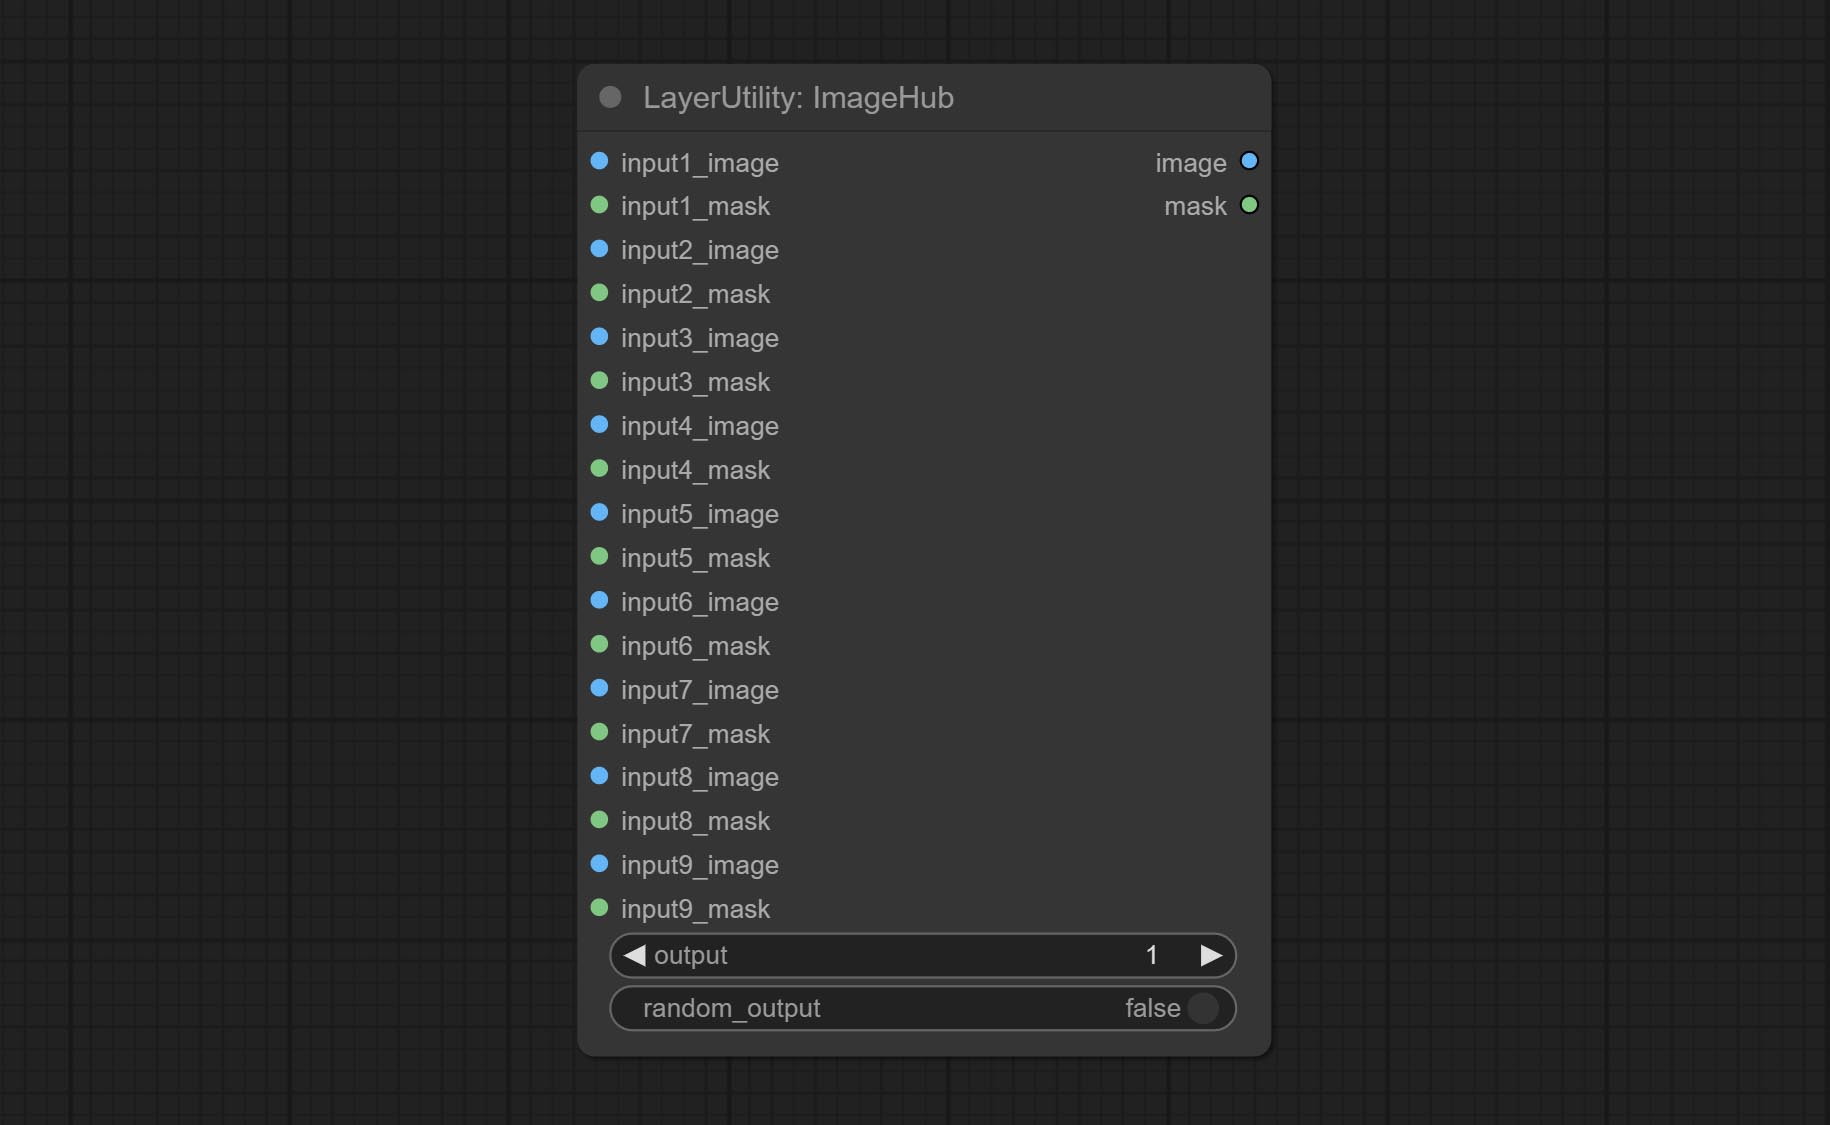
- output: Switch output. the value is the corresponding input group. when the
random-output option is True, this setting will be ignored. - random_output: When this is true, the
output setting will be ignored and a random set will be output among all valid inputs.
BatchSelector
Retrieve specified images or masks from batch images or masks. 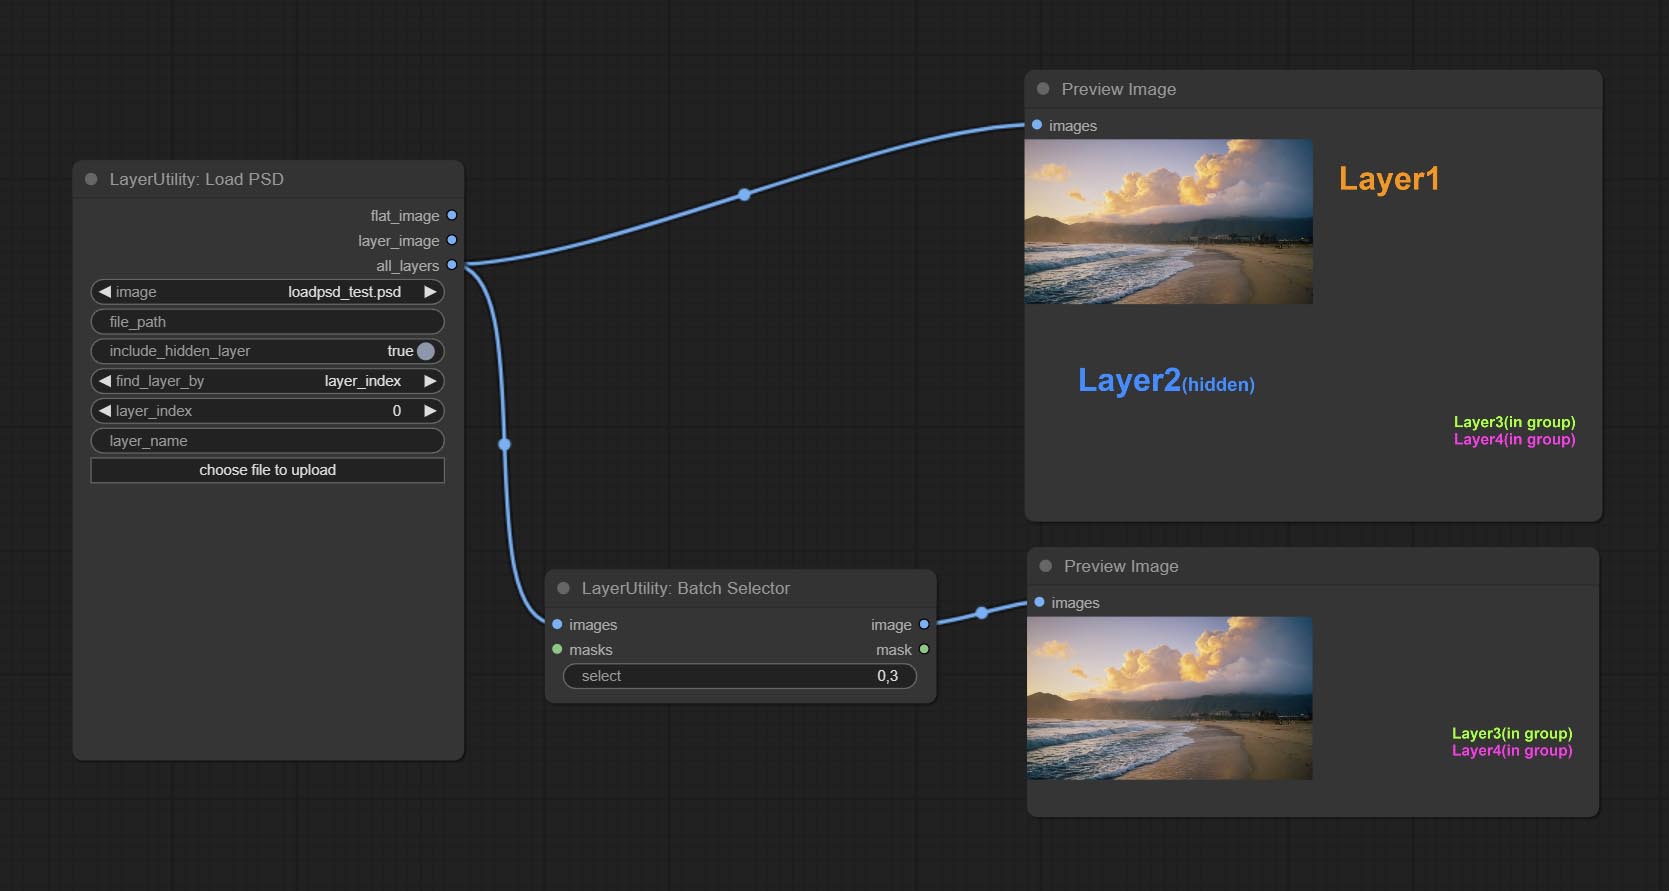
节点选项:
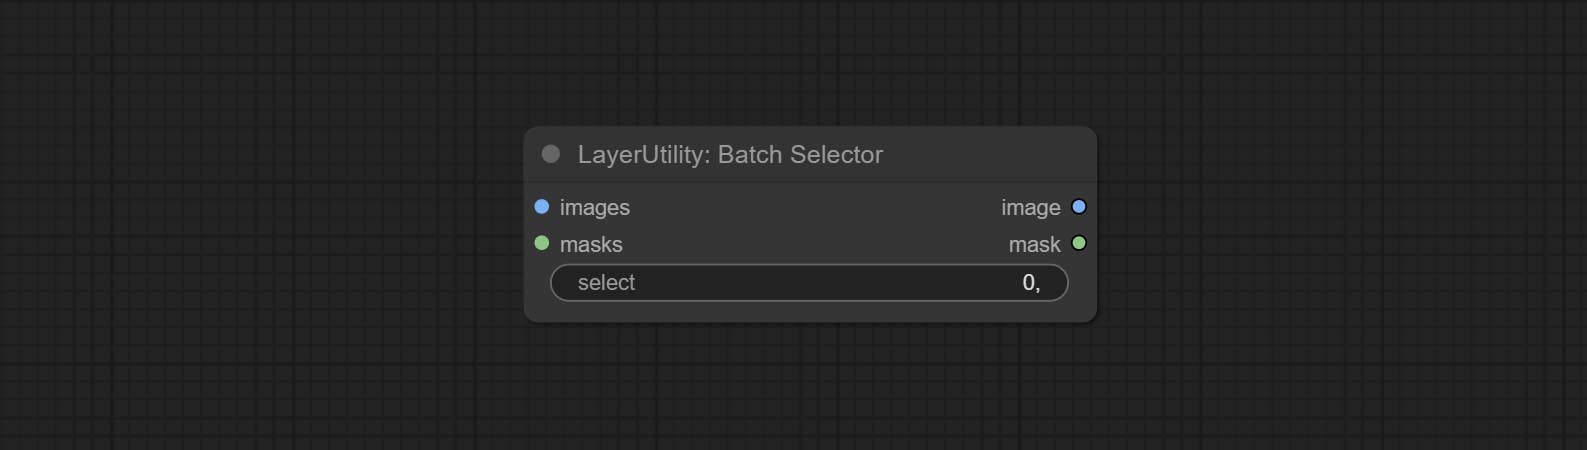
- images: Batch images input. This input is optional.
- masks: Batch masks input. This input is optional.
- select: Select the output image or mask at the batch index value, where 0 is the first image. Multiple values can be entered, separated by any non numeric character, including but not limited to commas, periods, semicolons, spaces or letters, and even Chinese characters. Note: If the value exceeds the batch size, the last image will be output. If there is no corresponding input, an empty 64x64 image or a 64x64 black mask will be output.
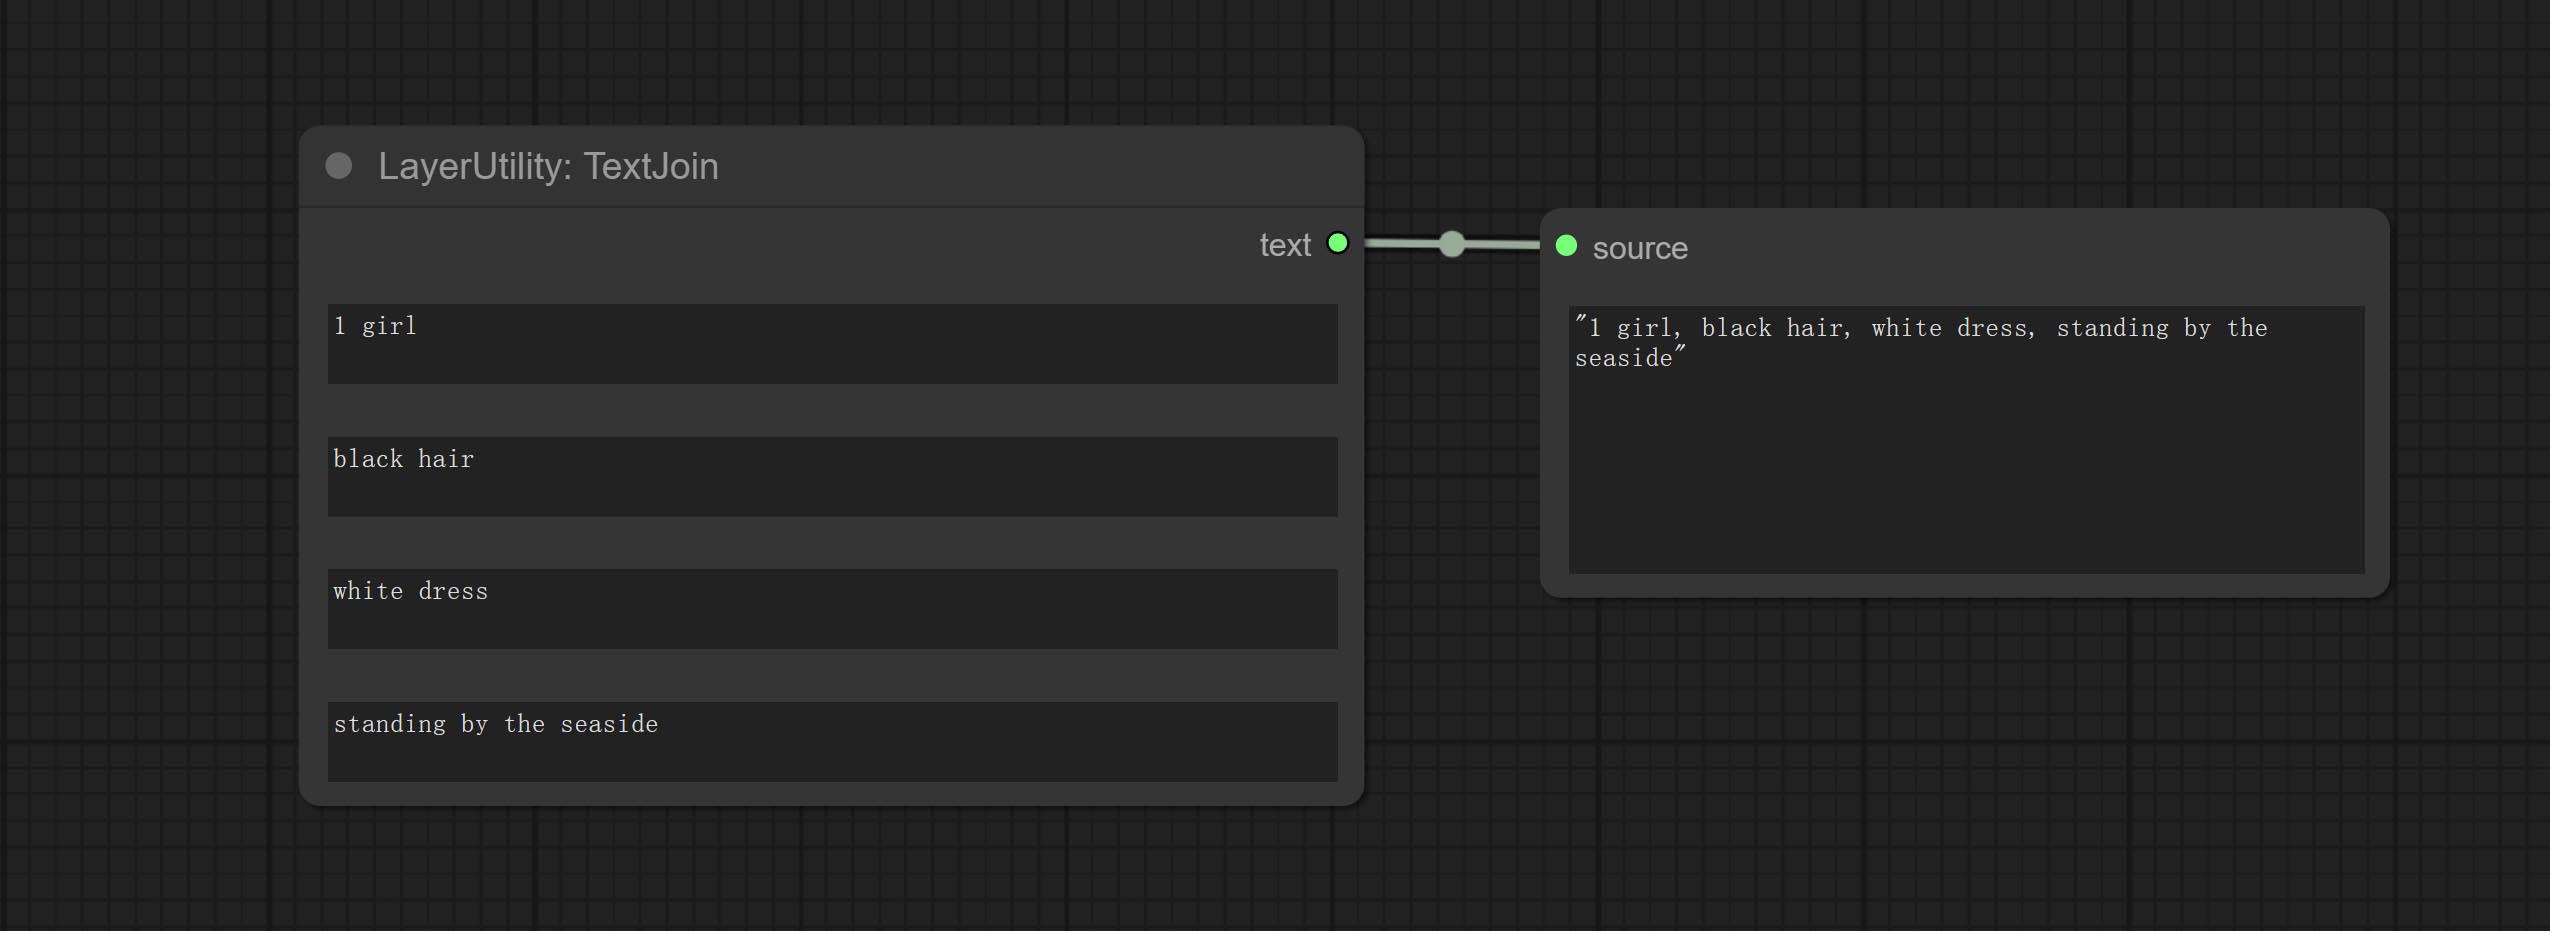
TextJoin
Combine multiple paragraphs of text into one.
TextJoinV2
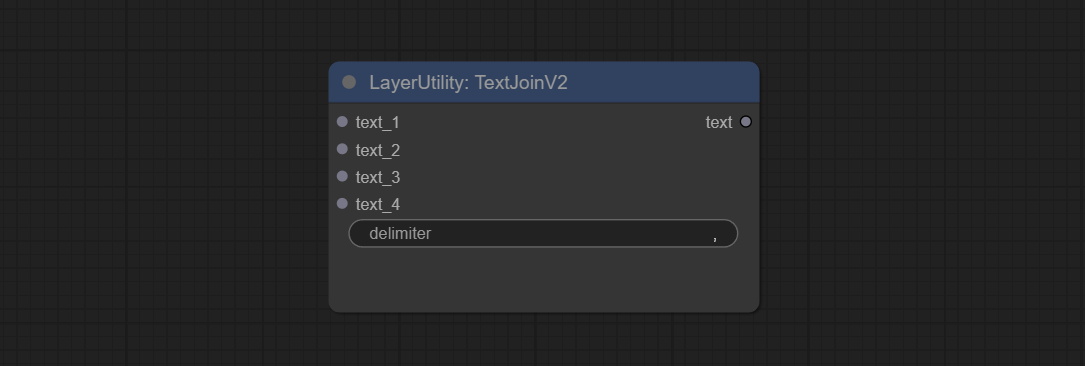
Added delimiter options on the basis of TextJoin.
PrintInfo
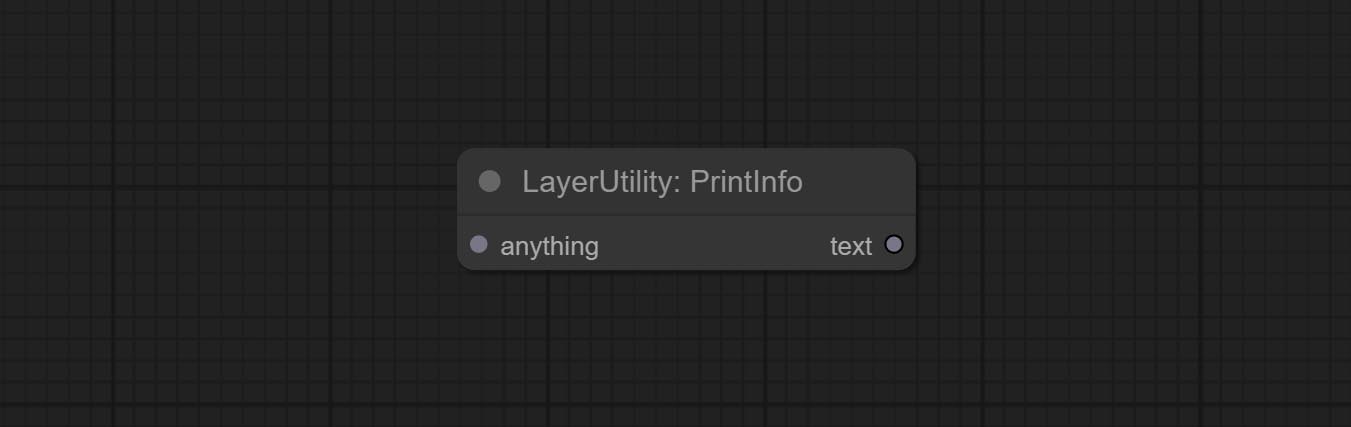
Used to provide assistance for workflow debugging. When running, the properties of any object connected to this node will be printed to the console.
This node allows any type of input.
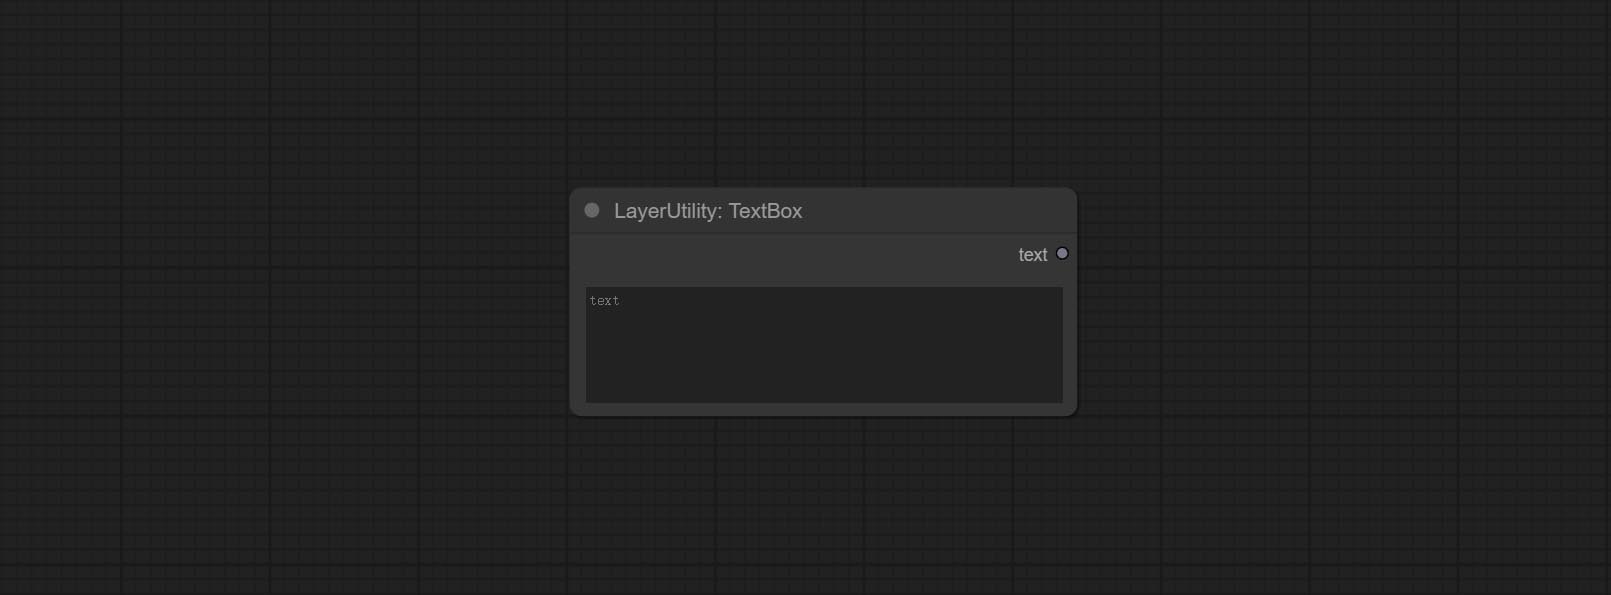
文本框
Output a string.
细绳
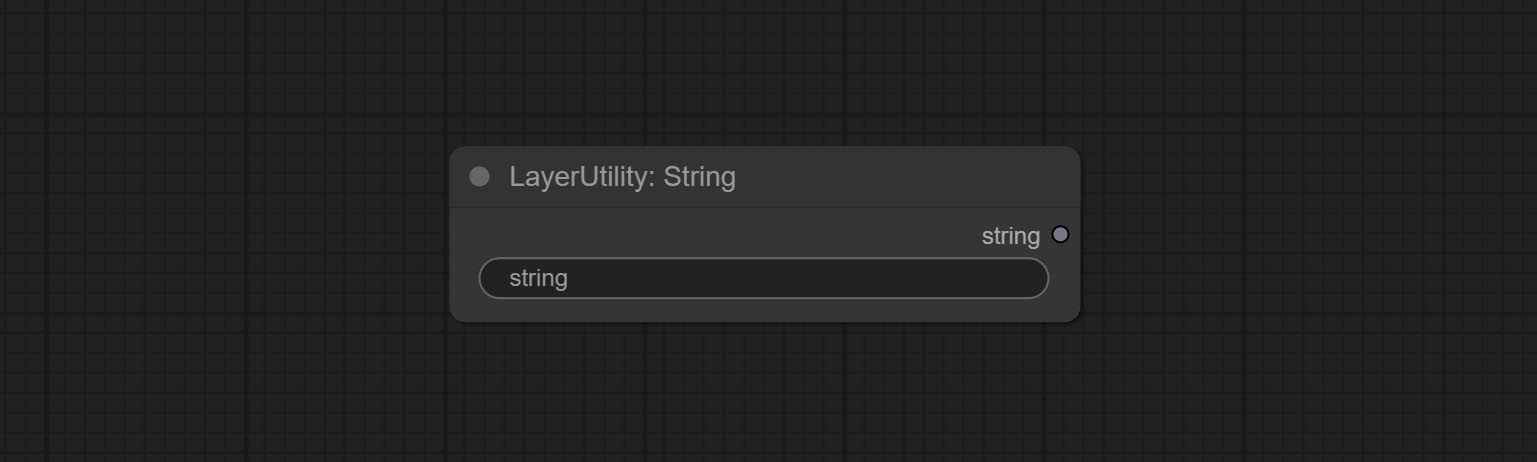
Output a string. same as TextBox.
整数
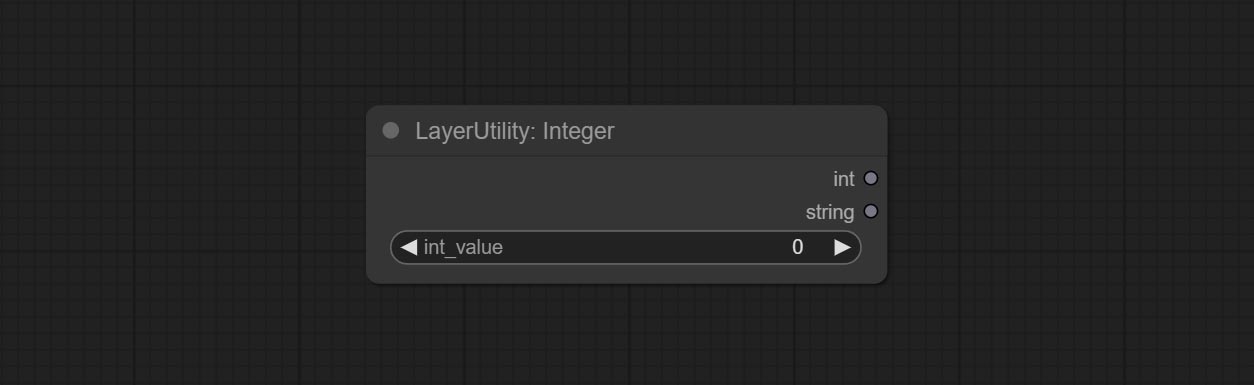
Output a integer value.
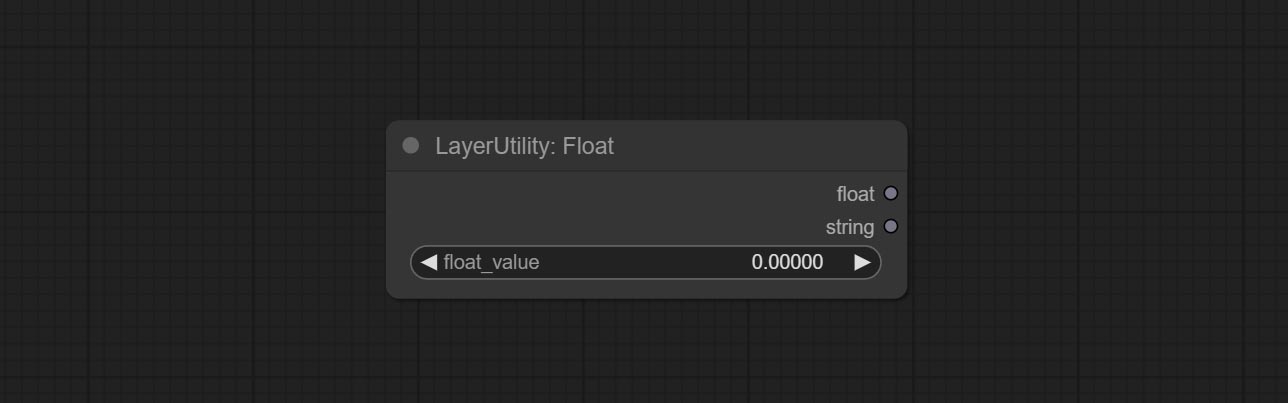
漂浮
Output a floating-point value with a precision of 5 decimal places.
布尔

Output a boolean value.
RandomGenerator
Used to generate random value within a specified range, with outputs of int, float, and boolean. Supports batch and list generation, and supports batch generation of a set of different random number lists based on image batch. 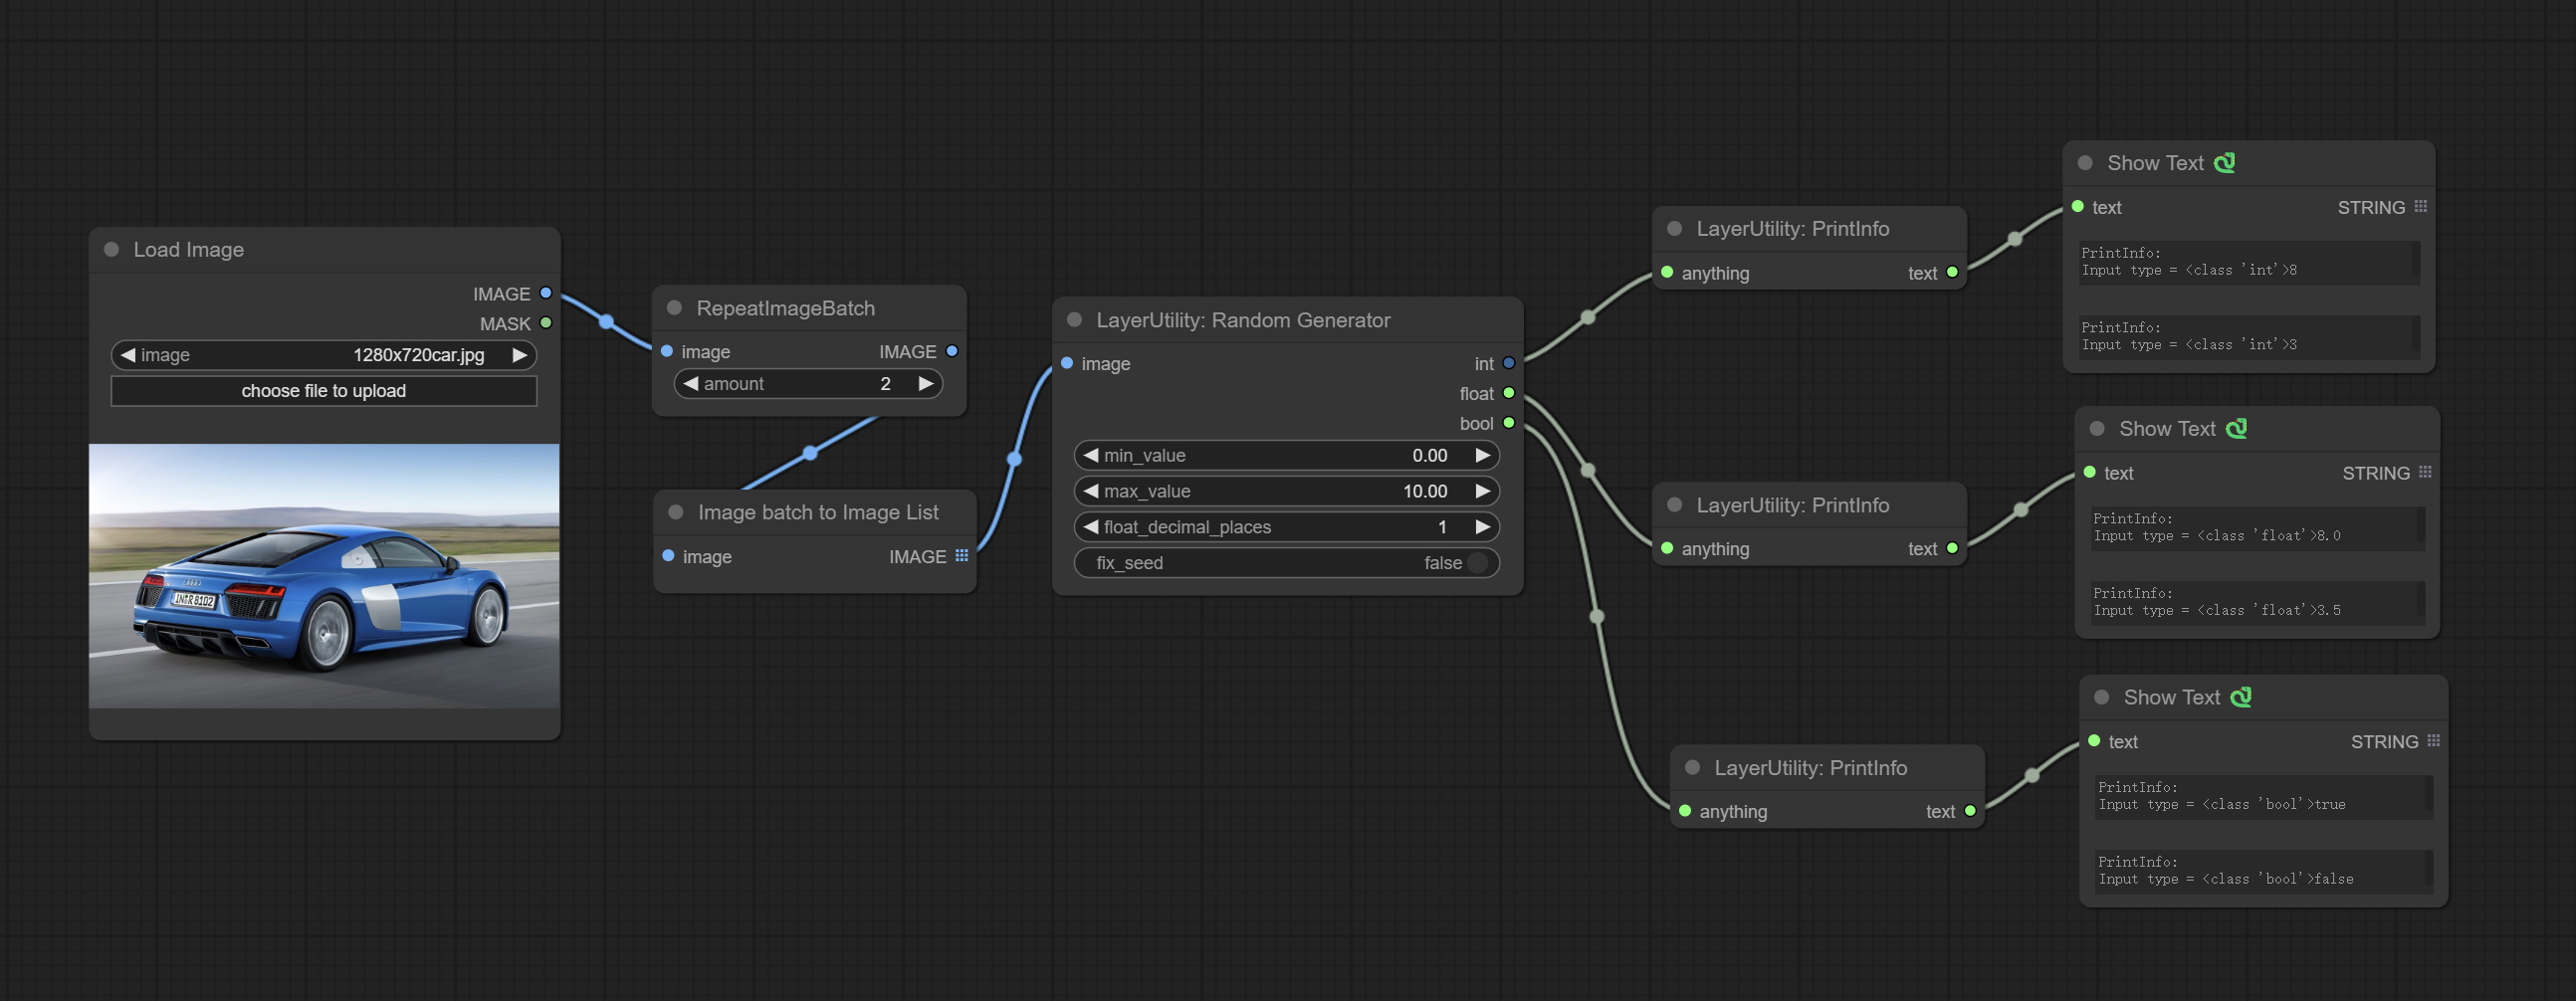
节点选项: 
- image: Optional input, generate a list of random numbers that match the quantity in batches according to the image.
- min_value: Minimum value. Random numbers will randomly take values from the minimum to the maximum.
- max_value: Maximum value. Random numbers will randomly take values from the minimum to the maximum.
- float_decimal_places: Precision of float value.
- fix_seed:Is the random number seed fixed.如果此选项已固定,则生成的随机数将始终相同。
Outputs: int: Integer random number. float: Float random number. bool: Boolean random number.
RandomGeneratorV2
On the based of RandomGenerator, add the least random range and seed options.
节点选项: 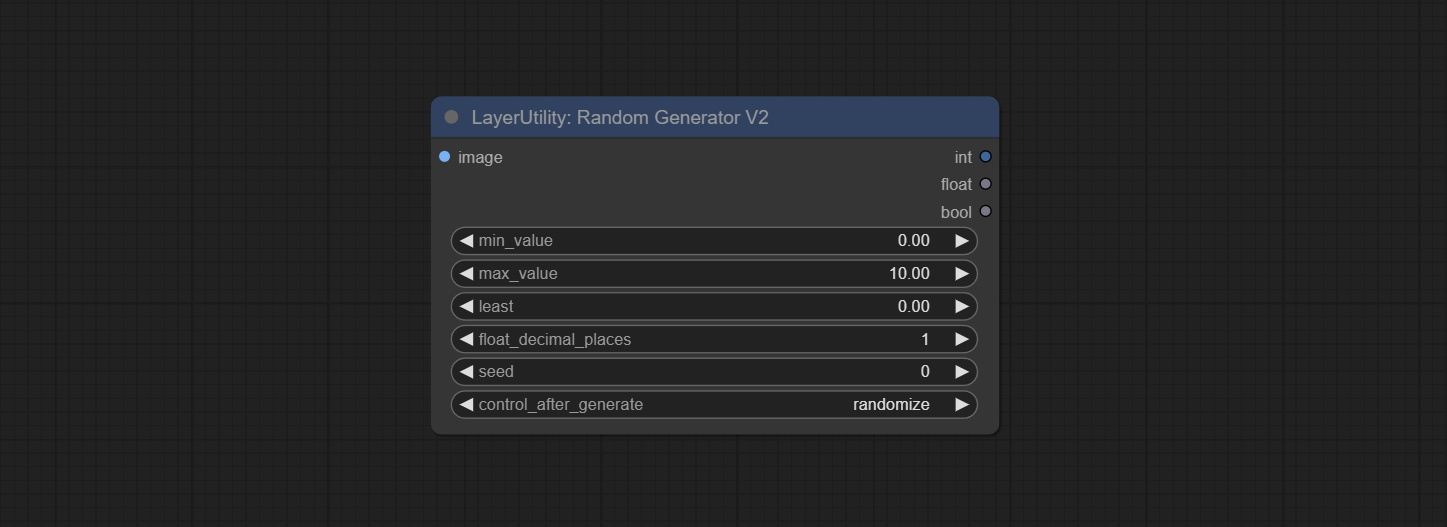
- image: Optional input, generate a list of random numbers that match the quantity in batches according to the image.
- min_value: Minimum value. Random numbers will randomly take values from the minimum to the maximum.
- max_value: Maximum value. Random numbers will randomly take values from the minimum to the maximum.
- least: Minimum random range. Random numbers will randomly at least take this value.
- float_decimal_places: Precision of float value.
- seed: The seed of random number.
- control_after_generate:种子更改选项。如果此选项已固定,则生成的随机数将始终相同。
Outputs: int: Integer random number. float: Float random number. bool: Boolean random number.
NumberCalculator
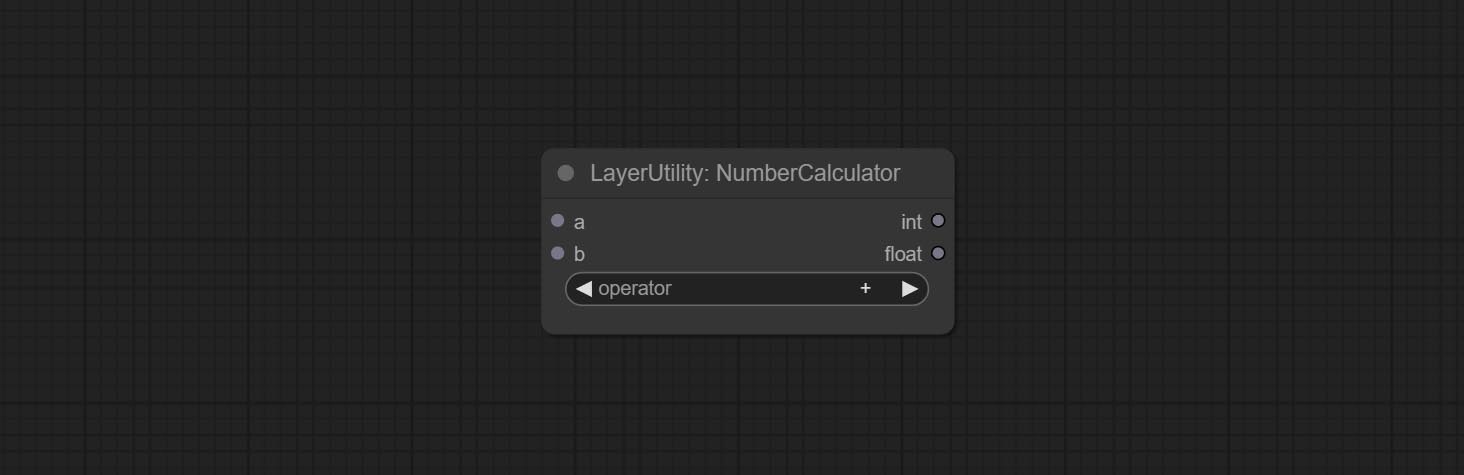
Performs mathematical operations on two numeric values and outputs integer and floating point results * . Supported operations include + , - , * , / , ** , // , % .
* The input only supports boolean, integer, and floating point numbers, forcing in other data will result in error.
NumberCalculatorV2
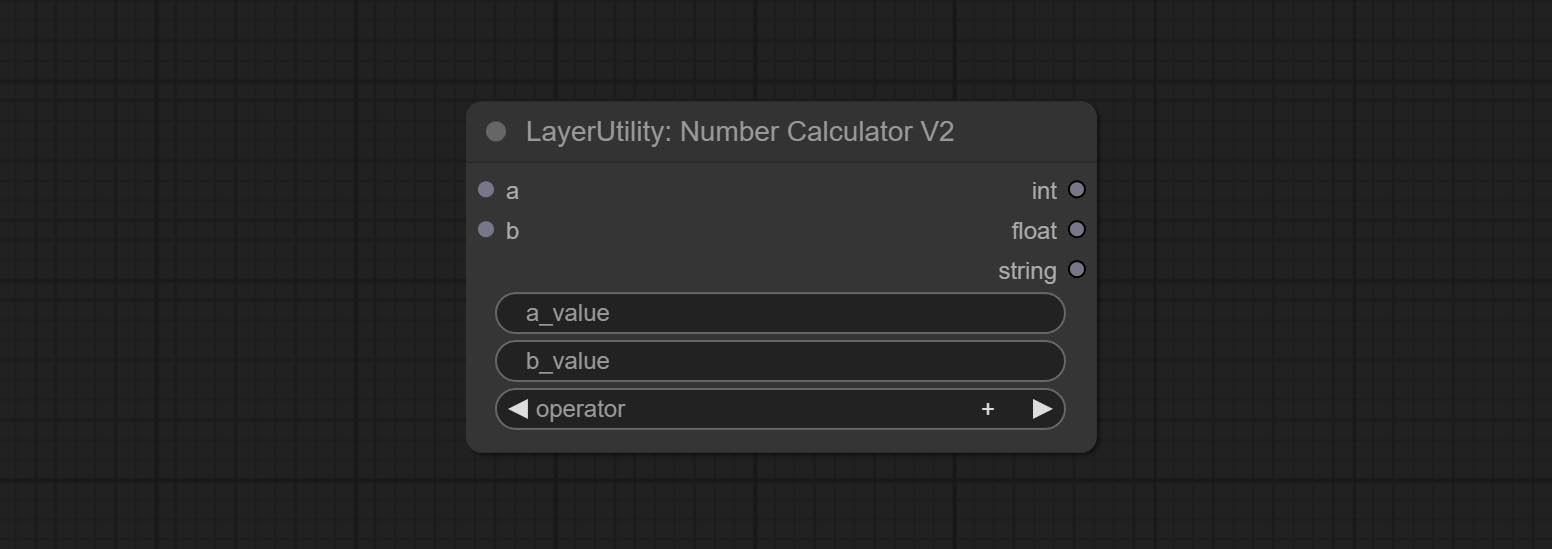
The upgraded version of NumberCalculator has added numerical inputs within nodes and square root operations. The square root operation option is nth_root Note: The input takes priority, and when there is input, the values within the node will be invalid.
BooleanOperator

Perform a Boolean operation on two numeric values and output the result * . Supported operations include == , != , and , or , xor , not , min , max .
* The input only supports boolean, integer, and floating point numbers, forcing in other data will result in error. The and operation between the values outputs a larger number, and the or operation outputs a smaller number.
BooleanOperatorV2

The upgraded version of Boolean Operator has added numerical inputs within nodes and added judgments for greater than, less than, greater than or equal to, and less than or equal to. Note: The input takes priority, and when there is input, the values within the node will be invalid.
StringCondition
Determine whether the text contains or does not contain substrings, and output a Boolean value.
节点选项:

- text: Input text.
- condition: Judgment conditions.
include determines whether it contains a substring, and exclude determines whether it does not. - sub_string: Substring.
CheckMask
Check if the mask contains enough valid areas and output a Boolean value.
节点选项:

- white_point: The white point threshold used to determine whether the mask is valid is considered valid if it exceeds this value.
- area_percent: The percentage of effective areas. If the proportion of effective areas exceeds this value, output True.
CheckMaskV2
On the basis of CheckMask, the method option has been added, which allows for the selection of different detection methods. The area_percent is changed to a floating point number with an accuracy of 2 decimal places, which can detect smaller effective areas.
节点选项:

- method: There are two detection methods, which are
simple and detectability . The simple method only detects whether the mask is completely black, while the detect_percent method detects the proportion of effective areas.
如果
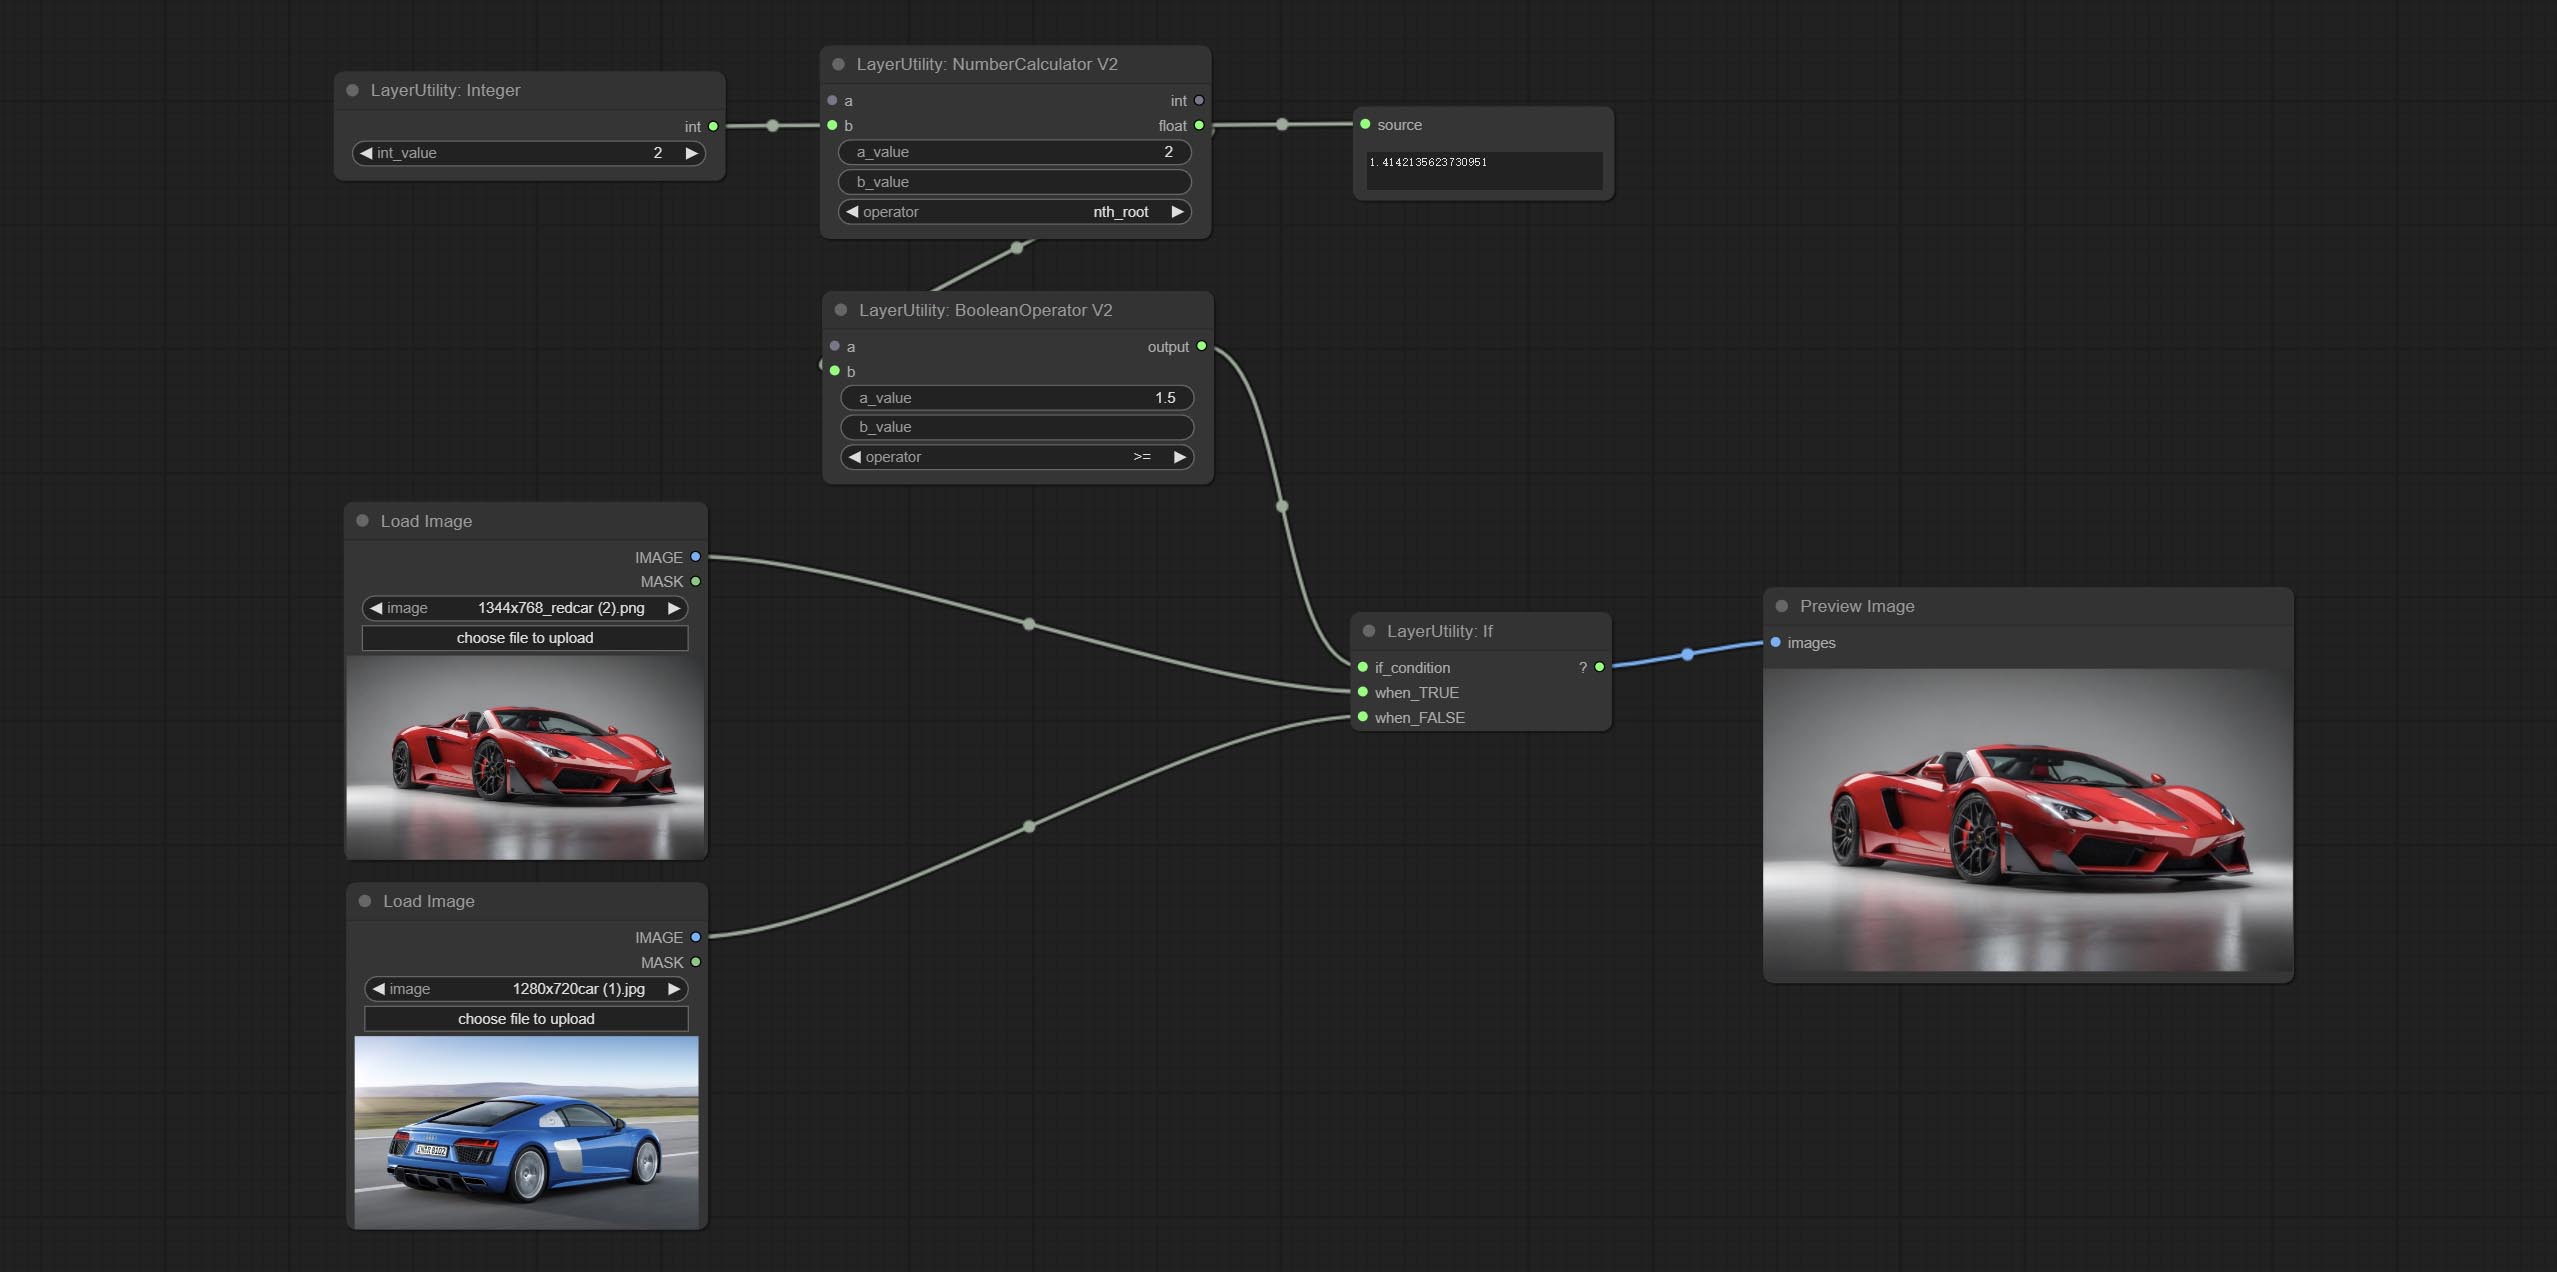
Switches output based on Boolean conditional input. It can be used for any type of data switching, including but not limited to numeric values, strings, pictures, masks, models, latent, pipe pipelines, etc.
节点选项:
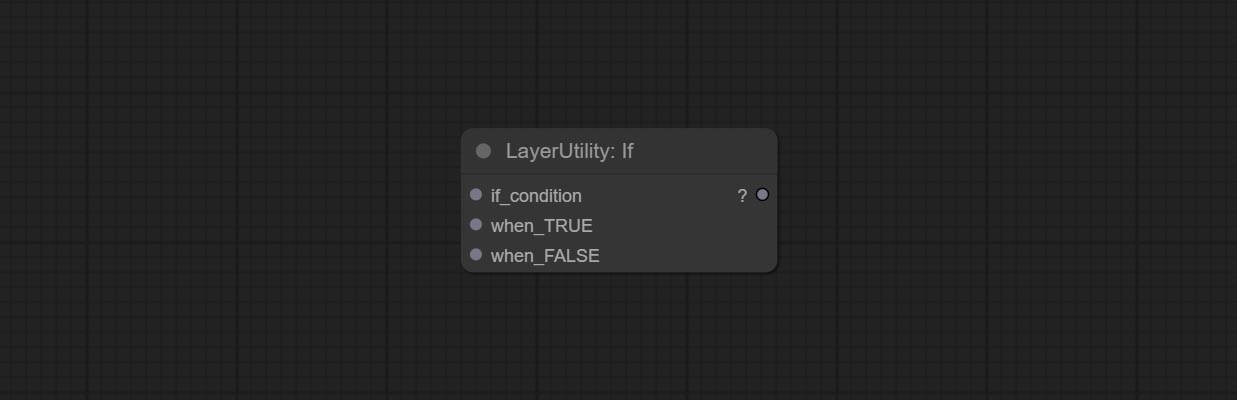
- if_condition: Conditional input. Boolean, integer, floating point, and string inputs are supported. When entering a value, 0 is judged to be False; When a string is entered, an empty string is judged as Flase.
- when_True: This item is output when the condition is True.
- when_False: This item is output when the condition is False.
SwitchCase

Switches the output based on the matching string. It can be used for any type of data switching, including but not limited to numeric values, strings, pictures, masks, models, latent, pipe pipelines, etc. Supports up to 3 sets of case switches. Compare case to switch_condition , if the same, output the corresponding input. If there are the same cases, the output is prioritized in order. If there is no matching case, the default input is output. Note that the string is case sensitive and Chinese and English full-width and half-width.
节点选项:
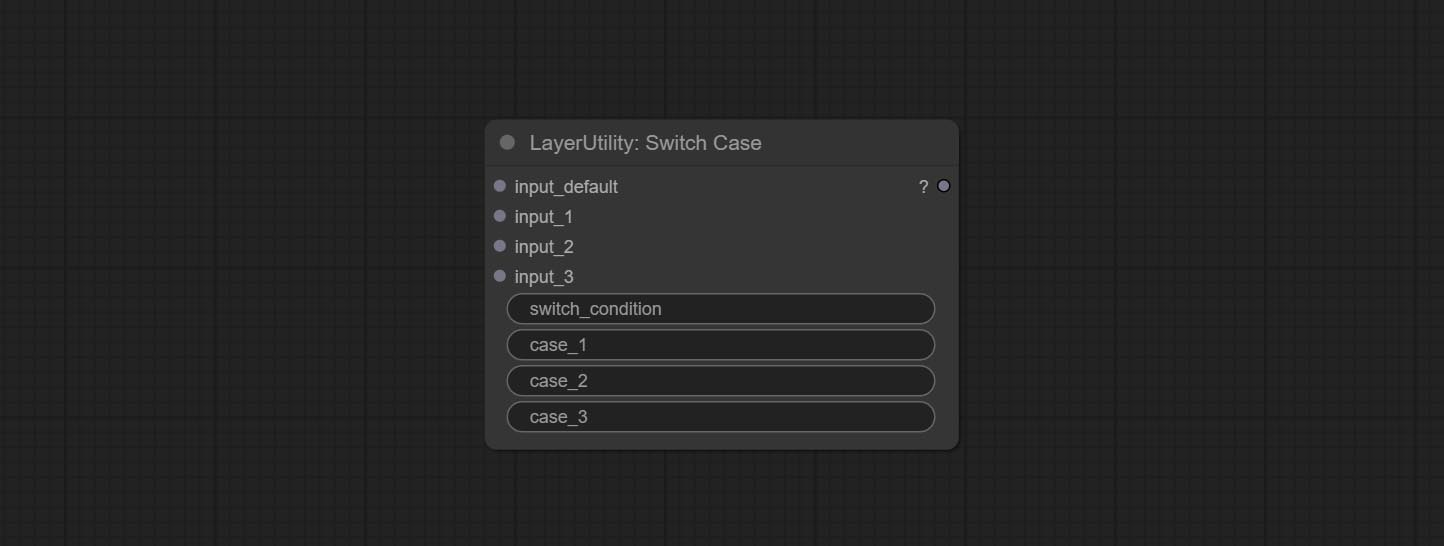
- input_default: Input entry for default output. This input is required.
- input_1: Input entry used to match
case_1 . This input is optional. - input_2: Input entry used to match
case_2 . This input is optional. - input_3: Input entry used to match
case_3 . This input is optional. - switch_condition: String used to judge with case.
- case_1: case_1 string.
- case_2: case_2 string.
- case_3: case_3 string.
QueueStop
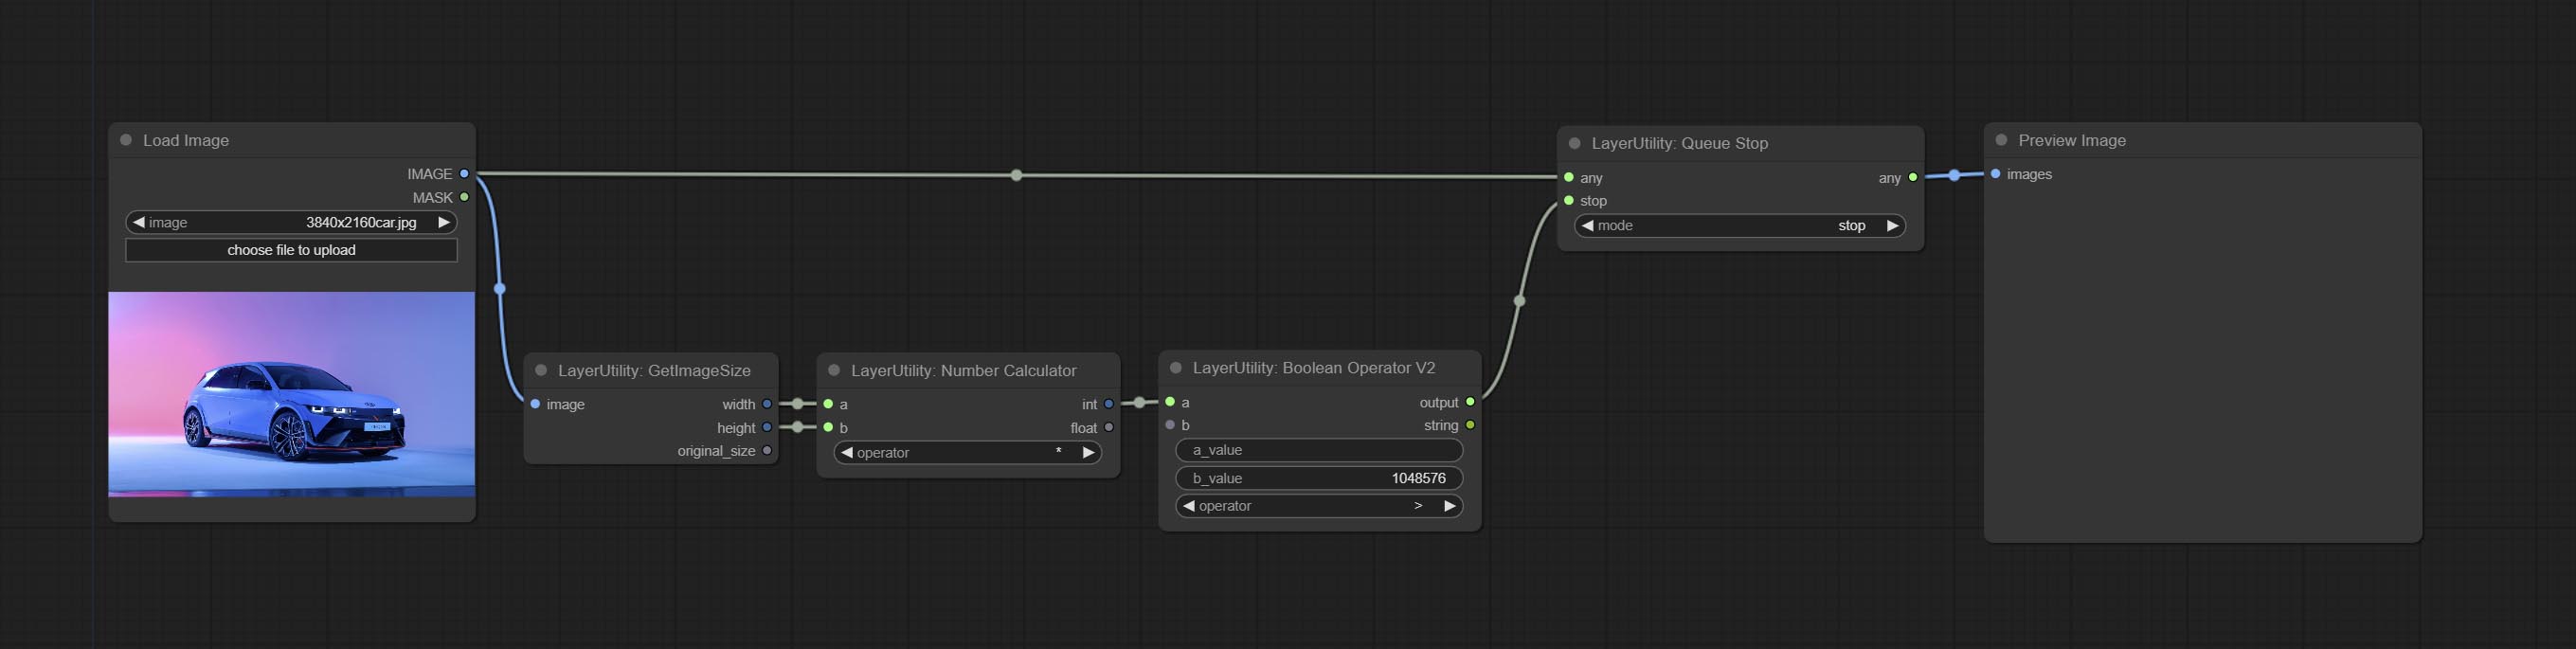
Stop the current queue. When executed at this node, the queue will stop. The workflow diagram above illustrates that if the image is larger than 1Mega pixels, the queue will stop executing.
节点选项:
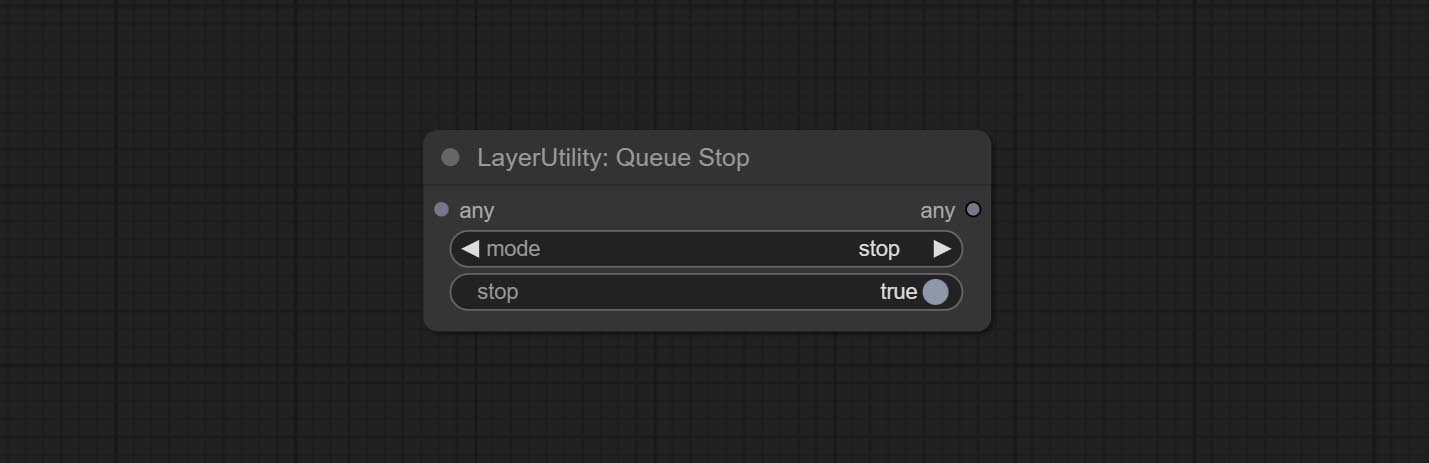
- mode: Stop mode. If you choose
stop , it will be determined whether to stop based on the input conditions. If you choose continue , ignore the condition to continue executing the queue. - stop: If true, the queue will stop. If false, the queue will continue to execute.
清除
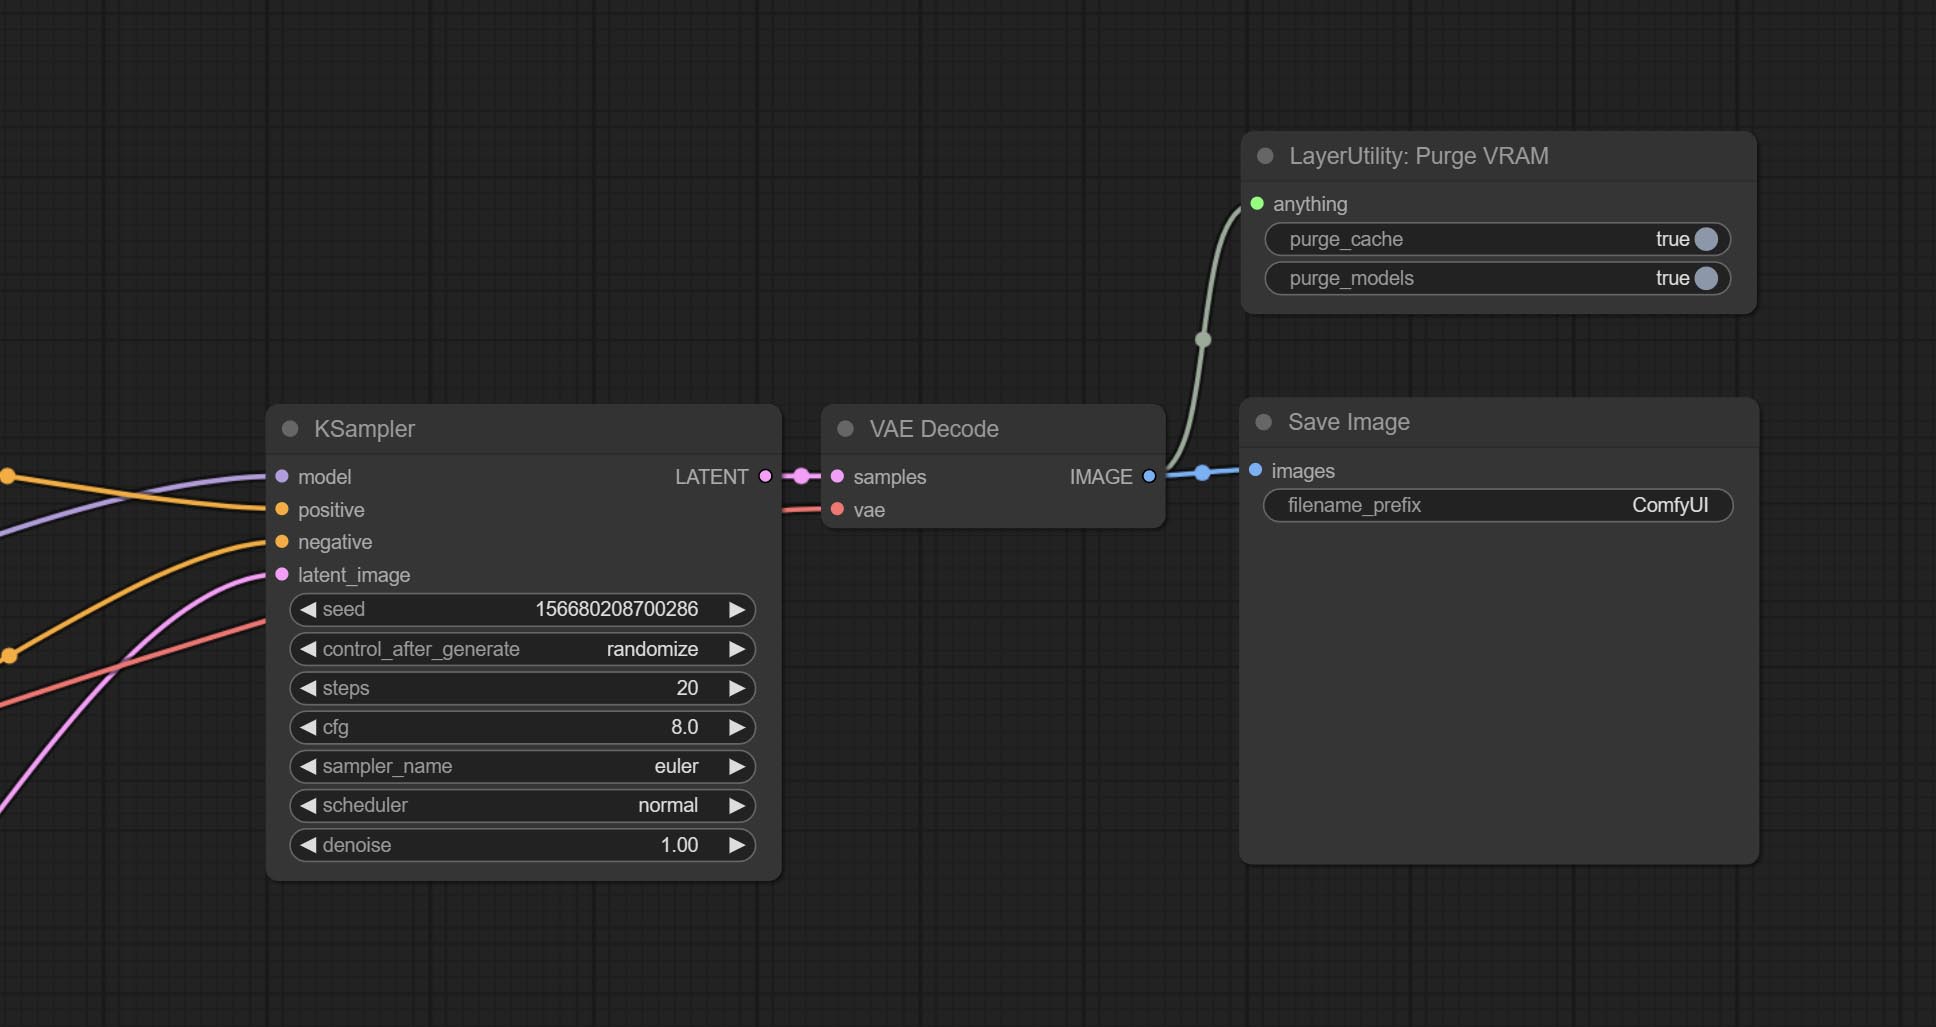
Clean up GPU VRAM and system RAM. any type of input can be accessed, and when executed to this node, the VRAM and garbage objects in the RAM will be cleaned up. Usually placed after the node where the inference task is completed, such as the VAE Decode node.
节点选项:
- purge_cache: Clean up cache。
- purge_models: Unload all loaded models。
SaveImagePlus
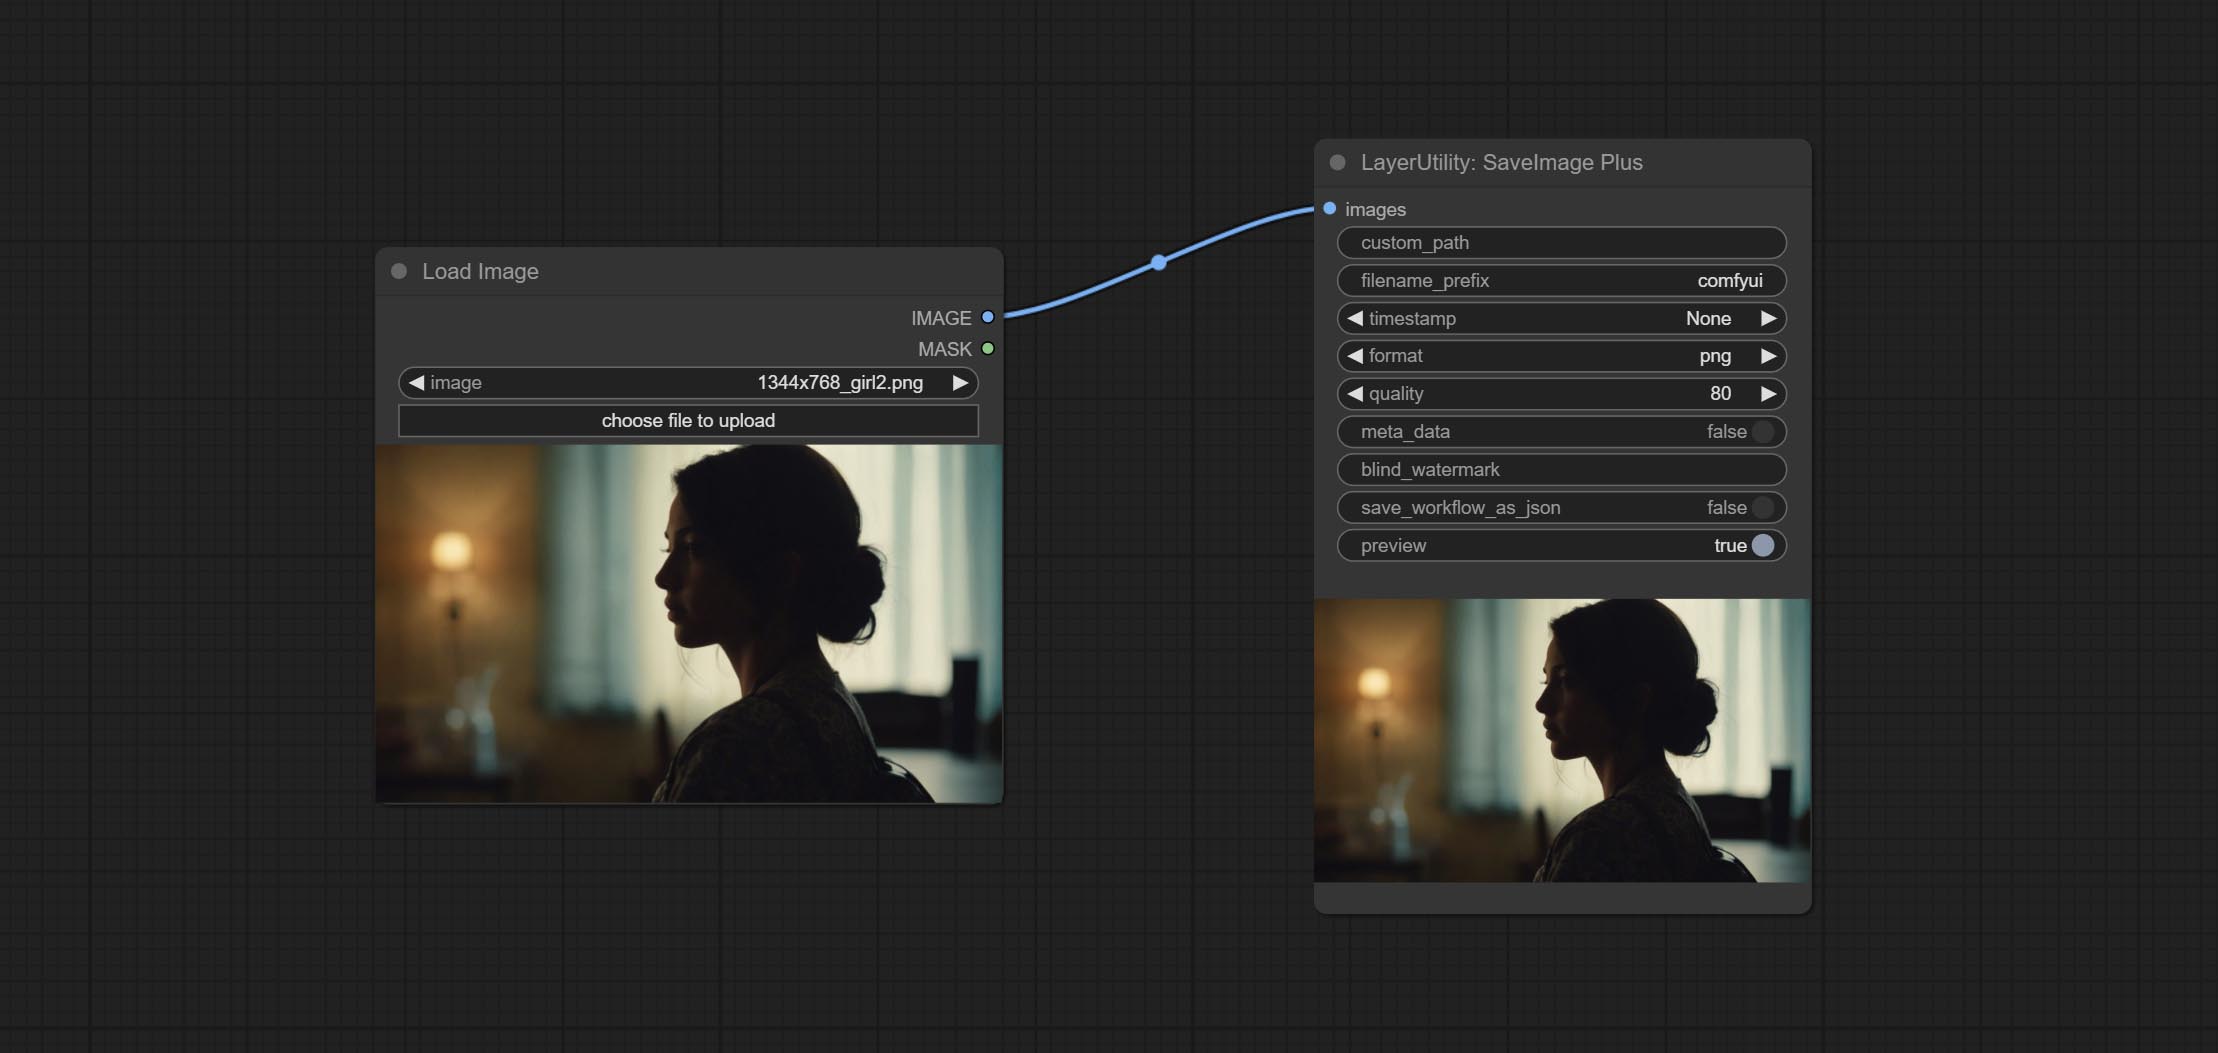
Enhanced save image node. You can customize the directory where the picture is saved, add a timestamp to the file name, select the save format, set the image compression rate, set whether to save the workflow, and optionally add invisible watermarks to the picture. (Add information in a way that is invisible to the naked eye, and use the ShowBlindWaterMark node to decode the watermark). Optionally output the json file of the workflow.
节点选项: 
- iamge: The input image.
- custom_path * : User-defined directory, enter the directory name in the correct format. If empty, it is saved in the default output directory of ComfyUI.
- filename_prefix * : The prefix of file name.
- timestamp: Timestamp the file name, opting for date, time to seconds, and time to milliseconds.
- format: The format of image save. Currently available in
png and jpg . Note that only png format is supported for RGBA mode pictures. - quality: Image quality, the value range 10-100, the higher the value, the better the picture quality, the volume of the file also correspondingly increases.
- meta_data: Whether to save metadata to png file, that is workflow information. Set this to false if you do not want the workflow to be leaked.
- blind_watermark: The text entered here (does not support multilingualism) will be converted into a QR code and saved as an invisible watermark. Use
ShowBlindWaterMark node can decode watermarks. Note that pictures with watermarks are recommended to be saved in png format, and lower-quality jpg format will cause watermark information to be lost. - save_workflow_as_json: Whether the output workflow is a json file at the same time (the output json is in the same directory as the picture).
- preview: Preview switch.
* Enter %date for the current date (YY-mm-dd) and %time for the current time (HH-MM-SS). You can enter / for subdirectories. For example, %date/name_%tiem will output the image to the YY-mm-dd folder, with name_HH-MM-SS as the file name prefix.
ImageTaggerSave
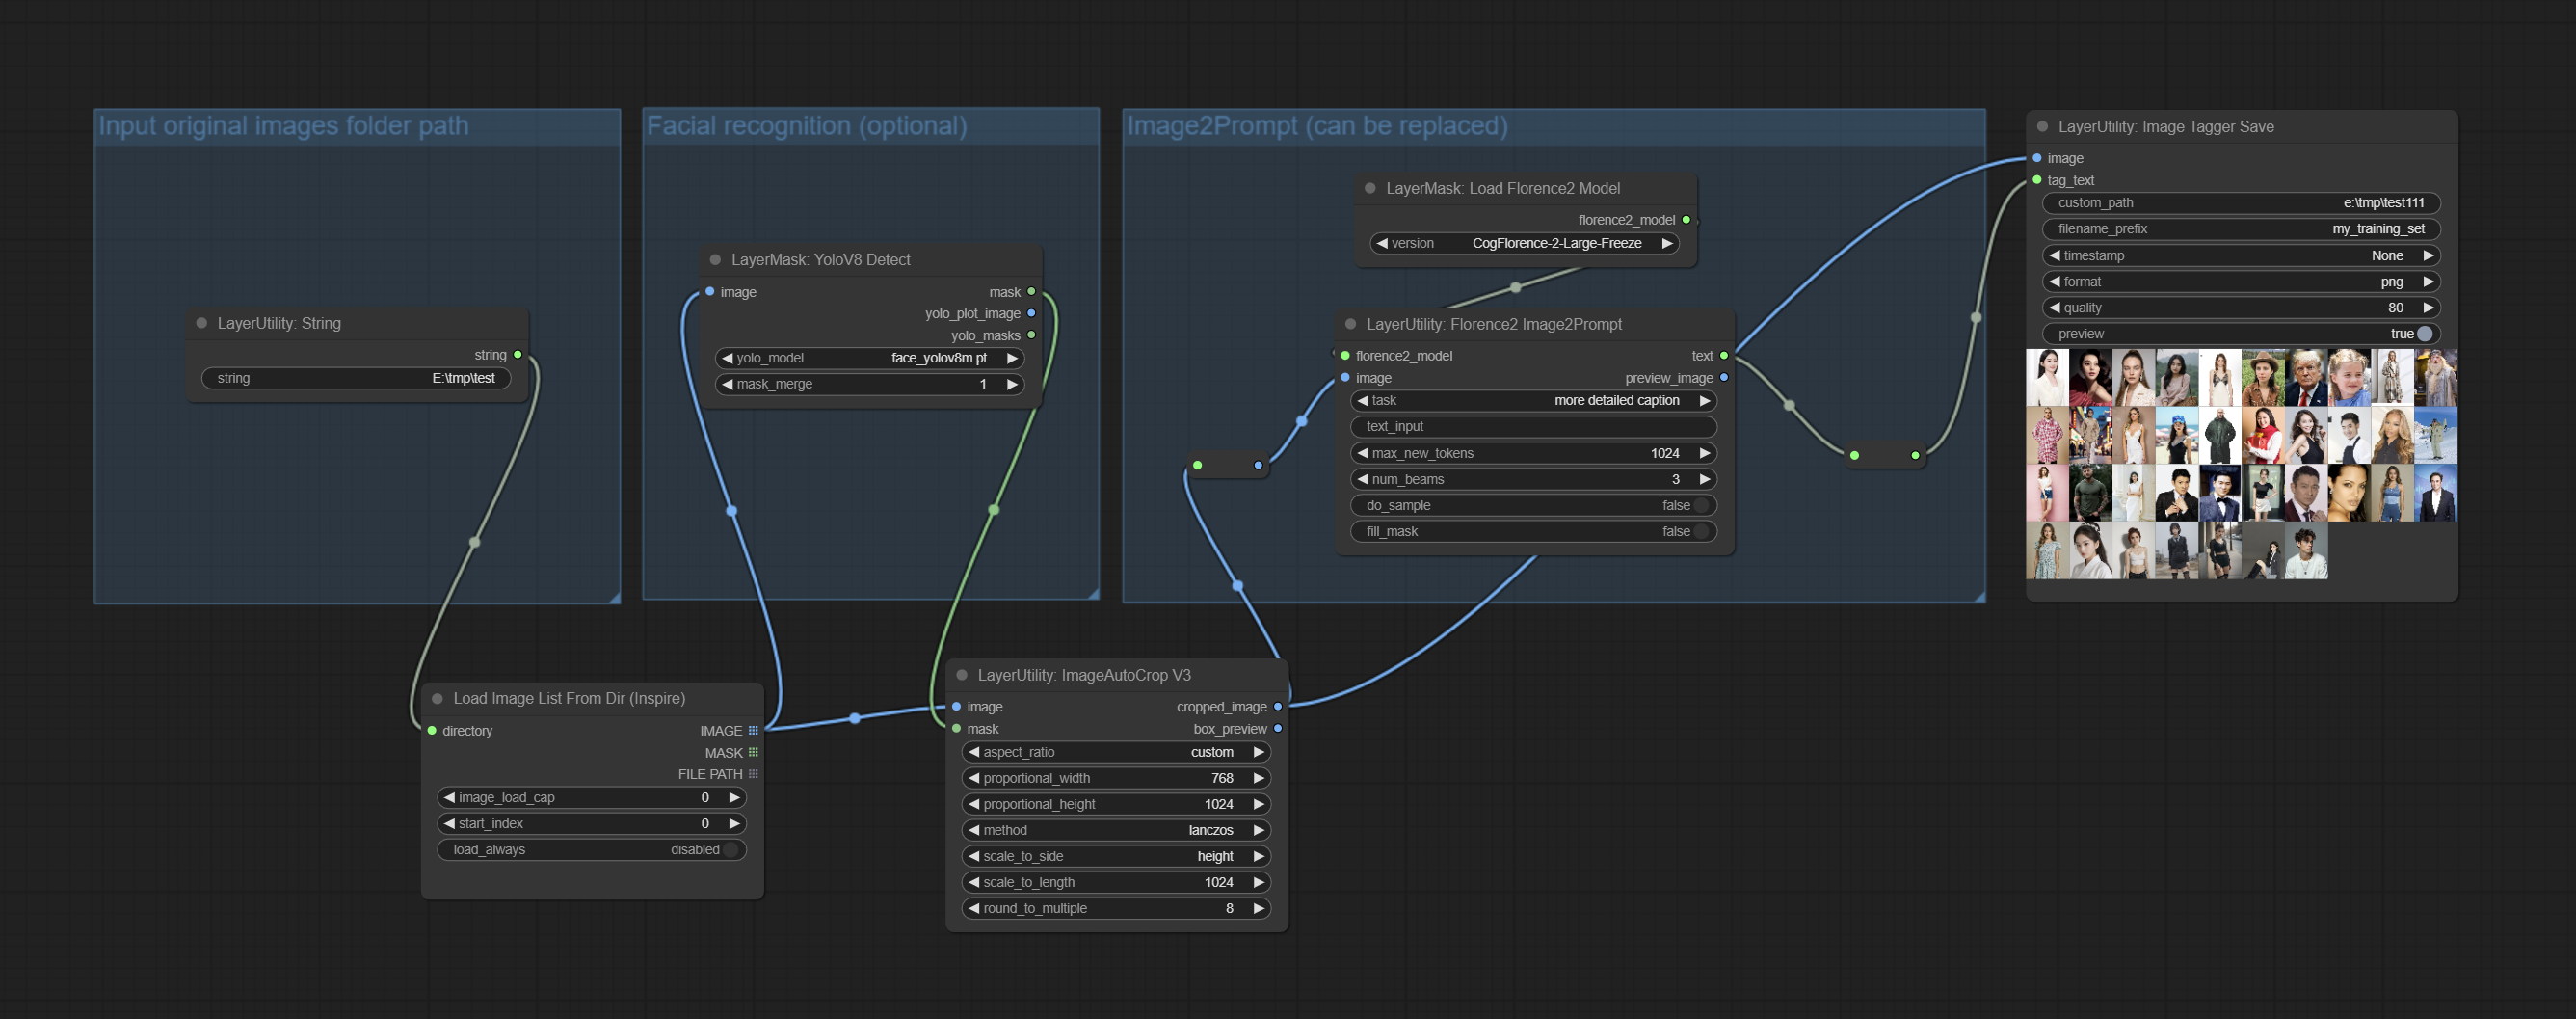
The node used to save the training set images and their text labels, where the image files and text label files have the same file name. Customizable directory for saving images, adding timestamps to file names, selecting save formats, and setting image compression rates. *The workflow image_tagger_stave.exe is located in the workflow directory.
节点选项: 
- iamge: The input image.
- tag_text: Text label of image.
- custom_path * : User-defined directory, enter the directory name in the correct format. If empty, it is saved in the default output directory of ComfyUI.
- filename_prefix * : The prefix of file name.
- timestamp: Timestamp the file name, opting for date, time to seconds, and time to milliseconds.
- format: The format of image save. Currently available in
png and jpg . Note that only png format is supported for RGBA mode pictures. - quality: Image quality, the value range 10-100, the higher the value, the better the picture quality, the volume of the file also correspondingly increases.
- preview: Preview switch.
* Enter %date for the current date (YY-mm-dd) and %time for the current time (HH-MM-SS). You can enter / for subdirectories. For example, %date/name_%tiem will output the image to the YY-mm-dd folder, with name_HH-MM-SS as the file name prefix.
AddBlindWaterMark
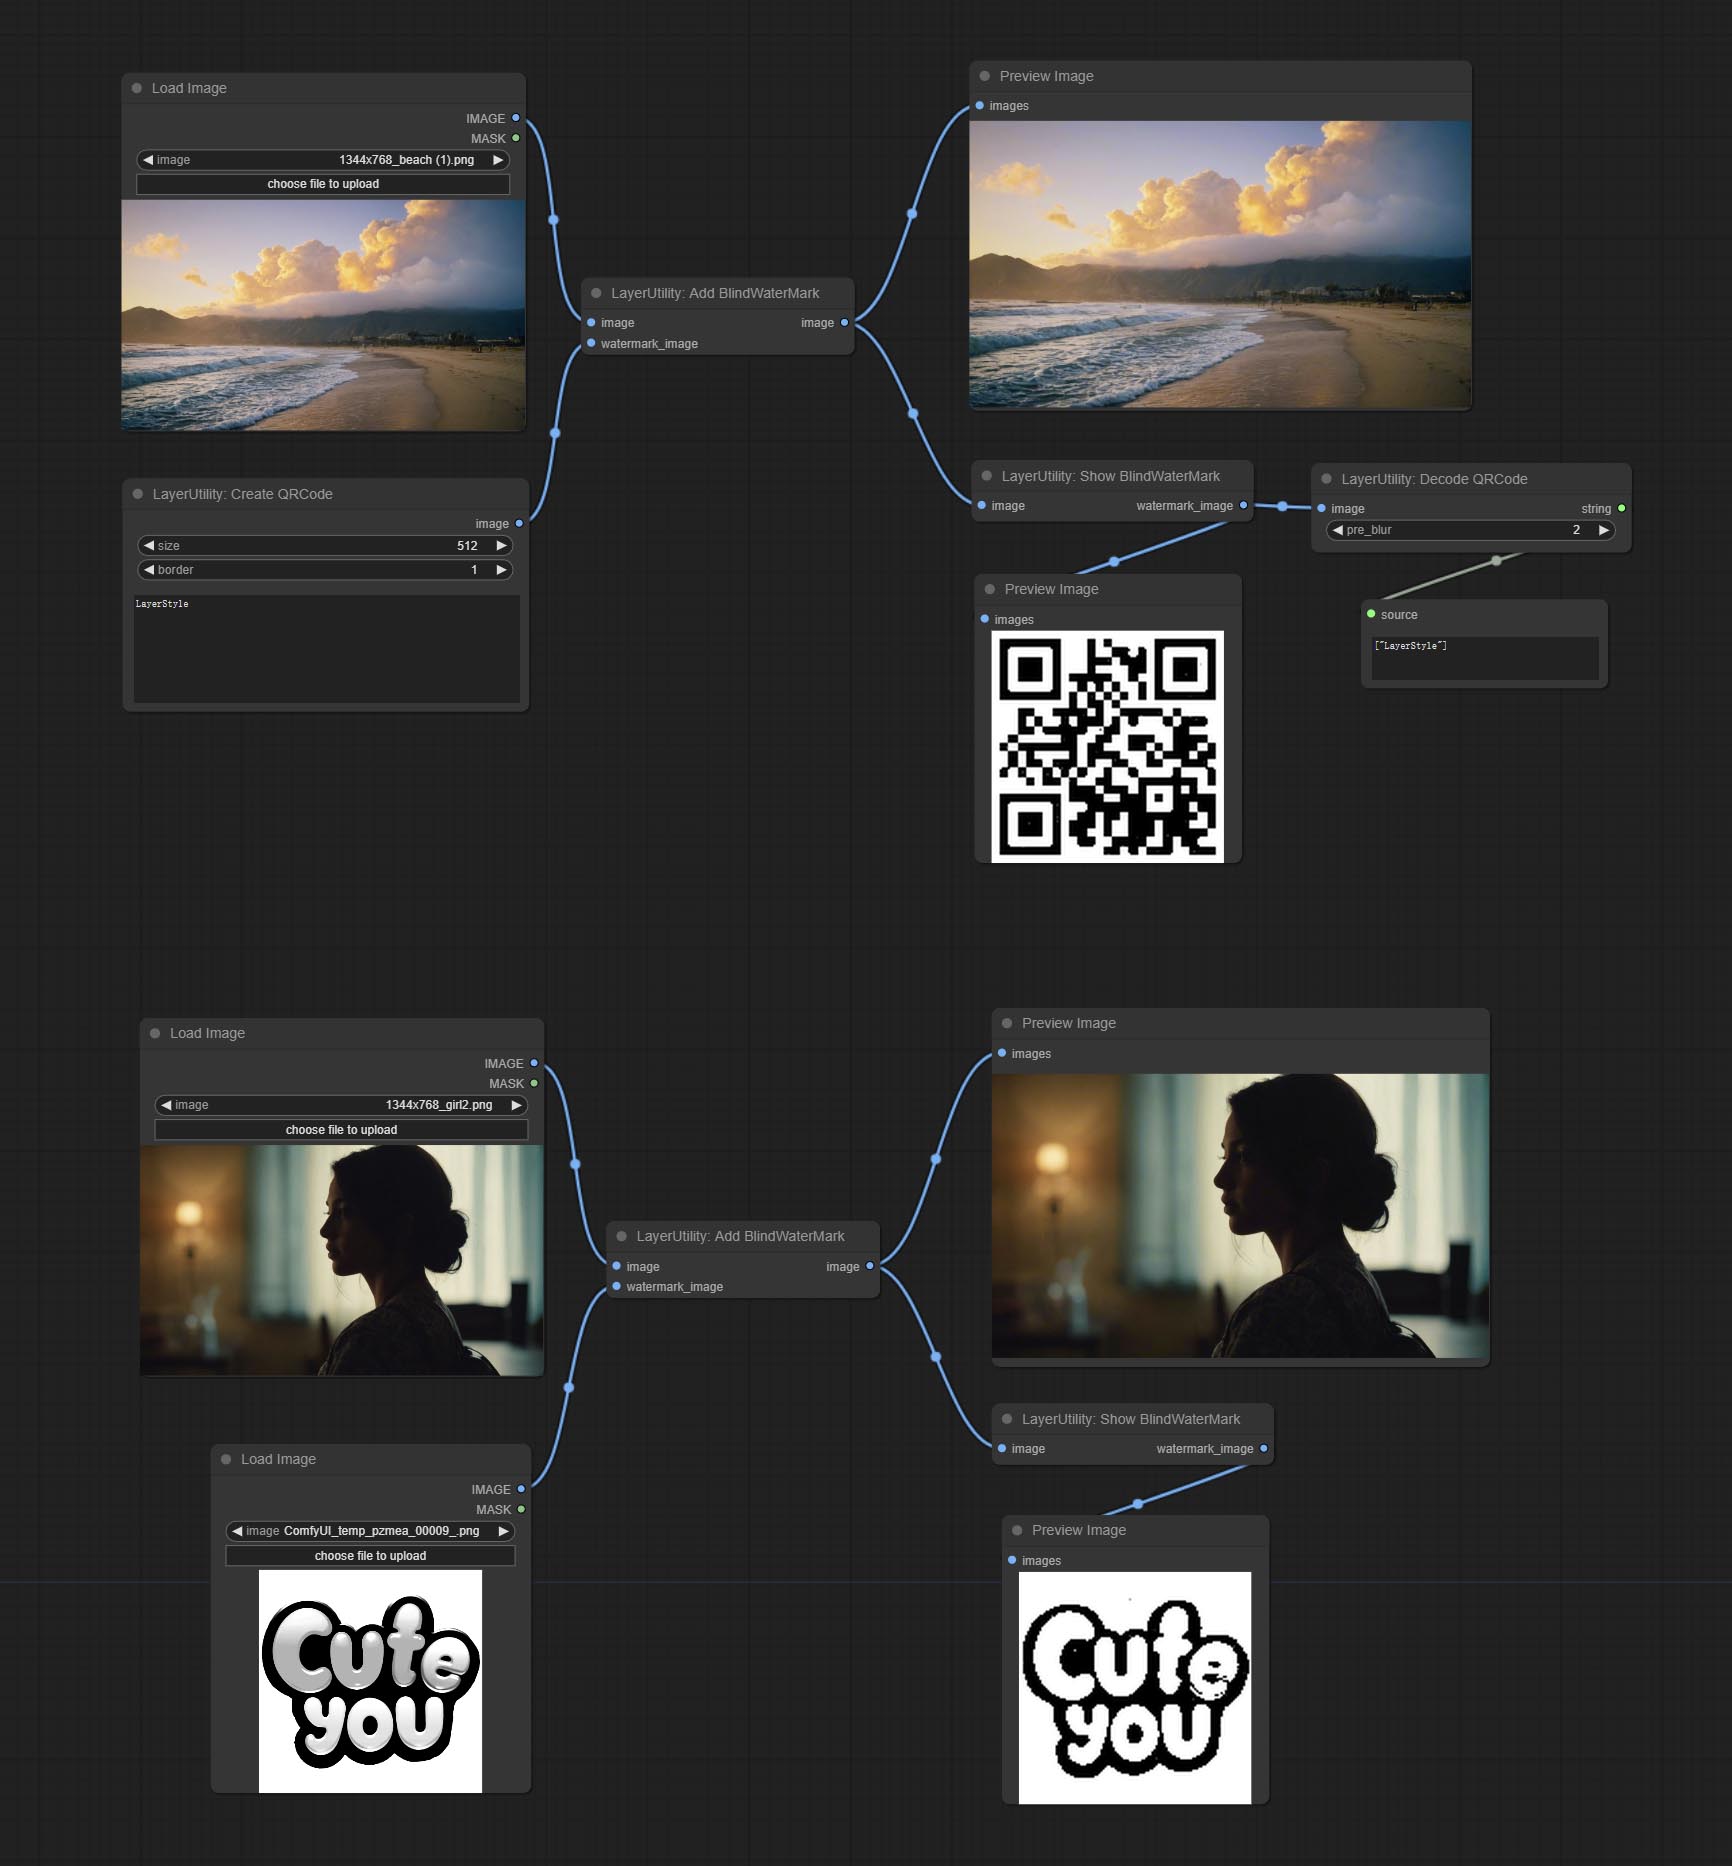
Add an invisible watermark to a picture. Add the watermark image in a way that is invisible to the naked eye, and use the ShowBlindWaterMark node to decode the watermark.
节点选项: 
- iamge: The input image.
- watermark_image: Watermark image. The image entered here will automatically be converted to a square black and white image as a watermark. It is recommended to use a QR code as a watermark.
ShowBlindWaterMark
Decoding the invisible watermark added to the AddBlindWaterMark and SaveImagePlus nodes. 
CreateQRCode
Generate a square QR code picture.
节点选项:

- size: The side length of image.
- border: The size of the border around the QR code, the larger the value, the wider the border.
- text: Enter the text content of the QR code here, and multi-language is not supported.
DecodeQRCode
Decoding the QR code.
节点选项:

- image: The input QR code image.
- pre_blur: Pre-blurring, you can try to adjust this value for QR codes that are difficult to identify.
LoadPSD
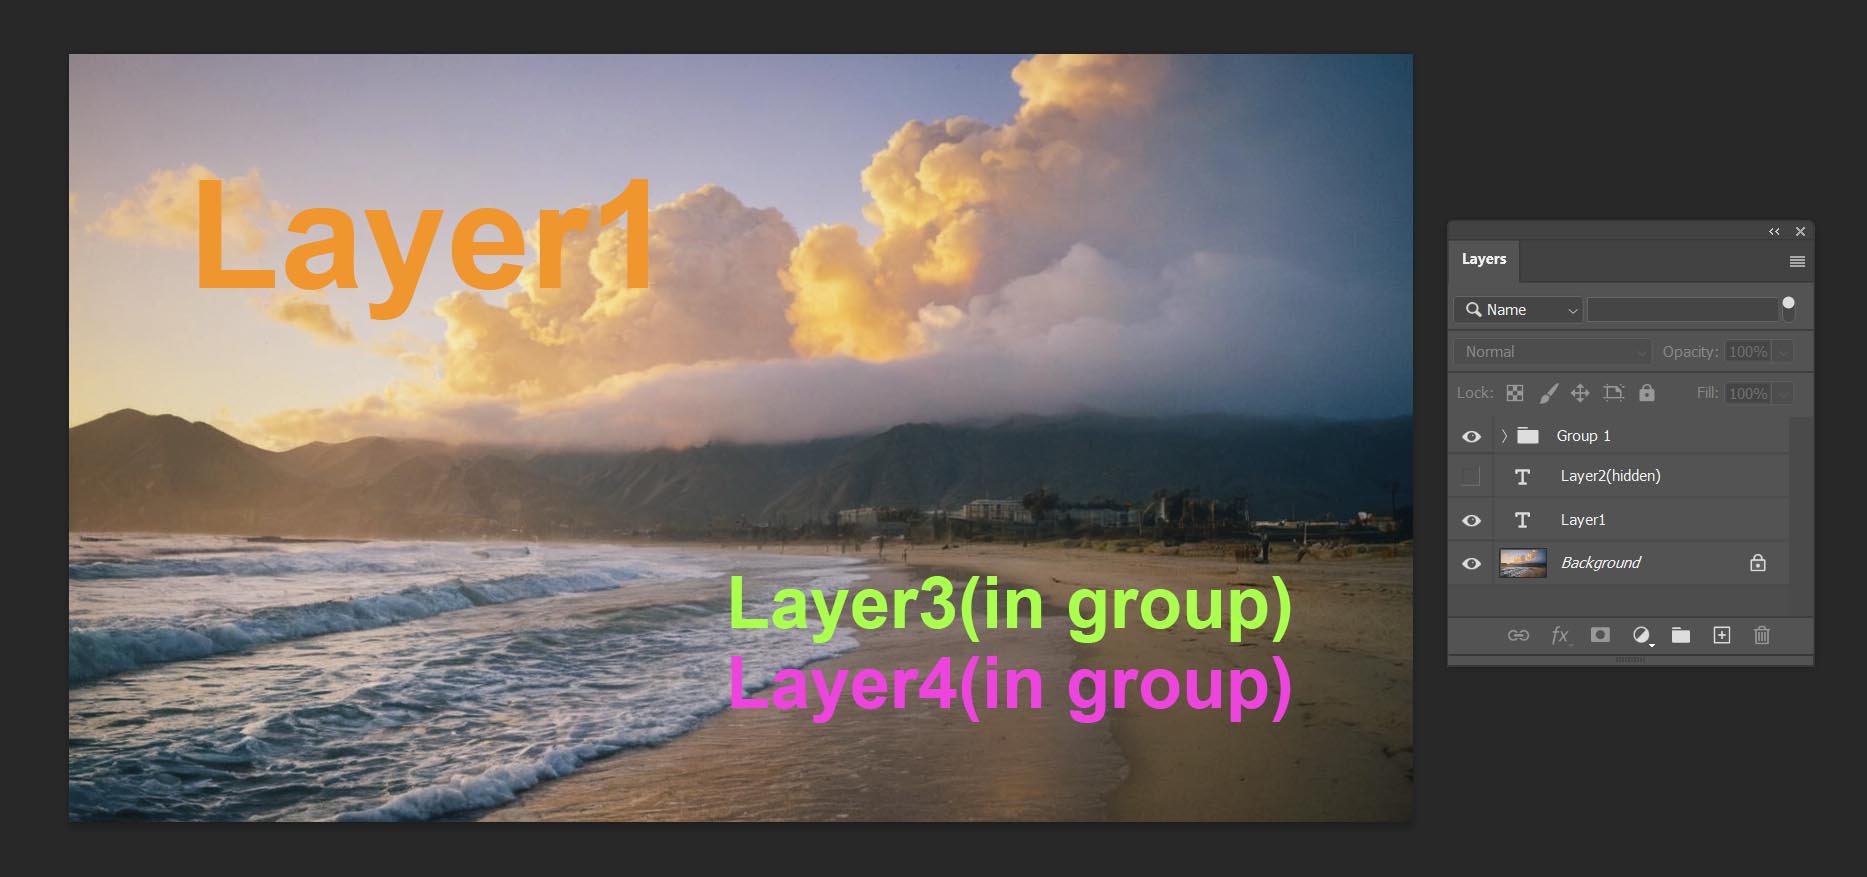
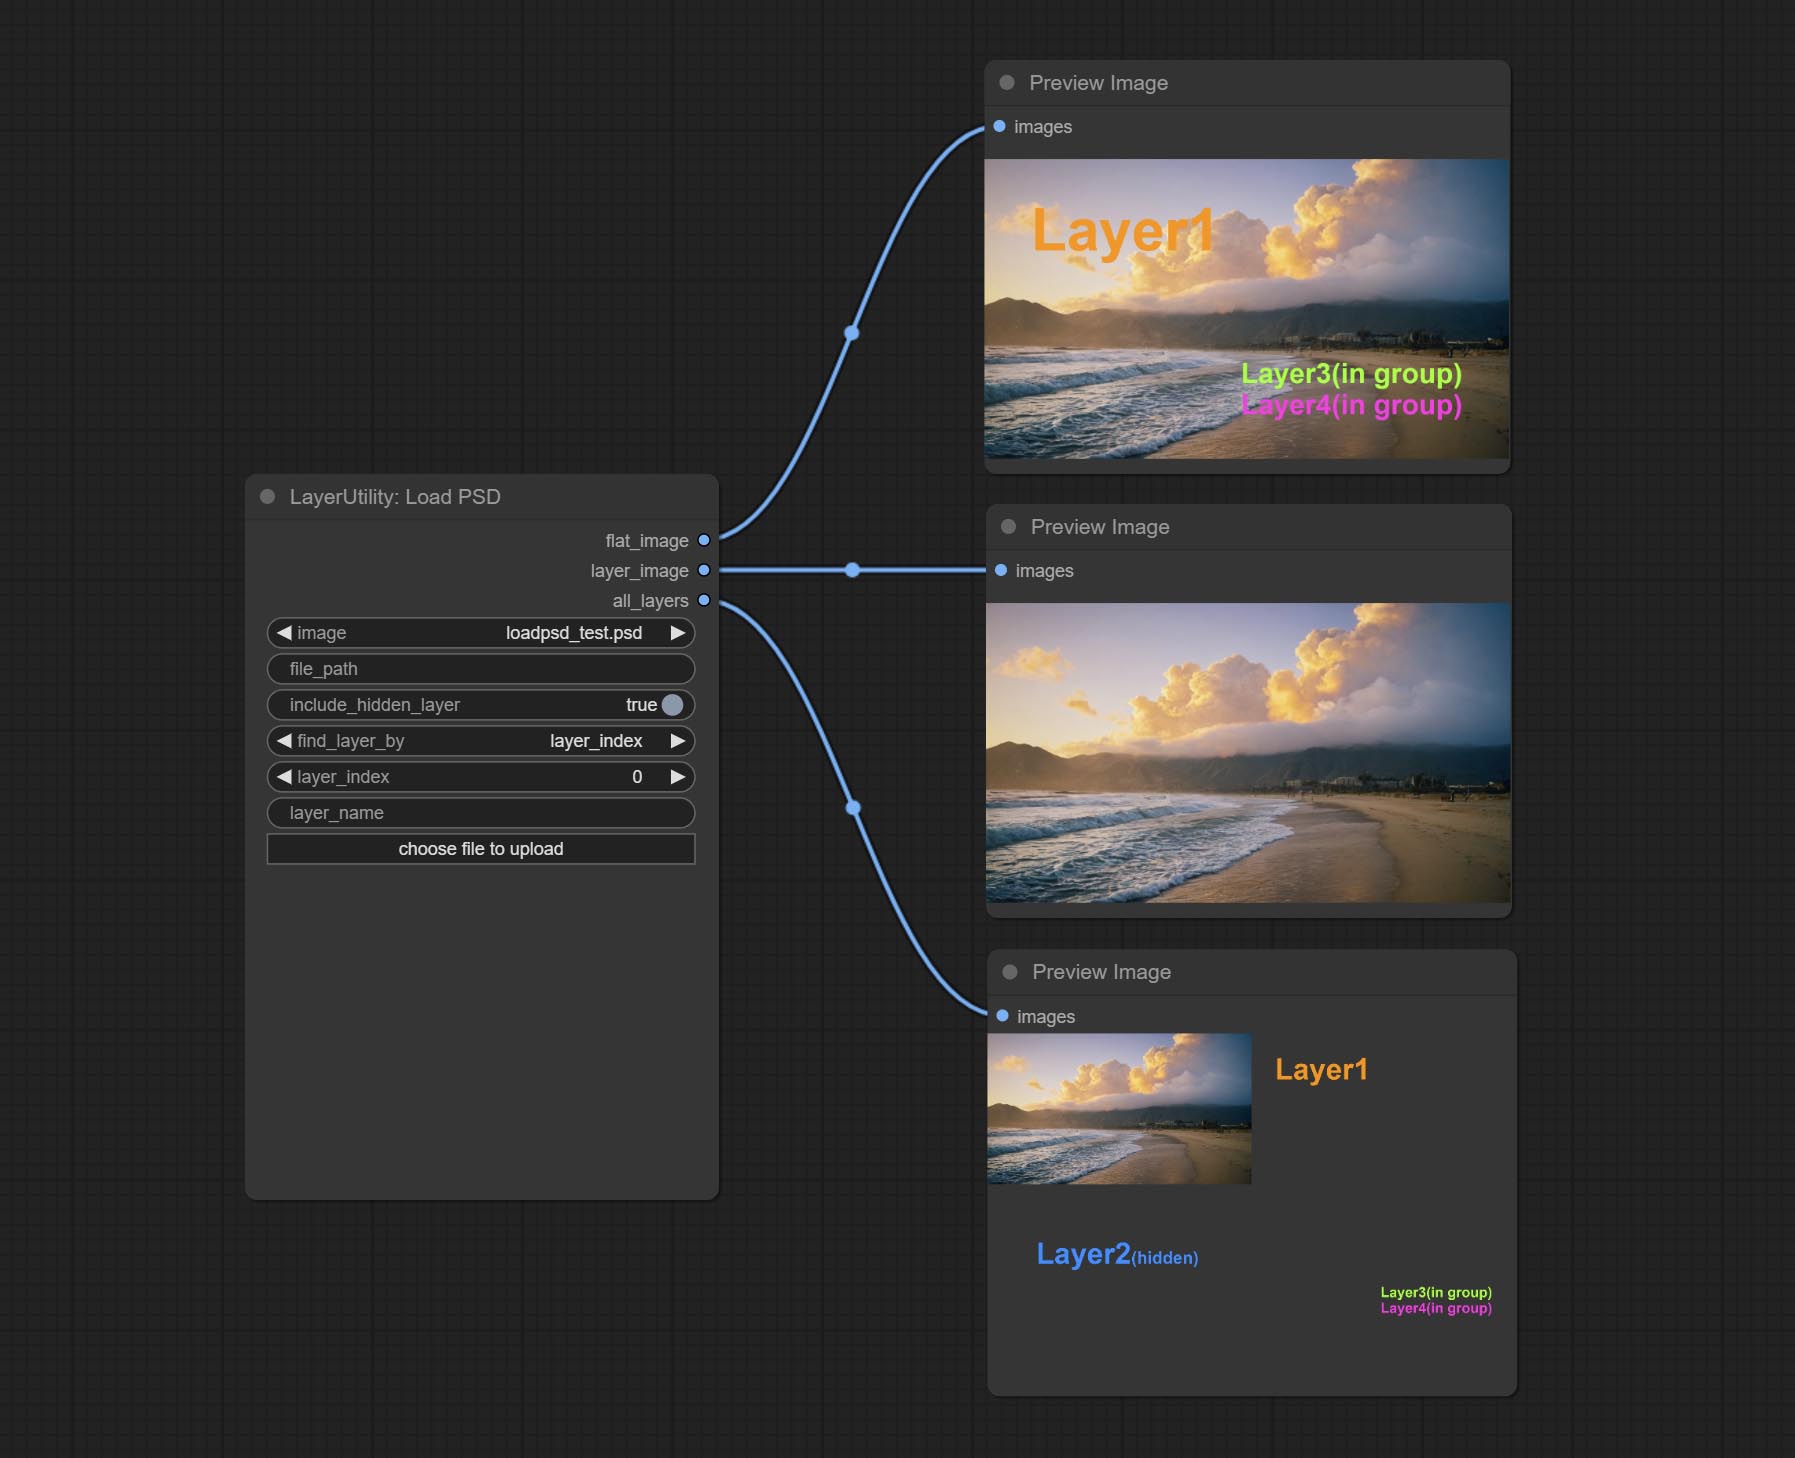
Load the PSD format file and export the layers. Note that this node requires the installation of the psd_tools dependency package, If error occurs during the installation of psd_tool, such as ModuleNotFoundError: No module named 'docopt' , please download docopt's whl and manual install it.
节点选项:
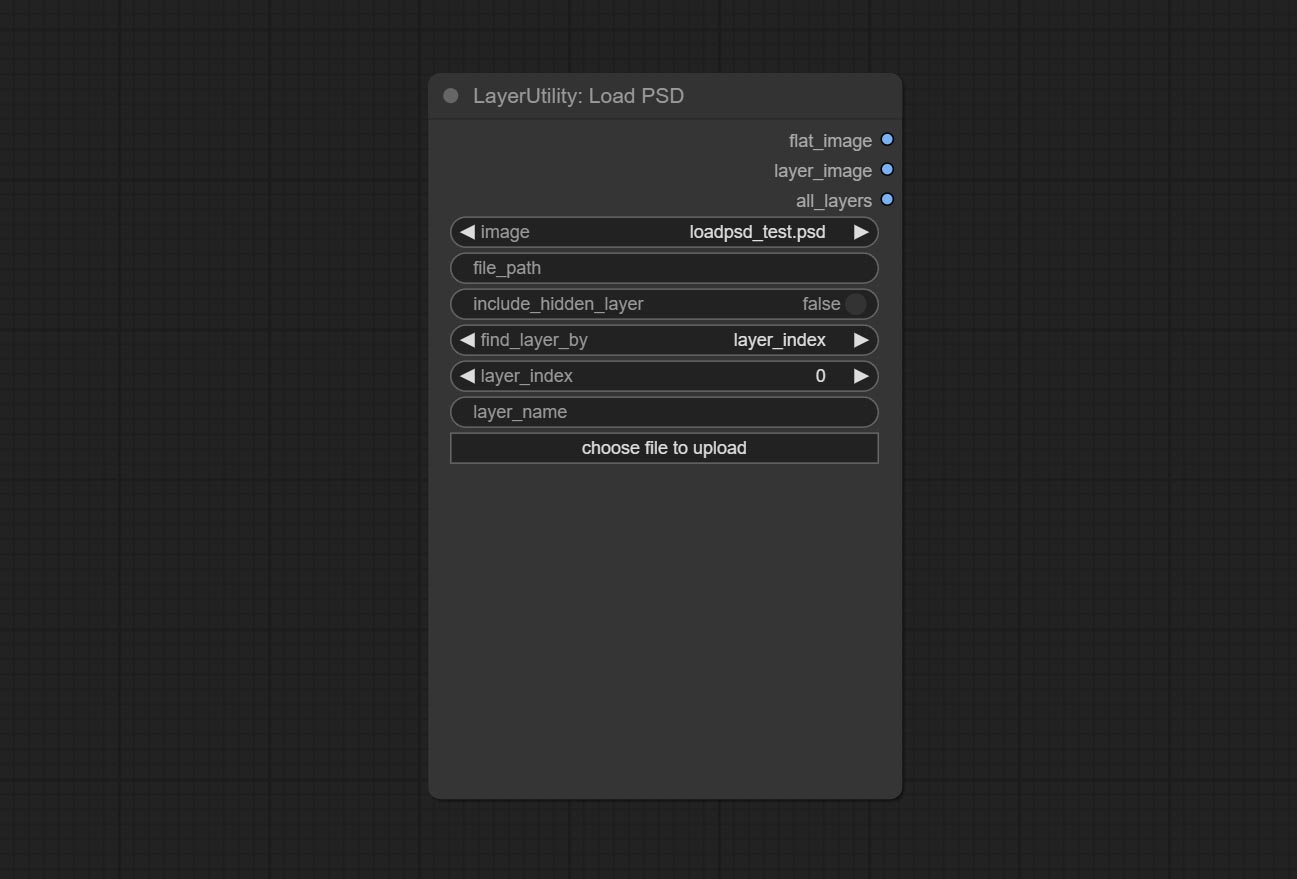
- image: Here is a list of *.psd files under
ComfyUI/input , where previously loaded psd images can be selected. - file_path: The complete path and file name of the psd file.
- include_hidden_layer: whether include hidden layers.
- find_layer_by: The method for finding layers can be selected by layer key number or layer name. Layer groups are treated as one layer.
- layer_index: The layer key number, where 0 is the bottom layer, is incremented sequentially. If include_hiddenlayer is set to false, hidden layers are not counted. Set to -1 to output the top layer.
- layer_name: Layer name. Note that capitalization and punctuation must match exactly.
Outputs: flat_image: PSD preview image. layer_iamge: Find the layer output. all_layers: Batch images containing all layers.
SD3NegativeConditioning
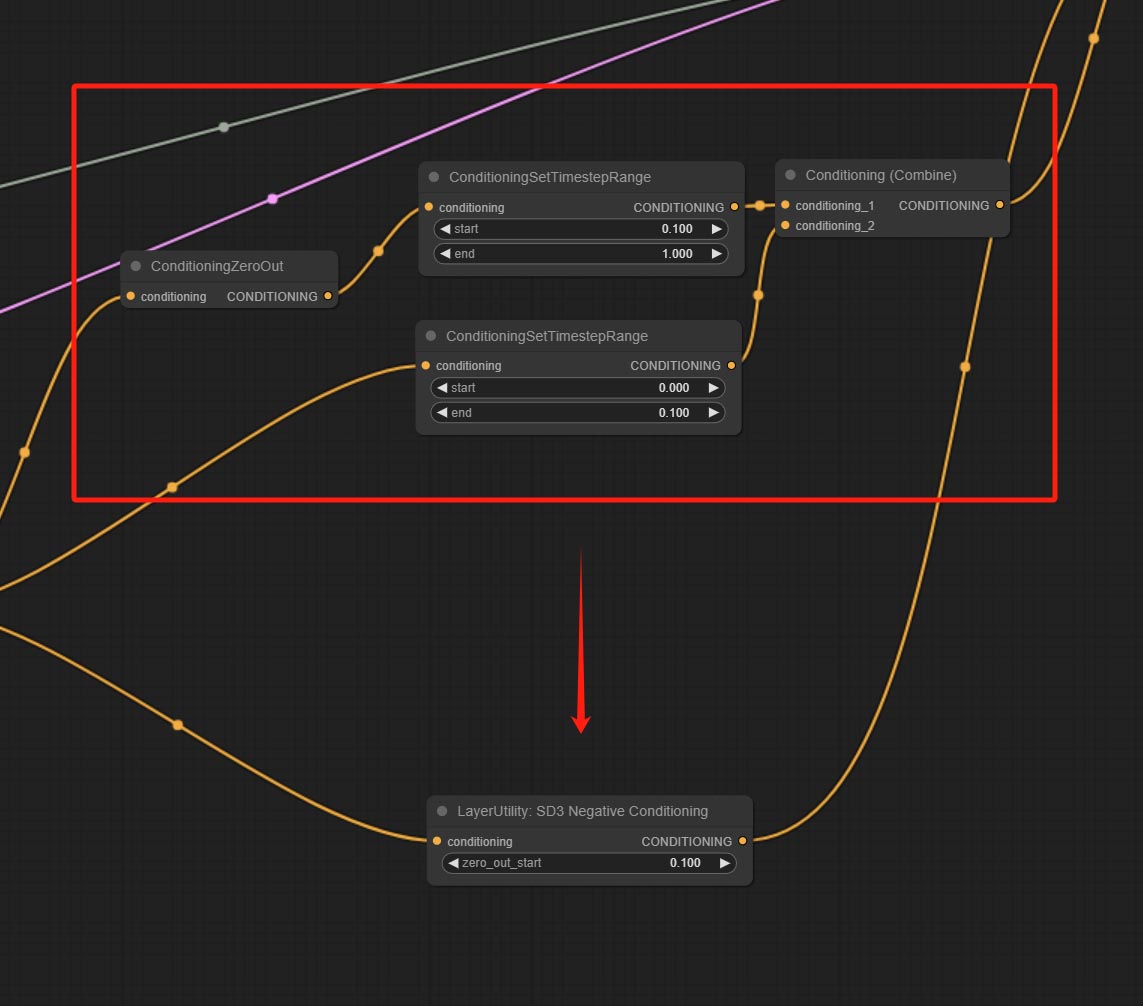
Encapsulate the four nodes of Negative Condition in SD3 into a separate node.
节点选项:

- zero_out_start: Set the ConditioningSetTimestepRange start value for Negative ConditioningZeroOut, which is the same as the ConditioningSetTimestepRange end value for Negative.
LayerMask
BlendIfMask
Reproduction of Photoshop's layer Style - Blend If function. This node outputs a mask for layer composition on the ImageBlend or ImageBlendAdvance nodes. mask is an optional input, and if you enter a mask here, it will act on the output. 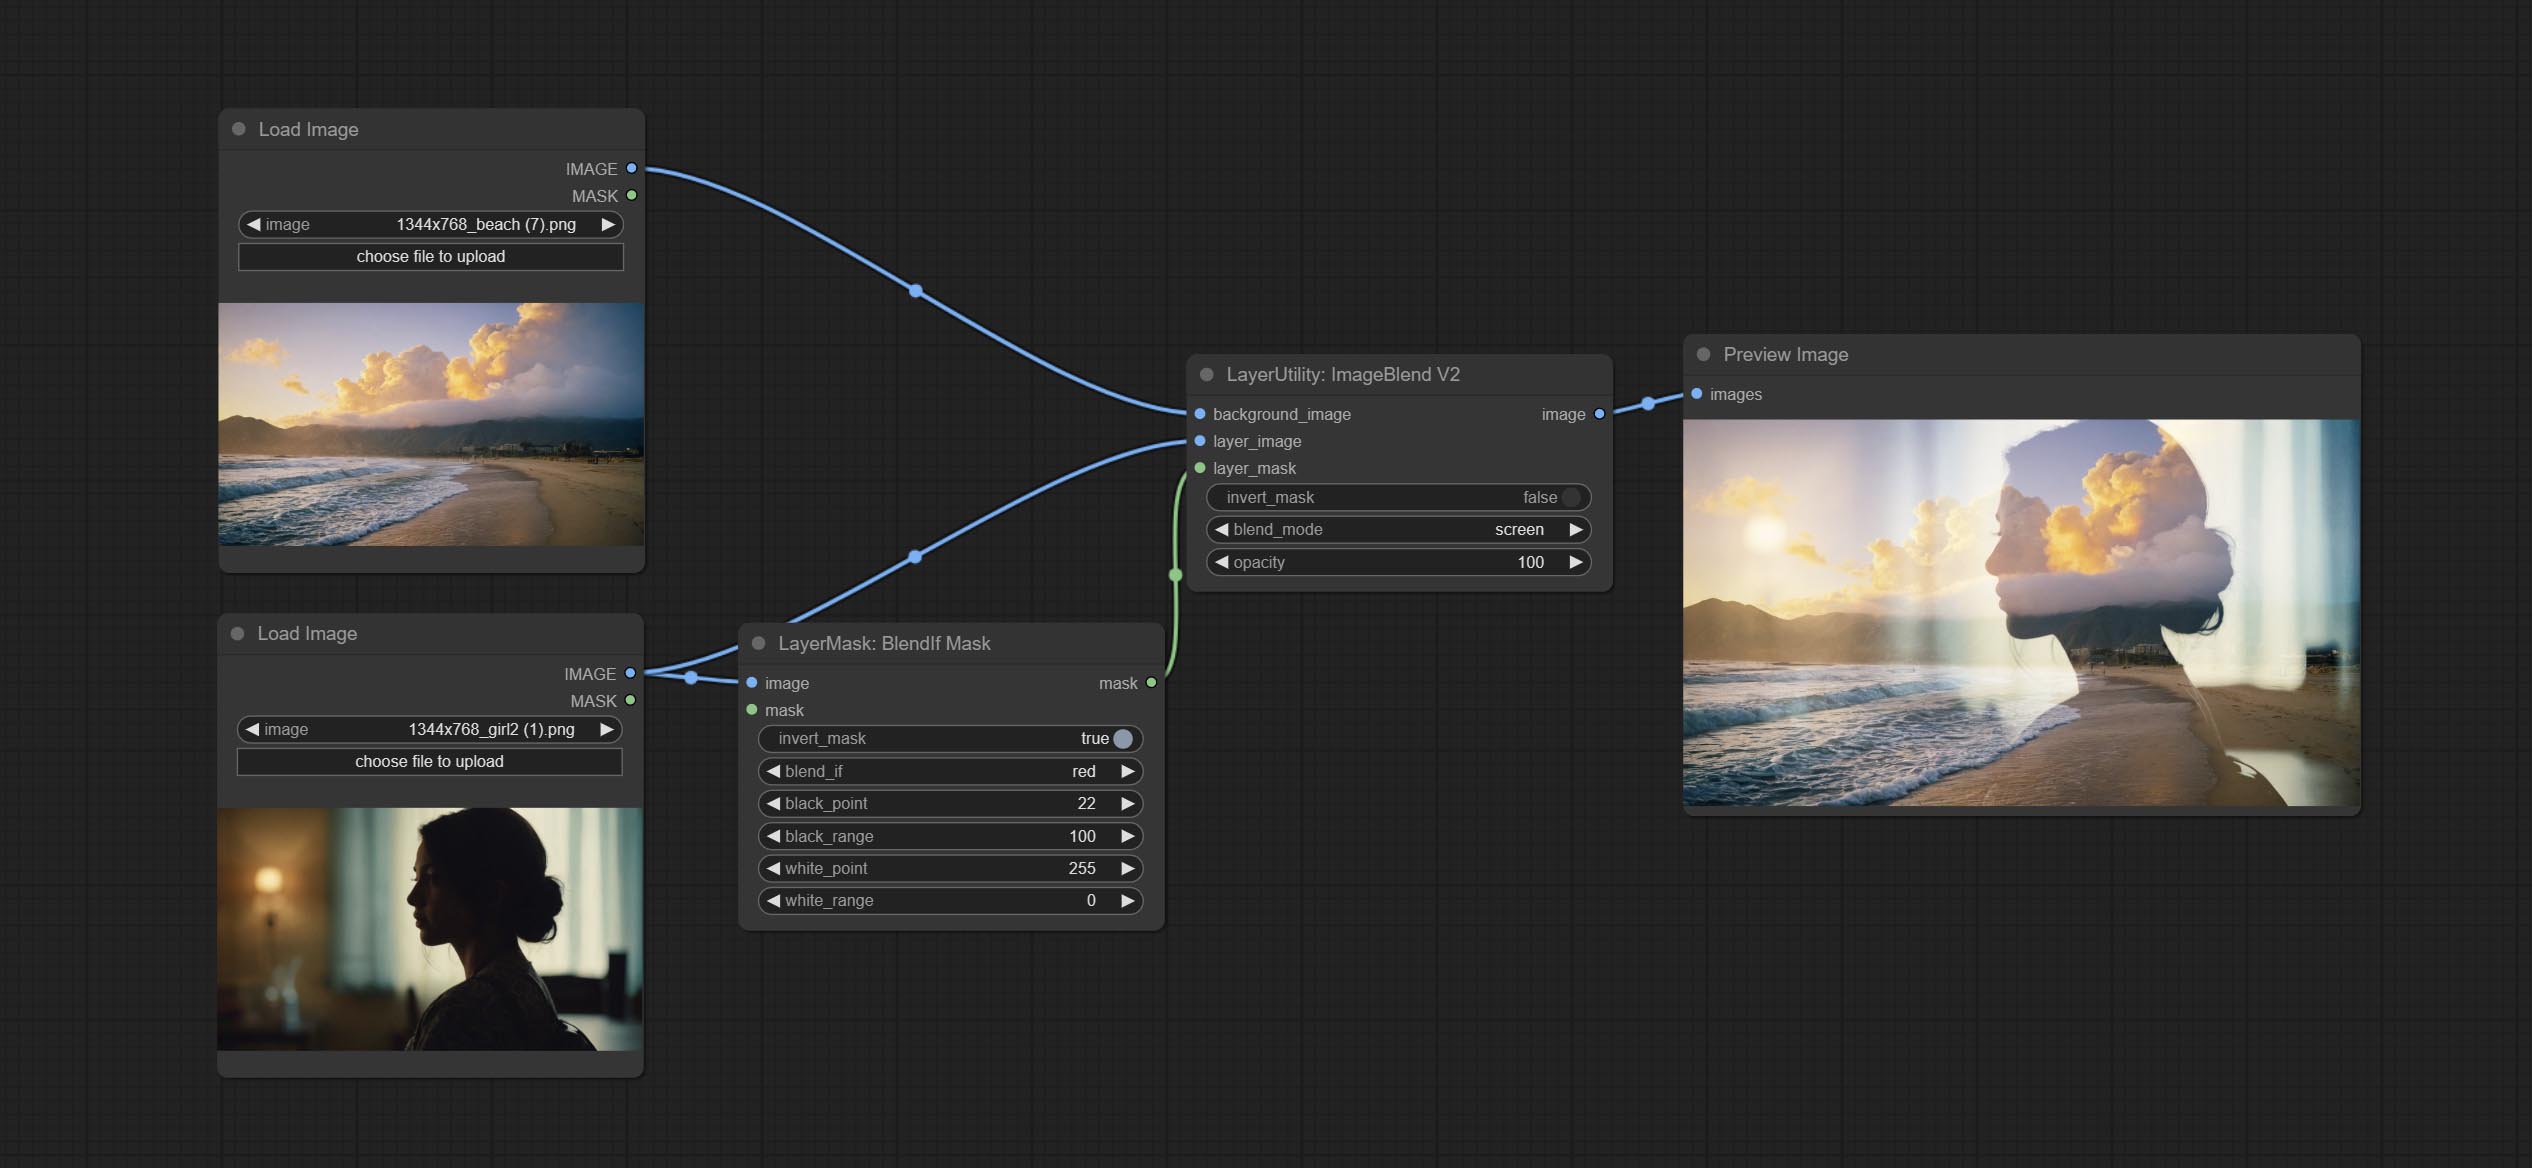
节点选项:
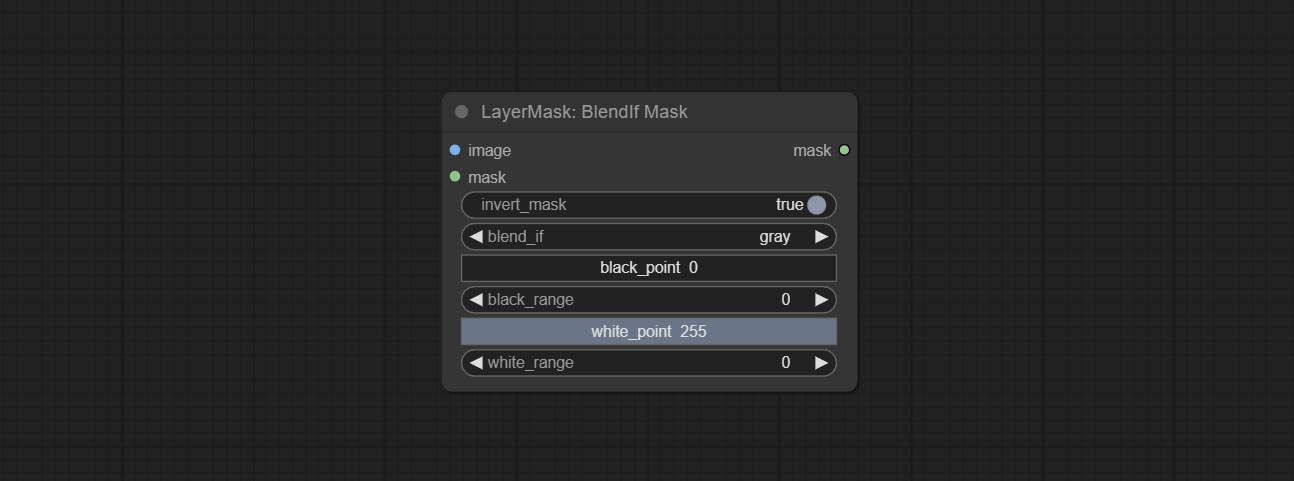
- invert_mask: Whether to reverse the mask.
- blend_if: Channel selection for Blend If. There are four options:
gray , red , green , and blue . - black_point: Black point values, ranging from 0-255.
- black_range: Dark part transition range. The larger the value, the richer the transition level of the dark part mask.
- white_point: White point values, ranging from 0-255.
- white_range: Brightness transition range. The larger the value is, the richer the transition level of the bright part mask is.
MaskBoxDetect
Detect the area where the mask is located and output its position and size. 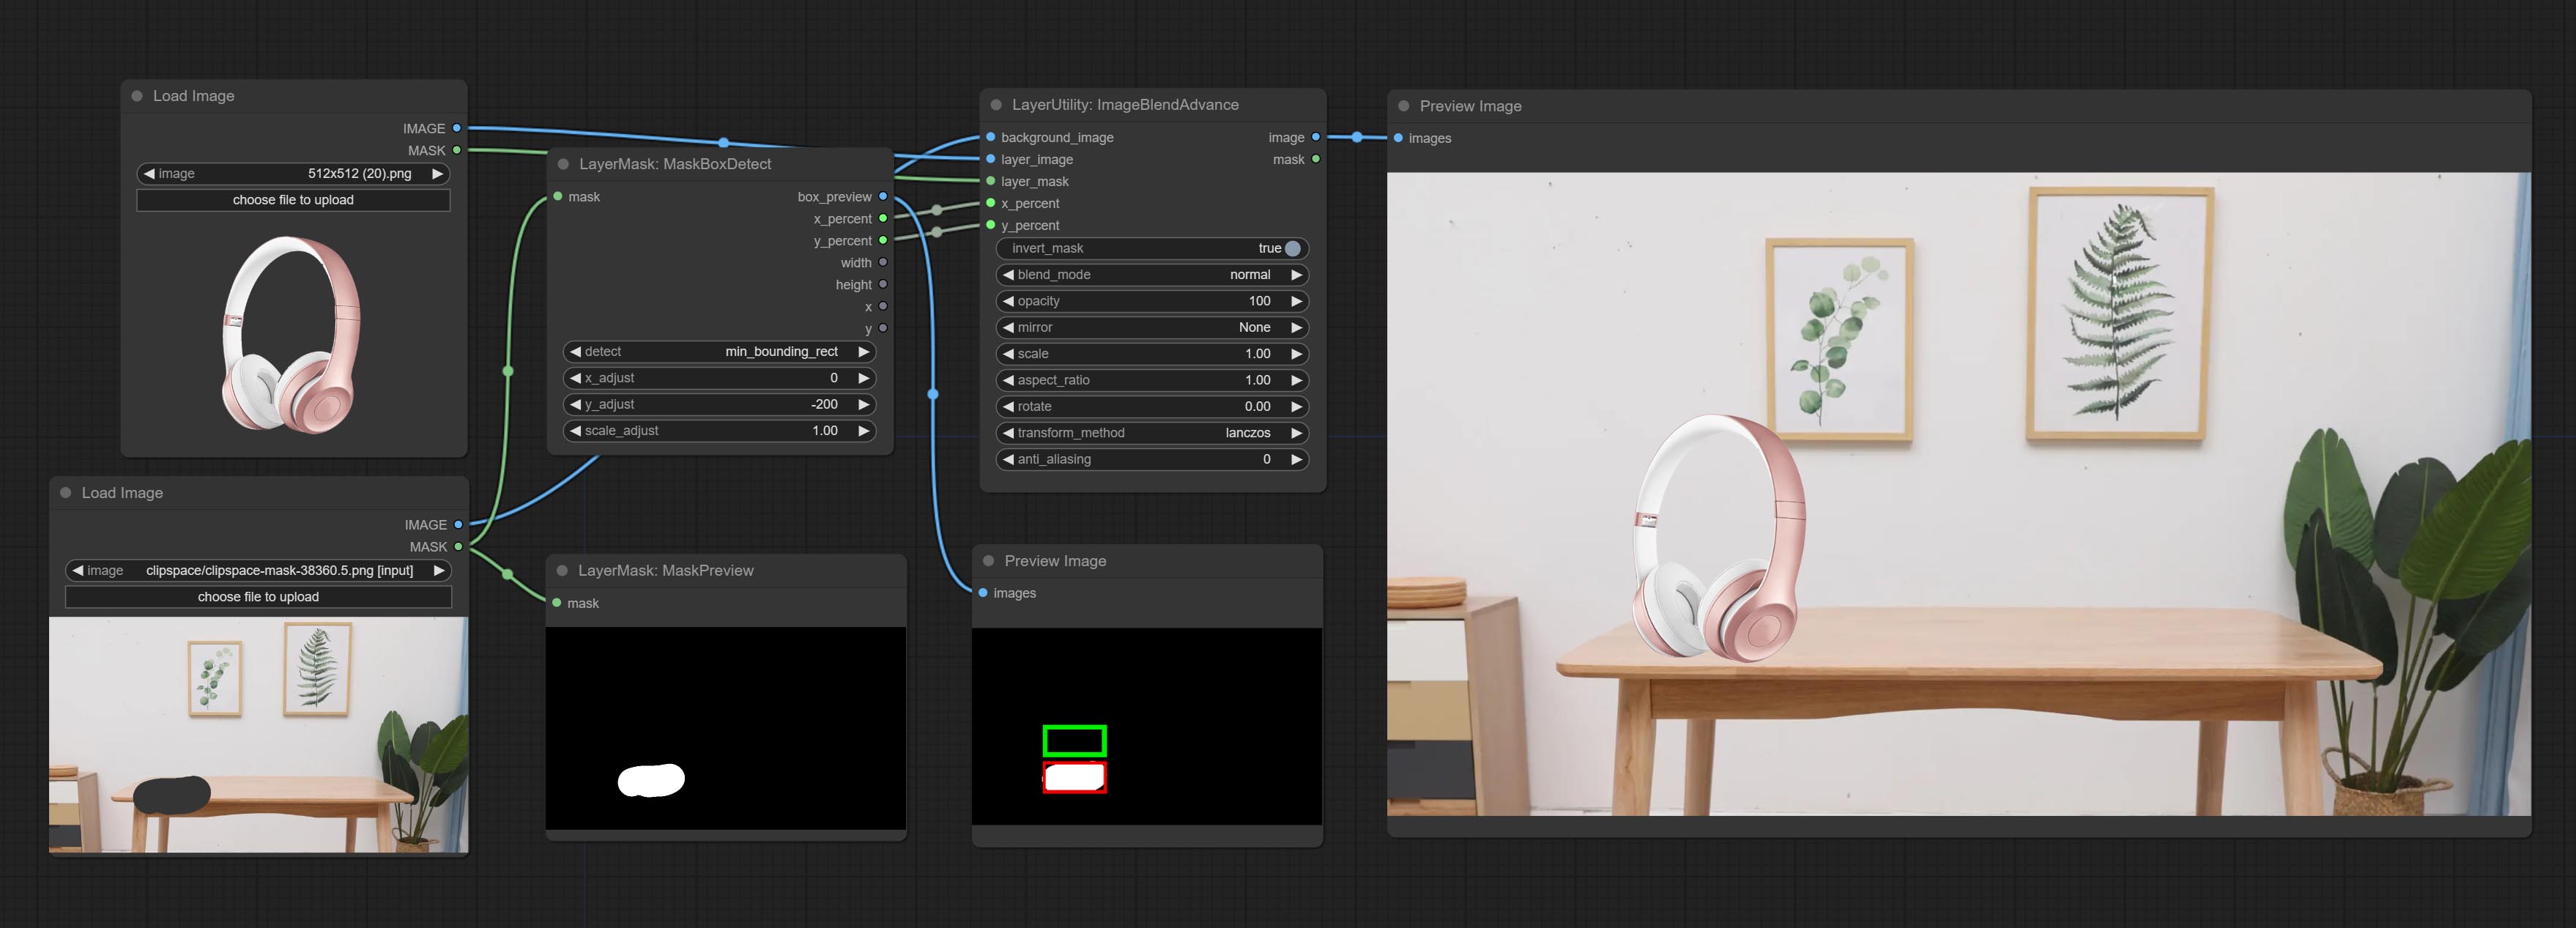
Node options:
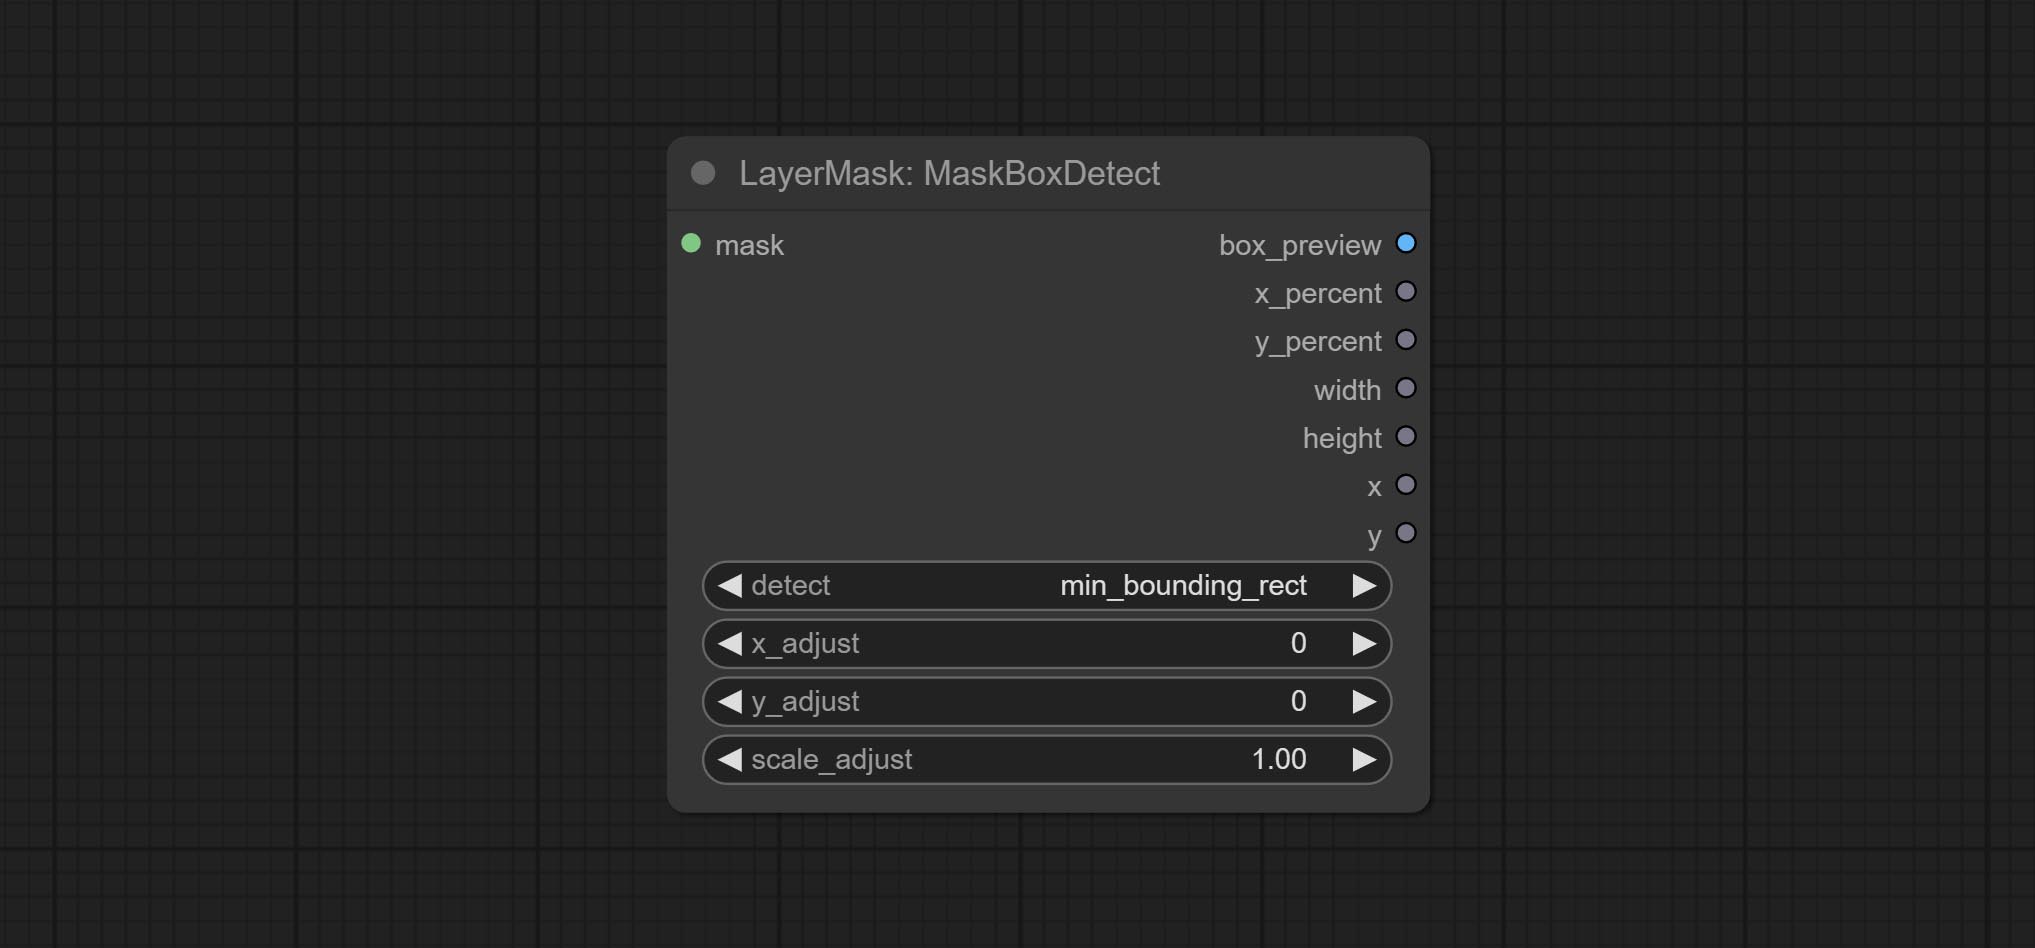
- detect: Detection method,
min_bounding_rect is the minimum bounding rectangle of block shape, max_inscribed_rect is the maximum inscribed rectangle of block shape, and mask-area is the effective area for masking pixels. - x_adjust: Adjust of horizontal deviation after detection.
- y_adjust: Adjust of vertical offset after detection.
- scale_adjust: Adjust the scaling offset after detection.
输出:
- Box_Preview:检测结果的预览图像。红色代表检测到的结果,绿色表示调整的输出结果。
- x_percent: Horizontal position output in percentage.
- y_percent: Vertical position output in percentage.
- width: Width.
- height: Height.
- x: The x-coordinate of the top left corner position.
- y: The y-coordinate of the top left corner position.
Ultra Nodes
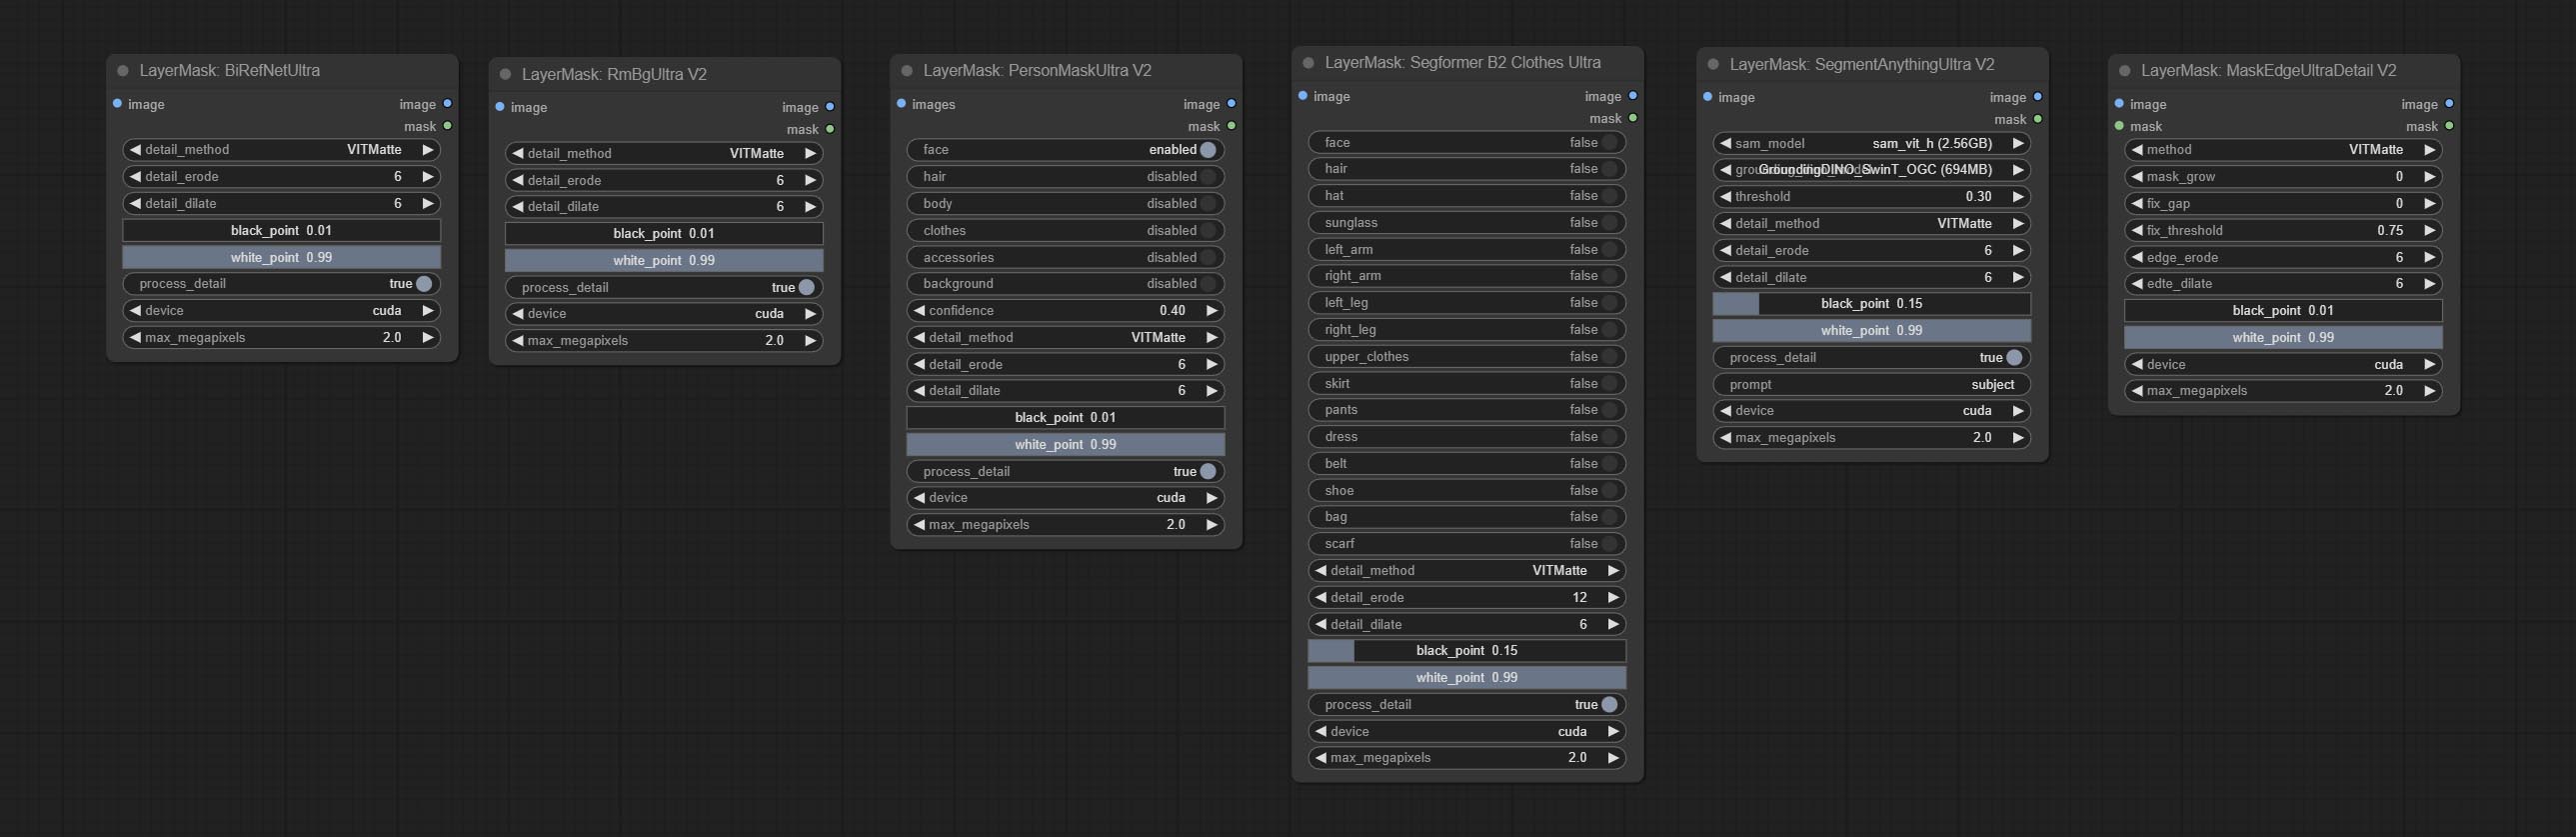
最新版本的节点的节点包括:SementAnyingultrav2,rmbgultrav2,birefnetultra,segformertrav2,segformerb2clothesultra和maskEdgeDeceDeltradeTaildAildailv2。 There are three edge processing methods for these nodes:
-
PyMatting optimizes the edges of the mask by using a closed form matching to mask trimap. -
GuideFilter uses opencv guidedfilter to feather edges based on color similarity, and performs best when edges have strong color separation.
The code for the above two methods is from the ComfyUI-Image-Filters in spacepxl's Alpha Matte, thanks to the original author. -
VitMatte uses the transformer vit model for high-quality edge processing, preserving edge details and even generating semi transparent masks. Note: When running for the first time, you need to download the vitmate model file and wait for the automatic download to complete. If the download cannot be completed, you can run the command huggingface-cli download hustvl/vitmatte-small-composition-1k to manually download. After successfully downloading the model, you can use VITMatte(local) without accessing the network. - VitMatte's options:
device set whether to use CUDA for vitimate operations, which is about 5 times faster than CPU. max_megapixels set the maximum image size for vitmate operation, and oversized images will be reduced in size. For 16G VRAM, it is recommended to set it to 3.
*Download all model files from BaiduNetdisk or Huggingface to ComfyUI/models/vitmatte folder.
The following figure is an example of the difference in output between three methods. 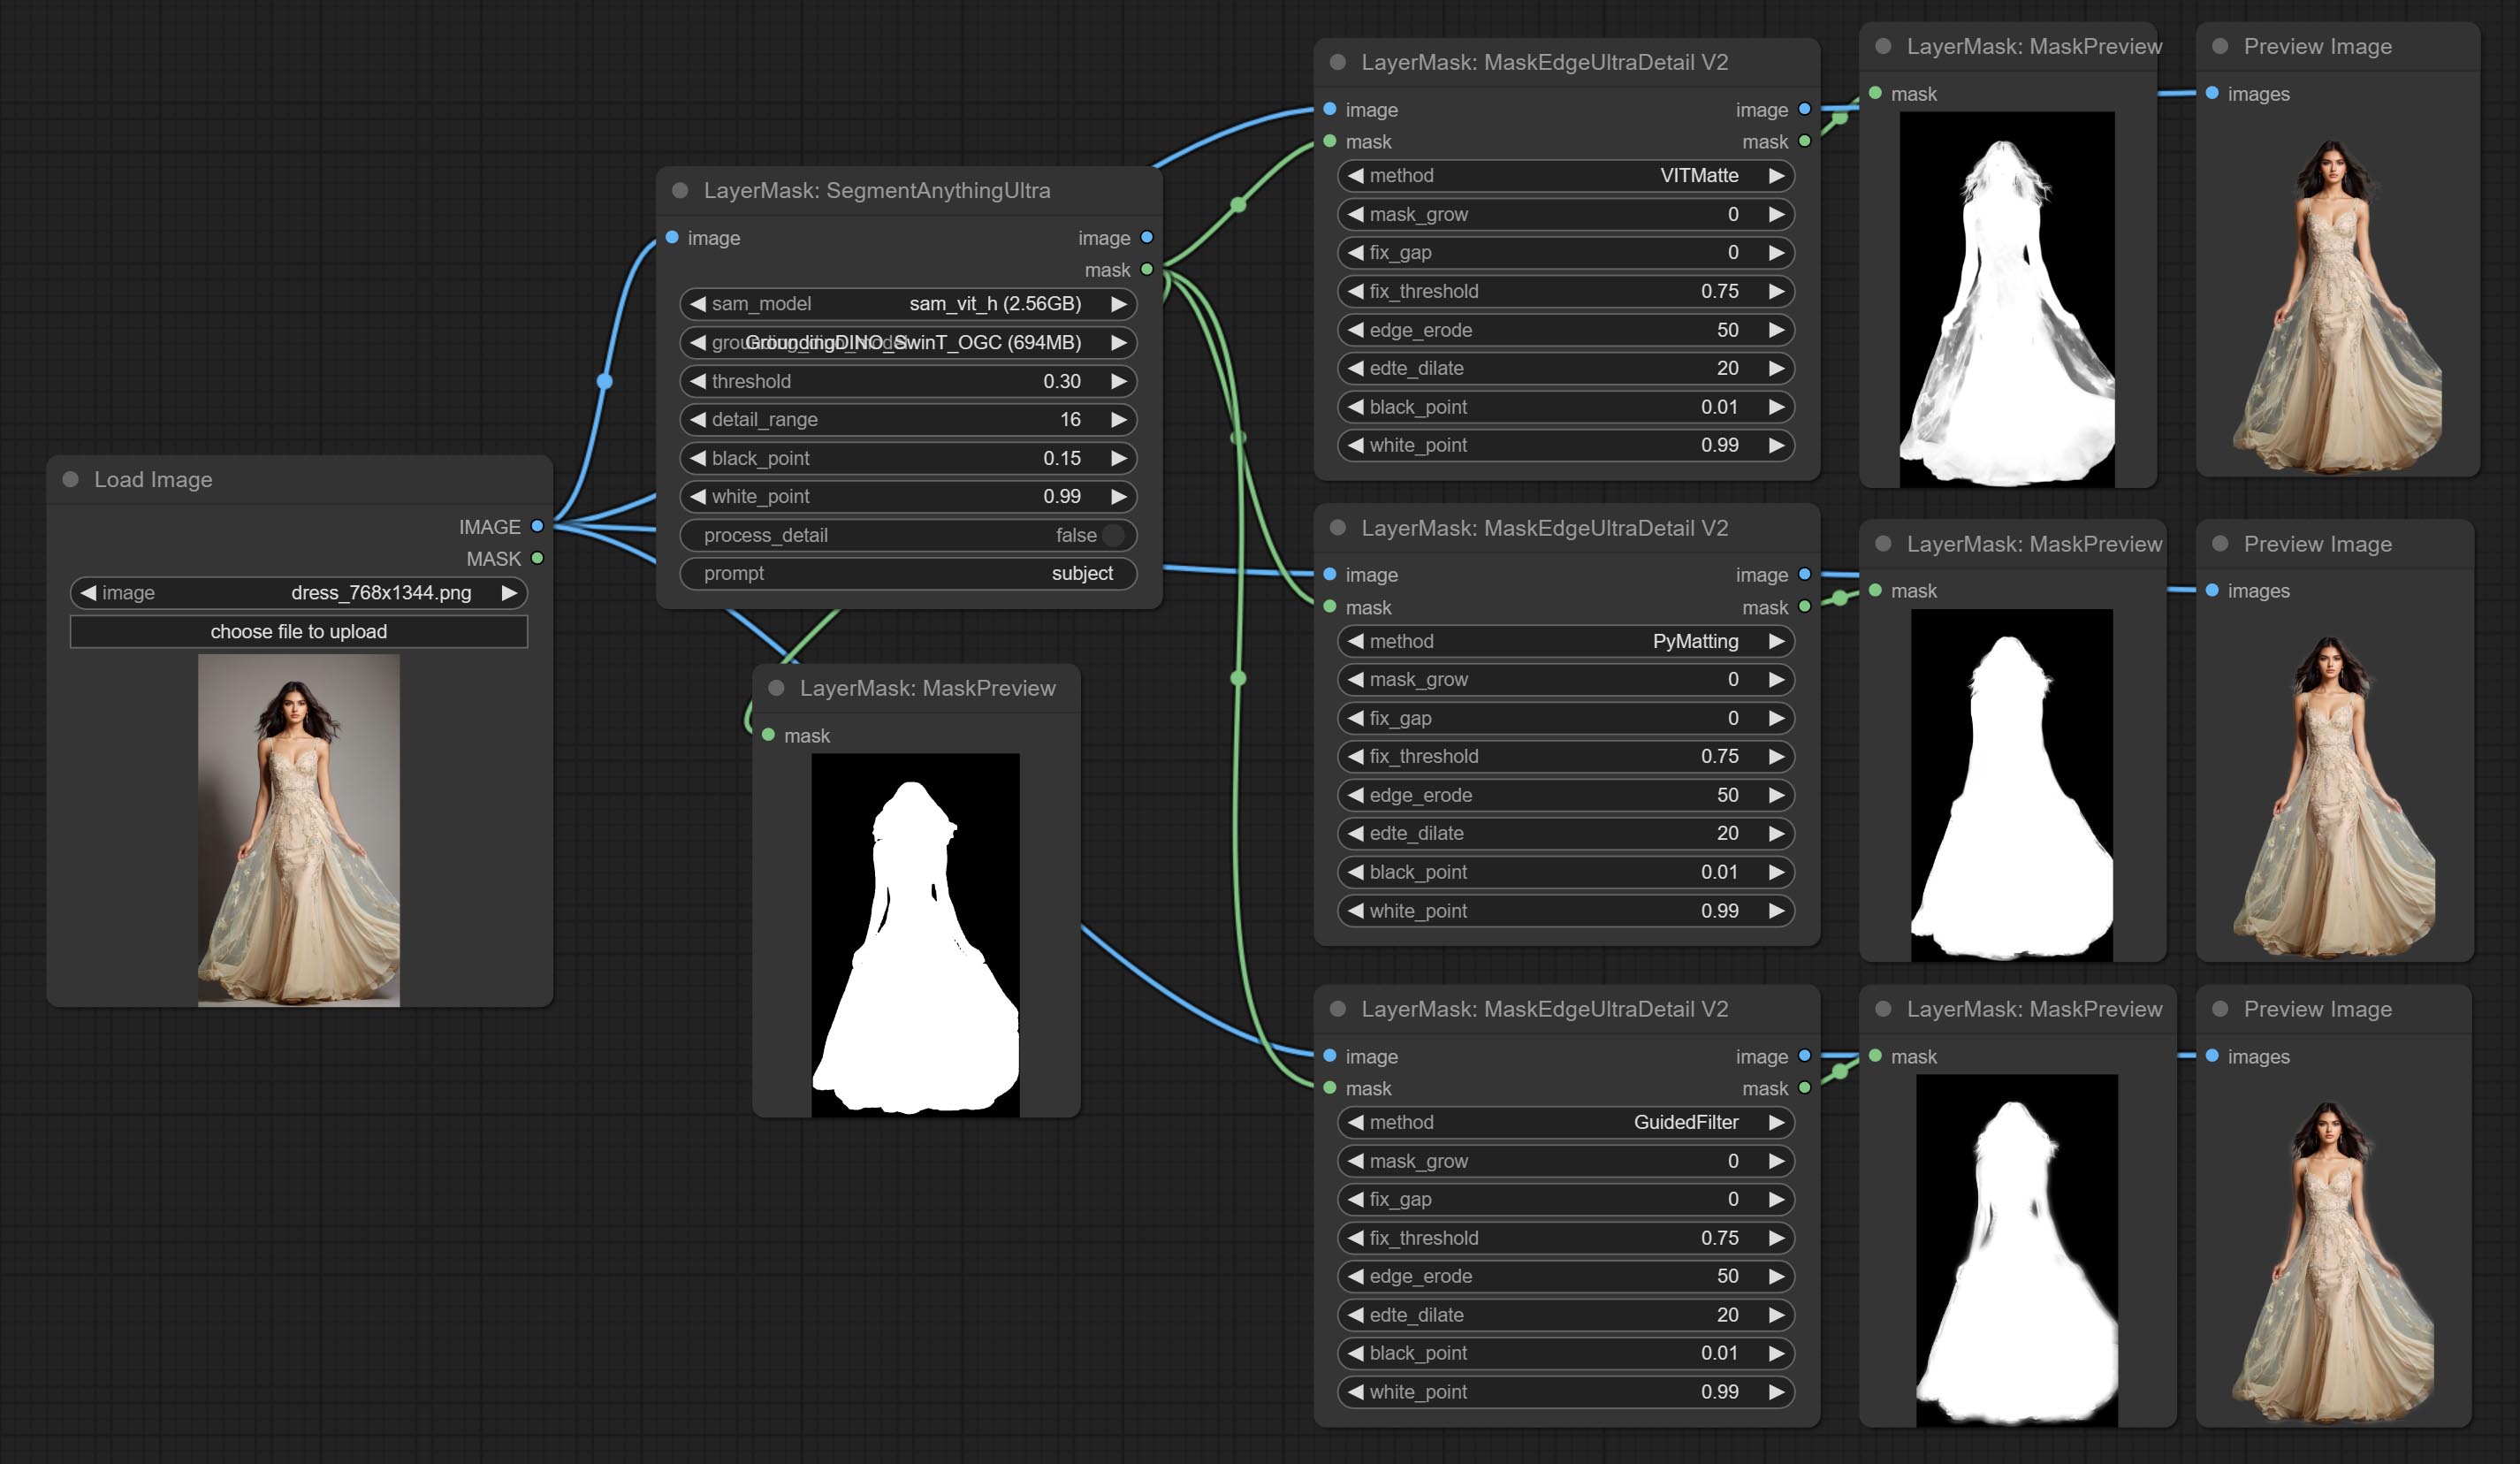
SegmentAnythingUltra
Improvements to ComfyUI Segment Anything, thanks to the original author.
*Please refer to the installation of ComfyUI Segment Anything to install the model. If ComfyUI Segment Anything has been correctly installed, you can skip this step.
- From here download the config.json,model.safetensors,tokenizer_config.json,tokenizer.json and vocab.txt 5 files to
ComfyUI/models/bert-base-uncased folder. - Download GroundingDINO_SwinT_OGC config file, GroundingDINO_SwinT_OGC model, GroundingDINO_SwinB config file, GroundingDINO_SwinB model to
ComfyUI/models/grounding-dino folder. - Download sam_vit_h,sam_vit_l, sam_vit_b, sam_hq_vit_h, sam_hq_vit_l, sam_hq_vit_b, mobile_sam to
ComfyUI/models/sams folder. *Or download them from GroundingDino models on BaiduNetdisk and SAM models on BaiduNetdisk . 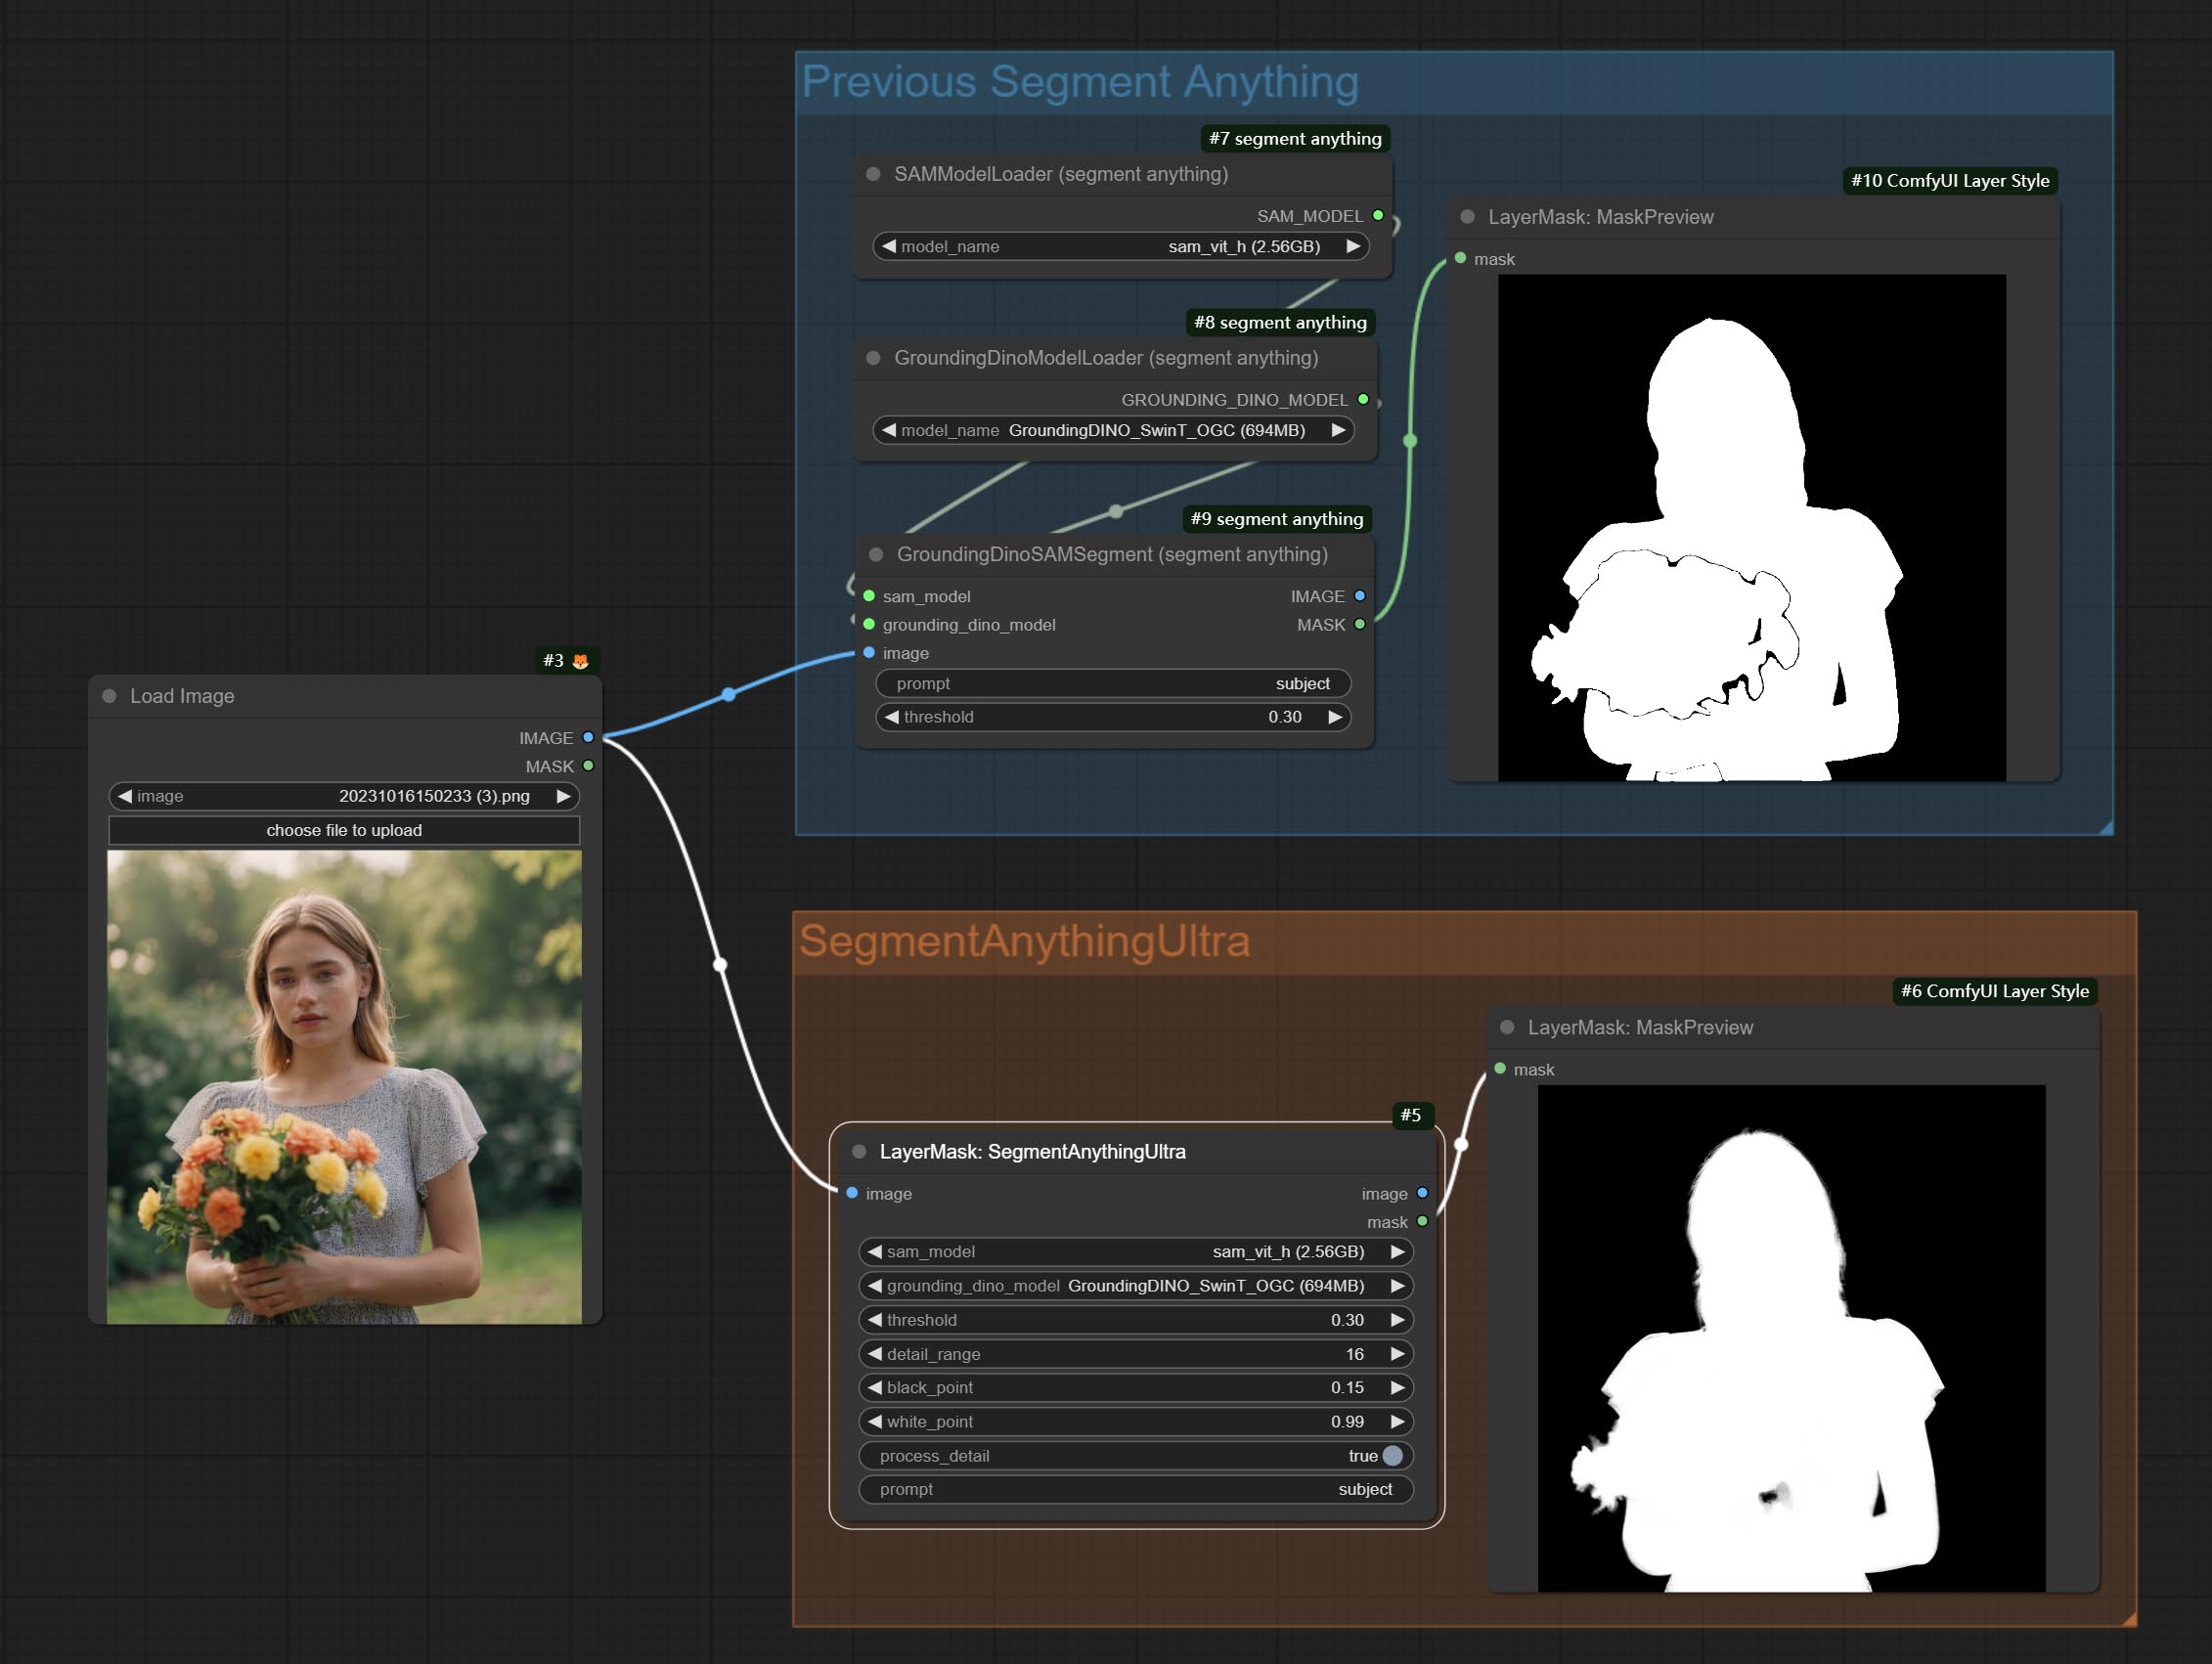
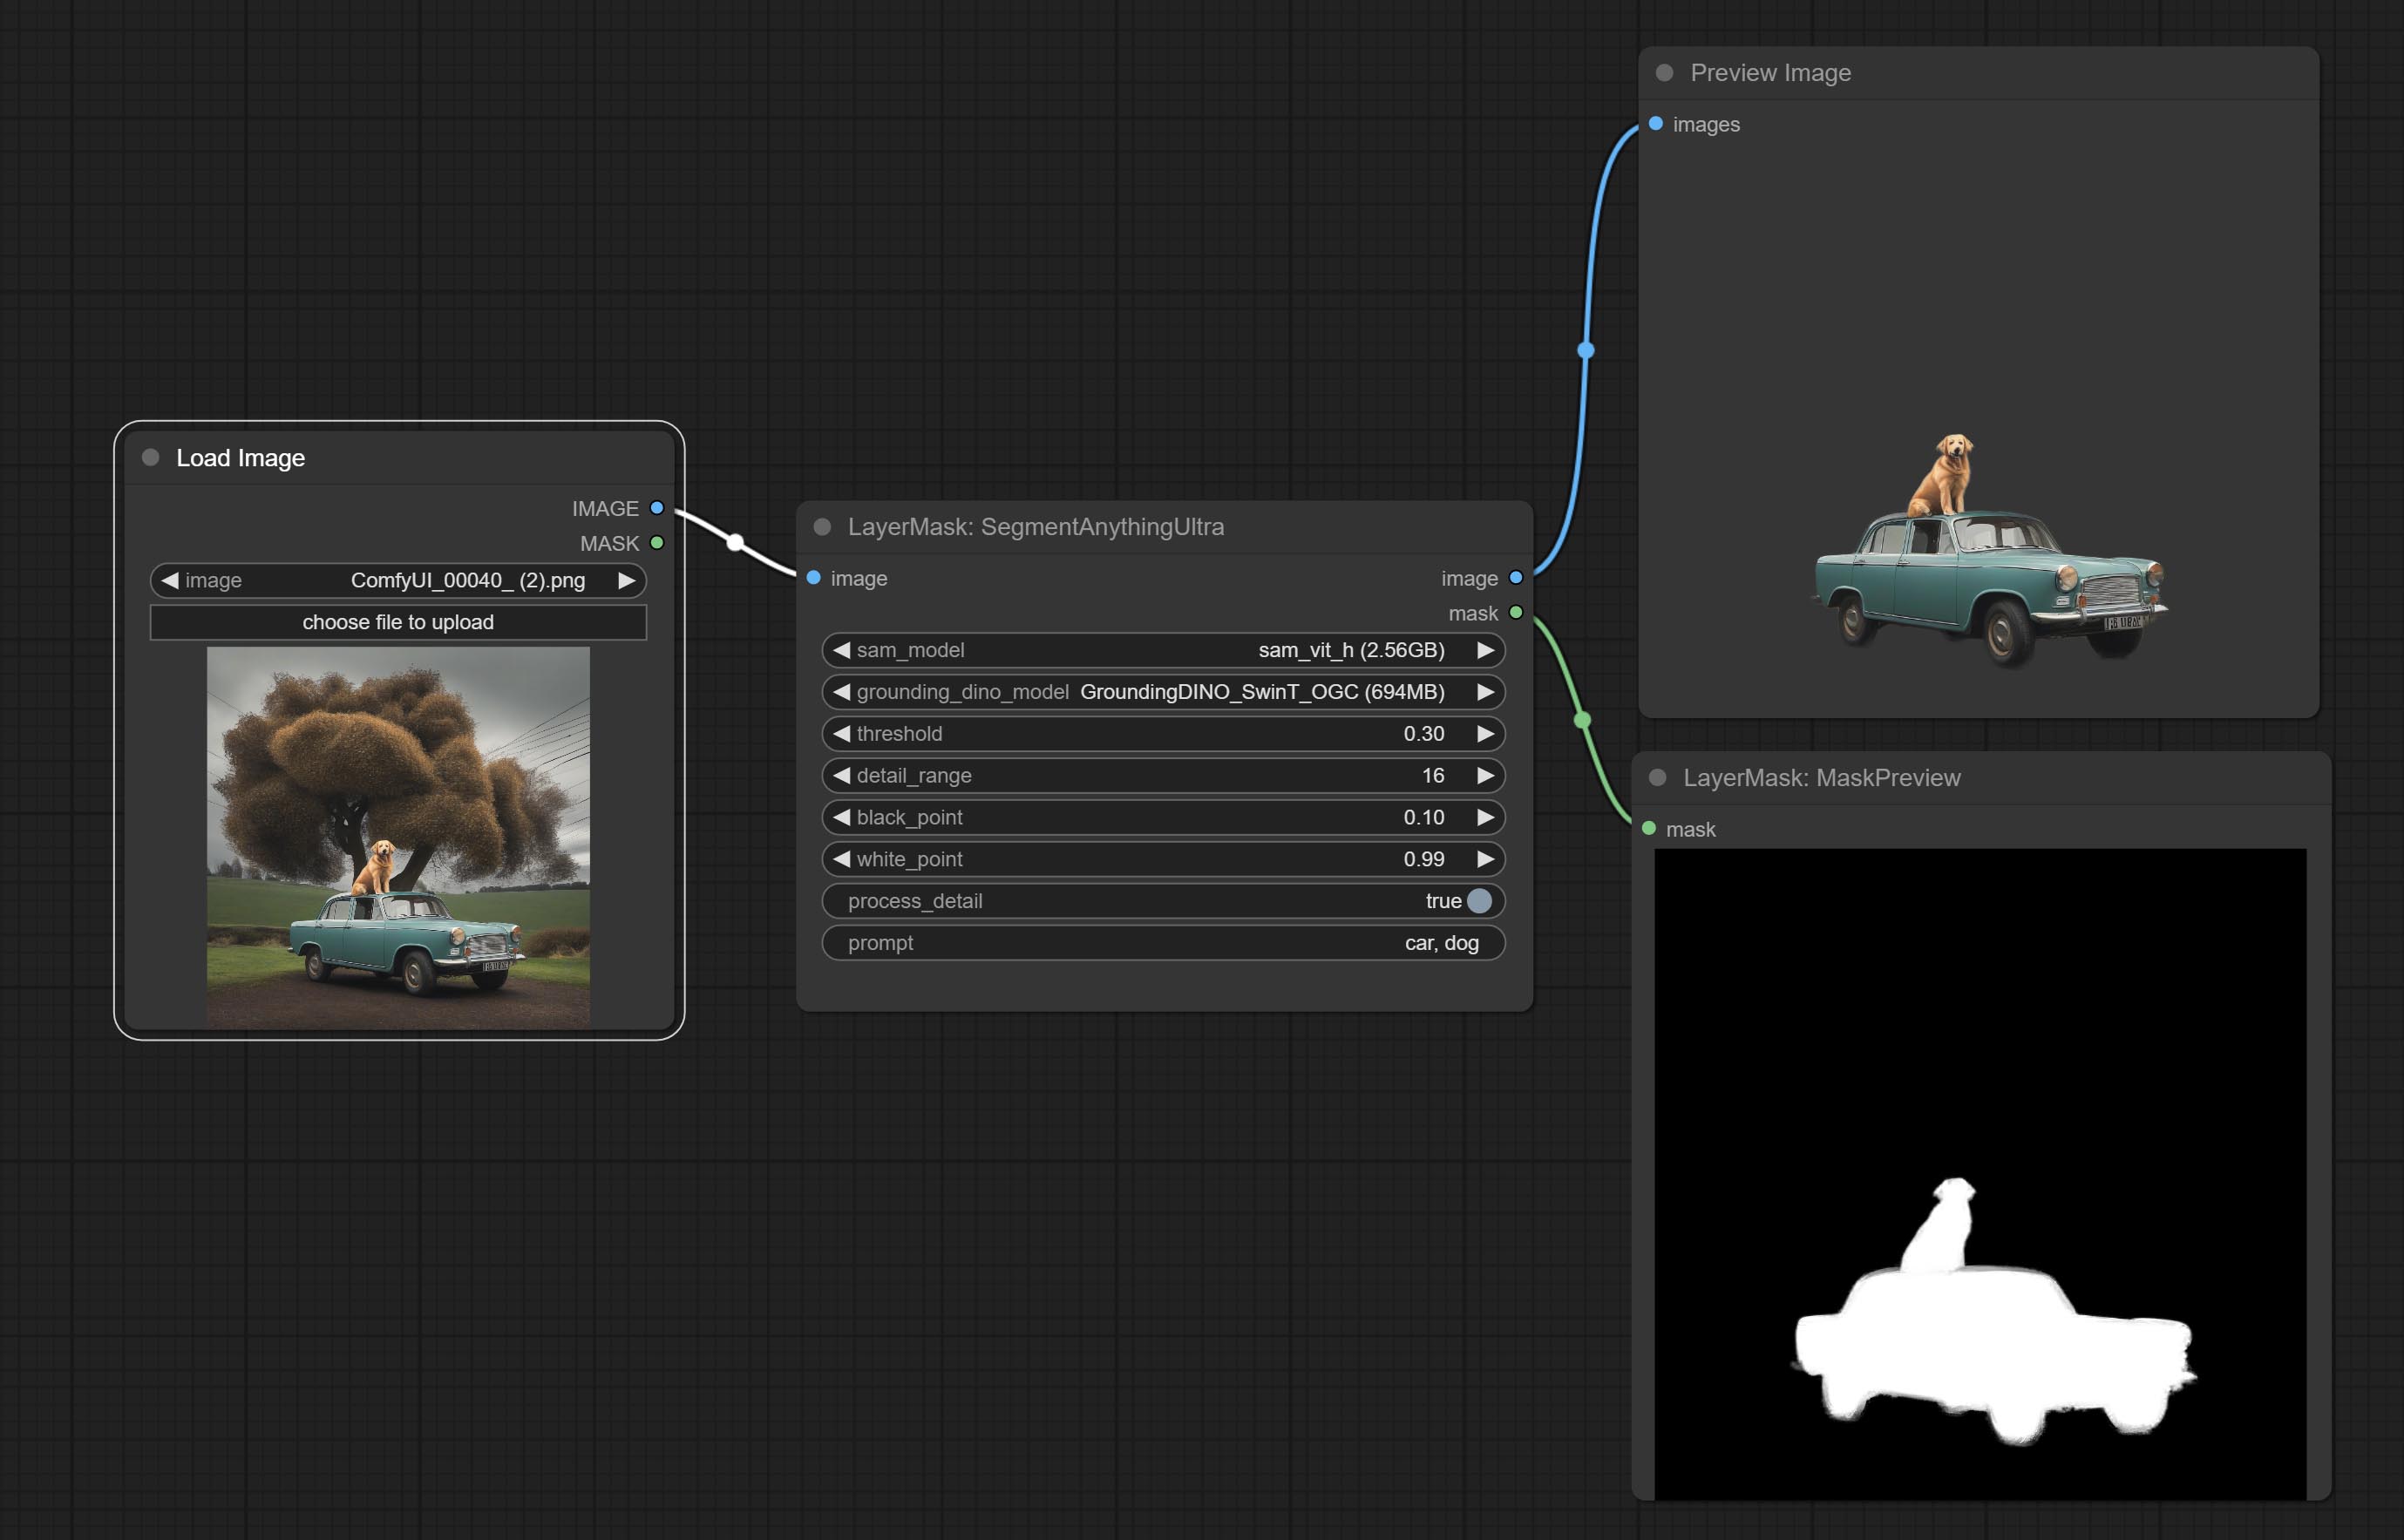
Node options:

- sam_model: Select the SAM model.
- ground_dino_model: Select the Grounding DINO model.
- threshold: The threshold of SAM.
- detail_range: Edge detail range.
- black_point: Edge black sampling threshold.
- white_point: Edge white sampling threshold.
- process_detail: Set to false here will skip edge processing to save runtime.
- prompt: Input for SAM's prompt.
- cache_model: Set whether to cache the model.
SegmentAnythingUltraV2
The V2 upgraded version of SegmentAnythingUltra has added the VITMatte edge processing method.(Note: Images larger than 2K in size using this method will consume huge memory) 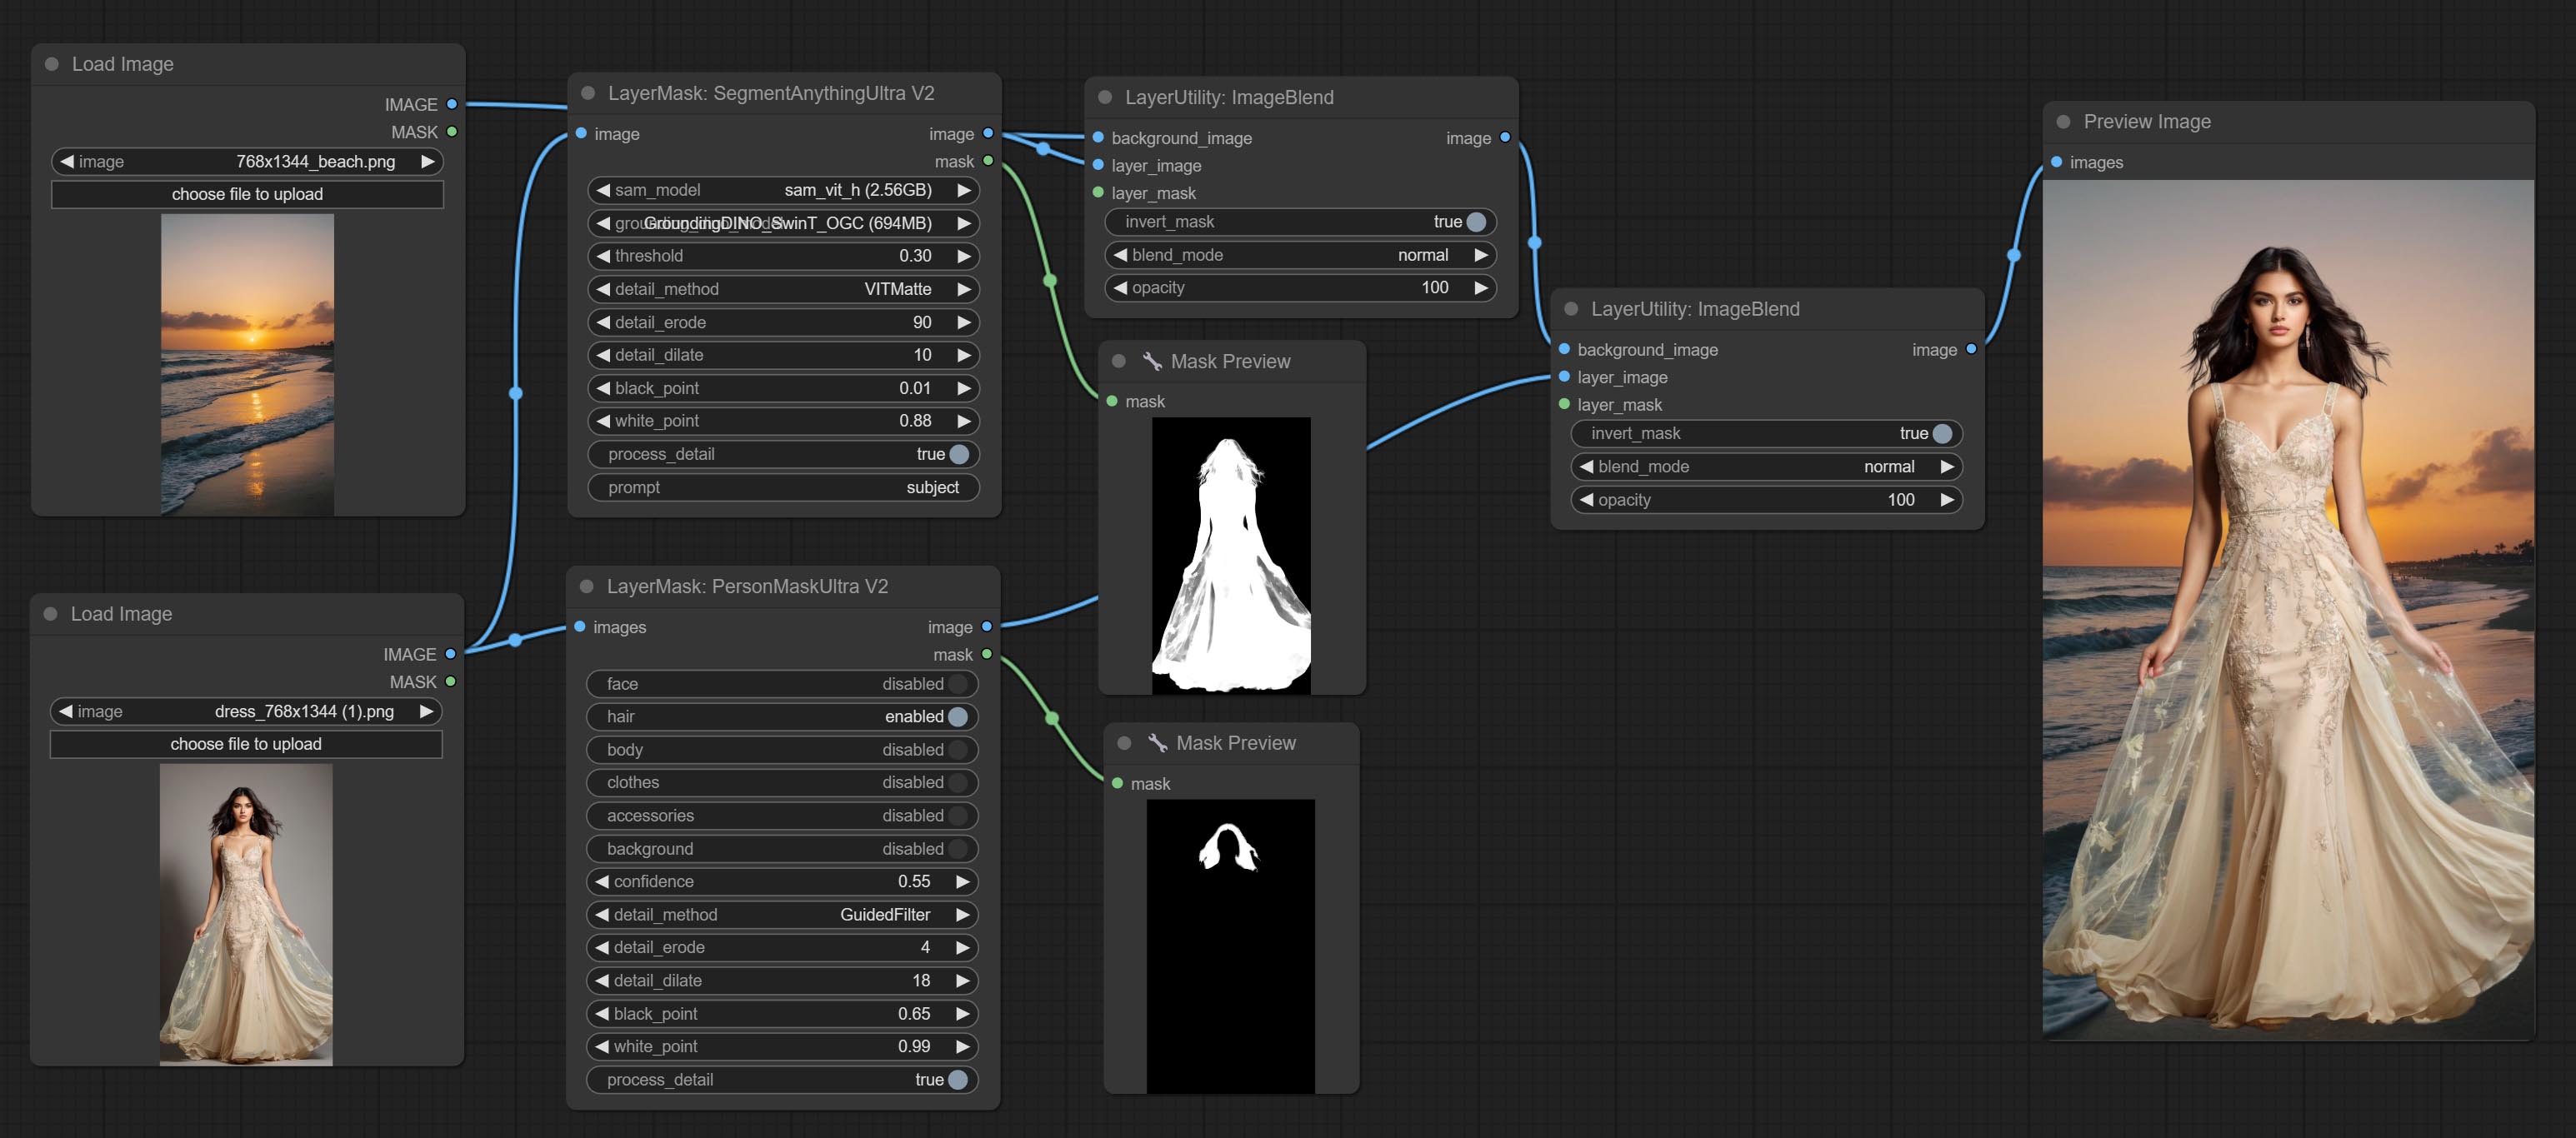
On the basis of SegmentAnythingUltra, the following changes have been made: 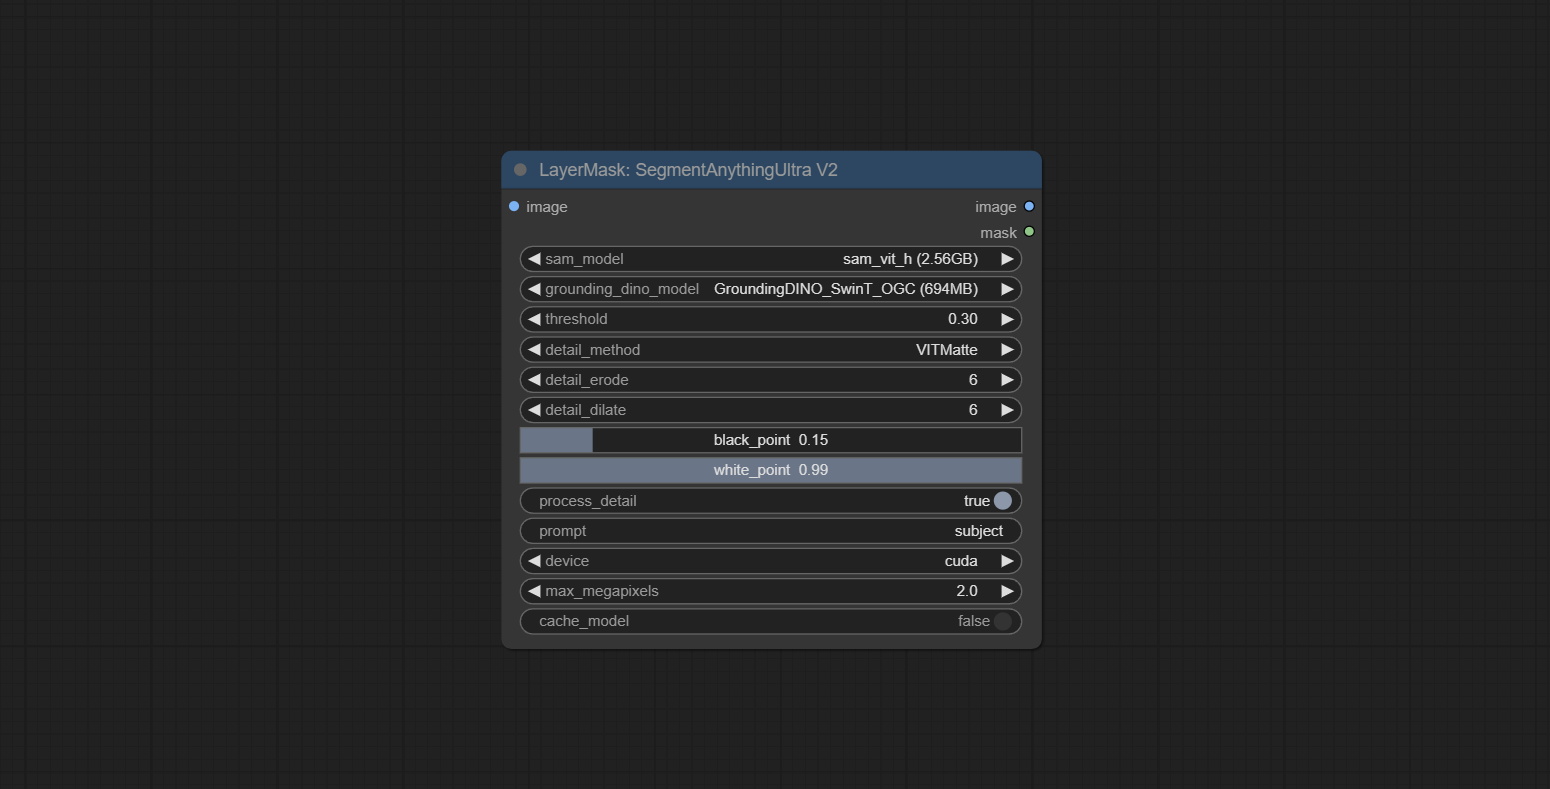
- detail_method: Edge processing methods. provides VITMatte, VITMatte(local), PyMatting, GuidedFilter. If the model has been downloaded after the first use of VITMatte, you can use VITMatte (local) afterwards.
- detail_erode: Mask the erosion range inward from the edge. the larger the value, the larger the range of inward repair.
- detail_dilate: The edge of the mask expands outward. the larger the value, the wider the range of outward repair.
- device: Set whether the VitMatte to use cuda.
- max_megapixels: Set the maximum size for VitMate operations.
SAM2Ultra
This node is modified from kijai/ComfyUI-segment-anything-2. Thank to kijai for making significant contributions to the Comfyui community.
SAM2 Ultra node only support single image. If you need to process multiple images, please first convert the image batch to image list.
*Download models from BaiduNetdisk or huggingface.co/Kijai/sam2-safetensors and copy to ComfyUI/models/sam2 folder.
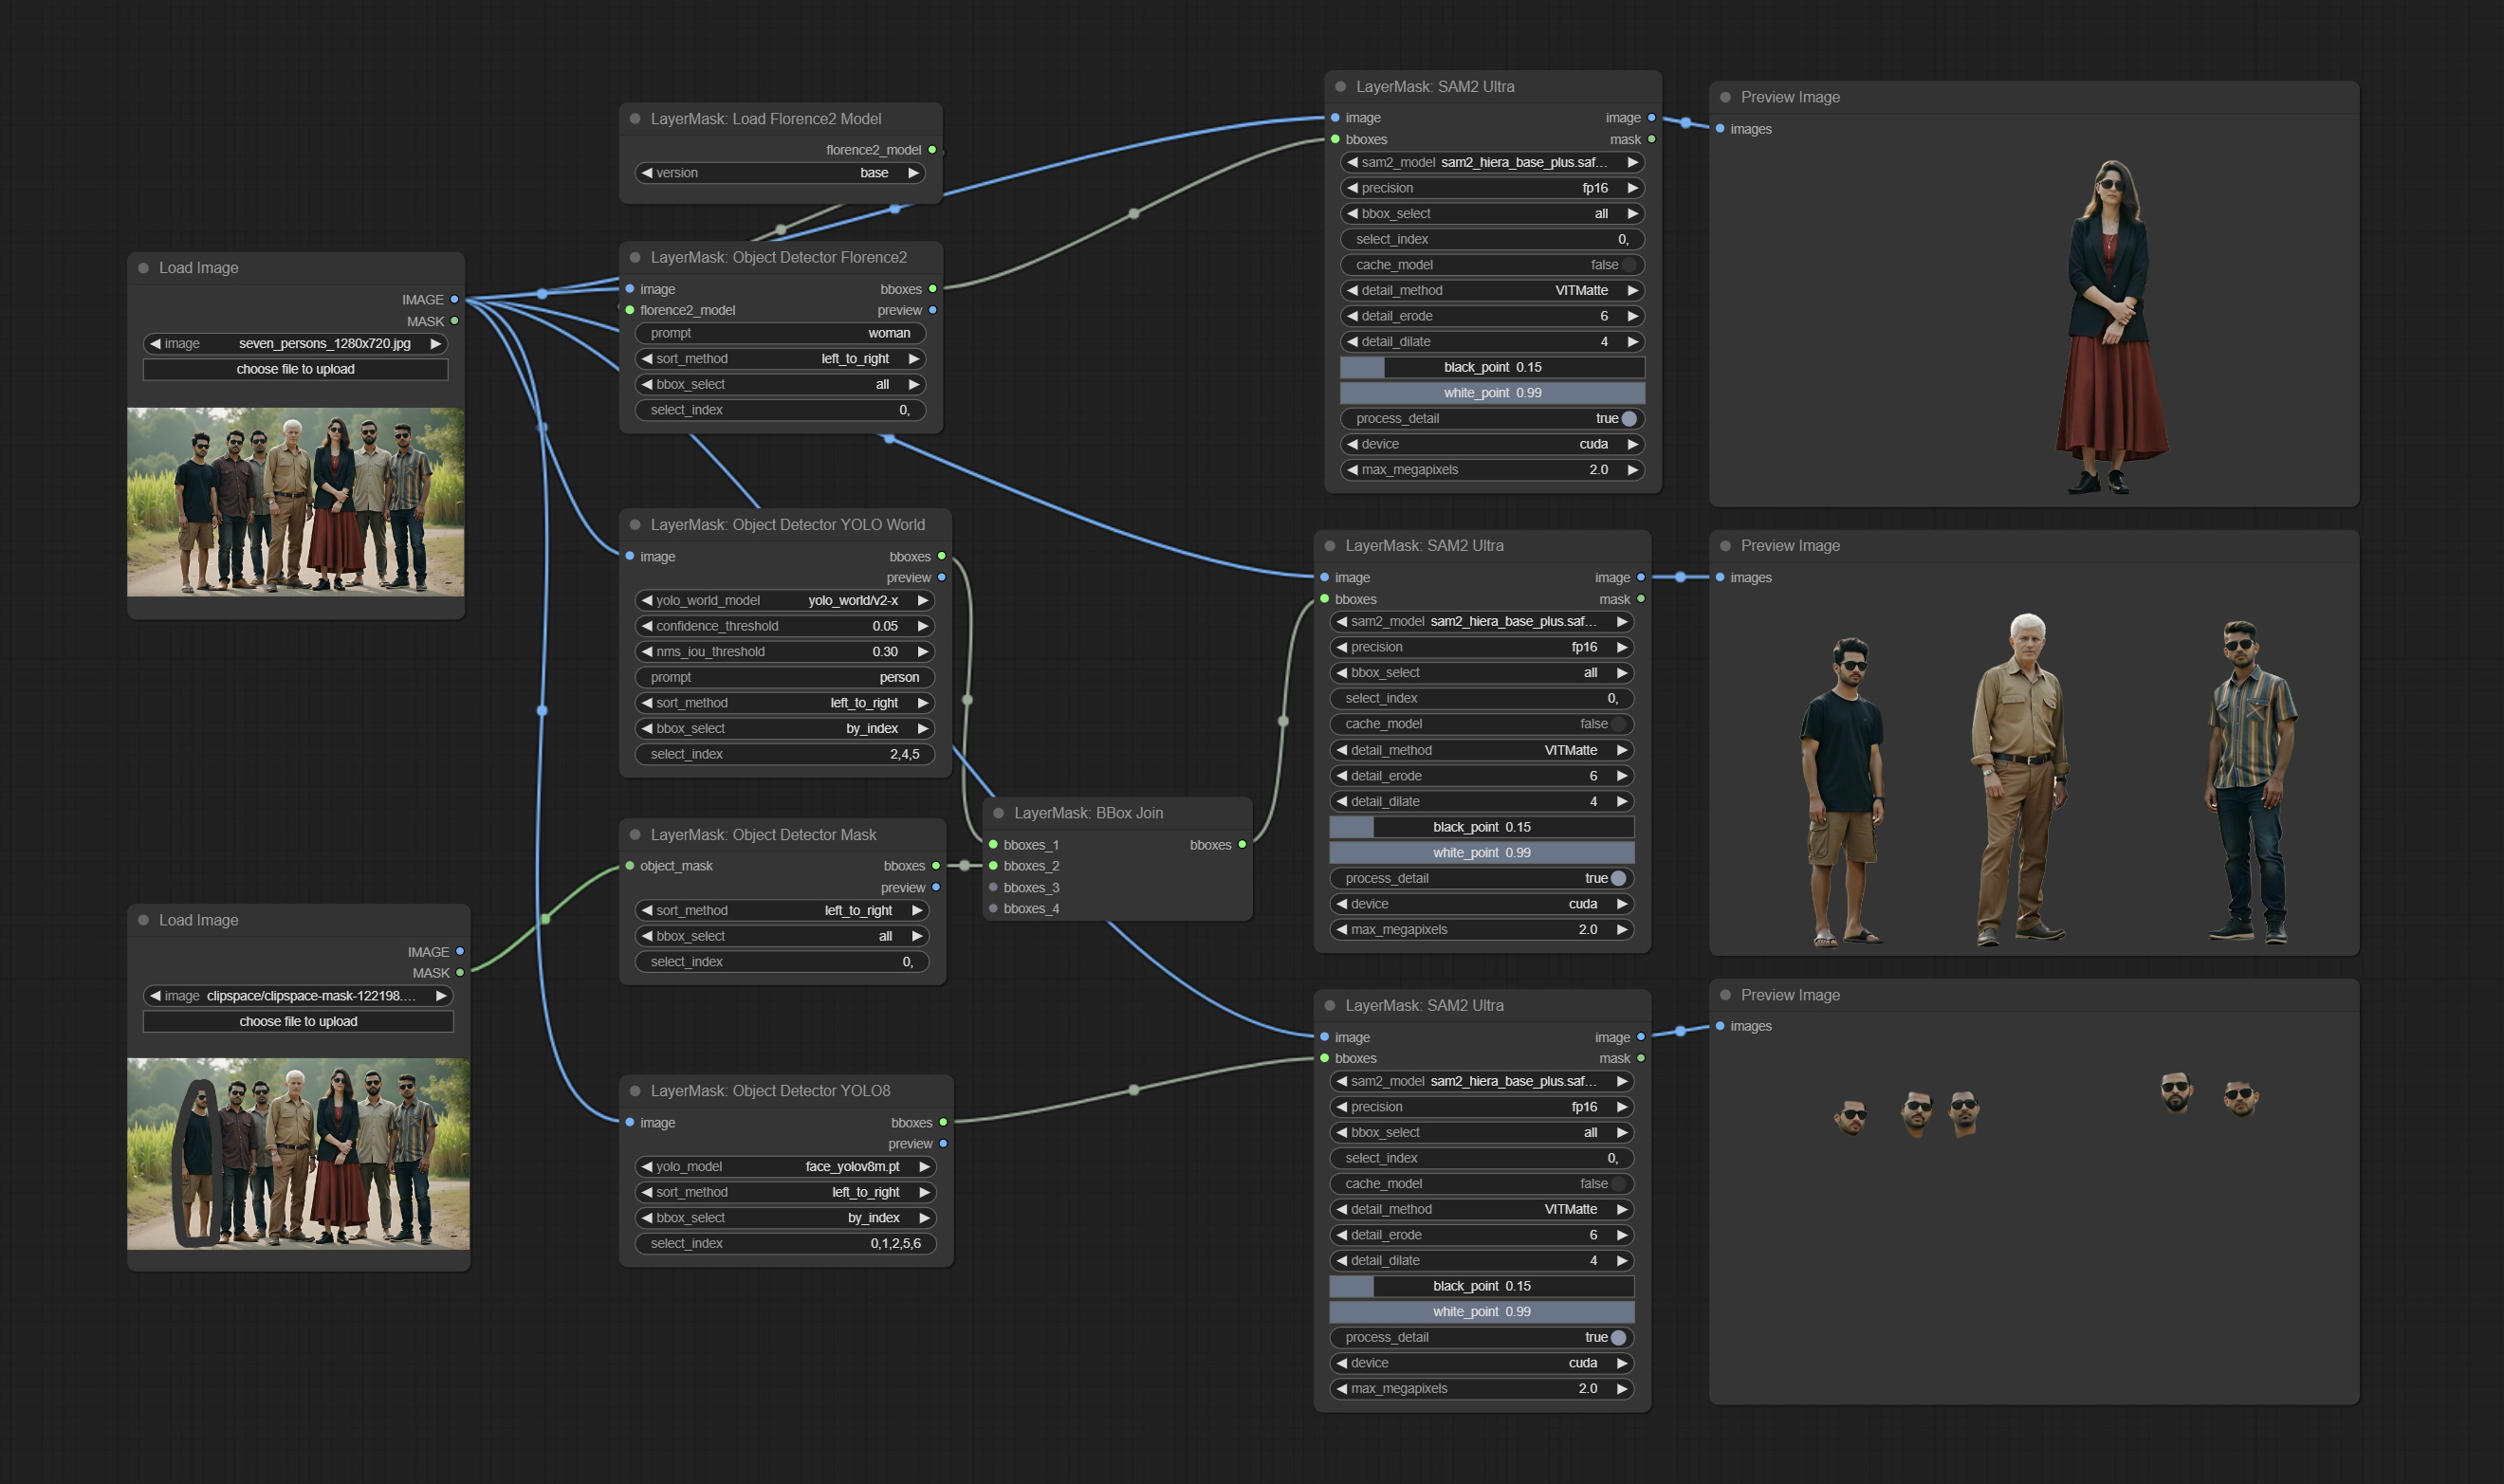
节点选项:
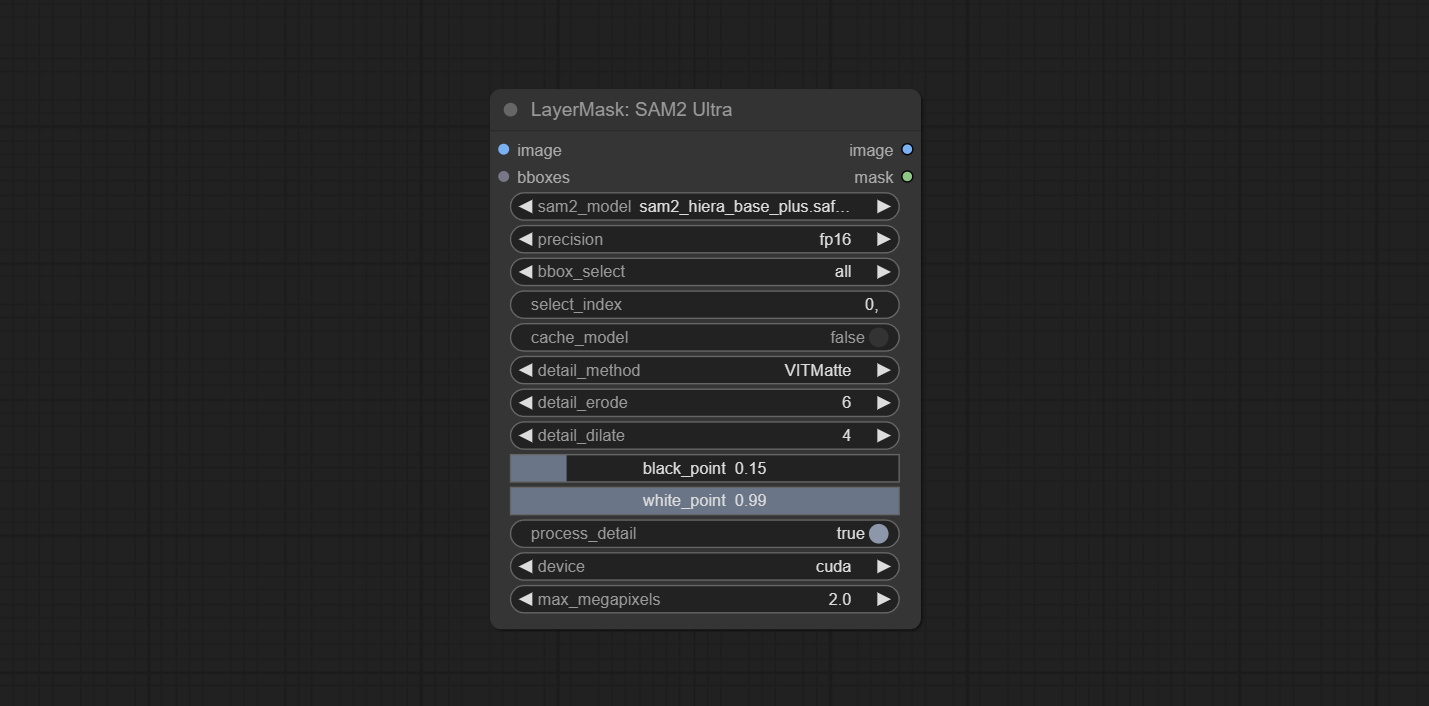
- image: The image to segment.
- bboxes: Input recognition box data.
- sam2_model: Select the SAM2 model.
- presicion: Model's persicion. can be selected from fp16, bf16, and fp32.
- bbox_select: Select the input box data. There are three options: "all" to select all, "first" to select the box with the highest confidence, and "by_index" to specify the index of the box.
- select_index: This option is valid when bbox_delect is 'by_index'. 0 is the first one. Multiple values can be entered, separated by any non numeric character, including but not limited to commas, periods, semicolons, spaces or letters, and even Chinese.
- cache_model:是否要缓存模型。 After caching the model, it will save time for model loading.
- detail_method: Edge processing methods. provides VITMatte, VITMatte(local), PyMatting, GuidedFilter. If the model has been downloaded after the first use of VITMatte, you can use VITMatte (local) afterwards.
- detail_erode: Mask the erosion range inward from the edge. the larger the value, the larger the range of inward repair.
- detail_dilate: The edge of the mask expands outward. the larger the value, the wider the range of outward repair.
- black_point: Edge black sampling threshold.
- white_point: Edge white sampling threshold.
- process_detail: Set to false here will skip edge processing to save runtime.
- device: Set whether the VitMatte to use cuda.
- max_megapixels: Set the maximum size for VitMate operations.
SAM2VideoUltra
SAM2 Video Ultra node support processing multiple frames of images or video sequences. Please define the recognition box data in the first frame of the sequence to ensure correct recognition.
sam2_video_ultra_example.mp4
2024-09-03.152625.mp4
节点选项:
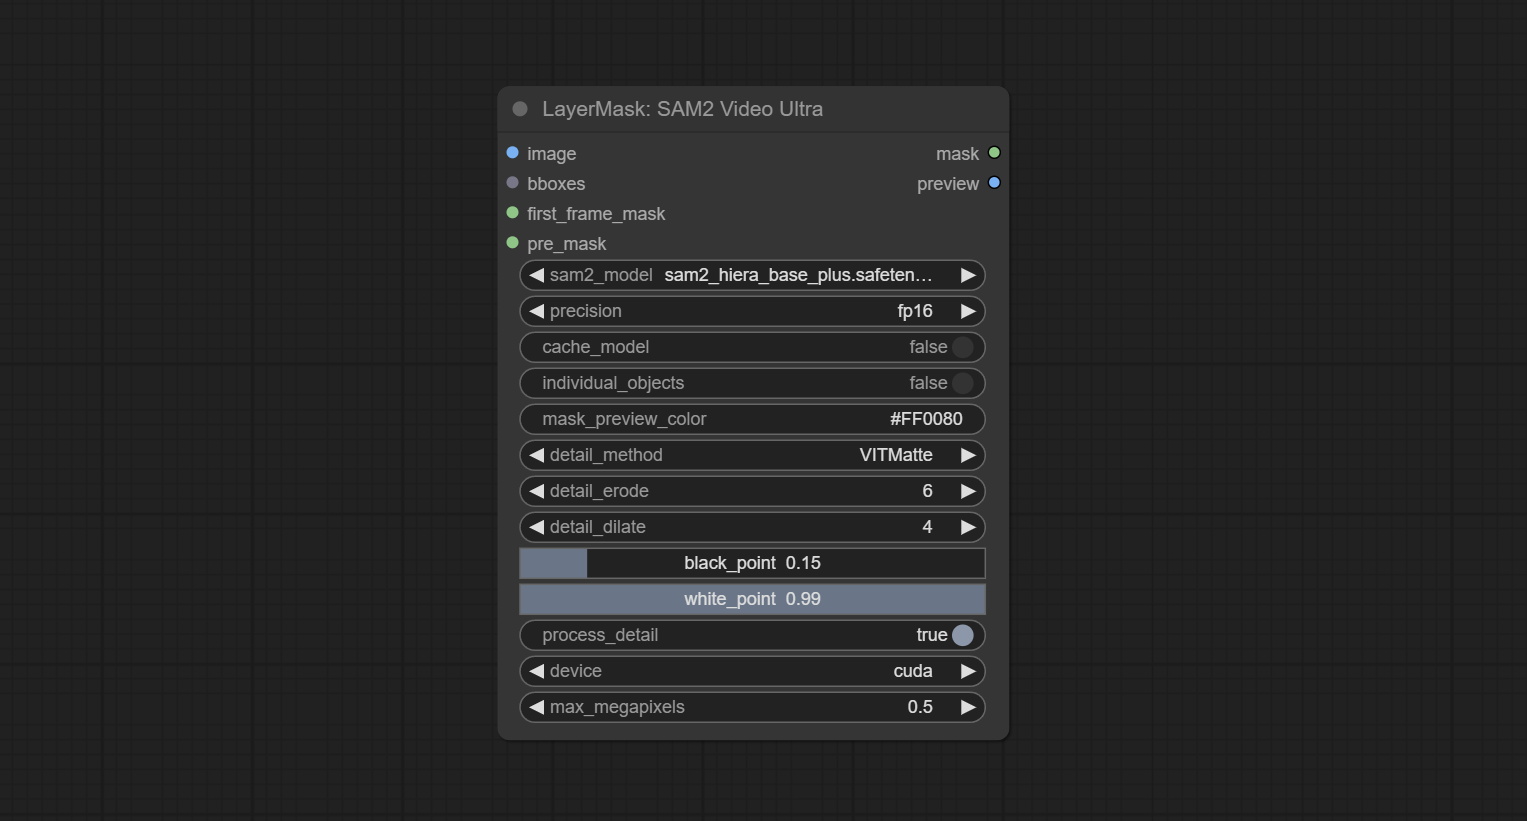
- image: The image to segment.
- bboxes: Optional input of recognition bbox data.
bboxes and first_frame_mask must have least one input. If first_frame_mask inputed, bbboxes will be ignored. - first_frame_mask: Optional input of the first frame mask. The mask will be used as the first frame recognition object.
bboxes and first_frame_mask must have least one input. If first_frame_mask inputed, bbboxes will be ignored. - pre_mask: Optional input mask, which will serve as a propagation focus range limitation and help improve recognition accuracy.
- sam2_model: Select the SAM2 model.
- presicion: Model's persicion. can be selected from fp16 and bf16.
- cache_model:是否要缓存模型。 After caching the model, it will save time for model loading.
- individual_object: When set to True, it will focus on identifying a single object. When set to False, attempts will be made to generate recognition boxes for multiple objects.
- mask_preview_color: Display the color of non masked areas in the preview output.
- detail_method: Edge processing methods. Only VITMatte method can be used.
- detail_erode: Mask the erosion range inward from the edge. the larger the value, the larger the range of inward repair.
- detail_dilate: The edge of the mask expands outward. the larger the value, the wider the range of outward repair.
- black_point: Edge black sampling threshold.
- white_point: Edge white sampling threshold.
- process_detail: Set to false here will skip edge processing to save runtime.
- device: Only cuda can be used.
- max_megapixels: Set the maximum size for VitMate operations.A larger size will result in finer mask edges, but it will lead to a significant decrease in computation speed.
ObjectDetectorFL2
Use the Florence2 model to identify objects in images and output recognition box data.
*Download models from BaiduNetdisk and copy to ComfyUI/models/florence2 folder.
节点选项:
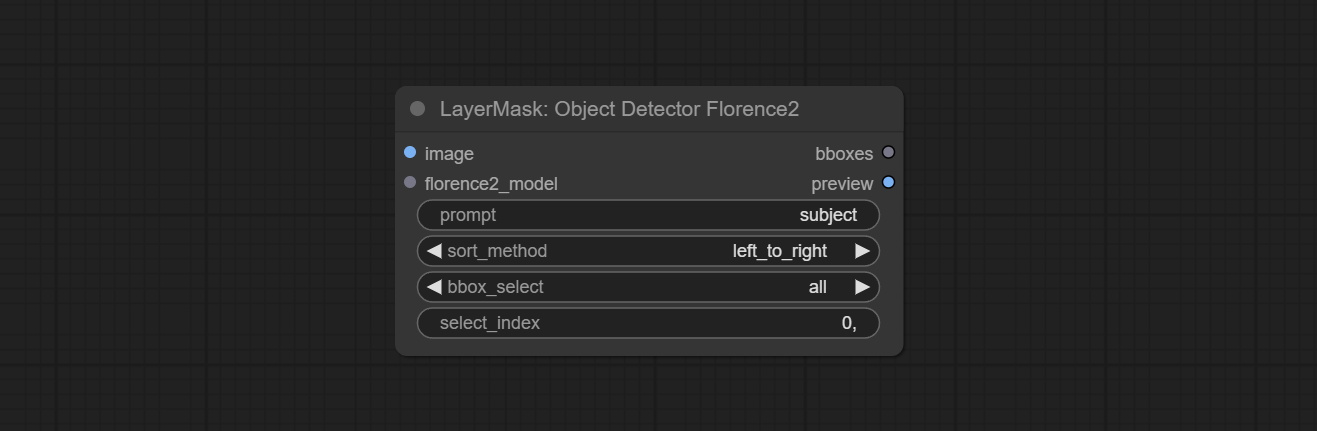
- image: The image to segment.
- florence2_model: Florence2 model, it from LoadFlorence2Model node.
- prompt: Describe the object that needs to be identified.
- sort_method: The selection box sorting method has 4 options: "left_to_right", "top_to_bottom", "big_to_small" and "confidence".
- bbox_select: Select the input box data. There are three options: "all" to select all, "first" to select the box with the highest confidence, and "by_index" to specify the index of the box.
- select_index: This option is valid when bbox_delect is 'by_index'. 0 is the first one. Multiple values can be entered, separated by any non numeric character, including but not limited to commas, periods, semicolons, spaces or letters, and even Chinese.
ObjectDetectorYOLOWorld
Use the YOLO-World model to identify objects in images and output recognition box data.
*Download models from BaiduNetdisk or GoogleDrive and copy to ComfyUI/models/yolo-world folder.
节点选项:
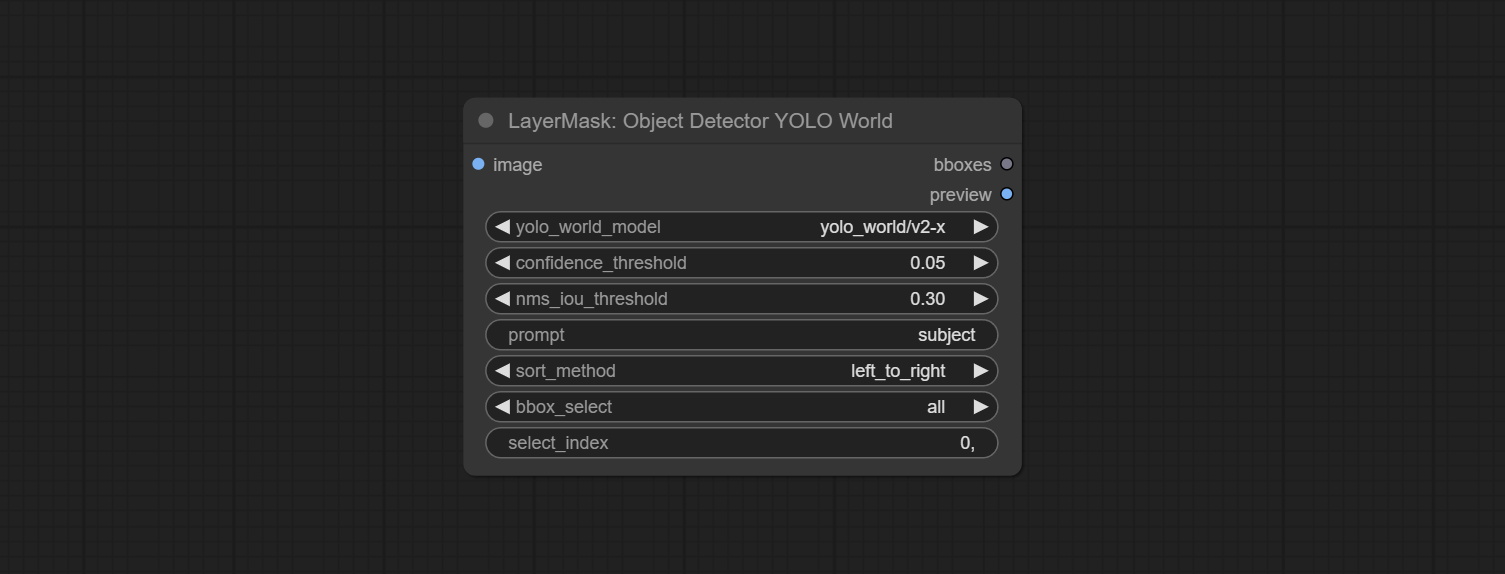
- image: The image to segment.
- confidence_threshold: The threshold of confidence.
- nms_iou_threshold: The threshold of Non-Maximum Suppression.
- prompt: Describe the object that needs to be identified.
- sort_method: The selection box sorting method has 4 options: "left_to_right", "top_to_bottom", "big_to_small" and "confidence".
- bbox_select: Select the input box data. There are three options: "all" to select all, "first" to select the box with the highest confidence, and "by_index" to specify the index of the box.
- select_index: This option is valid when bbox_delect is 'by_index'. 0 is the first one. Multiple values can be entered, separated by any non numeric character, including but not limited to commas, periods, semicolons, spaces or letters, and even Chinese.
ObjectDetectorYOLO8
Use the YOLO-8 model to identify objects in images and output recognition box data.
*Download models from GoogleDrive or BaiduNetdisk and copy to ComfyUI/models/yolo folder.
节点选项:
- image: The image to segment.
- yolo_model: Choose the yolo model.
- sort_method: The selection box sorting method has 4 options: "left_to_right", "top_to_bottom", "big_to_small" and "confidence".
- bbox_select: Select the input box data. There are three options: "all" to select all, "first" to select the box with the highest confidence, and "by_index" to specify the index of the box.
- select_index: This option is valid when bbox_delect is 'by_index'. 0 is the first one. Multiple values can be entered, separated by any non numeric character, including but not limited to commas, periods, semicolons, spaces or letters, and even Chinese.
ObjectDetectorMask
Use mask as recognition box data. All areas surrounded by white areas on the mask will be recognized as an object. Multiple enclosed areas will be identified separately.
节点选项:
- object_mask: The mask input.
- sort_method: The selection box sorting method has 4 options: "left_to_right", "top_to_bottom", "big_to_small" and "confidence".
- bbox_select: Select the input box data. There are three options: "all" to select all, "first" to select the box with the highest confidence, and "by_index" to specify the index of the box.
- select_index: This option is valid when bbox_delect is 'by_index'. 0 is the first one. Multiple values can be entered, separated by any non numeric character, including but not limited to commas, periods, semicolons, spaces or letters, and even Chinese.
BBoxJoin
Merge recognition box data.
节点选项:

- bboxes_1: Required input. The first set of identification boxes.
- bboxes_2: Optional input. The second set of identification boxes.
- bboxes_3: Optional input. The third set of identification boxes.
- bboxes_4: Optional input. The fourth set of identification boxes.
DrawBBoxMask
Draw the recognition BBoxes data output by the Object Detector node as a mask.
节点选项:
- 图像:图像输入。 It must be consistent with the image recognized by the Object Detector node.
- bboxes: Input recognition BBoxes data.
- grow_top: Each BBox expands upwards as a percentage of its height, positive values indicate upward expansion and negative values indicate downward expansion.
- grow_bottom: Each BBox expands downwards as a percentage of its height, positive values indicating downward expansion and negative values indicating upward expansion.
- grow_left: Each BBox expands to the left as a percentage of its width, positive values expand to the left and negative values expand to the right.
- grow_right: Each BBox expands to the right as a percentage of its width, positive values indicate expansion to the right and negative values indicate expansion to the left.
EVF-SAMUltra
This node is implementation of EVF-SAM in ComfyUI.
*Please download model files from BaiduNetdisk or huggingface/EVF-SAM2, huggingface/EVF-SAM to ComfyUI/models/EVF-SAM folder(save the models in their respective subdirectories). 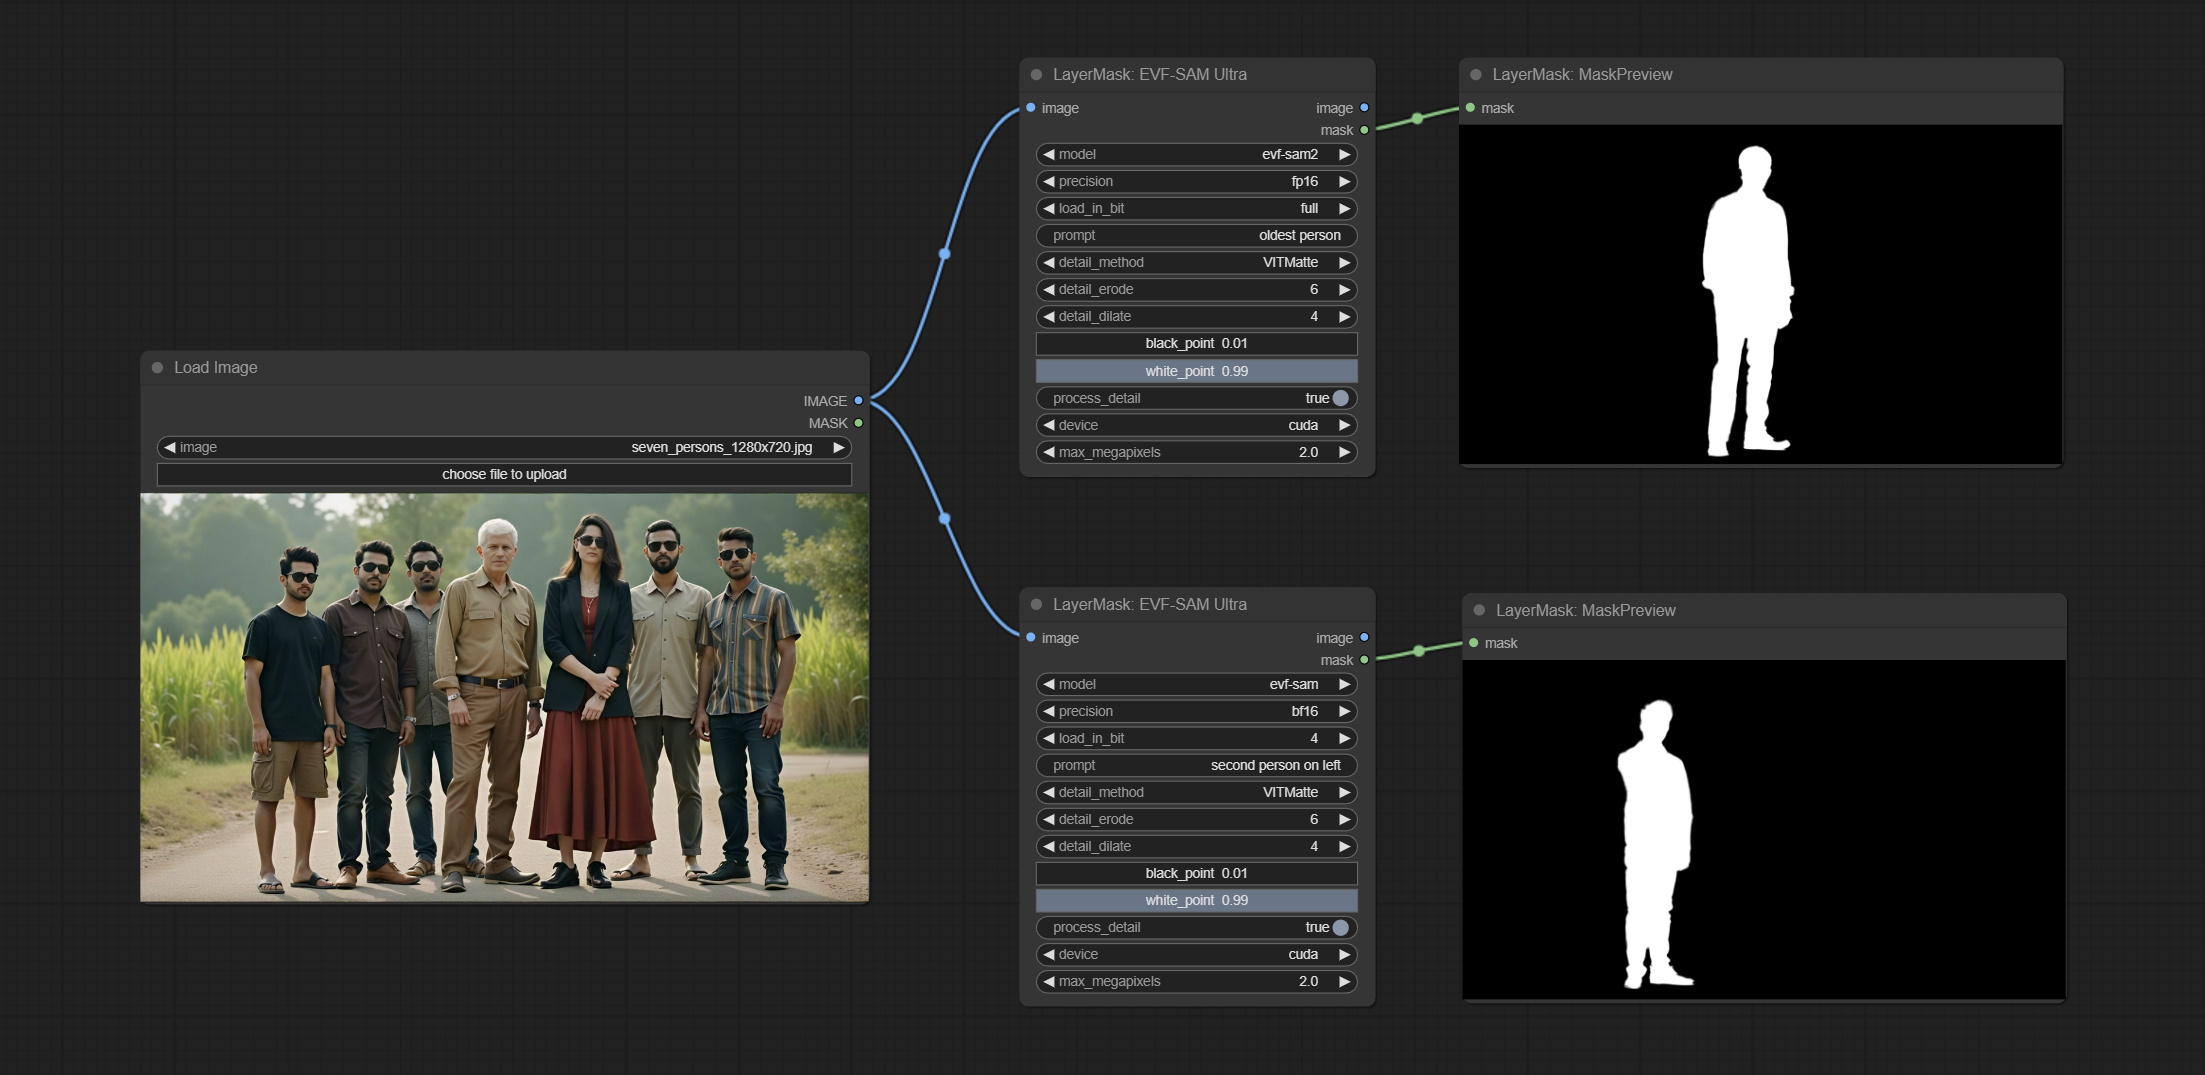
节点选项:
- image: The input image.
- 模型:选择模型。 Currently, there are options for evf-sam2 and evf sam.
- presicion: Model accuracy can be selected from fp16, bf16, and fp32.
- load_in_bit: Load the model with positional accuracy. You can choose from full, 8, and 4.
- pormpt: Prompt words used for segmentation.
- detail_method: Edge processing methods. provides VITMatte, VITMatte(local), PyMatting, GuidedFilter. If the model has been downloaded after the first use of VITMatte, you can use VITMatte (local) afterwards.
- detail_erode: Mask the erosion range inward from the edge. the larger the value, the larger the range of inward repair.
- detail_dilate: The edge of the mask expands outward. the larger the value, the wider the range of outward repair.
- black_point: Edge black sampling threshold.
- white_point: Edge white sampling threshold.
- process_detail: Set to false here will skip edge processing to save runtime.
- device: Set whether the VitMatte to use cuda.
- max_megapixels: Set the maximum size for VitMate operations.
Florence2Ultra
Using the segmentation function of the Florence2 model, while also having ultra-high edge details. The code for this node section is from spacepxl/ComfyUI-Florence-2, thanks to the original author. *Download the model files from BaiduNetdisk to ComfyUI/models/florence2 folder.
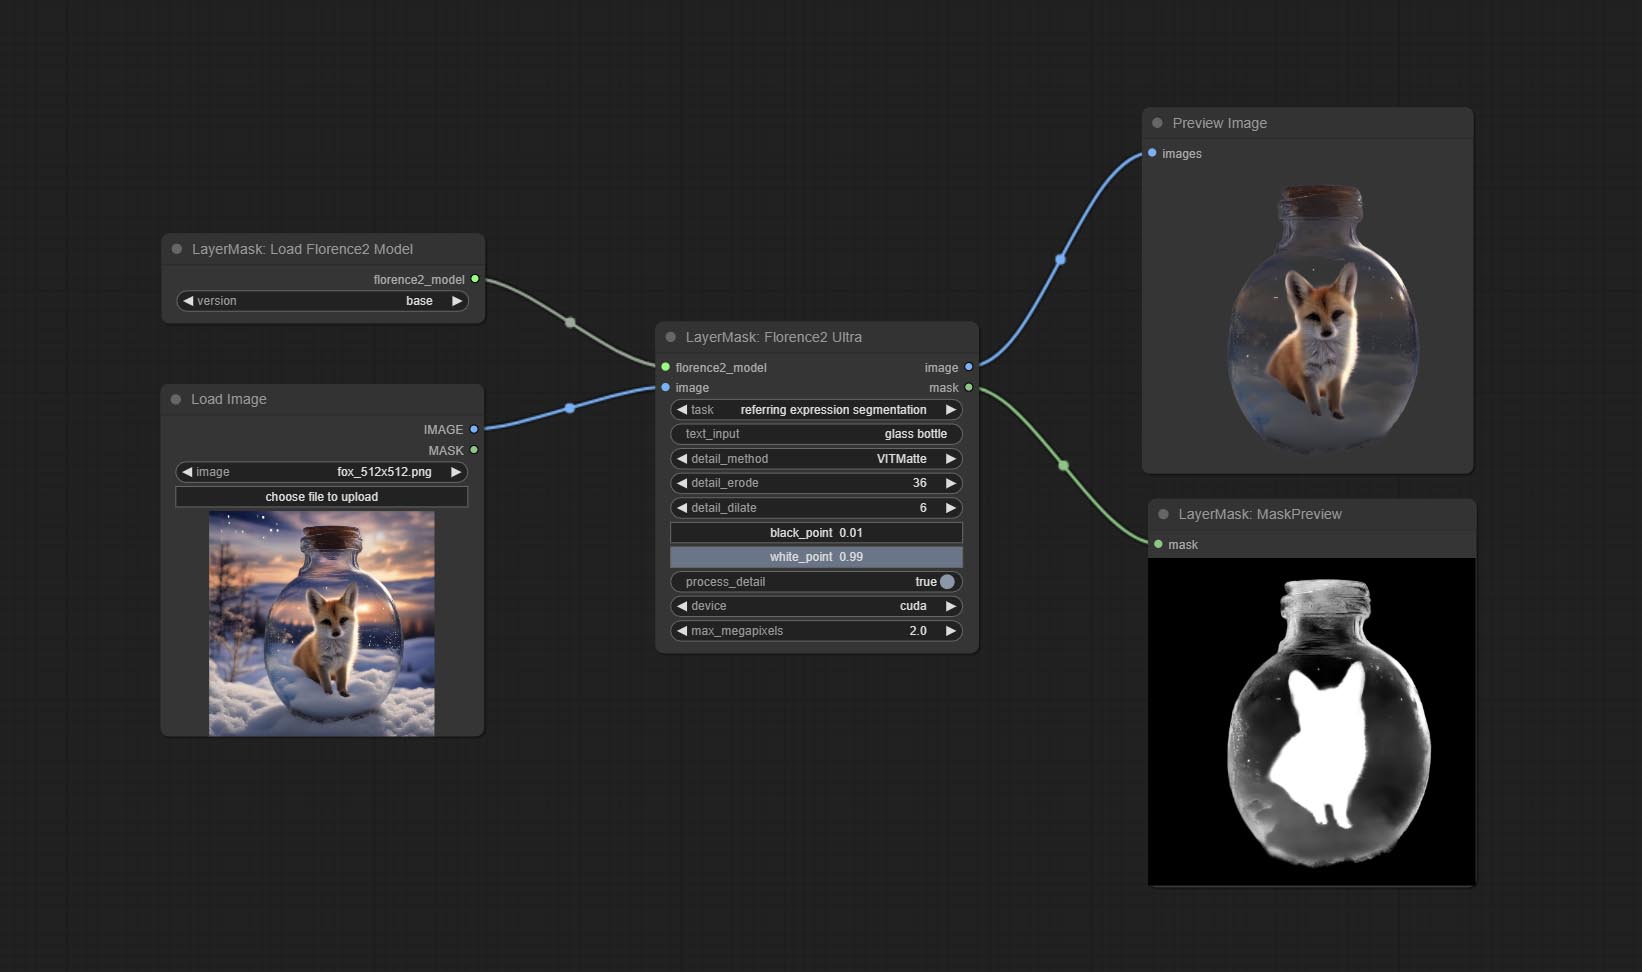
节点选项:
- florence2_model: Florence2 model input.
- 图像:图像输入。
- task: Select the task for florence2.
- text_input: Text input for florence2.
- detail_method: Edge processing methods. provides VITMatte, VITMatte(local), PyMatting, GuidedFilter. If the model has been downloaded after the first use of VITMatte, you can use VITMatte (local) afterwards.
- detail_erode: Mask the erosion range inward from the edge. the larger the value, the larger the range of inward repair.
- detail_dilate: The edge of the mask expands outward. the larger the value, the wider the range of outward repair.
- black_point: Edge black sampling threshold.
- white_point: Edge white sampling threshold.
- process_detail: Set to false here will skip edge processing to save runtime.
- device: Set whether the VitMatte to use cuda.
- max_megapixels: Set the maximum size for VitMate operations.
LoadFlorence2Model
Florence2 model loader. *When using it for the first time, the model will be automatically downloaded.

At present, there are base, base-ft, large, large-ft, DocVQA, SD3-Captioner and base-PromptGen models to choose from.
RemBgUltra
Remove background. compared to the similar background removal nodes, this node has ultra-high edge details.
This node combines the Alpha Matte node of Spacepxl's ComfyUI-Image-Filters and the functionality of ZHO-ZHO-ZHO's ComfyUI-BRIA_AI-RMBG, thanks to the original author.
*Download model files from BRIA Background Removal v1.4 or BaiduNetdisk to ComfyUI/models/rmbg/RMBG-1.4 folder. This model can be used for non-commercial purposes.
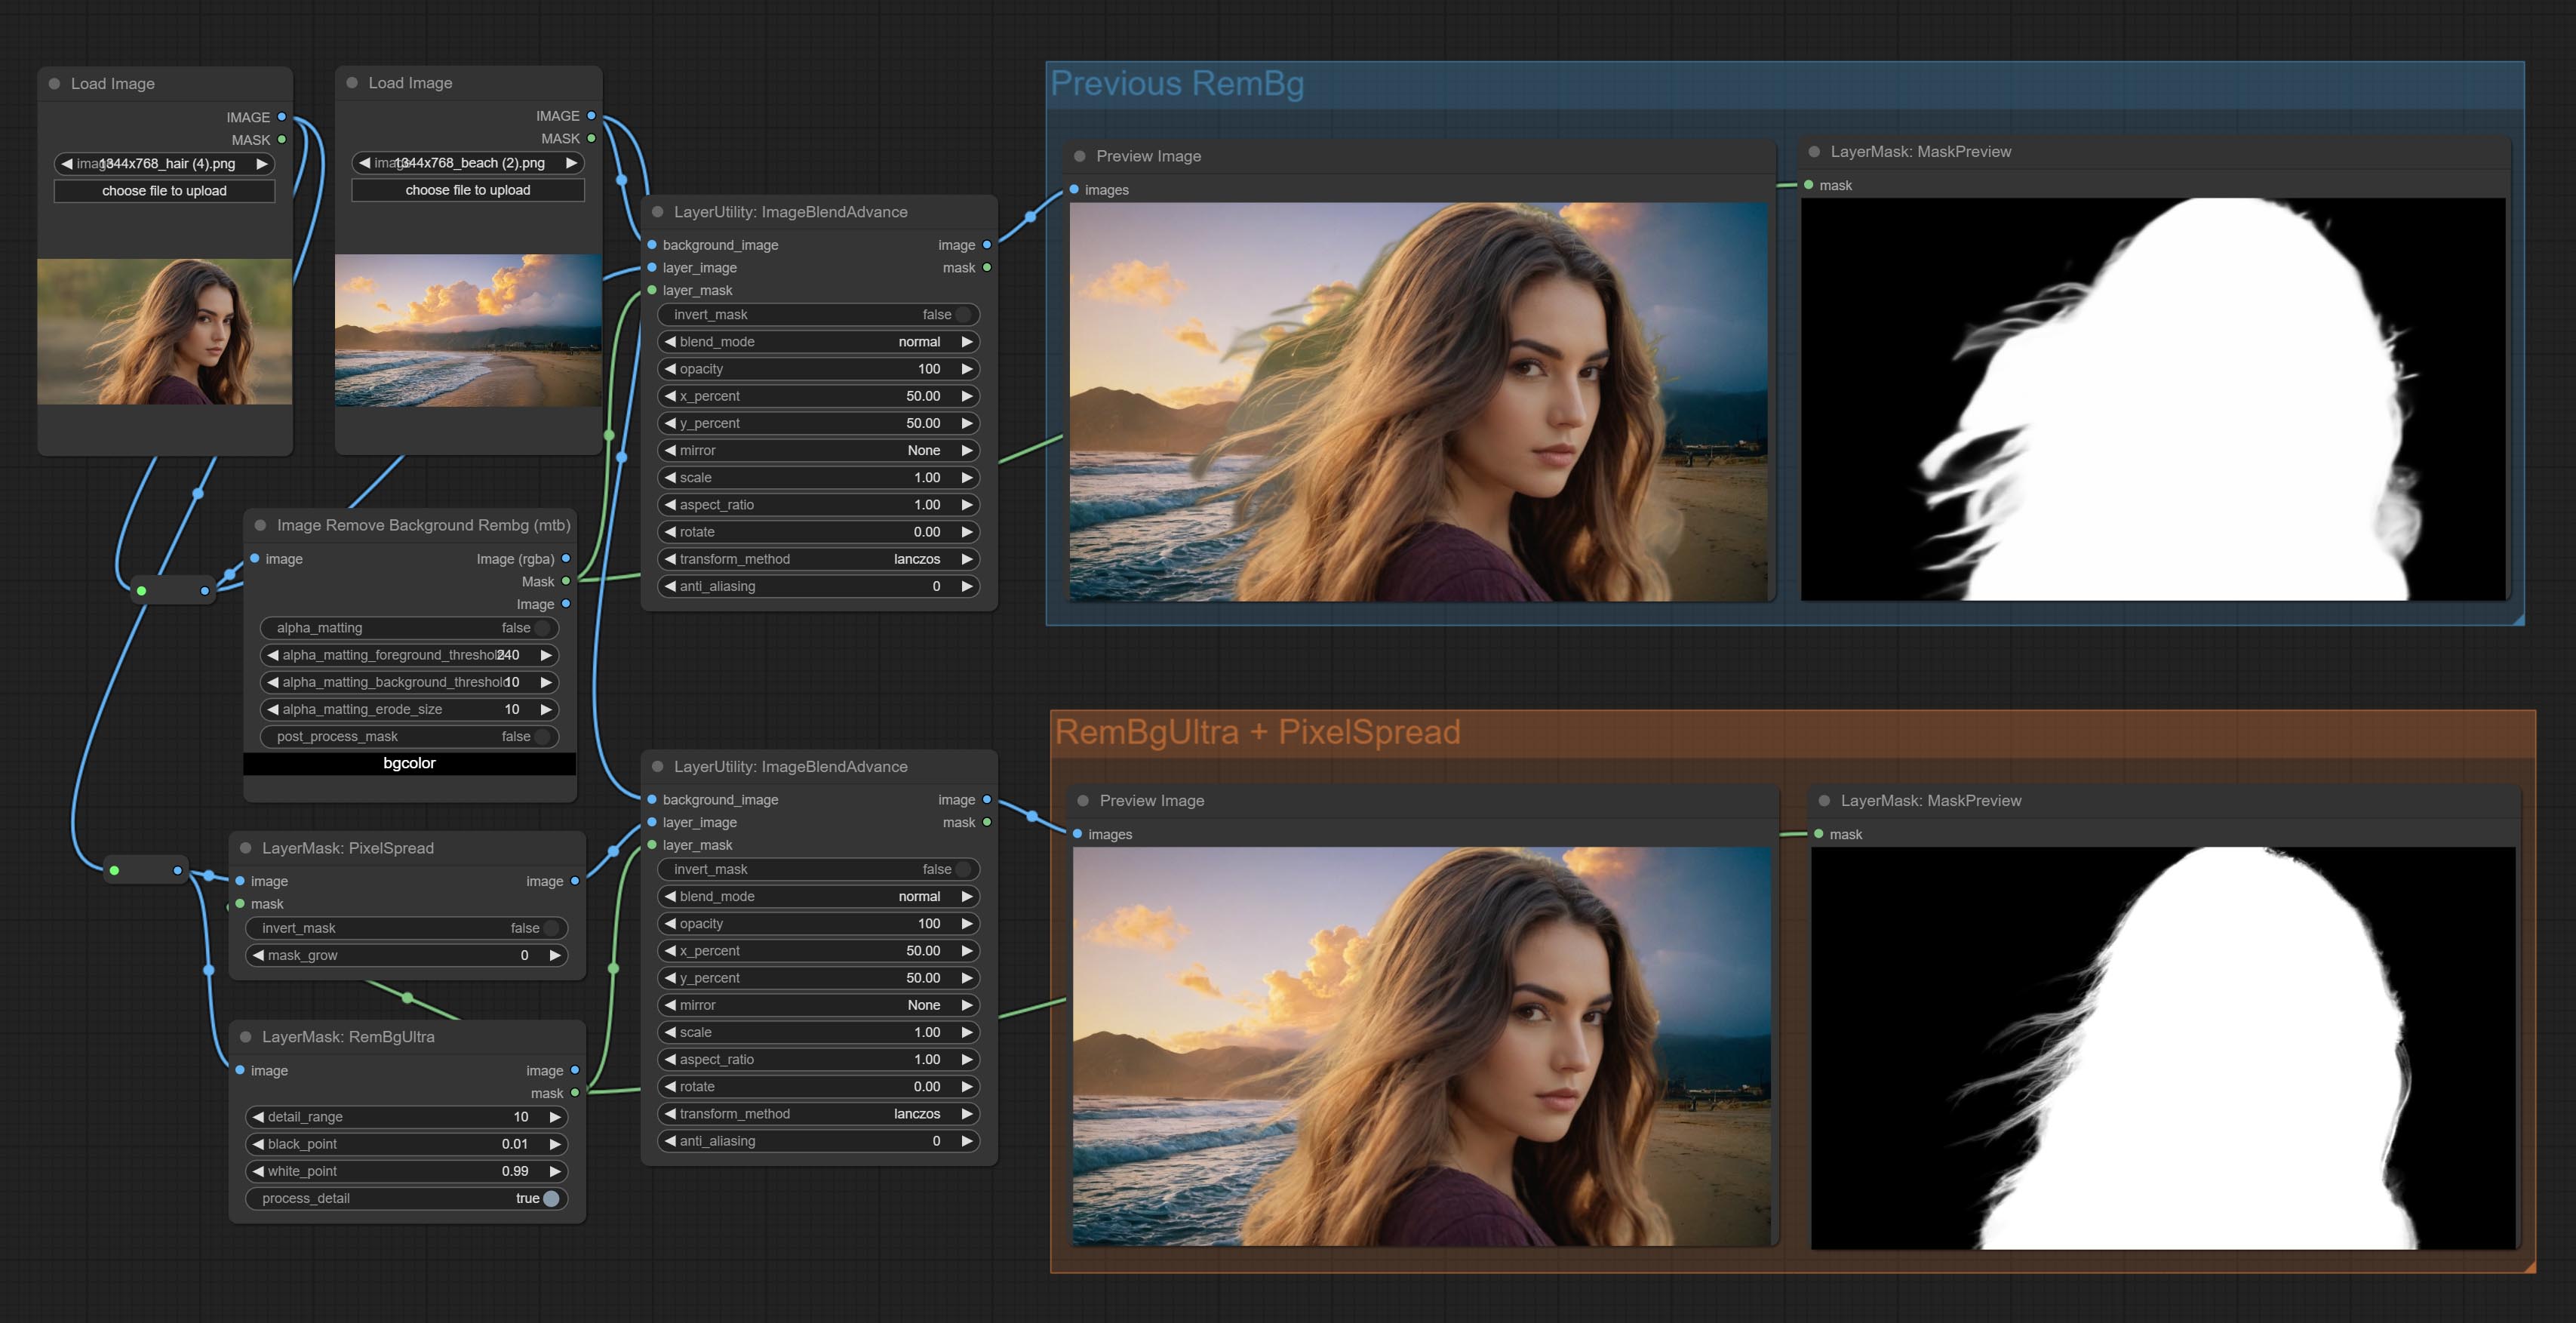
Node options:
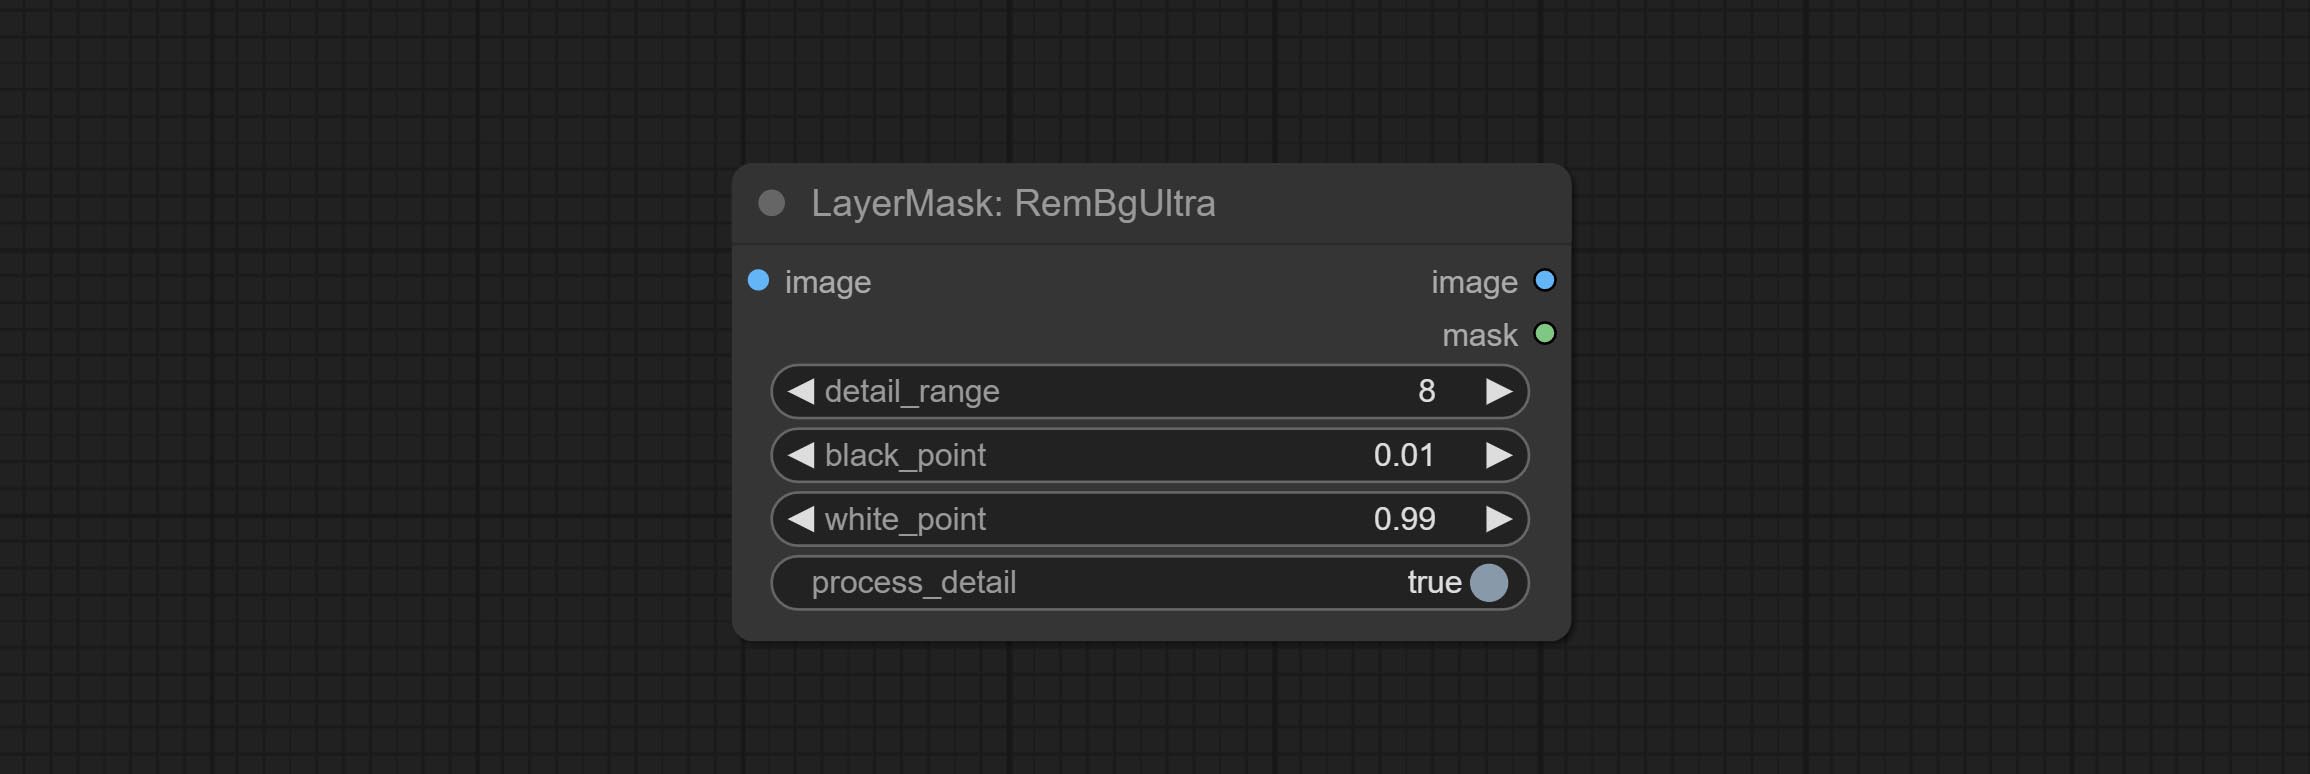
- detail_range: Edge detail range.
- black_point: Edge black sampling threshold.
- white_point: Edge white sampling threshold.
- process_detail: Set to false here will skip edge processing to save runtime.
RmBgUltraV2
The V2 upgraded version of RemBgUltra has added the VITMatte edge processing method.(Note: Images larger than 2K in size using this method will consume huge memory)
On the basis of RemBgUltra, the following changes have been made: 
- detail_method: Edge processing methods. provides VITMatte, VITMatte(local), PyMatting, GuidedFilter. If the model has been downloaded after the first use of VITMatte, you can use VITMatte (local) afterwards.
- detail_erode: Mask the erosion range inward from the edge. the larger the value, the larger the range of inward repair.
- detail_dilate: The edge of the mask expands outward. the larger the value, the wider the range of outward repair.
- device: Set whether the VitMatte to use cuda.
- max_megapixels: Set the maximum size for VitMate operations.
BenUltra
It is the implementation of PramaLLC/BEN project in ComfyUI. Thank you to the original author.
Download the BEN_Base.pth and config.json from huggingface or BaiduNetdisk and copy to ComfyUI/models/BEN folder.
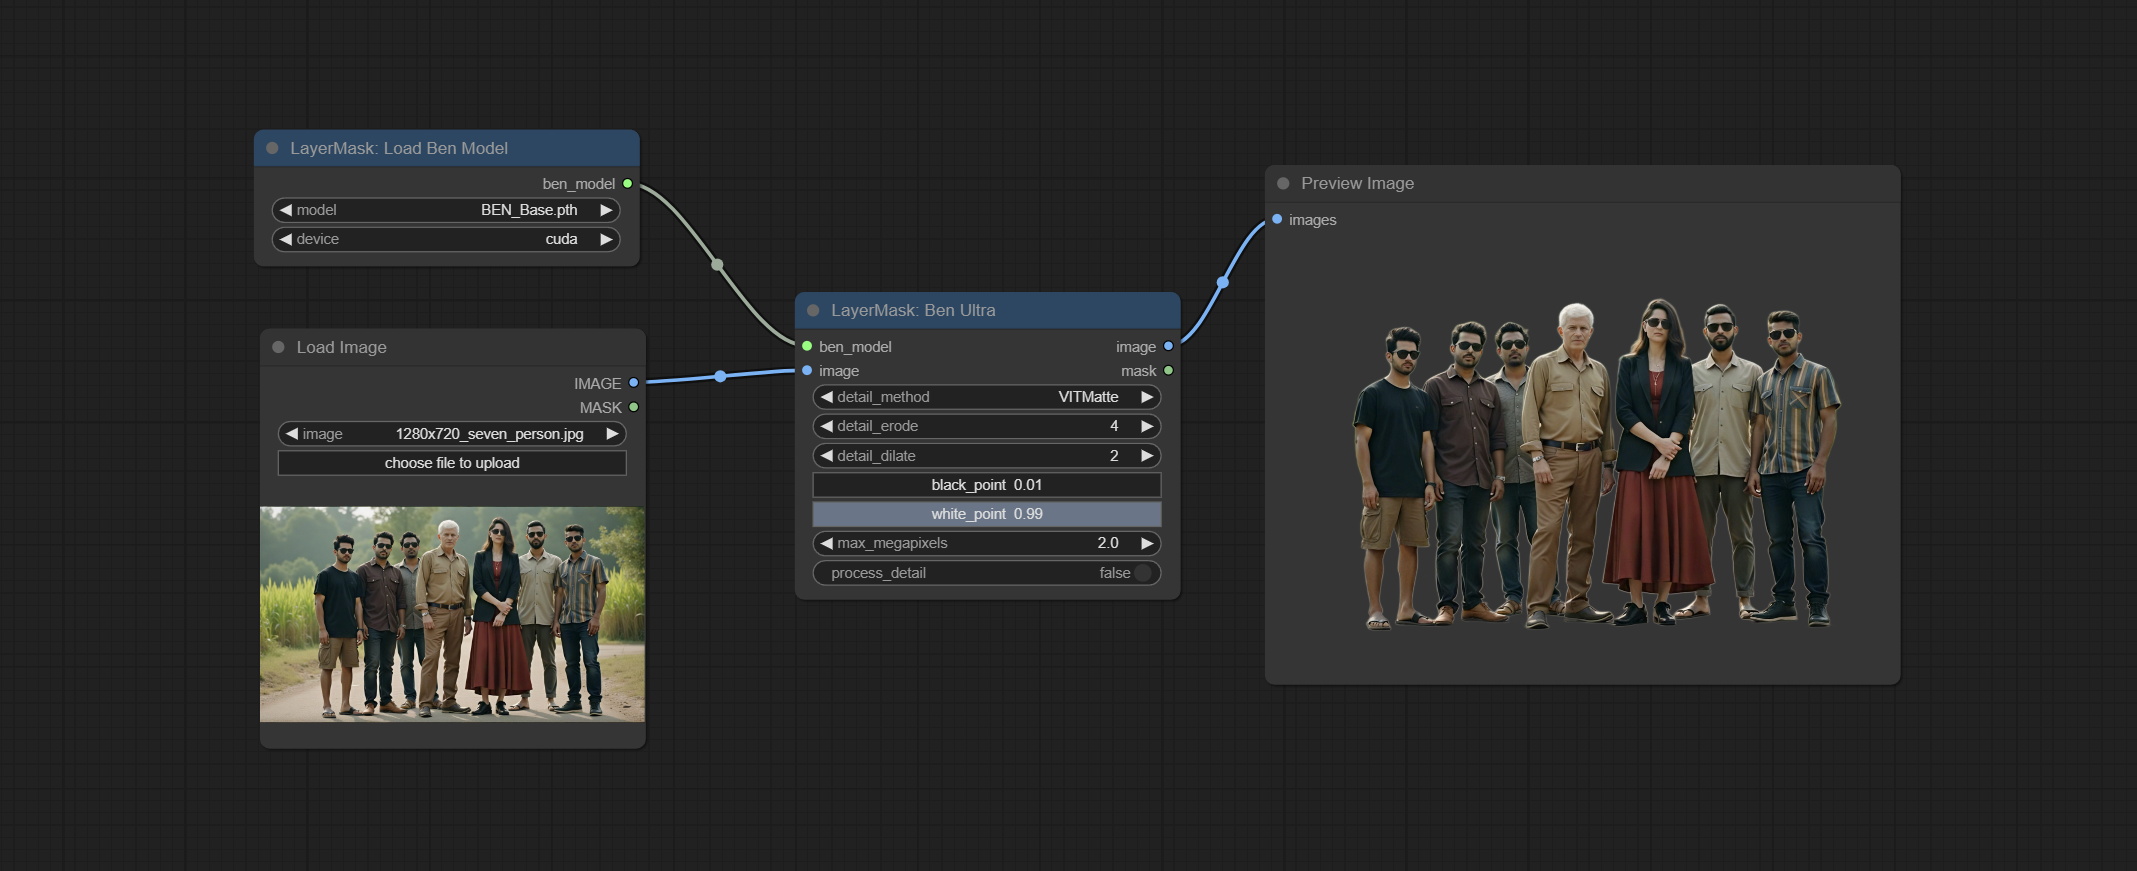
Node Options: 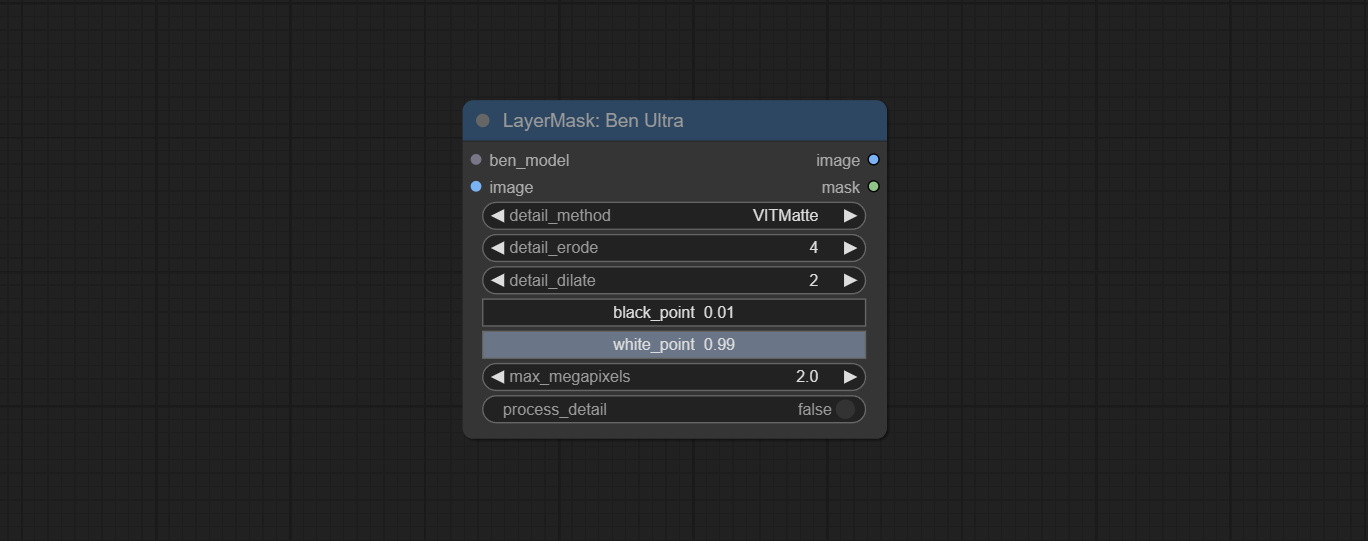
- ben_model: Ben model input.
- 图像:图像输入。
- detail_method: Edge processing methods. provides VITMatte, VITMatte(local), PyMatting, GuidedFilter. If the model has been downloaded after the first use of VITMatte, you can use VITMatte (local) afterwards.
- detail_erode: Mask the erosion range inward from the edge. the larger the value, the larger the range of inward repair.
- detail_dilate: The edge of the mask expands outward. the larger the value, the wider the range of outward repair.
- black_point: Edge black sampling threshold.
- white_point: Edge white sampling threshold.
- process_detail: Set to false here will skip edge processing to save runtime.
- max_megapixels: Set the maximum size for VitMate operations.
LoadBenModel
Load the BEN model.
节点选项:
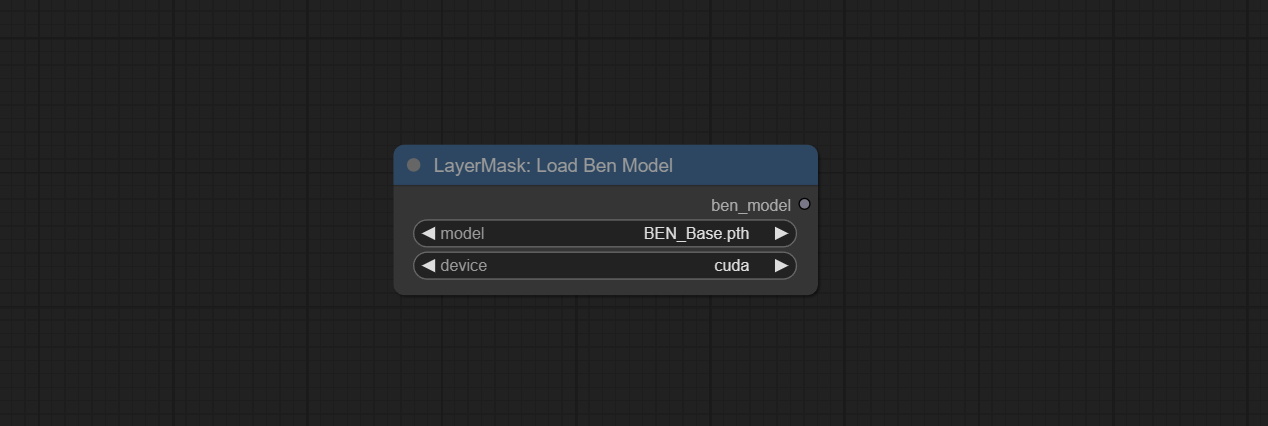
- 模型:选择模型。 Currently, only the Ben_Sase model is available for selection.
BiRefNetUltra
Using the BiRefNet model to remove background has better recognition ability and ultra-high edge details. The code for the model part of this node comes from Viper's ComfyUI-BiRefNet,thanks to the original author.
*From https://huggingface.co/ViperYX/BiRefNet or BaiduNetdisk download the BiRefNet-ep480.pth , pvt_v2_b2.pth , pvt_v2_b5.pth , swin_base_patch4_window12_384_22kto1k.pth , swin_large_patch4_window12_384_22kto1k.pth 5 files to ComfyUI/models/BiRefNet folder.
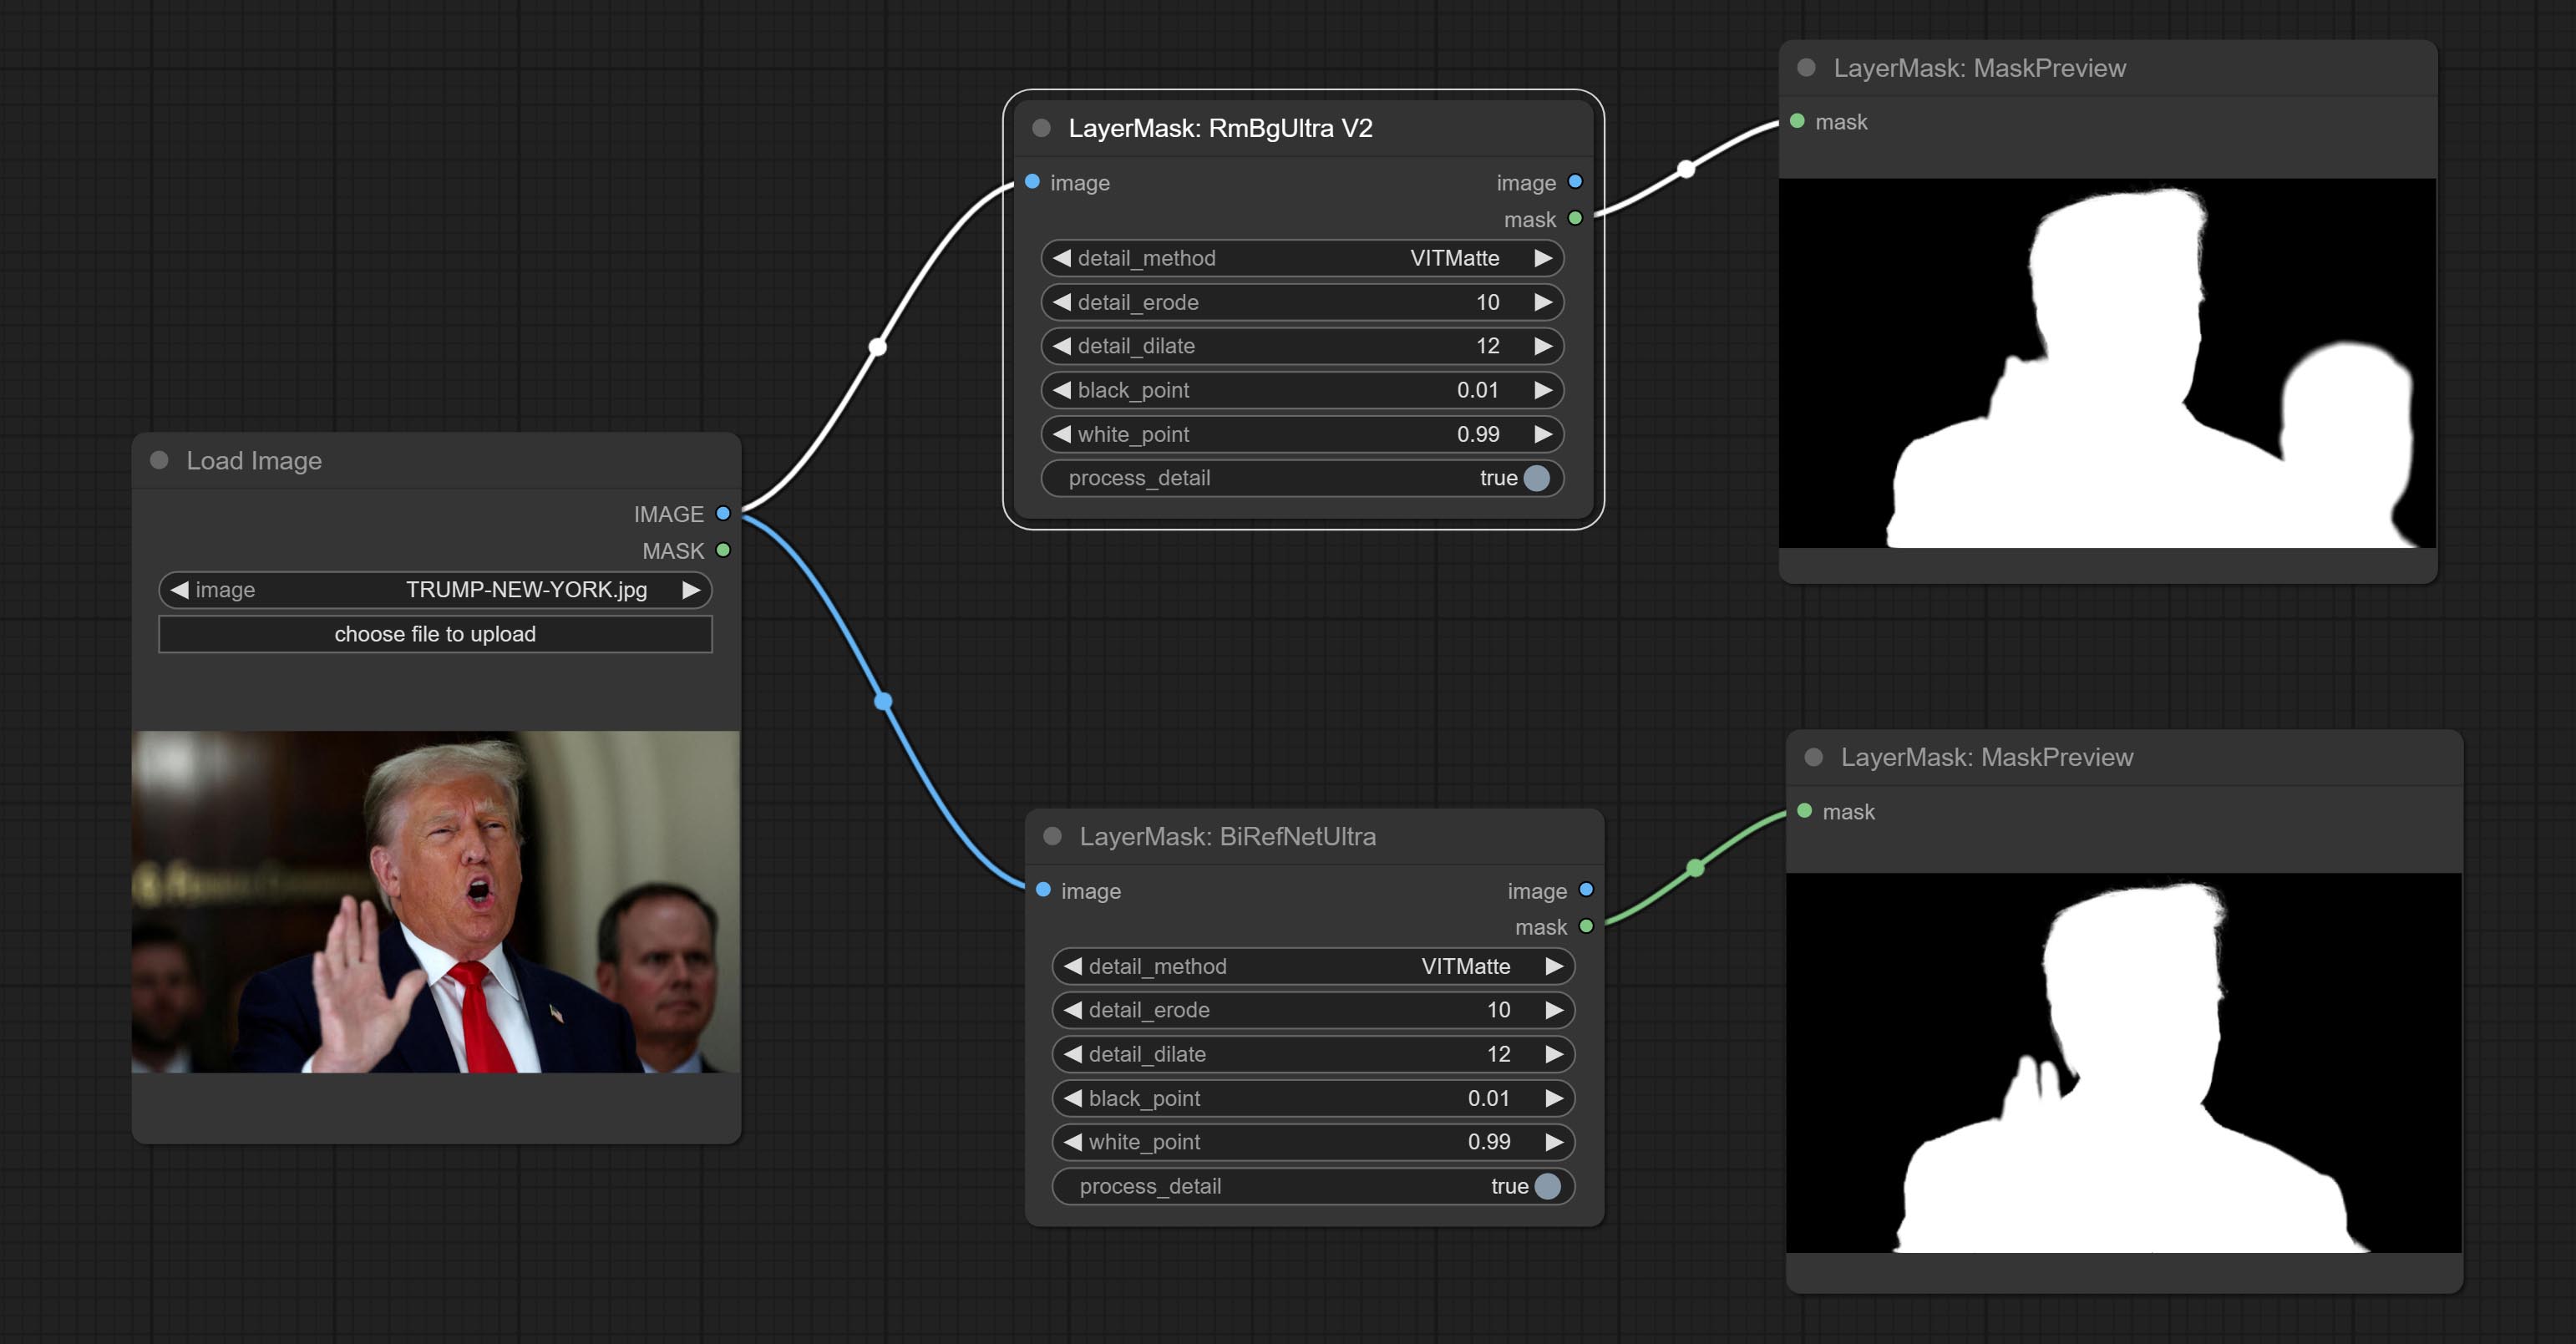
Node options:
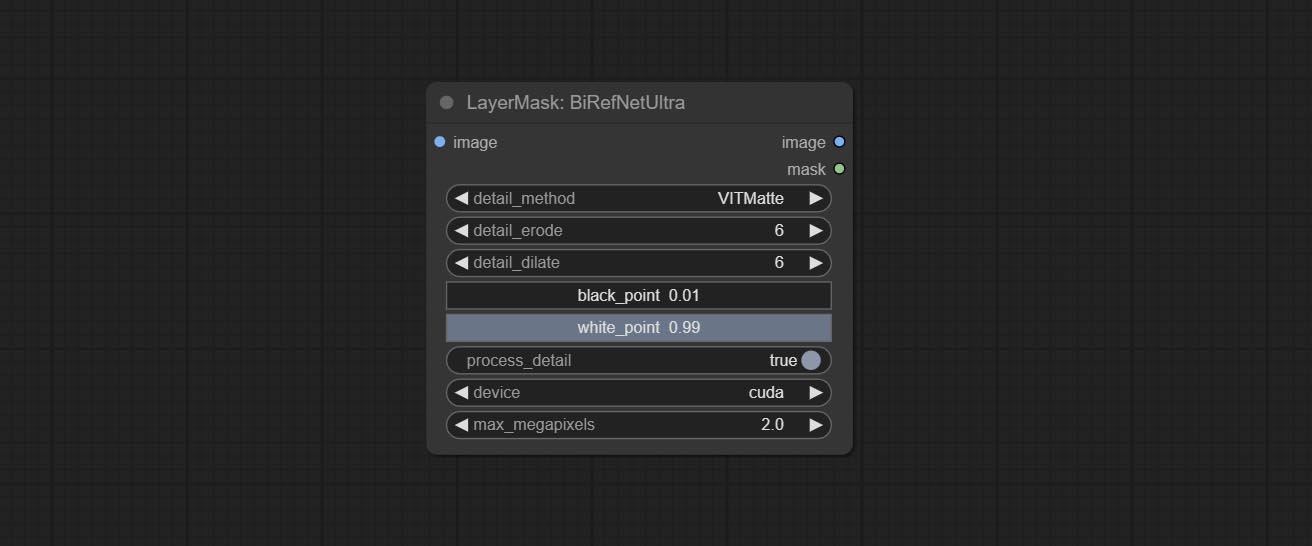
- detail_method: Edge processing methods. provides VITMatte, VITMatte(local), PyMatting, GuidedFilter. If the model has been downloaded after the first use of VITMatte, you can use VITMatte (local) afterwards.
- detail_erode: Mask the erosion range inward from the edge. the larger the value, the larger the range of inward repair.
- detail_dilate: The edge of the mask expands outward. the larger the value, the wider the range of outward repair.
- black_point: Edge black sampling threshold.
- white_point: Edge white sampling threshold.
- process_detail: Set to false here will skip edge processing to save runtime.
- device: Set whether the VitMatte to use cuda.
- max_megapixels: Set the maximum size for VitMate operations.
BiRefNetUltraV2
This node supports the use of the latest BiRefNet model. *Download model file from BaiduNetdisk or GoogleDrive named BiRefNet-general-epoch_244.pth to ComfyUI/Models/BiRefNet/pth folder. You can also download more BiRefNet models and put them here.
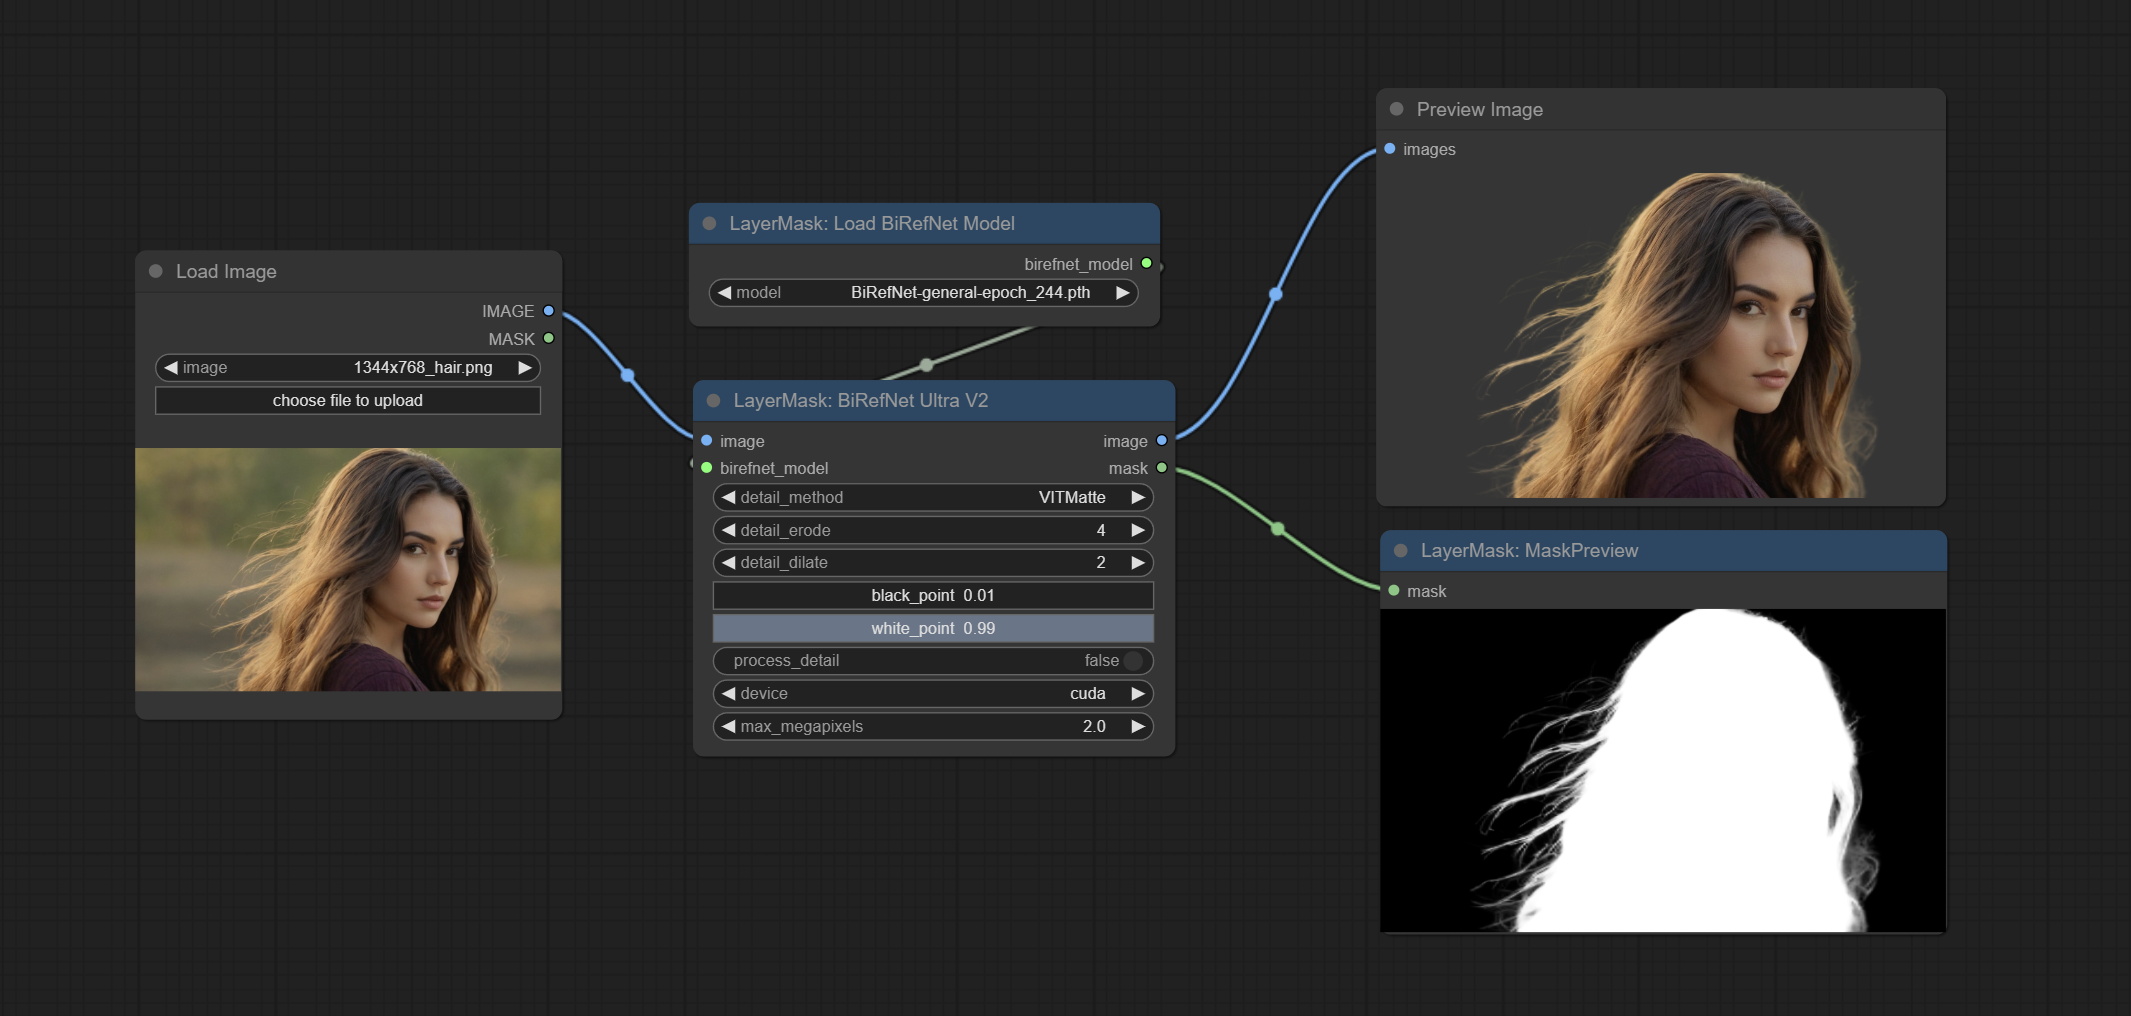
节点选项:
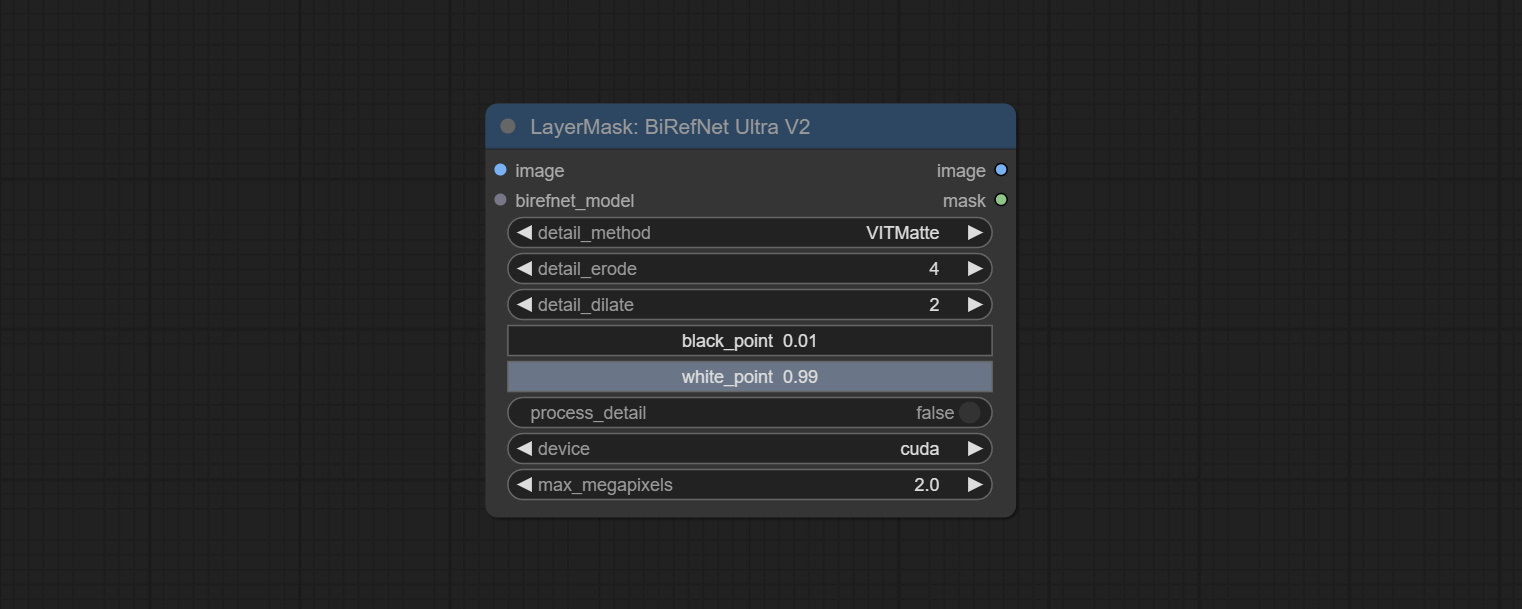
- image: The input image.
- birefnet_model: The BiRefNet model is input and it is output from the LoadBiRefNetModel node.
- detail_method: Edge processing methods. provides VITMatte, VITMatte(local), PyMatting, GuidedFilter. If the model has been downloaded after the first use of VITMatte, you can use VITMatte (local) afterwards.
- detail_erode: Mask the erosion range inward from the edge. the larger the value, the larger the range of inward repair.
- detail_dilate: The edge of the mask expands outward. the larger the value, the wider the range of outward repair.
- black_point: Edge black sampling threshold.
- white_point: Edge white sampling threshold.
- process_detail: Due to the excellent edge processing of BiRefNet, it is set to False by default here.
- device: Set whether the VitMatte to use cuda.
- max_megapixels: Set the maximum size for VitMate operations.
LoadBiRefNetModel
Load the BiRefNet model.
节点选项:

- 模型:选择模型。 List the files in the
CoomfyUI/models/BiRefNet/pth folder for selection.
LoadBiRefNetModelV2
This node is a PR submitted by jimlee2048 and supports loading RMBG-2.0 models.
Download model files from huggingface or 百度网盘 and copy to ComfyUI/models/BiRefNet/RMBG-2.0 folder.
节点选项:
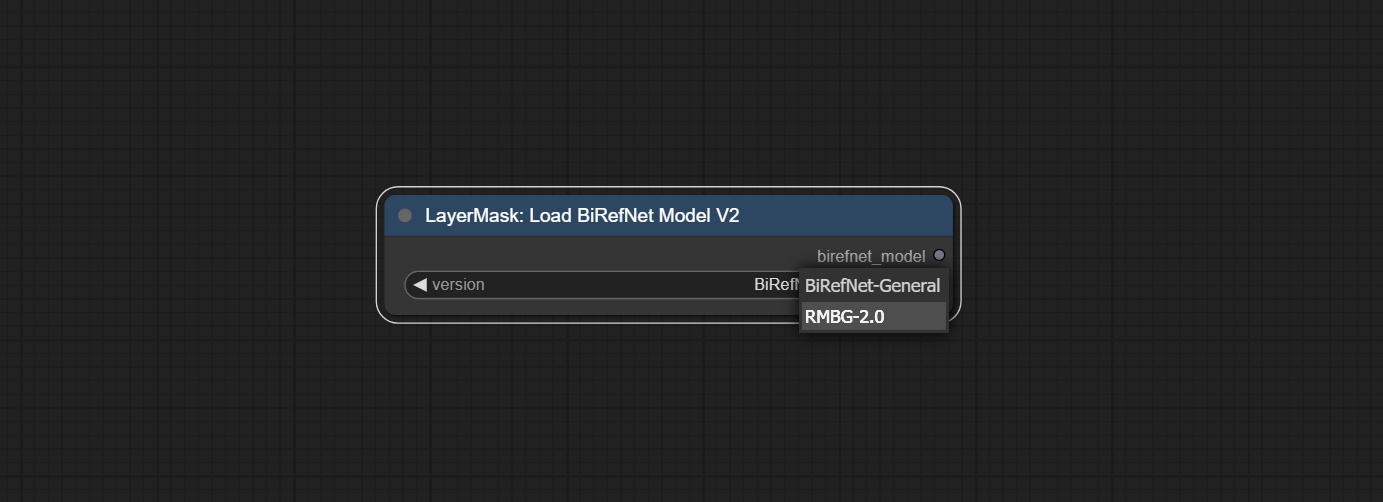
- 模型:选择模型。 There are two options,
BiRefNet-General and RMBG-2.0 .
TransparentBackgroundUltra
Using the transparent-background model to remove background has better recognition ability and speed, while also having ultra-high edge details.
*From googledrive or BaiduNetdisk download all files to ComfyUI/models/transparent-background folder.
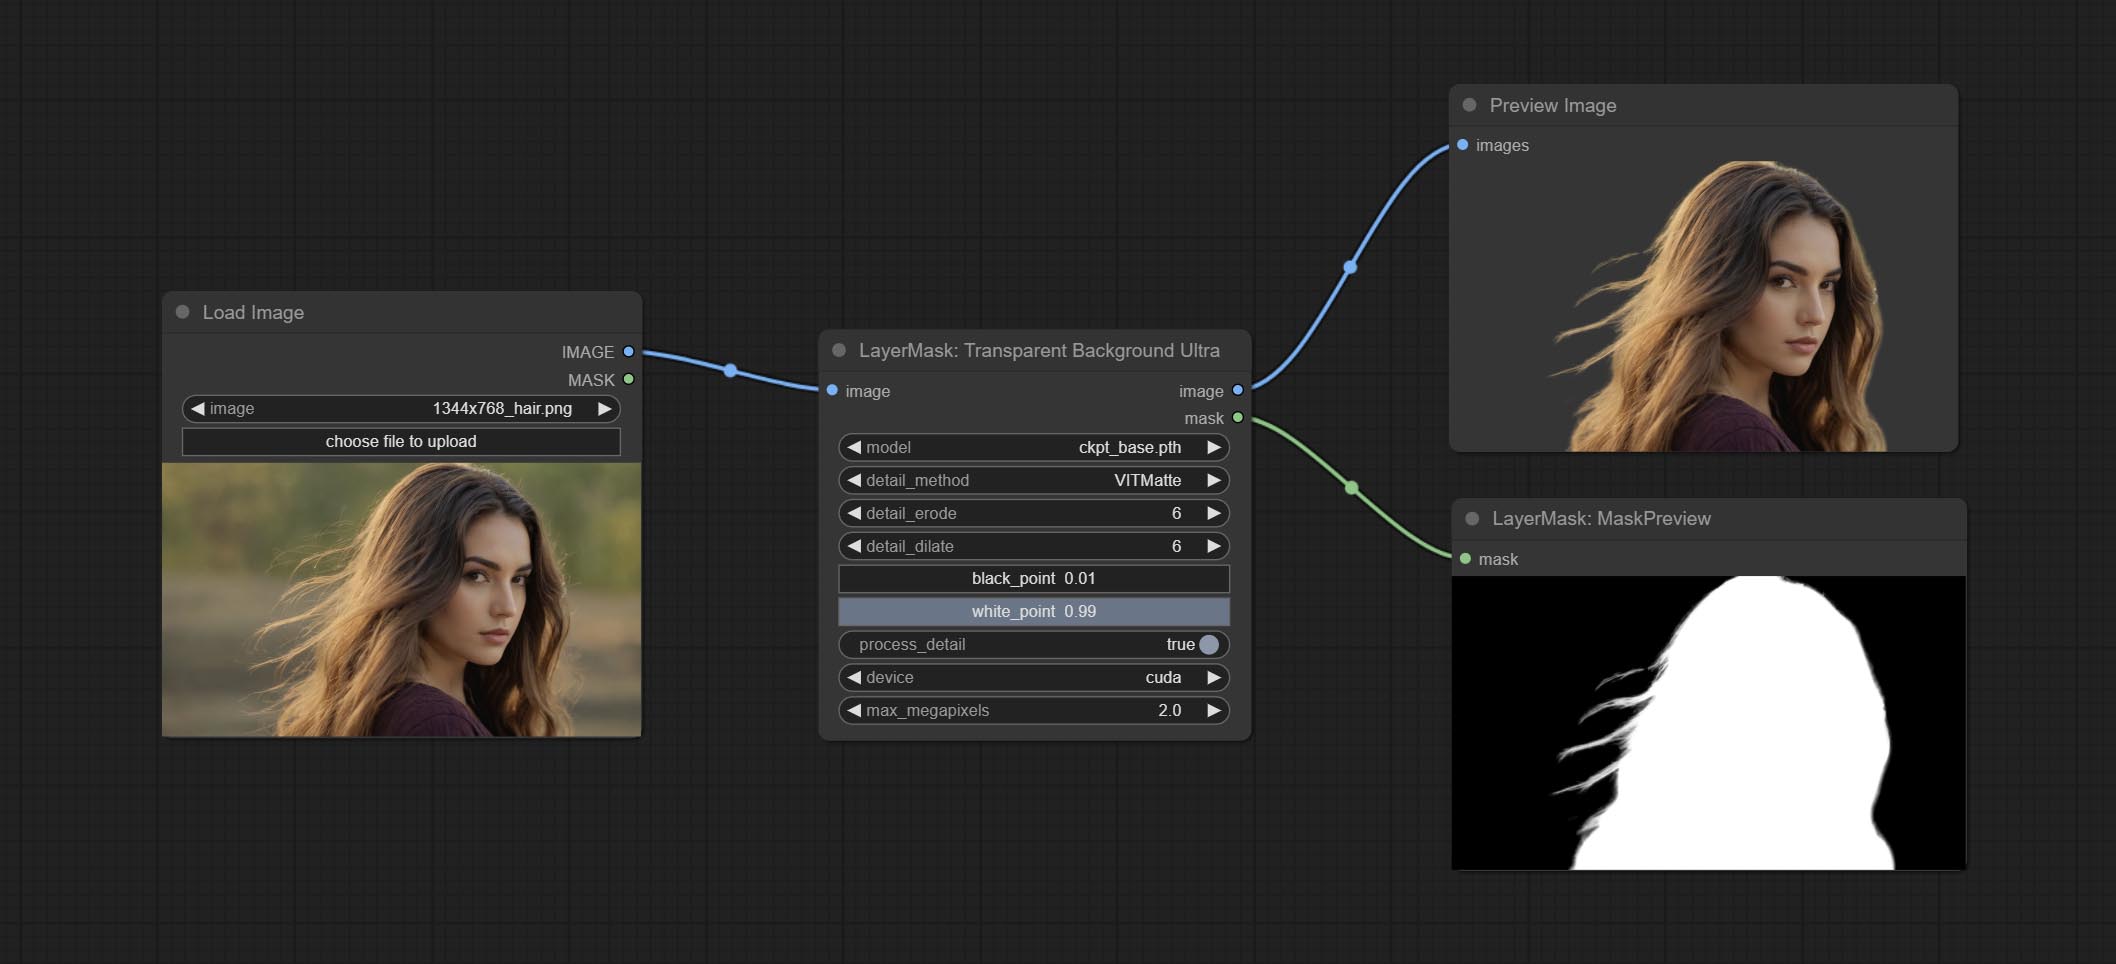
节点选项:
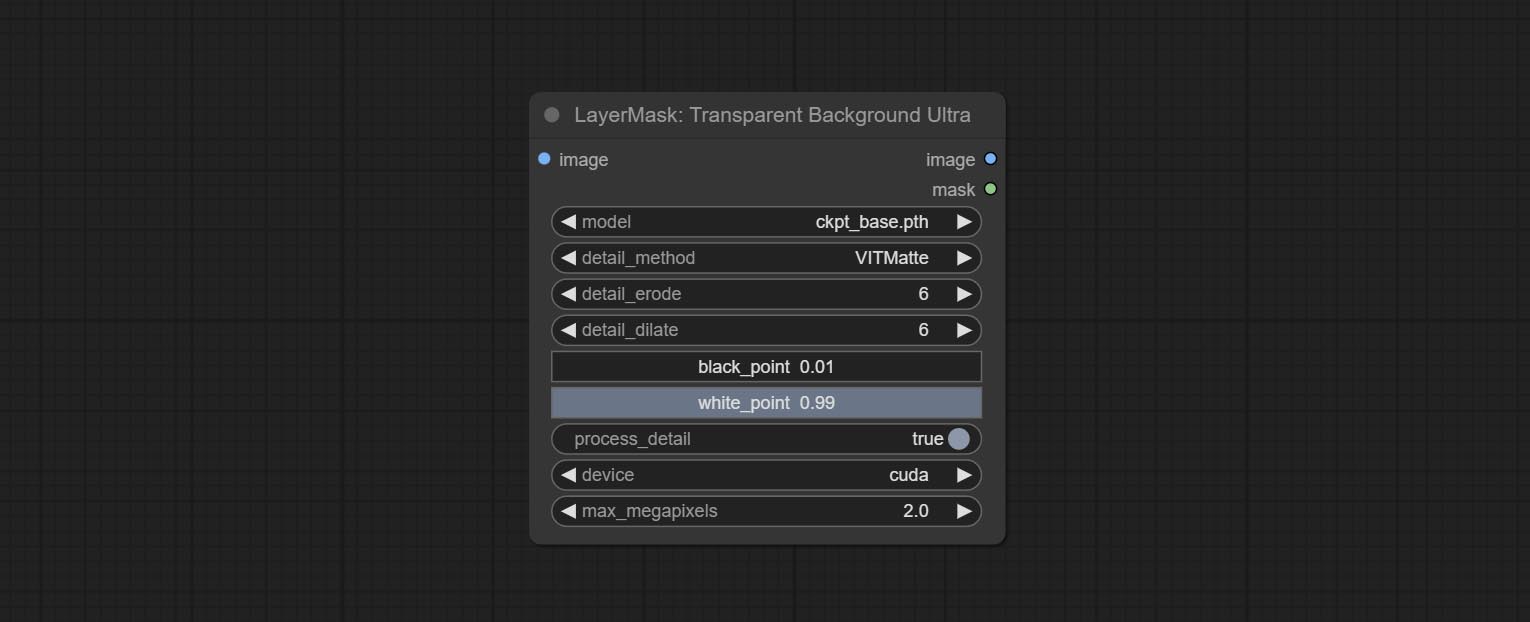
- 模型:选择模型。
- detail_method: Edge processing methods. provides VITMatte, VITMatte(local), PyMatting, GuidedFilter. If the model has been downloaded after the first use of VITMatte, you can use VITMatte (local) afterwards.
- detail_erode: Mask the erosion range inward from the edge. the larger the value, the larger the range of inward repair.
- detail_dilate: The edge of the mask expands outward. the larger the value, the wider the range of outward repair.
- black_point: Edge black sampling threshold.
- white_point: Edge white sampling threshold.
- process_detail: Set to false here will skip edge processing to save runtime.
- device: Set whether the VitMatte to use cuda.
- max_megapixels: Set the maximum size for VitMate operations.
PersonMaskUltra
Generate masks for portrait's face, hair, body skin, clothing, or accessories. Compared to the previous A Person Mask Generator node, this node has ultra-high edge details. The model code for this node comes from a-person-mask-generator, edge processing code from ComfyUI-Image-Filters,thanks to the original author. *Download model files from BaiduNetdisk to ComfyUI/models/mediapipe folder.
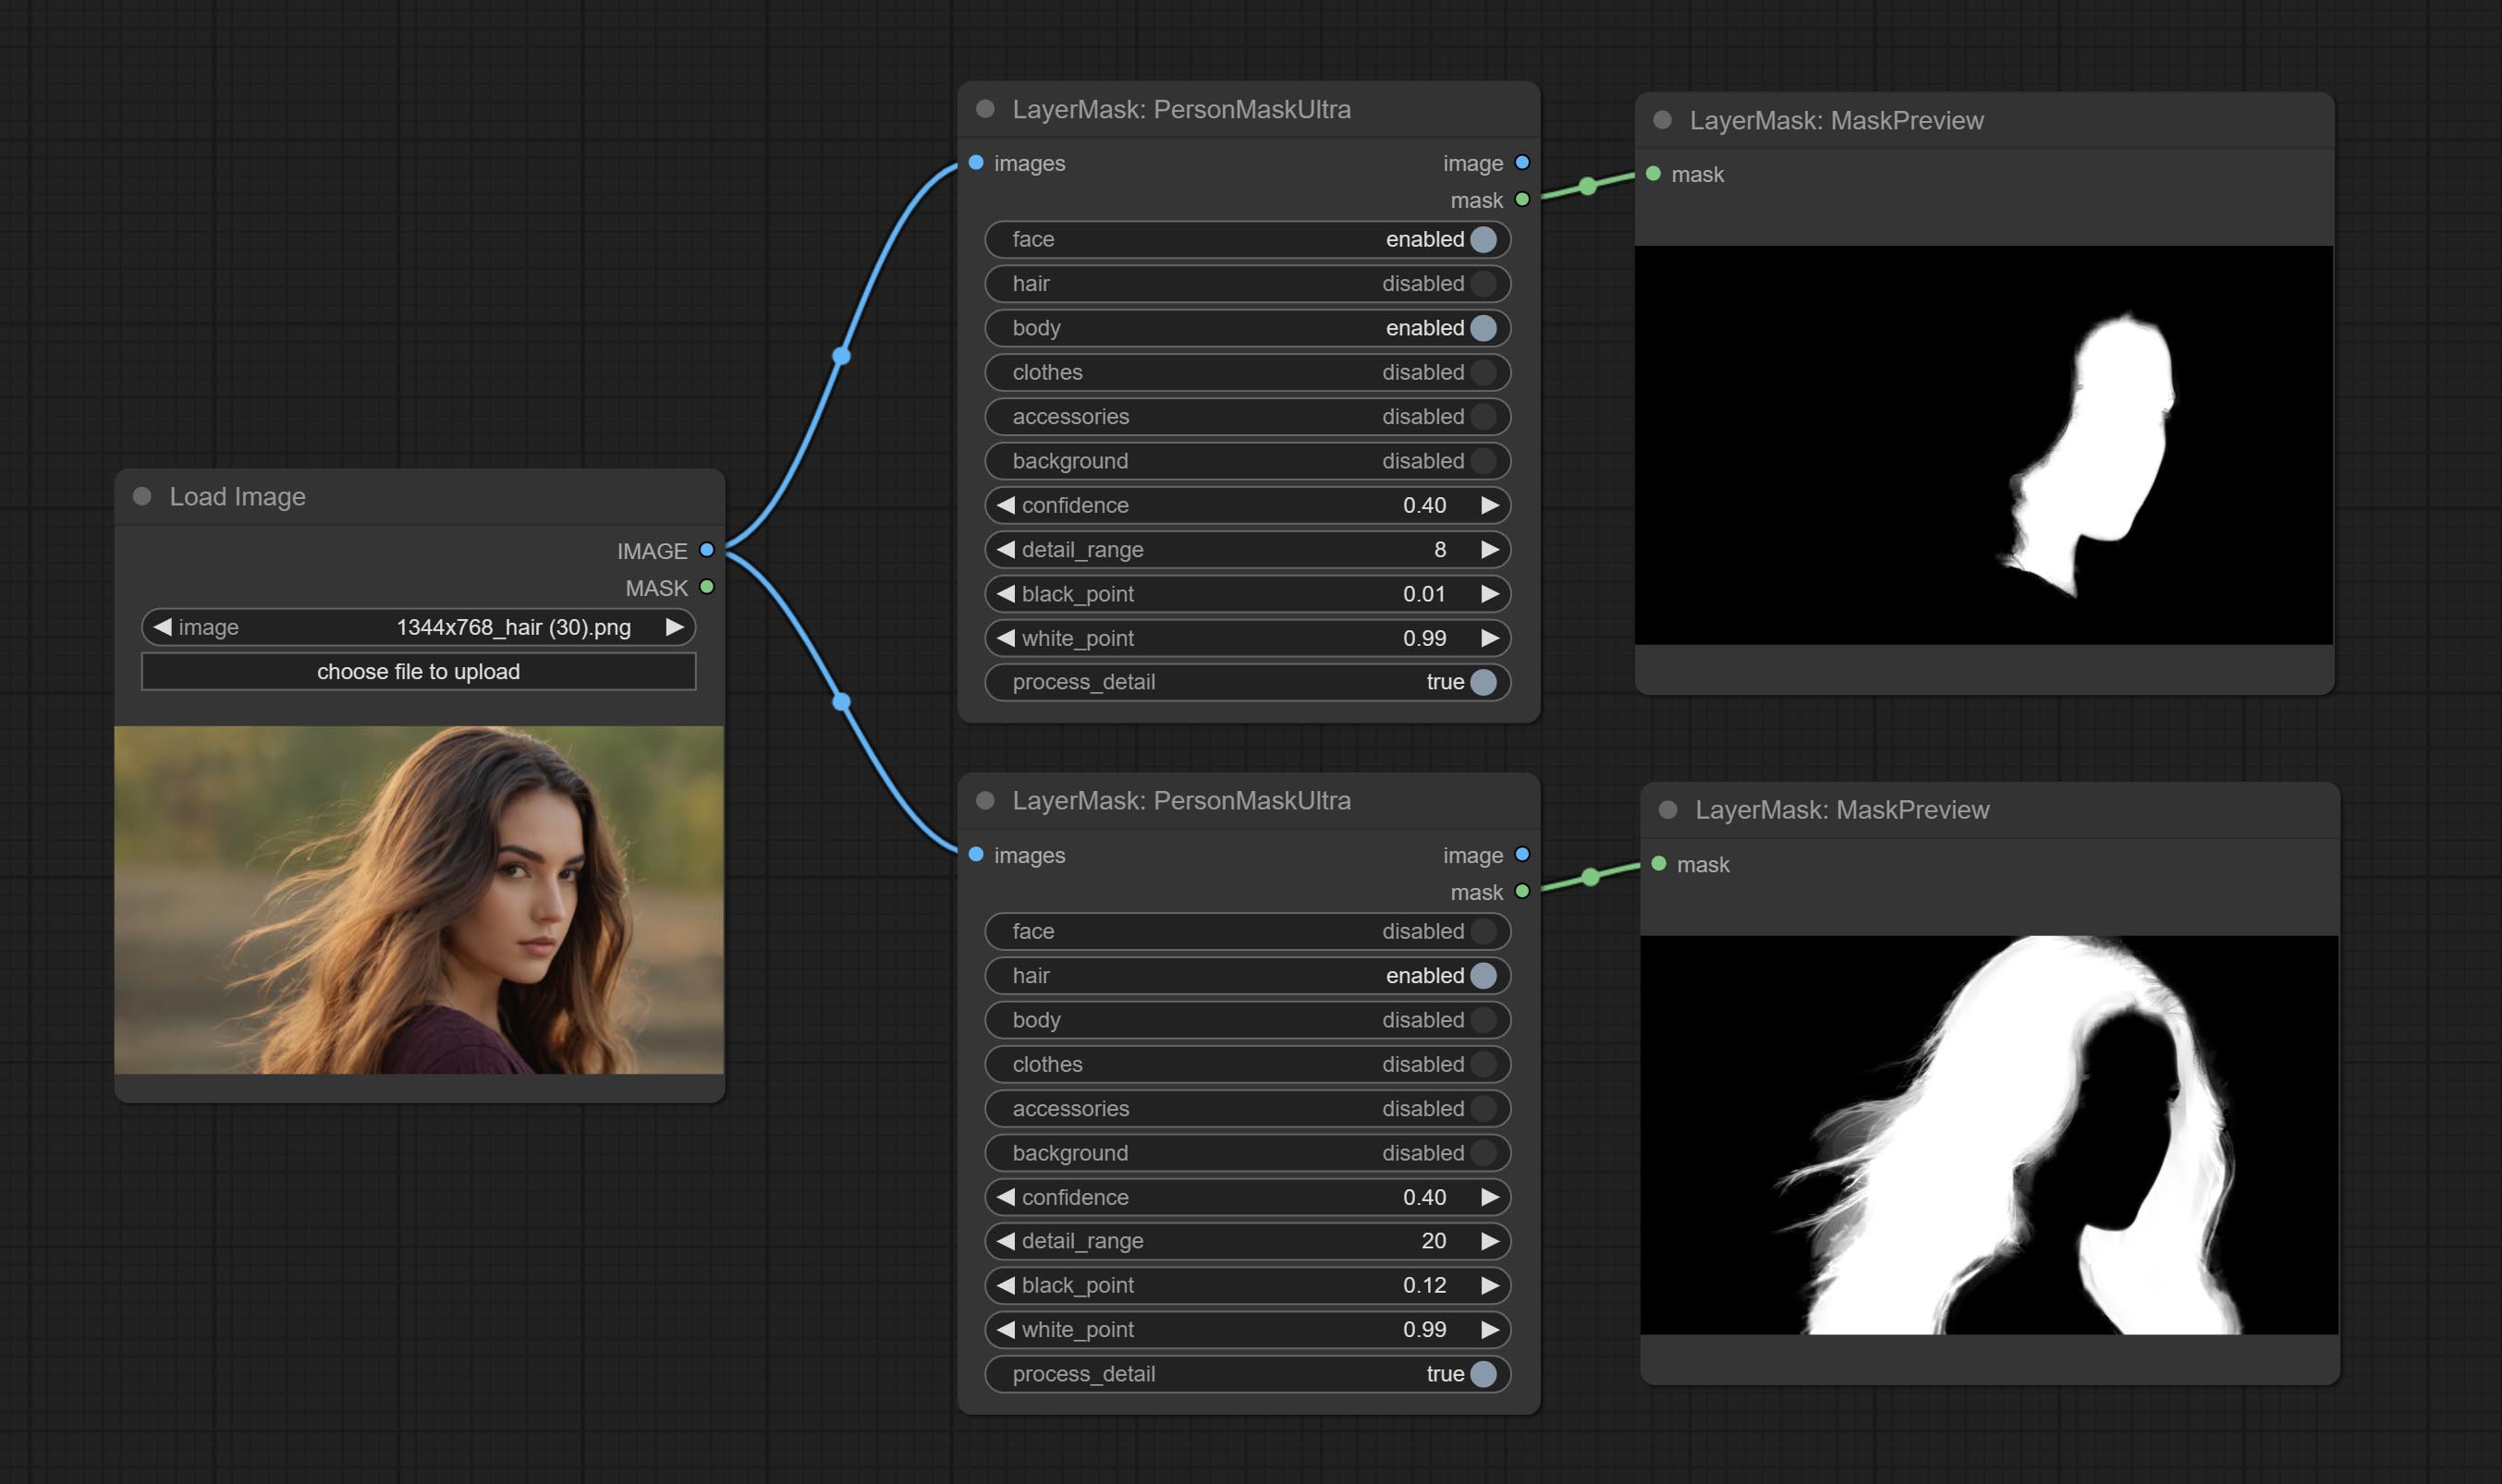
Node options:
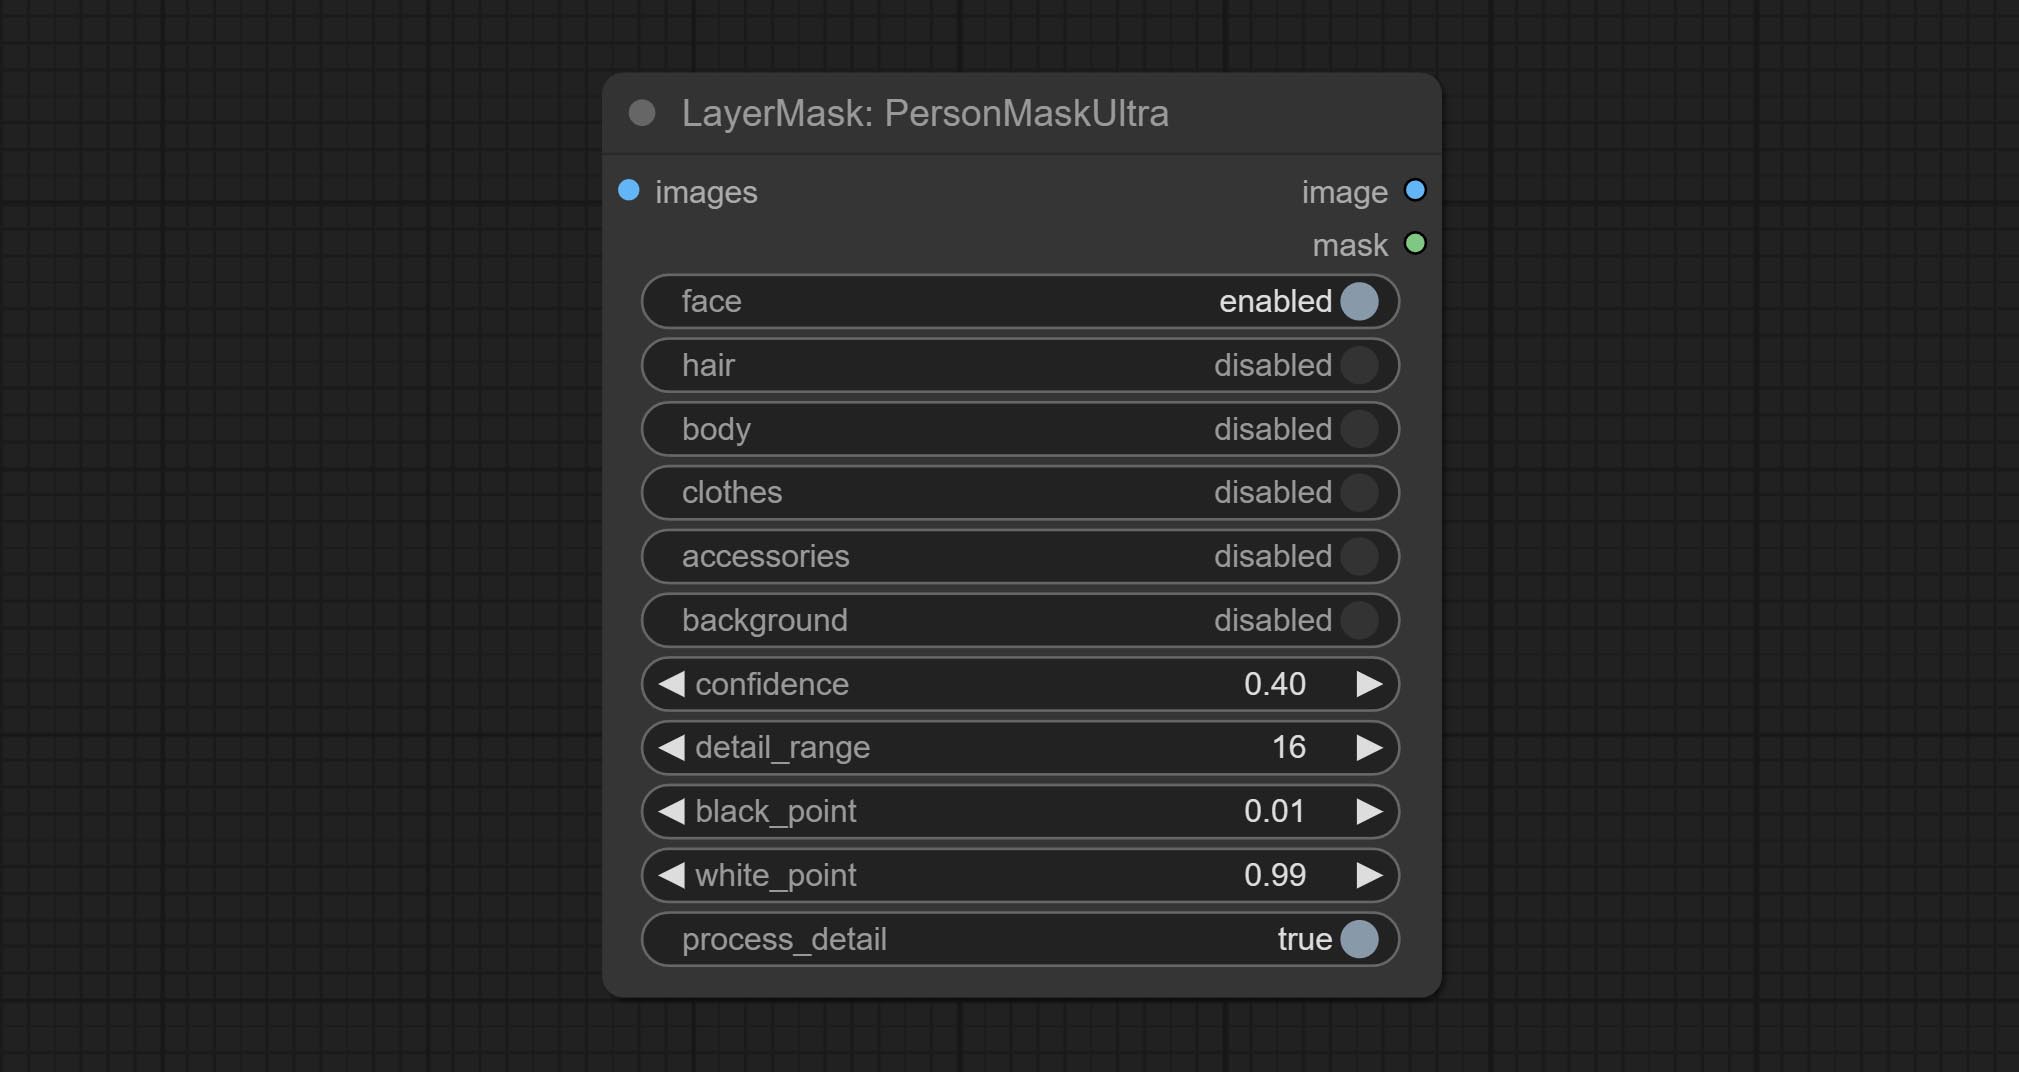
- face: Face recognition.
- hair: Hair recognition.
- body: Body skin recognition.
- clothes: Clothing recognition.
- accessories: Identification of accessories (such as backpacks).
- background: Background recognition.
- confidence: Recognition threshold, lower values will output more mask ranges.
- detail_range: Edge detail range.
- black_point: Edge black sampling threshold.
- white_point: Edge white sampling threshold.
- process_detail: Set to false here will skip edge processing to save runtime.
PersonMaskUltraV2
The V2 upgraded version of PersonMaskUltra has added the VITMatte edge processing method.(Note: Images larger than 2K in size using this method will consume huge memory)
On the basis of PersonMaskUltra, the following changes have been made: 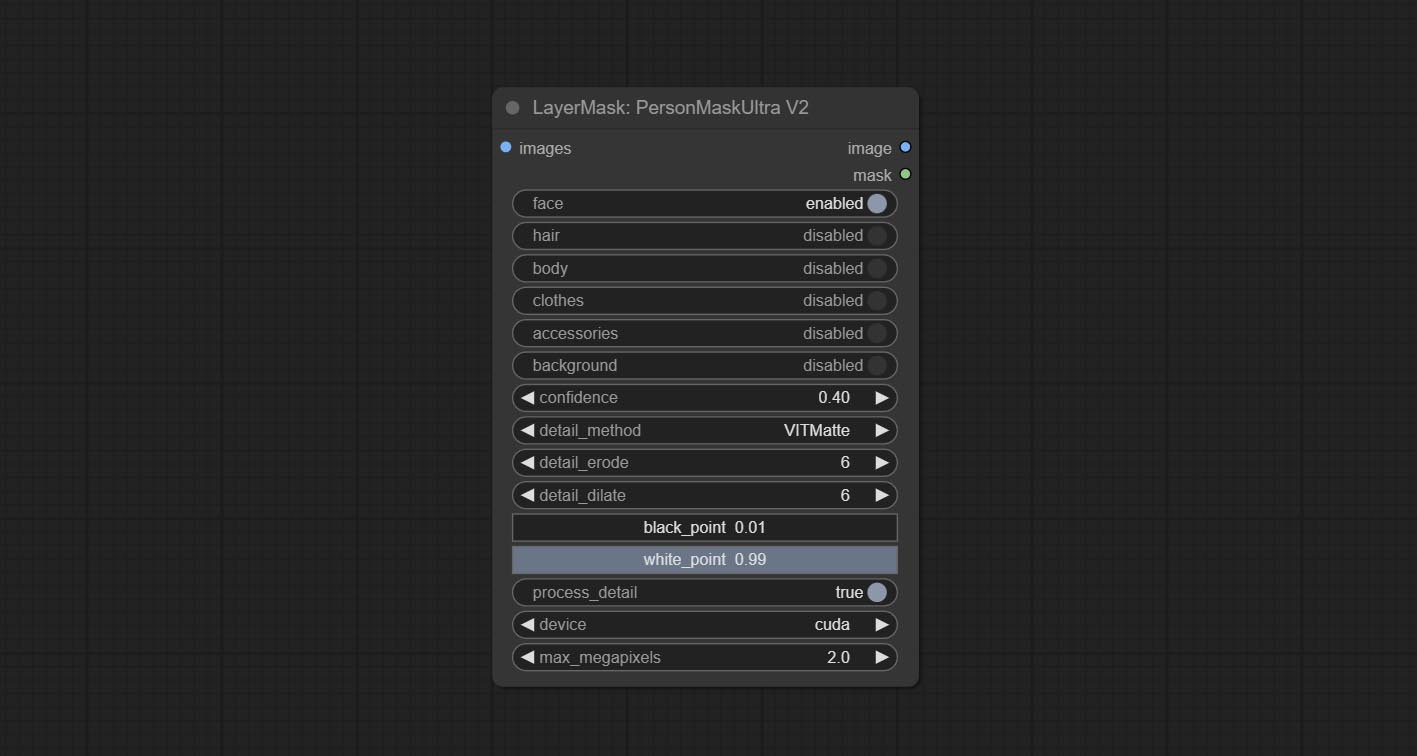
detail_method: Edge processing methods. provides VITMatte, VITMatte(local), PyMatting, GuidedFilter. If the model has been downloaded after the first use of VITMatte, you can use VITMatte (local) afterwards.
detail_erode: Mask the erosion range inward from the edge. the larger the value, the larger the range of inward repair.
detail_dilate: The edge of the mask expands outward. the larger the value, the wider the range of outward repair.
device: Set whether the VitMatte to use cuda.
max_megapixels: Set the maximum size for VitMate operations.
SegformerB2ClothesUltra

为角色的脸,头发,手臂,腿部和衣服生成面具,主要用于分割衣服。 The model segmentation code is fromStartHua,thanks to the original author. Compared to the comfyui_segformer_b2_clothes, this node has ultra-high edge details. (Note: Generating images with edges exceeding 2K in size using the VITMatte method will consume a lot of memory)
*Download all model files from huggingface or BaiduNetdisk to ComfyUI/models/segformer_b2_clothes folder.
节点选项:
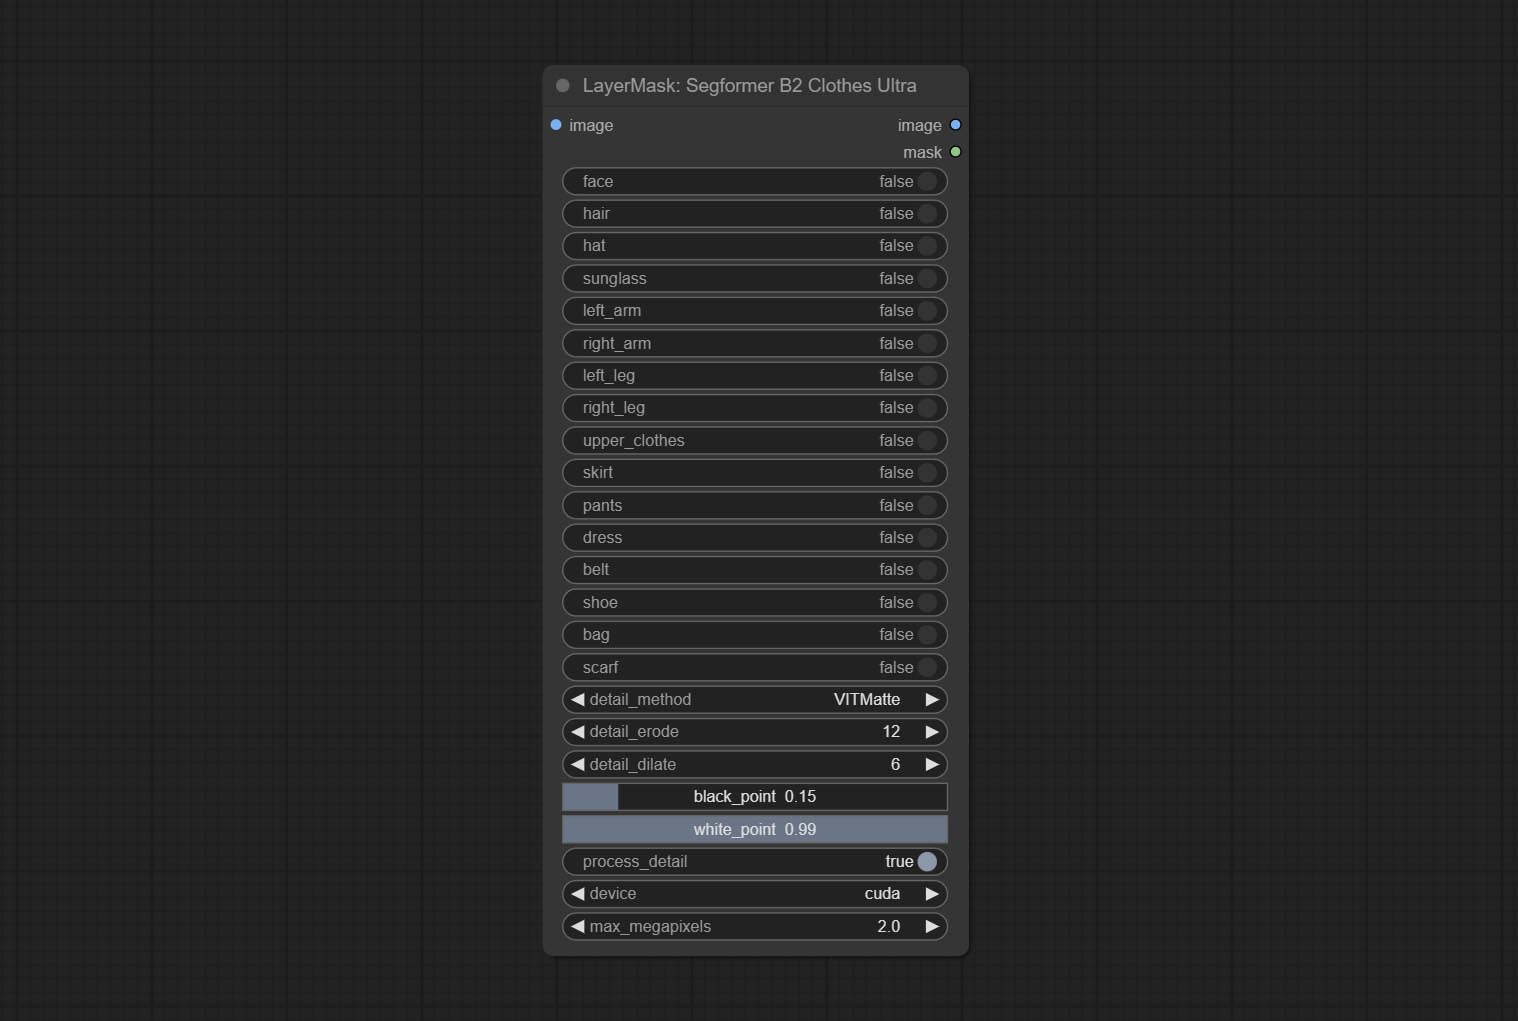
- face: Facial recognition switch.
- hair: Hair recognition switch.
- hat: Hat recognition switch.
- sunglass: Sunglass recognition switch.
- left_arm: Left arm recognition switch.
- right_arm: Right arm recognition switch.
- left_leg: Left leg recognition switch.
- right_leg:右腿识别开关。
- skirt: Skirt recognition switch.
- pants: Pants recognition switch.
- dress: Dress recognition switch.
- belt: Belt recognition switch.
- shoe: Shoes recognition switch.
- bag: Bag recognition switch.
- scarf: Scarf recognition switch.
- detail_method: Edge processing methods. provides VITMatte, VITMatte(local), PyMatting, GuidedFilter. If the model has been downloaded after the first use of VITMatte, you can use VITMatte (local) afterwards.
- detail_erode: Mask the erosion range inward from the edge. the larger the value, the larger the range of inward repair.
- detail_dilate: The edge of the mask expands outward. the larger the value, the wider the range of outward repair.
- black_point: Edge black sampling threshold.
- white_point: Edge white sampling threshold.
- process_detail: Set to false here will skip edge processing to save runtime.
- device: Set whether the VitMatte to use cuda.
- max_megapixels: Set the maximum size for VitMate operations.
SegformerUltraV2
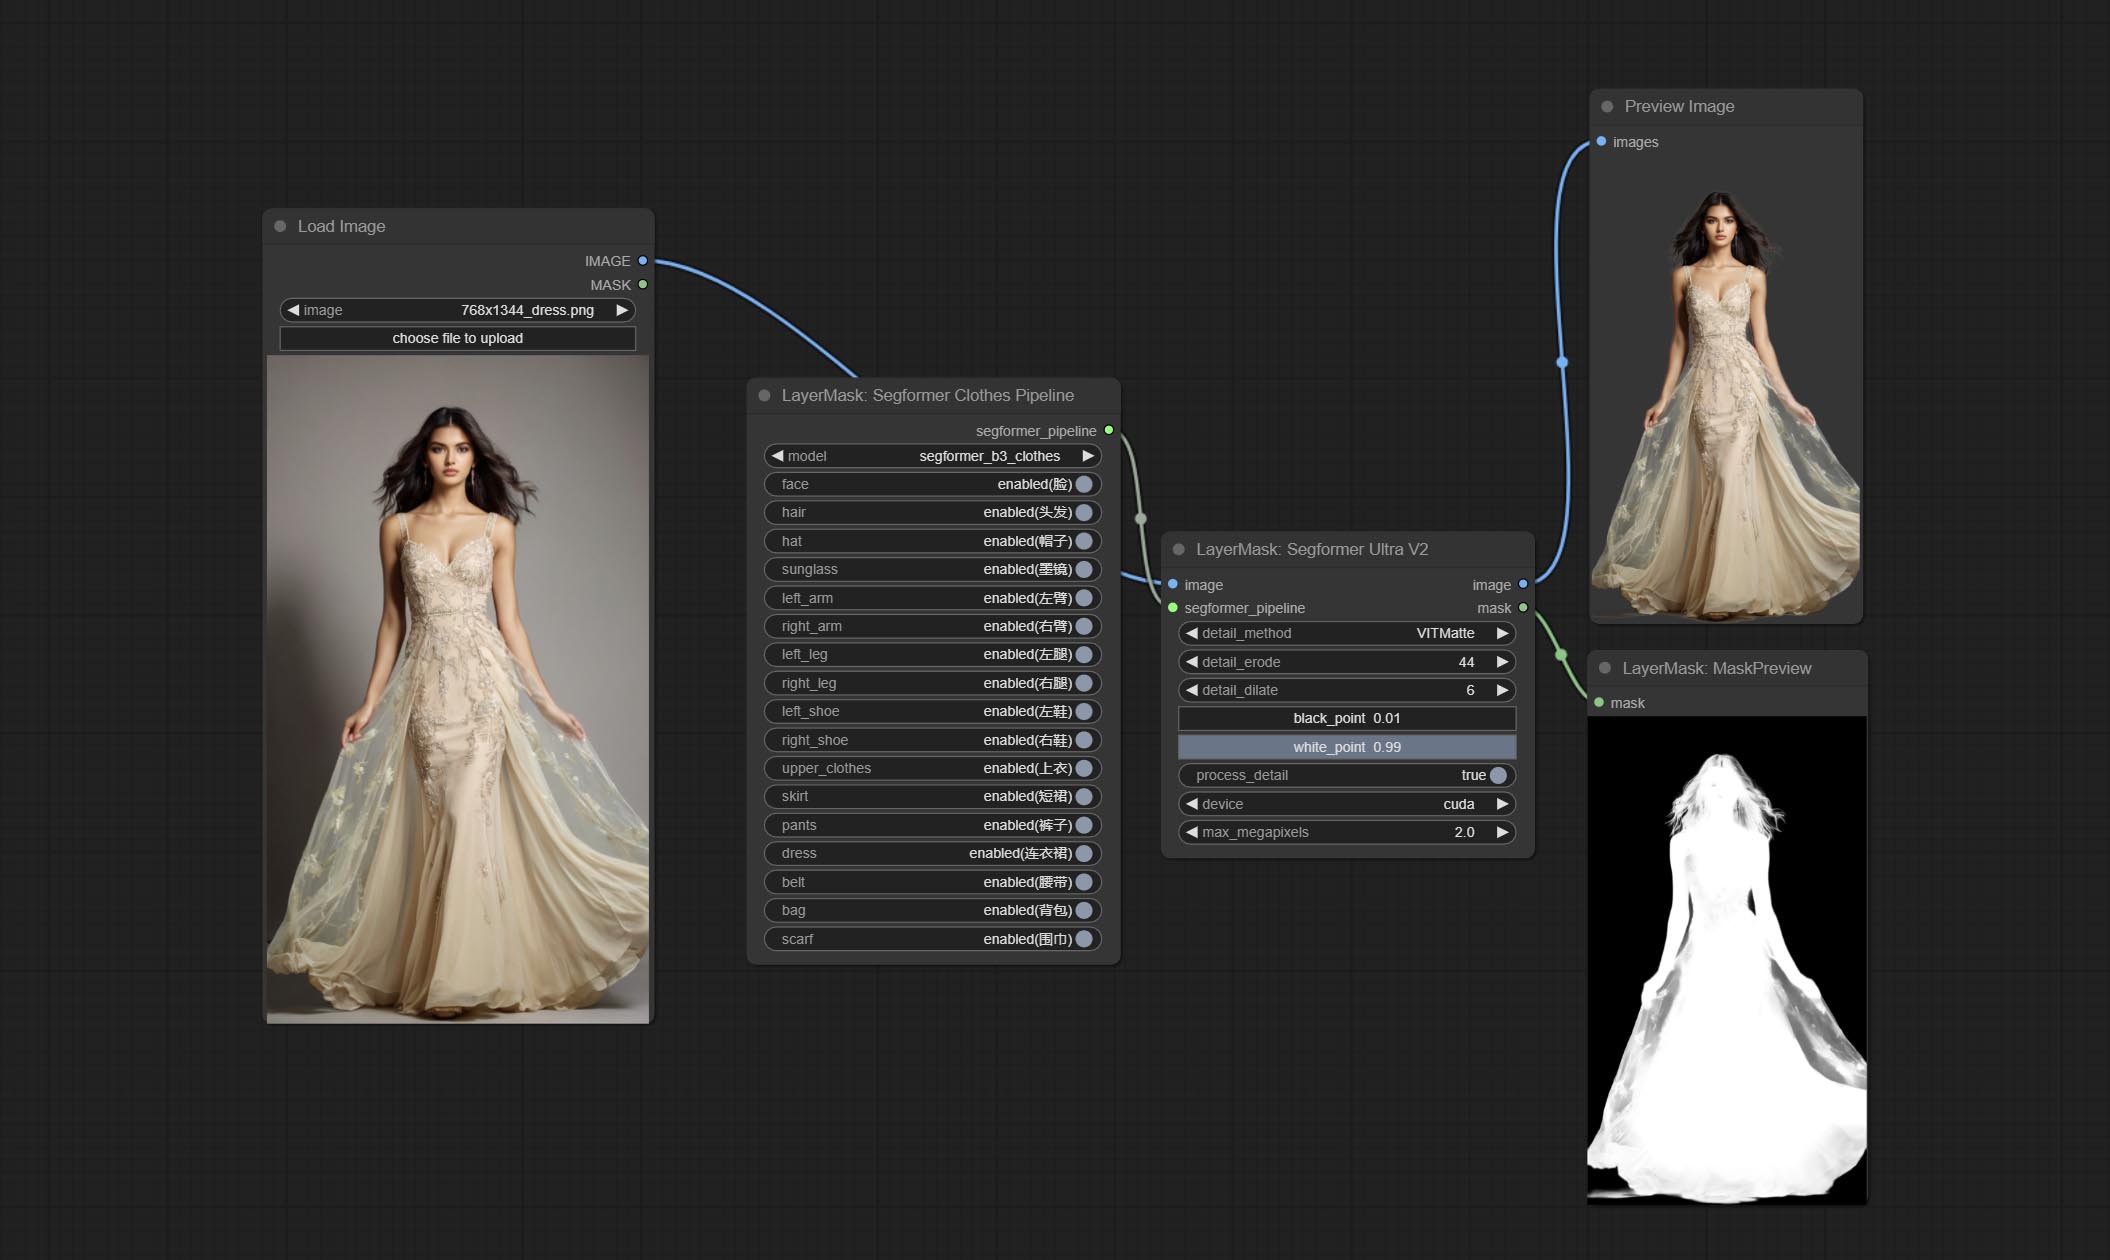
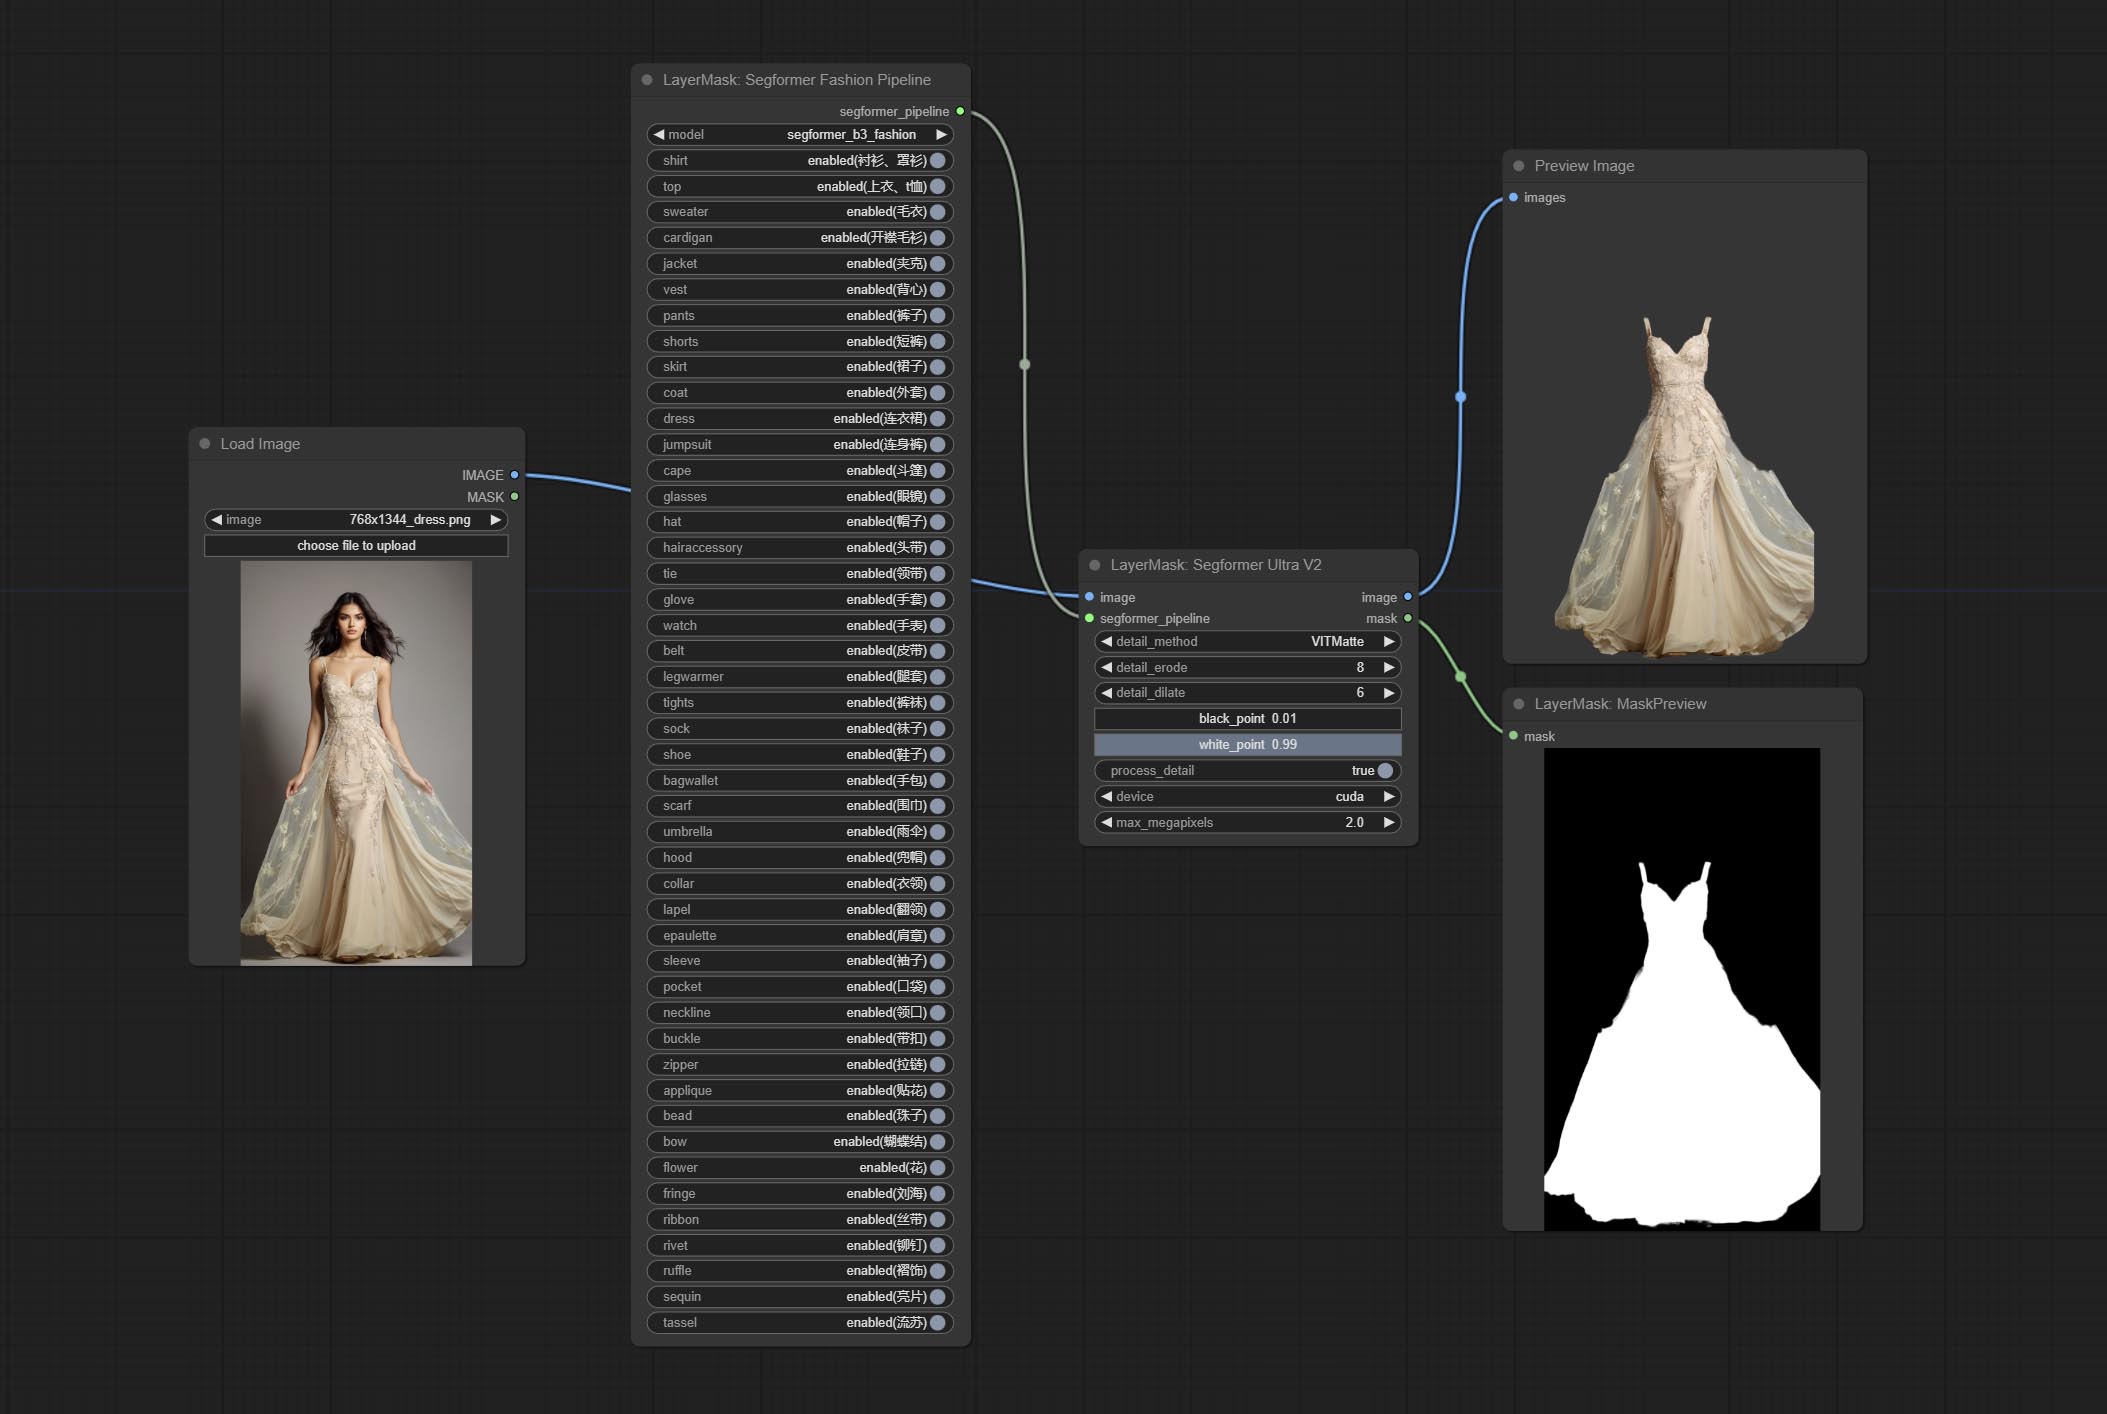
Using the segformer model to segment clothing with ultra-high edge details. Currently supports segformer b2 clothes, segformer b3 clothes and segformer b3 fashion。
*Download modelfiles from huggingface or BaiduNetdisk to ComfyUI/models/segformer_b2_clothes folder.
*Download modelfiles from huggingface or BaiduNetdisk to ComfyUI/models/segformer_b3_clothes folder.
*Download modelfiles from huggingface or BaiduNetdisk to ComfyUI/models/segformer_b3_fashion folder.
节点选项:
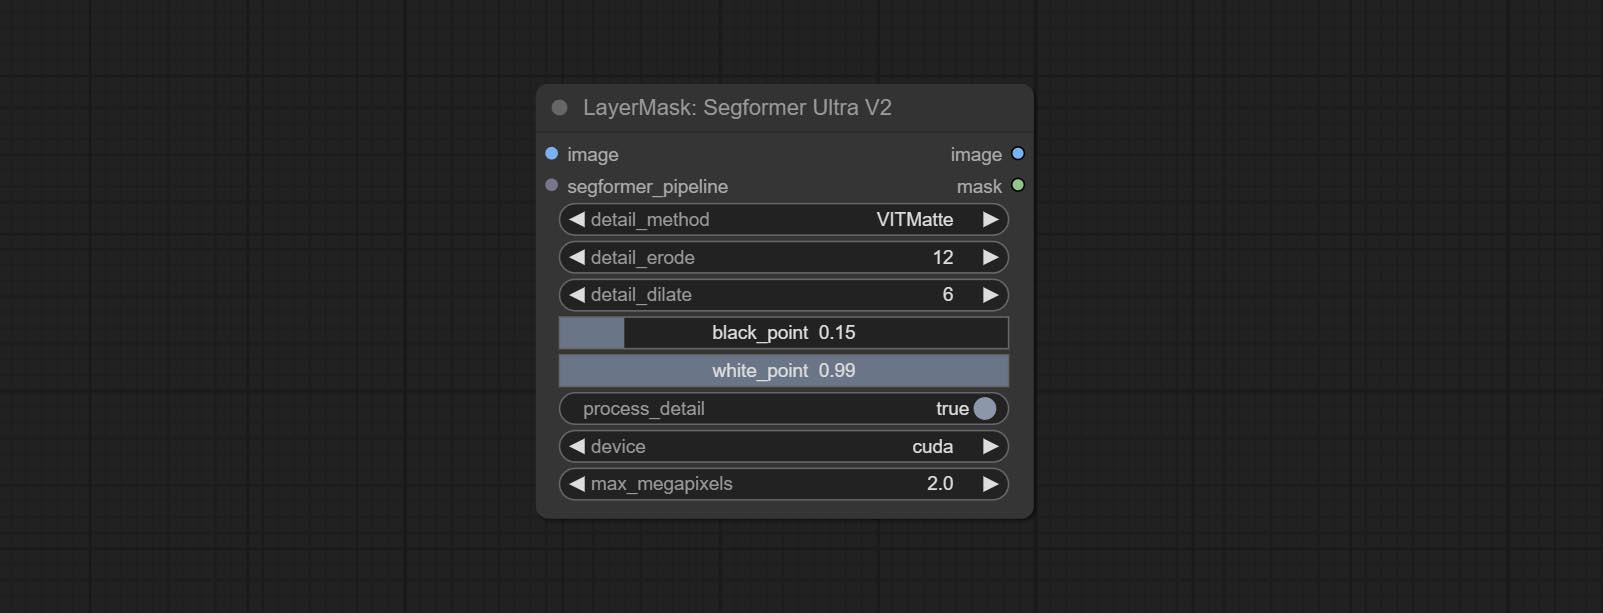
- image: The input image.
- segformer_pipeline: Segformer pipeline input. The pipeline is output by SegformerClottesPipeline and SegformerFashionPipeline node.
- detail_method: Edge processing methods. provides VITMatte, VITMatte(local), PyMatting, GuidedFilter. If the model has been downloaded after the first use of VITMatte, you can use VITMatte (local) afterwards.
- detail_erode: Mask the erosion range inward from the edge. the larger the value, the larger the range of inward repair.
- detail_dilate: The edge of the mask expands outward. the larger the value, the wider the range of outward repair.
- black_point: Edge black sampling threshold.
- white_point: Edge white sampling threshold.
- process_detail: Set to false here will skip edge processing to save runtime.
- device: Set whether the VitMatte to use cuda.
- max_megapixels: Set the maximum size for VitMate operations.
SegformerClothesPipiline
Select the segformer clothes model and choose the segmentation content.
节点选项:

- model: Model selection. There are currently two models available to choose from for segformer b2 clothes and segformer b3 clothes.
- face: Facial recognition switch.
- hair: Hair recognition switch.
- hat: Hat recognition switch.
- sunglass: Sunglass recognition switch.
- left_arm: Left arm recognition switch.
- right_arm: Right arm recognition switch.
- left_leg: Left leg recognition switch.
- right_leg:右腿识别开关。
- left_shoe: Left shoe recognition switch.
- right_shoe: Right shoe recognition switch.
- skirt: Skirt recognition switch.
- pants: Pants recognition switch.
- dress: Dress recognition switch.
- belt: Belt recognition switch.
- bag: Bag recognition switch.
- scarf: Scarf recognition switch.
SegformerFashionPipiline
Select the segformer fashion model and choose the segmentation content.
节点选项:
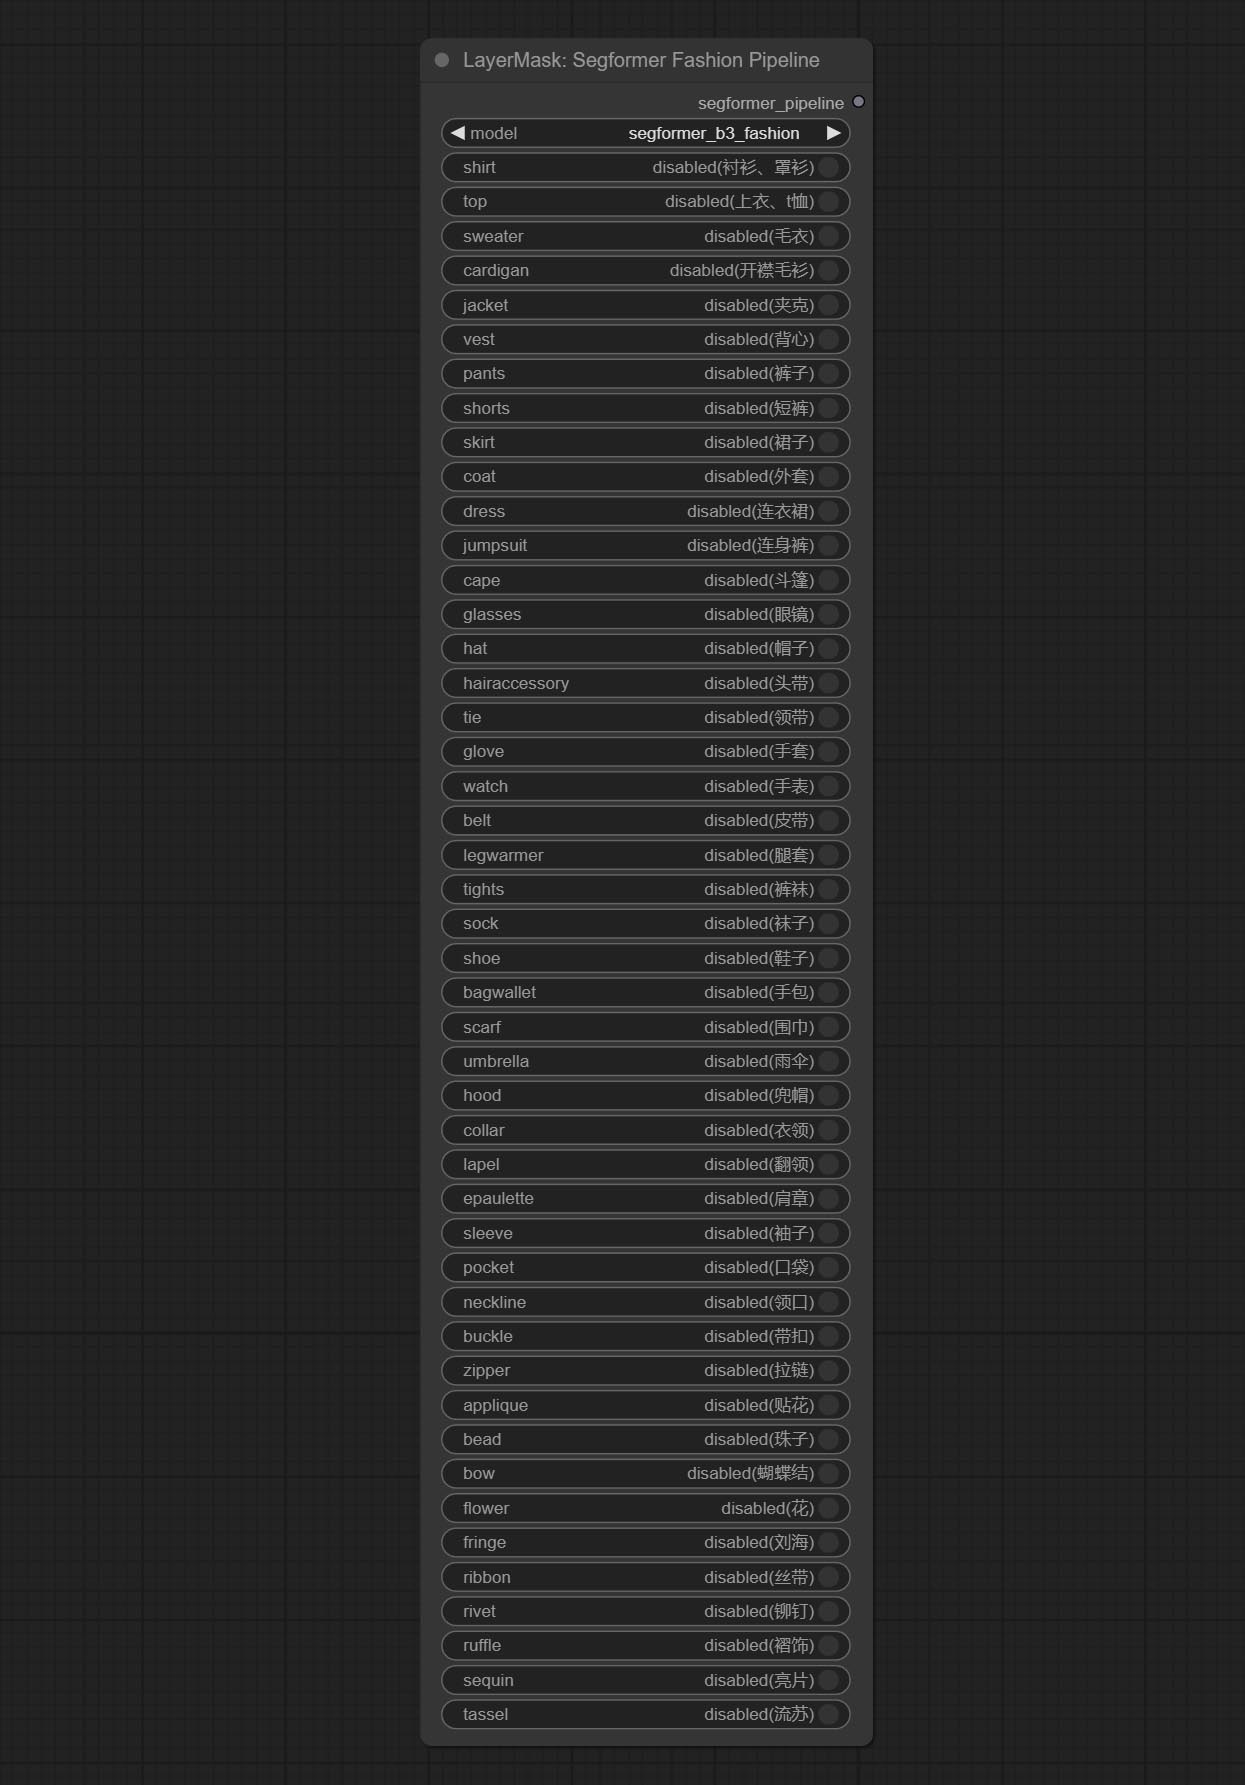
- model: Model selection. Currently, there is only one model available for selection: segformer b3 fashion。
- shirt: shirt and blouse switch.
- top: top, t-shirt, sweatshirt switch.
- sweater: sweater switch.
- cardigan: cardigan switch.
- jacket: jacket switch.
- vest: vest switch.
- pants: pants switch.
- shorts: shorts switch.
- skirt: skirt switch.
- coat: coat switch.
- dress: dress switch.
- jumpsuit: jumpsuit switch.
- cape: cape switch.
- glasses: glasses switch.
- hat: hat switch.
- hairaccessory: headband, head covering, hair accessory switch.
- tie: tie switch.
- glove: glove switch.
- watch: watch switch.
- belt: belt switch.
- legwarmer: leg warmer switch.
- tights: tights and stockings switch.
- sock: sock switch.
- shoe: shoes switch.
- bagwallet: bag and wallet switch.
- scarf: scarf switch.
- umbrella: umbrella switch.
- hood: hood switch.
- collar: collar switch.
- lapel: lapel switch.
- epaulette: epaulette switch.
- sleeve: sleeve switch.
- pocket: pocket switch.
- neckline: neckline switch.
- buckle: buckle switch.
- zipper: zipper switch.
- applique: applique switch.
- bead: bead switch.
- bow: bow switch.
- flower: flower switch.
- fringe: fringe switch.
- ribbon: ribbon switch.
- rivet: rivet switch.
- ruffle: ruffle switch.
- sequin: sequin switch.
- tassel: tassel switch.
HumanPartsUltra
Used for generate human body parts masks, it is based on the warrper of metal3d/ComfyUI_Human_Parts, thank the original author. This node has added ultra-fine edge processing based on the original work. Download model file from BaiduNetdisk or huggingface and copy to ComfyUImodelsonnxhuman-parts folder. 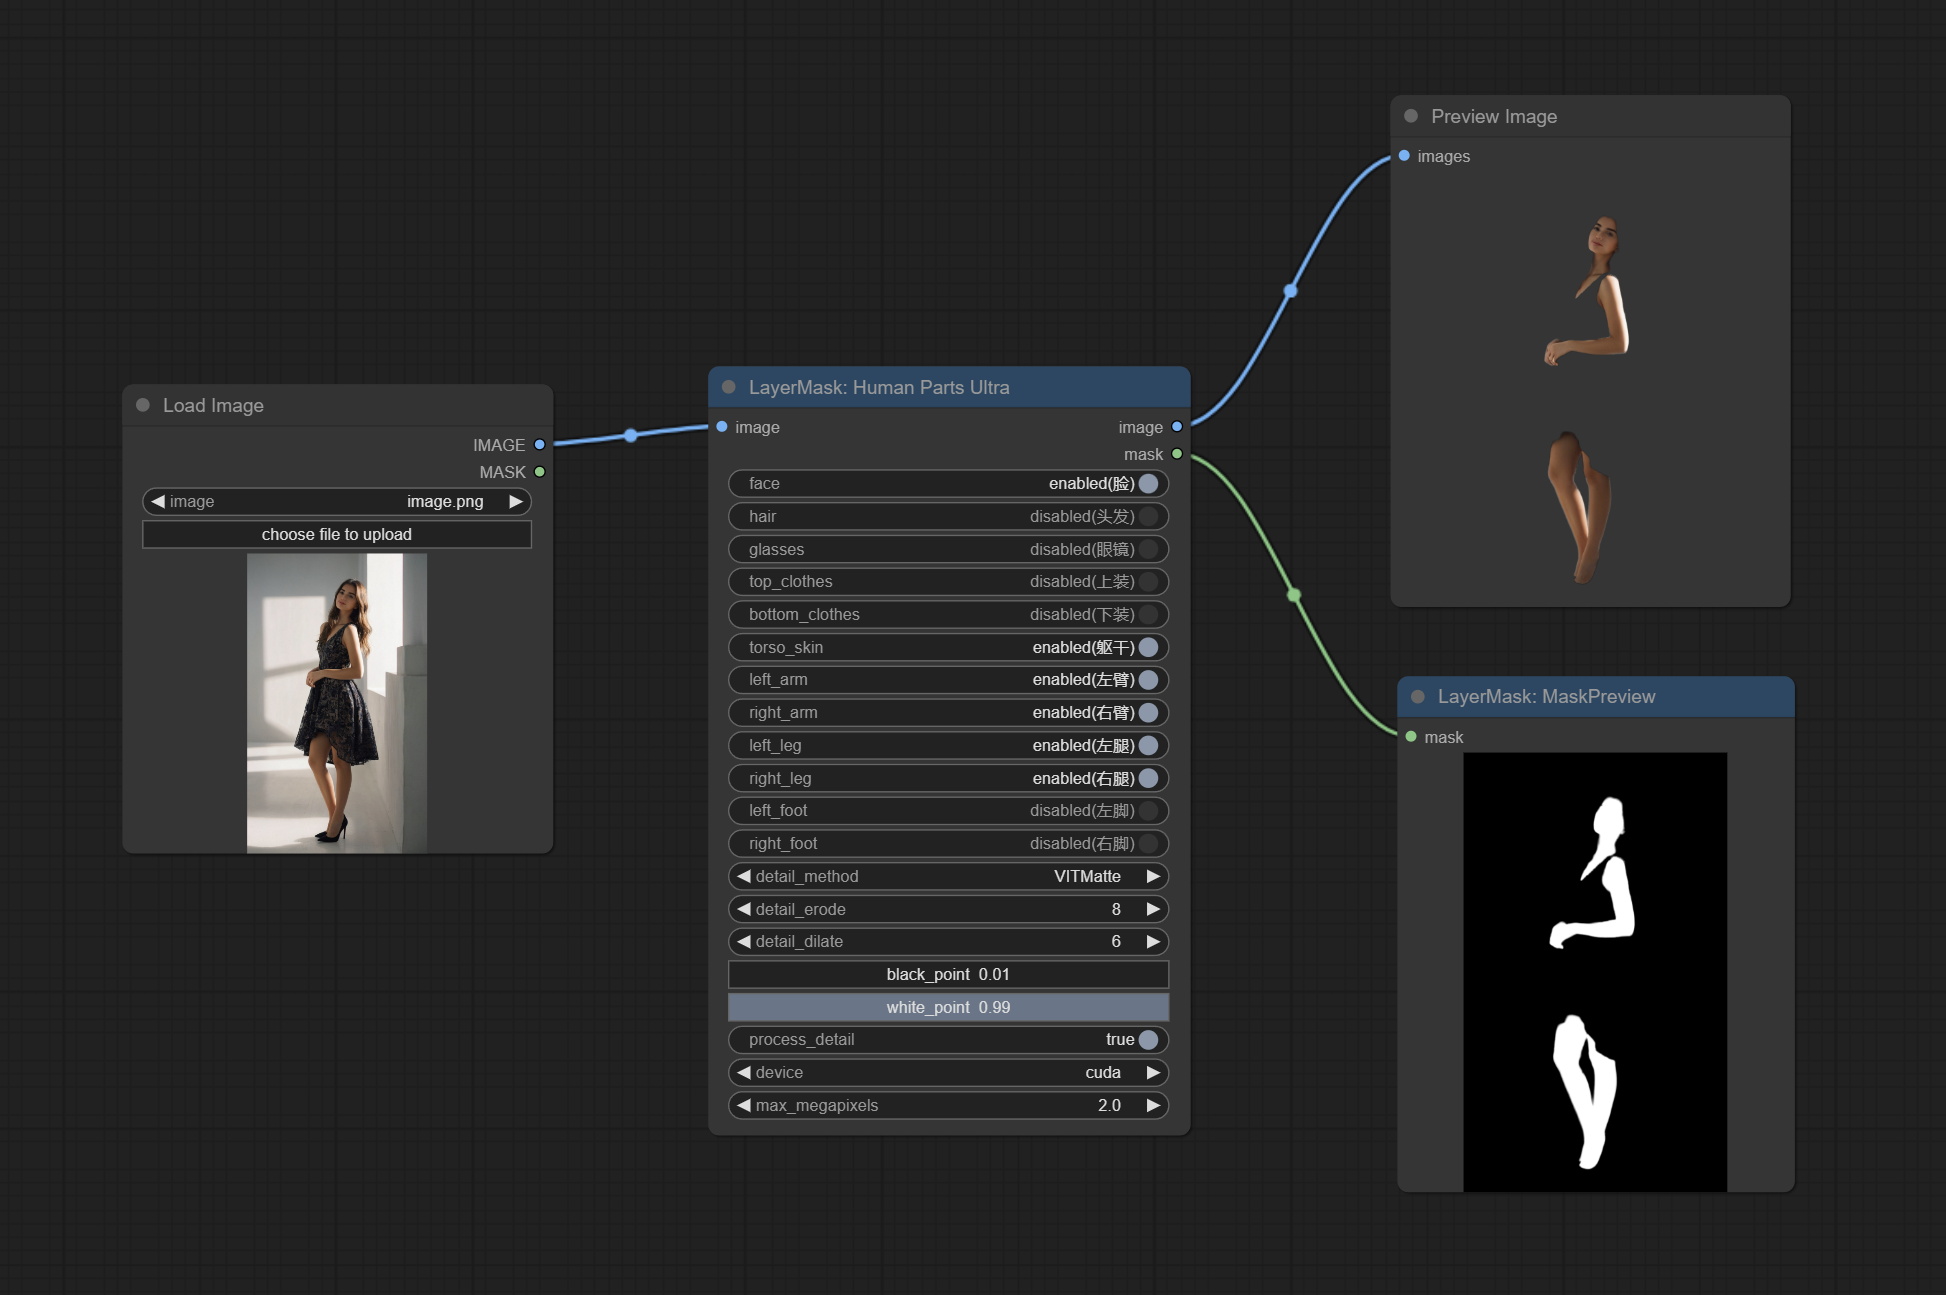
节点选项:
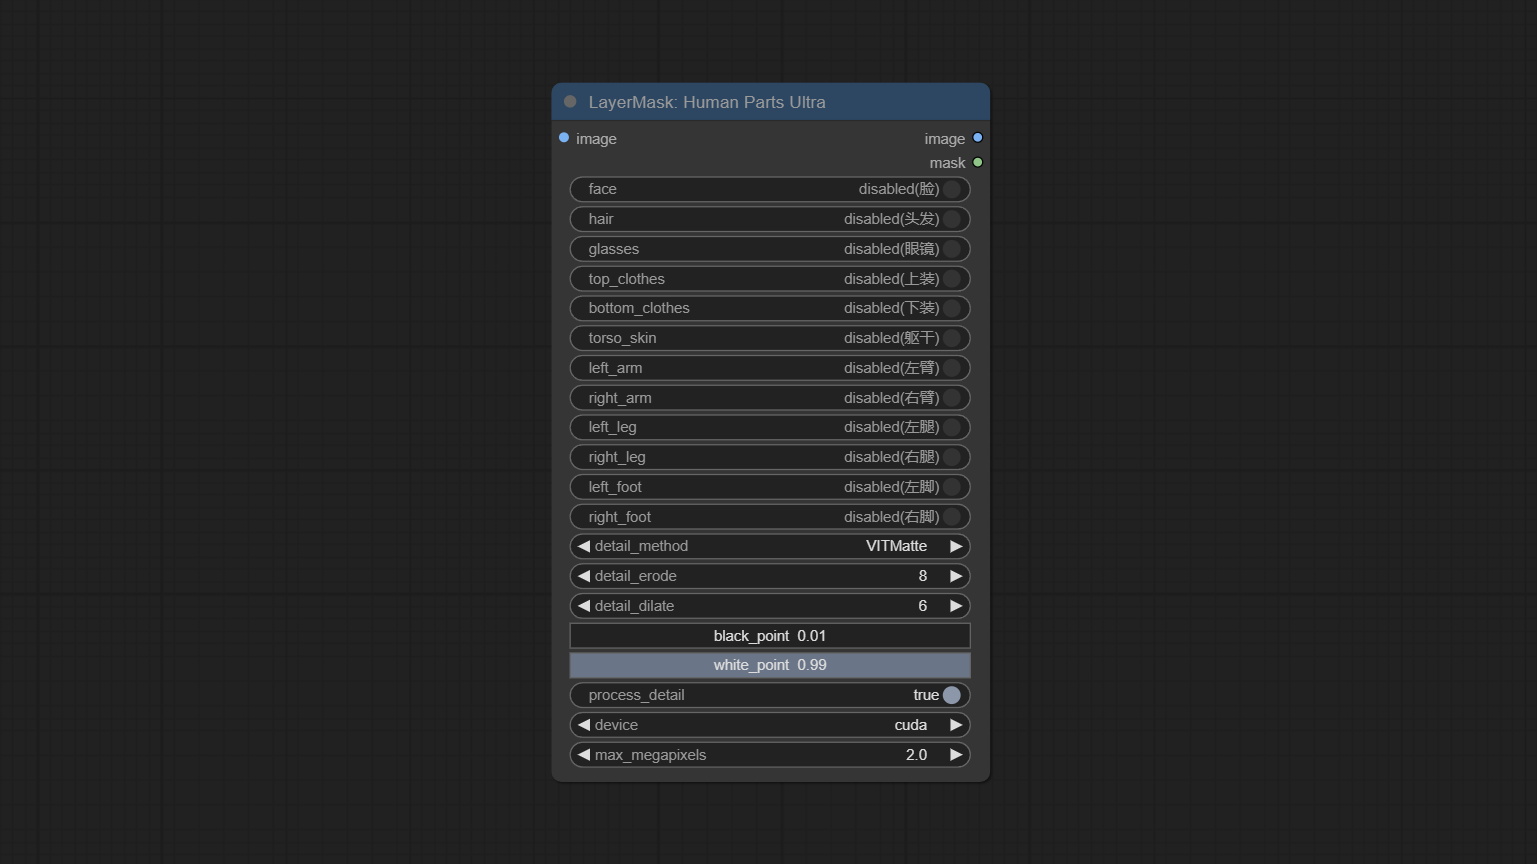
- image: The input image.
- face: Recognize face switch.
- hair: Recognize hair switch.
- galsses: Recognize glasses switch.
- top_clothes: Recognize top clothes switch.
- bottom_clothes: Recognize bottom clothes switch.
- torso_skin: Recognize torso skin switch.
- left_arm: Recognize left arm switch.
- right_arm: Recognize right arm switch.
- left_leg: Recognize left leg switch.
- right_leg: Recognize right leg switch.
- left_foot: Recognize left foot switch.
- right_foot: Recognize right foot switch.
- detail_method: Edge processing methods. provides VITMatte, VITMatte(local), PyMatting, GuidedFilter. If the model has been downloaded after the first use of VITMatte, you can use VITMatte (local) afterwards.
- detail_erode: Mask the erosion range inward from the edge. the larger the value, the larger the range of inward repair.
- detail_dilate: The edge of the mask expands outward. the larger the value, the wider the range of outward repair.
- black_point: Edge black sampling threshold.
- white_point: Edge white sampling threshold.
- process_detail: Set to false here will skip edge processing to save runtime.
- device: Set whether the VitMatte to use cuda.
- max_megapixels: Set the maximum size for VitMate operations.
MaskEdgeUltraDetail
Process rough masks to ultra fine edges. This node combines the Alpha Matte and the Guided Filter Alpha nodes functions of Spacepxl's ComfyUI-Image-Filters, thanks to the original author. 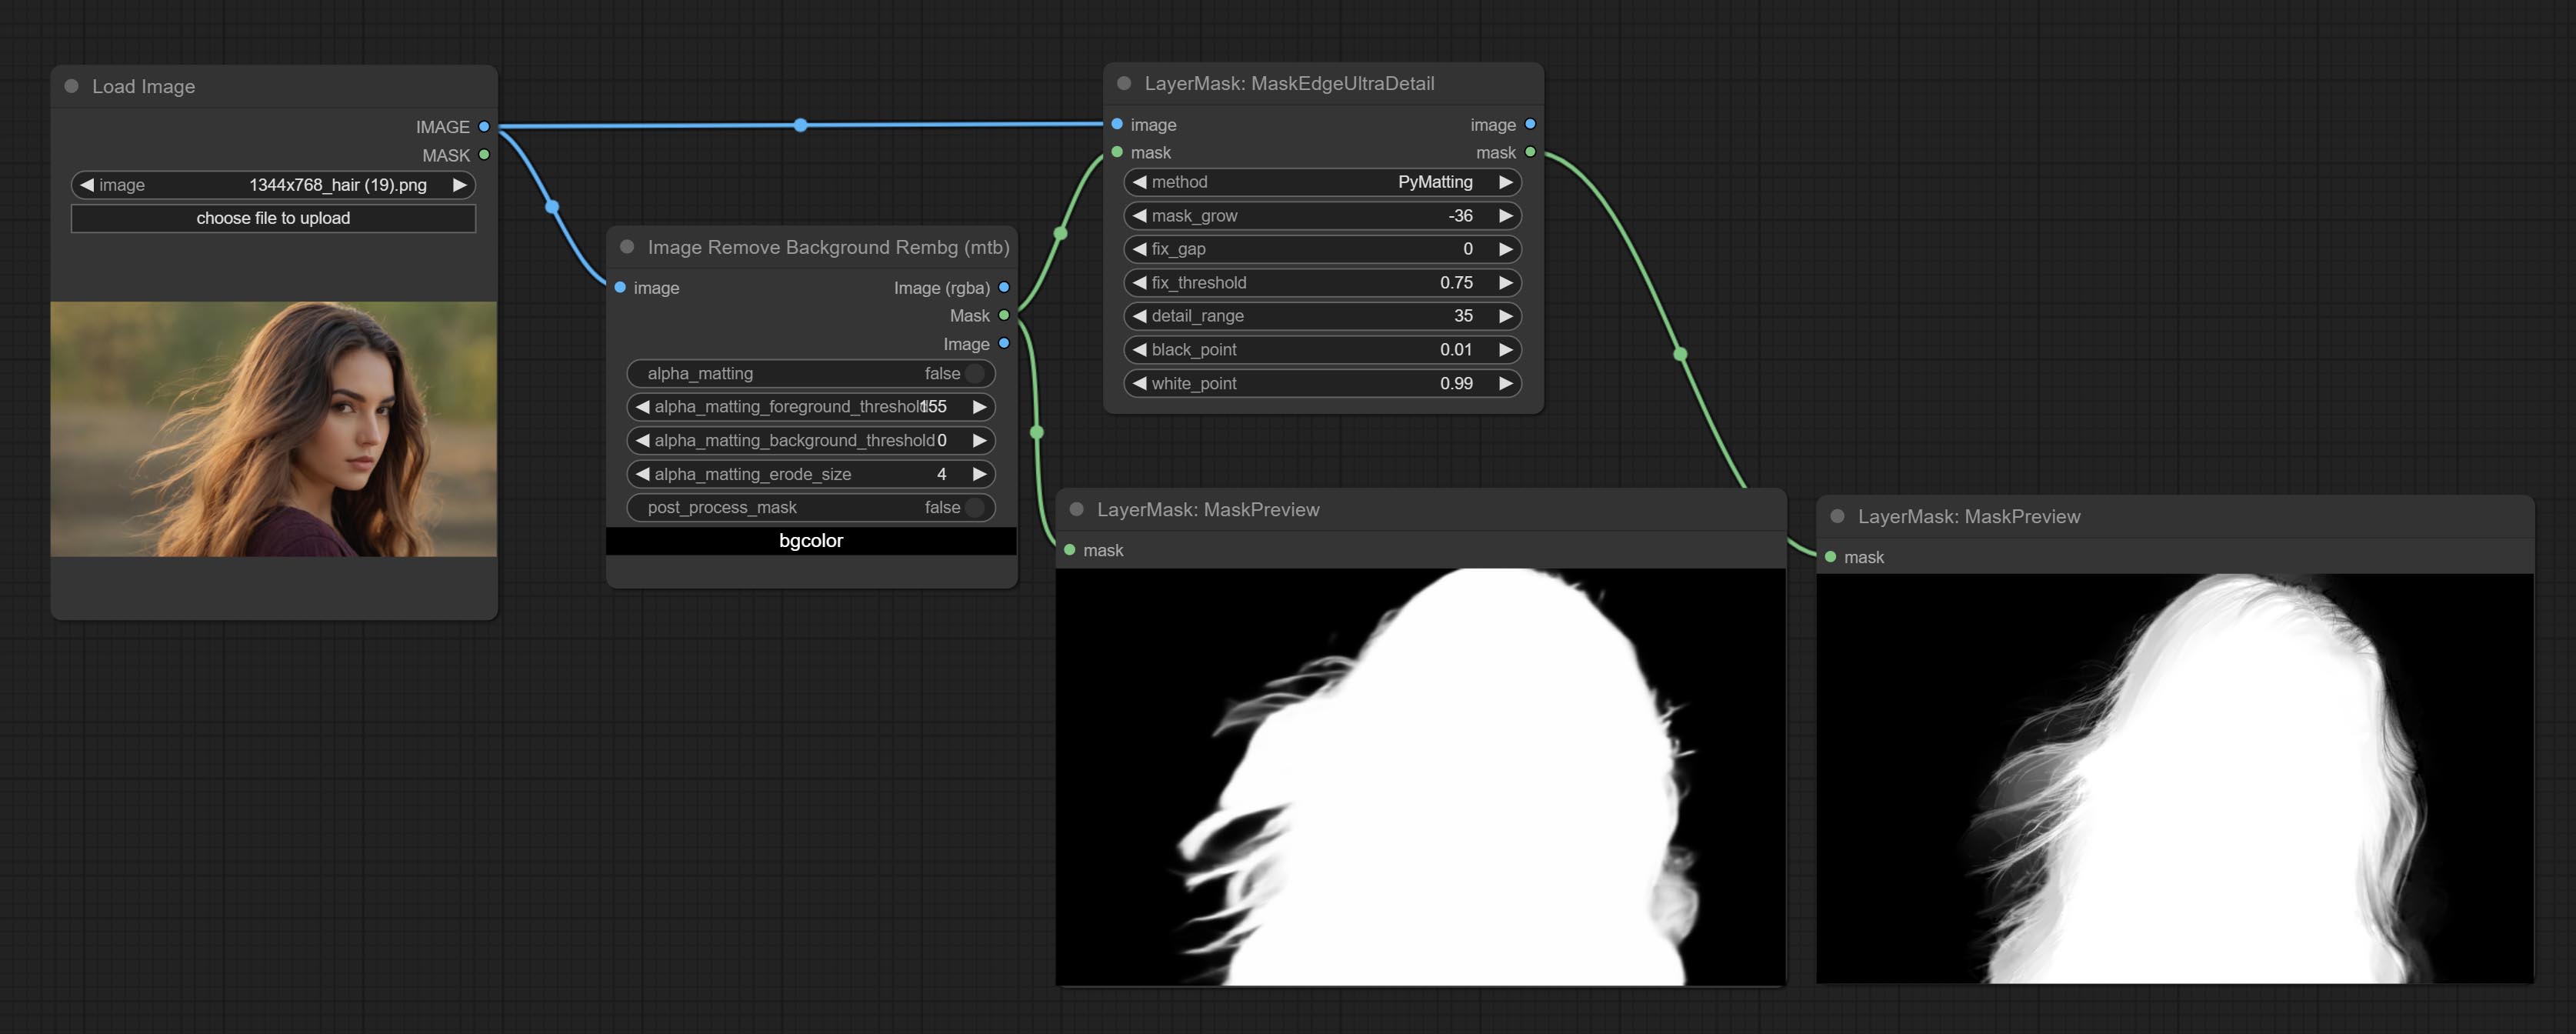
Node options:
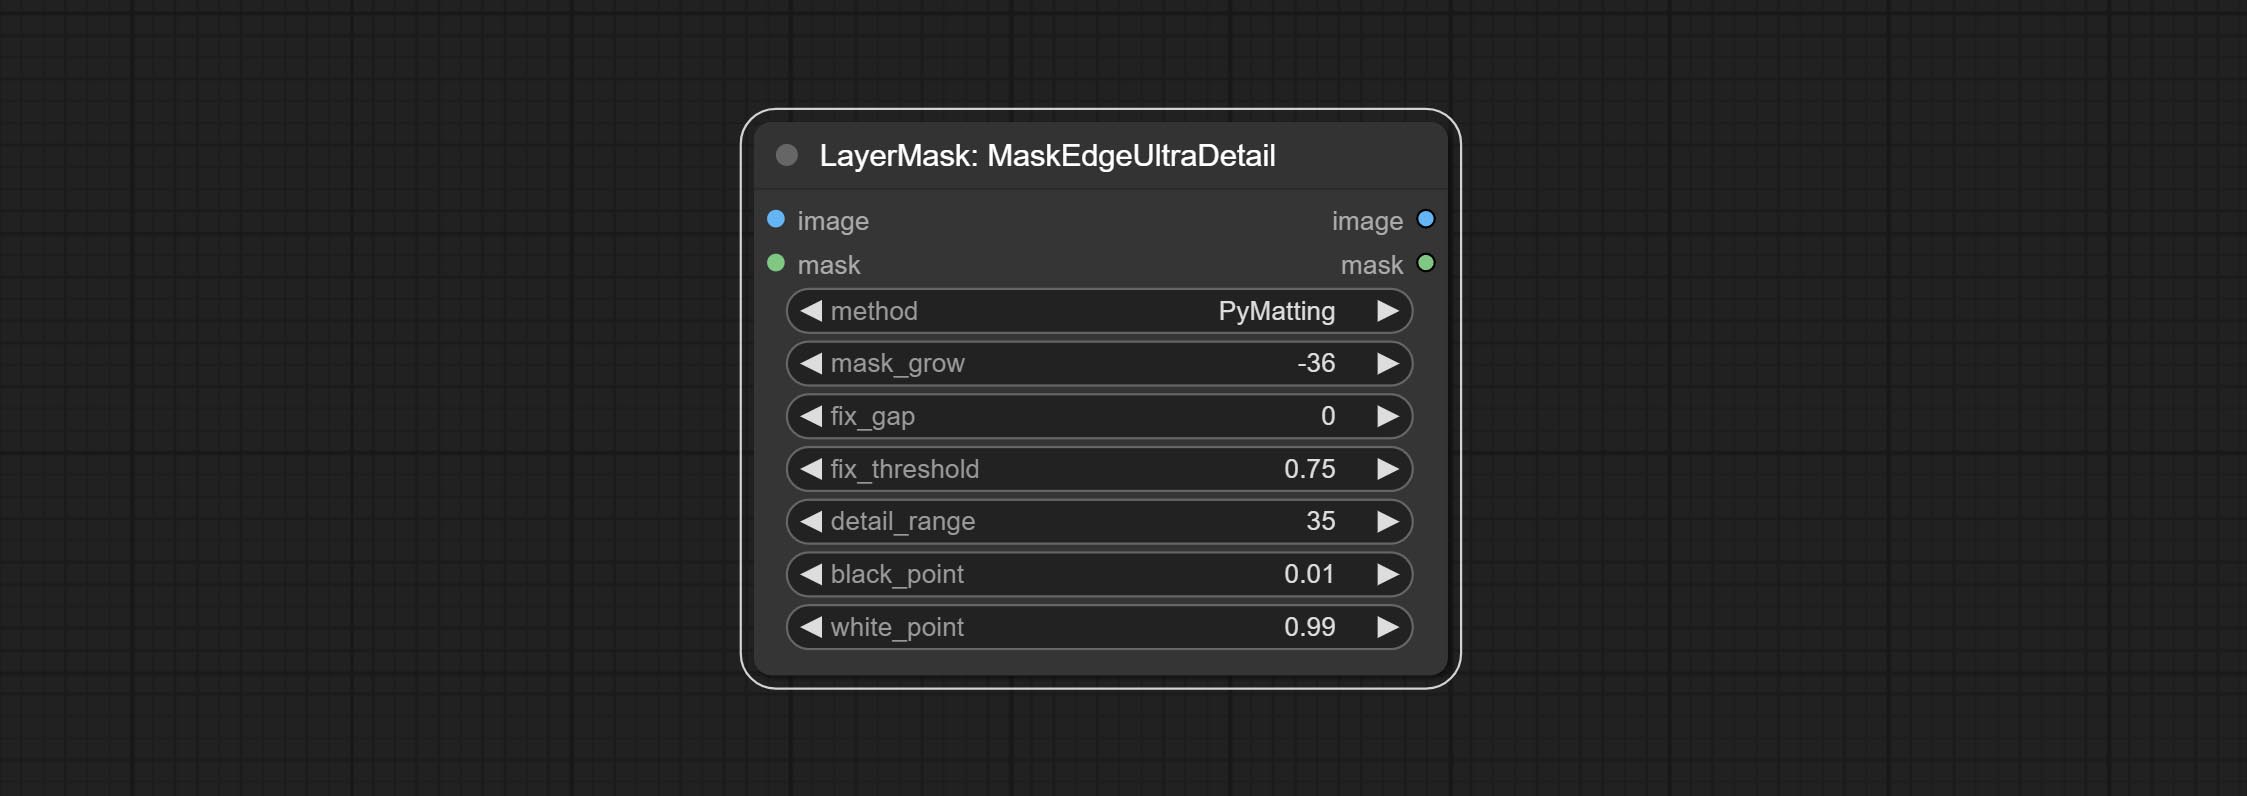
- method: Provide two methods for edge processing: PyMatting and OpenCV-GuidedFilter. PyMatching has a slower processing speed, but for video, it is recommended to use this method to obtain smoother mask sequences.
- mask_grow: Mask expansion amplitude. positive values expand outward, while negative values contract inward. For rougher masks, negative values are usually used to shrink their edges for better results.
- fix_gap: Repair the gaps in the mask. if obvious gaps in the mask, increase this value appropriately.
- fix_threshold: The threshold of fix_gap.
- detail_range: Edge detail range.
- black_point: Edge black sampling threshold.
- white_point: Edge white sampling threshold.
MaskEdgeUltraDetailV2
The V2 upgraded version of MaskEdgeUltraDetail has added the VITMatte edge processing method.(Note: Images larger than 2K in size using this method will consume huge memory)
This method is suitable for handling semi transparent areas.
On the basis of MaskEdgeUltraDetail, the following changes have been made: 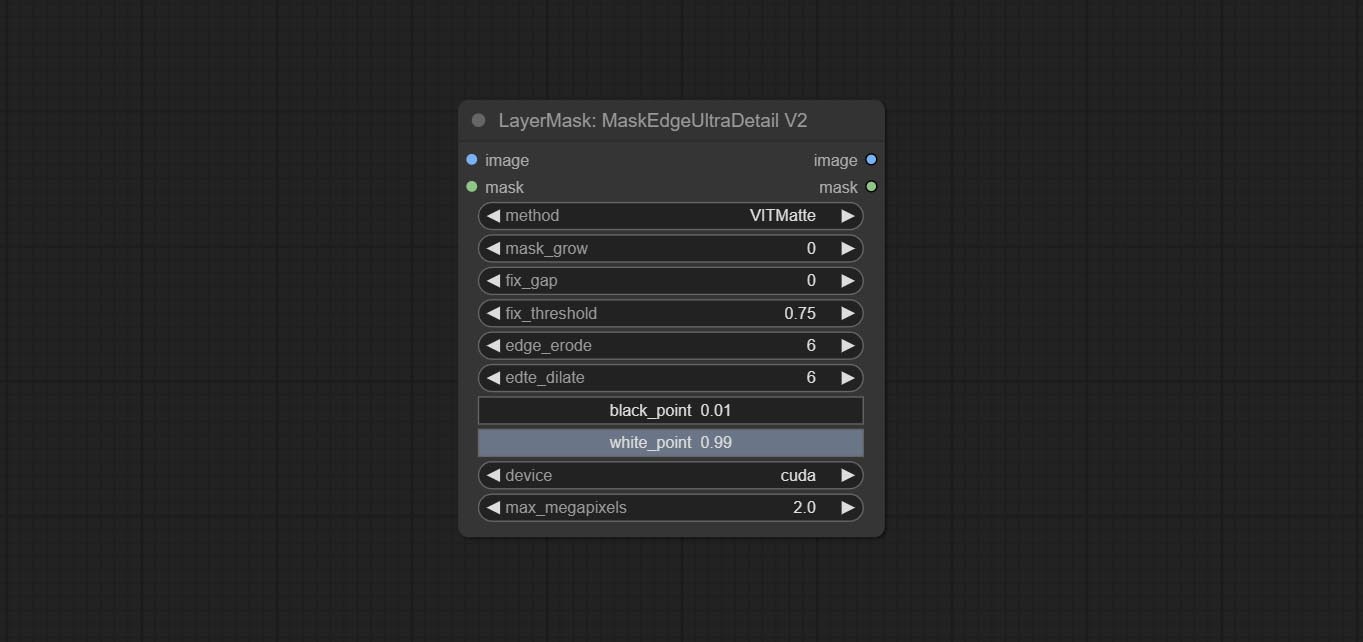
- method: Edge processing methods. provides VITMatte, VITMatte(local), PyMatting, GuidedFilter. If the model has been downloaded after the first use of VITMatte, you can use VITMatte (local) afterwards.
- edge_erode: Mask the erosion range inward from the edge. the larger the value, the larger the range of inward repair.
- edge_dilate: The edge of the mask expands outward. the larger the value, the wider the range of outward repair.
- device: Set whether the VitMatte to use cuda.
- max_megapixels: Set the maximum size for VitMate operations.
YoloV8Detect
Use the YoloV8 model to detect faces, hand box areas, or character segmentation. Supports the output of the selected number of channels. Download the model files from GoogleDrive or BaiduNetdisk to ComfyUI/models/yolo folder.
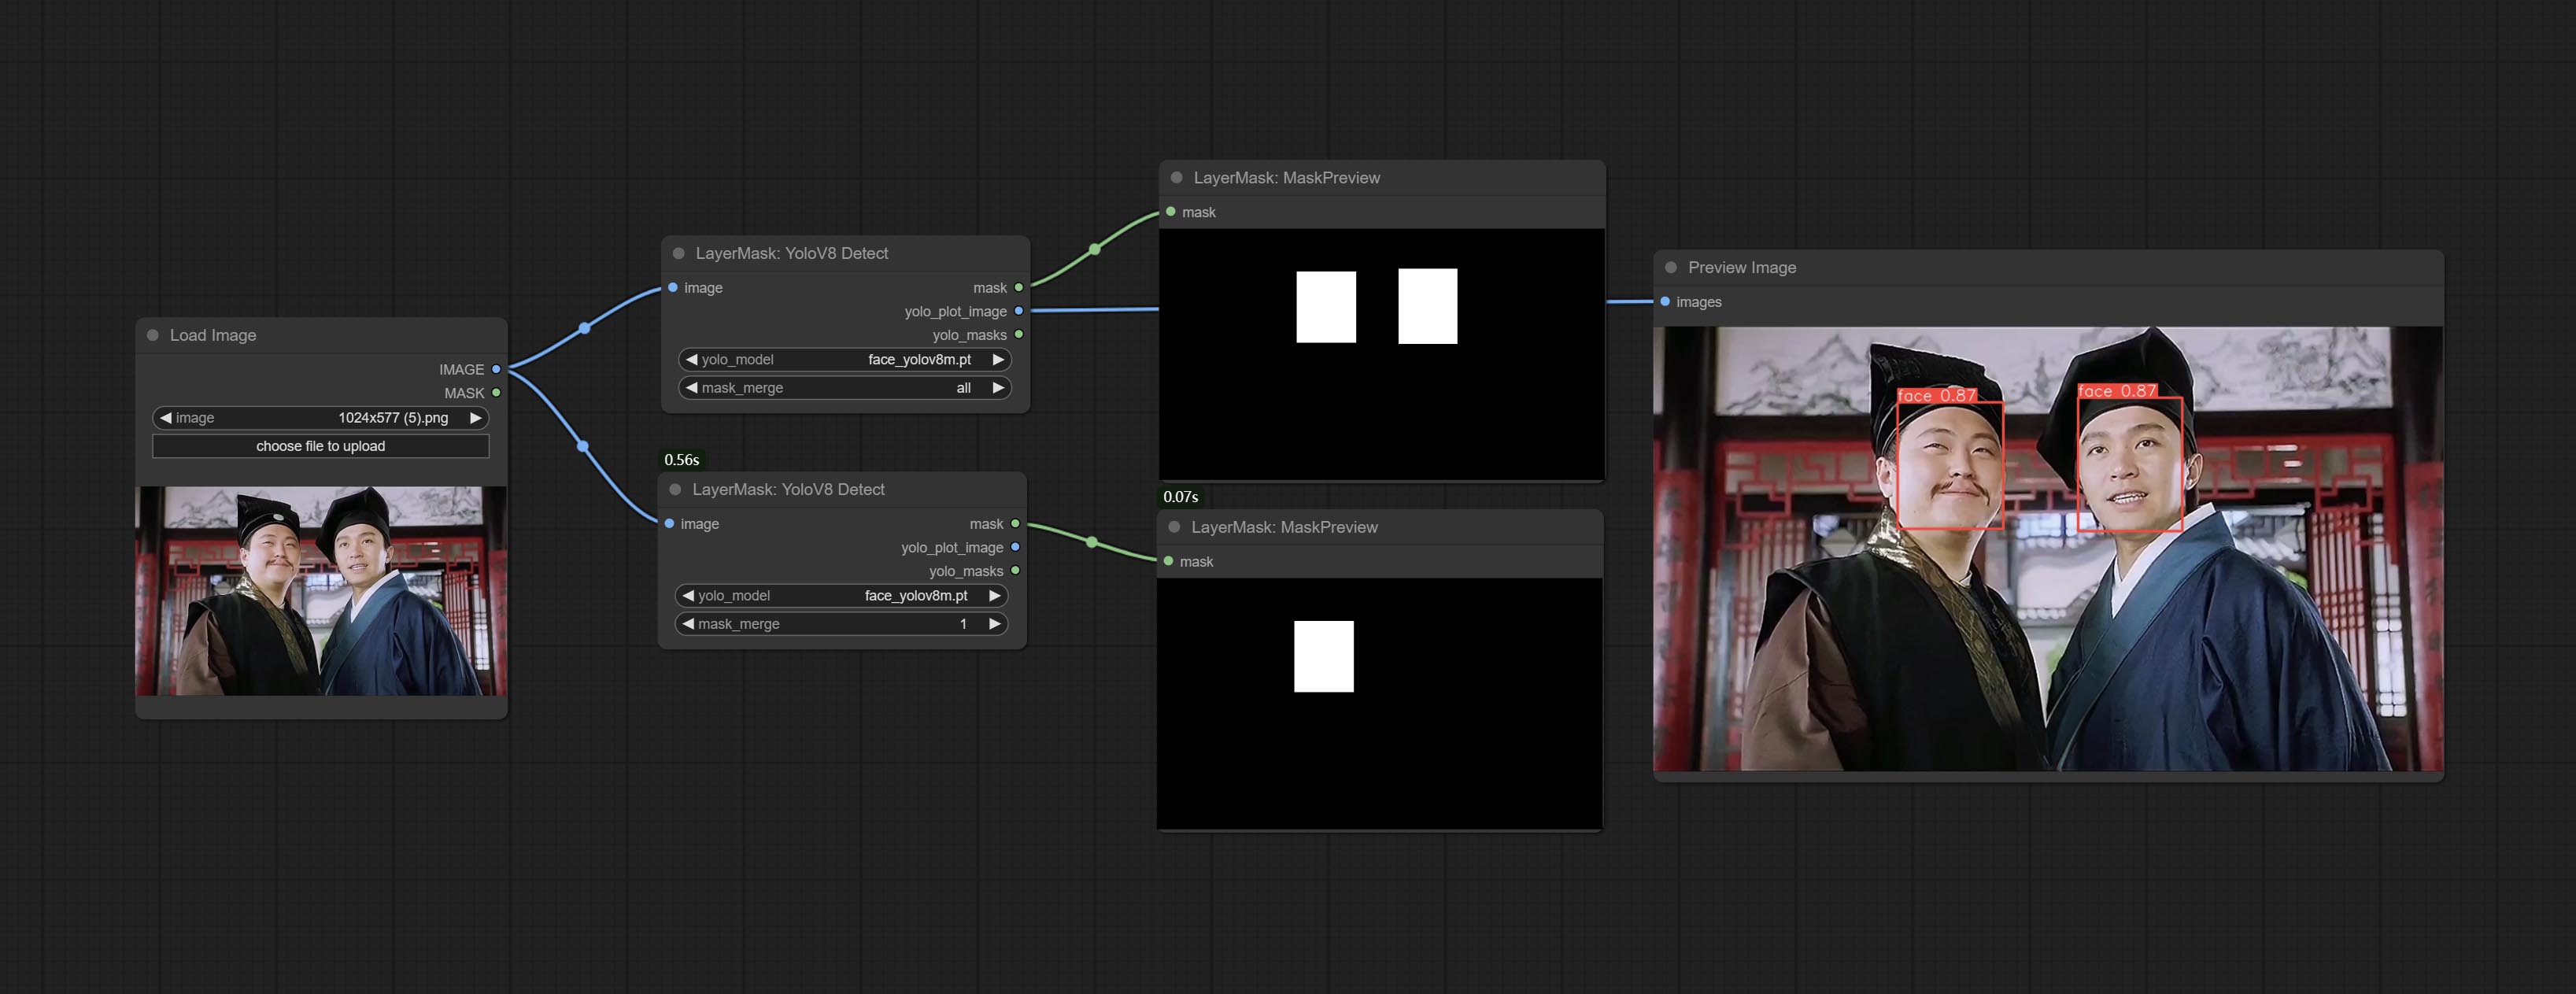
节点选项:
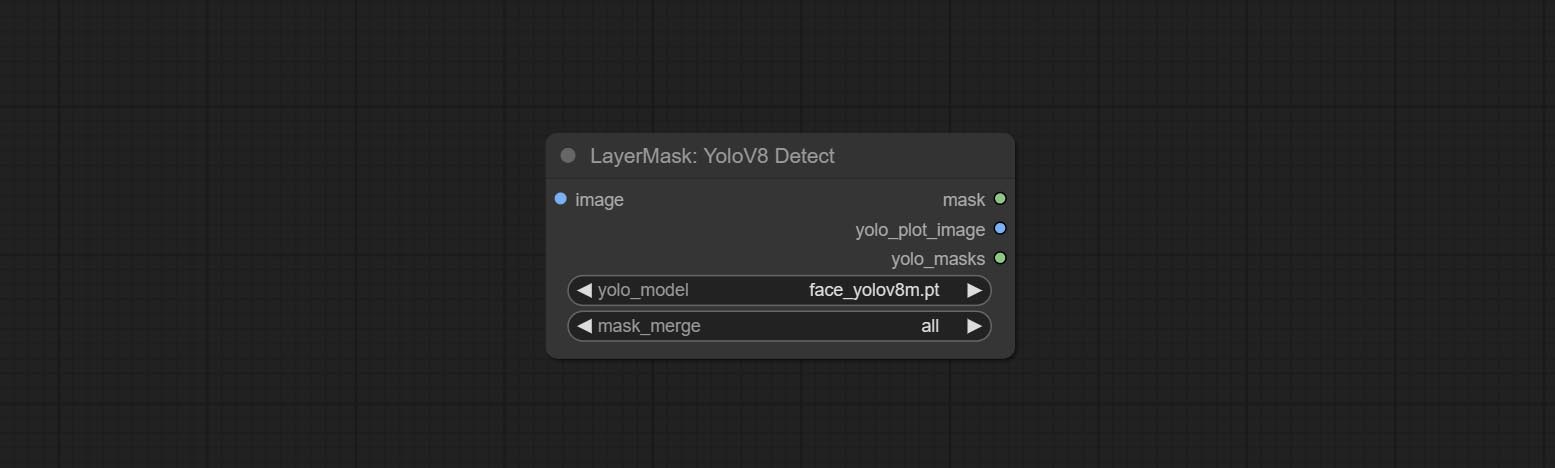
- yolo_model: Yolo model selection. the model with
seg name can output segmented masks, otherwise they can only output box masks. - mask_merge: Select the merged mask.
all is to merge all mask outputs. The selected number is how many masks to output, sorted by recognition confidence to merge the output.
输出:
- mask: The output mask.
- yolo_plot_image: Preview of yolo recognition results.
- yolo_masks: For all masks identified by yolo, each individual mask is output as a mask.
MediapipeFacialSegment
Use the Mediapipe model to detect facial features, segment left and right eyebrows, eyes, lips, and tooth. *Download the model files from BaiduNetdisk to ComfyUI/models/mediapipe folder.
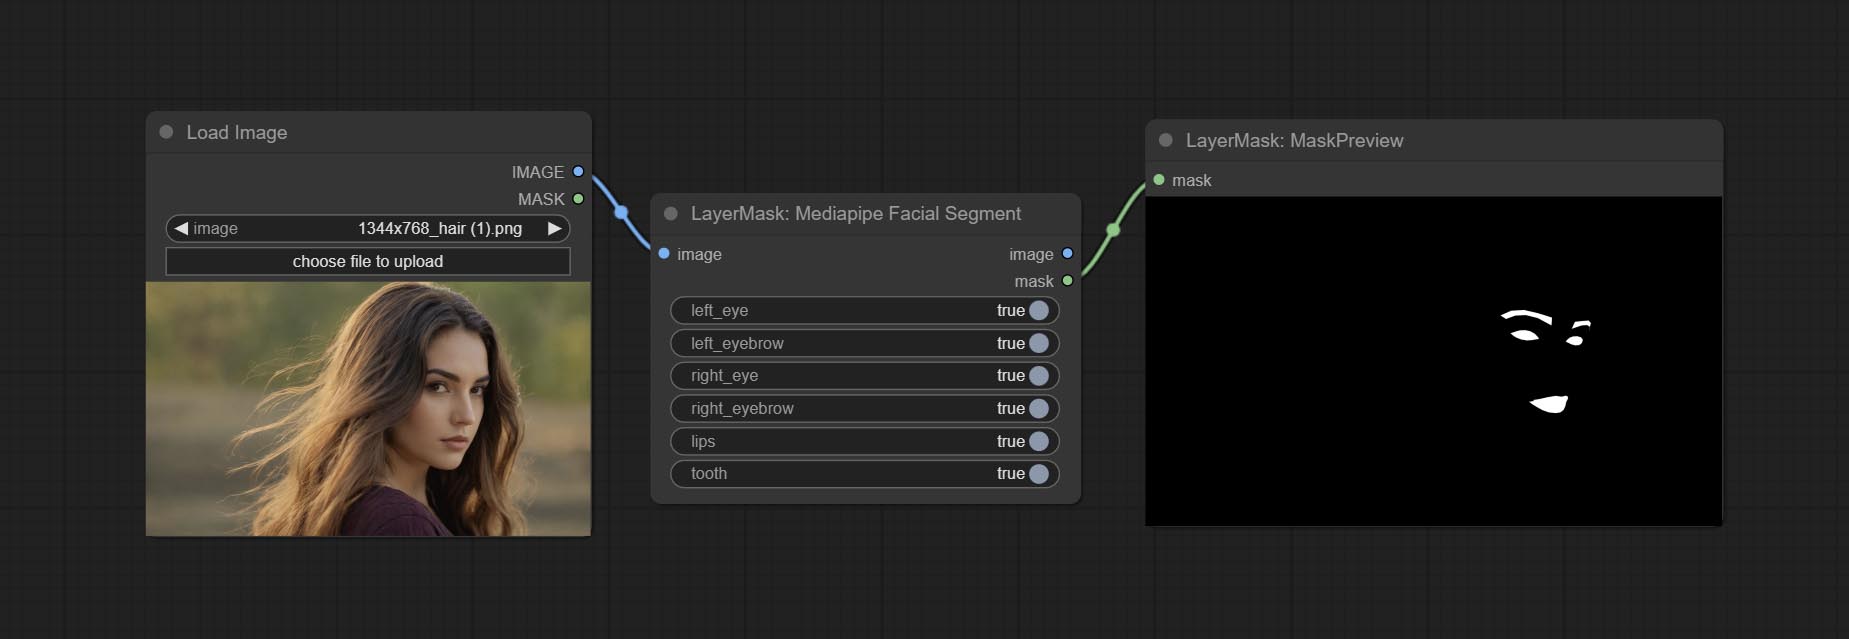
节点选项:
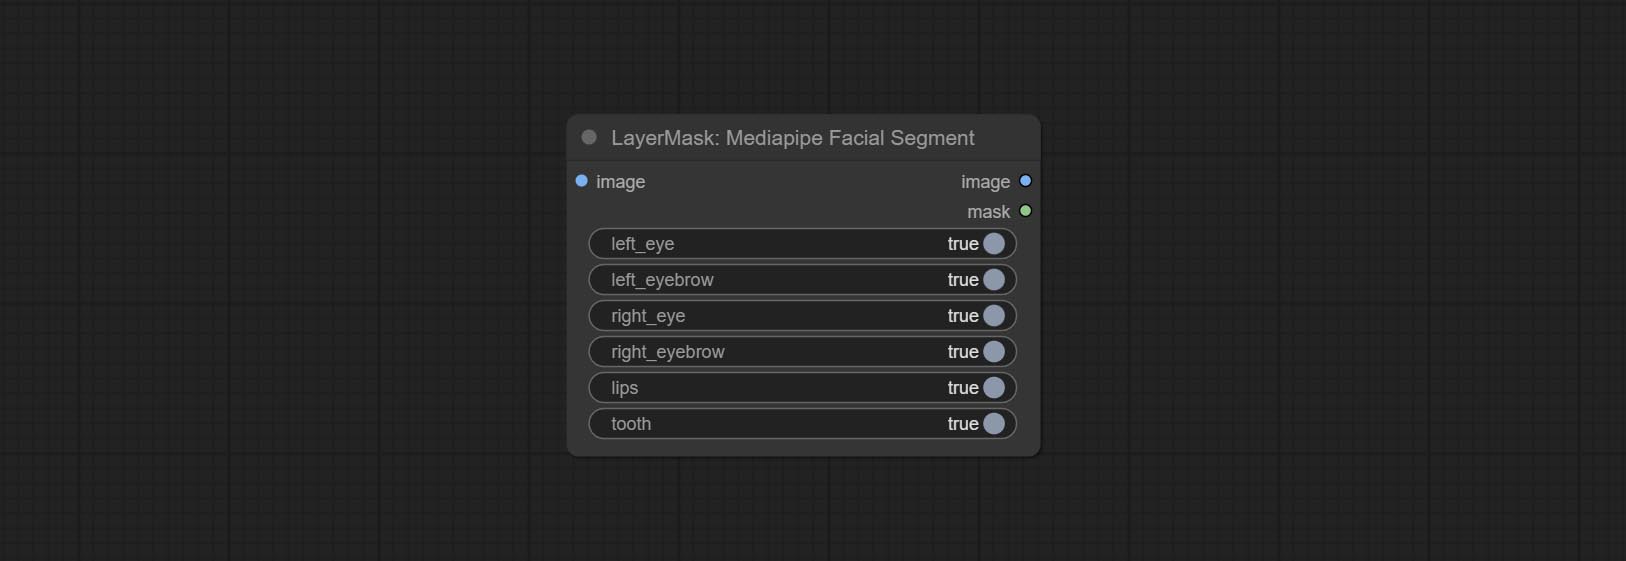
- left_eye: Recognition switch of left eye.
- left_eyebrow: Recognition switch of left eyebrow.
- right_eye: Recognition switch of right eye.
- right_eyebrow: Recognition switch of right eyebrow.
- lips: Recognition switch of lips.
- tooth: Recognition switch of tooth.
MaskByColor
Generate a mask based on the selected color. 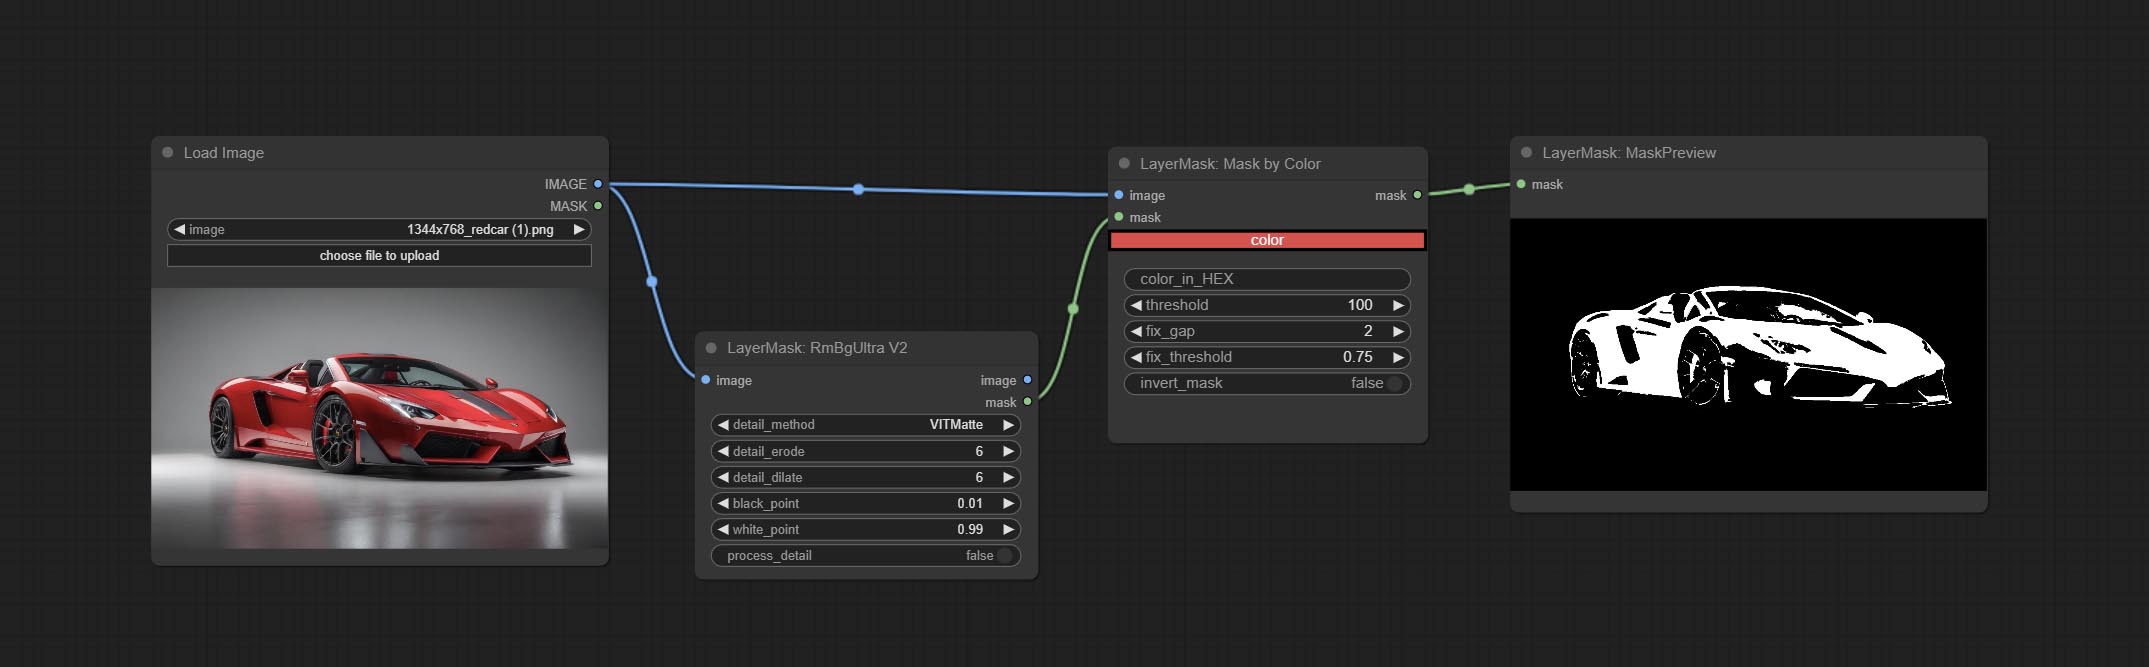
节点选项:
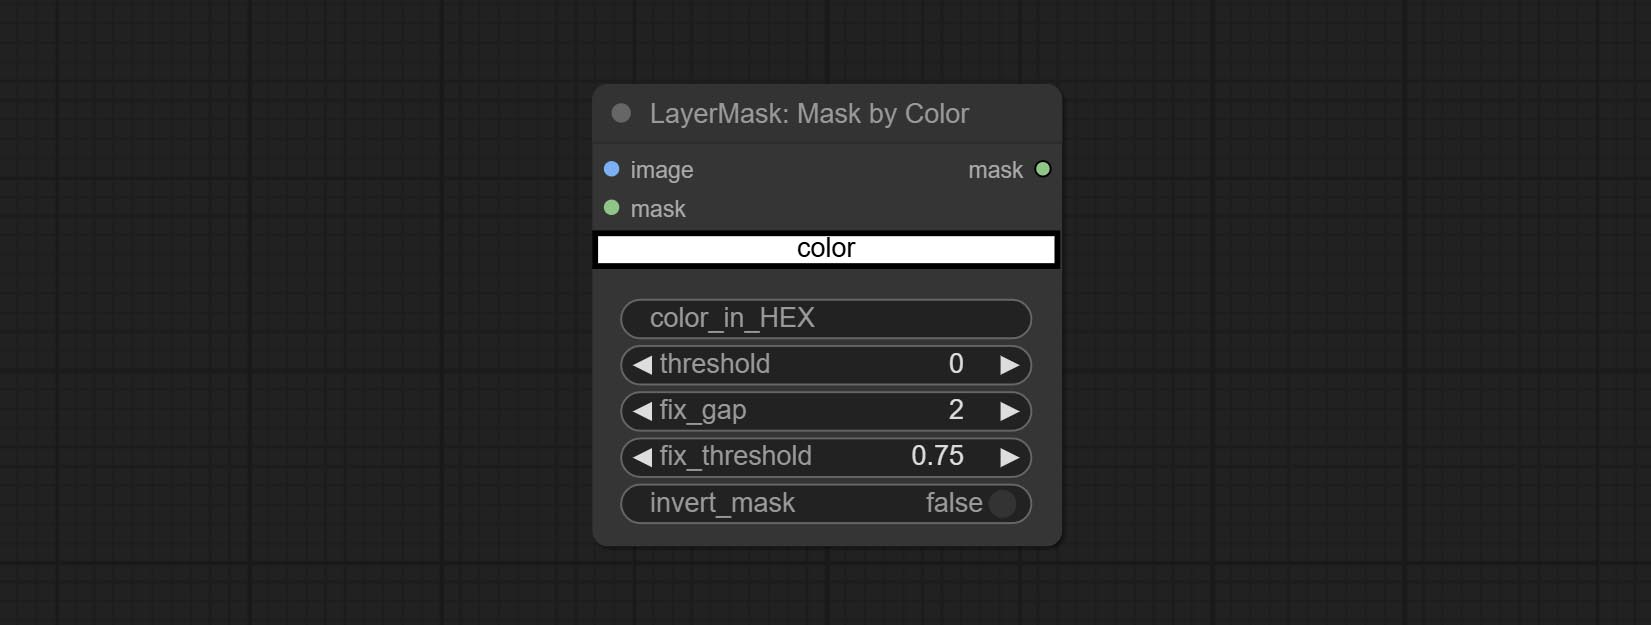
- image: Input image.
- mask: This input is optional, if there is a mask, only the colors inside the mask are included in the range.
- color: Color selector. Click on the color block to select a color, and you can use the straws on the color picker panel to pick up the screen color. Note: When using straws, maximize the browser window.
- color_in_HEX 4 : Enter color values. If this item has input, it will be used first, ignoring the color selected by the
color . - threshold: Mask range threshold, the larger the value, the larger the mask range.
- fix_gap: Repair the gaps in the mask. If there are obvious gaps in the mask, increase this value appropriately.
- fix_threshold: The threshold for repairing masks.
- invert_mask: Whether to reverse the mask.
成像膜
Convert the image to a mask. Supports converting any channel in LAB, RGBA, YUV, and HSV modes into masks, while providing color scale adjustment. Support mask optional input to obtain masks that only include valid parts. 
节点选项:
- image: Input image.
- mask: This input is optional, if there is a mask, only the colors inside the mask are included in the range.
- channel: Channel selection. You can choose any channel of LAB, RGBA, YUV, or HSV modes.
- black_point * : Black dot value for the mask. The value range is 0-255, with a default value of 0.
- white_point * : White dot value for the mask. The value range is 0-255, with a default value of 255.
- gray_point: Gray dot values for the mask. The value range is 0.01-9.99, with a default of 1.
- invert_output_mask: Whether to reverse the mask.
* If the black_point or output_black_point value is greater than white_point or output_white_point, the two values are swapped, with the larger value used as white_point and the smaller value used as black_point.
Shadow & Highlight Mask
Generate masks for the dark and bright parts of the image. 
Node options:
- image: The input image.
- mask: Optional input. if there is input, only the colors within the mask range will be adjusted.
- shadow_level_offset: The offset of values in the dark area, where larger values bring more areas closer to the bright into the dark area.
- shadow_range: The transitional range of the dark area.
- highlight_level_offset: The offset of values in the highlight area, where larger values bring more areas closer to the dark into the highlight area.
- highlight_range: The transitional range of the highlight area.
Shadow Highlight Mask V2
A replica of the Shadow & Highlight Mask node, with the "&" character removed from the node name to avoid ComfyUI workflow parsing errors.
PixelSpread
Pixel expansion preprocessing on the masked edge of an image can effectively improve the edges of image composit. 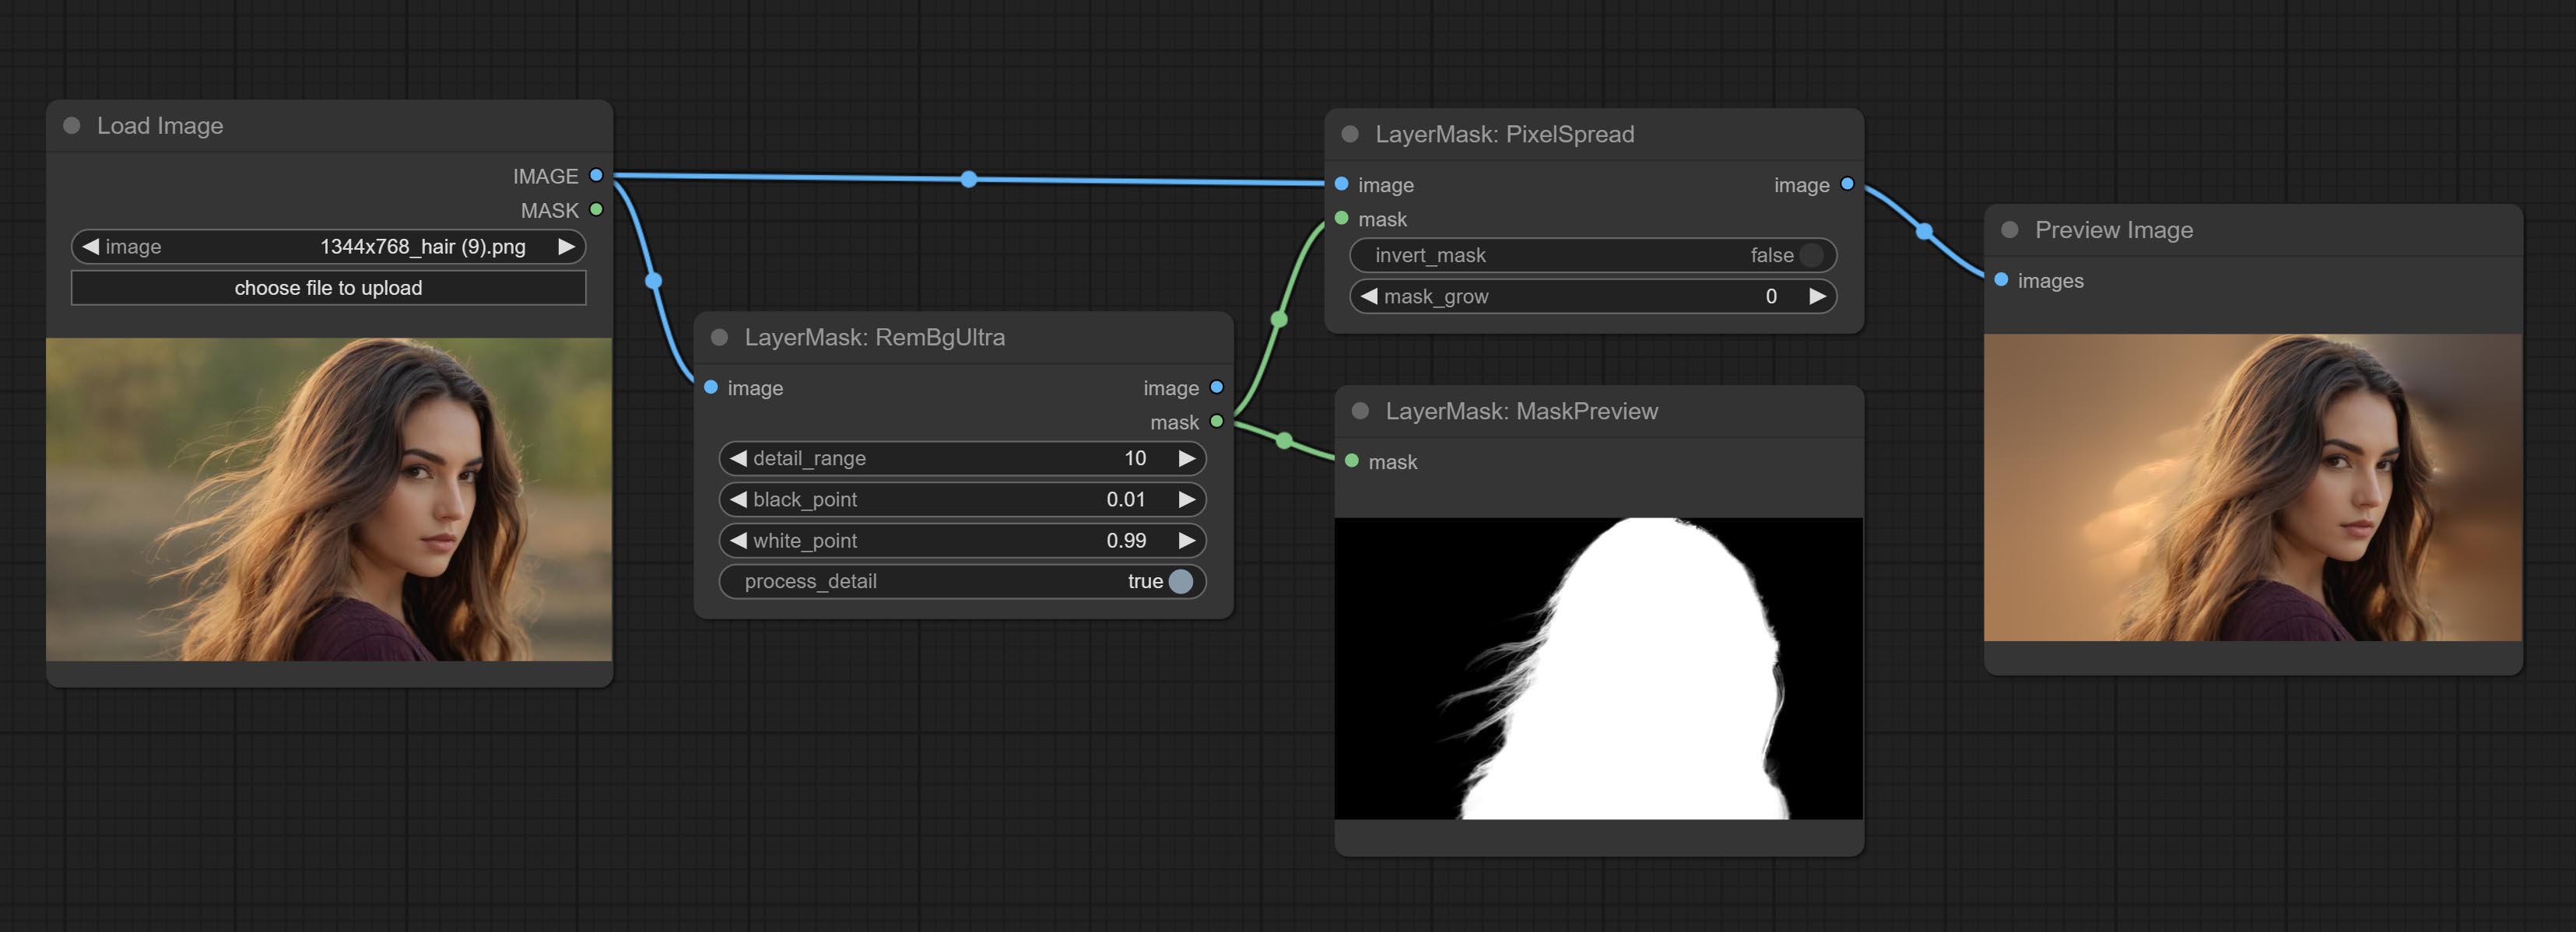
Node options:

- invert_mask: Whether to reverse the mask.
- mask_grow: Mask expansion amplitude.
MaskByDifferent
Calculate the differences between two images and output them as mask. 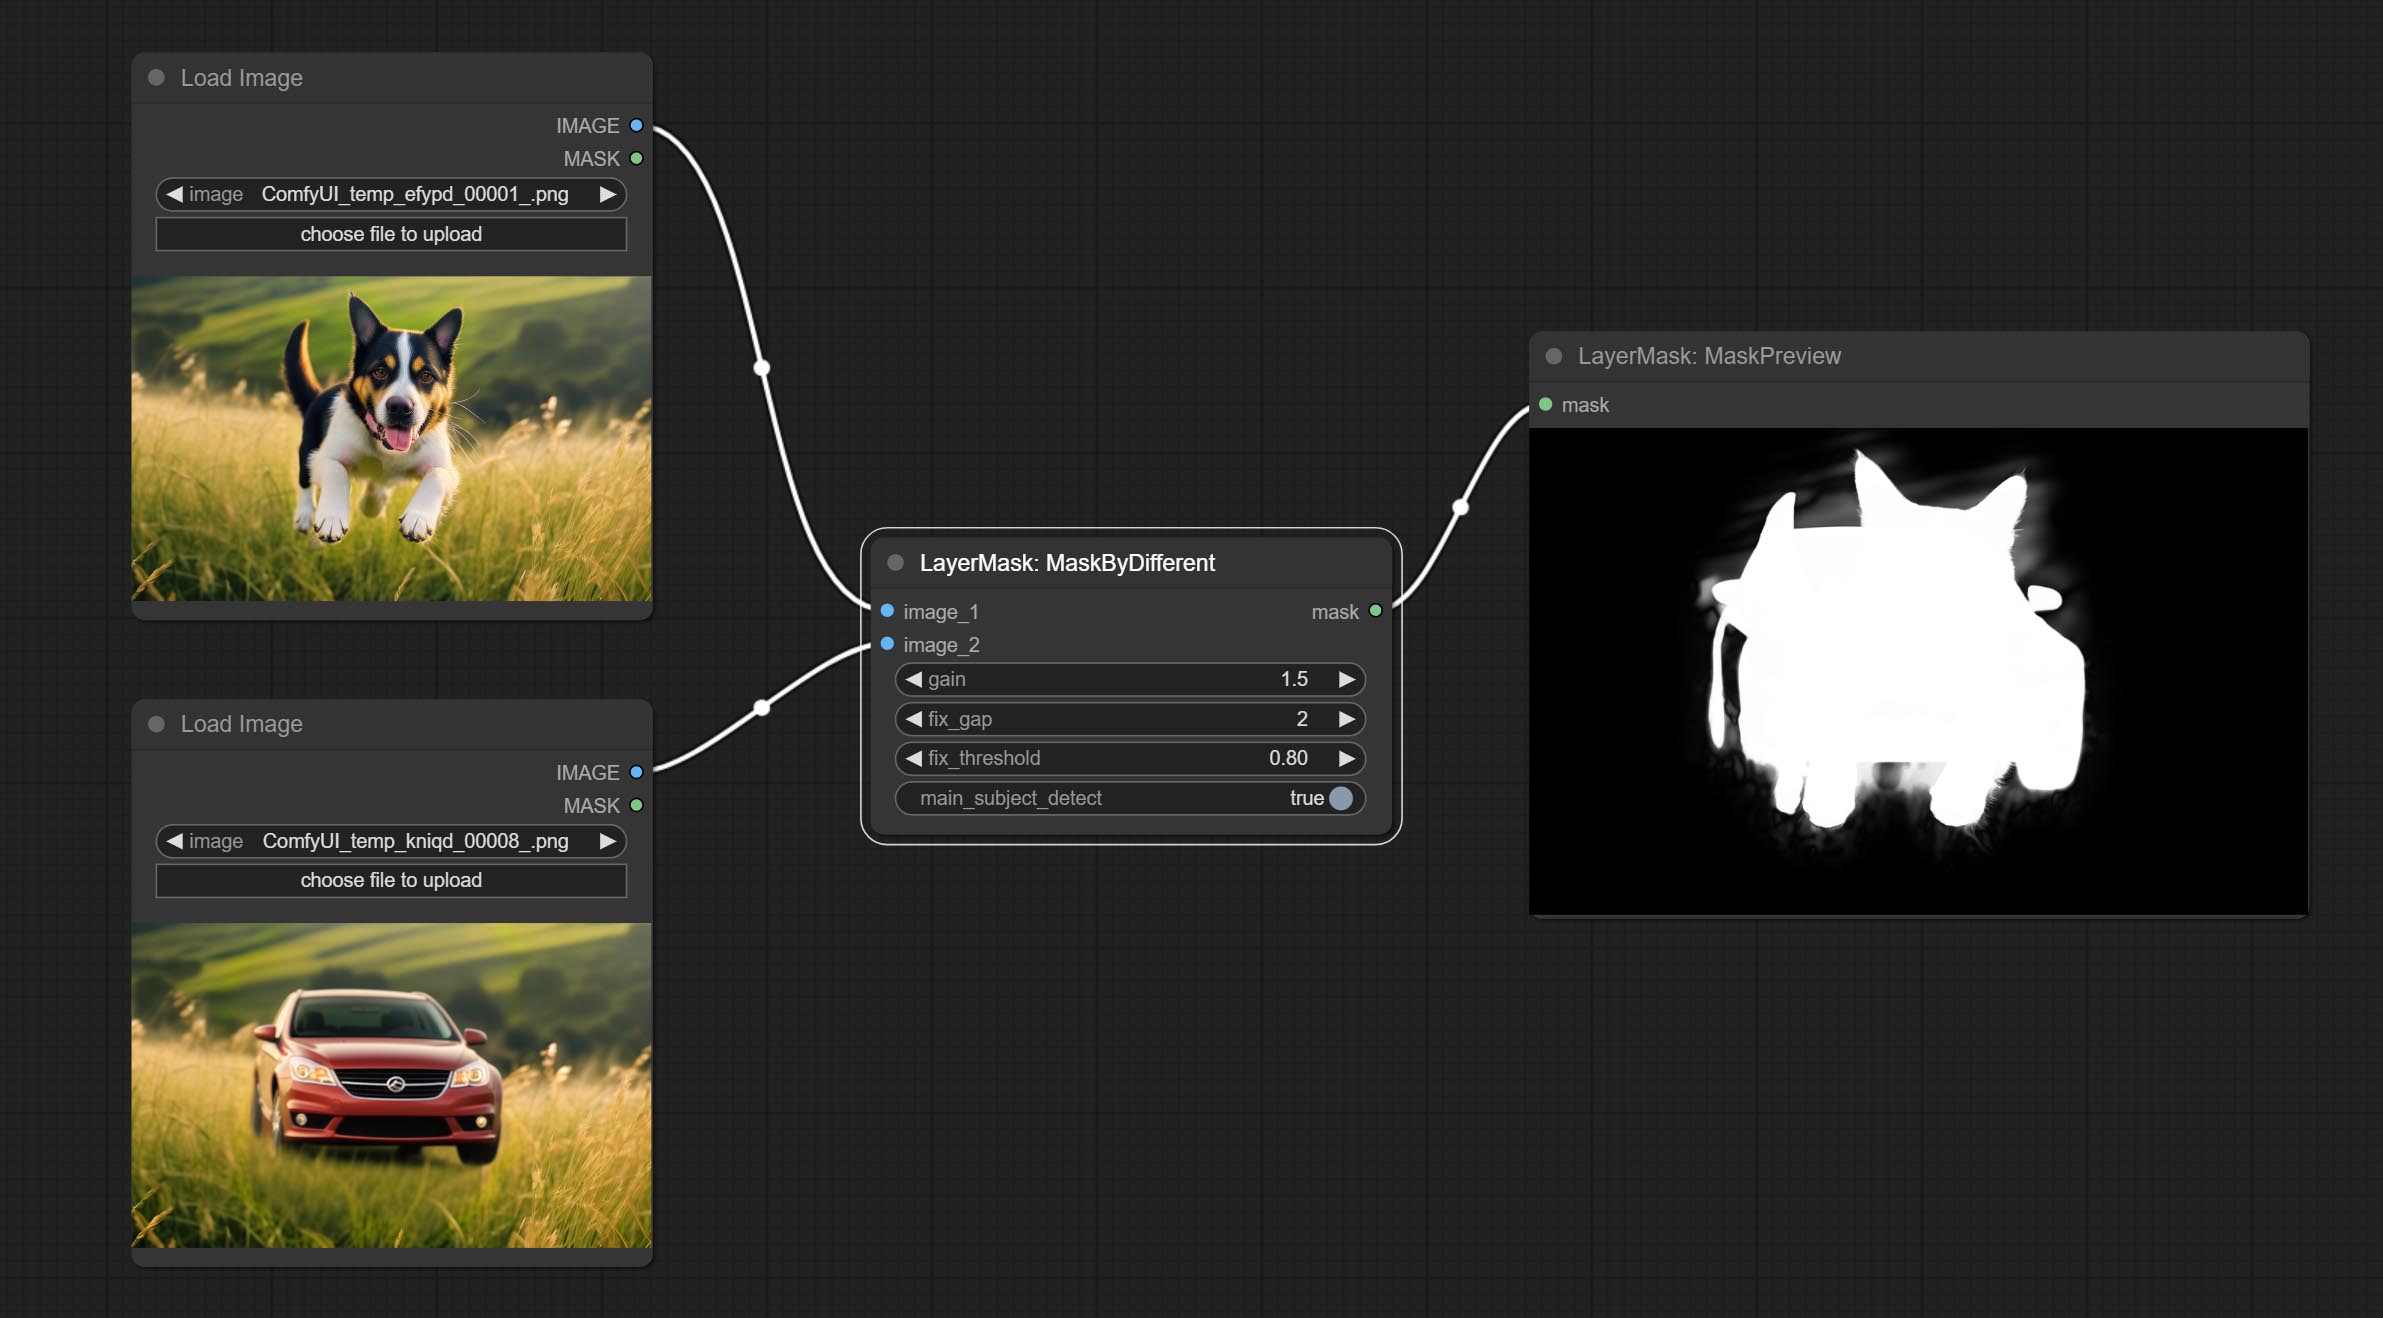
Node options:
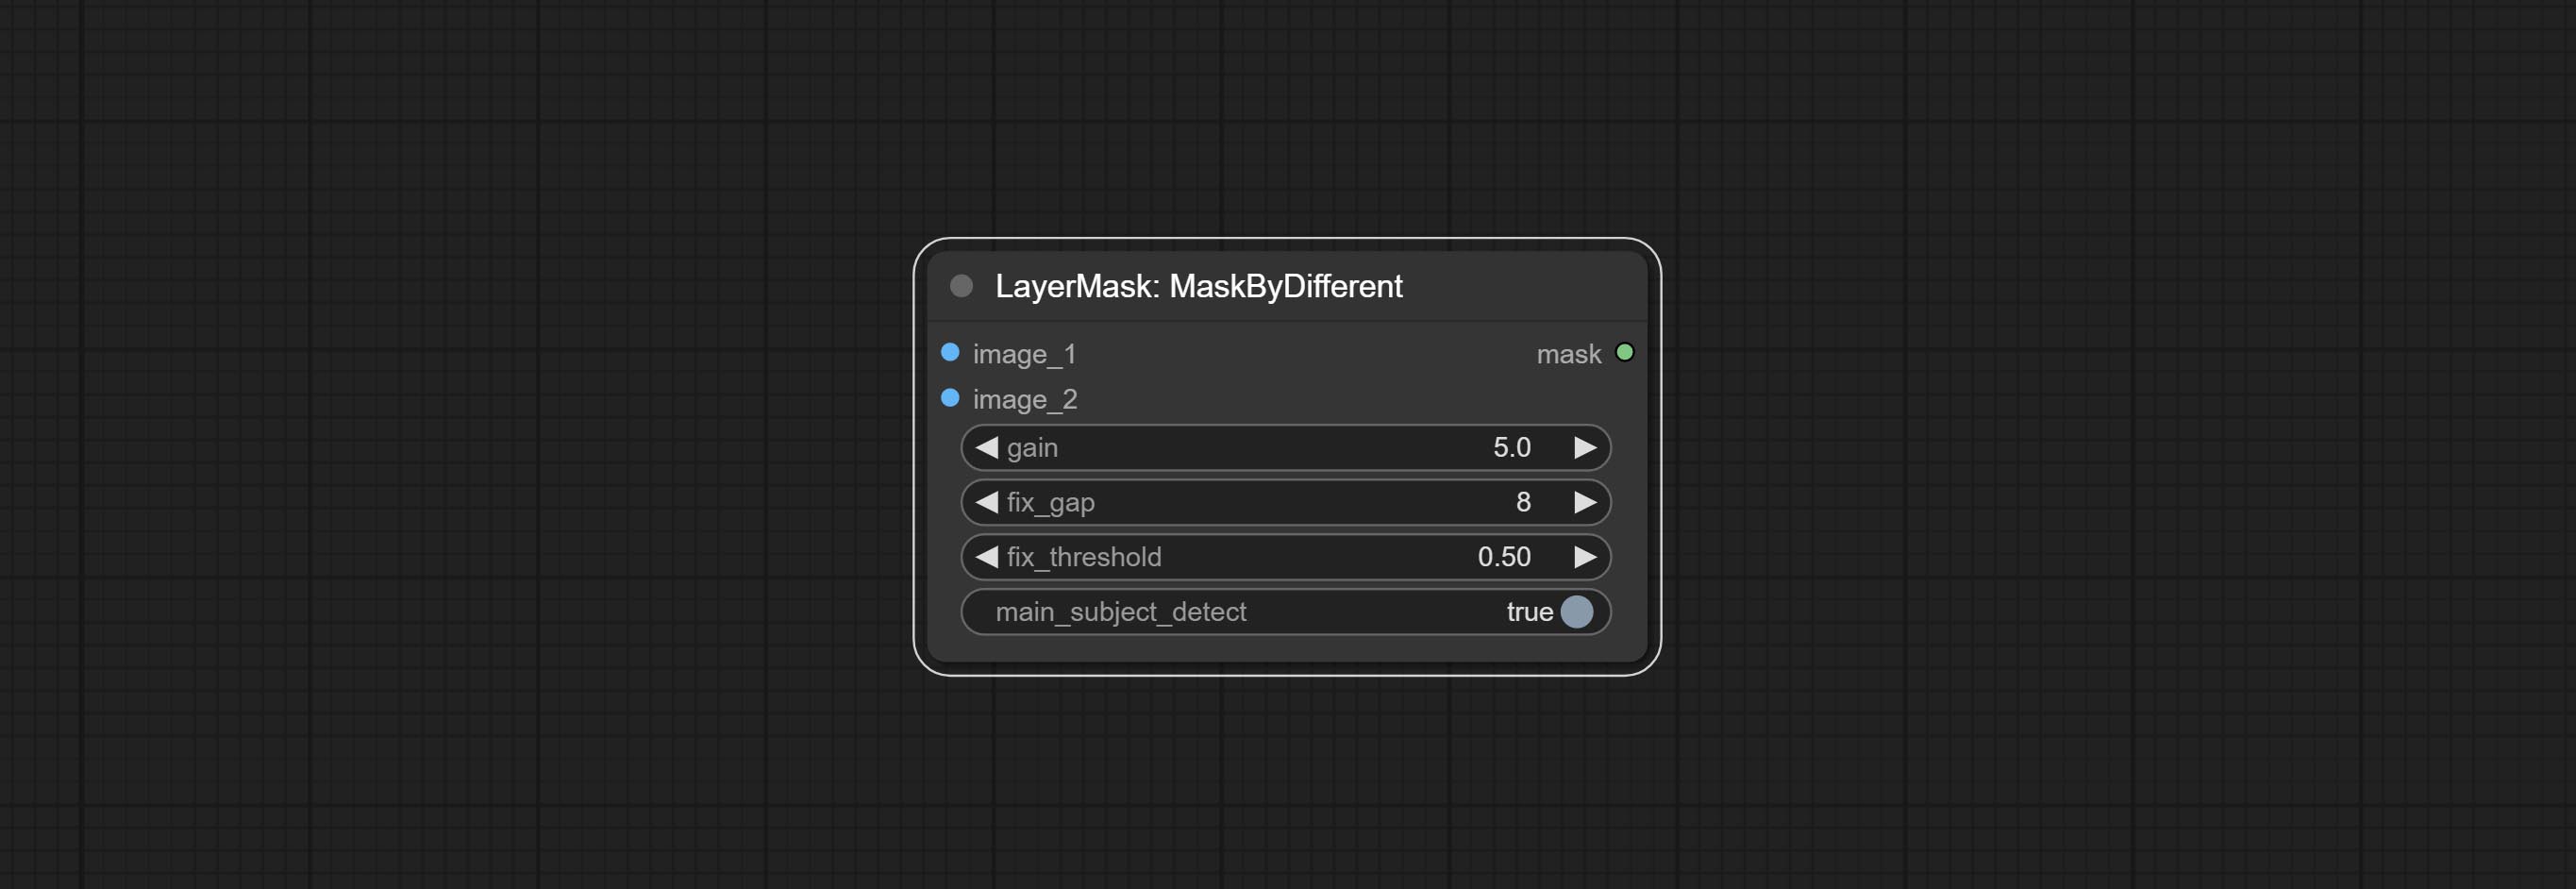
- 增益:计算差的增益。较高的价值将导致更明显的微小差异。
- fix_gap:修复蒙版的内部间隙。更高的价值将修复较大的差距。
- fix_threshold:fix_gap的阈值。
- main_subject_detect:将其设置为true将启用主题检测,忽略主题之外的差异。
MaskGrow
Grow and shrink edges and blur the mask 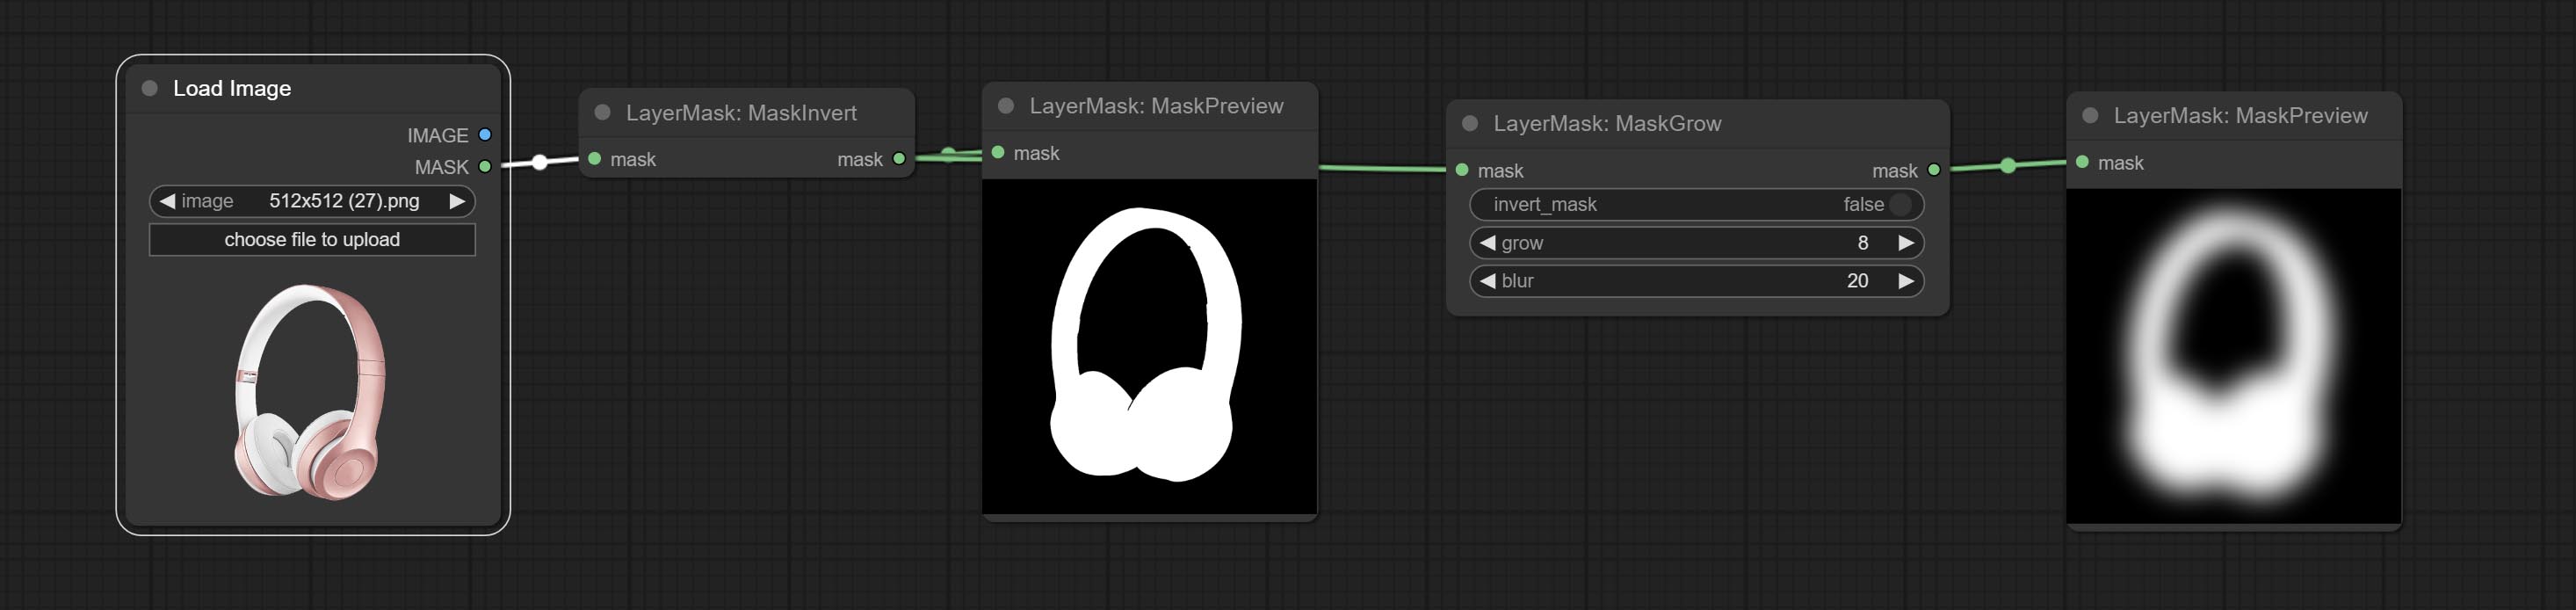
Node options: 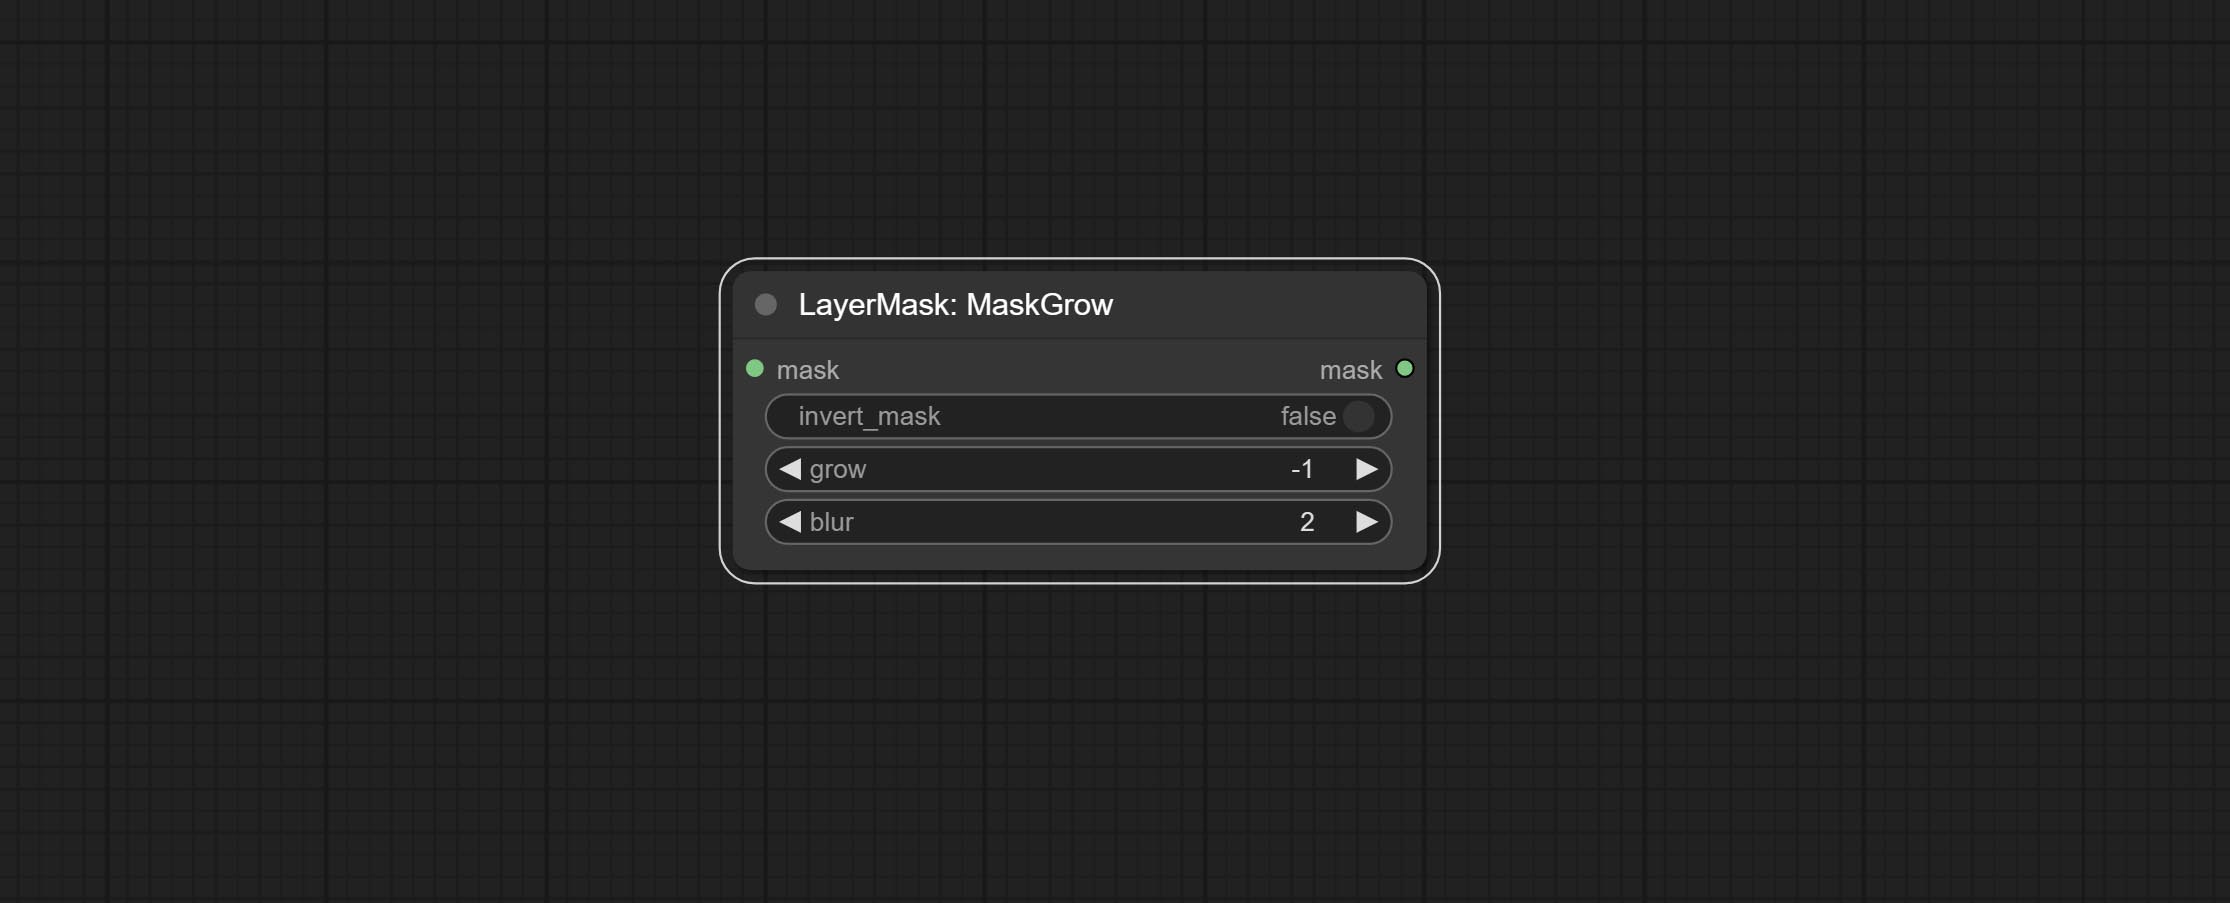
- invert_mask: Whether to reverse the mask.
- grow: Positive values expand outward, while negative values contract inward.
- blur: Blur the edge.
MaskEdgeShrink
Smooth transition and shrink the mask edges while preserving edge details. 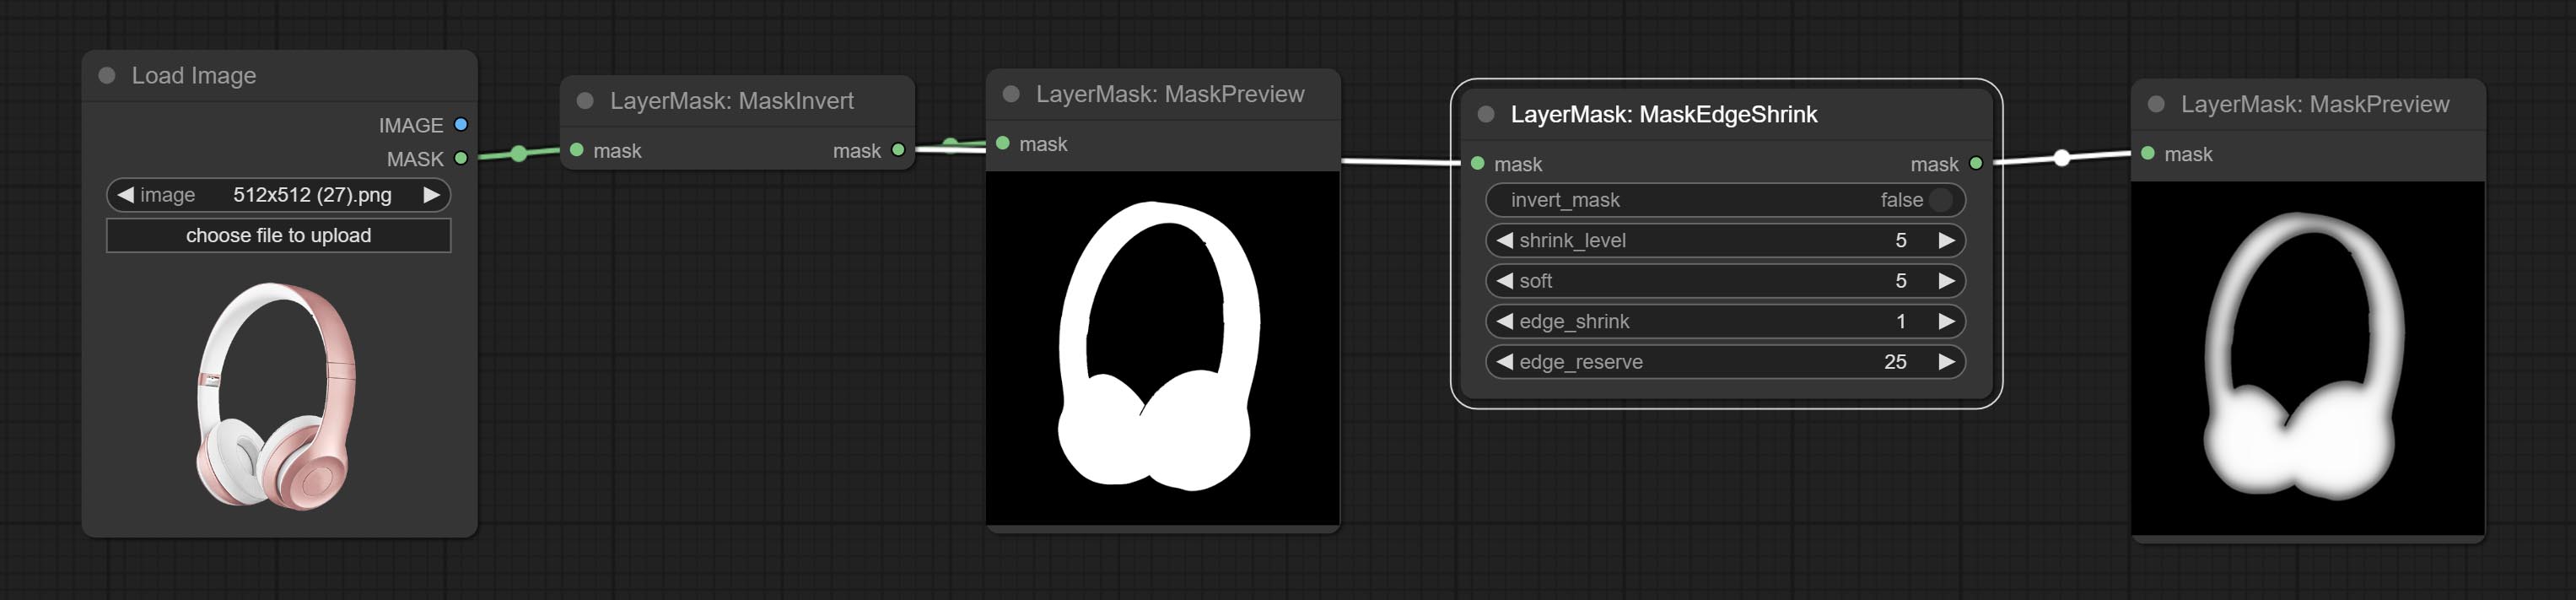
Node options: 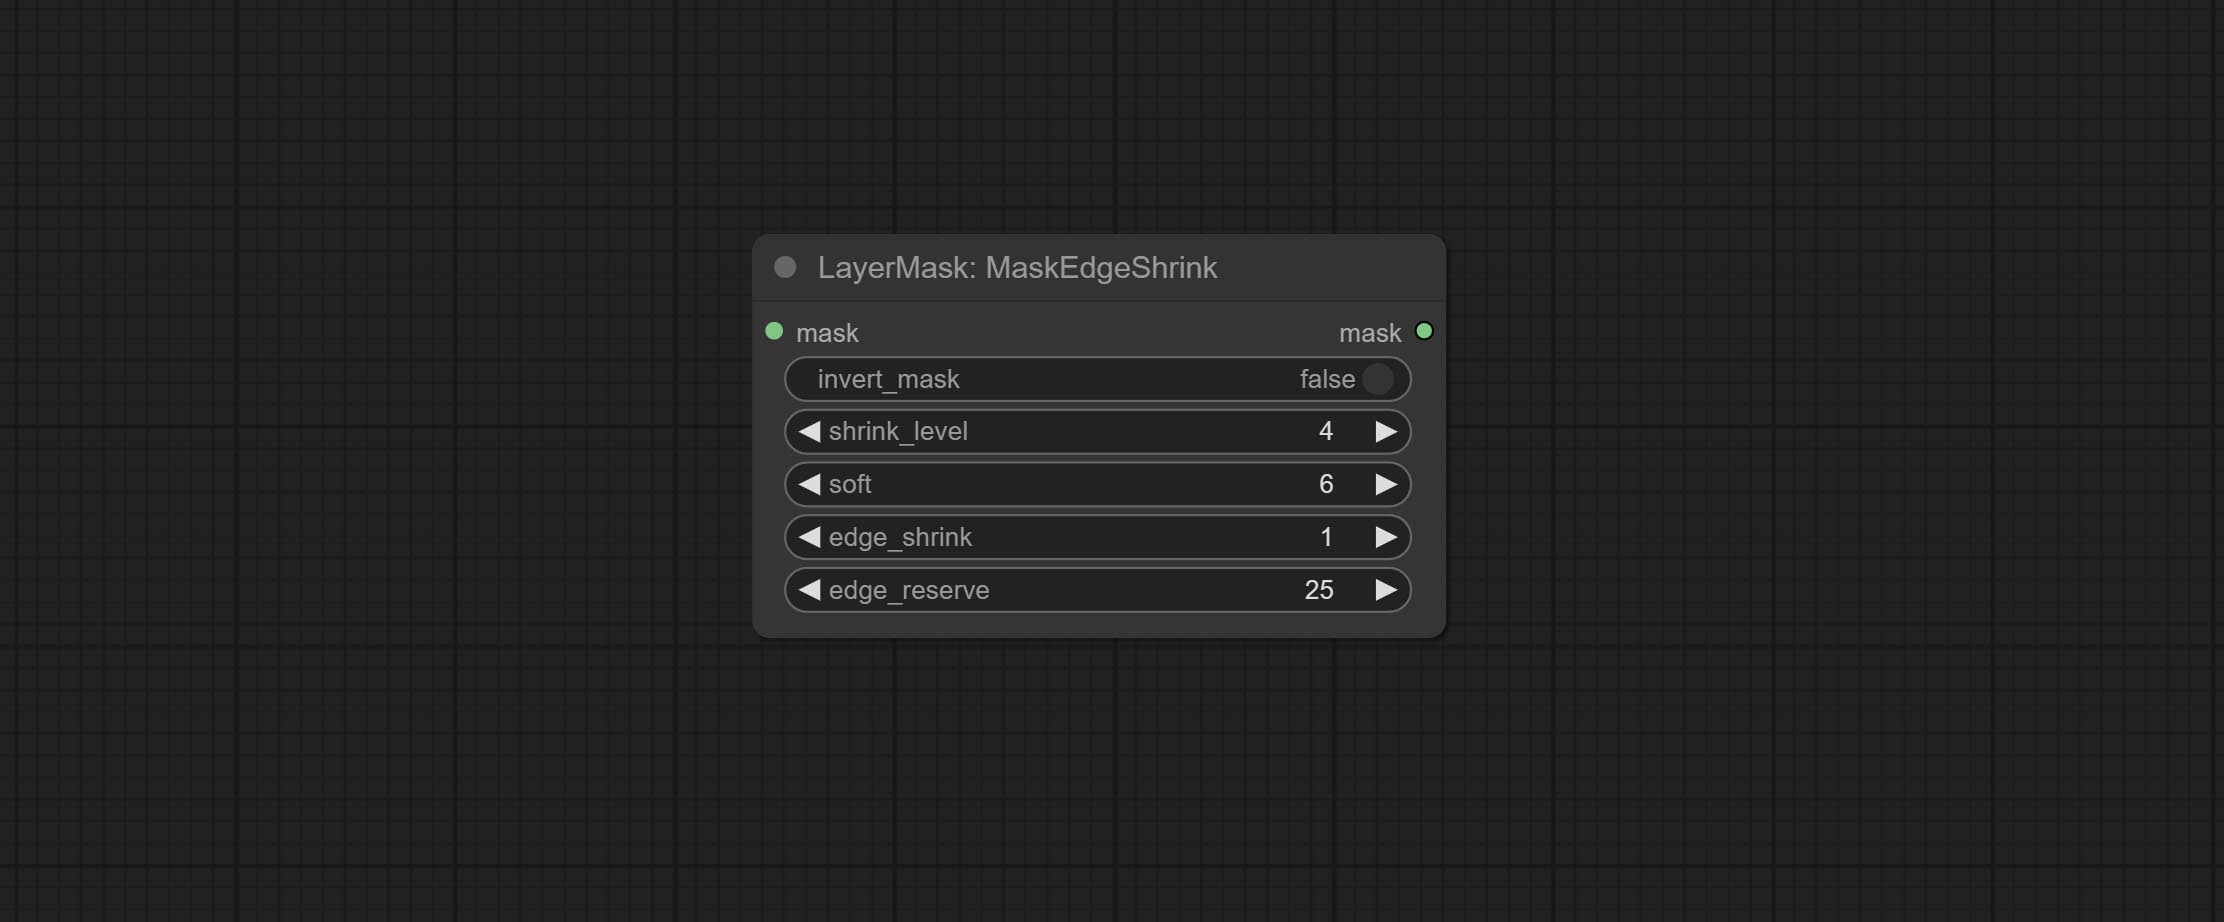
- invert_mask: Whether to reverse the mask.
- shrink_level: Shrink the smoothness level.
- soft: Smooth amplitude.
- edge_shrink: Edge shrinkage amplitude.
- edge_reserve: Preserve the amplitude of edge details, 100 represents complete preservation, and 0 represents no preservation at all.
Comparison of MaskGrow and MaskEdgeShrink 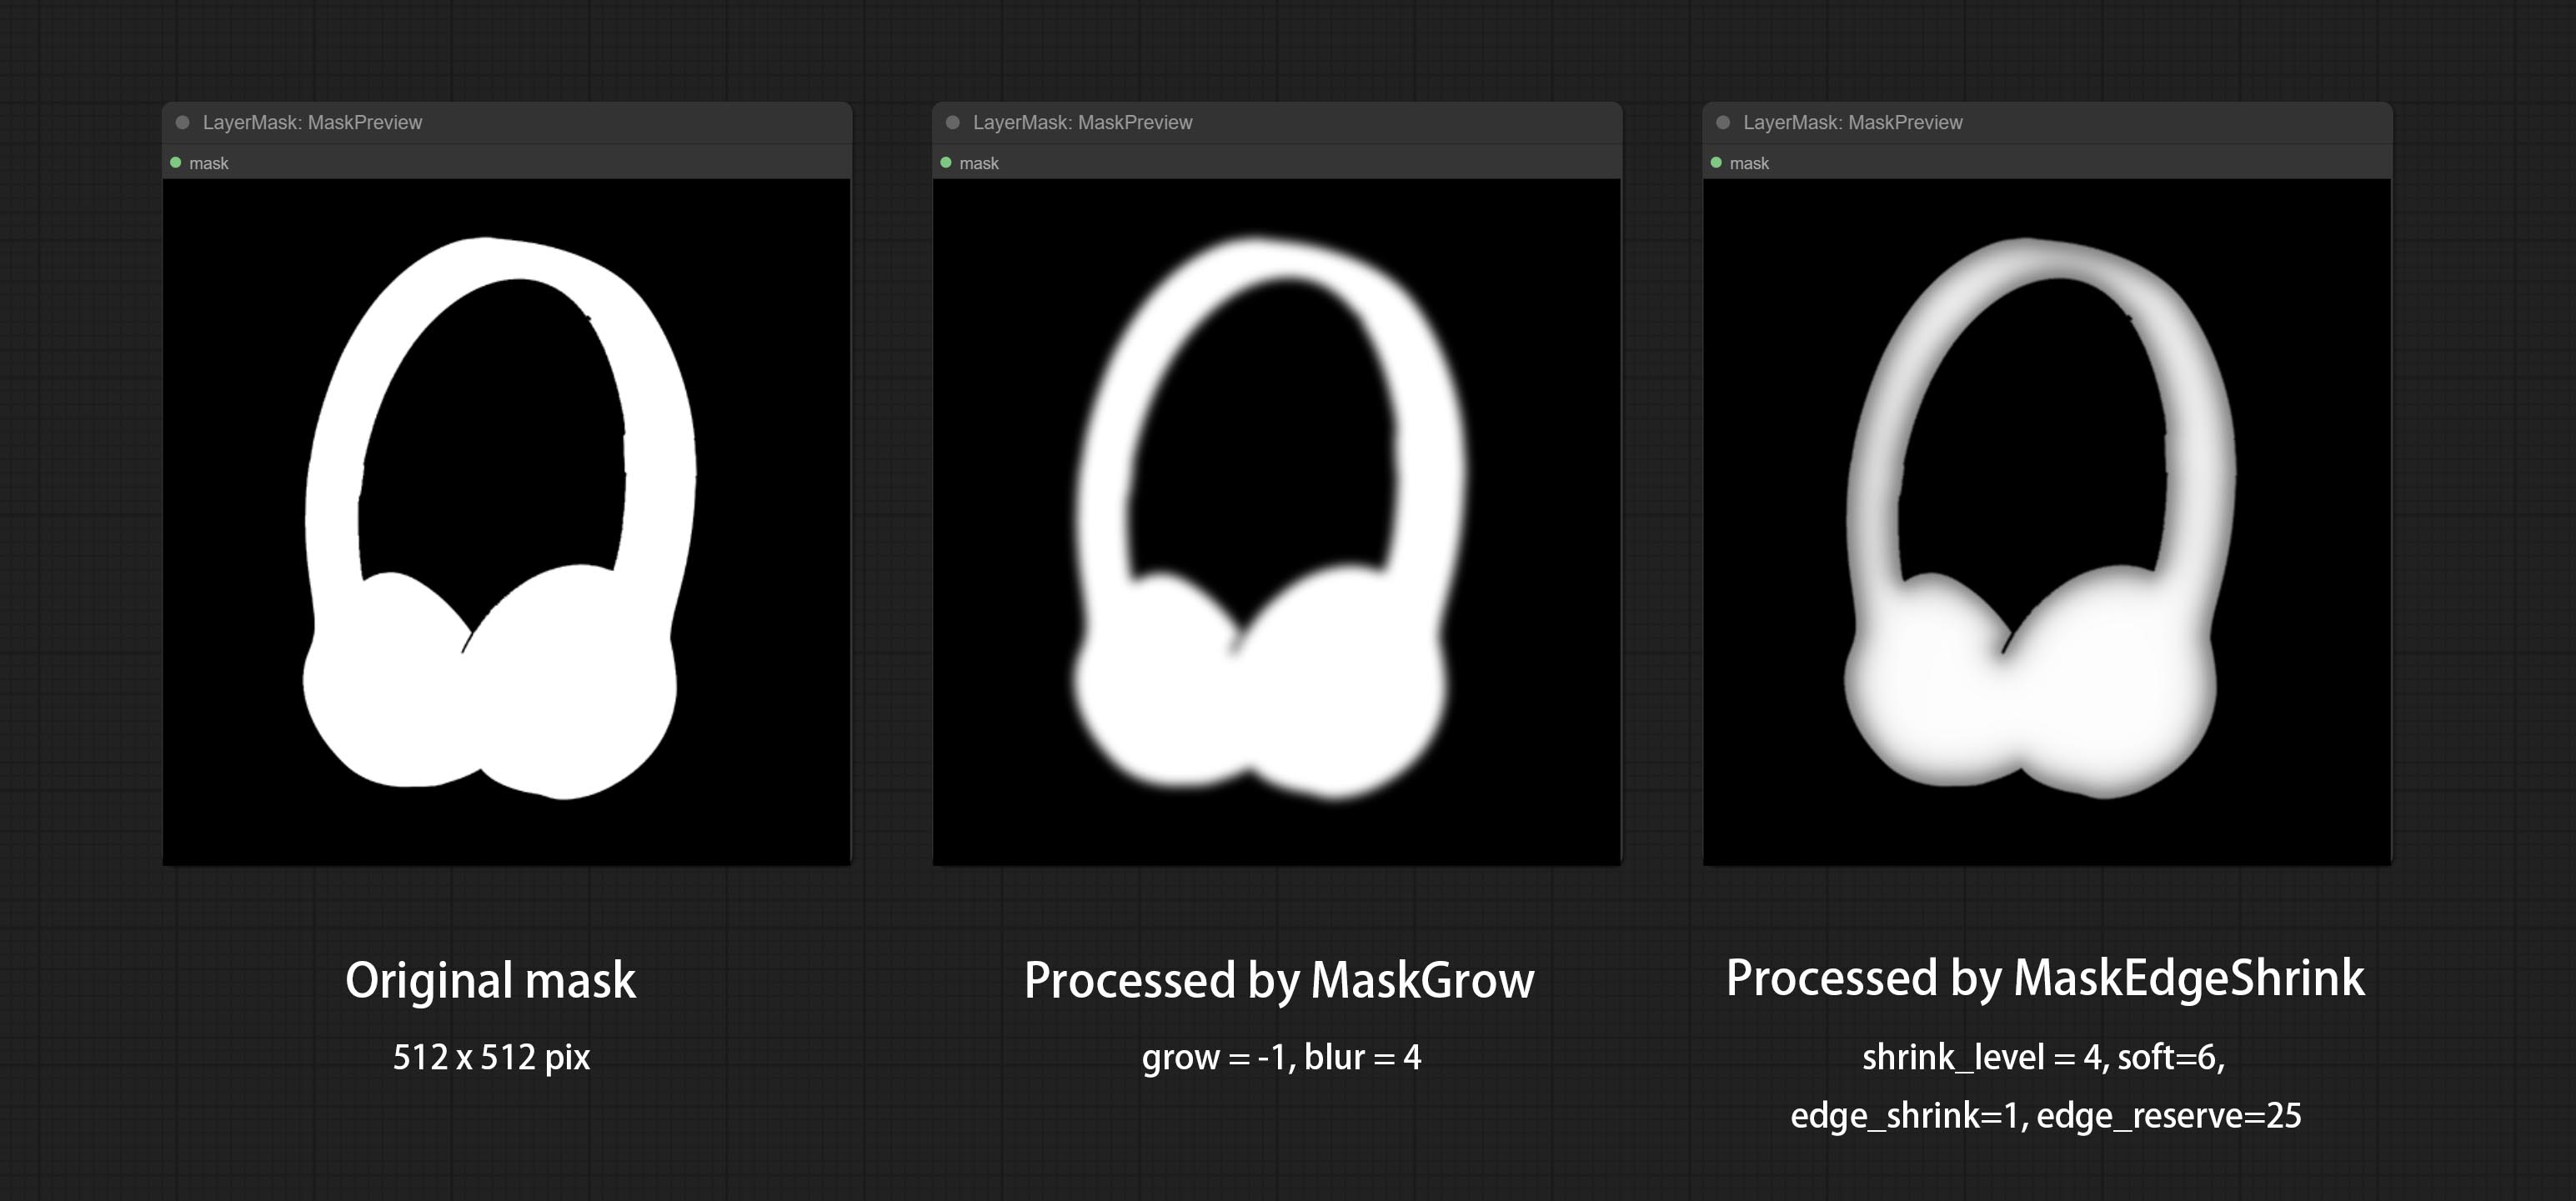
MaskMotionBlur
Create motion blur on the mask. 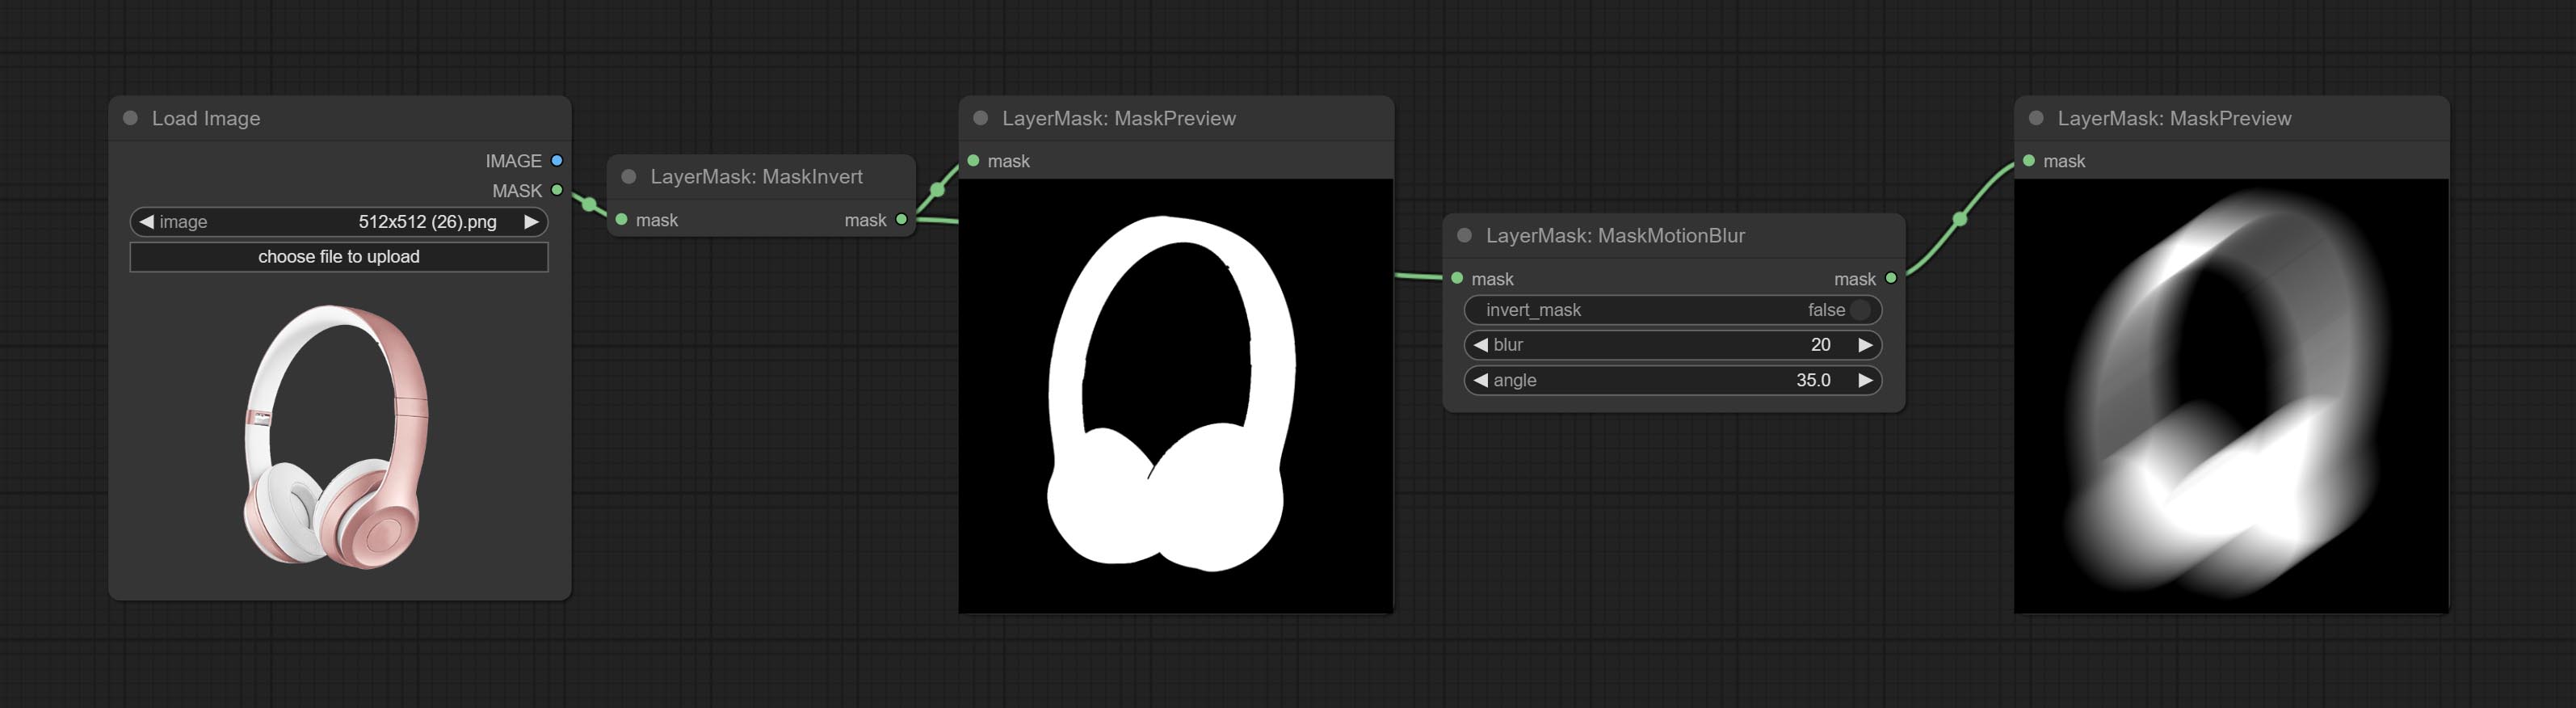
Node options:
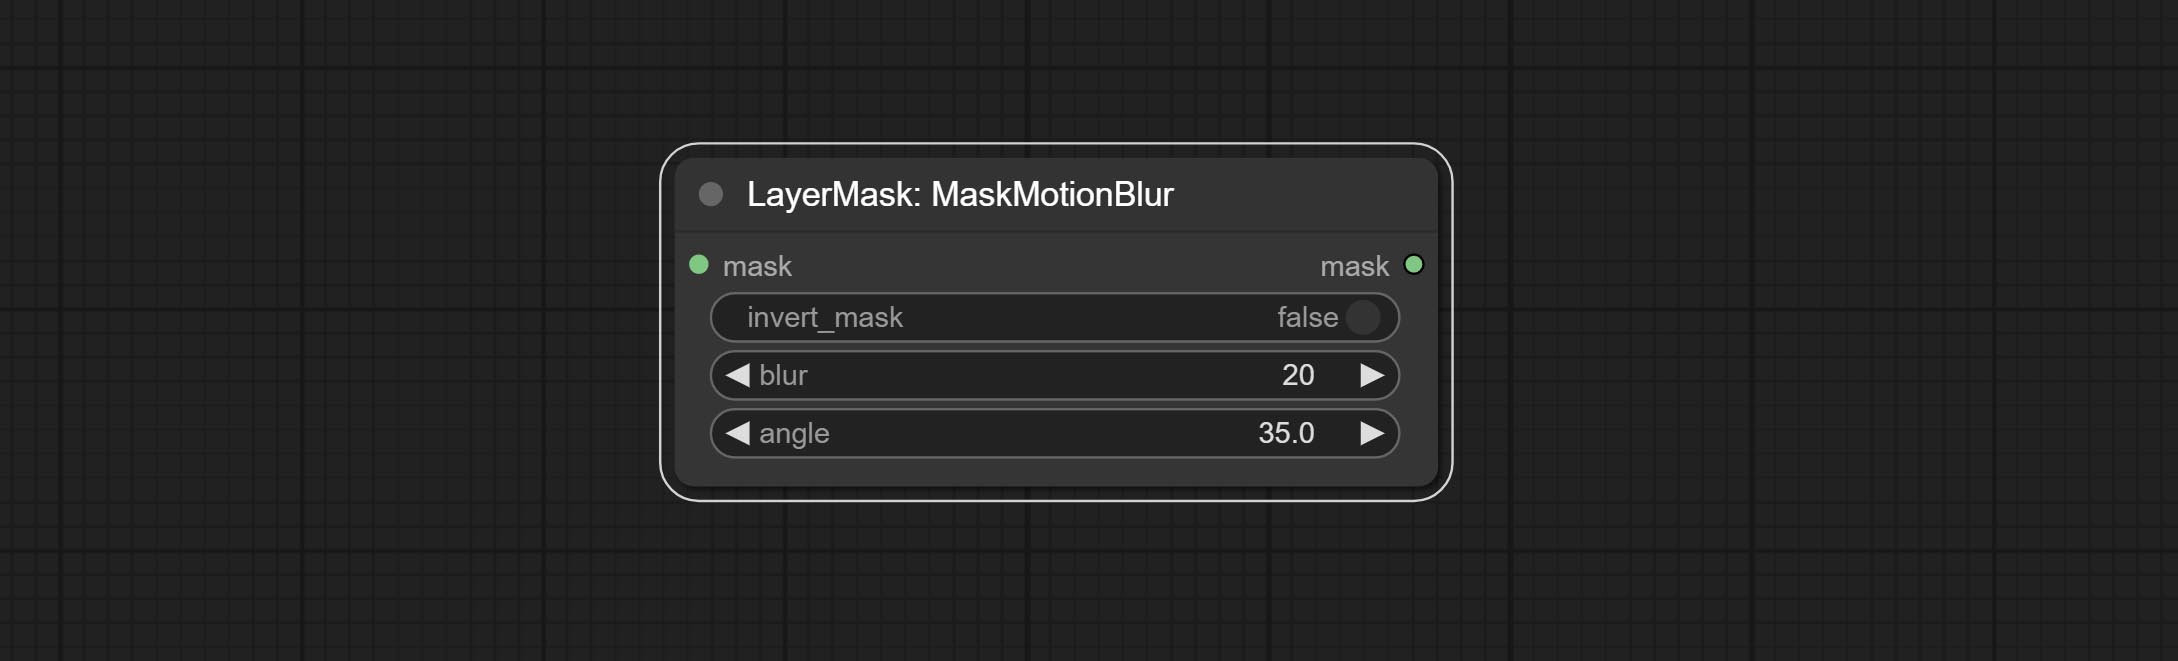
- invert_mask: Whether to reverse the mask.
- blur: The size of blur.
- angle: The angle of blur.
MaskGradient
Create a gradient for the mask from one side. please note the difference between this node and the CreateGradientMask node. 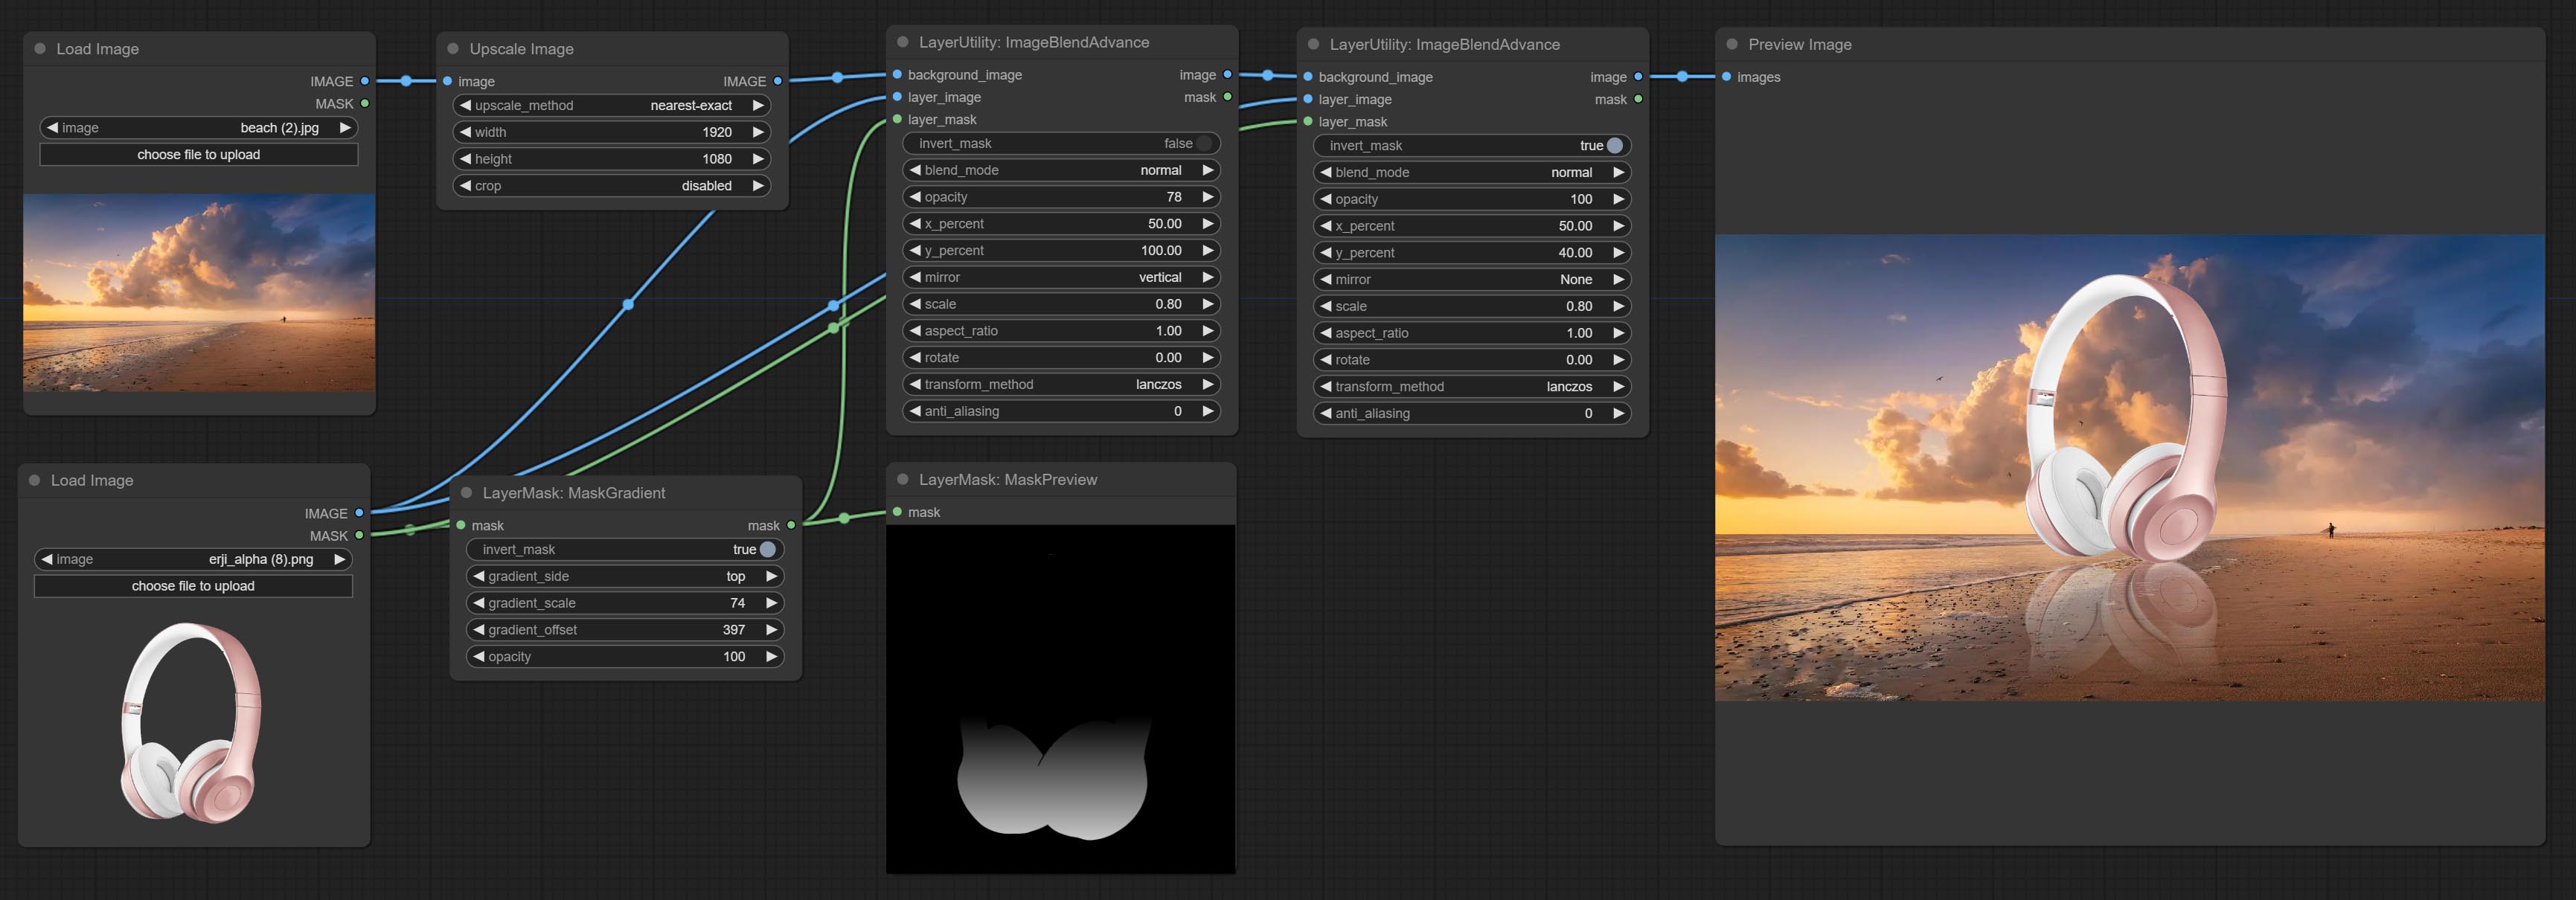
Node options: 
- invert_mask: Whether to reverse the mask.
- Gradient_side:生成从哪个边缘的梯度。 There are four directions: top, bottom, left and right.
- gradient_scale:梯度距离。默认值100表示梯度的一侧是完全透明的,另一侧完全不透明。值越小,从透明到不透明的距离越短。
- gradient_offset:梯度位置偏移。
- 不透明度:梯度的不透明度。
CreateGradientMask
Create a gradient mask. please note the difference between this node and the MaskGradient node. 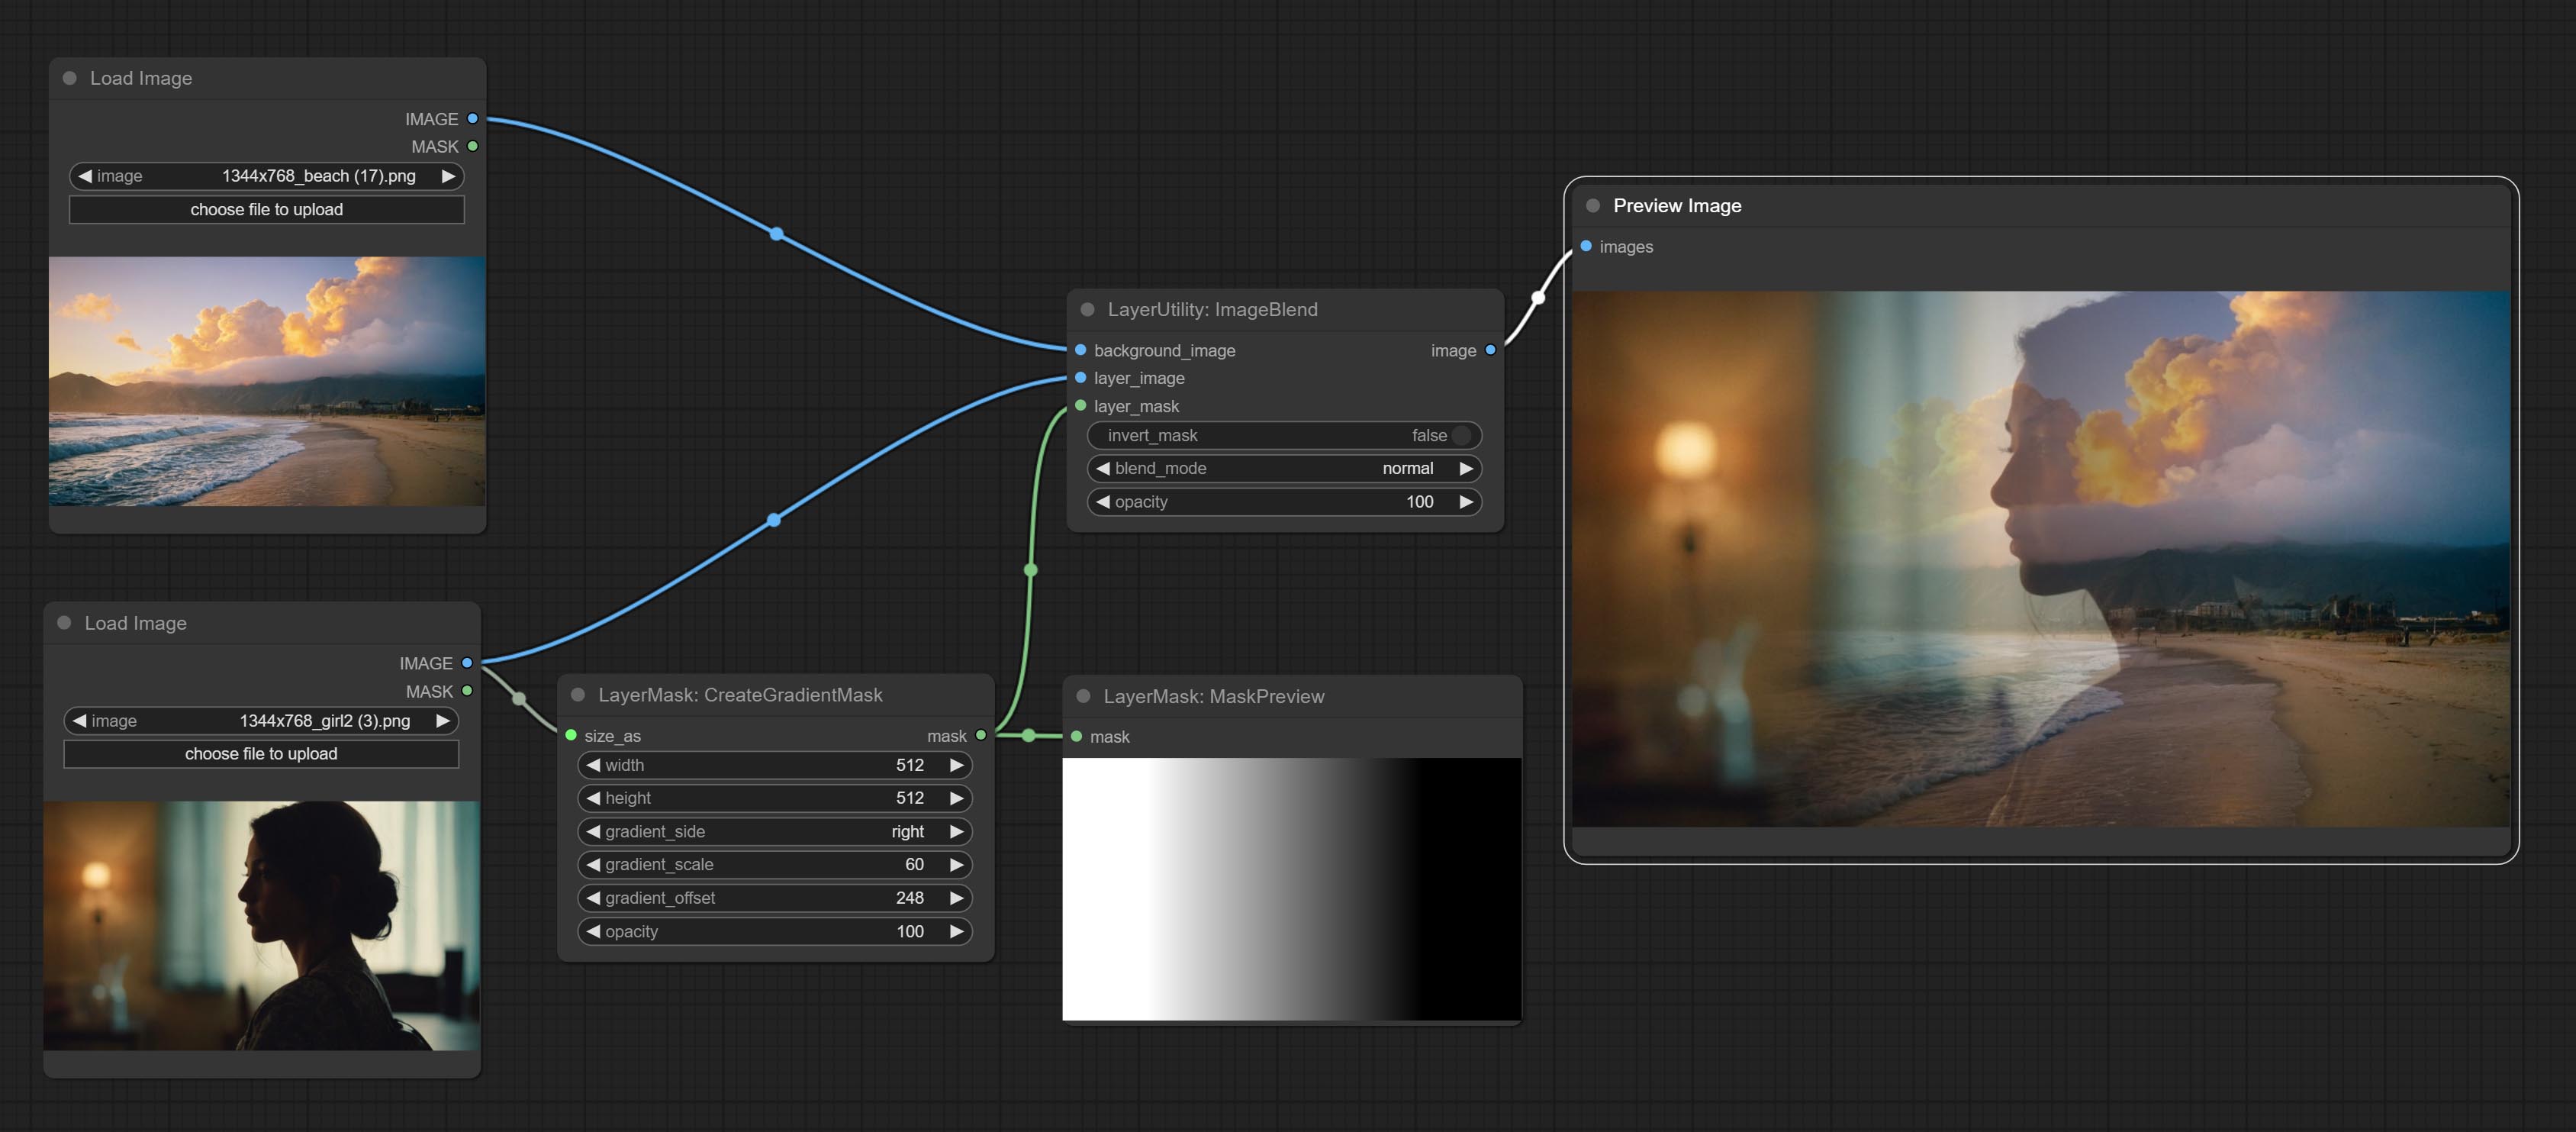
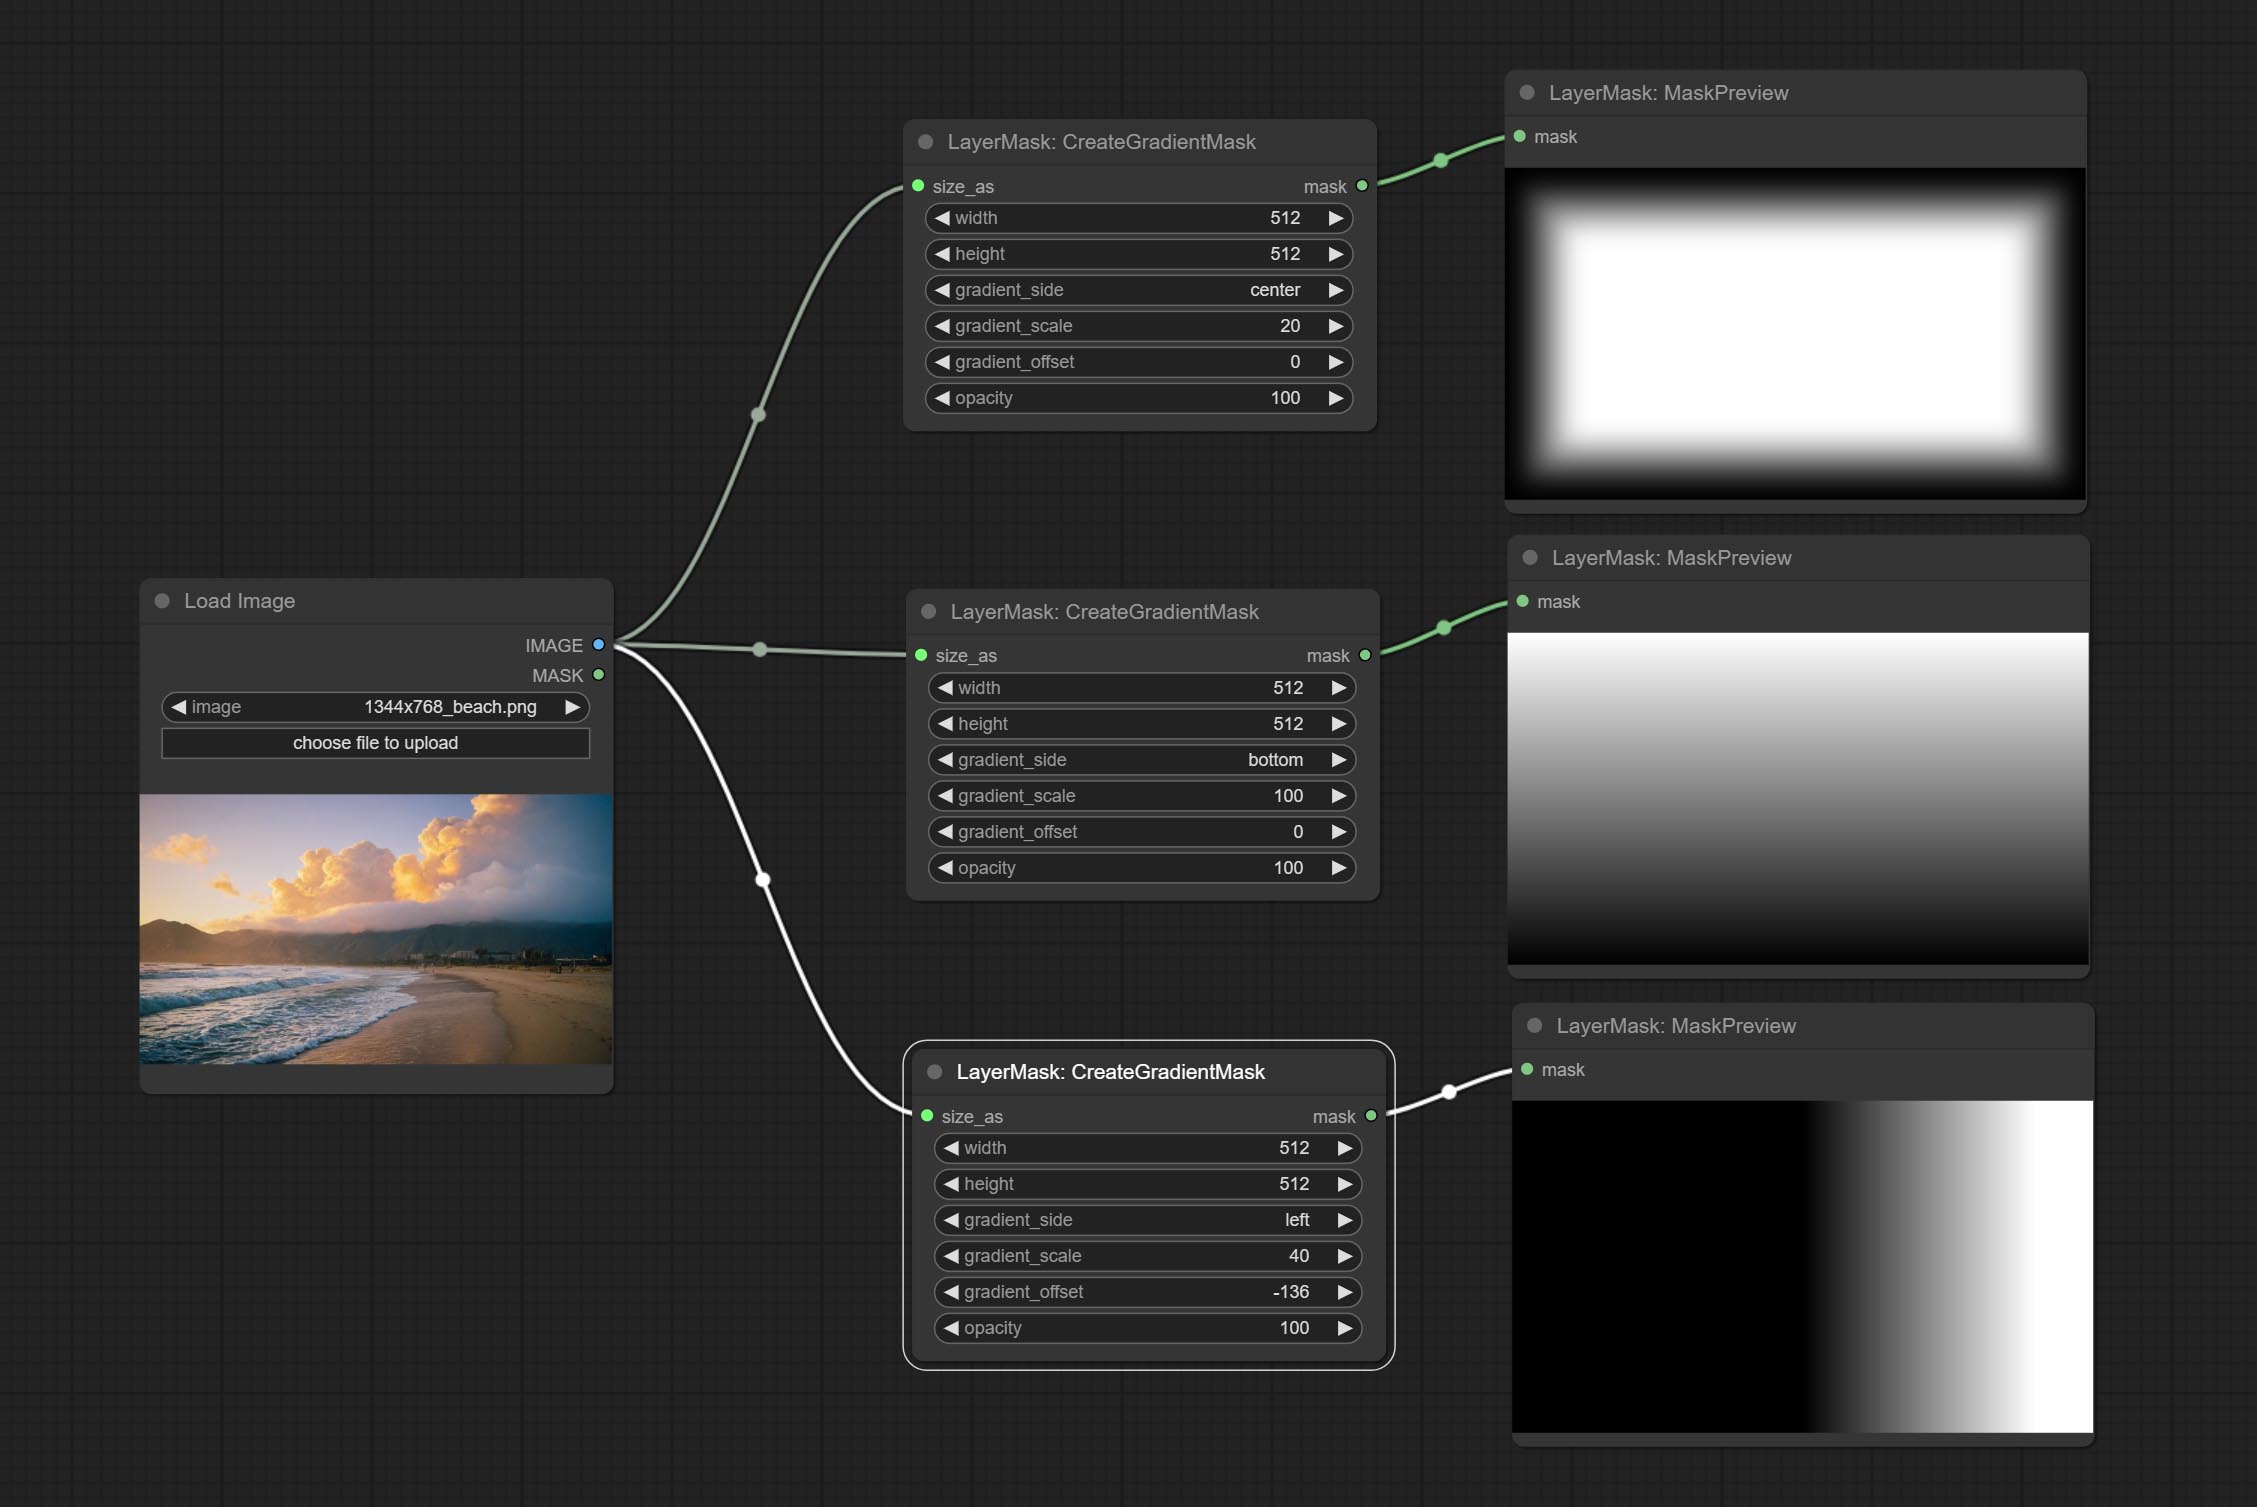
Node options:

- size_as * : The input image or mask here will generate the output image and mask according to their size. this input takes priority over the width and height below.
- width: Width of the image. If there is a size_as input, this setting will be ignored.
- height: Height of the image. If there is a size_as input, this setting will be ignored.
- Gradient_side:生成从哪个边缘的梯度。 There are five directions: top, bottom, left, right and center.
- gradient_scale:梯度距离。默认值100表示梯度的一侧是完全透明的,另一侧完全不透明。值越小,从透明到不透明的距离越短。
- gradient_offset:梯度位置偏移。 When
gradient_side is center, the size of the gradient area is adjusted here, positive values are smaller, and negative values are enlarged. - 不透明度:梯度的不透明度。
* Only limited to input image and mask. forcing the integration of other types of inputs will result in node errors.
MaskStroke
Generate mask contour strokes. 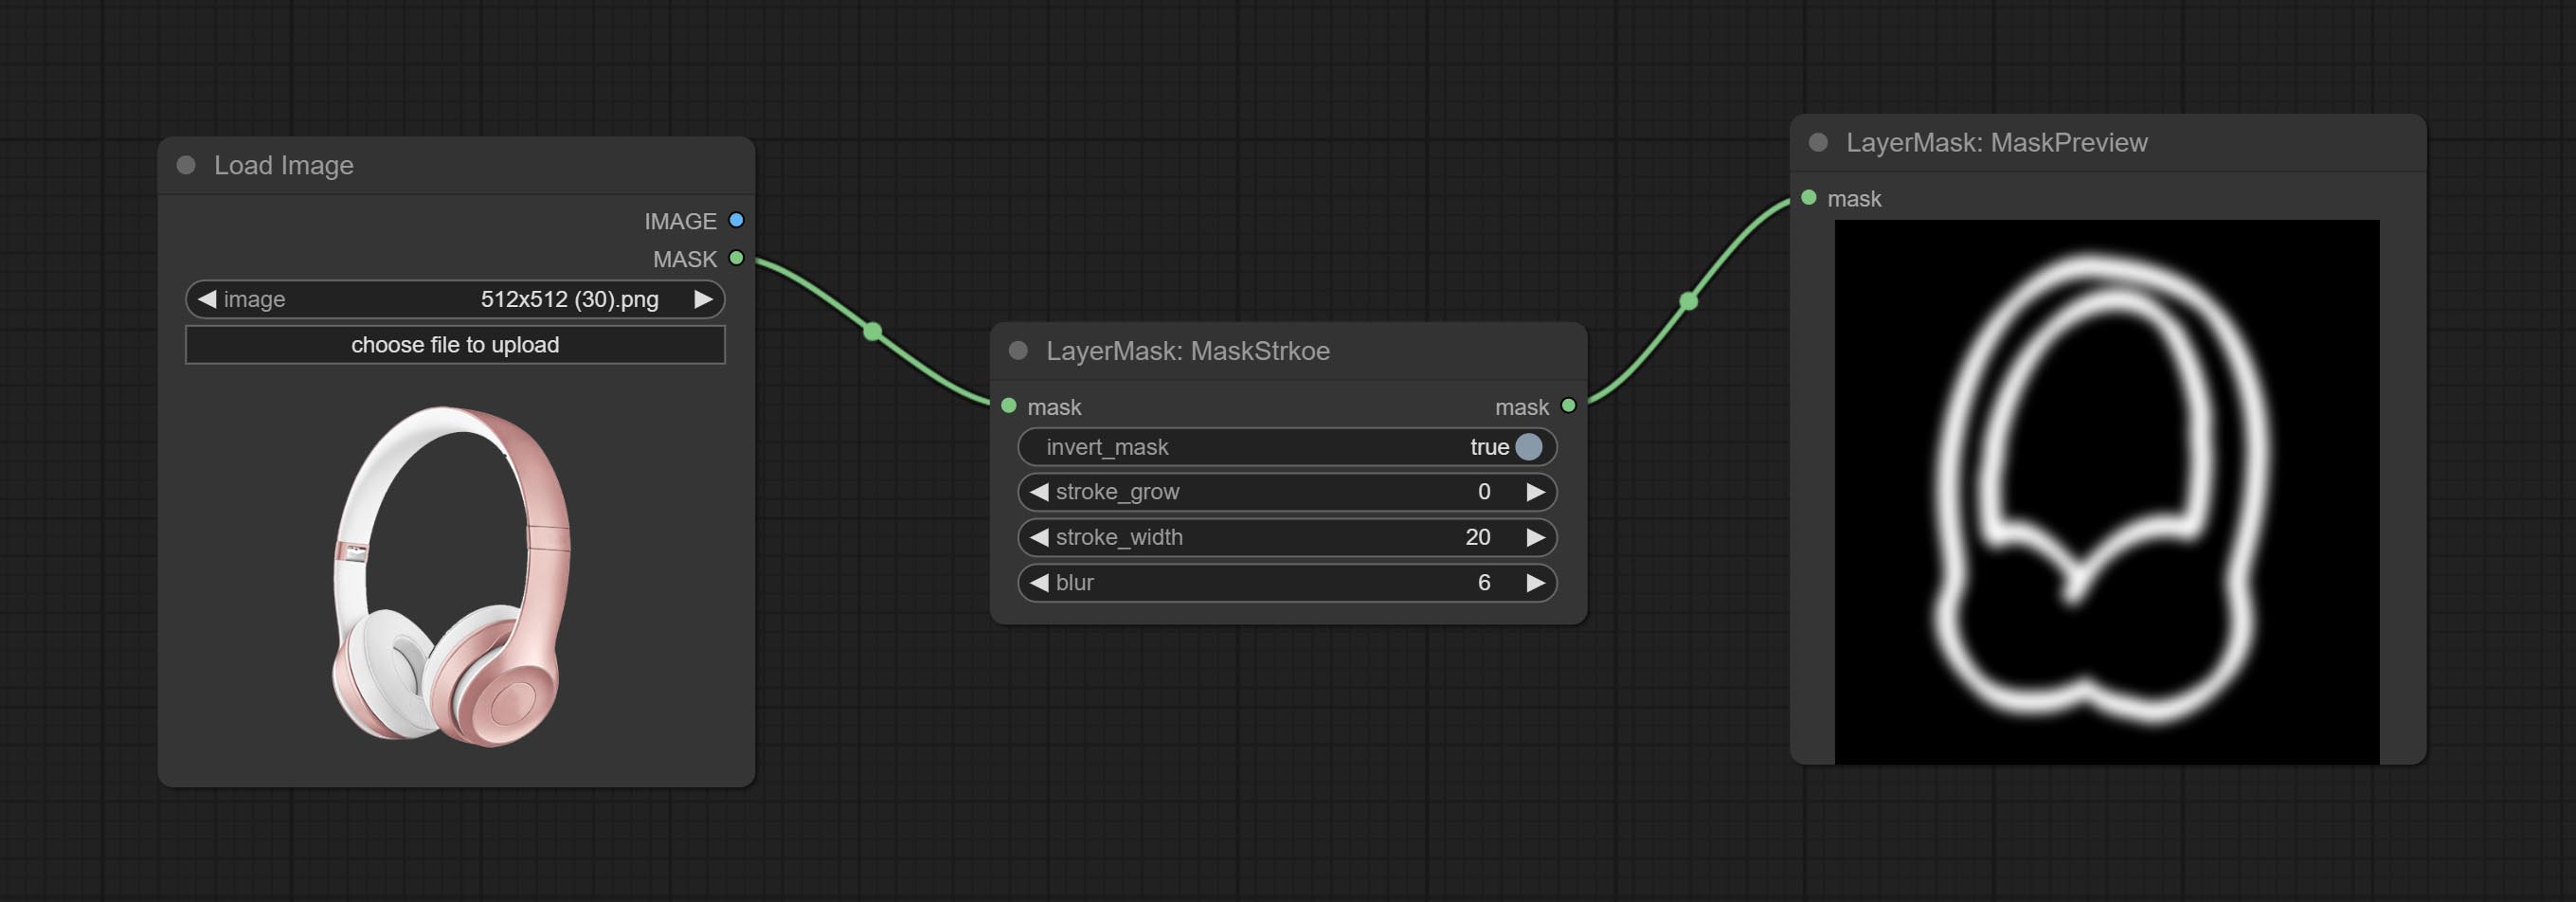
Node options:
- invert_mask: Whether to reverse the mask.
- stroke_grow: Stroke expansion/contraction amplitude, positive values indicate expansion and negative values indicate contraction.
- stroke_width: Stroke width.
- blur: Blur of stroke.
MaskGrain
Generates noise for the mask. 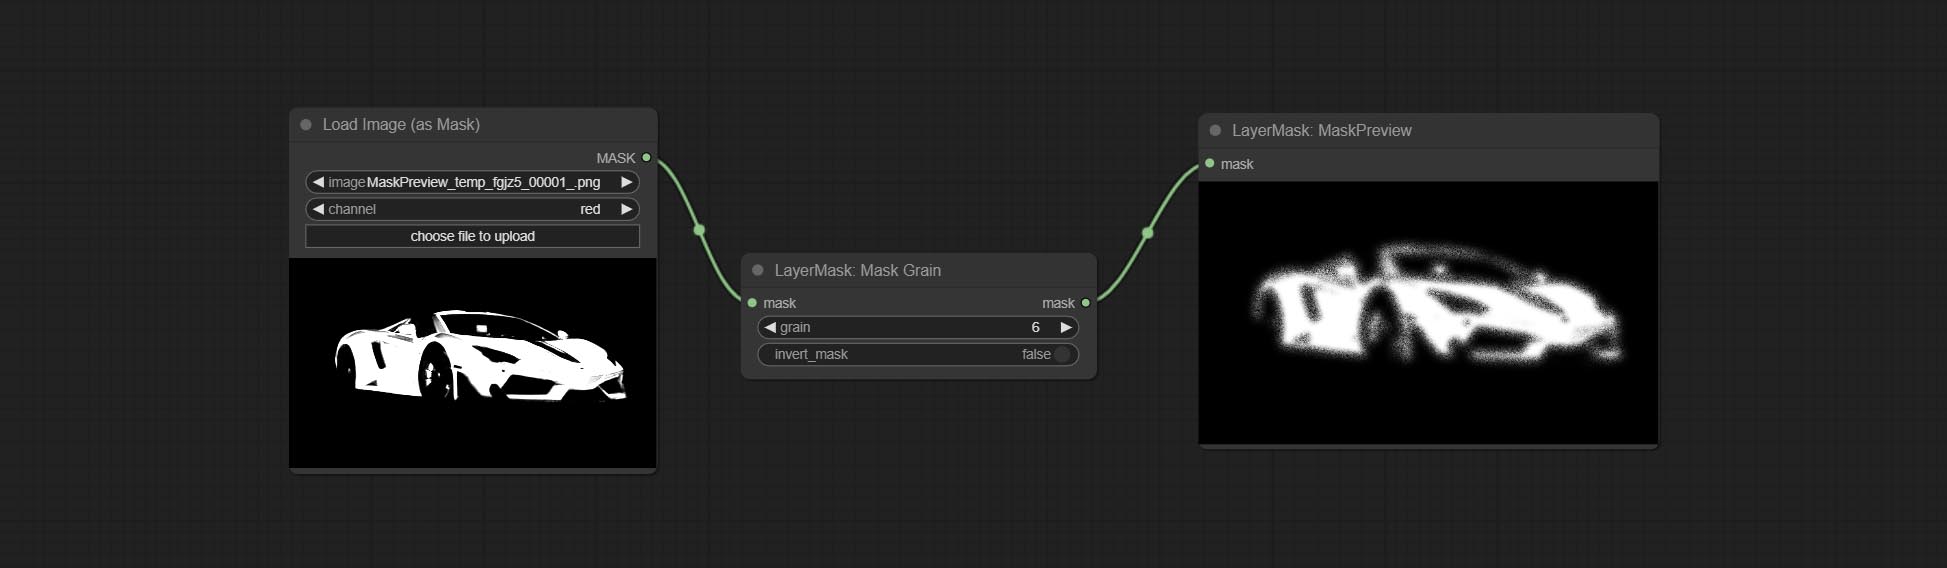
节点选项:
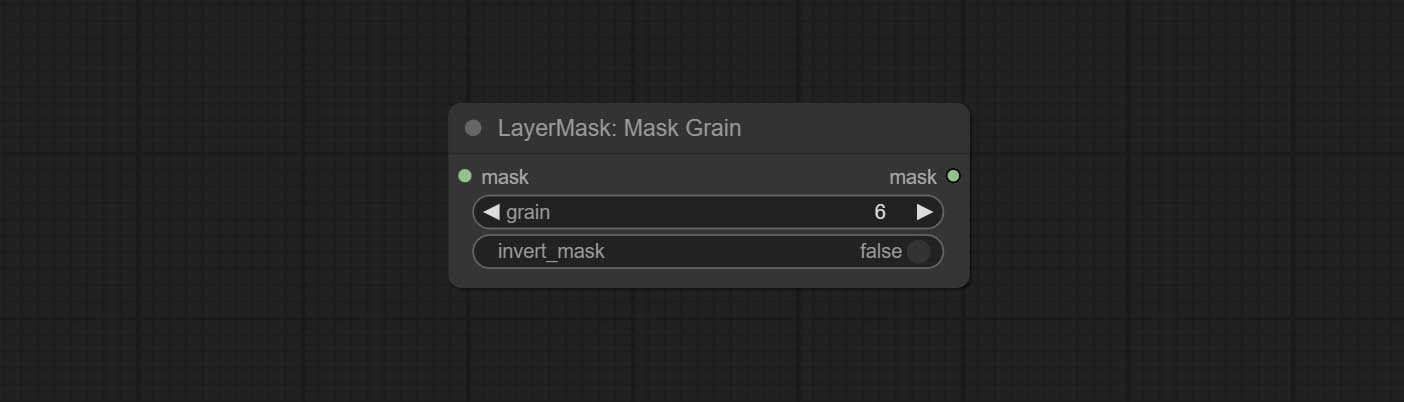
- grain: Noise intensity.
- invert_mask: Whether to reverse the mask.
MaskPreview
Preview the input mask 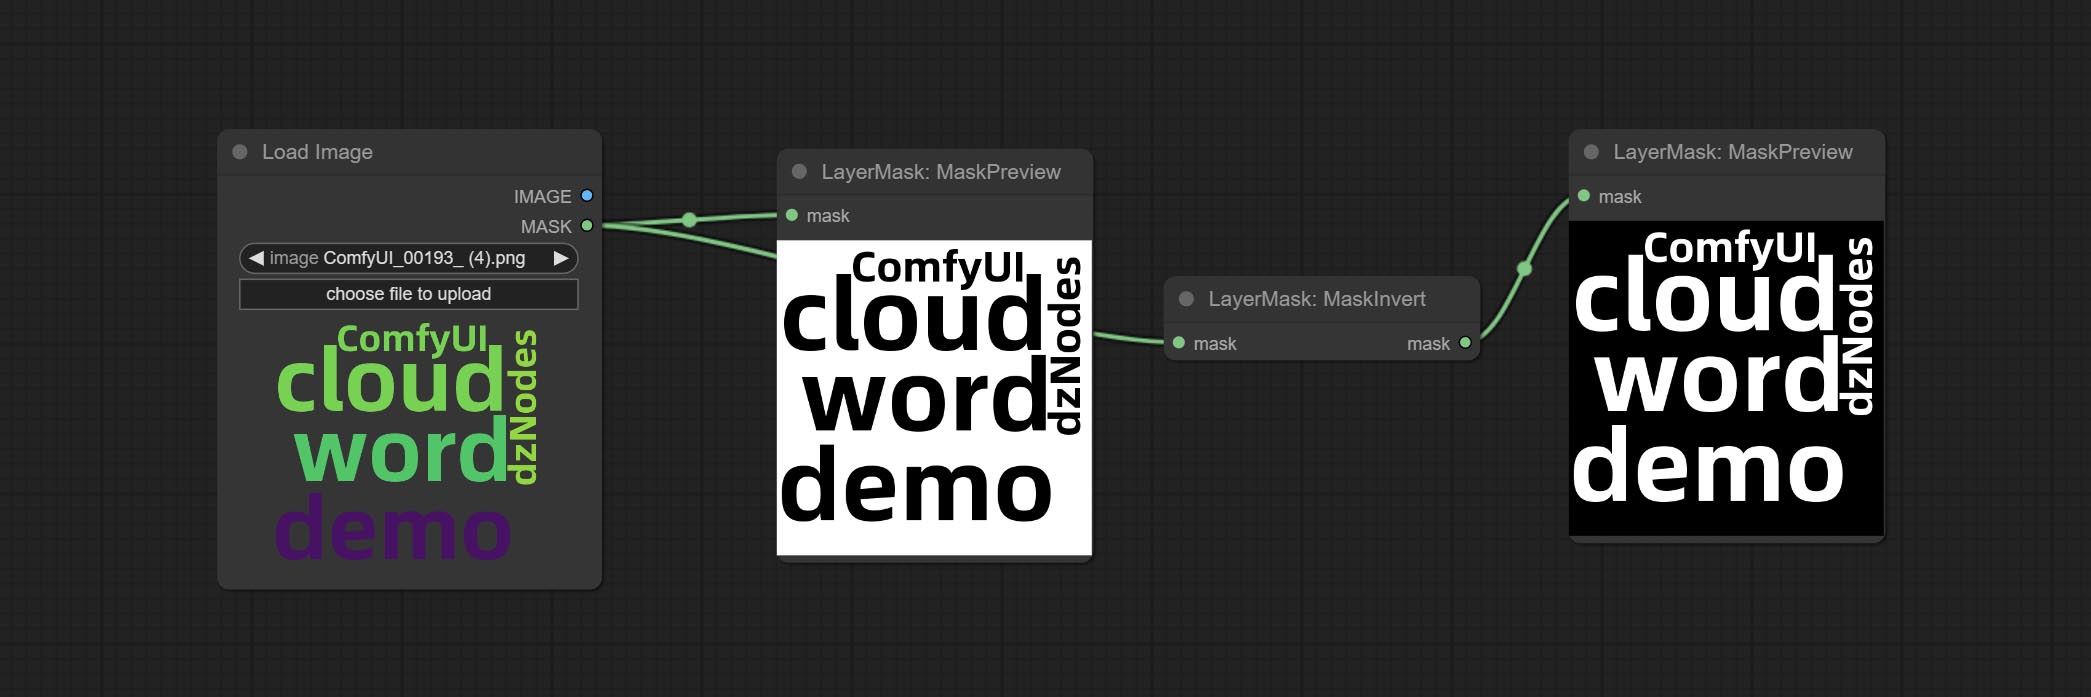
MaskInvert
Invert the mask 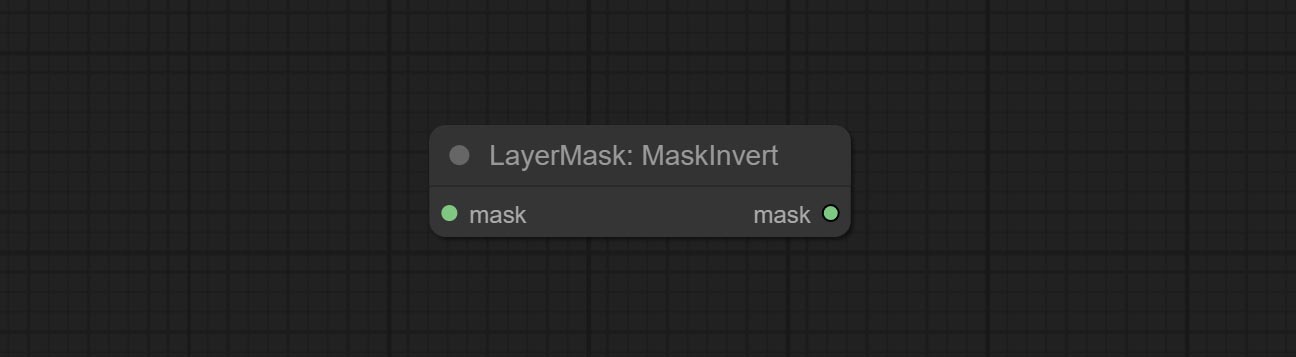
LayerFilter
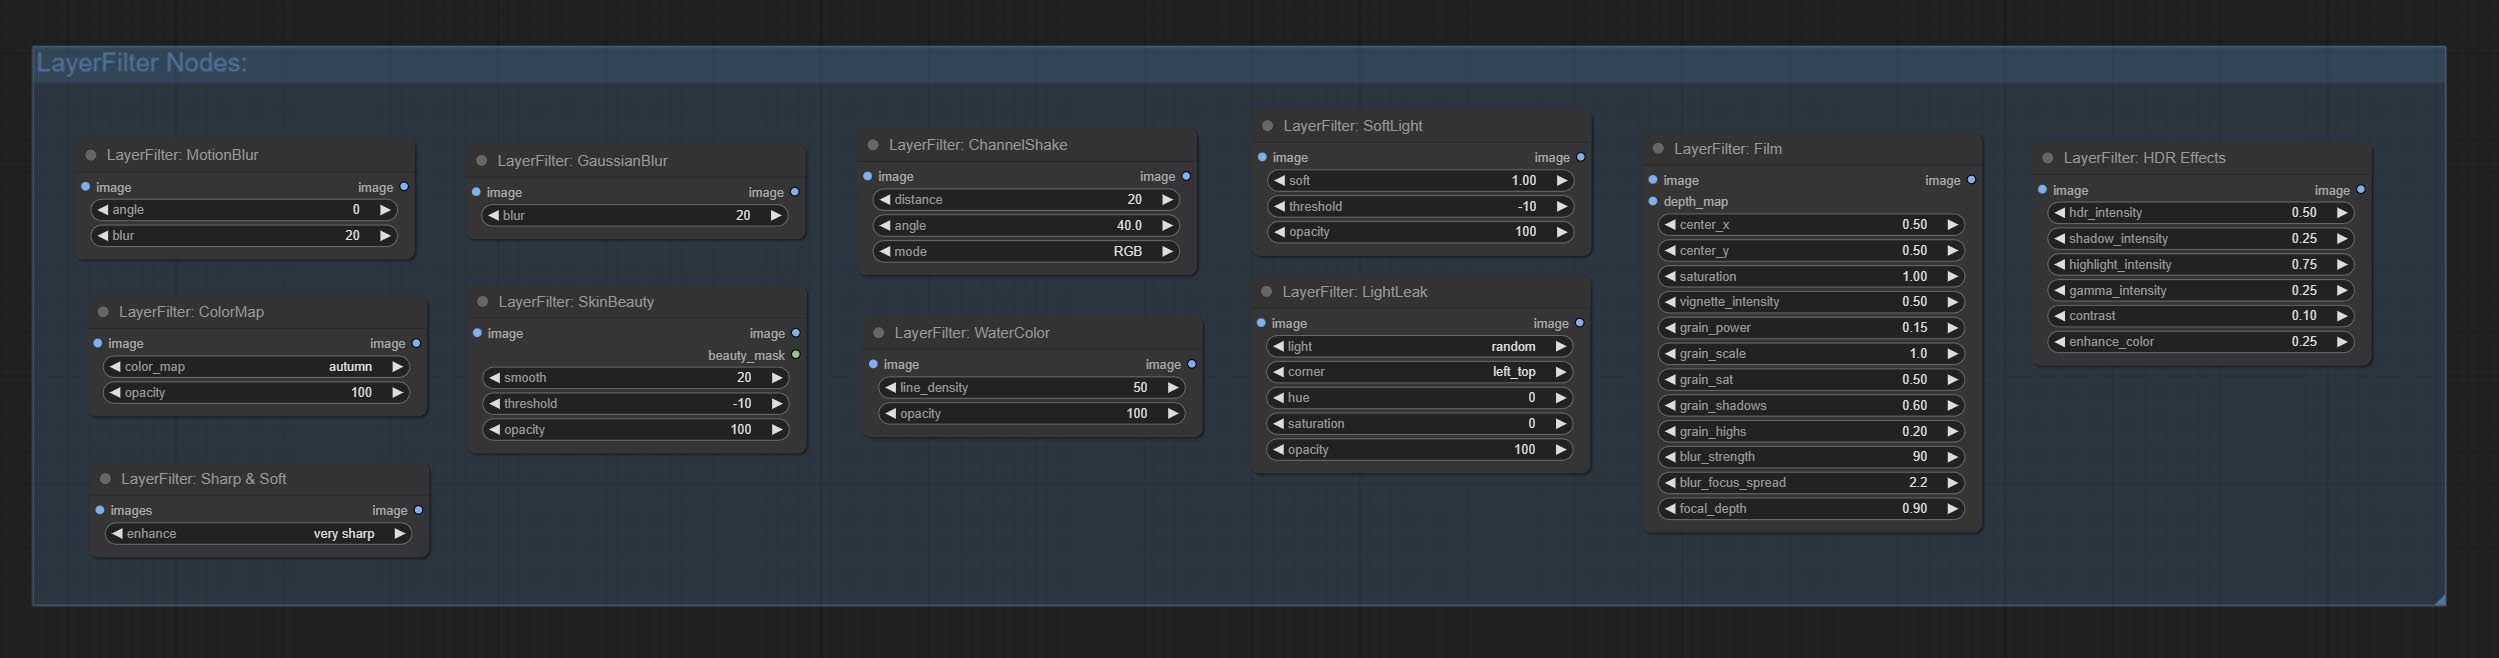
Sharp & Soft
增强或平滑图像的细节。 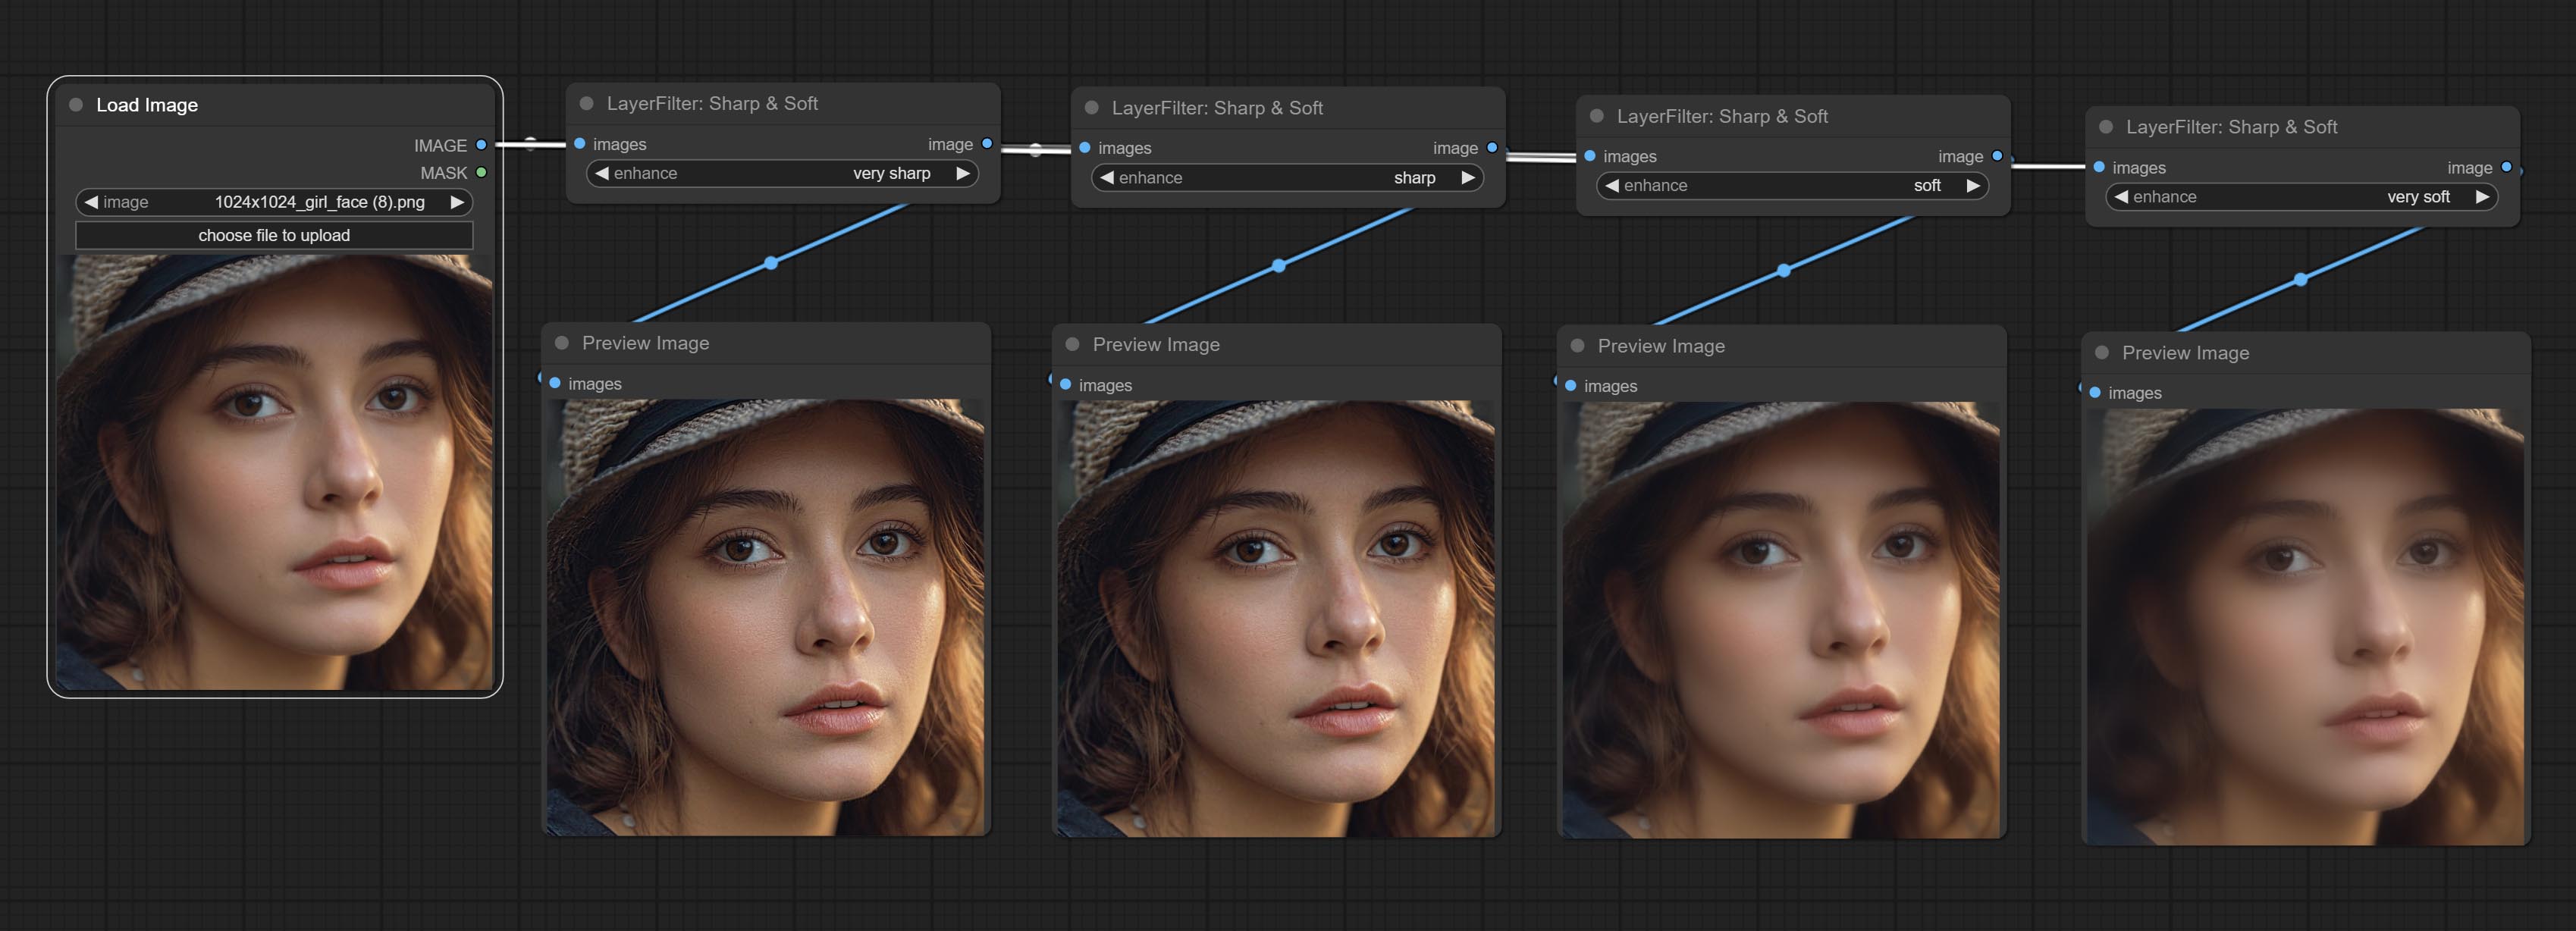
Node options: 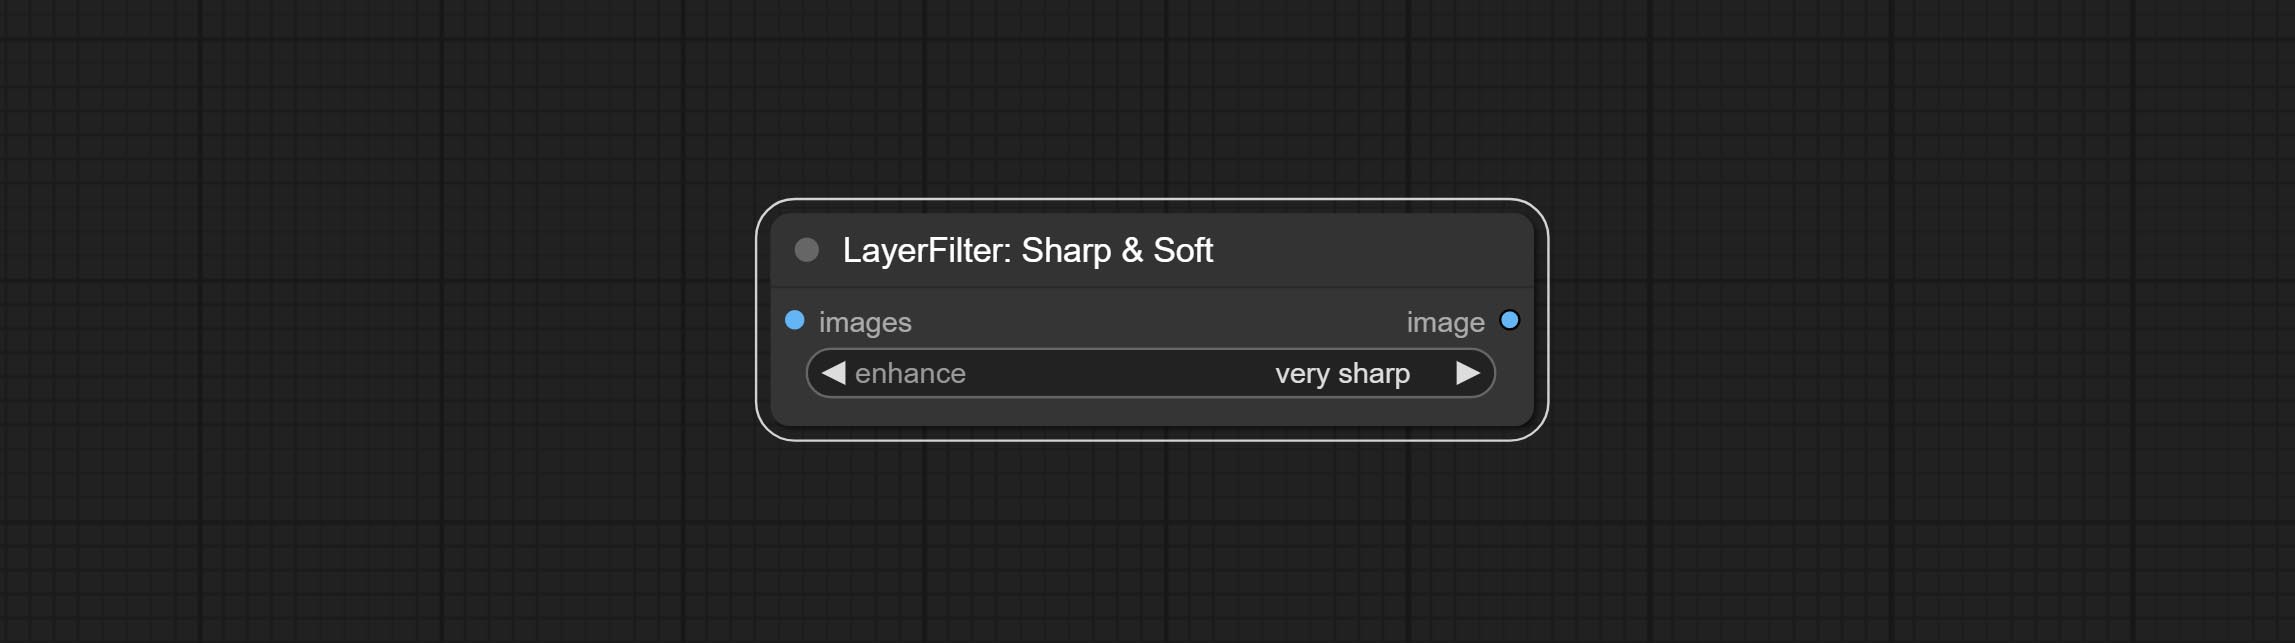
- 增强:提供4个预设,它们非常尖锐,锋利,柔软且非常柔软。 If you choose None, you will not do any processing.
SkinBeauty
Make the skin look smoother. 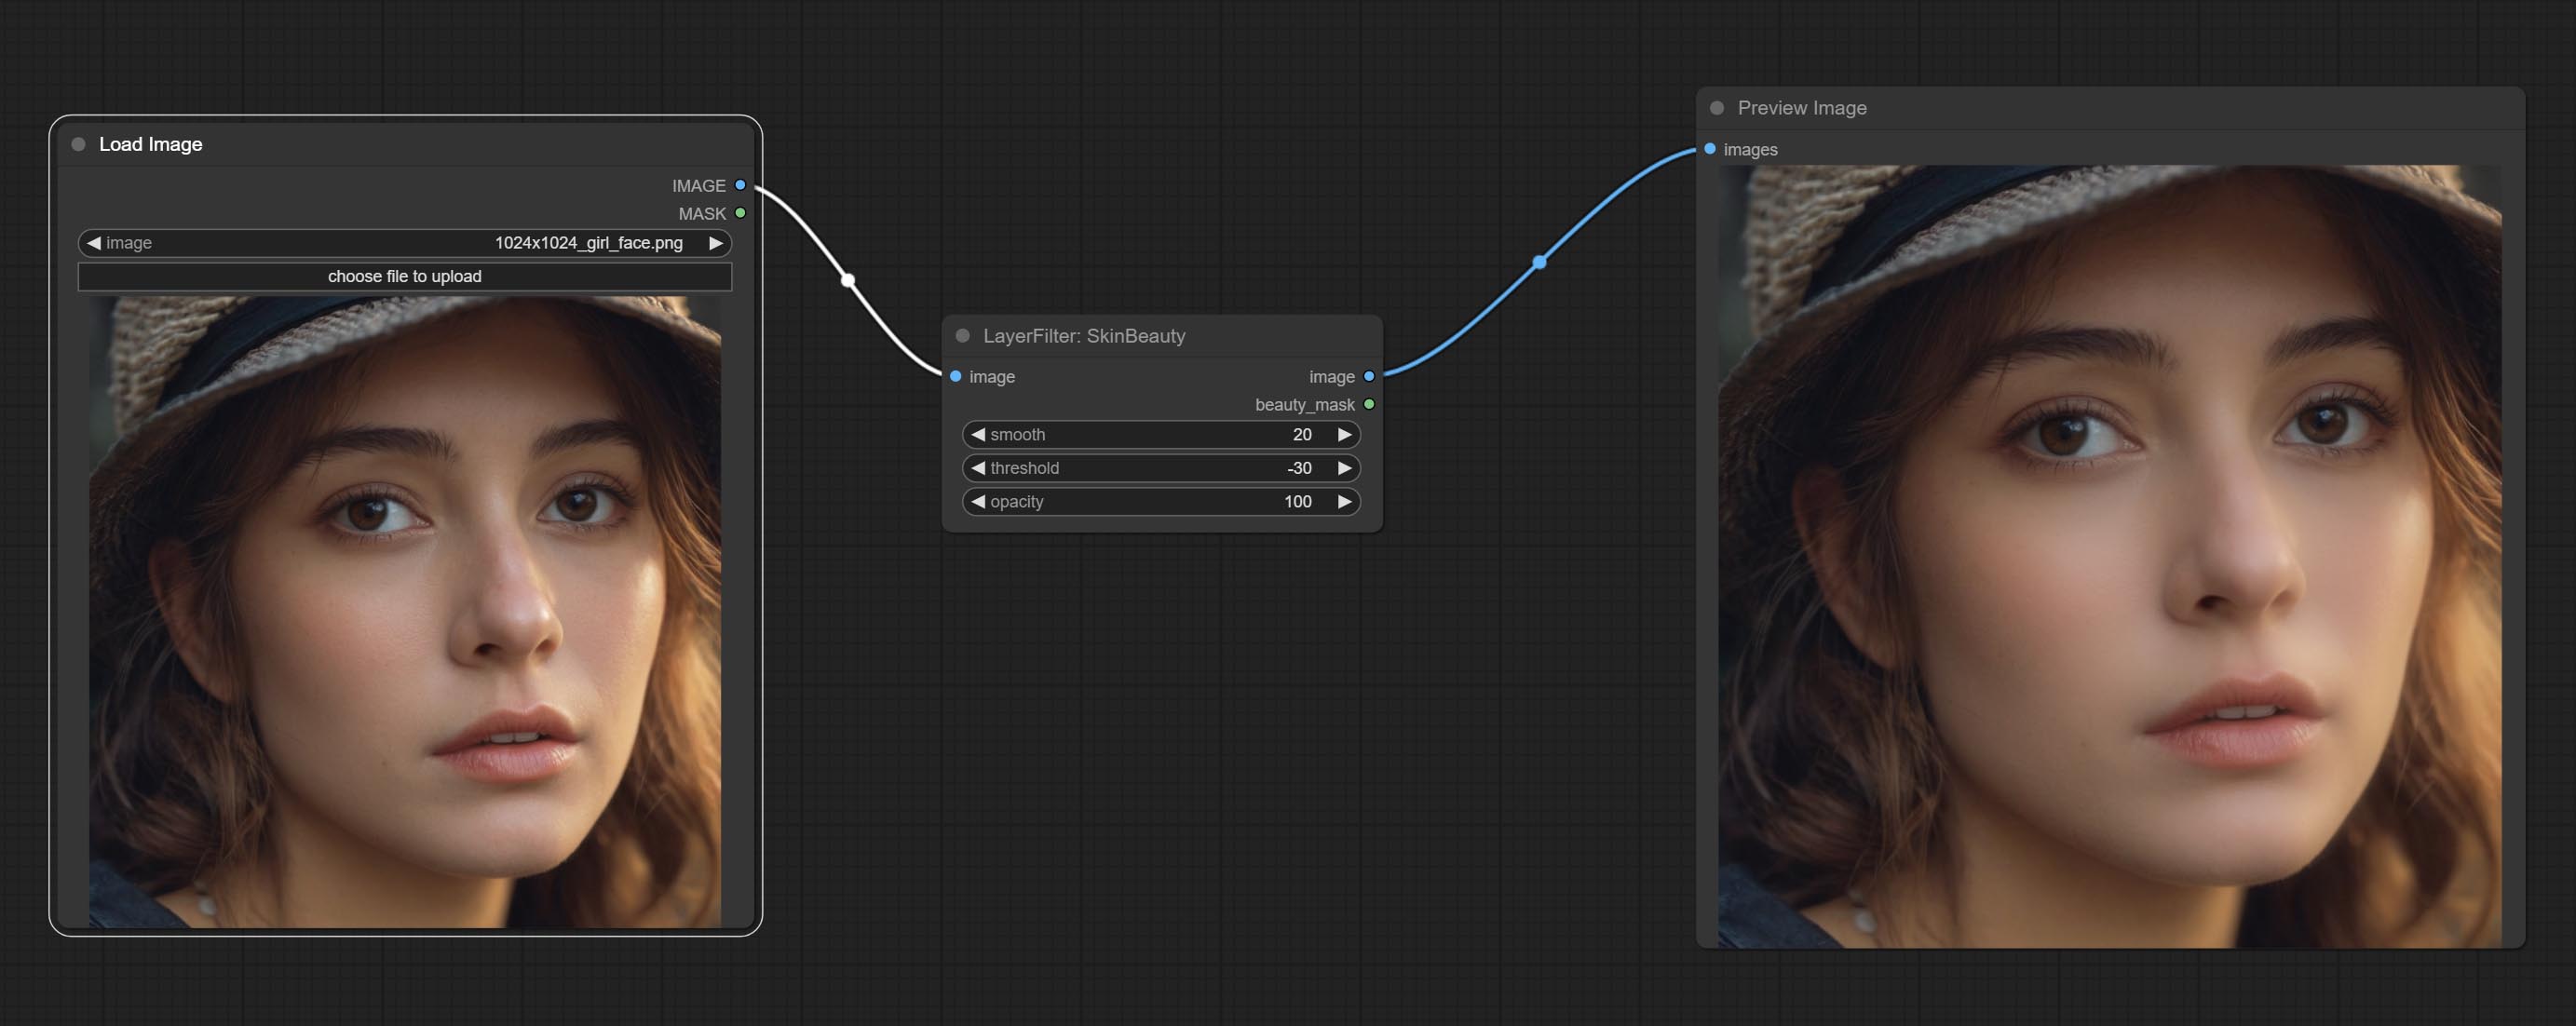
Node options: 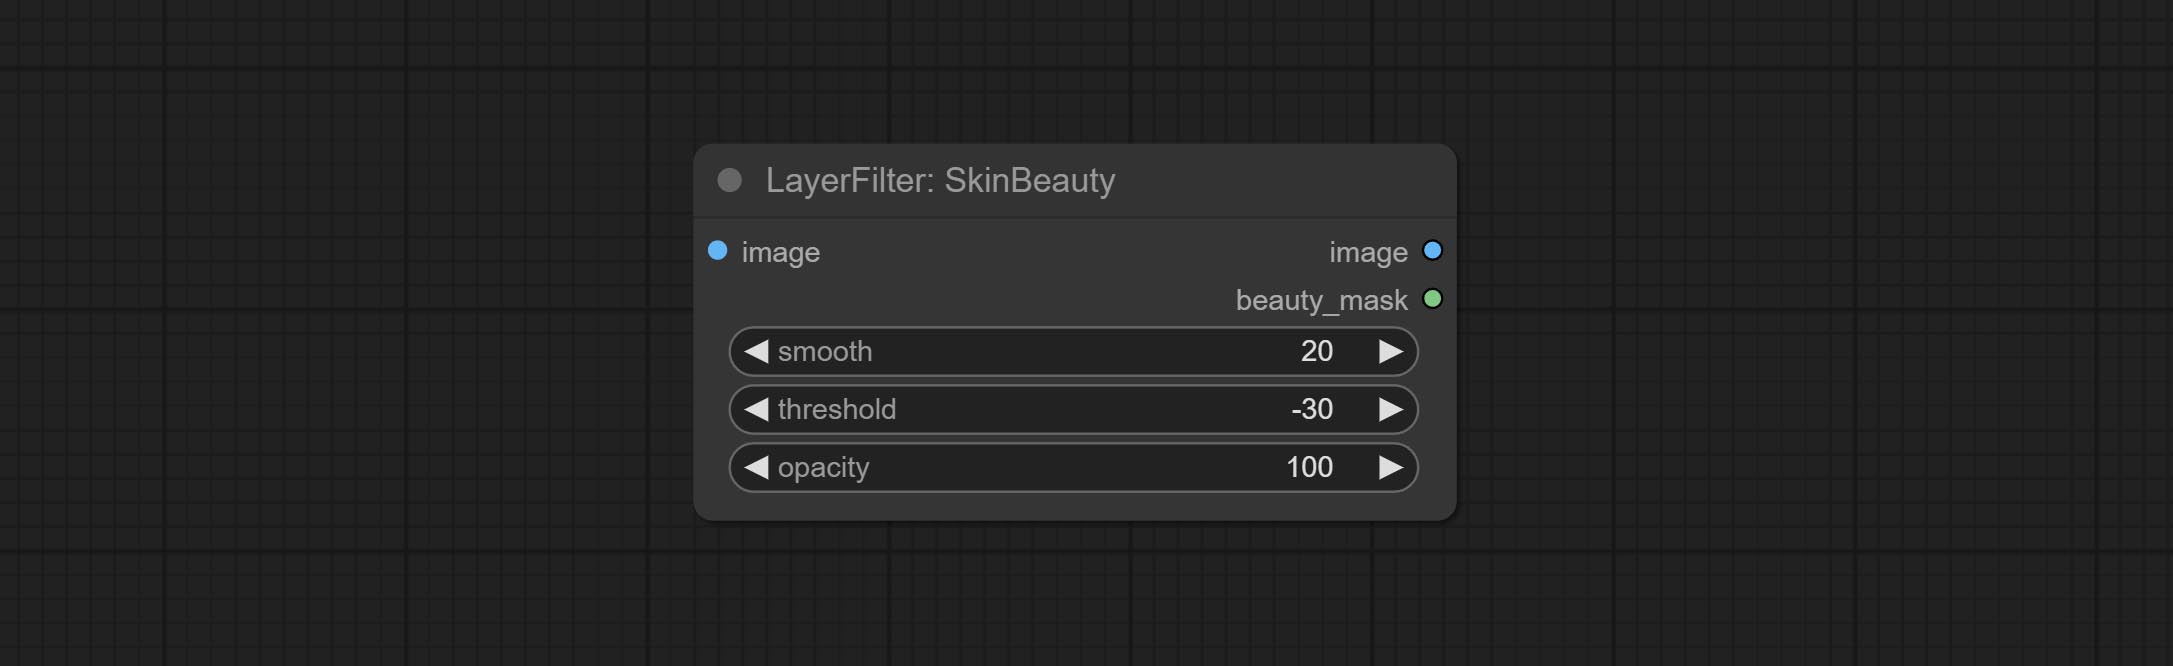
- smooth: Skin smoothness.
- threshold: Smooth range. the larger the range with the smaller value.
- 不透明度:光滑的不透明度。
水彩
Watercolor painting effect 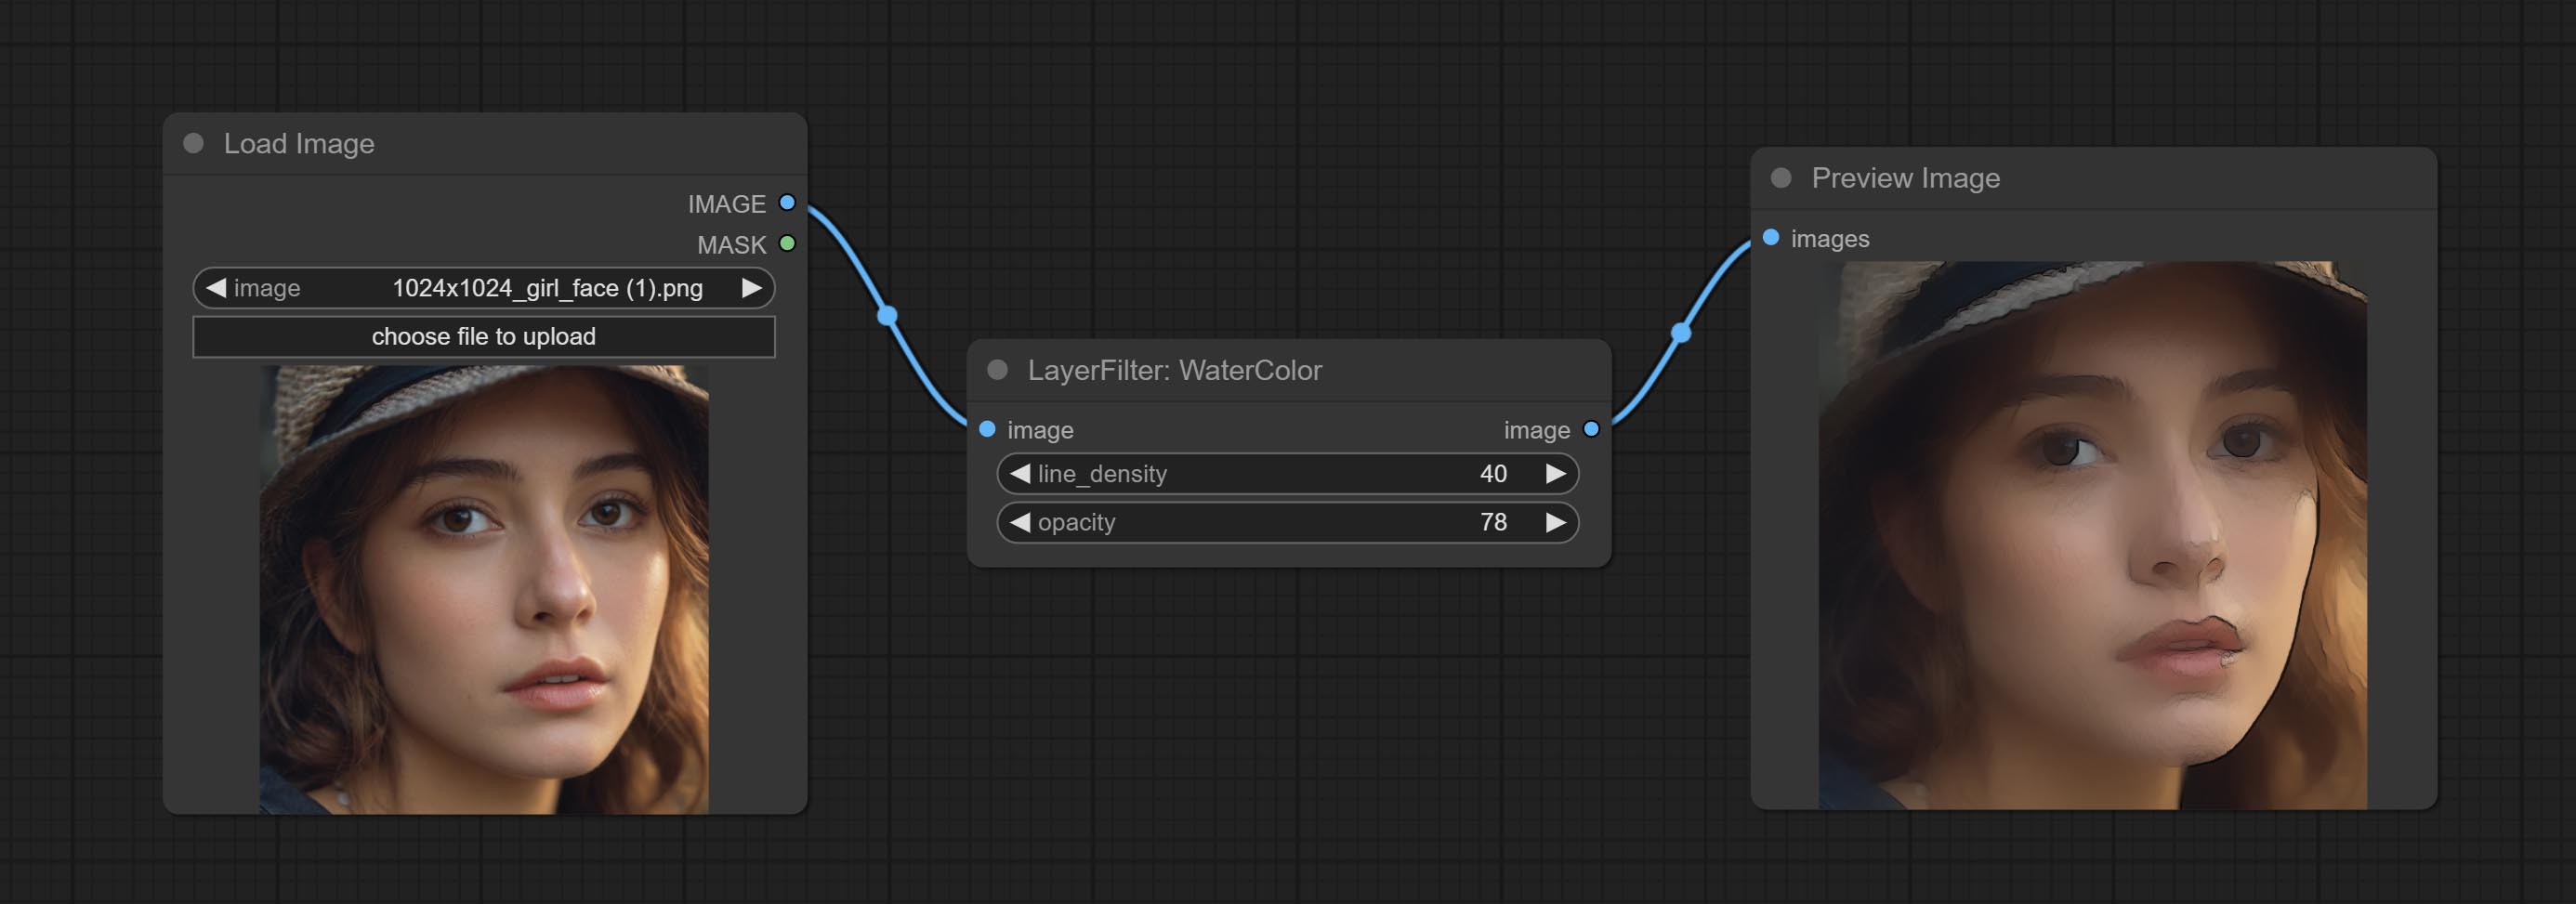
Node option: 
- line_density: The black line density.
- opacity: The opacity of watercolor effects.
SoftLight
Soft light effect, the bright highlights on the screen appear blurry. 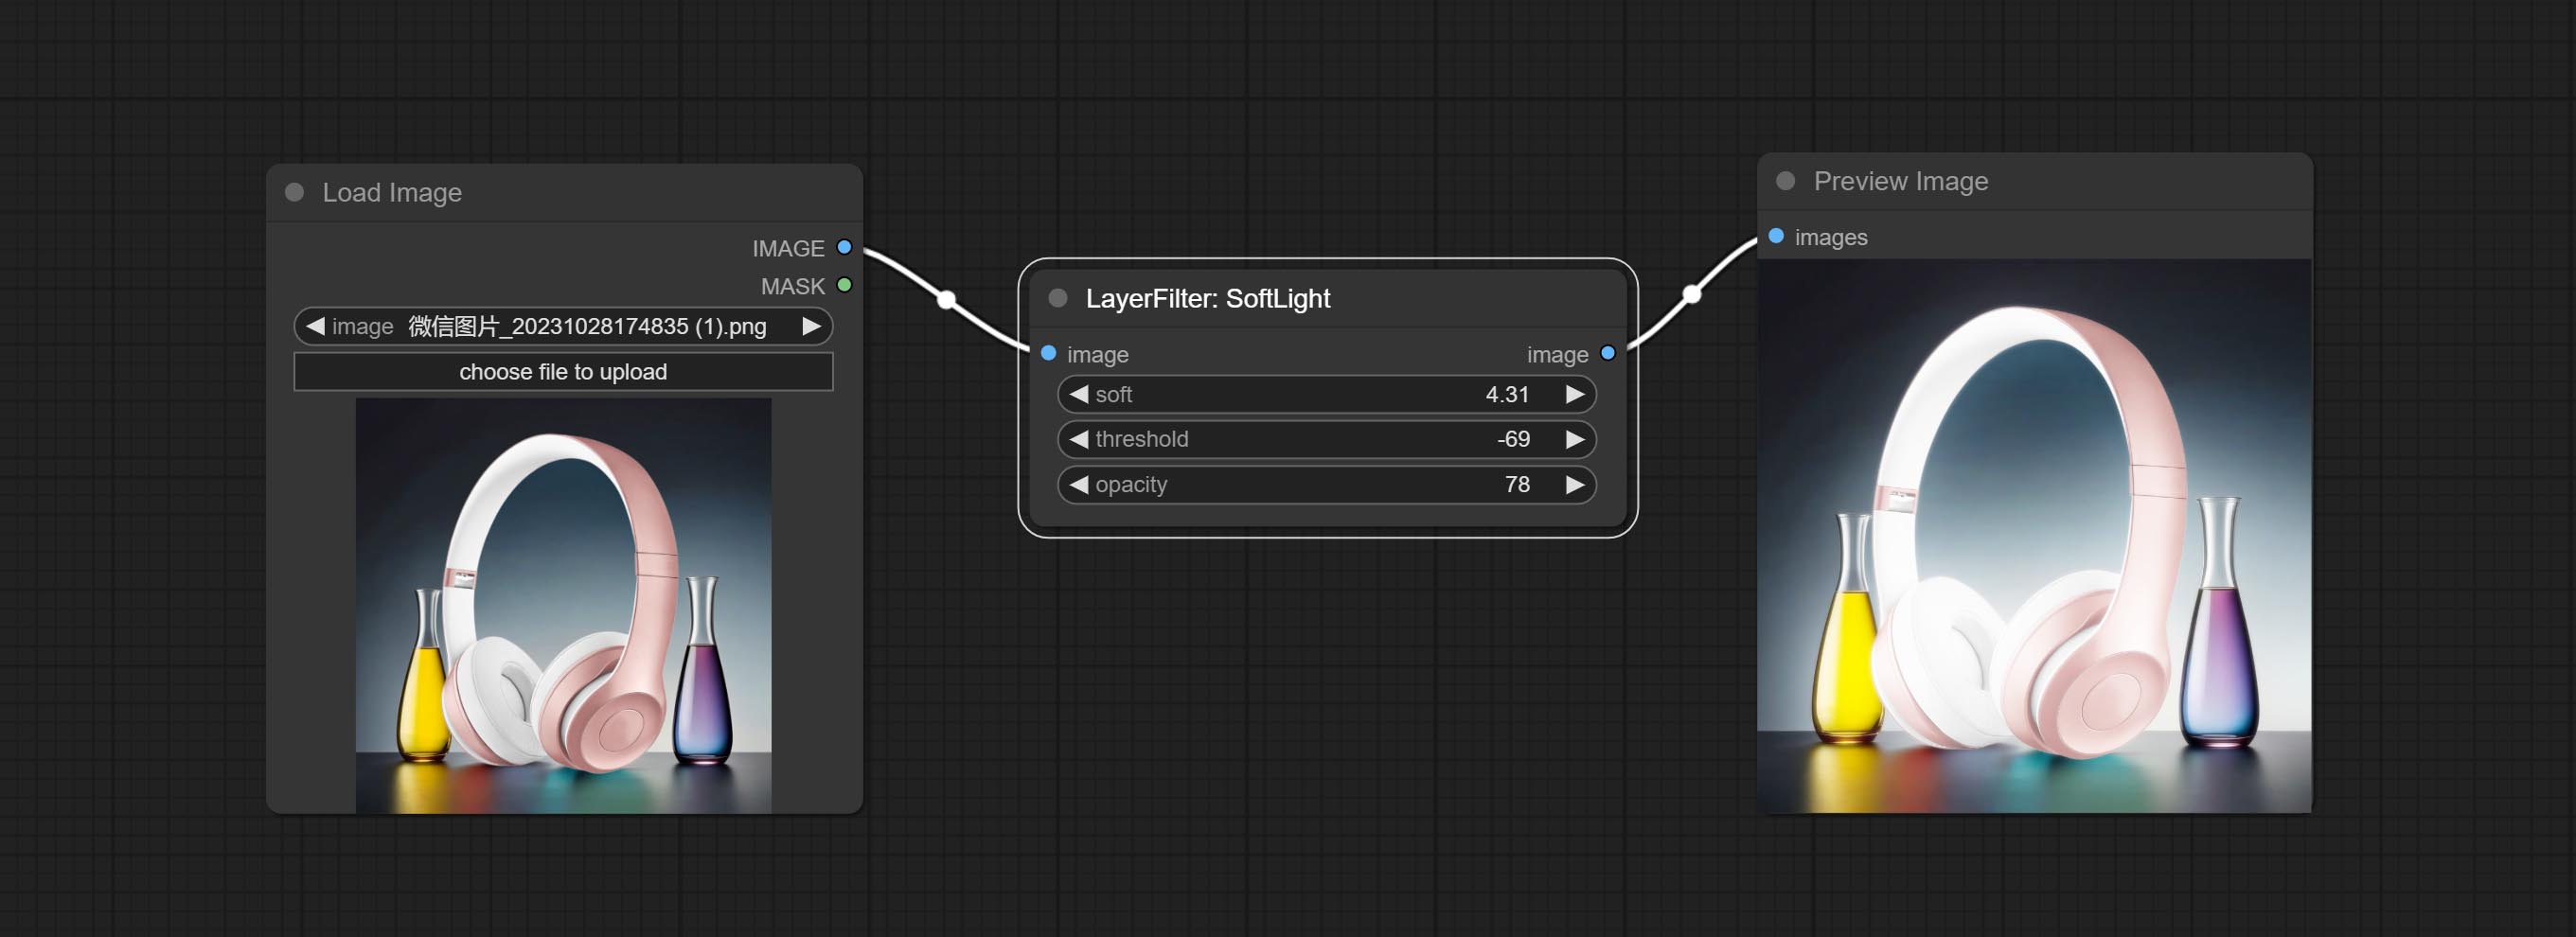
Node options: 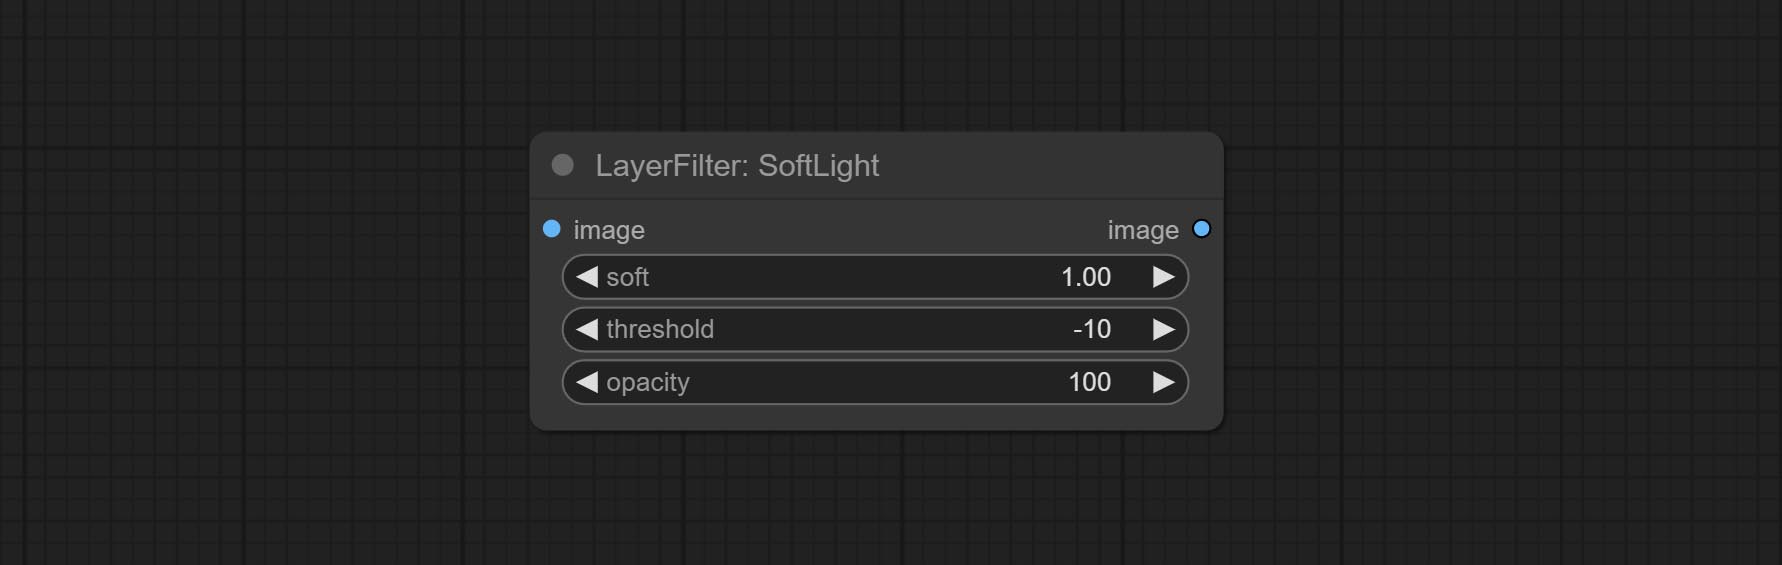
- soft: Size of soft light.
- threshold: Soft light range. the light appears from the brightest part of the picture. in lower value, the range will be larger, and in higher value, the range will be smaller.
- opacity: Opacity of the soft light.
ChannelShake
Channel misalignment. similar to the effect of Tiktok logo. 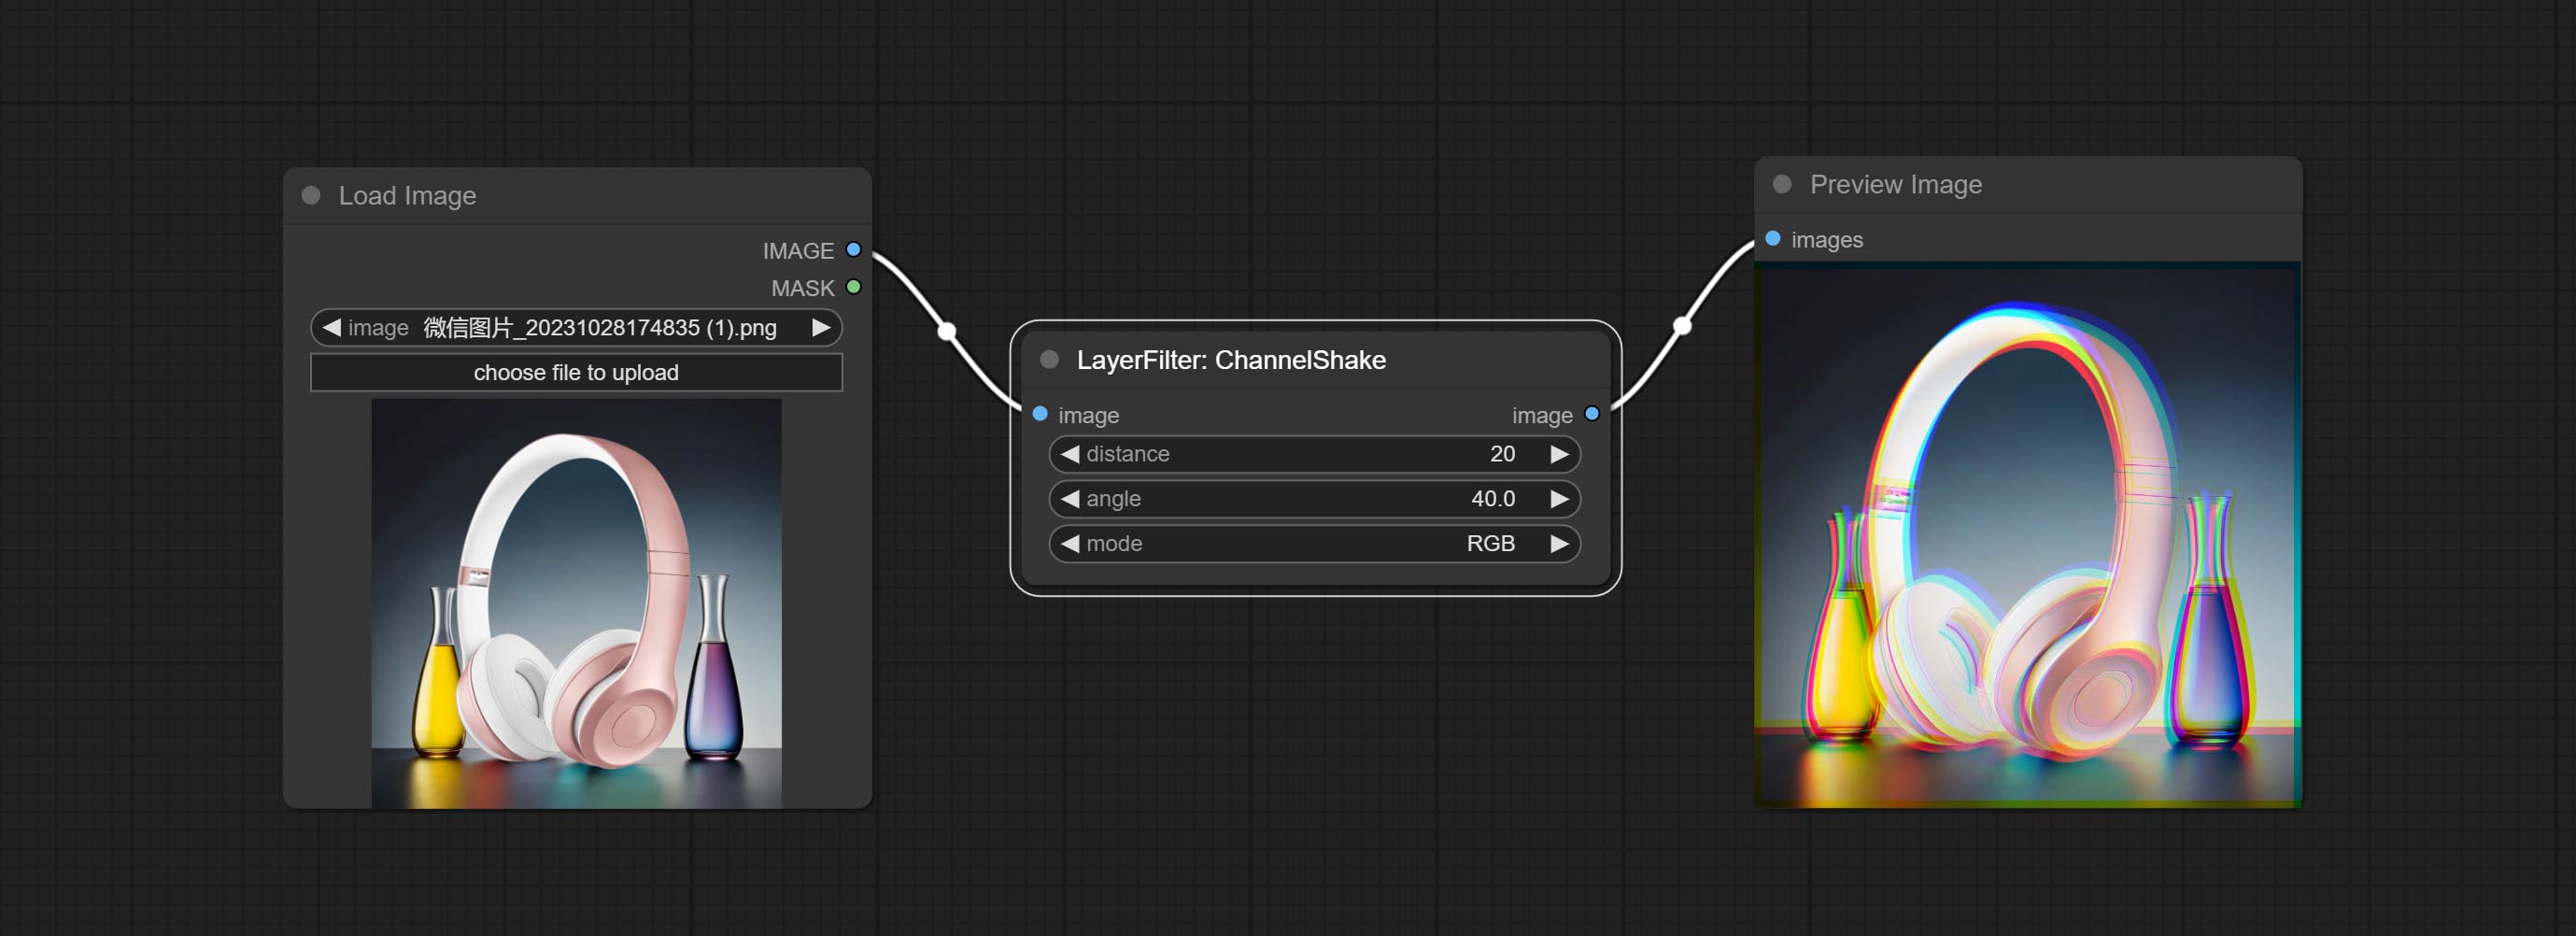
Node options: 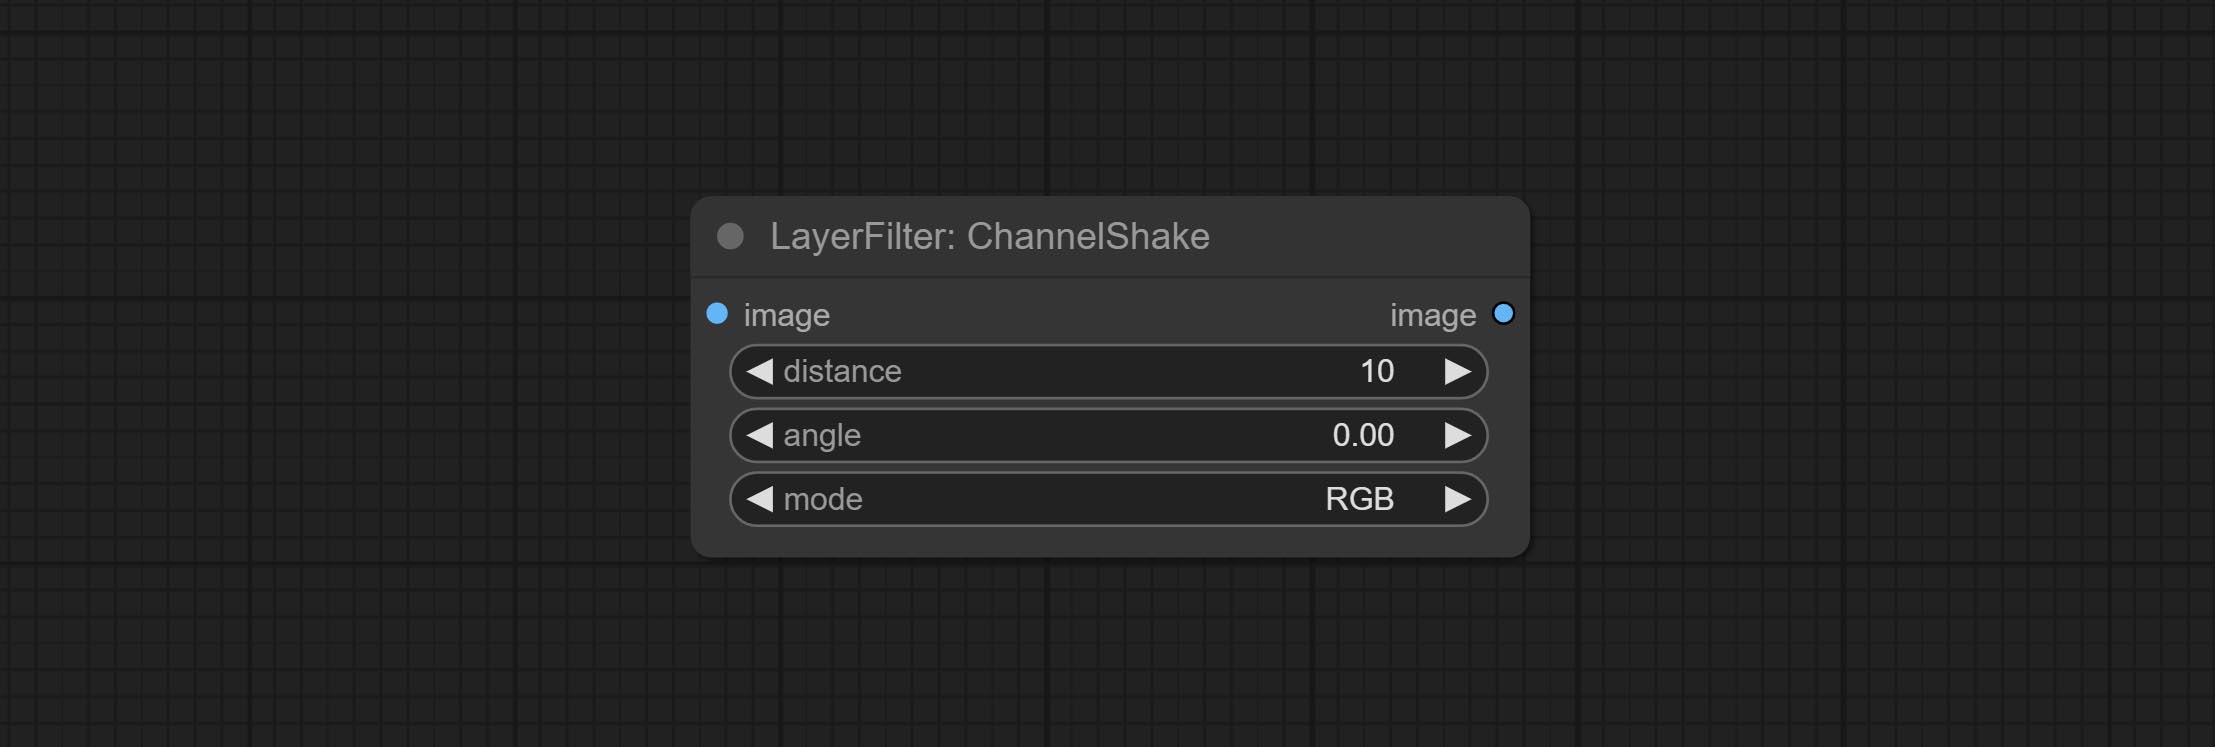
- distance: Distance of channel separation.
- angle: Angle of channel separation.
- mode: Channel shift arrangement order.
HDR Effects
enhances the dynamic range and visual appeal of input images. This node is reorganize and encapsulate of HDR Effects (SuperBeasts.AI), thanks to the original author. 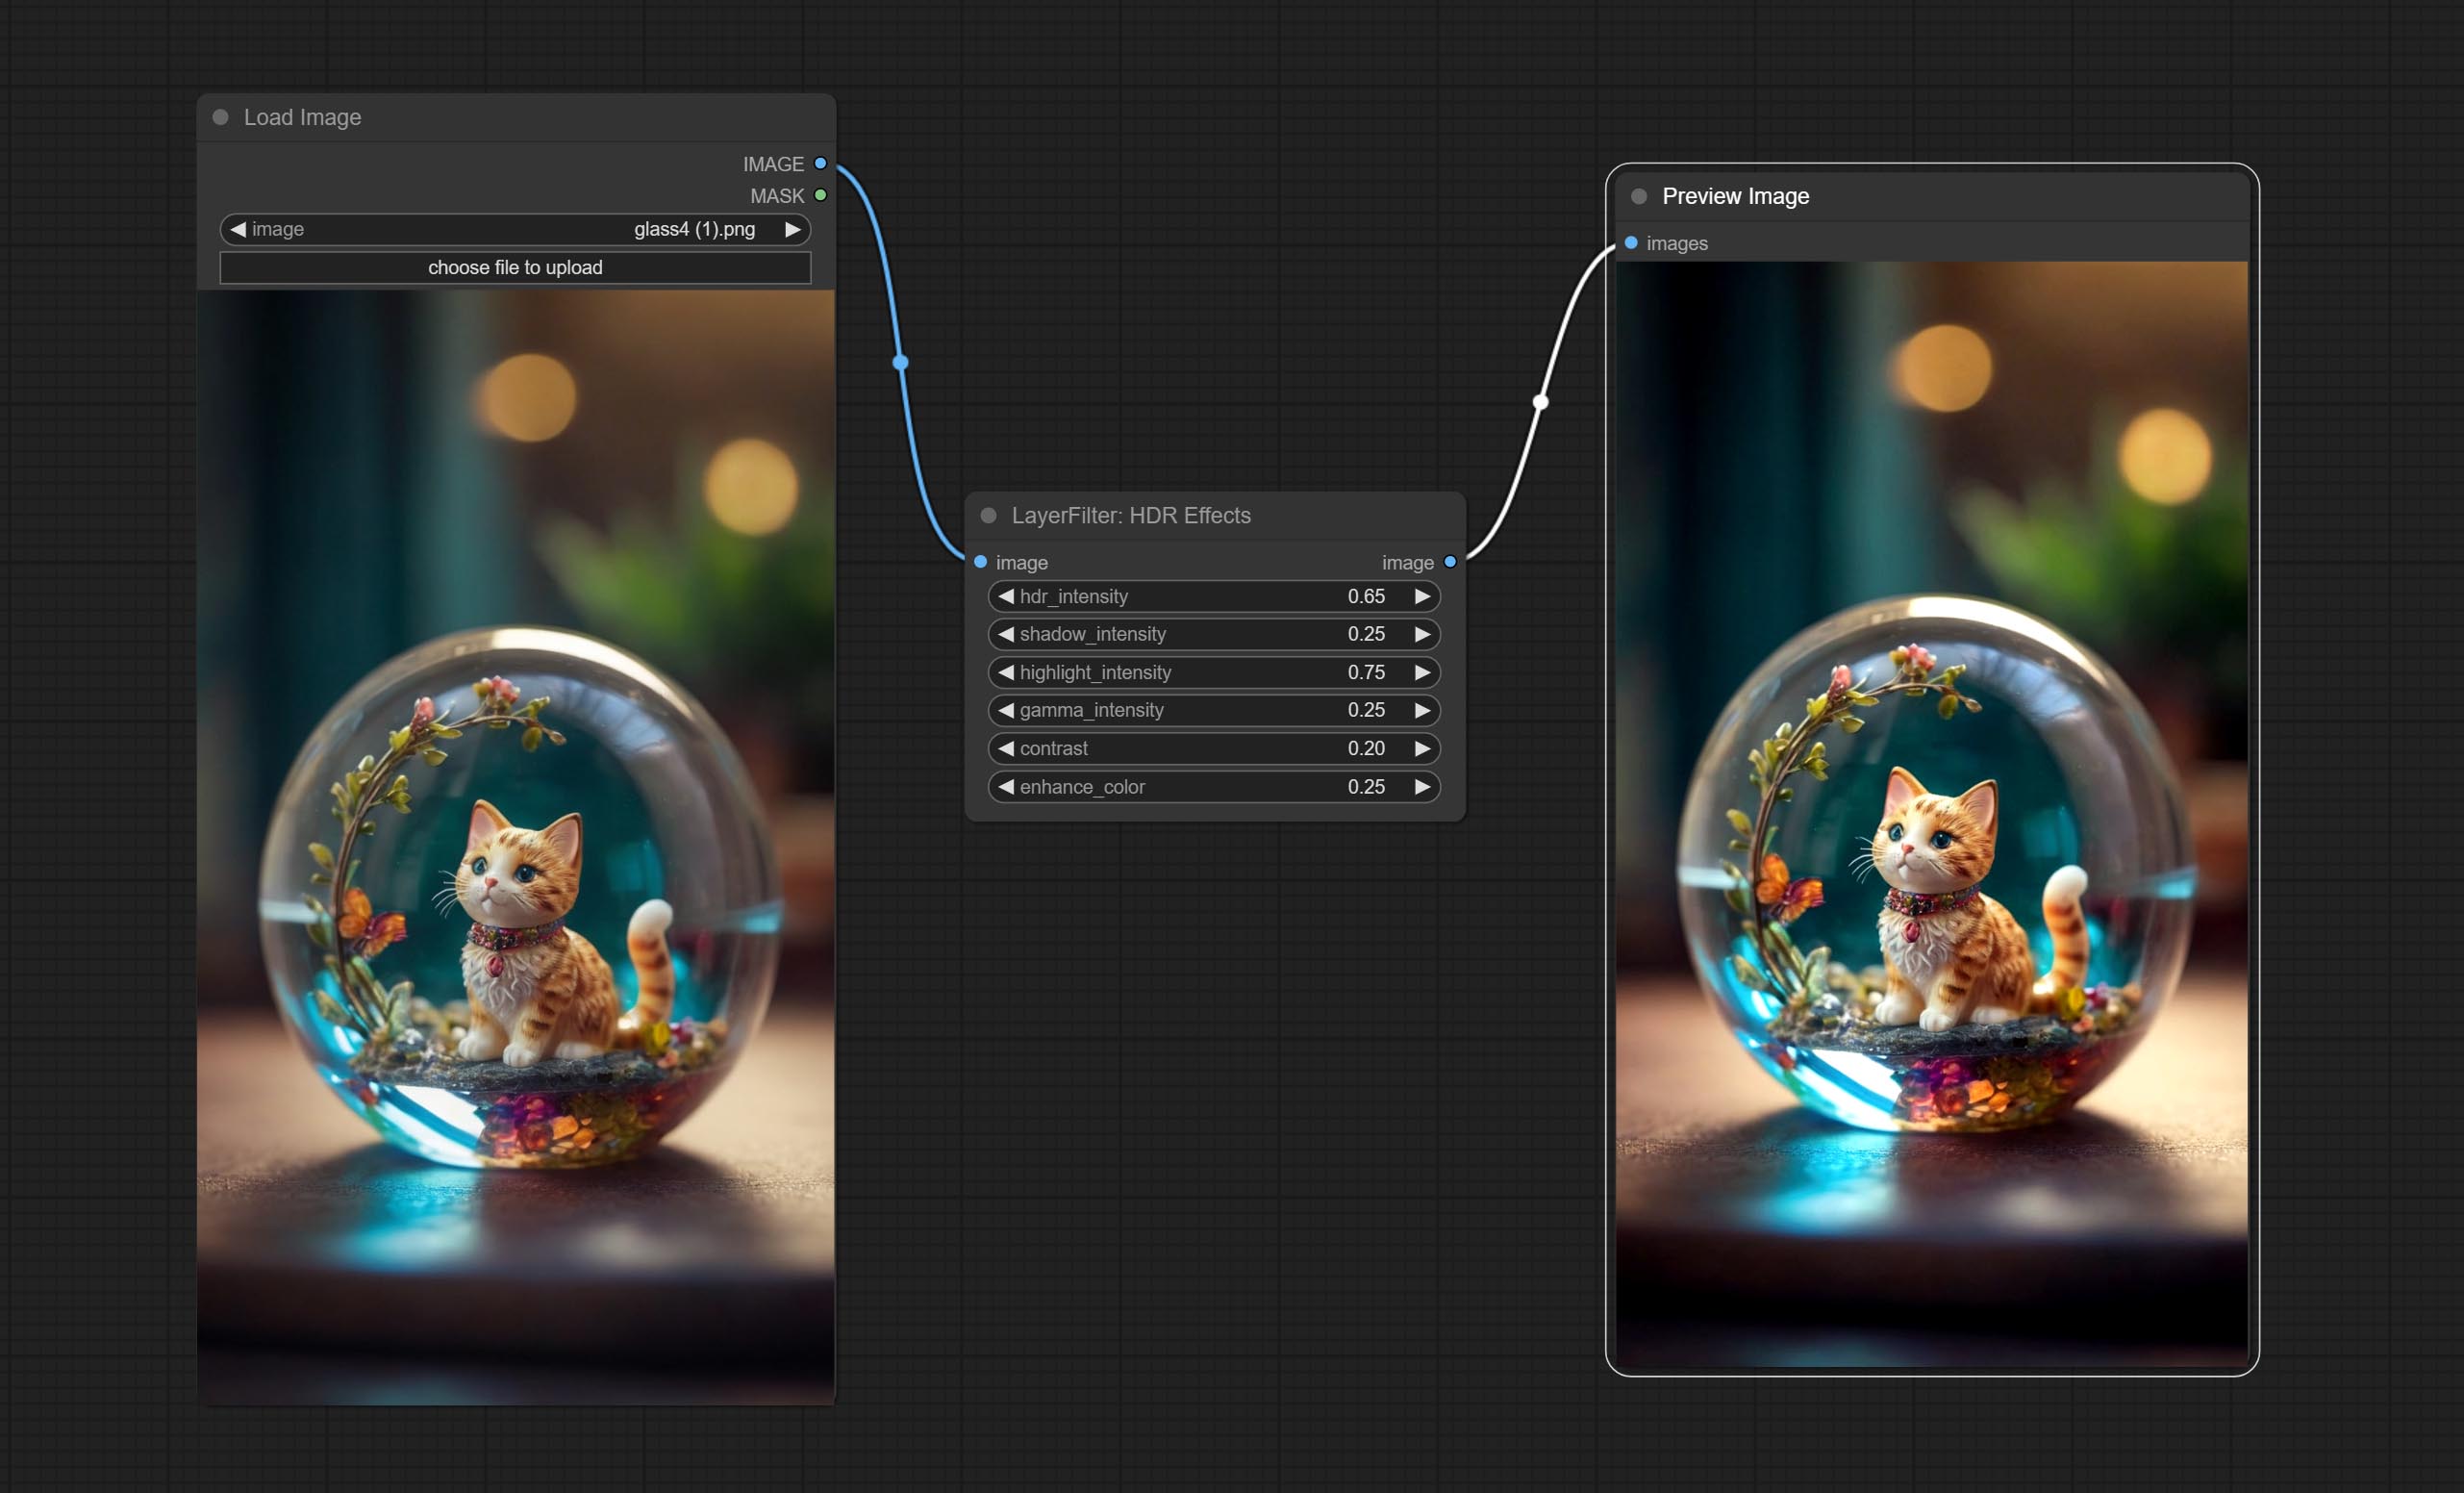
Node options: 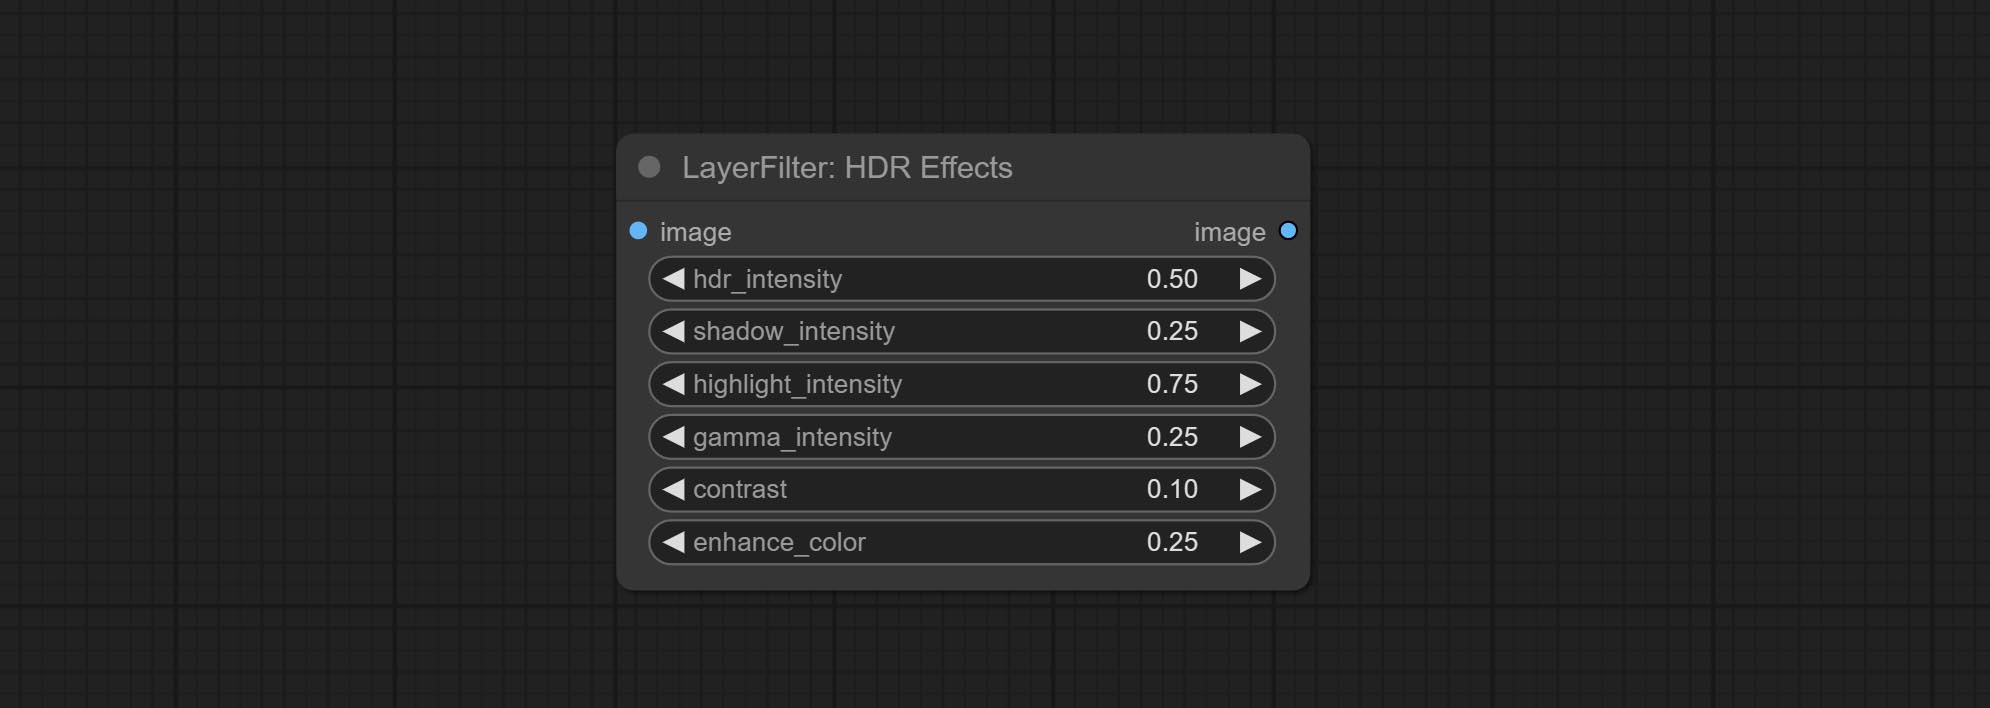
- hdr_intensity: Range: 0.0 to 5.0, Controls the overall intensity of the HDR effect, Higher values result in a more pronounced HDR effect.
- shadow_intmente:范围:0.0至1.0,调整图像中阴影的强度,较高的值使阴影变暗并增加对比度。
- Lightibly_intmentie:范围:0.0至1.0,调整图像中的亮点的强度,更高的值使高光增强并增加对比度。
- gamma_intensity: Range: 0.0 to 1.0,Controls the gamma correction applied to the image,Higher values increase the overall brightness and contrast.
- contrast: Range: 0.0 to 1.0,Enhances the contrast of the image, Higher values result in more pronounced contrast.
- Enhance_Color:范围:0.0至1.0,增强图像的颜色饱和度,更高的值会产生更鲜艳的颜色。
电影
Simulate the grain, dark edge, and blurred edge of the film, support input depth map to simulate defocus.
This node is reorganize and encapsulate of digitaljohn/comfyui-propost, thanks to the original author. 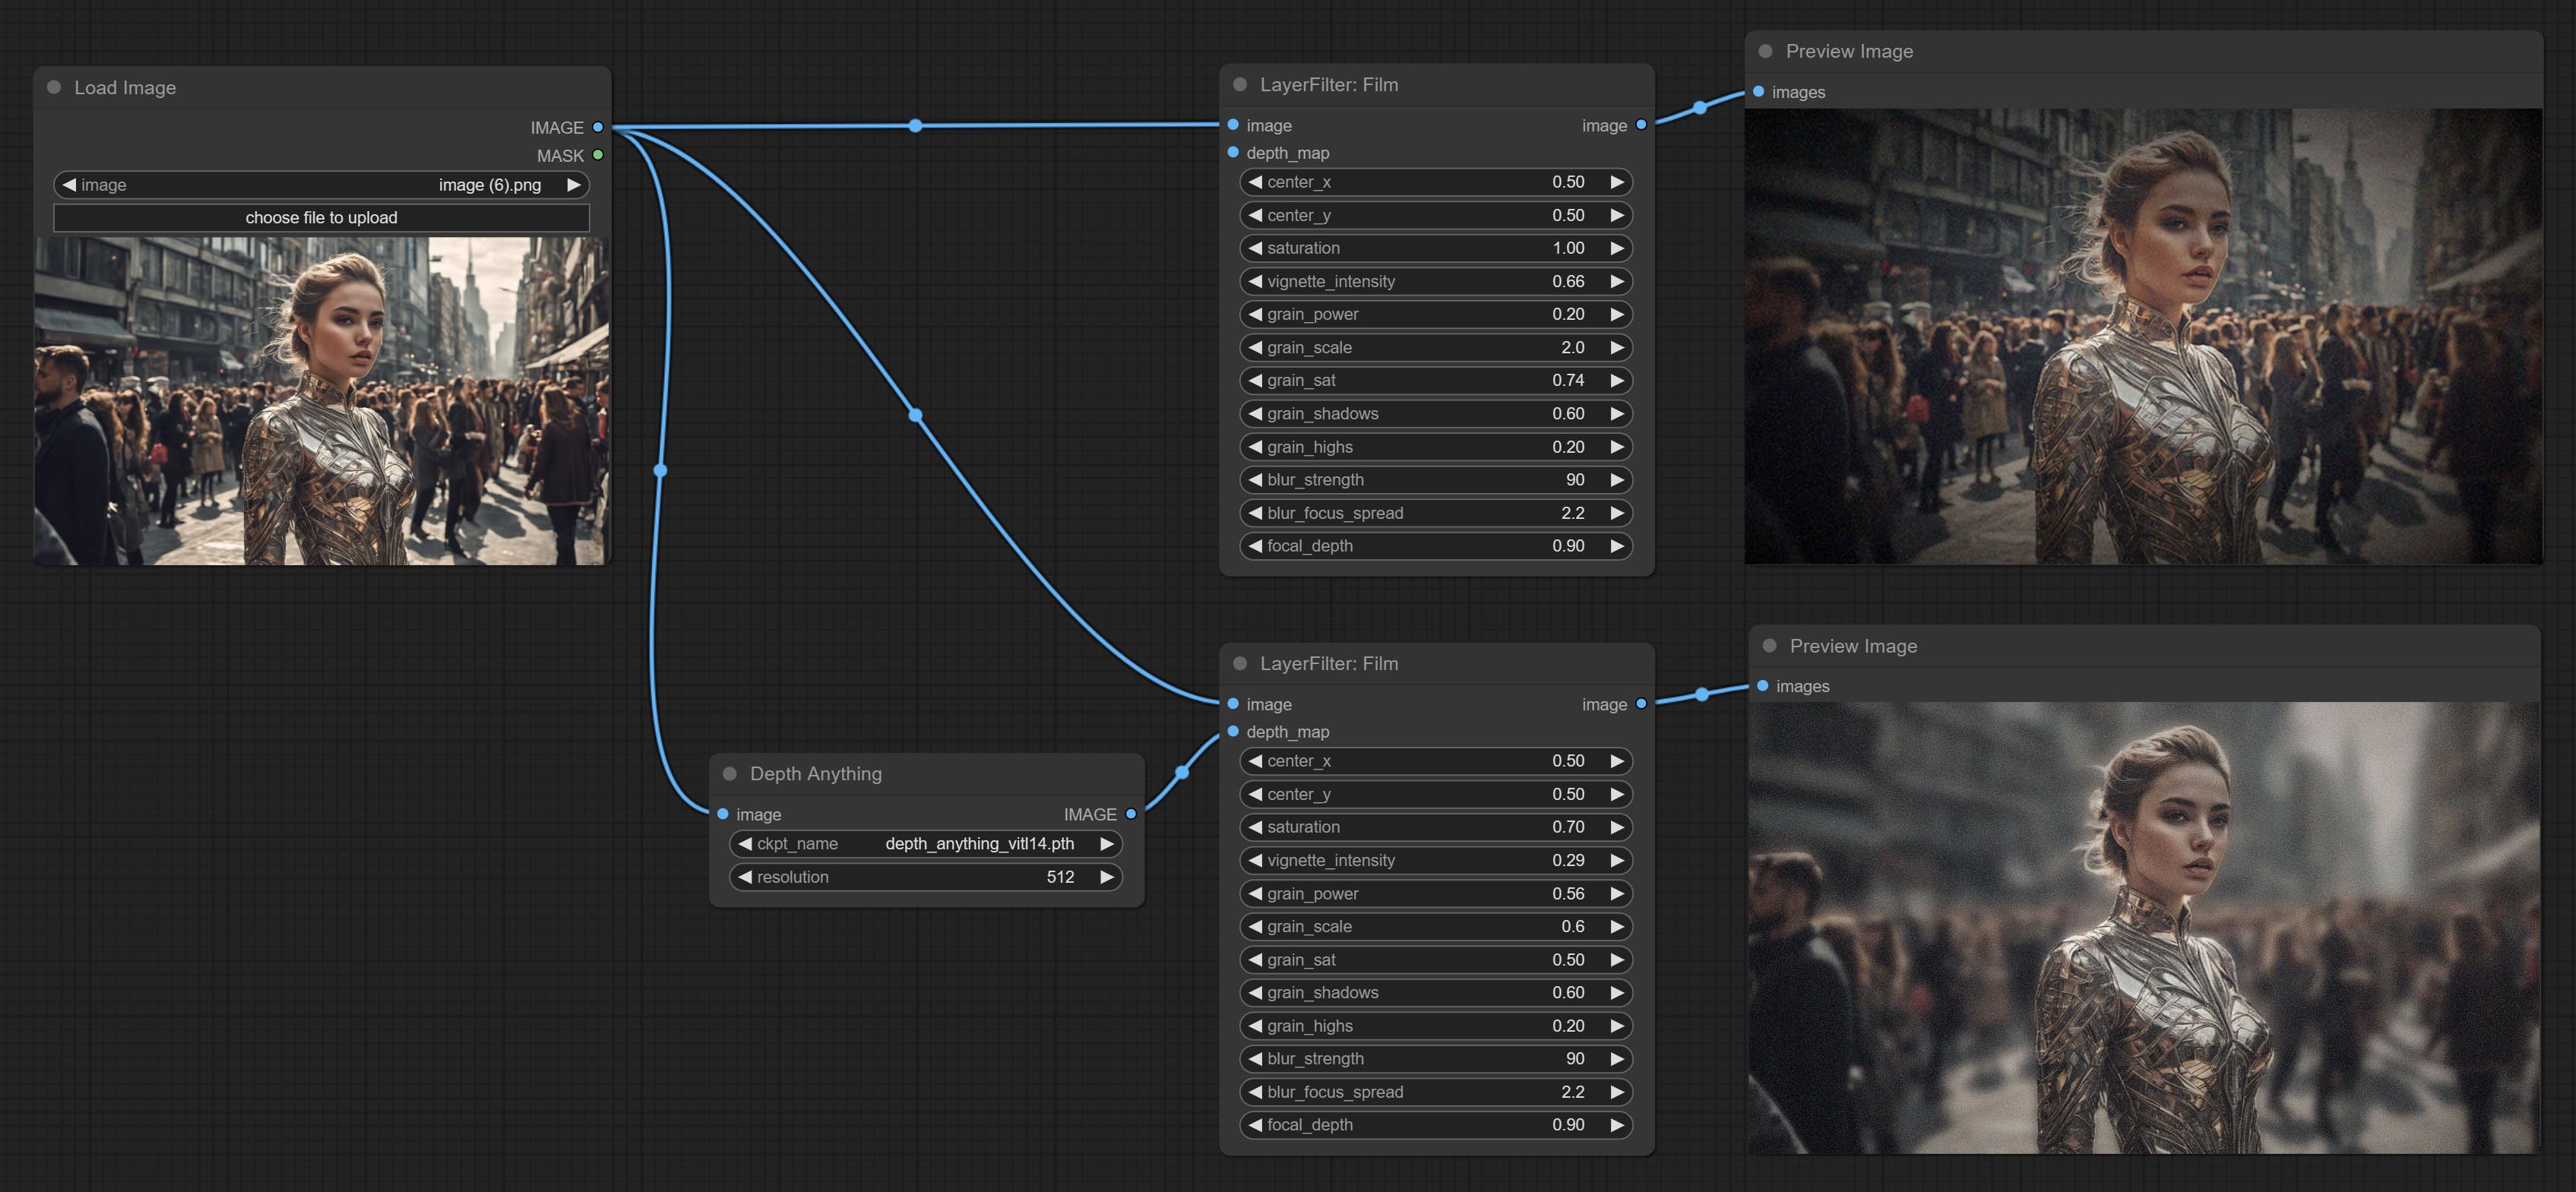
Node options: 
- image: The input image.
- depth_map: Input depth map to simulate defocus effect. it is an optional input. if there is no input, will simulates radial blur at the edges of the image.
- center_x: The horizontal axis of the center point position of the dark edge and radial blur, where 0 represents the leftmost side, 1 represents the rightmost side, and 0.5 represents at the center.
- center_y: The vertical axis of the center point position of the dark edge and radial blur, where 0 represents the leftmost side, 1 represents the rightmost side, and 0.5 represents at the center.
- saturation: Color saturation, 1 is the original value.
- grain_power: Grain intensity. larger value means more pronounced the noise.
- grain_scale: Grain size.
- grain_sat: The color saturation of grain. 0 represents mono noise, and the larger the value, the more prominent the color.
- grain_shadows: Grain intensity of dark part.
- grain_highs: Grain intensity of light part.
- blur_strength: The strength of blur. larger value means more blurry it becomes.
- blur_focus_spread: Focus diffusion range. larger value means larger clear range.
- focal_depth: Simulate the focal distance of defucus. 0 indicates that focus is farthest, and 1 indicates that is closest. this setting only valid when input the depth_map.
FilmV2
The upgraded version of the Film node adds the fastgrain method on the basis of the previous one, and the speed of generating noise is accelerated by 10 times. The code for fastgrain is from github.com/spacepxl/ComfyUI-Image-Filters BetterFilmGrain node, thanks to the original authors. 
LightLeak
Simulate the light leakage effect of the film. please download model file from Baidu Netdisk or [Google Drive]([light_leak.pkl(Google Drive)(https://drive.google.com/file/d/1DcH2Zkyj7W3OiAeeGpJk1eaZpdJwdCL-/view?usp=sharing)) and copy to ComfyUI/models/layerstyle folder. 
Node options: 
- light: 32 types of light spots are provided. random is a random selection.
- corner: There are four options for the corner where the light appears: top left, top right, bottom left, and bottom right.
- hue: The hue of the light.
- saturation: The color saturation of the light.
- opacity: The opacity of the light.
ColorMap
Pseudo color heat map effect. 
Node options: 
- color_map: Effect type. there are a total of 22 types of effects, as shown in the above figure.
- opacity: The opacity of the color map effect.
动态
Make the image motion blur 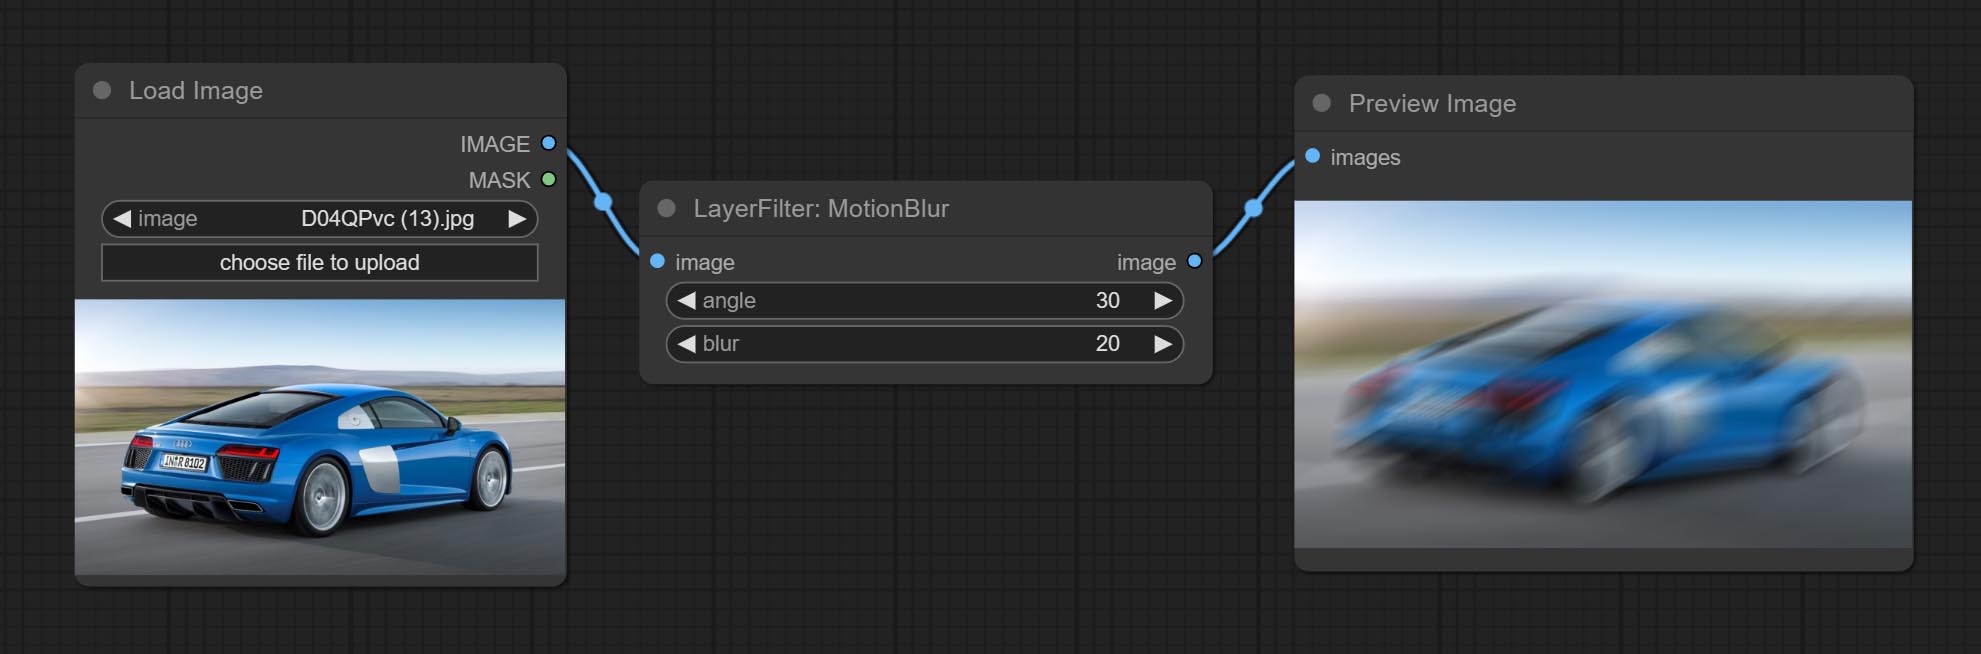
Node options:
- angle: The angle of blur.
- blur: The size of blur.
高斯布鲁尔
Make the image gaussian blur 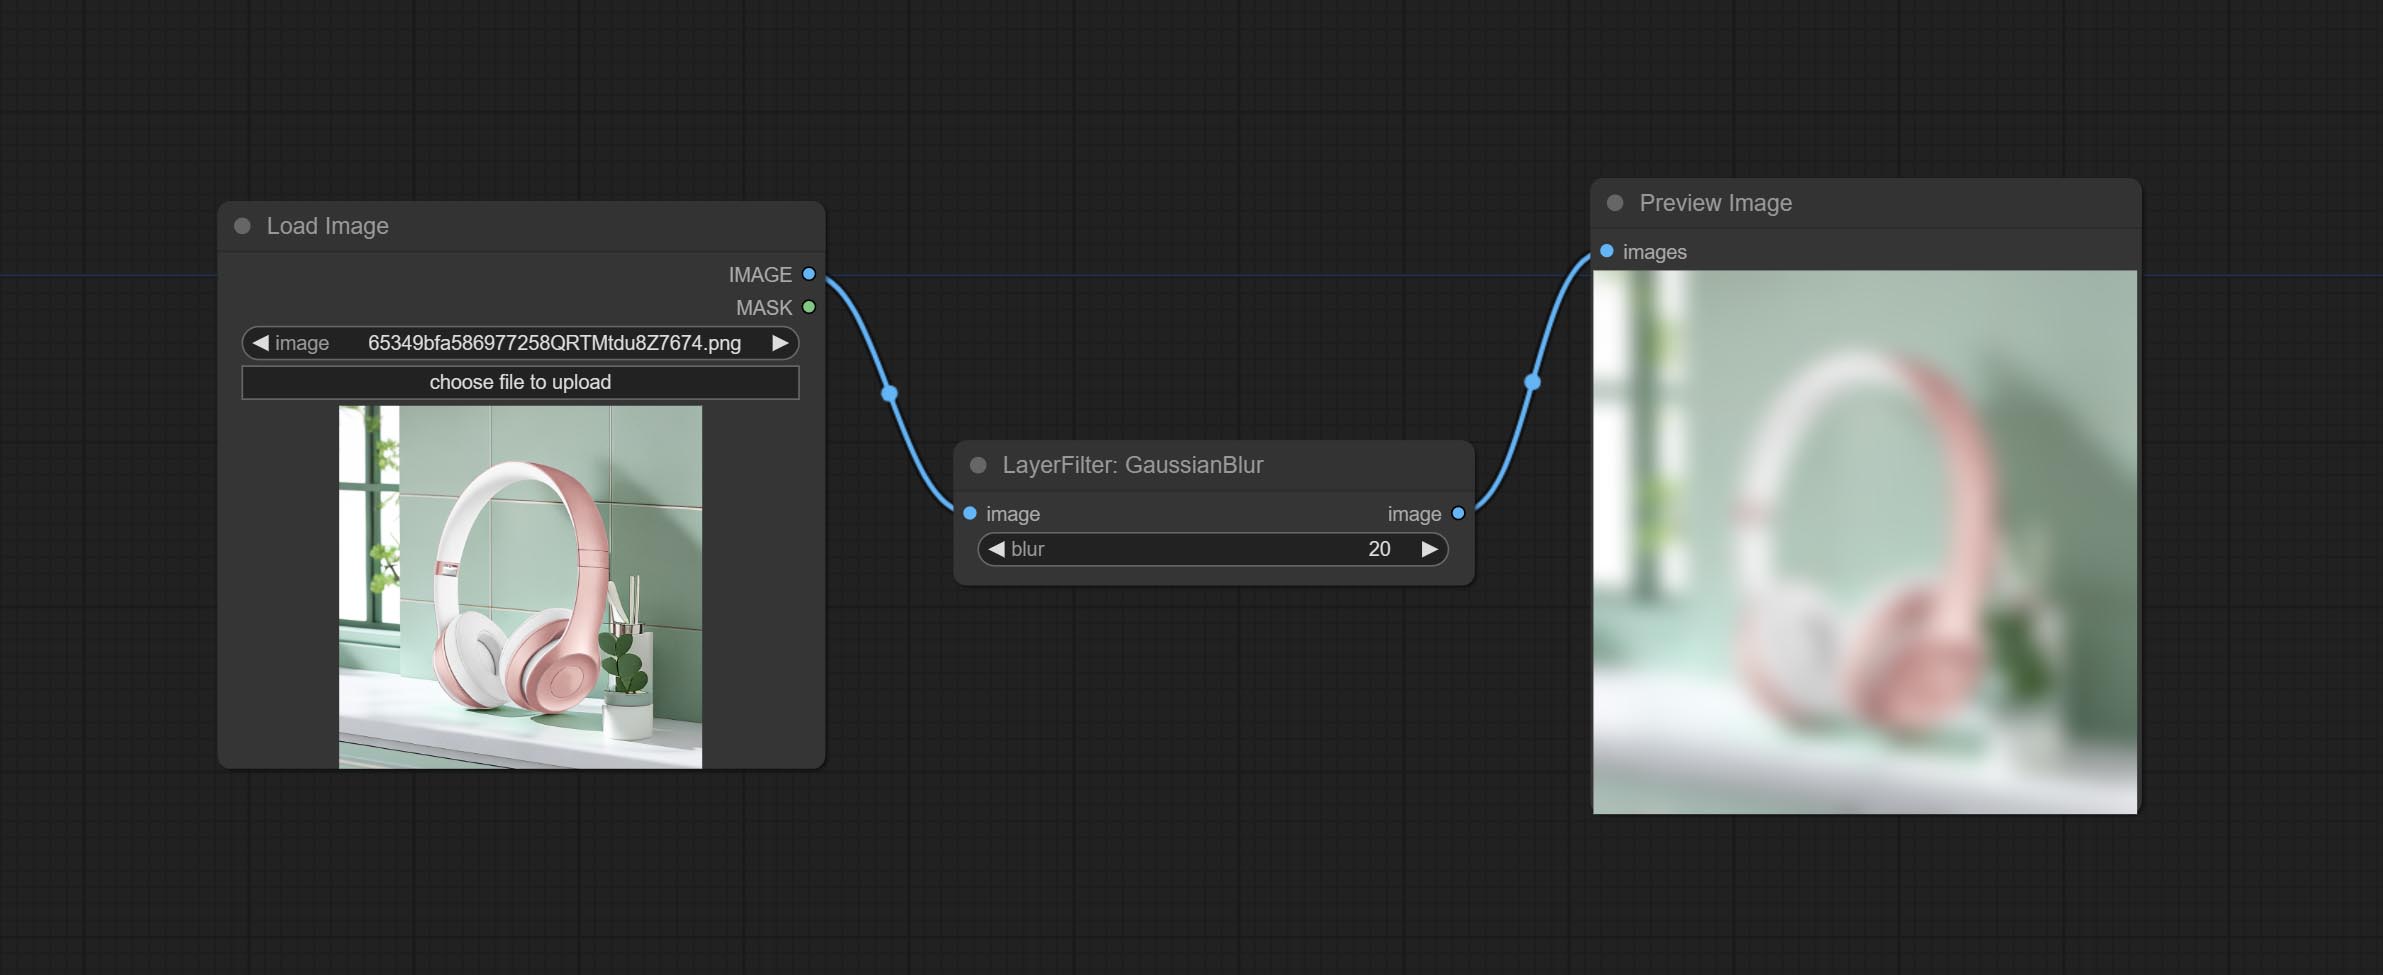
Node options:
- blur: The size of blur, integer, range 1-999.
GaussianBlurV2
Gaussian blur. Change the parameter precision to floating-point number, with a precision of 0.01
Node options: 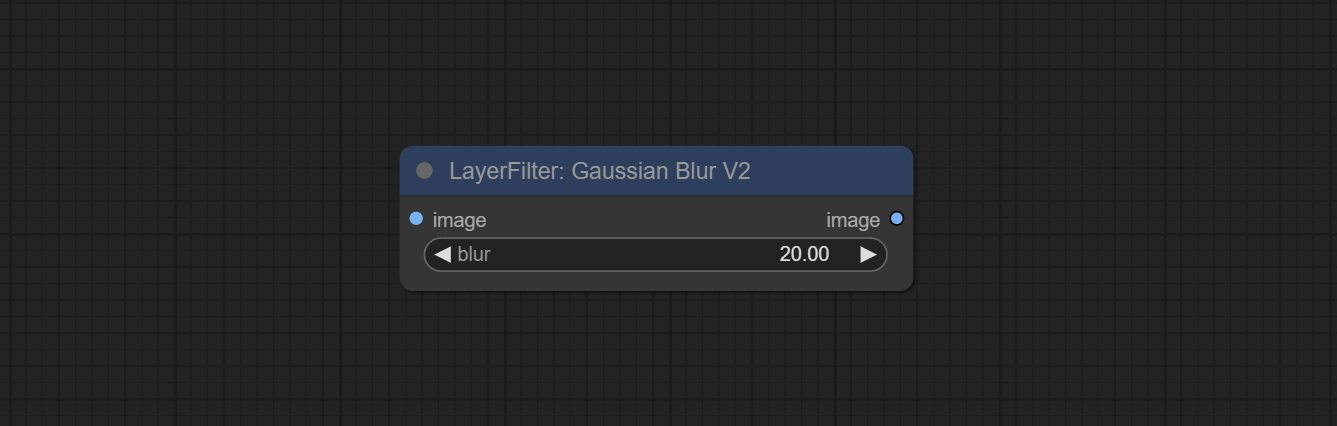
- blur: The size of blur, float, range 0 - 1000.
addgrain
Add noise to the picture. 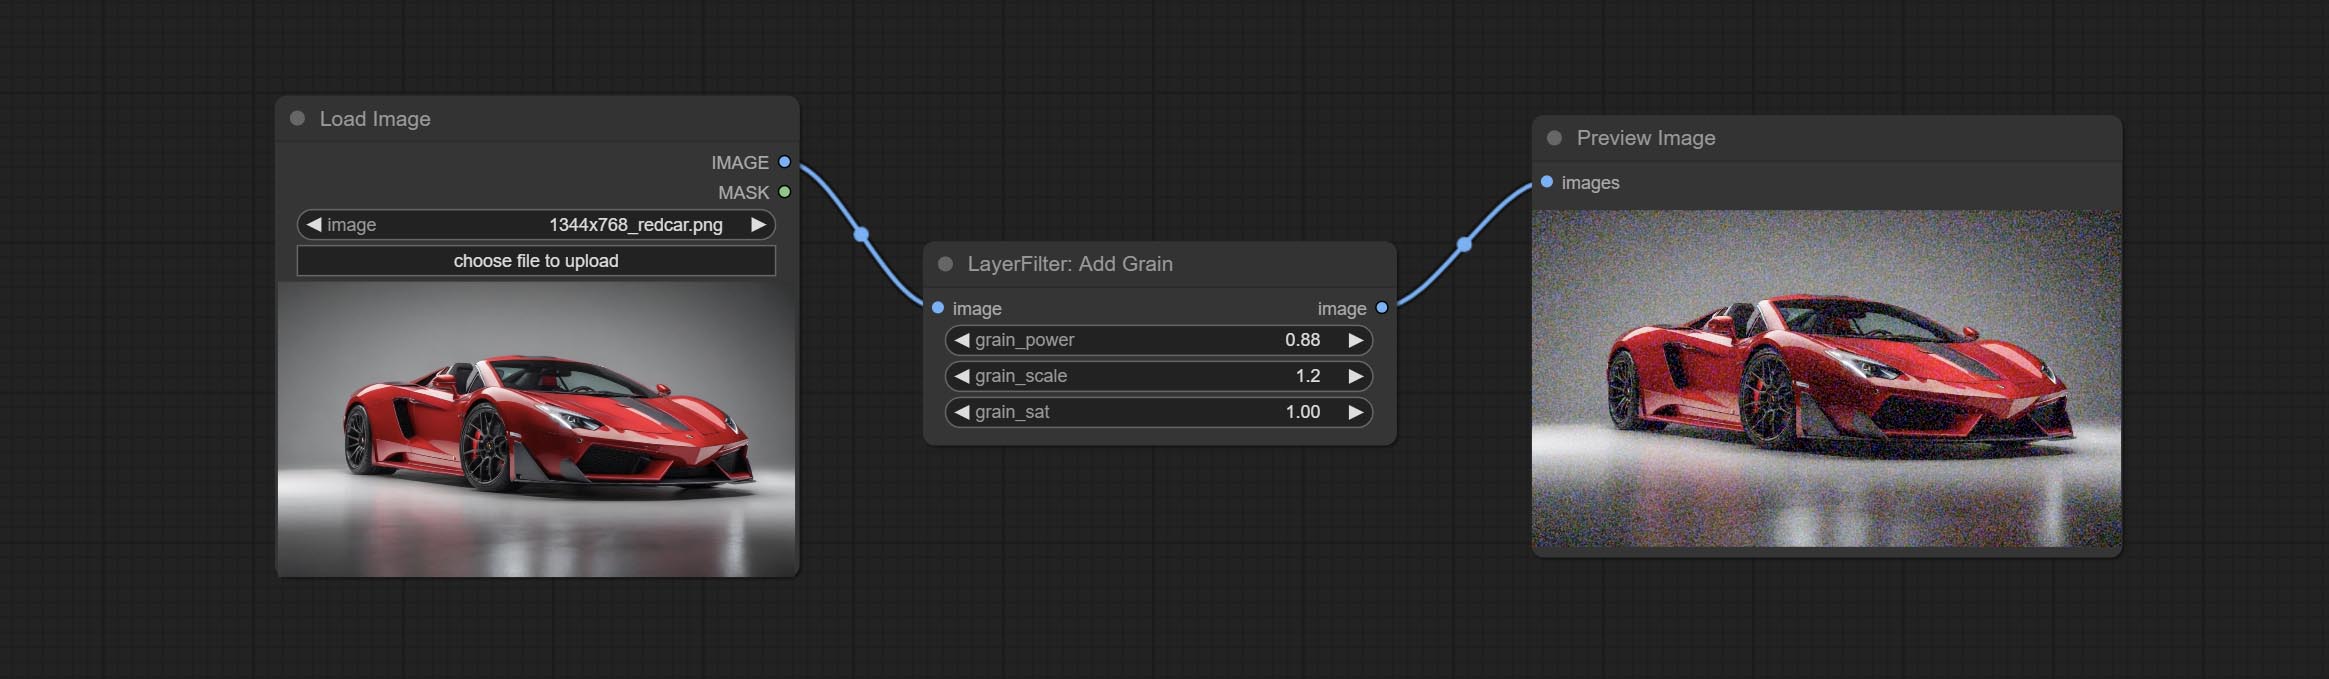
节点选项: 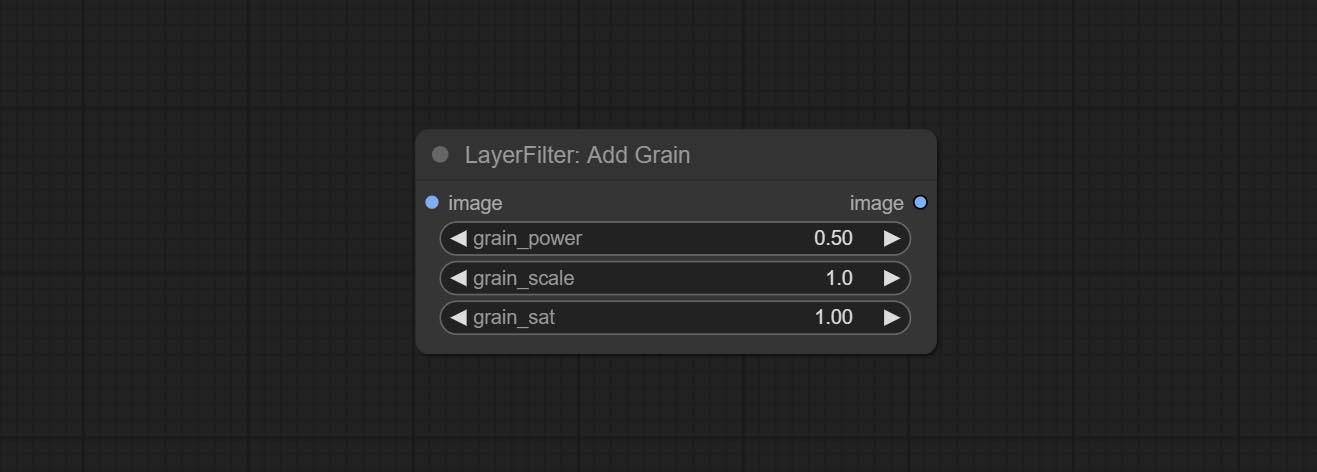
- grain_power: Noise intensity.
- grain_scale: Noise size.
- grain_sat: Color saturation of noise.
注释的注释
1 layer_image,layer_mask和backick_image(如果输入),这三个项目必须具有相同的大小。
2面具不是强制性输入项目。默认情况下使用图像的Alpha通道。如果图像输入不包括Alpha通道,则将自动创建整个图像的Alpha通道。如果同时具有口罩输入,则掩码将覆盖Alpha通道。
3混合模式包括普通,多屏,屏幕,添加,减去,差,差,color_burn,color_dodge,linear_burn,linear_dodge,linear_dodge,offorame,offorame,soft_light,hard_light,vidived_light,pin_light,pin_light,linear_light,linear_light和hard_mix。所有19种混合模式总共。
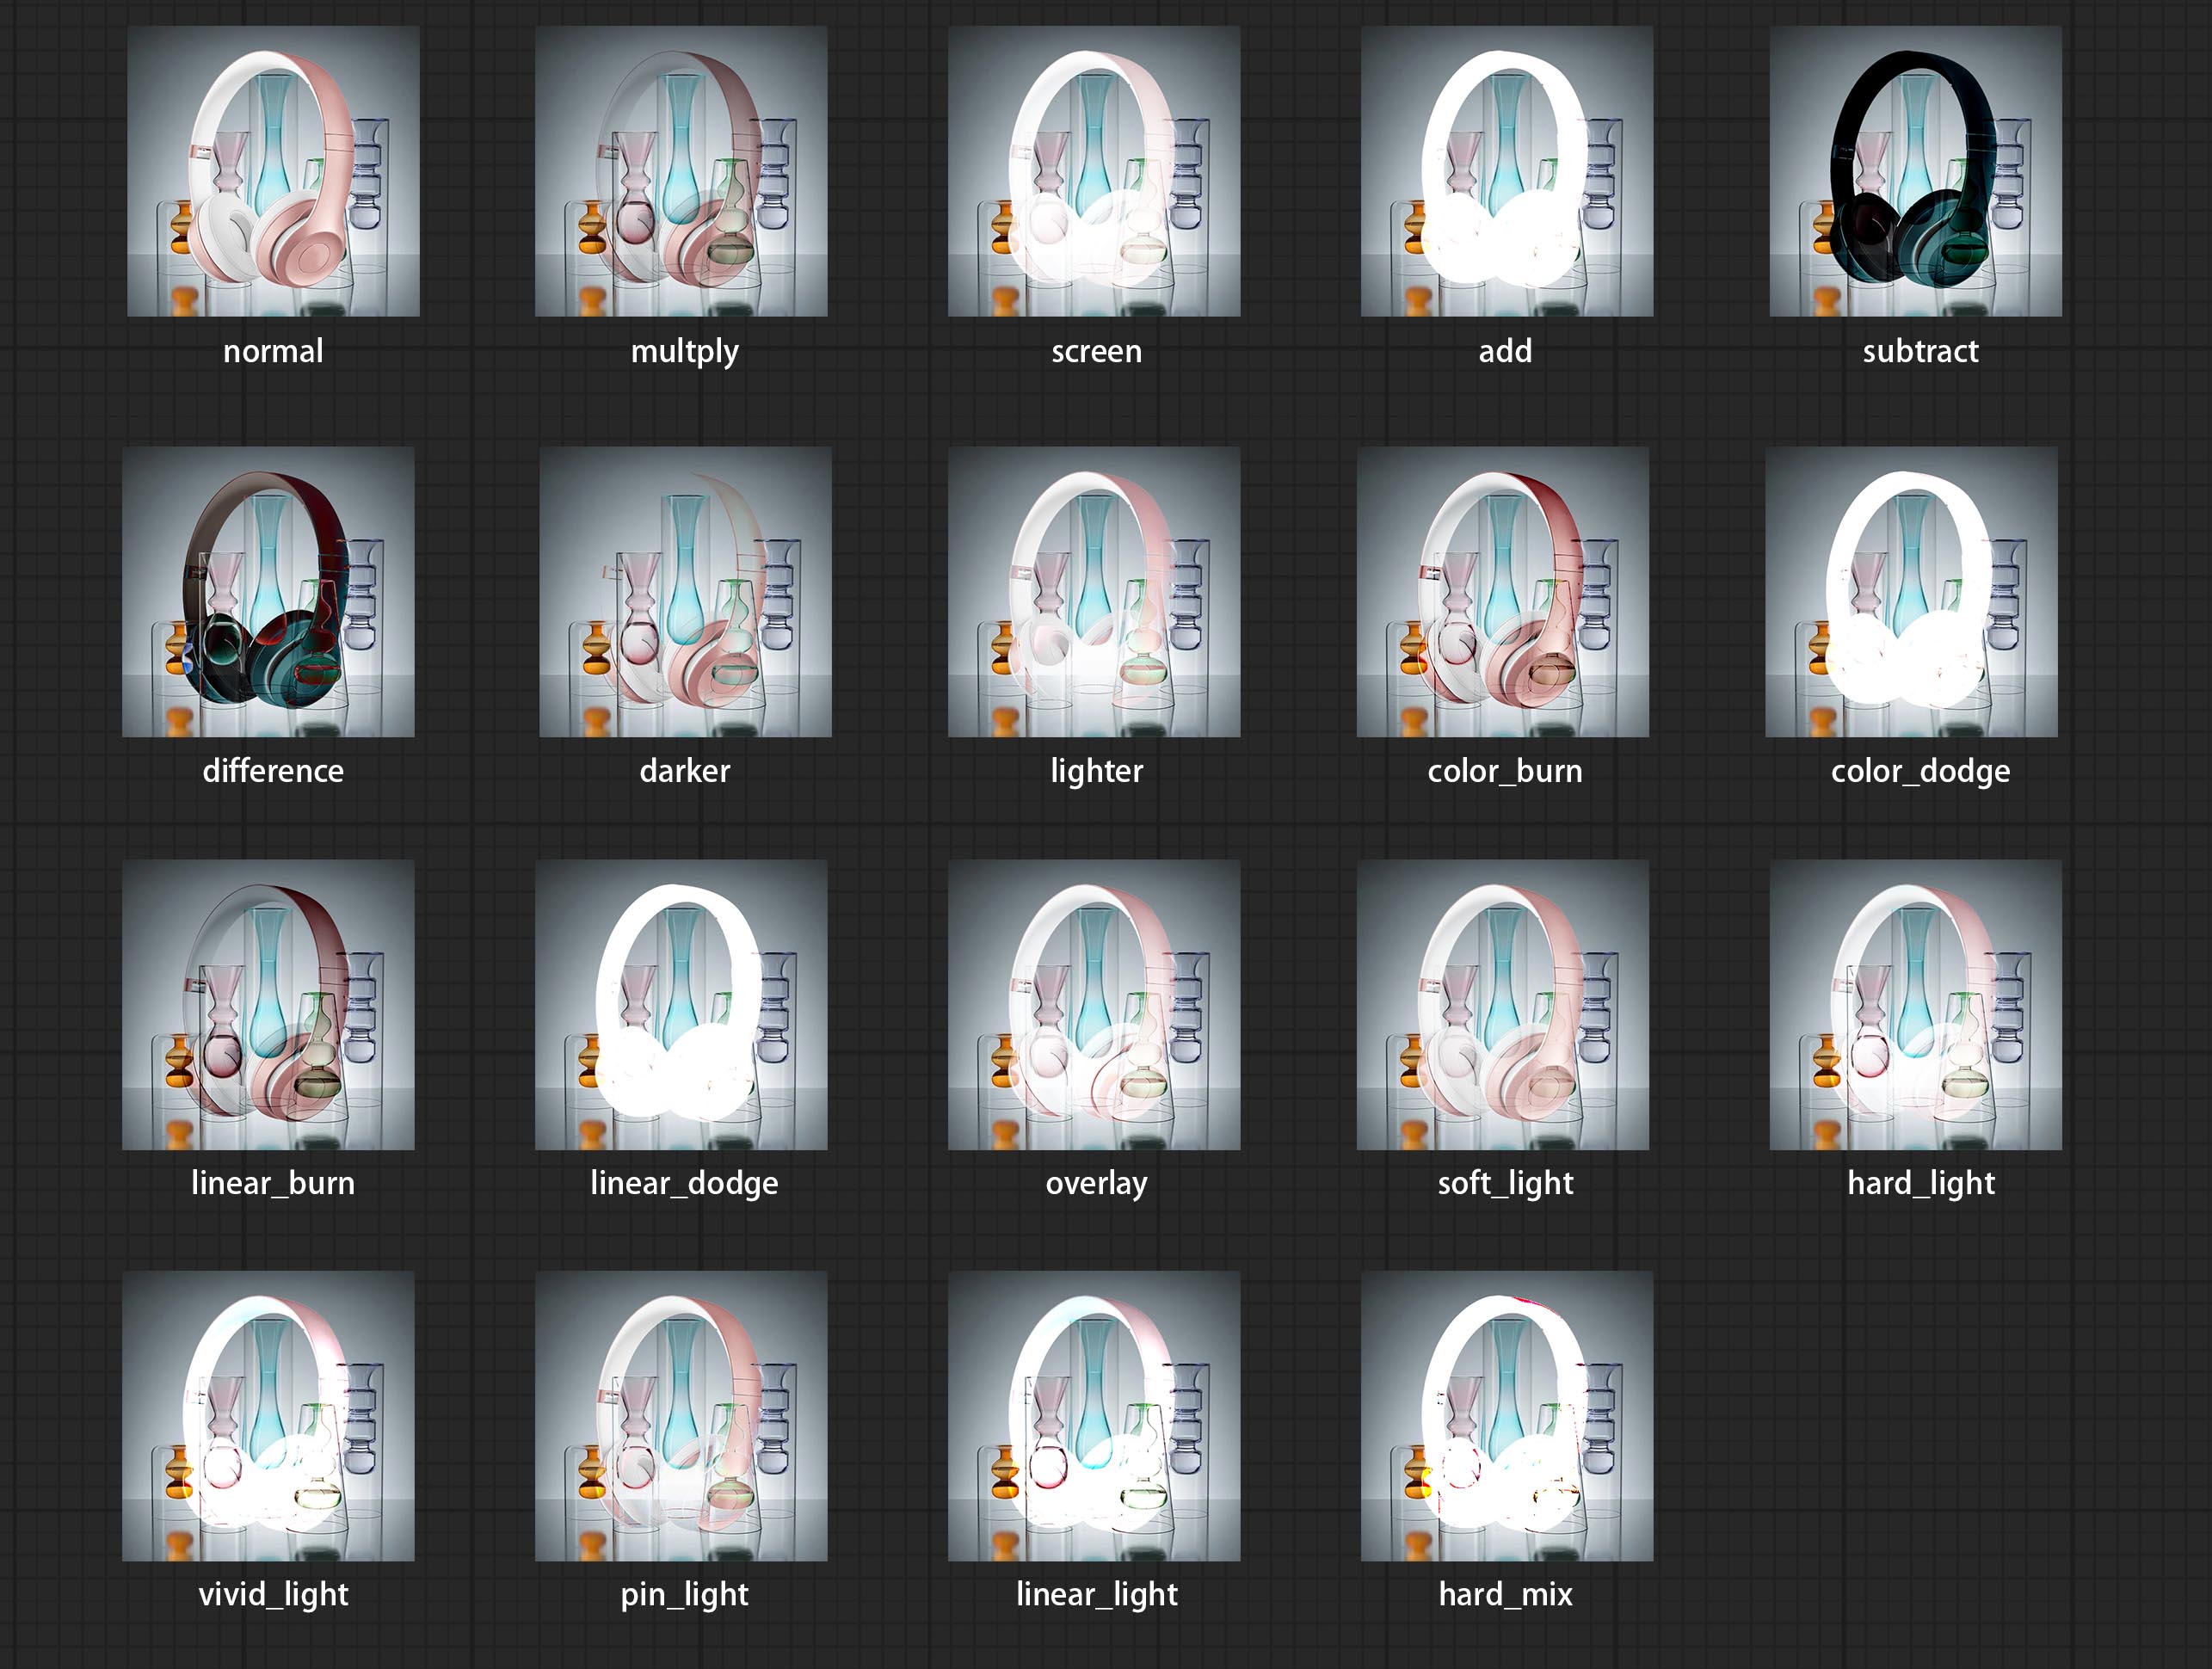
*混合模式的预览
3 The BlendModeV2 include normal, dissolve, darken, multiply, color burn, linear burn, darker color, lighten, screen, color dodge, linear dodge(add), lighter color, dodge, overlay, soft light, hard light, vivid light, linear light, pin light, hard mix, difference, exclusion, subtract, divide, hue, saturation, color, luminosity, grain extract, grain merge all of 30 blend modes in total.
Part of the code for BlendMode V2 is from Virtuoso Nodes for ComfyUI. Thanks to the original authors.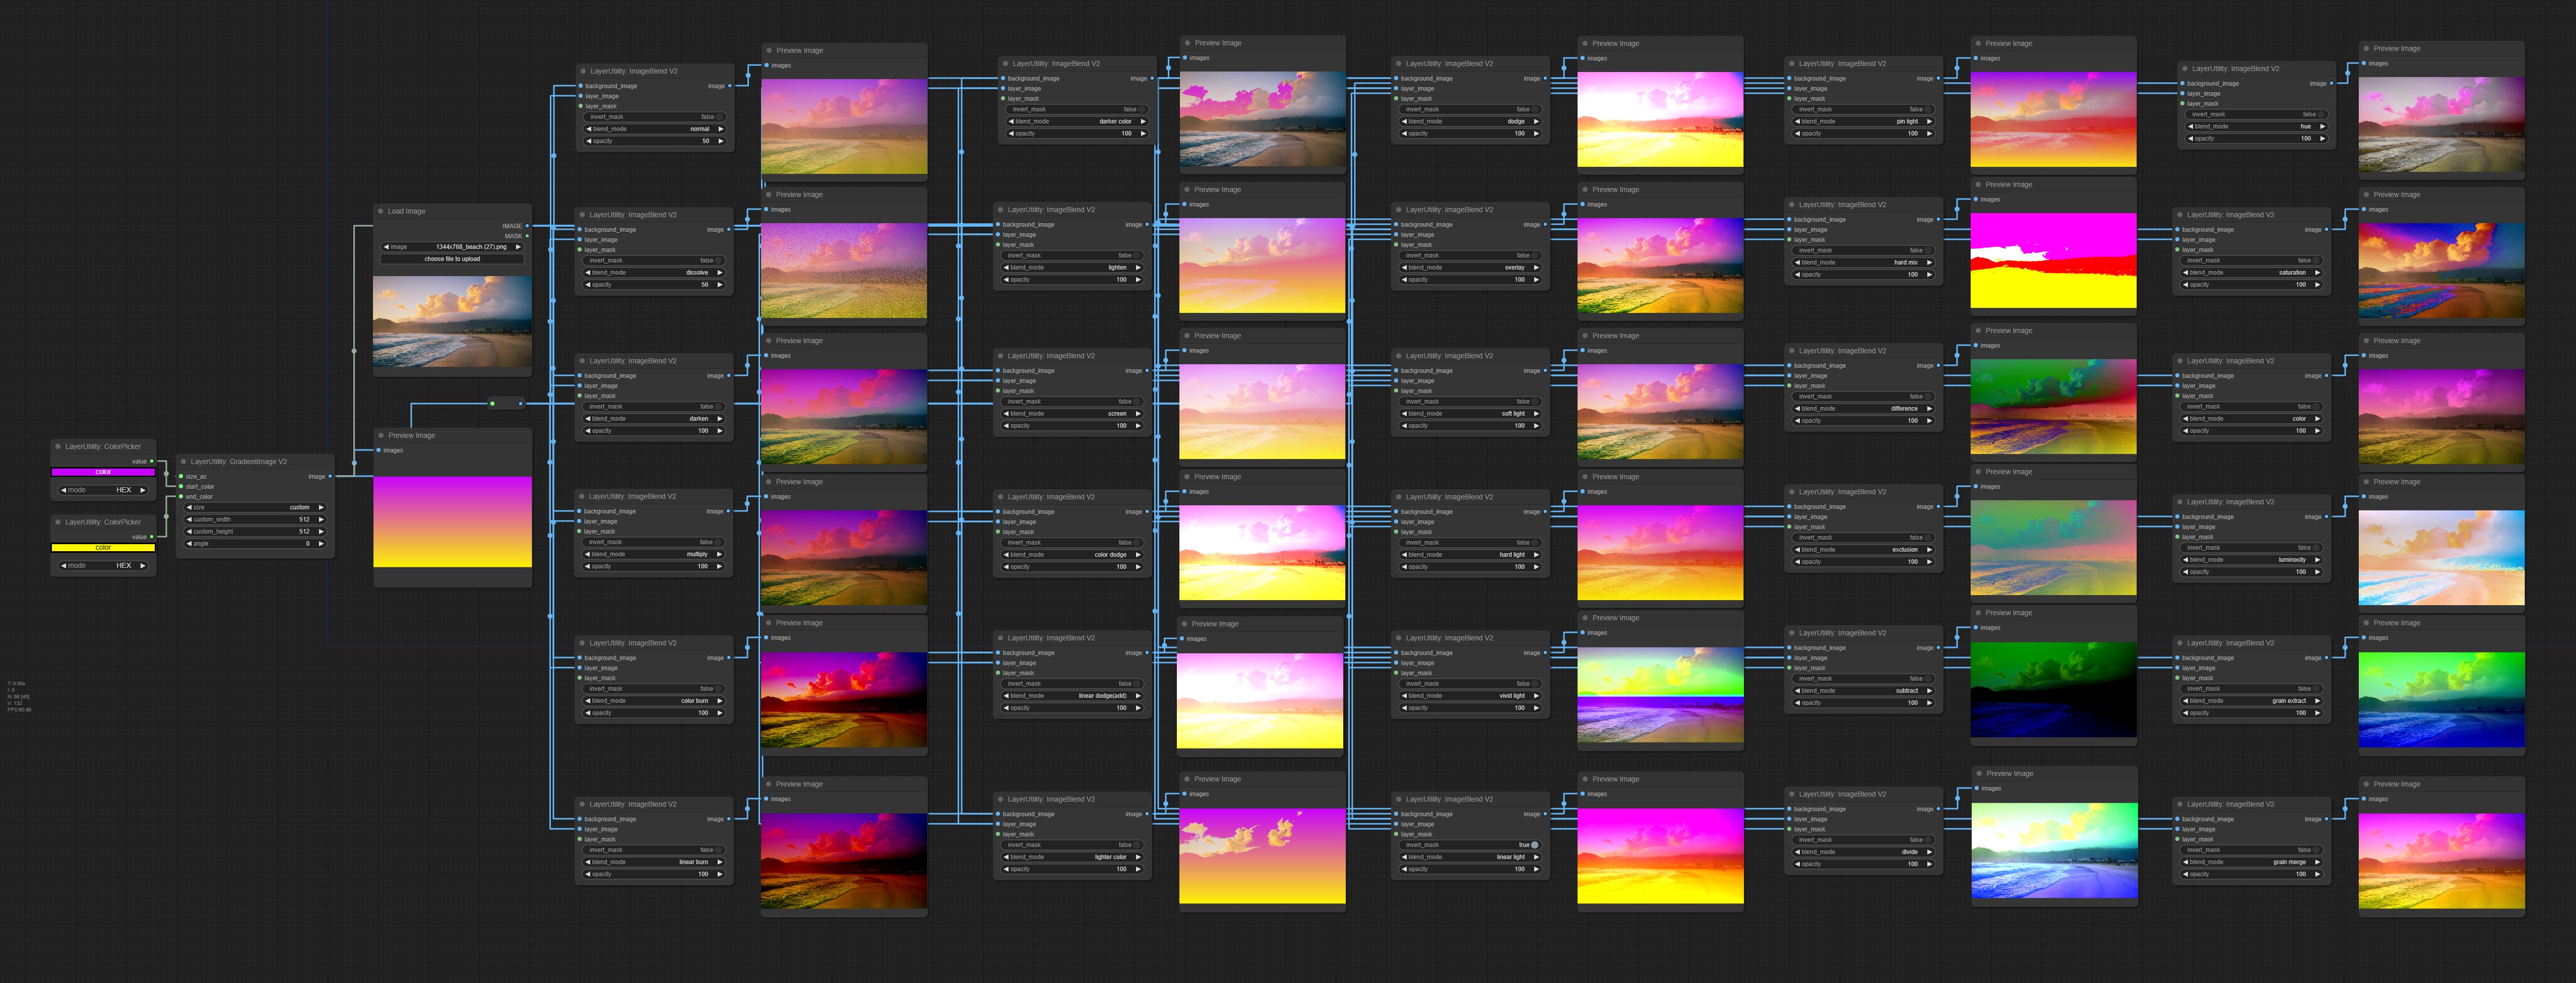
*Preview of the Blend Mode V2
4 The RGB color described by hexadecimal RGB format, like '#FA3D86'.
5 The layer_image and layer_mask must be of the same size.
星星
陈述
LayersTyle节点遵循MIT许可,其一些功能代码来自其他开源项目。感谢原始作者。如果用于商业目的,请参阅授权协议的原始项目许可证。


