vision_transformer
1.0.0
在此存储库中,我们从论文中发布模型
这些模型已在ImageNet和Imagenet-21K数据集上进行了预训练。我们提供用于微调Jax/Flax中发布模型的代码。
该代码库中的模型最初是在https://github.com/google-research/big_vision/中进行培训的/vit_i21k.py用于预训练vit或configs/trass.py用于传输模型)。
目录:
在Colabs下方,既有GPU,又有TPU(8个核心,数据并行性)。
第一个COLAB展示了视觉变压器和MLP混合器的JAX守则。该COLAB允许您直接从COLAB UI中的存储库中编辑文件,并带有注释的Colab单元,这些COLAB单元逐步引导您浏览代码,并让您与数据进行交互。
https://colab.research.google.com/github/google-research/vision_transformer/blob/main/main/vit_jax.ipynb
第二个COLAB允许您探索> 50k视觉变压器和用于生成第三篇论文数据“如何训练VIT?”的数据的混合检查点。 COLAB包括用于探索和选择检查点的代码,并使用此仓库中的JAX代码进行推理,还使用流行的timm Pytorch库,该库也可以直接加载这些检查点。请注意,少数模型也可以直接从TF-Hub提供:Sayakpaul/Collections/Vision_transformer(Sayak Paul的外部贡献)。
第二个COLAB还可以让您在任何TFD数据集和您自己的数据集上微调检查点,并在单个JPEG文件中进行示例(可选地直接从Google Drive读取)。
https://colab.research.google.com/github/google-research/vision_transformer/blob/main/main/vit_jax_augreg.ipynb
注意:目前(6/20/21)Google COLAB仅支持单个GPU(NVIDIA TESLA T4),而TPU(当前TPUV2-8)间接连接到Colab VM并通过慢速网络进行通信,从而导致漂亮的网络。训练速度不佳。如果您有多种数据进行微调,通常需要设置专用的计算机。有关详细信息,请参见云部分上的运行。
确保您的机器上安装了Python>=3.10 。
通过运行来安装JAX和Python依赖性:
 # If using GPU:
pip install -r vit_jax/requirements.txt

# If using TPU:
pip install -r vit_jax/requirements-tpu.txt
对于JAX的较新版本,请遵循此处链接的相应存储库中提供的说明。请注意,CPU,GPU和TPU的安装说明略有不同。
安装FlaxFormer,按照此处链接的相应存储库中提供的说明。
有关更多详细信息,请参阅下面云上运行的部分。
您可以在感兴趣的数据集上微调下载的模型。所有模型共享相同的命令行接口。
例如,用于对CIFAR10上的VIT-B/16进行微调(在Imagenet21K上进行预训练)(请注意我们如何指定b16,cifar10作为配置的参数,以及我们如何指示代码直接从GCS Buccet访问模型而不是首先将它们下载到本地目录):
python -m vit_jax.main --workdir=/tmp/vit- $( date +%s )
    --config= $( pwd ) /vit_jax/configs/vit.py:b16,cifar10
    --config.pretrained_dir= ' gs://vit_models/imagenet21k '
为了微调CIFAR10上的Mixer-B/16(在Imagenet21K上进行预训练):
python -m vit_jax.main --workdir=/tmp/vit- $( date +%s )
    --config= $( pwd ) /vit_jax/configs/mixer_base16_cifar10.py
    --config.pretrained_dir= ' gs://mixer_models/imagenet21k '
“如何训练VIT?...”纸张添加了> 50k检查点,您可以使用configs/augreg.py配置进行微调。当您仅指定模型名称( config.name值中的configs/model.py )时,则选择了上游验证精度的最佳i21k检查点(“推荐”检查点,请参见论文第4.5节)。要下定决心要使用哪种型号,请查看纸张中的图3。还可以选择一个不同的检查点(请参阅Colab vit_jax_augreg.ipynb ),然后从filename或adapt_filename列中指定值,该值与无需.npz的文件名对应于gs://vit_models/augreg目录。
python -m vit_jax.main --workdir=/tmp/vit- $( date +%s )
    --config= $( pwd ) /vit_jax/configs/augreg.py:R_Ti_16
    --config.dataset=oxford_iiit_pet
--config.base_lr=0.01当前,该代码将自动下载CIFAR-10和CIFAR-100数据集。使用TensorFlow数据集库可以轻松地集成其他公共或自定义数据集。请注意,您还需要更新vit_jax/input_pipeline.py以指定有关任何添加数据集的一些参数。
请注意,我们的代码使用所有可用的GPU/TPU进行微调。
要查看所有可用标志的详细列表,请运行python3 -m vit_jax.train --help 。
记忆的注释:
--config.accum_steps=8的值,或者,您也可以减少--config.batch=512 (并相应地降低--config.base_lr )。--config.shuffle_buffer=50000 。 由Alexey Dosovitskiy*†,Lucas Beyer*,Alexander Kolesnikov*,Dirk Weissenborn*,Xiaohua Zhai*,Thomas Unterthiner,Mostafa Dehghani,Matthiassinerer,Matthiassinerer,Matthias Minderer,Georg Heigold,Georg Heigold,Sylvain Gelly,Sylvain Gelly Gelly Gelly,Jakzkob Usit和neilial and neil neil andsby*I.
(*)同等的技术贡献,(†)同等的建议。
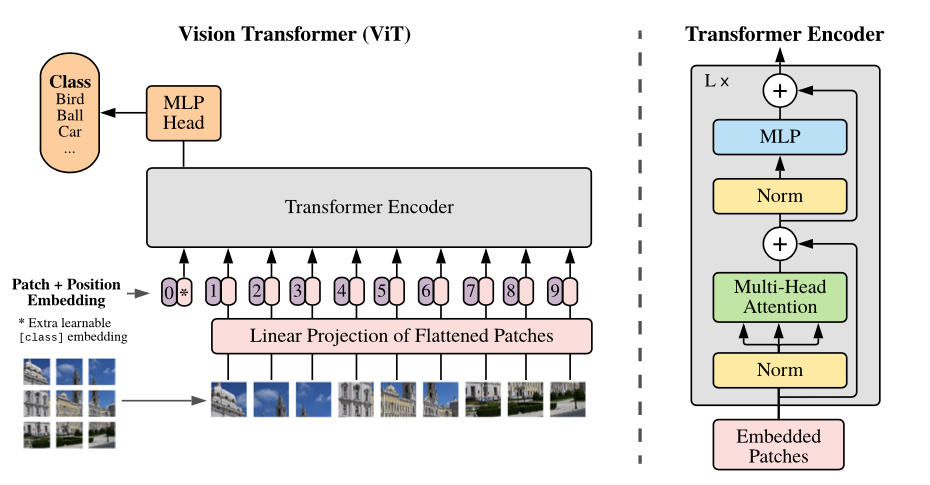
模型的概述:我们将图像拆分为固定尺寸的补丁,线性嵌入每个贴片,添加位置嵌入,然后将矢量的序列馈送到标准变压器编码器中。为了执行分类,我们使用标准方法将额外的可学习的“分类令牌”添加到序列中。
我们在不同的GCS存储桶中提供各种VIT模型。这些模型可以通过EG下载:
wget https://storage.googleapis.com/vit_models/imagenet21k/ViT-B_16.npz
模型文件名(不带.npz扩展名)对应于vit_jax/configs/models.py的config.model_name 。
gs://vit_models/imagenet21k在Imagenet-21K上预先训练的模型。gs://vit_models/imagenet21k+imagenet2012模型在Imagenet-21K上预先训练,并在Imagenet上进行微调。gs://vit_models/augreg在Imagenet-21K上预先训练的模型,应用不同量的AUGREG。提高性能。gs://vit_models/sam用SAM预先训练的模型。gs://vit_models/gsam - Models pre-trained on ImageNet with GSAM.我们建议使用以下检查点,该检查站接受了具有最好的预训练指标的AUGREG培训:
| 模型 | 预训练的检查点 | 尺寸 | 微调检查点 | 解决 | img/sec | 成像网的精度 |
|---|---|---|---|---|---|---|
| l/16 | gs://vit_models/augreg/L_16-i21k-300ep-lr_0.001-aug_strong1-wd_0.1-do_0.0-sd_0.0.npz | 1243 MIB | gs://vit_models/augreg/L_16-i21k-300ep-lr_0.001-aug_strong1-wd_0.1-do_0.0-sd_0.0--imagenet2012-steps_20k-lr_0.01-res_384.npz | 384 | 50 | 85.59% |
| B/16 | gs://vit_models/augreg/B_16-i21k-300ep-lr_0.001-aug_medium1-wd_0.1-do_0.0-sd_0.0.npz | 391 MIB | gs://vit_models/augreg/B_16-i21k-300ep-lr_0.001-aug_medium1-wd_0.1-do_0.0-sd_0.0--imagenet2012-steps_20k-lr_0.03-res_384.npz | 384 | 138 | 85.49% |
| S/16 | gs://vit_models/augreg/S_16-i21k-300ep-lr_0.001-aug_light1-wd_0.03-do_0.0-sd_0.0.npz | 115 MIB | gs://vit_models/augreg/S_16-i21k-300ep-lr_0.001-aug_light1-wd_0.03-do_0.0-sd_0.0--imagenet2012-steps_20k-lr_0.03-res_384.npz | 384 | 300 | 83.73% |
| R50+L/32 | gs://vit_models/augreg/R50_L_32-i21k-300ep-lr_0.001-aug_medium1-wd_0.1-do_0.1-sd_0.1.npz | 1337 MIB | gs://vit_models/augreg/R50_L_32-i21k-300ep-lr_0.001-aug_medium1-wd_0.1-do_0.1-sd_0.1--imagenet2012-steps_20k-lr_0.01-res_384.npz | 384 | 327 | 85.99% |
| R26+S/32 | gs://vit_models/augreg/R26_S_32-i21k-300ep-lr_0.001-aug_light1-wd_0.1-do_0.0-sd_0.0.npz | 170 MIB | gs://vit_models/augreg/R26_S_32-i21k-300ep-lr_0.001-aug_light1-wd_0.1-do_0.0-sd_0.0--imagenet2012-steps_20k-lr_0.01-res_384.npz | 384 | 560 | 83.85% |
| ti/16 | gs://vit_models/augreg/Ti_16-i21k-300ep-lr_0.001-aug_none-wd_0.03-do_0.0-sd_0.0.npz | 37 MIB | gs://vit_models/augreg/Ti_16-i21k-300ep-lr_0.001-aug_none-wd_0.03-do_0.0-sd_0.0--imagenet2012-steps_20k-lr_0.03-res_384.npz | 384 | 610 | 78.22% |
| B/32 | gs://vit_models/augreg/B_32-i21k-300ep-lr_0.001-aug_light1-wd_0.1-do_0.0-sd_0.0.npz | 398 MIB | gs://vit_models/augreg/B_32-i21k-300ep-lr_0.001-aug_light1-wd_0.1-do_0.0-sd_0.0--imagenet2012-steps_20k-lr_0.01-res_384.npz | 384 | 955 | 83.59% |
| S/32 | gs://vit_models/augreg/S_32-i21k-300ep-lr_0.001-aug_none-wd_0.1-do_0.0-sd_0.0.npz | 118 MIB | gs://vit_models/augreg/S_32-i21k-300ep-lr_0.001-aug_none-wd_0.1-do_0.0-sd_0.0--imagenet2012-steps_20k-lr_0.01-res_384.npz | 384 | 2154 | 79.58% |
| R+Ti/16 | gs://vit_models/augreg/R_Ti_16-i21k-300ep-lr_0.001-aug_none-wd_0.03-do_0.0-sd_0.0.npz | 40 MIB | gs://vit_models/augreg/R_Ti_16-i21k-300ep-lr_0.001-aug_none-wd_0.03-do_0.0-sd_0.0--imagenet2012-steps_20k-lr_0.03-res_384.npz | 384 | 2426 | 75.40% |
使用来自gs://vit_models/imagenet21k的模型复制了原始VIT论文(https://arxiv.org/abs/2010.11929)的结果。
| 模型 | 数据集 | 辍学= 0.0 | 辍学= 0.1 |
|---|---|---|---|
| R50+VIT-B_16 | CIFAR10 | 98.72%,3.9h(A100),TB.DEV | 98.94%,10.1H(V100),TB.DEV |
| R50+VIT-B_16 | CIFAR100 | 90.88%,4.1H(A100),tb.dev | 92.30%,10.1h(v100),tb.dev |
| R50+VIT-B_16 | Imagenet2012 | 83.72%,9.9h(A100),TB.DEV | 85.08%,24.2h(v100),tb.dev |
| VIT-B_16 | CIFAR10 | 99.02%,2.2h(a100),tb.dev | 98.76%,7.8h(v100),tb.dev |
| VIT-B_16 | CIFAR100 | 92.06%,2.2H(A100),tb.dev | 91.92%,7.8h(v100),tb.dev |
| VIT-B_16 | Imagenet2012 | 84.53%,6.5h(A100),TB.DEV | 84.12%,19.3h(v100),tb.dev |
| VIT-B_32 | CIFAR10 | 98.88%,0.8h(a100),tb.dev | 98.75%,1.8h(v100),tb.dev |
| VIT-B_32 | CIFAR100 | 92.31%,0.8H(A100),TB.DEV | 92.05%,1.8h(v100),tb.dev |
| VIT-B_32 | Imagenet2012 | 81.66%,3.3h(a100),tb.dev | 81.31%,4.9h(v100),tb.dev |
| VIT-L_16 | CIFAR10 | 99.13%,6.9h(A100),TB.DEV | 99.14%,24.7h(v100),tb.dev |
| VIT-L_16 | CIFAR100 | 92.91%,7.1H(A100),tb.dev | 93.22%,24.4h(v100),tb.dev |
| VIT-L_16 | Imagenet2012 | 84.47%,16.8h(A100),TB.DEV | 85.05%,59.7h(v100),tb.dev |
| VIT-L_32 | CIFAR10 | 99.06%,1.9H(A100),TB.DEV | 99.09%,6.1H(V100),TB.DEV |
| VIT-L_32 | CIFAR100 | 93.29%,1.9H(A100),TB.DEV | 93.34%,6.2h(v100),tb.dev |
| VIT-L_32 | Imagenet2012 | 81.89%,7.5h(A100),TB.DEV | 81.13%,15.0h(v100),tb.dev |
我们还要强调,通过较短的培训时间表可以实现高质量的结果,并鼓励我们的代码用户使用超参数来折衷准确性和计算预算。下表列出了CIFAR-10/100数据集的一些示例。
| 上游 | 模型 | 数据集 | total_steps / hamphup_steps | 准确性 | 墙上的时间 | 关联 |
|---|---|---|---|---|---|---|
| Imagenet21K | VIT-B_16 | CIFAR10 | 500 /50 | 98.59% | 17m | Tensorboard.dev |
| Imagenet21K | VIT-B_16 | CIFAR10 | 1000 /100 | 98.86% | 39m | Tensorboard.dev |
| Imagenet21K | VIT-B_16 | CIFAR100 | 500 /50 | 89.17% | 17m | Tensorboard.dev |
| Imagenet21K | VIT-B_16 | CIFAR100 | 1000 /100 | 91.15% | 39m | Tensorboard.dev |
由Ilya Tolstikhin*,Neil Houlsby*,Alexander Kolesnikov*,Lucas Beyer*,Xiaohua Zhai,Thomas Unterthiner,Jessica Yung,Andreas Steiner,Andreas Steiner,Daniel Keysers,Daniel Keysers,Jakob Uszkkoreit,Mario Lucic,Mario Lucic,Alexey Dosovitskiy。
(*)同等贡献。
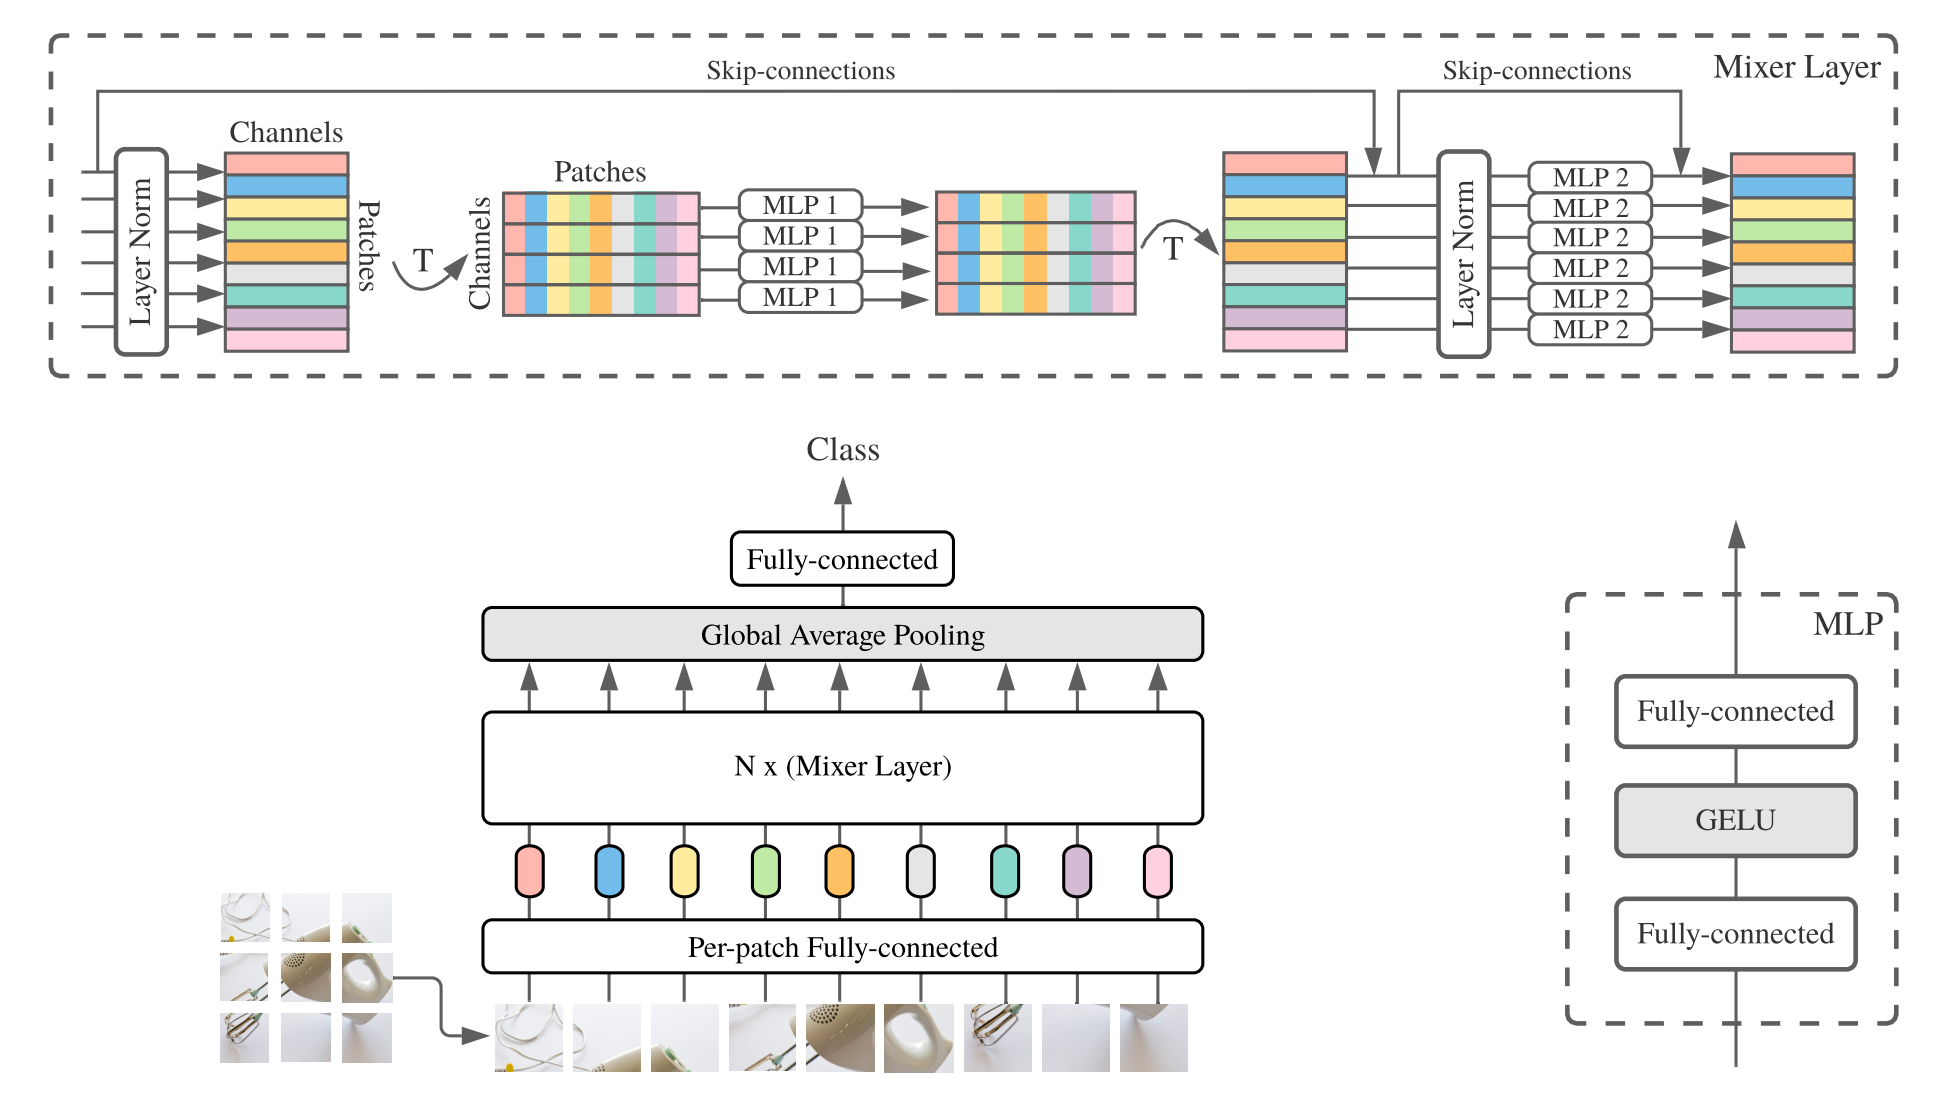
MLP-Mixer(简短的混合器)由每次斑点线性嵌入,混合层和分类器头组成。混合层包含一个令牌混合MLP和一个混合MLP,每个MLP由两个完全连接的层和一个Gelu非线性组成。其他组件包括:跳过连接,辍学和线性分类器头。
对于安装,请按照上述步骤进行相同的步骤。
我们提供了在ImageNet和Imagenet-21K数据集上预先训练的混合器-B/16和混合器L/16模型。详细信息可以在混合纸的表3中找到。所有模型都可以找到:
https://console.cloud.google.com/storage/mixer_models/
请注意,这些模型也可以直接从TF-HUB获得:Sayakpaul/Collections/MLP-Mixer(Sayak Paul的外部贡献)。
我们在Google Cloud Machine上使用了四个V100 GPU在该存储库中使用了四个V100 GPU的微调代码。这是结果:
| 上游 | 模型 | 数据集 | 准确性 | wall_clock_time | 关联 |
|---|---|---|---|---|---|
| 成像网 | 混音器-B/16 | CIFAR10 | 96.72% | 3.0H | Tensorboard.dev |
| 成像网 | 混音器l/16 | CIFAR10 | 96.59% | 3.0H | Tensorboard.dev |
| Imagenet-21k | 混音器-B/16 | CIFAR10 | 96.82% | 9.6H | Tensorboard.dev |
| Imagenet-21k | 混音器l/16 | CIFAR10 | 98.34% | 10.0h | Tensorboard.dev |
有关详细信息,请参阅Google AI博客文章LIT:在图像模型中添加语言理解,或阅读CVPR纸“ LIT:使用锁定图像文本调整”(https://arxiv.org/abs/2111.079991) )。
我们发布了一个具有成像Zeroshot精度为72.1%的变压器B/16基本模型,以及一个具有ImageNet Zeroshot精度为75.7%的L/16大型模型。有关这些型号的更多详细信息,请参阅LIT模型卡。
我们提供一个带有小文本编码器的浏览器演示(最小的型号甚至应该在现代手机上运行):
https://google-research.github.io/vision_transformer/lit/
最后,COLAB使用与图像和文本编码器的JAX模型:
https://colab.research.google.com/github/google-research/vision_transformer/blob/main/lit.ipynb
请注意,以上模型尚未支持多语言输入,但是我们正在努力发布此类模型,并一旦可用来更新该存储库。
该存储库仅包含针对LIT模型的评估代码。您可以在big_vision存储库中找到培训代码:
https://github.com/google-research/big_vision/tree/main/main/big_vision/configs/proj/image_text
预期的zeroshot结果来自model_cards/lit.md (请注意,Zeroshot评估与COLAB中的简化评估略有不同):
| 模型 | B16B_2 | L16L |
|---|---|---|
| Imagenet零射 | 73.9% | 75.7% |
| Imagenet V2零射 | 65.1% | 66.6% |
| CIFAR100零射 | 79.0% | 80.5% |
| PETS37零射 | 83.3% | 83.3% |
| resisc45零射 | 25.3% | 25.6% |
| MS-Coco字幕图像到文本检索 | 51.6% | 48.5% |
| MS-Coco字幕文本对图像检索 | 31.8% | 31.1% |
虽然上colabs上方的起步非常有用,但您通常需要在具有更强大加速器的较大机器上训练。
您可以使用以下命令在Google Cloud上设置使用GPU的VM:
 # Set variables used by all commands below.
# Note that project must have accounting set up.
# For a list of zones with GPUs refer to
# https://cloud.google.com/compute/docs/gpus/gpu-regions-zones
PROJECT=my-awesome-gcp-project  # Project must have billing enabled.
VM_NAME=vit-jax-vm-gpu
ZONE=europe-west4-b

# Below settings have been tested with this repository. You can choose other
# combinations of images & machines (e.g.), refer to the corresponding gcloud commands:
# gcloud compute images list --project ml-images
# gcloud compute machine-types list
# etc.
gcloud compute instances create $VM_NAME
    --project= $PROJECT --zone= $ZONE
    --image=c1-deeplearning-tf-2-5-cu110-v20210527-debian-10
    --image-project=ml-images --machine-type=n1-standard-96
    --scopes=cloud-platform,storage-full --boot-disk-size=256GB
    --boot-disk-type=pd-ssd --metadata=install-nvidia-driver=True
    --maintenance-policy=TERMINATE
    --accelerator=type=nvidia-tesla-v100,count=8

# Connect to VM (after some minutes needed to setup & start the machine).
gcloud compute ssh --project $PROJECT --zone $ZONE $VM_NAME

# Stop the VM after use (only storage is billed for a stopped VM).
gcloud compute instances stop --project $PROJECT --zone $ZONE $VM_NAME

# Delete VM after use (this will also remove all data stored on VM).
gcloud compute instances delete --project $PROJECT --zone $ZONE $VM_NAME
另外,您可以使用以下类似命令来设置带有TPU的云VM(以下从TPU教程复制的命令):
PROJECT=my-awesome-gcp-project  # Project must have billing enabled.
VM_NAME=vit-jax-vm-tpu
ZONE=europe-west4-a

# Required to set up service identity initially.
gcloud beta services identity create --service tpu.googleapis.com

# Create a VM with TPUs directly attached to it.
gcloud alpha compute tpus tpu-vm create $VM_NAME
    --project= $PROJECT --zone= $ZONE
    --accelerator-type v3-8
    --version tpu-vm-base

# Connect to VM (after some minutes needed to setup & start the machine).
gcloud alpha compute tpus tpu-vm ssh --project $PROJECT --zone $ZONE $VM_NAME

# Stop the VM after use (only storage is billed for a stopped VM).
gcloud alpha compute tpus tpu-vm stop --project $PROJECT --zone $ZONE $VM_NAME

# Delete VM after use (this will also remove all data stored on VM).
gcloud alpha compute tpus tpu-vm delete --project $PROJECT --zone $ZONE $VM_NAME然后像往常一样获取存储库和安装依赖关系(包括带有TPU支持的jaxlib ):
git clone --depth=1 --branch=master https://github.com/google-research/vision_transformer
cd vision_transformer

# optional: install virtualenv
pip3 install virtualenv
python3 -m virtualenv env
. env/bin/activate
如果您连接到附加GPU的VM,请使用以下命令安装JAX和其他依赖关系:
pip install -r vit_jax/requirements.txt如果您连接到附加TPU的VM,请使用以下命令安装JAX和其他依赖项:
pip install -r vit_jax/requirements-tpu.txt安装FlaxFormer,按照此处链接的相应存储库中提供的说明。
对于GPU和TPU,请检查JAX是否可以使用命令连接到附加的加速器:
python -c ' import jax; print(jax.devices()) '最后执行对模型进行微调部分中提到的命令之一。
 @article{dosovitskiy2020vit,
  title={An Image is Worth 16x16 Words: Transformers for Image Recognition at Scale},
  author={Dosovitskiy, Alexey and Beyer, Lucas and Kolesnikov, Alexander and Weissenborn, Dirk and Zhai, Xiaohua and Unterthiner, Thomas and  Dehghani, Mostafa and Minderer, Matthias and Heigold, Georg and Gelly, Sylvain and Uszkoreit, Jakob and Houlsby, Neil},
  journal={ICLR},
  year={2021}
}

@article{tolstikhin2021mixer,
  title={MLP-Mixer: An all-MLP Architecture for Vision},
  author={Tolstikhin, Ilya and Houlsby, Neil and Kolesnikov, Alexander and Beyer, Lucas and Zhai, Xiaohua and Unterthiner, Thomas and Yung, Jessica and Steiner, Andreas and Keysers, Daniel and Uszkoreit, Jakob and Lucic, Mario and Dosovitskiy, Alexey},
  journal={arXiv preprint arXiv:2105.01601},
  year={2021}
}

@article{steiner2021augreg,
  title={How to train your ViT? Data, Augmentation, and Regularization in Vision Transformers},
  author={Steiner, Andreas and Kolesnikov, Alexander and and Zhai, Xiaohua and Wightman, Ross and Uszkoreit, Jakob and Beyer, Lucas},
  journal={arXiv preprint arXiv:2106.10270},
  year={2021}
}

@article{chen2021outperform,
  title={When Vision Transformers Outperform ResNets without Pretraining or Strong Data Augmentations},
  author={Chen, Xiangning and Hsieh, Cho-Jui and Gong, Boqing},
  journal={arXiv preprint arXiv:2106.01548},
  year={2021},
}

@article{zhuang2022gsam,
  title={Surrogate Gap Minimization Improves Sharpness-Aware Training},
  author={Zhuang, Juntang and Gong, Boqing and Yuan, Liangzhe and Cui, Yin and Adam, Hartwig and Dvornek, Nicha and Tatikonda, Sekhar and Duncan, James and Liu, Ting},
  journal={ICLR},
  year={2022},
}

@article{zhai2022lit,
  title={LiT: Zero-Shot Transfer with Locked-image Text Tuning},
  author={Zhai, Xiaohua and Wang, Xiao and Mustafa, Basil and Steiner, Andreas and Keysers, Daniel and Kolesnikov, Alexander and Beyer, Lucas},
  journal={CVPR},
  year={2022}
}
按时间顺序相反:
2022-08-18:添加了LIT-B16B_2型号,该型号接受了60k步骤(LIT_B16B:30K)的训练,而图像侧没有线性头(LIT_B16B:768),并且性能更好。
2022-06-09:添加了使用ImageNet上GSAM从头开始训练的VIT和混音器模型,而无需大量数据增强。最终的VITS优于使用ADAMW优化器或原始SAM算法或具有强大数据增强的类似尺寸的尺寸。
2022-04-14:添加了点亮模型的型号和Colab。
2021-07-29:添加了VIT-B/8 AUGREG模型(3个上游检查点和分辨率= 224的改编)。
2021-07-02:添加了“当视觉变压器优于重置...”纸
2021-07-02:添加了SAM(清晰感最小化)优化的VIT和MLP混合检查点。
2021-06-20:添加了“如何训练您的Vit?...”纸,以及新的COLAB探索纸张中提到的> 50K预训练和微调的检查点。
2021-06-18:此存储库被重写用于使用亚麻亚麻api和ml_collections.ConfigDict进行配置。
2021-05-19:随着“如何培训您的VIT?...”纸张,我们在Imagenet和Imagenet-21K上添加了超过50k的Vit和Hybrid模型,并具有不同程度的数据增强和模型正则化。并在Imagenet,Pets37,Kitti-Distance,Cifar-100和Resisc45上进行微调。请查看vit_jax_augreg.ipynb以浏览模型的此宝藏!例如,您可以使用该Colab从表3的i21k_300列中获取推荐的预训练和微调检查点的文件名。
2020-12-01:添加了R50+VIT-B/16混合模型(在Resnet-50骨架之上的VIT-B/16)。当在Imagenet21K上预估计时,该模型几乎达到了L/16模型的性能,而计算芬特的成本却不到一半。请注意,“ R50”对B/16变体进行了修改:原始Resnet-50具有[3,4,6,3]块,每个块将图像的分辨率减少了两个因子。结合RESNET茎结合使用,这将导致32倍减少,因此即使贴片大小为(1,1),VIT-B/16变体也无法再实现。因此,我们将[3,4,9]块用于R50+B/16变体。
2020-11-09:添加了VIT-L/16模型。
2020-10-29:在ImageNet-21K上预测的VIT-B/16和VIT-L/16模型,然后以224x224分辨率在Imagenet上进行微调(而不是默认的384x384)。这些型号的名称具有后缀“ -224”。预计他们将分别达到81.2%和82.7%的TOP-1精确度。
安德烈亚斯·斯坦纳(Andreas Steiner)准备的开源释放。
注意:该存储库是从Google-Research/BIG_TRANSFER进行分配和修改的。
这不是官方的Google产品。


