all in one
v9.8.0
官方的NextCloud安装方法。 NextCloud AIO提供了轻松的部署和维护,其中包含大多数NextCloud实例中的功能。
包括:
ffmpeg , smbclient , libreoffice和nodejs| 第一个设置 | 安装后 |
|---|---|
 |  |
以下说明是针对没有Web服务器或反向代理(例如Apache,Nginx,Caddy,Caddy,Cloudflare隧道等)的安装的。如果您想在Web服务器或反向代理后面运行AIO(例如Apache,Nginx,Caddy,Cloudflare Tunnel等),请参见“反向代理文档”。此外,下面的说明特别适用于Linux。对于Macos,请参阅此信息,有关Windows,请参阅此信息,有关Synology,请参阅此信息。
警告
您可以使用下面的便利脚本安装Docker。但是,我们建议不要盲目下载并执行脚本作为sudo。但是,如果您喜欢它,那么您当然可以使用它。见下文:
curl -fsSL https://get.docker.com | sudo sh如果您需要IPv6支持,则应通过关注https://github.com/nextcloud/all-in-in-one/blob/main/main/docker-ipv6-support.md来启用它。
在下面运行命令,以便在Linux上启动容器,并且没有Web服务器或反向代理(例如Apache,Nginx,Caddy,Caddy,Cloudflare Tunnel等):
 # For Linux and without a web server or reverse proxy (like Apache, Nginx, Caddy, Cloudflare Tunnel and else) already in place:
sudo docker run
--init
--sig-proxy=false
--name nextcloud-aio-mastercontainer
--restart always
--publish 80:80
--publish 8080:8080
--publish 8443:8443
--volume nextcloud_aio_mastercontainer:/mnt/docker-aio-config
--volume /var/run/docker.sock:/var/run/docker.sock:ro
nextcloud/all-in-one:latest
sudo docker run此命令旋转一个新的Docker容器。如果将用户添加到Docker组,则可以选择不使用sudo使用Docker命令(这与Docker无根不同,请参见下面的常见问题解答)。--init此选项确保永远不会创建僵尸程序。请参阅Docker文档。--sig-proxy=false此选项允许通过使用[CTRL] + [C]运行docker run时自动连接的容器外壳,而无需关闭容器。--name nextcloud-aio-mastercontainer这是容器的名称。不允许更改此行,因为MasterContainer更新将失败。--restart always是“重新启动策略”。 always意味着容器应始终开始使用Docker守护程序。有关重新启动策略的更多详细信息,请参见Docker文档:https://docs.docker.com/config/containers/start-containers-automationaly/--publish 80:80这意味着容器的端口80应使用端口80在主机上发布。如果要使用端口8443,则用于获得AIO接口的有效证书。如果您运行,则不需要AIO在Web服务器或反向代理后面,可以在这种情况下删除,因为您可以简单地将端口8080用于AIO接口。--publish 8080:8080这意味着该容器的端口8080应使用端口8080在主机上发布。此端口用于AIO接口,并默认使用自签名证书。您也可以使用其他主机端口,如果端口8080已经在主机上使用,例如--publish 8081:8080 (只有第一个端口可以更改为主机,第二个端口是用于容器的,并且必须保留在8080 )。--publish 8443:8443这意味着该容器的端口8443应使用端口8443在主机上发布。如果您将端口80和8443发布到公共Internet,则可以通过此端口访问带有有效证书的AIO界面。如果您在Web服务器后面运行AIO或反向代理,则不需要在这种情况下被删除,因为您可以简单地将端口8080用于AIO接口。--volume nextcloud_aio_mastercontainer:/mnt/docker-aio-config这意味着由MasterContainer创建的文件将存储在称为nextcloud_aio_mastercontainer的Docker卷中。不允许此行更改,因为内置备份以后会失败。--volume /var/run/docker.sock:/var/run/docker.sock:ro Docker插座安装在容器中,该容器用于旋转所有其他容器,以获取进一步的功能。需要在Windows/MacOS和Docker无根上调整它。请参阅有关此的适用文档。如果调整,请不要忘记还设置WATCHTOWER_DOCKER_SOCKET_PATH !如果您不喜欢此事,请参见https://github.com/nextcloud/all-in-in-one/tree/main/manual-install。nextcloud/all-in-one:latest这是使用的Docker容器图像。--env NEXTCLOUD_DATADIR="/mnt/ncdata" (这是Linux的示例。如果要将其更改为特定路径,而不是默认的Docker卷,则应在第一个启动上指定。要查看更多变量的说明和示例(例如更改NextCloud的Datadir的位置或将某些位置作为外部存储在NextCloud容器中安装),请仔细阅读此decker-compose文件:https://github.com/ nextCloud/All-In-in-in-in-in-in-in-blob/main/compose.yaml注意:您可能有兴趣调整NextCloud的Datadir,以将文件存储在与默认Docker卷不同的位置。查看有关如何做的文档。
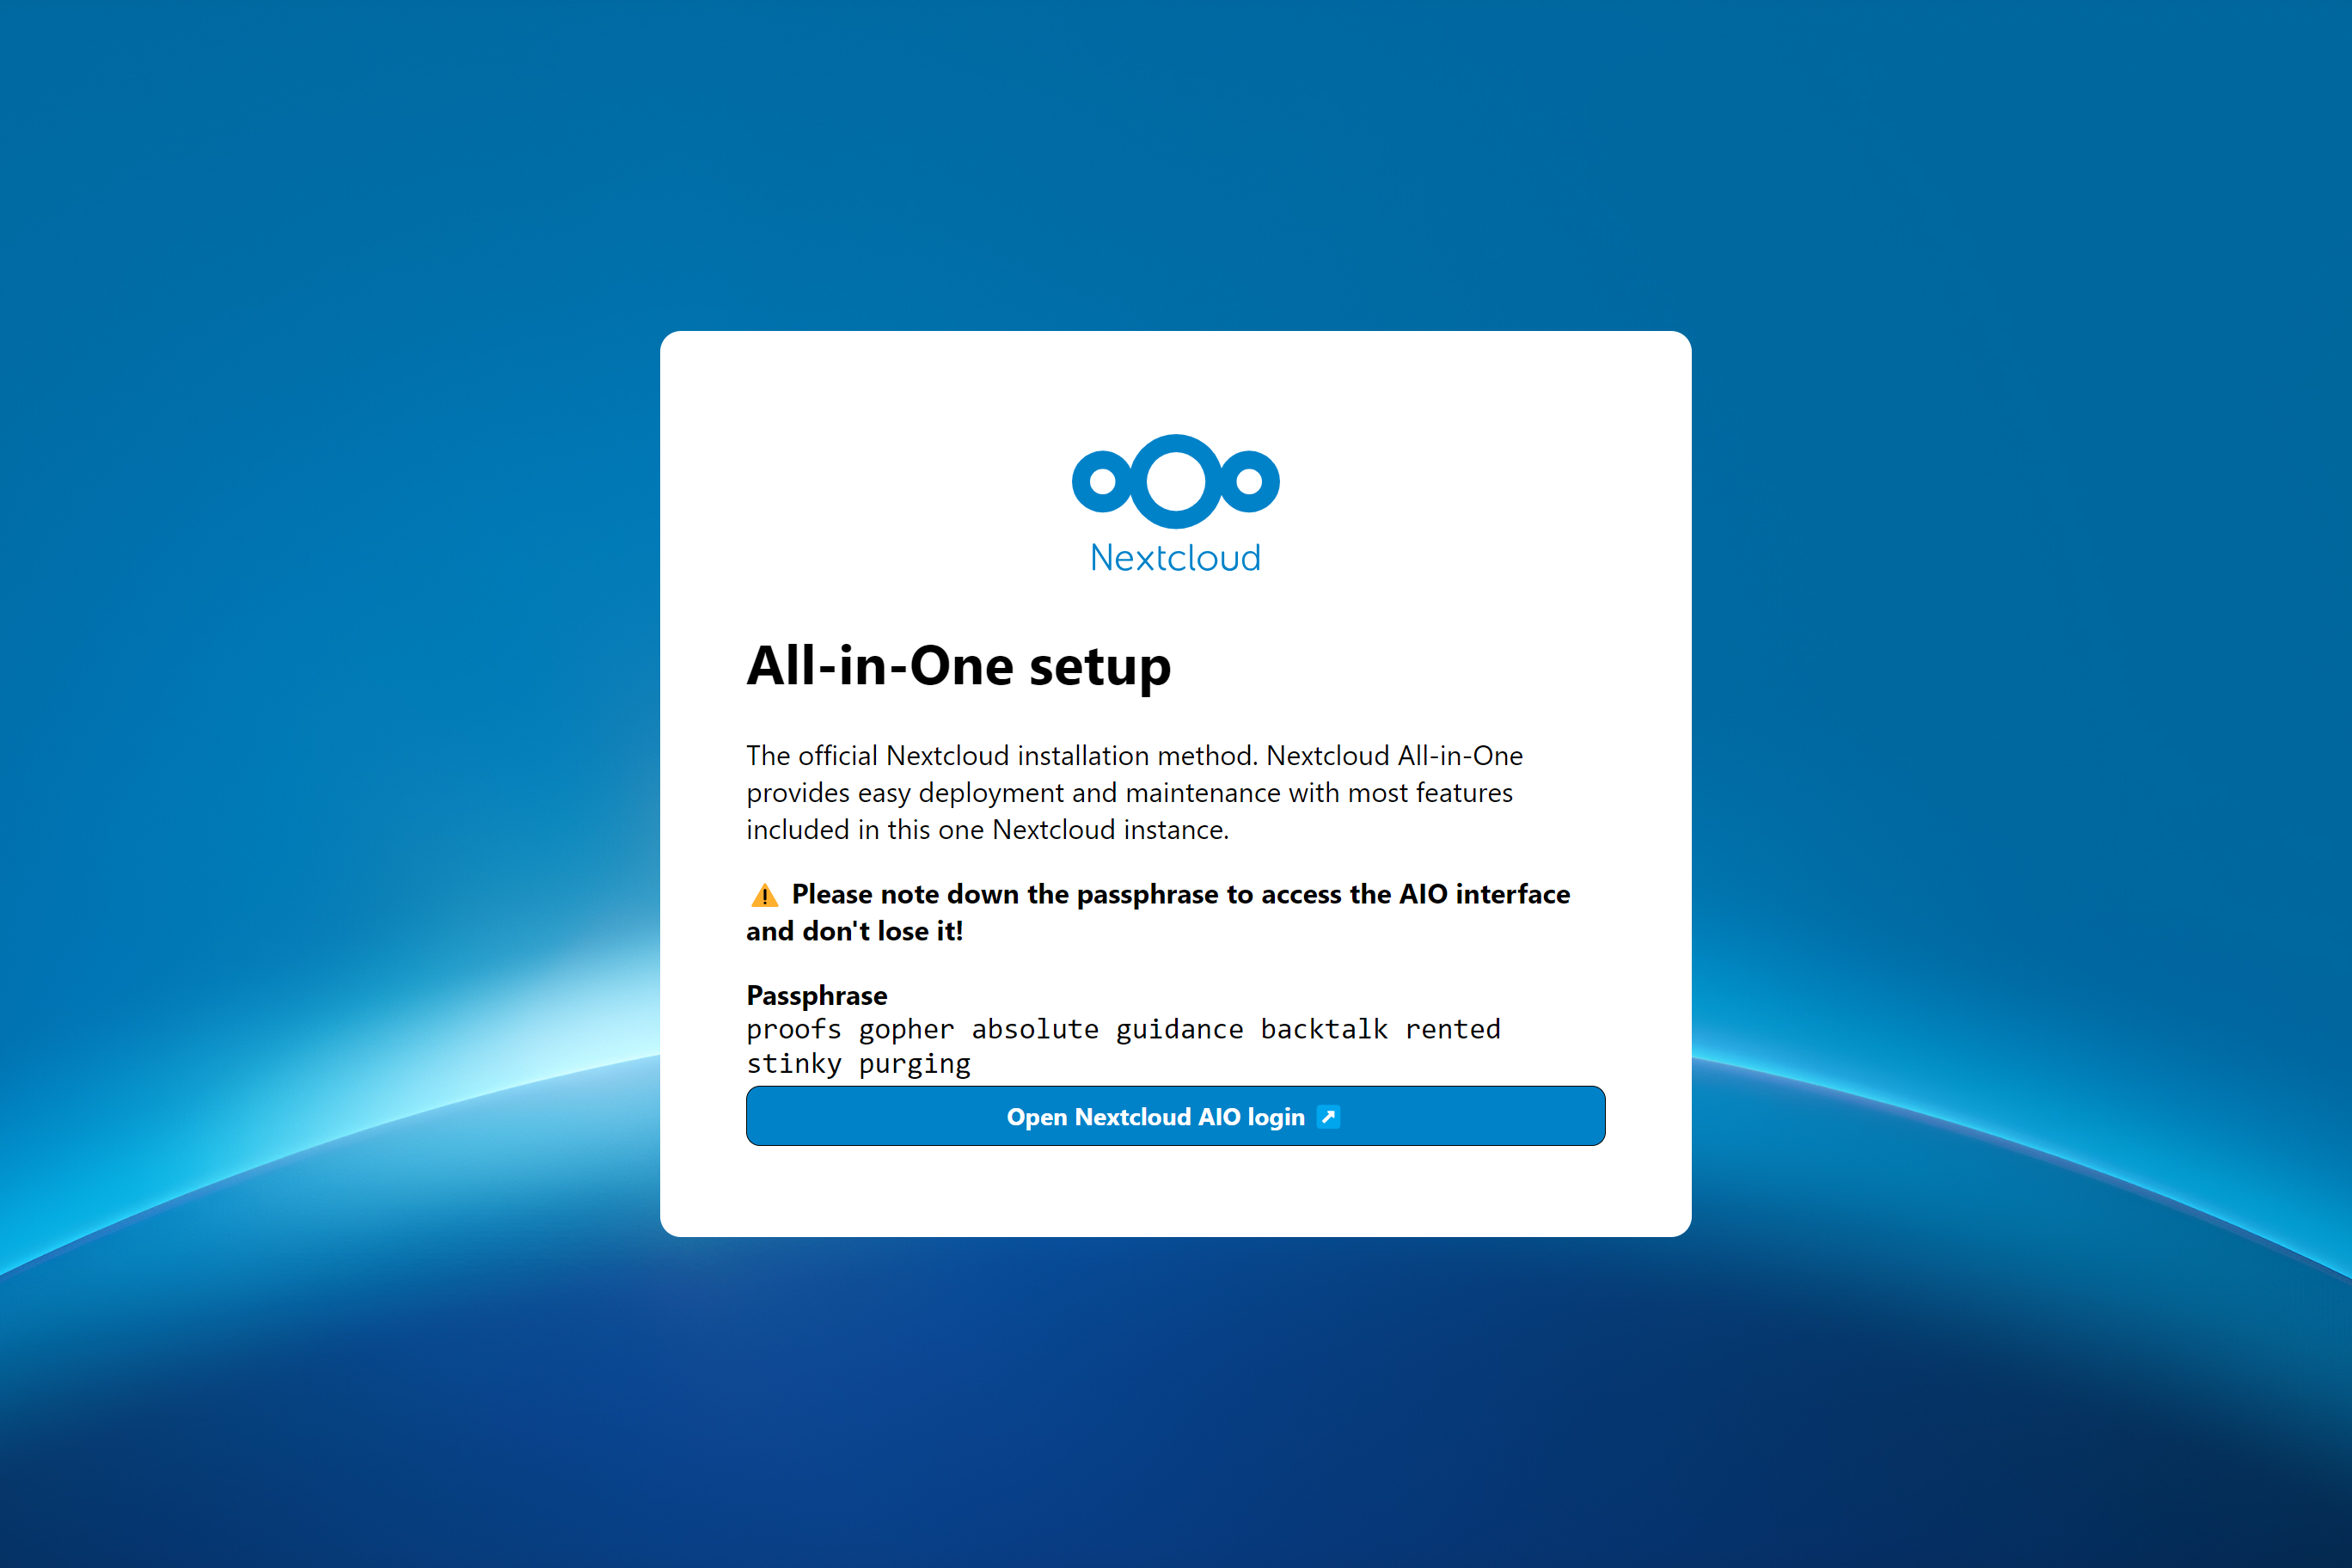
初始启动后,您应该能够在该服务器的端口8080上打开NextCloud AIO接口。
例如https://ip.address.of.this.server:8080
如果您的防火墙/路由器具有端口80和8443打开/转发,并且您可以将域名指向服务器,则可以通过以下方式通过以下方式自动获得有效的证书:
https://your-domain-that-points-to-this-server.tld:8443
请不要忘记在防火墙/路由器中打开端口3478/TCP和3478/UDP ,以供谈话容器!
NextCloud AIO的灵感来自Portainer之类的项目,这些项目通过直接通过Docker插座与Docker Daemon进行管理。该概念使用户只能安装一个具有一个命令的容器,该命令可以繁重地提升创建和管理所需的所有容器,以提供NextCloud安装,其中包含大多数功能。它还使更新变得轻而易举,并且不再绑定到主机系统(及其缓慢更新),因为所有内容都在容器中。此外,从用户角度来看,它很容易处理,因为提供了用于管理NextCloud AIO安装的简单接口。
有关需要贡献者帮助的功能请求列表,请参阅此问题。
是的。请参阅以下文档:reververs-proxy.md
您可以在Linux上通过运行: uname -m在Linux上进行检查
仅这些(如果您通过端口8080在内部访问MasterContainer接口):
443/TCP Apache容器443/UDP如果要启用http3的apache容器3478/TCP和3478/UDP用于谈话容器8080/TCP :具有自签名证书的MasterContainer接口(始终工作,也只有通过IP-Address访问,例如https://ip.address.of.this.server:8080/ )80/TCP :重定向到NextCloud(用于通过ACME HTTP-CHALLENGE获得MasterContainer的证书)8443/TCP :具有有效证书的万人框架接口(仅当端口80和8443在您的防火墙/路由器中打开/转发时,您可以将域名指向服务器。它将自动生成有效的证书,然后自动通过EG https访问eg https://public.domain.com:8443/是可能的。)443/TCP :稍后将由Apache容器使用,需要在防火墙/路由器中打开/转发443/UDP :Apache容器将稍后使用,如果您想启用HTTP3,则需要在防火墙/路由器中打开/转发3478/TCP和3478/UDP :将在谈话容器内使用Turnerver,需要在防火墙/路由器中打开/转发在MacOS上,与Linux相比,只有一件事是不同的:而不是使用--volume /var/run/docker.sock:/var/run/docker.sock:ro ,您需要使用--volume /var/run/docker.sock.raw:/var/run/docker.sock:ro在安装Docker桌面后运行它(如果需要的话,请不要忘记启用IPv6)。除此之外,它应该像Linux上一样起作用并表现出色。
另外,您可能有兴趣调整NextCloud的Datadir以将文件存储在主机系统上。查看有关如何做的文档。
在Windows上,安装Docker Desktop(如果需要的话,请不要忘记启用IPv6),然后在命令提示符中运行以下命令:
 docker run ^
--init ^
--sig-proxy=false ^
--name nextcloud-aio-mastercontainer ^
--restart always ^
--publish 80:80 ^
--publish 8080:8080 ^
--publish 8443:8443 ^
--volume nextcloud_aio_mastercontainer:/mnt/docker-aio-config ^
--volume //var/run/docker.sock:/var/run/docker.sock:ro ^
nextcloud/all-in-one:latest
另外,您可能有兴趣调整NextCloud的Datadir以将文件存储在主机系统上。查看有关如何做的文档。
笔记
该项目文档中几乎所有命令都使用sudo docker ...由于sudo在Windows上不可用,因此您只需从命令中删除sudo即可。
关于Synology,与Linux相比,有两件事不同:而不是使用--volume /var/run/docker.sock:/var/run/docker.sock:ro ro,您需要使用--volume /volume1/docker/docker.sock:/var/run/docker.sock:ro运行它。 You also need to add --env WATCHTOWER_DOCKER_SOCKET_PATH="/volume1/docker/docker.sock" to the docker run command of the mastercontainer (but before the last line nextcloud/all-in-one:latest ).除此之外,它应该像Linux上一样起作用并表现出色。显然,Synology Docker GUI将无法使用,因此您需要使用SSH或在任务调度程序中创建用户定义的脚本任务作为用户“ root”才能运行命令。
笔记
您的Synology上的Docker插座可能位于/var/run/docker.sock中,就像Linux上的默认值一样。然后,您可以只使用Linux命令而无需更改任何内容 - 当您尝试启动容器时,您会注意到这一点,并说绑定安装座失败了。例如docker: Error response from daemon: Bind mount failed: '/volume1/docker/docker.sock' does not exists.
另外,您可能有兴趣调整NextCloud的Datadir以将文件存储在主机系统上。查看有关如何做的文档。
您还需要调整Synology的防火墙,请参见下文:
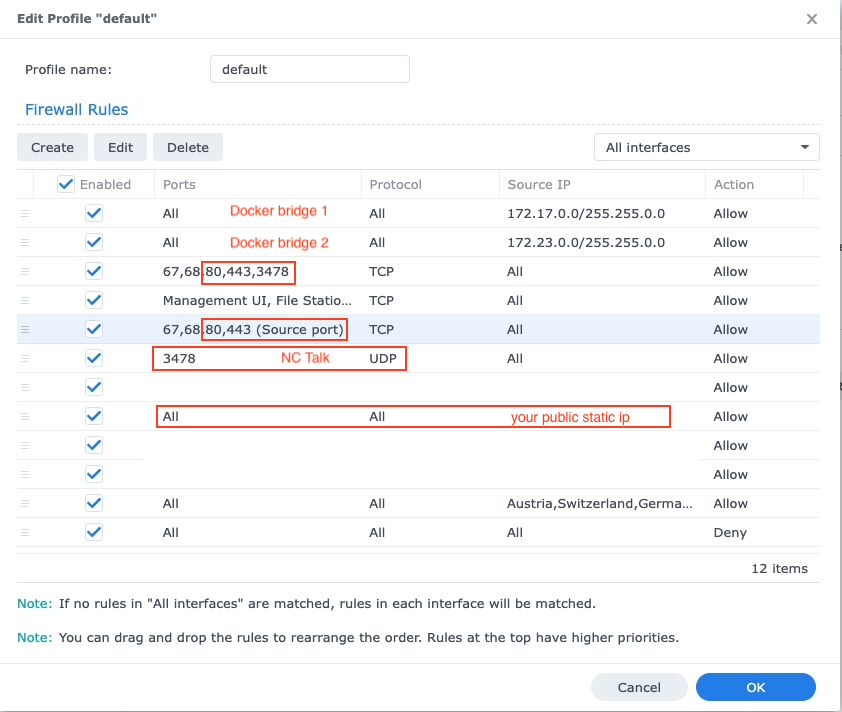
Synology DSM容易受到其开放端口和登录接口的攻击,这就是为什么始终建议使用防火墙设置的原因。如果激活了防火墙,则有必要对端口80,443(包括NextCloud容器,您的公共静态IP(如果您不使用DDNS),以及适用的NC-Talk端口3478 TCP)的Docker Bridge的子网进行例外+UDP:
如果您在本地网络(通常是这种情况)上具有NAS设置,则需要设置Synology DNS,以便能够通过其域从网络访问NextCloud。另外,不要忘记将新DNS添加到您的DHCP服务器和固定的IP设置:

在Linux上使用Portainer运行它的最简单方法是使用Portainer的堆栈功能,并使用此Docker-Compose文件以正确启动AIO。
凭借Truenas量表版本24.10.0(该版本于2024年10月29日正式发布,作为稳定的发行版)IX Systems抛弃了Kubernetes集成,并实施了完全有效的Docker环境。
有关更完整的指南,请参阅@zybster的本指南:#5506
在较旧的truenas量表上,有两种方法可以运行AIO。首选的是在VM内运行AIO。这是必要的,因为它们不会露出主机上容器的Docker插座,因此您也不能在其上使用Docker-Compose,因此也无法运行未针对Truenas量表的自定义掌舵式唱片。
Another but untested way is to install Portainer on your TrueNAS SCALE from here https://truecharts.org/charts/stable/portainer/installation-notes and add the Helm-chart repository https://nextcloud.github.io/all-按照https://docs.portainer.io/user/kubernetes/helm进行https://docs.portainer.io/helm。请参见AIOS Helm图表上的更多文档:https://github.com/nextcloud/all-in-in-one/tree/main/nextcloud-aio-helm-chart-chart#next#nextcloud-aio-helm-chart。
https://yourdomain.com/settings/admin/richdocuments中的WOPI-allowListhttps://yourdomain.com/settings/admin/talk中转动设置。尽管似乎并非如此,但是从AIO的角度来看,Cloudflare隧道的工作方式就像是反向代理。因此,请按照反向代理文档进行记录如何使其在Cloudflare隧道后面运行。但是,请在进行警告之前先查看。
有关尾部的反向代理示例指南,请参见@flll的本指南:#5439
/proc/user_beancounters文件,并且在其中设置了一个低的numproc限制,则一旦达到此限制,您的服务器可能会不当行为,而AIO很快达到了该限制,请参见此处。通常,建议的VP是那些是KVM/非虚拟化的VP,因为Docker应该在它们上最有效。
您可以在反向代理模式下安装AIO,其中还记录了如何使用ACME DNS-Challenge来运行它以获得AIO的有效证书。请参阅反向代理文档。 (意味着Caddy with ACME DNS-challenge )。另请参见https://github.com/dani-garcia/vaultwarden/wiki/running-a-private-vaultenen-instance-with-let--let%27s-cermrypt-certs#getting-a-cetting-a-custom-custom-caddy-build for其他文档关于这个话题。
如果您不想向公共互联网打开NextCloud,则可能会查看以下文档有关如何在本地设置它的文档:local-instance.md,但请记住,您仍然需要让HTTPS正常工作。
不,不会添加。如果您只想在本地运行它,则可以查看以下文档:local-instance.md用于配置而没有传统域。或者,请考虑在本地使用NextCloudpi进行IP地址访问(它比AIO捆绑的功能少)。
否。这是不可能的,由于多种原因:更新检查,通过应用商店安装应用程序,按需下载其他Docker映像等。
不,他们不会。如果您想在本地运行它,而无需向公共Internet打开NextCloud,请查看本地实例文档。
不,不会添加。但是,您可以使用此功能来创建多个AIO实例,一个用于每个域。
不,他们不会。请使用专用域进行NextCloud,并通过遵循反向代理文档正确设置它。如果端口443和/或80被阻止,则可以在线发布A CloudFlare隧道。您也可以使用ACME DNS-Challenge获得有效的证书。但是,在所有情况下,NextCloud接口都会将您重定向到端口443。
不,不会添加。请使用专用(子)域进行NextCloud,并通过遵循反向代理文档正确设置它。
请注意,如果您在Cloudflare隧道后面运行AIO,则无法进行本地访问,因为TLS代理是在这种情况下被卸载到Cloudflares Infrastructure的。您可以通过设置自己的反向代理来解决此问题,该代理在本地处理TLS,并将以下步骤进行工作。
请确保如果您在反向代理后面运行AIO,则将反向代理配置为在运行它的服务器上使用端口443。否则,以下步骤将不起作用。
现在,这已经陷入困境,推荐的方法如何在本地访问NextCloud,是设置一个像Pi-hole这样的本地DNS服务器,并为该域名设置一个自定义DNS记录,该域指向内部IP-运行NextCloud AIO的服务器的adddress。以下是一些指南:
如果您完全确定已正确配置了所有内容并且无法通过域验证,则可以通过添加--env SKIP_DOMAIN_VALIDATION=true MasterContainer的Docker Run命令来跳过域验证(但在最后一行之前nextcloud/all-in-one:latest !
众所周知,使用防火墙作为防火墙守护程序的Linux发行版在Docker Networks上存在问题。如果容器无法彼此通信,则可以通过运行来更改防火墙以使用Iptables后端:
 sudo sed -i 's/FirewallBackend=nftables/FirewallBackend=iptables/g' /etc/firewalld/firewalld.conf
sudo systemctl restart firewalld docker
之后它应该起作用。
有关更多详细信息,请参见https://dev.to/ozorest/fedora-32-how-to-solve-docker-internal-network-sissue-22me。甚至在官方Firewalld网站上提到了此限制:https://firewalld.org/#who-is-using-it
是的。如果启用了SELINUX,则可能需要添加--security-opt label:disable选项添加到MasterContainer的Docker Run命令中,以便允许其访问Docker套接字(或security_opt: ["label:disable"] compose.yaml)。参见#485
occ命令?只需运行以下内容: sudo docker exec --user www-data -it nextcloud-aio-nextcloud php occ your-command 。当然, your-command需要与您要运行的命令交换。
Security & setup warnings displays the "missing default phone region" after initial install ?只需运行以下命令: sudo docker exec --user www-data nextcloud-aio-nextcloud php occ config:system:set default_phone_region --value="yourvalue" 。当然,您需要根据位置修改yourvalue 。例子是DE , US和GB 。有关更多代码,请参见此列表:https://en.wikipedia.org/wiki/iso_3166-1_alpha-2#offically_assigned_code_elements
有关此的一些文档,请参见Mustical-Instances.md。
NextCloud具有内置的Bruteforce保护,该保护可能会触发,并会阻止IP地址或禁用用户。您可以通过运行sudo docker exec --user www-data -it nextcloud-aio-nextcloud php occ security:bruteforce:reset <ip-address>并通过运行sudo docker exec --user www-data -it nextcloud-aio-nextcloud php occ user:enable <name of user> useer-useer-useer-useer-user-user-user-user-user-user-user-user-user-user-user-user-user-user-user-user-user-user-user-user-user-user-user-user-user-user-user-user-user-user-user-user- sudo docker exec --user www-data -it nextcloud-aio-nextcloud php occ user:enable <name of user> 。请参阅https://docs.nextcloud.com/server/latest/admin_manual/configuration_server/occ_command.html#security有关更多信息。
该项目将稳定性评估在新功能上。这意味着,当引入一个新的主要NextCloud更新时,我们将至少等到第一个补丁发布,例如24.0.1升级之前。另外,我们将等待升级,直到所有重要的应用程序都与新的主要版本兼容。 NextCloud和所有依赖项以及所有容器的次要或补丁版本将尽快更新到新版本,但我们尝试先对所有更新进行良好的测试回合,然后再推动它们。这意味着大约需要2周的时间才能到达latest频道。如果您想帮助测试,则可以通过遵循此文档来切换到beta频道,这也将为您提供更新。
您可以通过停止MasterContainer,将其删除(不会丢失数据),然后使用您最初使用的相同命令来重新创建容器,从而切换到其他频道,例如Beta通道或从Beta频道返回最新频道。万事达。您只需要更改最后一行nextcloud/all-in-one:latest in- nextcloud/all-in-one:beta ,反之亦然。
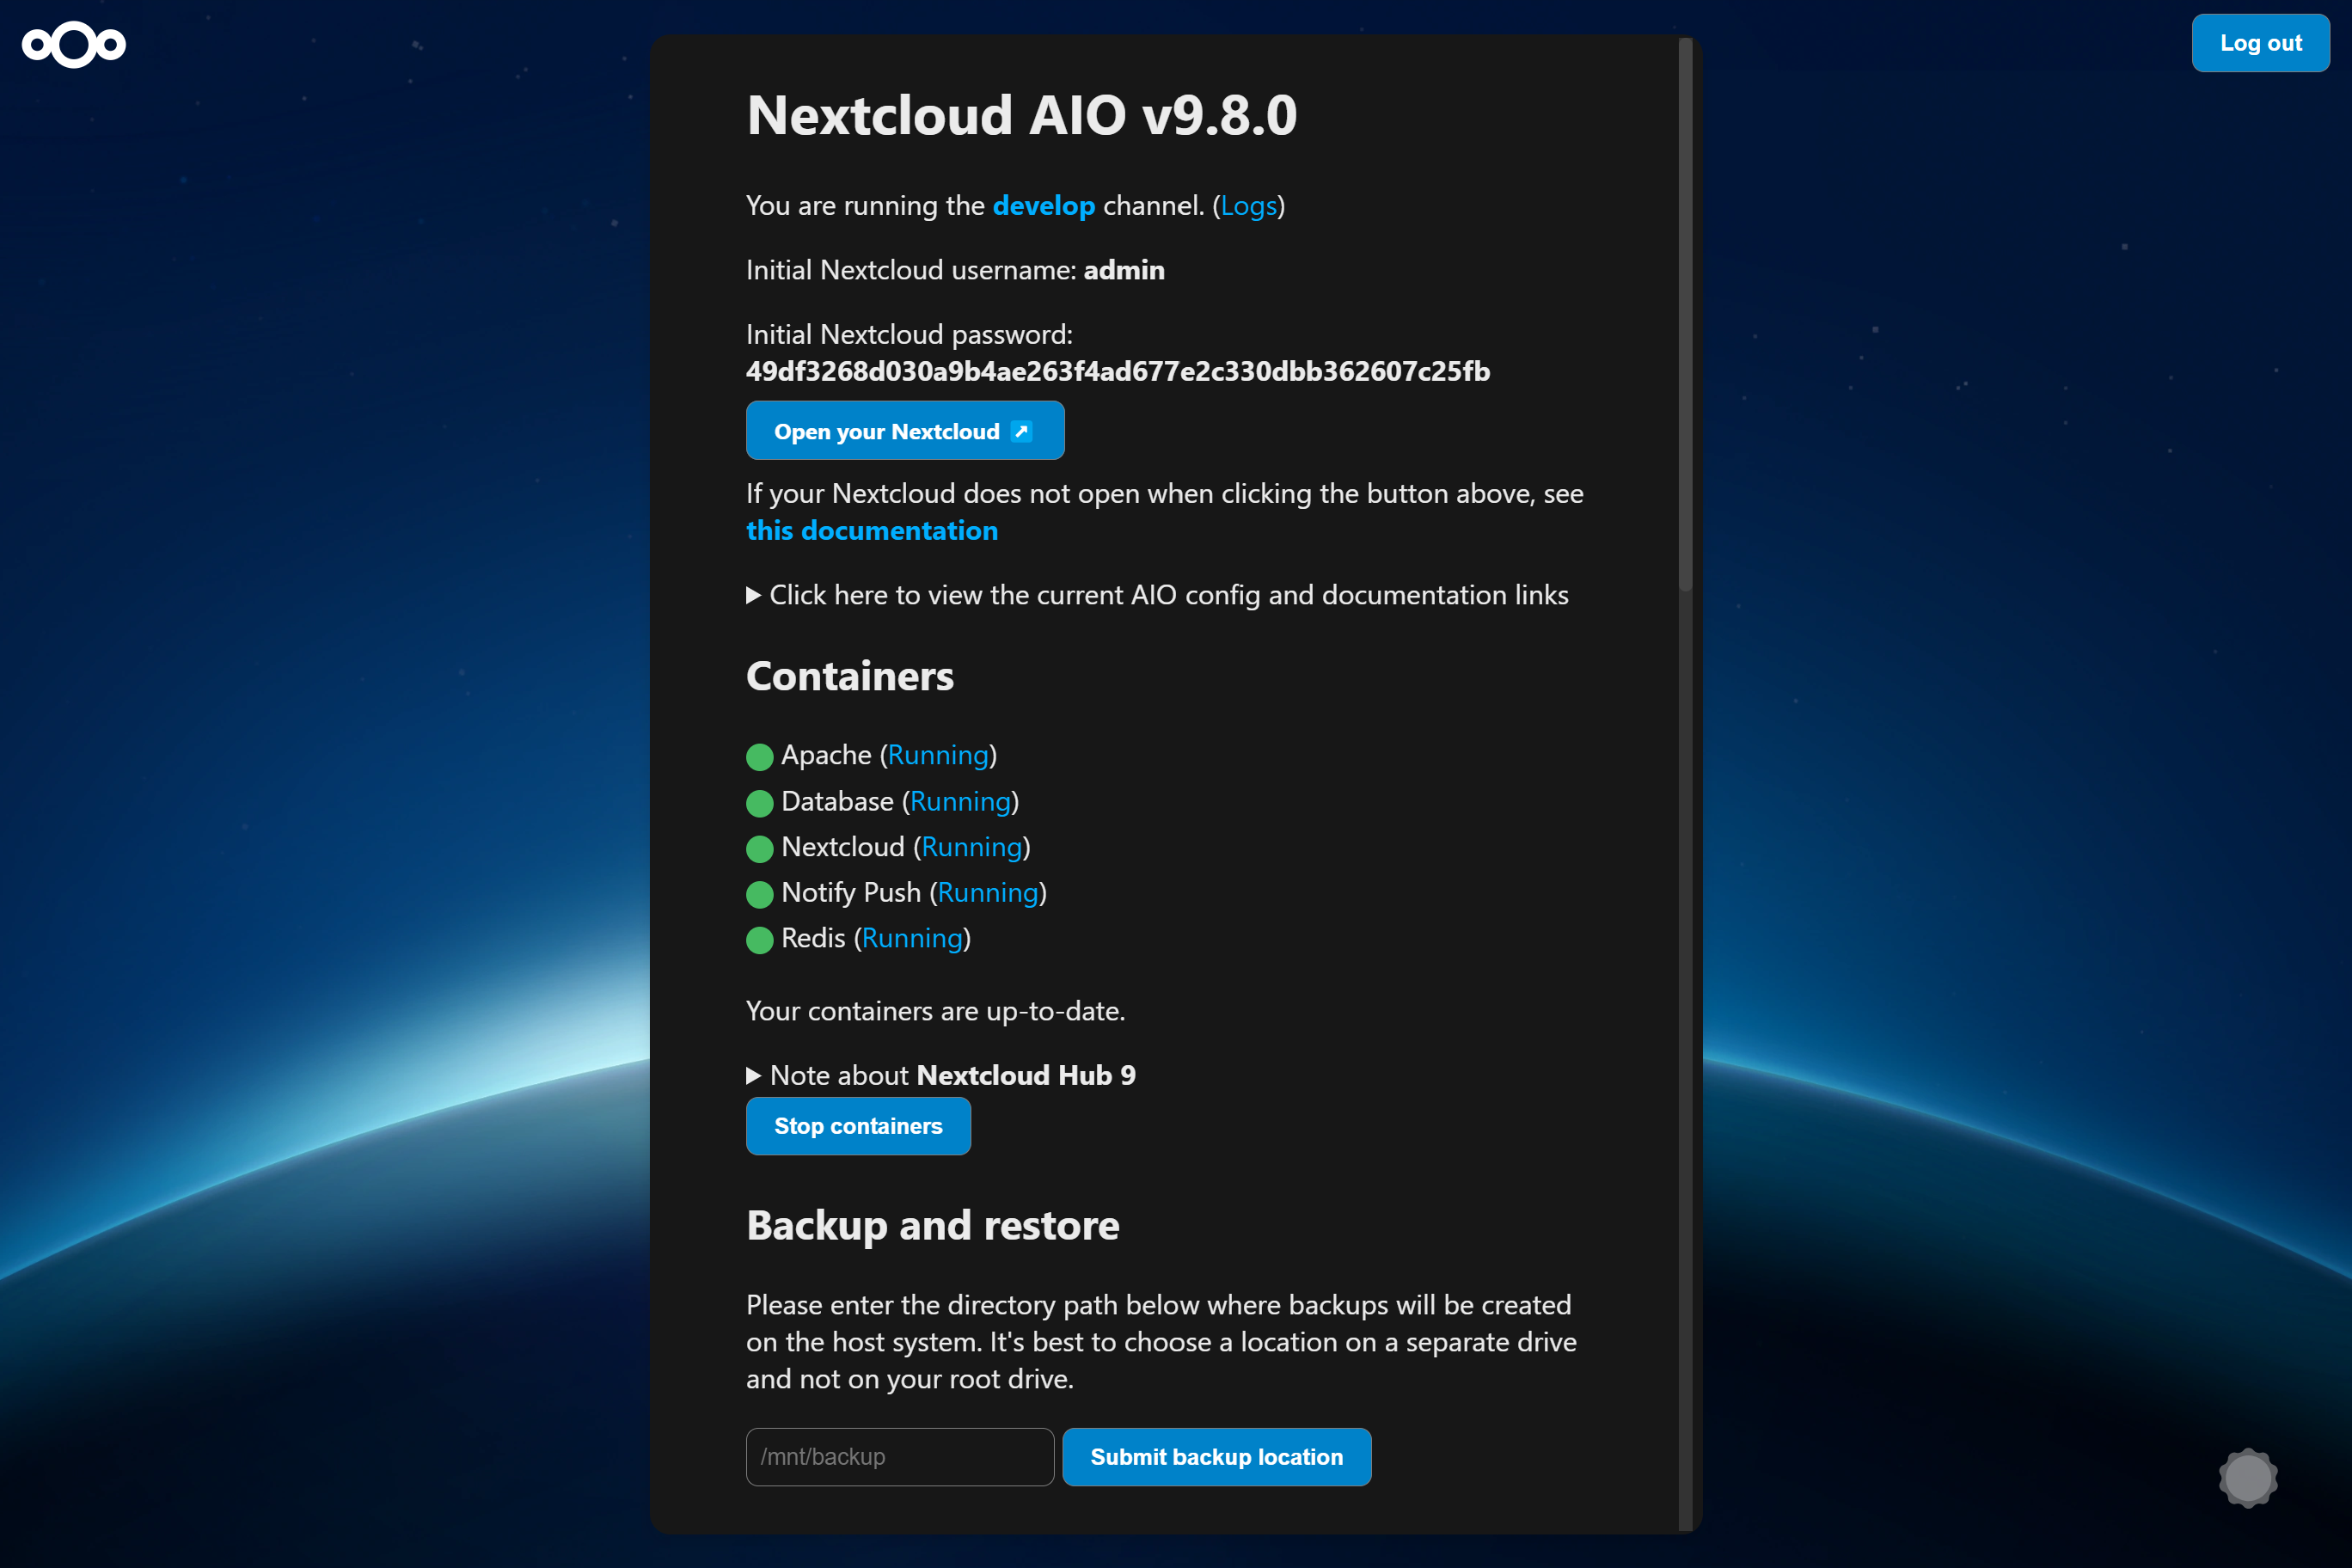
如果我们将新容器推向latest ,您将在containers部分下方的AIO接口中看到新的容器更新。在这种情况下,只需按Stop containers ,然后Start and update containers即可更新容器。 MasterContainer有自己的更新过程。见下文。而且,不要忘记使用内置备份解决方案备份实例的当前状态,然后再启动容器!否则,如果更新期间要破裂,您将无法轻松恢复您的实例。
如果发现了新的mastercontainer更新,您会在Stop containers按钮下方看到一个允许显示变形值的注释。如果您单击该按钮,并且容器停止,则将看到一个新按钮,允许更新万事通信。这样做之后,更新完成后,您将可以再次选择Start and update containers 。建议在单击Start and update containers按钮之前创建备份。
此外,还有一个每天运行一次的Cronjob,检查容器和万事包坦纳器更新,如果找到了新的更新,并将通知发送给所有NextCloud Admins。
AIO寄出了自己的更新通知实现。它检查容器更新是否可用。如果是这样,它将发送带有标题Container updates available!在星期六,属于admin组一部分的NextCloud用户。如果NextCloud容器映像应大于90天(〜3个月),因此过时,AIO将向所有带有标题AIO is outdated! 。因此,管理员应确保每3个月至少每3个月更新一次容器映像,以确保实例尽快获取所有安全错误。
如果您的NextCloud正在运行,并且您在NextCloud中登录为Admin,则可以通过打开https://yourdomain.tld/settings/admin/overview轻松登录到AIO界面,该按钮将在顶部显示一个按钮只需单击此按钮即可登录到AIO接口。
笔记
您可以通过简单地停止容器,从正确且所需的域/IP-Address/端口访问AIO接口,然后在Start containers上单击一次,然后单击一次。
笔记
手动编辑配置和犯错可能会破坏您的实例,因此请先创建备份!
如果您设置了一个新的AIO实例,则需要输入域。当前没有办法从AIO接口更改此域。因此,为了更改它,您需要使用sudo docker run -it --rm --volume nextcloud_aio_mastercontainer:/mnt/docker-aio-config:rw alpine sh -c "apk add --no-cache nano && nano /mnt/docker-aio-config/data/configuration.json"用新域中替换每个旧域都会出现您的旧域,并保存并写出文件。之后,从AIO接口重新启动您的容器,如果正确配置了新域,则所有内容都应按预期工作。
如果您在Web服务器或反向代理后面运行AIO(例如Apache,Nginx,Caddy,Cloudflare Tunnel等),则显然还需要更改反向代理配置中的域。
此外,重新启动容器后,您需要打开管理设置并手动更新无法自动更改的值。这是一些已知地点的列表:
https://your-nc-domain.com/settings/admin/talk for turn/stun服务器和信号服务器(如果您通过AIO接口启用通话)https://your-nc-domain.com/settings/admin/theming用于主题URLhttps://your-nc-domain.com/settings/admin/app_api for Deploy Daemon如果您通过AIO接口启用了应用程序API如果在初始安装过程中出乎意料的路线,则可能需要重置AIO安装,以便能够从头开始。
笔记
如果您已经运行它并在实例上具有数据,则不应遵循以下说明,因为它将删除与AIO实例耦合的所有数据。
这是正确重置AIO实例的方法:
sudo docker stop nextcloud-aio-mastercontainersudo docker stop nextcloud-aio-domaincheck运行sudo docker ps --format {{.Names}}来检查是否不再运行AIO容器。如果未列出nextcloud-aio容器,则可以继续下面的步骤。如果应该有一些,您将需要使用sudo docker stop <container_name>停止它们,直到没有人列出为止。sudo docker ps --filter "status=exited"sudo docker container prune卸下所有这些停止的容器sudo docker network rm nextcloud-aio删除docker网络sudo docker volume ls --filter "dangling=true"sudo docker volume prune --filter all=1 (在窗口上,您可能需要用docker volume rm nextcloud_aio_backupdir手动删除一些卷, docker volume rm nextcloud_aio_nextcloud_datadir )。NEXTCLOUD_DATADIR配置为主机上的路径而不是默认卷,则也需要清理。 (例如,简单地删除目录)。sudo docker volume ls --format {{.Name}}没有任何卷。如果未列出nextcloud-aio卷,则可以继续下面的步骤。如果应该有一些,您将需要使用sudo docker volume rm <volume_name>删除它们,直到没有人列出。sudo docker image prune -a删除所有Docker图像。NextCloud AIO提供了基于Borgbackup的备份解决方案。如果安装损坏,这些备份是还原点。通过使用此工具,备份是增量,微分,压缩和加密的 - 因此,只有第一个备份将需要一段时间。进一步的备份应快速,因为仅考虑更改。
建议在任何容器更新之前创建备份。通过这样做,您将在更新过程中对任何可能的并发症进行安全,因为您可以单击一键恢复整个实例。
对于本地备份,Restore进程应该非常快,因为RSYNC用于还原所选的备份,该备份只会传输更改文件并删除其他文件。对于远程BORG备份,从遥控器中提取了整个备份存档,这取决于borg extract的巧妙,可能需要下载整个存档。
如果将外部驱动器连接到主机,然后选择备份目录以在该驱动器上,则您也可以安全地防止存储Docker量的驱动器驱动器故障。
/mnt/backup中的驱动器。/mnt/backup 。Create Backup该备份应在外部磁盘上创建第一个备份。如果您想直接备份到远程BORG存储库:
Create backup ,这将创建一个SSH键对并失败,因为遥控器尚未信任此键。复制AIO中显示的公钥,并将其添加到遥控器上的授权密钥中。可以使用按钮创建备份并Restore selected backup在AIO接口中Create Backup和还原。此外,还提供了检查备份完整性的备份检查,但在大多数情况下不需要。
备份本身会使用一个加密密钥加密,该密钥在AIO接口中显示给您。请保存在安全的地方,因为如果没有此键,您将无法从备份中恢复。
完成初始备份后,每日备份可以启用。 Enabling this also allows to enable an option that allows to automatically update all containers, Nextcloud and its apps.
Be aware that this solution does not back up files and folders that are mounted into Nextcloud using the external storage app - but you can add further Docker volumes and host paths that you want to back up after the initial backup is done.
Backed up will get all important data of your Nextcloud AIO instance like the database, your files and configuration files of the mastercontainer and else. Files and folders that are mounted into Nextcloud using the external storage app are not getting backed up. There is currently no way to exclude the data directory because it would require hacks like running files:scan and would make the backup solution much more unreliable (since the database and your files/folders need to stay in sync). If you still don't want your datadirectory to be backed up, see https://github.com/nextcloud/all-in-one#how-to-enable-automatic-updates-without-creating-a-backup-beforehand for options (there is a hint what needs to be backed up in which order).
The built-in borg-based backup solution has by default a retention policy of --keep-within=7d --keep-weekly=4 --keep-monthly=6 . See https://borgbackup.readthedocs.io/en/stable/usage/prune.html for what these values mean. You can adjust the retention policy by providing --env BORG_RETENTION_POLICY="--keep-within=7d --keep-weekly=4 --keep-monthly=6" to the docker run command of the mastercontainer (but before the last line nextcloud/all-in-one:latest ! If it was started already, you will need to stop the mastercontainer, remove it (no data will be lost) and recreate it using the docker run command that you initially used) and customize the value to your fitting.
Backing up directly to a remote borg repository is supported. This avoids having to store a local copy of your backups, supports append-only borg keys to counter ransomware and allows using the AIO interface to manage your backups.
Some alternatives, which do not have all the above benefits:
If you are running AIO in a LXC container, you need to make sure that FUSE is enabled in the LXC container settings. Also, if using Alpine Linux as host OS, make sure to add fuse via apk add fuse . Otherwise the backup container will not be able to start as FUSE is required for it to work.
As stated in the AIO interface, it is possible to use a docker volume as backup target. Before you can use that, you need to create it first. Here is an example how to create one on Windows:
 docker volume create ^
--driver local ^
--name nextcloud_aio_backupdir ^
-o device="/host_mnt/e/your/backup/path" ^
-o type="none" ^
-o o="bind"
In this example, it would mount E:yourbackuppath into the volume so for a different location you need to adjust /host_mnt/e/your/backup/path accordingly. Afterwards enter nextcloud_aio_backupdir in the AIO interface as backup location.
You can open the BorgBackup archives on your host by following these steps:
(instructions for Ubuntu Desktop)
 # Install borgbackup on the host
sudo apt update && sudo apt install borgbackup

# In any shell where you use borg, you must first export this variable
# If you are using the default backup location /mnt/backup/borg
export BORG_REPO= ' /mnt/backup/borg '
# or if you are using a remote repository
export BORG_REPO= ' user@host:/path/to/repo '

# Mount the archives to /tmp/borg
sudo mkdir -p /tmp/borg && sudo borg mount " $BORG_REPO " /tmp/borg

# After entering your repository key successfully, you should be able to access all archives in /tmp/borg
# You can now do whatever you want by syncing them to a different place using rsync or doing other things
# E.g. you can open the file manager on that location by running:
xhost +si:localuser:root && sudo nautilus /tmp/borg

# When you are done, simply close the file manager and run the following command to unmount the backup archives:
sudo umount /tmp/borg You can delete BorgBackup archives on your host manually by following these steps:
(instructions for Debian based OS' like Ubuntu)
 # Install borgbackup on the host
sudo apt update && sudo apt install borgbackup

# In any shell where you use borg, you must first export this variable
# If you are using the default backup location /mnt/backup/borg
export BORG_REPO= ' /mnt/backup/borg '
# or if you are using a remote repository
export BORG_REPO= ' user@host:/path/to/repo '

# List all archives (if you are using the default backup location /mnt/backup/borg)
sudo borg list

# After entering your repository key successfully, you should now see a list of all backup archives
# An example backup archive might be called 20220223_174237-nextcloud-aio
# Then you can simply delete the archive with:
sudo borg delete --stats --progress " ::20220223_174237-nextcloud-aio "

# If borg 1.2.0 or higher is installed, you then need to run borg compact in order to clean up the freed space
sudo borg --version
# If version number of the command above is higher than 1.2.0 you need to run the command below:
sudo borg compact
After doing so, make sure to update the backup archives list in the AIO interface!
You can do so by clicking on the Check backup integrity button or Create backup button.
For increased backup security, you might consider syncing the local backup repository regularly to another drive.
To do that, first add the drive to /etc/fstab so that it is able to get automatically mounted and then create a script that does all the things automatically. Here is an example for such a script:
 #! /bin/bash

# Please modify all variables below to your needings:
SOURCE_DIRECTORY= " /mnt/backup/borg "
DRIVE_MOUNTPOINT= " /mnt/backup-drive "
TARGET_DIRECTORY= " /mnt/backup-drive/borg "

# #######################################
# Please do NOT modify anything below! #
# #######################################

if [ " $EUID " -ne 0 ] ; then
    echo " Please run as root "
    exit 1
fi

if ! [ -d " $SOURCE_DIRECTORY " ] ; then
    echo " The source directory does not exist. "
    exit 1
fi

if [ -z " $( ls -A " $SOURCE_DIRECTORY / " ) " ] ; then
    echo " The source directory is empty which is not allowed. "
    exit 1
fi

if ! [ -d " $DRIVE_MOUNTPOINT " ] ; then
    echo " The drive mountpoint must be an existing directory "
    exit 1
fi

if ! grep -q " $DRIVE_MOUNTPOINT " /etc/fstab ; then
    echo " Could not find the drive mountpoint in the fstab file. Did you add it there? "
    exit 1
fi

if ! mountpoint -q " $DRIVE_MOUNTPOINT " ; then
    mount " $DRIVE_MOUNTPOINT "
    if ! mountpoint -q " $DRIVE_MOUNTPOINT " ; then
        echo " Could not mount the drive. Is it connected? "
        exit 1
    fi
fi

if [ -f " $SOURCE_DIRECTORY /lock.roster " ] ; then
    echo " Cannot run the script as the backup archive is currently changed. Please try again later. "
    exit 1
fi

mkdir -p " $TARGET_DIRECTORY "
if ! [ -d " $TARGET_DIRECTORY " ] ; then
    echo " Could not create target directory "
    exit 1
fi

if [ -f " $SOURCE_DIRECTORY /aio-lockfile " ] ; then
    echo " Not continuing because aio-lockfile already exists. "
    exit 1
fi

touch " $SOURCE_DIRECTORY /aio-lockfile "

if ! rsync --stats --archive --human-readable --delete " $SOURCE_DIRECTORY / " " $TARGET_DIRECTORY " ; then
    echo " Failed to sync the backup repository to the target directory. "
    exit 1
fi

rm " $SOURCE_DIRECTORY /aio-lockfile "
rm " $TARGET_DIRECTORY /aio-lockfile "

umount " $DRIVE_MOUNTPOINT "

if docker ps --format " {{.Names}} " | grep " ^nextcloud-aio-nextcloud$ " ; then
    docker exec -it nextcloud-aio-nextcloud bash /notify.sh " Rsync backup successful! " " Synced the backup repository successfully. "
else
    echo " Synced the backup repository successfully. "
fi
You can simply copy and paste the script into a file eg named backup-script.sh eg here: /root/backup-script.sh . Do not forget to modify the variables to your requirements!
Afterwards apply the correct permissions with sudo chown root:root /root/backup-script.sh and sudo chmod 700 /root/backup-script.sh . Then you can create a cronjob that runs eg at 20:00 each week on Sundays like this:
sudo crontab -u root -e (and choose your editor of choice if not already done. I'd recommend nano).0 20 * * 7 /root/backup-script.sh which will run the script at 20:00 on Sundays each week.Ctrl + o -> Enter and close the editor with Ctrl + x ).警告
The below script will only work after the initial setup of AIO. So you will always need to first visit the AIO interface, type in your domain and start the containers the first time or restore an older AIO instance from its borg backup before you can use the script.
You can do so by running the /daily-backup.sh script that is stored in the mastercontainer. It accepts the following environment variables:
AUTOMATIC_UPDATES if set to 1 , it will automatically stop the containers, update them and start them including the mastercontainer. If the mastercontainer gets updated, this script's execution will stop as soon as the mastercontainer gets stopped. You can then wait until it is started again and run the script with this flag again in order to update all containers correctly afterwards.DAILY_BACKUP if set to 1 , it will automatically stop the containers and create a backup. If you want to start them again afterwards, you may have a look at the START_CONTAINERS option.START_CONTAINERS if set to 1 , it will automatically start the containers without updating them.STOP_CONTAINERS if set to 1 , it will automatically stop the containers.CHECK_BACKUP if set to 1 , it will start the backup check. This is not allowed to be enabled at the same time like DAILY_BACKUP . Please be aware that this option is non-blocking which means that the backup check is not done when the process is finished since it only start the borgbackup container with the correct configuration. One example for this would be sudo docker exec -it --env DAILY_BACKUP=1 nextcloud-aio-mastercontainer /daily-backup.sh , which you can run via a cronjob or put it in a script.
笔记
None of the option returns error codes. So you need to check for the correct result yourself.
If you already have a backup solution in place, you may want to hide the backup section. You can do so by adding --env AIO_DISABLE_BACKUP_SECTION=true to the docker run command of the mastercontainer (but before the last line nextcloud/all-in-one:latest ! If it was started already, you will need to stop the mastercontainer, remove it (no data will be lost) and recreate it using the docker run command that you initially used).
警告
Do not set or adjust this value after the initial Nextcloud installation is done! If you still want to do it afterwards, see this on how to do it.
You can configure the Nextcloud container to use a specific directory on your host as data directory. You can do so by adding the environmental variable NEXTCLOUD_DATADIR to the docker run command of the mastercontainer (but before the last line nextcloud/all-in-one:latest ! If it was started already, you will need to stop the mastercontainer, remove it (no data will be lost) and recreate it using the docker run command that you initially used). Allowed values for that variable are strings that start with / and are not equal to / . The chosen directory or volume will then be mounted to /mnt/ncdata inside the container.
--env NEXTCLOUD_DATADIR="/mnt/ncdata" ./mnt/ncdata , make sure to choose a subfolder like eg /mnt/ncdata/nextcloud as datadir, since the root folder is not suited as datadir in that case 。 See #2696.--env NEXTCLOUD_DATADIR="/var/nextcloud-data"--env NEXTCLOUD_DATADIR="/volume1/docker/nextcloud/data" .--env NEXTCLOUD_DATADIR="/run/desktop/mnt/host/c/ncdata" . (This path is equivalent to C:ncdata on your Windows host so you need to translate the path accordingly. Hint: the path that you enter needs to start with /run/desktop/mnt/host/ . Append to that the exact location on your windows host, eg c/ncdata which is equivalent to C:ncdata .)--env NEXTCLOUD_DATADIR="nextcloud_aio_nextcloud_datadir" . This volume needs to be created beforehand manually by you in order to be able to use it. eg on Windows with: docker volume create ^
--driver local ^
--name nextcloud_aio_nextcloud_datadir ^
-o device="/host_mnt/e/your/data/path" ^
-o type="none" ^
-o o="bind"
E:yourdatapath into the volume so for a different location you need to adjust /host_mnt/e/your/data/path accordingly.当然。 Add this to the /etc/fstab file on the host system:
<your-storage-host-and-subpath> <your-mount-dir> cifs rw,mfsymlinks,seal,credentials=<your-credentials-file>,uid=33,gid=0,file_mode=0770,dir_mode=0770 0 0
(Of course you need to modify <your-storage-host-and-subpath> , <your-mount-dir> and <your-credentials-file> for your specific case.)
One example could look like this:
//your-storage-host/subpath /mnt/storagebox cifs rw,mfsymlinks,seal,credentials=/etc/storage-credentials,uid=33,gid=0,file_mode=0770,dir_mode=0770 0 0
and add into /etc/storage-credentials :
 username=<smb/cifs username>
password=<password>
(Of course you need to modify <smb/cifs username> and <password> for your specific case.)
Now you can use /mnt/storagebox as Nextcloud's datadir like described in the section above this one.
By default, the Nextcloud container is confined and cannot access directories on the host OS. You might want to change this when you are planning to use local external storage in Nextcloud to store some files outside the data directory and can do so by adding the environmental variable NEXTCLOUD_MOUNT to the docker run command of the mastercontainer (but before the last line nextcloud/all-in-one:latest ! If it was started already, you will need to stop the mastercontainer, remove it (no data will be lost) and recreate it using the docker run command that you initially used). Allowed values for that variable are strings that start with / and are not equal to / .
--env NEXTCLOUD_MOUNT="/mnt/" and --env NEXTCLOUD_MOUNT="/media/" .--env NEXTCLOUD_MOUNT="/Volumes/your_drive/"--env NEXTCLOUD_MOUNT="/volume1/" .--env NEXTCLOUD_MOUNT="/run/desktop/mnt/host/d/your-folder/" . (This path is equivalent to D:your-folder on your Windows host so you need to translate the path accordingly. Hint: the path that you enter needs to start with /run/desktop/mnt/host/ . Append to that the exact location on your windows host, eg d/your-folder/ which is equivalent to D:your-folder .) After using this option, please make sure to apply the correct permissions to the directories that you want to use in Nextcloud. Eg sudo chown -R 33:0 /mnt/your-drive-mountpoint and sudo chmod -R 750 /mnt/your-drive-mountpoint should make it work on Linux when you have used --env NEXTCLOUD_MOUNT="/mnt/" 。 On Windows you could do this eg with docker exec -it nextcloud-aio-nextcloud chown -R 33:0 /run/desktop/mnt/host/d/your-folder/ and docker exec -it nextcloud-aio-nextcloud chmod -R 750 /run/desktop/mnt/host/d/your-folder/ .
You can then navigate to https://your-nc-domain.com/settings/apps/disabled , activate the external storage app, navigate to https://your-nc-domain.com/settings/admin/externalstorages and add a local external storage directory that will be accessible inside the container at the same place that you've entered. Eg /mnt/your-drive-mountpoint will be mounted to /mnt/your-drive-mountpoint inside the container, etc.
Be aware though that these locations will not be covered by the built-in backup solution - but you can add further Docker volumes and host paths that you want to back up after the initial backup is done.
笔记
If you can't see the type "local storage" in the external storage admin options, a restart of the containers from the AIO interface may be required.
By default will the talk container use port 3478/UDP and 3478/TCP for connections. You can adjust the port by adding eg --env TALK_PORT=3478 to the docker run command of the mastercontainer (but before the last line nextcloud/all-in-one:latest ! If it was started already, you will need to stop the mastercontainer, remove it (no data will be lost) and recreate it using the docker run command that you initially used) and adjusting the port to your desired value. Best is to use a port over 1024, so eg 3479 to not run into this: #2517
By default, public uploads to Nextcloud are limited to a max of 10G (logged in users can upload much bigger files using the webinterface or the mobile/desktop clients, since chunking is used in that case). You can adjust the upload limit by providing --env NEXTCLOUD_UPLOAD_LIMIT=10G to the docker run command of the mastercontainer (but before the last line nextcloud/all-in-one:latest ! If it was started already, you will need to stop the mastercontainer, remove it (no data will be lost) and recreate it using the docker run command that you initially used) and customize the value to your fitting. It must start with a number and end with G eg 10G .
By default, uploads to Nextcloud are limited to a max of 3600s. You can adjust the upload time limit by providing --env NEXTCLOUD_MAX_TIME=3600 to the docker run command of the mastercontainer (but before the last line nextcloud/all-in-one:latest ! If it was started already, you will need to stop the mastercontainer, remove it (no data will be lost) and recreate it using the docker run command that you initially used) and customize the value to your fitting. It must be a number eg 3600 .
By default, each PHP process in the Nextcloud container is limited to a max of 512 MB. You can adjust the memory limit by providing --env NEXTCLOUD_MEMORY_LIMIT=512M to the docker run command of the mastercontainer (but before the last line nextcloud/all-in-one:latest ! If it was started already, you will need to stop the mastercontainer, remove it (no data will be lost) and recreate it using the docker run command that you initially used) and customize the value to your fitting. It must start with a number and end with M eg 1024M .
If you get an error during the domain validation which states that your ip-address is an internal or reserved ip-address, you can fix this by first making sure that your domain indeed has the correct public ip-address that points to the server and then adding --add-host yourdomain.com:<public-ip-address> to the docker run command of the mastercontainer (but before the last line nextcloud/all-in-one:latest ! If it was started already, you will need to stop the mastercontainer, remove it (no data will be lost) and recreate it using the docker run command that you initially used) which will allow the domain validation to work correctly. And so that you know: even if the A record of your domain should change over time, this is no problem since the mastercontainer will not make any attempt to access the chosen domain after the initial domain validation.
是的。 For that to work, you need to use and follow the manual-install documentation.
是的。 For that to work, you need to use and follow the helm-chart documentation.
You can run AIO also with docker rootless. How to do this is documented here: docker-rootless.md
Since Podman is not 100% compatible with the Docker API, Podman is not supported (since that would add yet another platform where the maintainer would need to test on). However you can use and follow the manual-install documentation to get AIO's containers running with Podman or use Docker rootless, as described in the above section. Also there is this now: #3487
You might want to adjust the Nextcloud apps that are installed upon the first startup of the Nextcloud container. You can do so by adding --env NEXTCLOUD_STARTUP_APPS="deck twofactor_totp tasks calendar contacts notes" to the docker run command of the mastercontainer (but before the last line nextcloud/all-in-one:latest ! If it was started already, you will need to stop the mastercontainer, remove it (no data will be lost) and recreate it using the docker run command that you initially used) and customize the value to your fitting. It must be a string with small letters az, 0-9, spaces and hyphens or '_'. You can disable shipped and by default enabled apps by adding a hyphen in front of the appid. Eg -contactsinteraction .
Some Nextcloud apps require additional external dependencies that must be bundled within Nextcloud container in order to work correctly. As we cannot put each and every dependency for all apps into the container - as this would make the project quickly unmaintainable - there is an official way in which you can add additional dependencies into the Nextcloud container. However note that doing this is disrecommended since we do not test Nextcloud apps that require external dependencies.
You can do so by adding --env NEXTCLOUD_ADDITIONAL_APKS="imagemagick dependency2 dependency3" to the docker run command of the mastercontainer (but before the last line nextcloud/all-in-one:latest ! If it was started already, you will need to stop the mastercontainer, remove it (no data will be lost) and recreate it using the docker run command that you initially used) and customize the value to your fitting. It must be a string with small letters az, digits 0-9, spaces, dots and hyphens or '_'. You can find available packages here: https://pkgs.alpinelinux.org/packages?branch=v3.20. By default imagemagick is added. If you want to keep it, you need to specify it as well.
Some Nextcloud apps require additional php extensions that must be bundled within Nextcloud container in order to work correctly. As we cannot put each and every dependency for all apps into the container - as this would make the project quickly unmaintainable - there is an official way in which you can add additional php extensions into the Nextcloud container. However note that doing this is disrecommended since we do not test Nextcloud apps that require additional php extensions.
You can do so by adding --env NEXTCLOUD_ADDITIONAL_PHP_EXTENSIONS="imagick extension1 extension2" to the docker run command of the mastercontainer (but before the last line nextcloud/all-in-one:latest ! If it was started already, you will need to stop the mastercontainer, remove it (no data will be lost) and recreate it using the docker run command that you initially used) and customize the value to your fitting. It must be a string with small letters az, digits 0-9, spaces, dots and hyphens or '_'. You can find available extensions here: https://pecl.php.net/packages.php. By default imagick is added. If you want to keep it, you need to specify it as well.
The facerecognition app requires the pdlib PHP extension to be installed. Unfortunately, it is not available on PECL nor via PHP core, so there is no way to add this into AIO currently. However you can use this community container in order to run facerecognition.
警告
This only works if the /dev/dri device is present on the host! If it does not exists on your host, don't proceed as otherwise the Nextcloud container will fail to start! If you are unsure about this, better do not proceed with the instructions below.
The memories app allows to enable hardware transcoding for videos. In order to use that, you need to add --env NEXTCLOUD_ENABLE_DRI_DEVICE=true to the docker run command of the mastercontainer (but before the last line nextcloud/all-in-one:latest ! If it was started already, you will need to stop the mastercontainer, remove it (no data will be lost) and recreate it using the docker run command that you initially used) which will mount the /dev/dri device into the container. There is now a community container which allows to easily add the transcoding container of Memories to AIO: https://github.com/nextcloud/all-in-one/tree/main/community-containers/memories
In certain situations you might want to keep Nextcloud apps that are disabled in the AIO interface and not uninstall them if they should be installed in Nextcloud. You can do so by adding --env NEXTCLOUD_KEEP_DISABLED_APPS=true to the docker run command of the mastercontainer (but before the last line nextcloud/all-in-one:latest ! If it was started already, you will need to stop the mastercontainer, remove it (no data will be lost) and recreate it using the docker run command that you initially used).
警告
Doing this might cause unintended problems in Nextcloud if an app that requires an external dependency is still installed but the external dependency not for example.
If you should run into issues with huge docker logs, you can adjust the log size by following https://docs.docker.com/config/containers/logging/local/#usage. However for the included AIO containers, this should usually not be needed because almost all of them have the log level set to warn so they should not produce many logs.
The files and folders that you add to Nextcloud are by default stored in the following docker directory: nextcloud_aio_nextcloud:/mnt/ncdata/ (usually /var/lib/docker/volumes/nextcloud_aio_nextcloud_data/_data/ on linux host systems). If needed, you can modify/add/delete files/folders there but ATTENTION : be very careful when doing so because you might corrupt your AIO installation! Best is to create a backup using the built-in backup solution before editing/changing files/folders in there because you will then be able to restore your instance to the backed up state.
After you are done modifying/adding/deleting files/folders, don't forget to apply the correct permissions by running: sudo docker exec nextcloud-aio-nextcloud chown -R 33:0 /mnt/ncdata/ and sudo docker exec nextcloud-aio-nextcloud chmod -R 750 /mnt/ncdata/ and rescan the files with sudo docker exec --user www-data -it nextcloud-aio-nextcloud php occ files:scan --all .
You can move the whole docker library and all its files including all Nextcloud AIO files and folders to a separate drive by first mounting the drive in the host OS (NTFS is not supported and ext4 is recommended as FS) and then following this tutorial: https://www.guguweb.com/2019/02/07/how-to-move-docker-data-directory-to-another-location-on-ubuntu/
(Of course docker needs to be installed first for this to work.)
docker rm nextcloud-aio-collabora ) AND the Collabora image ( docker image rm nextcloud/aio-collabora ).docker system prune ) (no data will be lost).这应该解决问题。
You can edit Nextclouds config.php file directly from the host with your favorite text editor. Eg like this: sudo docker run -it --rm --volume nextcloud_aio_nextcloud:/var/www/html:rw alpine sh -c "apk add --no-cache nano && nano /var/www/html/config/config.php" . Make sure to not break the file though which might corrupt your Nextcloud instance otherwise. In best case, create a backup using the built-in backup solution before editing the file.
All users see a set of default files and folders as dictated by Nextcloud's configuration. To change these default files and folders a custom skeleton directory must first be created; this can be accomplished by copying your skeleton files sudo docker cp --follow-link /path/to/nextcloud/skeleton/ nextcloud-aio-nextcloud:/mnt/ncdata/skeleton/ , applying the correct permissions with sudo docker exec nextcloud-aio-nextcloud chown -R 33:0 /mnt/ncdata/skeleton/ and sudo docker exec nextcloud-aio-nextcloud chmod -R 750 /mnt/ncdata/skeleton/ and setting the skeleton directory option with sudo docker exec --user www-data -it nextcloud-aio-nextcloud php occ config:system:set skeletondirectory --value="/mnt/ncdata/skeleton" . Further information is available in the Nextcloud documentation on configuration parameters for the skeleton directory.
You can configure your server to block certain ip-addresses using fail2ban as bruteforce protection. Here is how to set it up: https://docs.nextcloud.com/server/stable/admin_manual/installation/harden_server.html#setup-fail2ban. The logpath of AIO is by default /var/lib/docker/volumes/nextcloud_aio_nextcloud/_data/data/nextcloud.log . Do not forget to add chain=DOCKER-USER to your nextcloud jail config ( nextcloud.local ) otherwise the nextcloud service running on docker will still be accessible even if the IP is banned. Also, you may change the blocked ports to cover all AIO ports: by default 80,443,8080,8443,3478 (see this). Apart from that there is now a community container that can be added to the AIO stack: https://github.com/nextcloud/all-in-one/tree/main/community-containers/fail2ban
It is possible to connect to an existing LDAP server. You need to make sure that the LDAP server is reachable from the Nextcloud container. Then you can enable the LDAP app and configure LDAP in Nextcloud manually. If you don't have a LDAP server yet, recommended is to use this docker container: https://hub.docker.com/r/nitnelave/lldap. Make sure here as well that Nextcloud can talk to the LDAP server. The easiest way is by adding the LDAP docker container to the docker network nextcloud-aio . Then you can connect to the LDAP container by its name from the Nextcloud container. There is now a community container which allows to easily add LLDAP to AIO: https://github.com/nextcloud/all-in-one/tree/main/community-containers/lldap
Netdata allows you to monitor your server using a GUI. You can install it by following https://learn.netdata.cloud/docs/agent/packaging/docker#create-a-new-netdata-agent-container. Apart from that there is now a way for the community to add containers: #392 (comment)
If you want to use the user_sql app, the easiest way is to create an additional database container and add it to the docker network nextcloud-aio . Then the Nextcloud container should be able to talk to the database container using its name.
It is possible to install any of these to get a GUI for your AIO database. The pgAdmin container is recommended. You can get some docs on it here: https://www.pgadmin.org/docs/pgadmin4/latest/container_deployment.html. For the container to connect to the aio-database, you need to connect the container to the docker network nextcloud-aio and use nextcloud-aio-database as database host, oc_nextcloud as database username and the password that you get when running sudo docker exec nextcloud-aio-nextcloud grep dbpassword config/config.php as the password. Apart from that there is now a way for the community to add containers: #3061 (comment)
You can configure one yourself by using either of these four recommended projects: Docker Mailserver, Mailu, Maddy Mail Server, Mailcow or Stalwart. There is now a community container which allows to easily add Stalwart Mail server to AIO: https://github.com/nextcloud/all-in-one/tree/main/community-containers/stalwart
Please see the following documentation on this: migration.md
For integrating new containers, they must pass specific requirements for being considered to get integrated in AIO itself. Even if not considered, we may add some documentation on it. Also there is this now: https://github.com/nextcloud/all-in-one/tree/main/community-containers#community-containers
有什么要求?
For some applications it might be necessary to establish a secure connection to another host/server which is using a certificate issued by a Certification Authority that is not trusted out of the box. An example could be configuring LDAPS against a domain controller (Active Directory or Samba-based) of an organization.
You can make the Nextcloud container trust any Certification Authority by providing the environmental variable NEXTCLOUD_TRUSTED_CACERTS_DIR to the docker run command of the mastercontainer (but before the last line nextcloud/all-in-one:latest ! If it was started already, you will need to stop the mastercontainer, remove it (no data will be lost) and recreate it using the docker run command that you initially used). The value of the variables should be set to the absolute paths of the directory on the host, which contains one or more Certification Authorities certificates. You should use X.509 certificates, Base64 encoded. (Other formats may work but have not been tested!) All the certificates in the directory will be trusted.
When using docker run , the environmental variable can be set with --env NEXTCLOUD_TRUSTED_CACERTS_DIR=/path/to/my/cacerts .
In order for the value to be valid, the path should start with / and not end with / and point to an existing directory . Pointing the variable directly to a certificate file will not work and may also break things.
The Collabora container enables Seccomp by default, which is a security feature of the Linux kernel. On systems without this kernel feature enabled, you need to provide --env COLLABORA_SECCOMP_DISABLED=true to the initial docker run command in order to make it work.
If you have an external backup solution, you might want to enable automatic updates without creating a backup first. However note that doing this is disrecommended since you will not be able to easily create and restore a backup from the AIO interface anymore and you need to make sure to shut down all the containers properly before creating the backup, eg by stopping them from the AIO interface first.
But anyhow, is here a guide that helps you automate the whole procedure:
 #! /bin/bash

# Stop the containers
docker exec --env STOP_CONTAINERS=1 nextcloud-aio-mastercontainer /daily-backup.sh

# Below is optional if you run AIO in a VM which will shut down the VM afterwards
# poweroff
You can simply copy and paste the script into a file eg named shutdown-script.sh eg here: /root/shutdown-script.sh .
Afterwards apply the correct permissions with sudo chown root:root /root/shutdown-script.sh and sudo chmod 700 /root/shutdown-script.sh . Then you can create a cronjob that runs it on a schedule eg runs the script at 04:00 each day like this:
sudo crontab -u root -e (and choose your editor of choice if not already done. I'd recommend nano).0 4 * * * /root/shutdown-script.sh which will run the script at 04:00 each day.Ctrl + o and then Enter to save, and close the editor with Ctrl + x ).After that is in place, you should schedule a backup from your backup solution that creates a backup after AIO is shut down properly. Hint: If your backup runs on the same host, make sure to at least back up all docker volumes and additionally Nextcloud's datadir if it is not stored in a docker volume.
Afterwards, you can create a second script that automatically updates the containers:
 #! /bin/bash

# Run container update once
if ! docker exec --env AUTOMATIC_UPDATES=1 nextcloud-aio-mastercontainer /daily-backup.sh ; then
    while docker ps --format " {{.Names}} " | grep -q " ^nextcloud-aio-watchtower$ " ; do
        echo " Waiting for watchtower to stop "
        sleep 30
    done

    while ! docker ps --format " {{.Names}} " | grep -q " ^nextcloud-aio-mastercontainer$ " ; do
        echo " Waiting for Mastercontainer to start "
        sleep 30
    done

    # Run container update another time to make sure that all containers are updated correctly.
    docker exec --env AUTOMATIC_UPDATES=1 nextcloud-aio-mastercontainer /daily-backup.sh
fi
You can simply copy and paste the script into a file eg named automatic-updates.sh eg here: /root/automatic-updates.sh .
Afterwards apply the correct permissions with sudo chown root:root /root/automatic-updates.sh and sudo chmod 700 /root/automatic-updates.sh . Then you can create a cronjob that runs eg at 05:00 each day like this:
sudo crontab -u root -e (and choose your editor of choice if not already done. I'd recommend nano).0 5 * * * /root/automatic-updates.sh which will run the script at 05:00 each day.Ctrl + o then Enter to save, and close the editor with Ctrl + x ).By design, Caddy that runs inside the mastercontainer, which handles automatic TLS certificate generation for the AIO interface, is vulnerable to receiving DNS challenges for arbitrary hostnames from anyone on the internet. While this does not compromise your server's security, it can result in cluttered logs and rejected certificate renewal attempts due to rate limit abuse. To mitigate this issue, it is recommended to place the AIO interface behind a VPN and/or limit its public exposure.


