Time Travel Rephotography.github.io
1.0.0
许多历史人才只被旧,褪色,黑白照片捕获,这些照片由于早期相机的局限性和时间流逝而被扭曲。本文模拟了与现代摄像机的时光倒流,再到重新摄影著名的主题。与传统的图像恢复过滤器不同,该过滤器采用独立操作(例如Denoising,颜色化和超级分辨率),我们利用stylegan2框架将旧照片投射到现代高分辨率照片的空间中,从而在统一的框架中实现了所有这些效果。这种方法的一个独特挑战是保留原始照片中对象的身份和姿势,同时丢弃在低质量古董照片中经常看到的许多文物。我们与当前的最新修复过滤器的比较显示了各种重要历史人物的显着改善和令人信服的结果。
时间旅行重新摄影
Xuan Luo,Xuaner Zhang,Paul Yoo,Ricardo Martin-Brualla,Jason Lawrence和Steven M. Seitz
在2021年亚洲Siggraph。
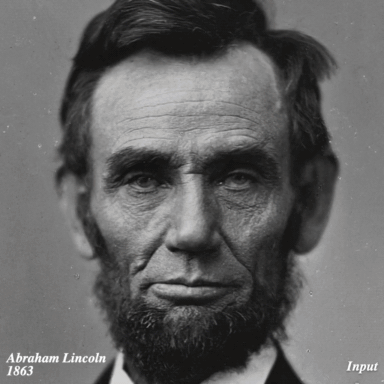
我们使用Google Colab提供了易于启动的演示! COLAB将允许您使用Google Colab上的Cloud GPU在样本Abraham Lincoln照片或您自己的照片上尝试我们的方法。
或者,您可以按照以下说明在自己的计算机上运行我们的方法。
拉第三方套餐。
git submodule update --init --recursive
安装Python软件包。
conda create --name rephotography python=3.8.5
conda activate rephotography
conda install pytorch==1.4.0 torchvision==0.5.0 cudatoolkit=10.1 -c pytorch
pip install -r requirements.txt
在亚伯拉罕·林肯的示例照片上运行我们的方法。
下载型号:
./scripts/download_checkpoints.sh
跑步:
./scripts/run.sh b "dataset/Abraham Lincoln_01.png" 0.75
您可以通过检查优化过程
tensorboard --logdir "log/Abraham Lincoln_01"
您可以在下面找到结果。
results/
  Abraham Lincoln_01/       # intermediate outputs for histogram matching and face parsing
  Abraham Lincoln_01_b.png  # the input after matching the histogram of the sibling image
  Abraham Lincoln_01-b-G0.75-init(10,18)-s256-vgg1-vggface0.3-eye0.1-color1.0e+10-cx0.1(relu3_4,relu2_2,relu1_2)-NR5.0e+04-lr0.1_0.01-c32-wp(250,750)-init.png        # the sibling image
  Abraham Lincoln_01-b-G0.75-init(10,18)-s256-vgg1-vggface0.3-eye0.1-color1.0e+10-cx0.1(relu3_4,relu2_2,relu1_2)-NR5.0e+04-lr0.1_0.01-c32-wp(250,750)-init.pt         # the sibing latent codes and initialized noise maps
  Abraham Lincoln_01-b-G0.75-init(10,18)-s256-vgg1-vggface0.3-eye0.1-color1.0e+10-cx0.1(relu3_4,relu2_2,relu1_2)-NR5.0e+04-lr0.1_0.01-c32-wp(250,750).png             # the output result
  Abraham Lincoln_01-b-G0.75-init(10,18)-s256-vgg1-vggface0.3-eye0.1-color1.0e+10-cx0.1(relu3_4,relu2_2,relu1_2)-NR5.0e+04-lr0.1_0.01-c32-wp(250,750).pt              # the final optimized latent codes and noise maps
  Abraham Lincoln_01-b-G0.75-init(10,18)-s256-vgg1-vggface0.3-eye0.1-color1.0e+10-cx0.1(relu3_4,relu2_2,relu1_2)-NR5.0e+04-lr0.1_0.01-c32-wp(250,750)-rand.png        # the result with the final latent codes but random noise maps
裁剪和对齐图像的头部区域:
python -m tools.data.align_images <input_raw_image_dir> <aligned_image_dir>
跑步:
./scripts/run.sh <spectral_sensitivity> <input_image_path> <blur_radius>
spectral_sensitivity可以是b (蓝色敏感), gb (正化)或g (Panchromatic)。您可以大致估计照片的spectral_sensitivity ,如下所示。在1873年之前使用蓝色敏感的模型进行照片,并在1873年至1906年的图像中手动选择蓝色敏感性和正化的图像,以及以后拍摄的所有型号。
如果输入光块大小为1024x1024,则blur_radius是像素中估计的高斯模糊半径。
| 小路 | 尺寸 | 描述 |
|---|---|---|
| 历史Wiki Face DataSet.zip | 148 MB | 图像 |
| Spectral_sensitivity.json | 6 KB | 光谱灵敏度( b , gb或g )。 |
| blur_radius.json | 6 KB | 像素中的模糊半径 |
json S是映射输入名称为相应光谱灵敏度或模糊半径的字典。由于版权限制, Historical Wiki Face Dataset.zip包含历史Wiki Face数据集中的所有图像,除了毛泽东的照片外,我们在用户研究中使用了所有图像。您可以单独下载并如上所述裁剪。
如果您发现我们的代码有用,请考虑引用我们的论文:
@article{Luo-Rephotography-2021,
  author    = {Luo, Xuan and Zhang, Xuaner and Yoo, Paul and Martin-Brualla, Ricardo and Lawrence, Jason and Seitz, Steven M.},
  title     = {Time-Travel Rephotography},
  journal = {ACM Transactions on Graphics (Proceedings of ACM SIGGRAPH Asia 2021)},
  publisher = {ACM New York, NY, USA},
  volume = {40},
  number = {6},
  articleno = {213},
  doi = {https://doi.org/10.1145/3478513.3480485},
  year = {2021},
  month = {12}
}这项工作是根据MIT许可证获得许可的。有关详细信息,请参见许可证。
stylegan2模型的代码来自https://github.com/rosinality/stylegan2-pytorch。
我们感谢Nick Brandreth捕获了干板照片。我们感谢Bo Zhang,Qingnan粉丝,Roy Or-El,Aleksander Holynski和Keunhong Park提供了深刻的建议。我们感谢Xiaojie Feng在COLAB演示上的贡献。


