slather
2.8.5
生成Xcode Projects的测试覆盖报告,并将其挂接到CI中。
| 项目 | 覆盖范围 |
|---|---|
| parsimmon | |
| vencore | |
| dazabtest | |
| tbstatemachine |
将此行添加到您的应用程序的gemfile:
宝石'slather'
然后执行:
$捆绑
或安装宝石:
宝石安装slather
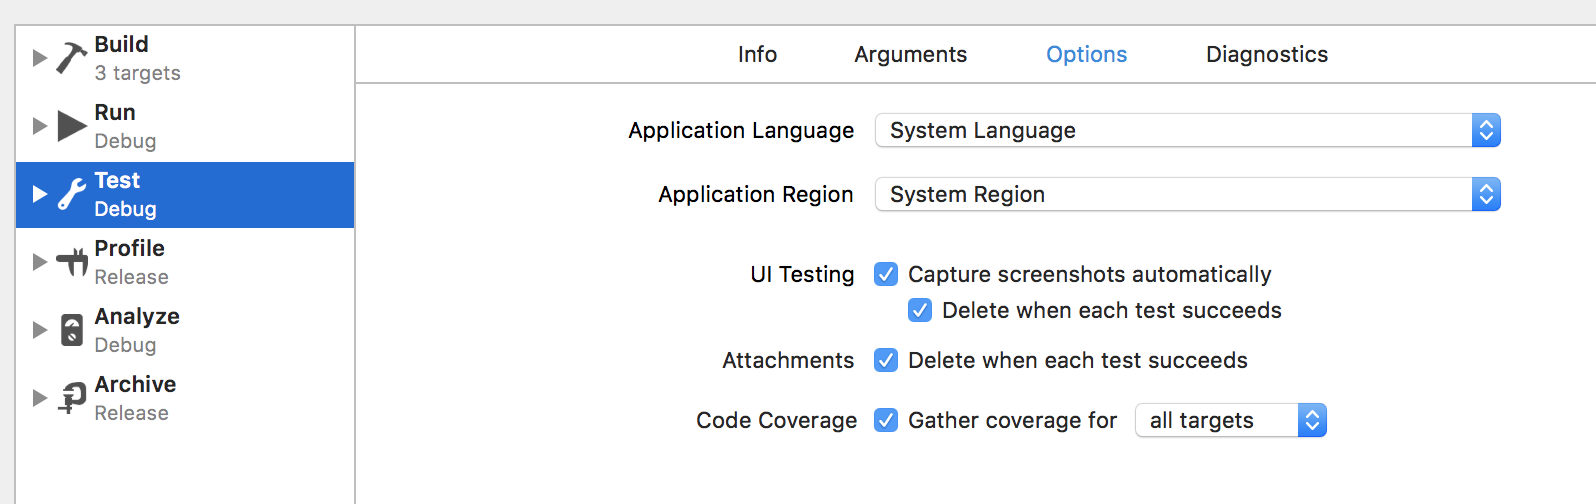
编辑方案时,通过勾选“收集覆盖数据”复选框来启用测试覆盖:
要验证您准备生成测试覆盖范围,请在项目上运行测试套件,然后运行:
$ slather覆盖范围-s -scheme yourxcodeschemename路径/to/project.xcodeproj
如果您使用XCode中的工作区,则需要指定它:
$ slather覆盖范围-s -scheme yourxcodeschemename -workspace path/to/workspace.xcworkspace path/to/project.xcodeproj
如果您使用其他配置进行测试:
$ slather覆盖范围-s -scheme yourxcodeschemename -configuration yourbuildConfigurationName path/to/project.xcodeproj
如果您的配置产生了通用二进制文件,则需要指定要使用的特定体系结构:
$ slather Coverage -s -ark x86_64 -scheme yourxcodeschemename -configuration yourbuildConfigurationName path/to/project.xcodeproj
如果您想运行一些模块,但不是全部(例如由Cocoapods创建的模块),您可以这样做:
$ slather覆盖范围-Binary-Basename Module1-Binary-Basename Module2 Path/to/project.xcodeproj
您也可以将其添加到.slather.yml文件中,作为数组:
 binary_basename:
   - 模块1
   - 模块2
运行此命令以启用您项目的Generate Test Coverage和Instrument Program Flow标志:
$ slather设置路径/到/project.xcodeproj
当使用配置文件( .slather.yml )和通过命令行提供参数时,参数将优先于配置文件中的匹配设置。
ignore总是赢得source-files在定义应忽略的两个文件( --ignore ,忽略)和源文件以包含( --source-files ,source_files)时,首先检查忽略列表。如果扫描该文件匹配忽略列表中的一个地球,则不会包含它。在这种情况下,未检查source_file列表。
如果扫描的文件不在“忽略”列表中,并且已定义了source_file,则将选中source_file列表。如果源文件匹配一个地球,则将包括在内。
登录到CodeCov(无需激活存储库,这会自动发生)。目前, slather通过此处列出的所有支持的CI提供商支持Codecov。
制作.slather.yml文件:
 #.slather.ymlcoverage_service:cobertura_xmlxcodeproj:path/to/to/project.xcodeprojscheme:yourxcodeschemenameconfiguration:testedconfigurationsource_directory:path/to/conse/to/to/to/source/to/counce outces outces/to/incruppeoutoutountuptut_dectory:path_decign/xml_/xml to/xml_ml:cml:cml:cml:cml:cml_ml to/xml:
   - 示例podcode/*
  -Project -TestSgroup/*
然后在您的.travis.yml , circle.yml (或其他CI提供者的测试命令之后),在成功的构建后致电slather :
 #.travis.ymlbefore_install:rvm使用$ rvm_ruby_versionInstall:bundle install -without = documentation -path ../ travis_bundle_dirafter_success:
    -  sl
  -bash <(curl -s https://codecov.io/bash)-f Path/to/xml_report/cobertura.xml -x Coveragepy -x coveragepy -x gcov -x gcod -x xcode
#circle.ymltest:发布:
- 捆绑exec slather-bash <(curl -s https://codecov.io/bash)-f Path/to/xml_report/cobertura.xml -x cubsegagepy -x gcove -x gcove -x xcode私人仓库?添加
-t :uuid-repo-tokento codecov上传器。在此处阅读有关上传报告的更多信息
登录以放入并启用您的存储库。目前, slather通过Travis CI,Circleci,Jenkins,Teamcity,Buildkite和Bitrise支持下班。
制作.slather.yml文件并指定您正在使用的CI服务:
 #.slather.ymlci_service:CircleCi | travis_ci | travis_pro |詹金斯| buildkite | TeamCityCoverage_service:CoverallSxCodeProj:path/to/project.xcodeprojscheme:yourxcodeschemenameignore:
   - 示例podcode/*
  -Project -TestSgroup/*
然后在您的.travis.yml或circle.yml或github-action.yml中,成功构建后致电slather :
#.travis.ymlbefore_install:rvm使用$ rvm_ruby_versionInstall:bundle install -without = documentation -path ../ travis_bundle_dirafter_success:slather:slather:slather
 #circle.ymltest:发布:
     - 捆绑执行slather
#github-action.yml
myjob:步骤:
- 运行:| 捆绑配置路径供应商/捆绑捆绑安装 - without = document = documentation -jobs 4- retry 3-名称:提取分支nameshell:bashrun:echo:echo“ ## [set -out -output name = branch = branch;] $(echo $ {github_ref#{github_ref# refs/head/})” id:get_branch-运行:捆绑exec slatherenv:git_branch:$ {{steps.gets.get_branch.outputs.branch}} ci_pull_request:$ {{github.event.event.number}} coveral_access_access_token:$ {number}} covery_access_token:$ { github_token}}}要使用Travis CI Pro(用于私人存储库)的地下室,请在.slather.yml中添加以下行以及其他设置:
#.slather.ymlci_service:travis_procoverage_access_token:<您的访问token>
可以在Coveralls Repo页面上找到覆盖范围令牌。否则可以通过COVERAGE_ACCESS_TOKEN环境将其传递。
要创建一个Cobertura XML报告将cobertura_xml设置为.slather.yml中的覆盖范围服务。您可以选择为XML报告定义输出目录:
 #.slather.ymlcoverage_service:cobertura_xmlxcodeproj:path/to/to/project.xcodeprojscheme:yourxcodeschemenamesource_directory:path/to/to/to/to/to/to/to/to/include unclude outtutput_directory:path/to/xml_reportignore:path/xml_reportignore:path/xml_reportignore:
   - 示例podcode/*
  -Project -TestSgroup/*
或使用命令行选项--cobertura-xml或-x和--output-directory :
$ slather Coverage -x -Output -directory Path/to/xml_report
要以静态HTML页面创建报告,请使用命令行选项--html :
$ slather覆盖范围 - html -scheme yourxcodeschemename path/to/project.xcodeproj
这将使您的根目录中的名为html的目录(除非指定--output-directory ),并将所有报告作为静态HTML页面生成目录内的静态HTML页面。默认情况下,它将打印出报告的路径,但您也可以指定--show标志以自动在浏览器中打开。
默认情况下,生成的HTML将引用本地托管资产(JS,CSS)。您可以指定--cdn-assets ,以指定您更喜欢生成的HTML使用外部托管资产。如果将HTML文件作为构建工件发布,这将很有用。
向TeamCity报告覆盖范围统计信息:
$ slather覆盖范围-Teamcity -S -Scheme yourxcodeschemename
如果您试图计算通过Cocoapods包含的代码的覆盖范围,则需要告诉Cocoapods通过将以下内容添加到您的Podfile中,以使用Slather插件。
插件'slather'
您还需要告诉Slather在哪里可以找到POD的源文件。
#.slather.ymlsource_directory:pods/afnetworking
默认情况下,Slather将在DerivedData中查找测试覆盖范围文件。如果将构建输出发送到自定义位置,则还应在.slather.yml中设置build_directory属性
如果您在工作区中构建项目,请包括--workspace参数或将workspace添加到.slather.yml 。例如:
$ slather覆盖范围 - html -scheme yourxcodeschemename -workspace路径/to/workspace.xcworkspace path/to/project.xcodeproj
我们很想看到您改善该图书馆的想法!最好的贡献方法是提交拉动请求。我们将尽力尽快响应您的补丁。如果发现错误或有疑问,也可以提交新的GitHub问题。
请确保遵循我们的一般编码样式,并为新功能添加测试覆盖范围!
@tpoulos,完美的徽标。
@Ayanonagon和@kylef,反馈和测试。
@Jhersh,Circleci支持。
@tarbrain,Cobertura的支持和错误装饰。
@ikhsan,HTML支持。
@martin-key和@troyfontaine,GitHub Actions支持。


