OneForAll
1.0.0
论文:https://arxiv.org/abs/2310.00149
作者:Hao Liu,Jiarui Feng,Lecheng Kong,Ningyue Liang,Dacheng Tao,Yixin Chen,Muhan Zhang
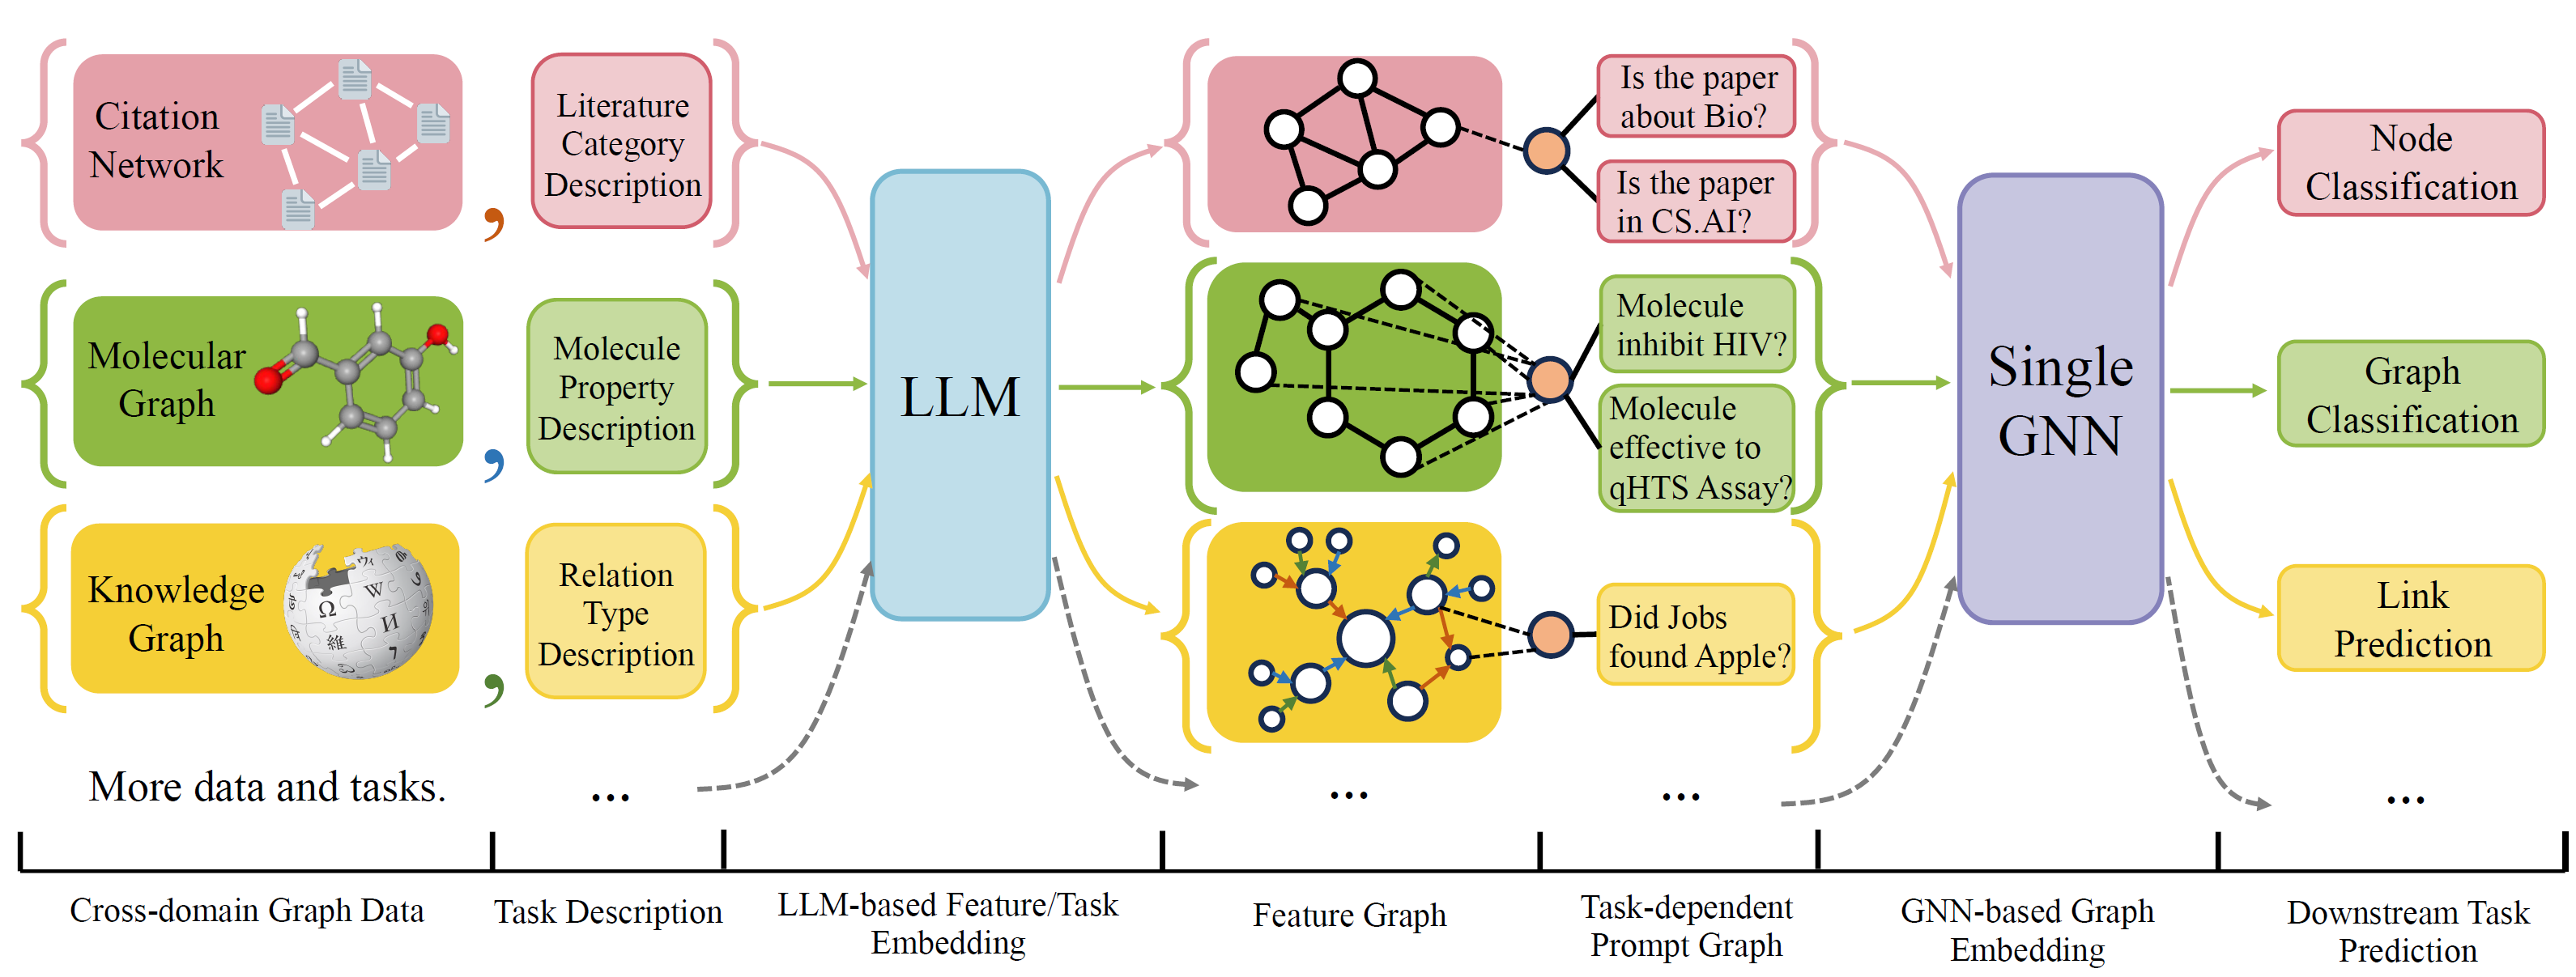
OFA是一个通用的图形分类框架,可以使用单个模型和一组参数来解决广泛的图形分类任务。这些任务是跨域(例如引用网络,分子图,...)和交叉任务(例如,几次,零射击,图形级,节点 - leve,...)
OFA使用自然语言来描述所有图形,并使用LLM将所有描述嵌入相同的嵌入空间中,从而可以使用单个模型来实现跨域训练。
OFA提出了一个提示的Paradiagm,将所有任务信息转换为提示图。因此,子序列模型能够读取任务信息并相应地预测Relavent Target,而无需调整模型参数和体系结构。因此,单个模型可以是交叉任务。
OFA策划了来自不同源和域的图形数据集列表,并用系统递减协议描述了图中的节点/边缘。我们感谢以前的作品,包括OGB,Gimlet,Moleculenet,Graphllm和Villmow提供了精美的原始图形/文本数据,使我们的工作成为可能。
Oneforall进行了重大修订,我们清理了代码并修复了几个报告的错误。主要更新是:
如果您以前使用过我们的存储库,请拉并删除旧生成的功能/文本文件并再生。带来不便敬请谅解。
使用Conda安装项目要求:
conda env create -f environment.yml
对于所有收集的数据集的联合端到端实验,请运行
python run_cdm.py --override e2e_all_config.yaml
所有参数都可以通过空间分离值(例如
python run_cdm.py --override e2e_all_config.yaml num_layers 7 batch_size 512 dropout 0.15 JK none
用户可以在./e2e_all_config.yaml中修改task_names变量以控制培训期间包含哪些数据集。 task_names , d_multiple和d_min_ratio的长度应相同。也可以通过逗号分隔值在命令行参数中指定它们。
例如
python run_cdm.py task_names cora_link,arxiv d_multiple 1,1 d_min_ratio 1,1
可以通过
python run_cdm.py task_names cora_link d_multiple 1 d_min_ratio 1
运行几次射击和零射实验
python run_cdm.py --override lr_all_config.yaml
我们为每个任务定义配置,每个任务配置都包含几个数据集配置。
任务配置存储在./configs/task_config.yaml中。一个任务通常包括几个数据集(不一定是同一数据集)。例如,常规的端到端CORA节点分类任务将使CORA数据集的火车拆分为火车数据集,CORA数据集的有效拆分是有效的数据集之一,同样对于测试拆分。您还可以通过将CORA的火车分配为验证/测试数据集之一来获得更多的验证/测试。具体来说,任务配置看起来像
 arxiv :
  eval_pool_mode : mean
  dataset : arxiv             # dataset name
  eval_set_constructs :
    - stage : train           # a task should have one and only one train stage dataset
      split_name : train
    - stage : valid
      split_name : valid
      dataset : cora          # replace the default dataset for zero-shot tasks
    - stage : valid
      split_name : valid
    - stage : test
      split_name : test
    - stage : test
split_name : train # test the train split数据集配置存储在./configs/task_config.yaml中。数据集配置定义了数据集的构建方式。具体来说,
 arxiv :
  task_level : e2e_node
  preprocess : null                       # name of the preprocess function defined in task_constructor.py
  construct : ConstructNodeCls            # name of the dataset construction function defined in task_constructor.py
  args : # additional arguments to construct function
    walk_length : null
    single_prompt_edge : True
  eval_metric : acc                       # evaluation metric
  eval_func : classification_func         # evaluation function that process model output and batch to input to evaluator
  eval_mode : max                         # evaluation mode (min/max)
  dataset_name : arxiv                    # name of the OFAPygDataset
  dataset_splitter : ArxivSplitter        # splitting function defined in task_constructor.py
  process_label_func : process_pth_label  # name of process label function that transform original label to the binary labels
num_classes : 40 如果您正在实现Cora/PubMed/arxiv之类的数据集,我们建议在Data/single_graph/$ customized_data $下添加数据$ customized_data $的目录,并在目录下实现gen_data.py,您可以使用data/cora/gen_data。 PY作为一个例子。
构造数据后,您需要在此处注册数据集名称,并在此处实现分离器。如果您要执行零射击/少量射击任务,则也可以在此处构造零击/几次拆分。
最后,在configs/data_config.yaml中注册配置条目。例如,用于端到端节点分类
 $data_name$ :
  << : *E2E-node
  dataset_name : $data_name$
  dataset_splitter : $splitter$
  process_label_func : ... # usually processs_pth_label should work
  num_classes : $number of classes$
process_label_func将目标标签转换为二进制标签,并转换类嵌入,如果任务为零/少数射击,则无法修复类节点的数量。 Avalailable Process_label_func的列表在这里。它需要所有类嵌入和正确的标签。输出是一个元组:(标签,class_node_embedding,二进制/单速标签)。
如果您想要更高的灵活性,那么添加自定义数据集需要实现ofapygdataset的自定义子类。一个模板在这里:
 class CustomizedOFADataset ( OFAPygDataset ):
    def gen_data ( self ):
        """
        Returns a tuple of the following format
        (data, text, extra)
        data: a list of Pyg Data, if you only have a one large graph, you should still wrap it with the list.
        text: a list of list of texts. e.g. [node_text, edge_text, label_text] this is will be converted to pooled vector representation.
        extra: any extra data (e.g. split information) you want to save.
        """

    def add_text_emb ( self , data_list , text_emb ):
        """
        This function assigns generated embedding to member variables of the graph

        data_list: data list returned in self.gen_data.
        text_emb: list of torch text tensor corresponding to the returned text in self.gen_data. text_emb[0] = llm_encode(text[0])


        """
        data_list [ 0 ]. node_text_feat = ...     # corresponding node features
        data_list [ 0 ]. edge_text_feat = ...      # corresponding edge features
        data_list [ 0 ]. class_node_text_feat = ...      # class node features
        data_list [ 0 ]. prompt_edge_text_feat = ...     # edge features used in prompt node
        data_list [ 0 ]. noi_node_text_feat = ...       # noi node features, refer to the paper for the definition
        return self . collate ( data_list )

    def get_idx_split ( self ):
        """
        Return the split information required to split the dataset, this optional, you can further split the dataset in task_constructor.py

        """

    def get_task_map ( self ):
        """
        Because a dataset can have multiple different tasks that requires different prompt/class text embedding. This function returns a task map that maps a task name to the desired text embedding. Specifically, a task map is of the following format.

        prompt_text_map = {task_name1: {"noi_node_text_feat": ["noi_node_text_feat", [$Index in data[0].noi_node_text_feat$]],
                                    "class_node_text_feat": ["class_node_text_feat",
                                                             [$Index in data[0].class_node_text_feat$]],
                                    "prompt_edge_text_feat": ["prompt_edge_text_feat", [$Index in data[0].prompt_edge_text_feat$]]},
                       task_name2: similar to task_name 1}
        Please refer to examples in data/ for details.
        """
        return self . side_data [ - 1 ]

    def get_edge_list ( self , mode = "e2e" ):
        """
        Defines how to construct prompt graph
        f2n: noi nodes to noi prompt node
        n2f: noi prompt node to noi nodes
        n2c: noi prompt node to class nodes
        c2n: class nodes to noi prompt node
        For different task/mode you might want to use different prompt graph construction, you can do so by returning a dictionary. For example
        {"f2n":[1,0], "n2c":[2,0]} means you only want f2n and n2c edges, f2n edges have edge type 1, and its text embedding feature is data[0].prompt_edge_text_feat[0]
        """
        if mode == "e2e_link" :
            return { "f2n" : [ 1 , 0 ], "n2f" : [ 3 , 0 ], "n2c" : [ 2 , 0 ], "c2n" : [ 4 , 0 ]}
        elif mode == "lr_link" :
            return { "f2n" : [ 1 , 0 ], "n2f" : [ 3 , 0 ]}

