Pax 是一個在 Jax 之上配置和運行機器學習實驗的框架。
我們參考此頁面以取得有關啟動 Cloud TPU 專案的更詳盡文件。以下命令足以從企業電腦建立具有 8 個核心的 Cloud TPU VM。
 export ZONE=us-central2-b
export VERSION=tpu-vm-v4-base
export PROJECT= < your-project >
export ACCELERATOR=v4-8
export TPU_NAME=paxml

# create a TPU VM
gcloud compute tpus tpu-vm create $TPU_NAME
--zone= $ZONE --version= $VERSION
--project= $PROJECT
--accelerator-type= $ACCELERATOR
如果您使用 TPU Pod 切片,請參閱本指南。使用 gcloud 和--worker=all選項從本機電腦執行所有命令:
gcloud compute tpus tpu-vm ssh $TPU_NAME --zone= $ZONE
--worker=all --command= " <commmands> "
以下快速入門部分假設您在單主機 TPU 上執行,因此您可以透過 ssh 連線到虛擬機器並在其中執行命令。
gcloud compute tpus tpu-vm ssh $TPU_NAME --zone= $ZONE透過 ssh 連接虛擬機器後,您可以從 PyPI 安裝 paxml 穩定版本,或從 github 安裝開發版本。
從 PyPI 安裝穩定版本 (https://pypi.org/project/paxml/):
python3 -m pip install -U pip
python3 -m pip install paxml jax[tpu]
-f https://storage.googleapis.com/jax-releases/libtpu_releases.html
如果您遇到傳遞依賴問題,而您使用的是本機 Cloud TPU VM 環境,請導覽至對應的發行分支 rX.YZ 並下載paxml/pip_package/requirements.txt 。該檔案包含本機 Cloud TPU VM 環境中所需的所有傳遞依賴項的確切版本,我們在其中建置/測試對應的版本。
git clone -b rX.Y.Z https://github.com/google/paxml
pip install --no-deps -r paxml/paxml/pip_package/requirements.txt
用於從 github 安裝開發版本,並方便編輯程式碼:
 # install the dev version of praxis first
git clone https://github.com/google/praxis
pip install -e praxis
git clone https://github.com/google/paxml
pip install -e paxml
pip install " jax[tpu] " -f https://storage.googleapis.com/jax-releases/libtpu_releases.html # example model using pjit (SPMD)
python3 .local/lib/python3.8/site-packages/paxml/main.py
--exp=tasks.lm.params.lm_cloud.LmCloudSpmd2BLimitSteps
--job_log_dir=gs:// < your-bucket >
# example model using pmap
python3 .local/lib/python3.8/site-packages/paxml/main.py
--exp=tasks.lm.params.lm_cloud.LmCloudTransformerAdamLimitSteps
--job_log_dir=gs:// < your-bucket >
--pmap_use_tensorstore=True請造訪我們的文件夾以取得文件和 Jupyter Notebook 教學。請參閱以下部分,以了解在 Cloud TPU VM 上執行 Jupyter Notebook 的說明。
您可以在剛安裝 paxml 的 TPU VM 中執行範例筆記本。 ####在v4-8中啟用筆記本的步驟
TPU VM 中的 ssh 連接埠轉送gcloud compute tpus tpu-vm ssh $TPU_NAME --project=$PROJECT_NAME --zone=$ZONE --ssh-flag="-4 -L 8080:localhost:8080"
在TPU虛擬機器上安裝jupyter筆記本並降級markupsafe
 pip install notebook
pip install markupsafe==2.0.1
匯出jupyter路徑export PATH=/home/$USER/.local/bin:$PATH
scp 將範例筆記本複製到您的 TPU VM gcloud compute tpus tpu-vm scp $TPU_NAME:<path inside TPU> <local path of the notebooks> --zone=$ZONE --project=$PROJECT
從 TPU VM 啟動 jupyter Notebook 並記下 Jupyter Notebook 產生的令牌jupyter notebook --no-browser --port=8080
然後在本機瀏覽器中造訪:http://localhost:8080/ 並輸入提供的令牌
注意:如果您需要在第一個筆記本仍在佔用 TPU 時開始使用第二個筆記本,您可以執行pkill -9 python3來釋放 TPU。
注意:NVIDIA 發布了 Pax 的更新版本,支援 H100 FP8 並進行了廣泛的 GPU 效能改進。請造訪 NVIDIA Rosetta 儲存庫以取得更多詳細資訊和使用說明。
設定檔引導延遲估計器 (PGLE) 工作流程可測量計算和集合的實際運行時間,設定檔資訊將回饋至 XLA 編譯器以做出更好的調度決策。
設定檔引導延遲估計器可以手動或自動使用。在自動模式下,JAX 將收集設定檔資訊並在一次運行中重新編譯模組。在手動模式下,您需要執行任務兩次,第一次收集並儲存設定文件,第二次使用提供的資料進行編譯和執行。
可以透過設定以下環境變數來開啟自動 PGLE:
 XLA_FLAGS="--xla_gpu_enable_latency_hiding_scheduler=true"
JAX_ENABLE_PGLE=true
JAX_PGLE_PROFILING_RUNS=3
JAX_REMOVE_CUSTOM_PARTITIONING_PTR_FROM_CACHE_KEY=True
Optional JAX_PGLE_AGGREGATION_PERCENTILE=85
或在 JAX 中可以設定如下:
 import jax
from jax._src import config

with config.enable_pgle(True), config.pgle_profiling_runs(1):
  # Run with the profiler collecting performance information.
  train_step()
  # Automatically re-compile with PGLE profile results
  train_step()
  ...
您可以透過更改JAX_PGLE_PROFILING_RUNS來控制用於收集設定檔資料的重新運行量。增加此參數將帶來更好的配置文件信息,但也會增加非最佳化訓練步驟的數量。
JAX_REMOVE_CUSTOM_PARTITIONING_PTR_FROM_CACHE_KEY參數允許將主機回呼與自動 PGLE 一起使用。
如果步驟之間的效能雜訊太大而無法過濾掉不相關的度量,則減少JAX_PGLE_AGGREGATION_PERCENTILE參數可能會有所幫助。
注意: Auto PGLE 不適用於預編譯模組。由於 JAX 需要在執行期間重新編譯模組,因此自動 PGLE 既不適用於 AoT,也不適用於下列情況:
 import jax
from jax._src import config

train_step_compiled = train_step().lower().compile()

with config.enable_pgle(True), config.pgle_profiling_runs(1):
  train_step_compiled()
  # No effect since module was pre-compiled.
  train_step_compiled()
如果您仍想使用手動設定檔引導延遲估計器,XLA/GPU 中的工作流程為:
您可以透過設定來做到這一點:
export XLA_FLAGS= " --xla_gpu_enable_latency_hiding_scheduler=true " import os
from etils import epath
import jax
from jax . experimental import profiler as exp_profiler
# Define your profile directory
profile_dir = 'gs://my_bucket/profile'
jax . profiler . start_trace ( profile_dir )
# run your workflow
# for i in range(10):
# train_step()
# Stop trace
jax . profiler . stop_trace ()
profile_dir = epath . Path ( profile_dir )
directories = profile_dir . glob ( 'plugins/profile/*/' )
directories = [ d for d in directories if d . is_dir ()]
rundir = directories [ - 1 ]
logging . info ( 'rundir: %s' , rundir )
# Post process the profile
fdo_profile = exp_profiler . get_profiled_instructions_proto ( os . fspath ( rundir ))
# Save the profile proto to a file.
dump_dir = rundir / 'profile.pb'
dump_dir . parent . mkdir ( parents = True , exist_ok = True )
dump_dir . write_bytes ( fdo_profile )完成這一步驟後,您將在程式碼中列印的rundir下方取得一個profile.pb檔案。
您需要將profile.pb檔案傳遞給--xla_gpu_pgle_profile_file_or_directory_path標誌。
export XLA_FLAGS= " --xla_gpu_enable_latency_hiding_scheduler=true --xla_gpu_pgle_profile_file_or_directory_path=/path/to/profile/profile.pb "若要在 XLA 中啟用日誌記錄並檢查設定檔是否良好,請將日誌記錄等級設定為包含INFO :
export TF_CPP_MIN_LOG_LEVEL=0運行真正的工作流程,如果您在運行日誌中發現這些日誌記錄,則表示在延遲隱藏排程器中使用了分析器:
 2023-07-21 16:09:43.551600: I external/xla/xla/service/gpu/gpu_hlo_schedule.cc:478] Using PGLE profile from /tmp/profile/plugins/profile/2023_07_20_18_29_30/profile.pb
2023-07-21 16:09:43.551741: I external/xla/xla/service/gpu/gpu_hlo_schedule.cc:573] Found profile, using profile guided latency estimator
Pax 在 Jax 上運行,您可以在此處找到有關在 Cloud TPU 上運行 Jax 作業的詳細信息,也可以在此處找到有關在 Cloud TPU pod 上運行 Jax 作業的詳細信息
如果遇到相依性錯誤,請參閱與您正在安裝的穩定版本對應的分支中的requirements.txt檔案。例如,對於穩定版本 0.4.0,請使用分支r0.4.0並參閱requirements.txt 以取得用於穩定版本的依賴項的確切版本。
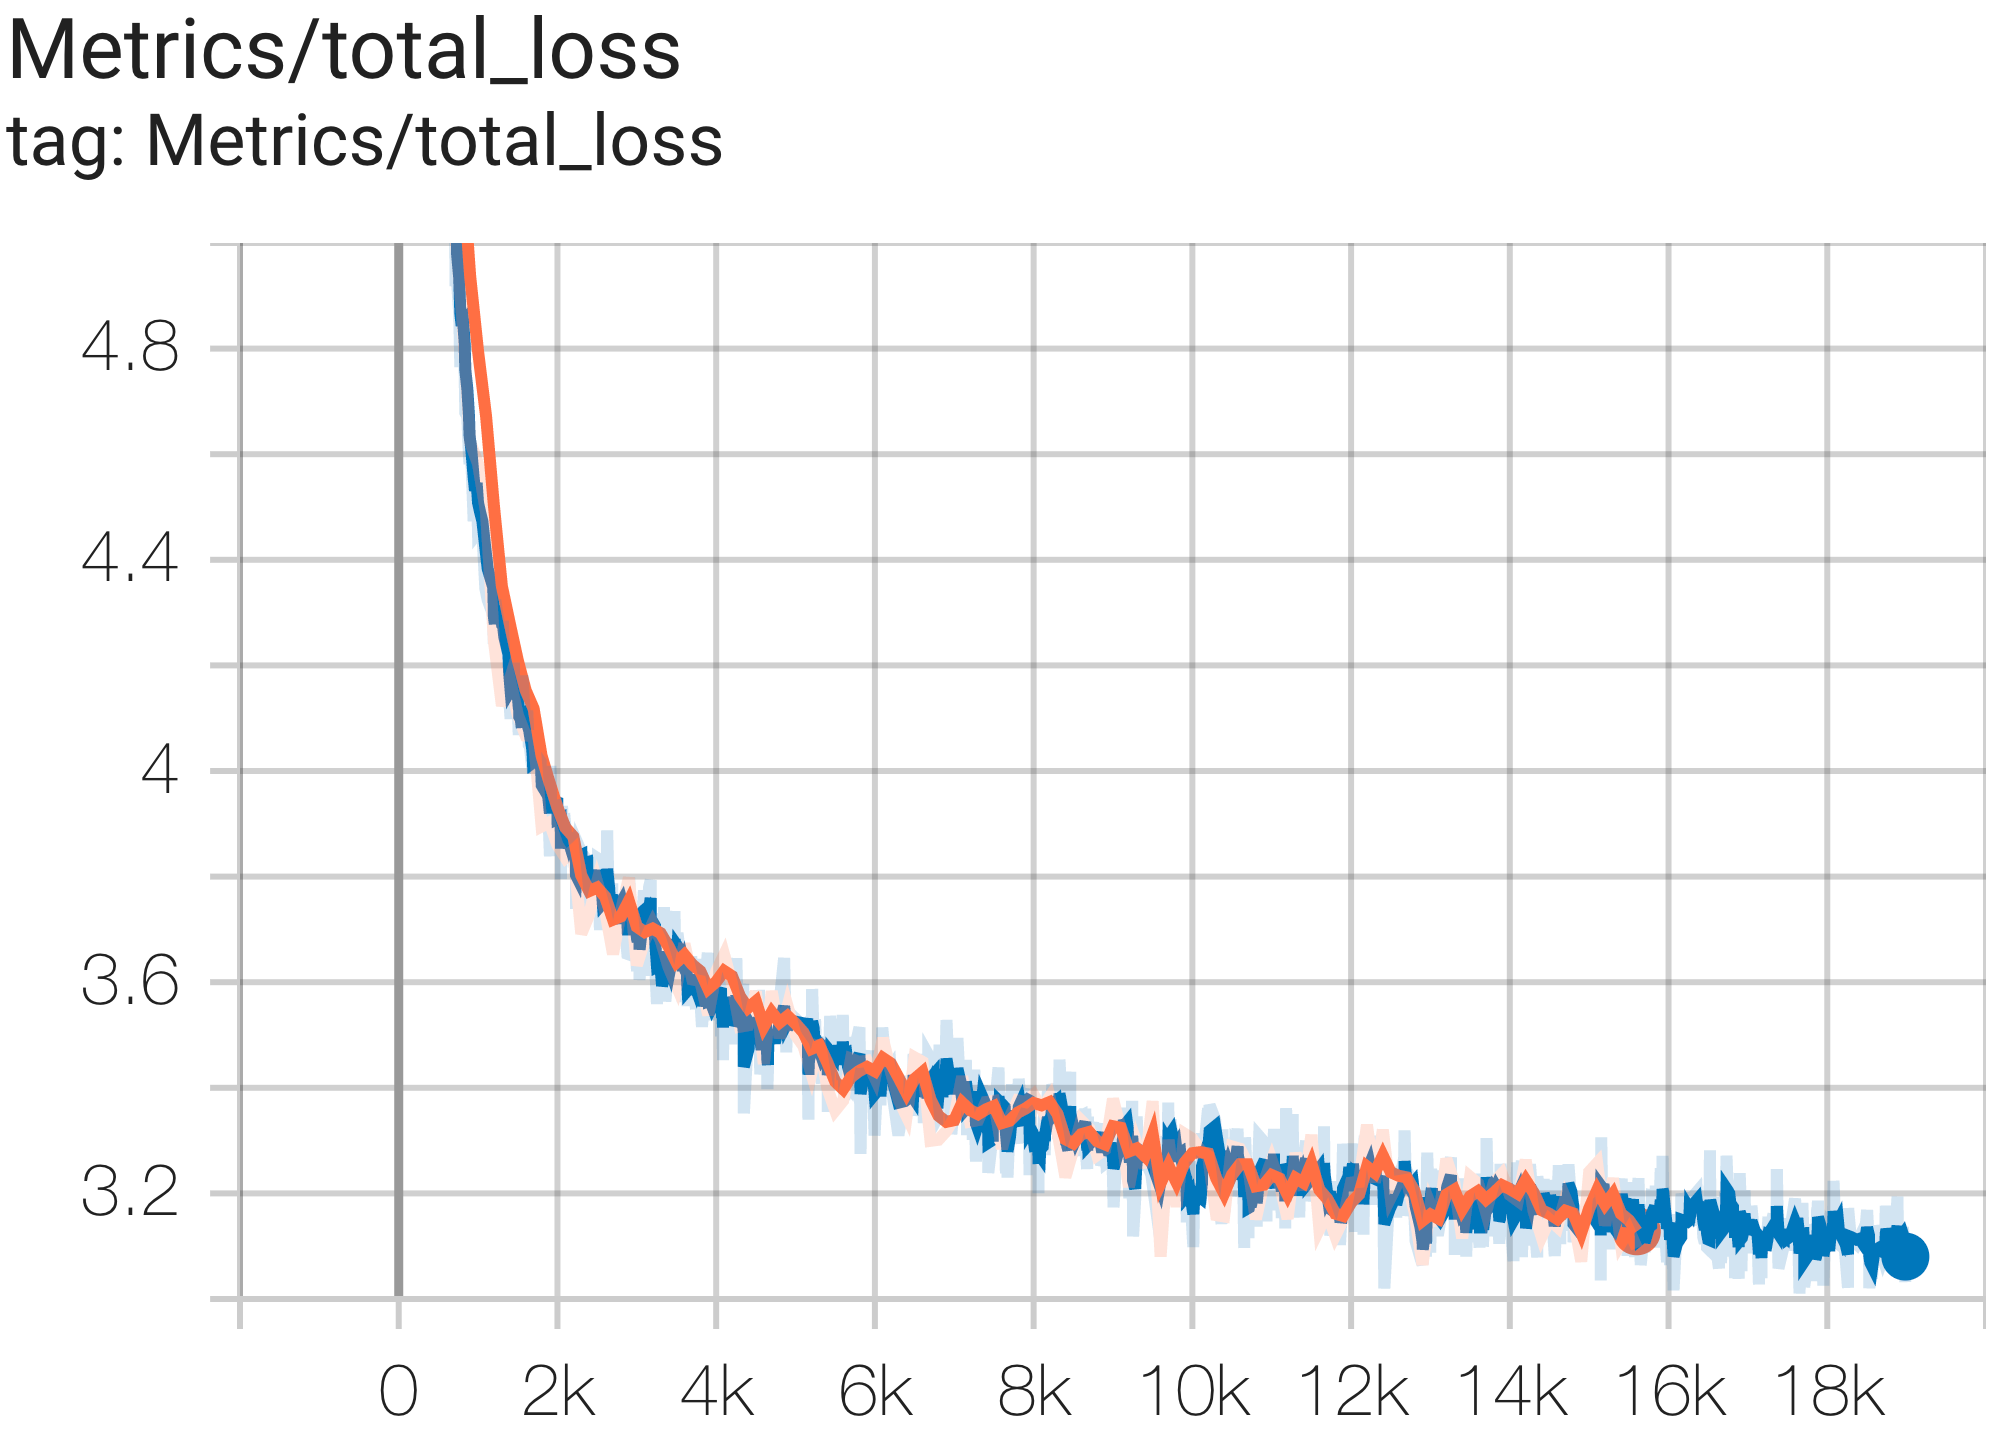
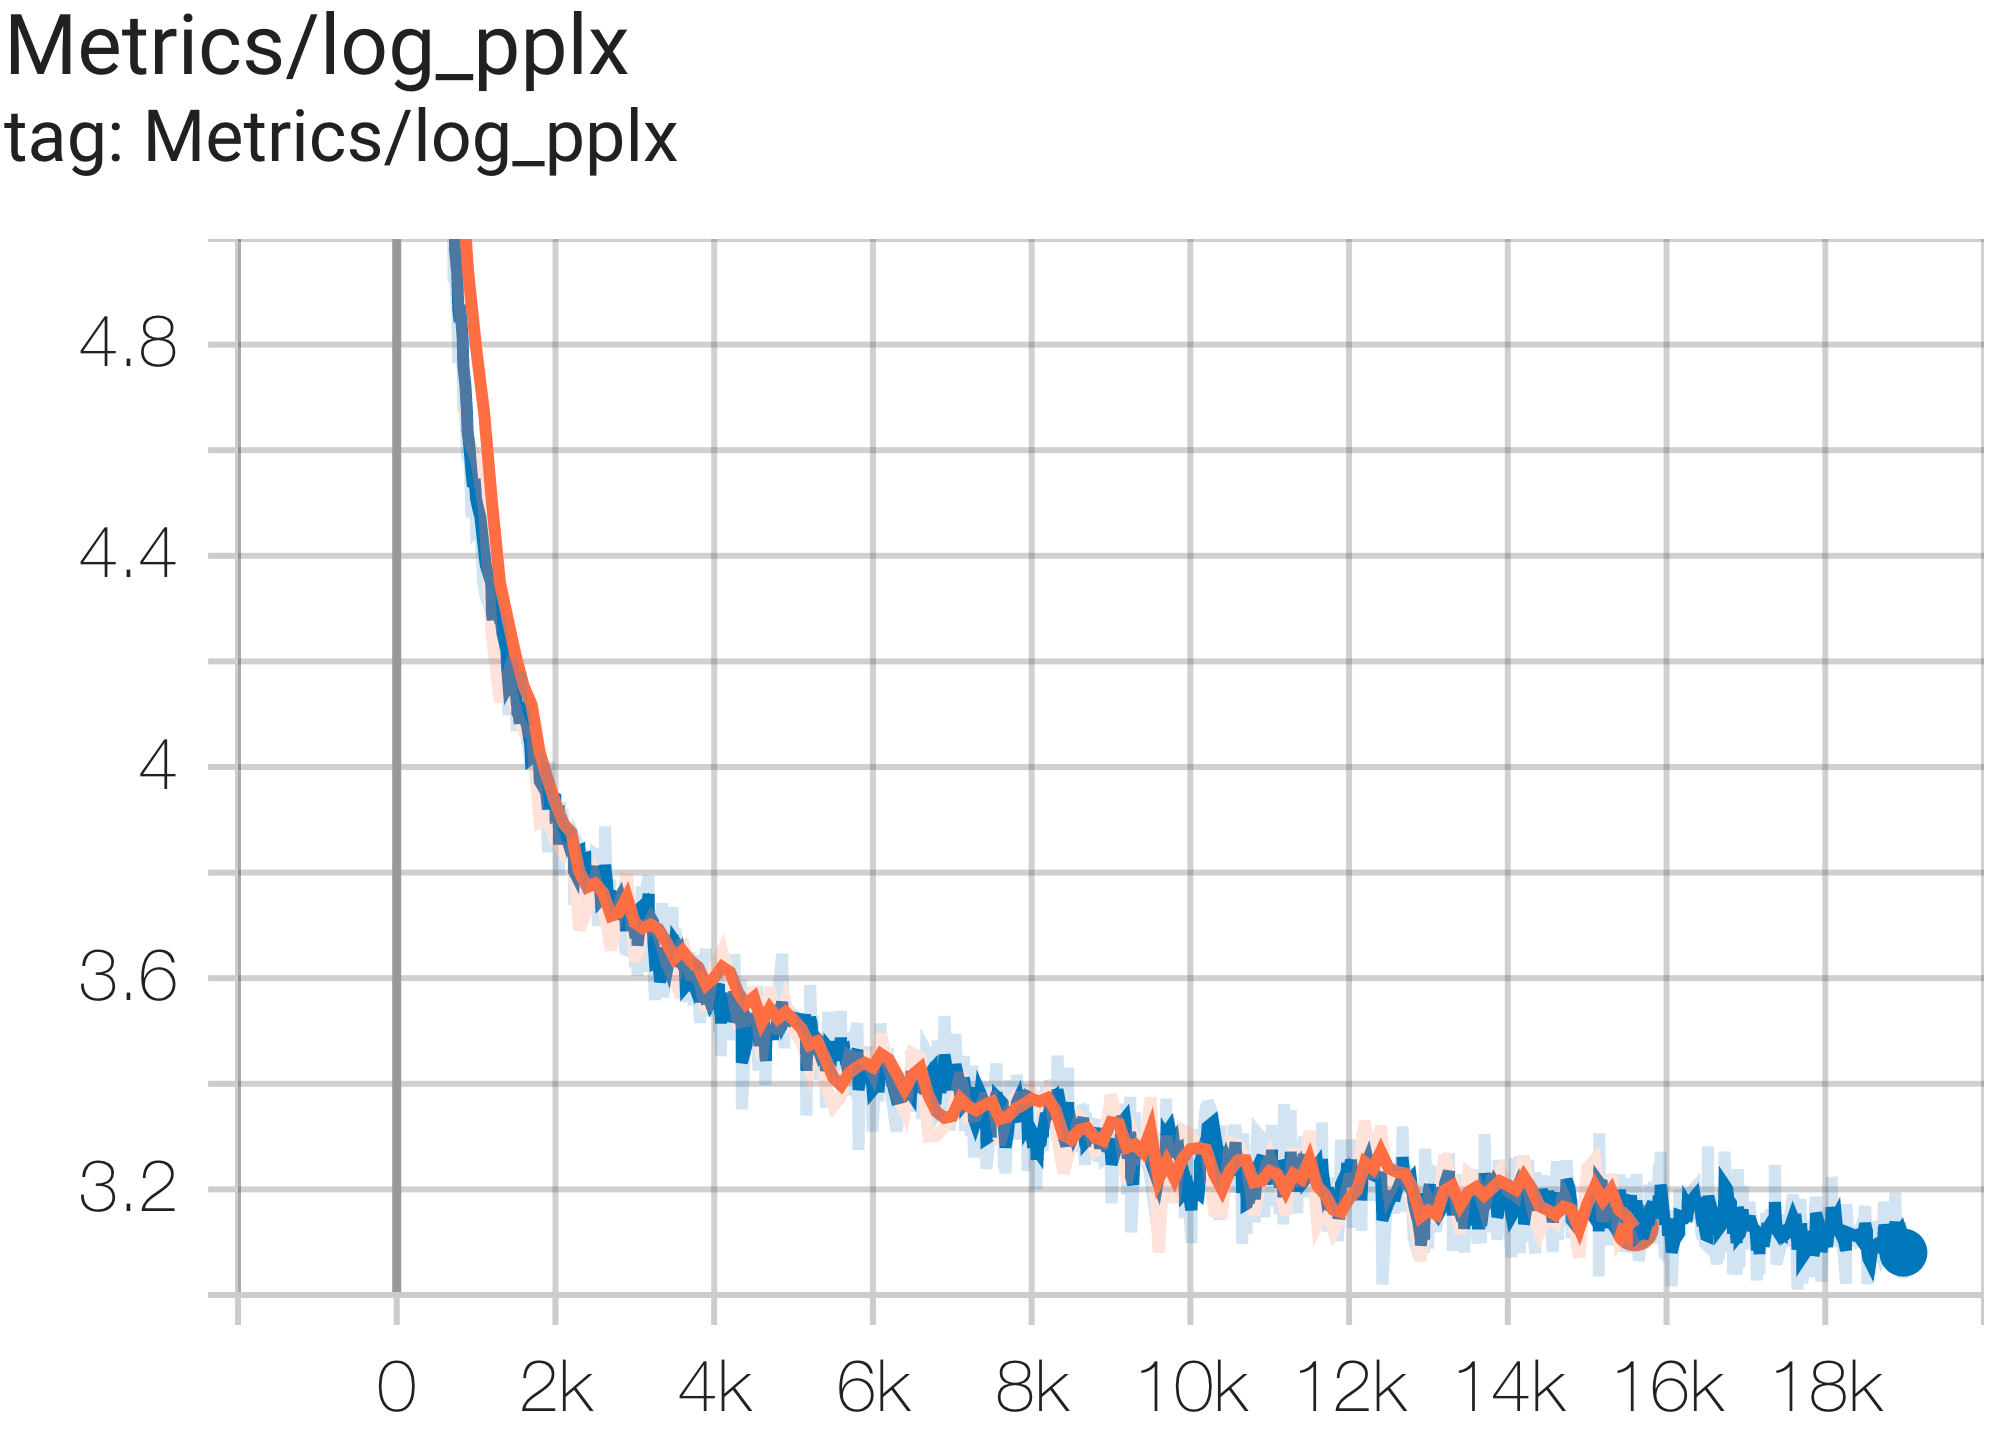
以下是在 c4 資料集上運行的一些收斂範例。
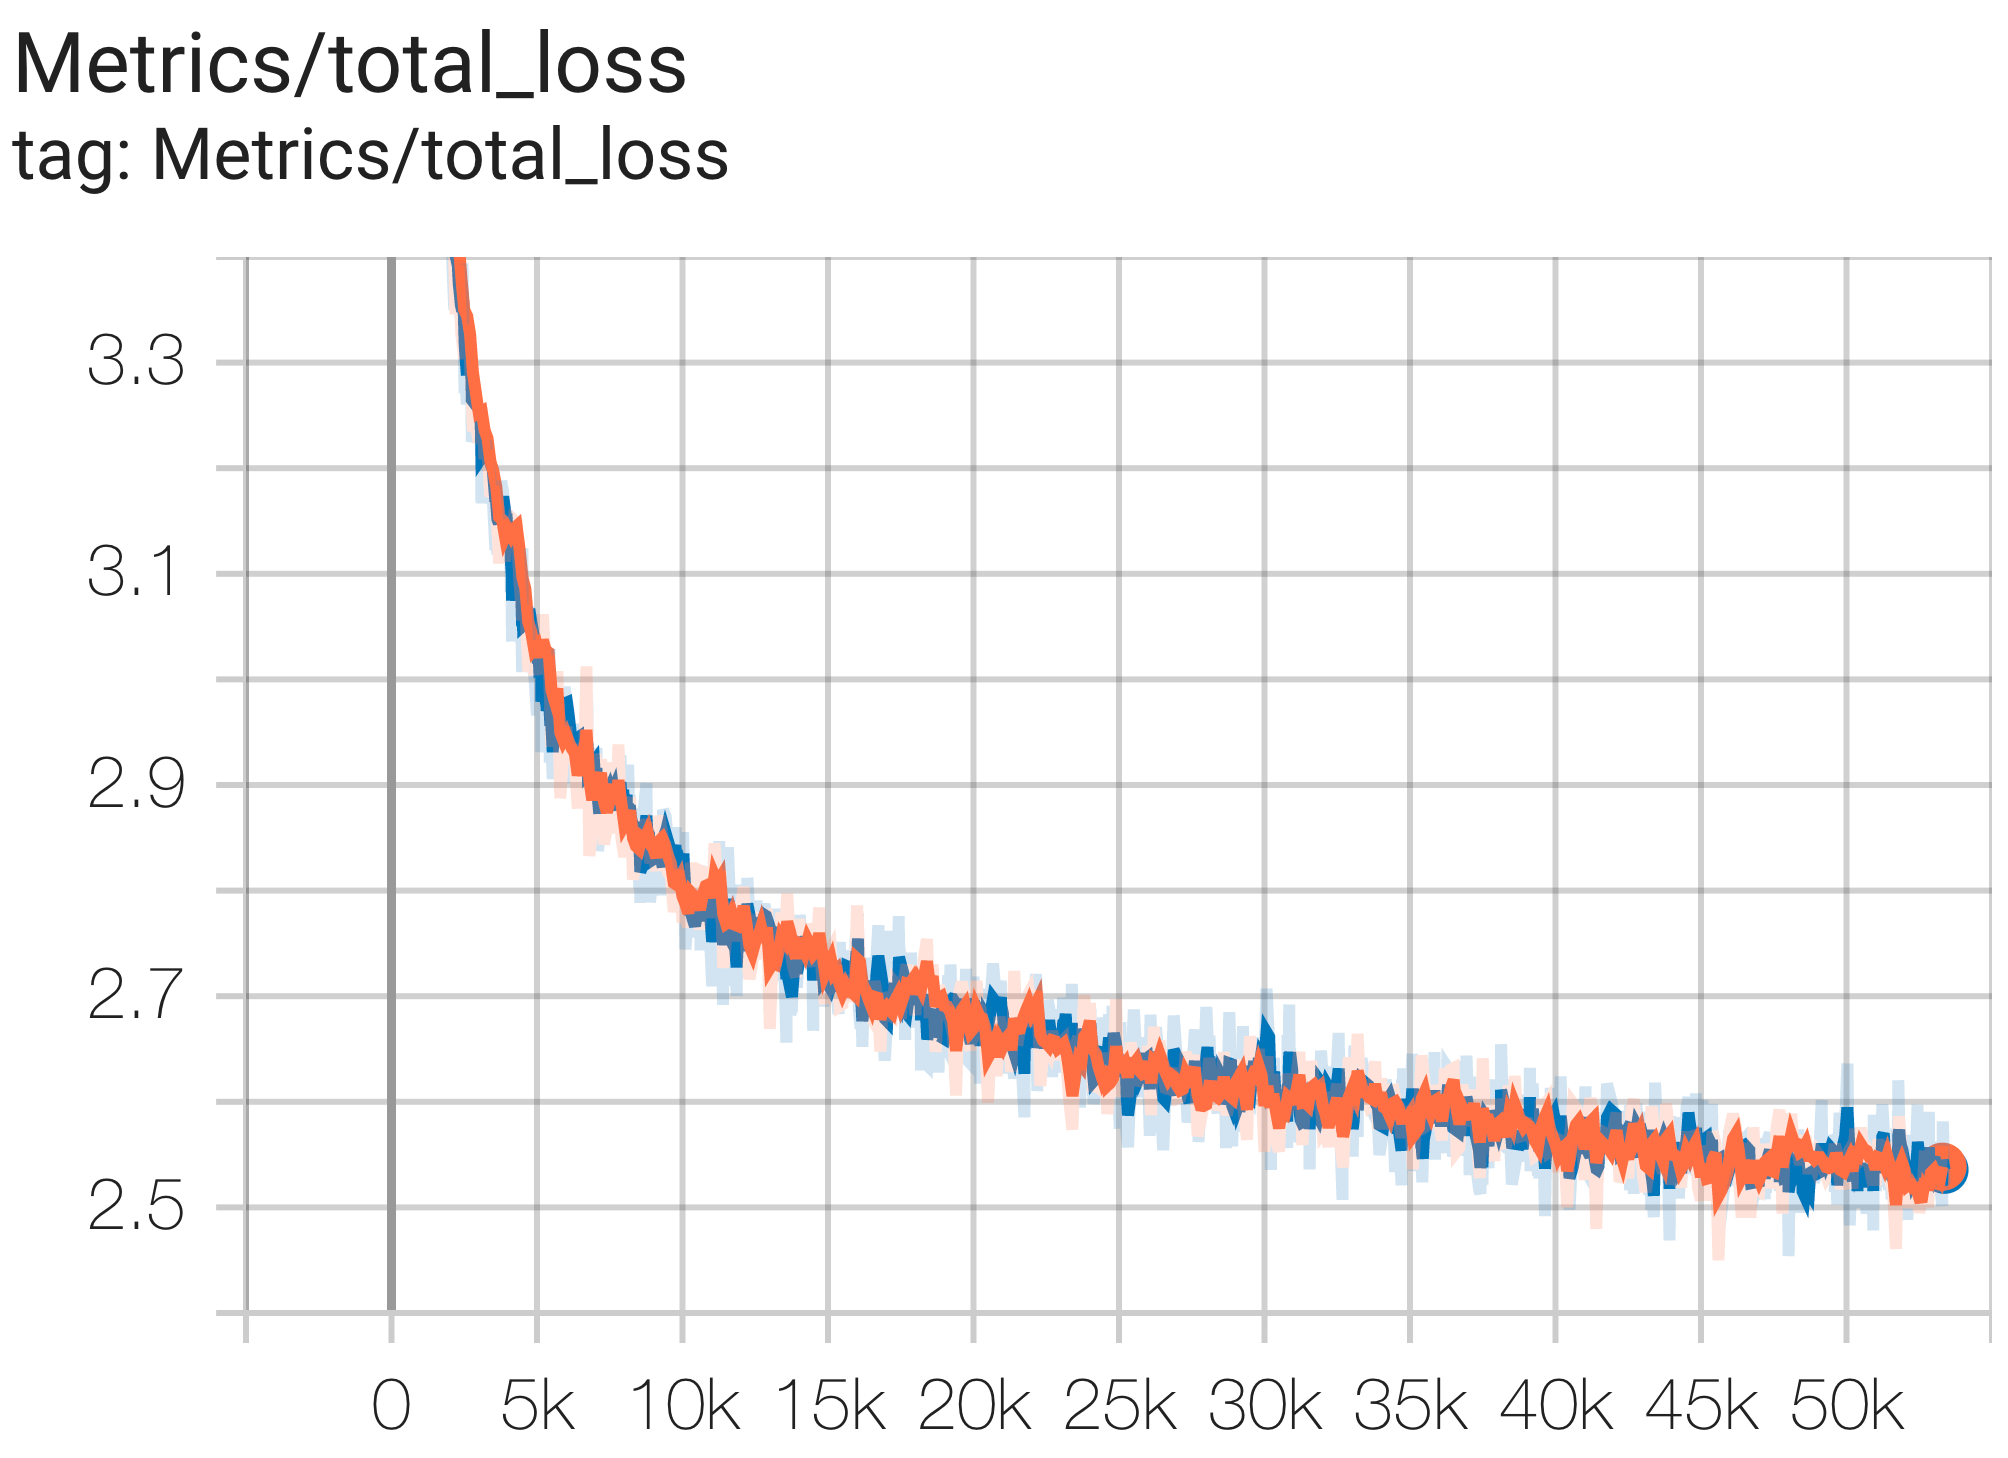
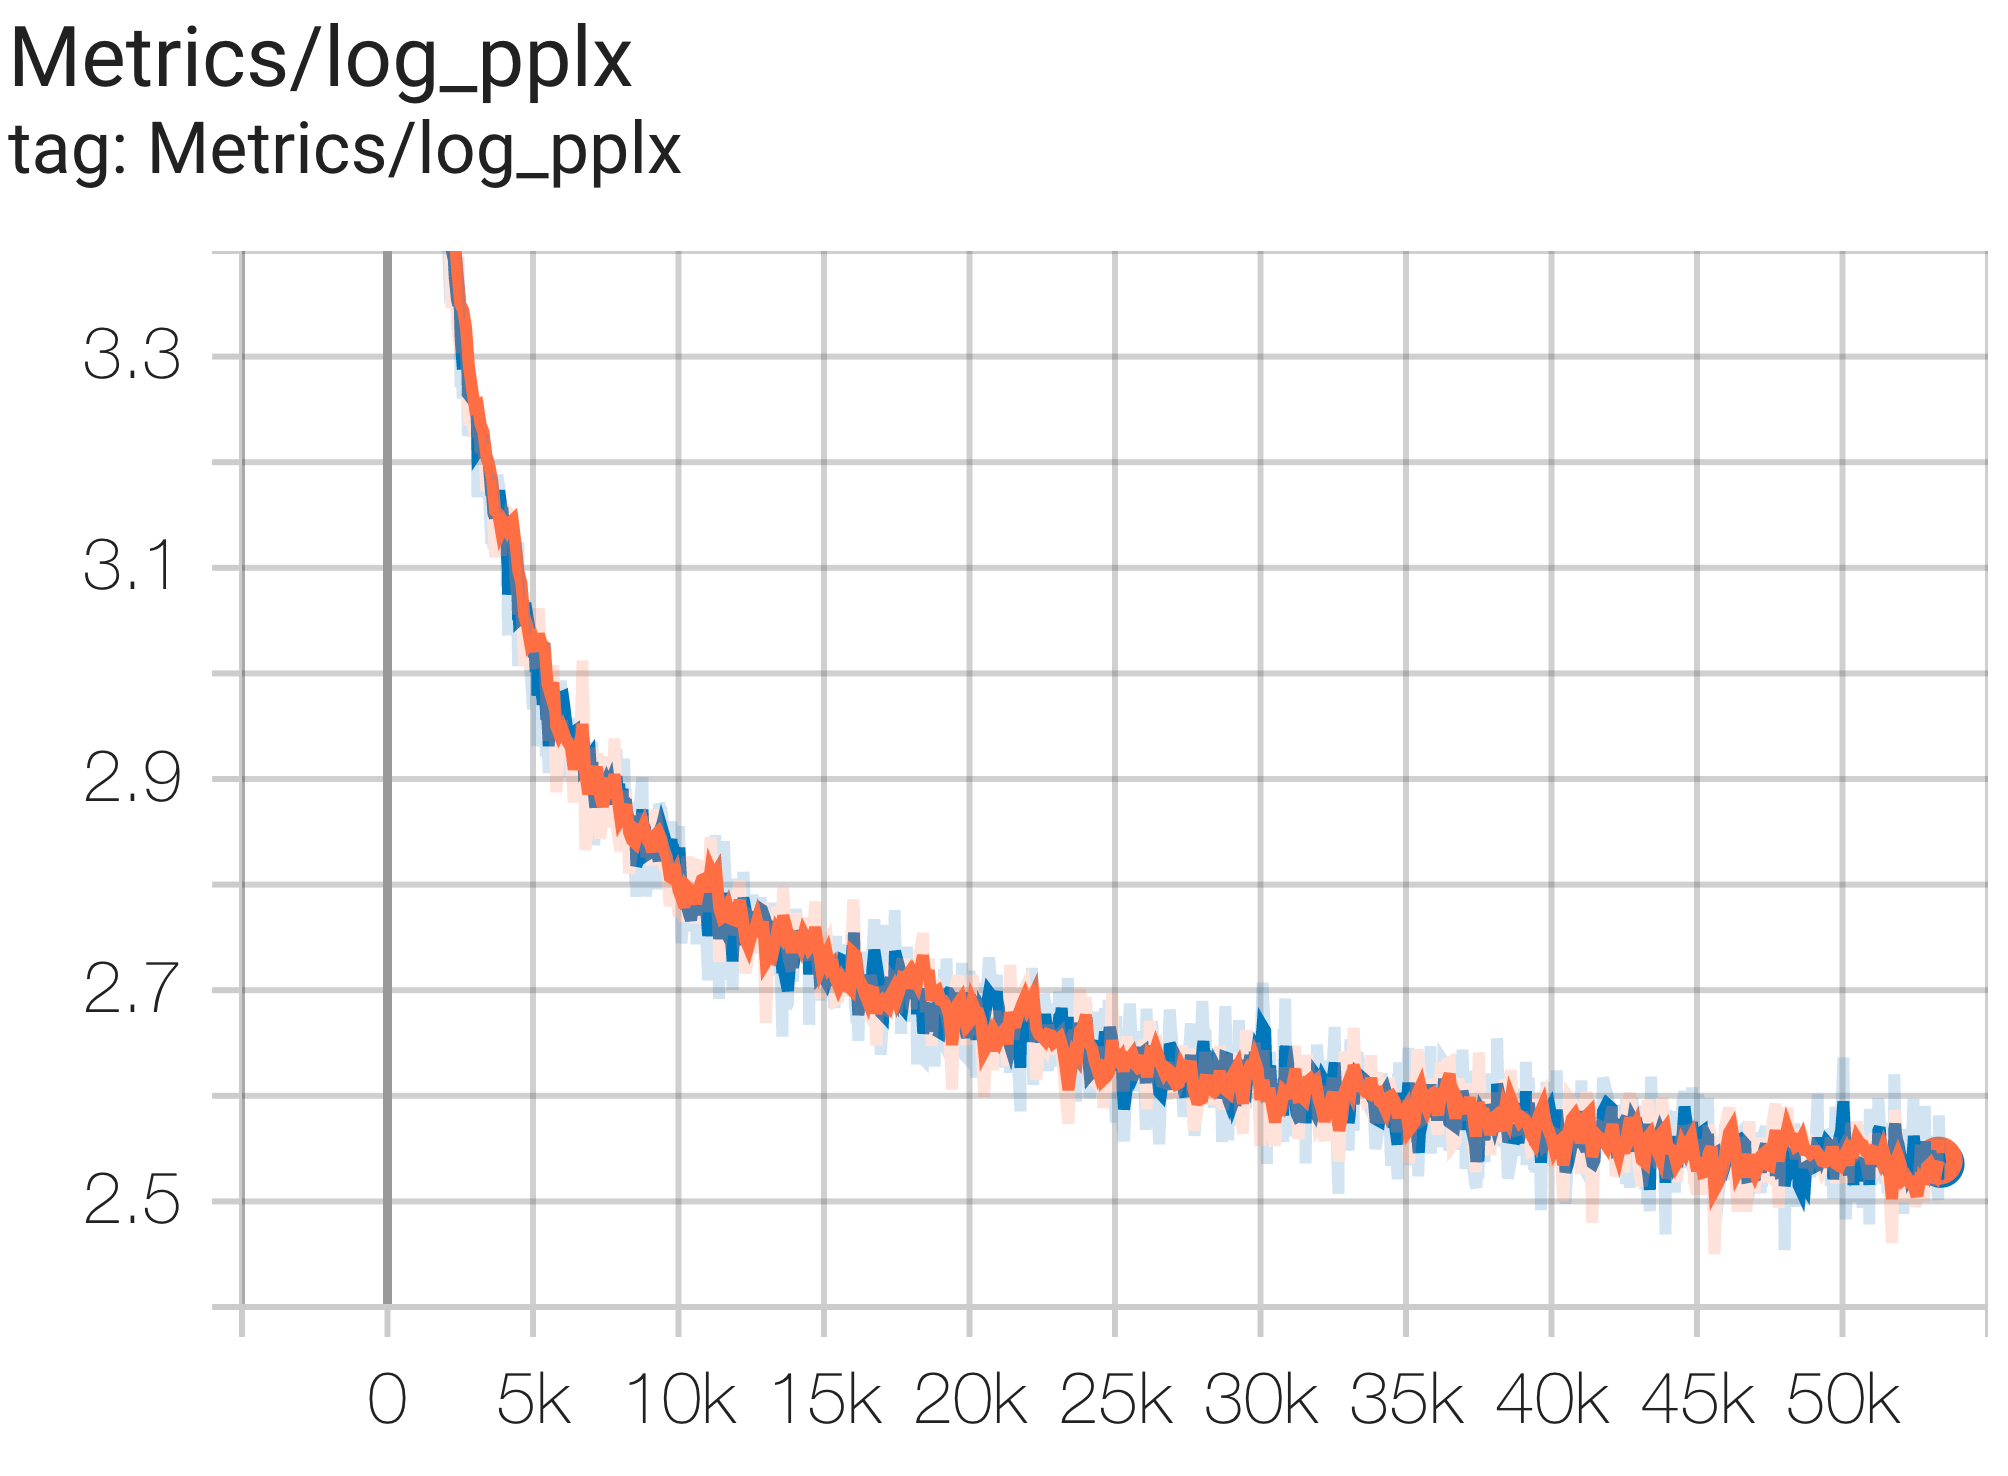
您可以使用 c4.py 中的配置C4Spmd1BAdam4Replicas在 TPU v4-8上的 c4 資料集上運行1B參數模型,如下所示:
python3 .local/lib/python3.8/site-packages/paxml/main.py
--exp=tasks.lm.params.c4.C4Spmd1BAdam4Replicas
--job_log_dir=gs:// < your-bucket >可以觀察loss曲線和log perplexity圖如下:
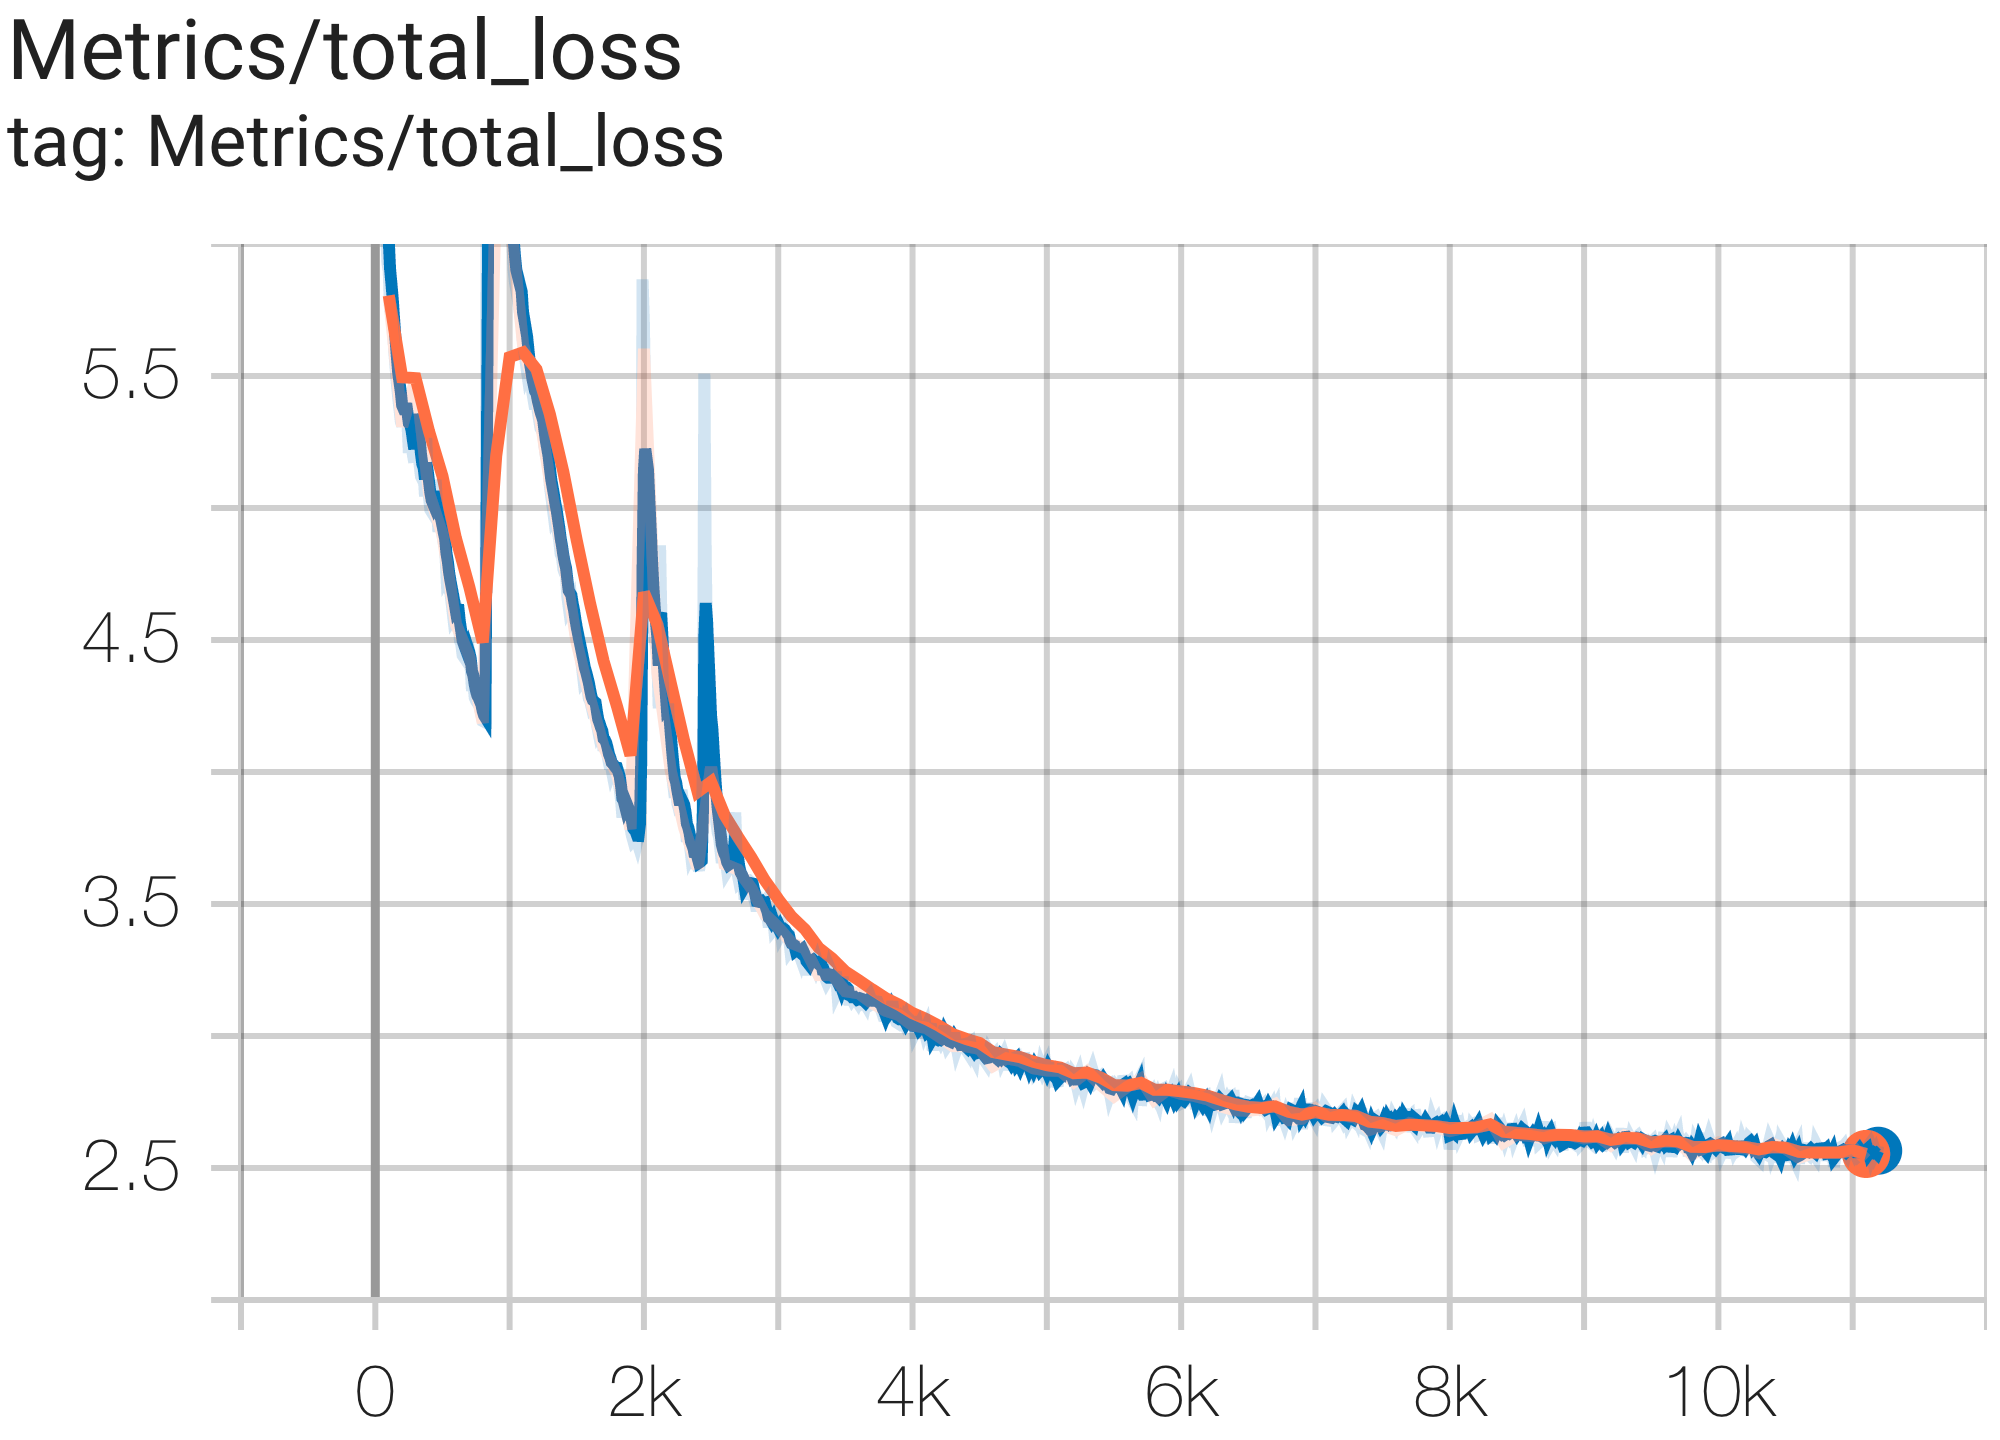
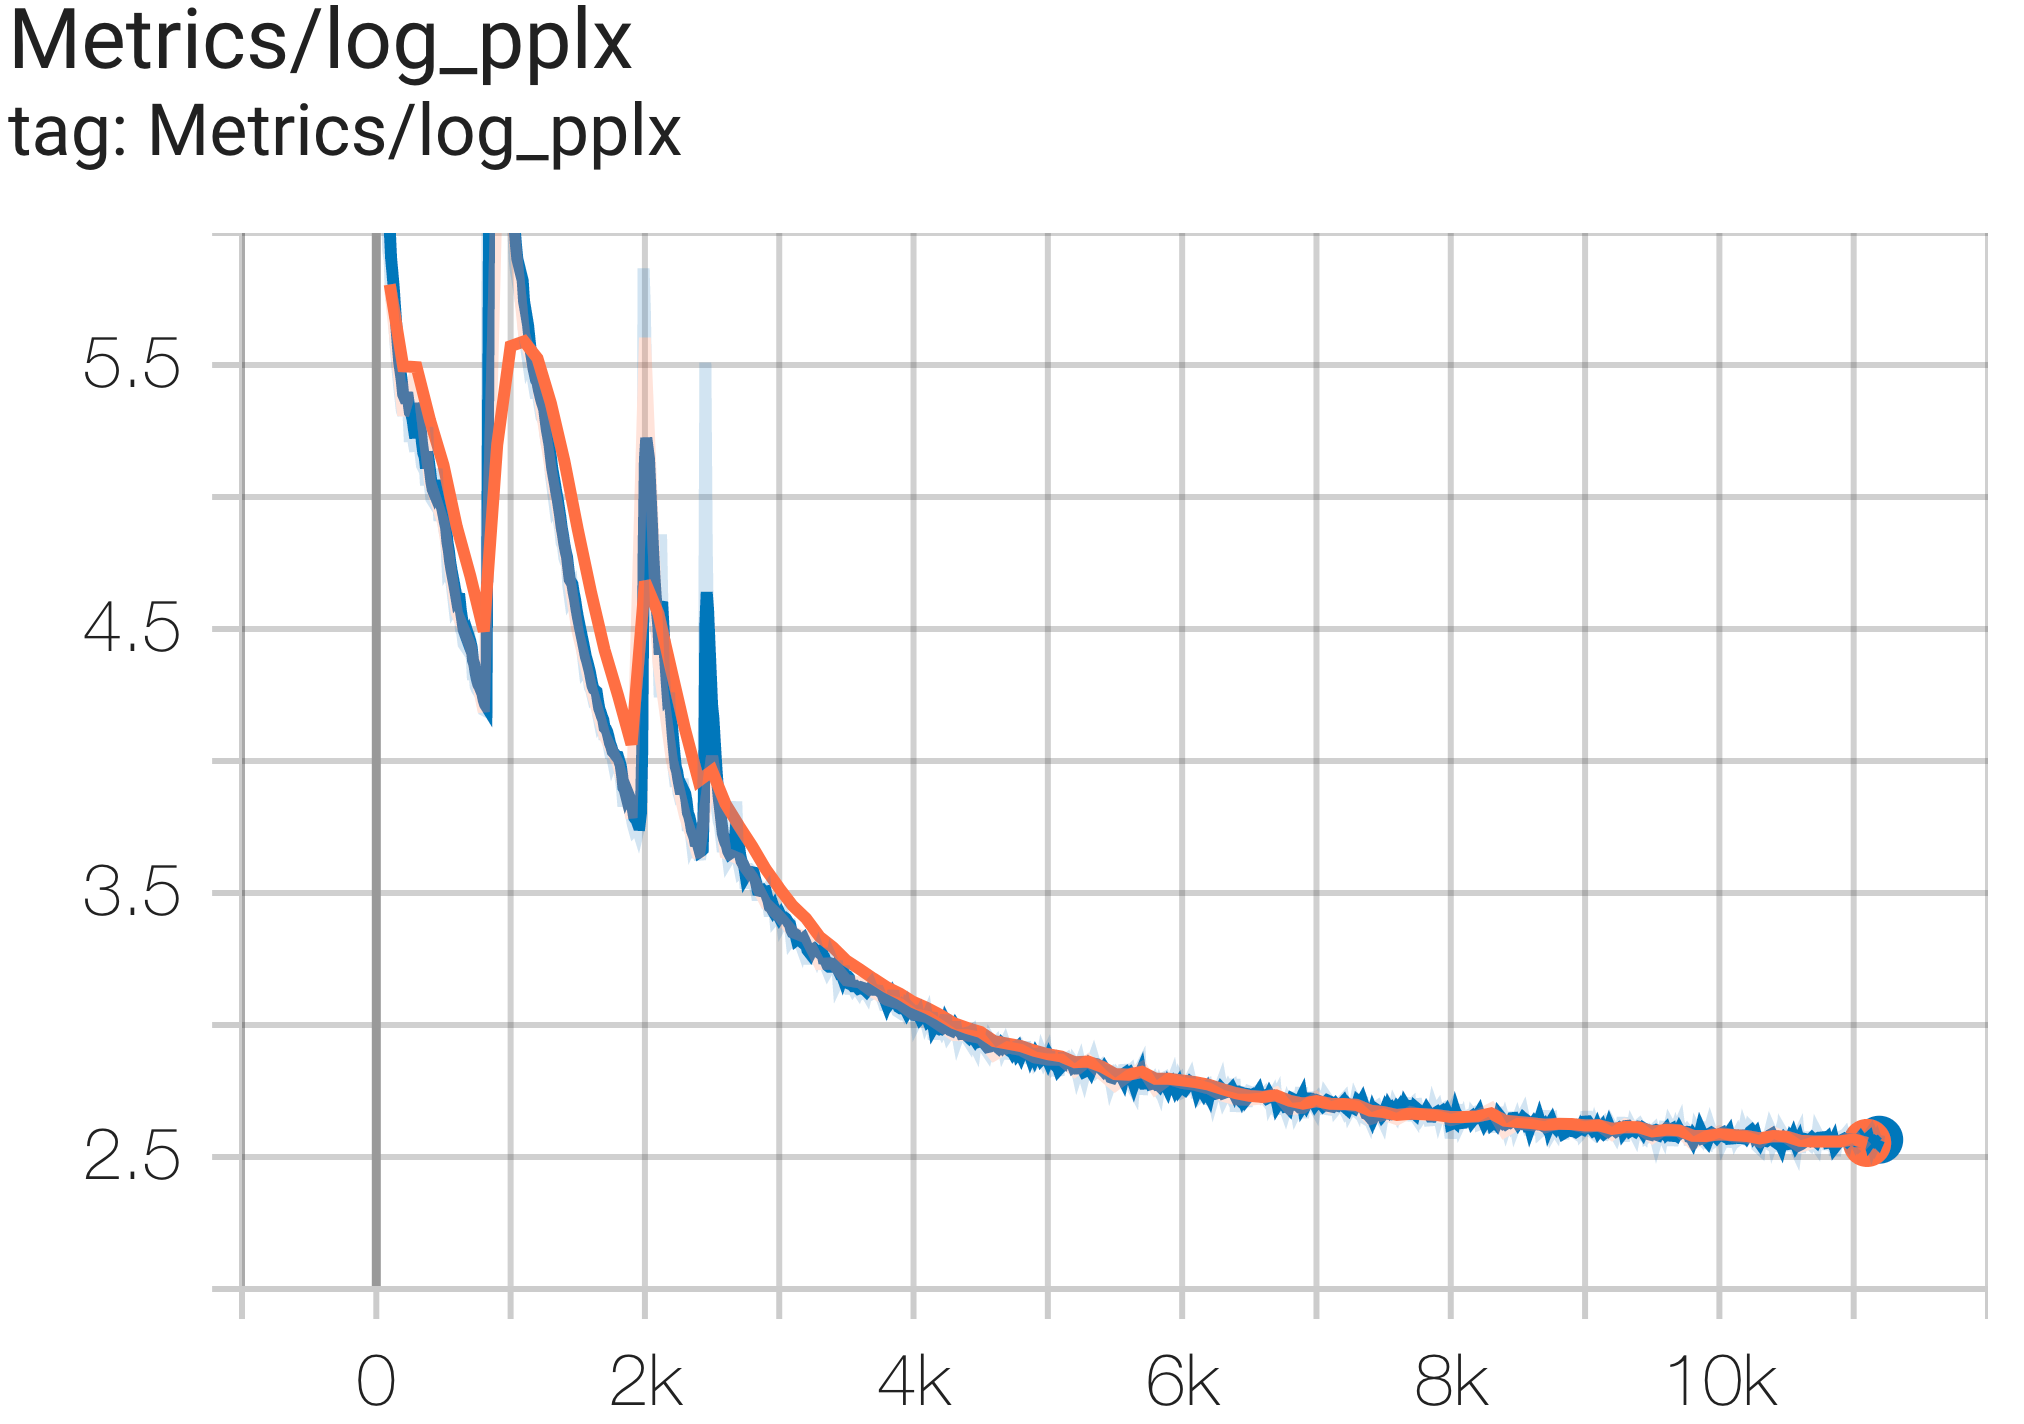
您可以使用 c4.py 中的配置C4Spmd16BAdam32Replicas在 TPU v4-64上的 c4 資料集上執行16B參數模型,如下所示:
python3 .local/lib/python3.8/site-packages/paxml/main.py
--exp=tasks.lm.params.c4.C4Spmd16BAdam32Replicas
--job_log_dir=gs:// < your-bucket >可以觀察loss曲線和log perplexity圖如下:
您可以使用 c4.py 中的配置C4SpmdPipelineGpt3SmallAdam64Replicas在 TPU v4-128上的 c4 資料集上運行 GPT3-XL 模型,如下所示:
python3 .local/lib/python3.8/site-packages/paxml/main.py
--exp=tasks.lm.params.c4.C4SpmdPipelineGpt3SmallAdam64Replicas
--job_log_dir=gs:// < your-bucket >可以觀察loss曲線和log perplexity圖如下:
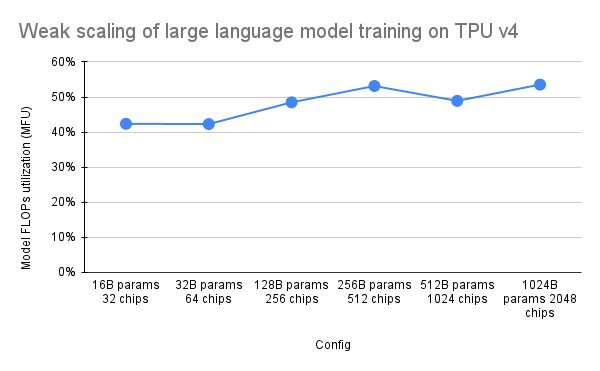
PaLM 論文引入了一種稱為模型 FLOP 利用率 (MFU) 的效率指標。這是透過觀察到的吞吐量(例如,語言模型每秒的令牌數)與利用 100% 峰值 FLOP 的系統的理論最大吞吐量的比率來衡量的。它與測量計算利用率的其他方法不同,因為它不包括在向後傳遞過程中啟動重新實現所花費的 FLOP,這意味著 MFU 測量的效率可直接轉換為端到端訓練速度。
為了評估具有Pax 的TPU v4 Pod 上一類關鍵工作負載的MFU,我們對一系列僅解碼器的Transformer 語言模型(GPT) 配置進行了深入的基準測試,這些配置的參數大小從數十億到數萬億不等。下圖顯示了使用「弱縮放」模式的訓練效率,其中我們根據所使用的晶片數量按比例增加模型大小。
此儲存庫中的多切片配置指的是 1. 用於語法/模型架構的單切片配置和 2. 用於配置值的 MaxText 儲存庫。
我們提供在 c4_multislice.py` 下運行的範例,作為多切片上 Pax 的起點。
我們參考此頁面以取得有關在多切片 Cloud TPU 專案中使用排隊資源的更詳盡文件。以下顯示了設定 TPU 以運行此儲存庫中的範例配置所需的步驟。
 export ZONE=us-central2-b
export VERSION=tpu-vm-v4-base
export PROJECT= < your-project >
export ACCELERATOR=v4-128 # or v4-384 depending on which config you run
比方說,要在 2 個 v4-128 切片上運行C4Spmd22BAdam2xv4_128 ,您需要以以下方式設定 TPU:
 export TPU_PREFIX= < your-prefix > # New TPUs will be created based off this prefix
export QR_ID= $TPU_PREFIX
export NODE_COUNT= < number-of-slices > # 1, 2, or 4 depending on which config you run


# create a TPU VM
gcloud alpha compute tpus queued-resources create $QR_ID --accelerator-type= $ACCELERATOR --runtime-version=tpu-vm-v4-base --node-count= $NODE_COUNT --node-prefix= $TPU_PREFIX前面描述的設定命令需要在所有切片中的所有工作執行緒上執行。您可以 1) 分別透過 ssh 進入每個工作進程和每個切片;或 2) 使用帶有--worker=all標誌的 for 循環,如下命令。
 for (( i = 0 ; i < $NODE_COUNT ; i ++ ))
do
gcloud compute tpus tpu-vm ssh $TPU_PREFIX - $i --zone=us-central2-b --worker=all --command= " pip install paxml && pip install orbax==0.1.1 && pip install " jax[tpu] " -f https://storage.googleapis.com/jax-releases/libtpu_releases.html "
done為了運行多切片配置,請開啟與 $NODE_COUNT 相同數量的終端。對於我們在 2 個切片 ( C4Spmd22BAdam2xv4_128 ) 上的實驗,打開兩個終端。然後,從每個終端單獨執行這些命令。
從終端 0,執行切片 0 的訓練指令,如下所示:
 export TPU_PREFIX= < your-prefix >
export EXP_NAME=C4Spmd22BAdam2xv4_128
export LIBTPU_INIT_ARGS= " --xla_jf_spmd_threshold_for_windowed_einsum_mib=0 --xla_tpu_spmd_threshold_for_allgather_cse=10000 --xla_enable_async_all_gather=true --xla_tpu_enable_latency_hiding_scheduler=true TPU_MEGACORE=MEGACORE_DENSE "
gcloud compute tpus tpu-vm ssh $TPU_PREFIX -0 --zone=us-central2-b --worker=all
--command= " LIBTPU_INIT_ARGS= $LIBTPU_INIT_ARGS
python3 /home/yooh/.local/lib/python3.8/site-packages/paxml/main.py
--exp=tasks.lm.params.c4_multislice. ${EXP_NAME} --job_log_dir=gs://<your-bucket> "
從終端 1,同時執行切片 1 的訓練指令,如下所示:
 export TPU_PREFIX= < your-prefix >
export EXP_NAME=C4Spmd22BAdam2xv4_128
export LIBTPU_INIT_ARGS= " --xla_jf_spmd_threshold_for_windowed_einsum_mib=0 --xla_tpu_spmd_threshold_for_allgather_cse=10000 --xla_enable_async_all_gather=true --xla_tpu_enable_latency_hiding_scheduler=true TPU_MEGACORE=MEGACORE_DENSE "
gcloud compute tpus tpu-vm ssh $TPU_PREFIX -1 --zone=us-central2-b --worker=all
--command= " LIBTPU_INIT_ARGS= $LIBTPU_INIT_ARGS
python3 /home/yooh/.local/lib/python3.8/site-packages/paxml/main.py
--exp=tasks.lm.params.c4_multislice. ${EXP_NAME} --job_log_dir=gs://<your-bucket> "此表詳細介紹如何將 MaxText 變數名稱轉換為 Pax。
請注意,MaxText 有一個“比例”,它乘以幾個參數(base_num_decoder_layers、base_emb_dim、base_mlp_dim、base_num_heads)以獲得最終值。
另外要提的是,雖然 Pax 將 DCN 和 ICN MESH_SHAPE 作為陣列涵蓋,但在 MaxText 中,DCN 和 ICI 有單獨的 data_parallelism、fsdp_parallelism 和 tensor_parallelism 變數。由於這些值預設為 1,因此只有值大於 1 的變數才會記錄在該轉換表中。
即, ICI_MESH_SHAPE = [ici_data_parallelism, ici_fsdp_parallelism, ici_tensor_parallelism]和DCN_MESH_SHAPE = [dcn_data_parallelism, dcn_fsdp_parallelism, dcn_tensor_parallelism]
| 帕克斯 C4Spmd22BAdam2xv4_128 | MaxText 2xv4-128.sh | (應用比例後) | ||
|---|---|---|---|---|
| 規模(應用於接下來的 4 個變數) | 3 | |||
| NUM_LAYERS 個 | 48 | base_num_decoder_layers | 16 | 48 |
| 模型_DIMS | 6144 | 基礎嵌入尺寸 | 2048 | 6144 |
| 隱藏_DIMS | 24576 | MODEL_DIMS * 4(= base_mlp_dim) | 8192 | 24576 |
| NUM_HEADS 個 | 24 | 基數頭數 | 8 | 24 |
| DIMS_PER_HEAD | 256 | 頭昏暗 | 256 | |
| PERCORE_BATCH_SIZE | 16 | 每設備批量大小 | 16 | |
| 最大序列長度 | 1024 | 最大目標長度 | 1024 | |
| VOCAB_SIZE | 32768 | 詞彙大小 | 32768 | |
| FPROP_DTYPE | jnp.bfloat16 | 資料類型 | bfloat16 | |
| 使用重複層 | 真的 | |||
| 摘要_間隔_步驟 | 10 | |||
| ICI_MESH_SHAPE | [1, 64, 1] | ici_fsdp_平行度 | 64 | |
| DCN_MESH_SHAPE | [2,1,1] | DCN_資料_並行性 | 2 |
Input 是BaseInput類別的一個實例,用於將資料輸入模型以進行訓練/評估/解碼。
 class BaseInput :

  def get_next ( self ):
    pass

  def reset ( self ):
    pass
它的作用就像一個迭代器: get_next()傳回一個NestedMap ,其中每個欄位都是一個數值數組,以批量大小作為其前導維度。
每個輸入均由BaseInput.HParams的子類別配置。在此頁面中,我們使用p表示BaseInput.Params的實例,並將其實例化為input 。
在 Pax 中,資料總是多主機的:每個 Jax 程序都會實例化一個單獨的、獨立的input 。它們的參數將具有不同的p.infeed_host_index ,由 Pax 自動設定。
因此,每個主機上看到的本地批次大小為p.batch_size ,全域批次大小為(p.batch_size * p.num_infeed_hosts) 。人們常會看到p.batch_size設定為jax.local_device_count() * PERCORE_BATCH_SIZE 。
由於這種多主機性質, input必須正確分片。
對於訓練,每個input絕不能發出相同的批次,對於有限資料集上的評估,每個input必須在相同數量的批次後終止。最好的解決方案是讓輸入實現正確地對資料進行分片,以便不同主機上的每個input不會重疊。如果做不到這一點,我們還可以使用不同的隨機種子來避免訓練期間重複批次。
input.reset()永遠不會在訓練資料上調用,但可以用於評估(或解碼)資料。
對於每次 eval(或解碼)運行,Pax 透過呼叫input.get_next() N次從input中取得N批次。使用的批次數量N可以是使用者透過p.eval_loop_num_batches指定的固定數量;或者N可以是動態的( p.eval_loop_num_batches=None ),也就是我們呼叫input.get_next()直到耗盡其所有資料(透過引發StopIteration或tf.errors.OutOfRange )。
如果p.reset_for_eval=True ,則忽略p.eval_loop_num_batches並動態決定N作為耗盡資料的批次數。在這種情況下, p.repeat應設定為 False,否則會導致無限解碼/評估。
如果p.reset_for_eval=False ,Pax 將會取得p.eval_loop_num_batches批次。應使用p.repeat=True設定此值,以便資料不會過早耗盡。
請注意,LingvoEvalAdaptor 輸入需要p.reset_for_eval=True 。
N :靜態 | N :動態 | |
|---|---|---|
p.reset_for_eval=True | 每次評估運行都使用 | 每次評估運行一個時期。 |
: : 前N批。不是: eval_loop_num_batches : | ||
| : : 還支援。 : 被忽略。輸入必須: | ||
| : : : 是有限的: | ||
: : : ( p.repeat=False ) : | ||
p.reset_for_eval=False | 每次評估運行都使用 | 不支援。 |
: : 不重疊N : : | ||
| : : 滾動批次: : | ||
| : : 依據,根據 : : | ||
: : eval_loop_num_batches : : | ||
| : : 。輸入必須重複: : | ||
| : : 無限期 : : | ||
: : ( p.repeat=True ) 或 : : | ||
| : : 否則可能會提出: : | ||
| : : 例外 : : |
如果在一個 epoch 上執行解碼/評估(即當p.reset_for_eval=True時),輸入必須正確處理分片,以便每個分片在產生完全相同數量的批次後在同一步驟中引發。這通常意味著輸入必須填充評估資料。這是由SeqIOInput和LingvoEvalAdaptor自動完成的(請參閱下文)。
對於大多數輸入,我們只對它們呼叫get_next()來取得批次資料。一種類型的評估資料是一個例外,其中「如何計算指標」也在輸入物件上定義。
僅定義一些規範評估基準的SeqIOInput支援此功能。具體來說,Pax 使用 SeqIO 任務上定義的predict_metric_fns和score_metric_fns()來計算 eval 指標(儘管 Pax 不直接依賴 SeqIO 評估器)。
當模型使用多個輸入時,無論是在訓練/評估之間還是在預訓練/微調之間使用不同的訓練數據,使用者必須確保輸入使用的分詞器相同,尤其是在導入其他人實現的不同輸入時。
使用者可以透過使用input.ids_to_strings()解碼一些 id 來檢查分詞器的完整性。
透過查看幾個批次來對資料進行健全性檢查總是一個好主意。使用者可以輕鬆地在 Colab 中重現參數並檢查資料:
 p = ... # specify the intended input param
inp = p . Instantiate ()
b = inp . get_next ()
print ( b )
訓練資料通常不應使用固定的隨機種子。這是因為如果訓練作業被搶佔,訓練資料就會開始重複。特別是,對於 Lingvo 輸入,我們建議為訓練資料設定p.input.file_random_seed = 0 。
要測試分片是否正確處理,使用者可以手動為p.num_infeed_hosts, p.infeed_host_index設定不同的值,並查看實例化的輸入是否發出不同的批次。
Pax 支援 3 種類型的輸入:SeqIO、Lingvo 和自訂。
SeqIOInput可用於匯入資料集。
SeqIO 輸入自動處理評估資料的正確分片和填滿。
LingvoInputAdaptor可用於匯入資料集。
輸入完全委託給 Lingvo 實現,它可能會也可能不會自動處理分片。
對於使用固定packing_factor的基於 GenericInput 的 Lingvo 輸入實現,我們建議使用LingvoInputAdaptorNewBatchSize為內部 Lingvo 輸入指定更大的批次大小,並將所需(通常要小得多)的批次大小放在p.batch_size上。
對於評估數據,我們建議使用LingvoEvalAdaptor來處理分片和填充,以便在一個 epoch 上執行評估。
BaseInput的自訂子類別。使用者通常使用tf.data或 SeqIO 來實作自己的子類別。
使用者也可以繼承現有的輸入類別來僅自訂批次的後處理。例如:
 class MyInput ( base_input . LingvoInputAdaptor ):

  def get_next ( self ):
    batch = super (). get_next ()
    # modify batch: batch.new_field = ...
return batch超參數是定義模型和配置實驗的重要組成部分。
為了更好地與 Python 工具集成,Pax/Praxis 使用基於 Pythonic 資料類的超參數配置樣式。
 class Linear ( base_layer . BaseLayer ):
  """Linear layer without bias."""

  class HParams ( BaseHParams ):
    """Associated hyperparams for this layer class.

    Attributes:
      input_dims: Depth of the input.
      output_dims: Depth of the output.
    """
    input_dims : int = 0
output_dims : int = 0也可以嵌套HParams資料類,在下面的範例中,線性_tpl屬性是嵌套的Linear.HParams。
 class FeedForward ( base_layer . BaseLayer ):
  """Feedforward layer with activation."""

  class HParams ( BaseHParams ):
    """Associated hyperparams for this layer class.

    Attributes:
      input_dims: Depth of the input.
      output_dims: Depth of the output.
      has_bias: Adds bias weights or not.
      linear_tpl: Linear layer params.
      activation_tpl: Activation layer params.
    """
    input_dims : int = 0
    output_dims : int = 0
    has_bias : bool = True
    linear_tpl : BaseHParams = sub_config_field ( Linear . HParams )
    activation_tpl : activations . BaseActivation . HParams = sub_config_field (
ReLU . HParams )層表示可能具有可訓練參數的任意函數。一個圖層可以包含其他圖層作為子圖層。層是模型的基本構建塊。層繼承自 Flax nn.Module。
通常層定義兩種方法:
此方法可建立可訓練的權重和子層。
此方法定義了前向傳播函數,根據輸入計算一些輸出。此外,fprop 可能會新增摘要或追蹤輔助損失。
Fiddle 是一個開源的 Python-first 設定庫,專為 ML 應用程式設計。 Pax/Praxis 支援與 Fiddle Config/Partial 的互通性以及一些高級功能,例如急切的錯誤檢查和共享參數。
 fdl_config = Linear . HParams . config ( input_dims = 1 , output_dims = 1 )

# A typo.
fdl_config . input_dimz = 31337  # Raises an exception immediately to catch typos fast!


fdl_partial = Linear . HParams . partial ( input_dims = 1 )
使用 Fiddle,層可以配置為共享(例如:使用共享的可訓練權重僅實例化一次)。
模型僅定義網絡,通常是層的集合,並定義用於與模型交互的接口,例如解碼等。
一些範例基本模型包括:
一項任務包含多個模型和學習器/優化器。最簡單的 Task 子類別是SingleTask ,它需要以下 Hparam:
  class HParams ( base_task . BaseTask . HParams ):
    """ Task parameters .

    Attributes :
      name : Name of this task object , must be a valid identifier .
      model : The underlying JAX model encapsulating all the layers .
      train : HParams to control how this task should be trained .
      metrics : A BaseMetrics aggregator class to determine how metrics are
         computed .
      loss_aggregator : A LossAggregator aggregator class to derermine how the
        losses are aggregated ( e . g single or MultiLoss )
vn : HParams to control variational noise .| PyPI版本 | 犯罪 |
|---|---|
| 0.1.0 | 546370f5323ef8b27d38ddc32445d7d3d1e4da9a |
 Copyright 2022 Google LLC

Licensed under the Apache License, Version 2.0 (the "License");
you may not use this file except in compliance with the License.
You may obtain a copy of the License at

    https://www.apache.org/licenses/LICENSE-2.0

Unless required by applicable law or agreed to in writing, software
distributed under the License is distributed on an "AS IS" BASIS,
WITHOUT WARRANTIES OR CONDITIONS OF ANY KIND, either express or implied.
See the License for the specific language governing permissions and
limitations under the License.