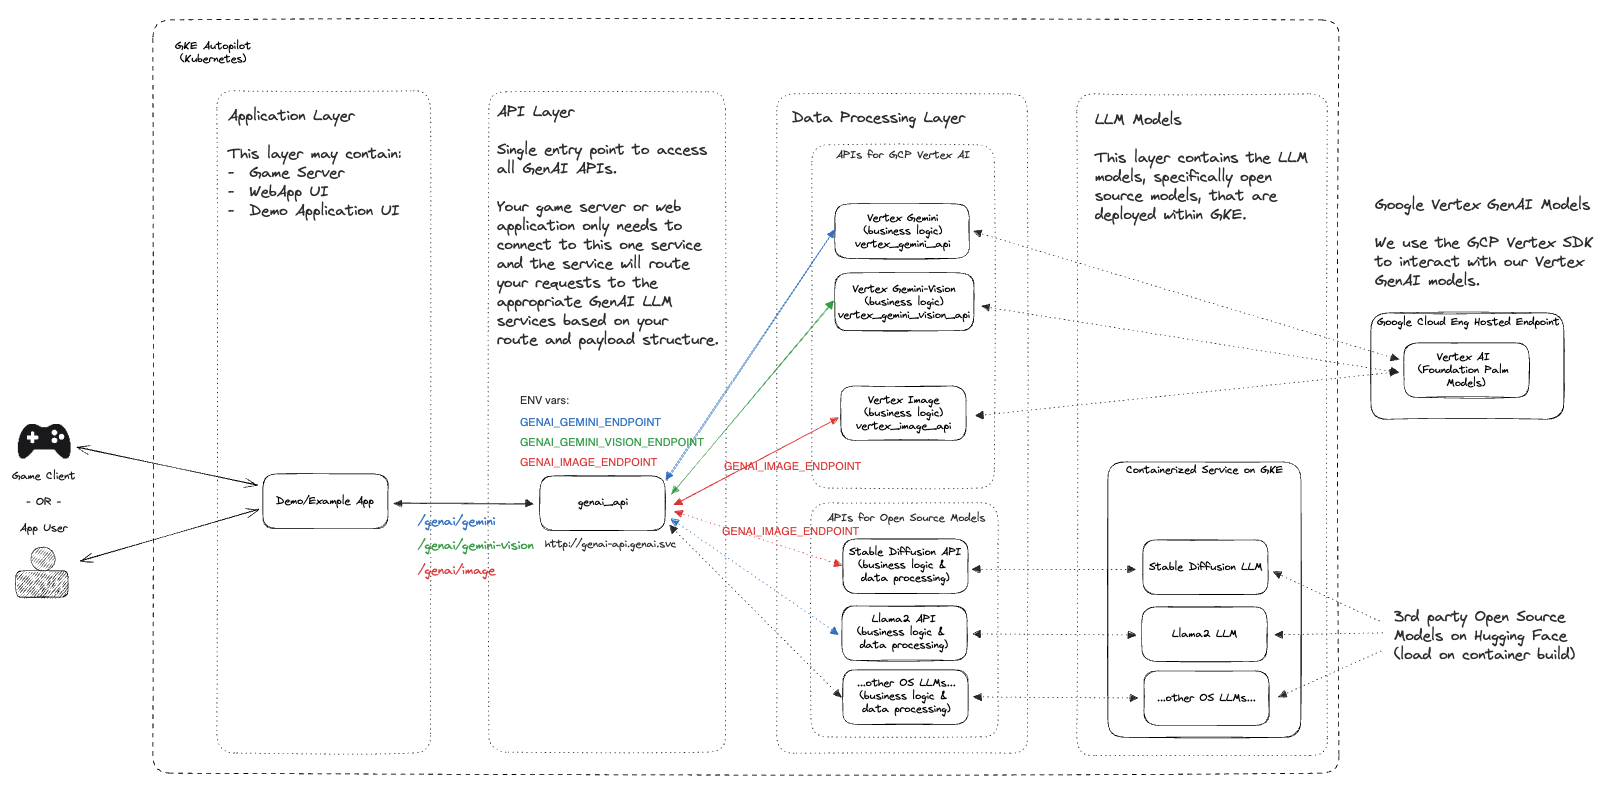
該專案提供了一系列快速入門,旨在使用 Google Cloud 產品和開源遊戲解決方案加速即時遊戲環境中的 GenAI 整合和個人化。
在當今的遊戲產業中,為玩家提供個人化且引人入勝的體驗至關重要。該計畫為遊戲開發者提供了一組快速入門資源,幫助他們將 GenAI 功能整合到他們的即時遊戲環境中。透過利用 Google Cloud 產品和開源遊戲解決方案,您可以提高玩家參與度,透過生成式 AI 解鎖新用例,並創造令人難忘的遊戲體驗。
注意:這是一個快速發展的儲存庫,正在針對各種用例進行調整。如果您想貢獻或發現任何錯誤,請提出問題和/或隨時提交 PR 供審核。
如果您正在使用該項目,請為該儲存庫加星標以表達您的興趣!
| 資料夾 | 描述 |
|---|---|
| 地形 | 基於Terraform的基礎架構部署腳本 |
| 例子 | 可以根據您的用例進行測試和部署的單獨快速入門 |
| 原始碼 | 用作我們快速入門一部分的核心原始碼 |

以下步驟將引導您完成GenAI 快速入門的設定指南。流程將逐步介紹啟用正確的Google Cloud API 、透過Terraform建立資源以及部署執行專案所需的Kubernetes 清單。
注意:這些步驟假設您在 Google Cloud 中已有一個正在執行的項目,並且您擁有 IAM 權限可以將資源部署到其中。
 git clone https://github.com/googleforgames/GenAI-quickstart.git

cd GenAI-quickstart
為 Google Cloud 設定唯一的項目 ID
 # To just use your current project
export PROJECT_ID=$(gcloud config list --format 'value(core.project)' 2>/dev/null)

# Otherwise set it to the project you wish to use.
設定 Google Cloud 的預設位置
export LOCATION=us-central1
為了更好地遵循本快速入門指南,請設定CUR_DIR環境變量
export CUR_DIR=$(pwd)
gcloud auth list
檢查您的驗證是否正常以及您的PROJECT_ID是否有效。
gcloud projects describe ${PROJECT_ID:?}
您應該會看到列出的PROJECT_ID狀態為ACTIVE 。
 gcloud services enable --project ${PROJECT_ID:?}
  aiplatform.googleapis.com
  artifactregistry.googleapis.com
  cloudbuild.googleapis.com
  cloudresourcemanager.googleapis.com
  compute.googleapis.com
  container.googleapis.com
  containerfilesystem.googleapis.com
  containerregistry.googleapis.com
  iam.googleapis.com
  servicecontrol.googleapis.com
  spanner.googleapis.com
 cd ${CUR_DIR:?}/terraform

cat terraform.example.tfvars | sed -e "s:your-unique-project-id:${PROJECT_ID:?}:g" > terraform.tfvars

terraform init

terraform plan

terraform apply
雲端資源的部署可能需要 5 - 10 分鐘。有關已部署資源的詳細視圖,請參閱terraform目錄中的 README。
使用 Terraform 成功部署雲端資源後,取得新建立的 GKE 叢集憑證。
gcloud container clusters get-credentials genai-quickstart --region us-central1 --project ${PROJECT_ID:?}
測試您的 Kubernetes 用戶端憑證。
kubectl get nodes
切換到genai目錄並渲染使用您唯一的專案 ID 的通用模板。
 # Find all files named .template.yaml, replace `your-unique-project-id` with PROJECT_ID, and output to .yaml.
cd ${CUR_DIR:?}/genai && find common -type f -name "*.template.yaml" -exec
  bash -c "template_path={}; sed "s:your-unique-project-id:${PROJECT_ID:?}:g" < ${template_path} > ${template_path/%.template.yaml/.yaml} " ;
使用Skaffold建置和運行 GenAI 工作負載
 gcloud auth configure-docker ${LOCATION:?}-docker.pkg.dev

export SKAFFOLD_DEFAULT_REPO=${LOCATION:?}-docker.pkg.dev/${PROJECT_ID:?}/repo-genai-quickstart

cd ${CUR_DIR:?}/genai

# To run all apis and models (requires a GPU node for stable-diffusion)
skaffold run --build-concurrency=0
部署工作負載後,您可以改為使用 GPU 部署:
 # Scale up a 2xL4 Mixtral 8x7B Deployment:
kubectl scale -n genai deployment huggingface-tgi-mixtral-small --replicas=1

# Or scale up a 8xL4 Mixtral 8x7B Deployment:
kubectl scale -n genai deployment huggingface-tgi-mixtral-big --replicas=1

# Scale down CPU Deployment:
kubectl scale -n genai deployment huggingface-tgi-mistral-cpu --replicas=0

# Note that the `huggingface-tgi-api` Service matches all of the huggingface-tgi-*
# Deployments, so if you have multiple replicas running, it will load balance
# between them.
您也可以單獨運行各個後端:
 # To run only stable-diffusion (requires a GPU node)
#skaffold run --module stable-diffusion-api-cfg,stable-diffusion-endpt-cfg

# To run only Vertex chat (Vertex AI is required)
#skaffold run --module vertex-chat-api-cfg
存取 API - 您可以從這裡測試應用程式和所有 API :)
叢集建立內部直通網路負載平衡器 (ILB)。若要存取 API,請執行:
kubectl port-forward svc/genai-api -n genai 8080:80
然後在另一個視窗中運行:
 export EXT_IP=localhost:8080
echo "Browse to http://${EXT_IP}/genai_docs to try out the GenAI APIs!"
然後在瀏覽器中導航到該 URL。
使用curl測試API:
 curl -X 'POST' "http://${EXT_IP}/genai/text"
  -H 'accept: application/json'
  -H 'Content-Type: application/json'
  -d '{"prompt": "Who are the founders of Google?"}'
或使用叢集內的api-caller容器測試 API:
 # See available service endpoints. The `genai` endpoint wraps them all.
kubectl get svc -ngenai

# Start `api-caller` pod interactively
kubectl run -it -ngenai --rm --restart=Never api-caller --image=${SKAFFOLD_DEFAULT_REPO}/api-caller:latest

# Examples:

# See available example scripts
root@api-caller:/app# ls
embeddings.py  genai_api.py  huggingface_tgi.py  npc_chat_api.py  stable_diffusion_api.py  vertex_chat_api.py  vertex_code_api.py  vertex_gemini_api.py  vertex_image_api.py  vertex_text_api.py

# The genai_api script works for text prompts
root@api-caller:/app# python3 genai_api.py --endpoint=http://genai-api/genai/text --prompt "Describe a wombat"
INFO:root:Status Code: 200
INFO:root:Response:    "A wombat is a marsupial native to Australia. [...]"

# To try the Smart NPC, first reset the world data:
root@api-caller:/app# python3 npc_chat_api.py --endpoint http://genai-api/genai/npc_chat/reset_world_data --empty
INFO:root:Status Code: 200
INFO:root:Response:    {"status":"ok"}

# Then you can use the interactive chat:
root@api-caller:/app# python3 npc_chat_api.py --endpoint http://genai-api/genai/npc_chat --chat
>>> hey, how are you?
<<< I am doing my best here at the distribution center. It's a tough situation, but I am staying focused on helping those in need. How about you? How are you holding up?

# You can also interact with the services underneath, e.g.: Hugging Face TGI supports an interactive chat
root@api-caller:/app# python3 huggingface_tgi.py --endpoint=http://huggingface-tgi-api:8080/v1
>>> hello!
INFO:httpx:HTTP Request: POST http://huggingface-tgi-api:8080/v1/chat/completions "HTTP/1.1 200 OK"
<<<  Hello! How can I help you today? If you have any questions or need assistance with something, feel free to ask and I'll do my best to help. If you just want to chat, we can talk about pretty much anything. What's on your mind?
在genai目錄中
 cd ${CUR_DIR:?}/genai

skaffold delete
在terraform目錄中
 cd ${CUR_DIR:?}/terraform

terraform destroy
如果您沒有在 Google Cloud shell 中執行上述項目,請確保您已登入並通過所需項目的驗證:
 gcloud auth application-default login

gcloud config set project ${PROJECT_ID:?}
並遵循身份驗證流程。
整個儲存庫可以按原樣克隆和使用,或者在許多情況下,您可以選擇分叉此儲存庫並保留對您的用例最有用和最相關的程式碼庫。如果您想貢獻,可以在我們的貢獻指南中找到更多資訊。