DALLE2 pytorch
1.15.6
在 Pytorch 中實作 OpenAI 更新的文字到影像合成神經網路 DALL-E 2。
Yannic Kilcher 總結 |組裝AI講解器
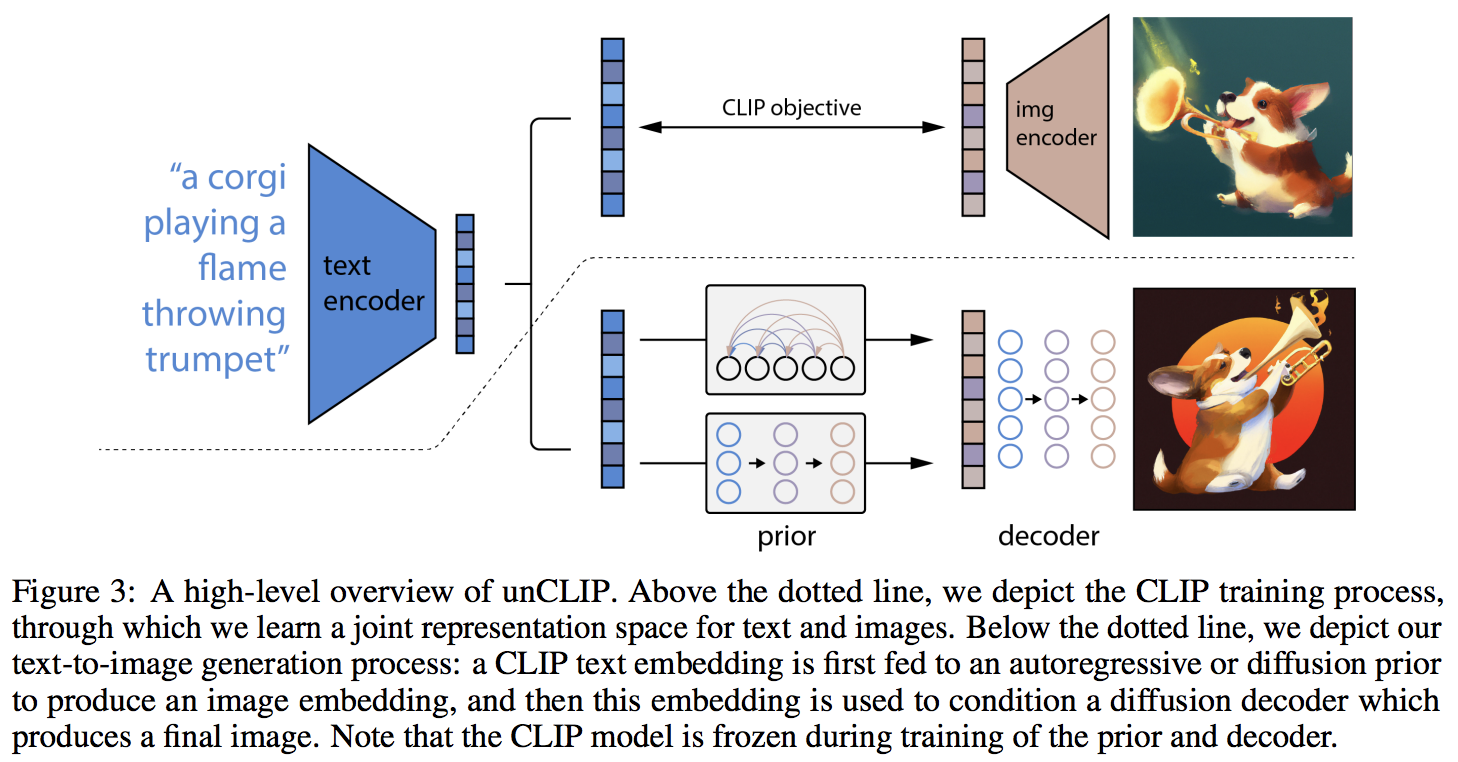
主要的新穎之處似乎是與先前網路(無論是自回歸變壓器還是擴散網路)的額外間接層,它根據來自 CLIP 的文本嵌入來預測圖像嵌入。具體來說,這個儲存庫只會建立擴散先驗網絡,因為它是性能最好的變體(但它順便涉及因果變壓器作為去噪網絡?)
目前,該模型對於文字到圖像的處理是 SOTA。
如果您有興趣幫助 LAION 社區進行複製,請加入 |雅尼克專訪
截至 22 年 5 月 23 日,它不再是 SOTA。索塔將會在這裡。 Jax 版本以及文字到視訊專案將轉向 Imagen 架構,因為它更簡單。
一個研究小組已使用此儲存庫中的程式碼在其 CLIP 世代之前訓練功能擴散。一旦他們發布預印本,將分享他們的工作。這以及 Katherine 自己的實驗驗證了 OpenAI 的發現,即額外的先驗會增加代數。
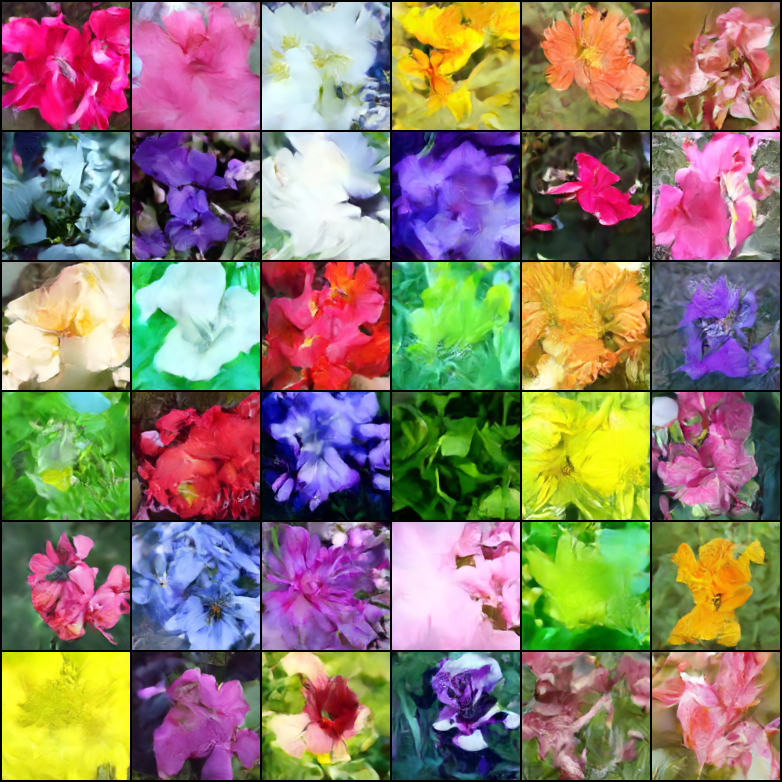
現在,解碼器已在我的牛津花實驗裝置上被驗證可用於無條件生成。 2 位研究人員也證實 Decoder 正在為他們工作。
正在進行 21k 步
Justin Pinkney 在其 CLIP 到 Stylegan2 文字到圖像應用程式的儲存庫中成功訓練了擴散
Romain 使用可用腳本將訓練擴展到 800 個 GPU,沒有出現任何問題
如果沒有幫助,這個函式庫就不會達到這種工作狀態
……以及許多其他人。謝謝你!
$ pip install dalle2-pytorch訓練 DALLE-2 分為 3 個步驟,其中 CLIP 的訓練是最重要的
要訓練 CLIP,您可以使用 x-clip 包,或加入 LAION Discord,其中大量複製工作已經在進行中。
該存儲庫將為初學者演示與x-clip集成
 import torch
from dalle2_pytorch import CLIP

clip = CLIP (
    dim_text = 512 ,
    dim_image = 512 ,
    dim_latent = 512 ,
    num_text_tokens = 49408 ,
    text_enc_depth = 1 ,
    text_seq_len = 256 ,
    text_heads = 8 ,
    visual_enc_depth = 1 ,
    visual_image_size = 256 ,
    visual_patch_size = 32 ,
    visual_heads = 8 ,
    use_all_token_embeds = True ,            # whether to use fine-grained contrastive learning (FILIP)
    decoupled_contrastive_learning = True ,  # use decoupled contrastive learning (DCL) objective function, removing positive pairs from the denominator of the InfoNCE loss (CLOOB + DCL)
    extra_latent_projection = True ,         # whether to use separate projections for text-to-image vs image-to-text comparisons (CLOOB)
    use_visual_ssl = True ,                  # whether to do self supervised learning on images
    visual_ssl_type = 'simclr' ,             # can be either 'simclr' or 'simsiam', depending on using DeCLIP or SLIP
    use_mlm = False ,                        # use masked language learning (MLM) on text (DeCLIP)
    text_ssl_loss_weight = 0.05 ,            # weight for text MLM loss
    image_ssl_loss_weight = 0.05            # weight for image self-supervised learning loss
). cuda ()

# mock data

text = torch . randint ( 0 , 49408 , ( 4 , 256 )). cuda ()
images = torch . randn ( 4 , 3 , 256 , 256 ). cuda ()

# train

loss = clip (
    text ,
    images ,
    return_loss = True              # needs to be set to True to return contrastive loss
)

loss . backward ()

# do the above with as many texts and images as possible in a loop
然後,您需要訓練解碼器,它學習根據來自上面訓練的 CLIP 的圖像嵌入來生成圖像
 import torch
from dalle2_pytorch import Unet , Decoder , CLIP

# trained clip from step 1

clip = CLIP (
    dim_text = 512 ,
    dim_image = 512 ,
    dim_latent = 512 ,
    num_text_tokens = 49408 ,
    text_enc_depth = 1 ,
    text_seq_len = 256 ,
    text_heads = 8 ,
    visual_enc_depth = 1 ,
    visual_image_size = 256 ,
    visual_patch_size = 32 ,
    visual_heads = 8
). cuda ()

# unet for the decoder

unet = Unet (
    dim = 128 ,
    image_embed_dim = 512 ,
    cond_dim = 128 ,
    channels = 3 ,
    dim_mults = ( 1 , 2 , 4 , 8 )
). cuda ()

# decoder, which contains the unet and clip

decoder = Decoder (
    unet = unet ,
    clip = clip ,
    timesteps = 100 ,
    image_cond_drop_prob = 0.1 ,
    text_cond_drop_prob = 0.5
). cuda ()

# mock images (get a lot of this)

images = torch . randn ( 4 , 3 , 256 , 256 ). cuda ()

# feed images into decoder

loss = decoder ( images )
loss . backward ()

# do the above for many many many many steps
# then it will learn to generate images based on the CLIP image embeddings
最後是論文的主要貢獻。此儲存庫提供了擴散先驗網路。它採用 CLIP 文字嵌入並嘗試產生 CLIP 圖像嵌入。同樣,您將需要從第一步開始訓練的 CLIP
 import torch
from dalle2_pytorch import DiffusionPriorNetwork , DiffusionPrior , CLIP

# get trained CLIP from step one

clip = CLIP (
    dim_text = 512 ,
    dim_image = 512 ,
    dim_latent = 512 ,
    num_text_tokens = 49408 ,
    text_enc_depth = 6 ,
    text_seq_len = 256 ,
    text_heads = 8 ,
    visual_enc_depth = 6 ,
    visual_image_size = 256 ,
    visual_patch_size = 32 ,
    visual_heads = 8 ,
). cuda ()

# setup prior network, which contains an autoregressive transformer

prior_network = DiffusionPriorNetwork (
    dim = 512 ,
    depth = 6 ,
    dim_head = 64 ,
    heads = 8
). cuda ()

# diffusion prior network, which contains the CLIP and network (with transformer) above

diffusion_prior = DiffusionPrior (
    net = prior_network ,
    clip = clip ,
    timesteps = 100 ,
    cond_drop_prob = 0.2
). cuda ()

# mock data

text = torch . randint ( 0 , 49408 , ( 4 , 256 )). cuda ()
images = torch . randn ( 4 , 3 , 256 , 256 ). cuda ()

# feed text and images into diffusion prior network

loss = diffusion_prior ( text , images )
loss . backward ()

# do the above for many many many steps
# now the diffusion prior can generate image embeddings from the text embeddings
在論文中,他們實際上使用了 Jonathan Ho 本人(DDPM 的原始作者,DALL-E v2 中使用的核心技術)最近發現的一項技術來進行高解析度影像合成。
這可以很容易地在這個框架中使用,如下所示
 import torch
from dalle2_pytorch import Unet , Decoder , CLIP

# trained clip from step 1

clip = CLIP (
    dim_text = 512 ,
    dim_image = 512 ,
    dim_latent = 512 ,
    num_text_tokens = 49408 ,
    text_enc_depth = 6 ,
    text_seq_len = 256 ,
    text_heads = 8 ,
    visual_enc_depth = 6 ,
    visual_image_size = 256 ,
    visual_patch_size = 32 ,
    visual_heads = 8
). cuda ()

# 2 unets for the decoder (a la cascading DDPM)

unet1 = Unet (
    dim = 32 ,
    image_embed_dim = 512 ,
    cond_dim = 128 ,
    channels = 3 ,
    dim_mults = ( 1 , 2 , 4 , 8 )
). cuda ()

unet2 = Unet (
    dim = 32 ,
    image_embed_dim = 512 ,
    cond_dim = 128 ,
    channels = 3 ,
    dim_mults = ( 1 , 2 , 4 , 8 , 16 )
). cuda ()

# decoder, which contains the unet(s) and clip

decoder = Decoder (
    clip = clip ,
    unet = ( unet1 , unet2 ),            # insert both unets in order of low resolution to highest resolution (you can have as many stages as you want here)
    image_sizes = ( 256 , 512 ),         # resolutions, 256 for first unet, 512 for second. these must be unique and in ascending order (matches with the unets passed in)
    timesteps = 1000 ,
    image_cond_drop_prob = 0.1 ,
    text_cond_drop_prob = 0.5
). cuda ()

# mock images (get a lot of this)

images = torch . randn ( 4 , 3 , 512 , 512 ). cuda ()

# feed images into decoder, specifying which unet you want to train
# each unet can be trained separately, which is one of the benefits of the cascading DDPM scheme

loss = decoder ( images , unet_number = 1 )
loss . backward ()

loss = decoder ( images , unet_number = 2 )
loss . backward ()

# do the above for many steps for both unets
最後,從文字產生 DALL-E2 圖像。插入經過訓練的DiffusionPrior以及Decoder (它包裝CLIP 、因果變換器和unet)
 from dalle2_pytorch import DALLE2

dalle2 = DALLE2 (
    prior = diffusion_prior ,
    decoder = decoder
)

# send the text as a string if you want to use the simple tokenizer from DALLE v1
# or you can do it as token ids, if you have your own tokenizer

texts = [ 'glistening morning dew on a flower petal' ]
images = dalle2 ( texts ) # (1, 3, 256, 256)
就是這樣!
讓我們看看下面的整個腳本
 import torch
from dalle2_pytorch import DALLE2 , DiffusionPriorNetwork , DiffusionPrior , Unet , Decoder , CLIP

clip = CLIP (
    dim_text = 512 ,
    dim_image = 512 ,
    dim_latent = 512 ,
    num_text_tokens = 49408 ,
    text_enc_depth = 6 ,
    text_seq_len = 256 ,
    text_heads = 8 ,
    visual_enc_depth = 6 ,
    visual_image_size = 256 ,
    visual_patch_size = 32 ,
    visual_heads = 8
). cuda ()

# mock data

text = torch . randint ( 0 , 49408 , ( 4 , 256 )). cuda ()
images = torch . randn ( 4 , 3 , 256 , 256 ). cuda ()

# train

loss = clip (
    text ,
    images ,
    return_loss = True
)

loss . backward ()

# do above for many steps ...

# prior networks (with transformer)

prior_network = DiffusionPriorNetwork (
    dim = 512 ,
    depth = 6 ,
    dim_head = 64 ,
    heads = 8
). cuda ()

diffusion_prior = DiffusionPrior (
    net = prior_network ,
    clip = clip ,
    timesteps = 1000 ,
    sample_timesteps = 64 ,
    cond_drop_prob = 0.2
). cuda ()

loss = diffusion_prior ( text , images )
loss . backward ()

# do above for many steps ...

# decoder (with unet)

unet1 = Unet (
    dim = 128 ,
    image_embed_dim = 512 ,
    text_embed_dim = 512 ,
    cond_dim = 128 ,
    channels = 3 ,
    dim_mults = ( 1 , 2 , 4 , 8 ),
    cond_on_text_encodings = True    # set to True for any unets that need to be conditioned on text encodings
). cuda ()

unet2 = Unet (
    dim = 16 ,
    image_embed_dim = 512 ,
    cond_dim = 128 ,
    channels = 3 ,
    dim_mults = ( 1 , 2 , 4 , 8 , 16 )
). cuda ()

decoder = Decoder (
    unet = ( unet1 , unet2 ),
    image_sizes = ( 128 , 256 ),
    clip = clip ,
    timesteps = 100 ,
    image_cond_drop_prob = 0.1 ,
    text_cond_drop_prob = 0.5
). cuda ()

for unet_number in ( 1 , 2 ):
    loss = decoder ( images , text = text , unet_number = unet_number ) # this can optionally be decoder(images, text) if you wish to condition on the text encodings as well, though it was hinted in the paper it didn't do much
    loss . backward ()

# do above for many steps

dalle2 = DALLE2 (
    prior = diffusion_prior ,
    decoder = decoder
)

images = dalle2 (
    [ 'cute puppy chasing after a squirrel' ],
    cond_scale = 2. # classifier free guidance strength (> 1 would strengthen the condition)
)

# save your image (in this example, of size 256x256)
本自述文件中的所有內容都應正常運行
您也可以在大於訓練 CLIP 的尺寸(例如 512x512)(256x256)的圖像上訓練解碼器。影像將調整為 CLIP 影像解析度以進行影像嵌入
對於外行人來說,不用擔心,培訓將全部自動化到 CLI 工具中,至少對於小規模培訓來說是如此。
在擴大規模時,您可能會先將圖像和文字預處理為相應的嵌入,然後再訓練先前的網路。您只需傳入image_embed 、 text_embed和可選的text_encodings即可輕鬆完成此操作
下面的工作範例
 import torch
from dalle2_pytorch import DiffusionPriorNetwork , DiffusionPrior , CLIP

# get trained CLIP from step one

clip = CLIP (
    dim_text = 512 ,
    dim_image = 512 ,
    dim_latent = 512 ,
    num_text_tokens = 49408 ,
    text_enc_depth = 6 ,
    text_seq_len = 256 ,
    text_heads = 8 ,
    visual_enc_depth = 6 ,
    visual_image_size = 256 ,
    visual_patch_size = 32 ,
    visual_heads = 8 ,
). cuda ()

# setup prior network, which contains an autoregressive transformer

prior_network = DiffusionPriorNetwork (
    dim = 512 ,
    depth = 6 ,
    dim_head = 64 ,
    heads = 8
). cuda ()

# diffusion prior network, which contains the CLIP and network (with transformer) above

diffusion_prior = DiffusionPrior (
    net = prior_network ,
    clip = clip ,
    timesteps = 100 ,
    cond_drop_prob = 0.2 ,
    condition_on_text_encodings = False  # this probably should be true, but just to get Laion started
). cuda ()

# mock data

text = torch . randint ( 0 , 49408 , ( 4 , 256 )). cuda ()
images = torch . randn ( 4 , 3 , 256 , 256 ). cuda ()

# precompute the text and image embeddings
# here using the diffusion prior class, but could be done with CLIP alone

clip_image_embeds = diffusion_prior . clip . embed_image ( images ). image_embed
clip_text_embeds = diffusion_prior . clip . embed_text ( text ). text_embed

# feed text and images into diffusion prior network

loss = diffusion_prior (
    text_embed = clip_text_embeds ,
    image_embed = clip_image_embeds
)

loss . backward ()

# do the above for many many many steps
# now the diffusion prior can generate image embeddings from the text embeddings您也可以完全採用CLIP -less,在這種情況下,您需要在初始化時將image_embed_dim傳遞到DiffusionPrior中
 import torch
from dalle2_pytorch import DiffusionPriorNetwork , DiffusionPrior

# setup prior network, which contains an autoregressive transformer

prior_network = DiffusionPriorNetwork (
    dim = 512 ,
    depth = 6 ,
    dim_head = 64 ,
    heads = 8
). cuda ()

# diffusion prior network, which contains the CLIP and network (with transformer) above

diffusion_prior = DiffusionPrior (
    net = prior_network ,
    image_embed_dim = 512 ,               # this needs to be set
    timesteps = 100 ,
    cond_drop_prob = 0.2 ,
    condition_on_text_encodings = False  # this probably should be true, but just to get Laion started
). cuda ()

# mock data

text = torch . randint ( 0 , 49408 , ( 4 , 256 )). cuda ()
images = torch . randn ( 4 , 3 , 256 , 256 ). cuda ()

# precompute the text and image embeddings
# here using the diffusion prior class, but could be done with CLIP alone

clip_image_embeds = torch . randn ( 4 , 512 ). cuda ()
clip_text_embeds = torch . randn ( 4 , 512 ). cuda ()

# feed text and images into diffusion prior network

loss = diffusion_prior (
    text_embed = clip_text_embeds ,
    image_embed = clip_image_embeds
)

loss . backward ()

# do the above for many many many steps
# now the diffusion prior can generate image embeddings from the text embeddings 儘管他們有可能使用未發布的、功能更強大的 CLIP,但如果您不想從頭開始訓練自己的 CLIP,則可以使用已發布的 CLIP 之一。這也將使社區能夠更快地驗證論文的結論。
要使用預先訓練的 OpenAI CLIP,只需導入OpenAIClipAdapter並將其傳遞到DiffusionPrior或Decoder中,如下所示
 import torch
from dalle2_pytorch import DALLE2 , DiffusionPriorNetwork , DiffusionPrior , Unet , Decoder , OpenAIClipAdapter

# openai pretrained clip - defaults to ViT-B/32

clip = OpenAIClipAdapter ()

# mock data

text = torch . randint ( 0 , 49408 , ( 4 , 256 )). cuda ()
images = torch . randn ( 4 , 3 , 256 , 256 ). cuda ()

# prior networks (with transformer)

prior_network = DiffusionPriorNetwork (
    dim = 512 ,
    depth = 6 ,
    dim_head = 64 ,
    heads = 8
). cuda ()

diffusion_prior = DiffusionPrior (
    net = prior_network ,
    clip = clip ,
    timesteps = 100 ,
    cond_drop_prob = 0.2
). cuda ()

loss = diffusion_prior ( text , images )
loss . backward ()

# do above for many steps ...

# decoder (with unet)

unet1 = Unet (
    dim = 128 ,
    image_embed_dim = 512 ,
    cond_dim = 128 ,
    channels = 3 ,
    dim_mults = ( 1 , 2 , 4 , 8 ),
    text_embed_dim = 512 ,
    cond_on_text_encodings = True  # set to True for any unets that need to be conditioned on text encodings (ex. first unet in cascade)
). cuda ()

unet2 = Unet (
    dim = 16 ,
    image_embed_dim = 512 ,
    cond_dim = 128 ,
    channels = 3 ,
    dim_mults = ( 1 , 2 , 4 , 8 , 16 )
). cuda ()

decoder = Decoder (
    unet = ( unet1 , unet2 ),
    image_sizes = ( 128 , 256 ),
    clip = clip ,
    timesteps = 1000 ,
    sample_timesteps = ( 250 , 27 ),
    image_cond_drop_prob = 0.1 ,
    text_cond_drop_prob = 0.5
). cuda ()

for unet_number in ( 1 , 2 ):
    loss = decoder ( images , text = text , unet_number = unet_number ) # this can optionally be decoder(images, text) if you wish to condition on the text encodings as well, though it was hinted in the paper it didn't do much
    loss . backward ()

# do above for many steps

dalle2 = DALLE2 (
    prior = diffusion_prior ,
    decoder = decoder
)

images = dalle2 (
    [ 'a butterfly trying to escape a tornado' ],
    cond_scale = 2. # classifier free guidance strength (> 1 would strengthen the condition)
)

# save your image (in this example, of size 256x256)
或者,您也可以使用“開啟剪輯”
$ pip install open-clip-torch前任。使用 Romain 訓練的 SOTA Open Clip 模型


