有關如何在 Apple Silicon Mac 上安裝優化的pytorch和可選的 Apple 新MLX和/或 Google 的tensorflow或JAX以及如何使用HuggingFace大型語言模型進行自己的實驗的指導。最近的 Mac 在機器學習任務方面表現出了良好的性能。
我們將執行以下步驟:
homebrewpytorchmlx框架JAX (目前處於實驗階段 (2024-07),並非總是最新的。)tensorflowjupyter lab來運行筆記本huggingface並使用transformers和 jupyter 實驗室中的幾行程式碼來執行一些預先訓練的語言模型。然後我們提供額外的操作指南:
(如果您知道要使用哪個框架,請跳至1.準備工作)
Tensorflow、JAX、Pytorch 和 MLX 都是深度學習框架,它們提供了執行訓練和推理中使用的最佳化張量運算所需的函式庫。在高層次上,所有四個的功能是等效的。 Huggingface 建構在任何這些框架之上,並為許多不同的用例提供了一個大型的預訓練模型庫,可供使用或自訂,此外還提供了許多方便的庫和範例程式碼,以便輕鬆入門。
jax-metal驅動程式的開發並不總是與最新版本的JAX保持同步。HuggingFace 發布了每個框架的模型支援概述。目前,如果您想利用現有模型,Pytorch 是事實上的標準。
對於「什麼是最快的?」這個問題的答案(可能太簡單了)查看 Jupyter Notebook 02-Benchmarks,安裝完成後,您可以測試自己的環境。該筆記本允許比較不同框架的矩陣乘法的速度。然而,在執行「標準」模型訓練或推理任務時,框架之間的差異很可能不太明顯。
如果您還沒有這樣做,請訪問 https://brew.sh/ 並按照說明安裝 homebrew。完成後,打開終端機並輸入brew --version以檢查它是否安裝正確。
現在使用brew安裝更新版本的python和git 。如果您不打算使用具有 Metal 優化的 Tensorflow(仍需要 3.11(2024 年 4 月)),建議使用 Homebrew 的預設 Python 3.12。
brew install [email protected] gitbrew install [email protected] git您可以安裝兩個版本的 Python,然後使用每個情況所需的特定 Python 版本建立虛擬環境。
如果您也打算使用 Linux,請注意 Mac 和 Linux 版本的框架之間的 Python 版本支援有時會有所不同。
蘋果並沒有投入太多的精力來保持 MacOS 的 python 保持最新。如果你想使用最新的預設 python,那麼將 homebrew 的 python 設定為預設系統 python 是有意義的。因此,如果您想在全域範圍內使用 homebrew 的 Python 3.11 或 3.12 系統,最簡單的方法是(在
brew install [email protected]或3.11之後):
編輯~/.zshrc並插入:
 # This is OPTIONAL and only required if you want to make homebrew's Python 3.12 as the global version:
export PATH= " /opt/homebrew/opt/[email protected]/bin: $PATH "
export PATH=/opt/homebrew/opt/[email protected]/libexec/bin: $PATH
當想要使homebrew的Python 3.11系統標準python時,將3.12的所有引用更改為3.11 。
(重新啟動終端以啟動路徑更改,或在目前終端會話中輸入source ~/.zshrc 。)
無論使用什麼系統 python,在建立虛擬環境時,您始終可以透過使用該 python 建立
venv來選擇要在venv中使用的特定 python 版本。例如/usr/bin/python3 -m venv my_venv_name使用 Apple 的 macOS python 建立虛擬環境(在撰寫本文時,2024-07,仍停留在 3.9.6)。有關更多詳細信息,請參閱下文虛擬環境。
現在將此項目複製為測試項目:
git clone https://github.com/domschl/HuggingFaceGuidedTourForMac這會將測試項目克隆到目錄HuggingFaceGuidedTourForMac中
現在為該專案創建Python 3.12環境並啟動它:
(再次:如果需要,請替換為3.11 )
python3.12 -m venv HuggingFaceGuidedTourForMac建立 venv 會將虛擬 python 環境所需的檔案(python 二進位檔案、函式庫、設定)新增到我們剛剛複製的專案資料夾中,再次使用相同的目錄HuggingFaceGuidedTourForMac 。進入目錄並啟動虛擬環境:
 cd HuggingFaceGuidedTourForMac
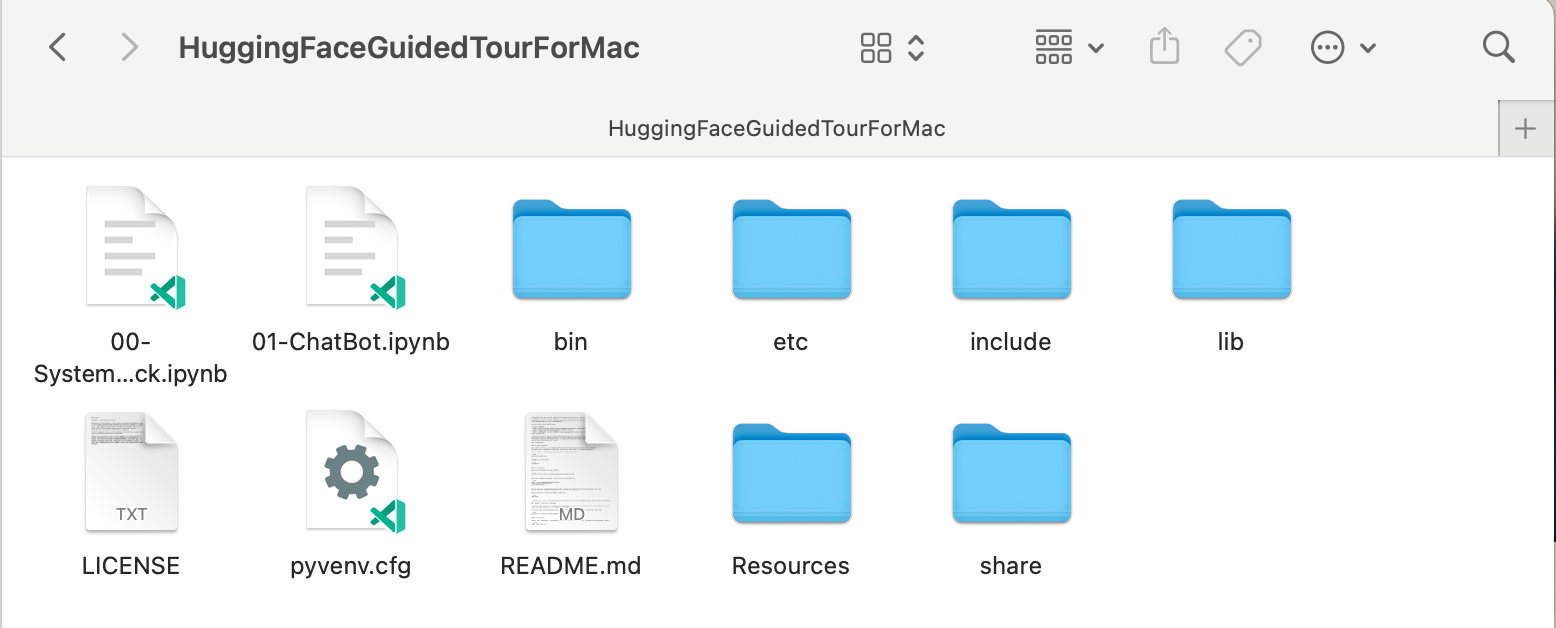
source bin/activate現在目錄HuggingFaceGuidedTourForMac包含 github 儲存庫的內容(例如00-SystemCheck.ipynb )和虛擬環境的檔案(例如bin 、 lib etc 、 include 、 share 、 pyvenv.cfg ):

替代方案:如果安裝了許多不同的 python 版本,您可以透過指定用於建立venv的 python 路徑來建立使用特定版本的環境,例如:
/opt/homebrew/opt/[email protected]/bin/python3.12 -m venv my_new_312_env明確使用 homebrew 的 python 來建立新的venv ,而
/usr/bin/python3 -m venv my_old_system_venv將在新環境中使用 Apple 的 macOS python 版本。
若要停用此虛擬環境,只需使用:
deactivate要重新啟動它,請輸入包含venv的目錄,此處: HuggingFaceGuidedTourForMac並使用:
source bin/activatevenv的附加說明
venv的一個非常不直觀的屬性是:當您透過在專案的子目錄中啟動環境(使用source bin/activate)來進入環境時,當您離開專案資料夾並開始處理完全不同的內容時,venv會保持活動狀態,直到您可以使用deactivate明確停用venv。有許多工具可以修改終端系統提示符號以顯示目前活動的
venv,這是非常有幫助的事情。看看 starship (推薦),或者,如果您喜歡點綴Oh My Zsh。
 安裝了
安裝了powerlevel10k的範例。系統提示字元的左側顯示目前目錄,右側將顯示venv的名稱。目前,沒有venv處於活動狀態。
在HuggingFaceGuidedTourForMac中啟動venv後:
 即使工作目錄已更改(此處為
home ),由於venv仍然處於活動狀態,因此它的名稱會透過powerlevel10k顯示在右側。非常方便。
有關 Python 虛擬環境的更多信息,請參閱 https://docs.python.org/3/tutorial/venv.html。
pytorch使用pip -V (大寫 V)確保您的虛擬環境處於活動狀態,這應該會顯示專案中pip的路徑:
<your-path>/HuggingFaceGuidedTourForMac/lib/python3.12/site-packages/pip (python 3.12)
在https://pytorch.org之後,我們將使用pip安裝 Pytorch。您至少需要 2.x 版本(自 2023 年起預設)才能在 pytorch 中獲得 MPS(金屬性能著色器)支持,這在 Apple Silicon 上提供了顯著的性能優勢。
將pytorch安裝到venv中:
pip install -U torch numpy torchvision torchaudio若要測試pytorch是否已正確安裝以及 MPS Metal 效能著色器是否可用,請開啟終端,輸入python並在 python shell 中輸入:
 import torch
# check if MPS is available:
torch . backends . mps . is_available ()這應該返回True 。
MLX pip install -U mlx再次啟動python並輸入:
 import mlx . core as mx
print ( mx . __version__ )這應該列印一個版本,例如0.16.1 (2024-07)
JAX如果您的重點是演算法的低階最佳化和超越既定深度學習演算法邊界的研究,那麼 JAX 是一個絕佳的選擇。它以numpy為模型,支援「一切」的自動微分(針對最佳化問題),並支援 Python 演算法的向量化和平行化,而不僅僅是深度學習。若要獲得其他深度學習框架所期望的功能(層、訓練循環函數和類似的「進階」),請考慮安裝額外的神經網路庫,例如: flax 。
不幸的是, JAX metal 驅動程式已開始落後於 JAX 版本,因此您需要檢查與可用jax-metal驅動程式相符的支援JAX版本的相容性表。
要使用pip將特定版本的JAX和最新的jax-metal安裝到活動環境中:
 # The version 0.4.26 is taken from the compatibility table mentioned above. Update as required.
pip install -U jax==0.4.26 jaxlib==0.4.26 jax-metal啟動python (支援3.12)並輸入:
 import jax
print ( jax . devices ()[ 0 ])
這應該會顯示(僅在第一次運行時):
 Platform 'METAL' is experimental and not all JAX functionality may be correctly supported!
WARNING: All log messages before absl::InitializeLog() is called are written to STDERR
W0000 00:00:1721975334.430133   43061 mps_client.cc:510] WARNING: JAX Apple GPU support is experimental and not all JAX functionality is correctly supported!
Metal device set to: Apple M2 Max

systemMemory: 32.00 GB
maxCacheSize: 10.67 GB

I0000 00:00:1721975334.446739   43061 service.cc:145] XLA service 0x60000031d100 initialized for platform METAL (this does not guarantee that XLA will be used). Devices:
I0000 00:00:1721975334.446771   43061 service.cc:153]   StreamExecutor device (0): Metal, <undefined>
I0000 00:00:1721975334.448269   43061 mps_client.cc:406] Using Simple allocator.
I0000 00:00:1721975334.448308   43061 mps_client.cc:384] XLA backend will use up to 22906109952 bytes on device 0 for SimpleAllocator.
[METAL(id=0)]
這裡METAL:0是 JAX 將用於計算的設備,並且支援 Apple Silicon。
相反,如果您看到以下錯誤:
RuntimeError: Unable to initialize backend 'METAL': INVALID_ARGUMENT: Mismatched PJRT plugin PJRT API version (0.47) and framework PJRT API version 0.54). (you may need to uninstall the failing plugin package, or set JAX_PLATFORMS=cpu to skip this backend.)
您的jax和jaxlib版本與jax-metal不相容。檢查jax-metal的相容性表並依照表中的指示安裝所需的版本。
tensorflowTensorflow 正在快速失去支持,甚至 Google 也沒有發布 Tensorflow 的新模型。如果您打算使用此功能,建議您制定遷移計劃。
雖然 Tensorflow 從 2.16 開始支援 Python 3.12,但 macOS
tensorflow-metal加速器自 2023 年 9 月(2024 年 7 月的狀態)以來一直沒有更新,並且需要 Python 3.11:
使用pip -V (大寫 V)確保您的虛擬環境處於活動狀態,這應該會顯示專案中pip的路徑:
<your-path>/HuggingFaceGuidedTourForMac/lib/python3.11/site-packages/pip (python 3.11)
在 https://developer.apple.com/metal/tensorflow-plugin/ 之後,我們將在venv中使用pip安裝tensorflow :
pip install -U tensorflow tensorflow-metal若要測試tensorflow是否正確安裝,請開啟終端,輸入python並在 python shell 中輸入:
 import tensorflow as tf
tf . config . list_physical_devices ( 'GPU' )
您應該會看到類似以下內容:
[PhysicalDevice(name='/physical_device:GPU:0', device_type='GPU')]
此時,您的 Apple Silicon Mac 應該已準備好使用 Apple Metal 框架運行pytorch以及可選的MLX和/或JAX或具有硬體加速支援的tensorflow 。
要測試這一點,您可以使用jupyter lab來運行一些筆記本。要安裝jupyter lab ,首先確保要使用的虛擬環境處於活動狀態 ( pip -V ),然後輸入:
pip install -U jupyterlab ipywidgets如果您安裝了其他 Jupyter 版本,
venv中新安裝的 jupyter 版本的路徑通常無法正確更新,請重新啟動環境以確保使用正確的本機 Jupyter 版本:
deactivate
source bin/activate
若要啟動 Jupyter 實驗室,請輸入:
jupyter lab這應該會打開一個運行jupyter lab的瀏覽器視窗。然後,您可以建立一個新的 python 筆記本並執行一些程式碼來測試tensorflow和pytorch是否正常運作:

 import torch

print ( "Pytorch version:" , torch . __version__ )
如果成功完成,您的 Mac 現在就可以進行深度學習實驗了。
HuggingFace 是 NLP 和深度學習實驗的重要資源。它提供了大量預先訓練的語言模型和一個簡單的 API 來使用它們。它將使我們能夠快速開始深度學習實驗。
transformers從huggingface安裝說明來看,我們使用pip來安裝transformers :
pip install -U transformers accelerate " huggingface_hub[cli] "嘗試 HuggingFace 時,您將下載大型模型,並將其儲存在您的主目錄中:
~/.cache/huggingface/hub。您可以隨時透過刪除此目錄或其部分內容來刪除這些模型。
accelerate是可選的,但用於運行一些大型模型。安裝accelerate的副作用可能是降級其他一些模組,例如numpy 。"huggingface_hub[cli]"安裝 Huggingface 命令列工具,有時需要下載 Llama 3 等模型(部分專有許可)。 在目錄HuggingFaceGuidedTourForMac和活動venv中,啟動jupyter lab並載入00-SystemCheck.ipynb筆記本。筆記本將首先檢查所有深度學習框架並提供信息,如果它們安裝正確。隨後使用Pytorch進行了簡單的實驗。
使用<Shift>-Enter運行筆記本的儲存格。
如果您在安裝 Huggingface 之前啟動了 Jupyter Lab,則需要在 Jupyter 中重新啟動 python 內核,或者直接重新啟動 Jupyter Lab,否則它將找不到 Transformers 庫。
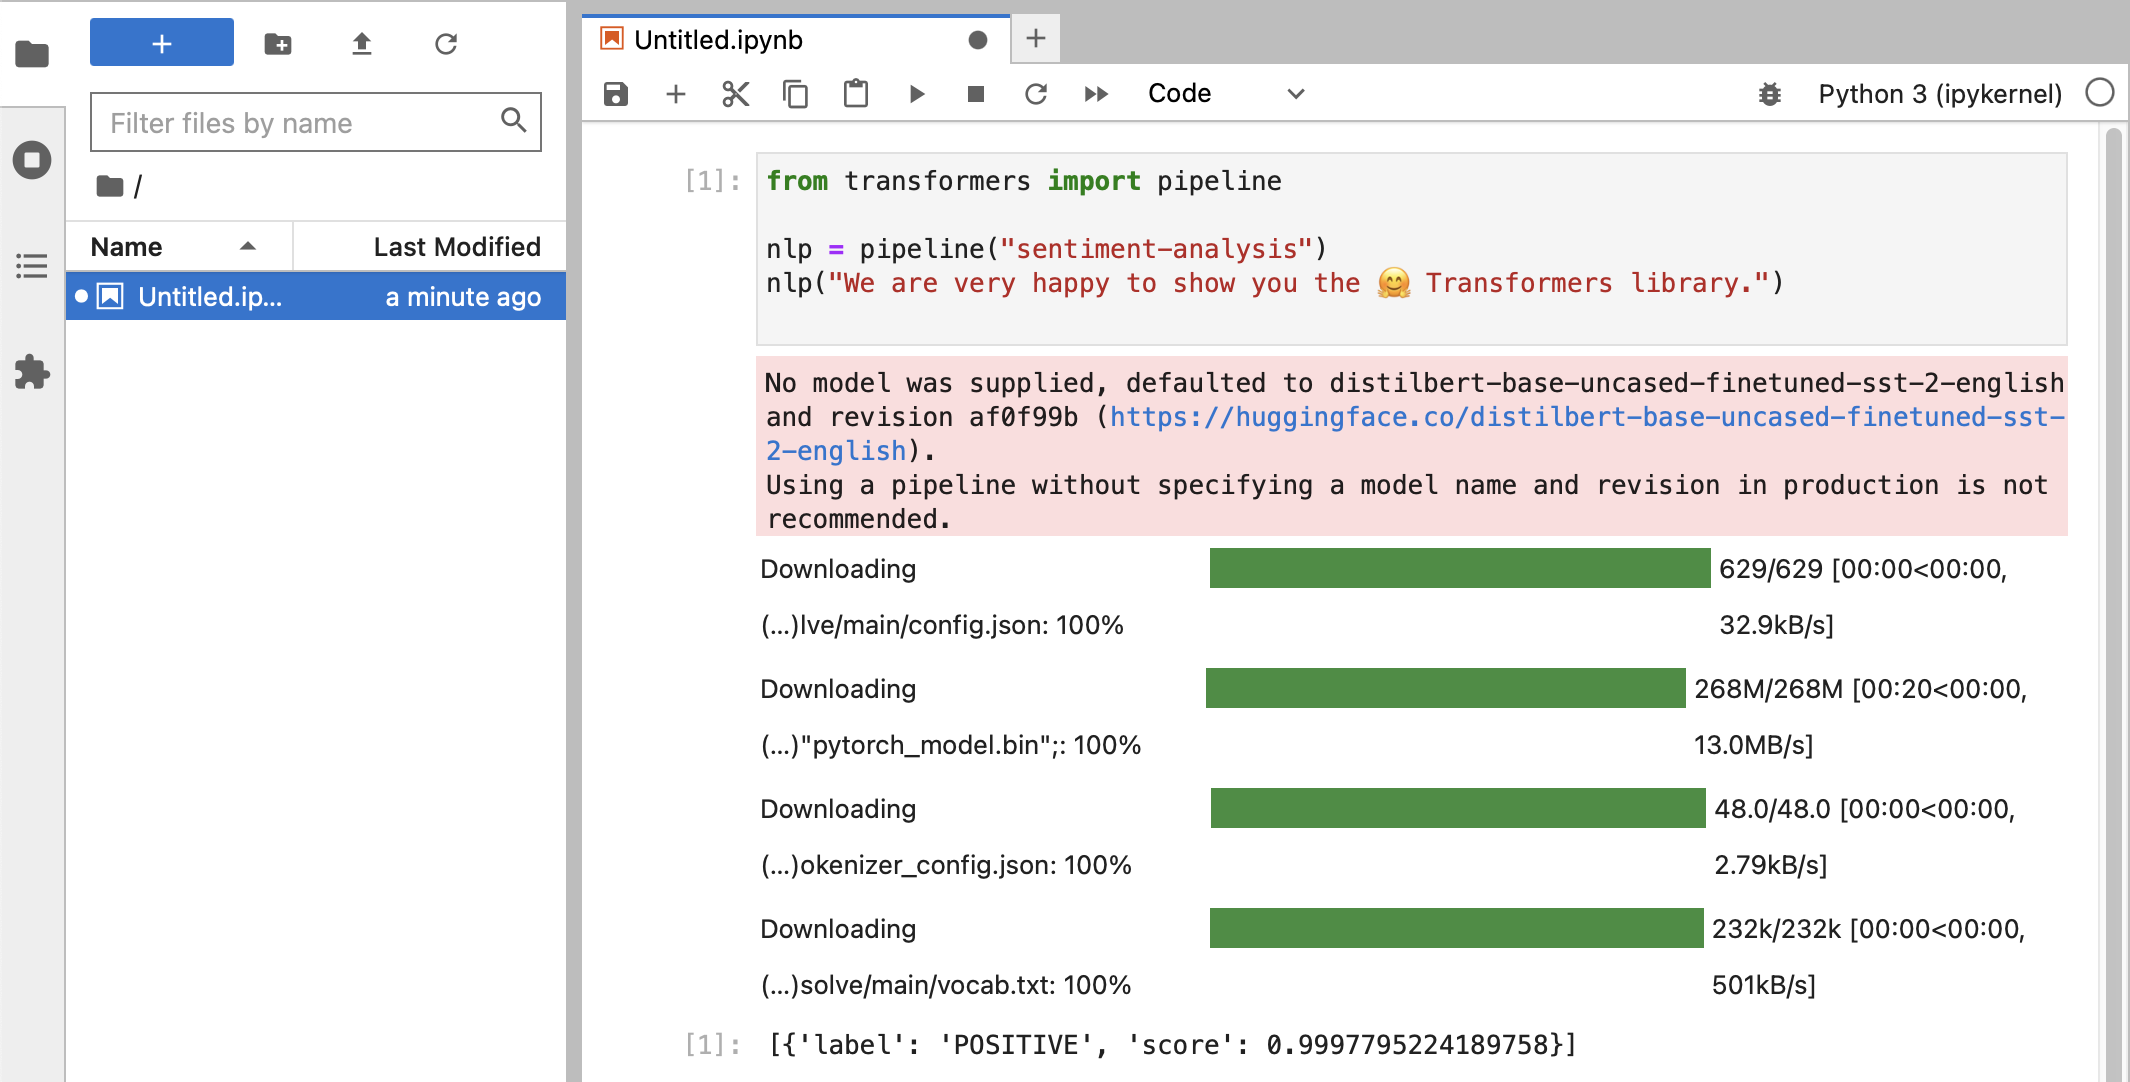
經過各種測試後,您最終應該看到以下內容:

如果您收到得分為0.99的POSITIVE標籤分類,那麼您就可以開始嘗試 HuggingFace 了!
您將看到
HuggingFace庫正在下載各種包含經過訓練的模型資料的大型二進位 blob。該資料儲存在您的主目錄中:~/.cache/huggingface/hub。您可以隨時透過刪除此目錄或其部分內容來刪除這些模型。
您可以打開筆記本01-ChatBot.ipynb在 Mac 上嘗試一個非常簡單的聊天機器人。
使用的python程式碼是:
 import torch
from transformers import AutoModelForCausalLM , AutoTokenizer
from transformers . utils import logging

# Disable warnings about padding_side that cannot be rectified with current software:
logging . set_verbosity_error ()

model_names = [ "microsoft/DialoGPT-small" , "microsoft/DialoGPT-medium" , "microsoft/DialoGPT-large" ]
use_model_index = 1  # Change 0: small model, 1: medium, 2: large model (requires most resources!)
model_name = model_names [ use_model_index ]

tokenizer = AutoTokenizer . from_pretrained ( model_name ) # , padding_side='left')
model = AutoModelForCausalLM . from_pretrained ( model_name )

# The chat function: received a user input and chat-history and returns the model's reply and chat-history:
def reply ( input_text , history = None ):
    # encode the new user input, add the eos_token and return a tensor in Pytorch
    new_user_input_ids = tokenizer . encode ( input_text + tokenizer . eos_token , return_tensors = 'pt' )

    # append the new user input tokens to the chat history
    bot_input_ids = torch . cat ([ history , new_user_input_ids ], dim = - 1 ) if history is not None else new_user_input_ids

    # generated a response while limiting the total chat history to 1000 tokens,
    chat_history_ids = model . generate ( bot_input_ids , max_length = 1000 , pad_token_id = tokenizer . eos_token_id )

    # pretty print last ouput tokens from bot
    return tokenizer . decode ( chat_history_ids [:, bot_input_ids . shape [ - 1 ]:][ 0 ], skip_special_tokens = True ), chat_history_ids

history = None
while True :
    input_text = input ( "> " )
    if input_text in [ "" , "bye" , "quit" , "exit" ]:
        break
    reply_text , history_new = reply ( input_text , history )
    history = history_new
    if history . shape [ 1 ] > 80 :
        old_shape = history . shape
        history = history [:, - 80 :]
        print ( f"History cut from { old_shape } to { history . shape } " )
    # history_text = tokenizer.decode(history[0])
    # print(f"Current history: {history_text}")
    print ( f"D_GPT: { reply_text } " )
這顯示了一個使用 Microsoft 的 DialoGPT 模型的(相當有限且重複的)聊天機器人。
值得嘗試的事:
0..2之間更改use_model_index ,您可以選擇小型、中型或大型語言模型。history_text相關的行。~/.cache/huggingface/hub 。遺失的內容會在需要時自動重新下載。 llama.cpp項目,它實作了以高度最佳化的 C++ 程式碼運行 LLM 所需的推理程式碼,支援 Mac 的 Metal 加速。本段用於卸載本指南舊版本中使用的 conda:
brew uninstall miniconda
其他修改是(一旦刪除 miniconda,所有修改均無效):
~/.condarc (頻道清單)和~/.conda 。~/.zshrc (或.bashrc )用於設定路徑和環境。~/.cache/huggingface/hub 。只需刪除該目錄即可。 conda切換到pip和venv ,安裝現在更加簡單。pytorch v2.0 現已發布,安裝說明中的通道pytorch-nightly現在可以替換為pytorch 。 MPS 支援不再需要pytorch-nightly通道。