build your local ragstack chatbot
1.0.0
歡迎參加本次研討會,使用檢索增強生成、本地推理器 DataStax Enterprise v7 和本地開放大型語言模型 Mistral 來建立和部署您自己的 Enterprise Co-Pilot。
該儲存庫透過將您的敏感資料保留在防火牆內來專注於安全性!
為什麼?
它利用 DataStax RAGStack,這是一個精選的最佳開源軟體堆疊,用於在使用 DataStax Enterprise、Astra Vector DB 或 Apache Cassandra 作為向量儲存的生產就緒應用程式中簡化 RAG 模式的實作。
你將學到什麼:
?如何利用 DataStax RAGStack 實現以下元件的生產就緒使用:
?如何使用 Ollama 作為本地推理引擎
?如何使用 Mistral 作為問答式聊天機器人的本地開放大型語言模型 (LLM)
?如何使用 Streamlit 輕鬆部署您出色的應用程式!
簡報的幻燈片可以在這裡找到
本研討會假設您有權造訪:
在接下來的步驟中,我們將準備儲存庫、DataStax Enterprise、Jupyter Notebook 和帶有 Ollama 的 Ollama 推理引擎。
首先,我們需要將此儲存庫克隆到您的本機開發筆記型電腦。
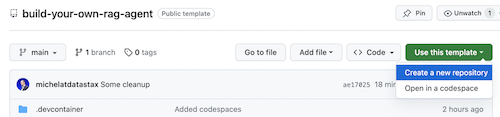
開啟 build-your-local-ragstack-chatbot 儲存庫
按一下Use this template -> Ceate new repository ,如下所示:
現在選擇您的 github 帳戶並命名新儲存庫。最好還要設定描述。按一下Create repository
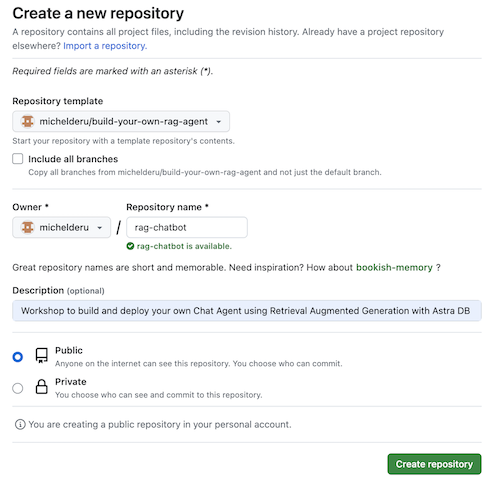
涼爽的!您剛剛在自己的 Gihub 帳戶中建立了一個副本!
cd到一個合理的目錄(如 /projects 等);git clone <url-to-your-repo>cd到您的新目錄!你已經準備好搖滾了! ?
創建虛擬環境很有用。使用以下內容進行設定:
python3 -m venv myenv
然後按如下方式激活它:
 source myenv/bin/activate   # on Linux/Mac
myenvScriptsactivate.bat  # on Windows
現在您可以開始安裝所需的軟體包:
pip3 install -r requirements.txt
從新的終端機視窗透過以下兩種方式之一運行 DSE 7:
docker-compose up
這使用了該儲存庫根目錄中的 docker-compose.yml 文件,該文件也可以方便地啟動 Jupyter 解釋器。
DataStax 將在 http://localhost:9042 上運行,Jupyter 將透過瀏覽 http://localhost:8888 進行訪問
有許多推理引擎。你可以選擇 LM Studio,它有一個很好的 UI。在此筆記本中,我們將使用 Ollama。
ollama run mistral下載 Mistral (~4GB)如果這一切都失敗了,由於 RAM 限制,您可以選擇使用tinyllama 作為模型。
為了開始本次研討會,我們將首先嘗試提供的筆記本中的概念。我們假設您將從 Jupyter Docker 容器中執行,如果不是,請將主機名稱從host.docker.internal更改為localhost 。
本筆記本展示了使用 DataStax Enterprise Vector Store 作為使 LLM 互動有意義且不產生幻覺的方法所需採取的步驟。這裡採用的方法是檢索增強生成。
你將學到:
瀏覽至 http://localhost:8888 並開啟根目錄中名為Build_Your_Own_RAG_Meetup.ipnb的筆記本。
在本次研討會中,我們將使用 Streamlit,這是一個非常簡單易用的框架來建立前端 Web 應用程式。
首先,讓我們建立一個hello world應用程序,如下所示:
import streamlit as st
# Draw a title and some markdown
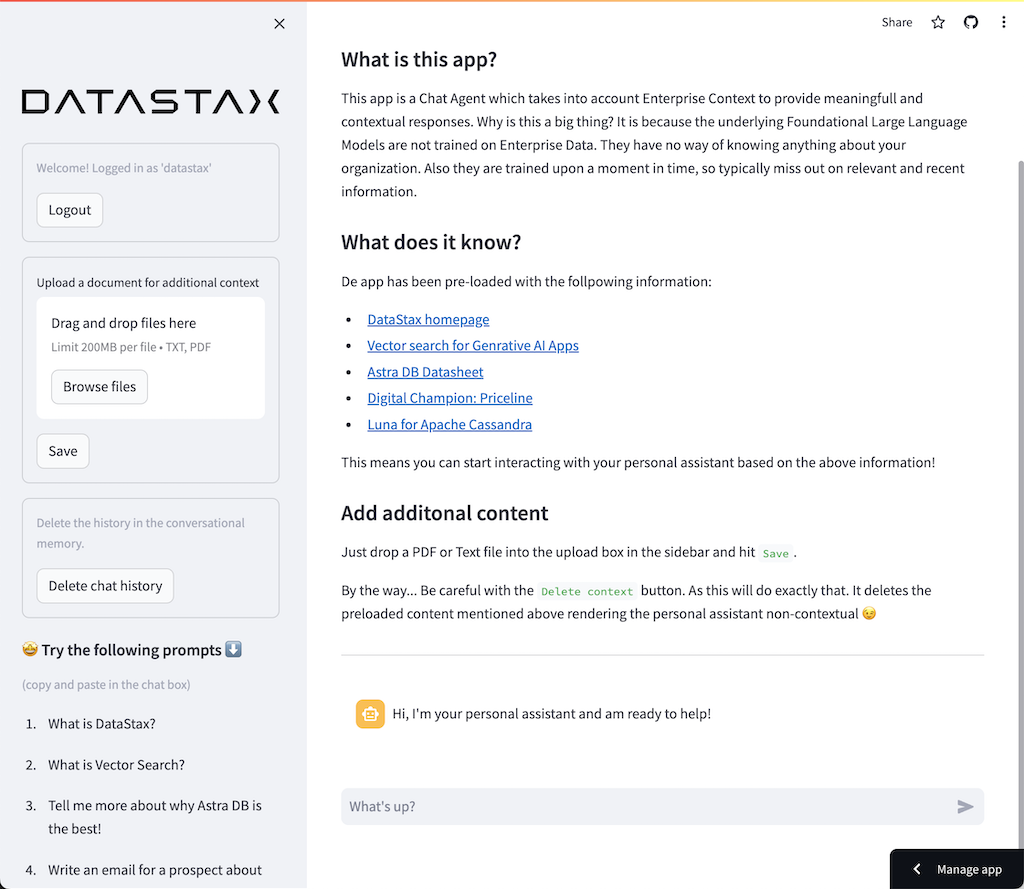
st . markdown ( """# Your Enterprise Co-Pilot
Generative AI is considered to bring the next Industrial Revolution.
Why? Studies show a **37% efficiency boost** in day to day work activities!
### Security and safety
This Chatbot is safe to work with sensitive data. Why?
- First of all it makes use of [Ollama, a local inference engine](https://ollama.com);
- On top of the inference engine, we're running [Mistral, a local and open Large Language Model (LLM)](https://mistral.ai/);
- Also the LLM does not contain any sensitive or enterprise data, as there is no way to secure it in a LLM;
- Instead, your sensitive data is stored securely within the firewall inside [DataStax Enterprise v7 Vector Database](https://www.datastax.com/blog/get-started-with-the-datastax-enterprise-7-0-developer-vector-search-preview);
- And lastly, the chains are built on [RAGStack](https://www.datastax.com/products/ragstack), an enterprise version of Langchain and LLamaIndex, supported by [DataStax](https://www.datastax.com/).""" )
st . divider ()第一步是導入streamlit 套件。然後我們呼叫st.markdown來寫標題,最後我們在網頁上寫入一些內容。
要在本地啟動此應用程序,您需要安裝 Streamlit 依賴項,如下所示(這應該已經作為先決條件的一部分完成):
pip install streamlit現在運行應用程式:
streamlit run app_1.py這將啟動應用程式伺服器並將您帶到剛剛建立的網頁。
很簡單,不是嗎? ?
在此步驟中,我們將開始準備應用程式以允許聊天機器人與使用者互動。我們將使用以下 Streamlit 元件: 1. 2. st.chat_input以便使用者允許輸入問題 2. st.chat_message('human')繪製使用者的輸入 3. st.chat_message('assistant')繪製聊天機器人的回應
這會產生以下程式碼:
 # Draw the chat input box
if question := st . chat_input ( "What's up?" ):

    # Draw the user's question
    with st . chat_message ( 'human' ):
        st . markdown ( question )

    # Generate the answer
    answer = f"""You asked: { question } """

    # Draw the bot's answer
    with st . chat_message ( 'assistant' ):
        st . markdown ( answer )
使用 app_2.py 進行嘗試並如下啟動。
如果您以前的應用程式仍在運行,只需提前按ctrl-c來終止它即可。
streamlit run app_2.py現在輸入一個問題,然後再次輸入另一個問題。您會看到只保留了最後一個問題。
為什麼?
這是因為 Streamlit 會根據最新的輸入一次又一次地重繪整個螢幕。由於我們不記得問題,因此只顯示最後一個問題。
在此步驟中,我們將確保追蹤問題和答案,以便每次重畫時都會顯示歷史記錄。
為此,我們將採取以下步驟:
messages的st.session_state中新增問題messages的st.session_state中for message in st.session_state.messages循環列印歷史記錄此方法之所以有效,是因為session_state在 Streamlit 運作中是有狀態的。
查看app_3.py中的完整程式碼。
正如您將看到的,我們使用字典來儲存role (可以是人類或人工智慧)和question或answer 。追蹤角色很重要,因為它將在瀏覽器中繪製正確的圖片。
運行它:
streamlit run app_3.py現在新增多個問題,您將看到每次 Streamlit 重新運行時這些問題都會重新繪製到螢幕上。 ?
在這裡,我們將連結回我們使用 Jupyter Notebook 所做的工作,並將問題與 Mistral 聊天模型的呼叫整合起來。
還記得每次使用者互動時 Streamlit 都會重新運行程式碼嗎?因此,我們將利用 Streamlit 中的資料和資源緩存,以便僅建立一次連線。我們將使用@st.cache_data()和@st.cache_resource()來定義快取。 cache_data通常用於資料結構。 cache_resource主要用於資料庫等資源。
這會產生以下程式碼來設定提示和聊天模型:
 # Cache prompt for future runs
@ st . cache_data ()
def load_prompt ():
    template = """You're a helpful AI assistent tasked to answer the user's questions.
You're friendly and you answer extensively with multiple sentences. You prefer to use bulletpoints to summarize.

QUESTION:
{question}

YOUR ANSWER:"""
    return ChatPromptTemplate . from_messages ([( "system" , template )])
prompt = load_prompt ()

# Cache Mistral Chat Model for future runs
@ st . cache_resource ()
def load_chat_model ():
    # parameters for ollama see: https://api.python.langchain.com/en/latest/chat_models/langchain_community.chat_models.ollama.ChatOllama.html
    # num_ctx is the context window size
    return ChatOllama (
        model = "mistral:latest" ,
        num_ctx = 18192 ,
        base_url = st . secrets [ 'OLLAMA_ENDPOINT' ]
    )
chat_model = load_chat_model ()
我們現在將改為呼叫鏈,而不是在前面的範例中使用靜態答案:
 # Generate the answer by calling Mistral's Chat Model
inputs = RunnableMap ({
    'question' : lambda x : x [ 'question' ]
})
chain = inputs | prompt | chat_model
response = chain . invoke ({ 'question' : question })
answer = response . content
查看app_4.py中的完整程式碼。
在繼續之前,我們必須在./streamlit/secrets.toml中提供OLLAMA_ENDPOINT 。 secrets.toml.example中提供了一個範例:
 # Ollama/Mistral Endpoint
OLLAMA_ENDPOINT = " http://localhost:11434 "
要在本地啟動此應用程序,您需要安裝 RAGStack,其中包含穩定版本的 LangChain 和所有依賴項(這應該已經作為先決條件的一部分完成):
pip install ragstack現在運行應用程式:
streamlit run app_4.py現在您可以開始與聊天機器人進行問答互動。當然,由於沒有與 DataStax Enterprise Vector Store 集成,因此不會有上下文相關的答案。由於尚未內建串流功能,請給客服人員一些時間,以便立即給出完整的答案。
我們先從問題開始:
What does Daniel Radcliffe get when he turns 18?
正如您將看到的,您將收到一個非常通用的答案,而無需 CNN 數據中提供的資訊。
現在事情變得非常有趣!在此步驟中,我們將整合 DataStax Enterprise Vector Store,以便為聊天模型提供即時情境。實作檢索增強產生所採取的步驟:
我們將重複使用透過筆記本插入的 CNN 資料。
為了實現這一點,我們首先必須建立與 DataStax Enterprise Vector Store 的連線:
 # Cache the DataStax Enterprise Vector Store for future runs
@ st . cache_resource ( show_spinner = 'Connecting to Datastax Enterprise v7 with Vector Support' )
def load_vector_store ():
    # Connect to DSE
    cluster = Cluster (
        [ st . secrets [ 'DSE_ENDPOINT' ]]
    )
    session = cluster . connect ()

    # Connect to the Vector Store
    vector_store = Cassandra (
        session = session ,
        embedding = HuggingFaceEmbeddings (),
        keyspace = st . secrets [ 'DSE_KEYSPACE' ],
        table_name = st . secrets [ 'DSE_TABLE' ]
    )
    return vector_store
vector_store = load_vector_store ()

# Cache the Retriever for future runs
@ st . cache_resource ( show_spinner = 'Getting retriever' )
def load_retriever ():
    # Get the retriever for the Chat Model
    retriever = vector_store . as_retriever (
        search_kwargs = { "k" : 5 }
    )
    return retriever
retriever = load_retriever ()
我們唯一需要做的另一件事是更改鏈以包含對向量存儲的呼叫:
 # Generate the answer by calling Mistral's Chat Model
inputs = RunnableMap ({
    'context' : lambda x : retriever . get_relevant_documents ( x [ 'question' ]),
    'question' : lambda x : x [ 'question' ]
})
查看app_5.py中的完整程式碼。
在繼續之前,我們必須在./streamlit/secrets.toml中提供DSE_ENDPOINT 、 DSE_KEYSPACE和DSE_TABLE 。 secrets.toml.example中提供了一個範例:
 # DataStax Enterprise Endpoint
DSE_ENDPOINT = " localhost "
DSE_KEYSPACE = " default_keyspace "
DSE_TABLE = " dse_vector_table "
並運行應用程式:
streamlit run app_5.py我們再問一個問題:
What does Daniel Radcliffe get when he turns 18?
正如您將看到的,現在您將收到一個非常上下文相關的答案,因為向量儲存為聊天模型提供了相關的 CNN 資料。
如果答案生成後出現在螢幕上,那該有多酷!嗯,這很容易。
首先,我們將建立一個流回調處理程序,在每次新令牌產生時都會呼叫該處理程序,如下所示:
 # Streaming call back handler for responses
class StreamHandler ( BaseCallbackHandler ):
    def __init__ ( self , container , initial_text = "" ):
        self . container = container
        self . text = initial_text

    def on_llm_new_token ( self , token : str , ** kwargs ):
        self . text += token
        self . container . markdown ( self . text + "▌" )
然後我們解釋聊天模型以使用 StreamHandler:
response = chain . invoke ({ 'question' : question }, config = { 'callbacks' : [ StreamHandler ( response_placeholder )]})上面程式碼中的response_placeholer定義了需要寫入token的位置。我們可以透過呼叫int st.empty()來建立該空間,如下所示:
 # UI placeholder to start filling with agent response
with st . chat_message ( 'assistant' ):
    response_placeholder = st . empty ()
查看app_6.py中的完整程式碼。
並運行應用程式:
streamlit run app_6.py現在您將看到回應將即時寫入瀏覽器視窗。
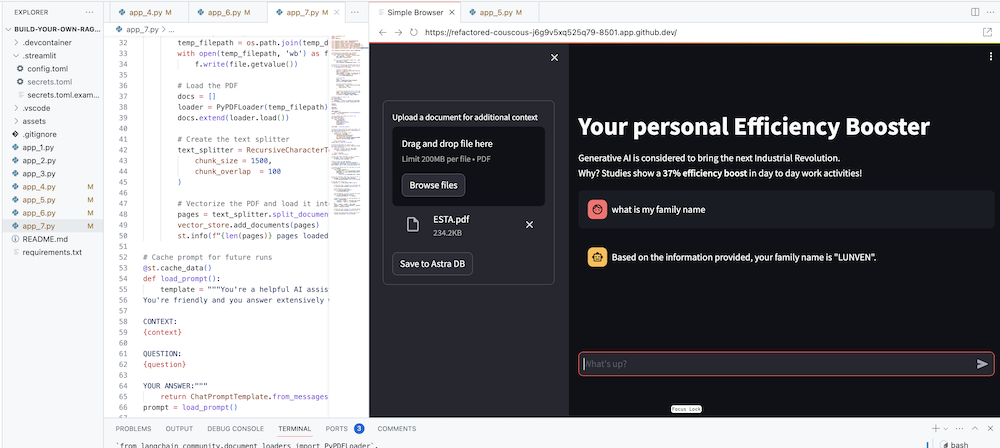
當然,最終目標是將您自己公司的背景添加到代理商中。為此,我們將添加一個上傳框,允許您上傳 PDF 文件,然後使用該文件提供有意義的上下文回應!
首先我們需要一個使用 Streamlit 建立的上傳表單:
 # Include the upload form for new data to be Vectorized
with st . sidebar :
    with st . form ( 'upload' ):
        uploaded_file = st . file_uploader ( 'Upload a document for additional context' , type = [ 'pdf' ])
        submitted = st . form_submit_button ( 'Save to DataStax Enterprise' )
        if submitted :
            vectorize_text ( uploaded_file )
現在我們需要一個函數來載入 PDF 並將其引入 DataStax Enterprise,同時對內容進行向量化。
 # Function for Vectorizing uploaded data into DataStax Enterprise
def vectorize_text ( uploaded_file , vector_store ):
    if uploaded_file is not None :

        # Write to temporary file
        temp_dir = tempfile . TemporaryDirectory ()
        file = uploaded_file
        temp_filepath = os . path . join ( temp_dir . name , file . name )
        with open ( temp_filepath , 'wb' ) as f :
            f . write ( file . getvalue ())

        # Load the PDF
        docs = []
        loader = PyPDFLoader ( temp_filepath )
        docs . extend ( loader . load ())

        # Create the text splitter
        text_splitter = RecursiveCharacterTextSplitter (
            chunk_size = 1500 ,
            chunk_overlap  = 100
        )

        # Vectorize the PDF and load it into the DataStax Enterprise Vector Store
        pages = text_splitter . split_documents ( docs )
        vector_store . add_documents ( pages )
        st . info ( f" { len ( pages ) } pages loaded." )
查看app_7.py中的完整程式碼。
要在本地啟動此應用程序,您需要安裝 PyPDF 依賴項,如下所示(這應該已經作為先決條件的一部分完成):
pip install pypdf並運行應用程式:
streamlit run app_7.py現在上傳與您相關的 PDF 文件(越多越好)並開始詢問有關該文件的問題。您會發現答案是相關的、有意義的並且符合上下文! ?見證奇蹟發生!