poster editor
v5.15
此類是 Intervention Image 套件的替代方案,可以更靈活地處理圖像上的文字。如果您需要使文字適合給定區域、自動計算字體大小並更改行高,請使用它。文字繪製方法也知道如何返回銘文的實際大小,例如,這將允許將區塊放置在彼此下面。
除了靈活地處理文字之外,該類別還提供了類似於 Intervention 套件的圖像 API。包括智慧海報調整大小、濾鏡、繪製形狀以及疊加其他影像。
如果您在工作中沒有使用 Composer,您可能也會對類別的簡單性和沒有任何依賴項感興趣。請注意,此類別僅支援 PHP-GD 驅動程式。您也可以輕鬆繼承您的類別 - 父級的所有方法都可以被覆寫。
安裝poster editor的最佳方法是使用 Composer 快速輕鬆地安裝。
但是,您可以直接請求該類別而不使用載入器 - 這不會以任何方式影響效能。
php composer.phar require antonlukin/poster-editor
如果發生錯誤,類別方法將傳回異常。
因此,最好在try..catch區塊內呼叫它們。
 // Using composer
require_once __DIR__ . ' /vendor/autoload.php ' ;

// Or directly
// require_once __DIR__ . '/PosterEditor.php';

try {
    $ image = new PosterEditor  PosterEditor ();
    $ image -> make ( ' images/bridge.jpg ' )-> fit ( 600 , 600 );
    $ image -> show ();

} catch ( Exception $ e ) {
    echo $ e -> getMessage ();
} $image->get()
取得影像資源以使用原始 gd 命令。
$image->set(instance $resourse)
使用原始 gd 指令後設定影像資源。
$image->make(mixed $data)
從檔案或二進位資料建立新的映像實例。
$image->insert(mixed $data, array $options = array())
將給定的影像來源貼到目前影像上,位置可選。第一個參數可以是二進位資料或檔案路徑或另一個類別實例。 Options 是從左上角開始的 x/y 相對偏移座標和從 0 到 100 的不透明度的數組,其中 0 表示不透明度。預設情況下圖像將居中。
$image->canvas(int $width, int $height, array $options = array())
按寬度和高度初始化畫布。背景顏色選項位於顏色/不透明度設定數組中。預設情況下,黑色畫布不透明。
$image->show(string $format = null, int $quality = 90)
以給定的格式和品質發送當前影像的 HTTP 回應。格式是檔案圖片副檔名。預設情況下,回應資料將以目前影像的類型進行編碼。如果尚未定義圖像類型,方法將傳回 jpeg 編碼資料。所有文件類型的品質均標準化為從 0(品質差,小文件)到 100(品質最好,大文件)的範圍。預設值為 90。
$image->save(string $path, int $quality = 90, string $format = null)
將影像物件的目前狀態保存在檔案系統中。可以選擇定義儲存影像的特定路徑。圖像類型將由檔案副檔名定義。如果沒有可用的副檔名,則回應資料將以目前影像的類型進行編碼。如果尚未定義圖像類型,方法將傳回 jpeg 編碼資料。您可以選擇使用格式參數覆寫它。所有文件類型的品質均標準化為從 0(品質差,小文件)到 100(品質最好,大文件)的範圍。預設值為 90。
$image->destroy()
在 PHP 腳本結束之前釋放與目前影像實例關聯的記憶體。通常資源在腳本完成後會自動銷毀。
$image->width()
傳回目前影像的高度(以像素為單位)。
$image->height()
傳回目前影像的高度(以像素為單位)。
$image->resize(int $width, int $height)
根據給定的寬度和高度調整目前影像的大小。不注意長寬比。為了按比例調整大小,請使用upsize和downsize方法。
$image->upsize(int $width = null, int $height = null)
放大最大一側的影像。透過零寬度或高度的比率計算。
$image->downsize(int $width = null, int $height = null)
縮小最大一側的影像。透過零寬度或高度的比率計算。
$image->crop(int $width, int $height, array $options = array())
以給定的寬度和高度剪切目前影像的矩形部分。定義可選的 x,y 座標以將切口的左上角移動到特定位置。
$image->fit(int $width, int $height, string $position = 'center')
結合裁剪和調整大小以智慧方式格式化影像。此方法會自動找到目前影像上最適合的長寬比,將其剪切出來並將其調整為給定的尺寸。預設情況下,可能的位置為top-left 、 top 、 top-right 、 bottom-left center bottom 、 bottom-right 、 right和left 。
$image->line(int $x1, int $y1, int $x2, int $y2, array $options = array())
在目前影像上從 x,y 點 1 到 x,y 點 2 繪製一條線。使用選項參數設定顏色、不透明度和寬度值。
$image->rectangle(int $x, int $y, int $width, int $height, array $options = array())
在目前影像上繪製一個彩色矩形。使用選項參數設定顏色、不透明度、厚度和輪廓值。
$image->ellipse(int $x, int $y, int $width, int $height, array $options = array())
畫一個橢圓。使用選項參數設定顏色、不透明度和輪廓值。
$image->brightness(int $level = 0)
按給定等級變更目前影像的亮度。使用 -100 之間的值表示最小亮度,0 表示無變化,+100 表示最大亮度。
$image->contrast(int $level = 0)
按給定等級變更目前影像的對比度。使用 -100 之間的值表示最小對比度,0 表示無變化,+100 表示最大對比。
$image->grayscale()
將影像轉換為灰階版本。
$image->blur()
應用模糊影像效果。
$image->invert()
反轉影像的顏色。
$image->blackout()
在影像上繪製黑色不透明矩形。
$image->rotate(int $angle, array $options = array())
旋轉影像。設定旋轉後未覆蓋區域的角度(以度為單位)和可選顏色。
$image->text(string $text, array $options = array(), array &$boundary = array())
在圖像上繪製文字。可能的選項:
使用邊界取得繪製文字方塊的實際尺寸。請參閱下面的詳細範例。
 $ image = new PosterEditor  PosterEditor ();
$ image -> make ( ' images/bridge.jpg ' )-> fit ( 1200 , 630 , ' bottom ' )-> blackout ( 50 );

$ logo = new PosterEditor  PosterEditor ();
$ logo -> make ( ' images/logo.png ' )-> downsize ( 150 , null );

$ image -> insert ( $ logo , array ( ' x ' => 50 , ' y ' => 50 ))-> show ();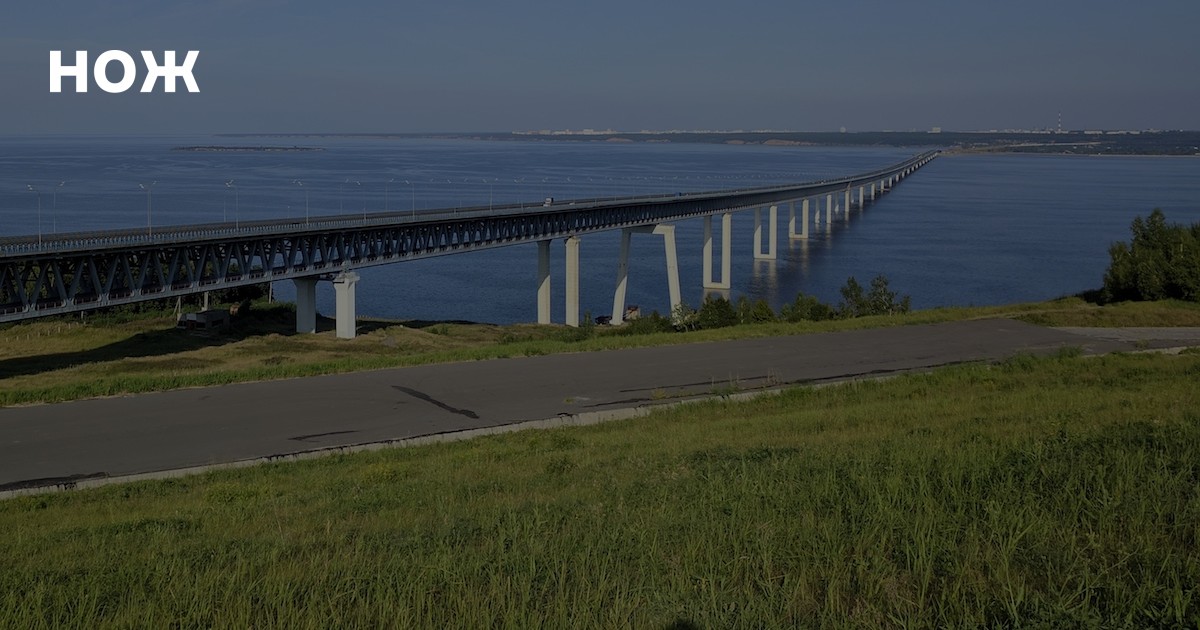
 $ image = new PosterEditor  PosterEditor ();
$ image -> make ( ' images/bridge.jpg ' )-> fit ( 1200 , 630 );
$ image -> grayscale ()-> brightness (- 40 );

$ image -> text (
    ' Lorem ipsum dolor sit amet, consectetur adipiscing elit, sed do eiusmod tempor incididunt ut labore et dolore magna aliqua. Ut enim ad minim veniam, quis nostrud exercitation ullamco laboris nisi ut aliquip ex ea commodo consequat Lorem ipsum dolor sit amet ' , // phpcs:ignore
    array (
        ' x '          => 100 ,
        ' y '          => 100 ,
        ' width '      => 1000 ,
        ' height '     => 400 ,
        ' horizontal ' => ' center ' ,
        ' vertical '   => ' center ' ,
        ' fontpath '   => ' fonts/opensans.ttf ' ,
        ' fontsize '   => 24 ,
        ' lineheight ' => 1.75 ,
        ' color '      => ' #ffffff ' ,
        ' opacity '    => 0 ,
        ' debug '      => true ,
    )
);

$ image -> show ( ' jpg ' , 70 );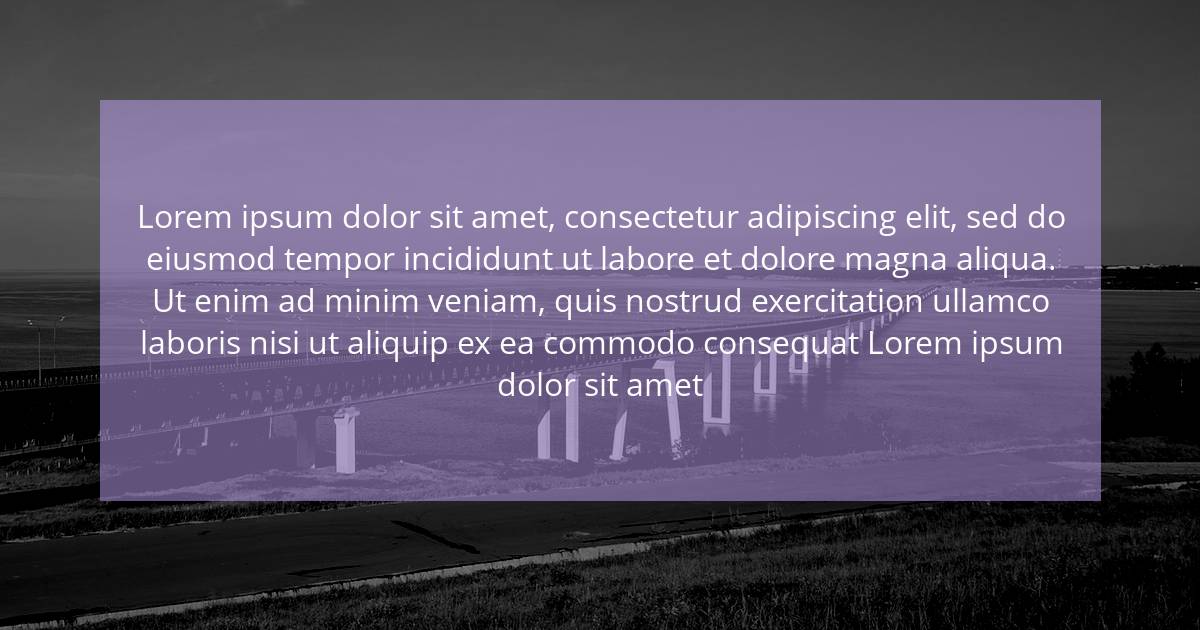
 $ image = new PosterEditor  PosterEditor ();
$ image -> make ( ' images/bridge.jpg ' )-> fit ( 900 , 600 );
$ image -> blackout ( 70 );

$ image -> text (
    ' Lorem ipsum dolor d d 4 g sit amet, consectetur adipiscing et, sed do eiusmod tempor incididunt ut labore et dolore magna aliqua. Ut enim ad minim veniam, quis nostrud exercitation ullamco laboris nisi ut aliquip ex eas commodo consequat sdfsdfl ' , // phpcs:ignore
    array (
        ' x '          => 100 ,
        ' y '          => 100 ,
        ' width '      => 600 ,
        ' height '     => 400 ,
        ' horizontal ' => ' justify ' ,
        ' vertical '   => ' justify ' ,
        ' fontpath '   => ' fonts/opensans.ttf ' ,
        ' fontsize '   => 20 ,
        ' lineheight ' => 1.5 ,
        ' color '      => ' #ffffff ' ,
        ' opacity '    => 0 ,
        ' debug '      => true ,
    )
);

$ image -> show ( ' png ' );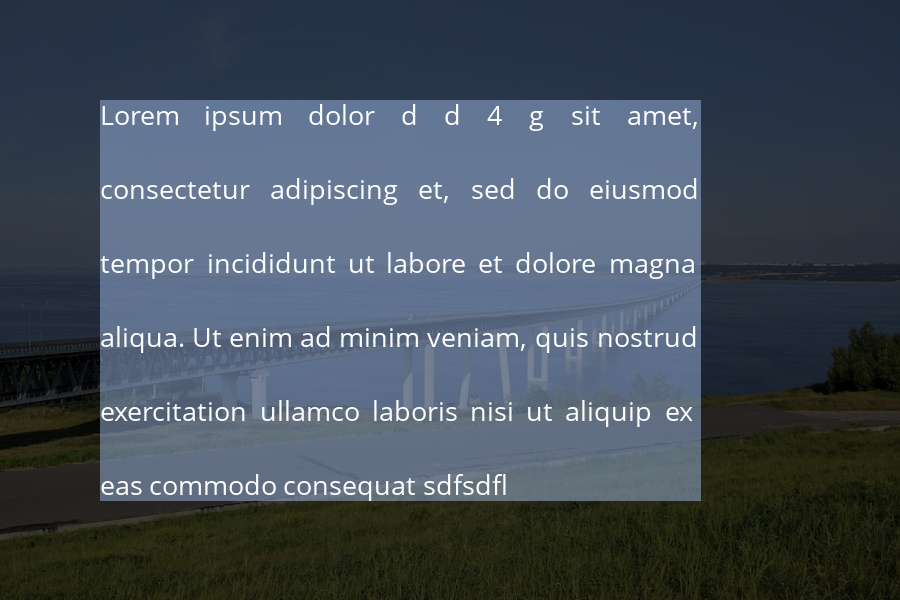
 $ image = new PosterEditor  PosterEditor ();
$ image -> make ( ' images/bridge.jpg ' )-> crop (
    900 , 600 ,
    array (
        ' x ' => ' 0 ' ,
        ' y ' => ' 100 '
    )
);

$ image -> grayscale ()-> brightness (- 40 );

$ image -> text (
    ' Large title with unknown height. Can be multi-line ' ,
    array (
        ' x '          => 50 ,
        ' y '          => 100 ,
        ' width '      => 800 ,
        ' fontpath '   => ' /fonts/merriweather.ttf ' ,
        ' fontsize '   => 48 ,
        ' lineheight ' => 1.5 ,
        ' color '      => ' #9999ff ' ,
    ),
    $ boundary
);

$ image -> text (
    ' This text appears right after title using smart boundaries ' ,
    array (
        ' x '          => 50 ,
        ' y '          => $ boundary [ ' y ' ] + $ boundary [ ' height ' ],
        ' width '      => 800 ,
        ' fontpath '   => ' /fonts/opensans.ttf ' ,
        ' fontsize '   => 20 ,
        ' lineheight ' => 1.5 ,
        ' color '      => ' #ff9999 ' ,
    ),
    $ boundary
);

$ image -> show ();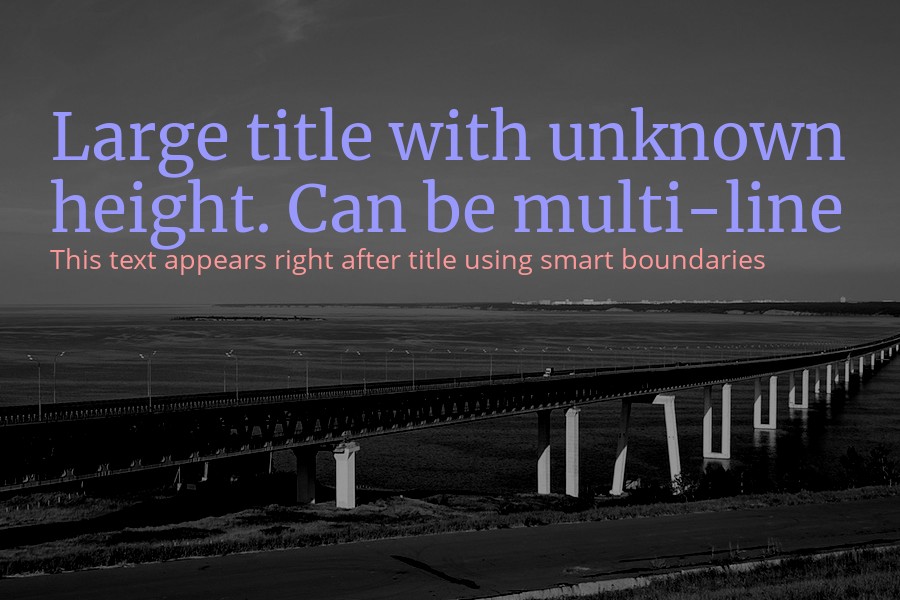
 $ image = new PosterEditor  PosterEditor ();
$ image -> make ( ' images/bridge.jpg ' )-> fit ( 1000 , 630 , ' bottom ' );
$ image -> contrast ( 5 )-> brightness (- 30 )-> blur ();

$ image -> rectangle (
    20 , 20 , 960 , 590 ,
    array (
        ' color '   => ' #ffffff ' ,
        ' outline ' => true ,
        ' width '   => 4 ,
    )
);

$ image -> ellipse (
    200 , 200 , 200 , 200 ,
    array (
        ' color '   => ' #00ff00 ' ,
        ' opacity ' => 50 ,
    )
);

$ image -> ellipse (
    800 , 200 , 200 , 200 ,
    array (
        ' color '   => ' #ff0000 ' ,
        ' opacity ' => 50 ,
    )
);

$ image -> rectangle (
    480 , 280 , 80 , 140 ,
    array (
        ' color '   => ' #0000ff ' ,
    )
);

$ image -> line (
    200 , 500 , 800 , 500 ,
    array (
        ' color '   => array ( 255 , 255 , 0 ),
        ' opacity ' => 10 ,
        ' width '   => 4 ,
    )
);

$ image -> show ( ' png ' );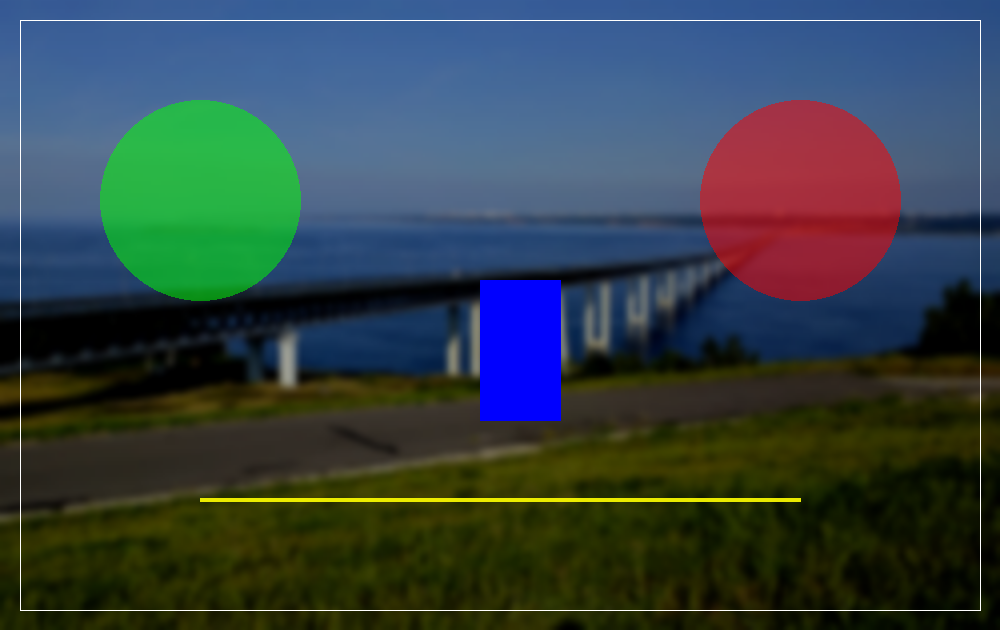
所有專案代碼都儲存在Github上。幫助專案的最好方法是報告錯誤或添加一些新功能。您也可以在此處開啟問題或發送請求請求。


