BepInEx.ConfigurationManager
v18.3
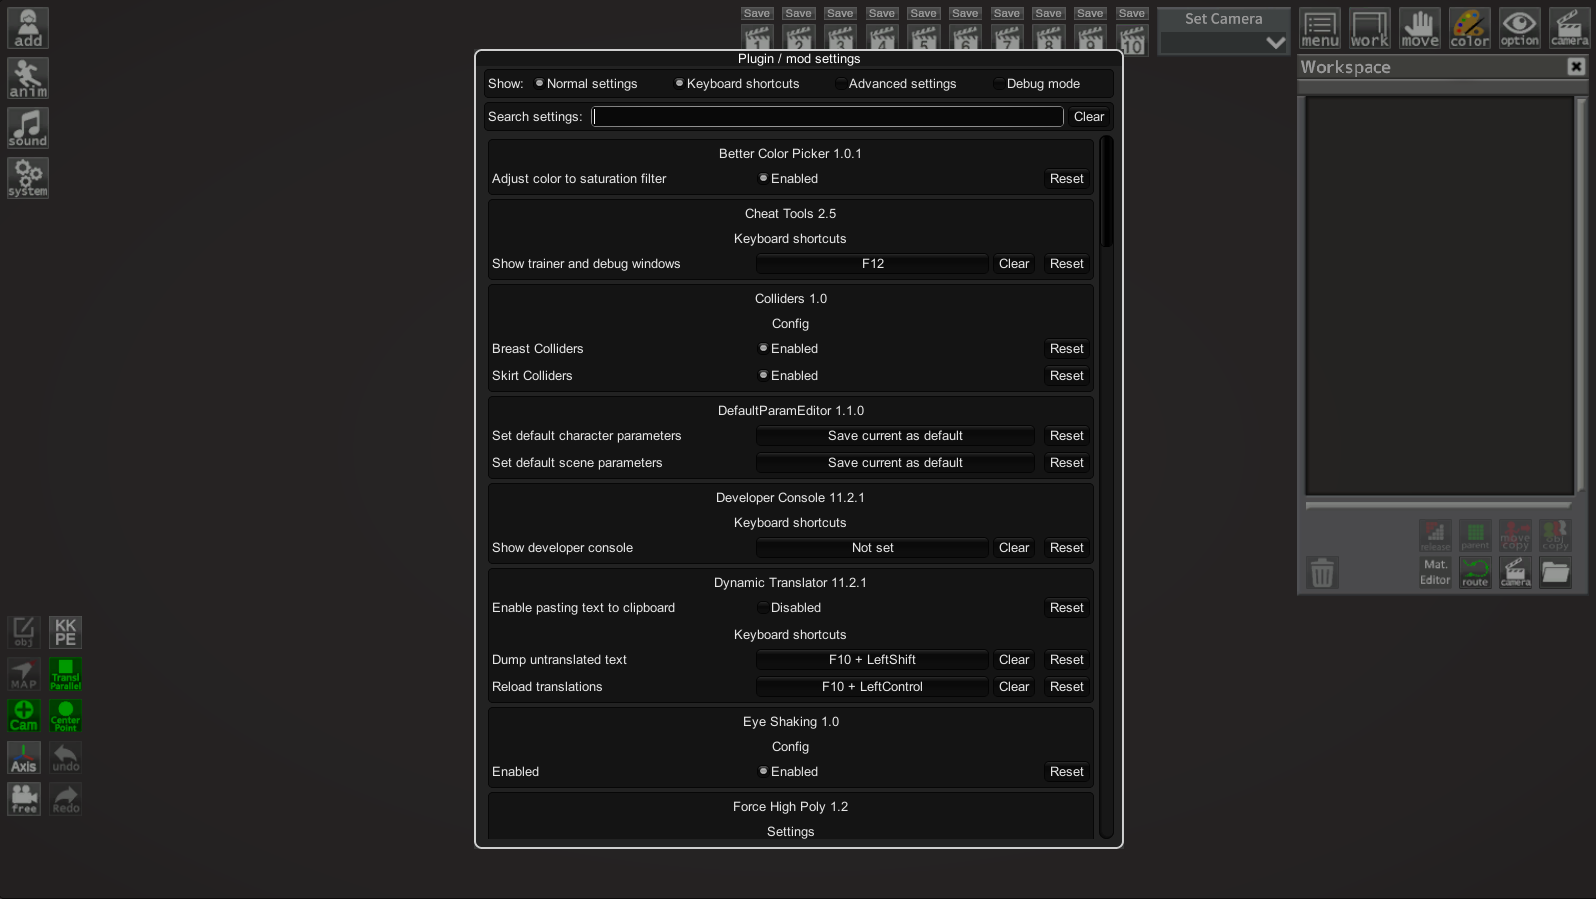
讓用戶配置插件的行為而無需製作自己的GUI的一種簡單方法。用戶可以更改您公開的任何設置,甚至可以更改鍵盤快捷鍵。
可以通過按HOTKEY(默認情況下F1)在遊戲中訪問配置管理器。懸停在設置名稱上以查看其描述(如果有)。
該插件有兩個版本,用於Bepinex 5(版本5.4.20或較新,僅Mono)和Bepinex 6(每晚構建664或較新,僅IL2CPP)。
注意:.xml文件在發行zip中包含在插件中時插件開發人員很有用。用戶可以忽略它。
Arial.ttf字體(UNITY UI默認字體在某些遊戲中可能有所不同)。當使用錯誤配置的葡萄酒在Linux上運行遊戲時,這可能會發生。UnityEngine.IMGUIModule.dll的遊戲中起作用(對某些遊戲的支持可以與恢復缺失成員的Patcher一起添加,例如)。 ConfigurationManager將自動顯示插件Config中的所有設置。 ConfigurationManager將使用所有元數據(例如描述,值範圍)向用戶顯示設置。
在大多數情況下,您不必參考configurationManager.dll或對您的設置進行任何特別的事情。只需確保添加盡可能多的元數據(即使所有用戶直接使用配置文件也可以幫助所有用戶)。始終添加描述性部分和關鍵名稱,描述以及可接受的價值列表或範圍(無論適用)。
創建設置時指定AcceptableValueRange 。如果範圍為0f -1f或0-100,則將滑塊顯示為%(可以在下面覆蓋)。
CaptureWidth = Config . Bind ( " Section " , " Key " , 1 , new ConfigDescription ( " Description " , new AcceptableValueRange < int > ( 0 , 100 ) ) ) ;在創建設置時指定AcceptableValueList 。如果您使用枚舉,則不需要指定可接受的valuelist,將顯示所有枚舉值。如果要隱藏一些值,則必須使用該屬性。
注意:您可以將System.ComponentModel.DescriptionAttribute添加到枚舉的項目中,以覆蓋其顯示的名稱。例如:
 public enum MyEnum
{
    // Entry1 will be shown in the combo box as Entry1
    Entry1 ,
    [ Description ( " Entry2 will be shown in the combo box as this string " ) ]
    Entry2
}添加類型的鍵盤ShortCut的設置。使用此設置的值檢查更新方法內部的輸入(推薦使用ISDOWN)。
鍵盤ShortCut類支持修飾符鍵 - 移位,控制和ALT。它們是正確處理的,可以防止常見問題,例如K+Shift+控制觸發K+Shift,如果不應該觸發K+Shift。
 private ConfigEntry < KeyboardShortcut > ShowCounter { get ; set ; }

public Constructor ( )
{
    ShowCounter = Config . Bind ( " Hotkeys " , " Show FPS counter " , new KeyboardShortcut ( KeyCode . U , KeyCode . LeftShift ) ) ;
}

private void Update ( )
{
    if ( ShowCounter . Value . IsDown ( ) )
    {
        // Handle the key press
    }
} 您可以通過將特殊類的實例作為設置標籤來更改配置管理器窗口內顯示的設置。特殊的類代碼可以在此處下載。只需下載.cs文件並將其拖入您的項目。
以下是重新設置順序的示例,並將其中一個設置標記為高級:
 // Override IsAdvanced and Order
Config . Bind ( " X " , " 1 " , 1 , new ConfigDescription ( " " , null , new ConfigurationManagerAttributes { IsAdvanced = true , Order = 3 } ) ) ;
// Override only Order, IsAdvanced stays as the default value assigned by ConfigManager
Config . Bind ( " X " , " 2 " , 2 , new ConfigDescription ( " " , null , new ConfigurationManagerAttributes { Order = 1 } ) ) ;
Config . Bind ( " X " , " 3 " , 3 , new ConfigDescription ( " " , null , new ConfigurationManagerAttributes { Order = 2 } ) ) ;如果您使用的是ConfigurationManager不支持的設置類型,則可以為其添加抽屜操作。該操作將在OnGui內部執行,使用Guilayout繪製您的設置,如下示例所示。
要將自定義設置抽屜用於單個設置,請在屬性類中使用CustomDrawer字段。有關屬性類的更多信息,請參見上文。
 void Start ( )
{
    // Add the drawer as a tag to this setting.
    Config . Bind ( " Section " , " Key " , " Some value "
        new ConfigDescription ( " Desc " , null , new ConfigurationManagerAttributes { CustomDrawer = MyDrawer } ) ;
}

static void MyDrawer ( BepInEx . Configuration . ConfigEntryBase entry )
{
    // Make sure to use GUILayout.ExpandWidth(true) to use all available space
    GUILayout . Label ( entry . BoxedValue , GUILayout . ExpandWidth ( true ) ) ;
} 您可以為設置類型的所有設置指定抽屜。使用ConfigurationManager.RegisterCustomSettingDrawer(Type, Action<SettingEntryBase>)來執行此操作。
警告:這需要您在項目中引用configurationManager.dll,並且不建議您使用所有用戶都安裝它。通常最好使用上述方法將自定義抽屜分別添加到每個設置中。
 void Start ( )
{
    ConfigurationManager . RegisterCustomSettingDrawer ( typeof ( MyType ) , CustomDrawer ) ;
}

static void CustomDrawer ( SettingEntryBase entry )
{
    GUILayout . Label ( ( MyType ) entry . Get ( ) , GUILayout . ExpandWidth ( true ) ) ;
}

