中文说明点这里
商务合作请联系 per E -Mail an [email protected].
Für die Geschäftszusammenarbeit wenden Sie sich bitte an eine E -Mail an [email protected].
Ein Satz von Knoten für Komfyui, die zusammengesetzt und maskiert werden können, um Photoshop -ähnliche Funktionen zu erzielen.
Es migriert einige grundlegende Funktionen von Photoshop auf komfortable, um den Workflow zu zentralisieren und die Häufigkeit des Software -Umschusses zu verringern.
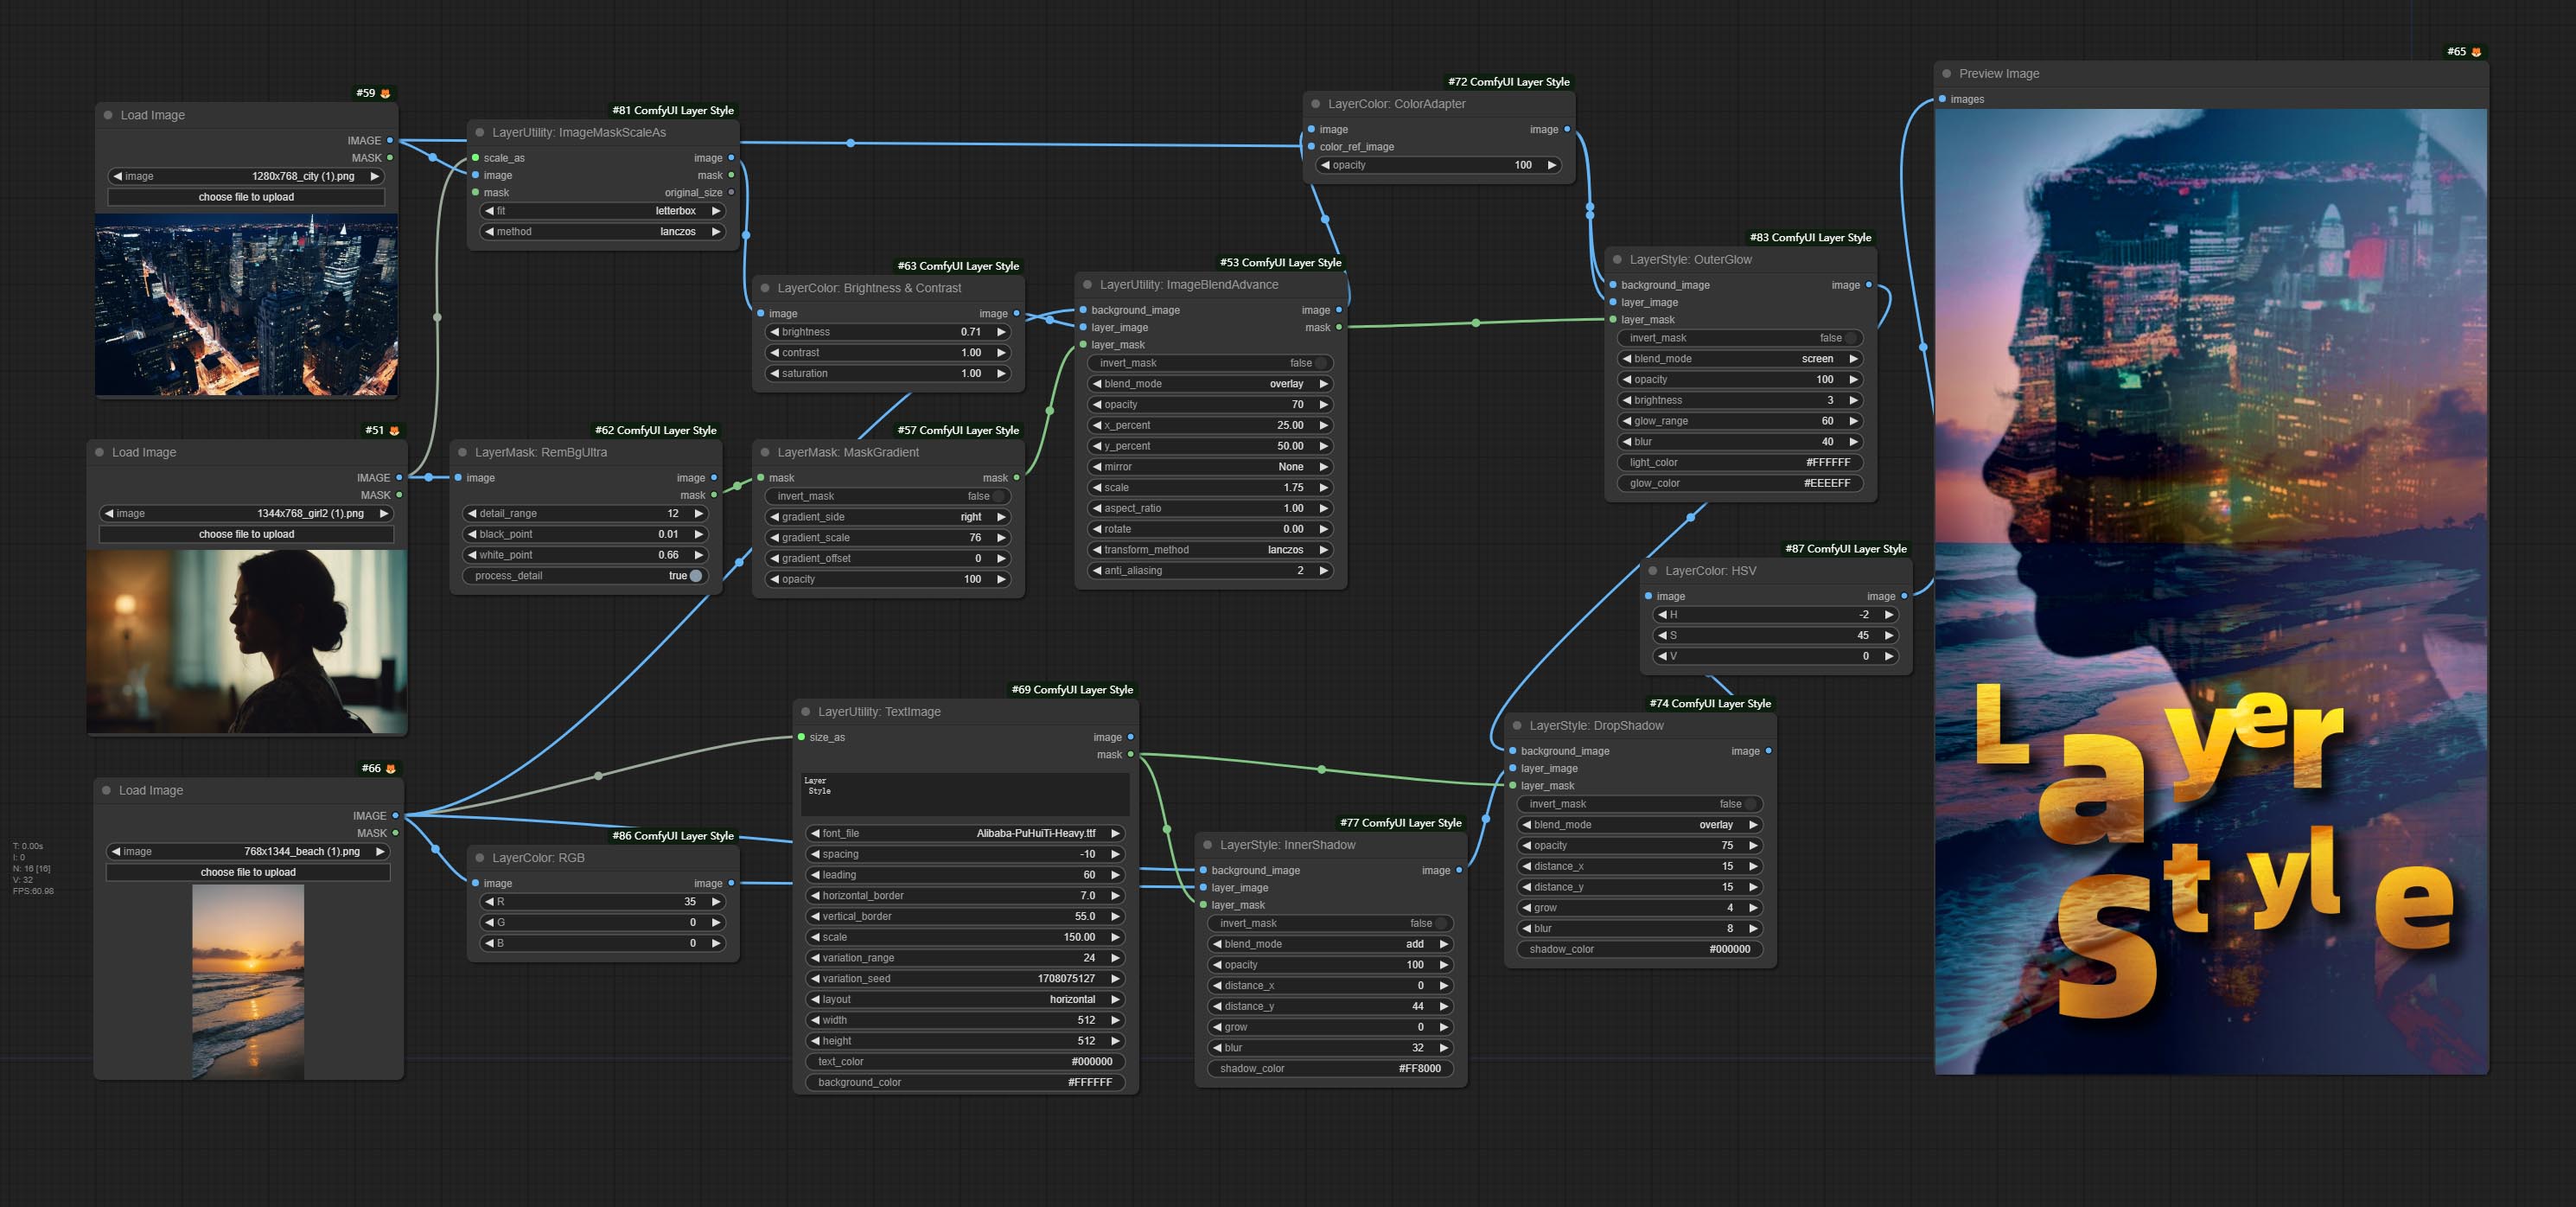
*Dieser Workflow (title_example_workflow.json) befindet sich im Workflow -Verzeichnis.
Einige JSON -Workflow -Dateien im workflow -Verzeichnis sind Beispiele dafür, wie diese Knoten in Comfyui verwendet werden können.
(Nehmen Sie das offizielle tragbare Paket und das Aki Comfyui -Paket als Beispiele, ändern Sie bitte das Abhängigkeitsumfeldverzeichnis für andere Comfyui -Umgebungen.)
Empfohlene Verwendung von Comfyui -Manager zur Installation.
Oder öffnen Sie das CMD -Fenster im Plugin -Verzeichnis von Comfyui, wie ComfyUIcustom_nodes ,
git clone https://github.com/chflame163/ComfyUI_LayerStyle.git
Oder laden Sie die ZIP -Datei herunter und extrahiert, kopieren Sie den resultierenden Ordner in ComfyUIcustom_ Nodes
Doppelklicken Sie auf das Plugin-Verzeichnis install_requirements_aki.bat install_requirements.bat .
Oder öffnen Sie Abhängigkeitspakete, öffnen Sie das CMD -Fenster im Verzeichnis comfyui_layerSyle -Plugin wie ComfyUIcustom_ NodesComfyUI_LayerStyle und geben Sie den folgenden Befehl ein.
Geben Sie für das offizielle portable Paket für bequeme ein. Typ:
 ......python_embededpython.exe -s -m pip install .whldocopt-0.6.2-py2.py3-none-any.whl
......python_embededpython.exe -s -m pip install .whlhydra_core-1.3.2-py3-none-any.whl
......python_embededpython.exe -s -m pip install -r requirements.txt
.repair_dependency.bat
Typen Sie für Aki Comfyui -Paket ein:
 ....pythonpython.exe -s -m pip install .whldocopt-0.6.2-py2.py3-none-any.whl
....pythonpython.exe -s -m pip install .whlhydra_core-1.3.2-py3-none-any.whl
....pythonpython.exe -s -m pip install -r requirements.txt
.repair_dependency.bat
Chinesische inländische Benutzer aus Baidunetdisk und anderen Benutzern von huggingface.co/Chflame163/comfyui_layerSyle
download all files and copy them to ComfyUImodels folder. Dieser Link enthält alle für dieses Plugin erforderlichen Modelldateien. Oder laden Sie die Modelldatei gemäß den Anweisungen jedes Knotens herunter.
Wenn der Knoten nicht ordnungsgemäß geladen wird oder während der Verwendung Fehler vorliegt, überprüfen Sie bitte die Fehlermeldung im Comfyui -Terminalfenster. Das Folgende sind häufige Fehler und ihre Lösungen.
Diese Warnmeldung zeigt an, dass die INI -Datei nicht gefunden werden kann und die die Verwendung nicht beeinflusst. Wenn Sie diese Warnungen nicht sehen möchten, ändern Sie bitte alle *.ini.example -Dateien im Plugin -Verzeichnis *.ini .
Dieser Fehler ist, dass die psd_tools nicht korrekt installiert wurden.
Lösung:
../../../python_embeded/python.exe -s -m pip install psd_tools Wenn ein Fehler während der Installation von PSD_TOOL auftritt, wie z. B. ModuleNotFoundError: No module named 'docopt' , bitte laden Sie das DOCOPT's WHL herunter und installieren Sie es. Führen Sie den folgenden Befehl im Terminalfenster aus: ../../../python_embeded/python.exe -s -m pip install path/docopt-0.6.2-py2.py3-none-any.whl der path ist Pfadname von WHL -Datei. Dieser Fehler wird durch eine falsche Version des opencv-contrib-python Pakets verursacht, oder dieses Paket wird von anderen OpenCV-Paketen überschrieben.
Der Grund für das Problem ist der gleiche wie oben.
Dieser Fehler wird durch die niedrige Version des transformers -Pakets verursacht.
Dieser Fehler wird durch die niedrige Version des protobuf -Pakets verursacht.
repair_dependency.bat (für offizielles Comfyui protable) oder repair_dependency_aki.bat (für comfyui-aki-v1.x) im Plugin-Ordner, um sie automatisch zu beheben. Lösung: Installieren Sie das onnxruntime -Abhängigkeitspaket erneut.
Überprüfen Sie die Netzwerkumgebung. Wenn Sie in China normalerweise nicht auf Huggingface.co zugreifen können, ändern Sie das Paket von Huggingface_Hub, um die Verwendung von HF_Mirror zu erzwingen.
Finden Sie constants.py im Verzeichnis des Pakets huggingface_hub (normalerweise Lib/site packages/huggingface_hub im virtuellen Umgebungsweg), fügen Sie nach import os eine Zeile hinzu
os.environ['HF_ENDPOINT'] = 'https://hf-mirror.com'
Dieser Fehler wird durch die zu große oder zu kleine Maskenfläche verursacht, wenn die PyMatting -Methode verwendet wird, um die Maskenkanten zu verarbeiten.
Lösung:
Wenn dieser Fehler aufgetreten ist, überprüfen Sie bitte die Netzwerkumgebung.
Wenn dieser Fehler bei der Ausführung JoyCaption2 -Knoten auftritt und es bestätigt wurde, dass die Modelldatei im richtigen Verzeichnis platziert wurde, überprüfen Sie bitte die Version transformers -Abhängigkeitspakets von mindestens 4.43.2 oder höher. Wenn transformers höher oder gleich 4,45.0 ist und auch Fehlermeldung aufweist:
 Error loading models: De️️scriptors cannot be created directly.
If this call came from a _pb2.py file, your generated code is out of date and must be regenerated with protoc >= 3.19.0.
......
Bitte versuchen Sie das protobuf -Abhängigkeitspaket auf 3.20.3 oder setzen Sie Umgebungsvariablen fest: PROTOCOL_BUFFERS_PYTHON_IMPLEMENTATION=python .
** Wenn der Abhängigkeitspaketfehler nach der Aktualisierung auf repair_dependency.bat (für offizielles Comfyui protable) oder repair_dependency_aki.bat (für Comfyui-V1.x) doppelklicken, im Plugin-Ordner, um die Abhängigkeitspakete neu zu installieren.
Beiten Sie Benultra- und Loadbenmodel -Knoten. Diese beiden Knoten sind die Implementierung des Pramallc/Ben -Projekts in Comfyui.
Laden Sie die BEN_Base.pth und config.json von Huggingface oder BaidunetDisk herunter und kopieren Sie in den Ordner ComfyUI/models/BEN .
Fucken Sie die von Jimlee2048 eingereichte PR, fügen Sie den LoadBirefnetModelv2 -Knoten hinzu und unterstützen Sie das Laden von RMBG 2.0 -Modellen.
Laden Sie die Modelldateien von Huggingface oder BaidunetDisk herunter und kopieren Sie in den Ordner ComfyUI/models/BiRefNet/RMBG-2.0 .
Florence2 Knoten unterstützen Basis-Promptgen-V2.0 und große Promptgen-V2.0, Download base-PromptGen-v2.0 und large-PromptGen-v2.0 Zwei-Ordner von Suggingface oder BaidunetDisk und kopieren Sie in ComfyUI/models/florence2 Ordner .
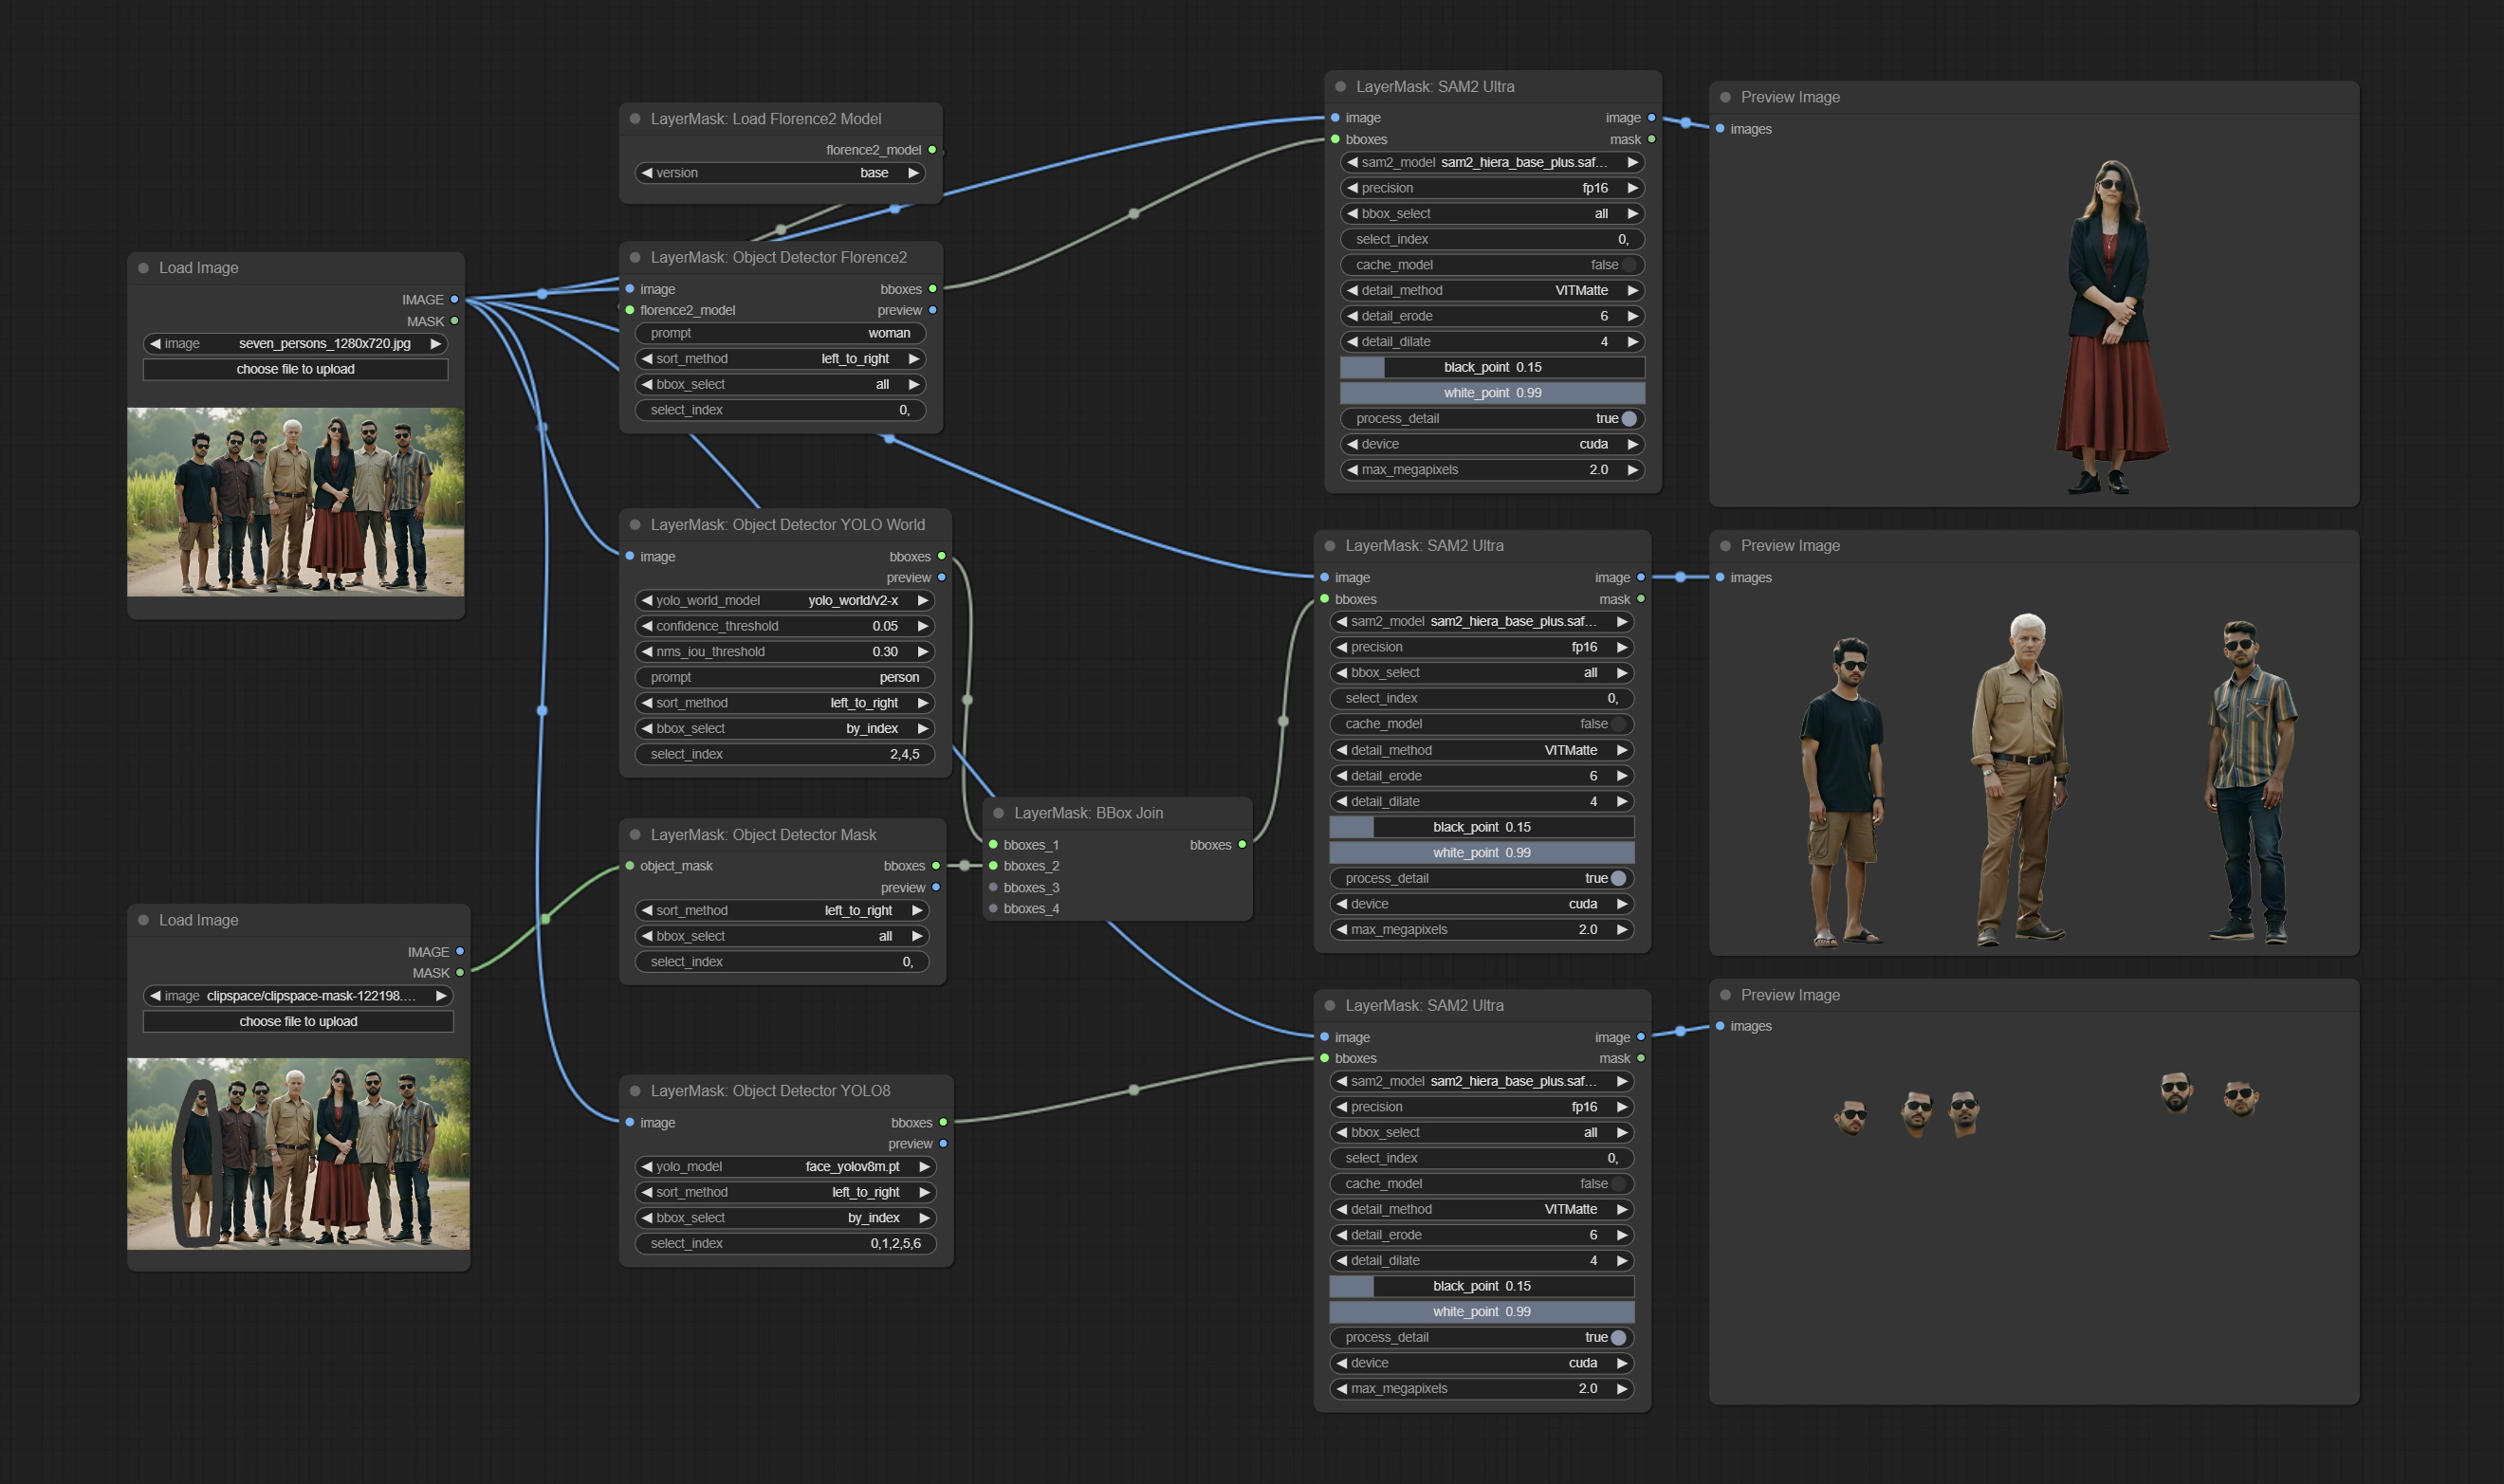
SAM2ULTRA- und ObjectDetektorknoten unterstützen die Bildcharge.
SAM2ultra- und SAM2Videoultra -Knoten fügen Unterstützung für das SAM2.1 -Modell hinzu, einschließlich des FP16 -Modells von Kijai. Laden Sie Modelldateien von BaidunetDisk oder Huggingface.co/kijai/SAM2-Safetensoren herunter und kopieren Sie in den Ordner ComfyUI/models/sam2 .
Beiten Sie JoyCaption2Split und LoadjoyCaption2Model -Knoten und teilen Sie das Modell über mehrere JoyCaption2 -Knoten, die die Effizienz verbessert.
SegmentanyThingultra und SegmentyThingultrav2 Fügen Sie die Option cache_model hinzu und können die VRAM -Verwendung flexibel verwalten.
Aufgrund der hohen Versionsanforderungen des Lamavision-Knotens für transformers , die sich auf das Laden einiger älterer Drittanbieter auswirken, hat das LayerSyle-Plugin die Standardanforderung auf 4,43,2 gesenkt. Wenn Sie Llamavision ausführen müssen, upgraden Sie bitte selbst auf 4.45.0 oder höher.
Begehen Sie JoyCaption2 und JoyCaption2ExtraOptions Knoten. Neue Abhängigkeitspakete müssen installiert werden. Verwenden Sie das JoyCaption-Alpha-Two-Modell für die lokale Inferenz. Kann verwendet werden, um schnelle Wörter zu generieren. Dieser Knoten ist https://huggingface.co/John6666/joy-caption-alpha-two-cli-mod-Implementierung in Comfyui. Vielen Dank an den ursprünglichen Autor. Download-Modelle Formular baidunetdisk und baidunetdisk oder huggingface ComfyUI/models/clip orenguteng und huggingface/ ComfyUI/models/LLM herunterladen, cgrkzexw-599808 kopieren BaiduNetdisk or huggingface/John6666 , and copy to ComfyUI/models/Joy_caption 。
Lamavision Node Kann verwendet werden, um schnelle Wörter zu generieren. Ein Teil des Codes für diesen Knoten stammt von Comfyui-Pixtralllamamolmovision. Vielen Dank an den ursprünglichen Autor. Um diesen Knoten zu verwenden, müssen die transformers auf 4.45,0 oder höher aktualisiert werden. Laden Sie Modelle von BaidunetDisk oder Huggingface/Seanscripts herunter und kopieren Sie in ComfyUI/models/LLM .
Befinden Sie RandomGeneratorv2 -Knoten, fügen Sie die Optionen für den kleinsten zufälligen Bereich und die Saatgut hinzu.
TextjoInv2 -Knoten
Commit Gaussianblurv2 -Knoten, die Parametergenauigkeit wurde auf 0,01 verbessert.
Commit UserPromptGeneratortXTImgWitHreenference -Knoten.
GrayValue -Knoten begehen und die Graustufenwerte ausgeben, die den RGB -Farbwerten entsprechen.
LUT anwenden, TextImagev2, TextImage, SimpleTextImage-Knoten, um die Definition mehrerer Ordner in resource-dir.ini zu unterstützen, die durch Kommas, Semikolons oder Räume getrennt sind. Unterstützt gleichzeitig aktualisierte Echtzeit-Updates.
LUT anwenden, TextImagev2, TextImage, SimpleTextImage-Knoten unterstützen die Definition von Multi-Verzeichnis-Schriftarten und LUT-Ordnern sowie Unterstützung von Aktualisierungen und Echtzeit-Updates.
Beiten Sie HumanPartsultra -Knoten, mit dem menschliche Körperteilemasken erzeugt werden. Es basiert auf dem Krieger von Metal3D/Comfyui_Human_Parts, danke dem ursprünglichen Autor. Laden Sie die Modelldatei von BaidunetDisk oder Huggingface herunter und kopieren Sie in den Ordner ComfyUImodelsonnxhuman-parts .
ObjectDetektorknoten fügen Sortier -Sortier -Optionen hinzu.
Commit Drawbboxmask -Knoten, verwendet, um die Boxes -Ausgabe durch den Objektdetektorknoten in eine Maske umzuwandeln.
Commit userPromptGeneratortXTIMG und UserPromptGeneratorRplaceword -Knoten, verwendet, um Text- und Bildeingabeaufforderungen zu generieren und Eingabeaufforderungsinhalt zu ersetzen.
Legen Sie den Phiprompt -Knoten fest, verwenden Sie Microsoft PHI 3.5 Text- und visuelle Modelle für die lokale Inferenz. Kann verwendet werden, um Schnellwörter zu generieren, Eingabeaufforderungswörter zu verarbeiten oder auf Eingabeaufforderungswörter aus den Bildern zu schließen. Das Ausführen dieses Modells erfordert mindestens 16 GB Videospeicher.
Laden Sie Modelldateien von BaidunetDisk oder Huggingface.co/Microsoft/Phi-3.5-vision-instruct und Huggingface.co/Microsoft/Phi-3.5-Mini-Instruct herunter und kopieren Sie sie in den Ordner ComfyUImodelsLLM .
Commit GetMainColors -Knoten, er kann 5 Hauptfarben des Bildes erhalten. Colorname -Knoten begehen, kann den Farbnamen des Eingangsfarbwerts erhalten.
Duplizieren Sie den Helligkeits- und Kontrastknoten als Hellnesscontrastv2, die Farbe des Shadow & Highlight -Knotens als ColorofShadowHighlight und Shadow & Highlight Mask zum Schatten -Highlight -Mask V2, um Fehler im Comfyui -Workflow -Parsen zu vermeiden, das durch den "&" -Zeichen im Node -Namen verursacht wird.
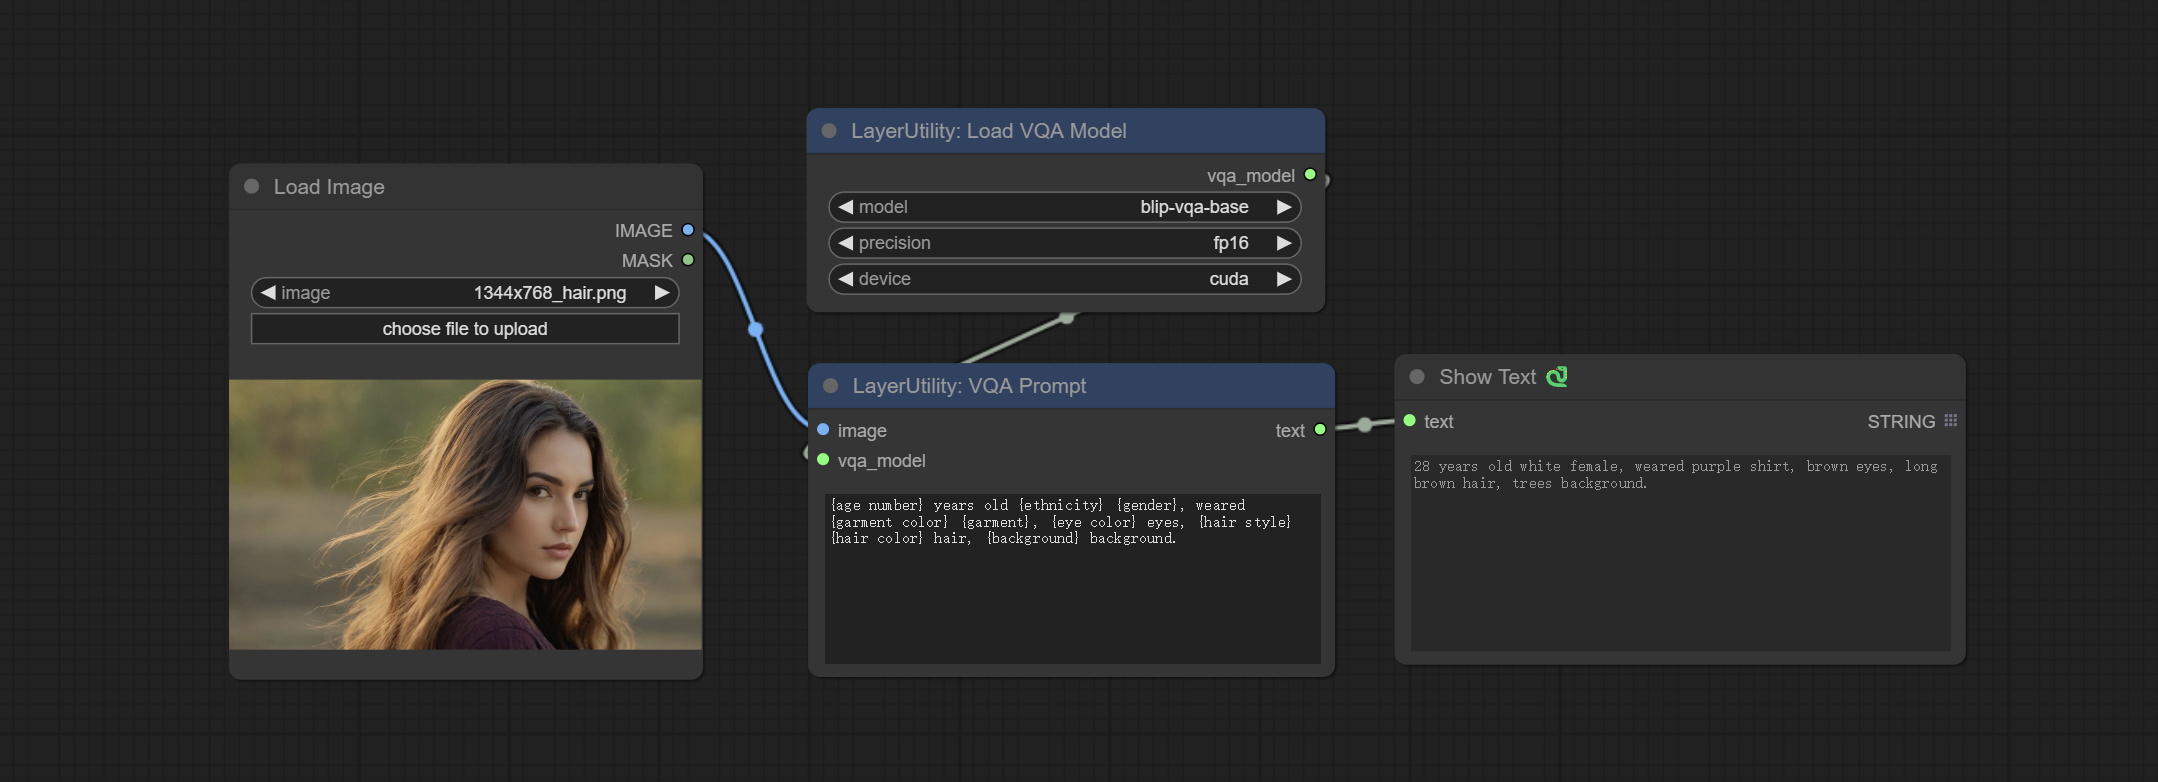
Beiten Sie VQAPROMPT- und LOADVQAMODEL -Knoten.
Laden Sie das Modell von BaidunetDisk oder Huggingface.co/Salesforce/blip-vqa-capfilt-large und huggingface.co/Salesforce/blip-vqa-base herunter und kopieren Sie sie in den Ordner ComfyUImodelsVQA .
Florence2ultra, Florence2Image2Prompt 和 Loadflorence2Model-Knoten unterstützen die Miaoshouai/Florence-2-large-Promptgen-V1.5 und Miaoshouai/Florence-2-Base-Promptgen-V1.5-Modell.
Laden Sie Modelldateien von Baidunetdisk ComfyUImodelsflorence2 Huggingface.co/Miaoshouai/florence-2-large-promptgen-v1.5 und Huggingface.co/Miaoshouai/florence-2-base-Promptgen-v1.5 herunter .
BIREFNETULTAV2- und LOADBIREFNETMODEL -Knoten begehen, die die Verwendung des neuesten Birefnet -Modells unterstützen. Laden Sie die Modelldatei von Baidunetdisk oder googledrive namens BiRefNet-general-epoch_244.pth auf ComfyUI/Models/BiRefNet/pth Ordner herunter. Sie können auch mehr Birefnet -Modelle herunterladen und hier einsetzen.
ExtendCanvasv2 -Knotenunterstützung negativer Werteingang, es bedeutet, dass das Bild beschnitten wird.
Die Standardtitelfarbe der Knoten wird in Blaugrün geändert, und Knoten in LayerSyle, Layercolor, Layermaske, Layerutility und LayerFilter werden durch verschiedene Farben unterschieden.
Die Objektdetektorknoten fügten eine Sortier -B -Box -Option hinzu, mit der die Sortierung von links nach rechts, oben nach unten und groß nach klein sortiert werden kann, wodurch die Objektauswahl intuitiver und bequemer wird. Die gestern veröffentlichten Knoten wurden aufgegeben. Bitte ersetzen Sie es manuell durch den neuen Versionsknoten (sorry).
Commit SAM2ultra, SAM2Videoultra, ObjectDetectorfl2, ObjectDeTeCtoryOloworld, ObjectDeTectoryOlo8, ObjectDeTectorMask und Bboxjoin -Knoten. Laden Sie Modelle von Baidunetdisk oder Huggingface.co/Kijai/Sam2-saftensors herunter und kopieren Sie in den Ordner ComfyUI/models/sam2 , laden Sie Modelle von Baidunetdisk oder googledrive und kopieren Sie in ComfyUI/models/yolo-world Ordner. Dieses Update führt neue Abhängigkeiten vor. Bitte installieren Sie das Abhängigkeitspaket neu.
Befinden Sie den RandomGenerator -Knoten, der verwendet wird, um Zufallszahlen innerhalb eines bestimmten Bereichs mit Ausgängen von INT, Float und Boolean zu generieren, die die Stapelerzeugung verschiedener Zufallszahlen nach Bildcharge unterstützt.
Beiten Sie den EVF-Samultra-Knoten, es ist die Implementierung von EVF-SAM in Comfyui. Bitte laden Sie Modelldateien von BaidunetDisk oder Huggingface/EVF-SAM2 herunter, Huggingface/EVF-SAM in ComfyUI/models/EVF-SAM Ordner (Speichern Sie die Modelle in ihren jeweiligen Unterverzeichnissen). Aufgrund der Einführung des neuen Abhängigkeitspakets nach dem Plugin -Upgrade können Sie bitte die Abhängigkeitspakete neu installieren.
Beiten Sie Imagetaggersave- und Imagesautocropv3 -Knoten. Wird verwendet, um den automatischen Trimm- und Markierungs -Workflow für das Trainingssatz zu implementieren (das Workflow image_tagger_save.json befindet sich im Workflow -Verzeichnis).
Commit Checkmaskv2 -Knoten, fügte die simple Methode hinzu, um Masken schneller zu erkennen.
Beiten Sie im Bilanz und im Bilanz von Impileneelcomposit -Knoten, um mehrere Bilder auf einer Leinwand zusammenzustellen.
NumberCalculatorv2 und NumberCalculator Fügen Sie die min und max Methode hinzu.
Optimieren Sie die Ladegeschwindigkeit der Knoten.
Florence2Image2Prompt Unterstützung für thwri/CogFlorence-2-Large-Freeze und thwri/CogFlorence-2.1-Large Modelle. Bitte laden Sie die Modelldateien von BaidunetDisk oder Huggingface/Cogflorence-2-Large Freeze und Huggingface/Cogflorence-2.1-Large herunter und kopieren Sie sie dann in den Ordner ComfyUI/models/florence2 .
Zusammenführen Branch von Clownsharkbatwing "Verwenden Sie die GPU für den Farbmischungsmodus", die Geschwindigkeit einiger Schicht mischt sich um mehr als zehnmal.
Commit Florence2ultra, Florence2Image2Prompt und Loadflorence2Model -Knoten.
Transparentbackgroundultra -Knoten fügen Sie neue Modellunterstützung hinzu. Bitte laden Sie die Modelldatei gemäß den Anweisungen herunter.
Commit Segformerultrav2, SegfromerfashionPipeline und SegformerCleHespipeline -Knoten, die zur Segmentierung von Kleidungsstücken verwendet werden. Bitte laden Sie die Modelldatei gemäß den Anweisungen herunter.
Comment install_requirements.bat und install_requirements_aki.bat , eine Klick -Lösung zur Installation von Abhängigkeitspaketen.
Transparentbackgroundultra-Knoten begehen und den Hintergrund basierend auf einem Transparenten-Background-Modell entfernen.
Ändern Sie das Vitmatte -Modell des Ultra -Knotens in einen lokalen Anruf. Bitte laden Sie alle Dateien des Vitmatte -Modells in den Ordner ComfyUI/models/vitmatte herunter.
GetColortonev2 -Knoten fügen Sie der Farbauswahloption die mask hinzu, die die Hauptfarbe und die durchschnittliche Farbe innerhalb der Maske genau erhalten kann.
ImagesCalebyaPectratiov2 -Knoten fügen Sie die Option "Hintergrund_Color" hinzu.
LUT anwenden addieren Sie die Option "Stärke".
Befinden Sie autoadjustV2 -Knoten, fügen Sie die optionale Maskeneingabe hinzu und unterstützen Sie mehrere automatische Farbanpassungsmodi.
Aufgrund der bevorstehenden Einstellung von Gemini-Pro-Vision-Diensten haben PromptTagger und promptembellish die API "Gemini-1.5-Flash" hinzugefügt, um sie weiter zu verwenden.
Ultra-Knoten fügten die Option hinzu, VitMatte auf dem CUDA-Gerät auszuführen, was zu einer 5-fachen Erhöhung der Laufgeschwindigkeit führte.
Komitee Queustop -Knoten, verwendet, um den Warteschlangenvorgang zu beenden.
Optimieren Sie die Leistung der VitMate -Methode für Ultra-Knoten bei der Verarbeitung großer Bild.
CropByMaskv2 fügen Sie die Option hinzu, um die Schnittgröße um Multiplikatoren zu runden.
Commit Checkmask -Knoten, er erkennt, ob die Maske ausreichende wirksame Bereiche enthält. Beiten Sie den HSVValue -Knoten, er wandelt Farbwerte in HSV -Werte um.
Booleanoperatorv2, NumberCalculatorv2, Integer, Float, Boolesche Knoten Fügen Sie die String -Ausgabe hinzu, um den Wert als Zeichenfolge für die Verwendung mit SwitchCase auszugeben.
Litwechselkursknoten, wechselt die Ausgabe basierend auf der Matching -Zeichenfolge. Kann für jede Art von Datenumschaltung verwendet werden.
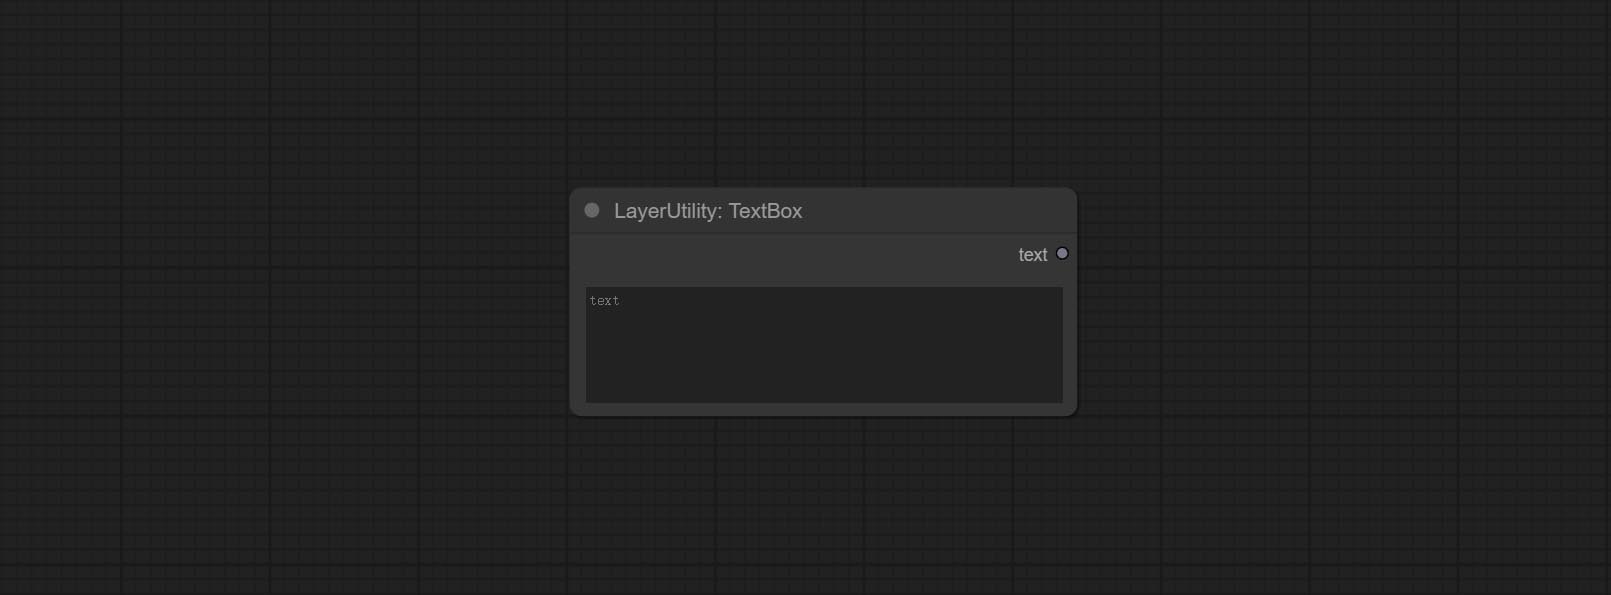
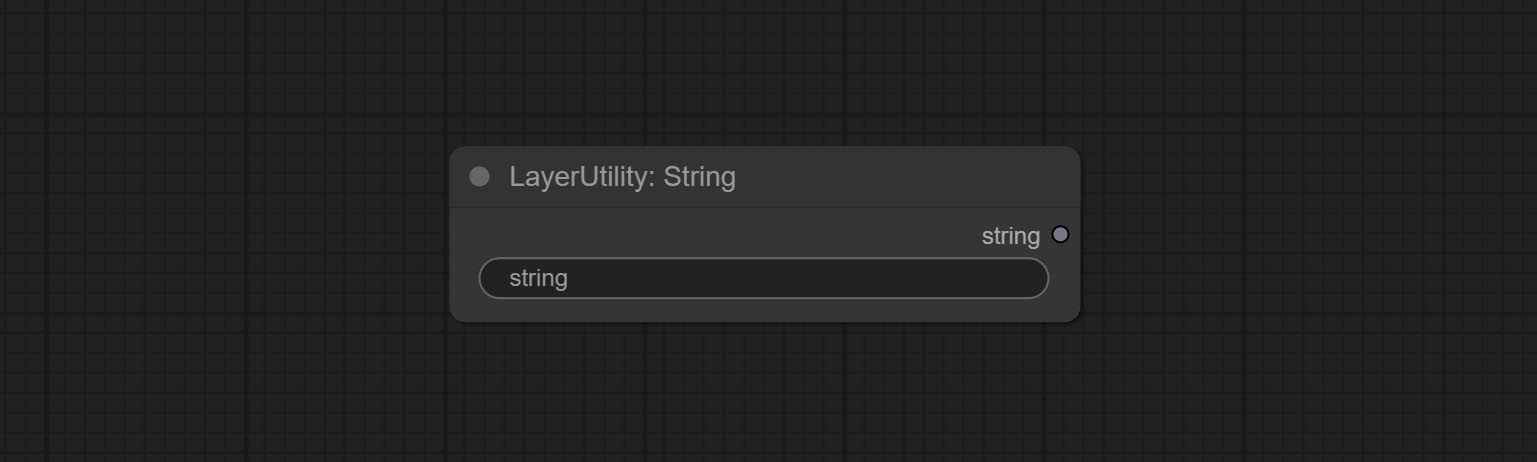
String -Knoten begehen, verwendet, um eine Zeichenfolge auszugeben. Es ist der vereinfachte Knoten von Textbox.
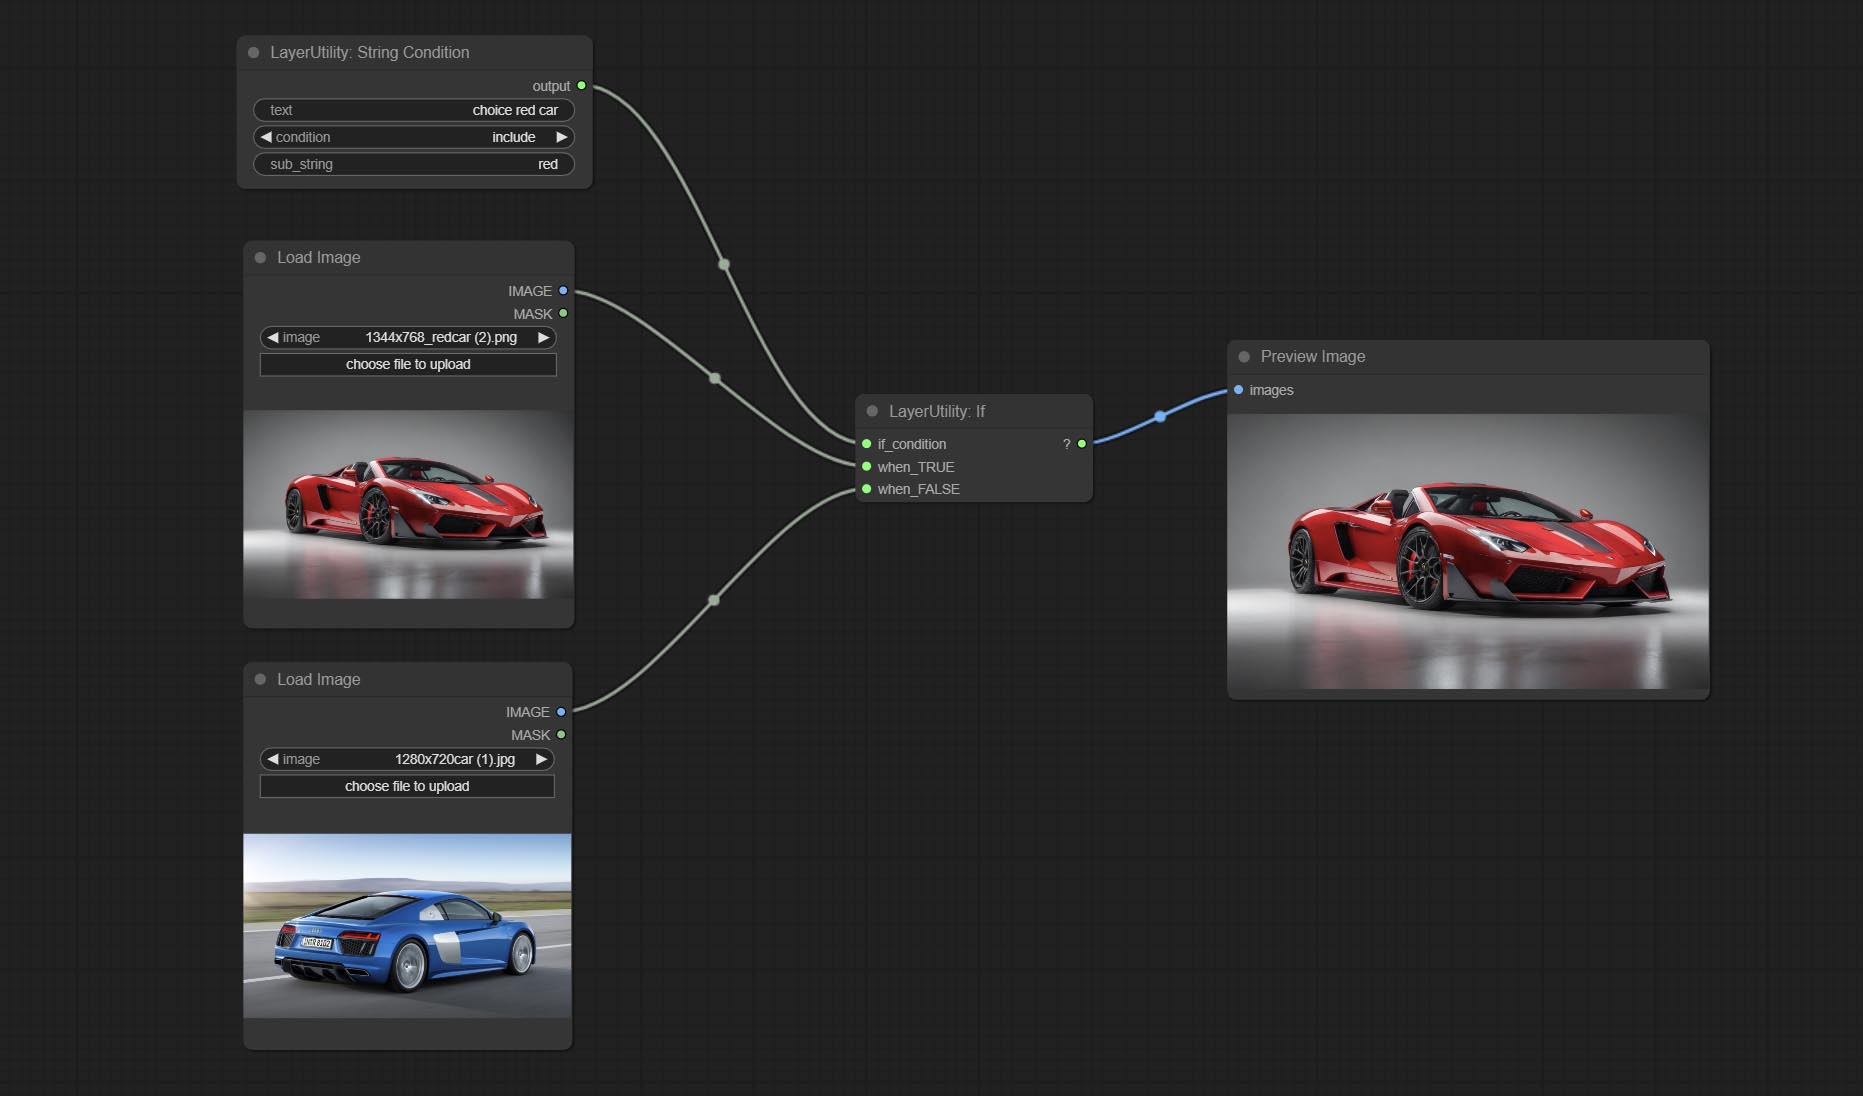
Bestimmte, wenn der Knoten , Ausgabe basierend auf booleschen bedingten Eingabe schaltet. Kann für jede Art von Datenumschaltung verwendet werden.
Commit StringCondition -Knoten, bestimmt, ob der Text ein Substring enthält oder nicht.
Commit NumberCalculatorv2 -Knoten , Fügen Sie den n -ten Root -Vorgang hinzu. Beiten Sie den Booleanoperatorv2 -Knoten und zunimmt größer/weniger als, größer/weniger als das gleiche logische Urteilsvermögen. Die beiden Knoten können auf numerische Eingänge zugreifen und numerische Werte innerhalb des Knotens eingeben. Hinweis: Die numerische Eingabe hat Vorrang. Die Werte in Knoten sind nicht gültig, wenn die Eingabe vorliegt.
Beiten Sie einen SD3Negativ -Konditionierungsknoten, verringern Sie die vier Knoten der negativen Bedingung in SD3 in einen separaten Knoten.
ImagePeremovealpha -Knoten fügen Sie optionale Maskeneingang hinzu.
Commit HlFrequencyDetailRestore-Knoten mit Niederfrequenzfilterung und hohem Frequenzerhalt, um Bilddetails wiederherzustellen, ist die Fusion besser.
Befinden Sie addGrain- und Maskgrain -Knoten, fügen Sie einem Bild oder einer Maske Geräusche hinzu.
Commit Filmv2 -Knoten, die FastGrain -Methode wird auf der Grundlage der vorherigen und die Geschwindigkeit der Rauscherzeugung zehnmal schneller hinzugefügt.
Commit Imagetomask -Knoten, er kann Bild in Maske umgewandelt werden. Unterstützt die Konvertierung jedes Kanals in Labor-, RGBA-, YUV- und HSV -Modi in Masken und sorgt gleichzeitig für die Einstellung von Farbskala. Unterstützen Sie die optionale Eingabe der Maske, um Masken zu erhalten, die nur gültige Teile enthalten.
Die Blackpoint- und WhitePoint -Optionen in einigen Knoten wurden für eine intuitivere Anzeige in die Einstellung der Schieberegler geändert. Integrieren Sie MasGedultradetailv2, SegmentanyThingultrav2, Rmbgultrav2 , Persönlichkeitsmaskultrav2 , Birefnetultra, SegformerB2Clothesultra, Blendifmask und Levels.
ImageScaleRestoreV2 and ImageScaleByAspectRatioV2 nodes add the total_pixel method to scale images.
Commit MediaPifeFacialSegment -Knoten , verwendet, um Gesichtsmerkmale zu segmentieren, einschließlich links und rechts Augenbrauen, Augen, Lippen und Zähne.
Commit BatchSelector -Knoten , verwendet, um bestimmte Bilder oder Masken aus Stapelbildern oder Masken abzurufen.
LayerUtility erstellt neue Unterverzeichnisse wie Systemio, Daten und Eingabeaufforderung. Einige Knoten werden in Unterverzeichnisse eingeteilt.
Commit MaskbyColor -Knoten, generieren Sie eine Maske basierend auf der ausgewählten Farbe.
Ladesportnode lasiert das PSD -Format und die Ausgabebilder. Beachten Sie, dass dieser Knoten die Installation des Abhängigkeitspakets psd_tools erfordert. Wenn während der Installation von PSD_TOOL ein Fehler auftritt, wie ModuleNotFoundError: No module named 'docopt'
Beiten Sie SegformerB2Clothesultra -Knoten, es wurde verwendet, um Zeichenkleidung zu segmentieren. Der Modellsegmentierungscode stammt dank des ursprünglichen Autors von Starthua.
SaveImagePlus -Knoten fügt der JSON -Funktion den Ausgangs -Workflow hinzu, unterstützt die %date und %time für die Einbettung von Datum oder Uhrzeit und Dateiname und fügt den Vorschauschalter hinzu.
Commit SaveImagePlus -Knoten , Es kann das Verzeichnis anpassen, in dem das Bild gespeichert wird, dem Dateinamen einen Zeitstempel hinzufügen, das Speicherformat auswählen, die Bildkomprimierungsrate festlegen, festlegen, ob der Workflow speichern soll, und dem Bild optional unsichtbare Wasserzeichen hinzuzufügen.
Commit addblindwatermark, Showblindwatermark -Knoten, fügen Sie dem Bild unsichtbarer Wasserzeichen und dekodiertes Wasserzeichen hinzu. Comit createQrCode, decodeqrCode-Knoten, es kann zweidimensionale Codebilder generieren und zweidimensionale Codes dekodieren.
ImagesCalerESTOREV2, ImagesCalebyaspatiov2, ImageAutoCropv2 -Knoten fügen Optionen für width und height hinzu, die Breite oder Höhe als feste Werte angeben können.
Commit Purgevram -Knoten, beseitigen Sie VRAM einen RAM.
Befinden Sie autoadjust -Knoten, er kann den Bildkontrast und den Weißabgleich automatisch anpassen.
Beiten Sie den RGBValue -Knoten, um den Farbwert als einzelne Dezimalwert von R, G, B. Diese Idee aus VxinHao auszugeben, danke.
Samenknoten begehen, um den Saatgutwert auszugeben. Die ImageMaskScaleas, ImagesCalebyspectratio, ImagesCalebyspectratiov2, ImagesCalerestore, ImagesCalerestorev2 -Knoten erhöhen width , height .
KOMMITTEL -NIDE KOMMEN KOMTER kann die gleiche Farbpegel -Anpassungsfunktion wie Photoshop.sharp & Soft erwerben, die Option "None" hinzufügen.
Commit Blendifmask -Knoten, dieser Knoten kooperiert mit Imgaeblendv2 oder ImageBlendAdvancev2, um dieselbe Mischung zu erreichen, wenn es als Photoshop funktioniert.
Verpfändung Colortemperatur- und Farbbalonance -Knoten, mit der die Farbtemperatur und die Farbbalance des Bildes angepasst werden.
Fügen Sie neue Arten von Mischmodus V2 zwischen den Bildern hinzu. Unterstützt jetzt bis zu 30 Mischmodi. Der neue Mischmodus ist für alle V2 -Versionen verfügbar, die Knoten gemischten Modus unterstützen, einschließlich ImageBlend V2, ImageBlendadvance V2, DropShadow V2, Innershadow V2, Outerglow V2, Innerglow V2, Stroke V2, Colorverlay V2, Gradientoverlay V2.
Ein Teil des Codes für BlendMode V2 stammt von virtuosen Knoten für Comfyui. Vielen Dank an die ursprünglichen Autoren.
Yolov8Dect -Knoten begehen.
Commit Qwenimage2Prompt-Knoten, dieser Knoten ist dank des ursprünglichen Autors um den UForm-Gen2 Qwen Node des uforme-gen2-Qwen-Knotens des uform-gen2-Qwen-Knotens neu verpackt.
Commit Booleanoperator, NumberCalculator, Textbox, Ganzzahl, Float, Booleannoden. Diese Knoten können mathematische und logische Operationen ausführen.
Commit ExtendCanvasv2 -Knoten , Unterstützung der Farbwerteingabe.
Befinden Sie einen Autobraurtheit -Knoten , Er kann die Bildhelligkeit automatisch anpassen.
CREATEGRADIENTMASK -Knoten -Noten center hinzufügen.
Commit GetColortonev2 -Knoten, kann die Haupt- und Durchschnittsfarben für den Hintergrund oder den Körper auswählen.
Commit MoveRewardFilter -Knoten, kann Bilder von schlechter Qualität herausfiltern.
Ultra -Knoten fügen VITMatte(local) Methode hinzu.
Beiten HDR -Effektknoten , Er verbessert den Dynamikbereich und die visuelle Anziehungskraft von Eingabebildern. Dieser Knoten hat eine Umpackung von HDR -Effekten (superbeasts.ai).
CropboxResolve -Knoten begehen.
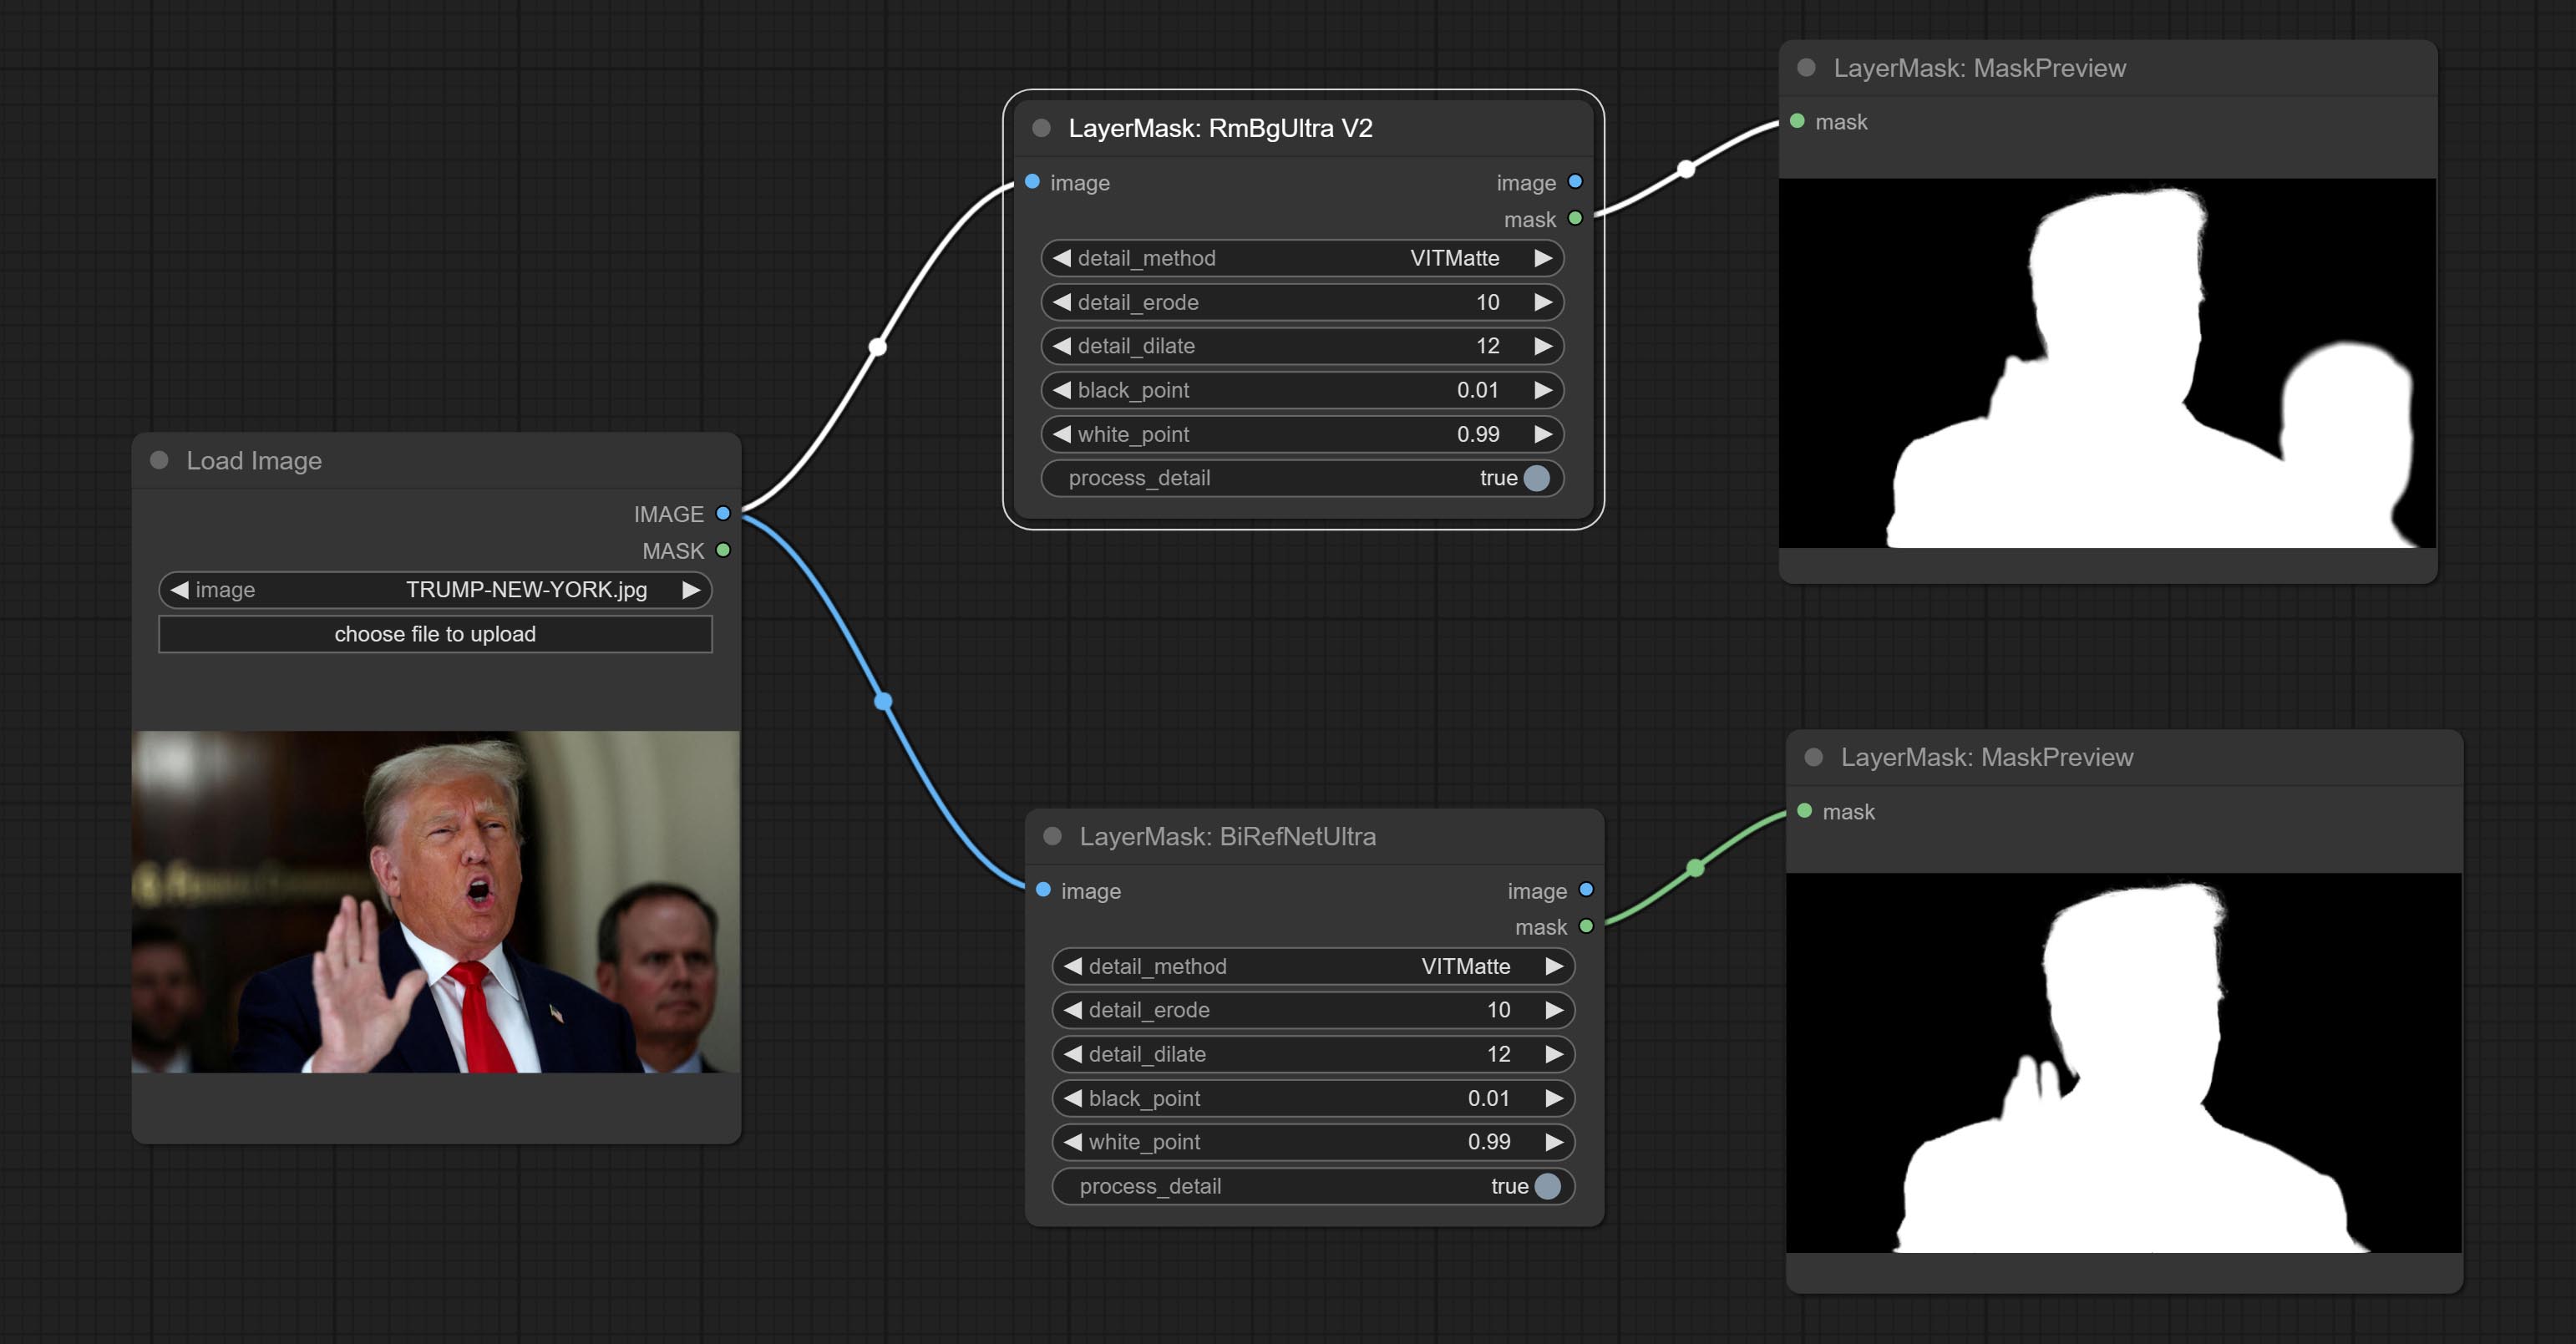
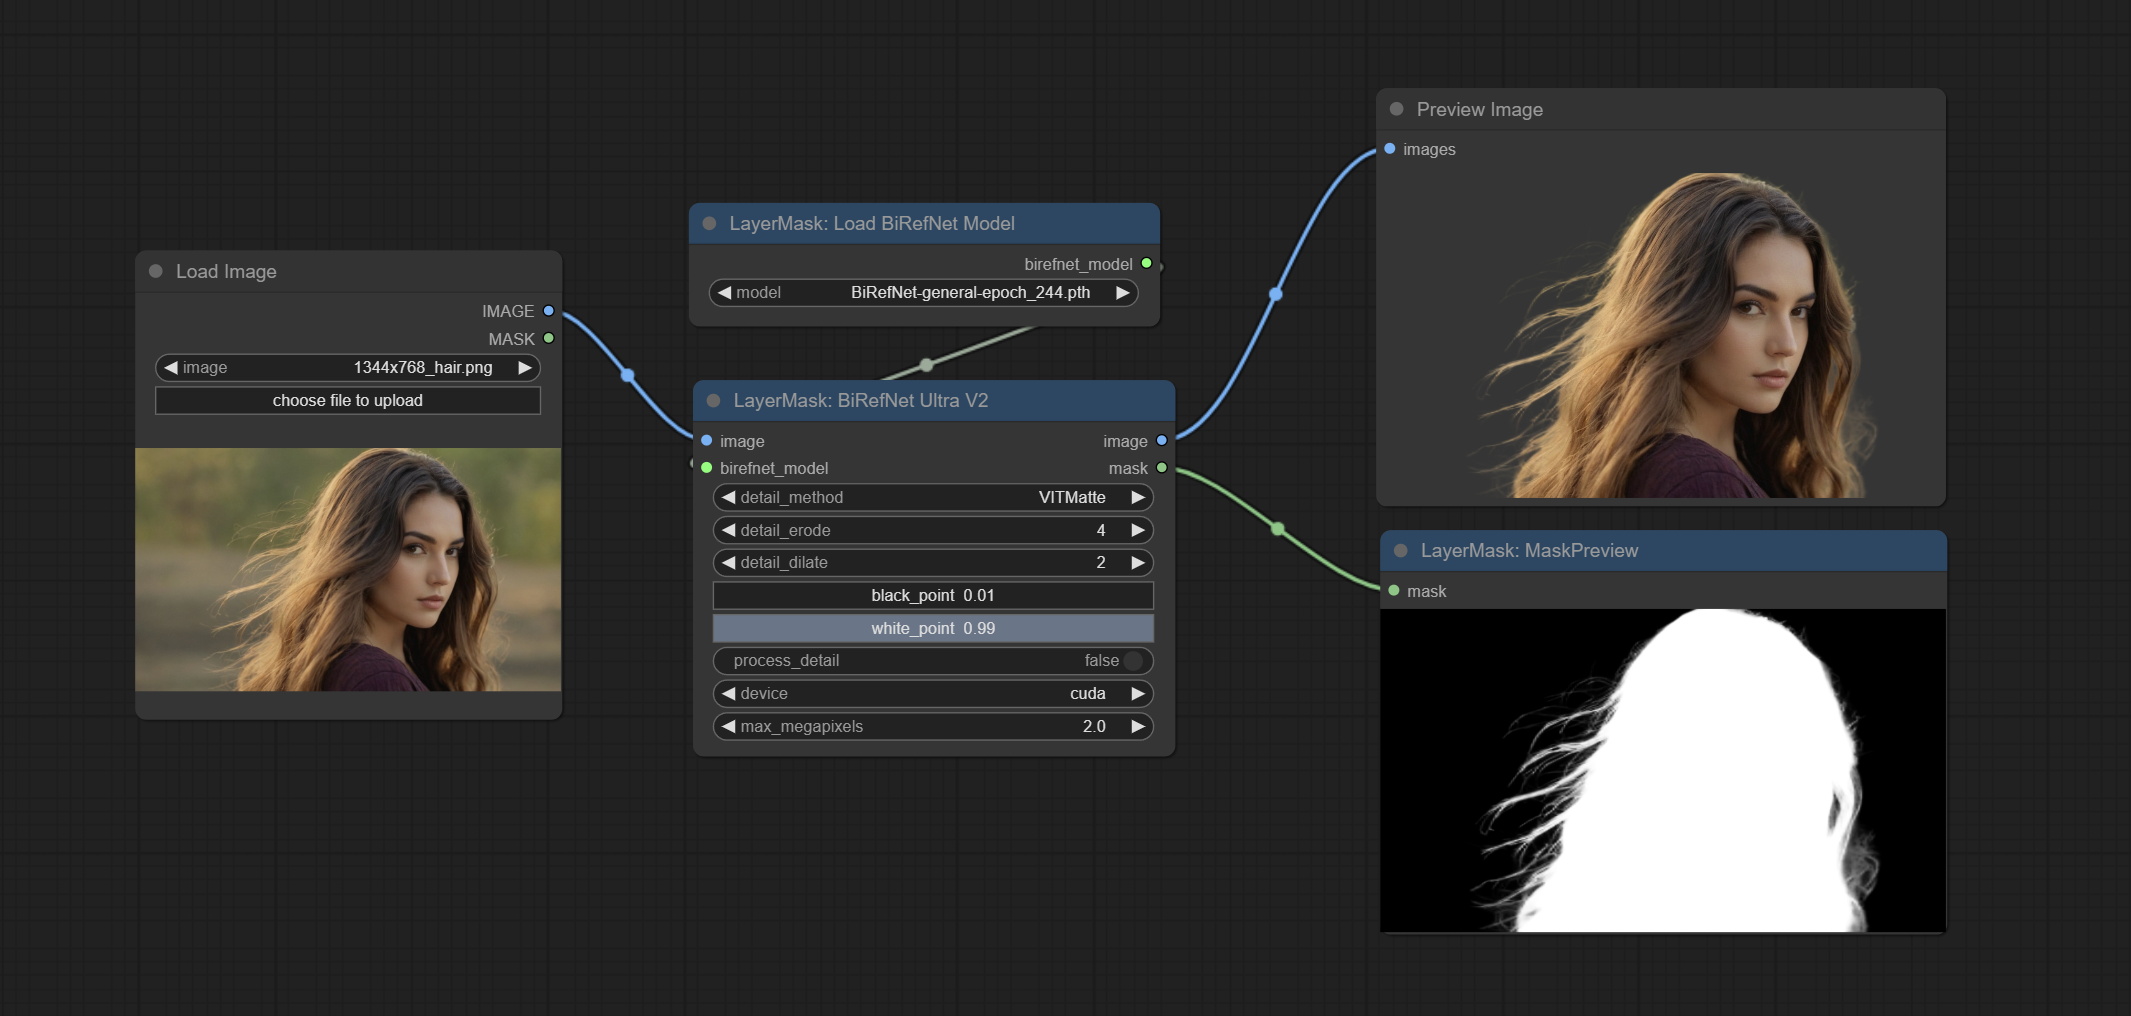
Beiten Sie den Birefnetultra-Knoten, der das Birefnet-Modell zum Entfernen des Hintergrunds bietet eine bessere Erkennungsfähigkeit und die extrem hohen Kantendetails.
Commit imageAutocropv2 -Knoten, er kann nicht entscheiden, den Hintergrund zu entfernen, die Maskeneingabe zu unterstützen und nach langer oder kurzer Seitengröße zu skalieren.
Commit ImageHub -Knoten, unterstützt bis zu 9 Bild- und Maskenschaltausgaben und unterstützt die zufällige Ausgabe.
Textjoin -Knoten begehen.
Beiten Sie einen Node von promptembellisch. Es gibt polierte Eingabeaufforderungen aus und unterstützt die Eingabe von Bildern als Referenzen.
Ultra -Knoten wurden vollständig auf die V2 -Version aktualisiert, wobei die Vitmatte -Kantenverarbeitungsmethode hinzugefügt wurde, die zum Umgang mit halbtransparenten Bereichen geeignet ist. Integrieren Sie MasGedultradetailv2, SegmentanyThingultrav2, RMBGultrav2 und Persönlichkeitsmaskultrav2 -Knoten.
Begehen Sie die Farbe des Shadow & Highlight -Knotens, er kann die Farbe der dunklen und hellen Teile separat einstellen. Beiten Sie den Schatten- und Highlight -Maskenknoten, er kann Maske für dunkle und helle Bereiche ausgeben.
Commit CropByMaskv2 -Knoten auf der Grundlage des ursprünglichen Knotens unterstützt crop_box -Eingabe, wodurch es bequem ist, Schichten derselben Größe zu schneiden.
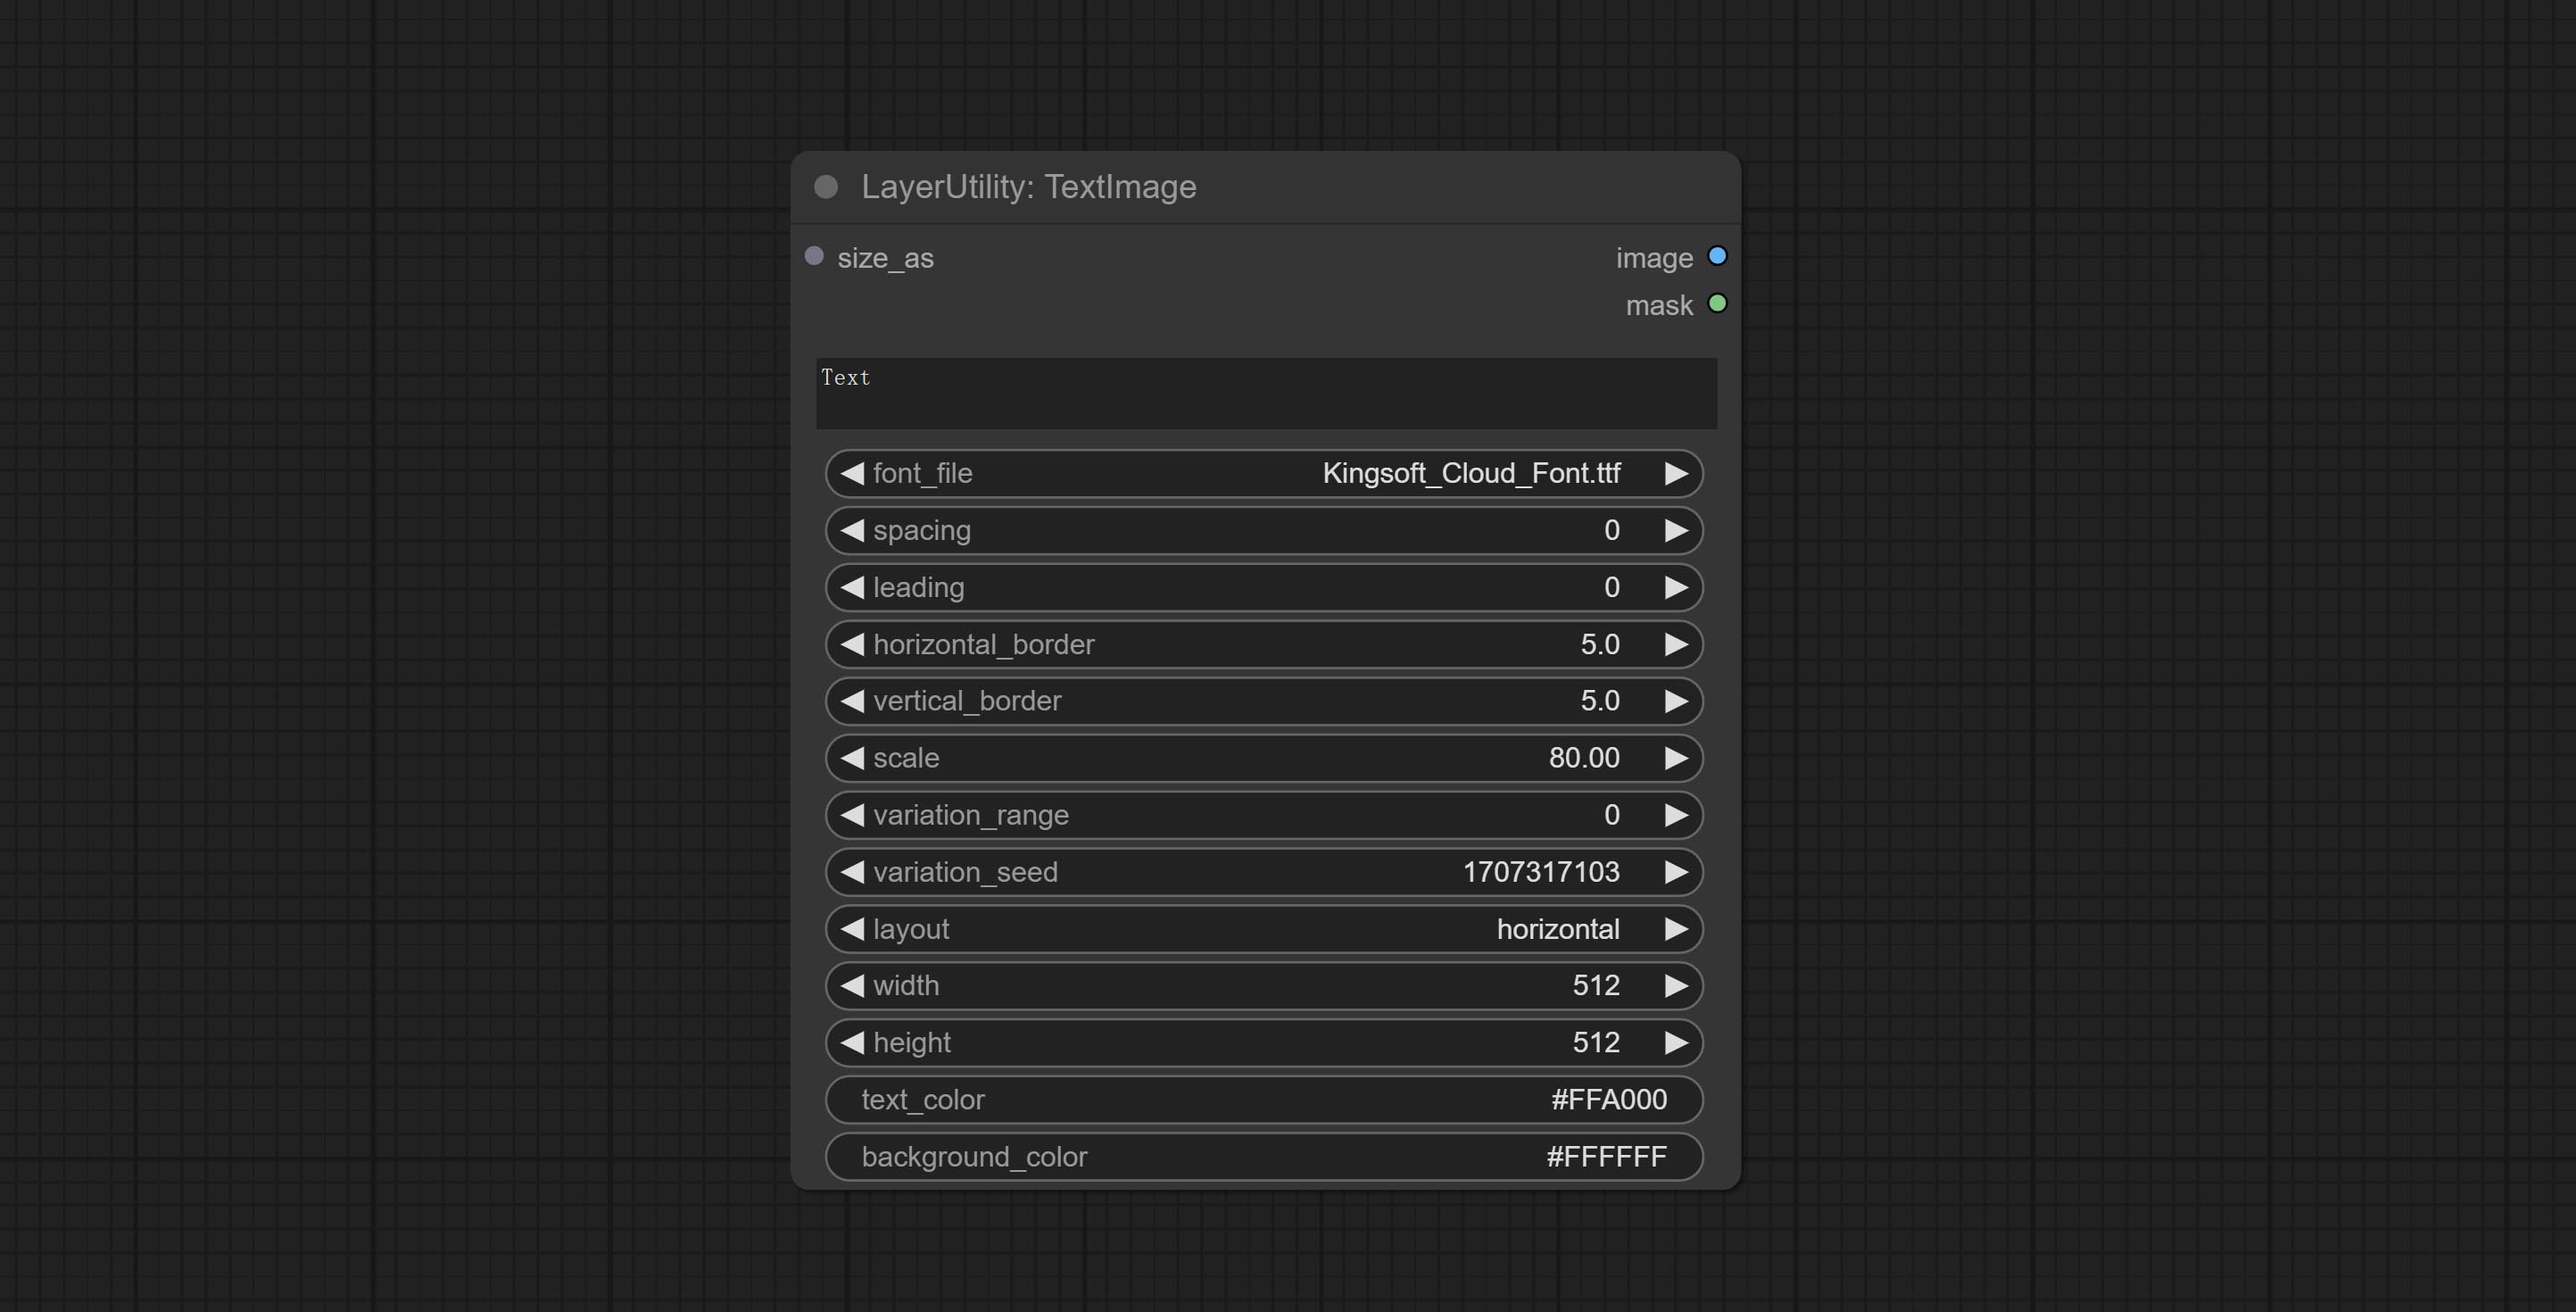
Beenden Sie SimpletextImage -Knoten, er generiert einfache Typensatzbilder und Masken aus dem Text. Dieser Knoten bezieht sich auf einige der Funktionen und Code von Zho-Zho-Zho/comfyui-text_image-composite.
Beiten Sie einen Knoten von promptTagger , Schließen Sie die Eingabeaufforderungen basierend auf dem Bild. und es kann das Schlüsselwort für die Eingabeaufforderung ersetzen (müssen für den Google Studio -API -Schlüssel angewendet werden). Upgrade ColorImagev2 und GradientImagev2 , Unterstützen Sie den Eingang der Benutzeranpassung voreingestellter Größen und Size_as.
LAMA -Knoten begehen, kann Objekte aus dem Bild basierend auf der Maske löschen. Dieser Knoten ist von Iopaint umpackt.
Commit ImageMovealpha- und ImageCombinealpha -Knoten, Alpha -Kanal des Bildes kann entfernt oder zusammengeführt werden.
Commit ImagesCalerestorev2 und ImagesCalebyaspatiov2 -Knoten unterstützt die Skalierung von Bildern für bestimmte lange oder kurze Kantengrößen.
Beiten Sie den Persönlichkeitsmaskultra -Knoten, erzeugen Sie Masken für das Gesicht, die Haare, die Körperhaut, die Kleidung oder das Accessoires von Porträt. Der Modellcode für diesen Knoten stammt von A-Person-Masken-Generator.
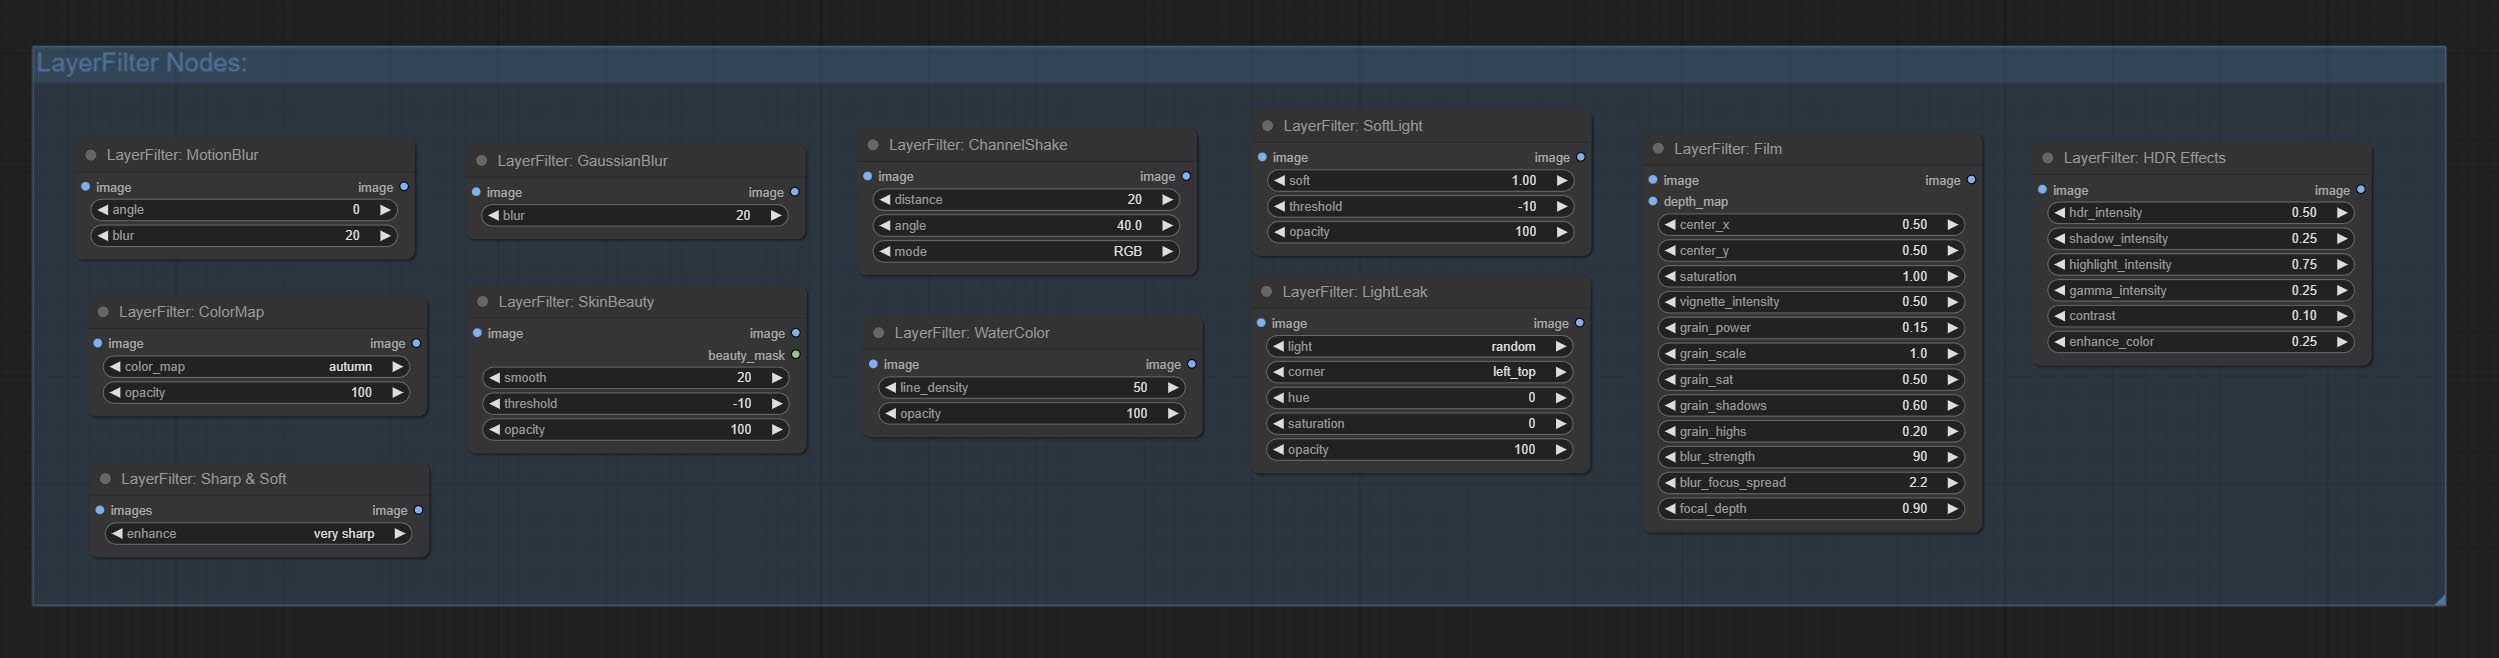
Lightleak -Knoten begehen, dieser Filter simuliert den Lichtleck -Effekt des Films.
Legen Sie den Filmknoten, diesen Filter, die Getreide, die dunkle Kante und die verschwommene Kante des Films simulieren, und unterstützen Sie die Eingangstiefenkarte, um den Defokus zu simulieren. Es wird von Digitaljohn/Comfyui-Propost neu organisiert und verkapelt.
Commit ImageAutoCrop -Knoten, der zum Generieren von Bildmaterialien für Trainingsmodelle ausgelegt ist.
Commit ImagesCalebyaspatio -Node
Beheben Sie den Fehler der Farbabstufung in der LUT -Noden -Rendering an. Dieser Knoten unterstützt nun den Log -Farbraum. *Bitte laden Sie die dedizierte Protokoll -LUT -Datei für das Bild des Log -Farbton Speichers.
Commit CREATEDRADIENTMASK -Knoten. LayerImagetRansform- und Laymasktransform -Knoten begehen.
Commit MasGedultradetail -Knoten, iT verarbeiten grobe Masken zu ultra feinen Kanten.Commit Exposure Node.
Beachten Sie einen scharfen und weichen Knoten, er kann Bilddetails verbessern oder glätten. Commit MaskbyDifferent Node, er vergleicht zwei Bilder und gibt eine Maske aus. SegmentanyThingultra -Knoten begehen und die Qualität von Maskenkanten verbessern. *Wenn Segmentanything nicht installiert ist, müssen Sie das Modell manuell herunterladen.
Alle Knoten haben vollständig unterstützte Batch -Bilder und bieten Komfort für die Videoerstellung. (Der CropByMask -Knoten unterstützt nur Schnitte derselben Größe. Wenn ein Stapel mask_for_crop eingegeben wird, werden die Daten aus dem ersten Blatt verwendet.)
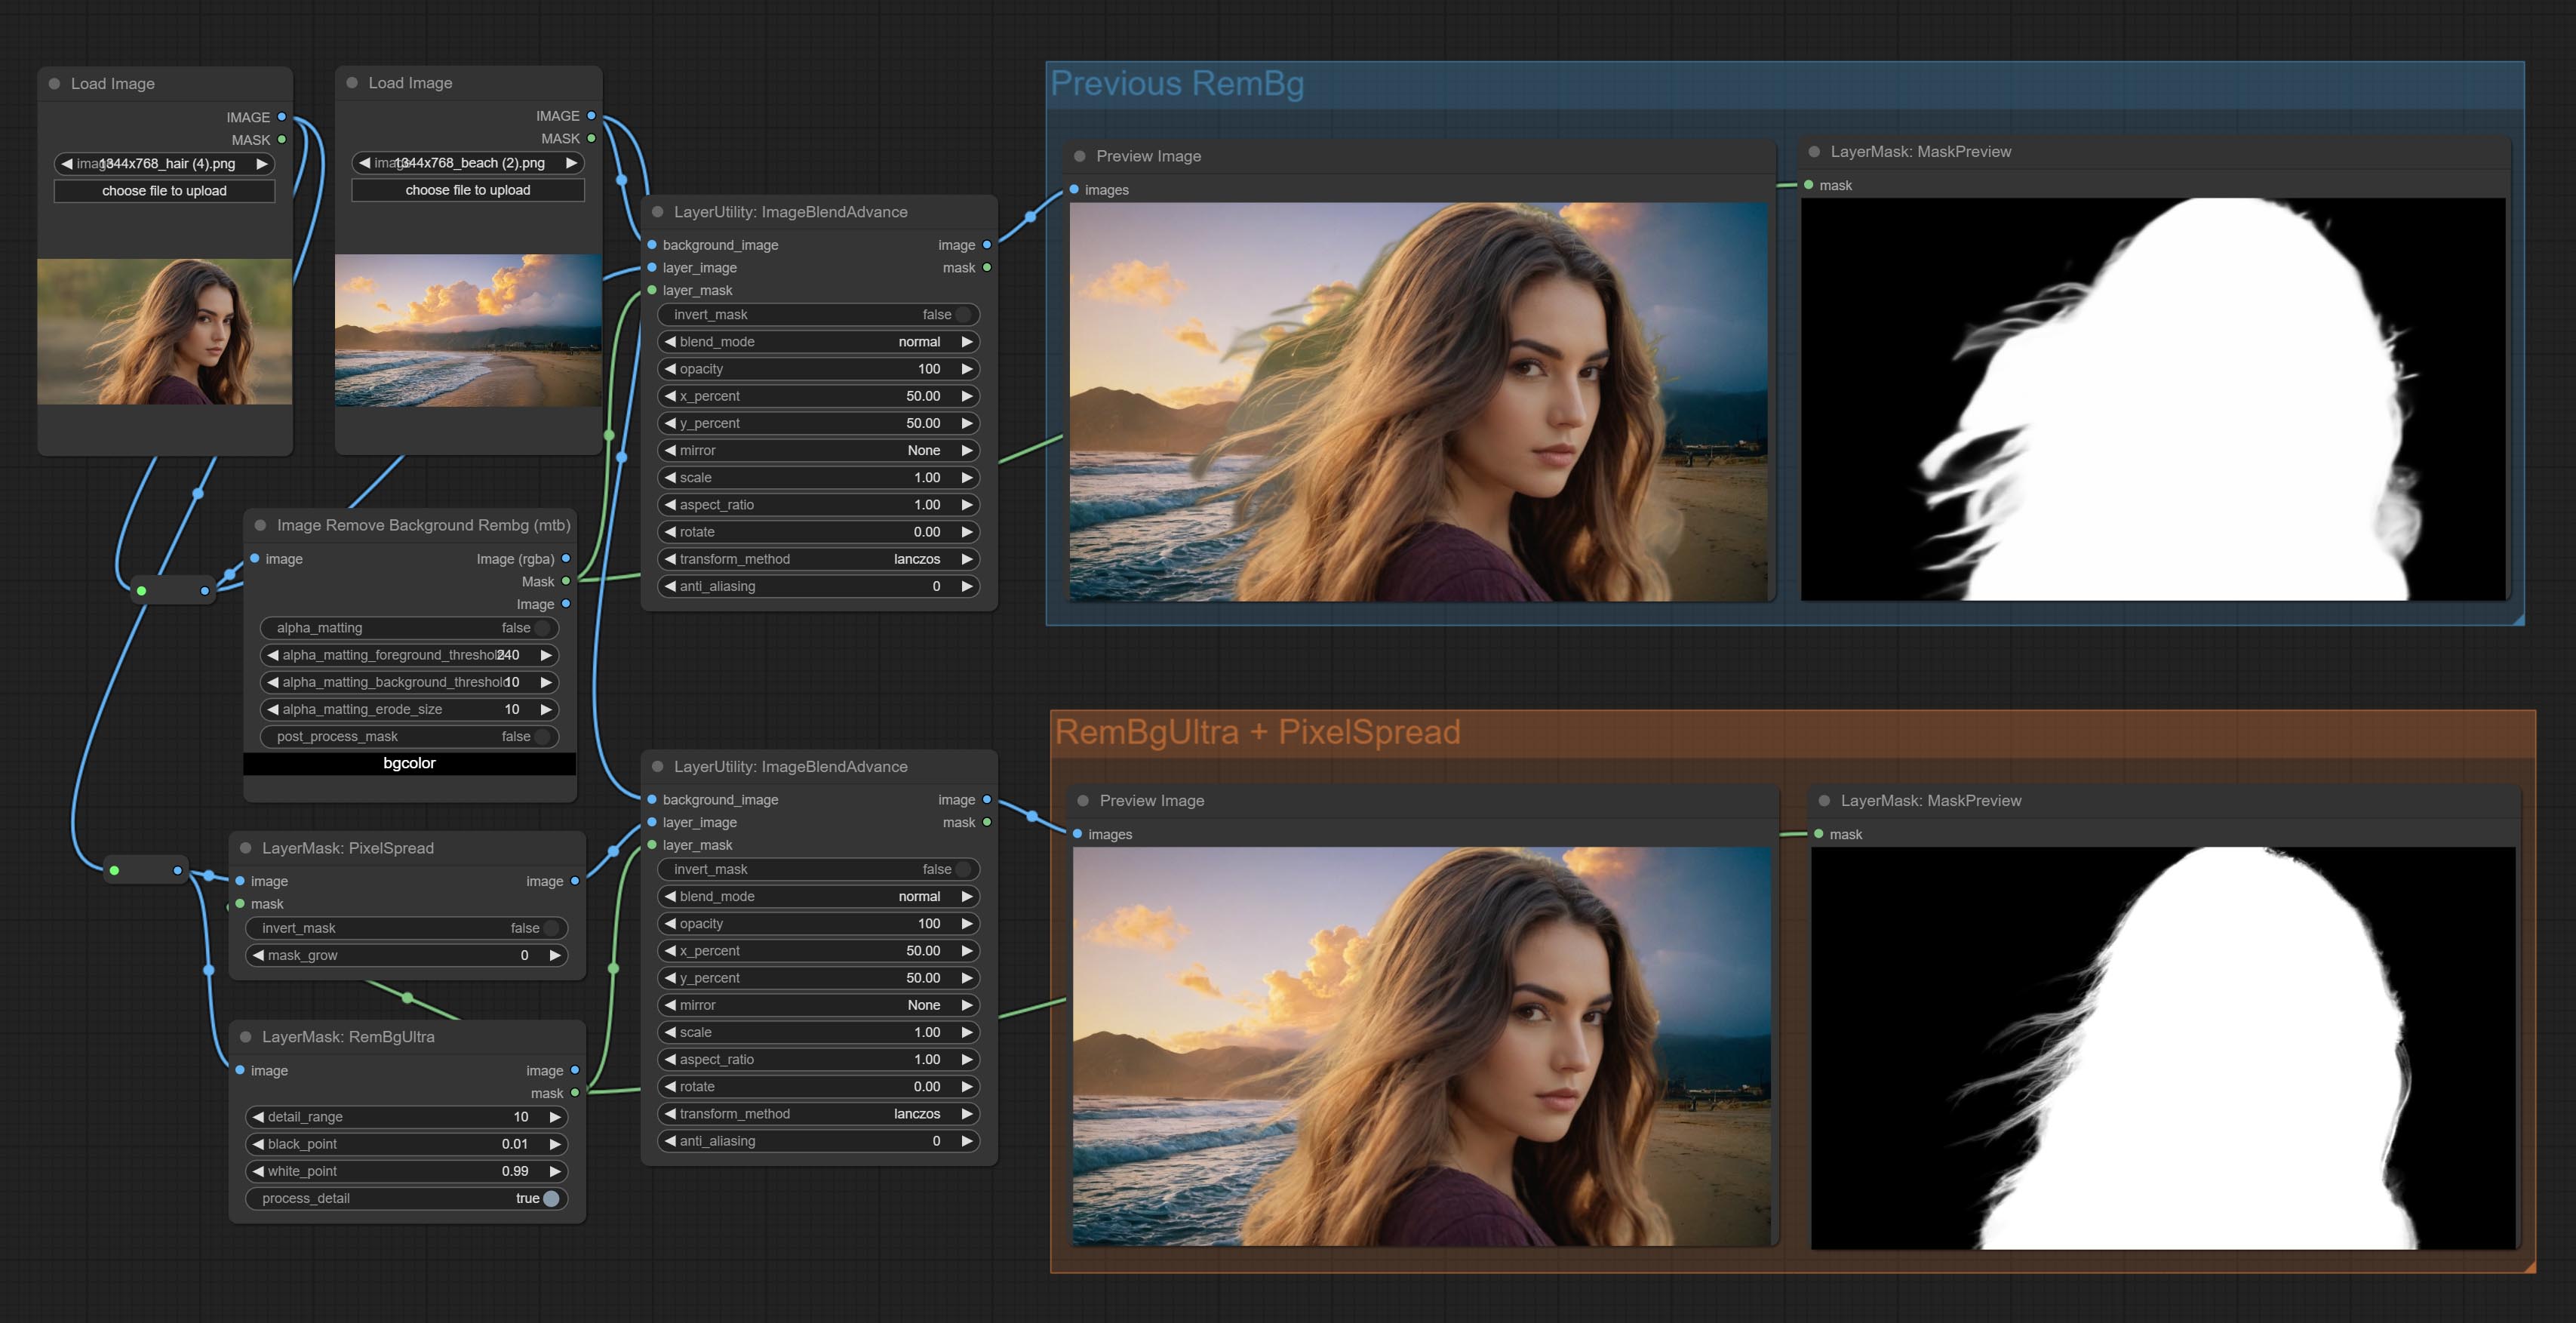
Rembgultra- und Pixelspread -Knoten begehen, verbesserte die Maskenqualität erheblich. *Rembgultra erfordert manuelles Modell Download.
Beiten Sie einen TextImage -Knoten, erzeugt Textbilder und Masken.
Fügen Sie neue Arten von Mischmodus zwischen den Bildern hinzu. Unterstützt jetzt bis zu 19 Mischmodi. Fügen Sie Color_burn, color_dodge, linear_burn, linear_dodge, Overlay, Soft_light, Hard_light, Vivid_light, Pin_light, linear_light und hard_mix hinzu. Der neu hinzugefügte Mischmodus gilt für alle Knoten, die den Mischmodus unterstützen.
Beiten Sie den Colormap -Filterknoten, um einen Pseudo -Farb -Heatmap -Effekt zu erzeugen.
Begehen Sie Aquarell- und Skinbeauty -Knoten - diese sind Bildfilter, die Aquarell- und Haut -Glätteffekte erzeugen.
Beiten Sie den Bildhiftknoten, um das Bild zu verschieben und eine Verschiebungsnahmmaske auszugeben, sodass es bequem ist, kontinuierliche Texturen zu erstellen.
Beiten Sie imagemaskenscaleas -Knoten, um die Bild- oder Maskengröße basierend auf dem Referenzbild anzupassen.
BITTE BILDYSCALERESTORE -Knoten für die Arbeit mit CropByMask für lokale gehobene und reparierte Arbeiten.
Beiten Sie CropbyMask und RestoreCropbox -Knoten. Die Kombination dieser beiden kann das Bild teilweise erregen und neu zeichnen, bevor es wiederhergestellt wird.
Coloradapter -Knoten begehen, mit dem automatisch den Farbton des Bildes eingestellt werden kann.
Maskenknoten begehen, er kann Maskenkonturschläge erzeugen.
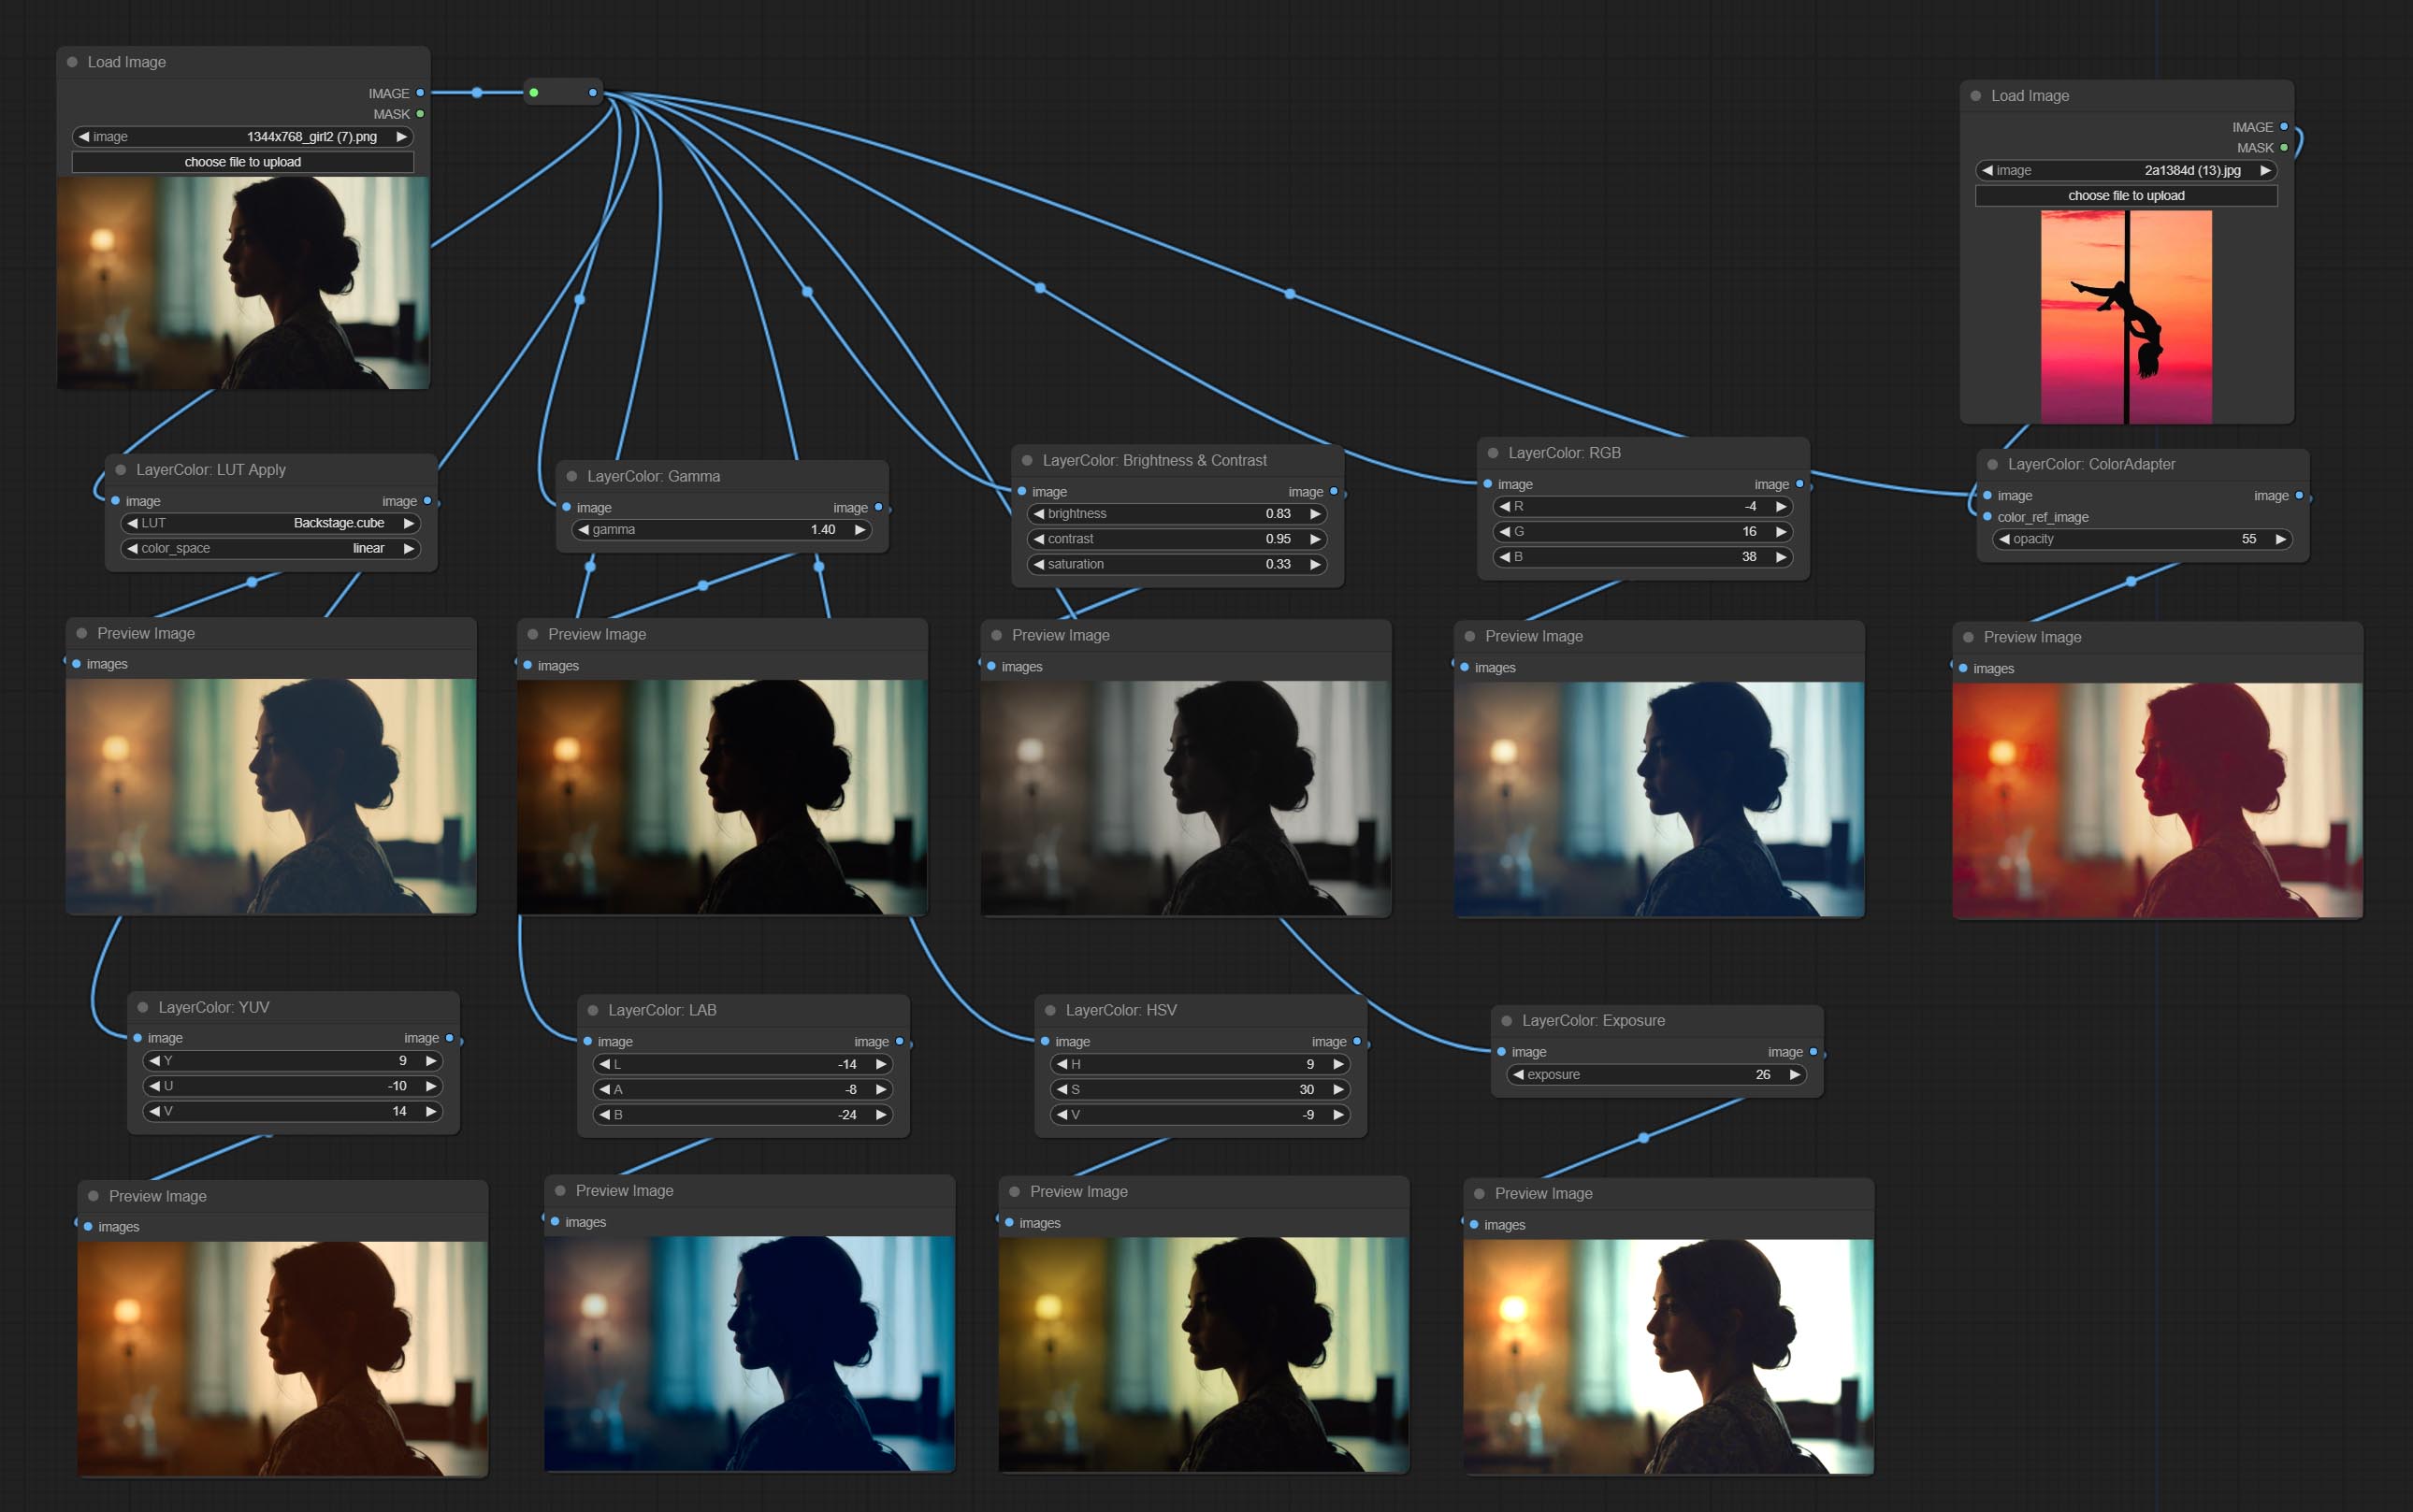
Fügen Sie die Layercolor -Knotengruppe hinzu, die zur Anpassung der Bildfarbe verwendet wird. Es umfasst LUT -Anwendung, Gamma, Helligkeit und Kontrast, RGB, YUV, LAB ADN HSV.
Beiten Sie imagechannelsplit und imagechannelmerge Knoten.
Commit MaskmotionBlur -Knoten.
Softlight -Knoten begehen.
Der Channelshake -Knoten des Komitees, der Filter ist, kann einen Kanalverlagerungseffekt erzeugen, ähnlich wie das TIKTOK -Logo.
Komituelle Maskengradient -Knoten, kann einen Gradienten in der Maske erstellen.
Commit GetColortone -Knoten, kann die Hauptfarbe oder die durchschnittliche Farbe des Bildes erhalten. Beiten Sie Masken- und Maskedgeshrink -Knoten.
Komitee MaskboxDeTect -Knoten, mit dem die Position automatisch über die Maske erfasst und an den zusammengesetzten Knoten ausgegeben werden kann. Verpflichten Sie XY zu Prozent Knoten, um absolute Koordinaten in prozentuale Koordinaten umzuwandeln. Gaussianblur -Knoten begehen. Commit GetImagesize -Knoten.
Commit ExtendCanvas -Knoten.
Commit ImageBlendAdvance -Knoten. Dieser Knoten ermöglicht die Synthese von Hintergrundbildern und Schichten verschiedener Größen und bietet eine freiere Syntheseerfahrung. Legen Sie den PrintInfo -Knoten als Workflow -Debugging -Hilfe ein.
Begehen Sie Farb- und Gradientimage -Knoten, die zur Erzeugung von festen und gradientenfarbenen Bildern verwendet werden.
Vergradientierende und Colorloverlay -Knoten begehen. Fügen Sie ungültiges Maskeneingabegurteil hinzu und ignorieren Sie es, wenn ungültige Maske eingegeben wird.
Beiten Sie Innerglow-, Innershadow- und Motionblur -Knoten.
Wenn Sie alle abgeschlossenen Knoten umbenennen, sind die Knoten in 4 Gruppen unterteilt: LayerSyle, Laymasmas, LayerUtility, LayerFilter. Workflows mit alten Versionsknoten müssen manuell durch neue Versionsknoten ersetzt werden.
Der Outerglow -Knoten wurde erhebliche Modifikationen durchgesetzt, indem Optionen für Helligkeit , Light_Color und Glow_Color hinzugefügt wurden.
Maskinvert -Knoten begehen.
Colorpick -Knoten begehen.
Strichknoten begehen.
Commit MaskPreview -Knoten.
BEMACHTIERUNGSKODEN.
Die Layer_mask ist jetzt keine obligatorische Eingabe. Es darf Schichten und Masken mit unterschiedlichen Formen verwenden, aber die Größe muss konsistent sein.
Beiten Sie ImageBlend Node.
Outerglow -Knoten begehen.
Tragen Sie einen Dropshadow -Knoten an.
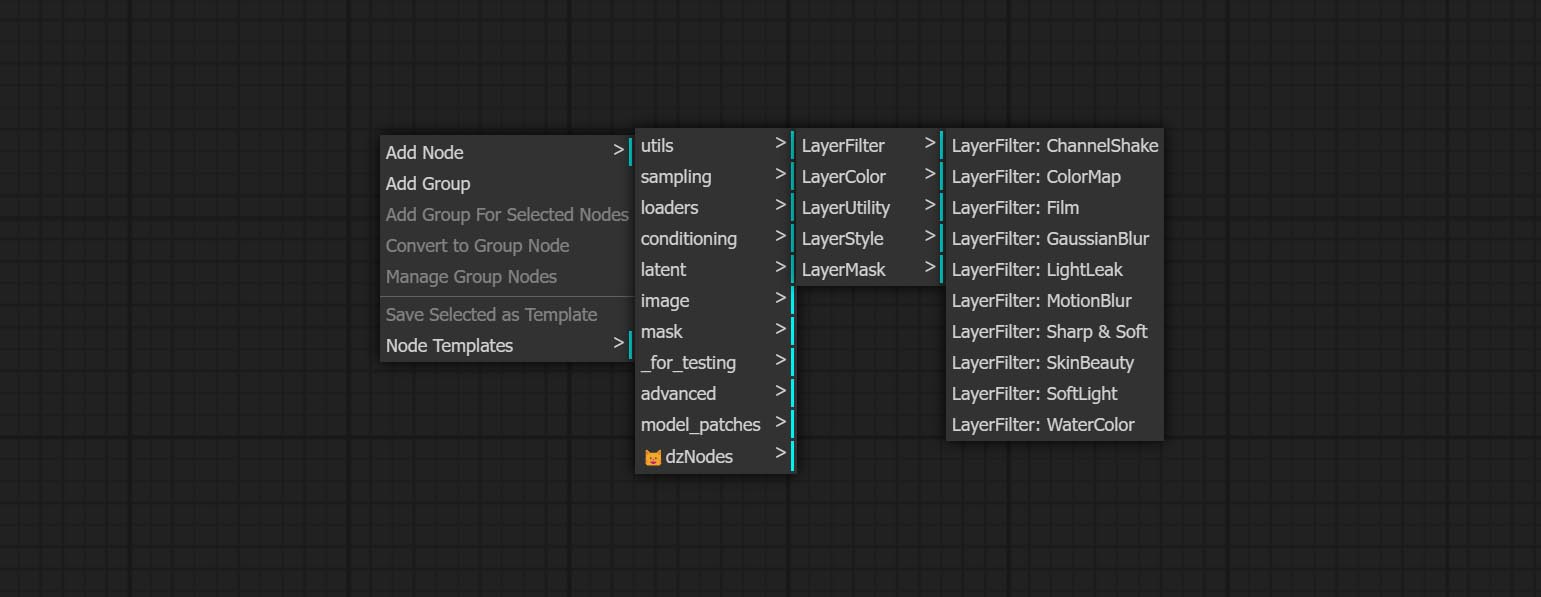
Die Knoten sind nach ihren Funktionen in 5 Gruppen unterteilt: Layeryle, Layercolor, Laymasmas, Layerutility und LayerFilter.

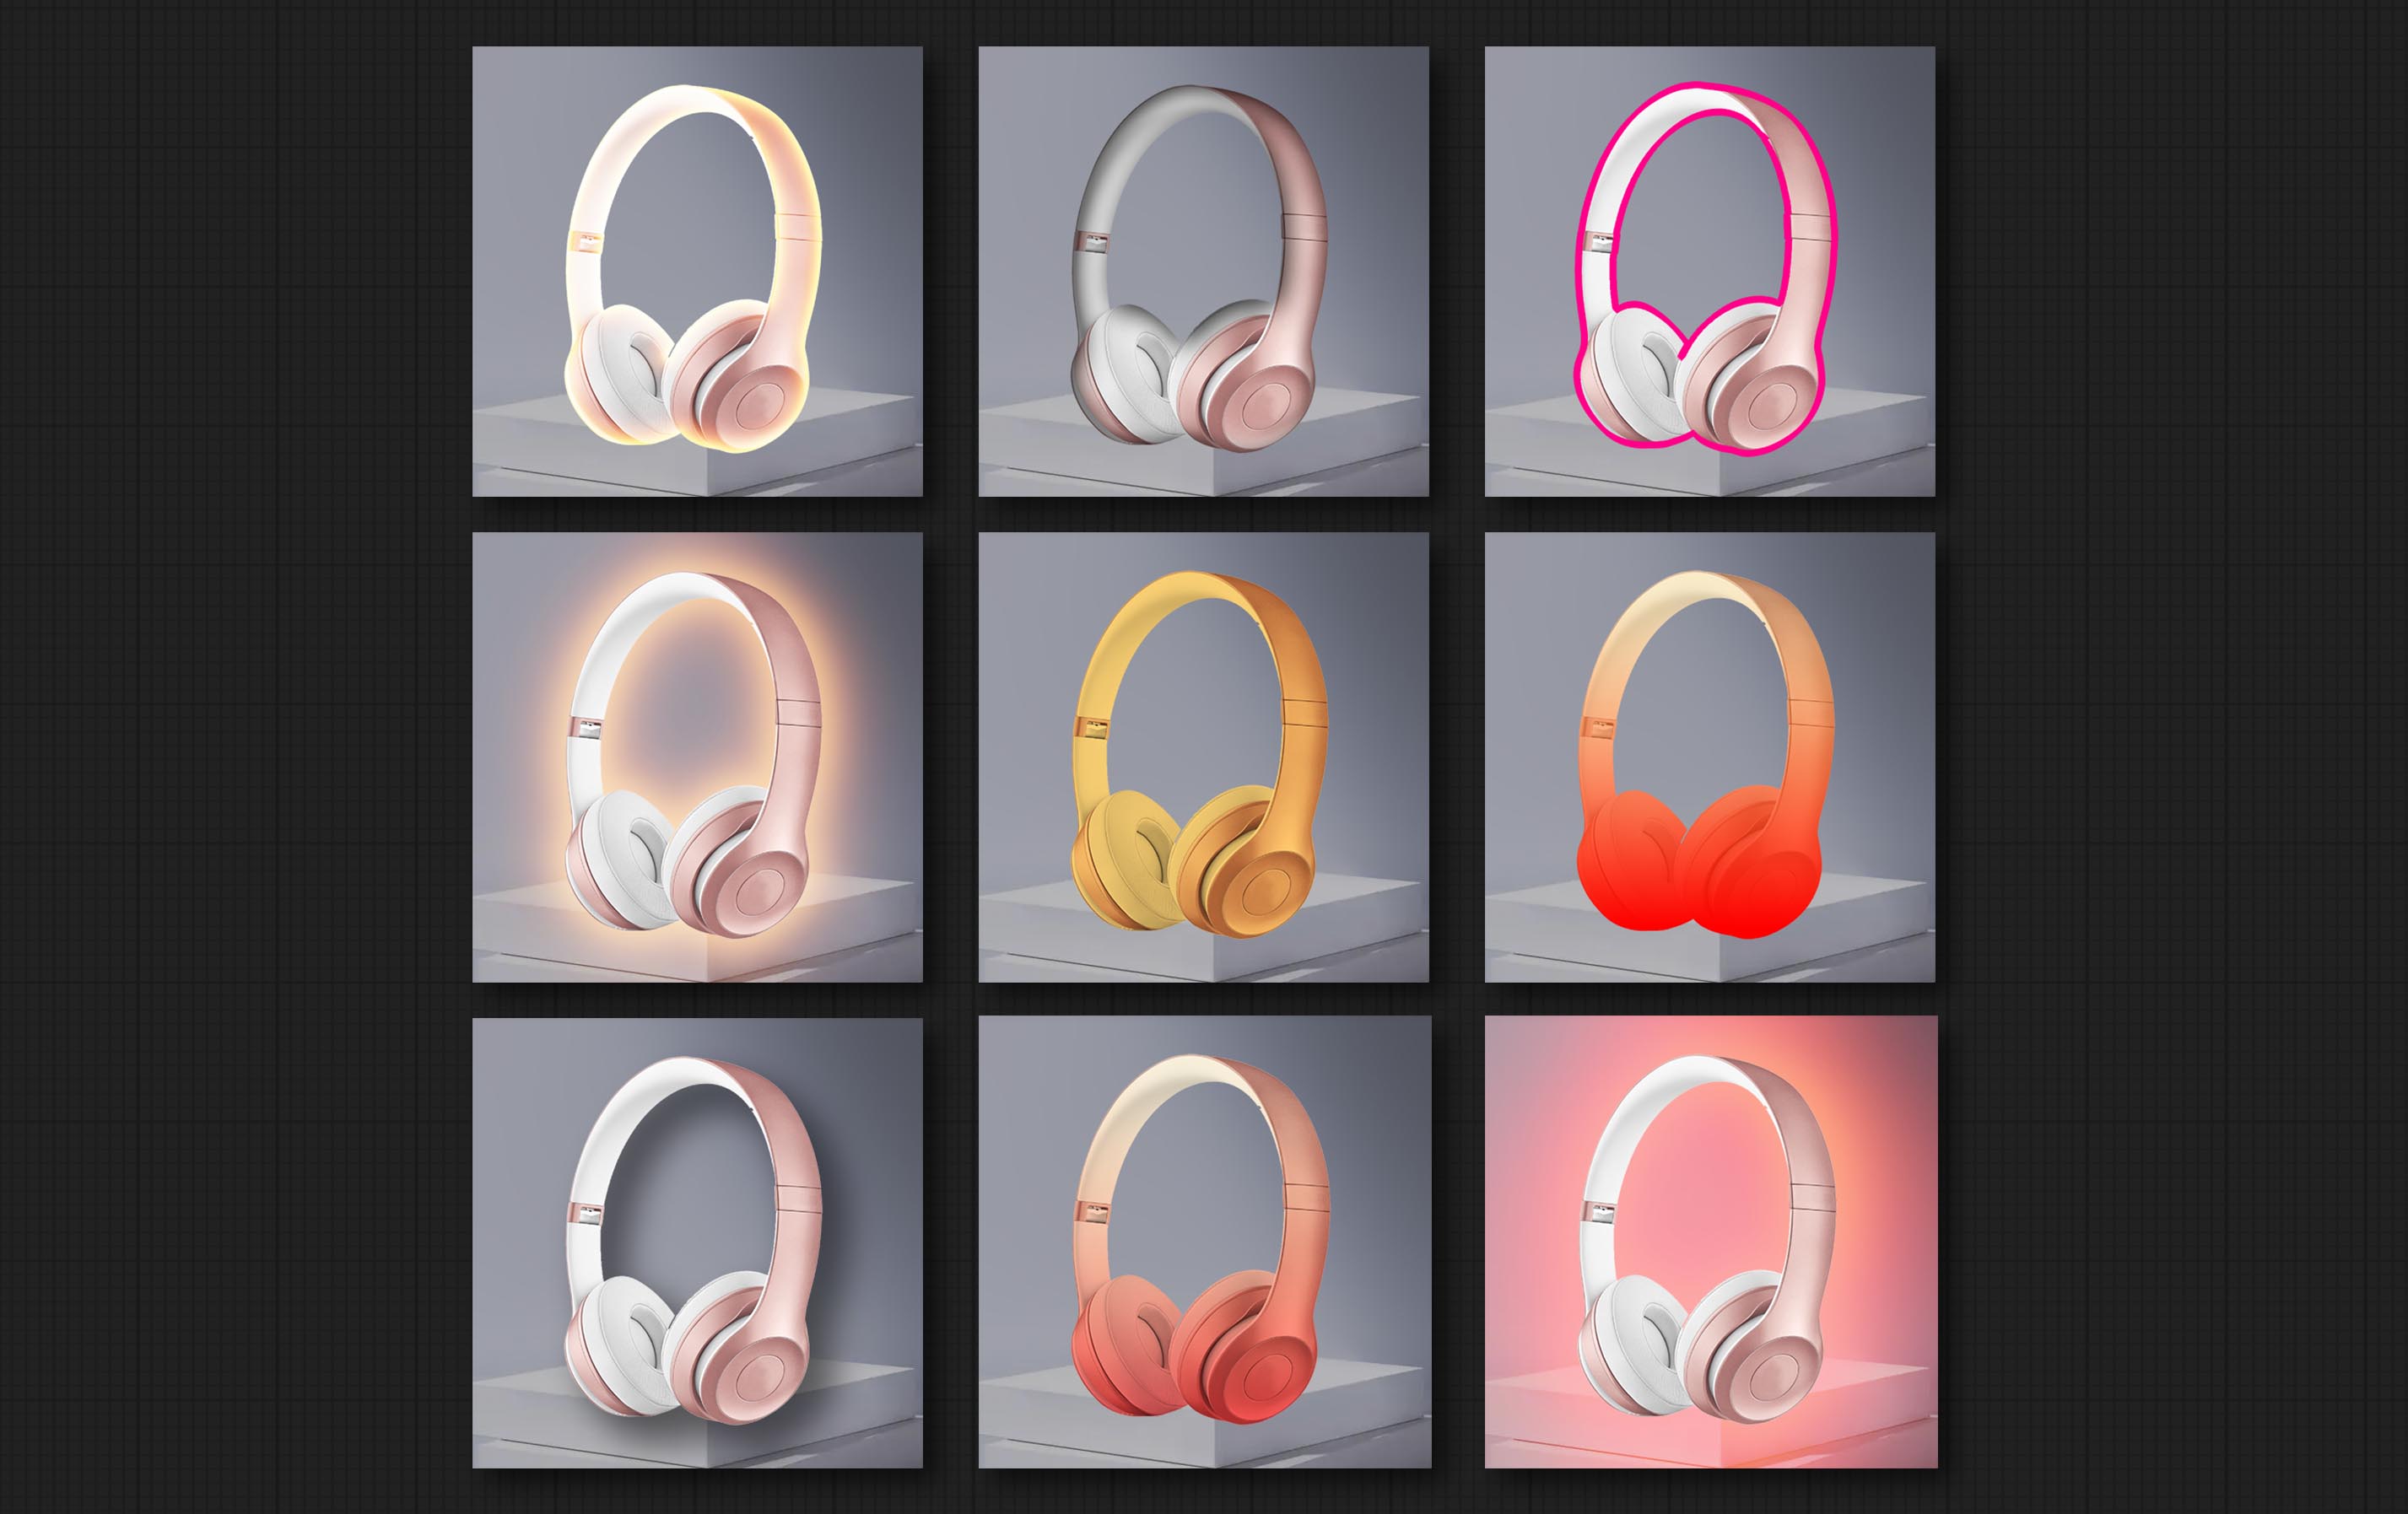
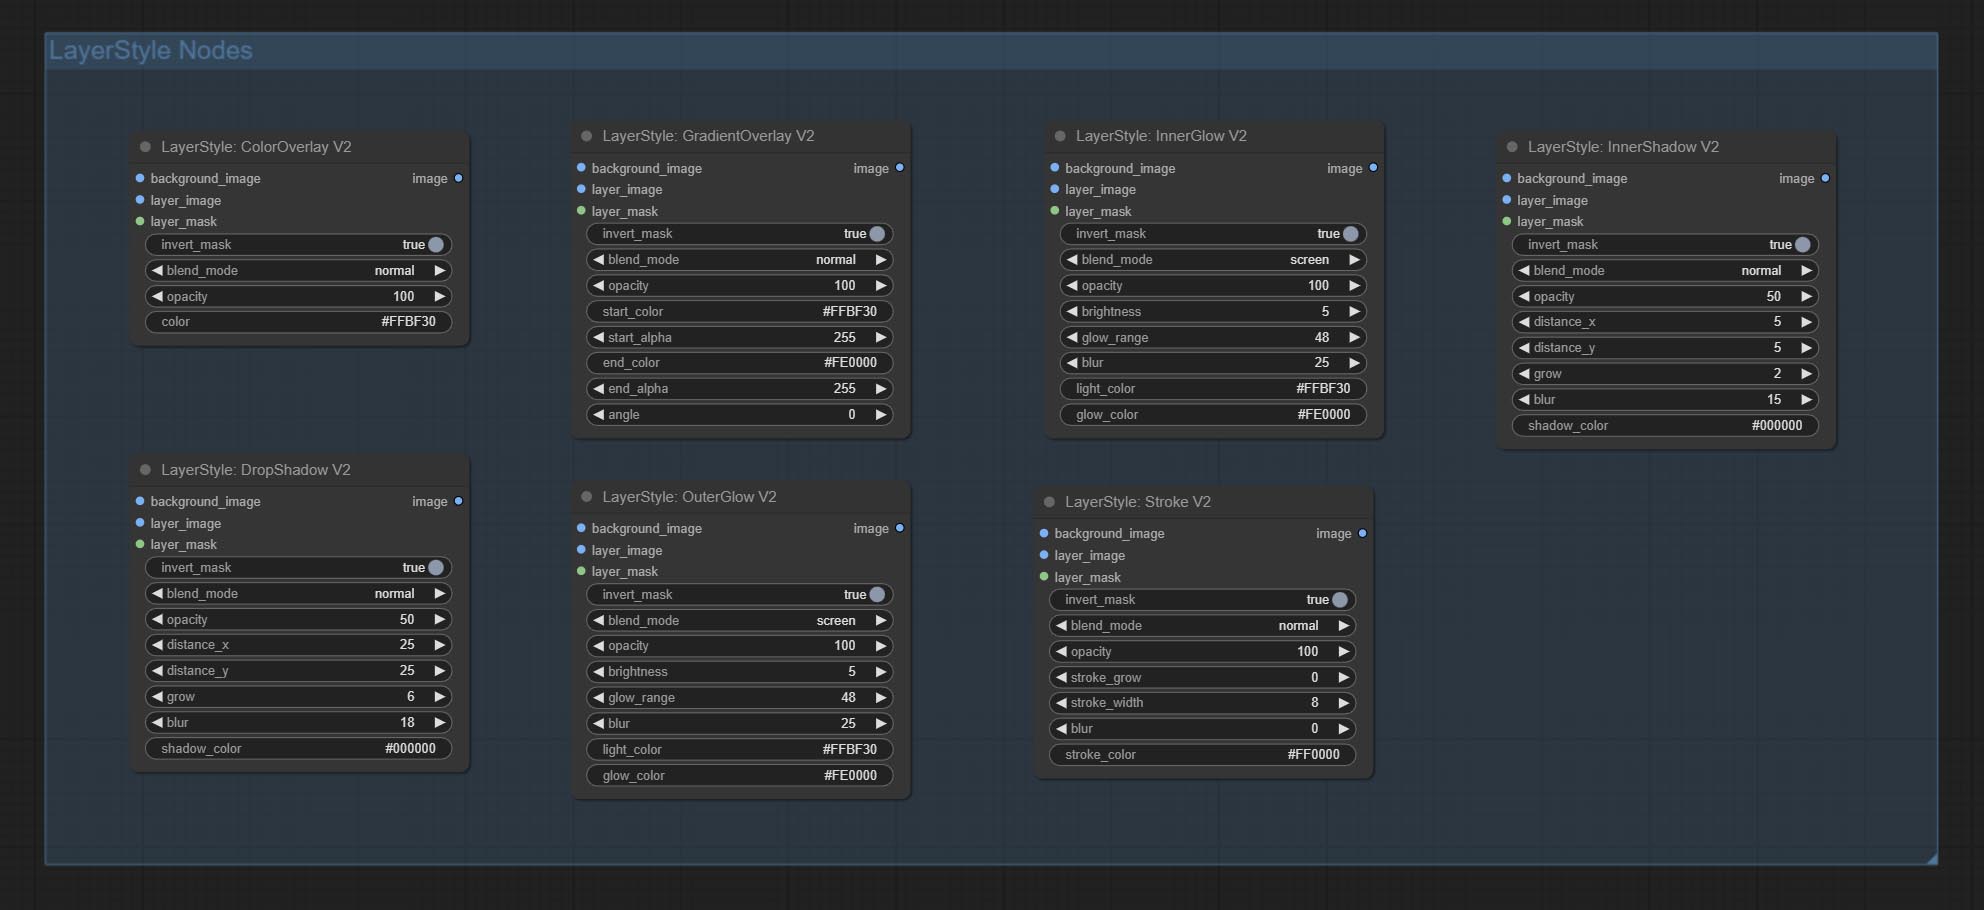
Schatten erzeugen 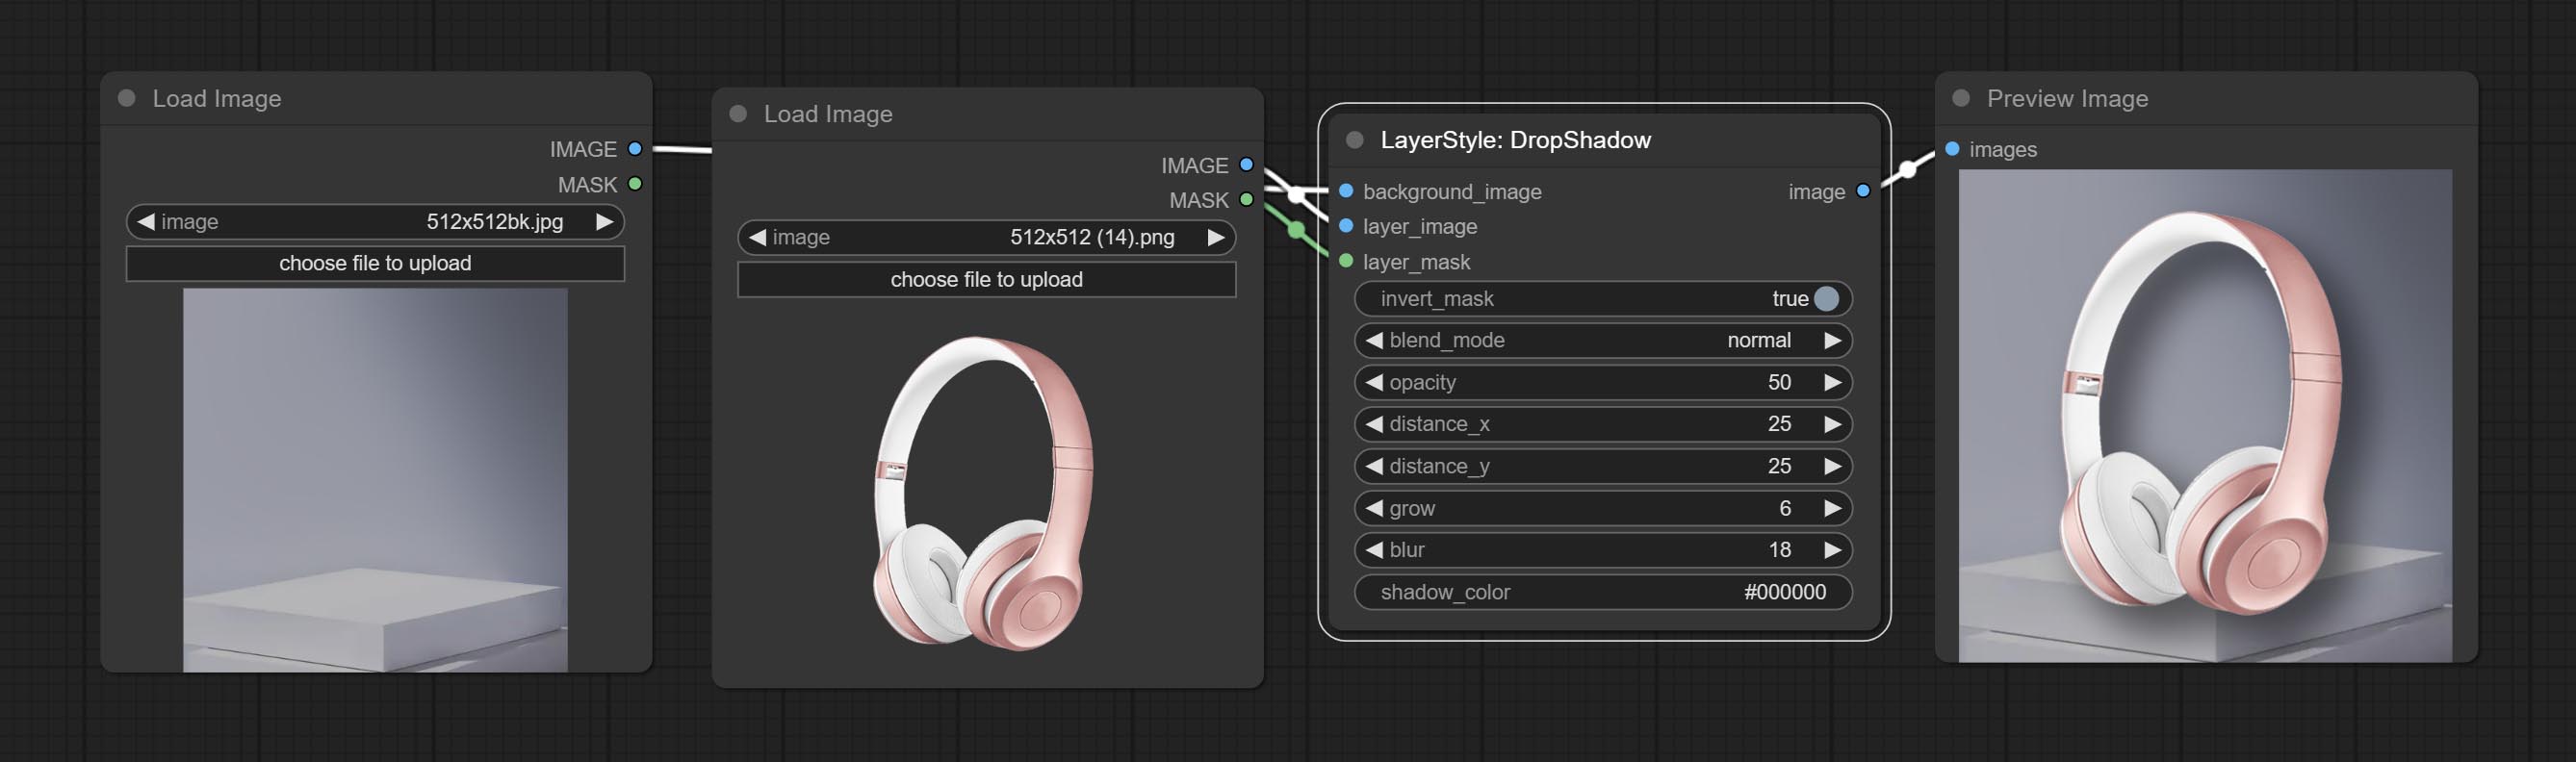
Knotenoptionen: 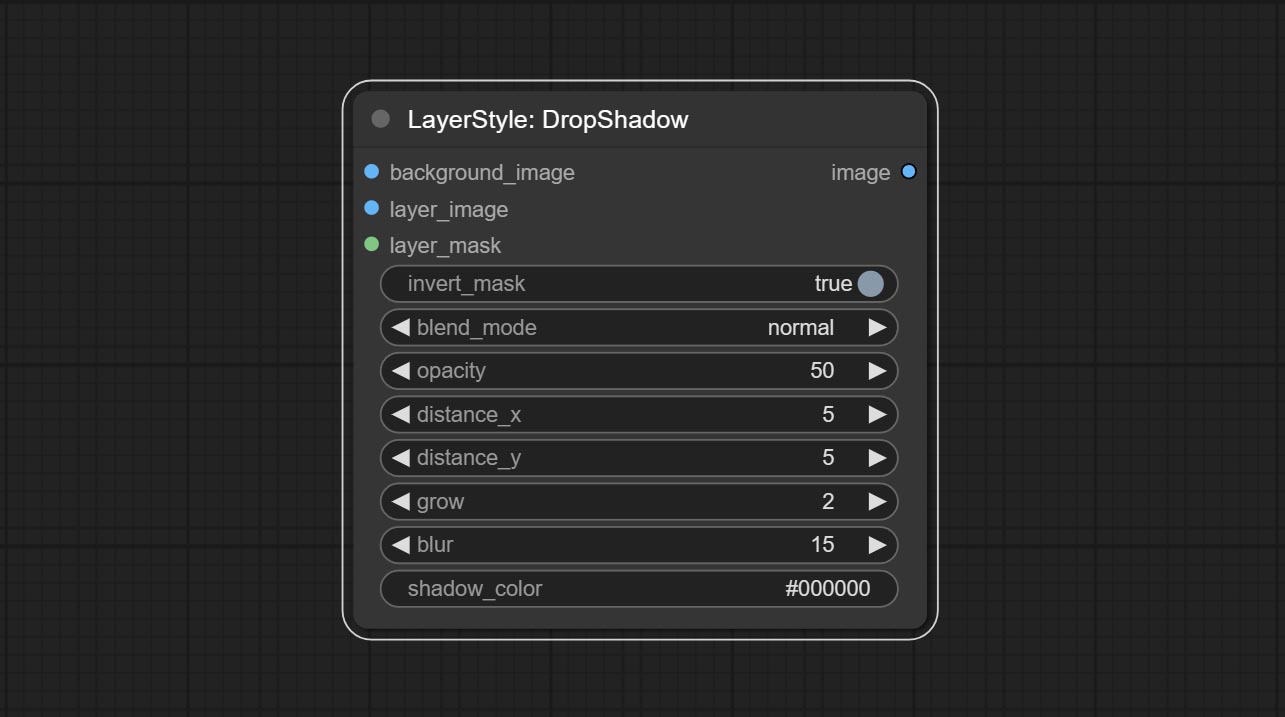
Erzeugen Sie äußeres Glühen 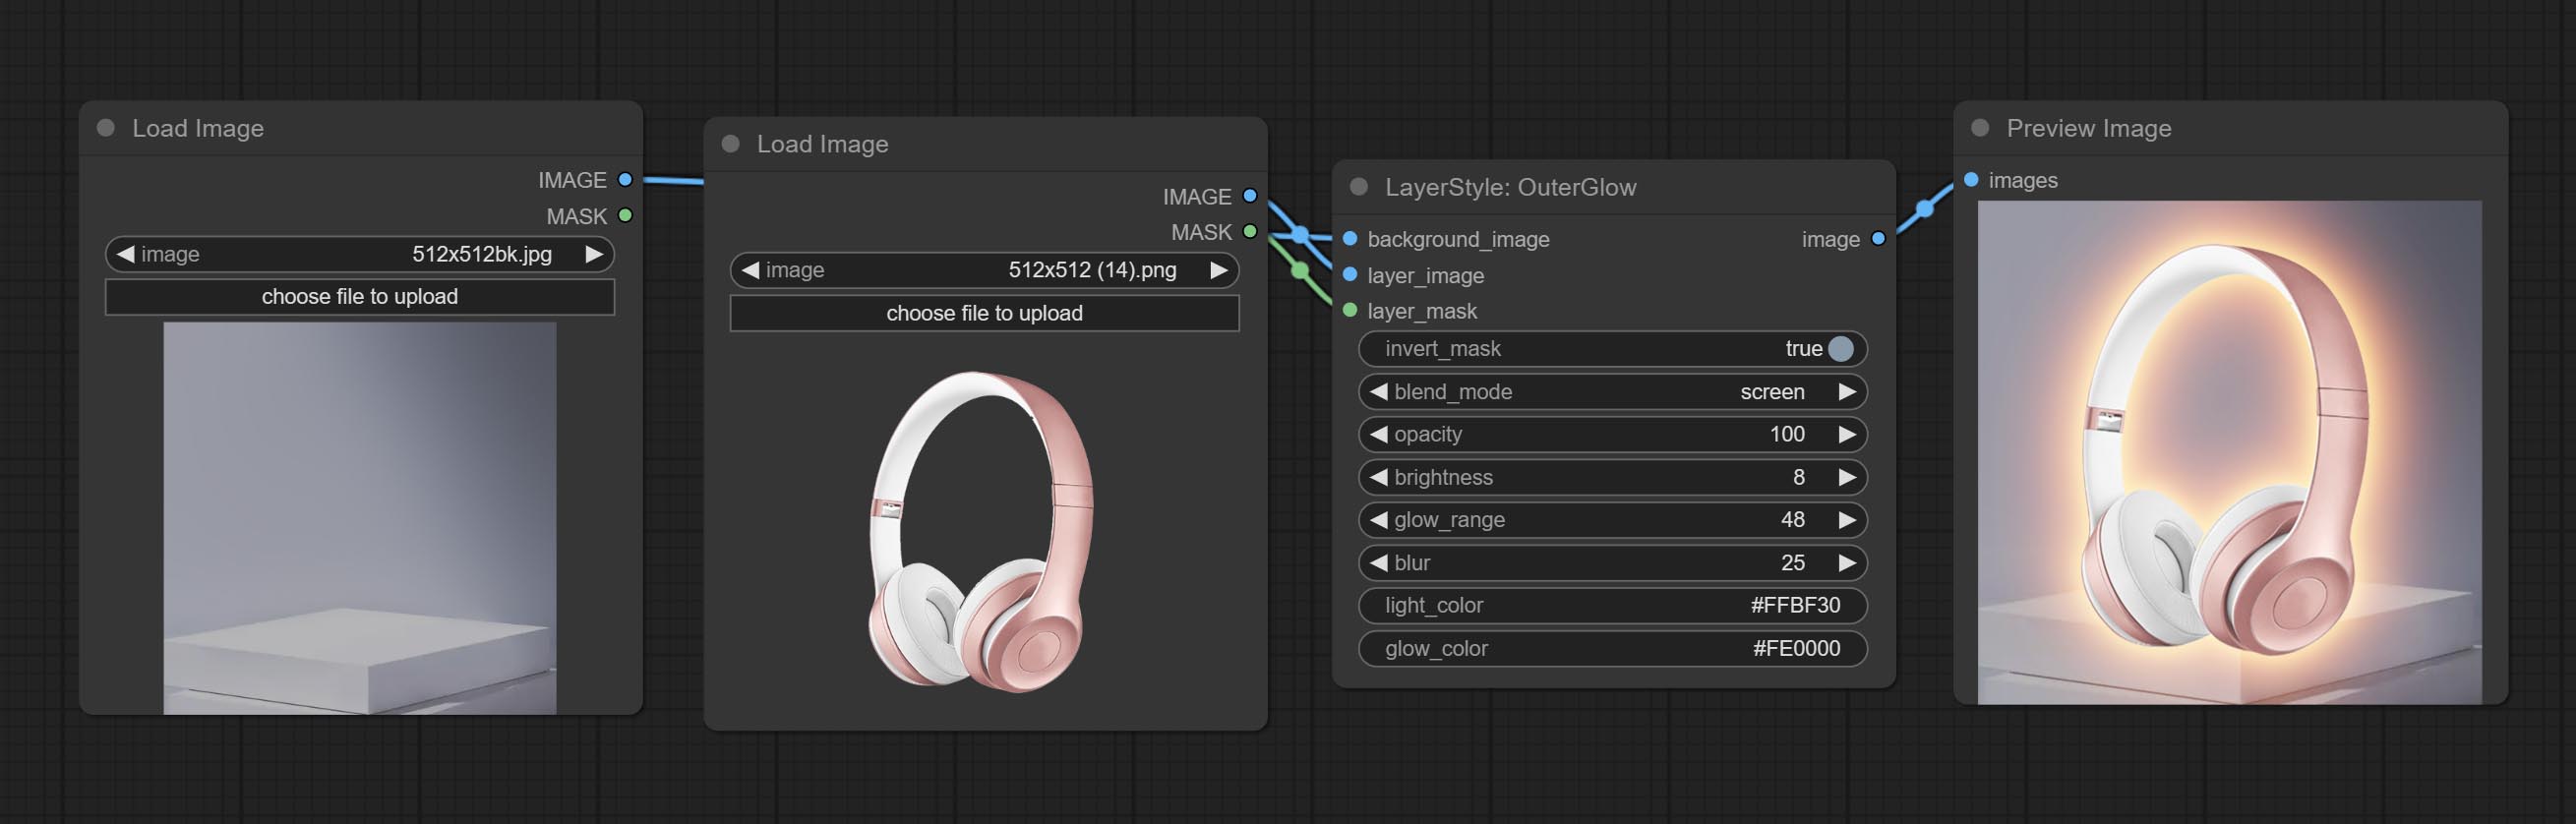
Knotenoptionen: 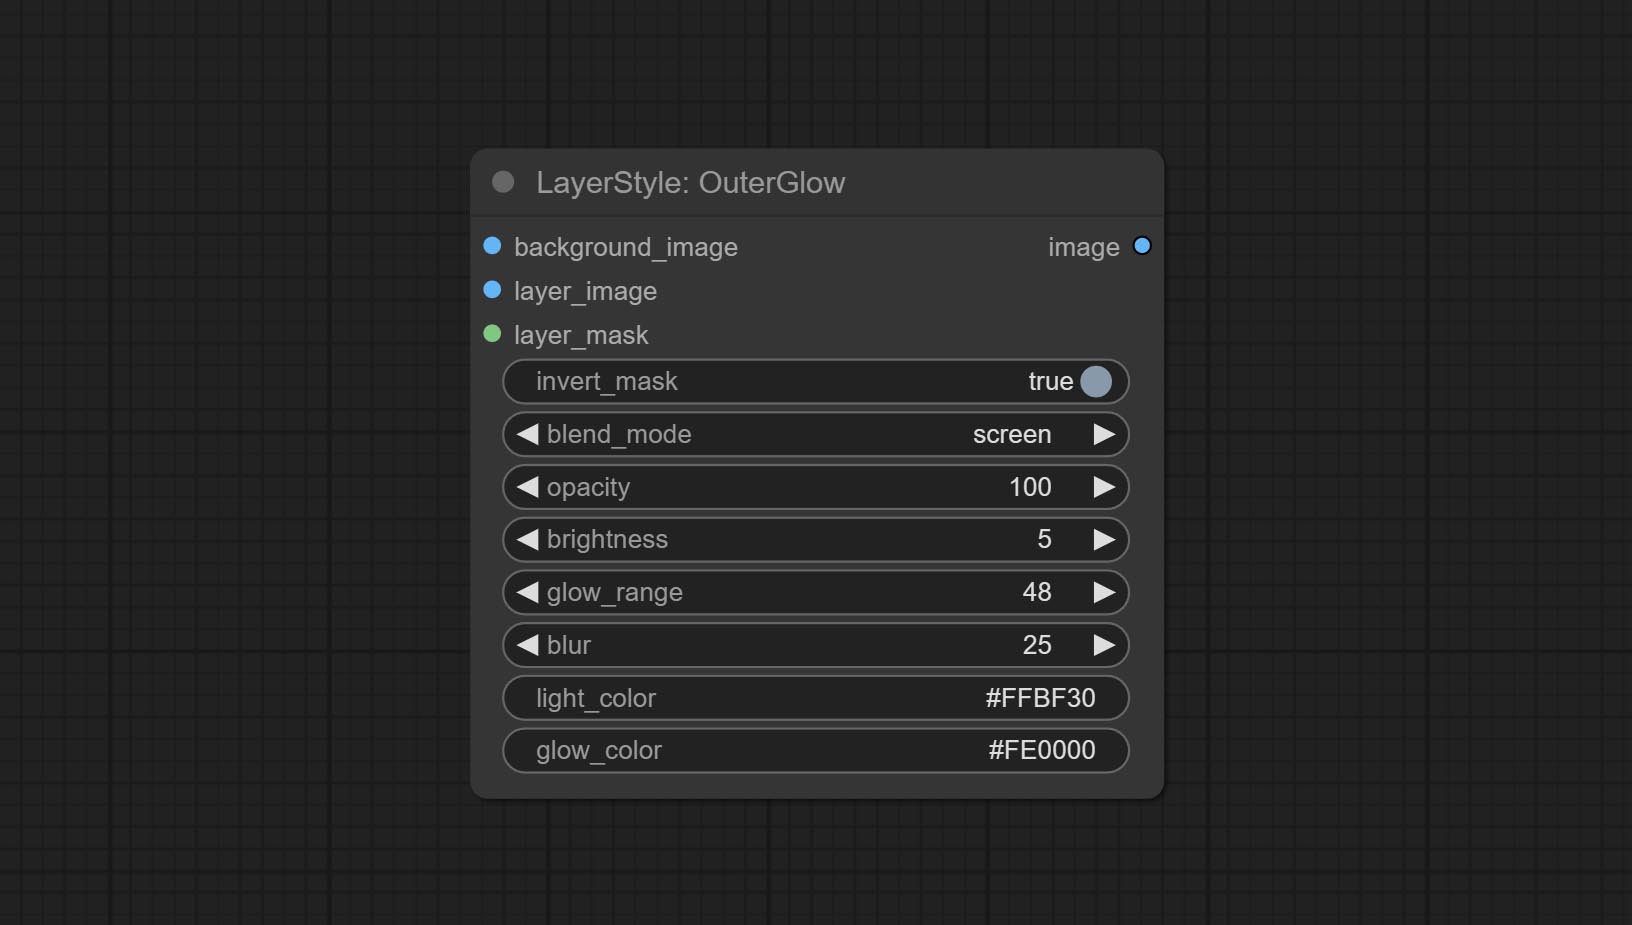
Erzeugen Sie inneren Schatten 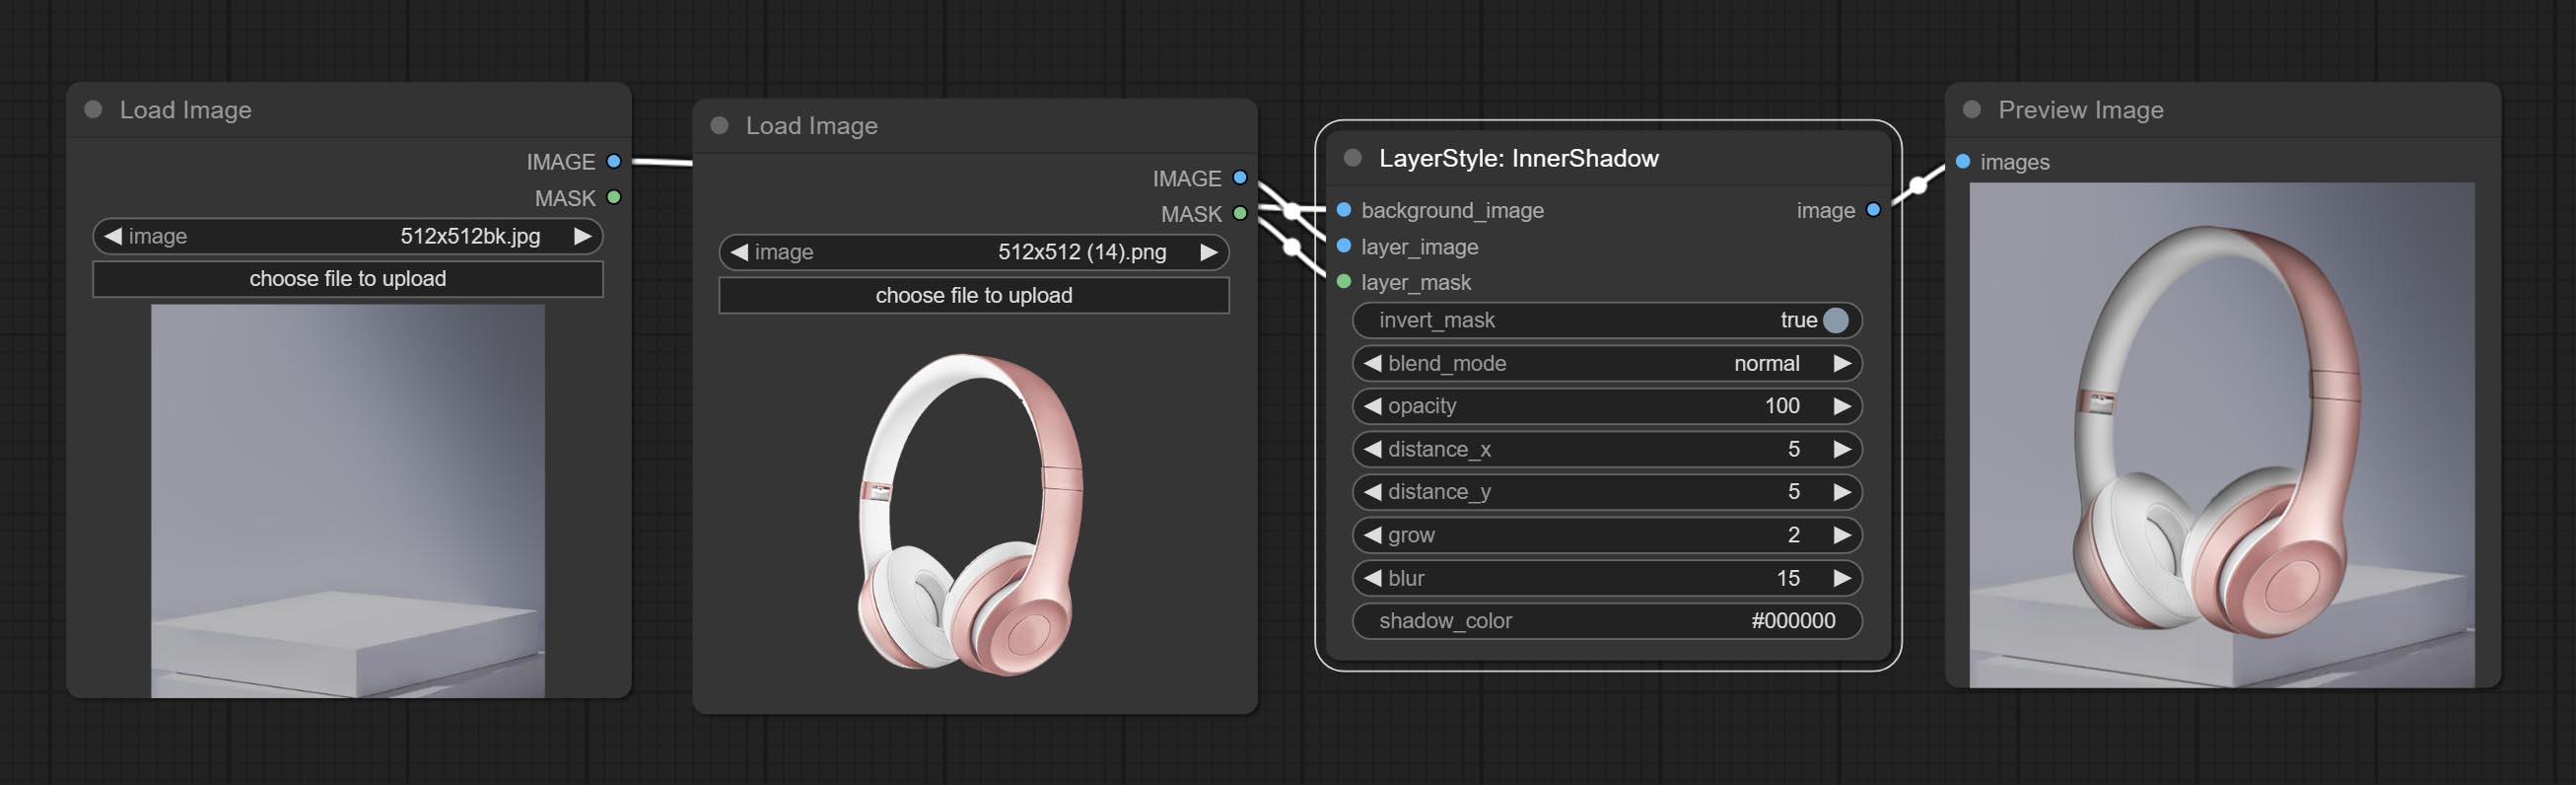
Knotenoptionen: 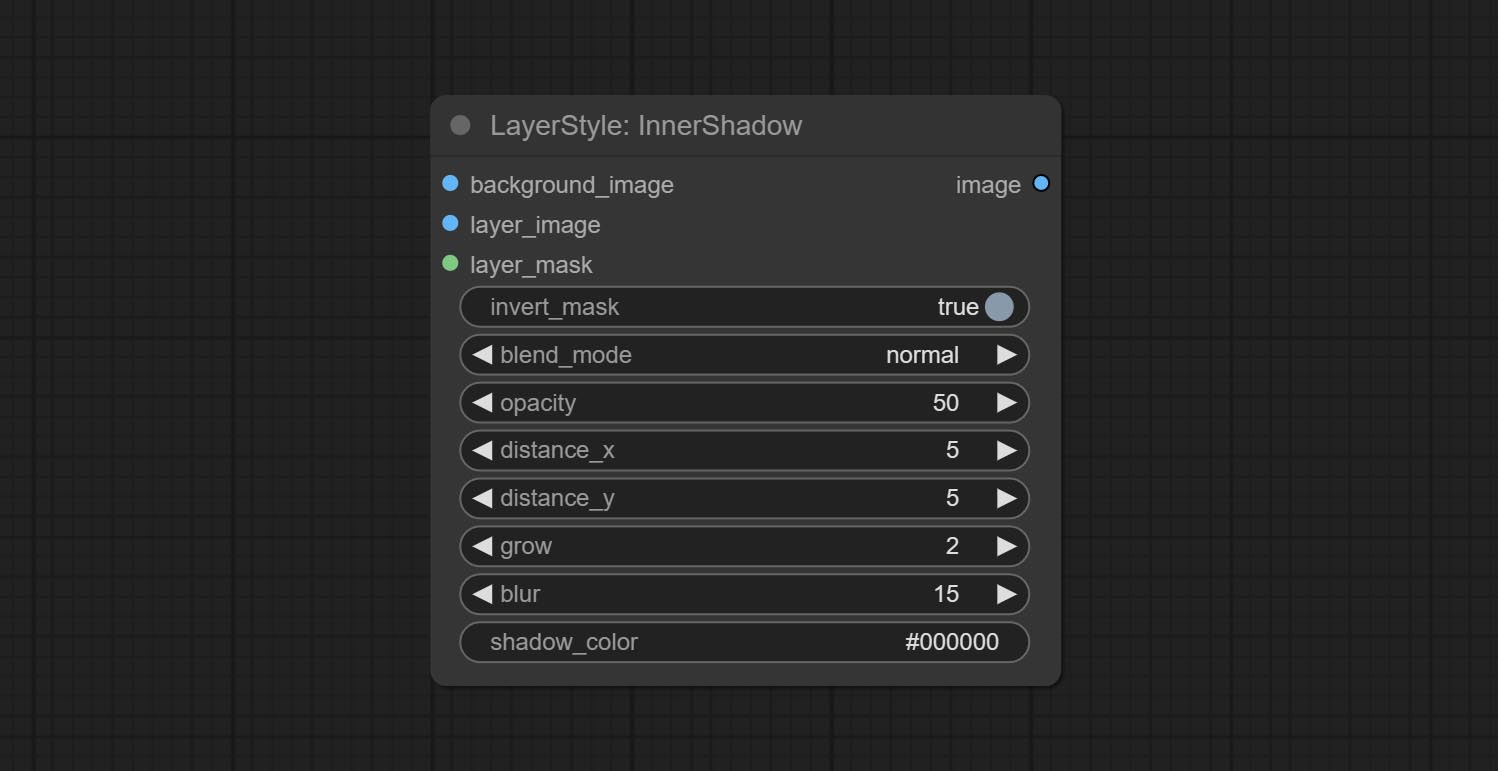
Erzeugen Sie inneres Glühen 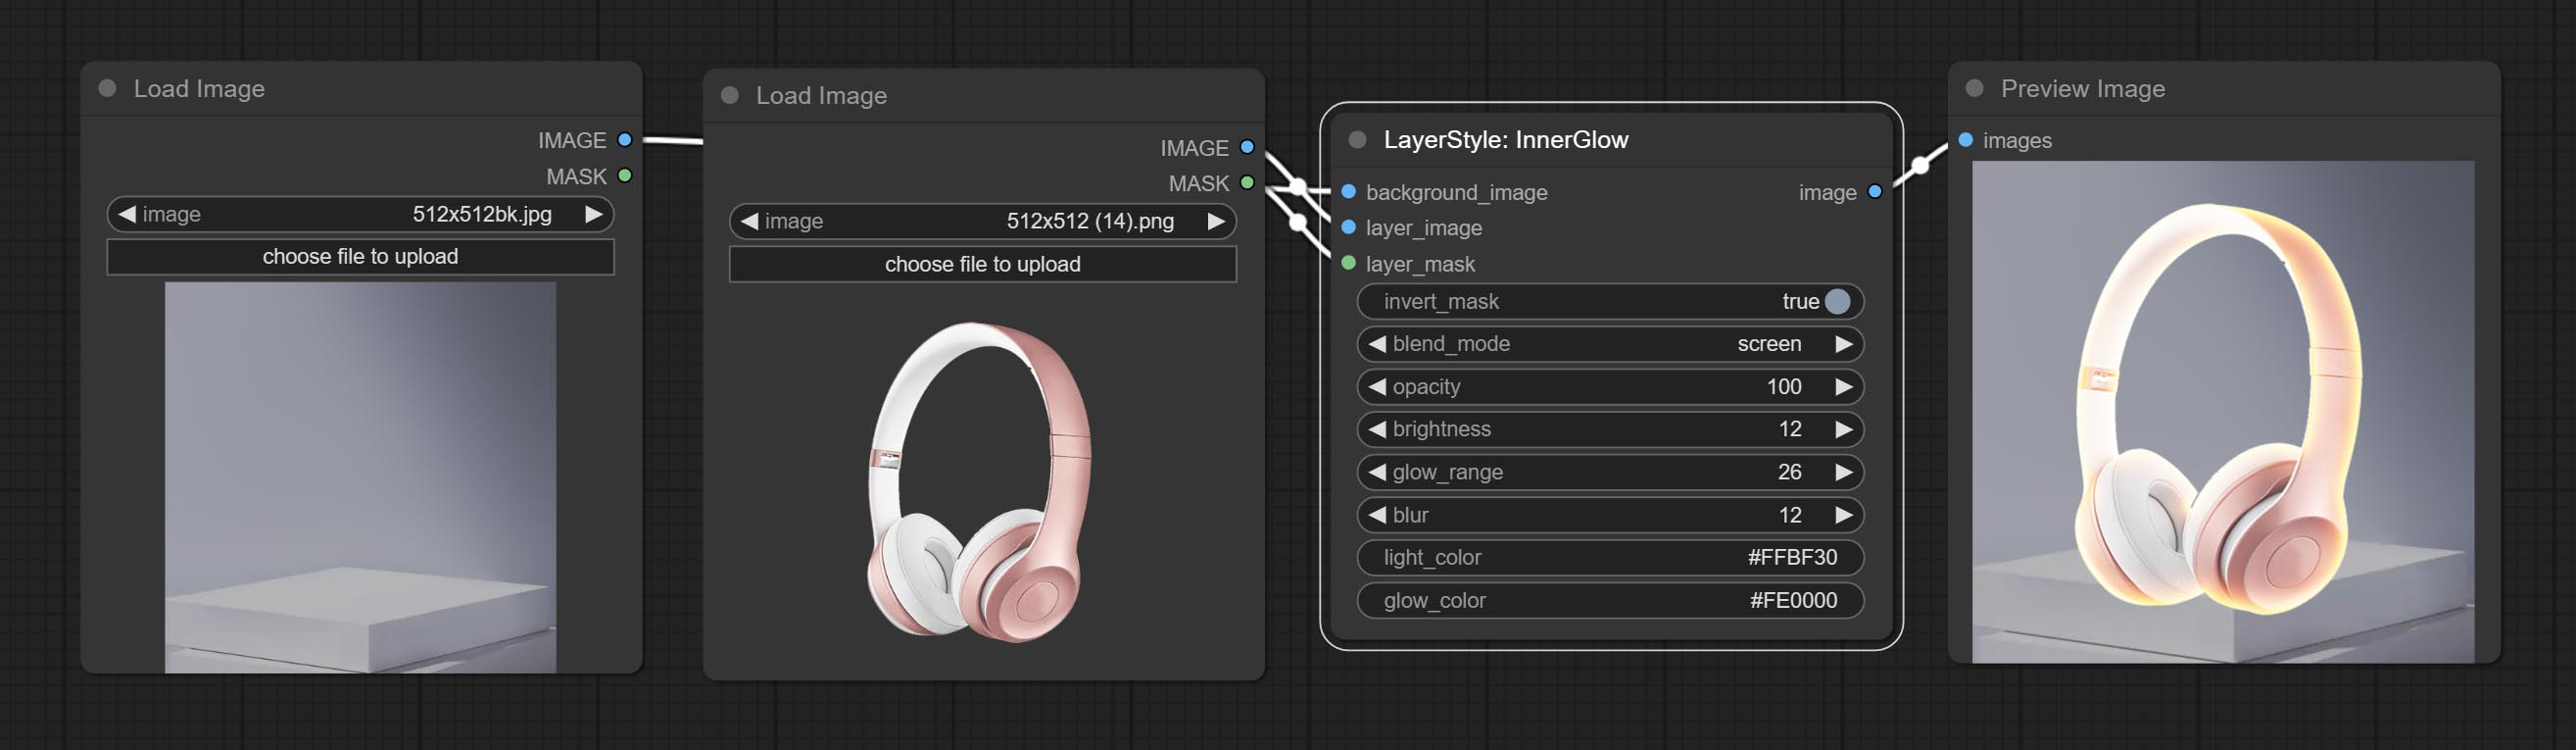
Knotenoptionen: 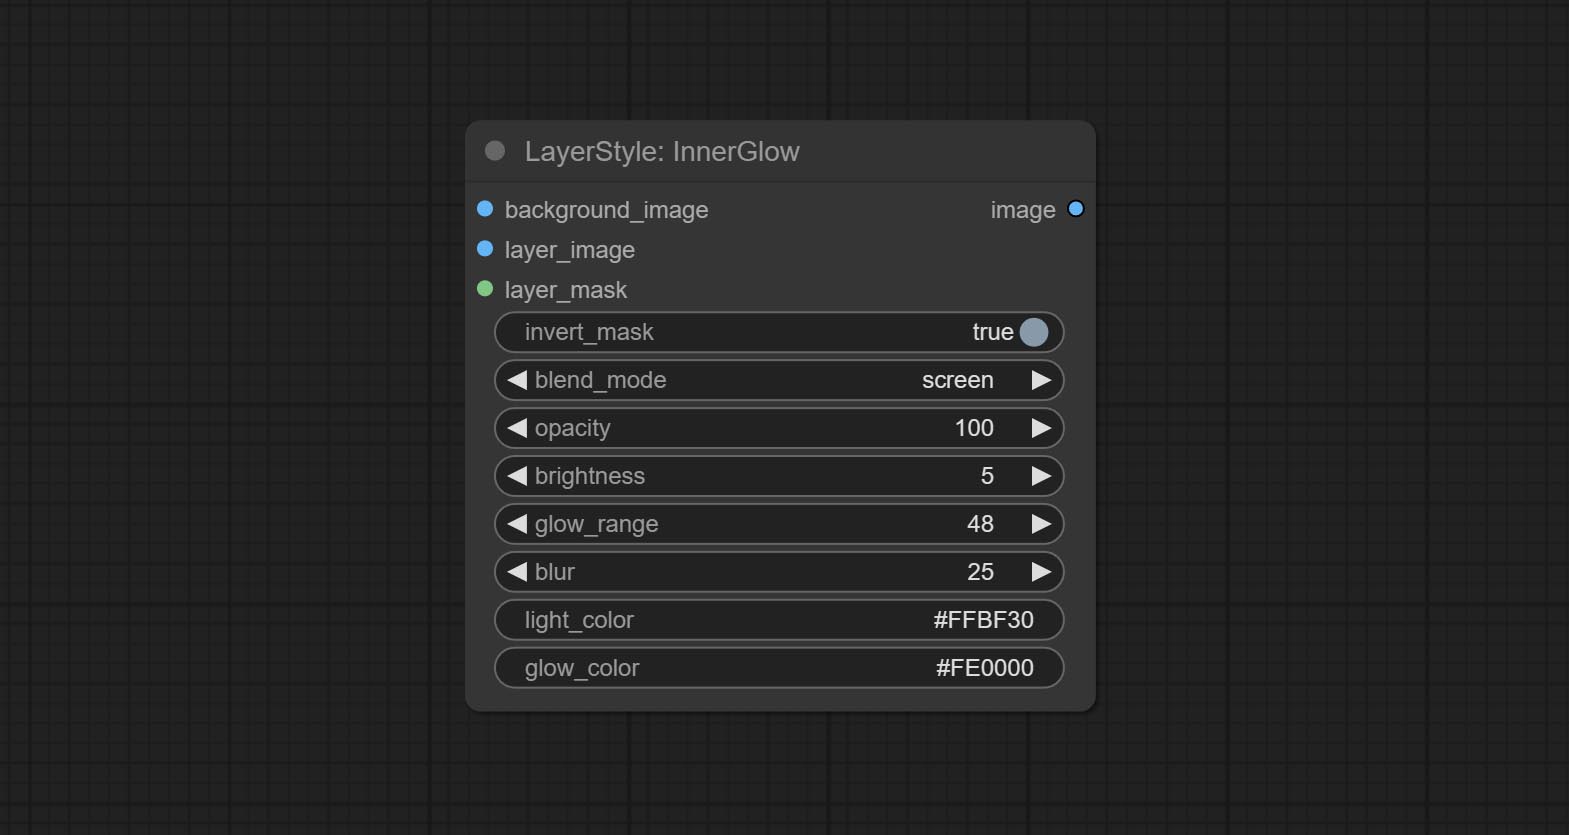
Erzeugen Sie einen Schichtstrich。 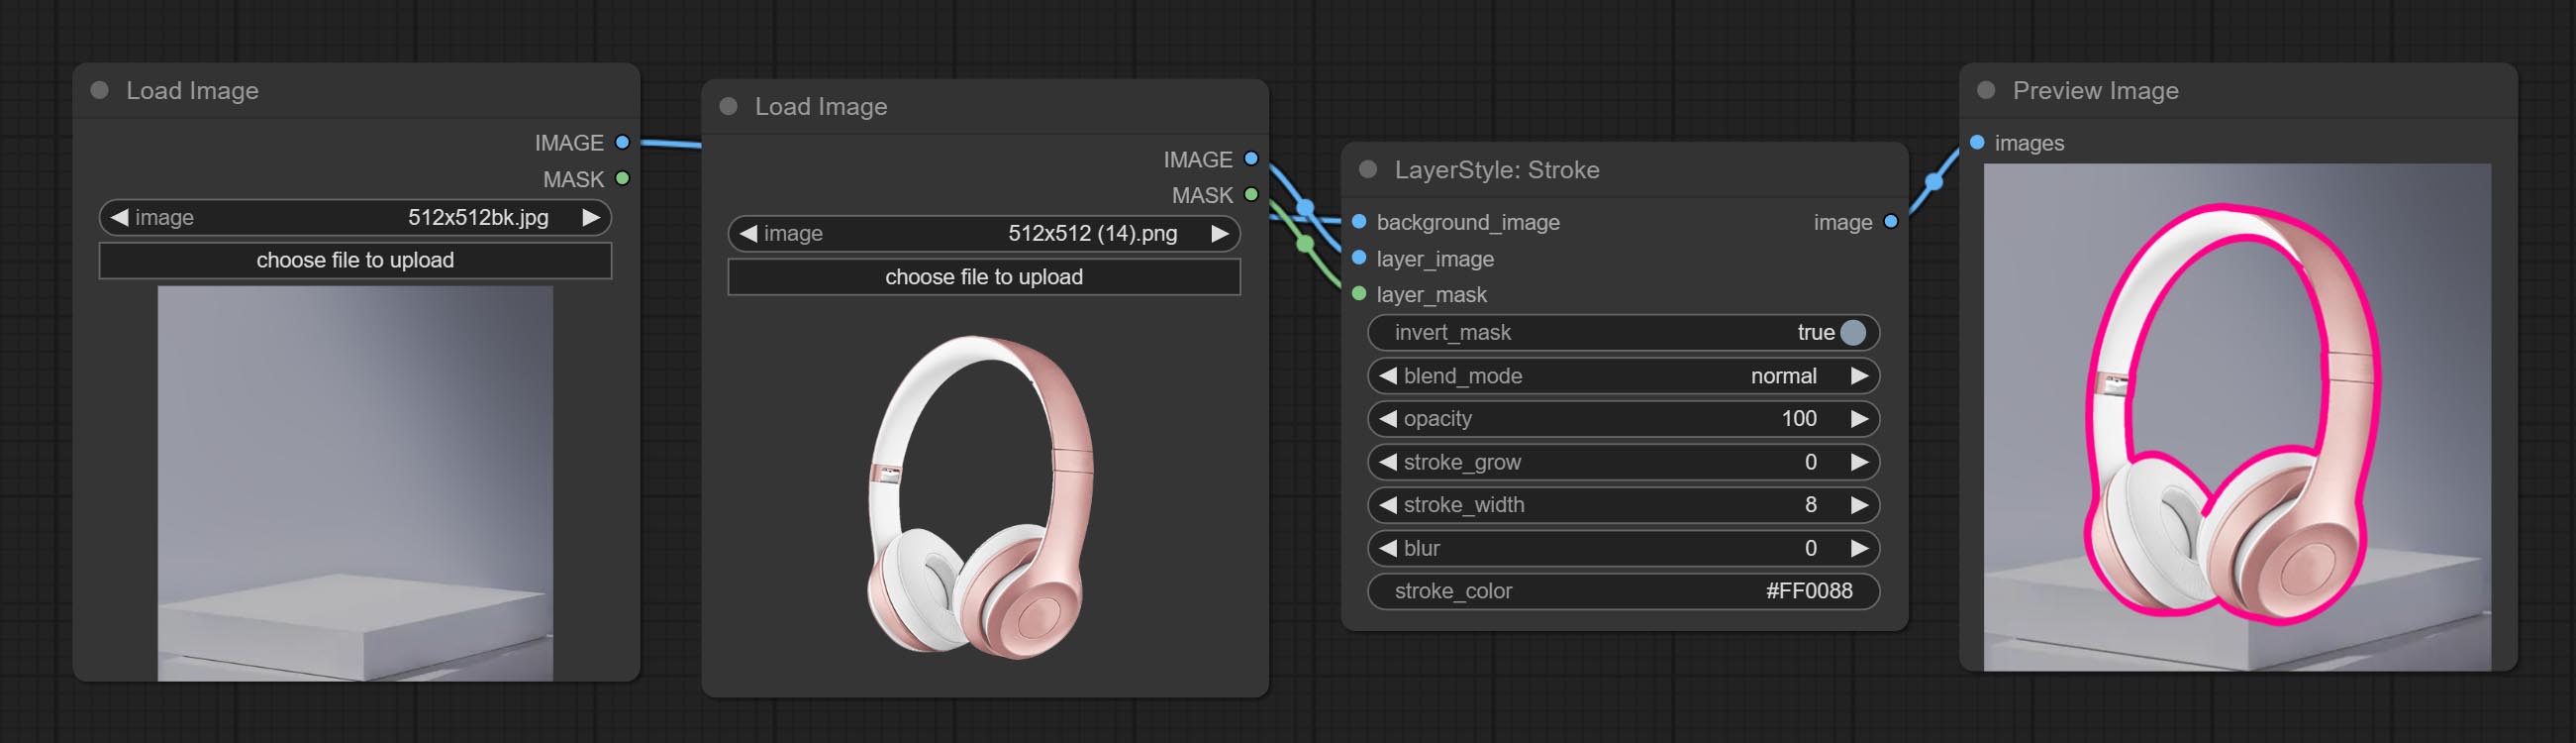
Knotenoptionen: 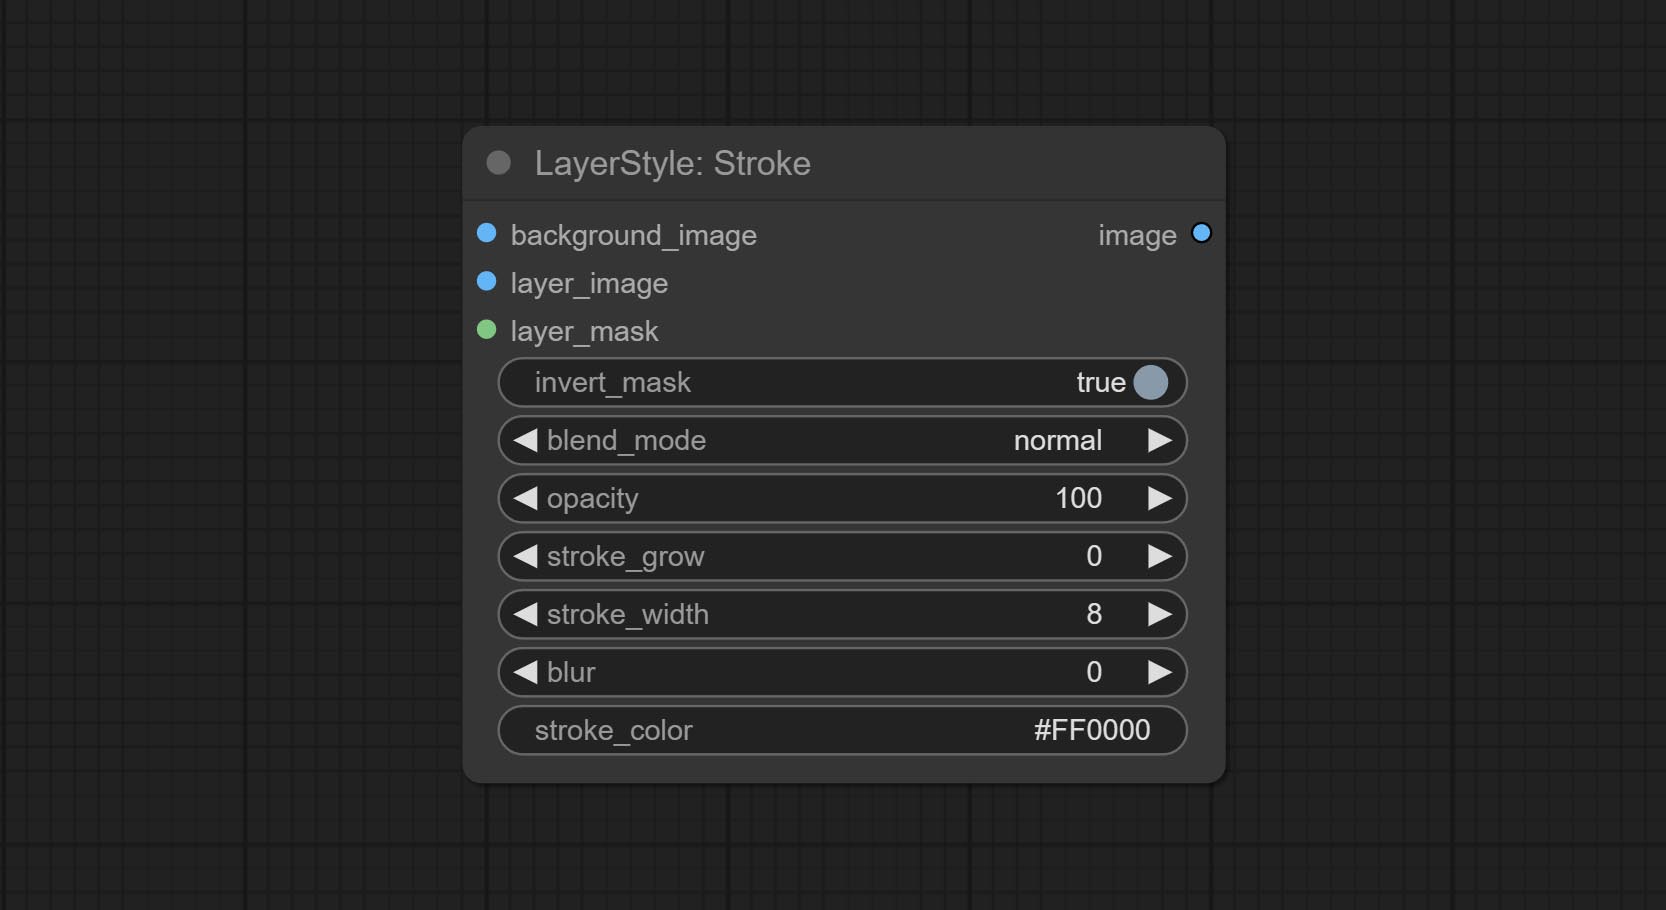
Gradientenüberlagerung erzeugen 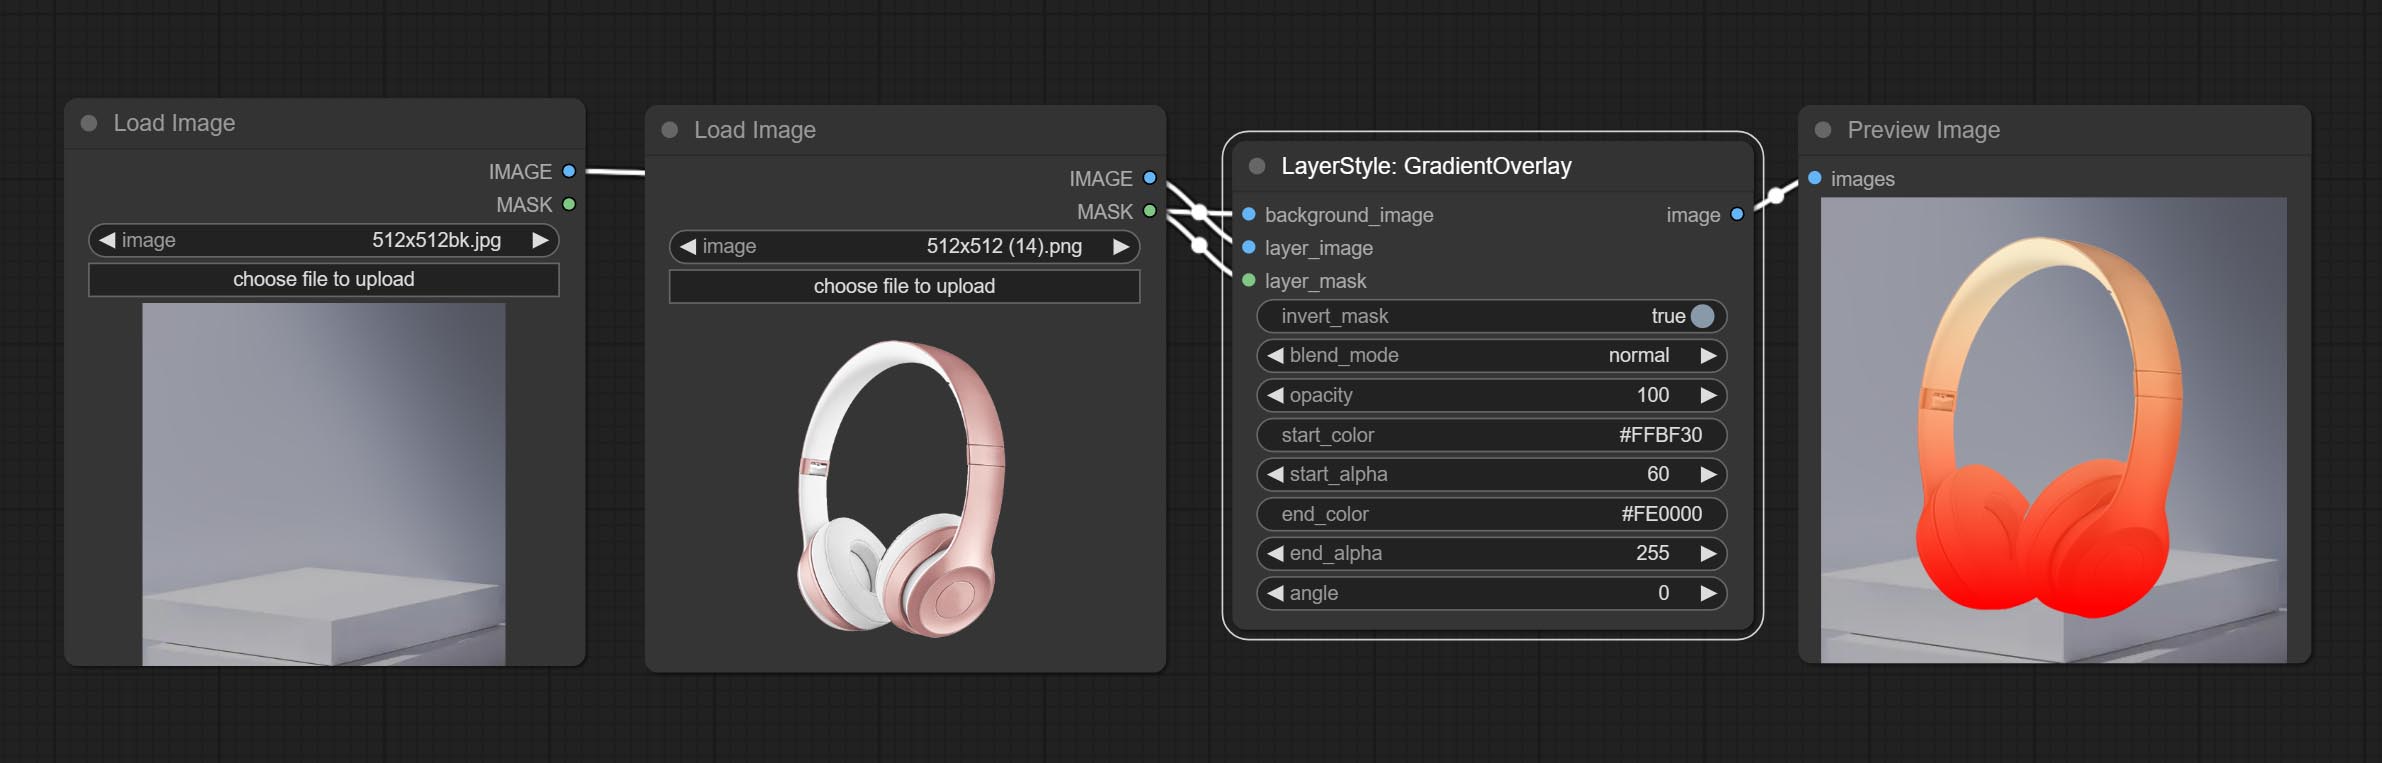
Knotenoptionen:
Generate color overlay 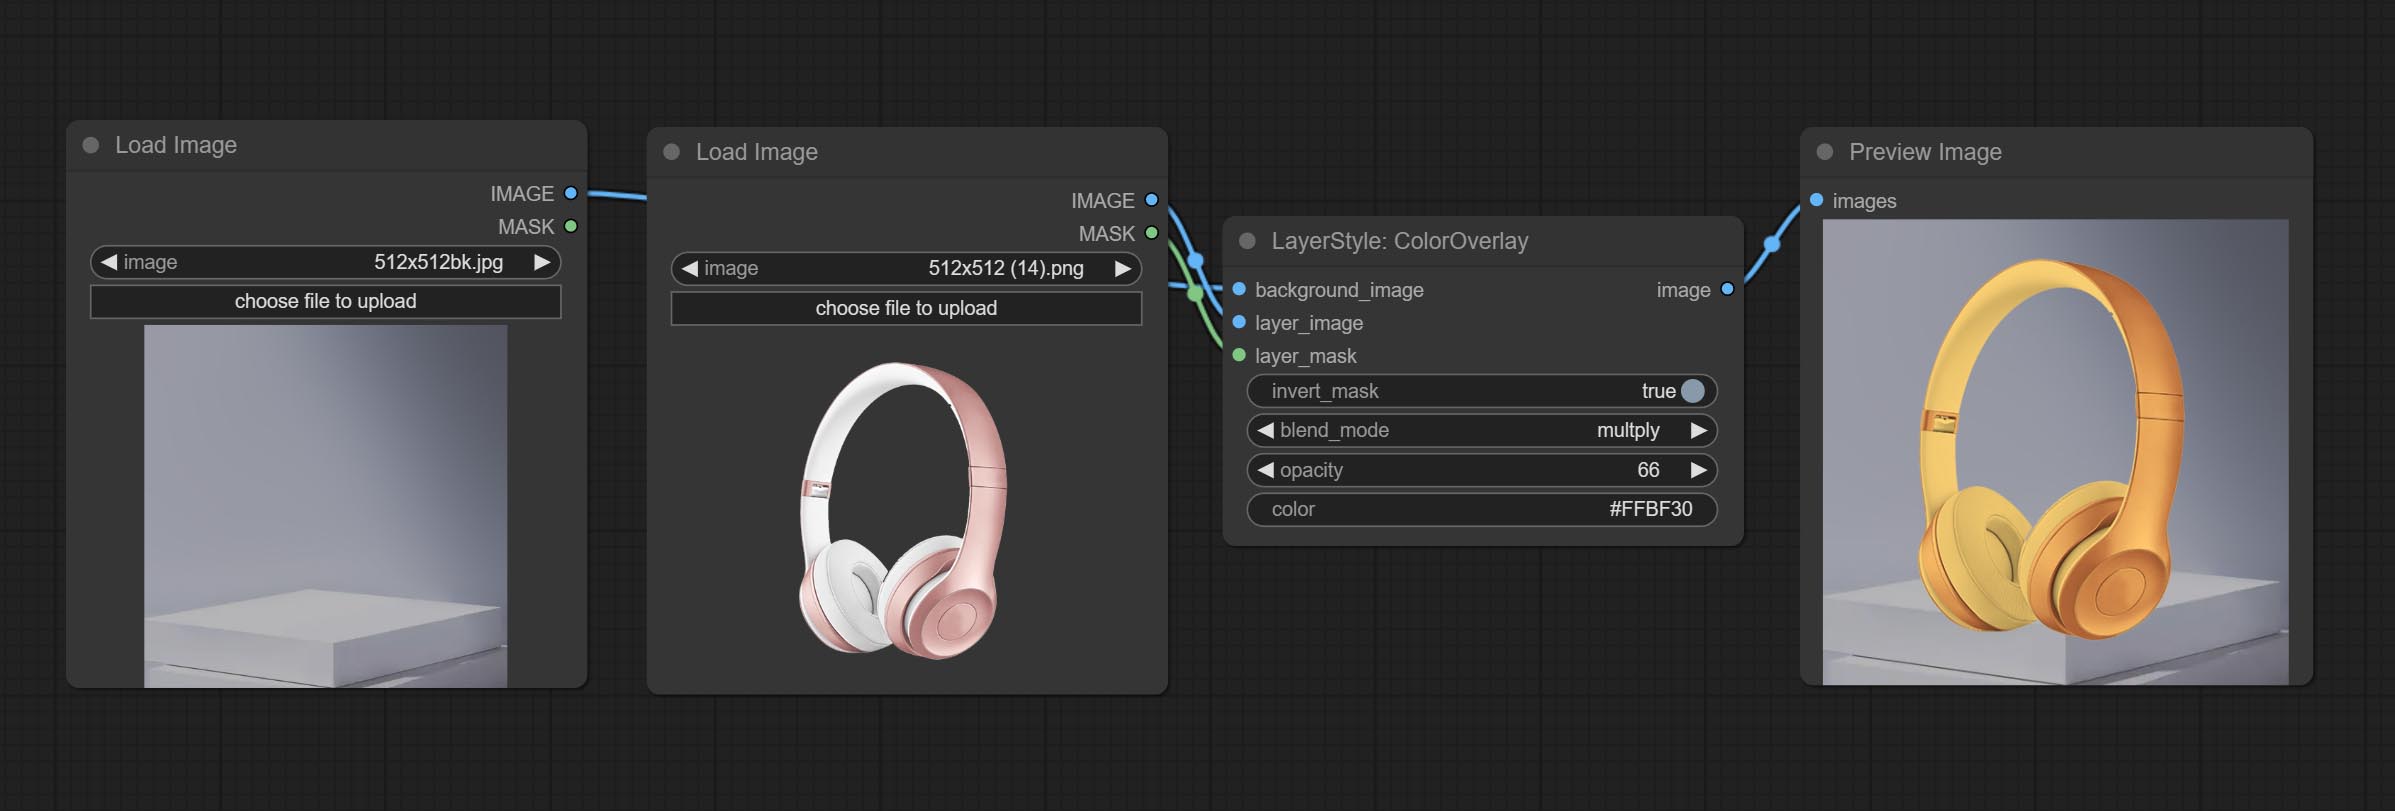
Node options: 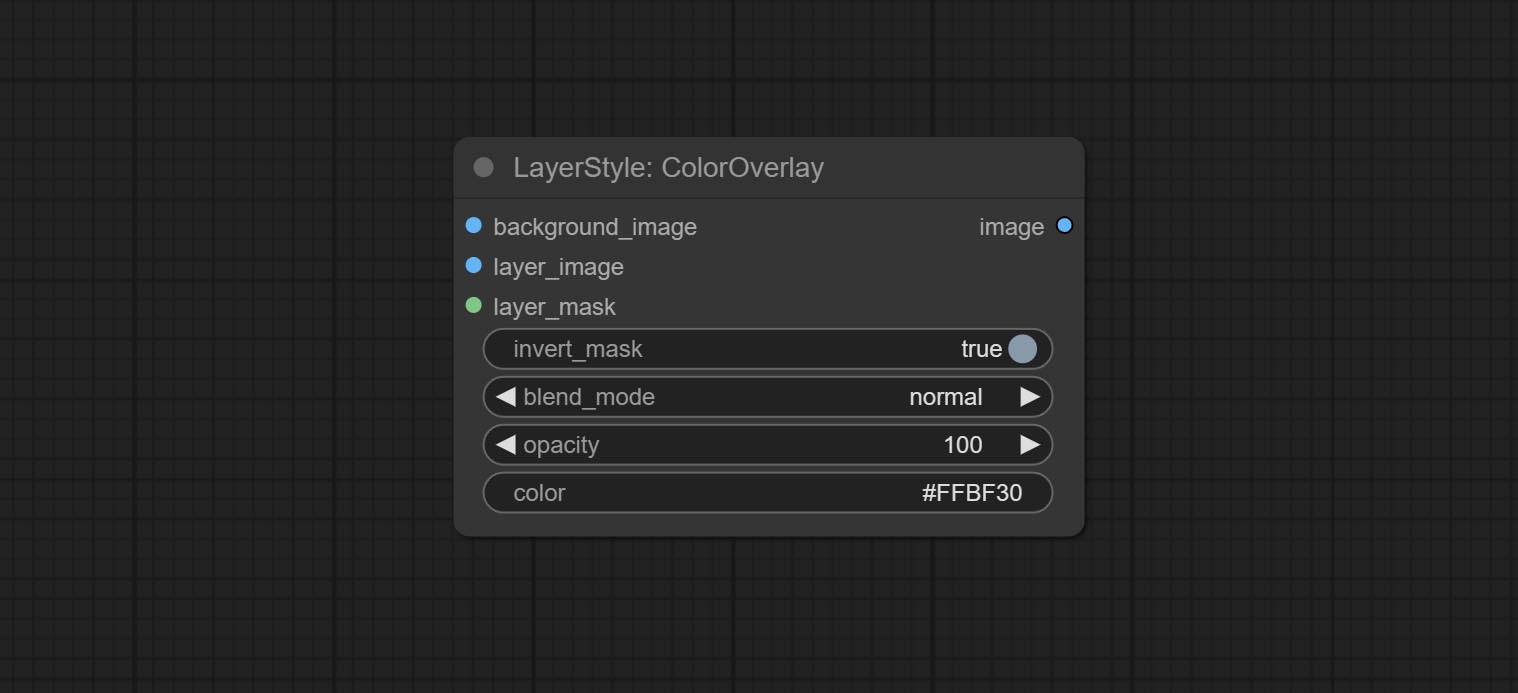
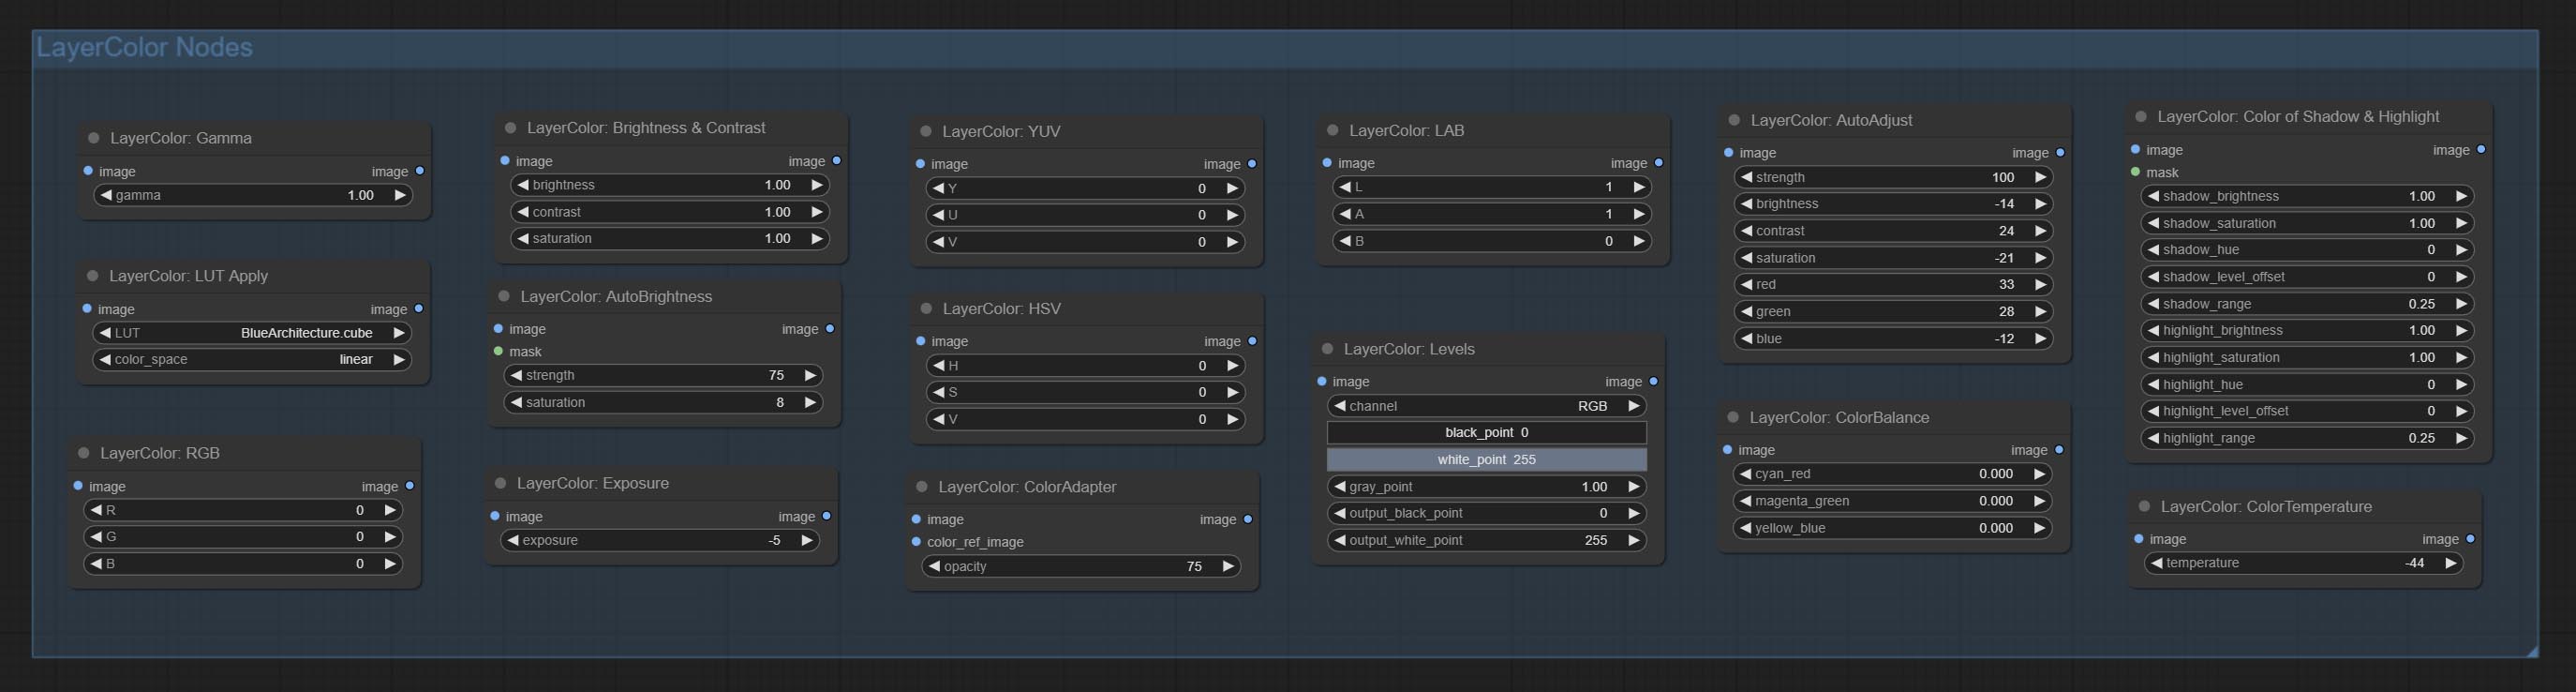
Apply LUT to the image. only supports .cube format. 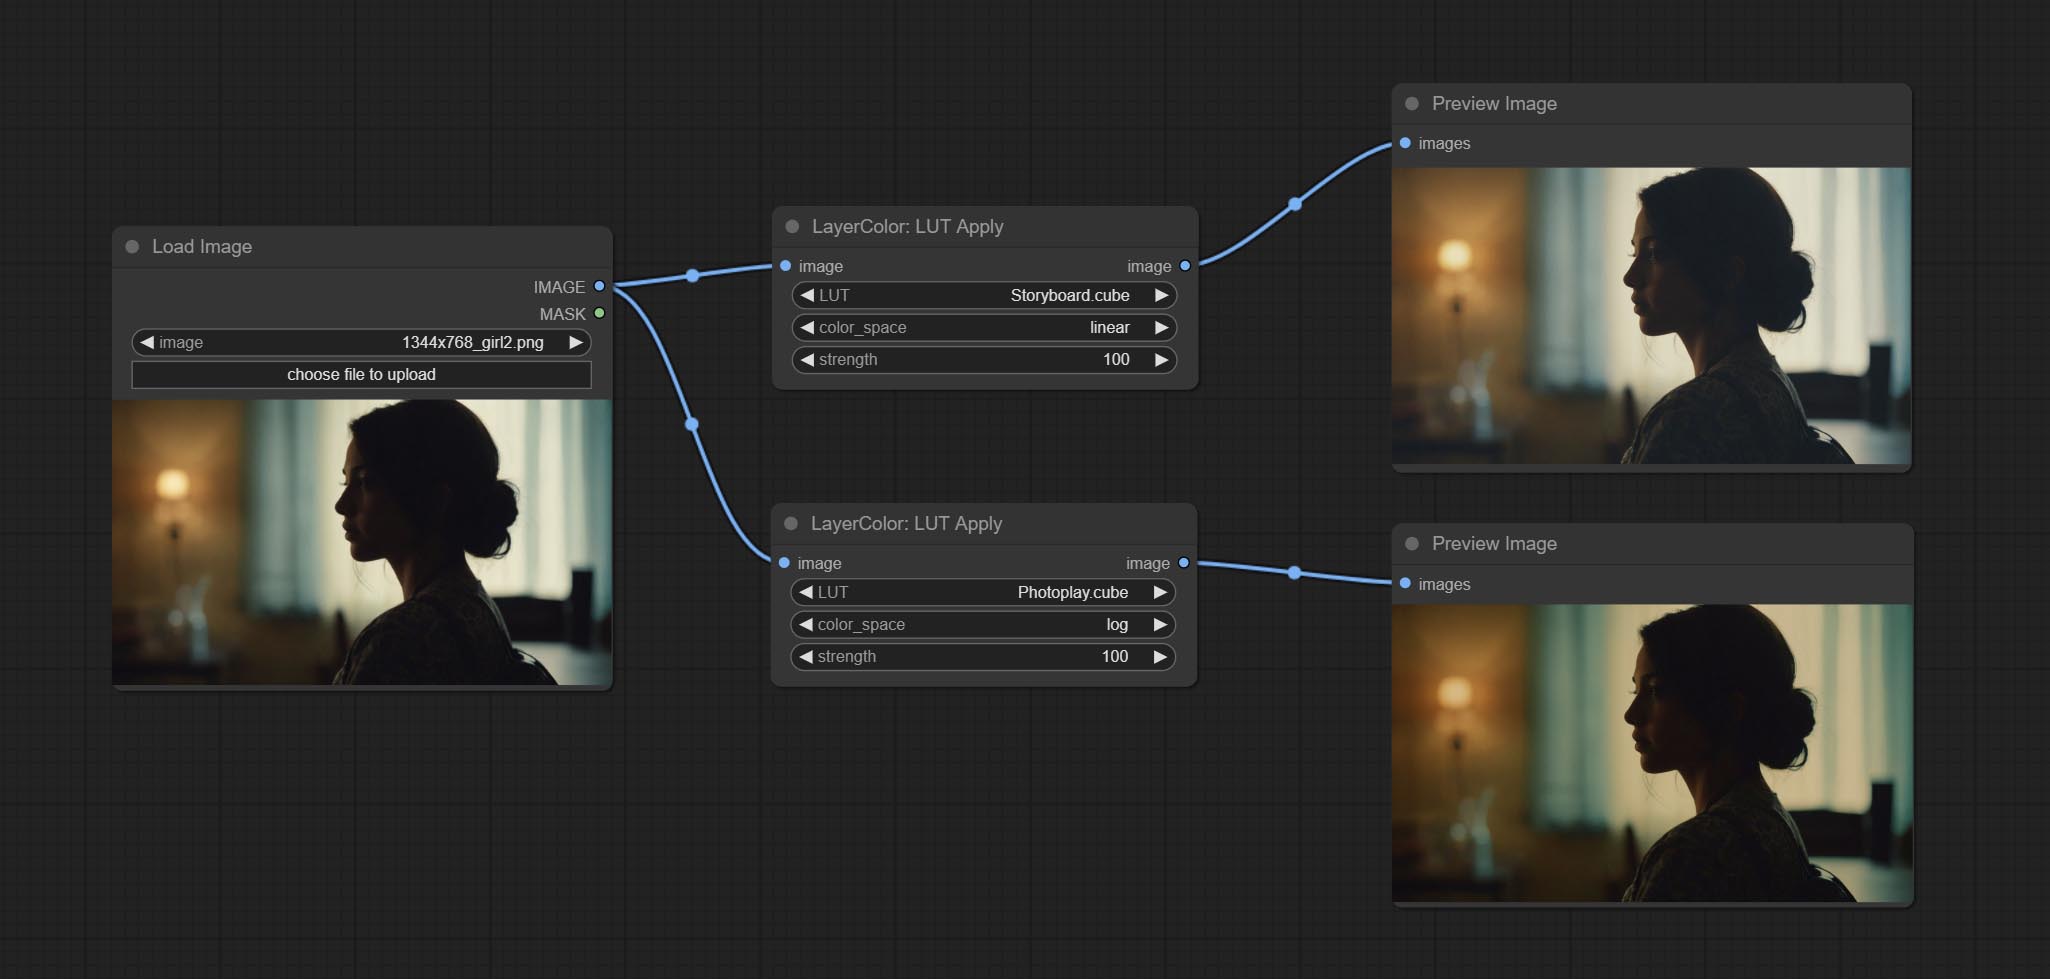
Node options: 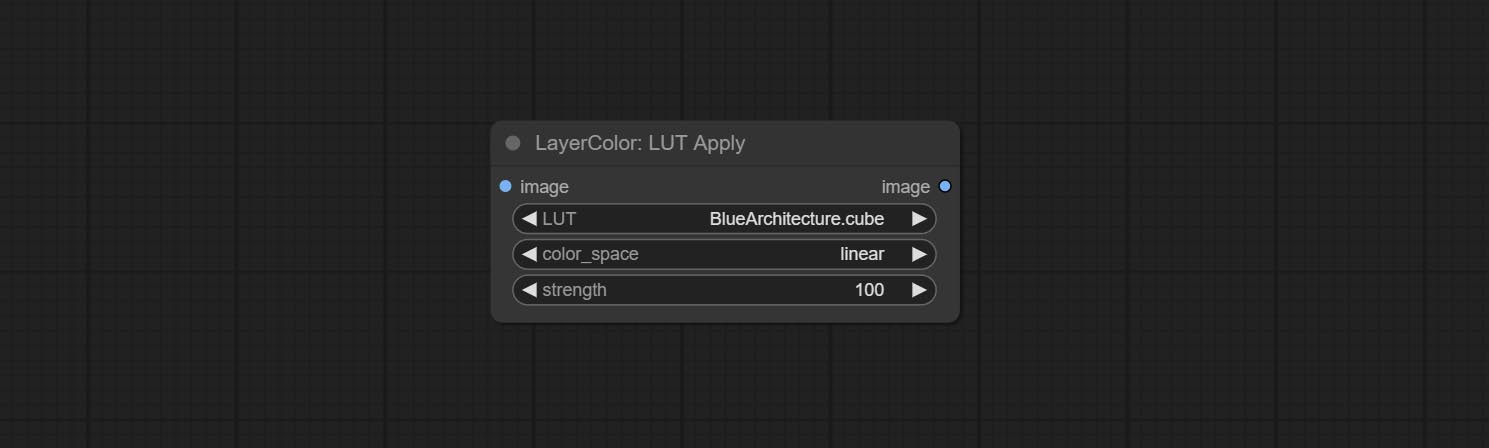
* LUT folder is defined in resource_dir.ini , this file is located in the root directory of the plug-in, and the default name is resource_dir.ini.example . to use this file for the first time, you need to change the file suffix to .ini . Open the text editing software and find the line starting with "LUT_dir=", after "=", enter the custom folder path name. support defining multiple folders in resource-dir.ini , separated by commas, semicolons, or spaces. all .cube files in this folder will be collected and displayed in the node list during ComfyUI initialization. If the folder set in ini is invalid, the LUT folder that comes with the plugin will be enabled.
Automatically adjust the brightness, contrast, and white balance of the image. Provide some manual adjustment options to compensate for the shortcomings of automatic adjustment. 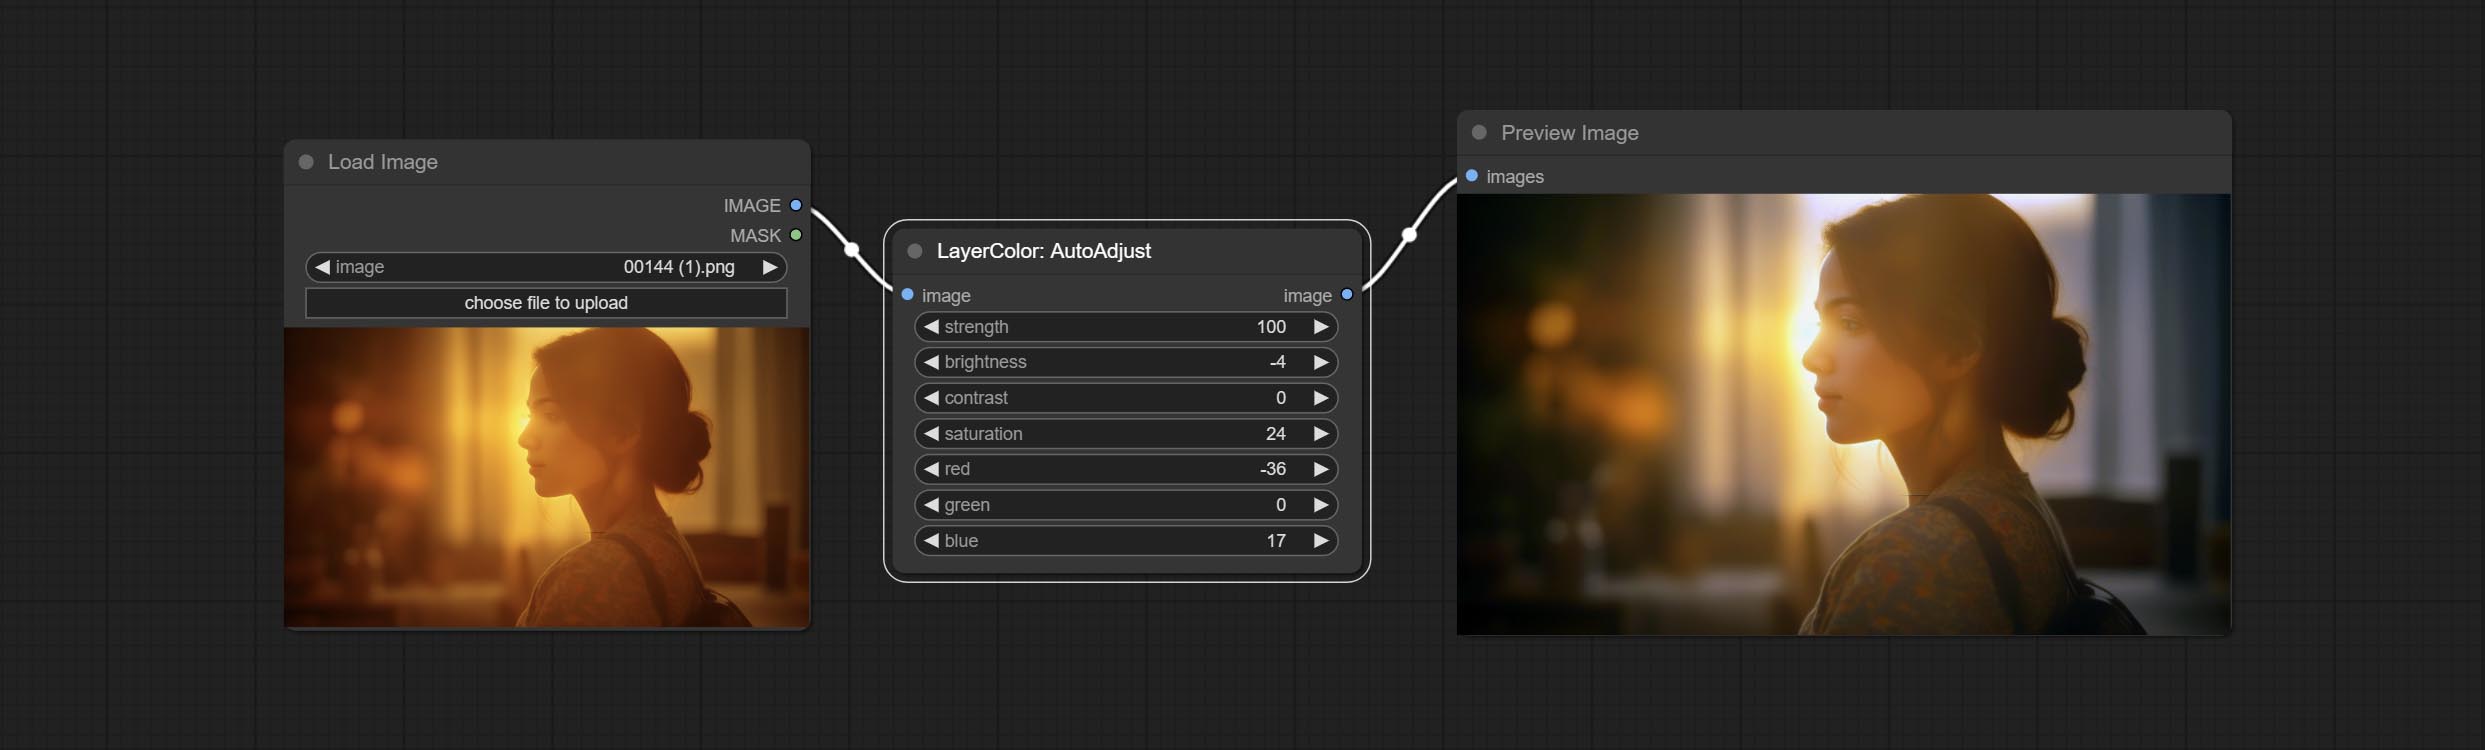
Node Options: 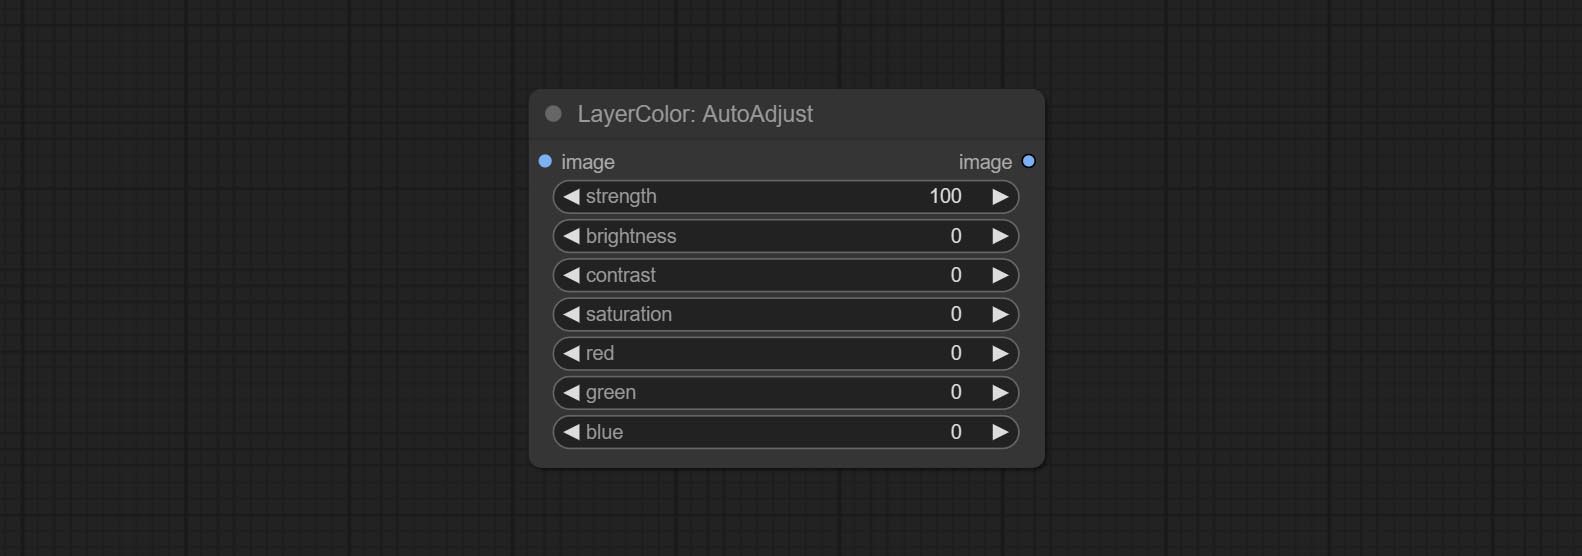
On the basis of AutoAdjust, add mask input and only calculate the content inside the mask for automatic color adjustment. Add multiple automatic adjustment modes. 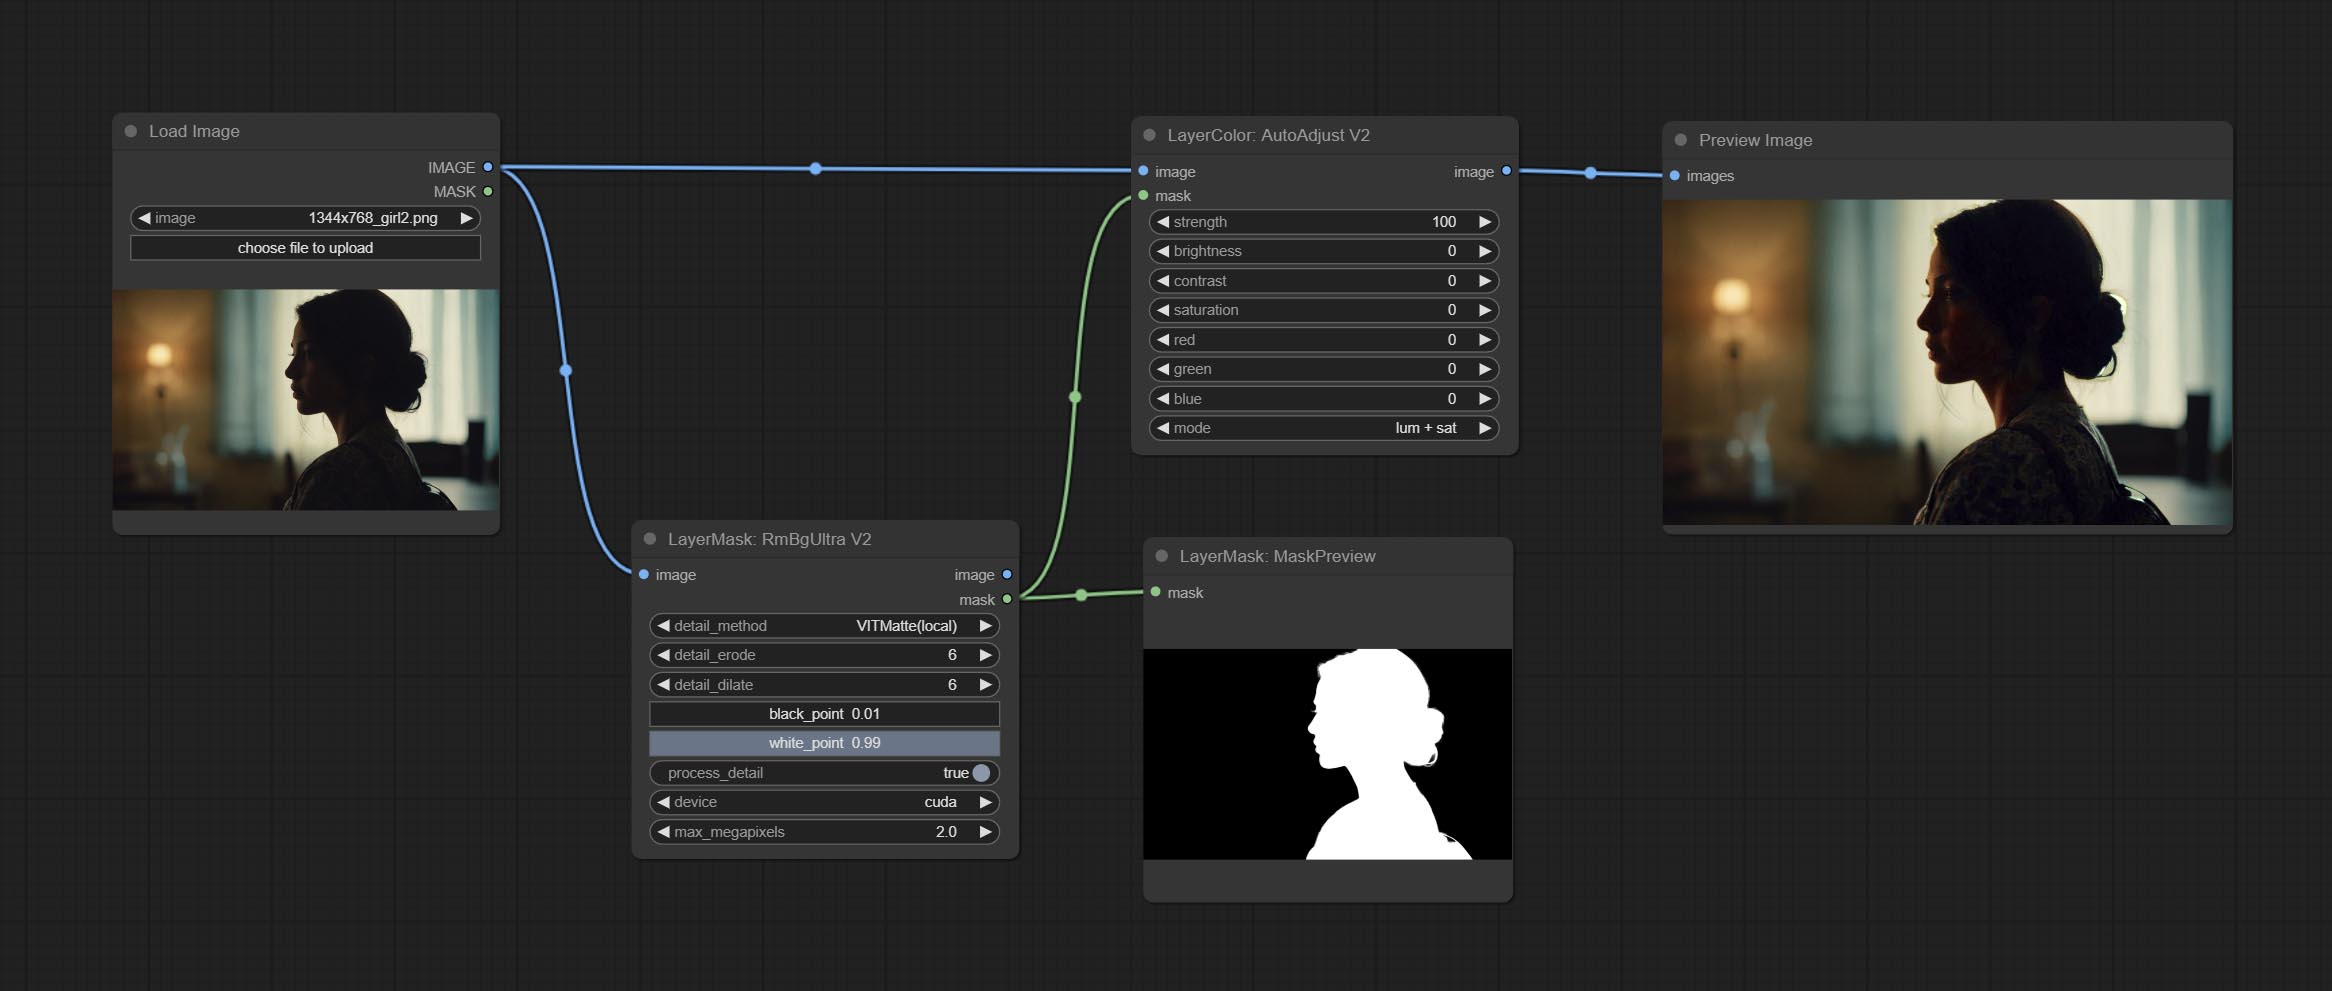
The following changes have been made based on AutoAdjust: 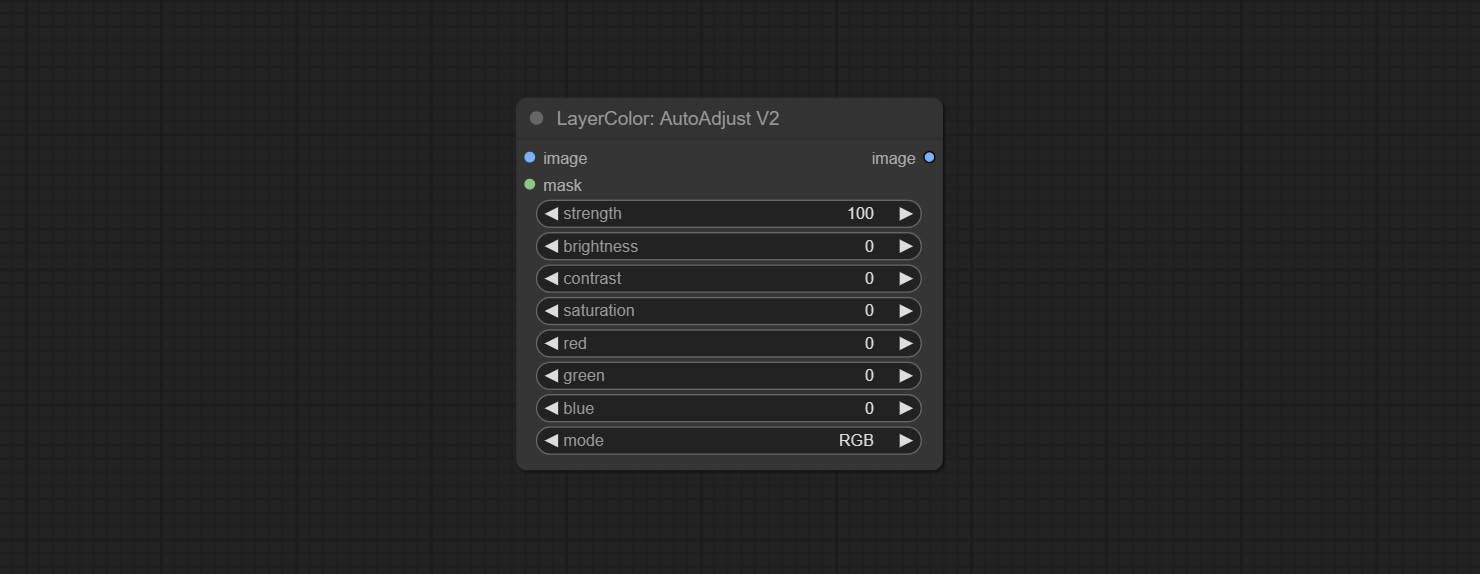
Automatically adjust too dark or too bright image to moderate brightness, and support mask input. When mask input, only the content of the mask part is used as the data source of the automatic brightness. The output is still the whole adjusted image. 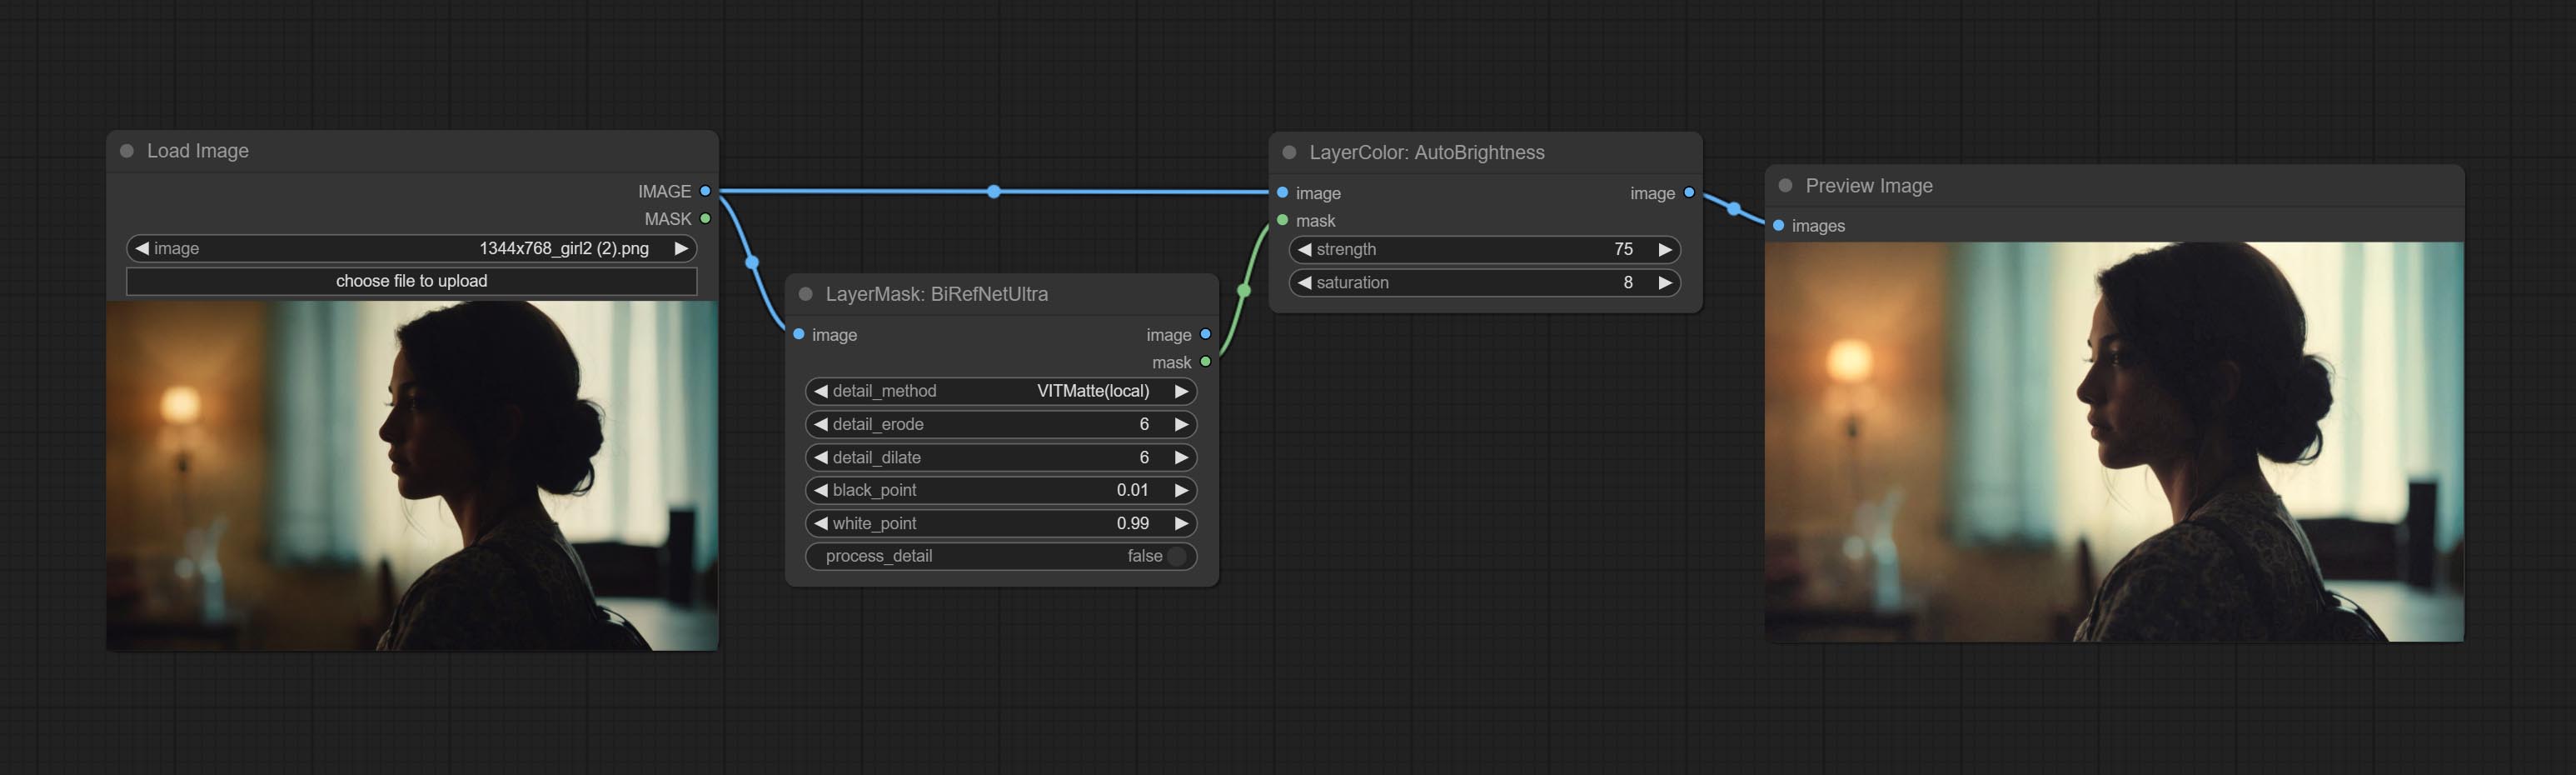
Node options: 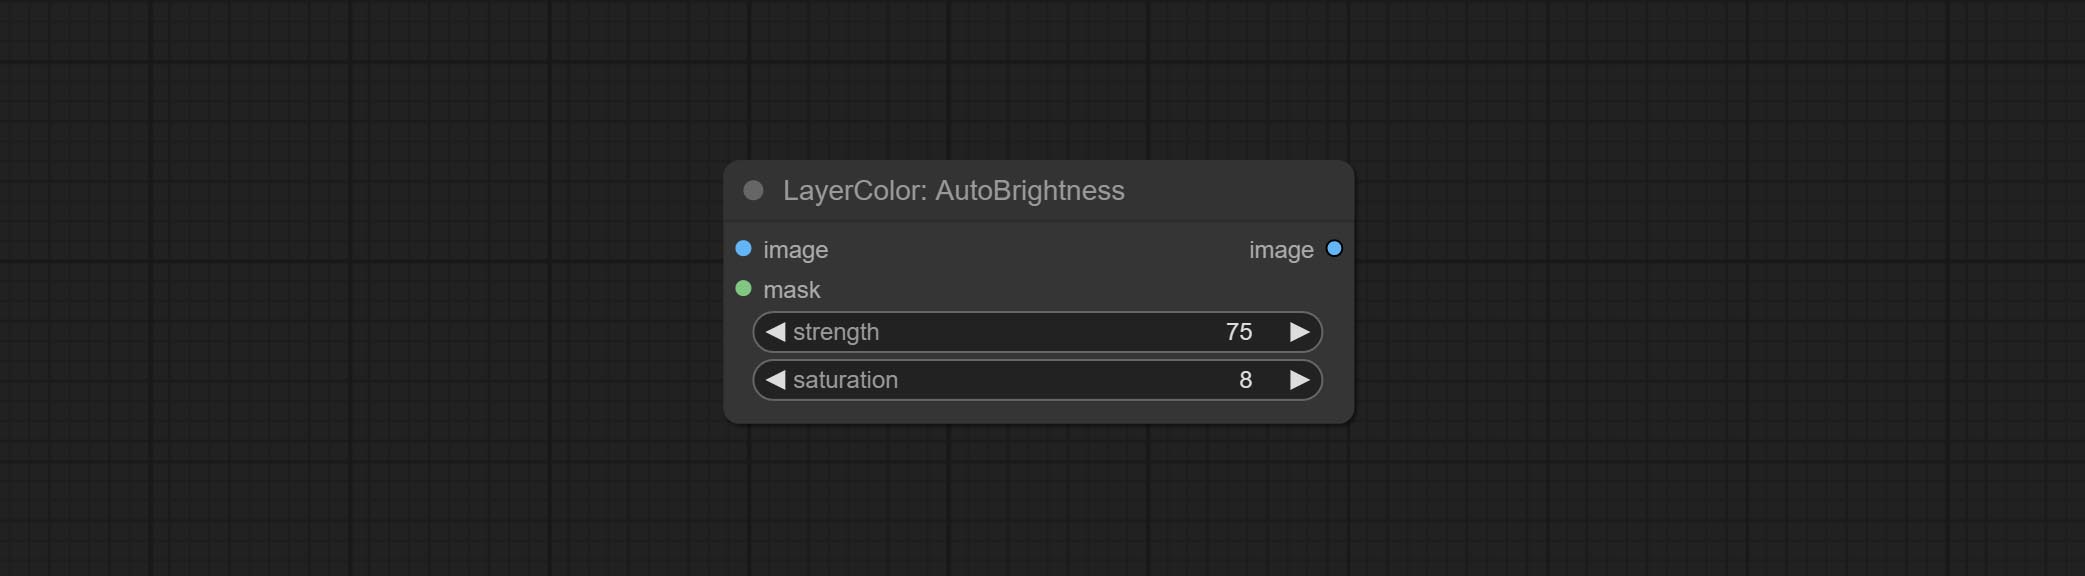
Auto adjust the color tone of the image to resemble the reference image. 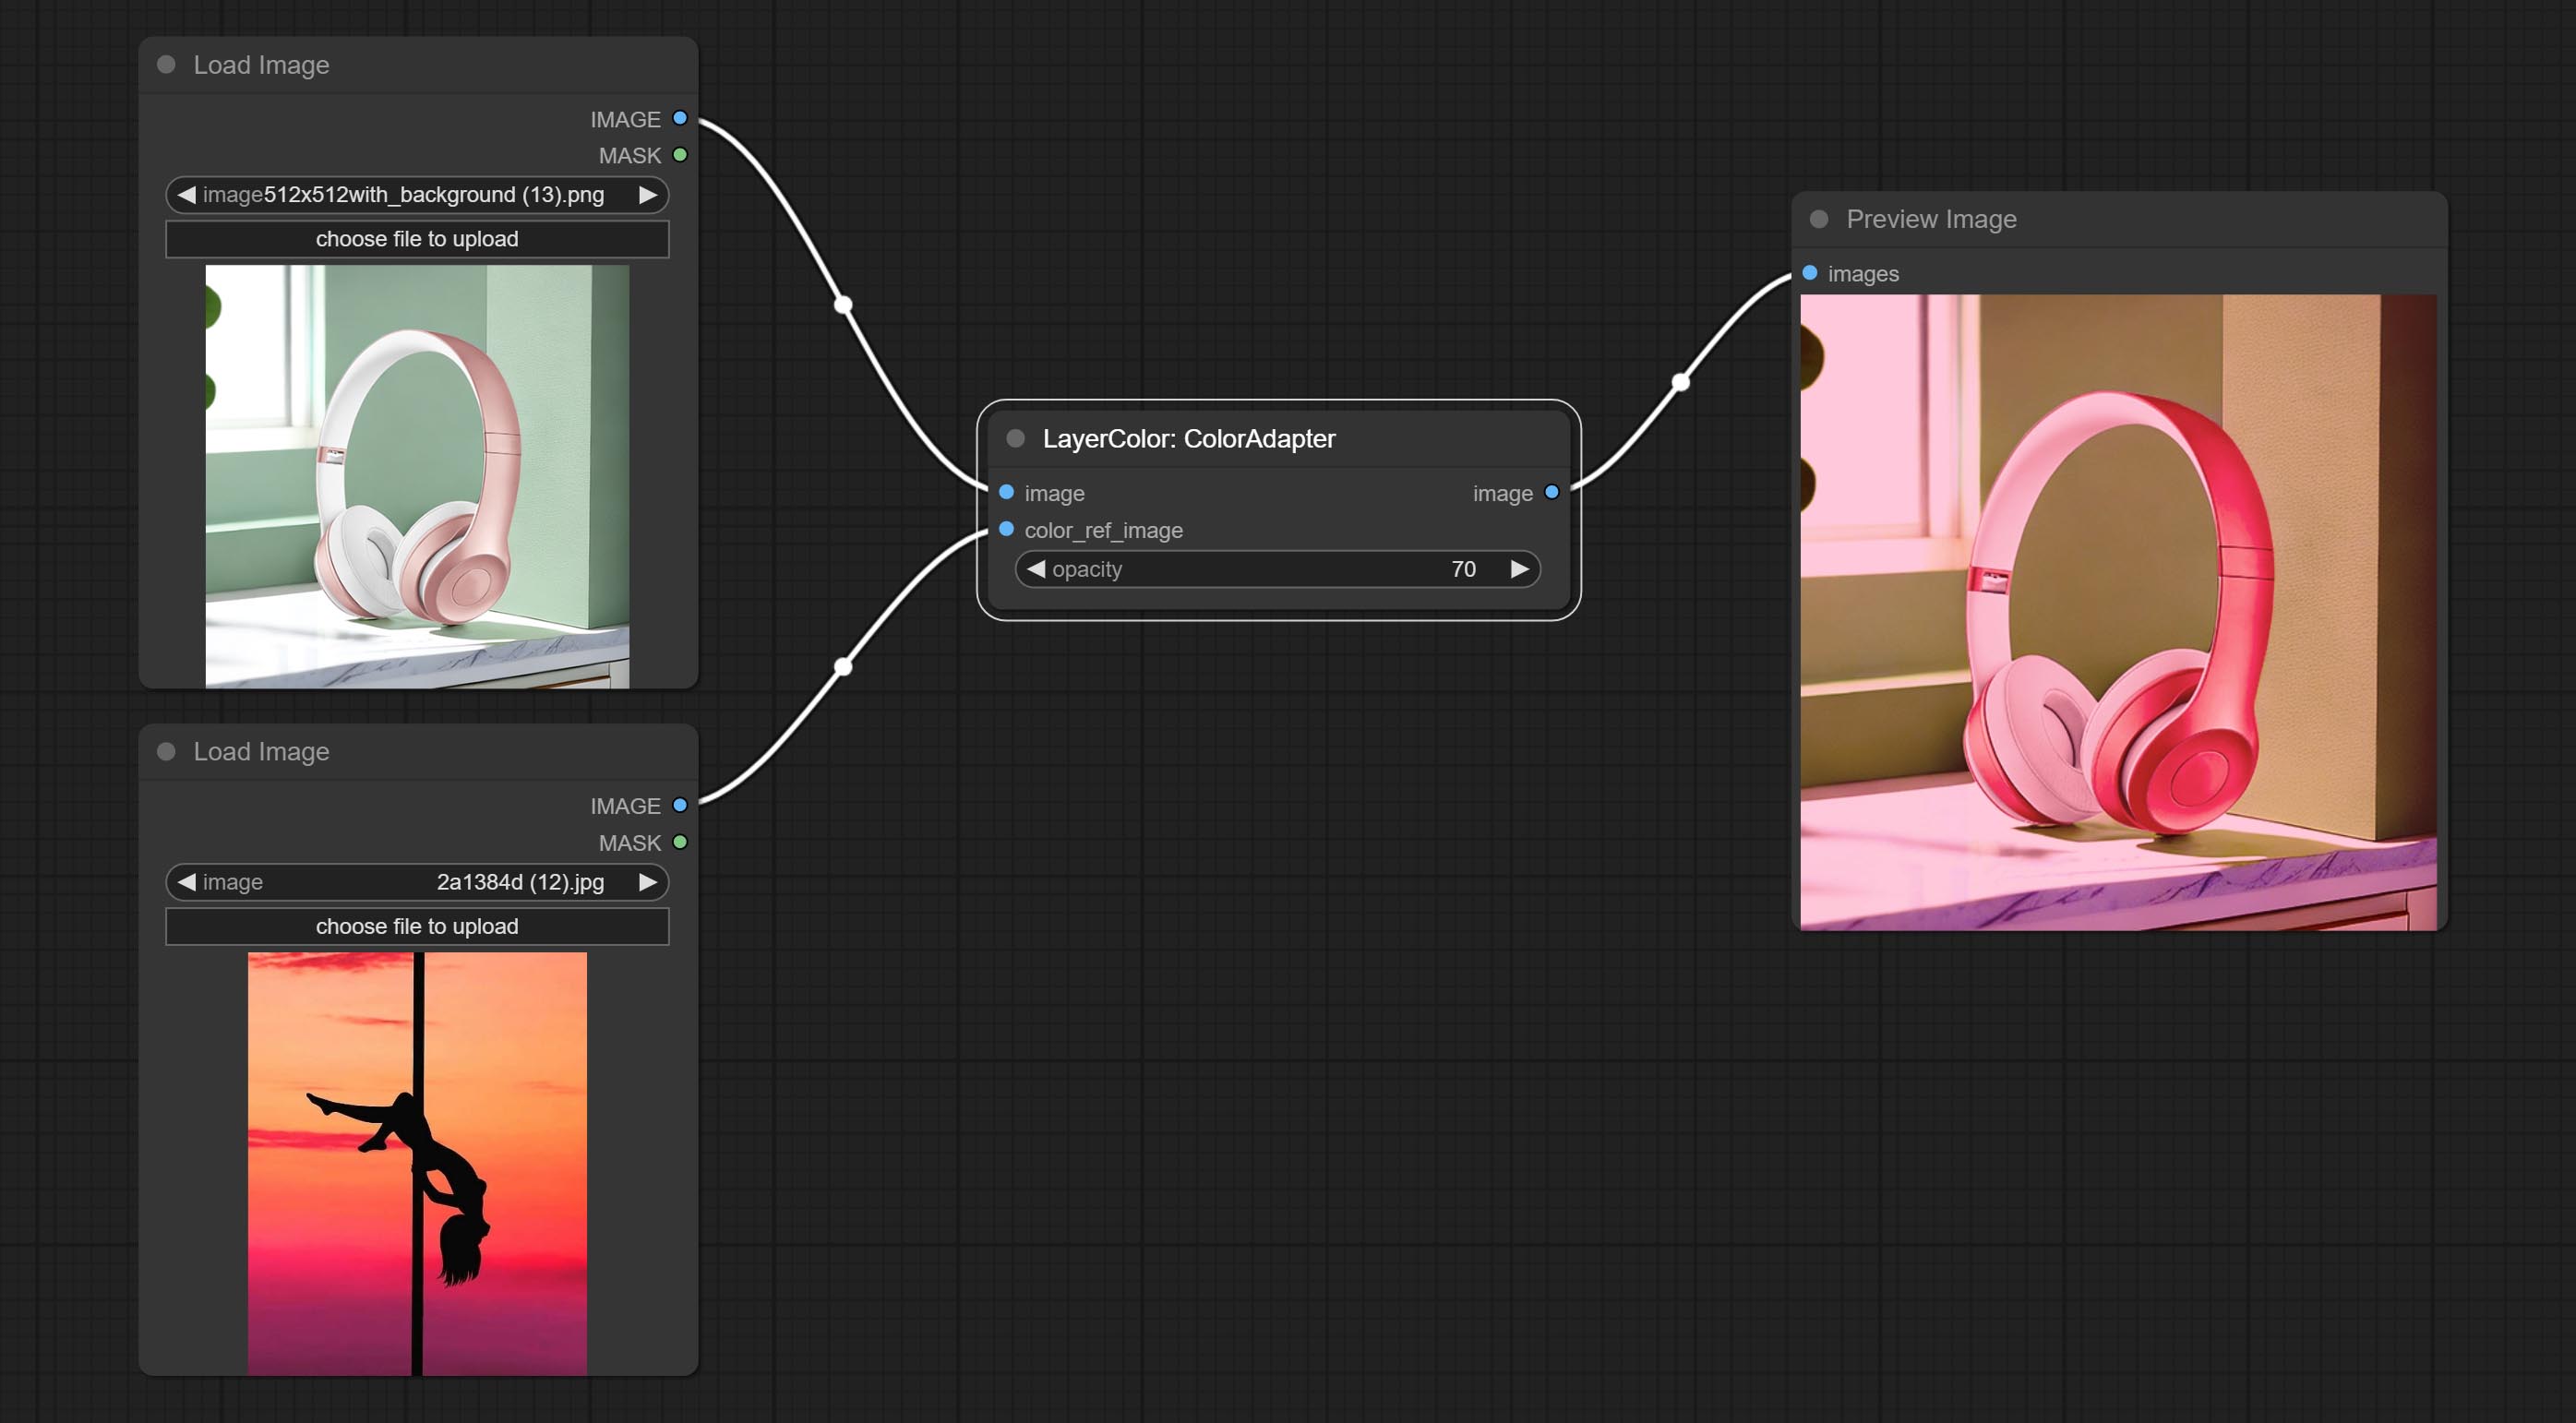
Node options: 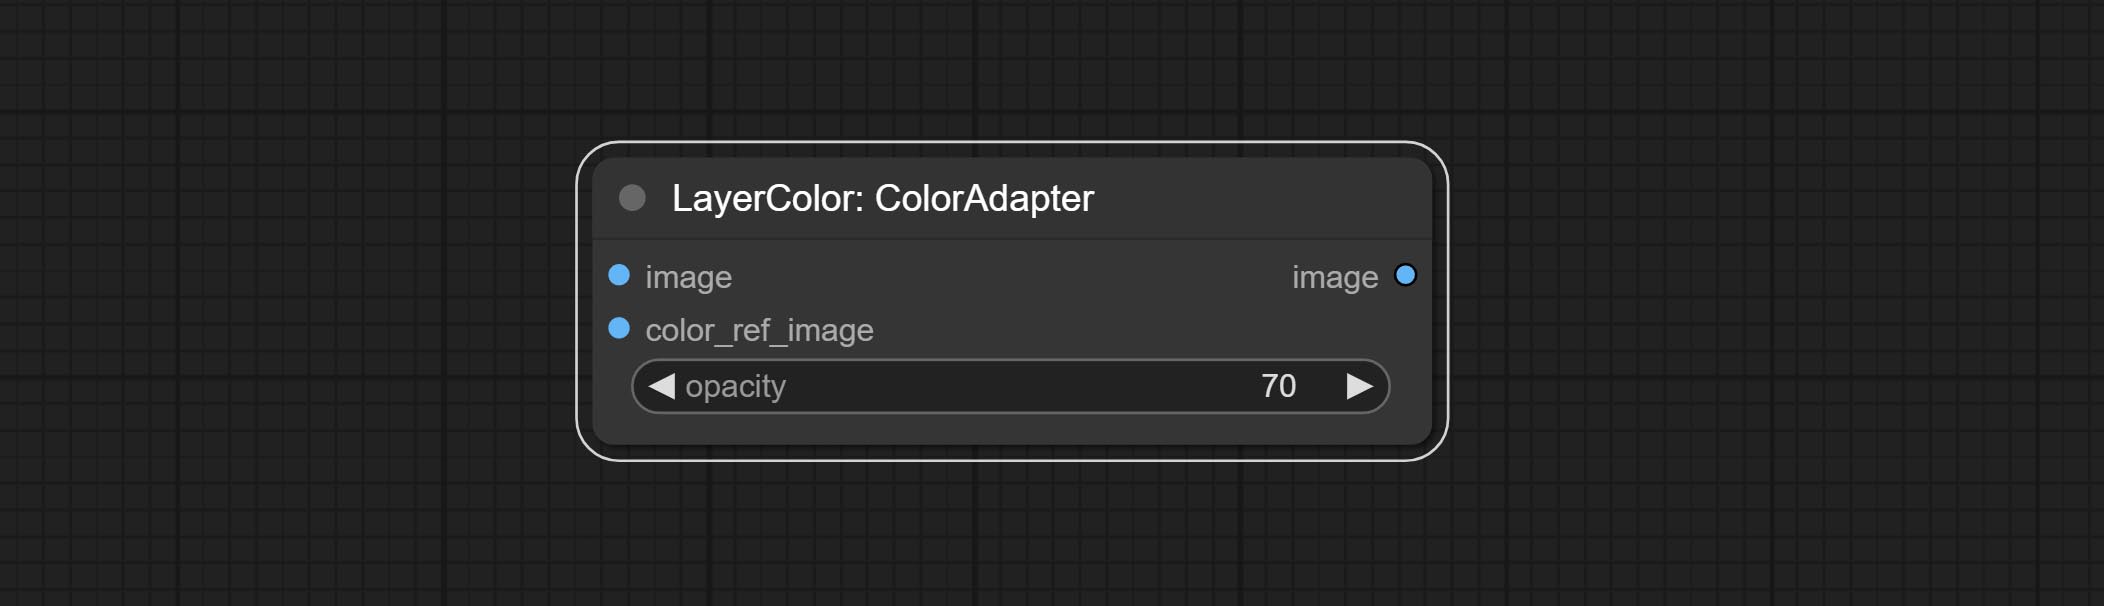
Change the exposure of the image. 
Adjust the color of the dark and bright parts of the image. 
Node options: 
Node option:
A replica of the Color of Shadow & Highlight node, with the "&" character removed from the node name to avoid ComfyUI workflow parsing errors.

Change the color temperature of the image.
Node Options: 
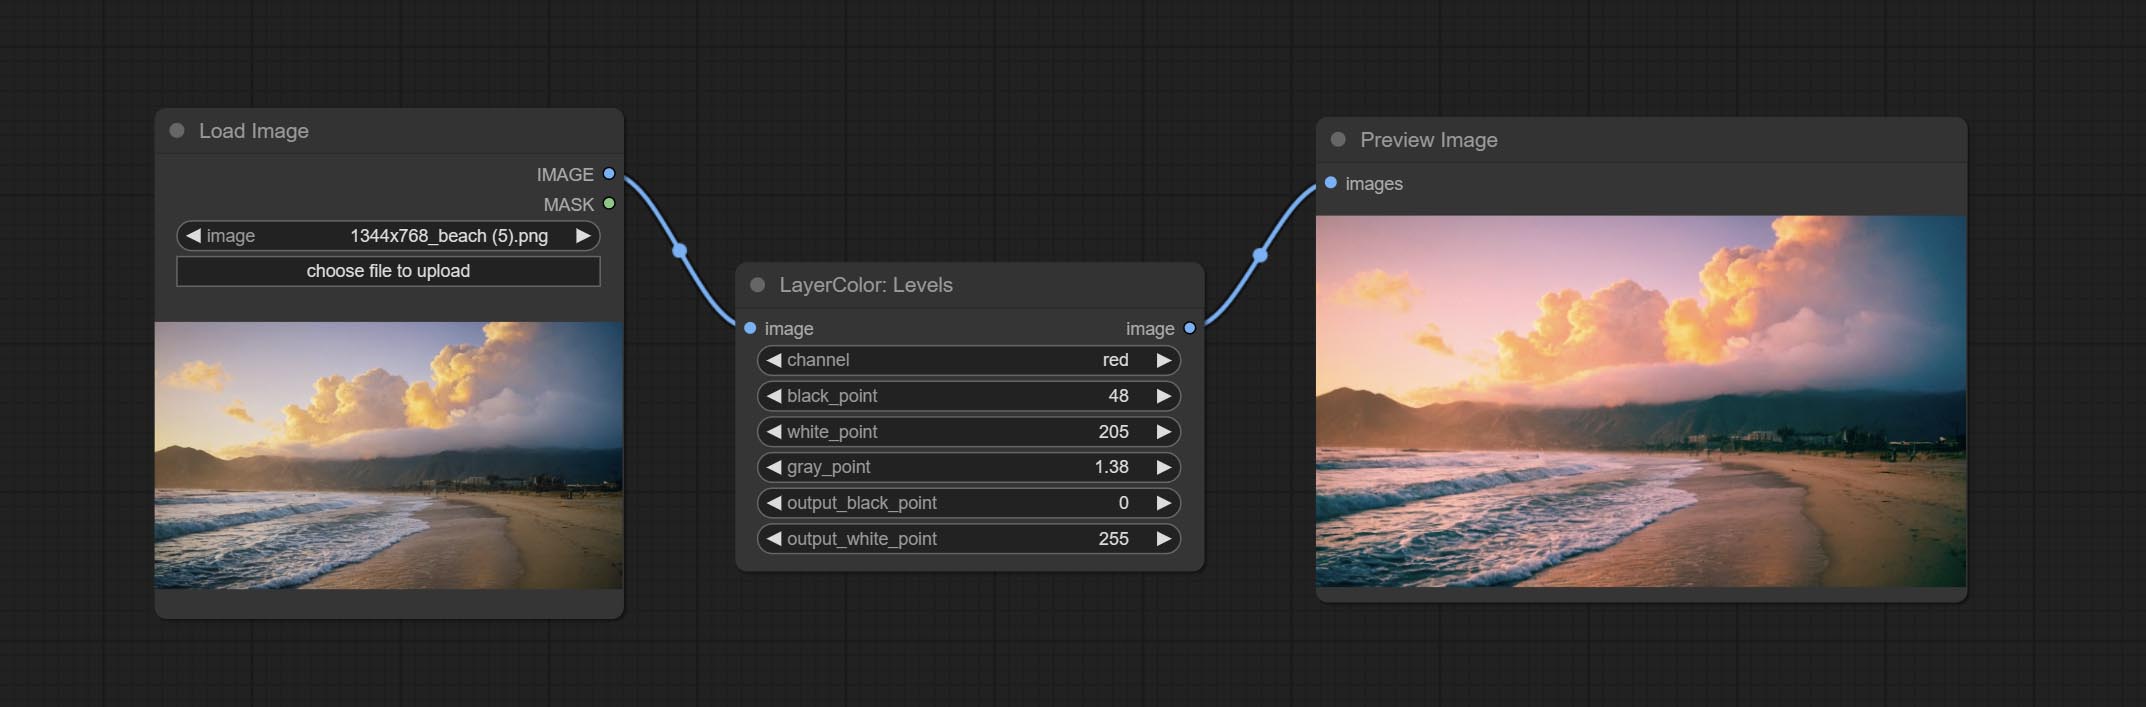
Change the levels of image.
Node Options: 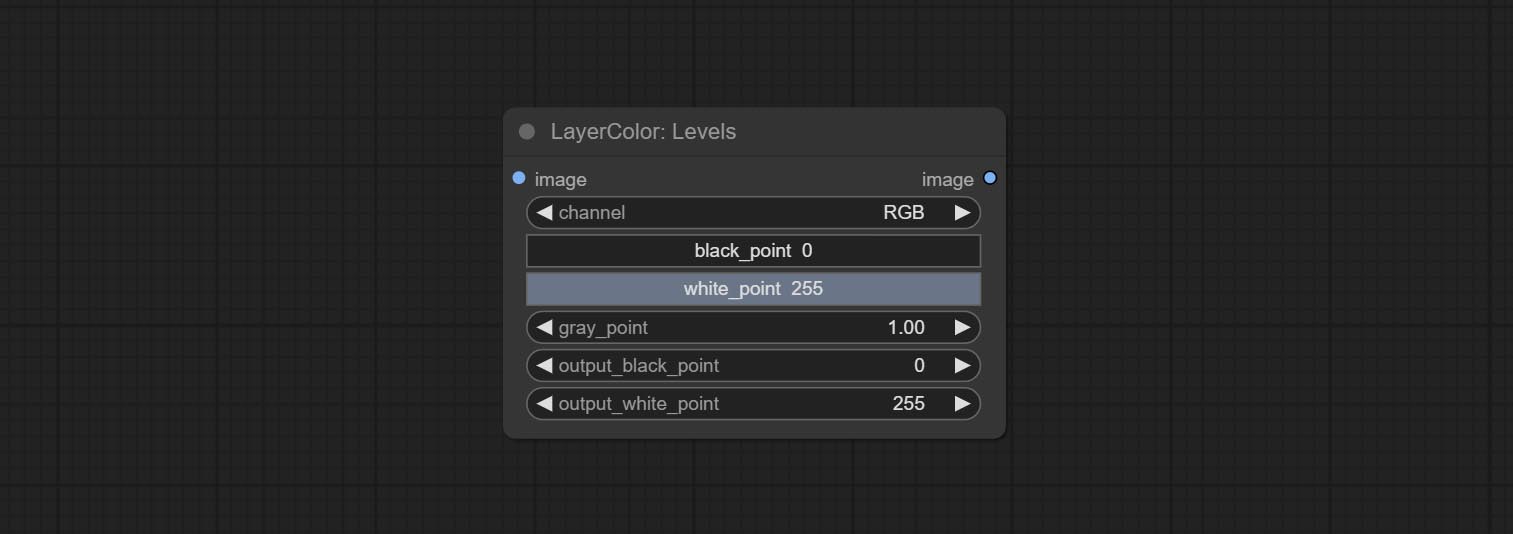
* If the black_point or output_black_point value is greater than white_point or output_white_point, the two values are swapped, with the larger value used as white_point and the smaller value used as black_point.
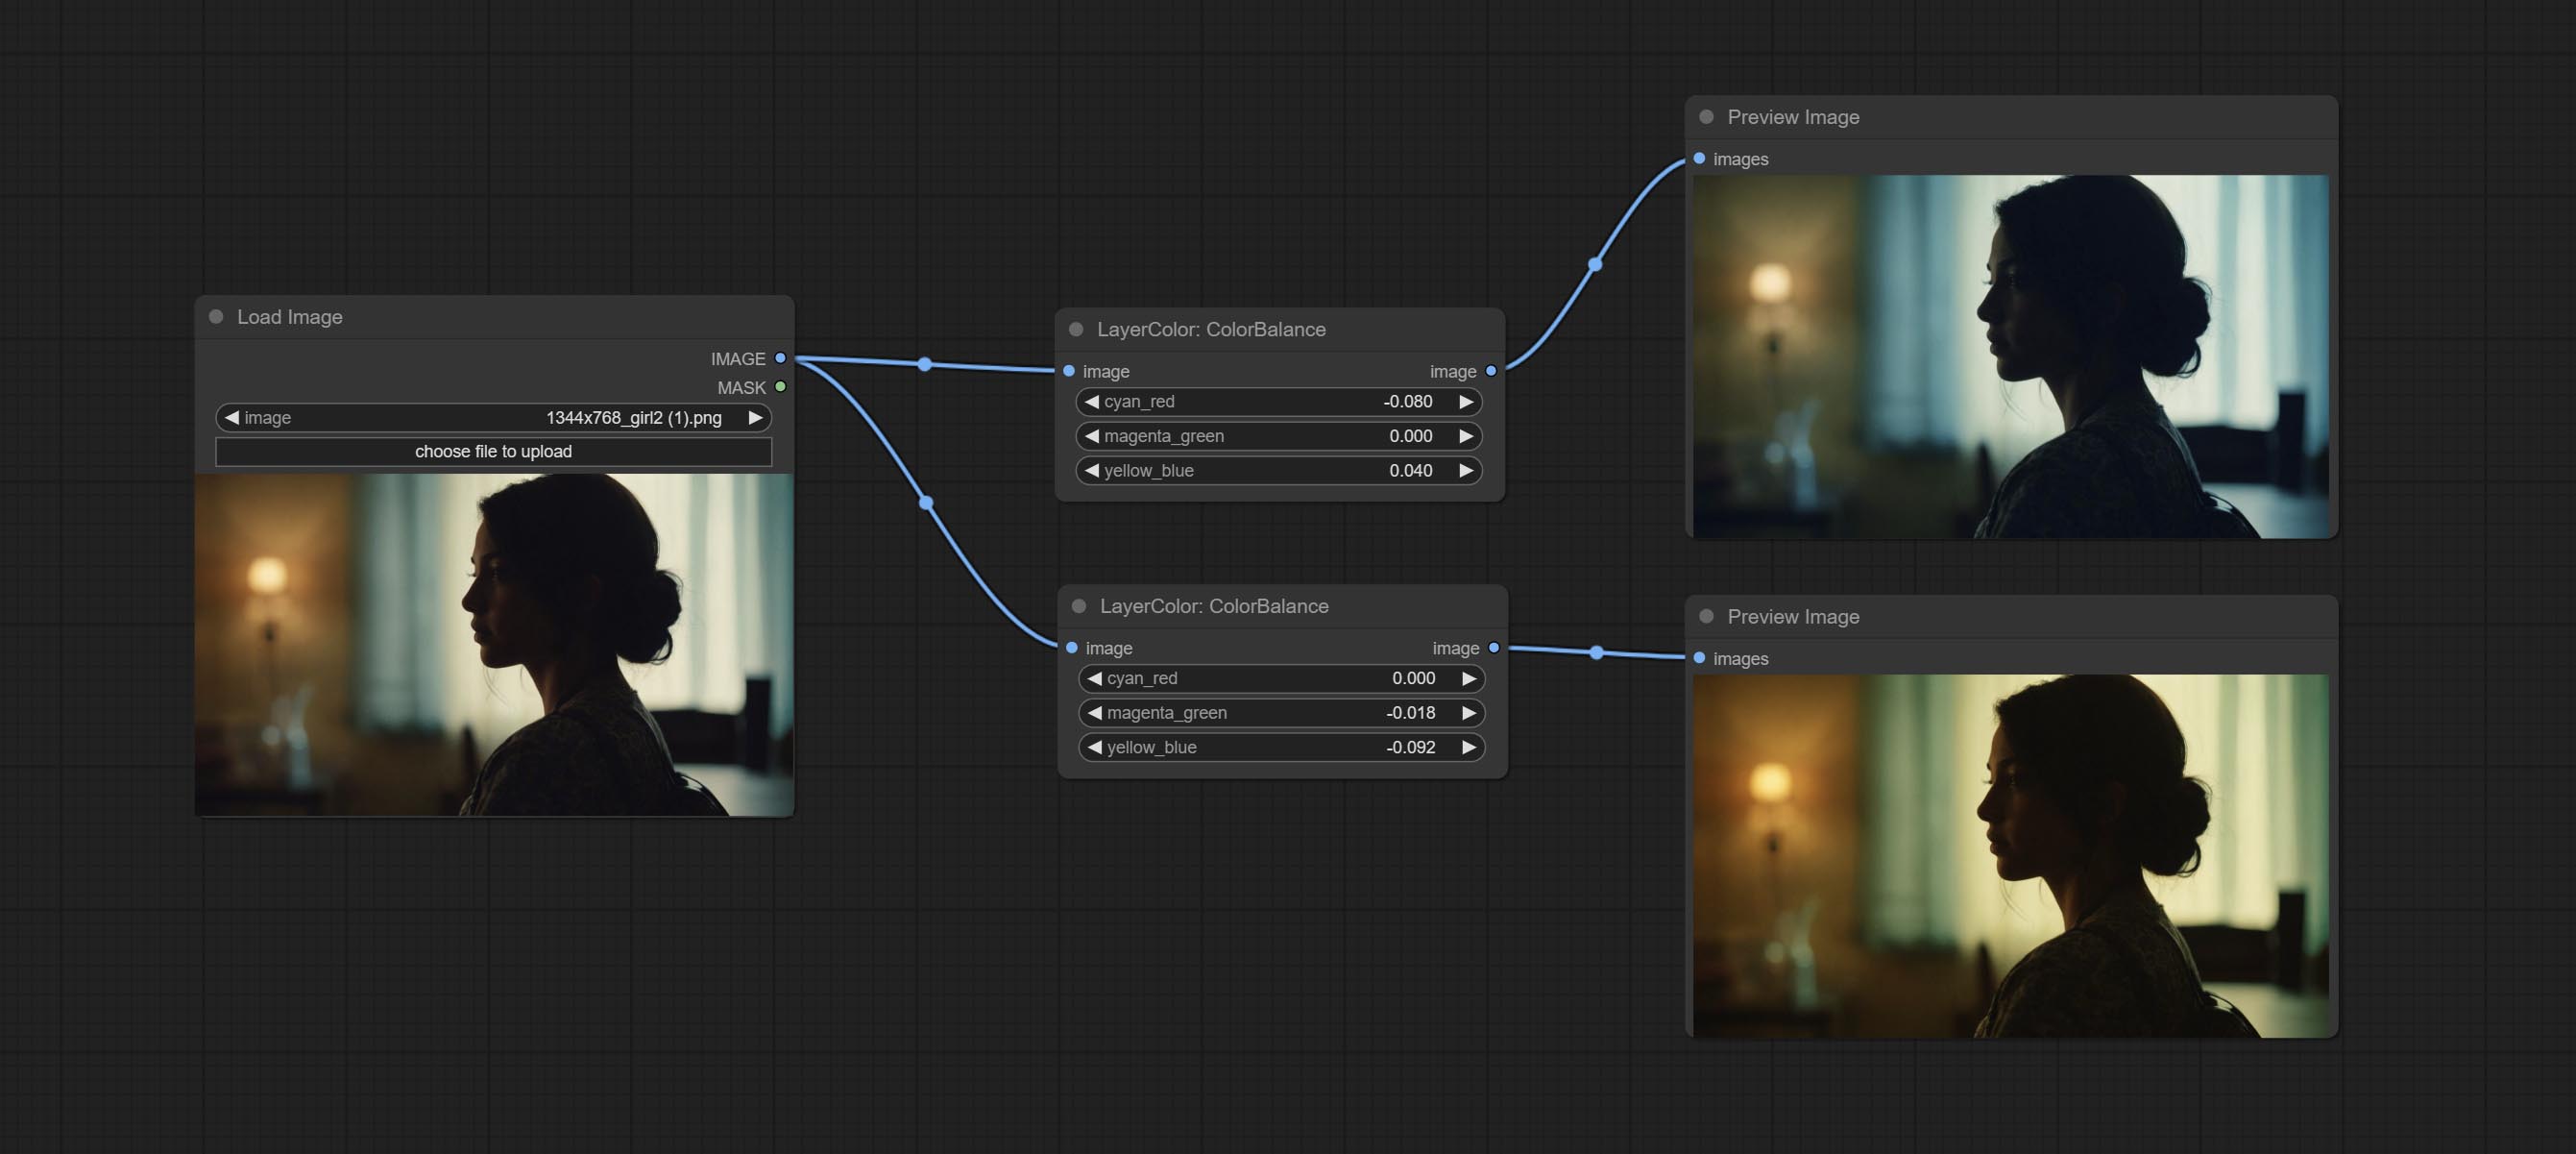
Change the color balance of an image.
Node Options: 
Change the gamma value of the image.
Node options: 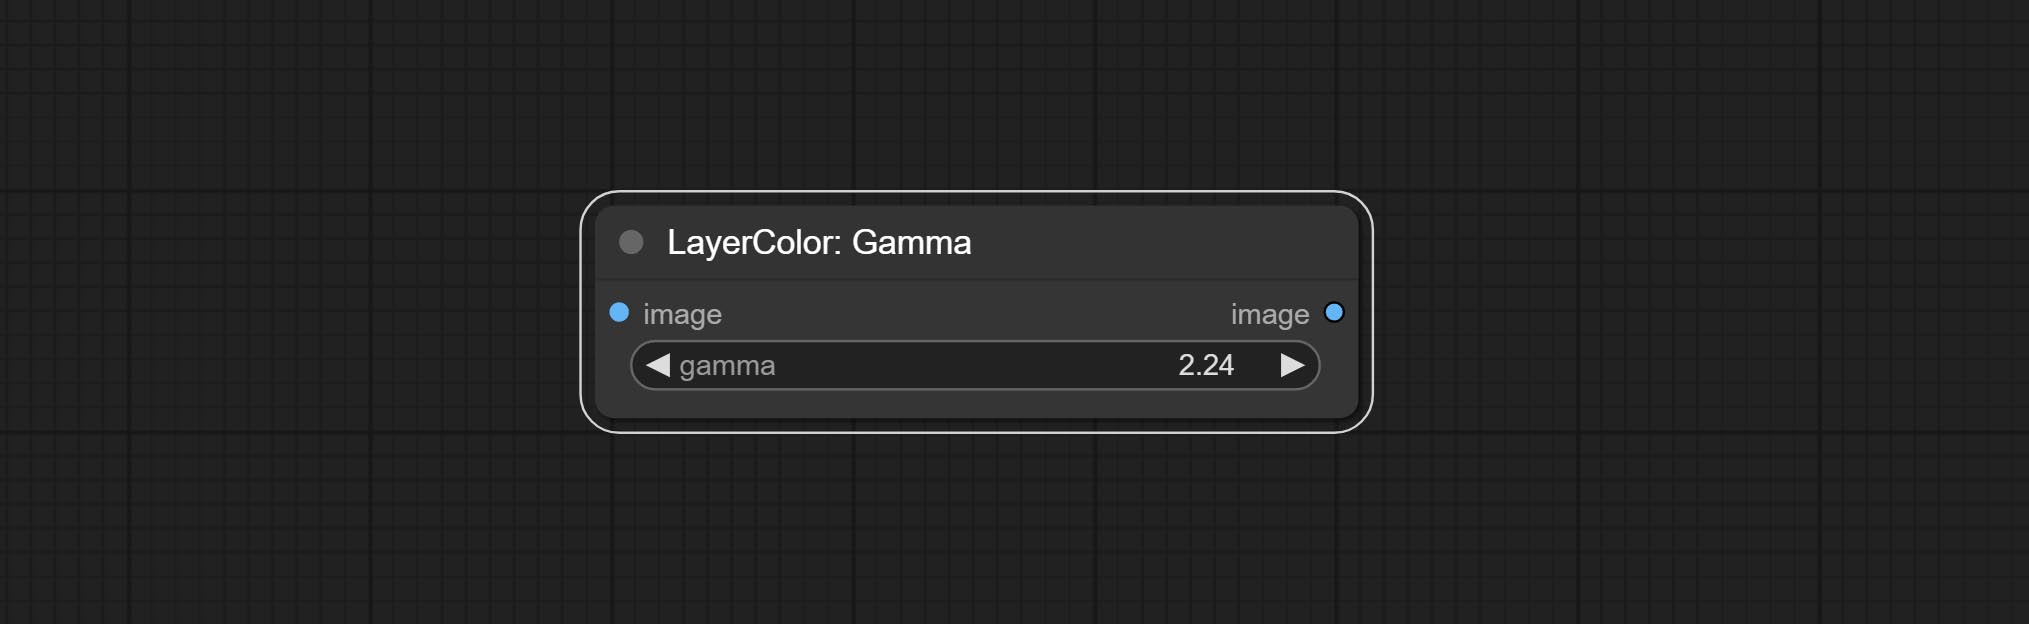
Change the brightness, contrast, and saturation of the image.
Node options: 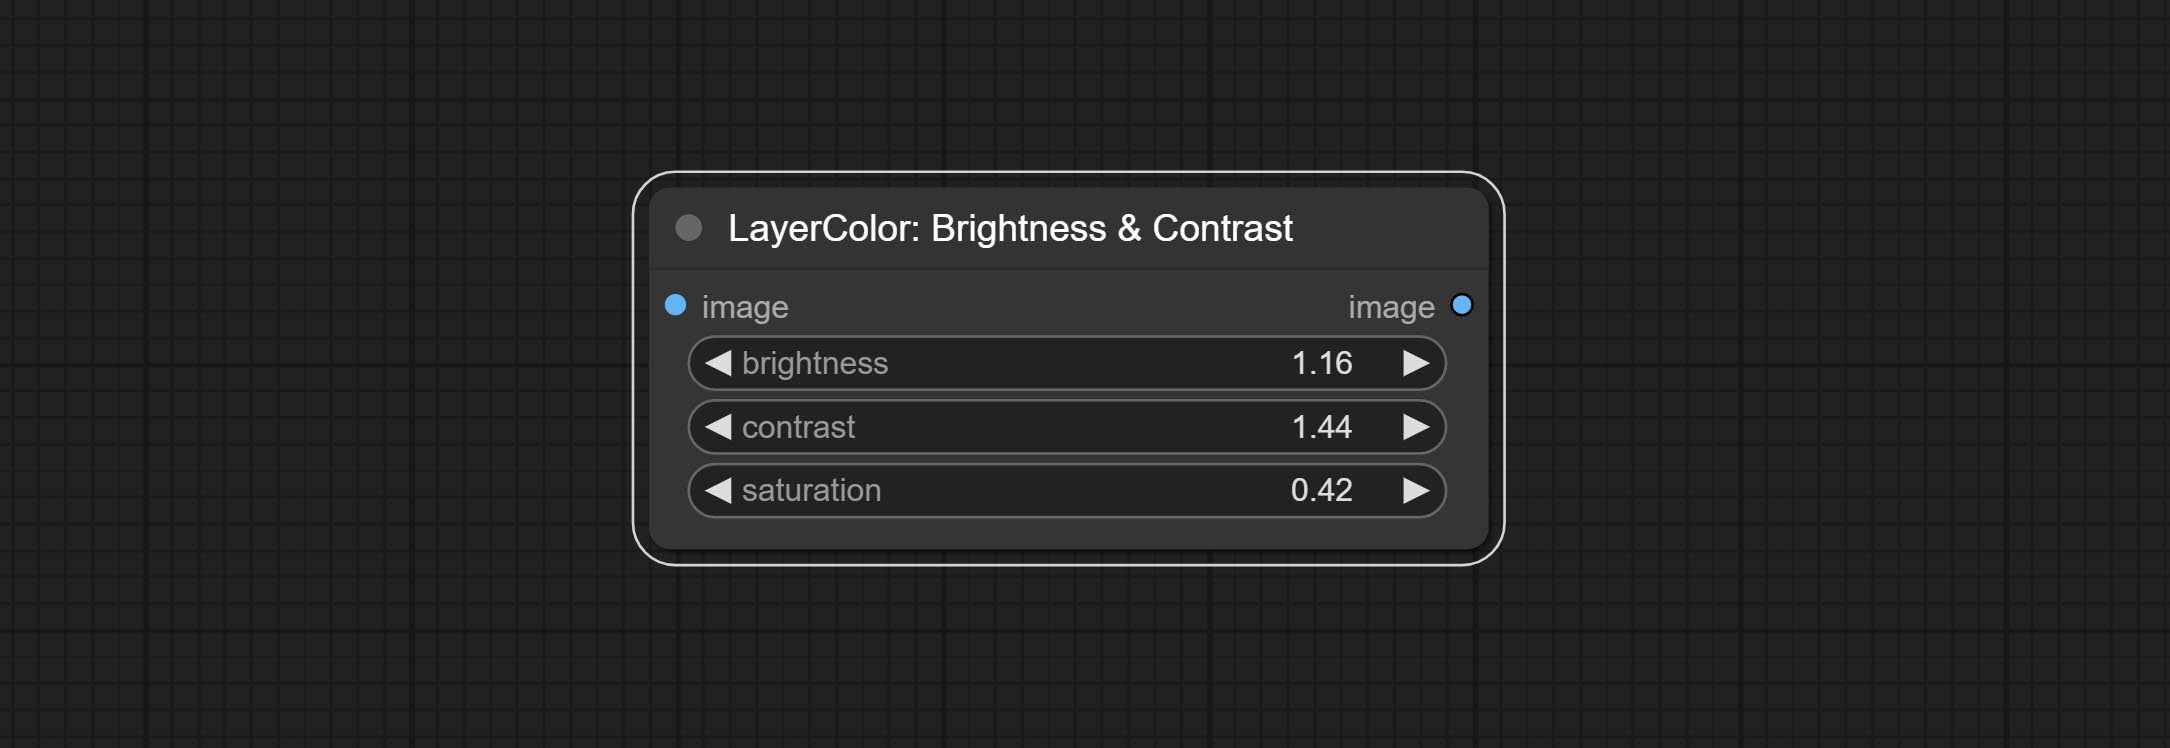
A replica of the Brightness & Contrast node, with the "&" character removed from the node name to avoid ComfyUI workflow parsing errors.
Adjust the RGB channels of the image.
Node options: 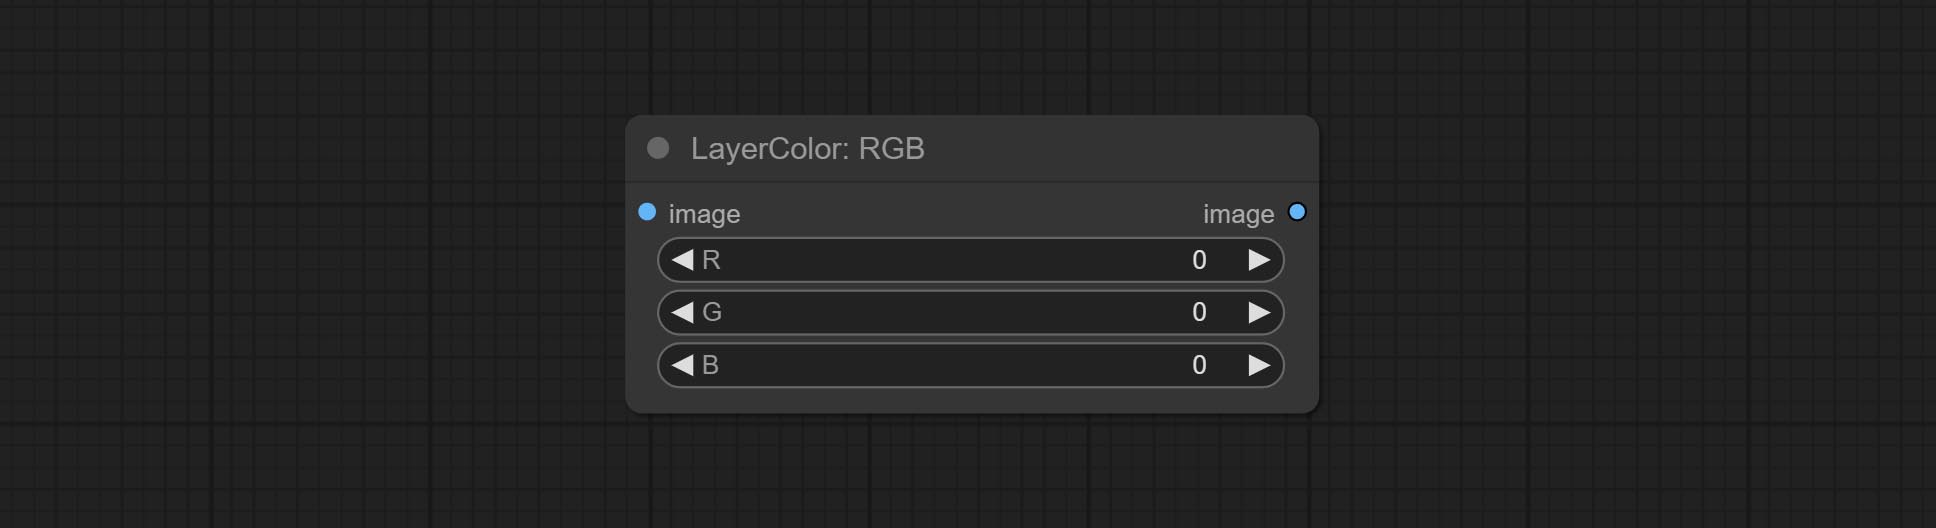
Adjust the YUV channels of the image.
Node options: 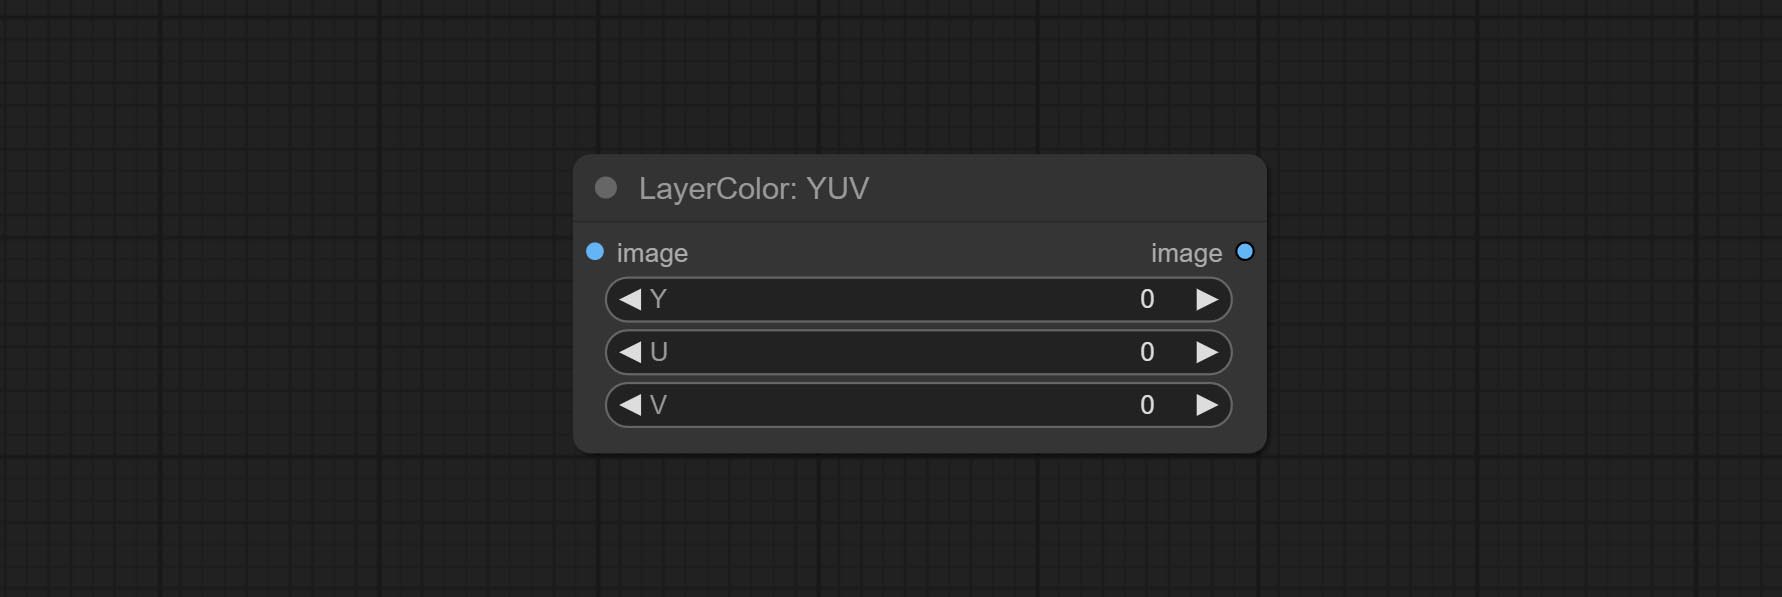
Adjust the LAB channels of the image.
Node options: 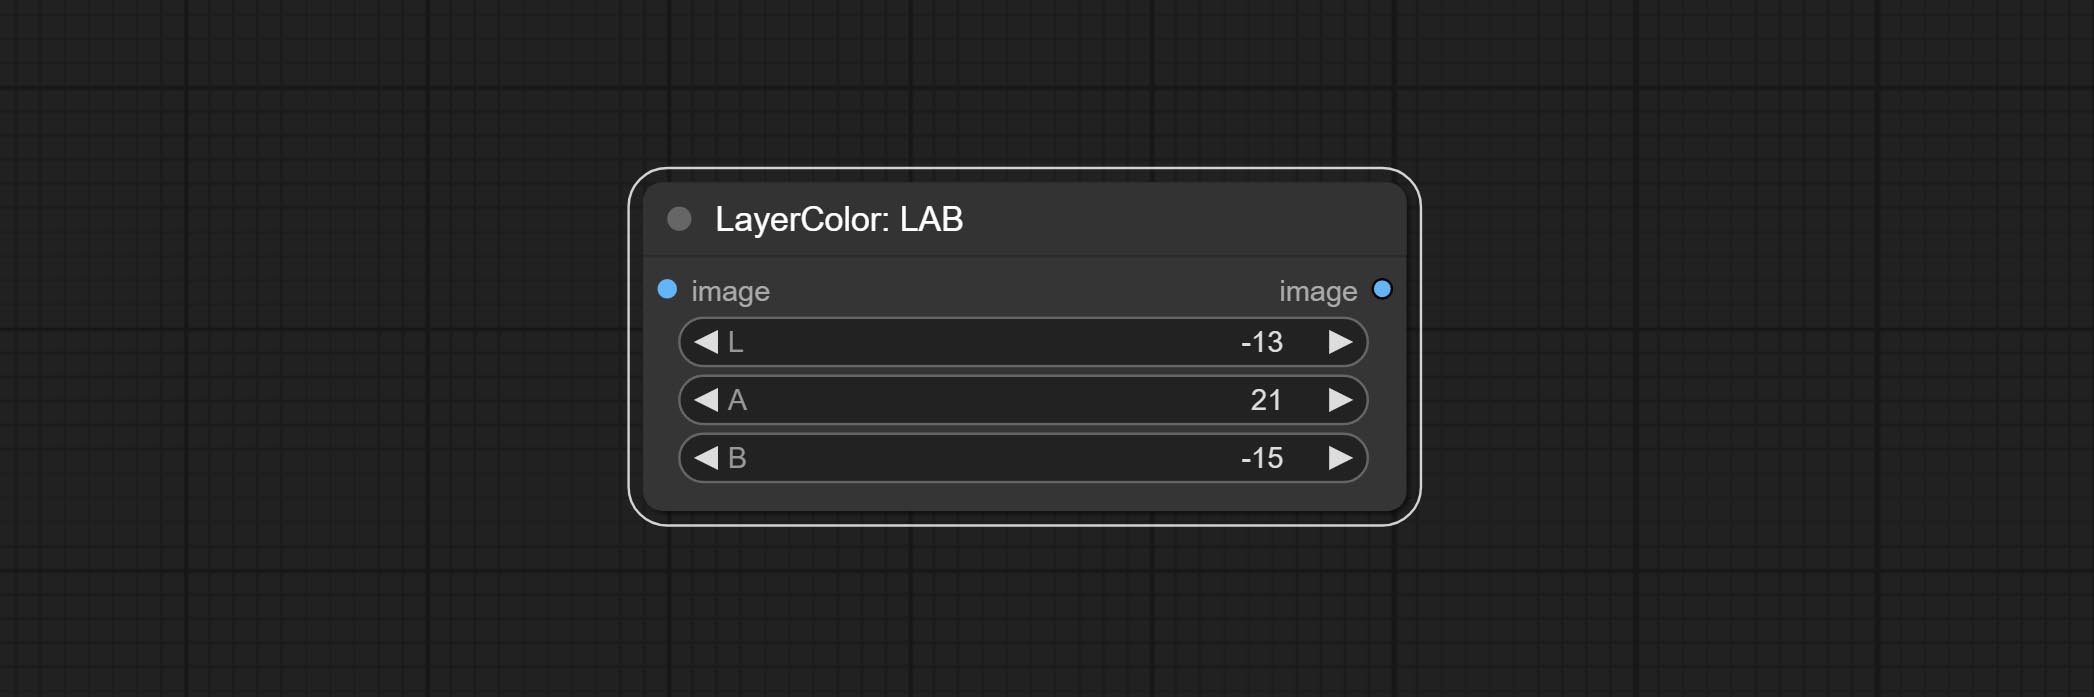
Adjust the HSV channels of the image.
Node options: 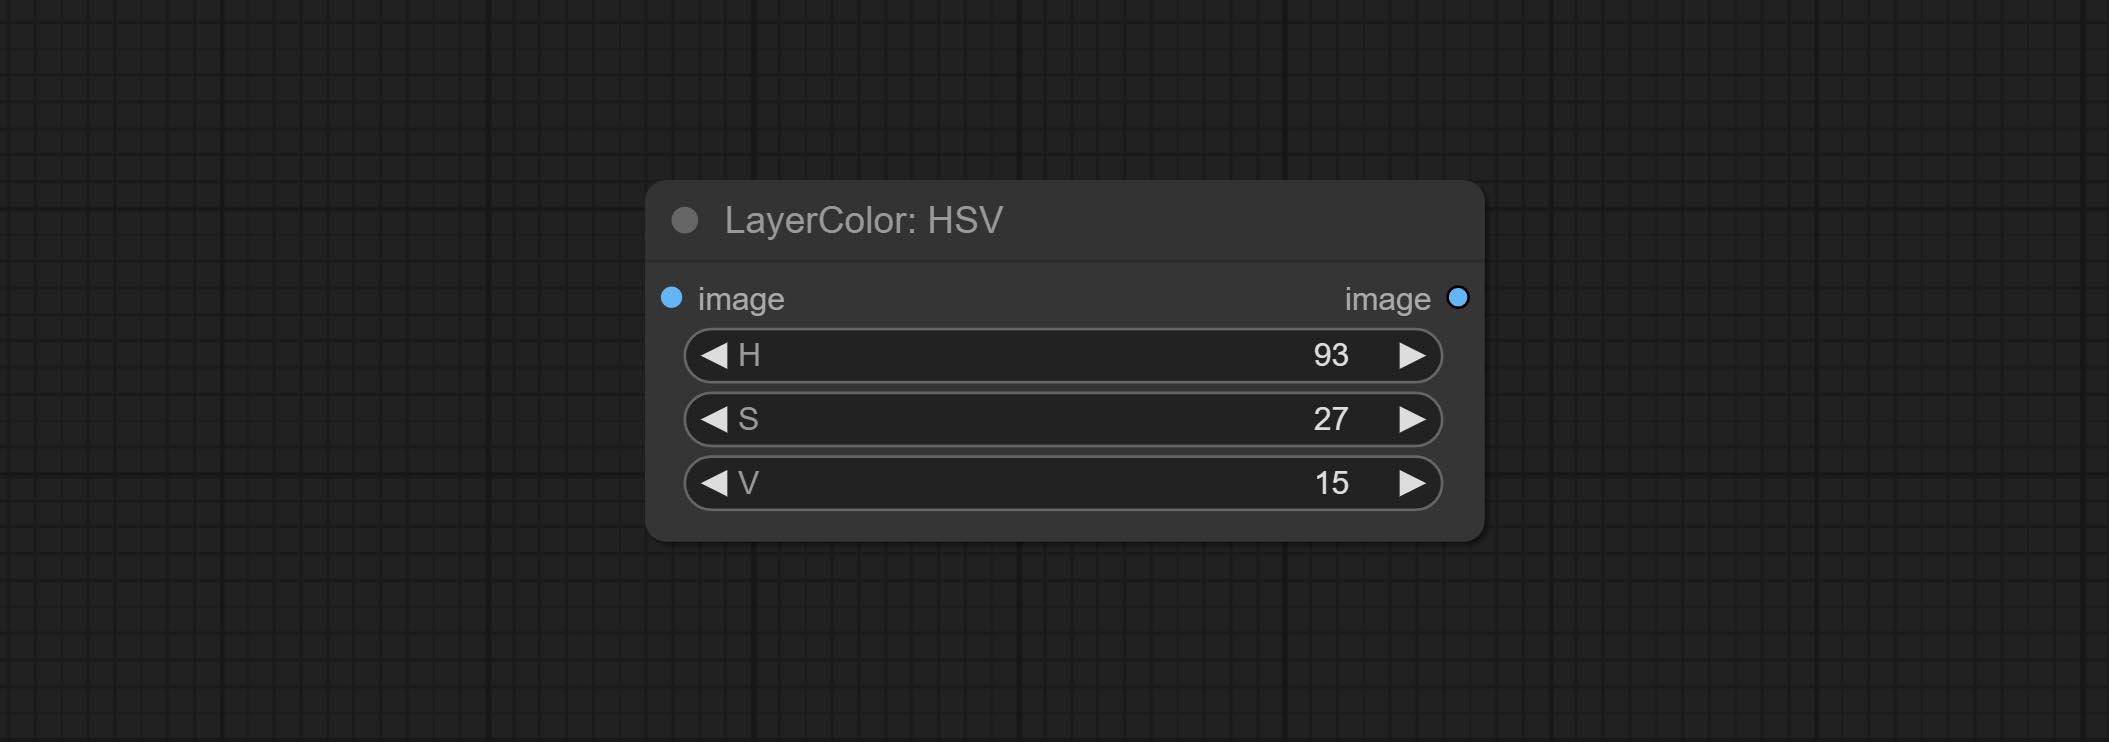
Used for compositing layers, allowing for compositing layer images of different sizes on the background image, and setting positions and transformations. multiple mixing modes are available for selection, and transparency can be set.
The node provide layer transformation_methods and anti_aliasing options. helps improve the quality of synthesized images.
The node provides mask output that can be used for subsequent workflows. 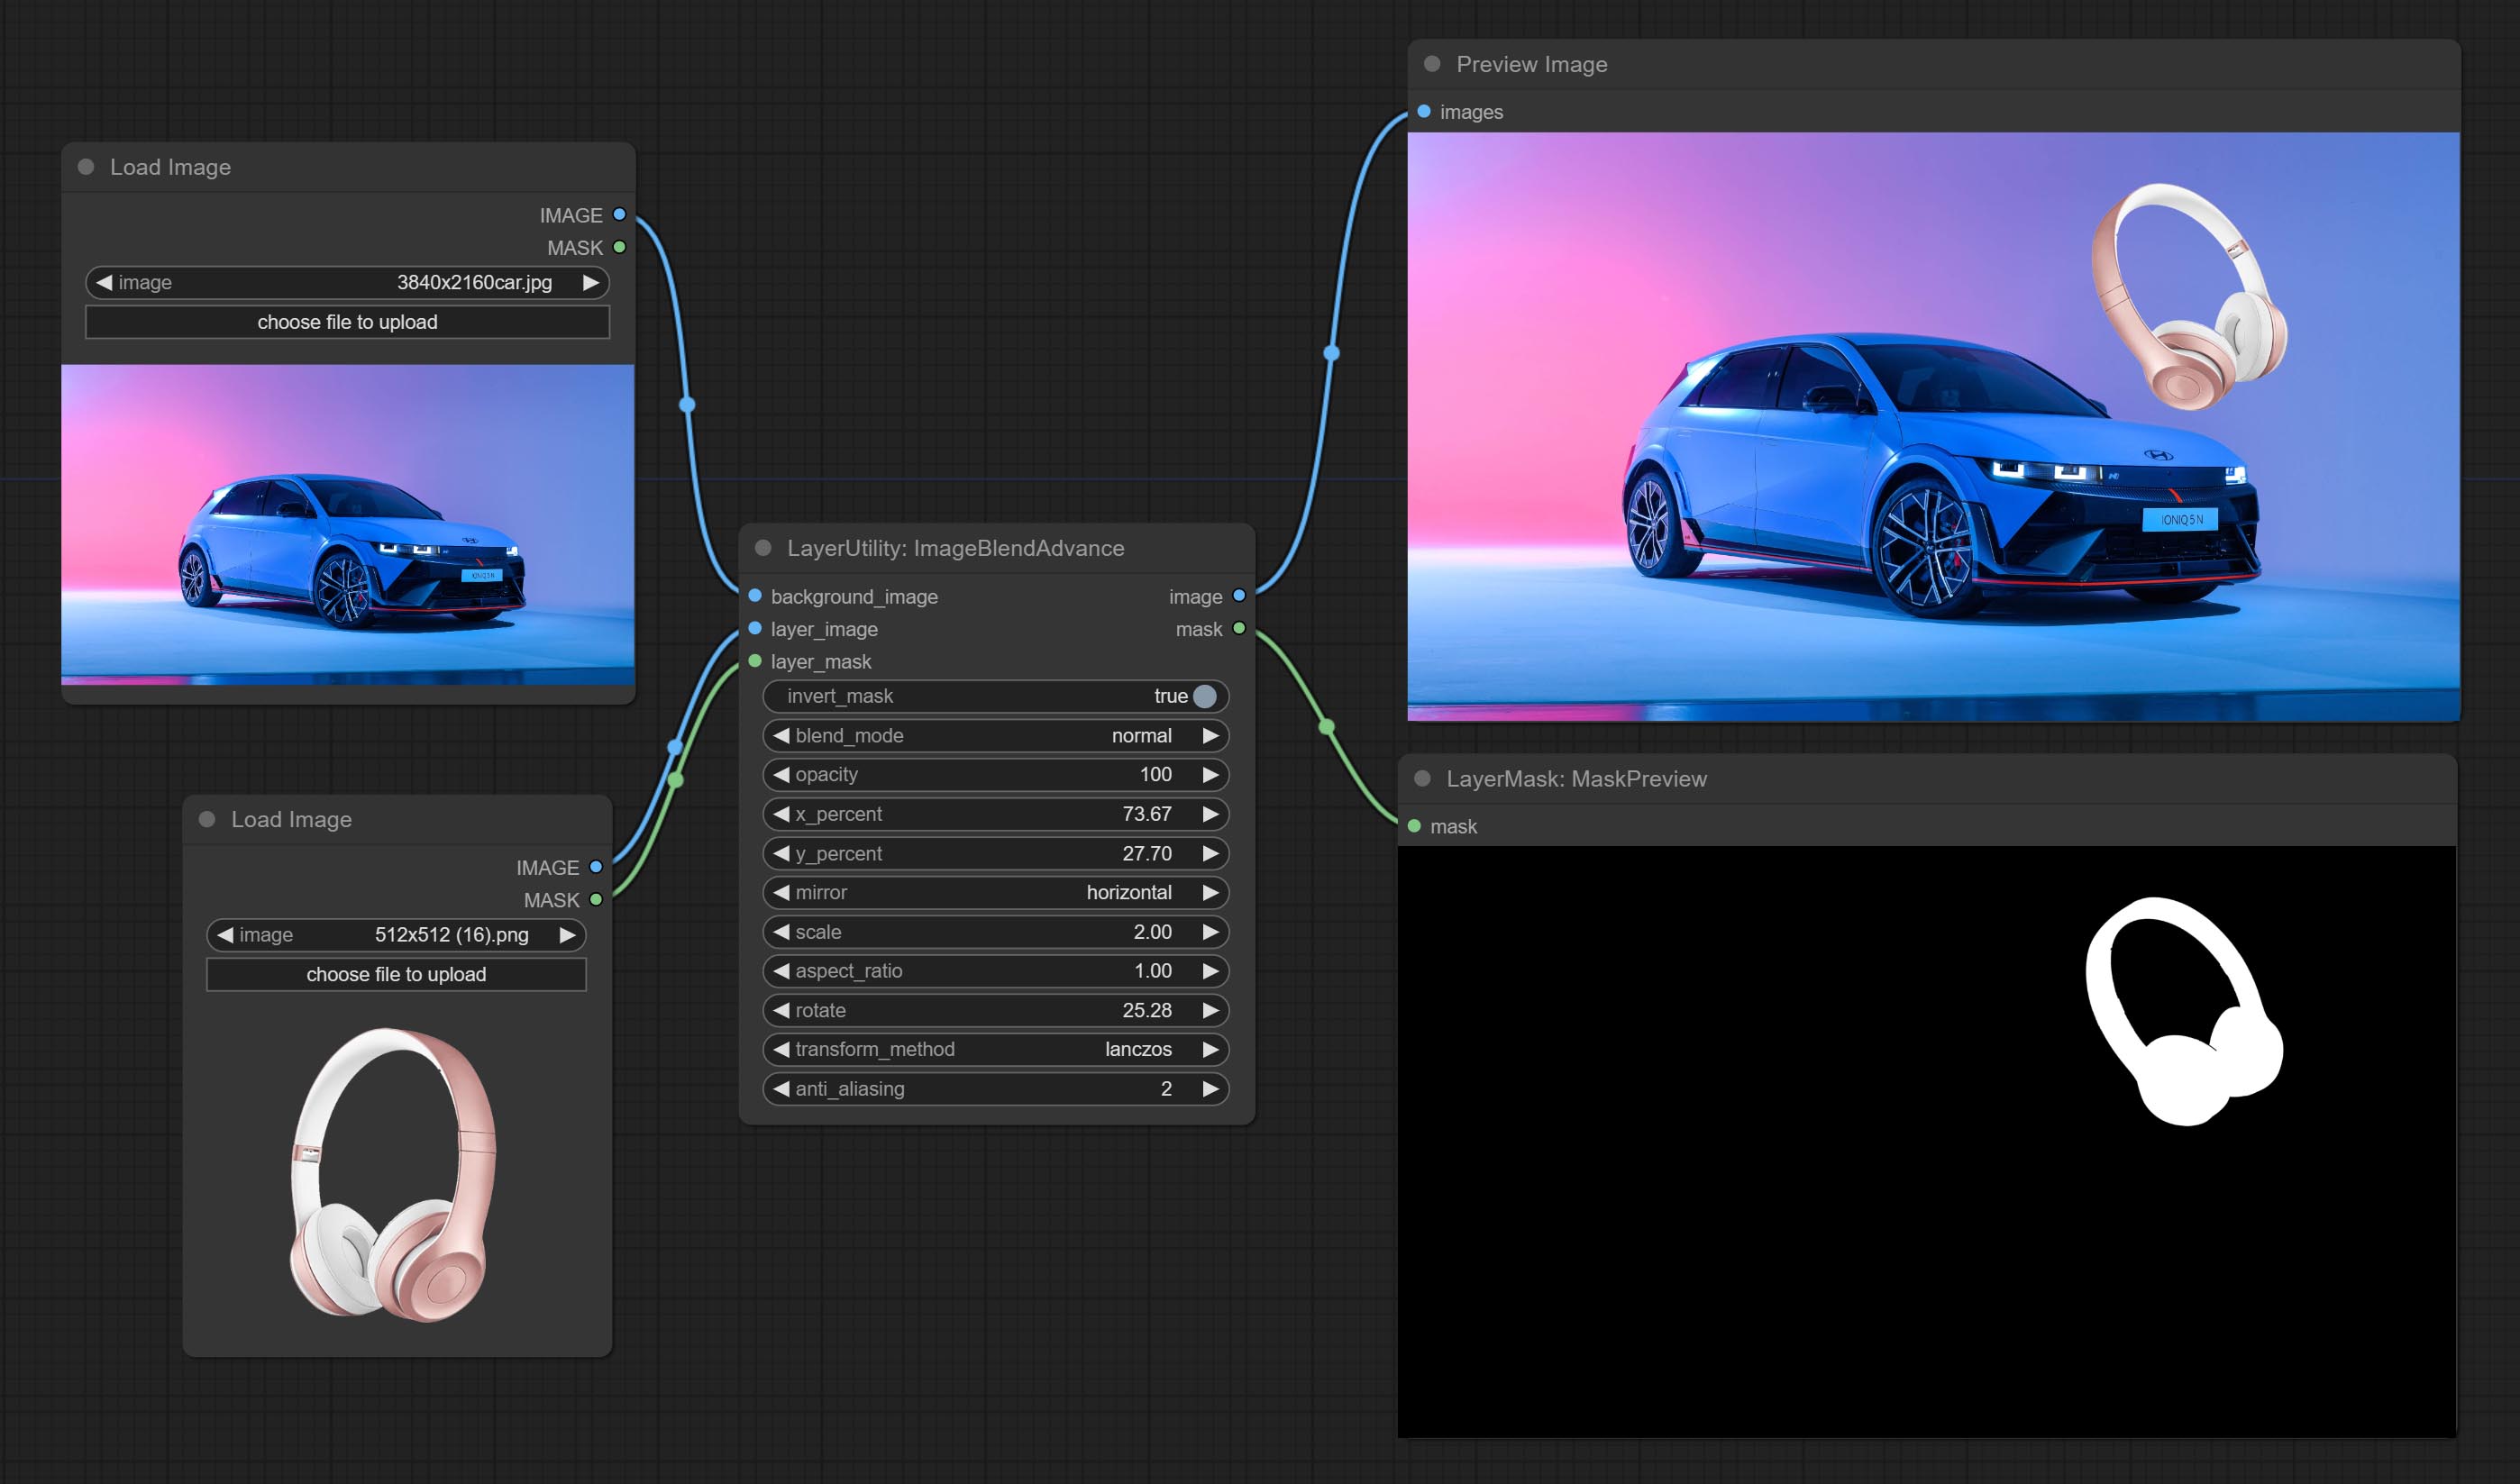
Node options: 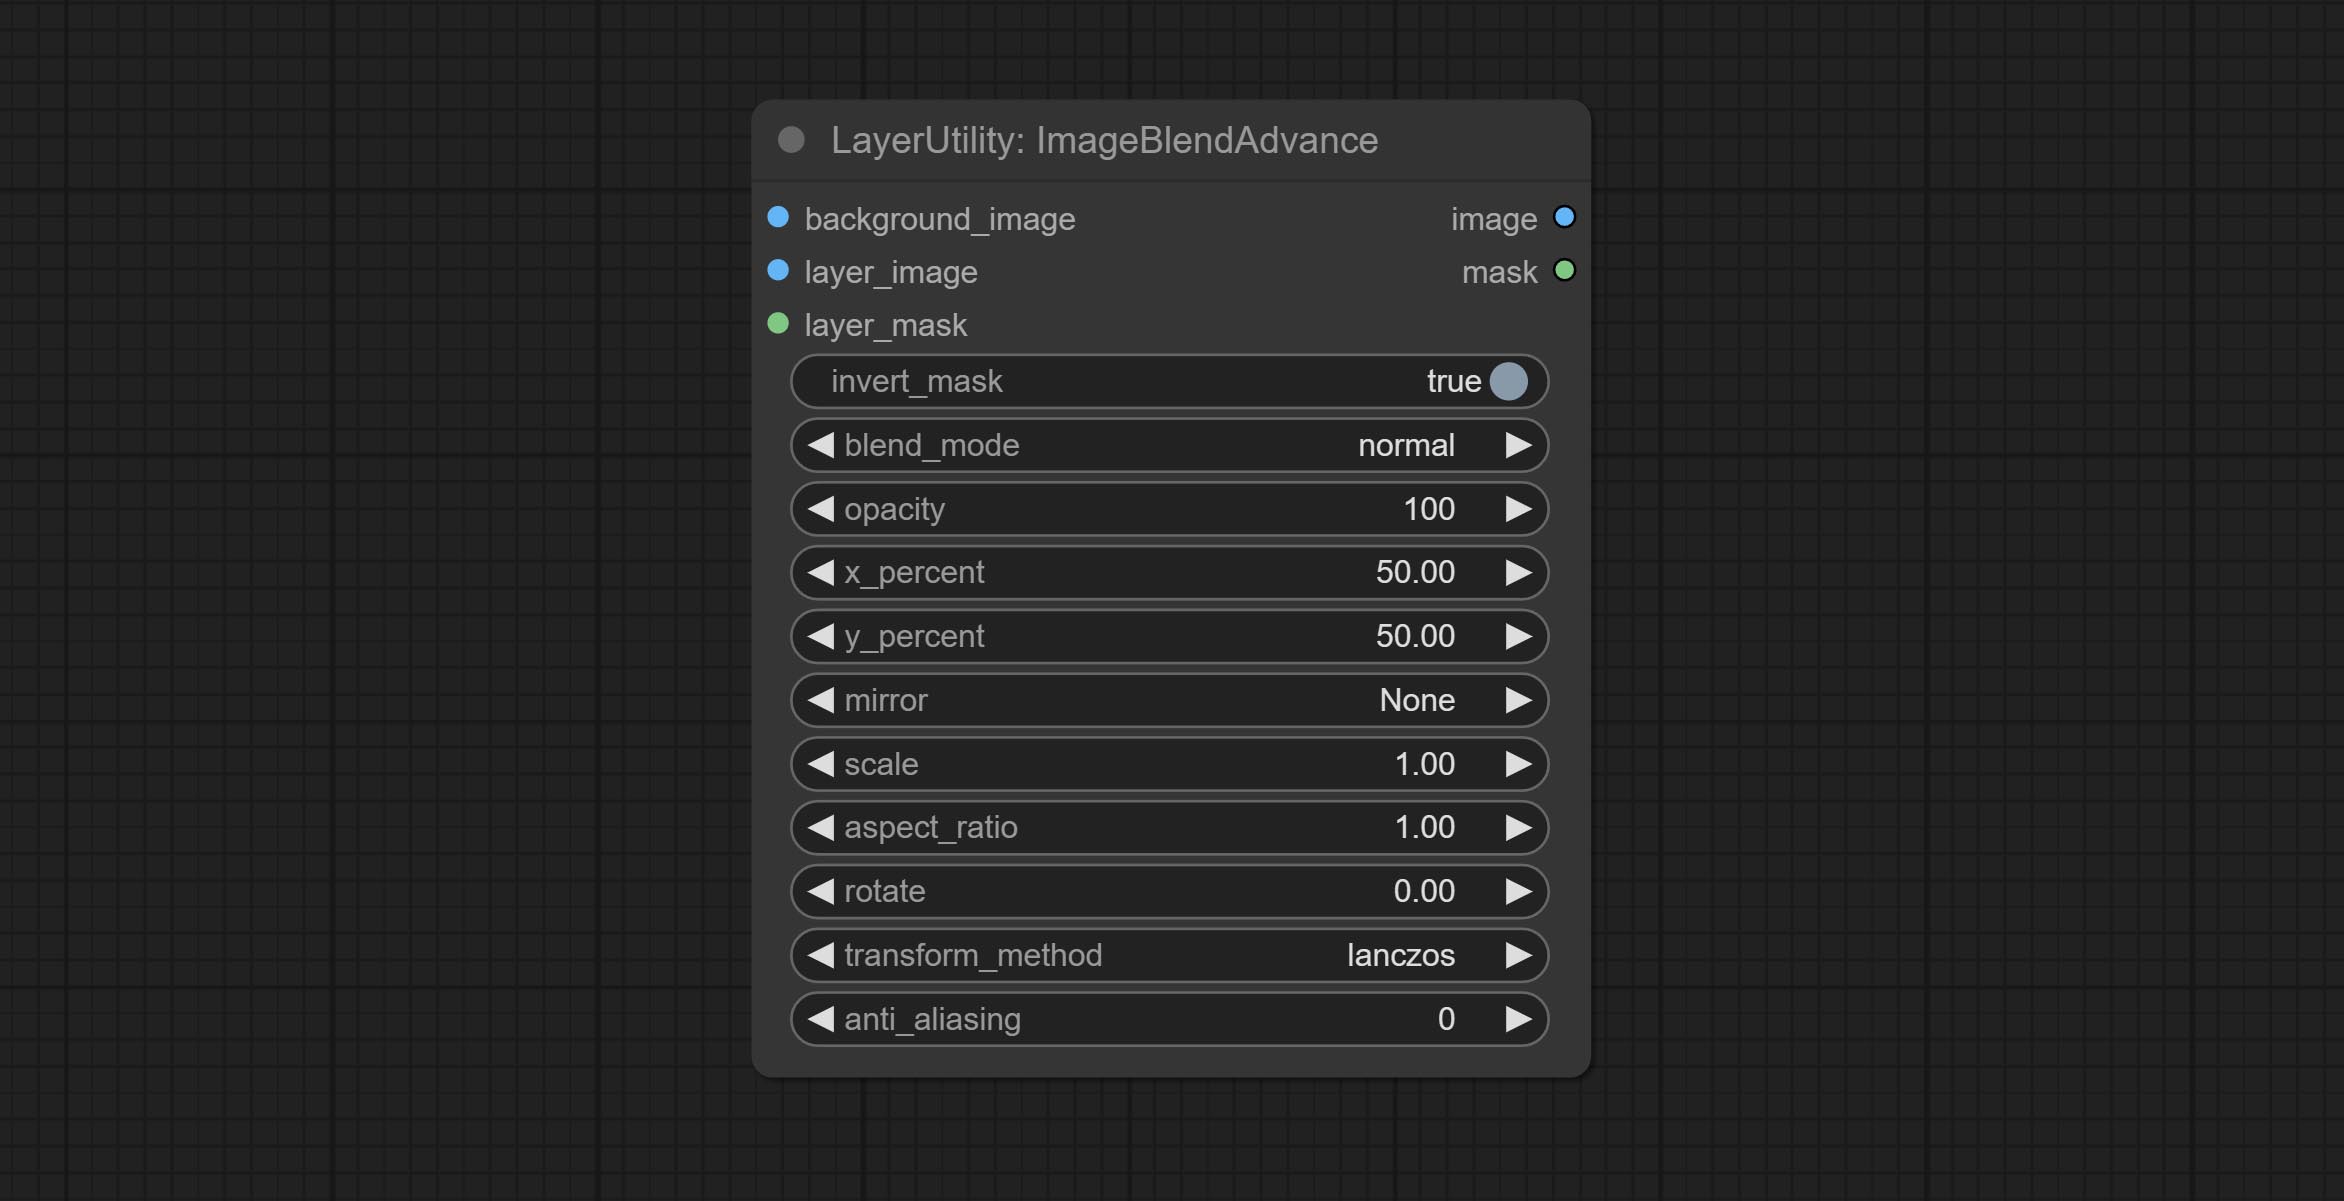
Crop the image according to the mask range, and set the size of the surrounding borders to be retained. This node can be used in conjunction with the RestoreCropBox and ImageScaleRestore nodes to crop and modify upscale parts of image, and then paste them back in place. 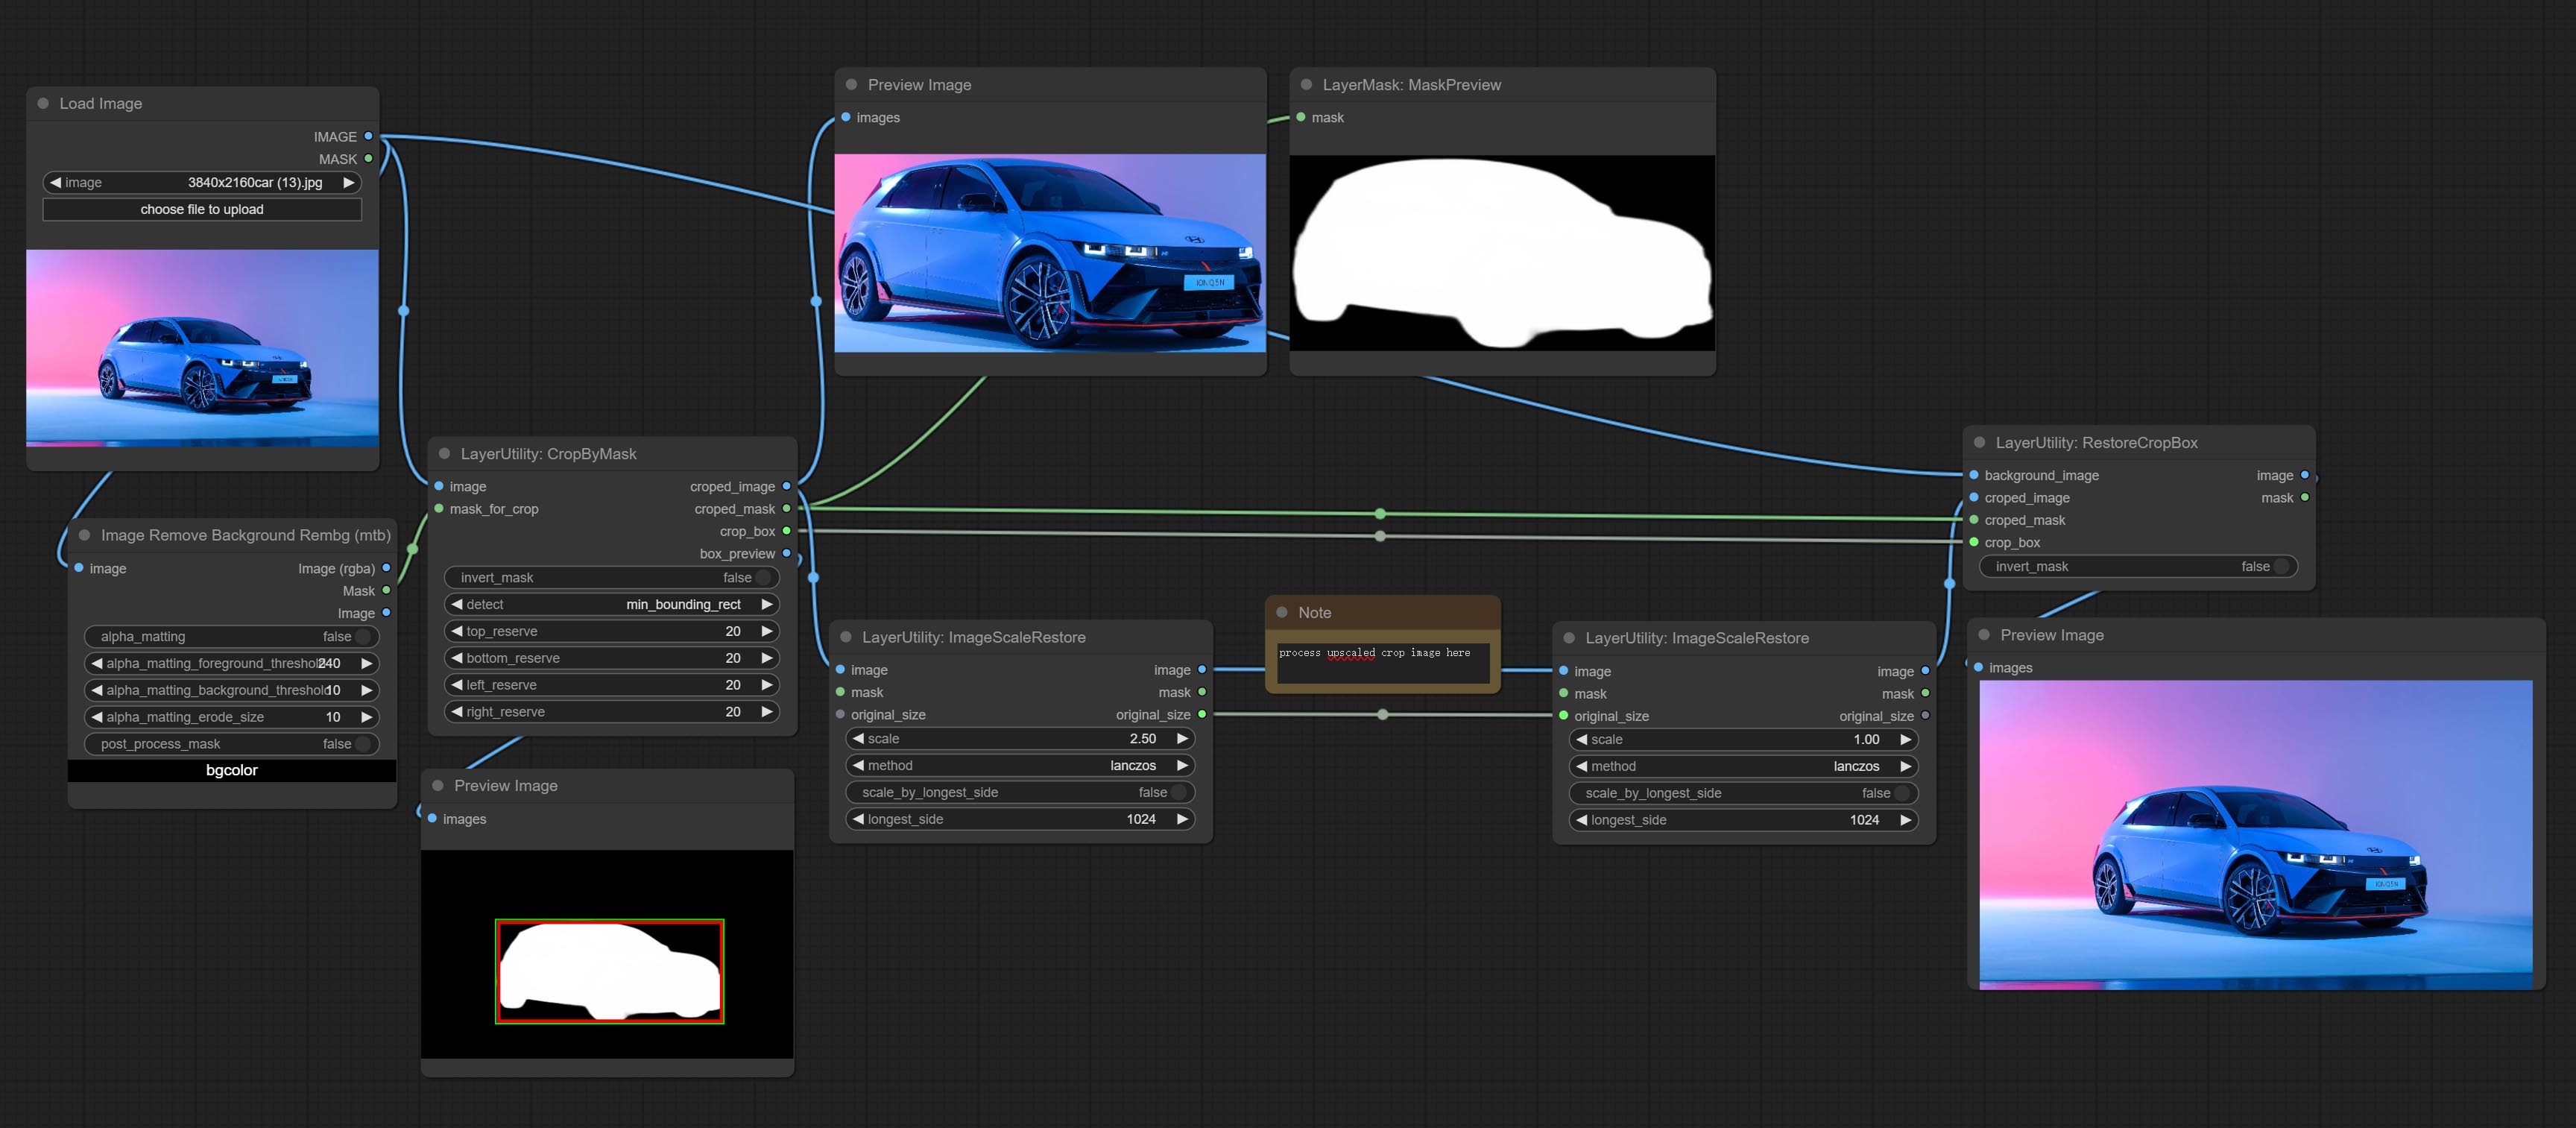
Node options: 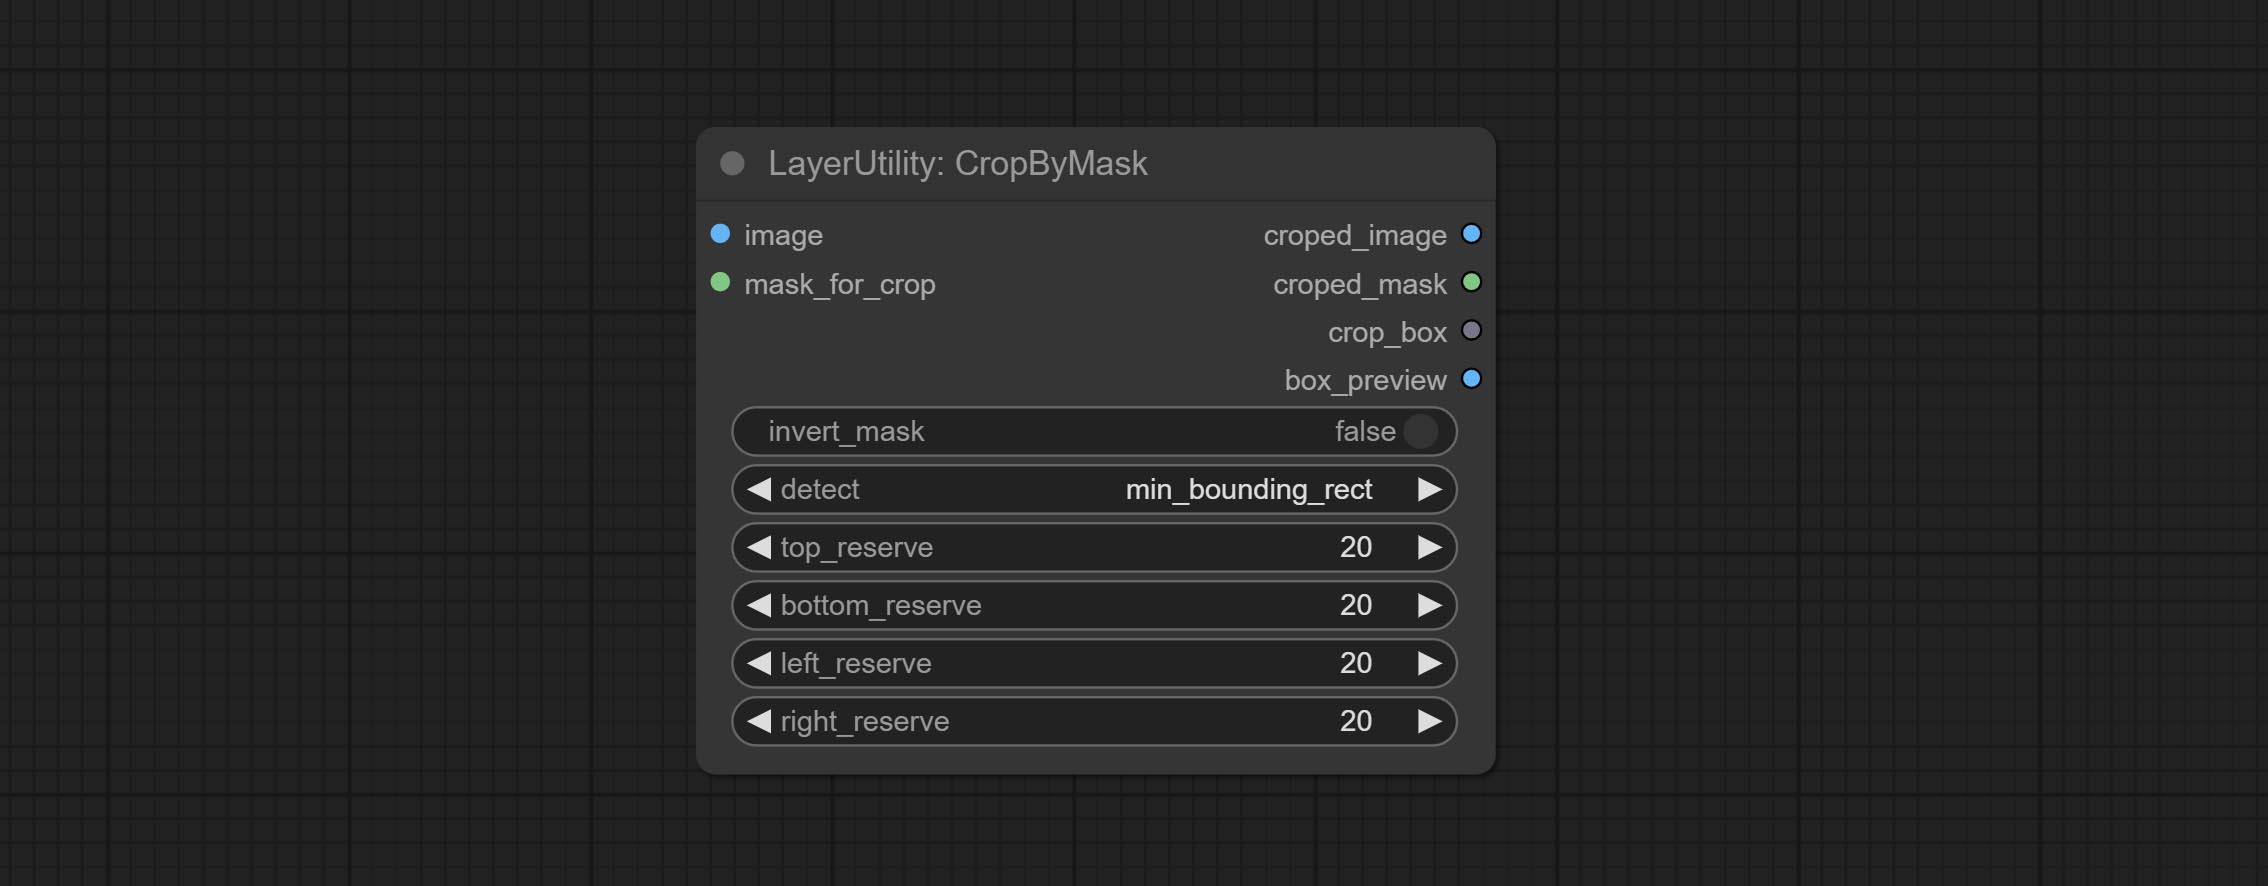
min_bounding_rect is the minimum bounding rectangle of block shape, max_inscribed_rect is the maximum inscribed rectangle of block shape, and mask-area is the effective area for masking pixels.Ausgabe:
The V2 upgraded version of CropByMask. Supports crop_box input, making it easy to cut layers of the same size.
The following changes have been made based on CropByMask: 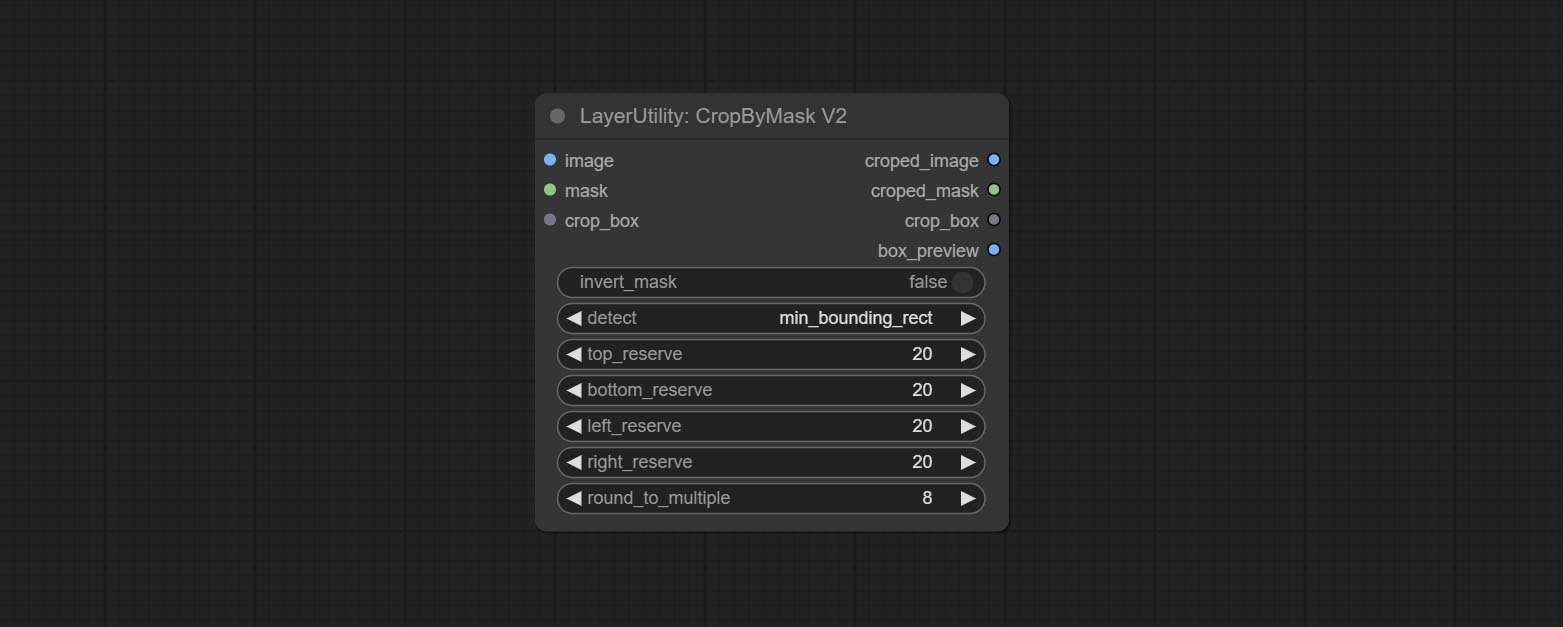
mask_for_crop reanme to mask 。crop_box . If there are inputs here, mask detection will be ignored and this data will be directly used for cropping.round_to_multiple to round the trimming edge length multiple. For example, setting it to 8 will force the width and height to be multiples of 8.Restore the cropped image to the original image by CropByMask.
Node options: 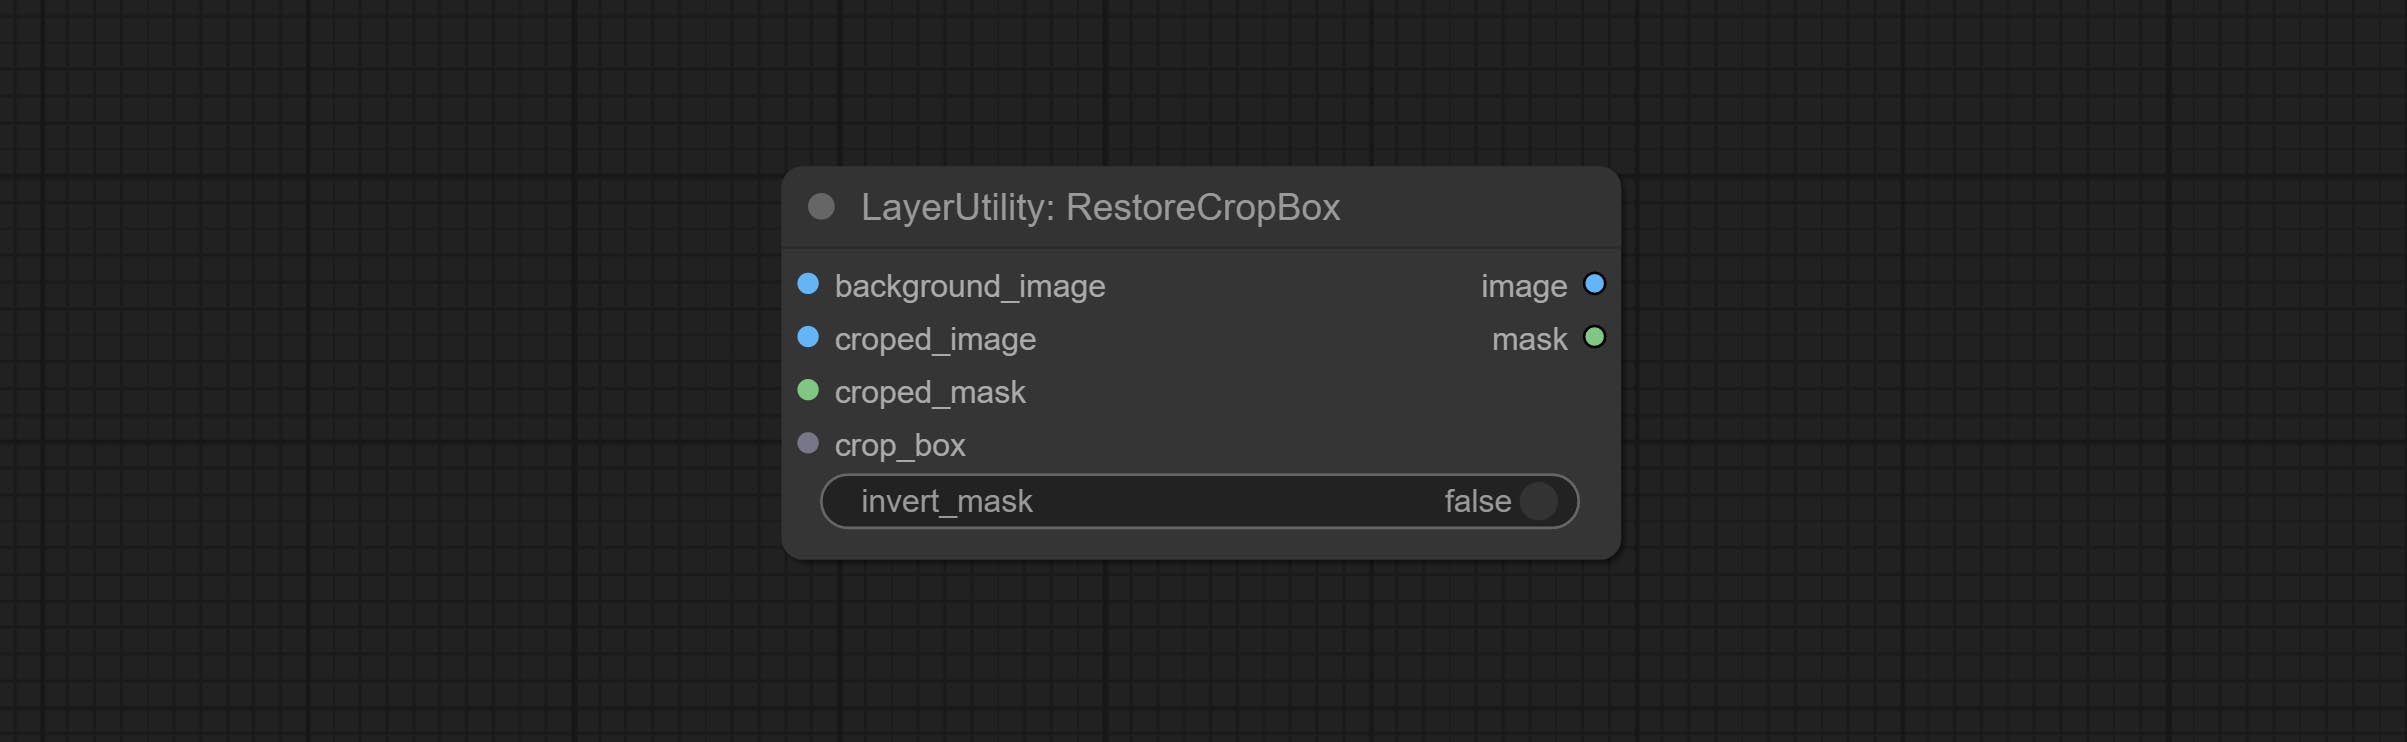
Parsing the corp_box to x , y , width , height . 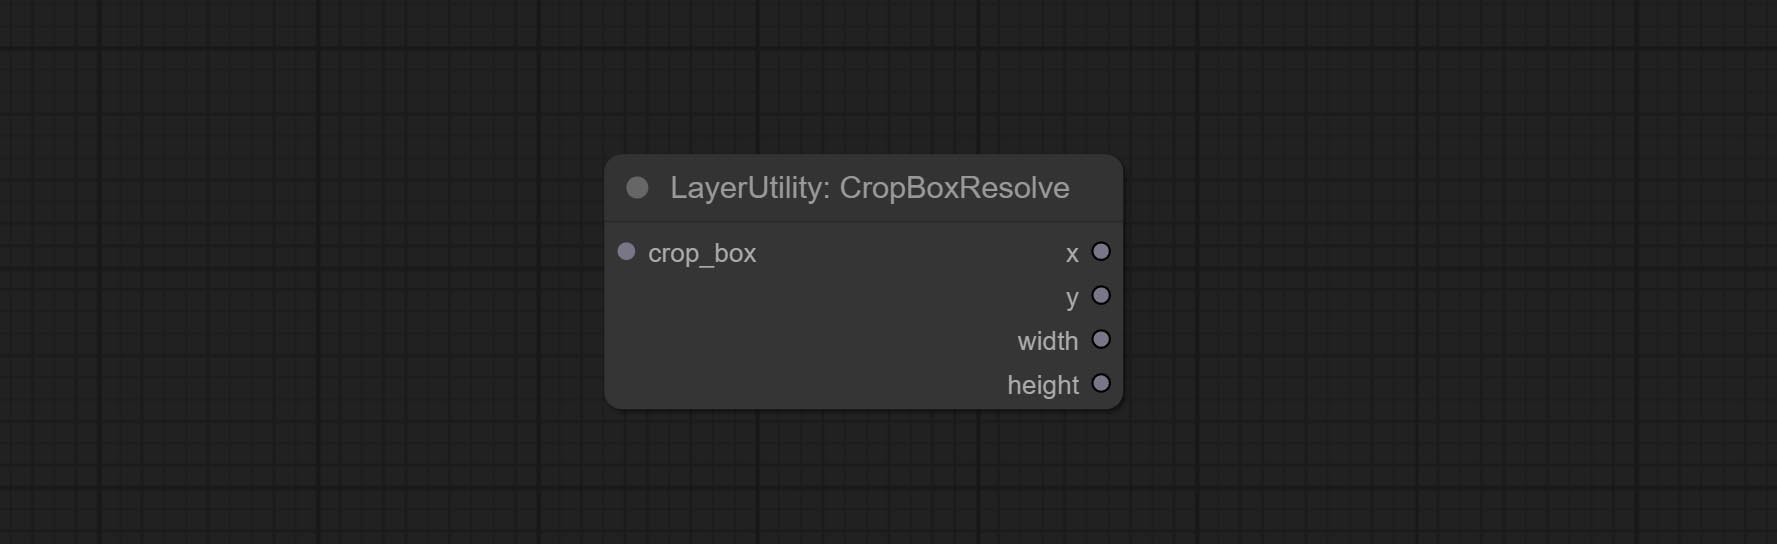
Image scaling. when this node is used in pairs, the image can be automatically restored to its original size on the second node. 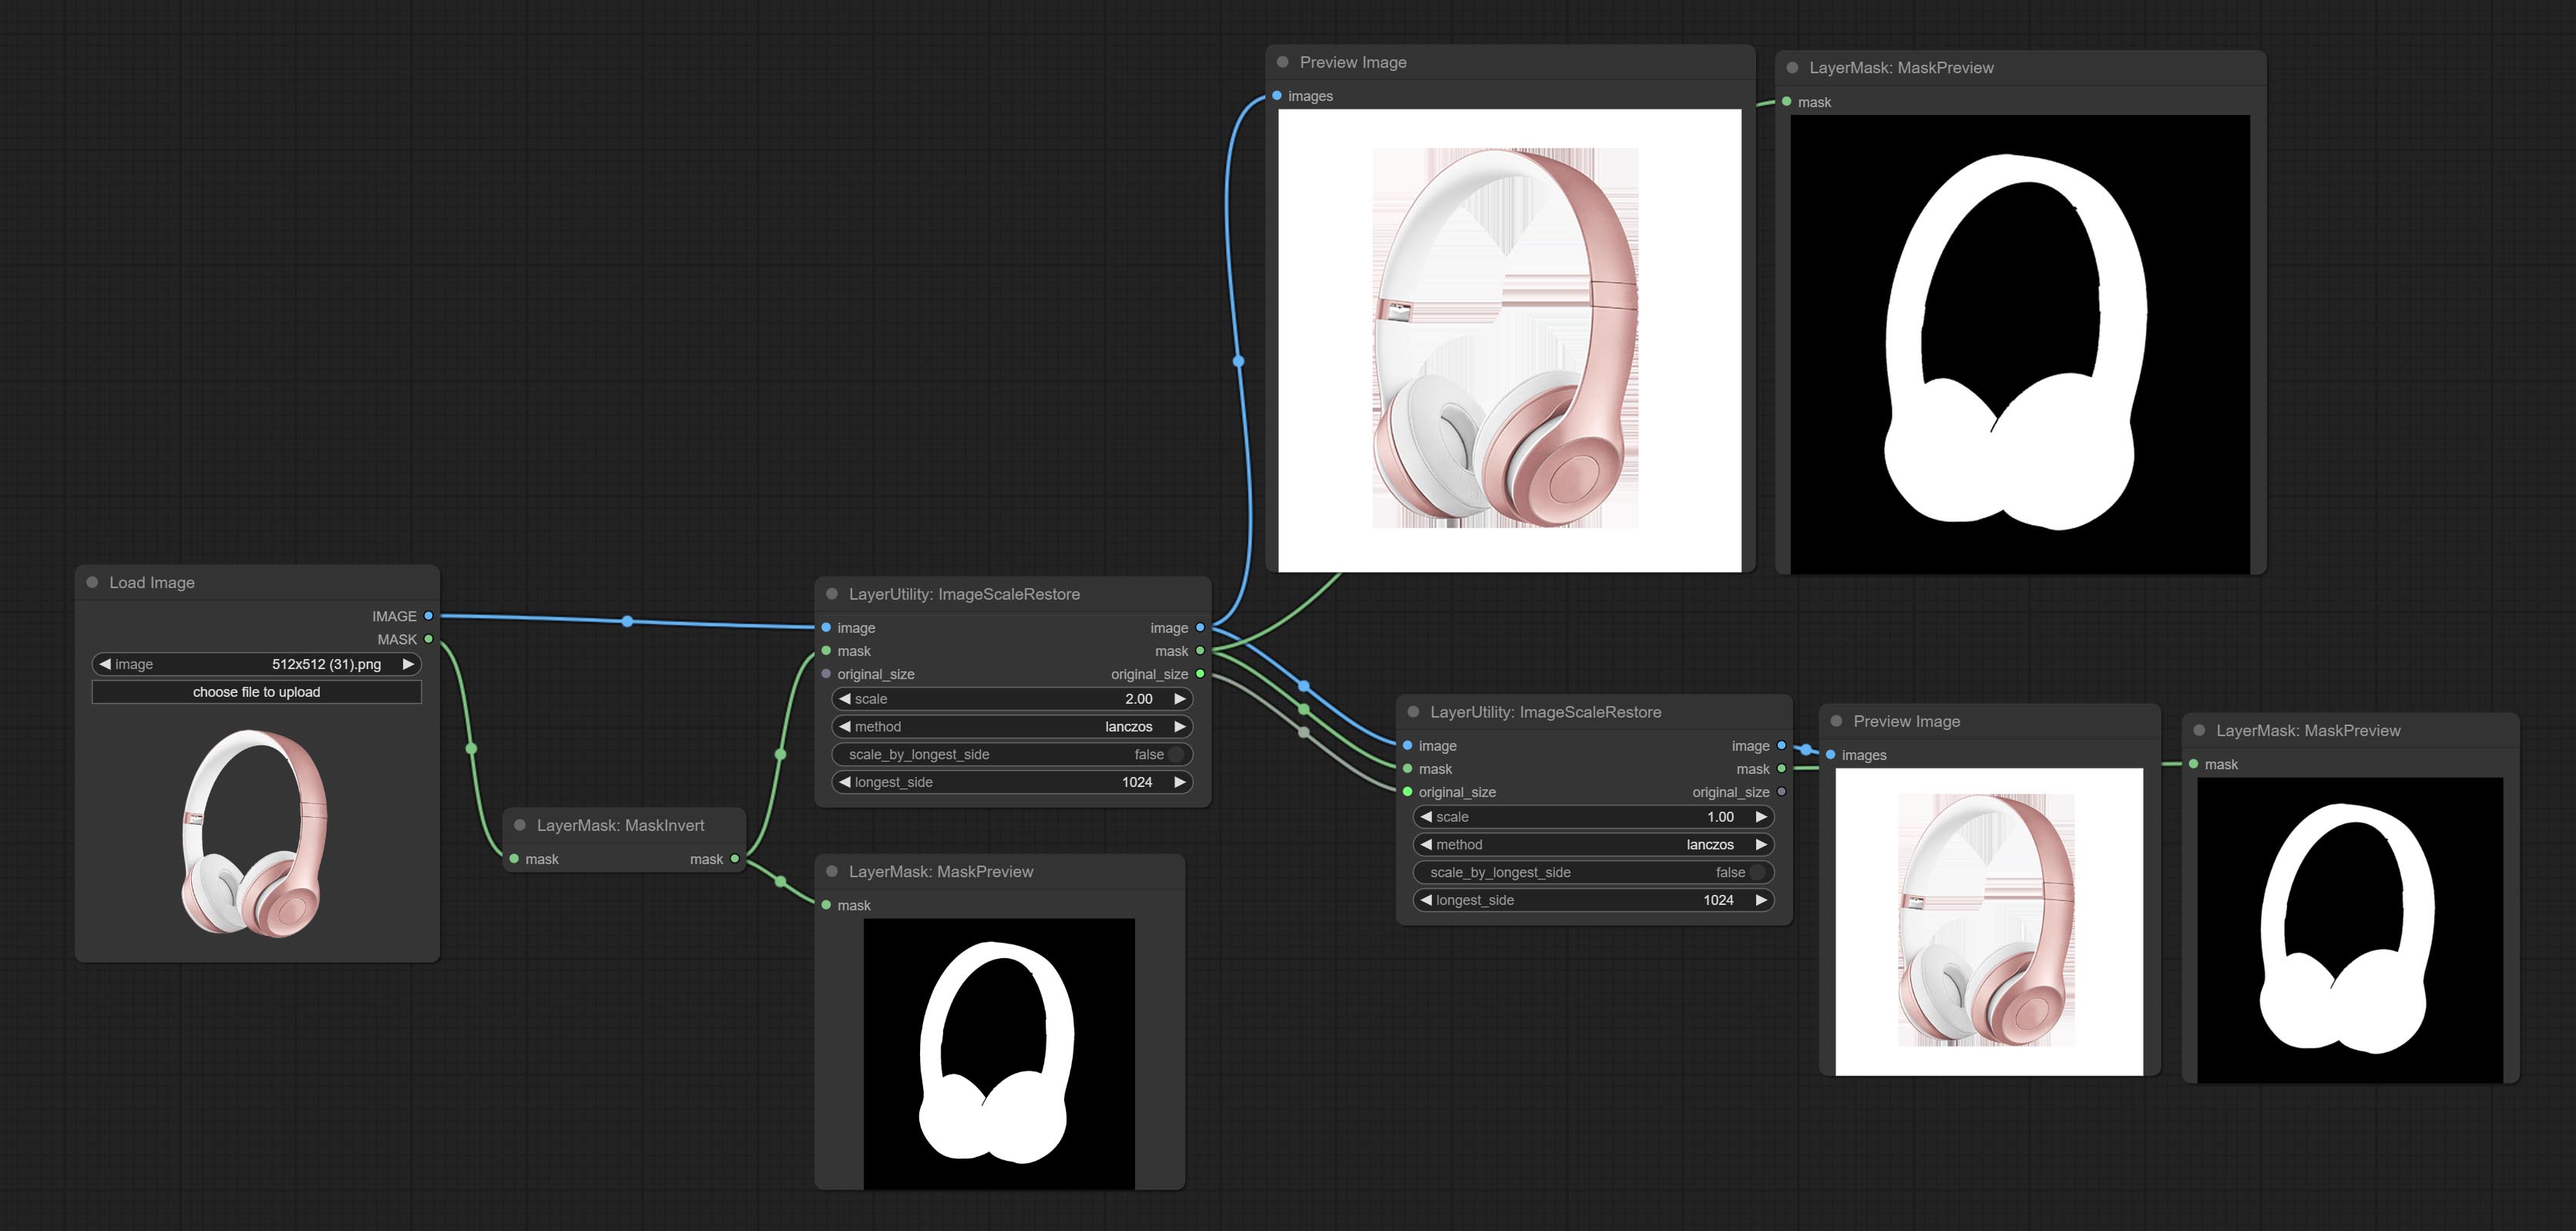
Node options: 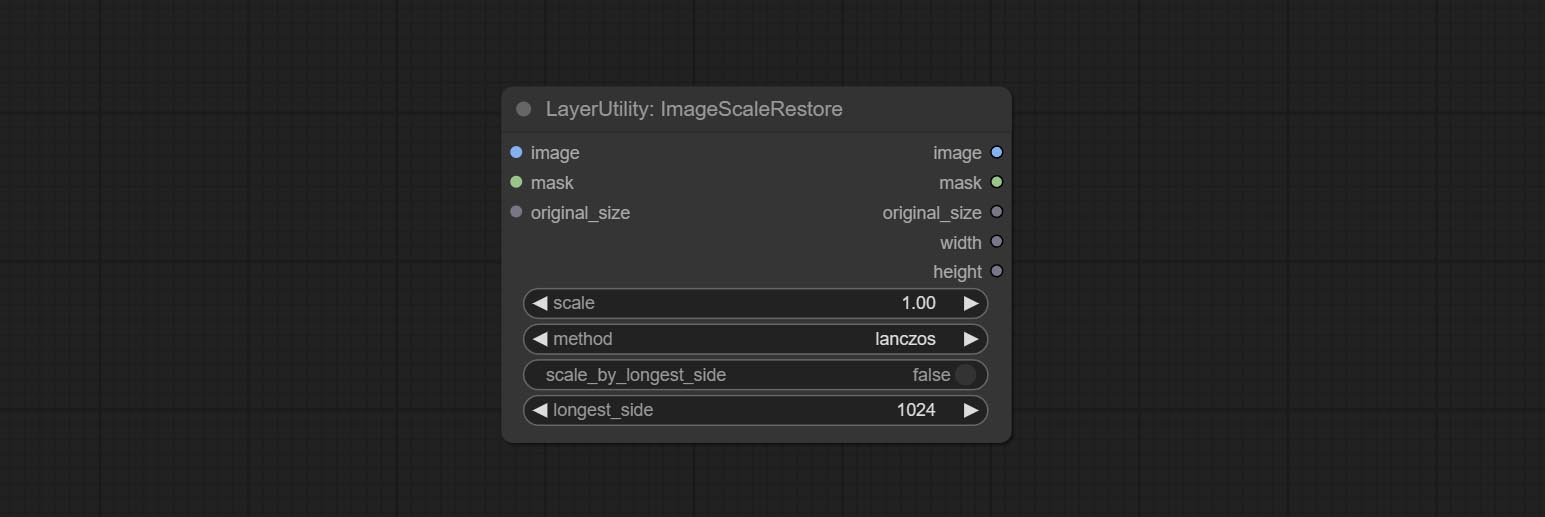
Outputs:
The V2 upgraded version of ImageScaleRestore.
Node options: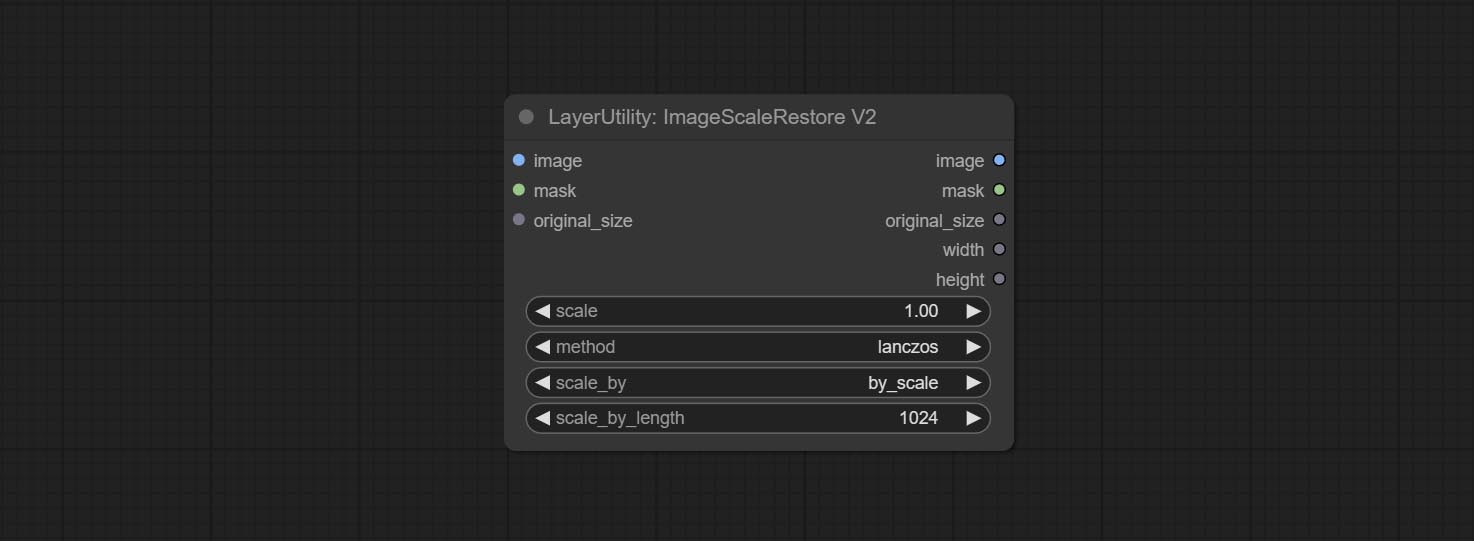
The following changes have been made based on ImageScaleRestore:
scale_by to specify the length of the edge. Scale the image or mask to the size of the reference image (or reference mask). 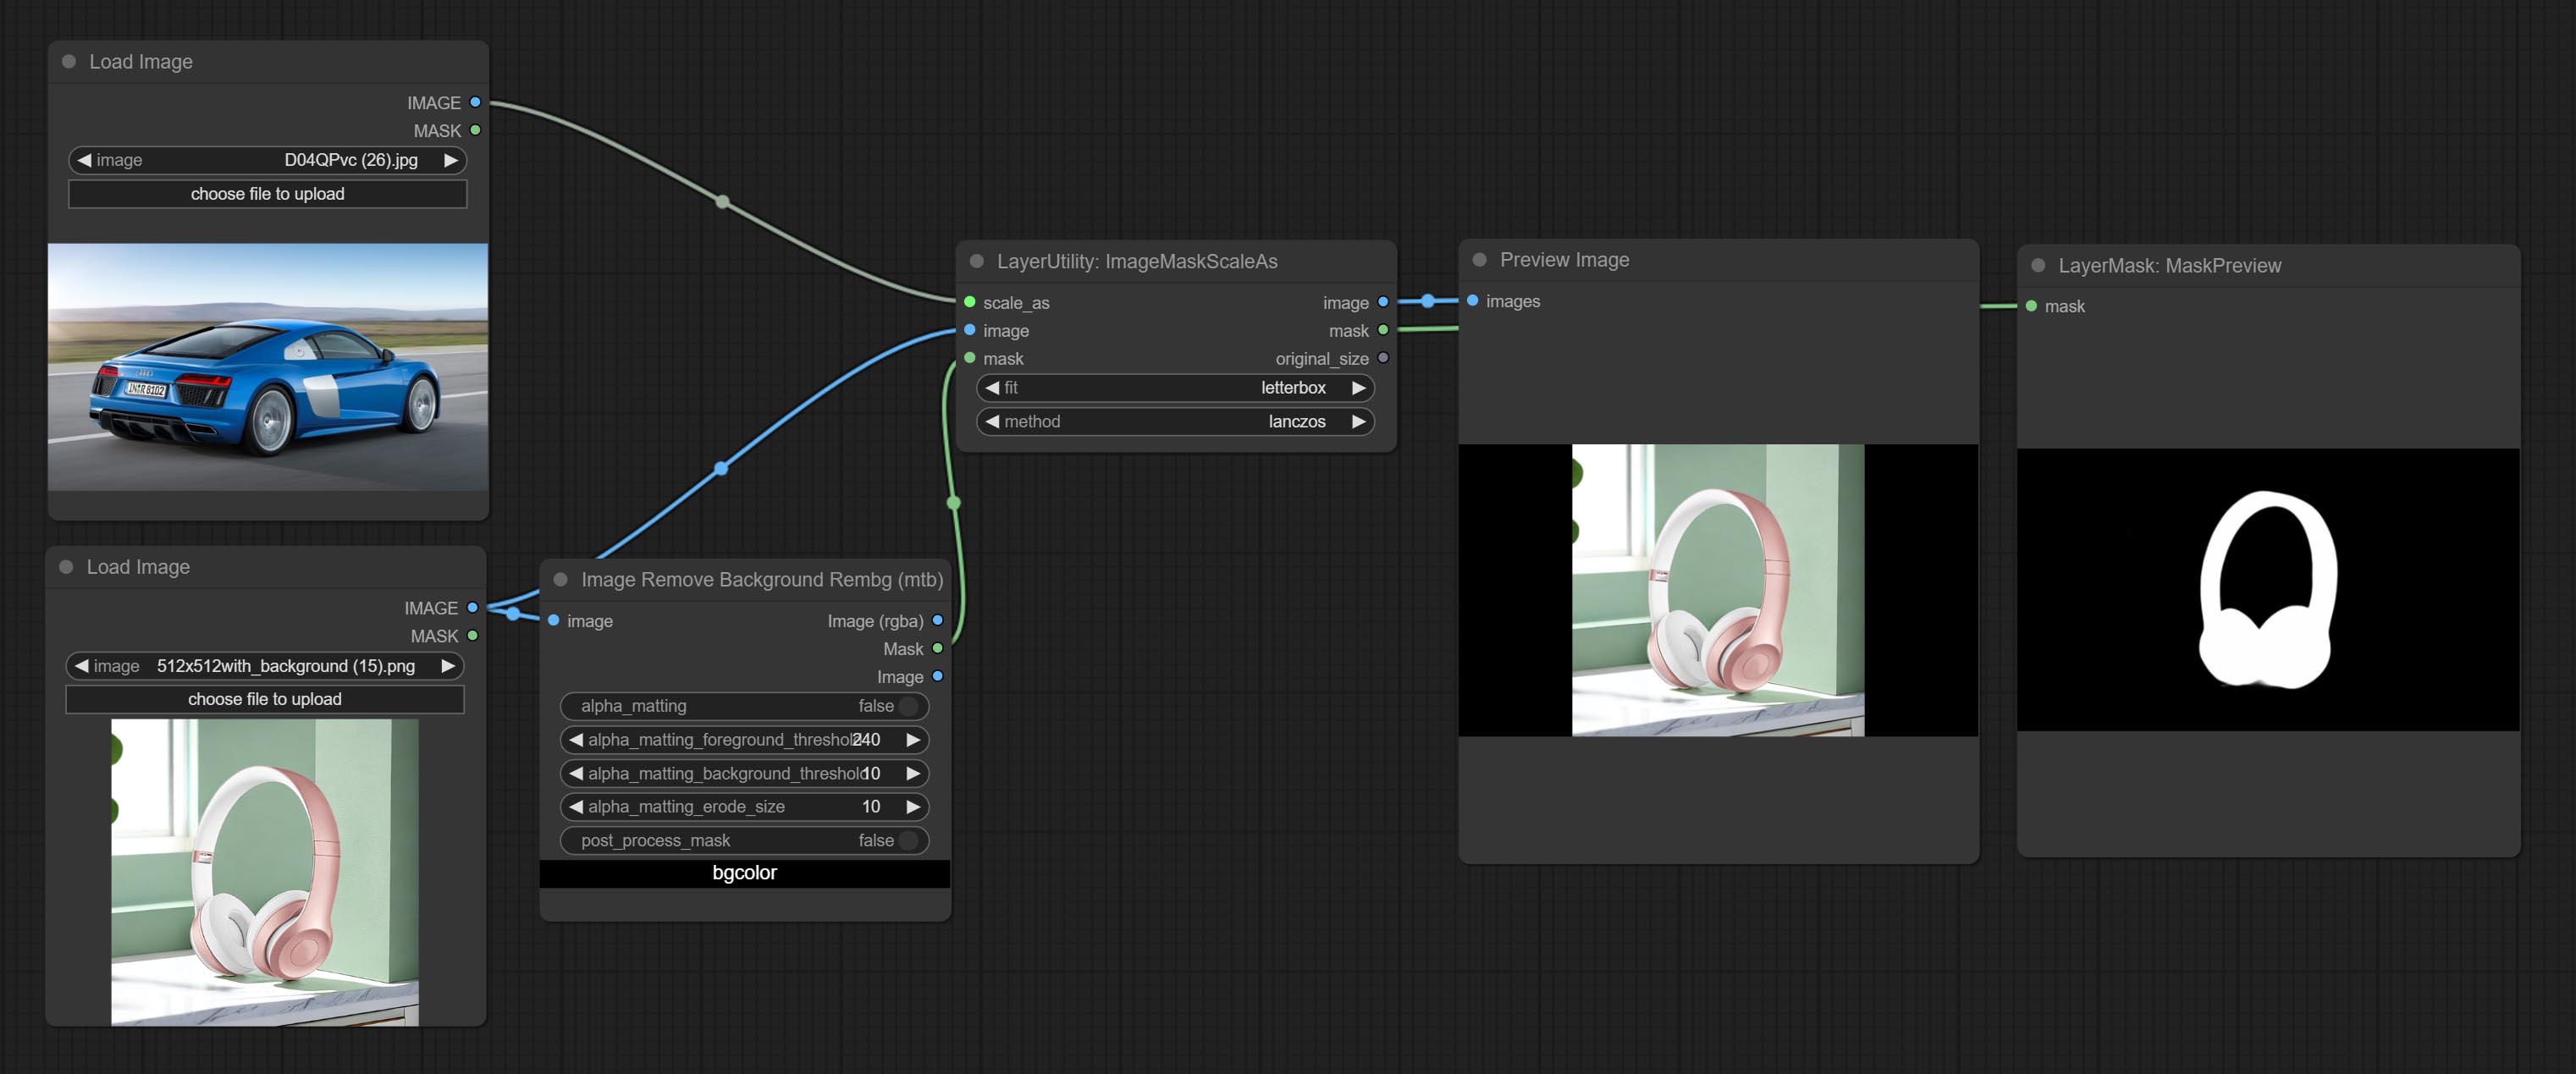
Node options: 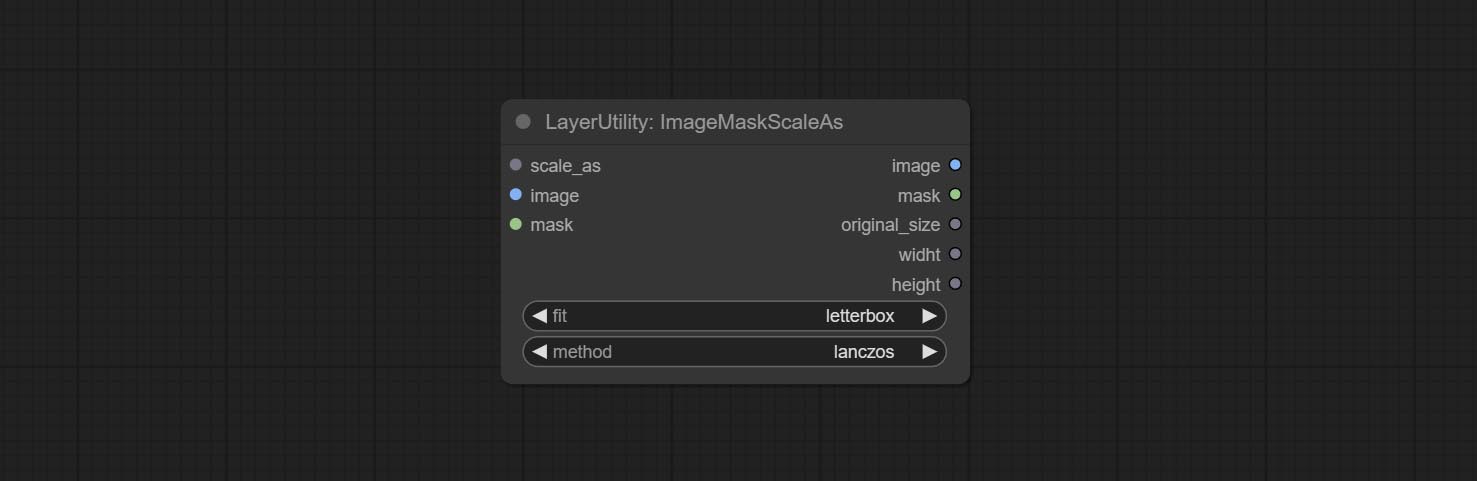
* Only limited to input images and masks. forcing the integration of other types of inputs will result in node errors.
Outputs:
Scale the image or mask by aspect ratio. the scaled size can be rounded to a multiple of 8 or 16, and can be scaled to the long side size. 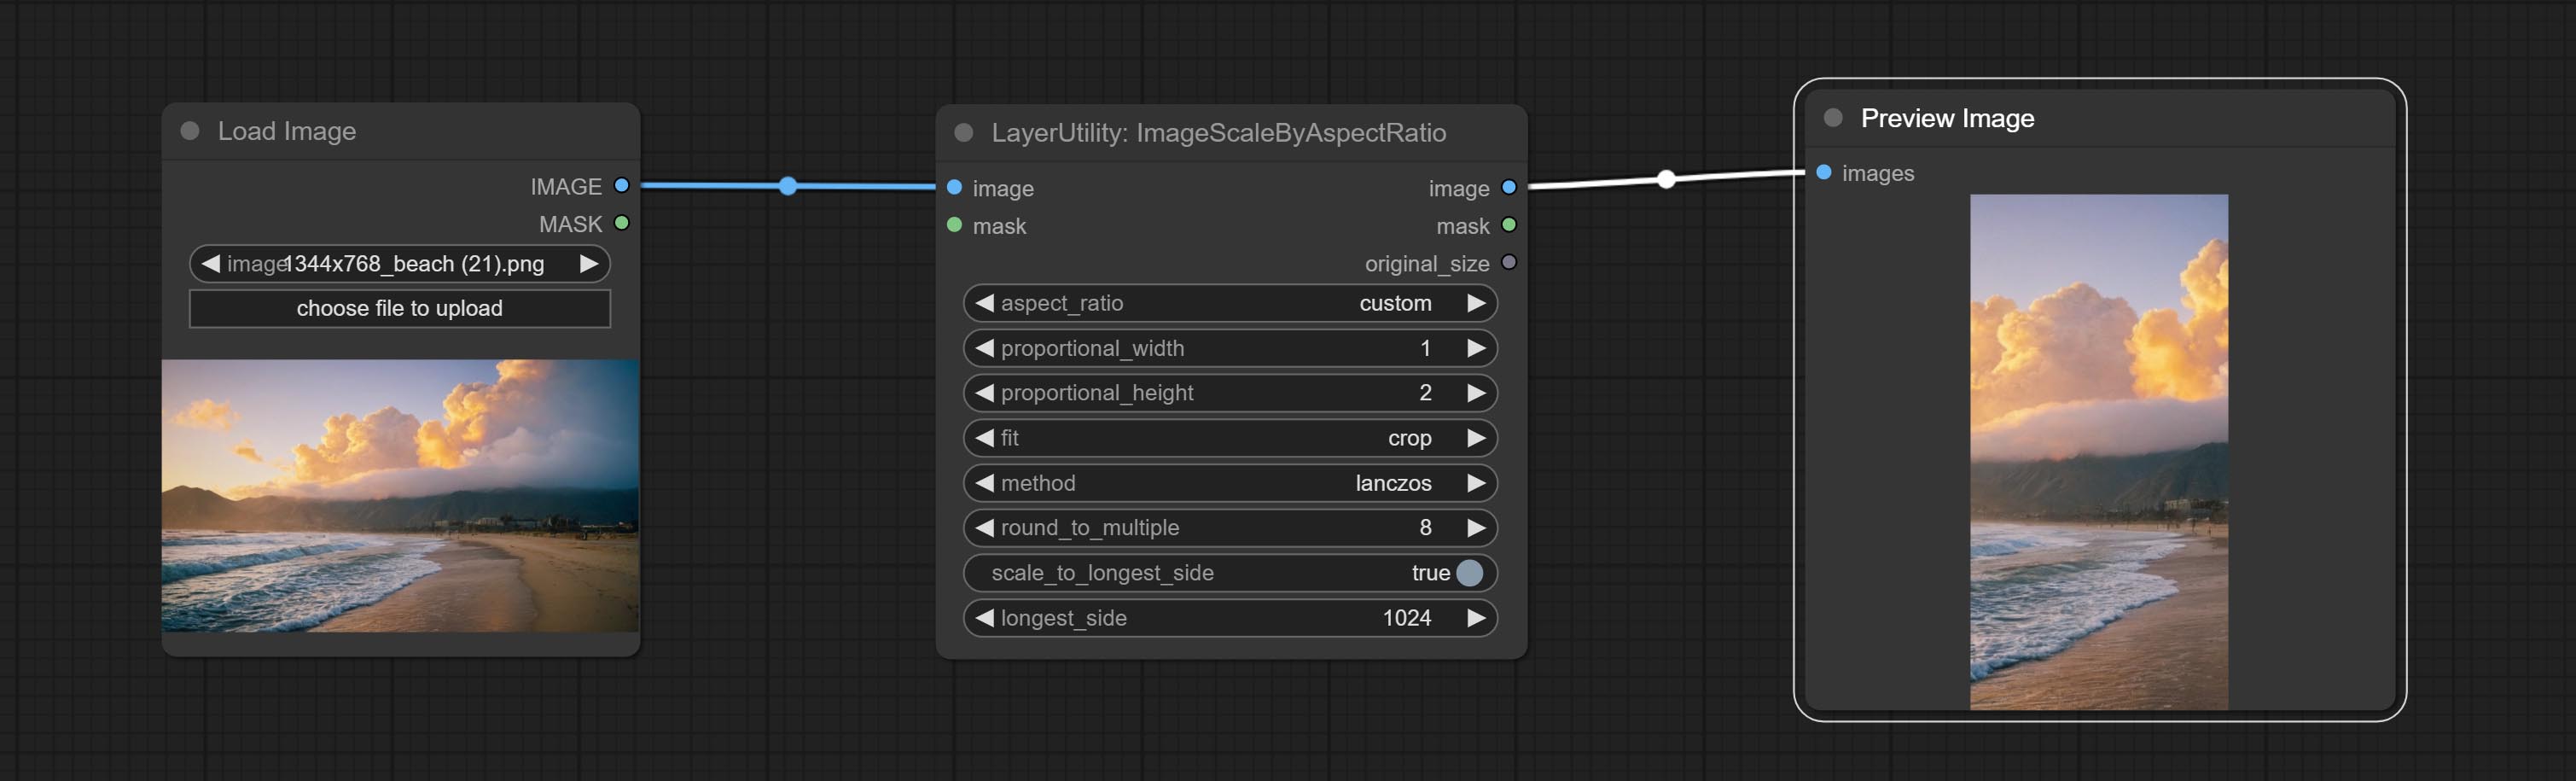
Node options: 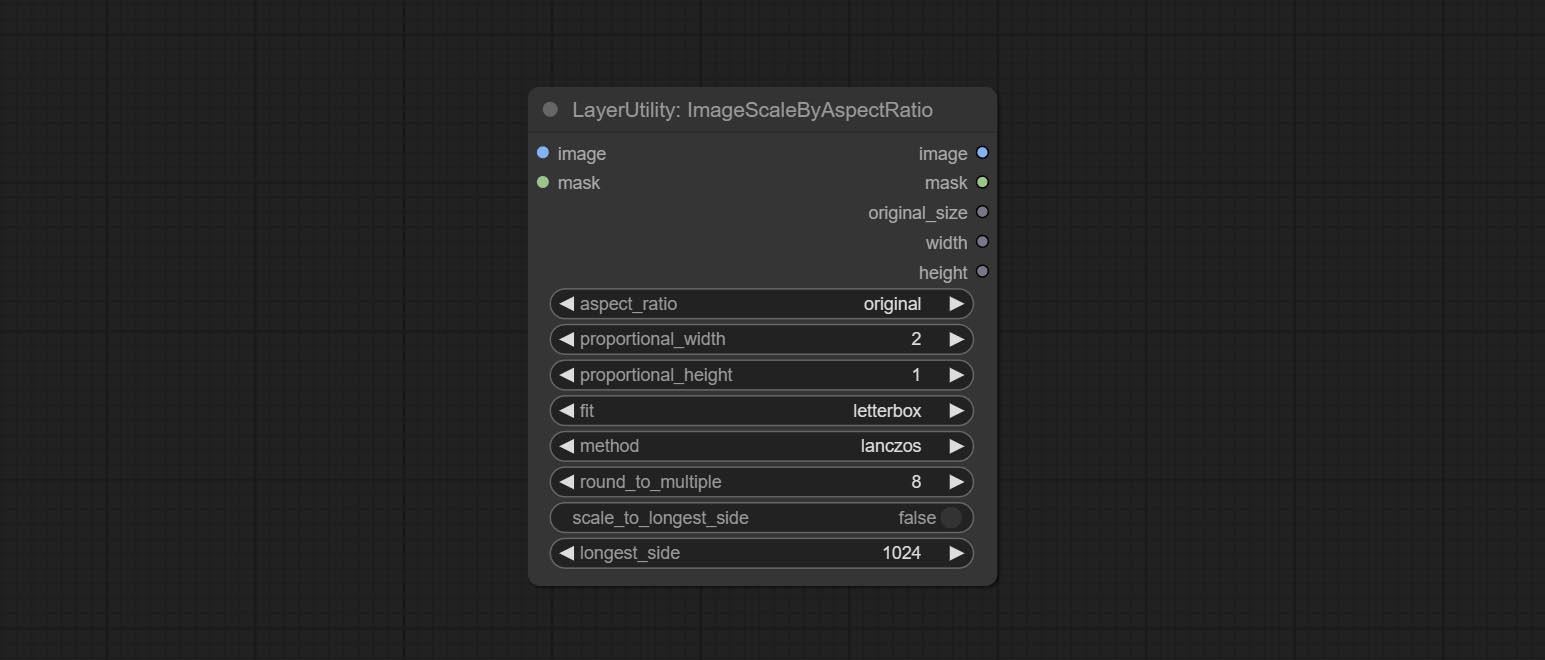
Outputs:
V2 Upgraded Version of ImageScaleByAspectRatio
Node options: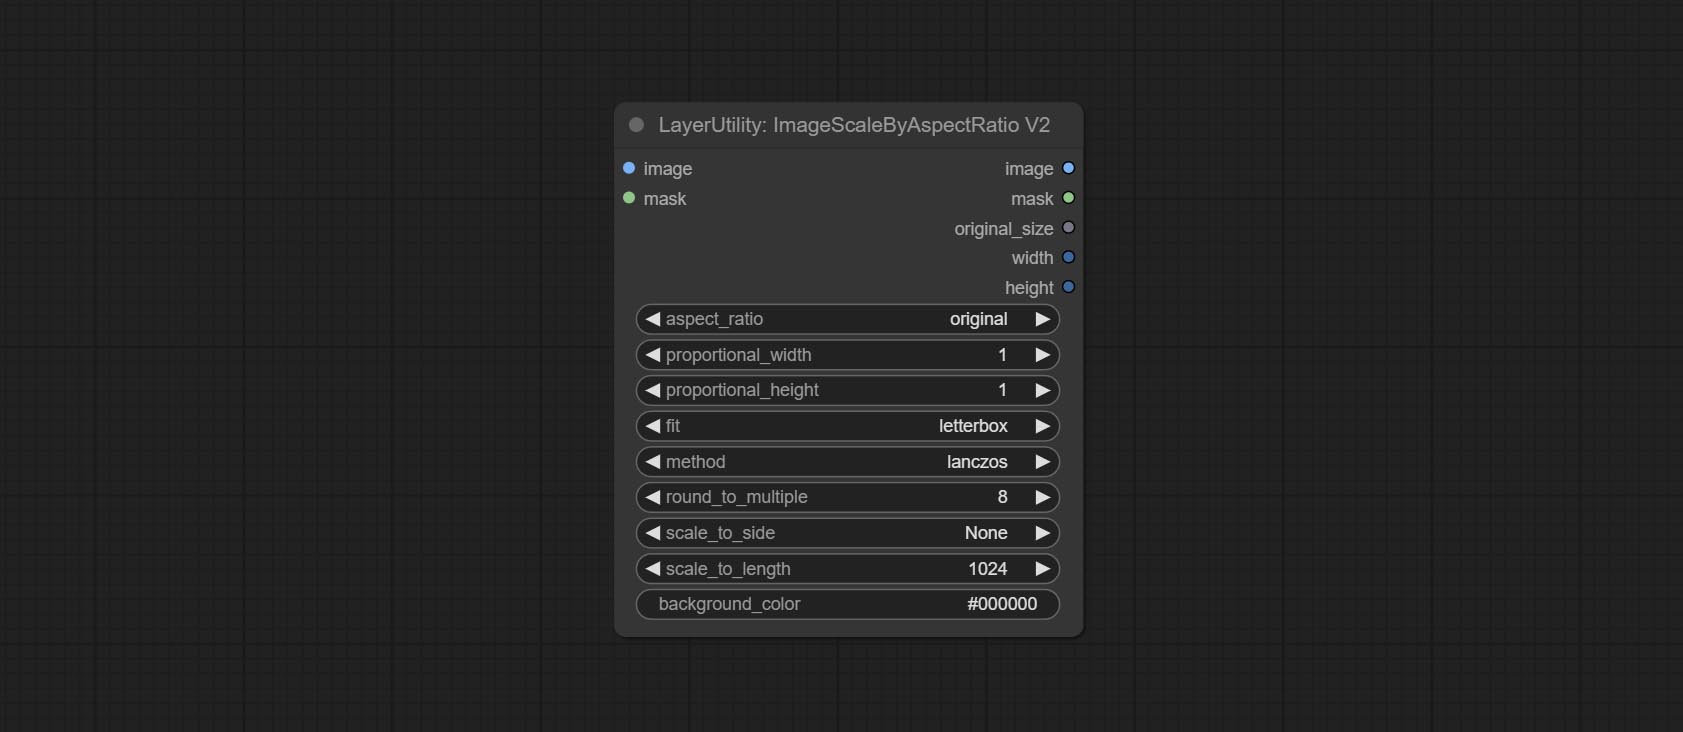
The following changes have been made based on ImageScaleByAspectRatio:
Inference the prompts based on the image. this node is repackage of the ComfyUI_VLM_nodes's UForm-Gen2 Qwen Node , thanks to the original author. Download model files from huggingface or Baidu Netdisk to ComfyUI/models/LLavacheckpoints/files_for_uform_gen2_qwen folder.
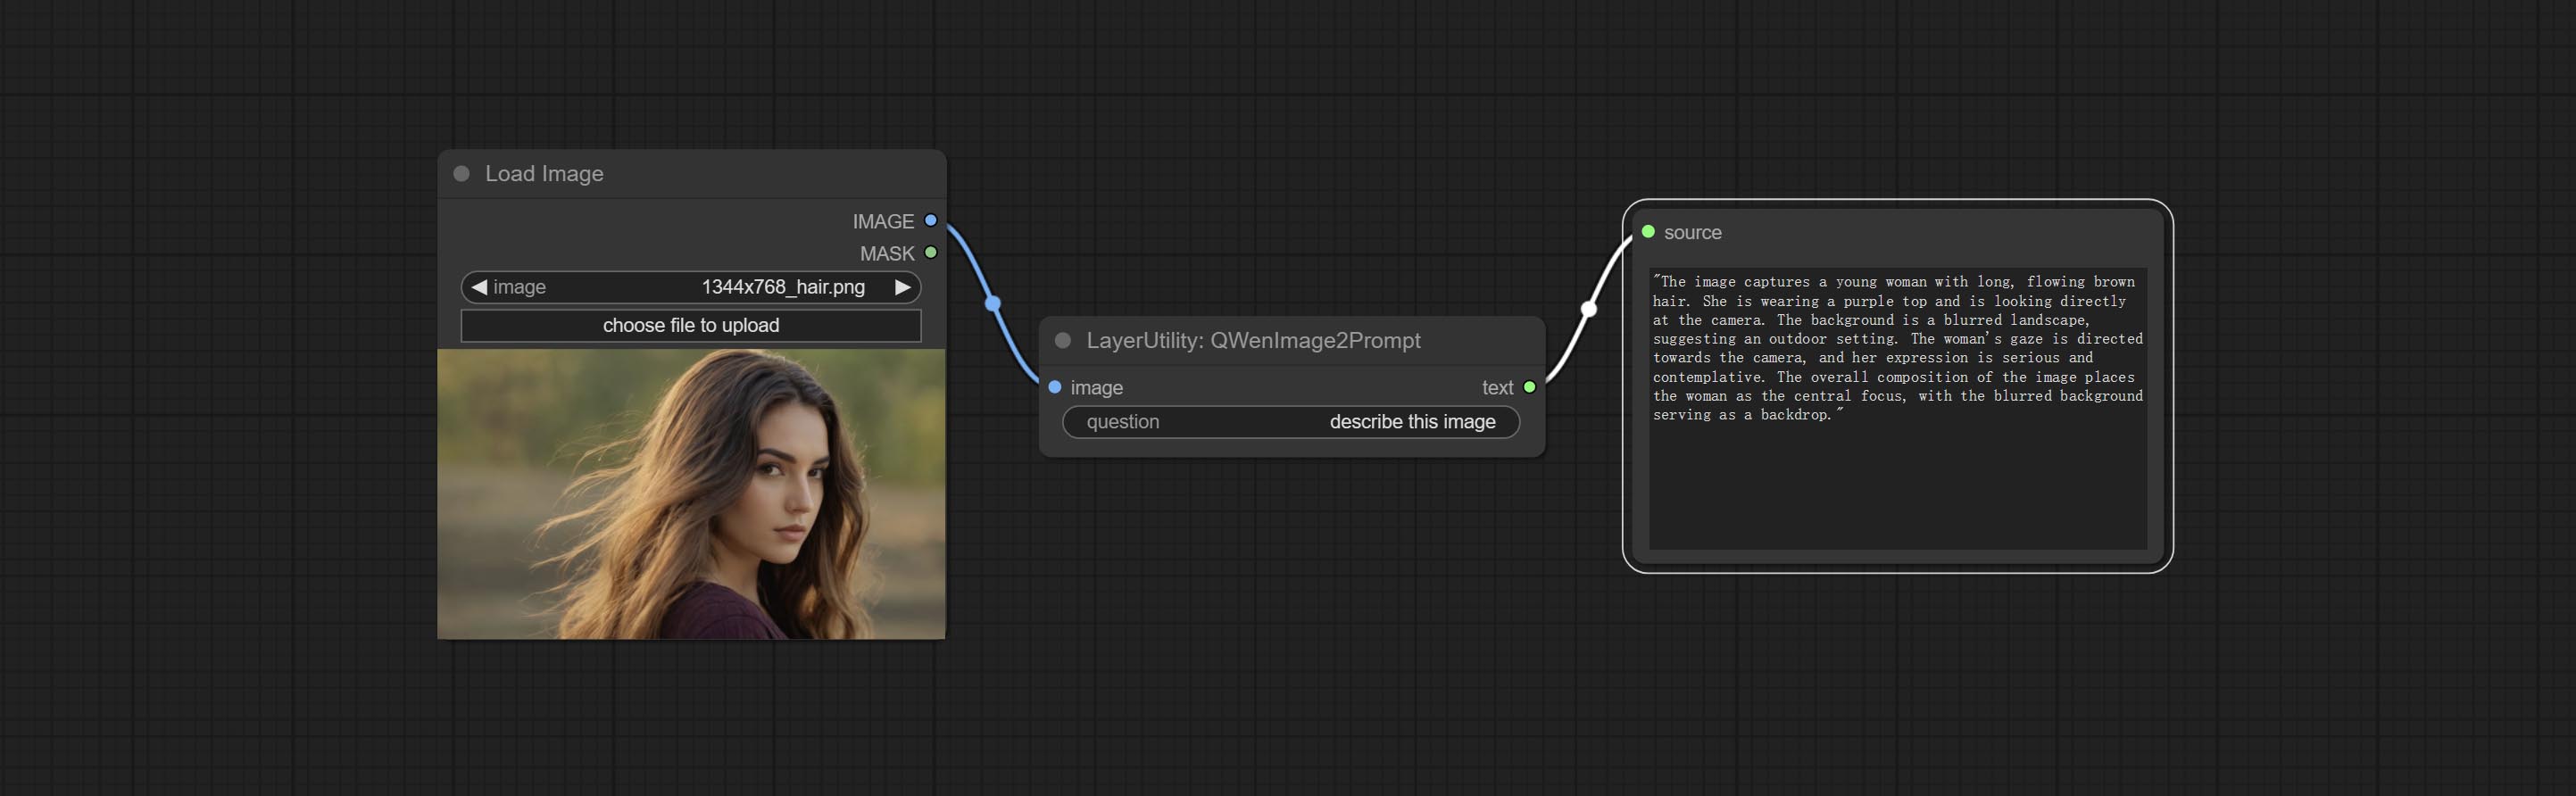
Node Options:
Use the Llama 3.2 vision model for local inference. Can be used to generate prompt words. part of the code for this node comes from ComfyUI-PixtralLlamaMolmoVision, thank you to the original author. To use this node, the transformers need upgraded to 4.45.0 or higher. Download models from BaiduNetdisk or huggingface/SeanScripts , and copy to ComfyUI/models/LLM . 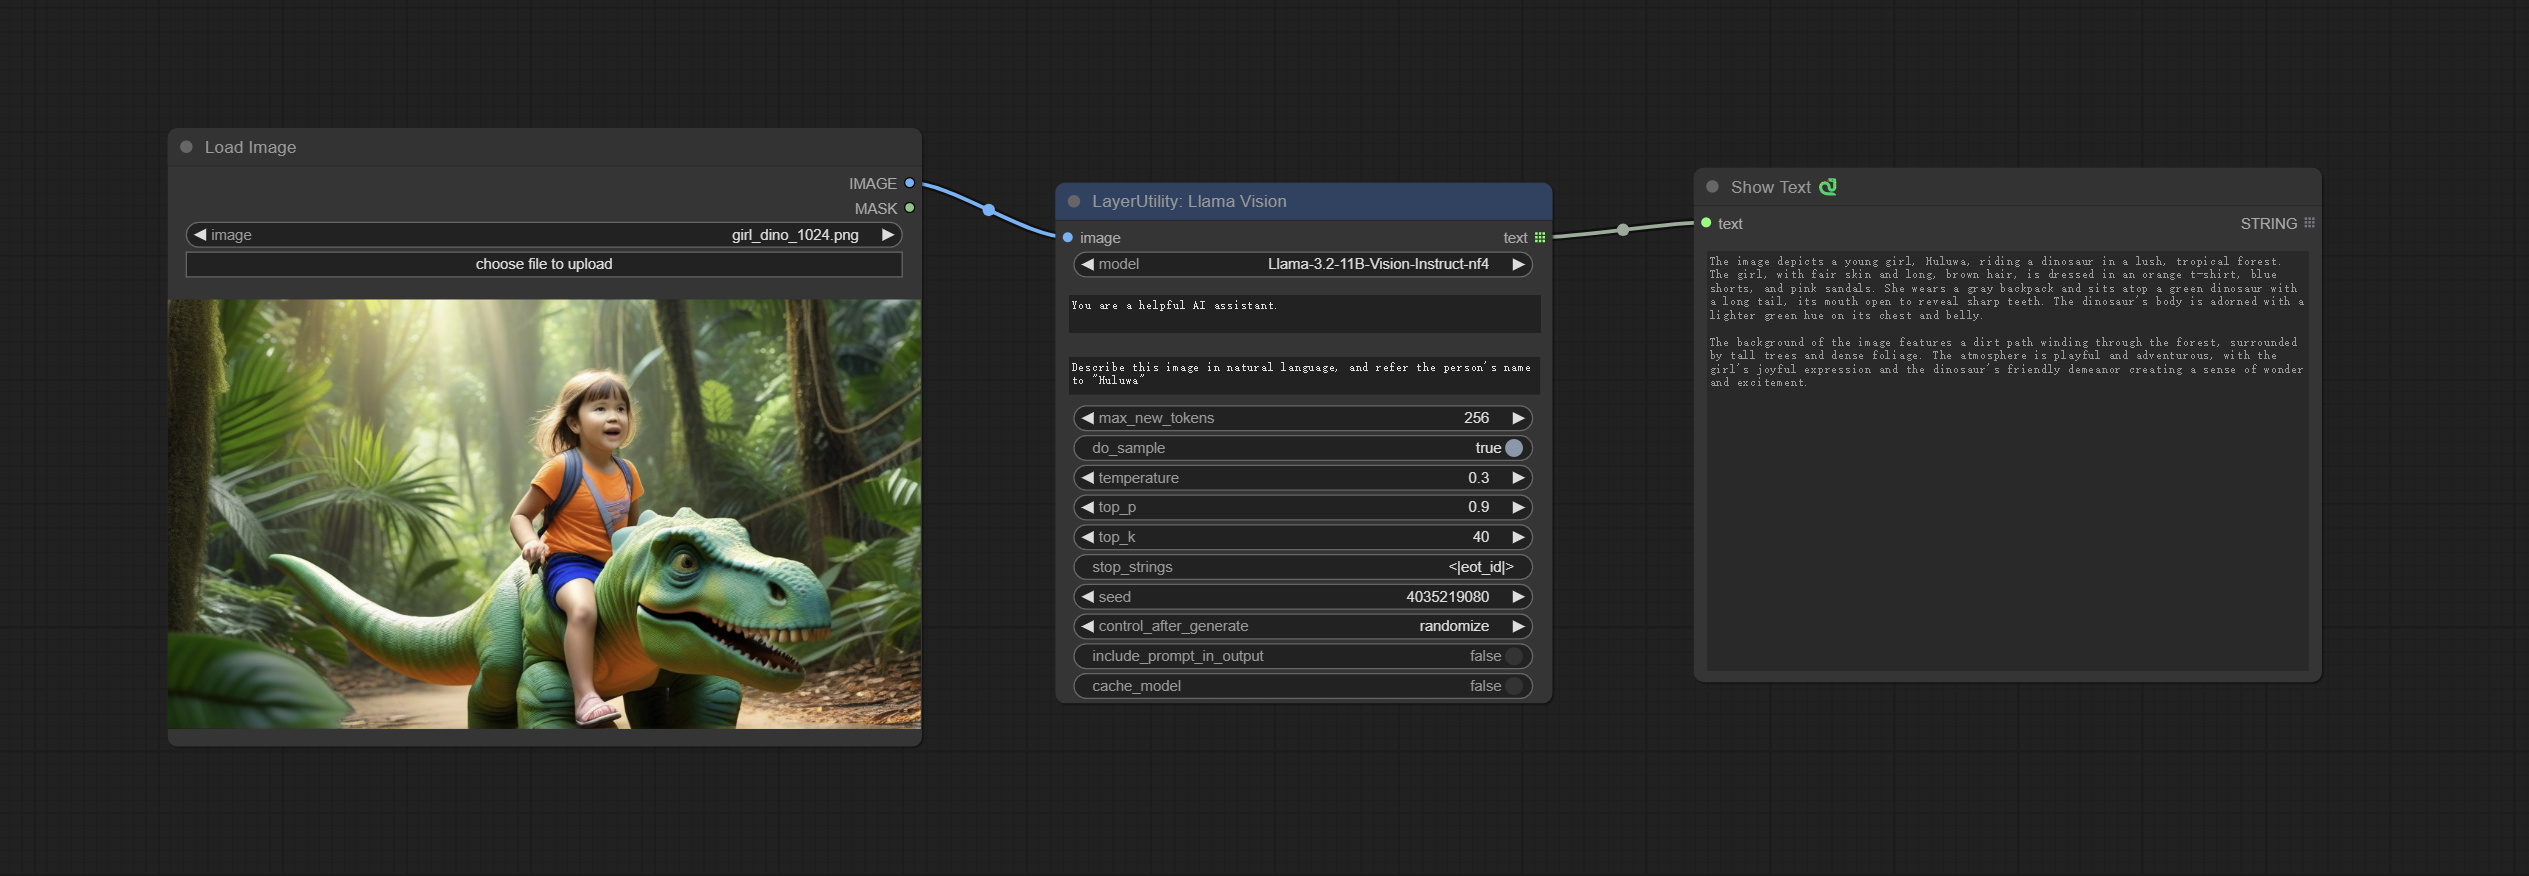
Node Options: 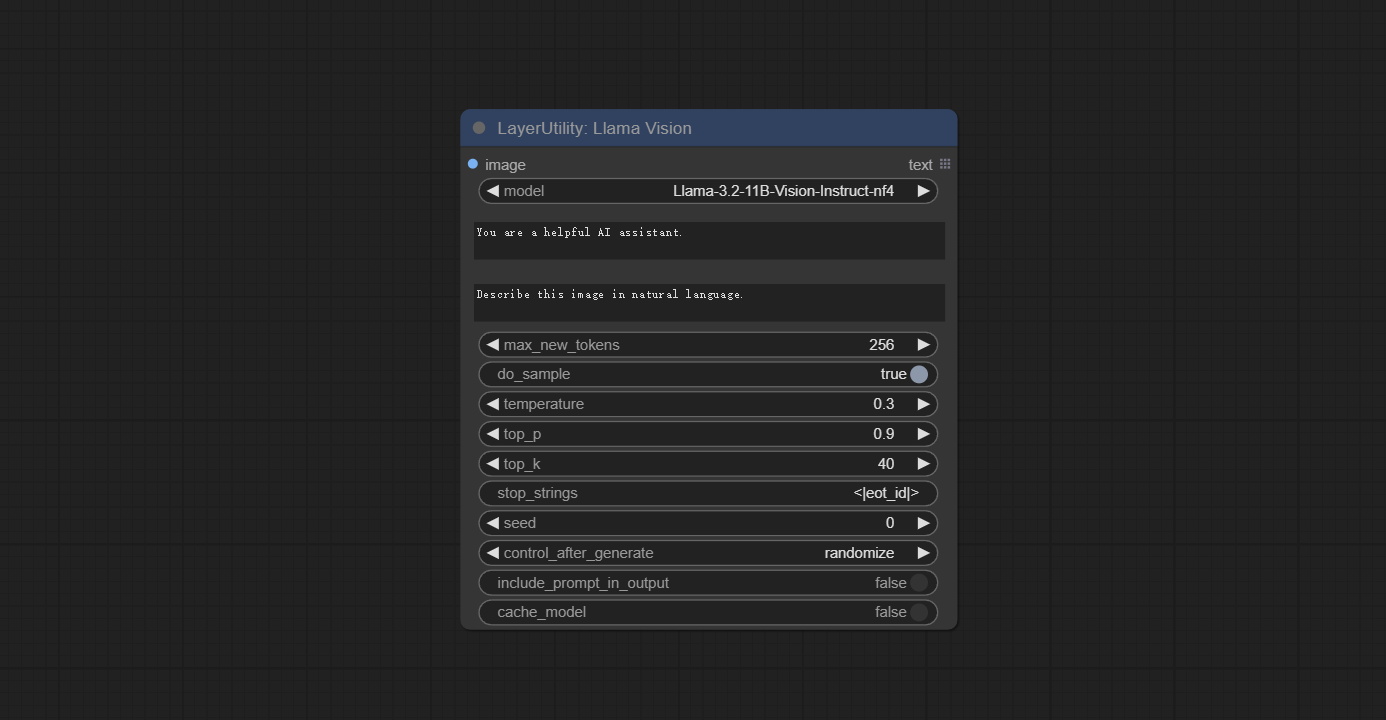
Use the JoyCaption-alpha-two model for local inference. Can be used to generate prompt words. this node is https://huggingface.co/John6666/joy-caption-alpha-two-cli-mod Implementation in ComfyUI, thank you to the original author. Download models form BaiduNetdisk and BaiduNetdisk , or huggingface/Orenguteng and huggingface/unsloth , then copy to ComfyUI/models/LLM , Download models from BaiduNetdisk or huggingface/google , and copy to ComfyUI/models/clip , Donwload the cgrkzexw-599808 folder from BaiduNetdisk or huggingface/John6666 , and copy to ComfyUI/models/Joy_caption 。 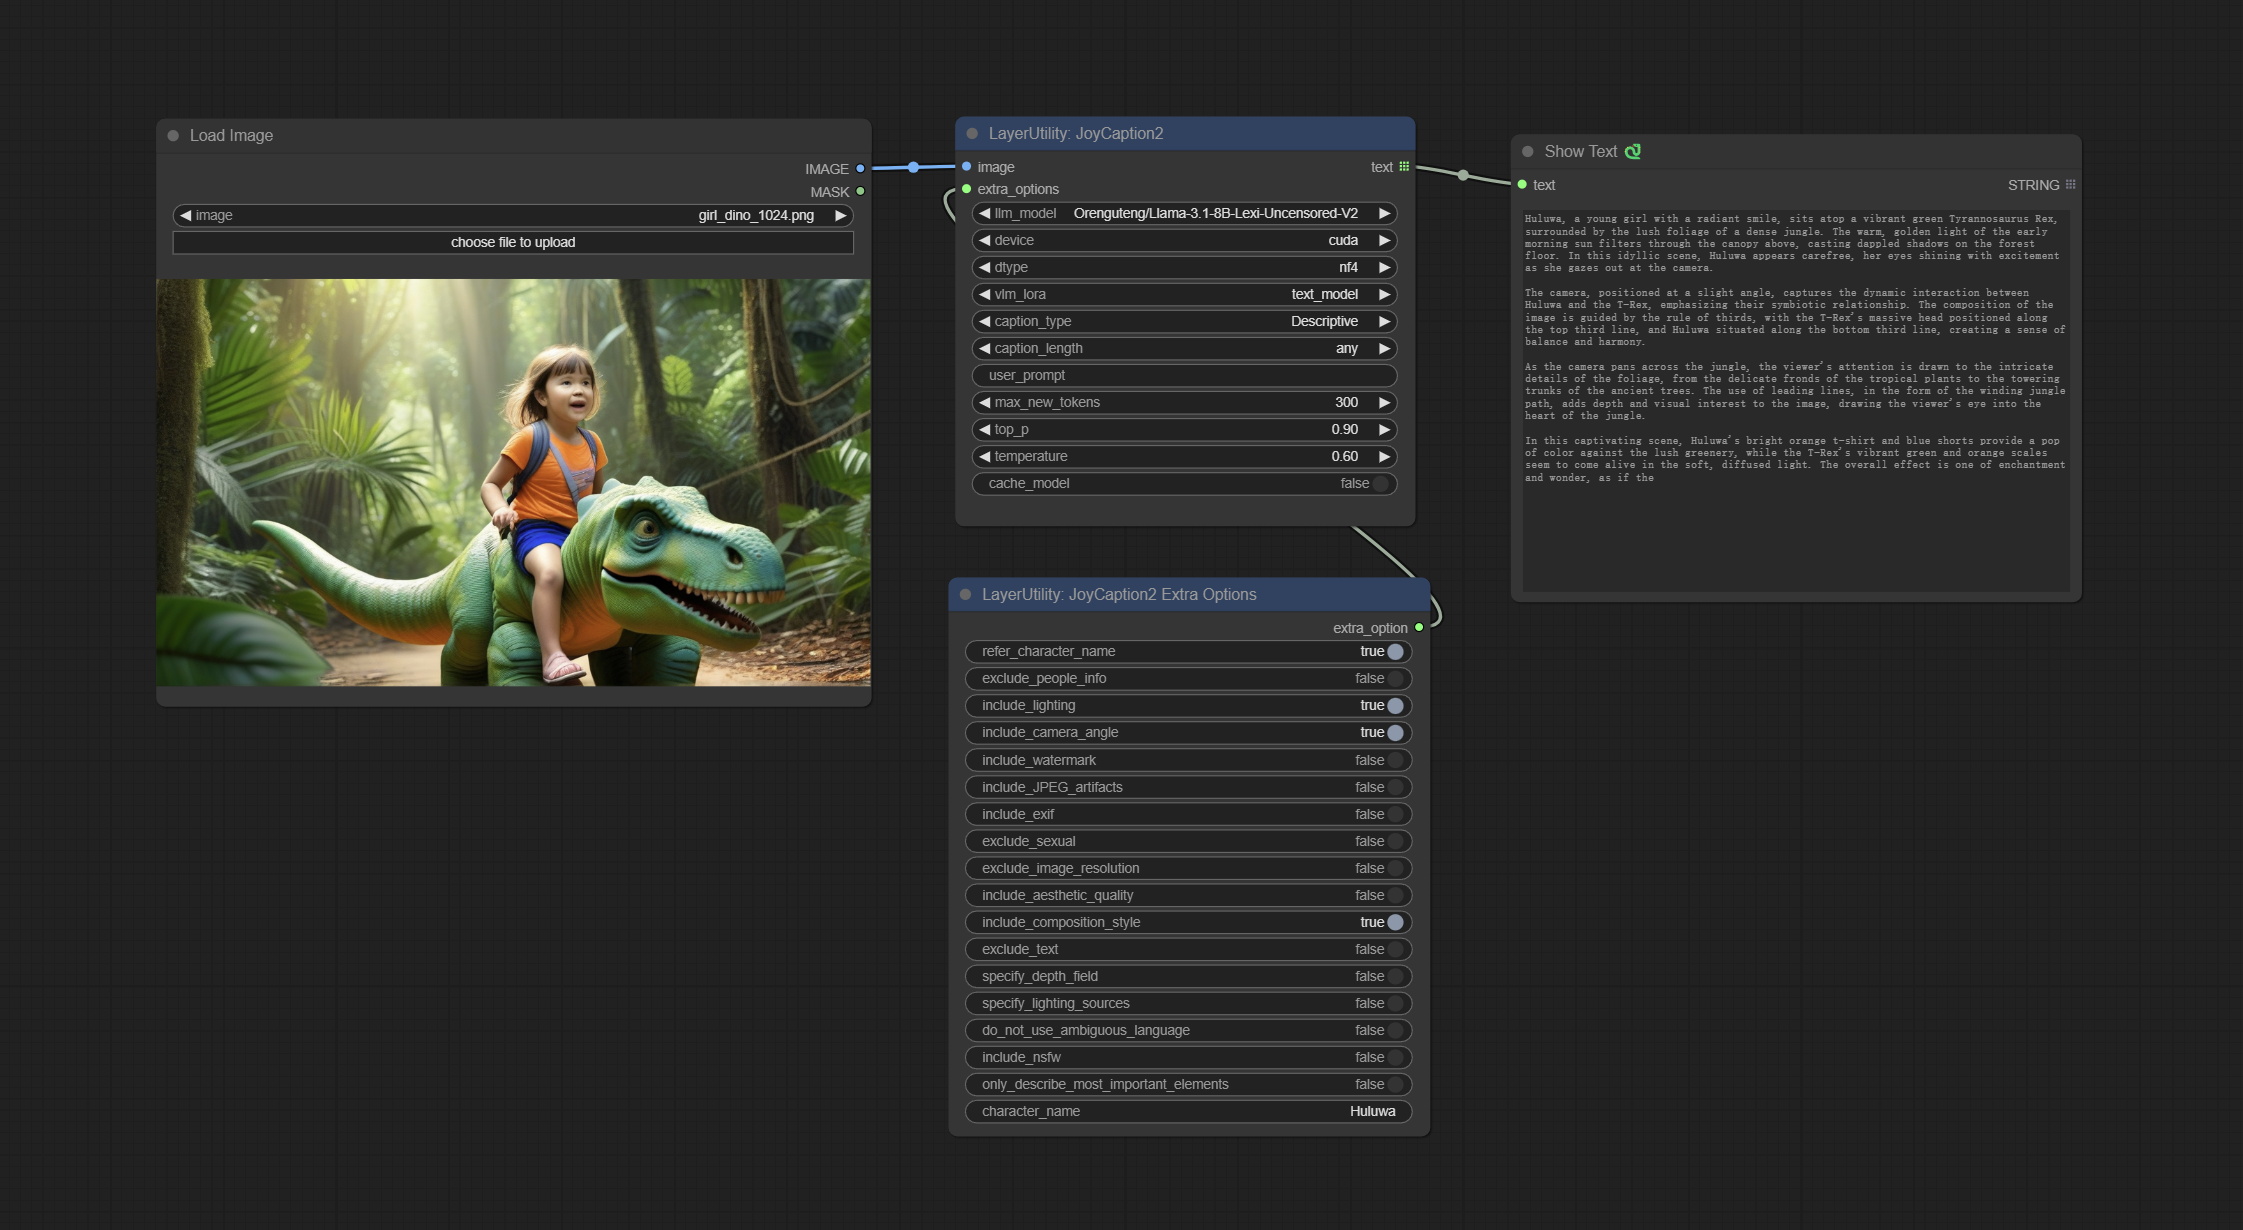
Node Options: 
The node of JoyCaption2 separate model loading and inference, and when multiple JoyCaption2 nodes are used, the model can be shared to improve efficiency.
Node Options: 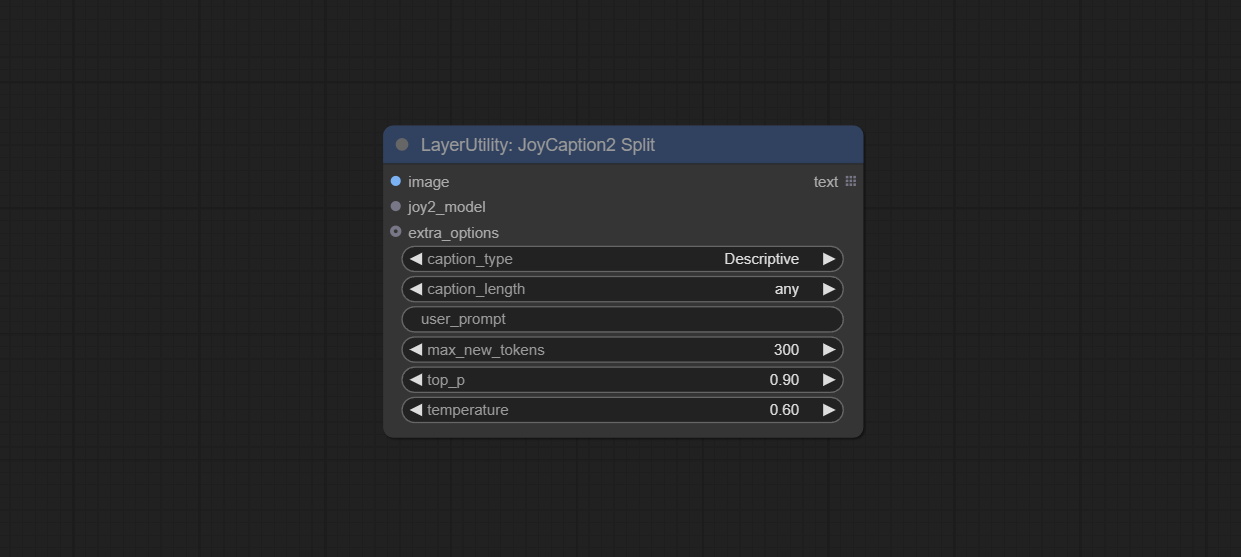
JoyCaption2's model loading node, used in conjunction with JoyCaption2Split.
Node Options: 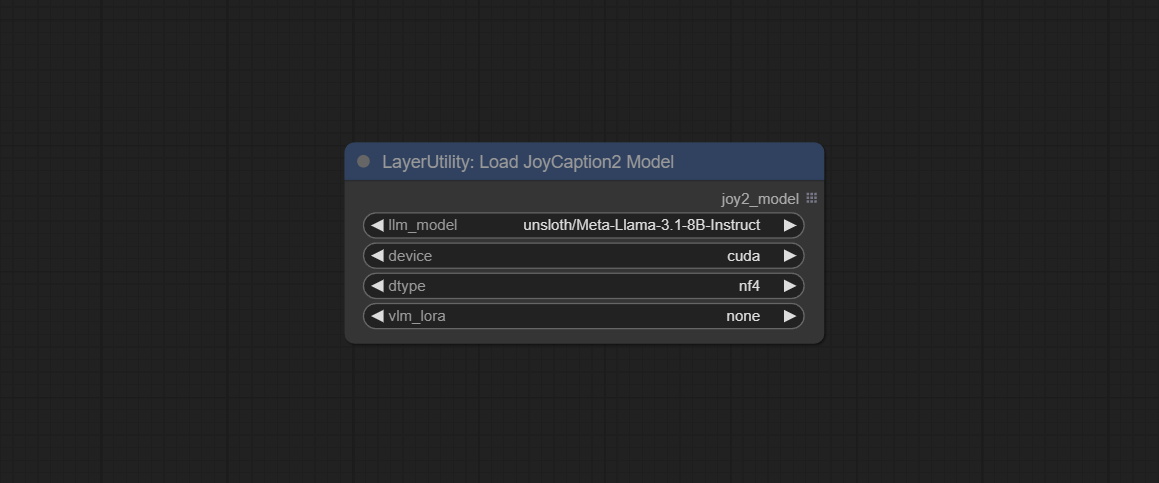
The extra_options parameter node of JoyCaption2.
Node Options: 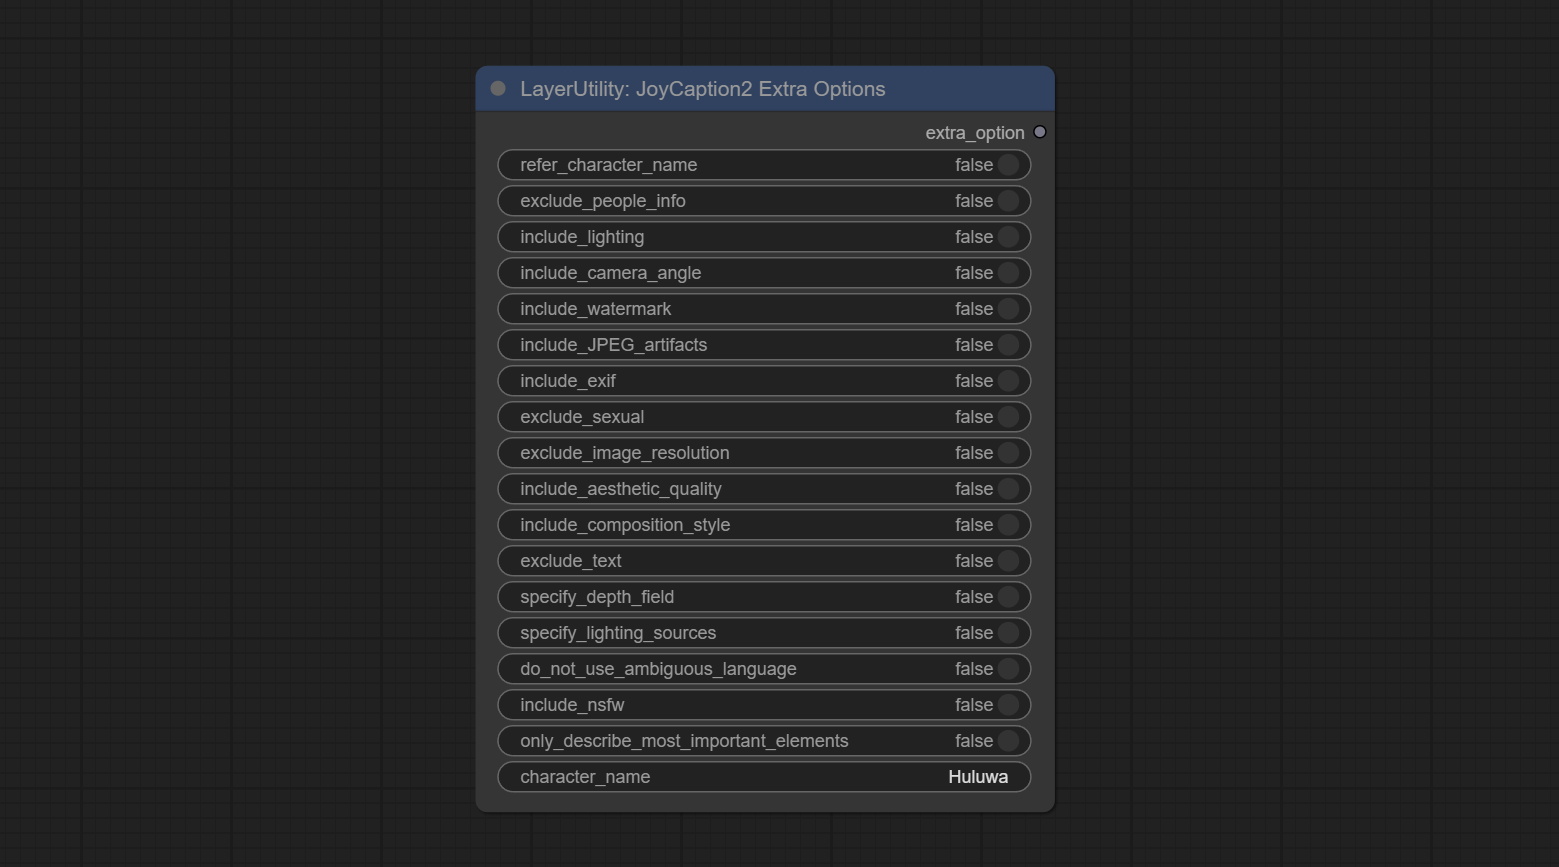
refer_character_name . Use Microsoft Phi 3.5 text and visual models for local inference. Can be used to generate prompt words, process prompt words, or infer prompt words from images. Running this model requires at least 16GB of video memory. Download model files from BaiduNetdisk or huggingface.co/microsoft/Phi-3.5-vision-instruct and huggingface.co/microsoft/Phi-3.5-mini-instruct and copy to ComfyUImodelsLLM folder. 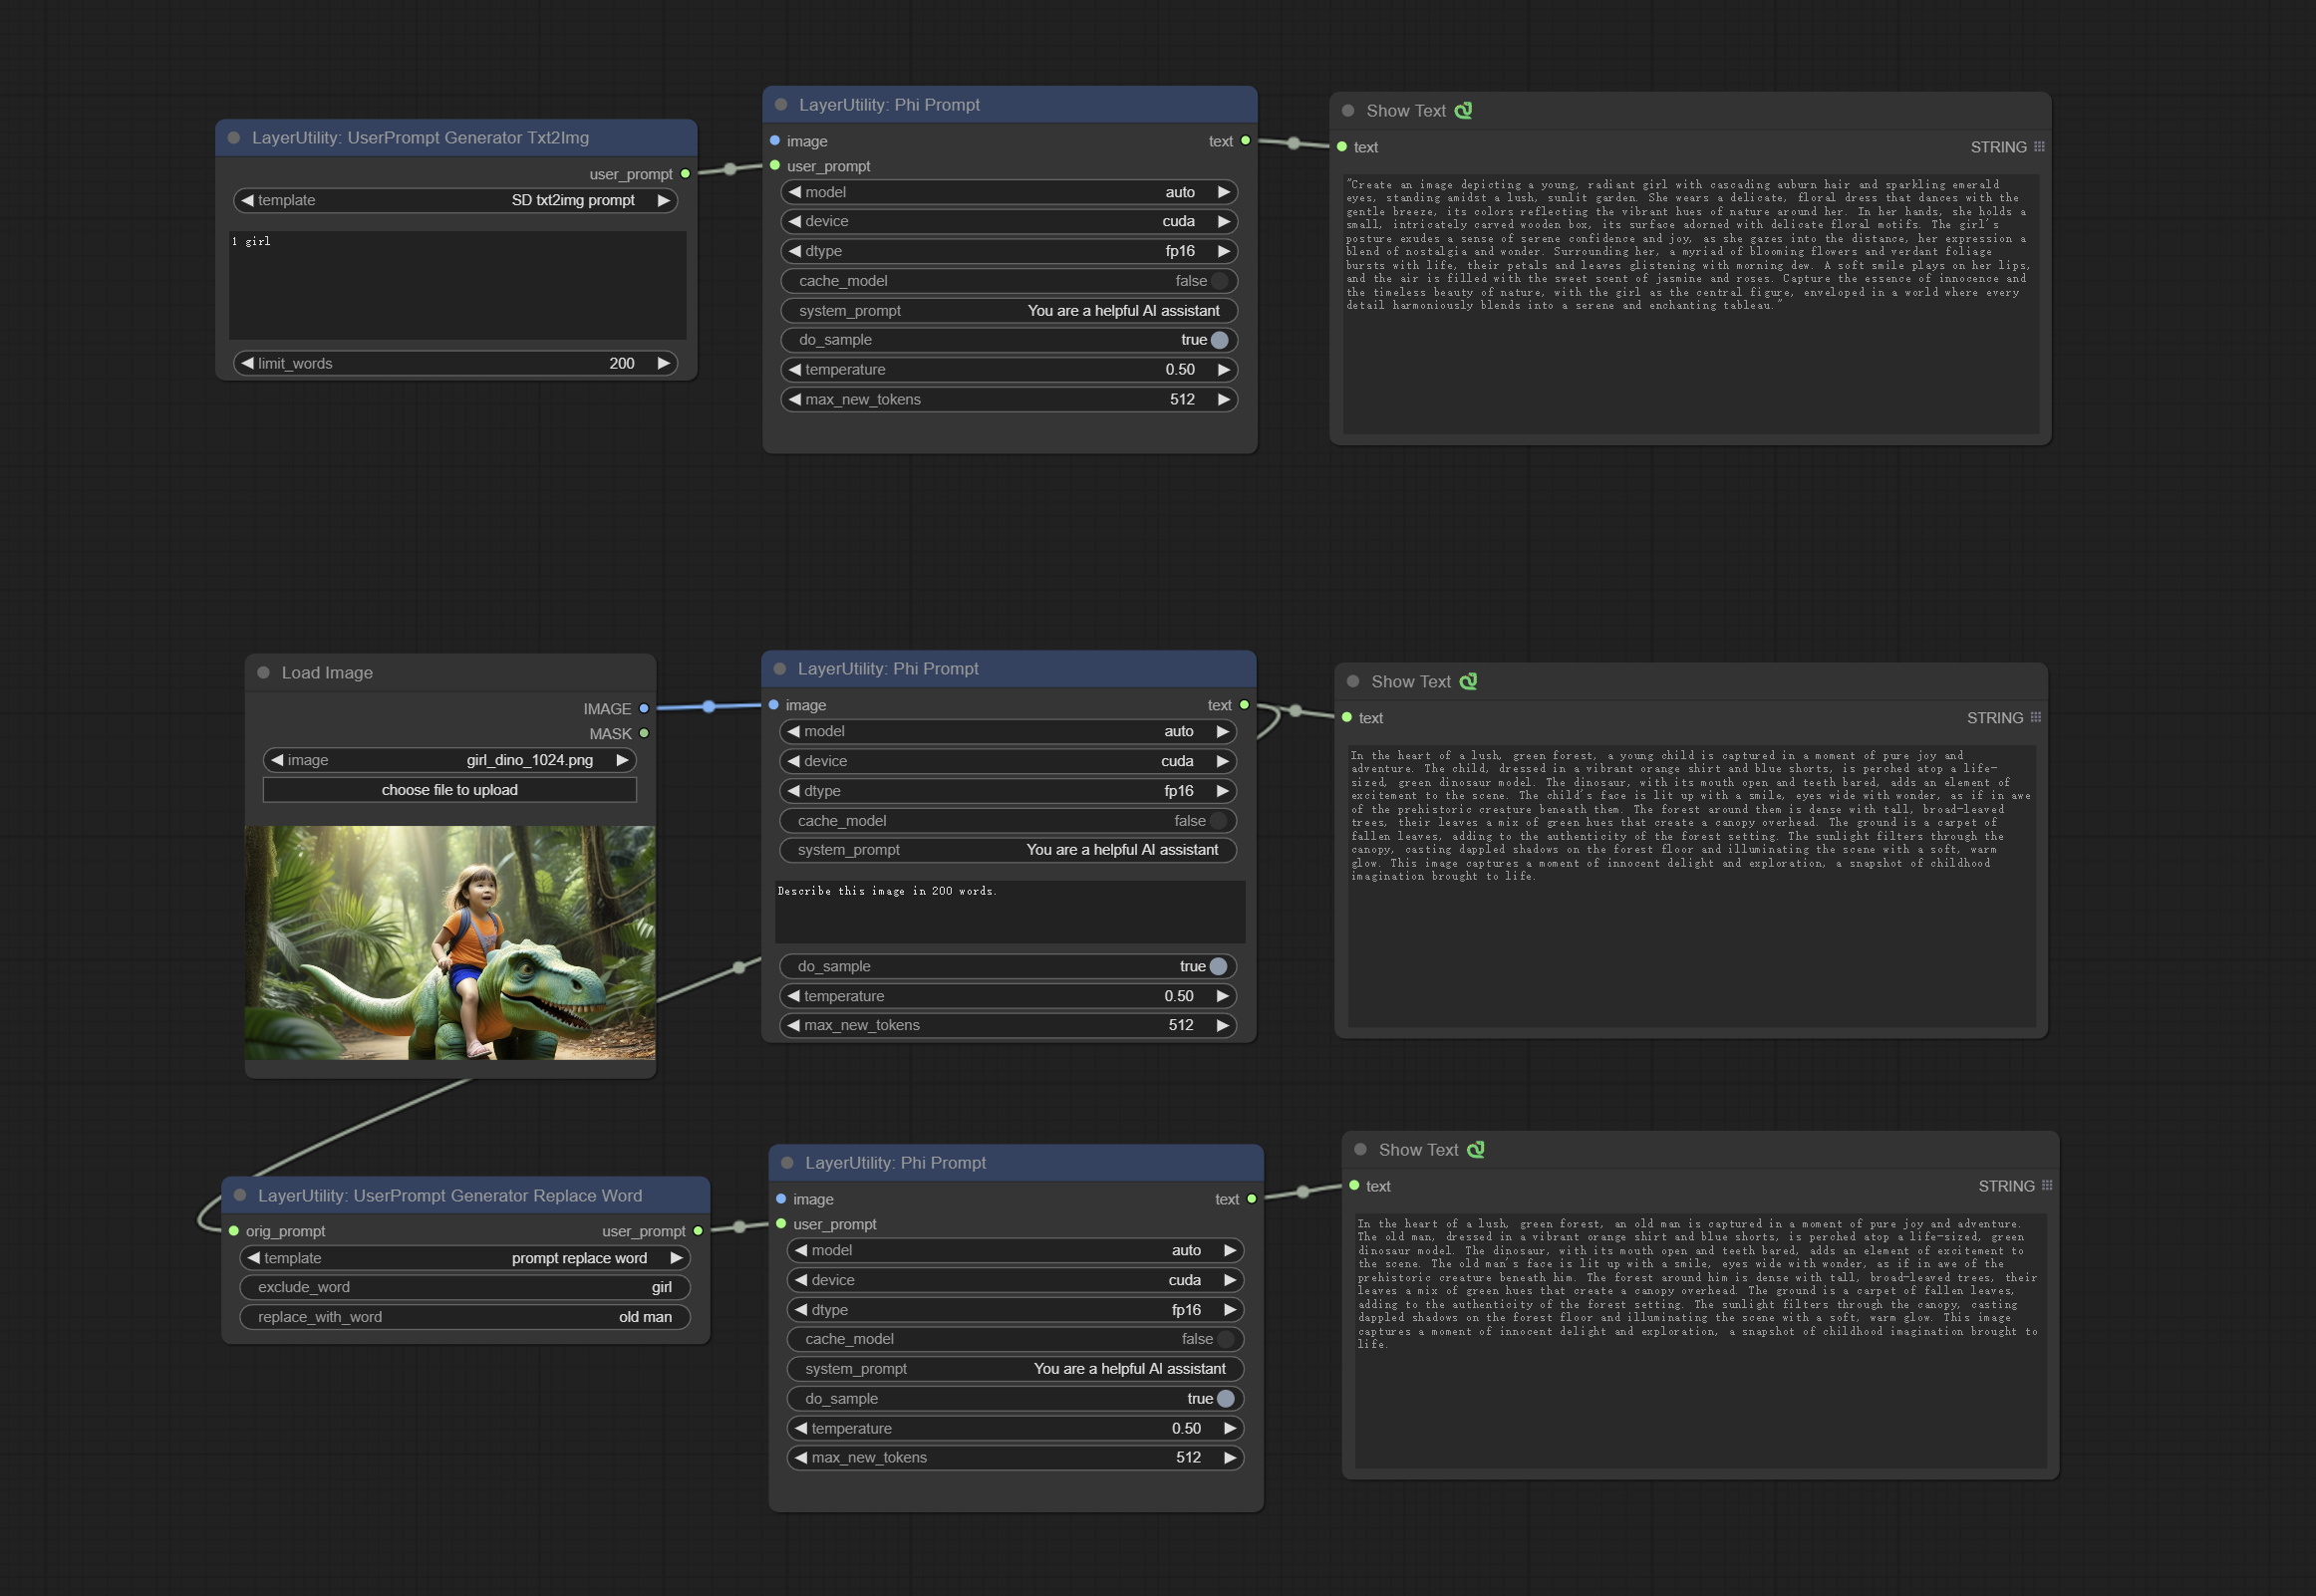
Node Options: 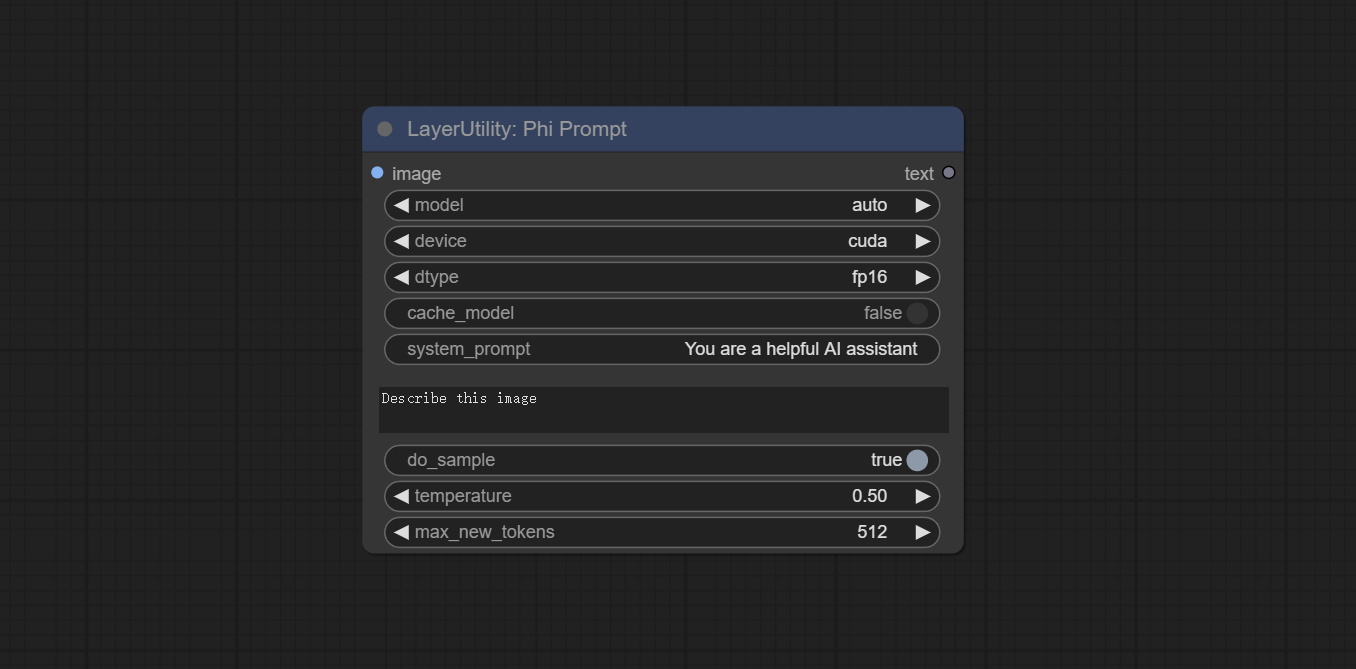
UserPrompt preset for generating SD text to image prompt words.
Node options: 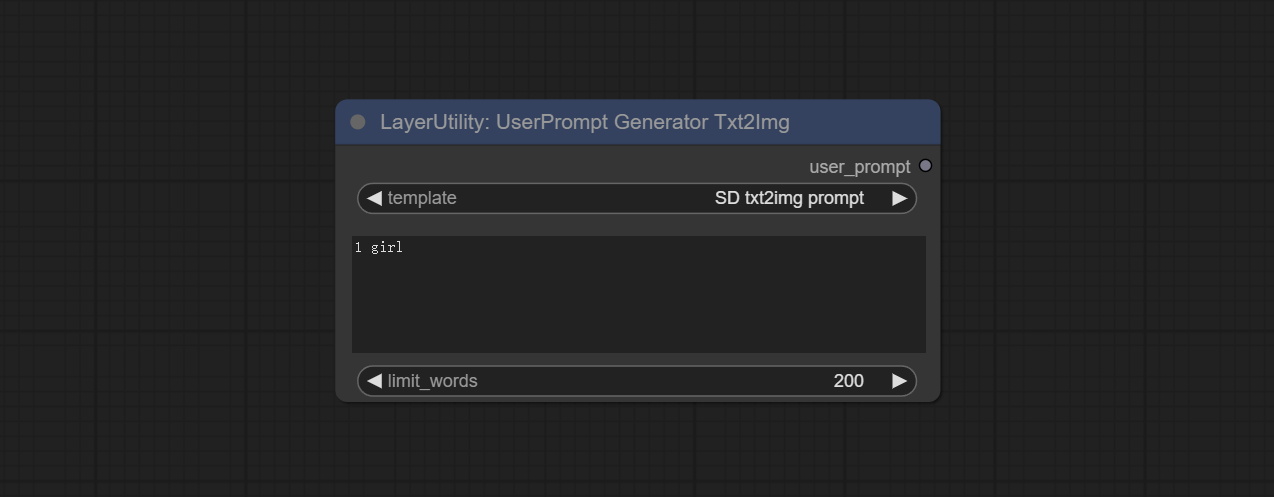
UserCompt preset for generating SD text to image prompt words based on input content.
Node options: 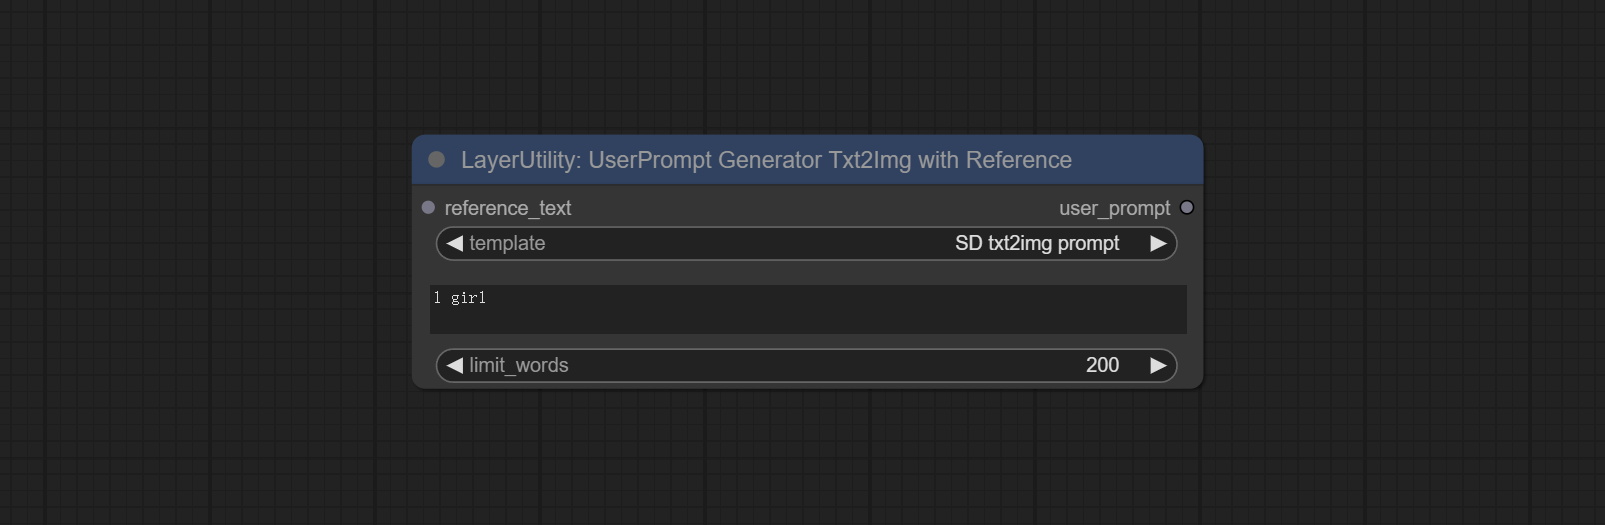
UserPrompt preset used to replace a keyword in text with different content. This is not only a simple replacement, but also a logical sorting of the text based on the context of the prompt words to achieve the rationality of the output content.
Node options: 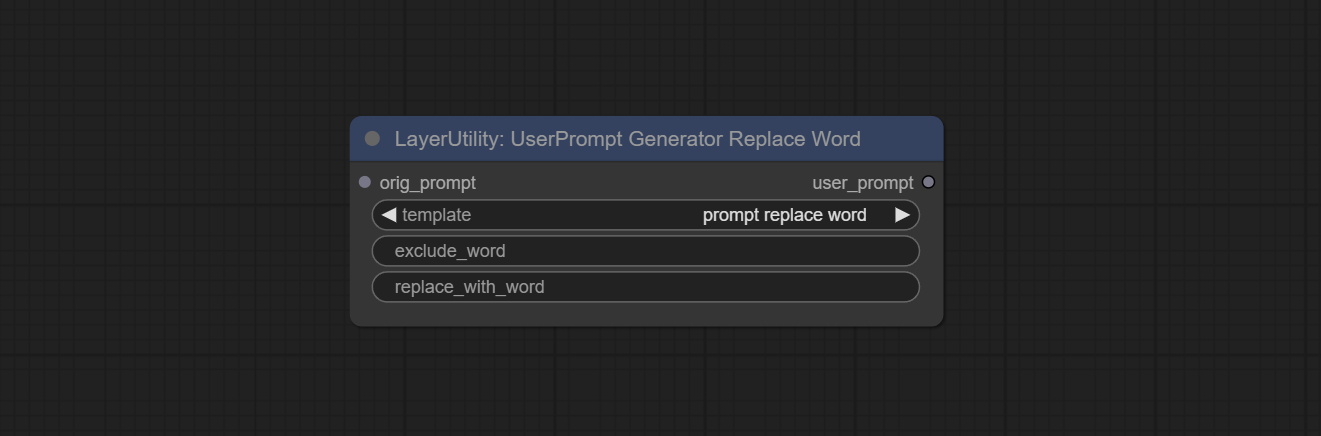
Inference the prompts based on the image. it can replace key word for the prompt. This node currently uses Google Gemini API as the backend service. Please ensure that the network environment can use Gemini normally. Please apply for your API key on Google AI Studio, And fill it in api_key.ini , this file is located in the root directory of the plug-in, and the default name is api_key.ini.example . to use this file for the first time, you need to change the file suffix to .ini . Open it using text editing software, fill in your API key after google_api_key= and save it. 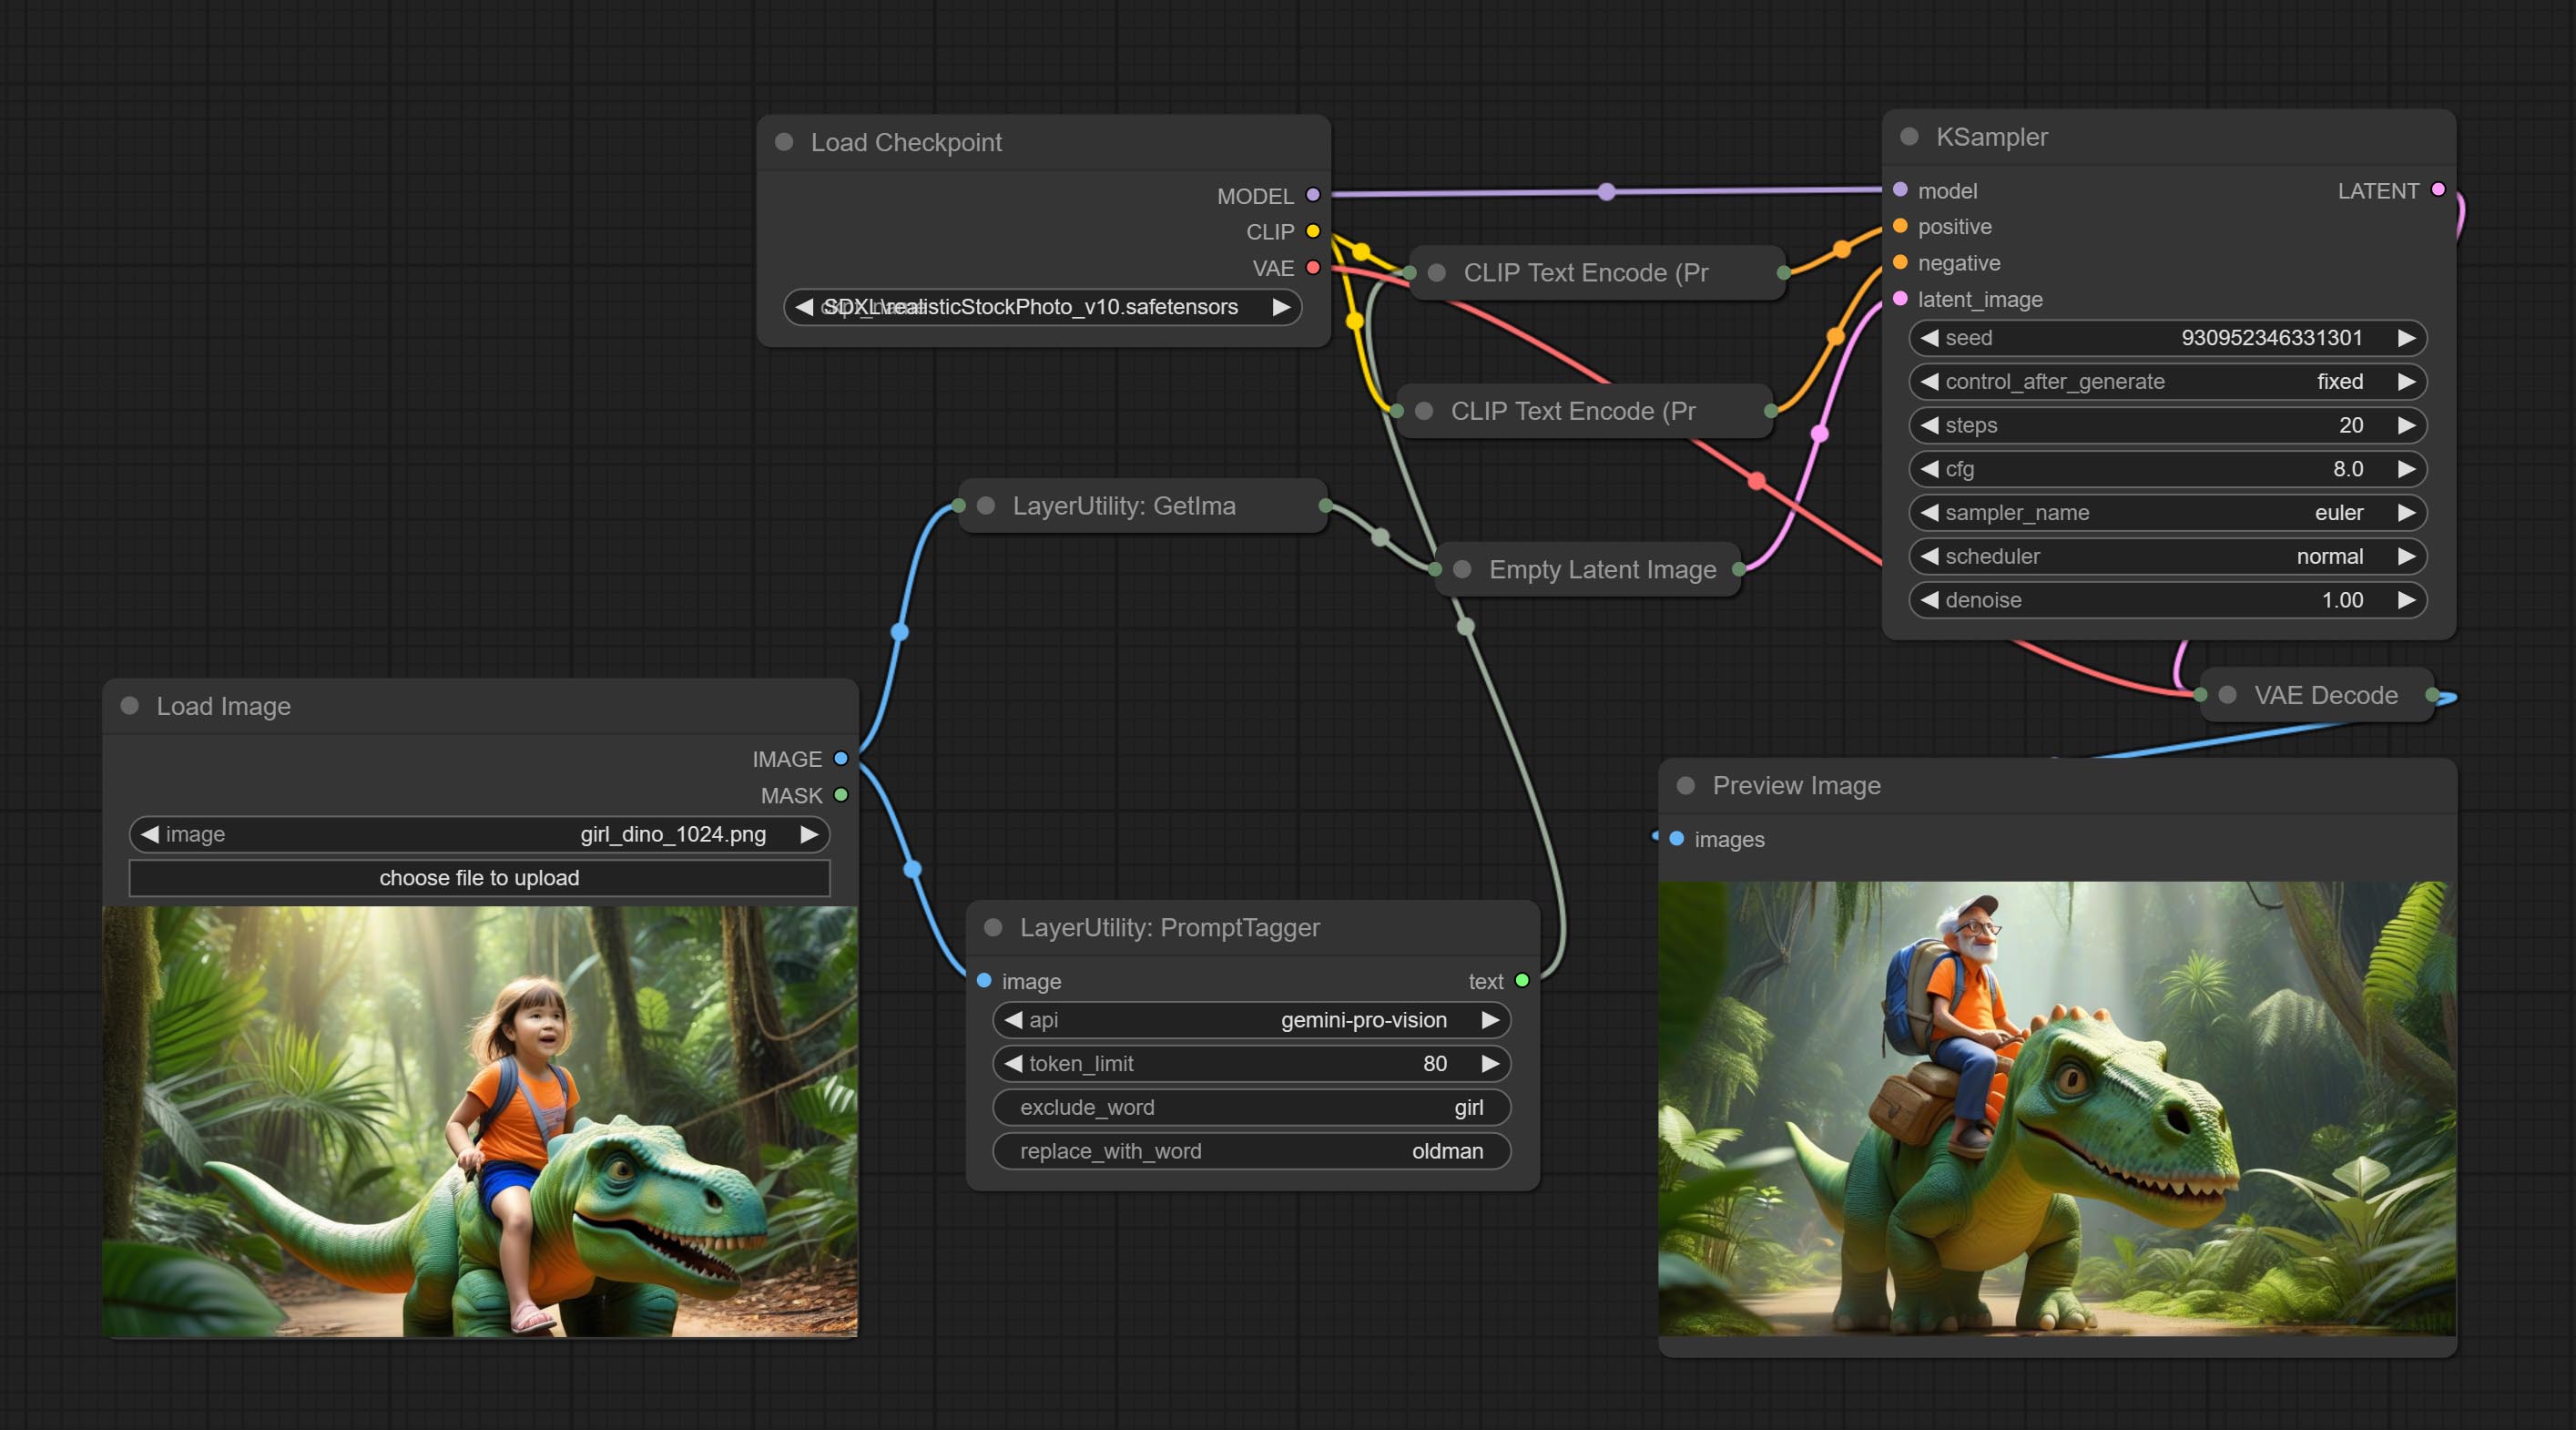
Node options: 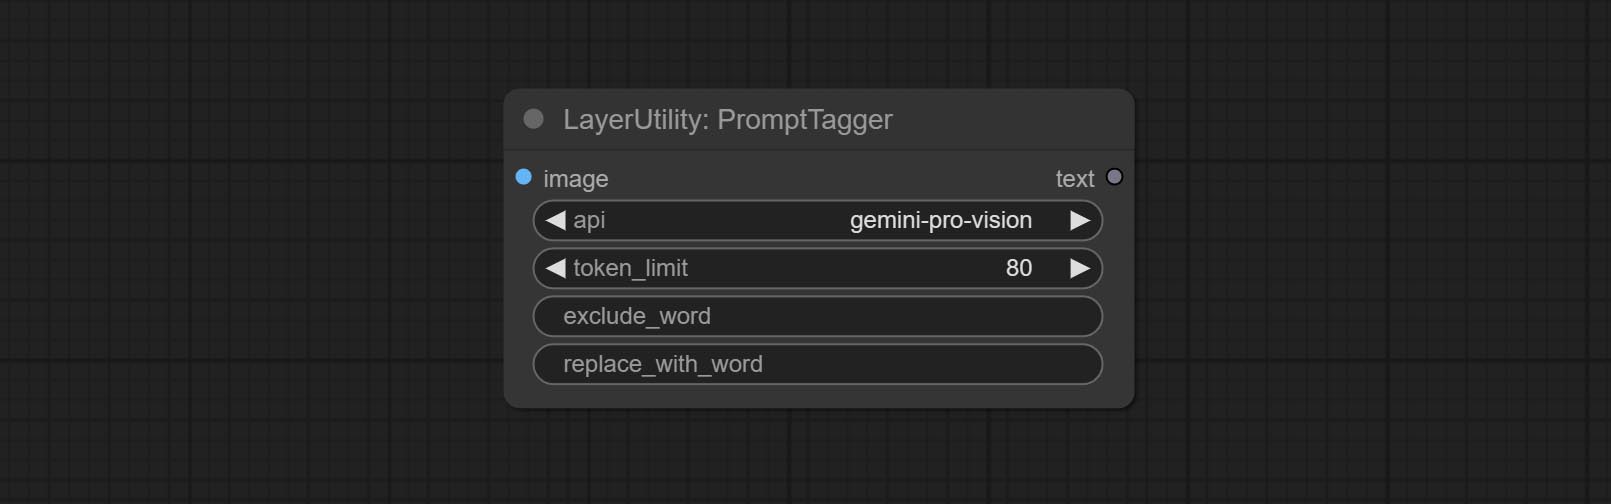
Enter simple prompt words, output polished prompt words, and support inputting images as references, and support Chinese input. This node currently uses Google Gemini API as the backend service. Please ensure that the network environment can use Gemini normally. Please apply for your API key on Google AI Studio, And fill it in api_key.ini , this file is located in the root directory of the plug-in, and the default name is api_key.ini.example . to use this file for the first time, you need to change the file suffix to .ini . Open it using text editing software, fill in your API key after google_api_key= and save it. 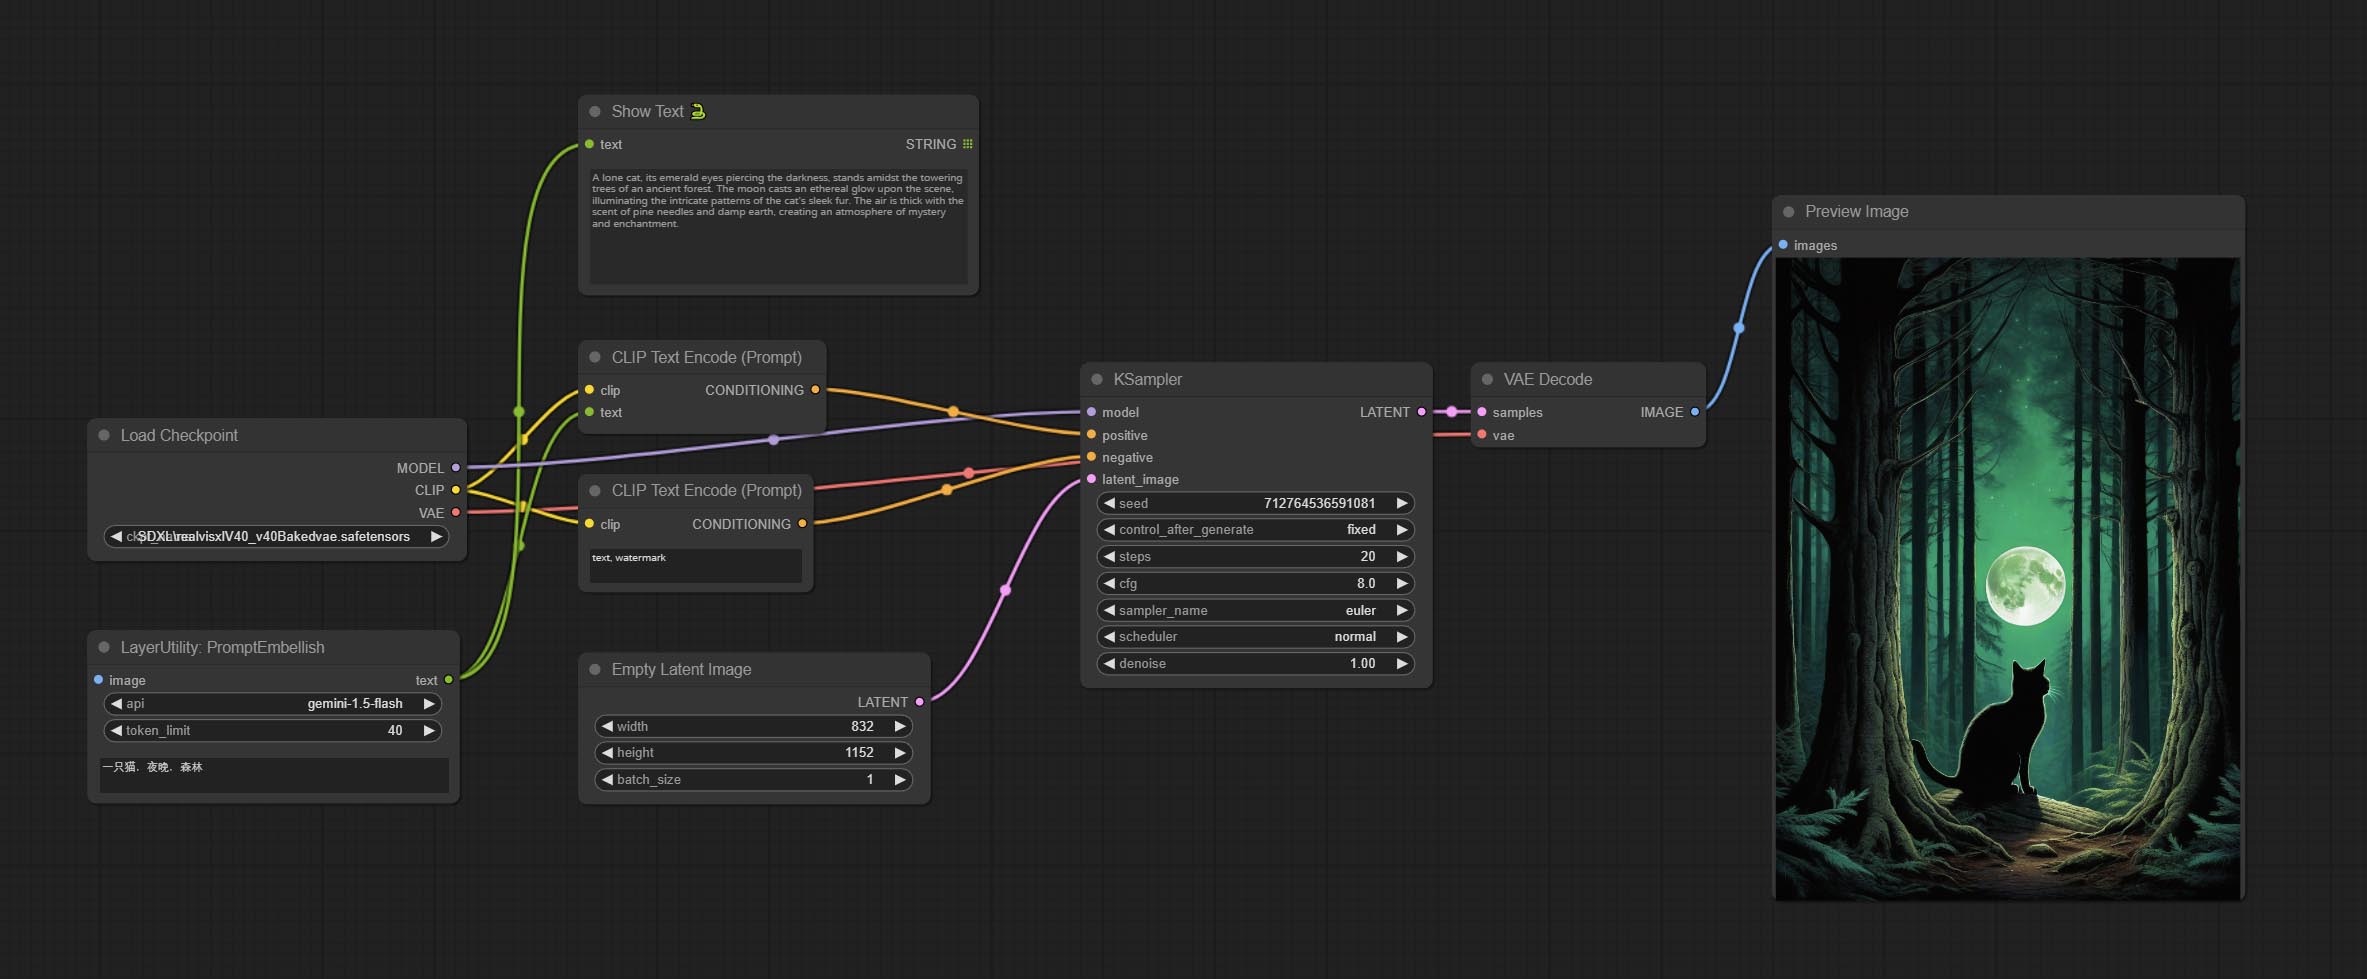
Node options: 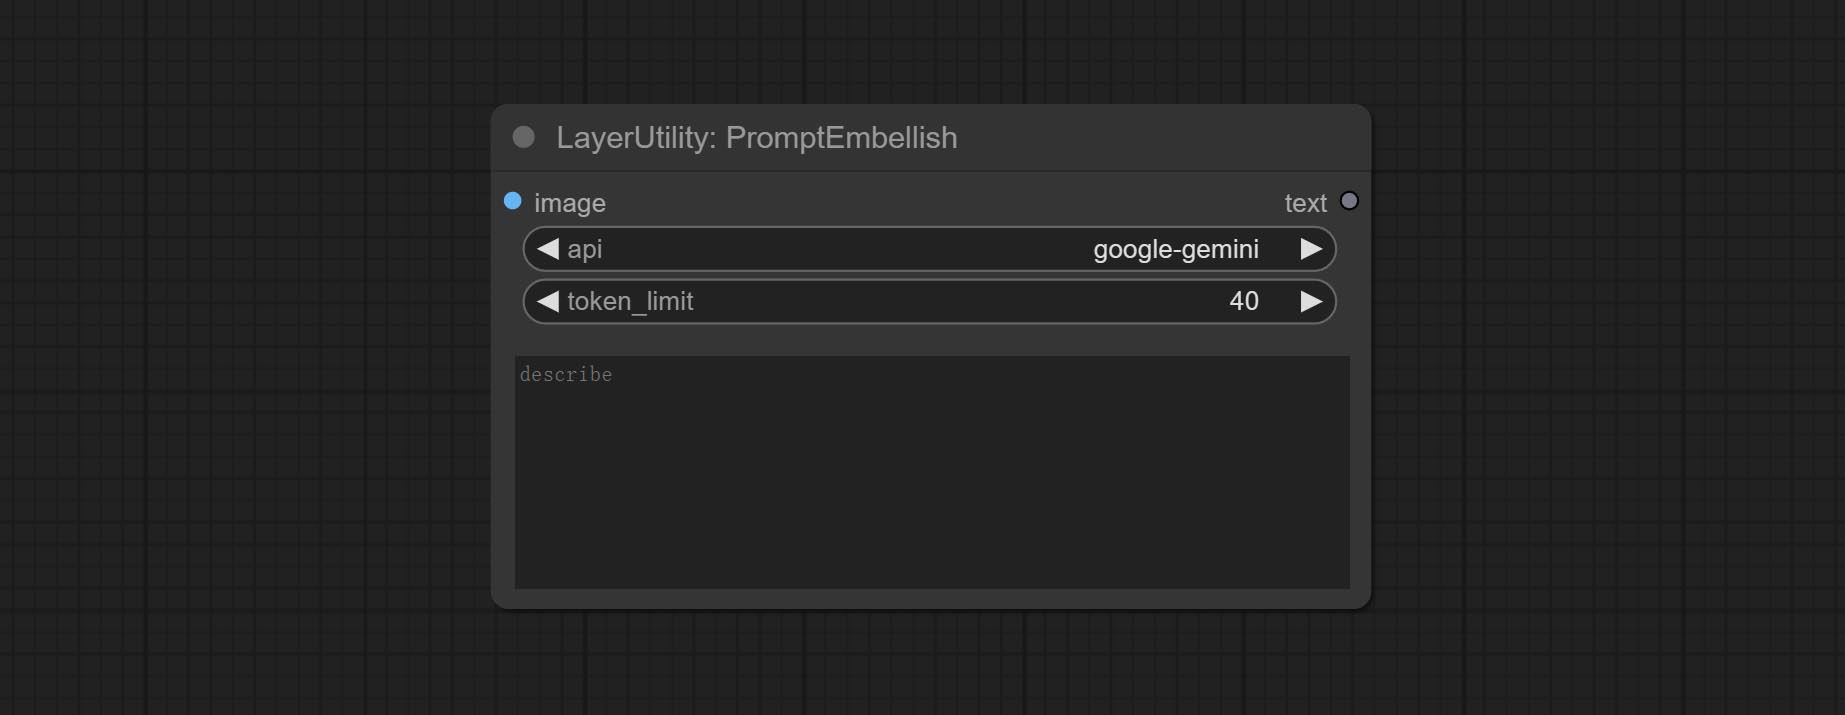
Use the Florence 2 model to infer prompt words. The code for this node section is fromyiwangsimple/florence_dw, thanks to the original author. *When using it for the first time, the model will be automatically downloaded. You can also download the model file from BaiduNetdisk to ComfyUI/models/florence2 folder. 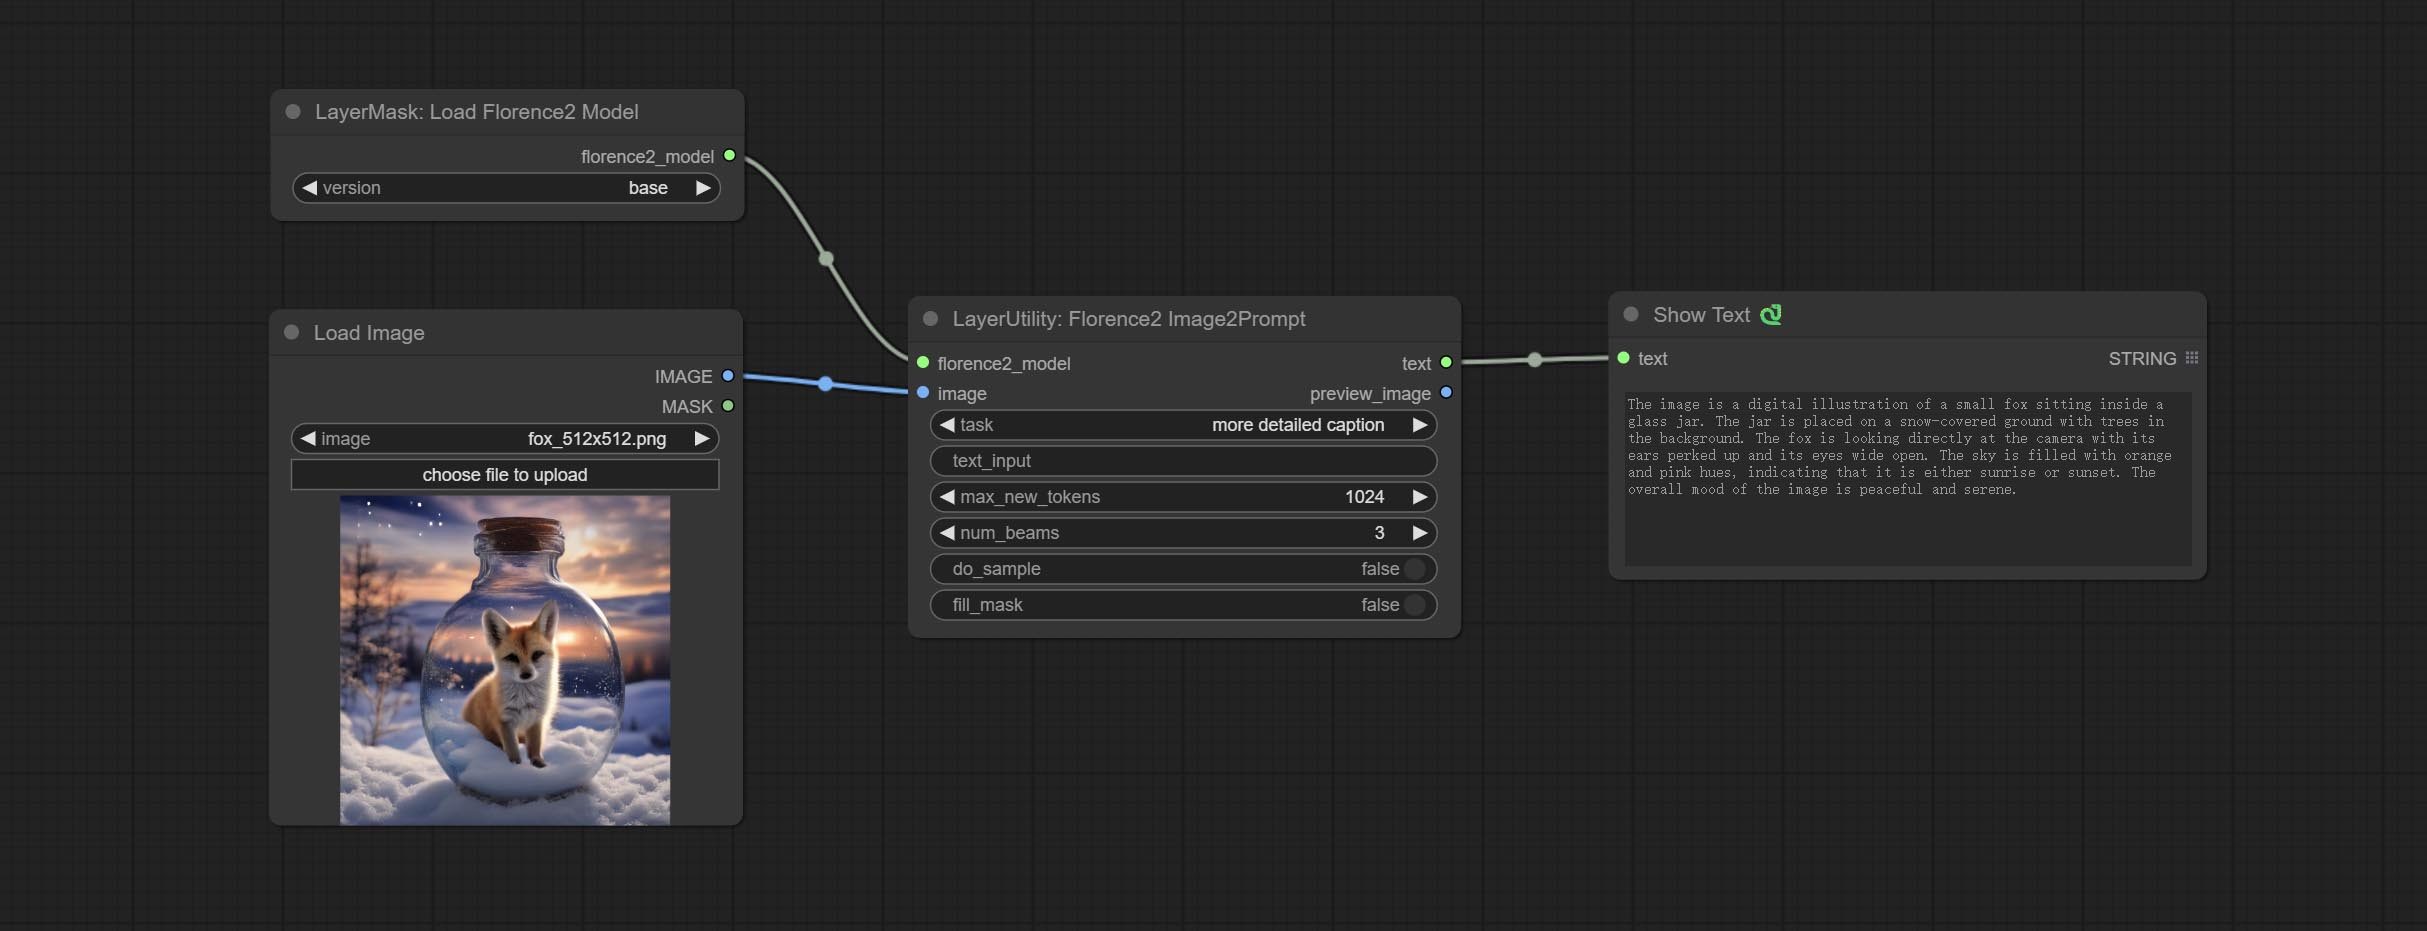
Node Options: 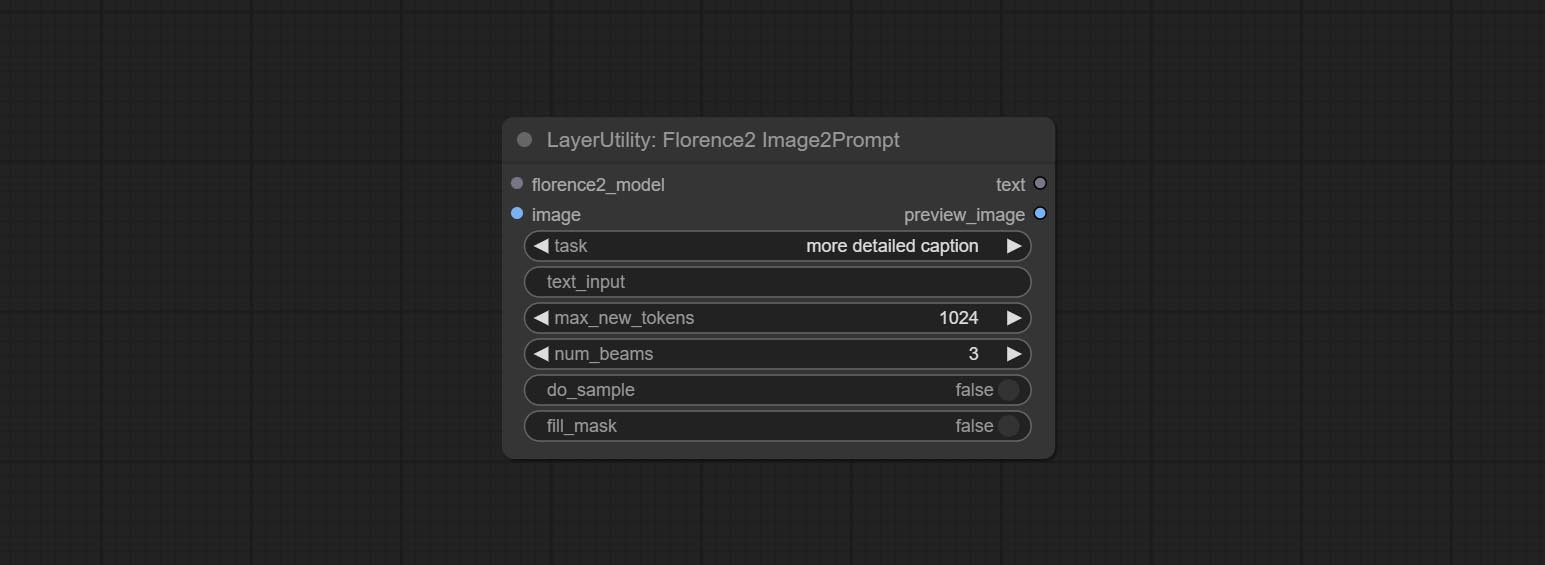
Use the blip-vqa model for visual question answering. Part of the code for this node is referenced from celoron/ComfyUI-VisualQueryTemplate, thanks to the original author.
*Download model files from BaiduNetdisk or huggingface.co/Salesforce/blip-vqa-capfilt-large and huggingface.co/Salesforce/blip-vqa-base and copy to ComfyUImodelsVQA folder.
Node Options: 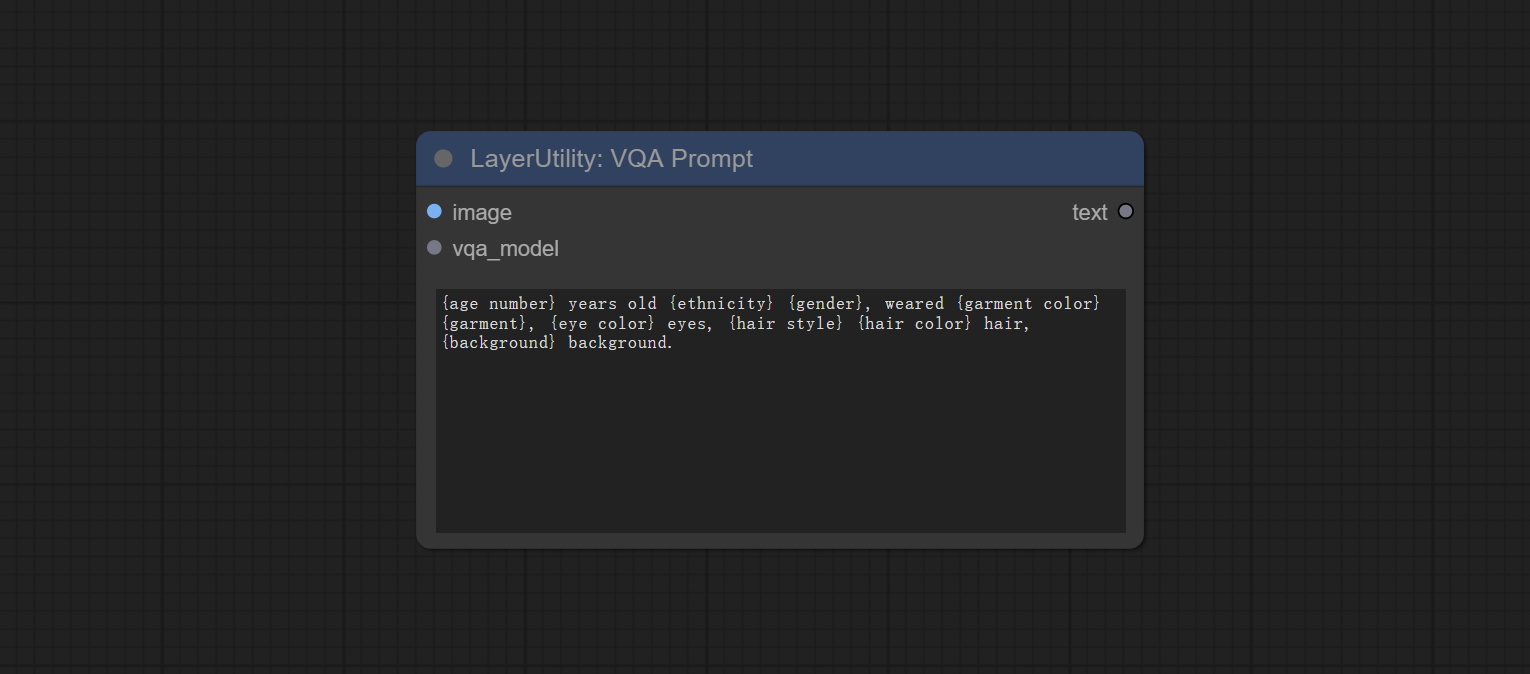
Load the blip-vqa model.
Node Options: 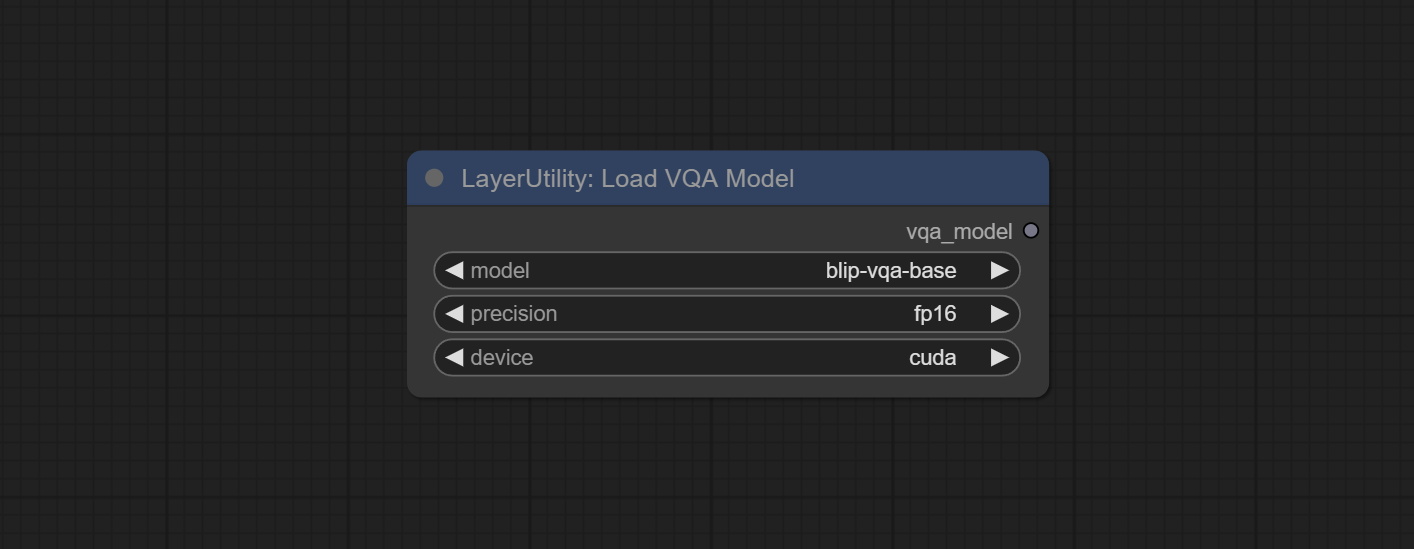
Shift the image. this node supports the output of displacement seam masks, making it convenient to create continuous textures. 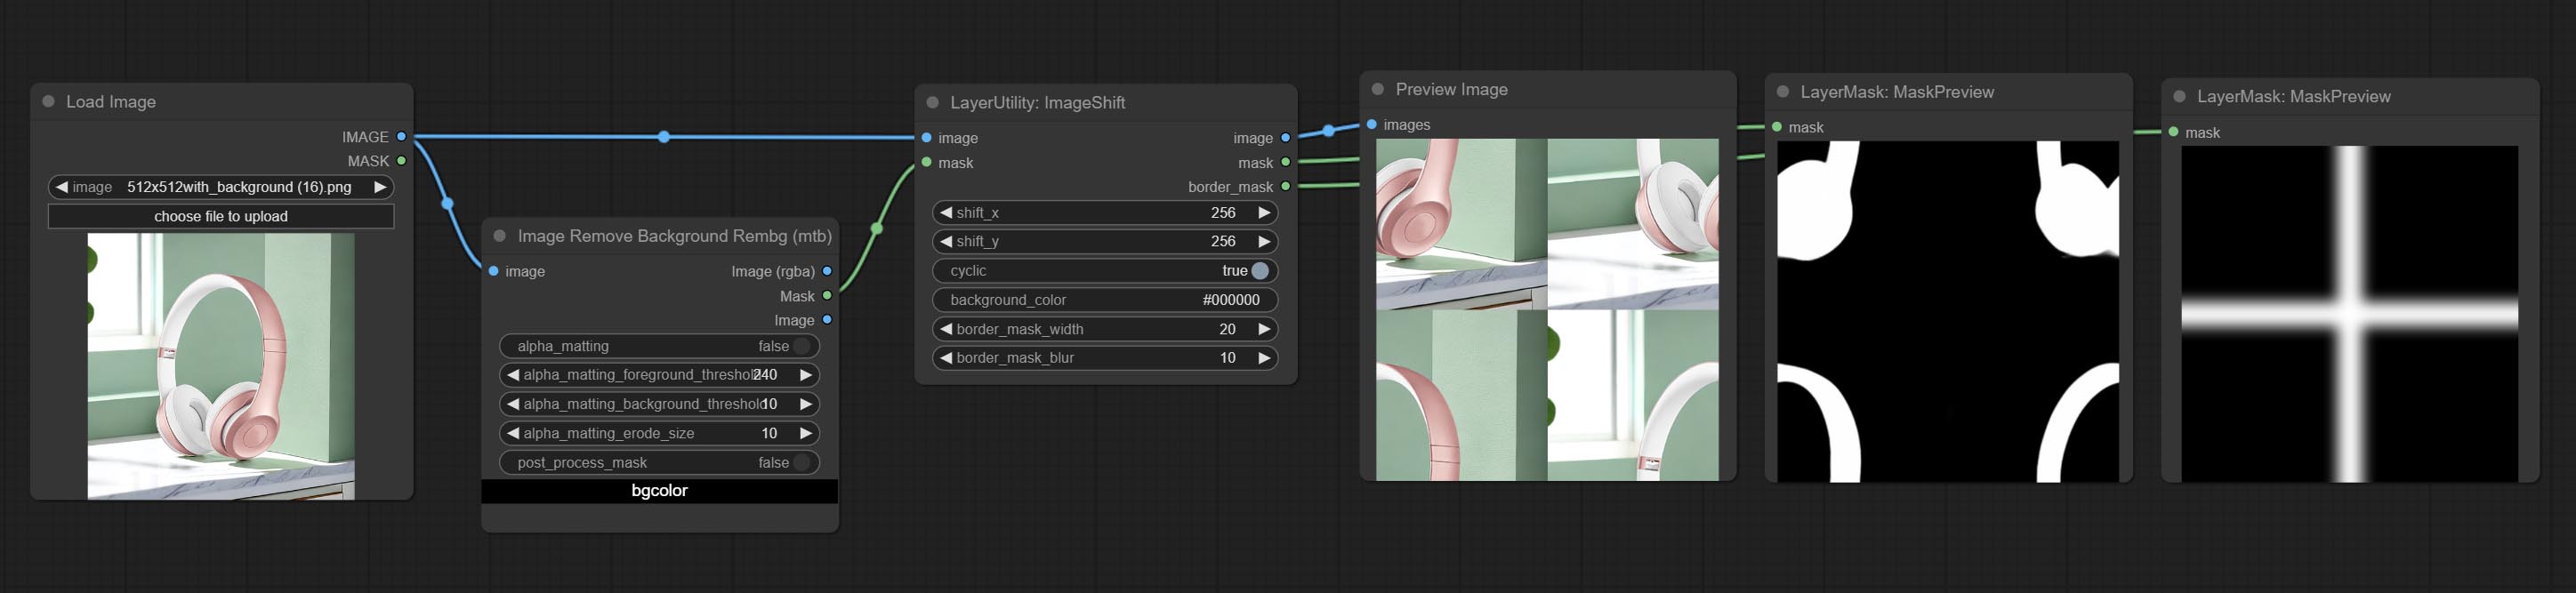
Node options: 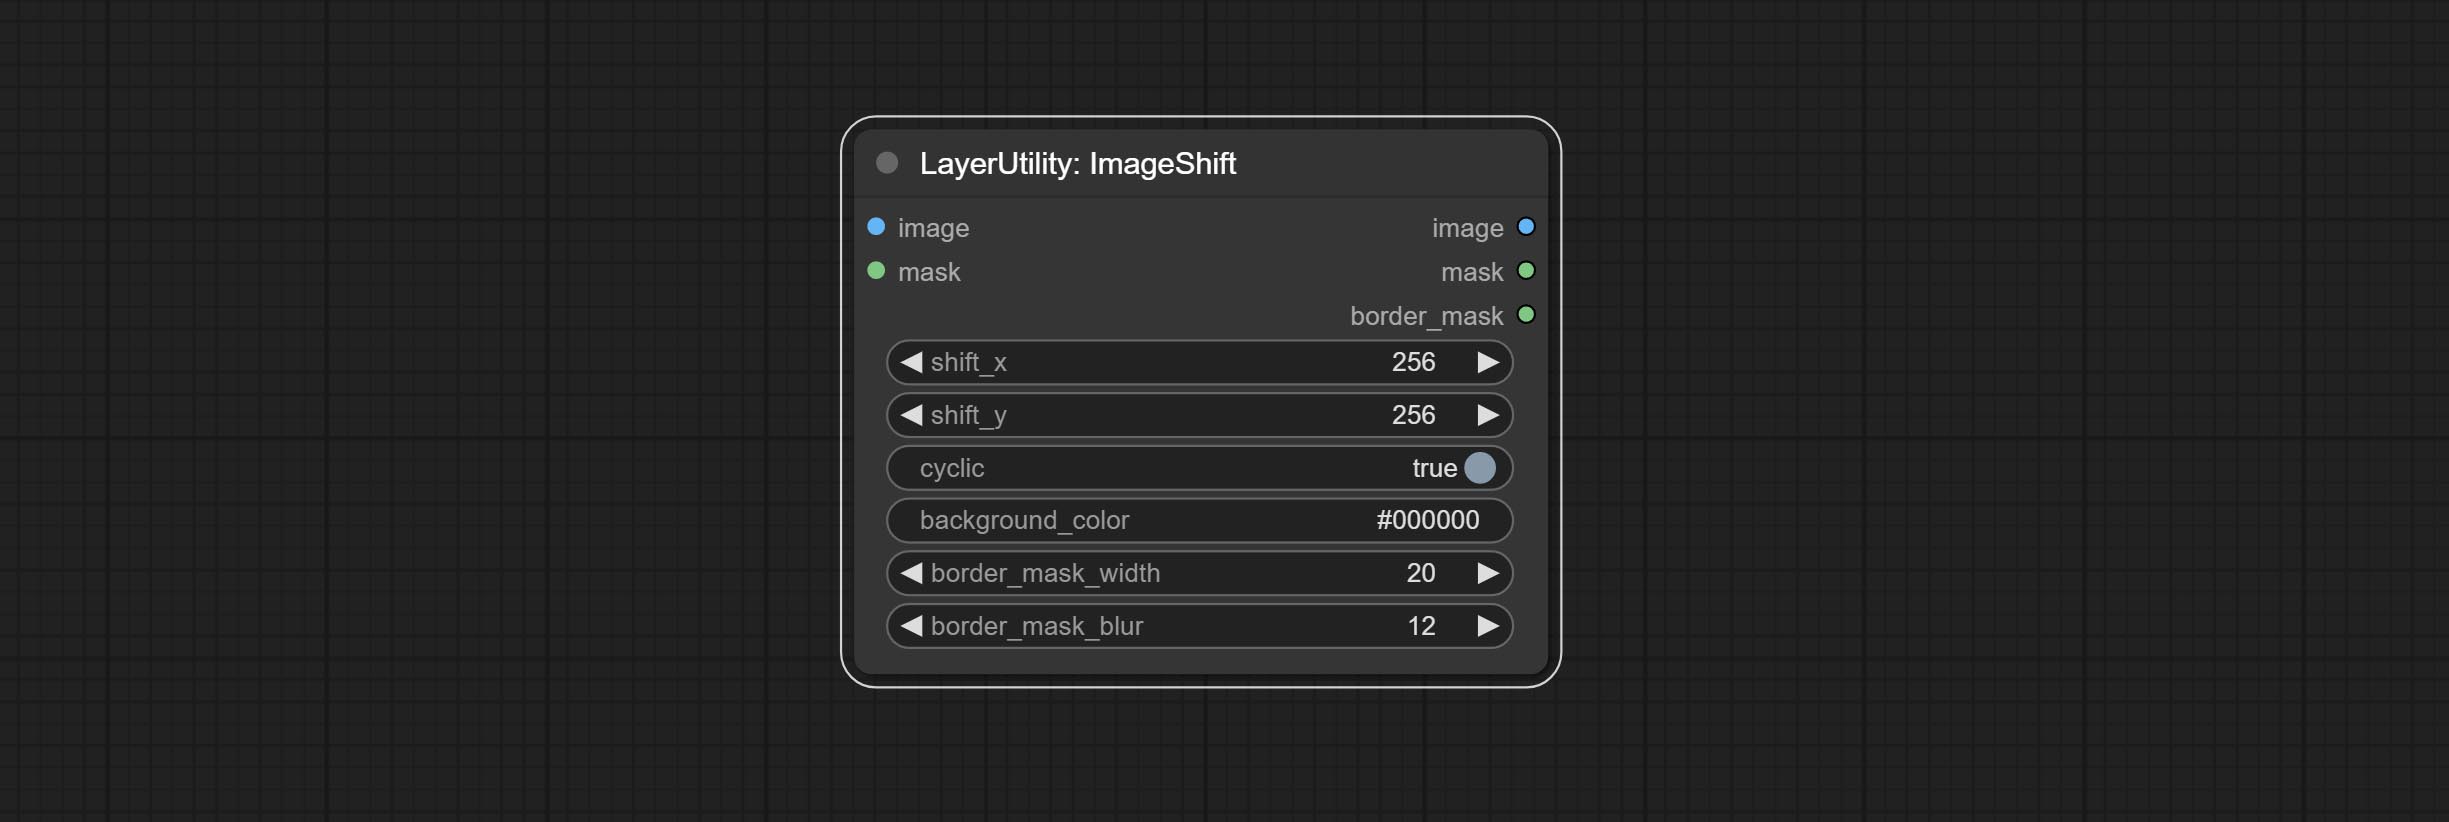
A simple node for composit layer image and background image, multiple blend modes are available for option, and transparency can be set. 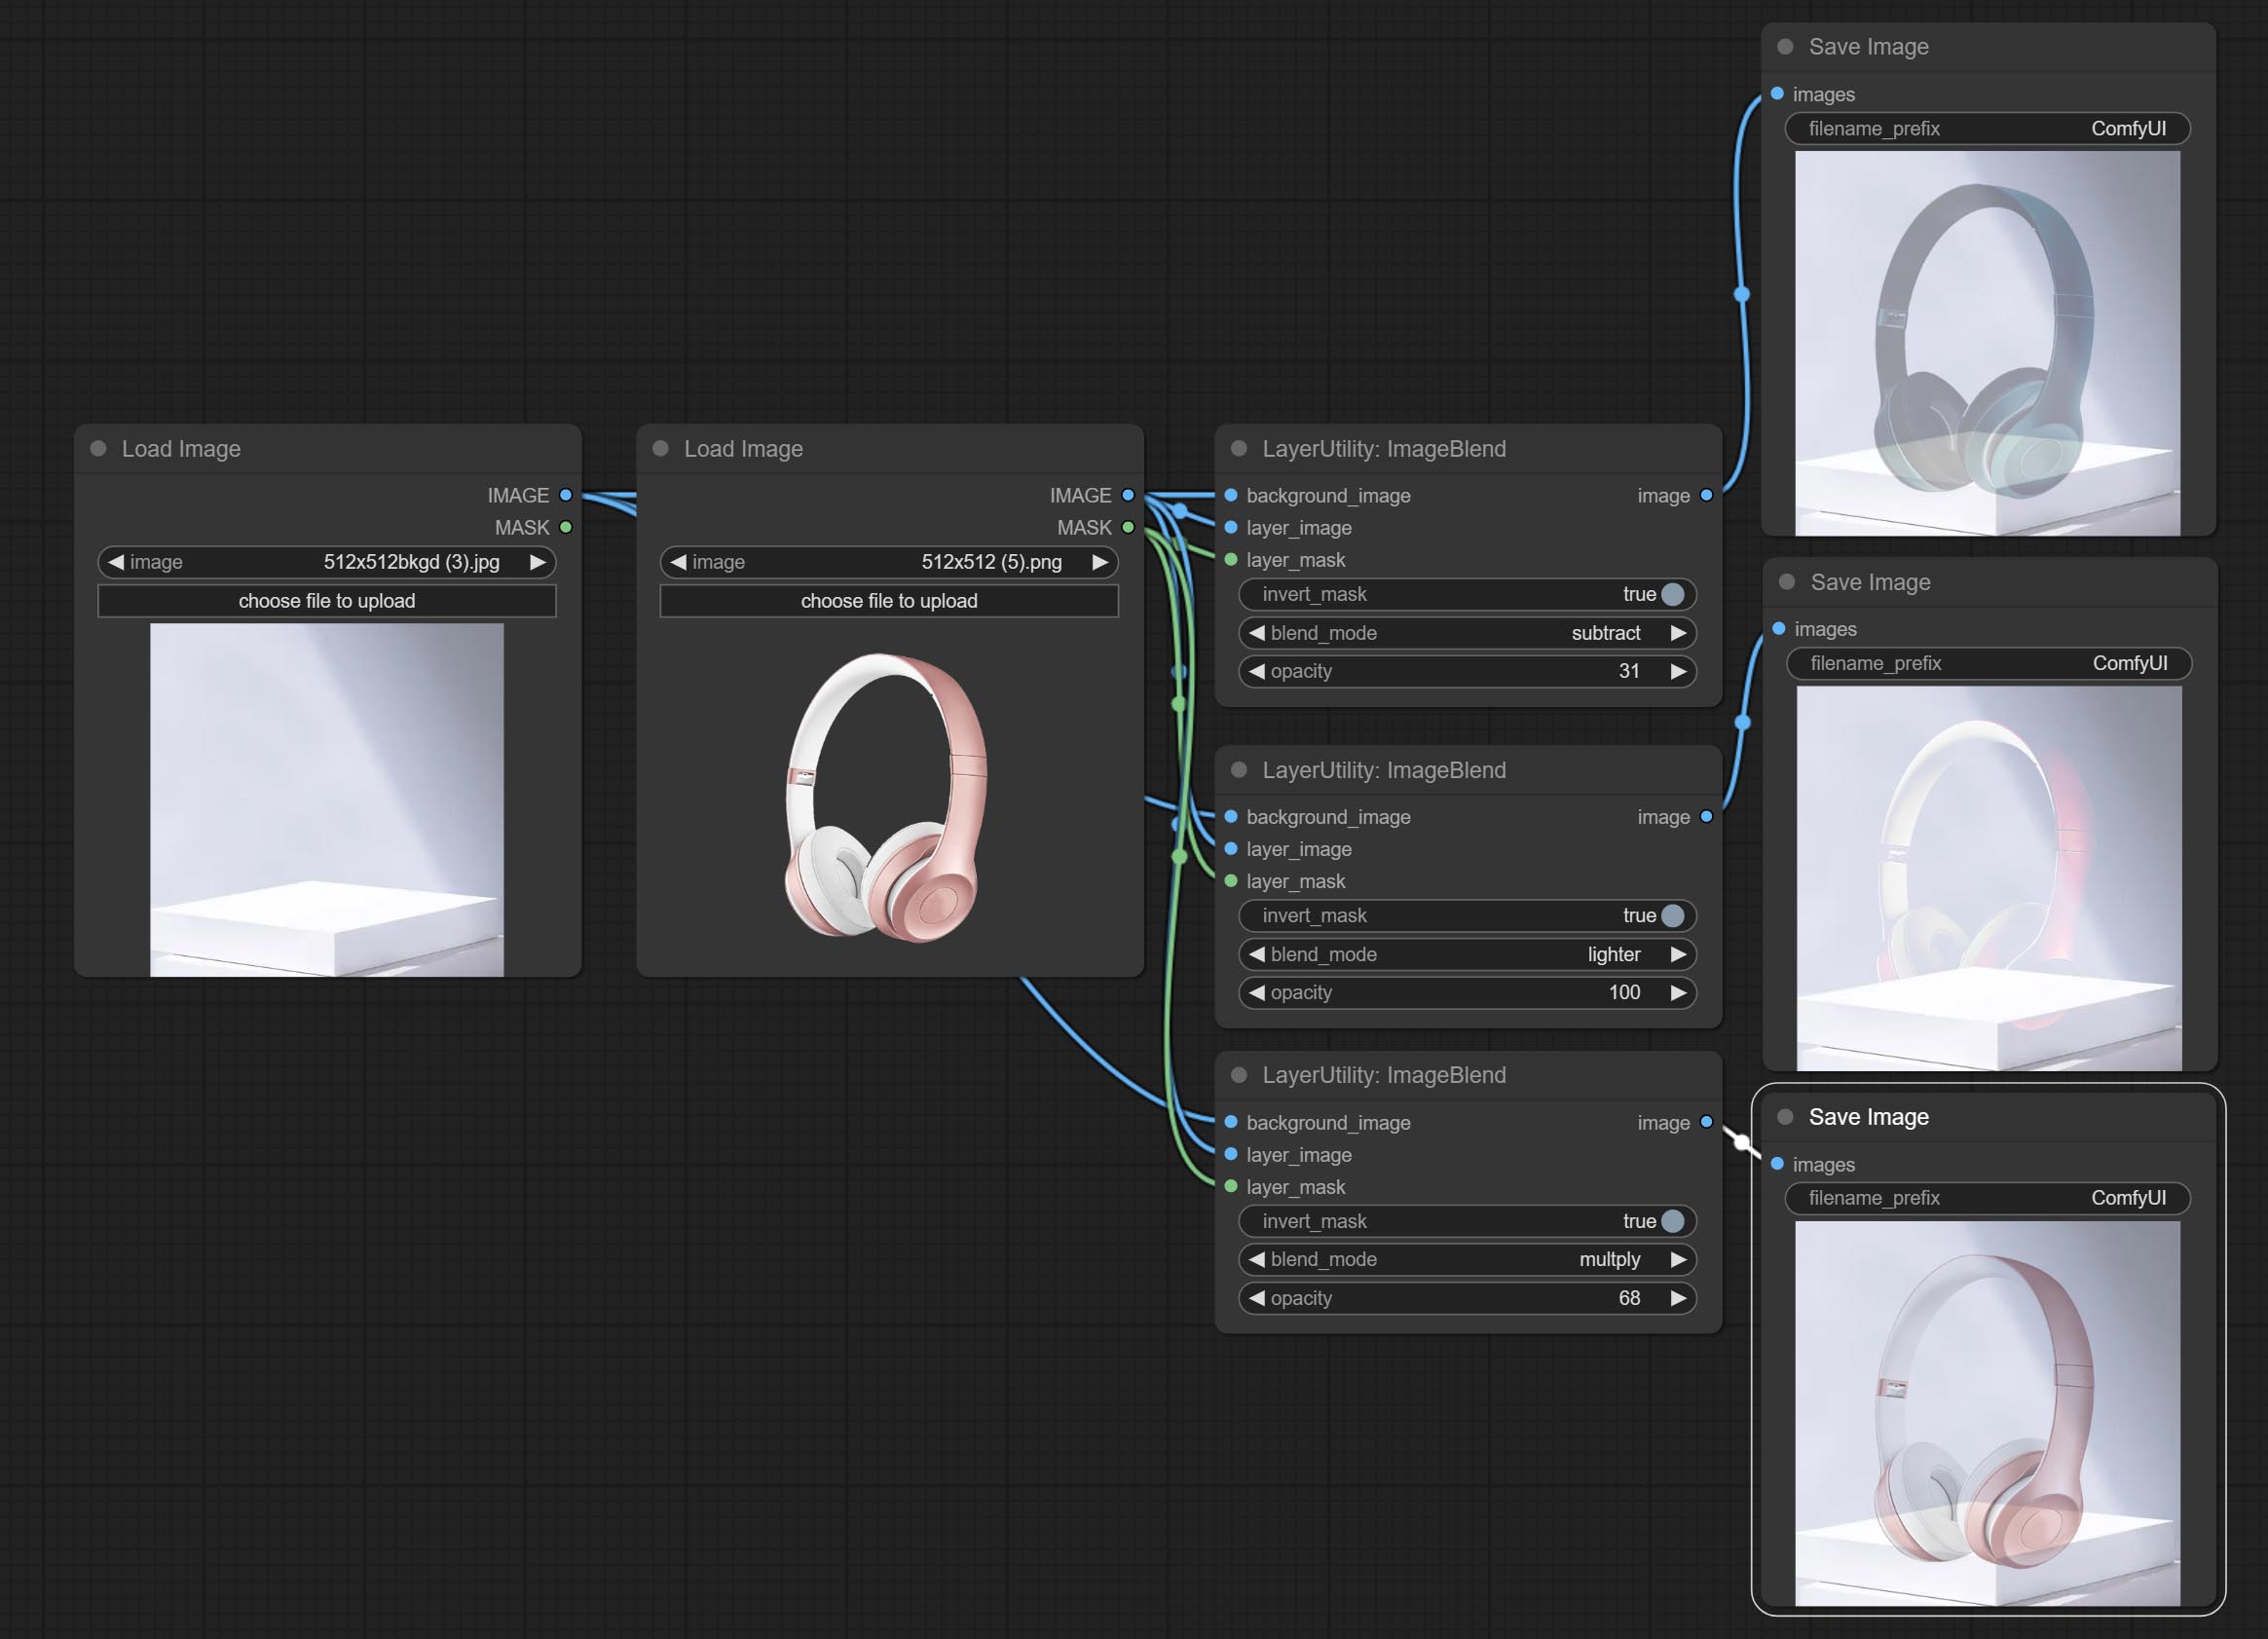
Node options: 
Display multiple images in one reel. Text annotations can be added to each image in the reel. By using the ImageReelComposite node, multiple reel can be combined into one image. 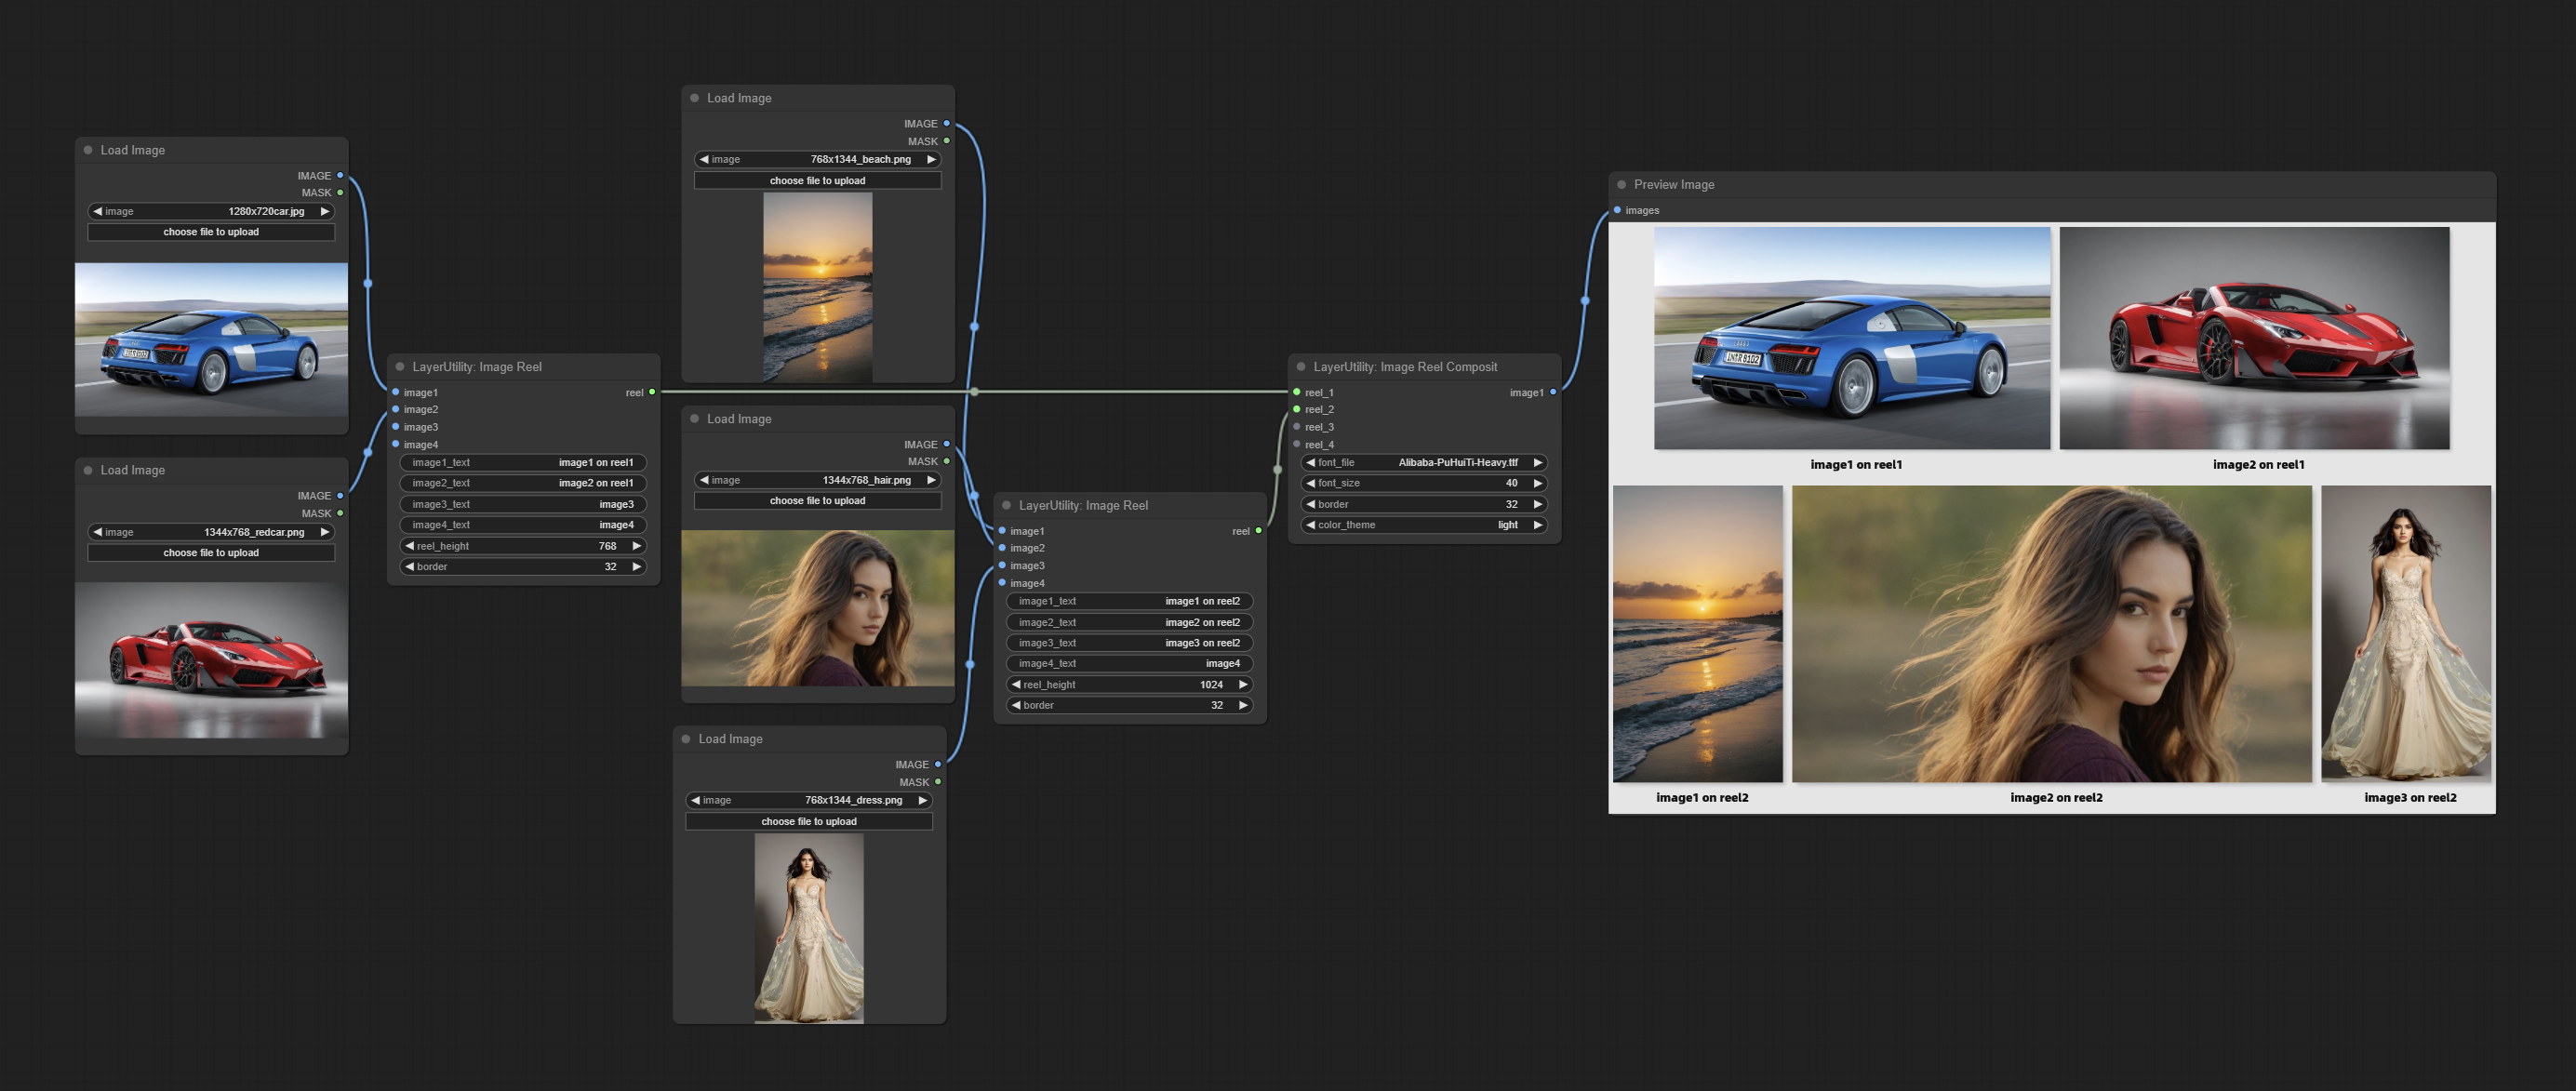
Node Options: 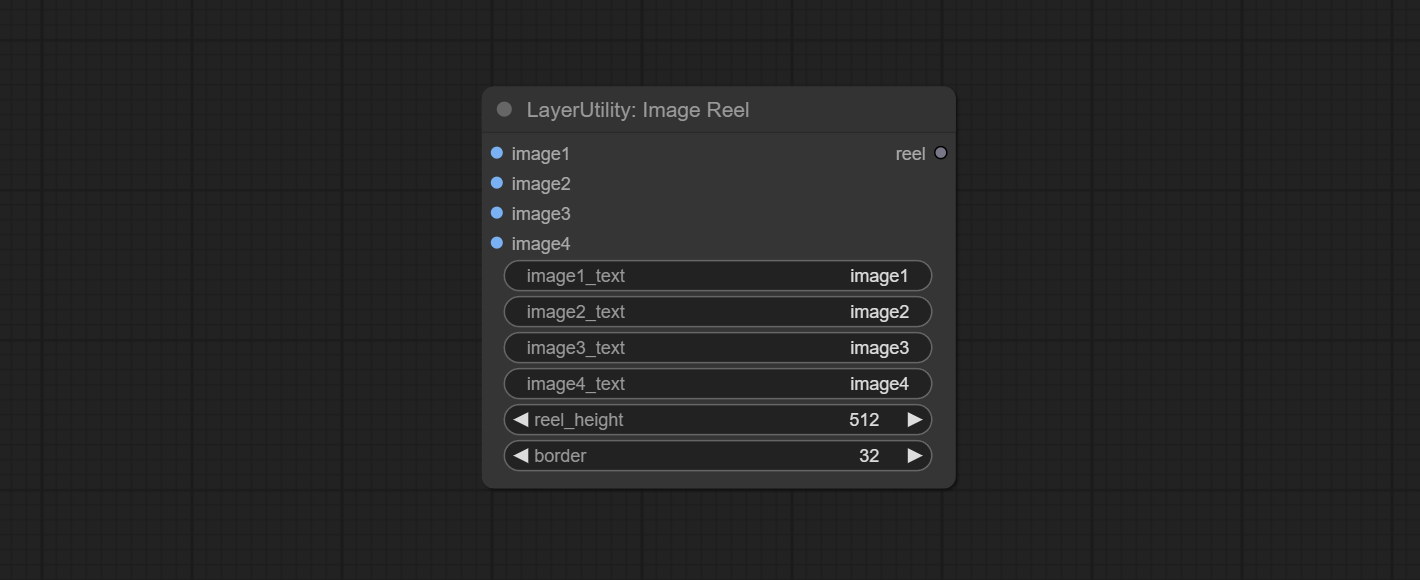
Ausgabe:
Combine multiple reel into one image.
Node Options: 
resource_dir.ini , this file is located in the root directory of the plug-in, and the default name is resource_dir.ini.example . to use this file for the first time, you need to change the file suffix to .ini . Open the text editing software and find the line starting with "FONT_dir=", after "=", enter the custom folder path name. support defining multiple folders in resource-dir.ini , separated by commas, semicolons, or spaces. all font files in this folder will be collected and displayed in the node list during ComfyUI initialization. If the folder set in ini is invalid, the font folder that comes with the plugin will be enabled. Adjust image opacity 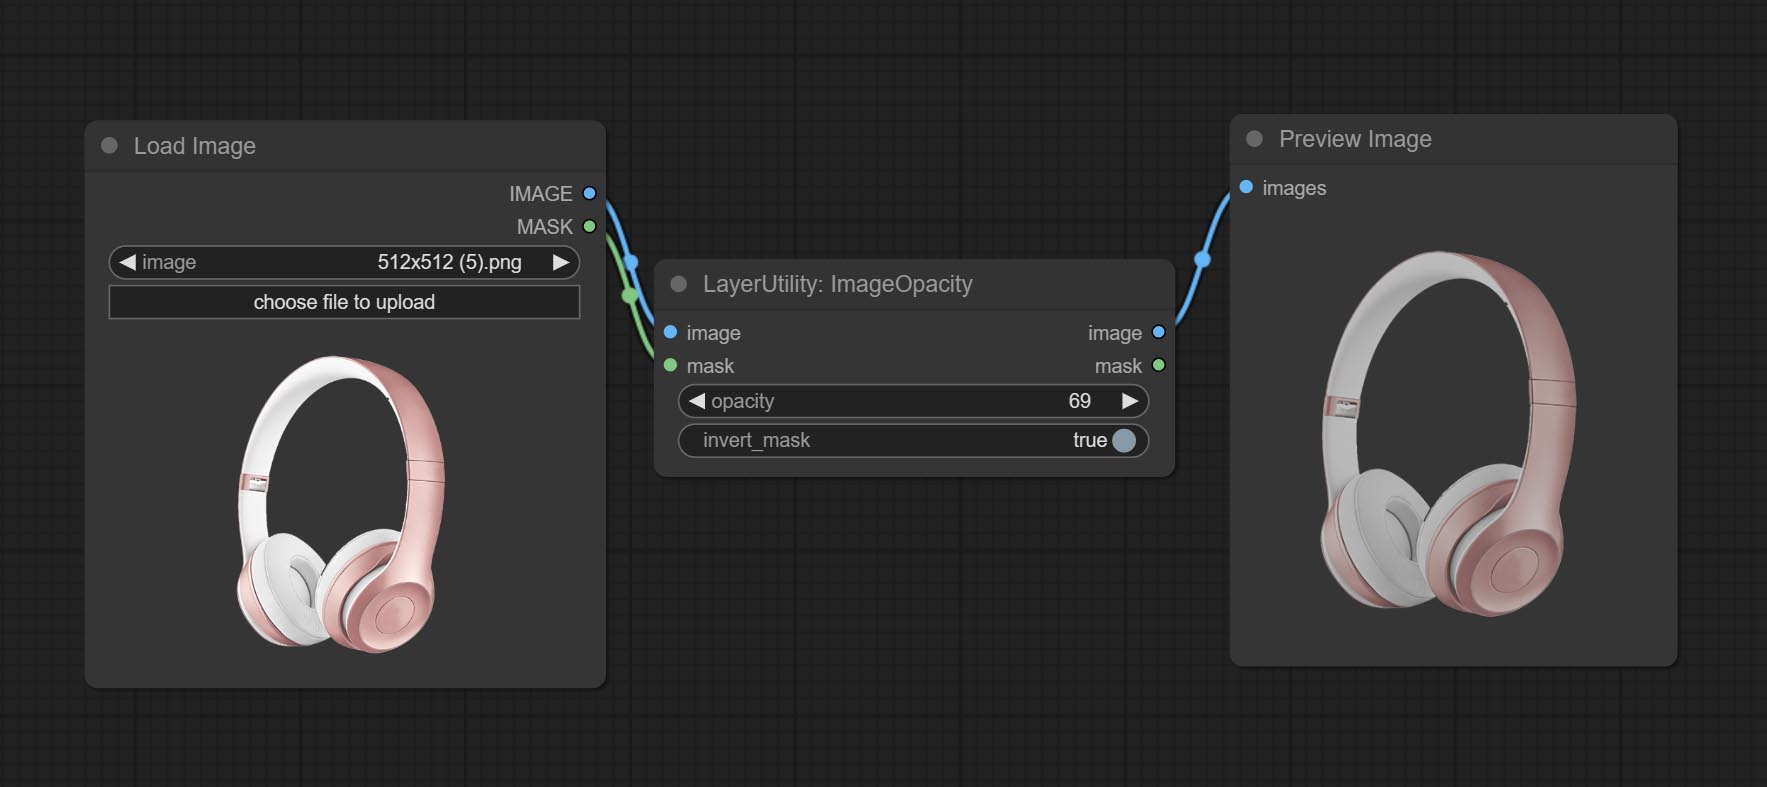
Node option:
Modify web extensions from mtb nodes. Select colors on the color palette and output RGB values, thanks to the original author. 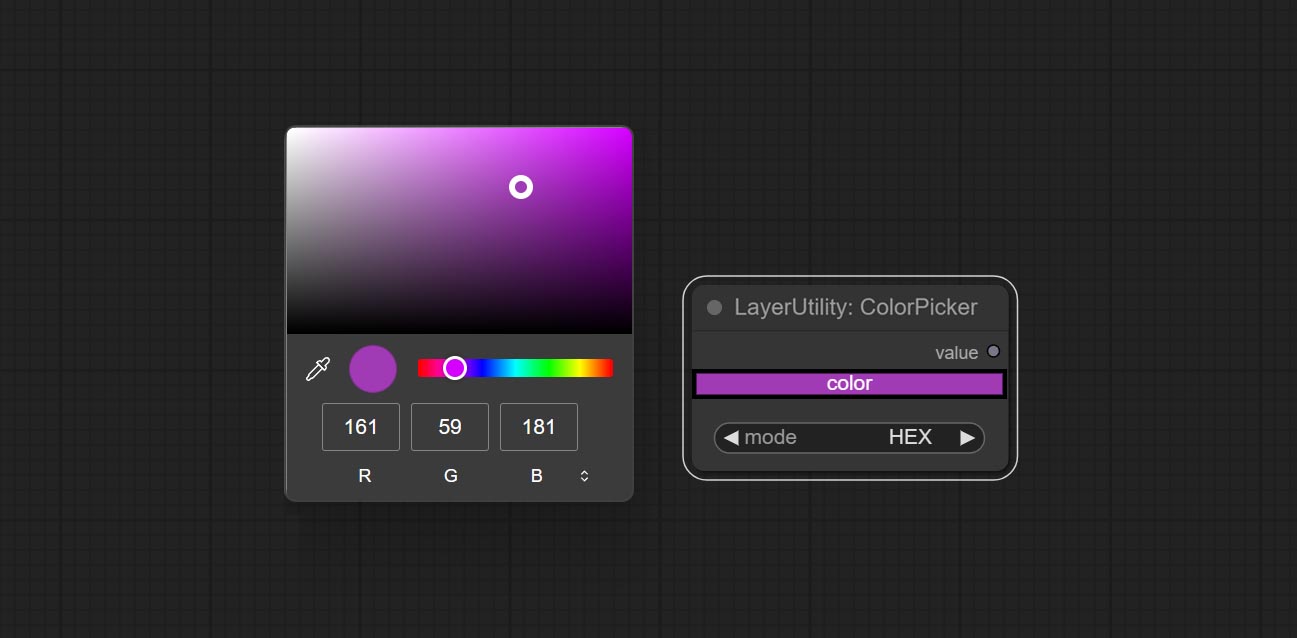
Node options:
Output type:
Output the color value as a single R, G, B three decimal values. Supports HEX and DEC formats for ColorPicker node output.
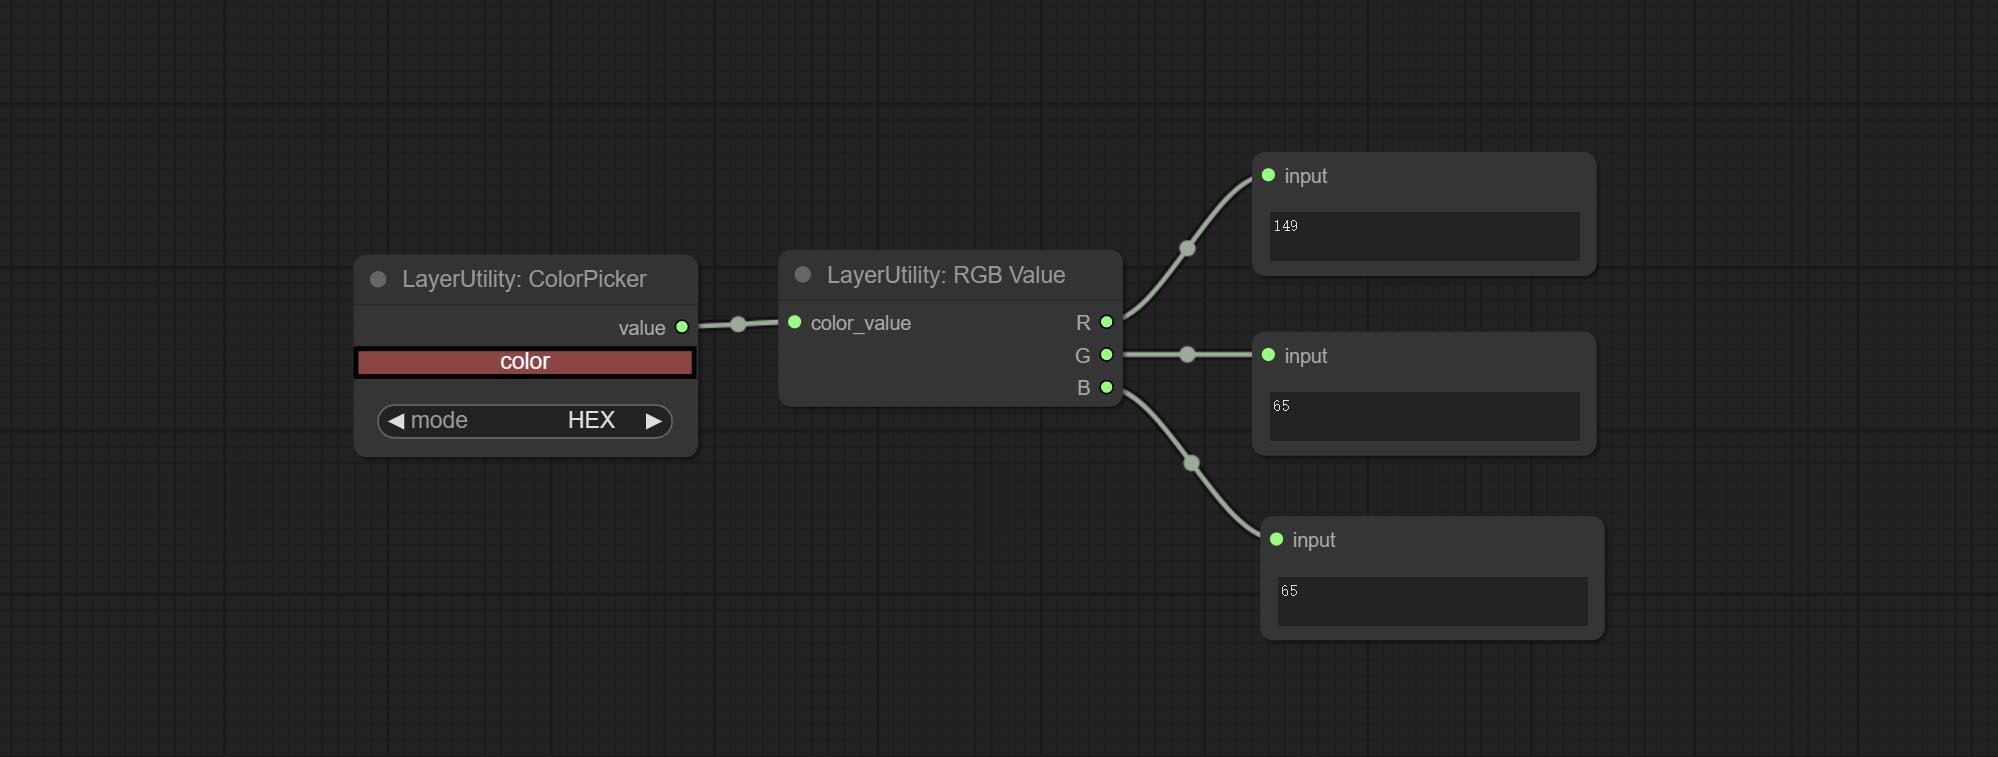
Node Options:
Output color values as individual decimal values of H, S, and V (maximum value of 255). Supports HEX and DEC formats for ColorPicker node output. 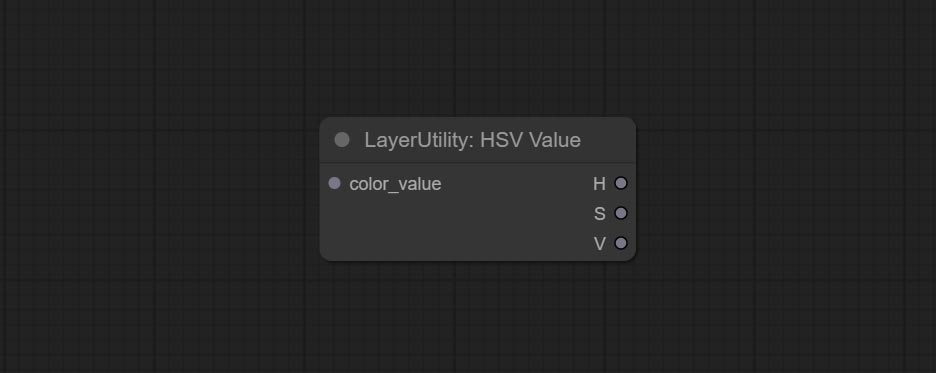
Node Options:
Output grayscale values based on color values. Supports outputting 256 level and 100 level grayscale values. 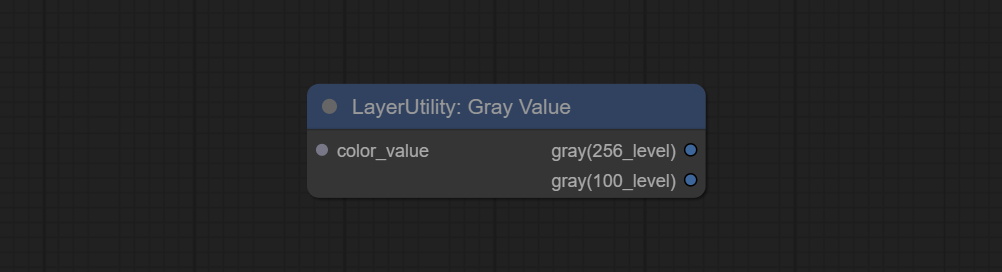
Node Options:
Outputs:
Obtain the main color or average color from the image and output RGB values. 
Node options: 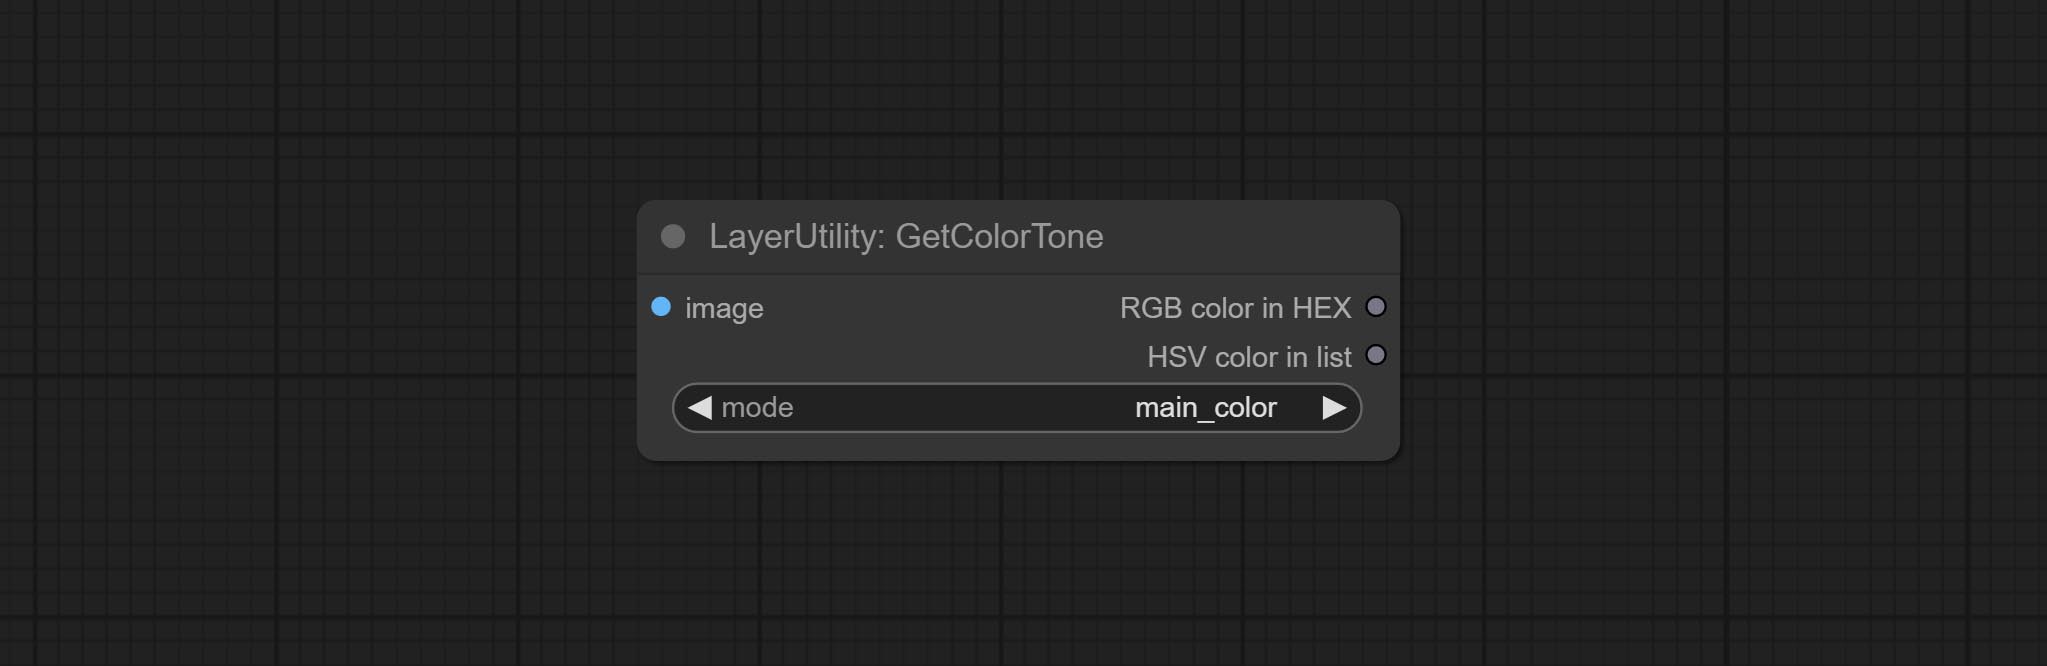
Output type:
V2 upgrade of GetColorTone. You can specify the dominant or average color to get the body or background. 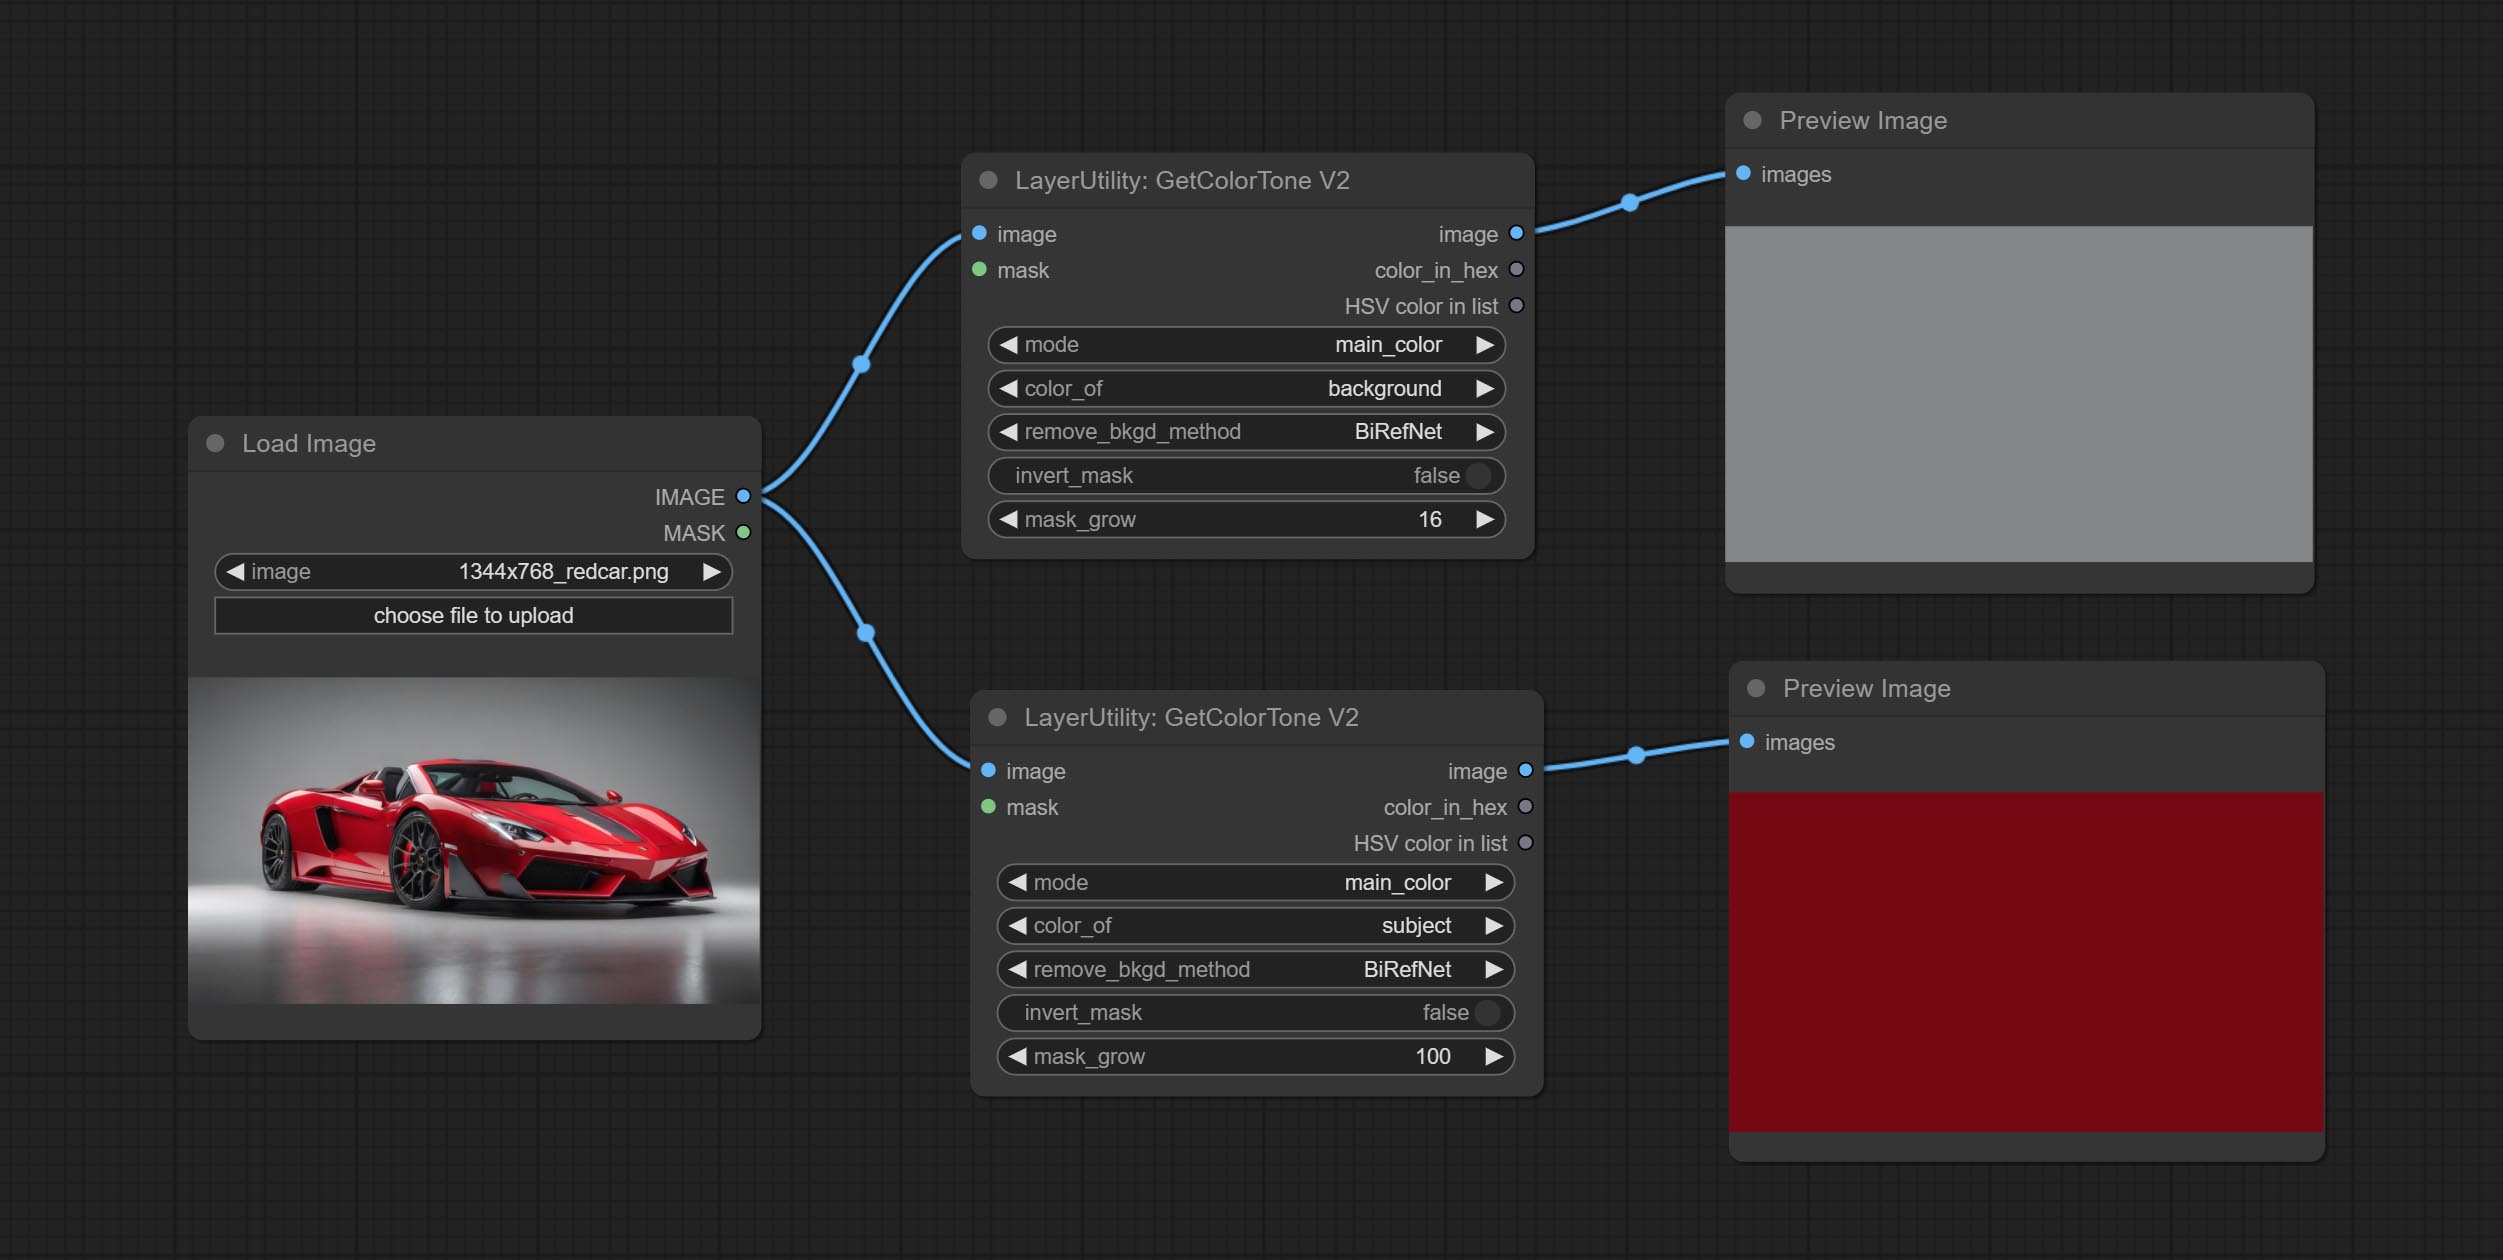
The following changes have been made on the basis of GetColorTong: 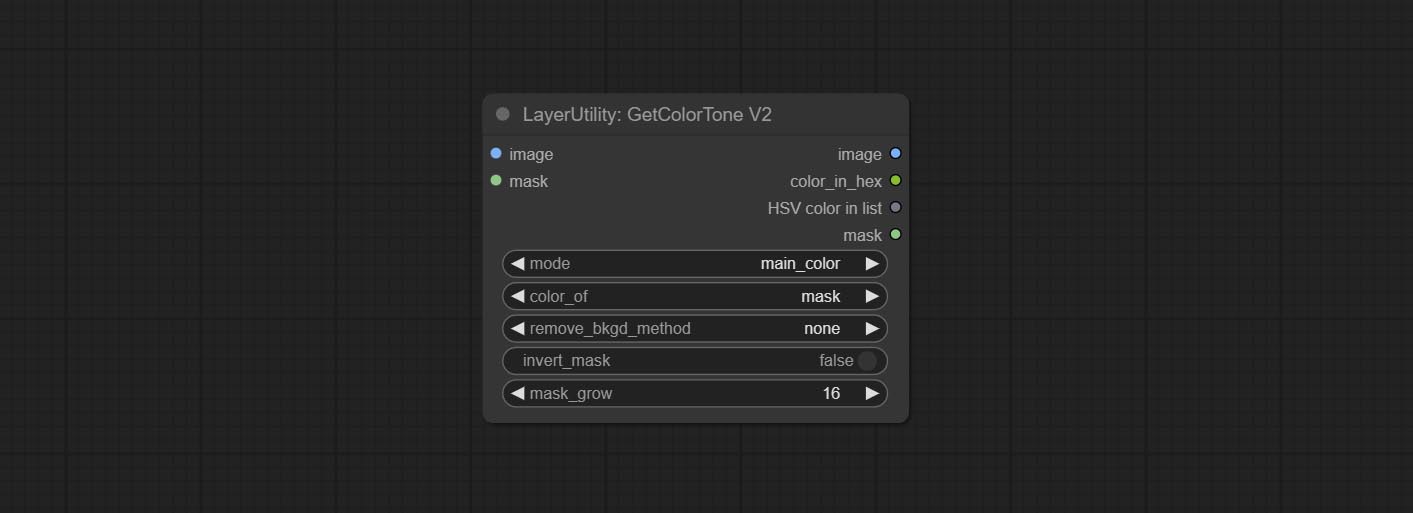
Ausgabe:
Obtain the main color of the image. You can obtain 5 colors. 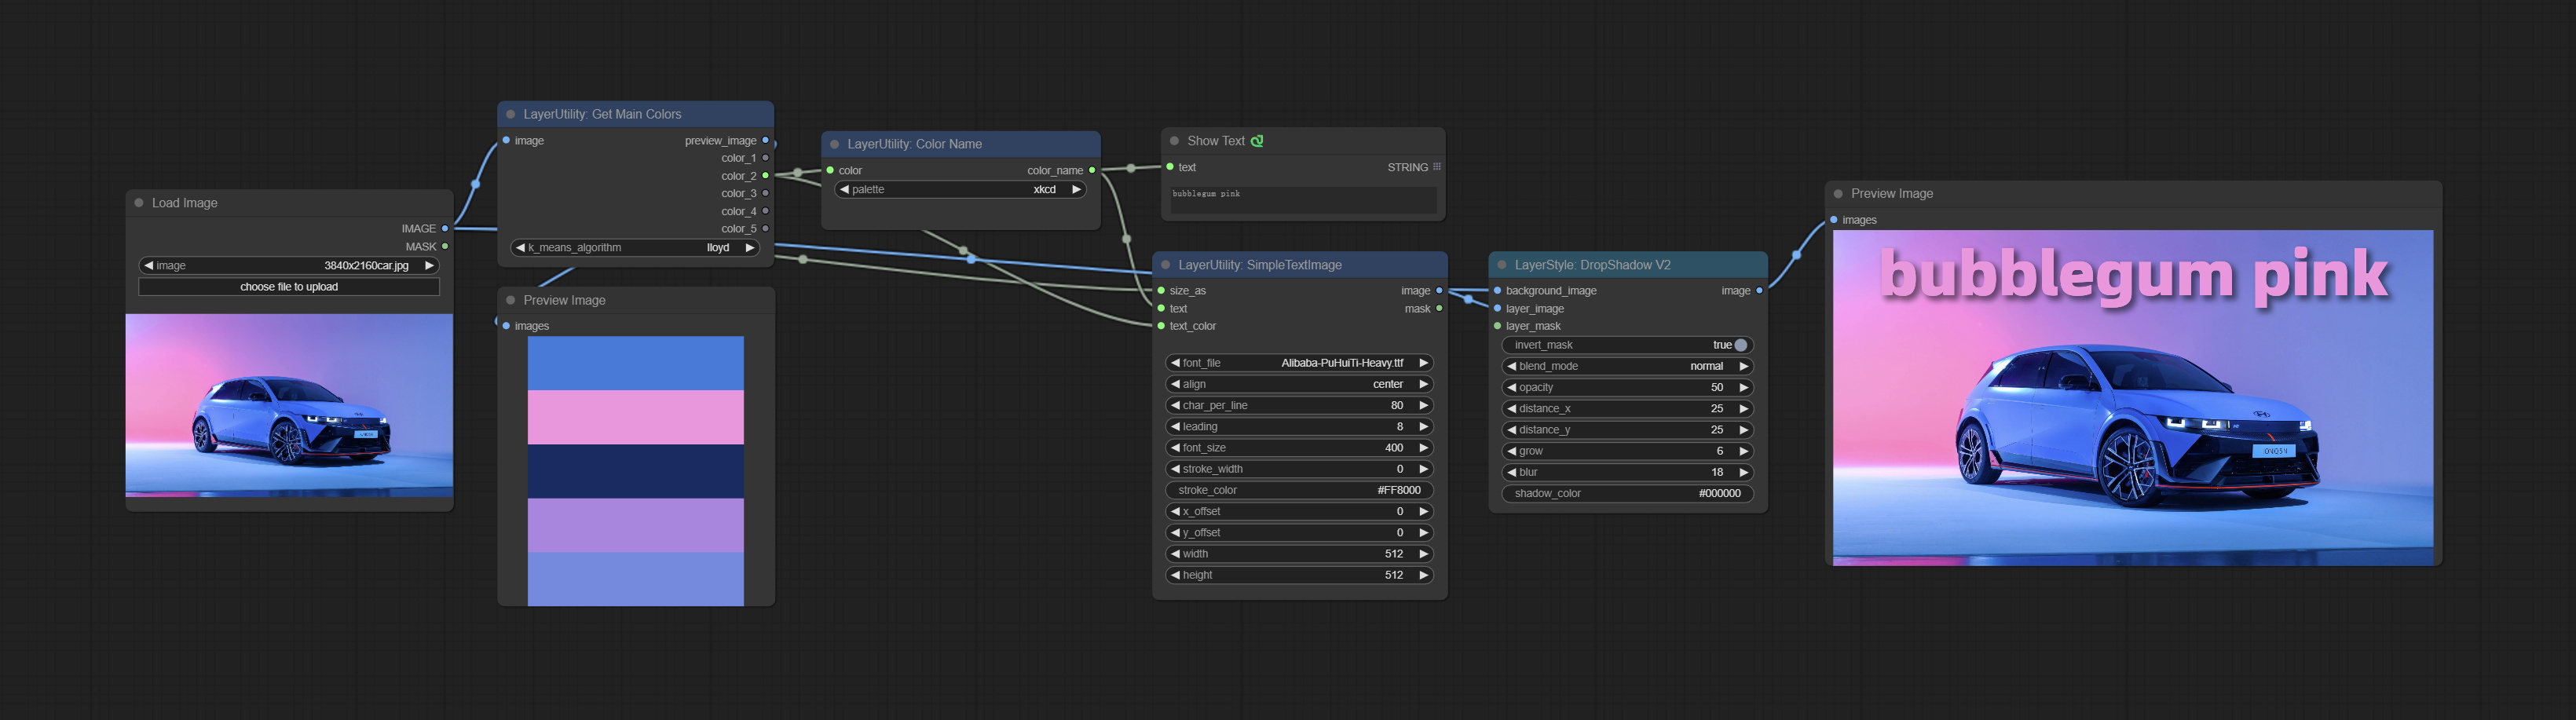
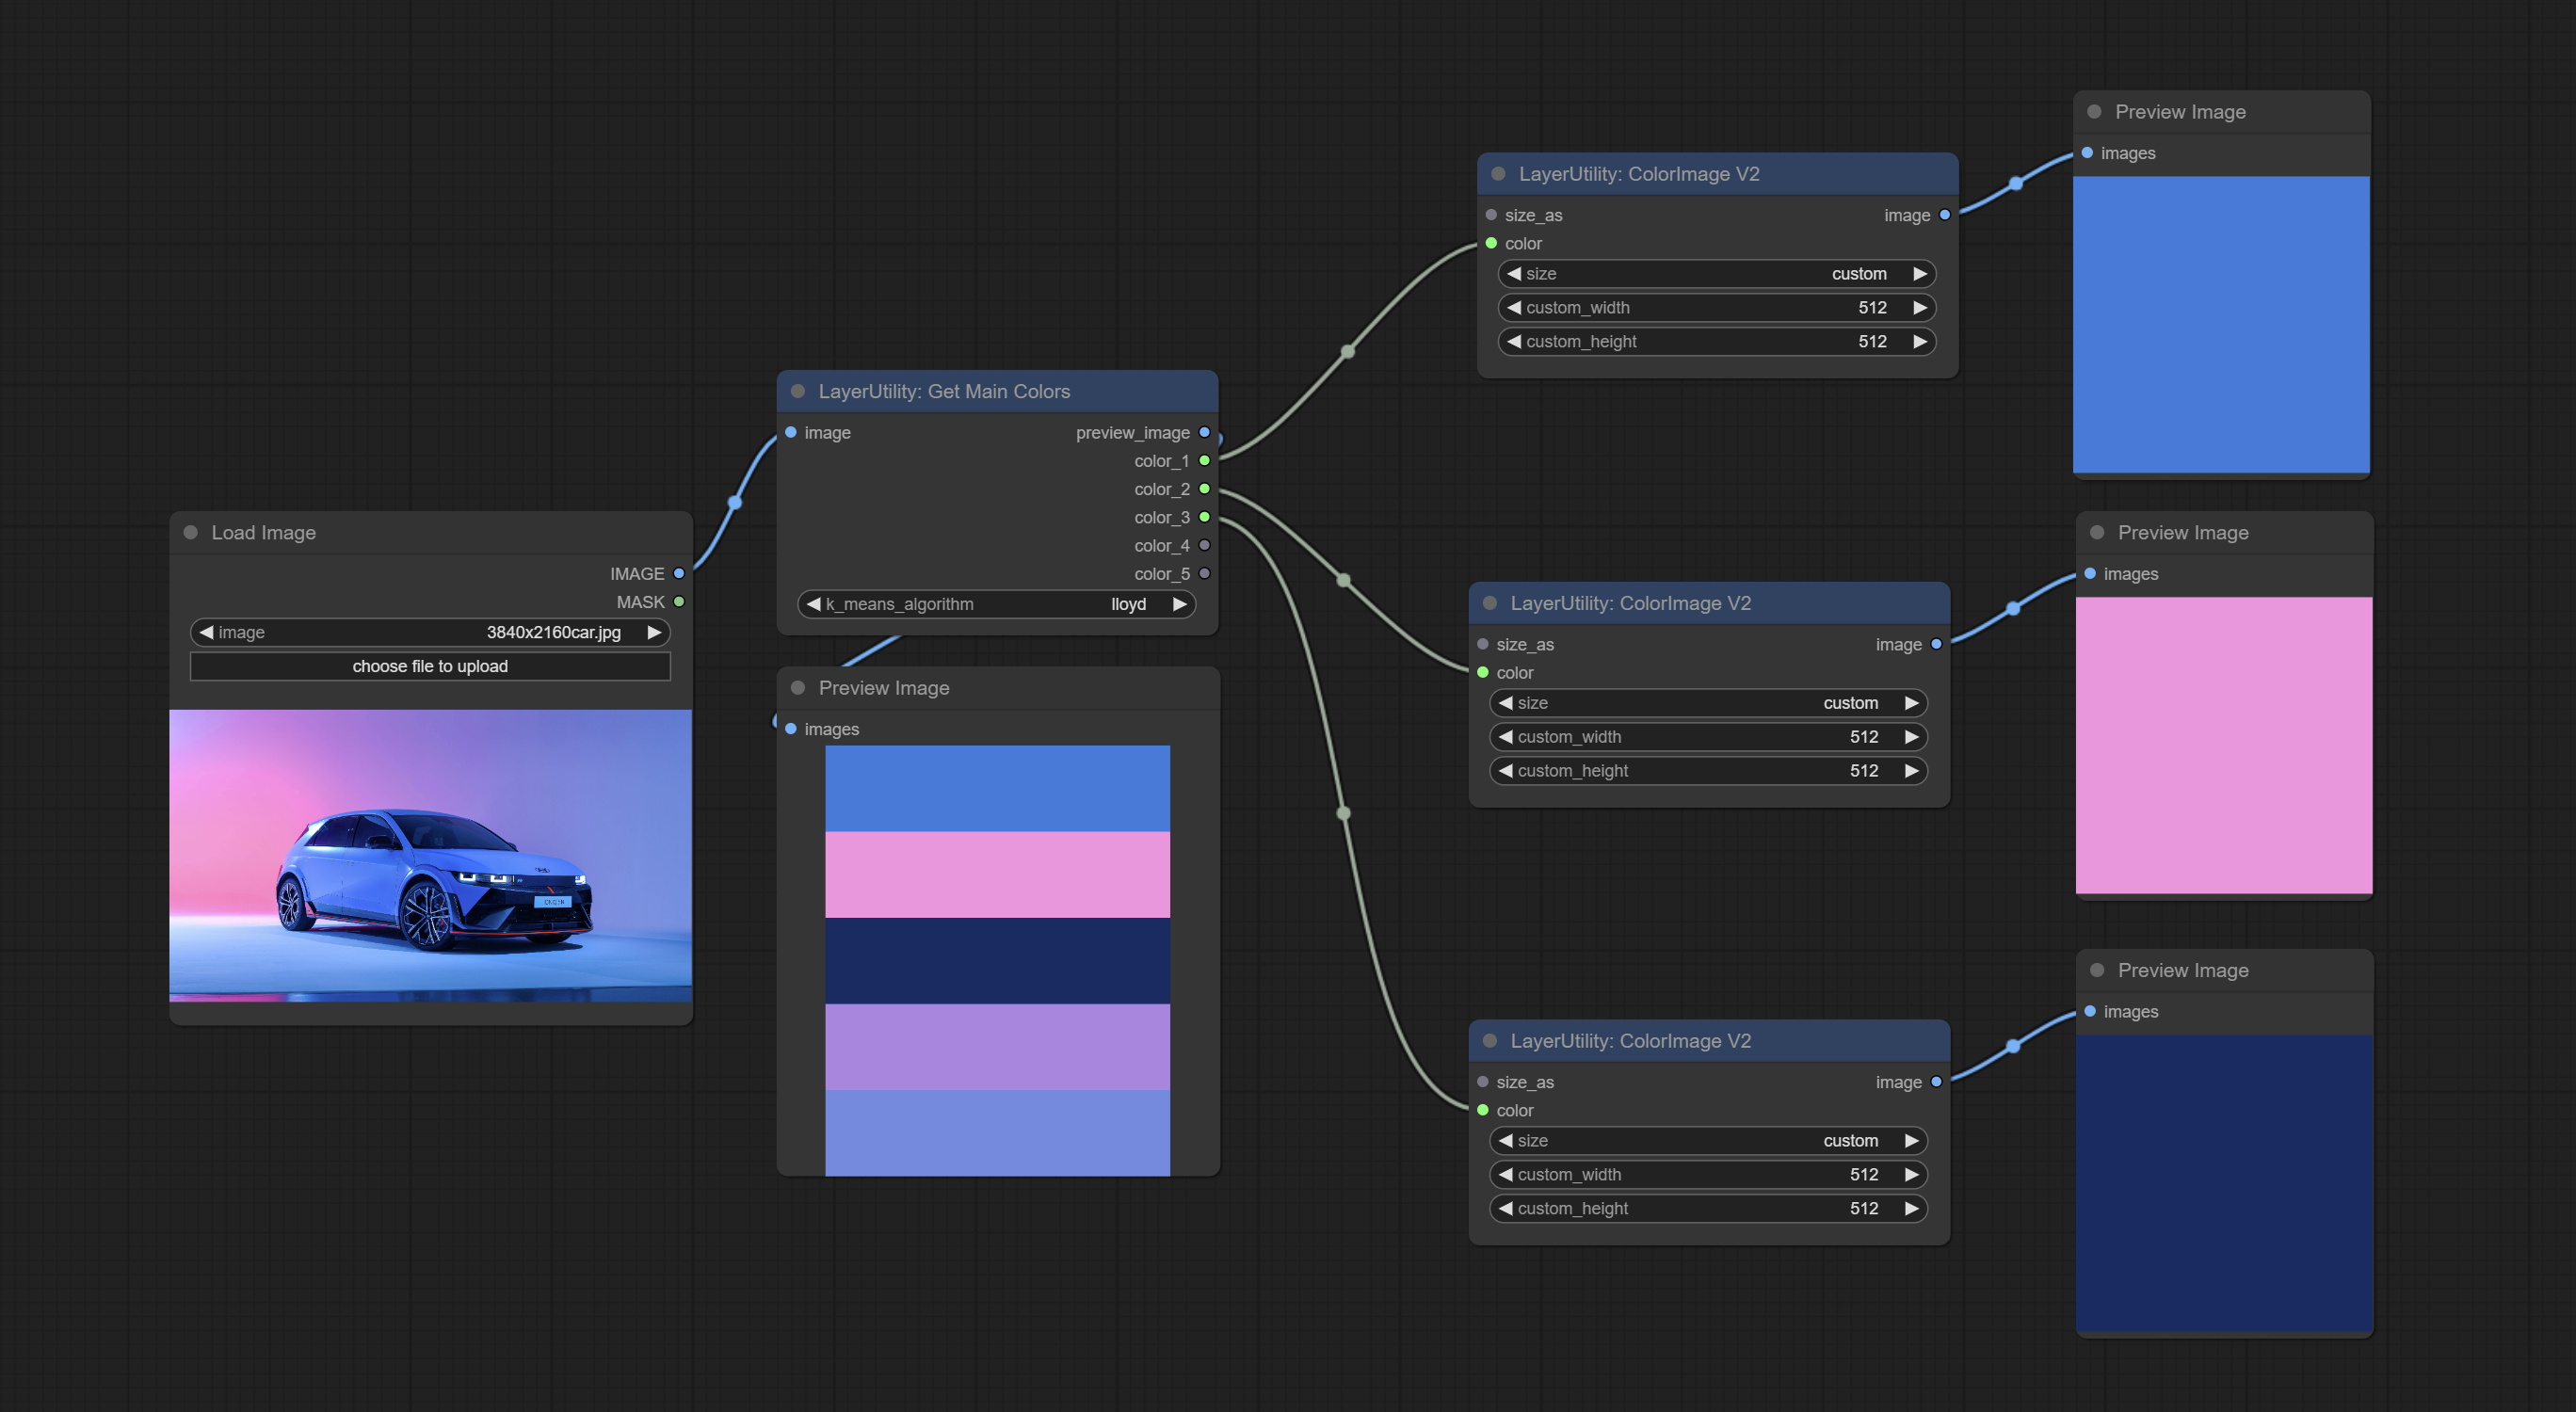
Node Options: 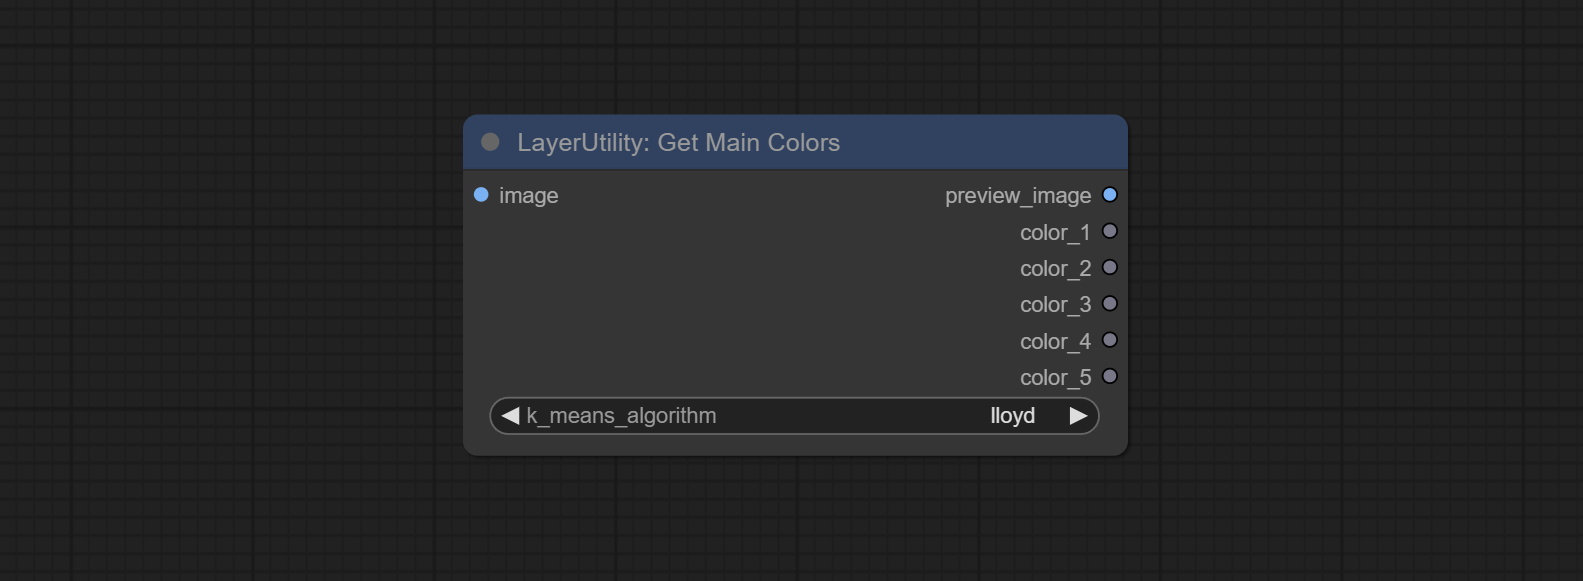
Outputs:
Output the most similar color name in the color palette based on the color value. 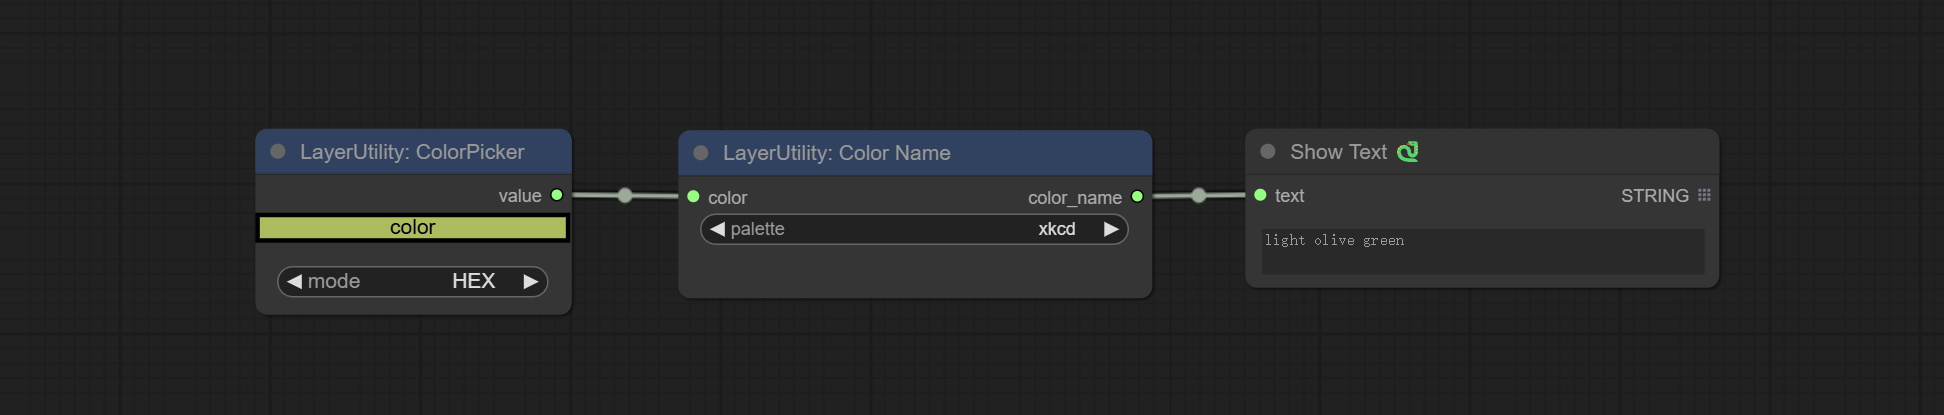
Node Options: 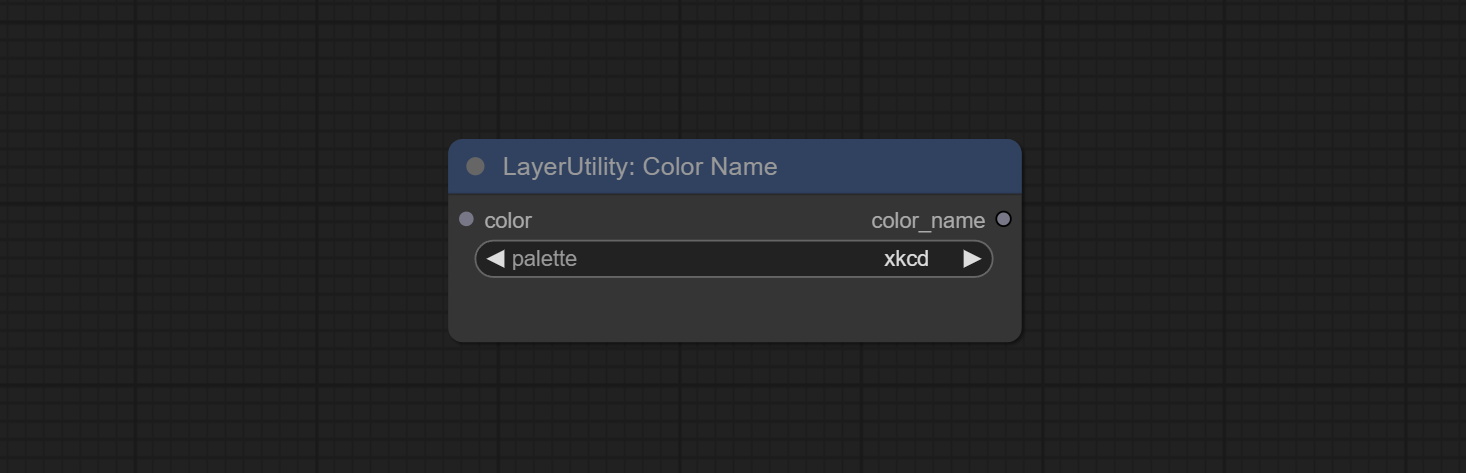
xkcd includes 949 colors, css3 includes 147 colors, and html4 includes 16 colors.Ausgabe:
Extend the canvas 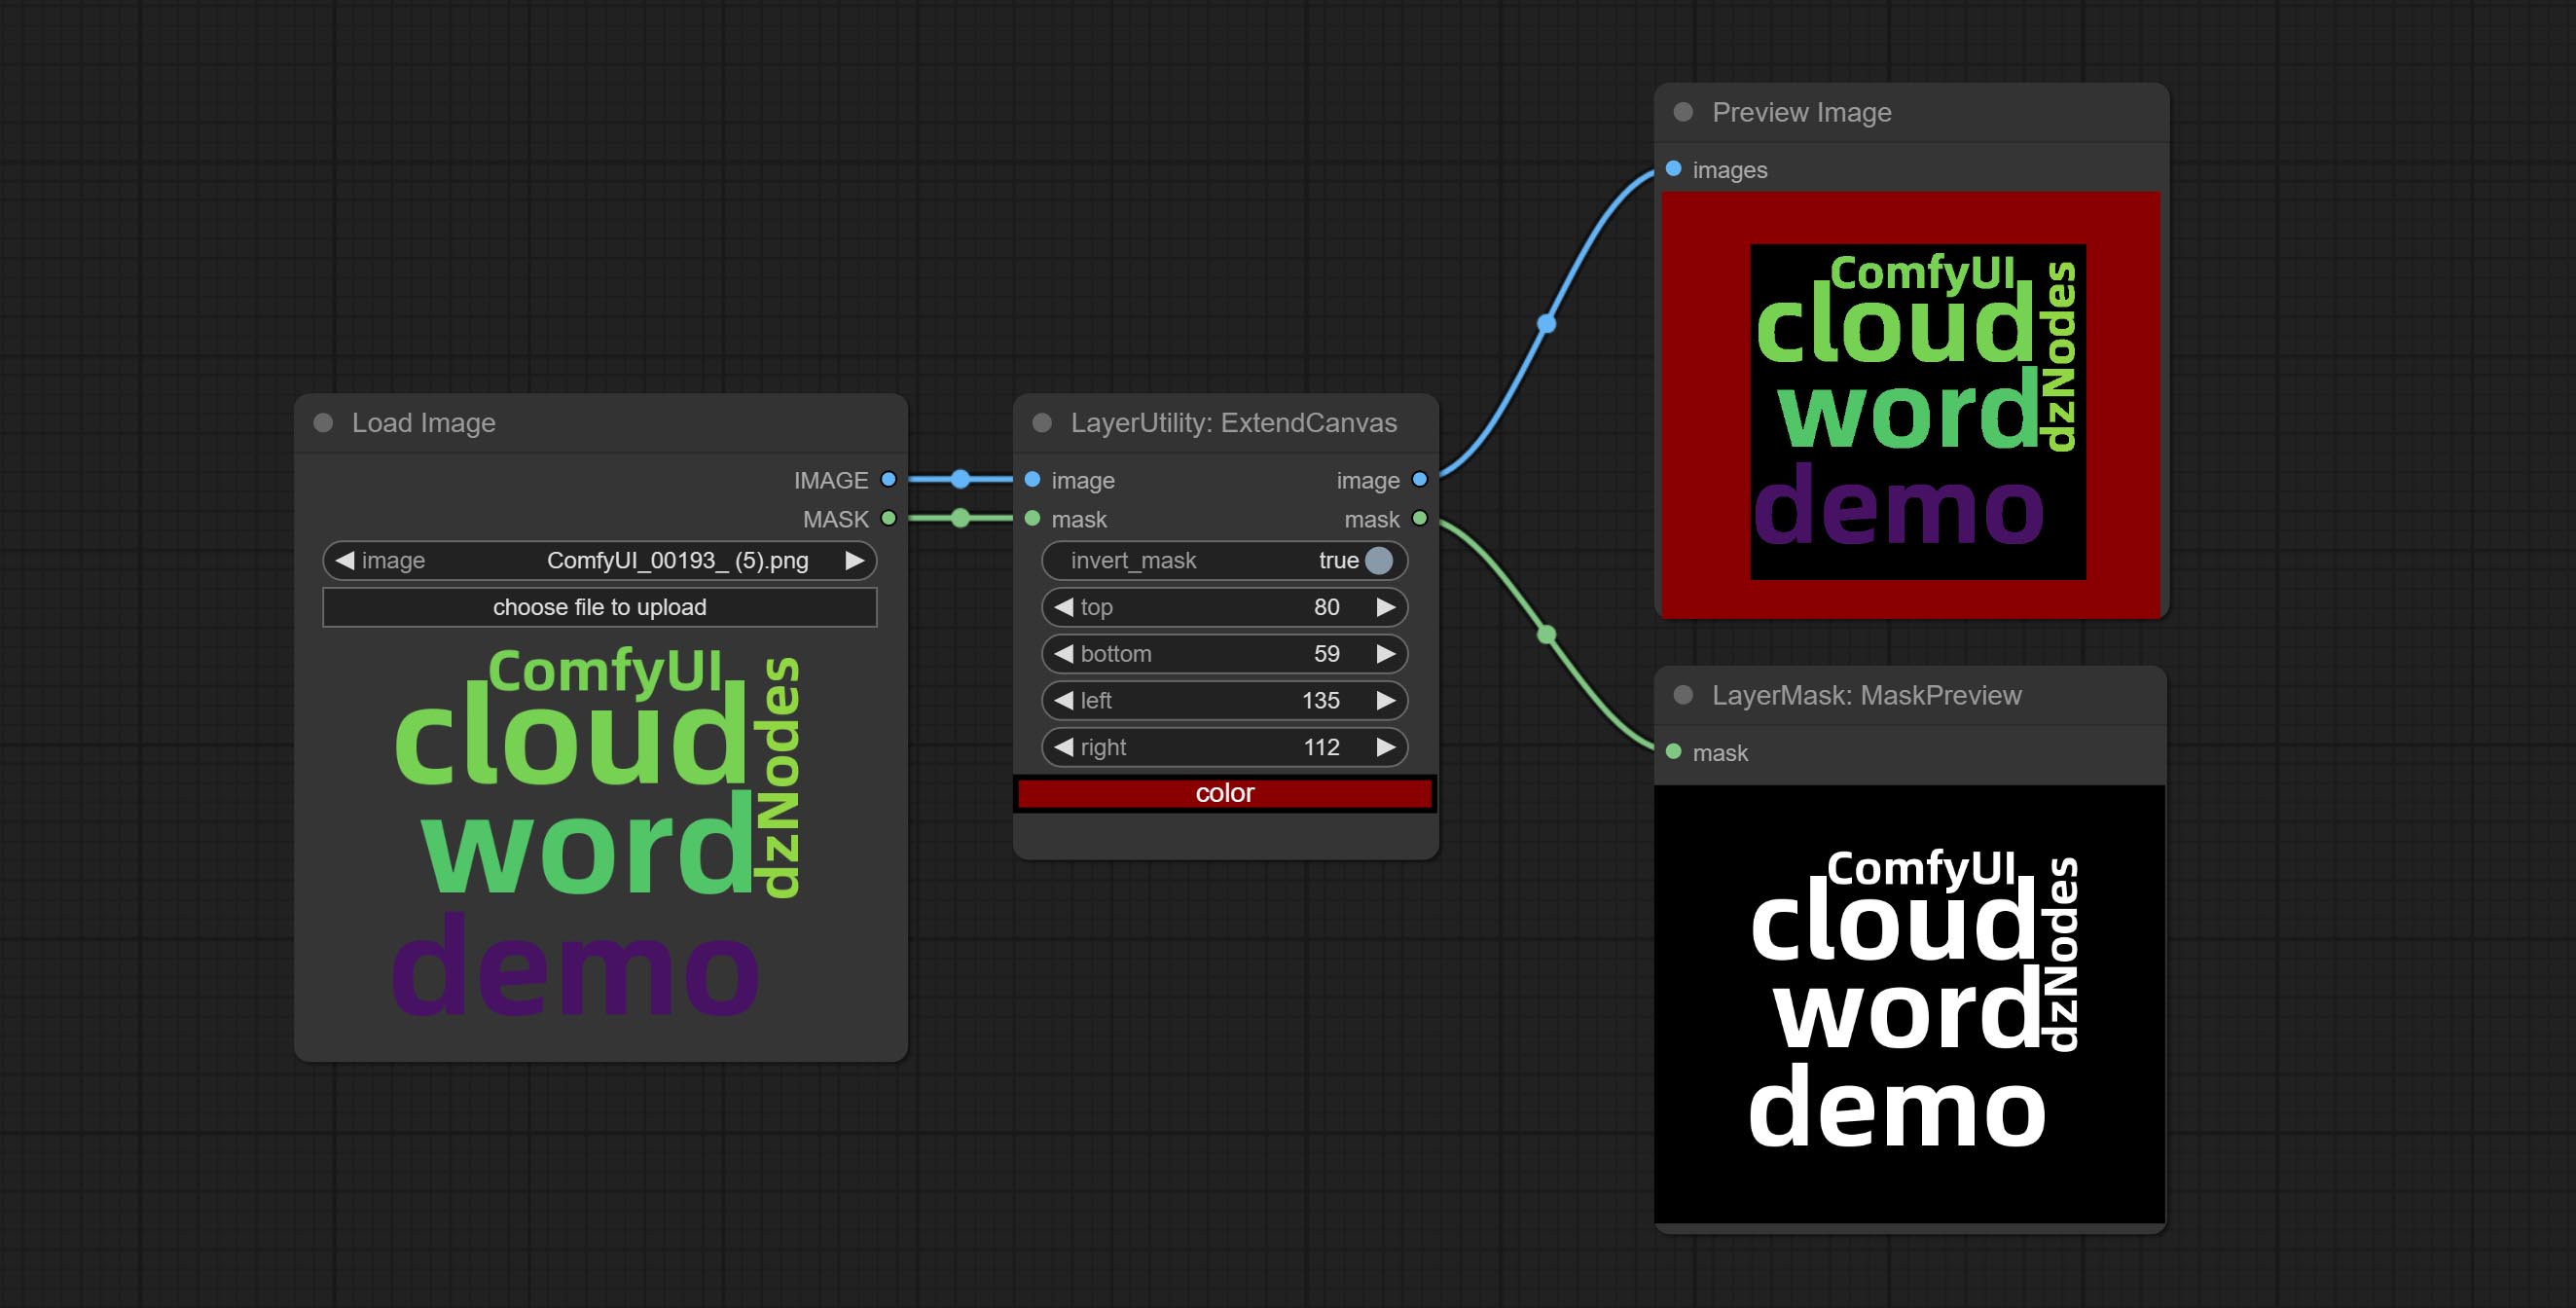
Node options: 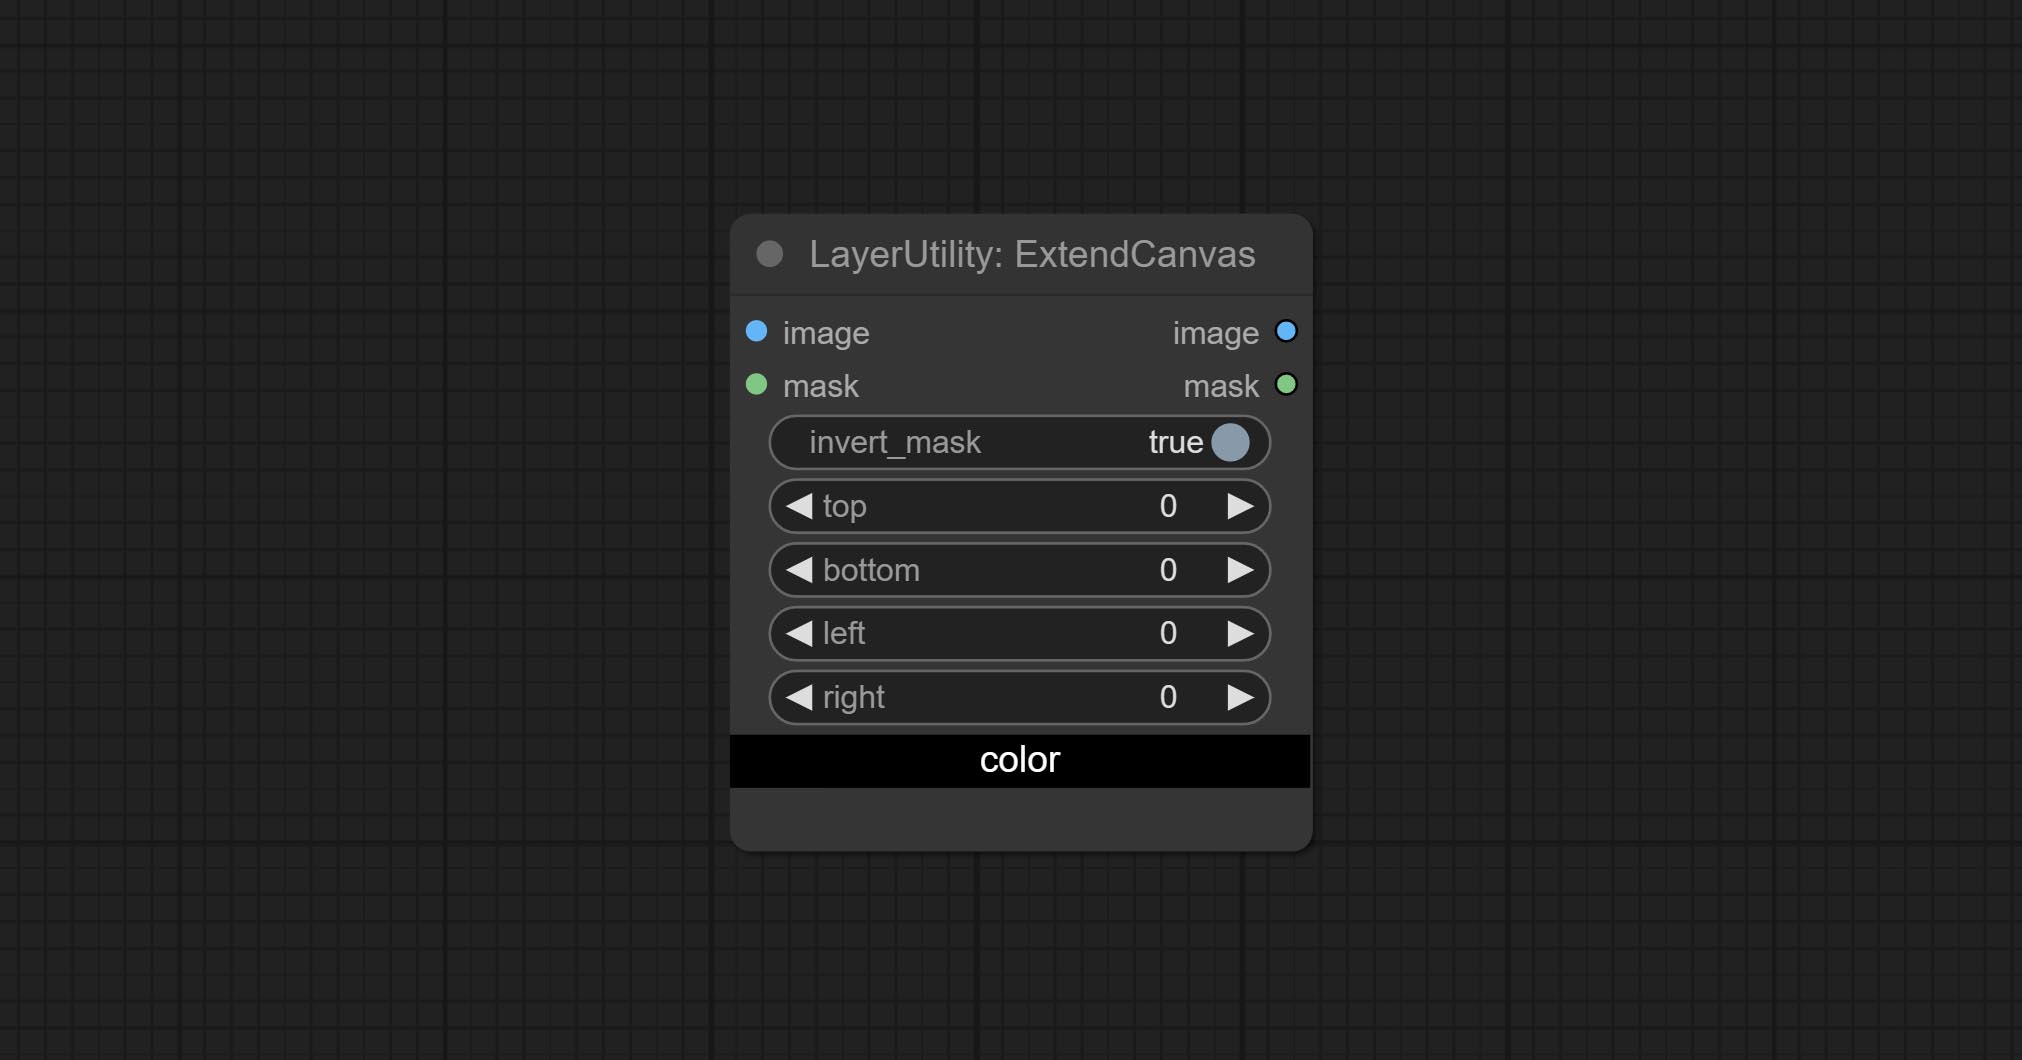
V2 upgrade to ExtendCanvas.
Based on ExtendCanvas, color is modified to be a string type, and it supports external ColorPicker input, Support negative value input, it means image will be cropped. 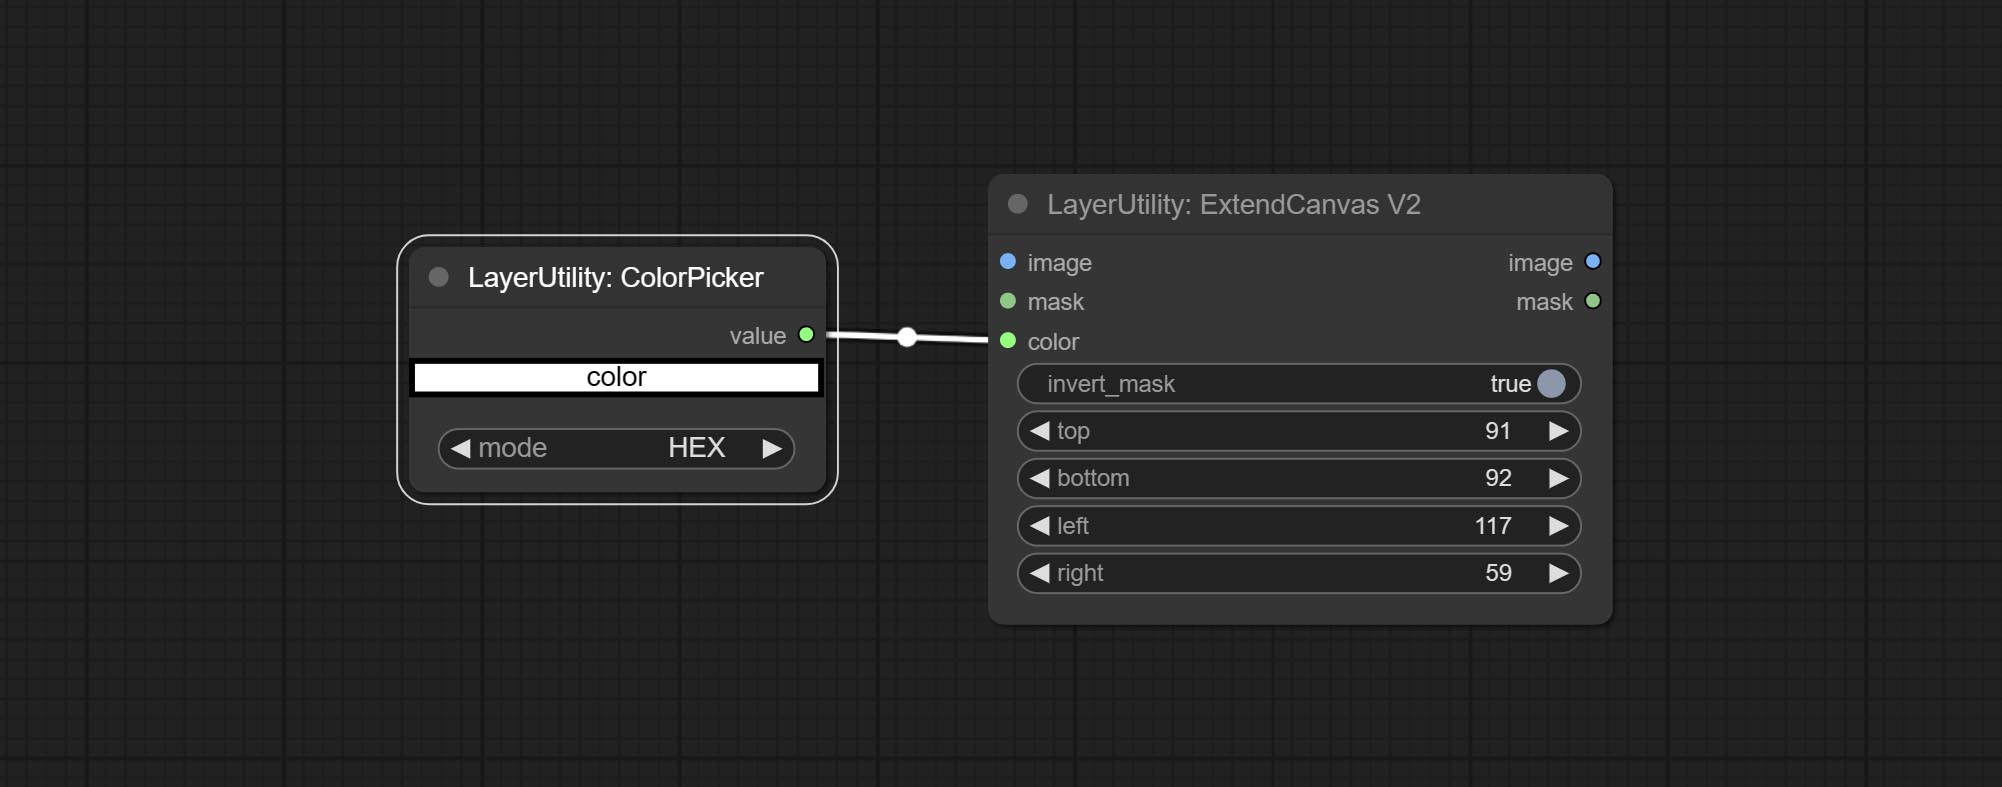
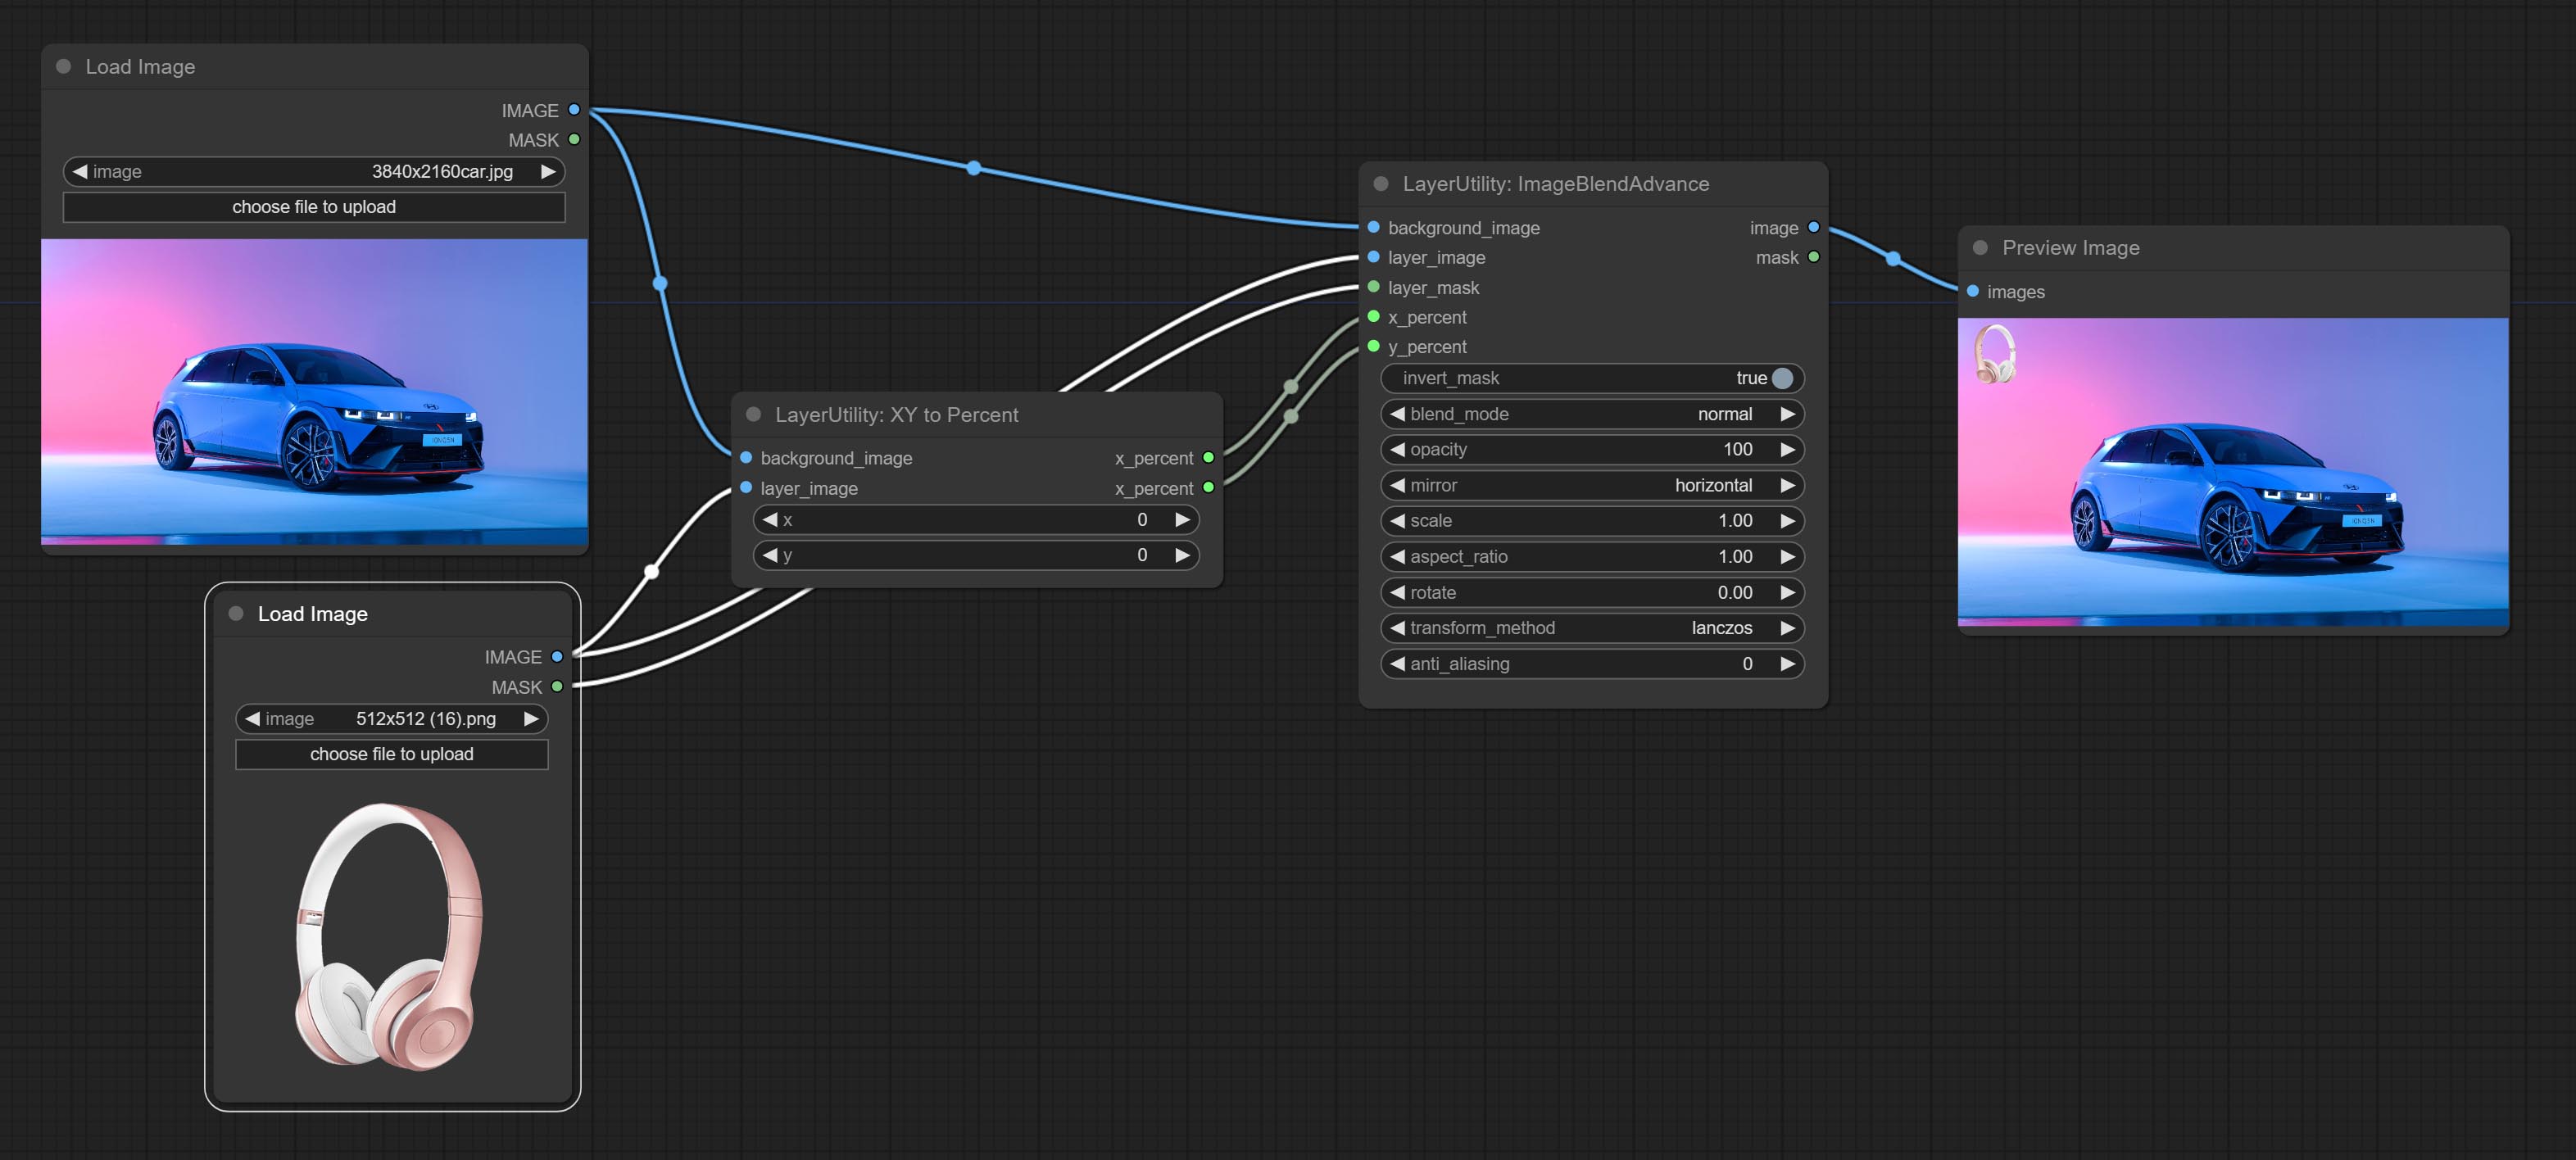
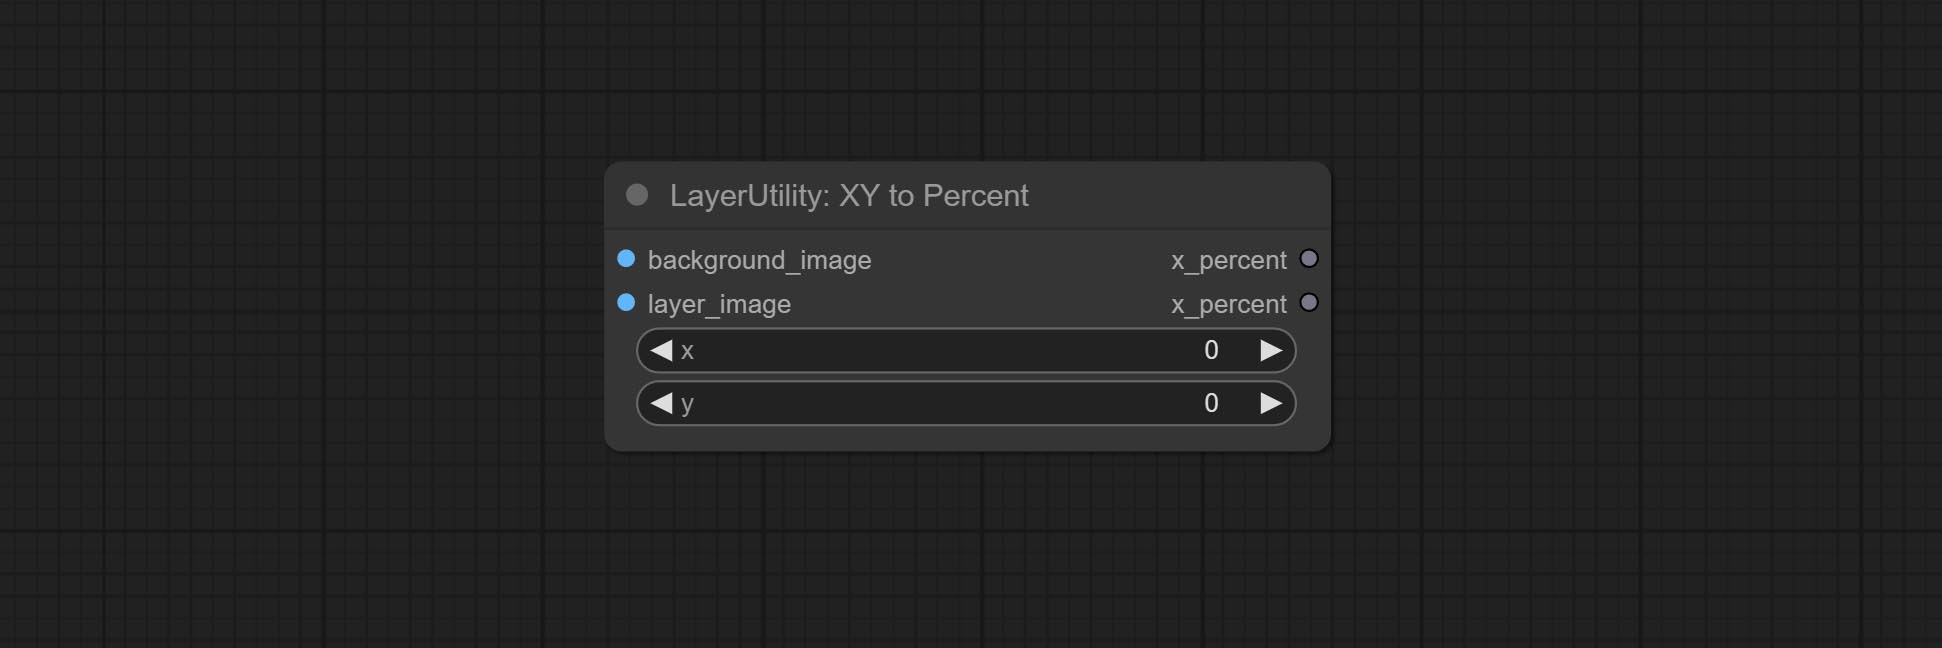
Convert absolute coordinates to percentage coordinates.
Node options:
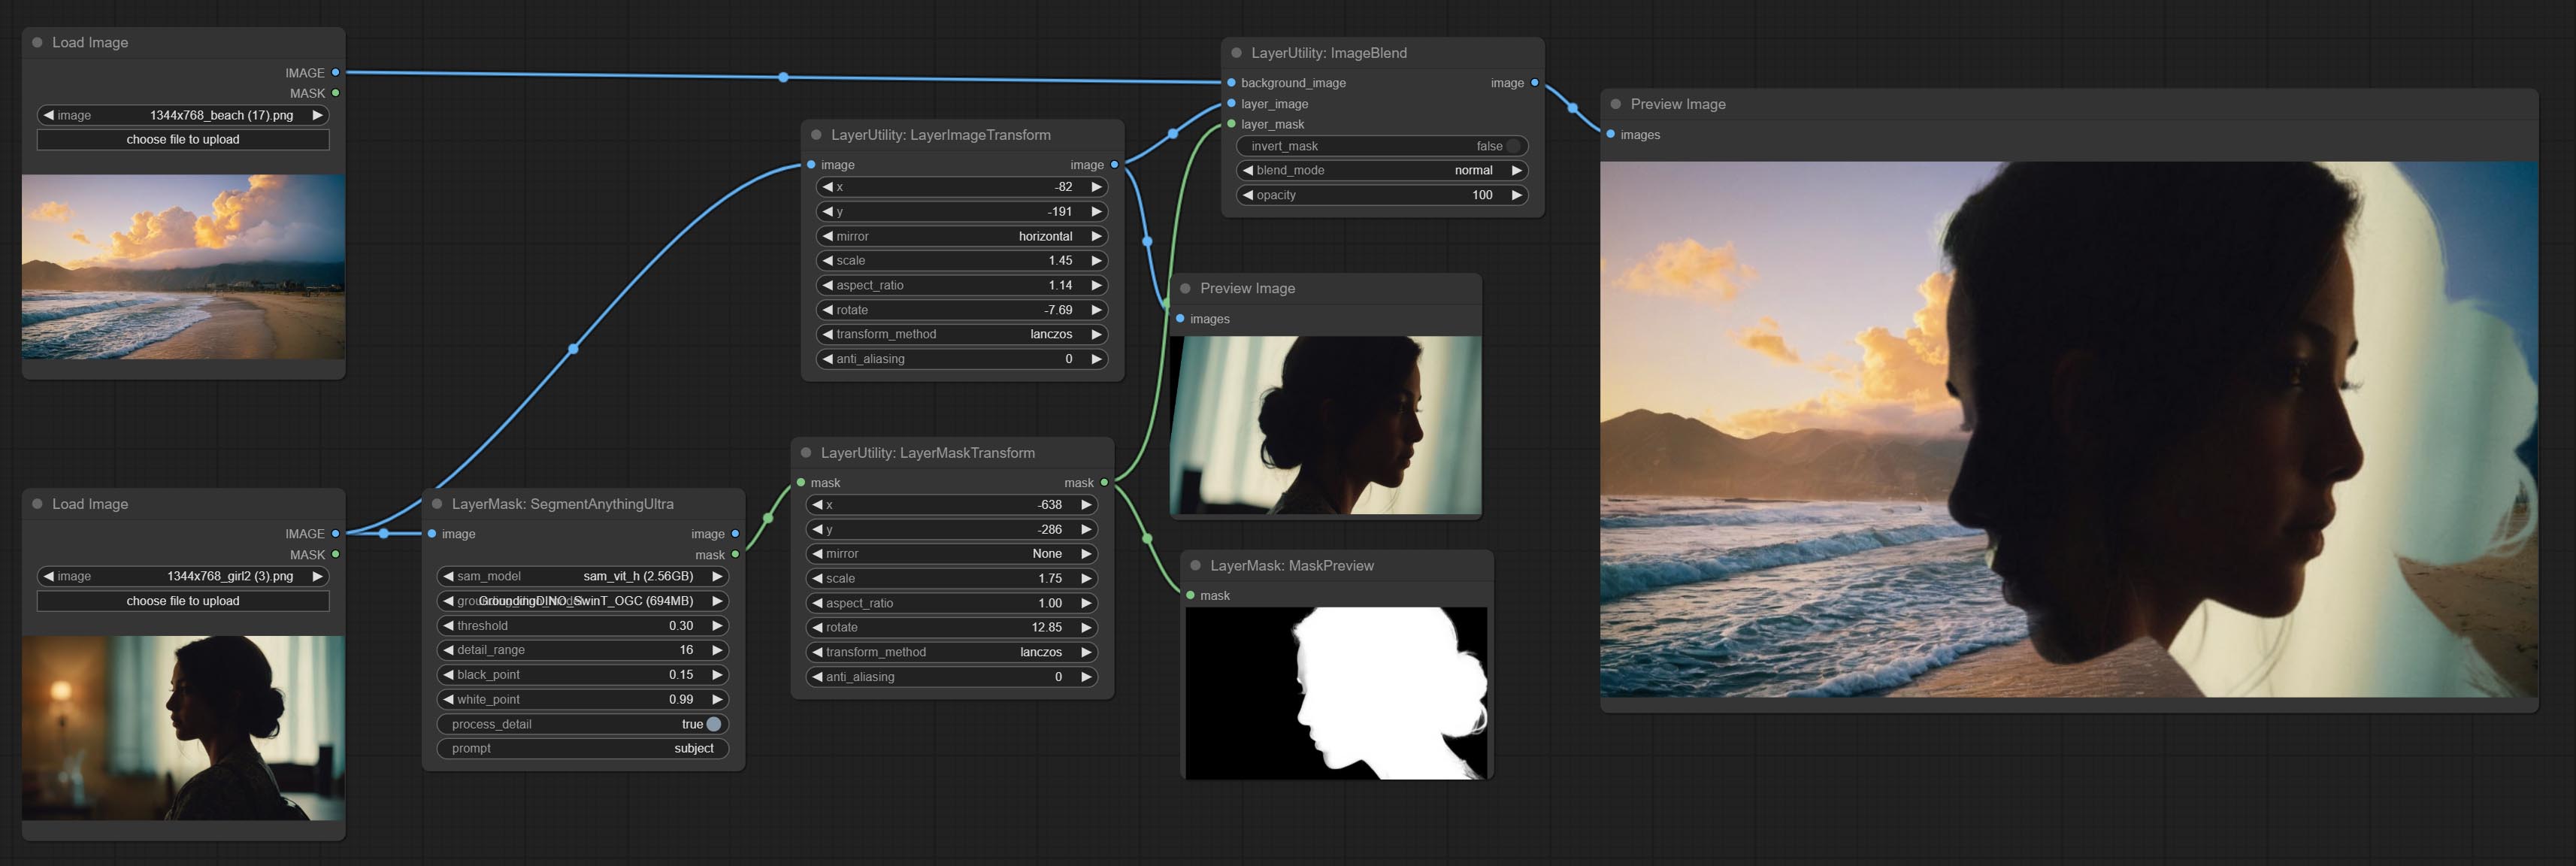
This node is used to transform layer_image separately, which can change size, rotation, aspect ratio, and mirror flip without changing the image size.
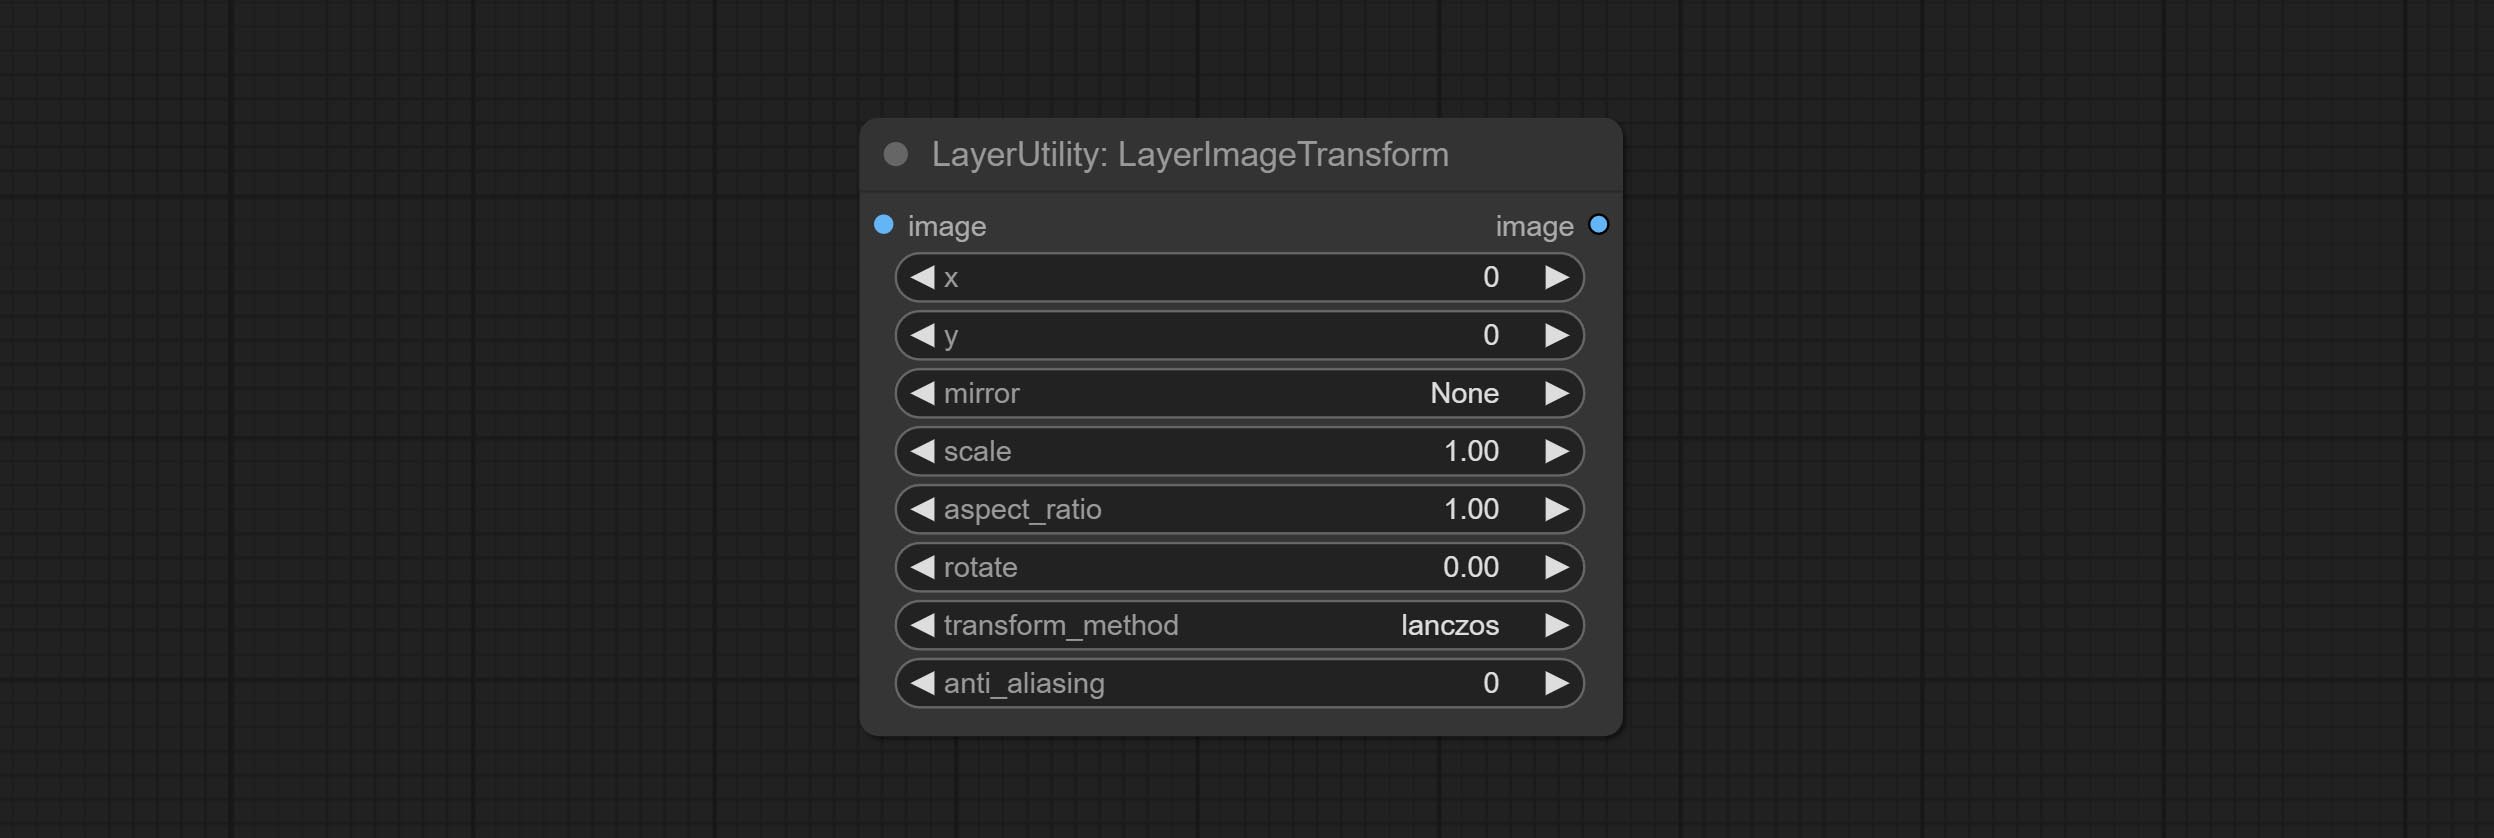
Node options:
Similar to LayerImageTransform node, this node is used to transform the layer_mask separately, which can scale, rotate, change aspect ratio, and mirror flip without changing the mask size.
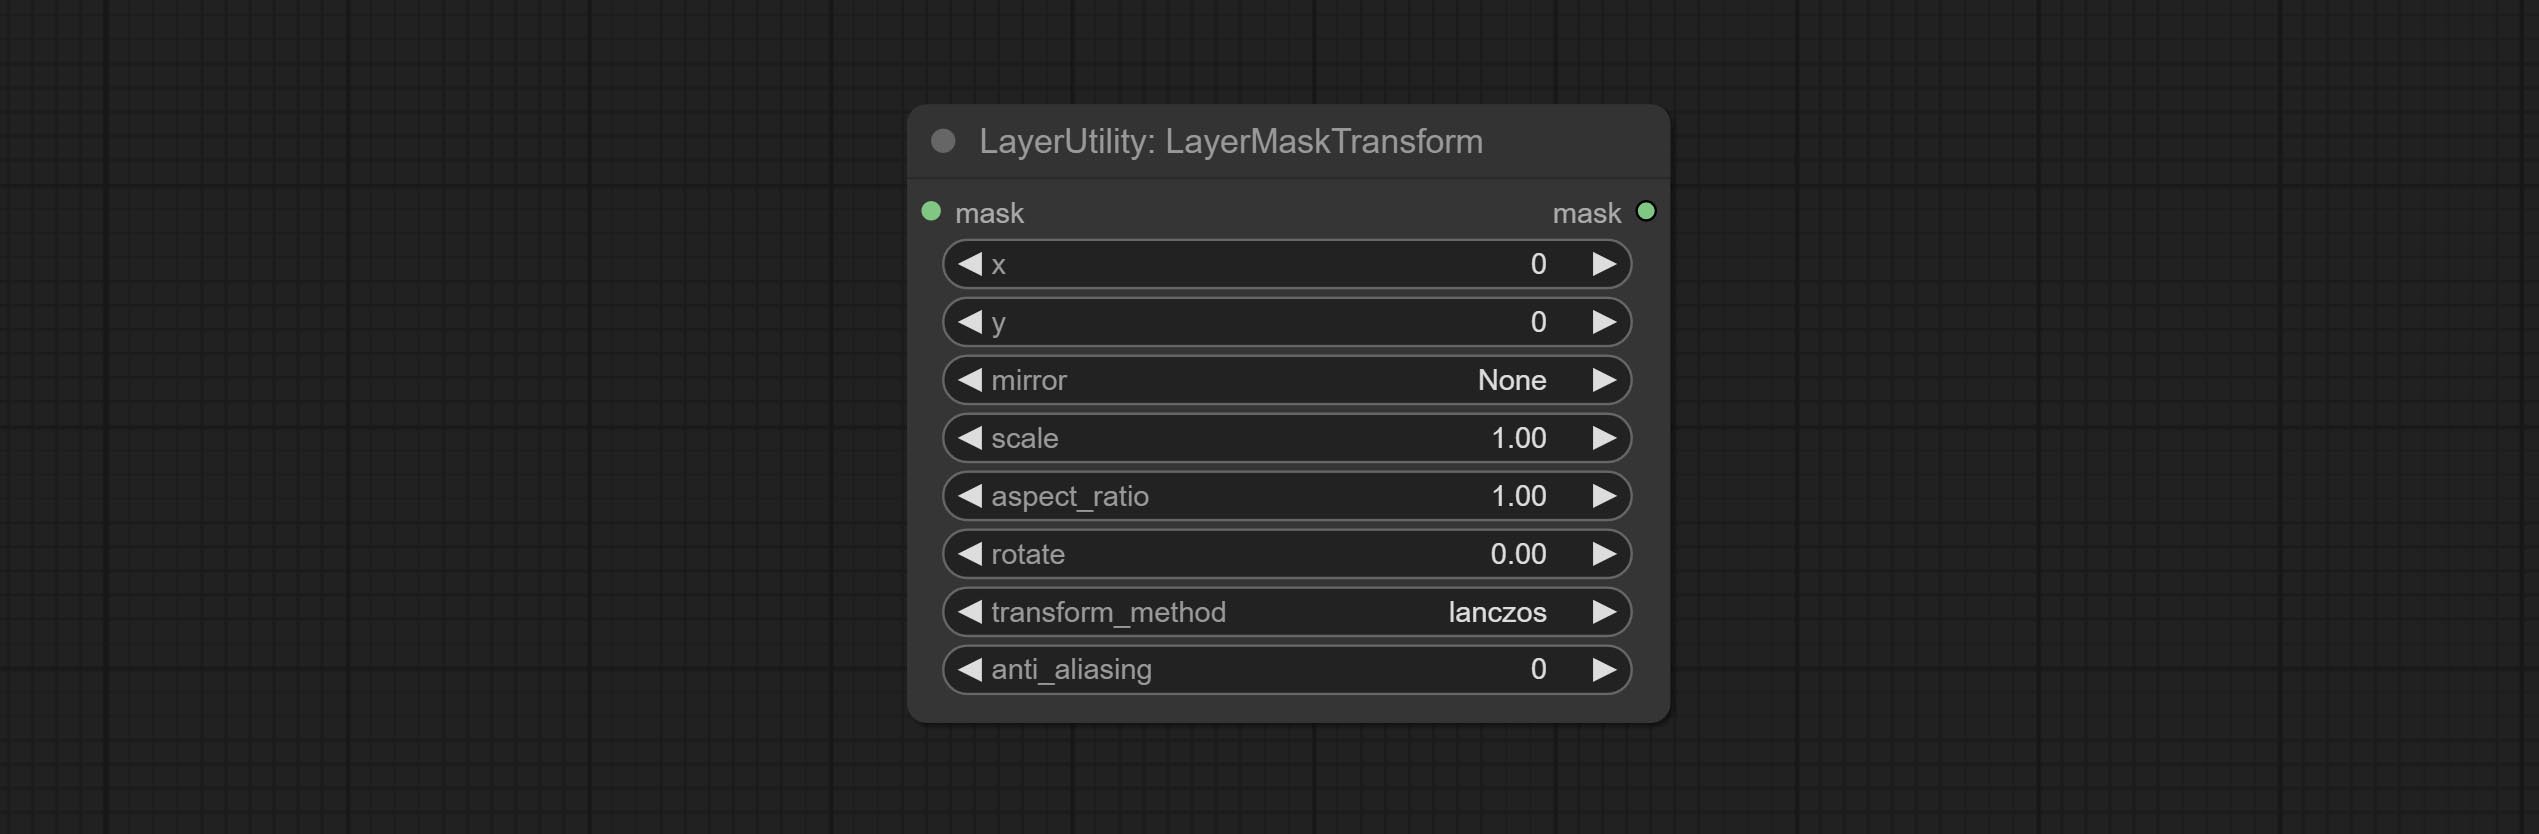
Node options:
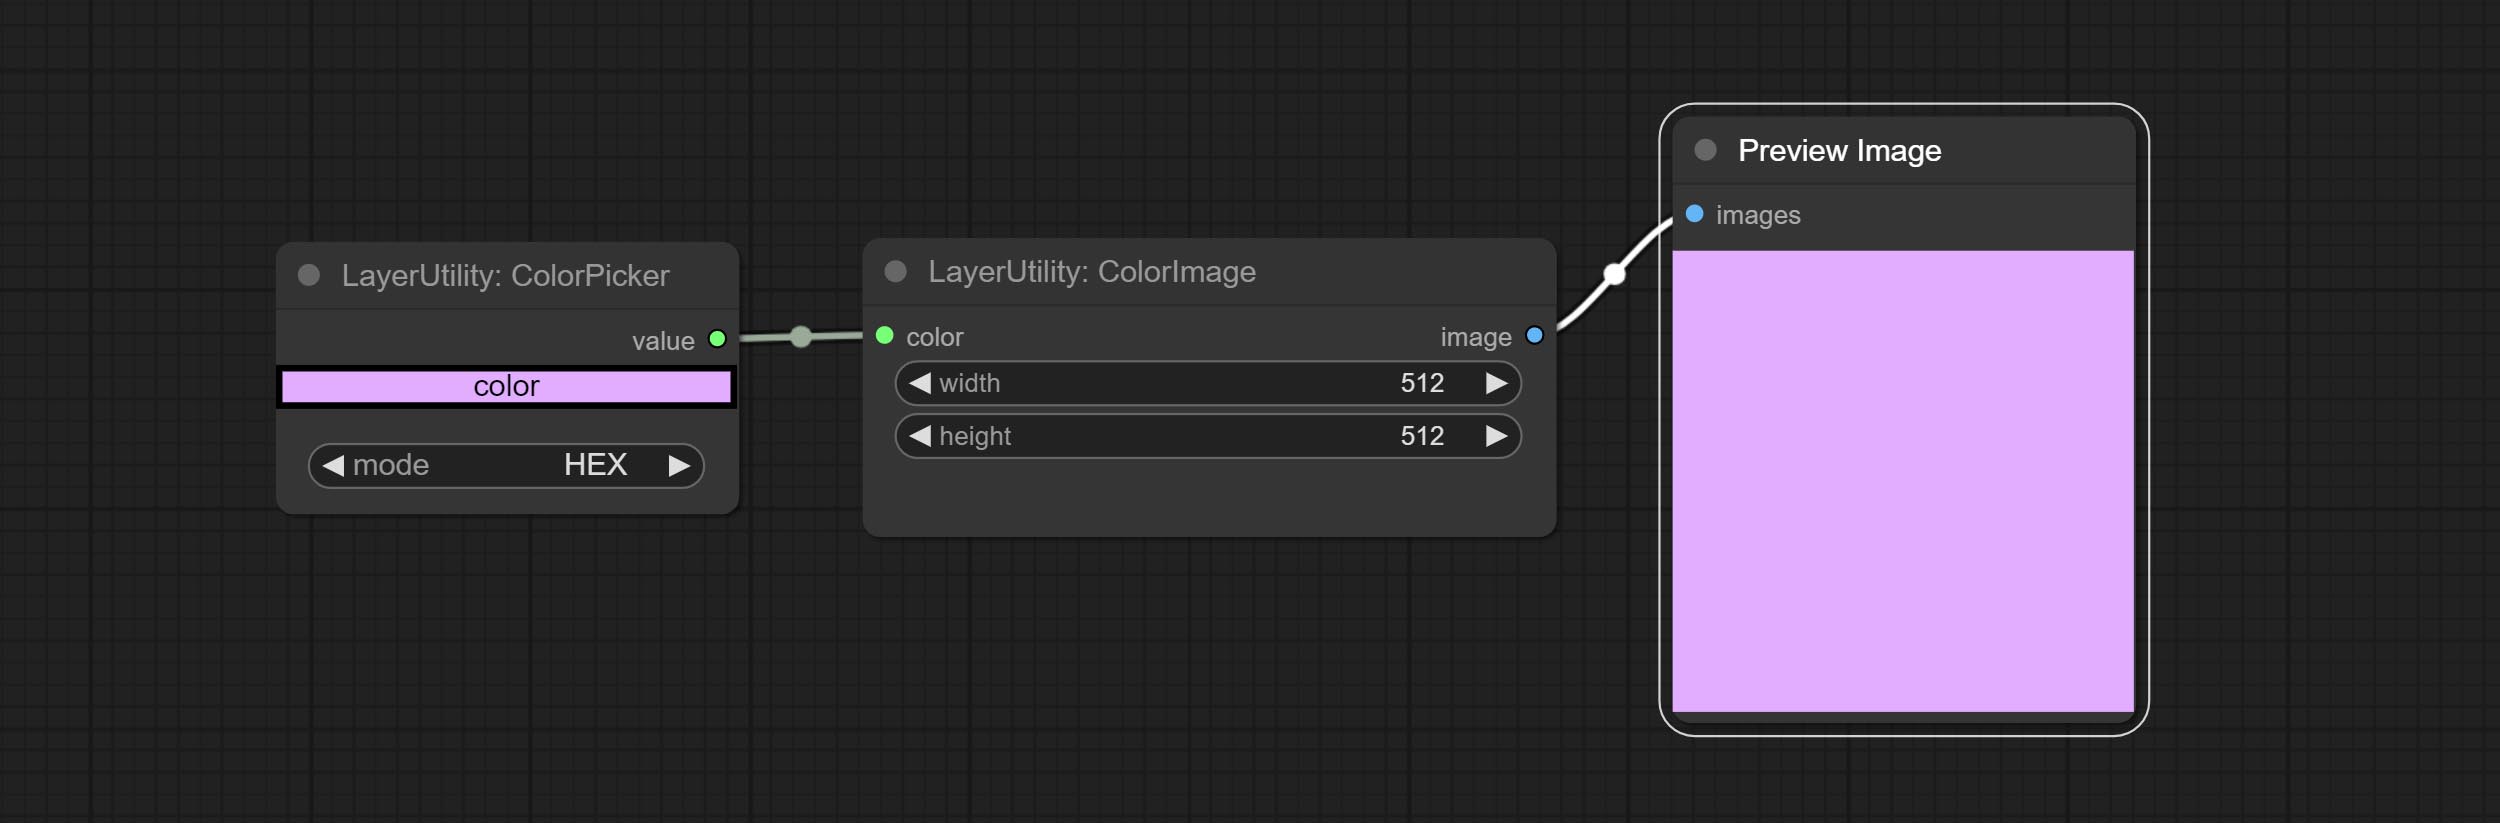
Generate an image of a specified color and size.

Node options:
The V2 upgraded version of ColorImage.
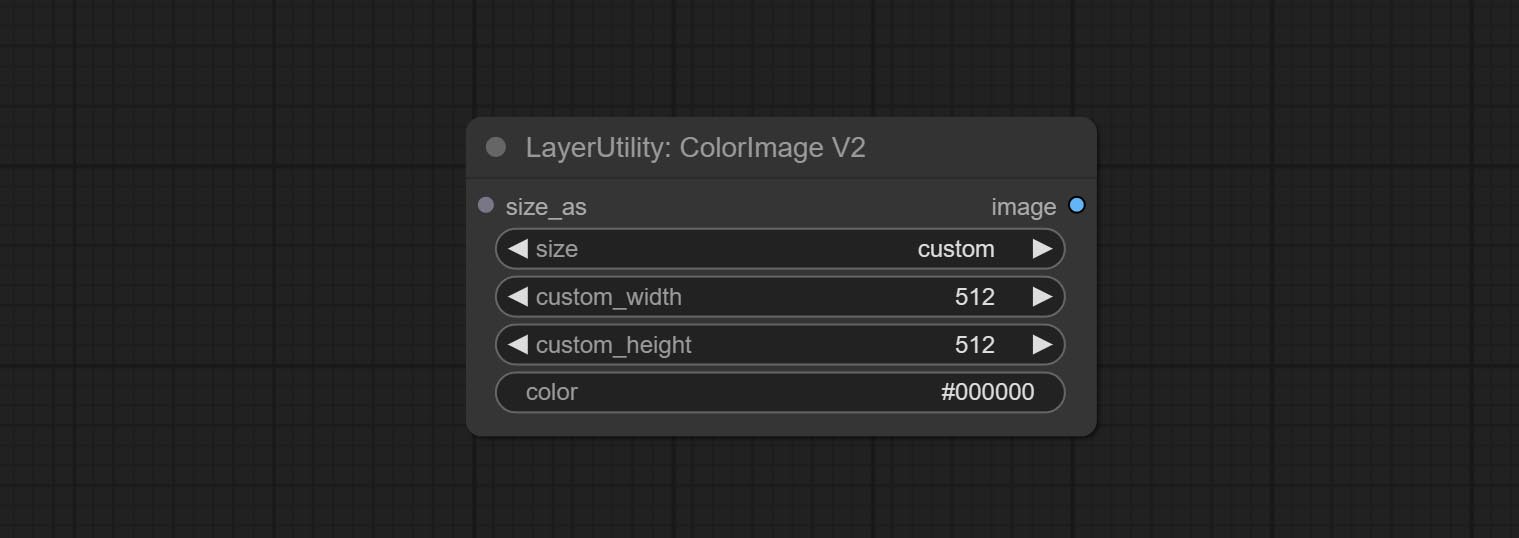
The following changes have been made based on ColorImage:
* Only limited to input images and masks. forcing the integration of other types of inputs will result in node errors. ** The preset size is defined in custom_size.ini , this file is located in the root directory of the plug-in, and the default name is custom_size.ini.example . to use this file for the first time, you need to change the file suffix to .ini . Open with text editing software. Each row represents a size, with the first value being width and the second being height, separated by a lowercase "x" in the middle. To avoid errors, please do not enter extra characters.
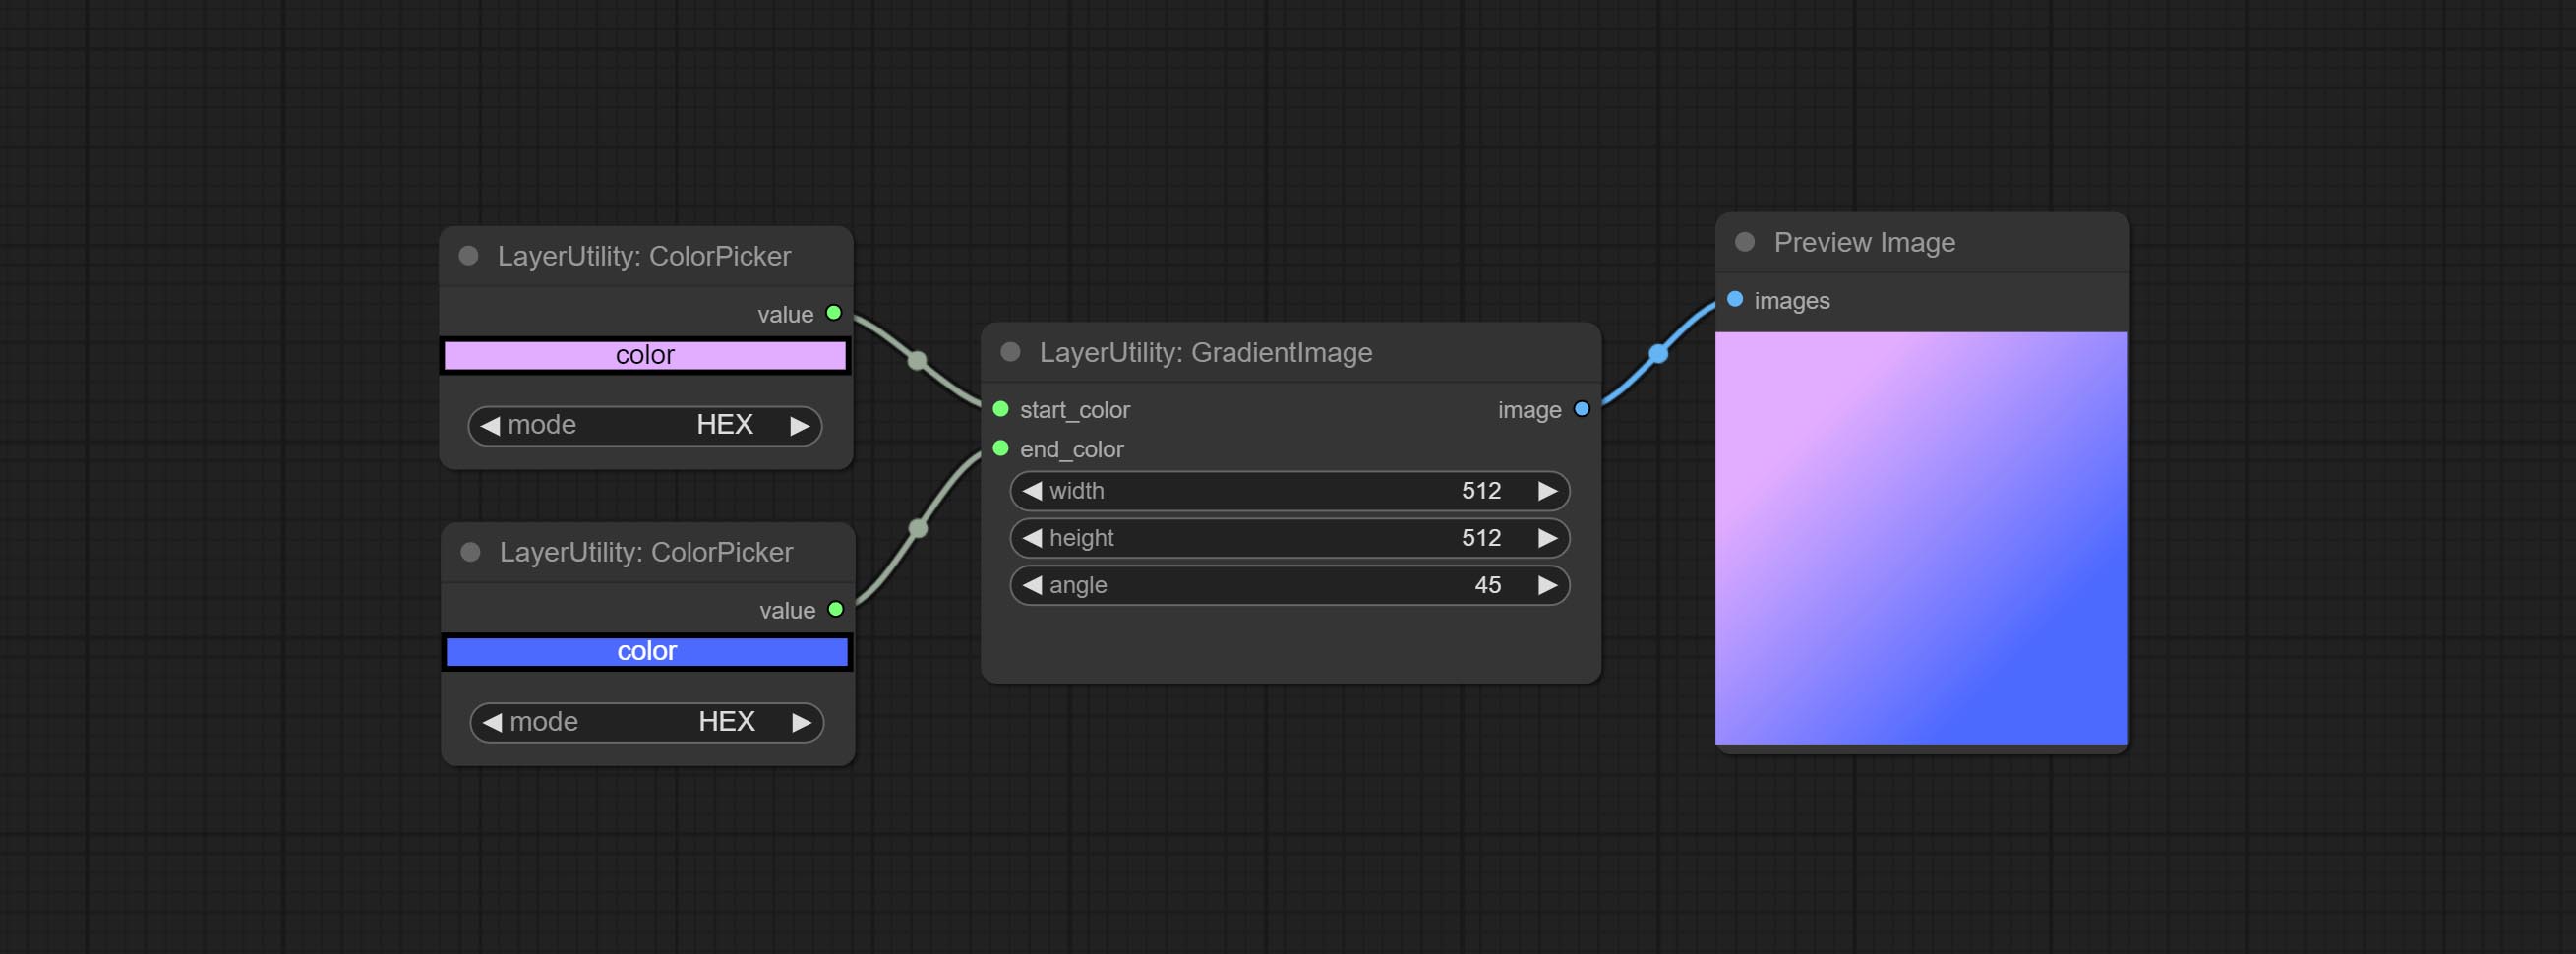
Generate an image with a specified size and color gradient.
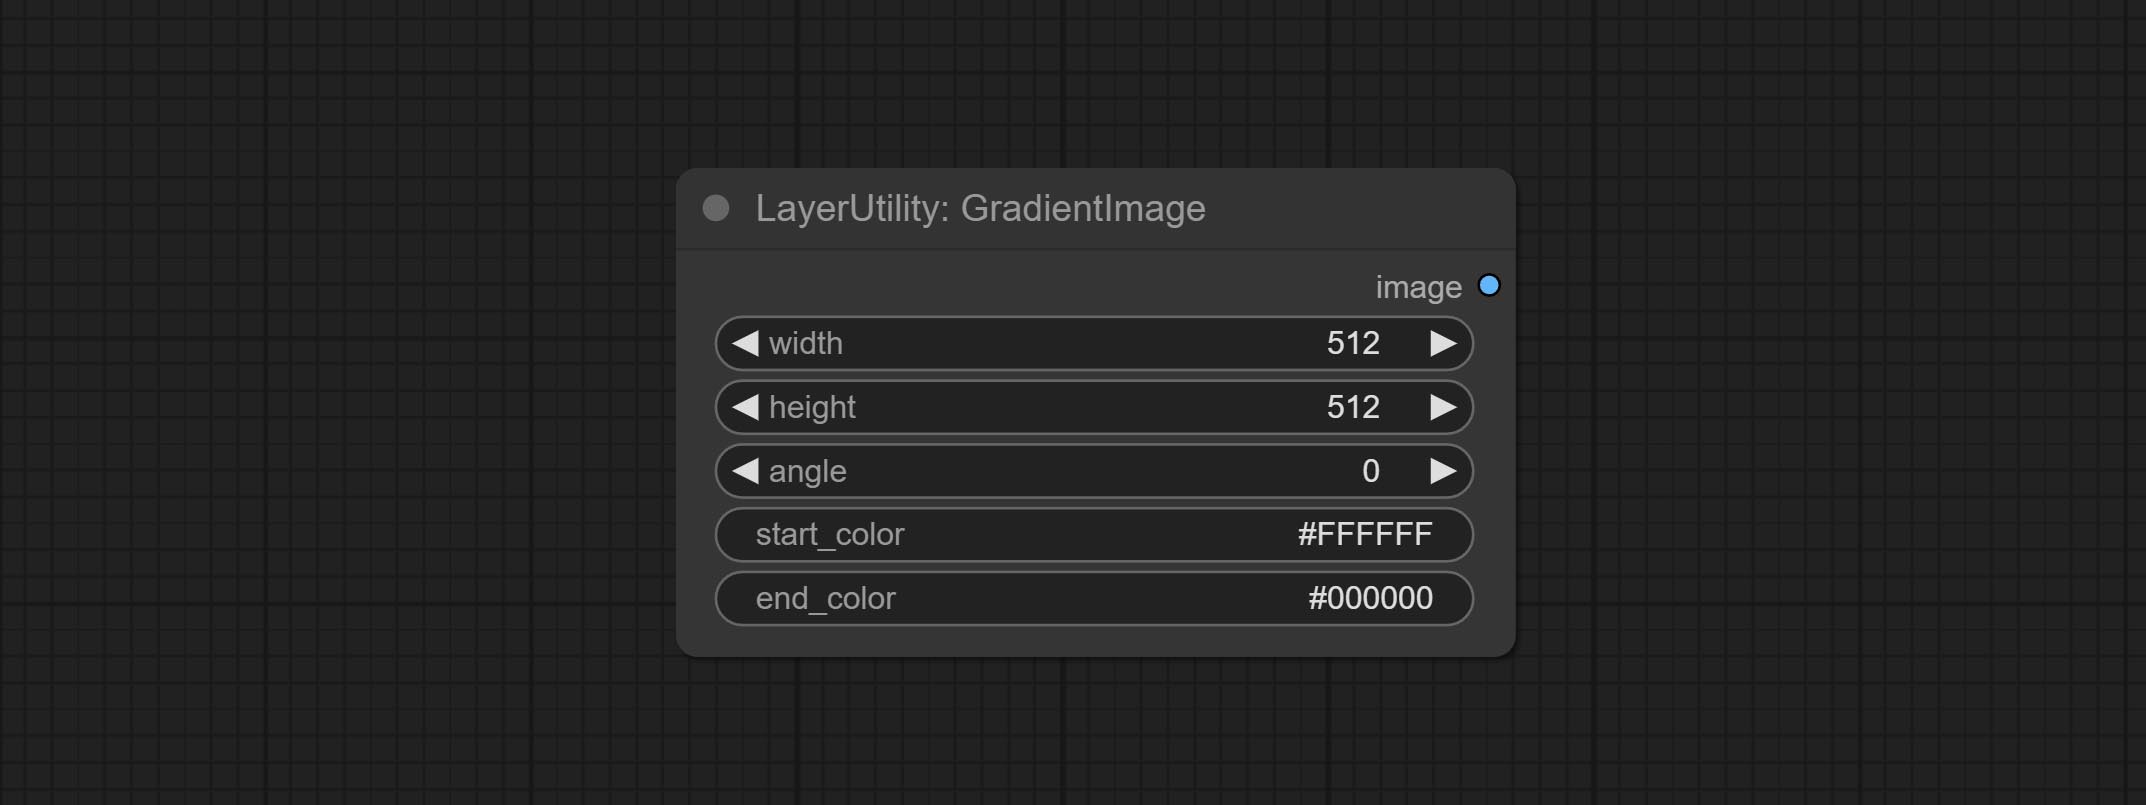
Node options:
The V2 upgraded version of GradientImage.
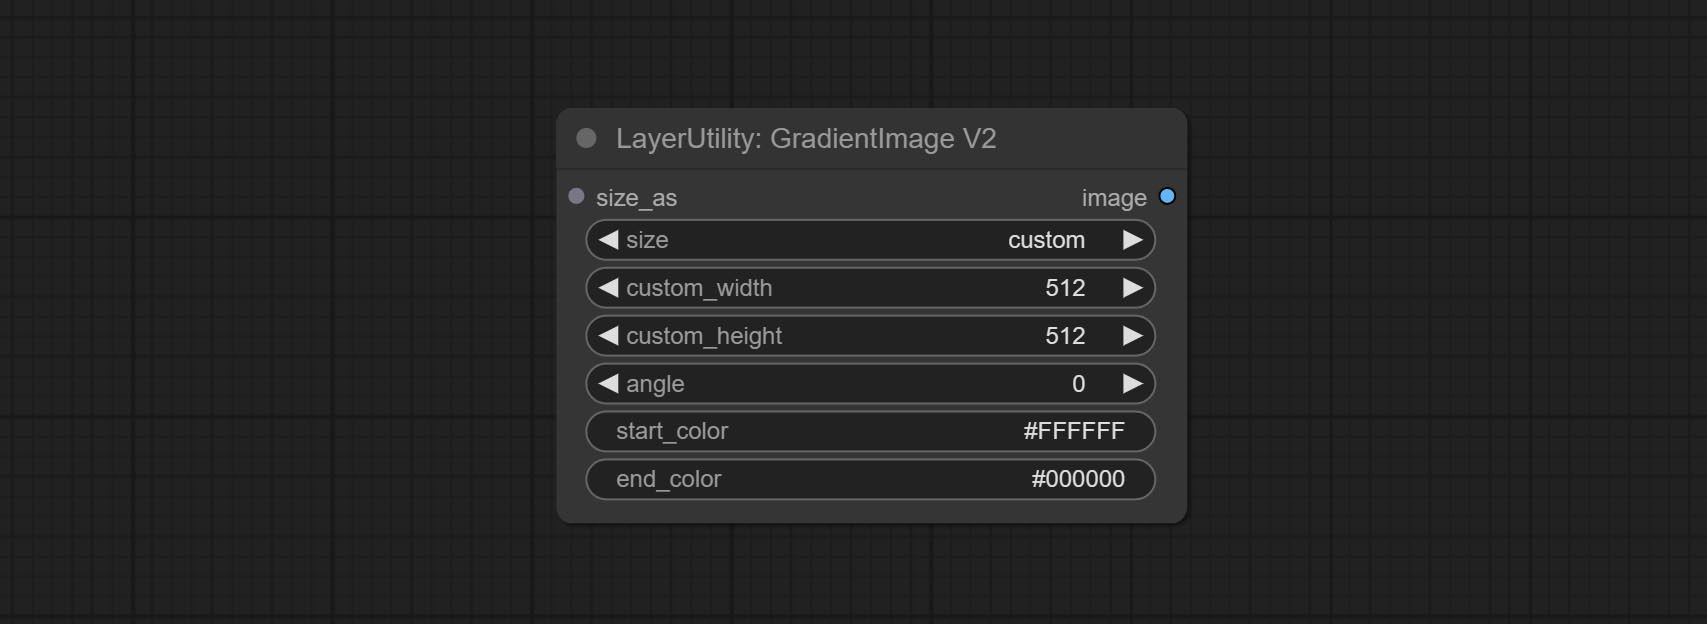
The following changes have been made based on GradientImage:
* Only limited to input images and masks. forcing the integration of other types of inputs will result in node errors. ** The preset size is defined in custom_size.ini , this file is located in the root directory of the plug-in, and the default name is custom_size.ini.example . to use this file for the first time, you need to change the file suffix to .ini . Open with text editing software. Each row represents a size, with the first value being width and the second being height, separated by a lowercase "x" in the middle. To avoid errors, please do not enter extra characters.
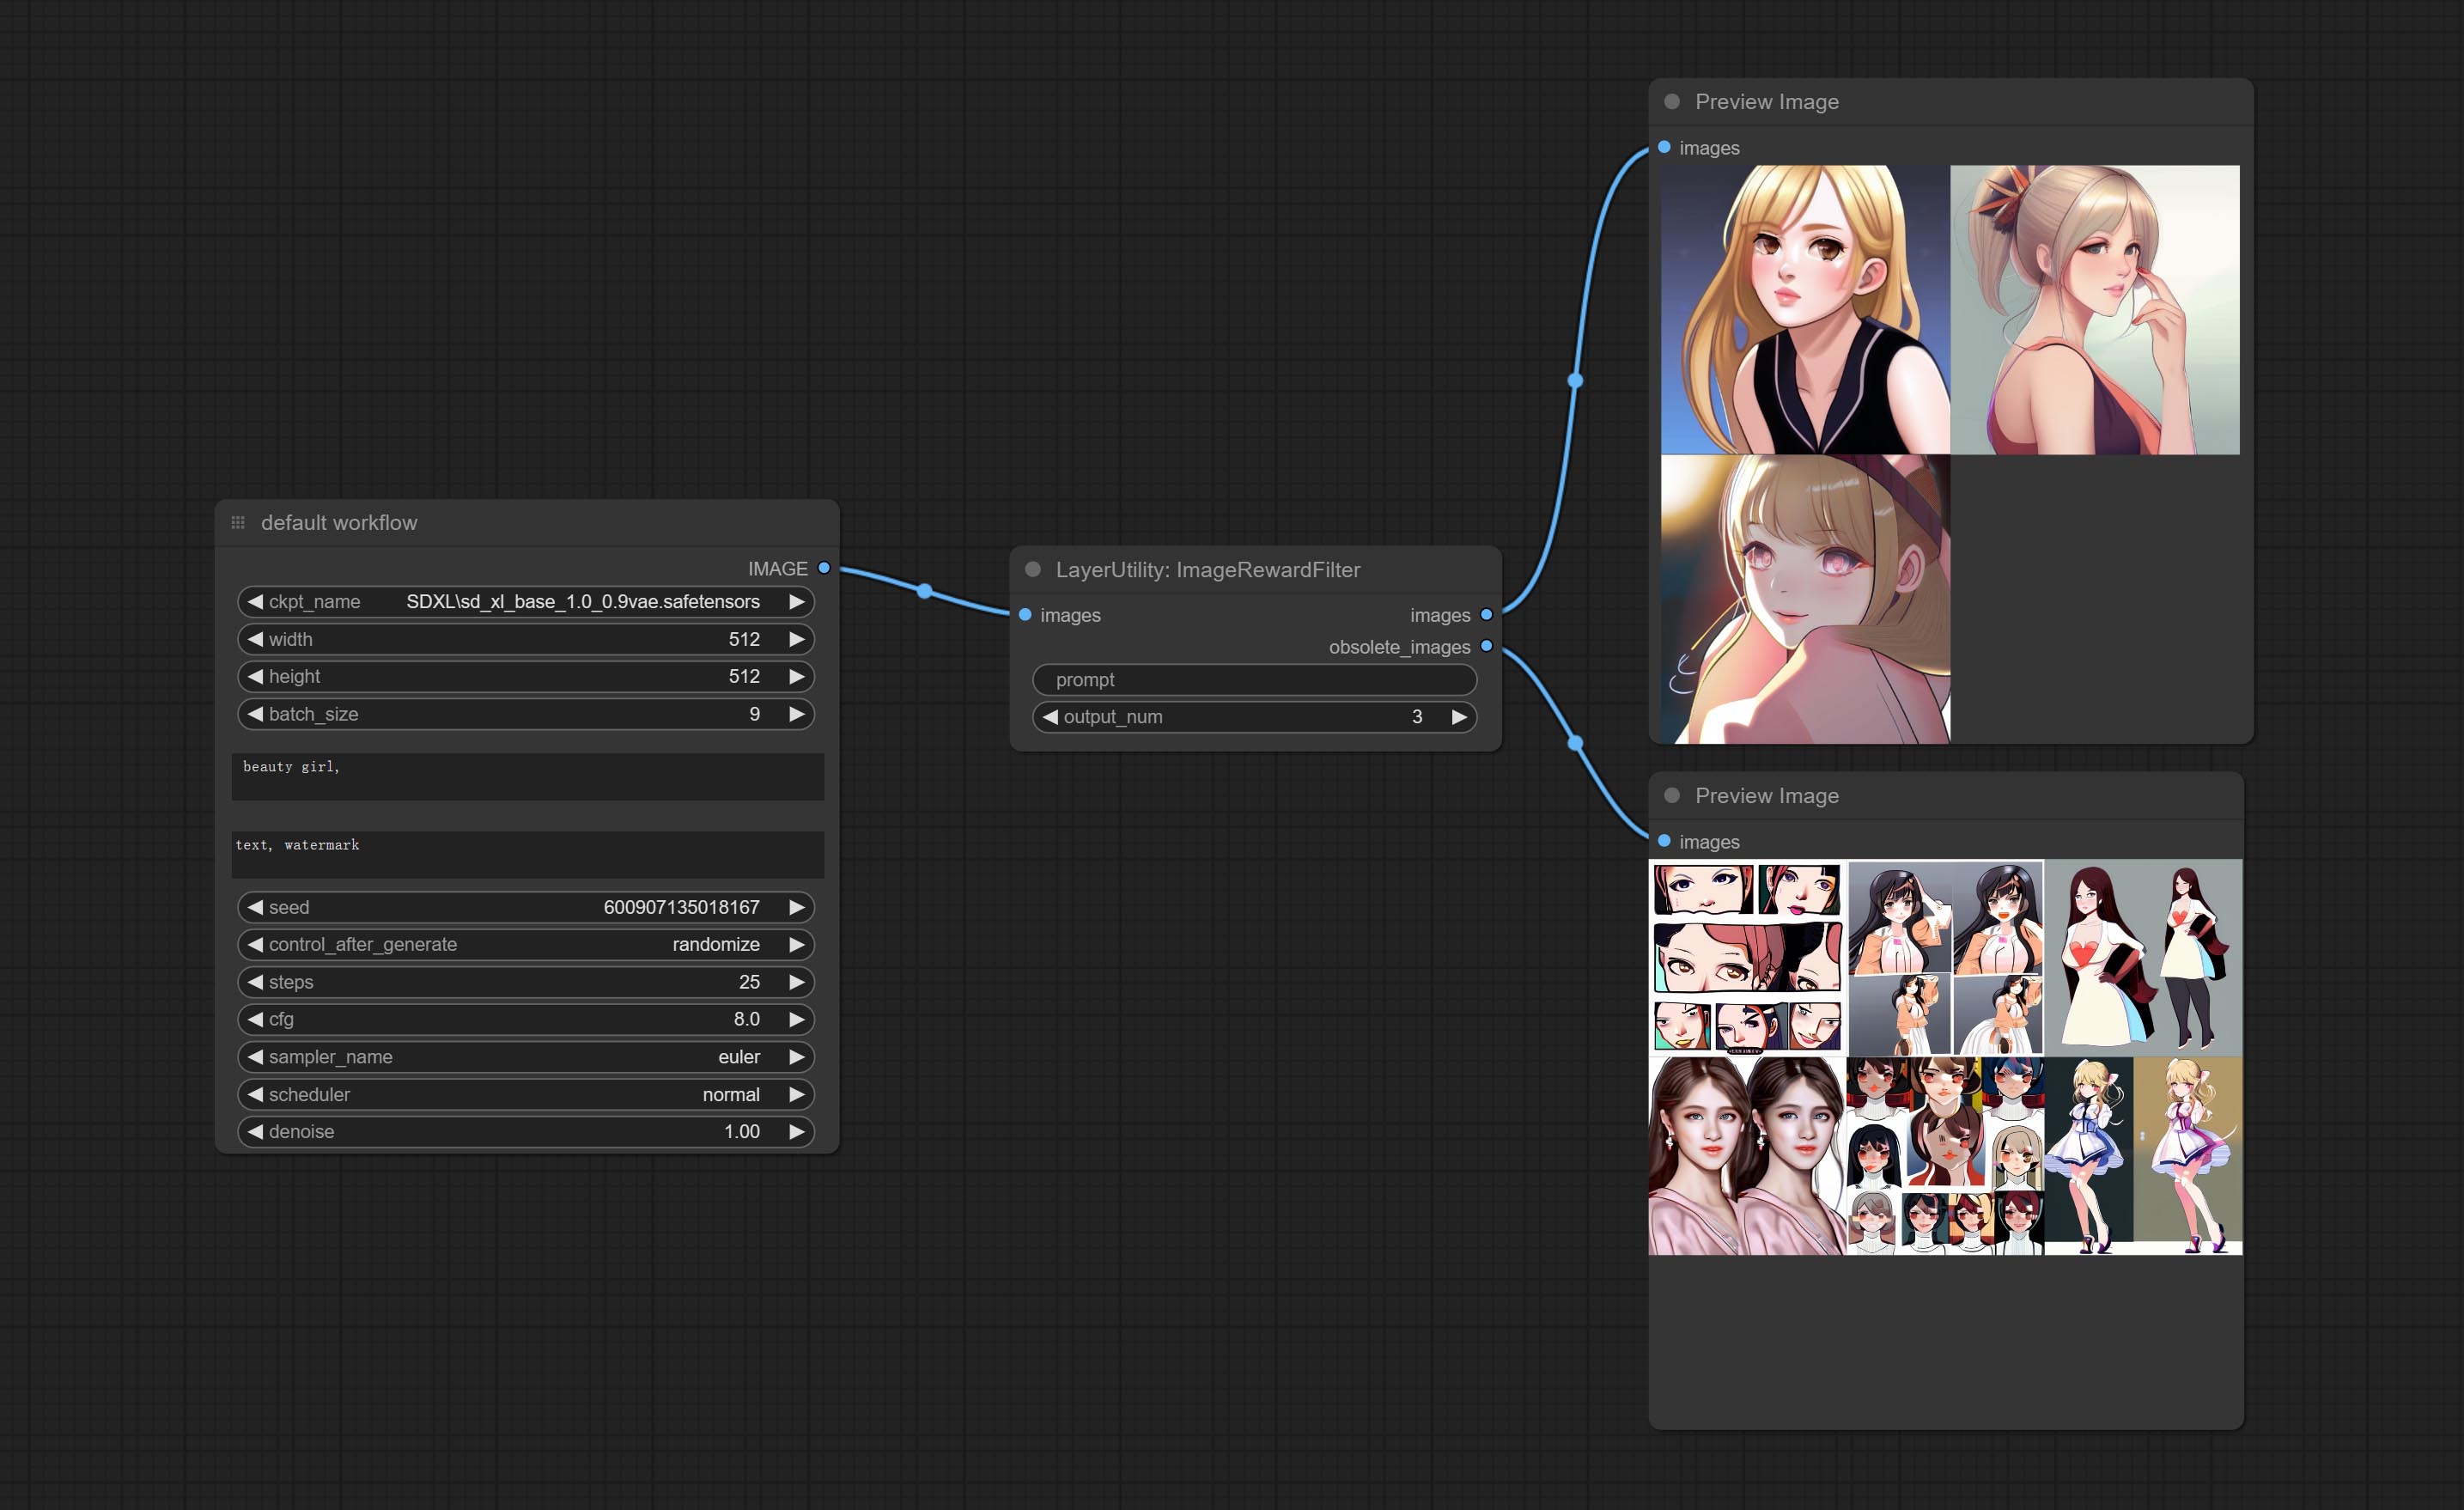
Rating bulk pictures and outputting top-ranked pictures. it used [ImageReward] (https://github.com/THUDM/ImageReward) for image scoring, thanks to the original authors.
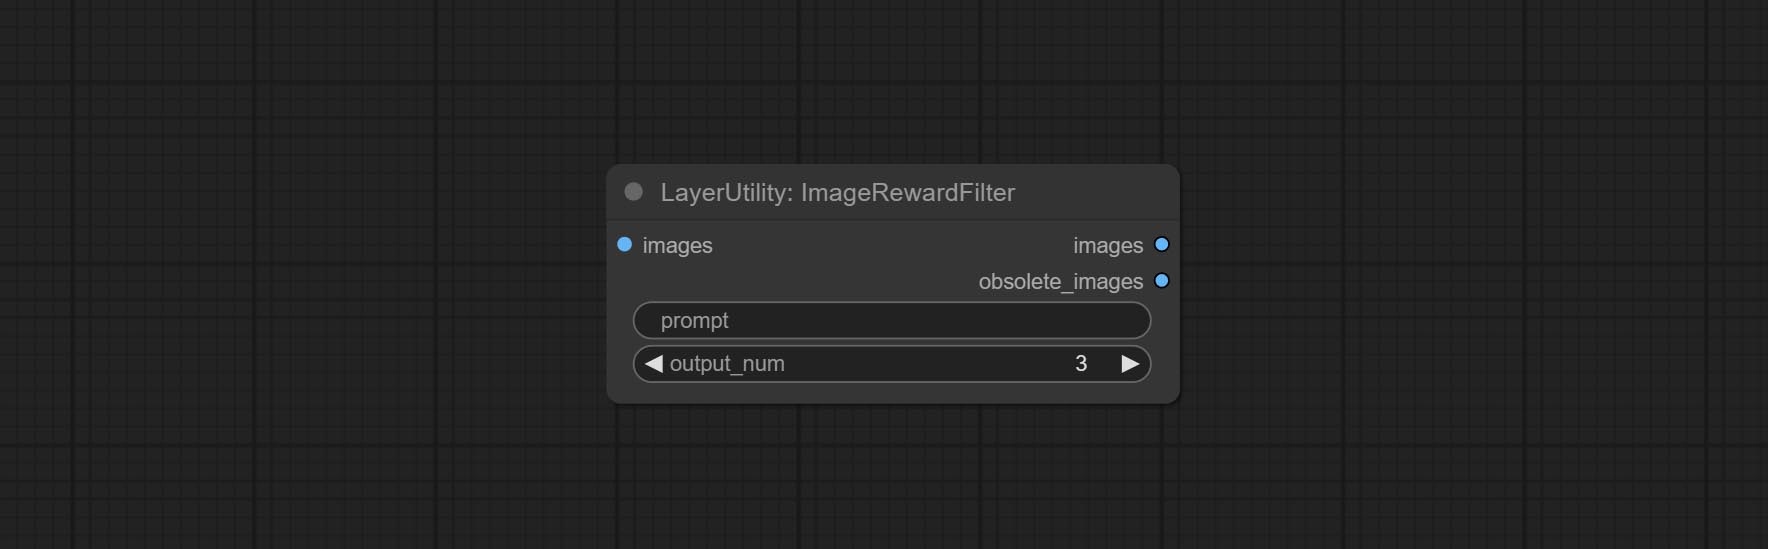
Node options:
Outputs:
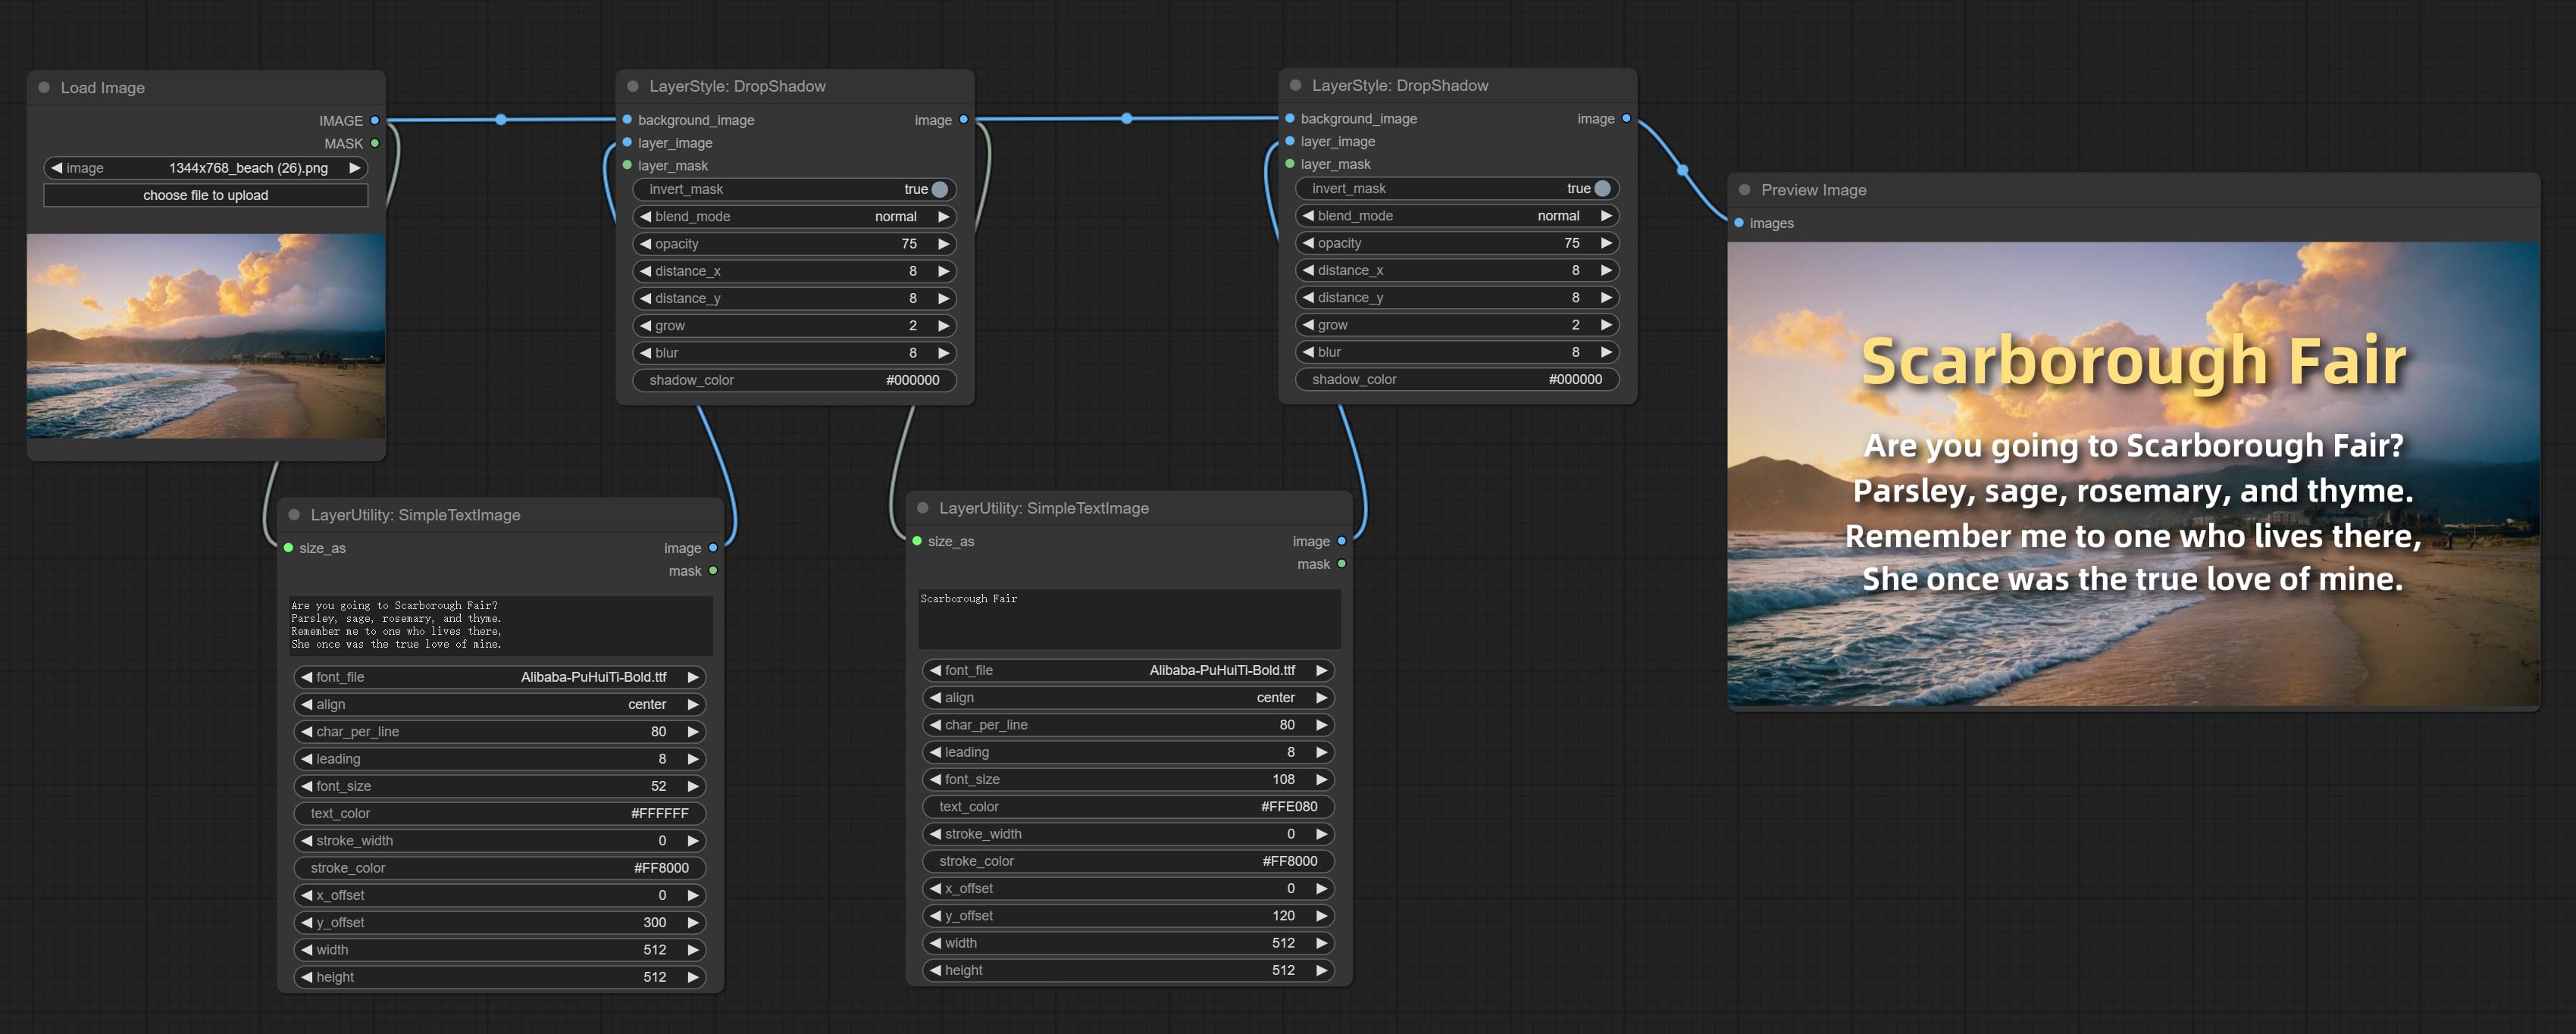
Generate simple typesetting images and masks from text. This node references some of the functionalities and code of ZHO-ZHO-ZHO/ComfyUI-Text_Image-Composite, thanks to the original author.
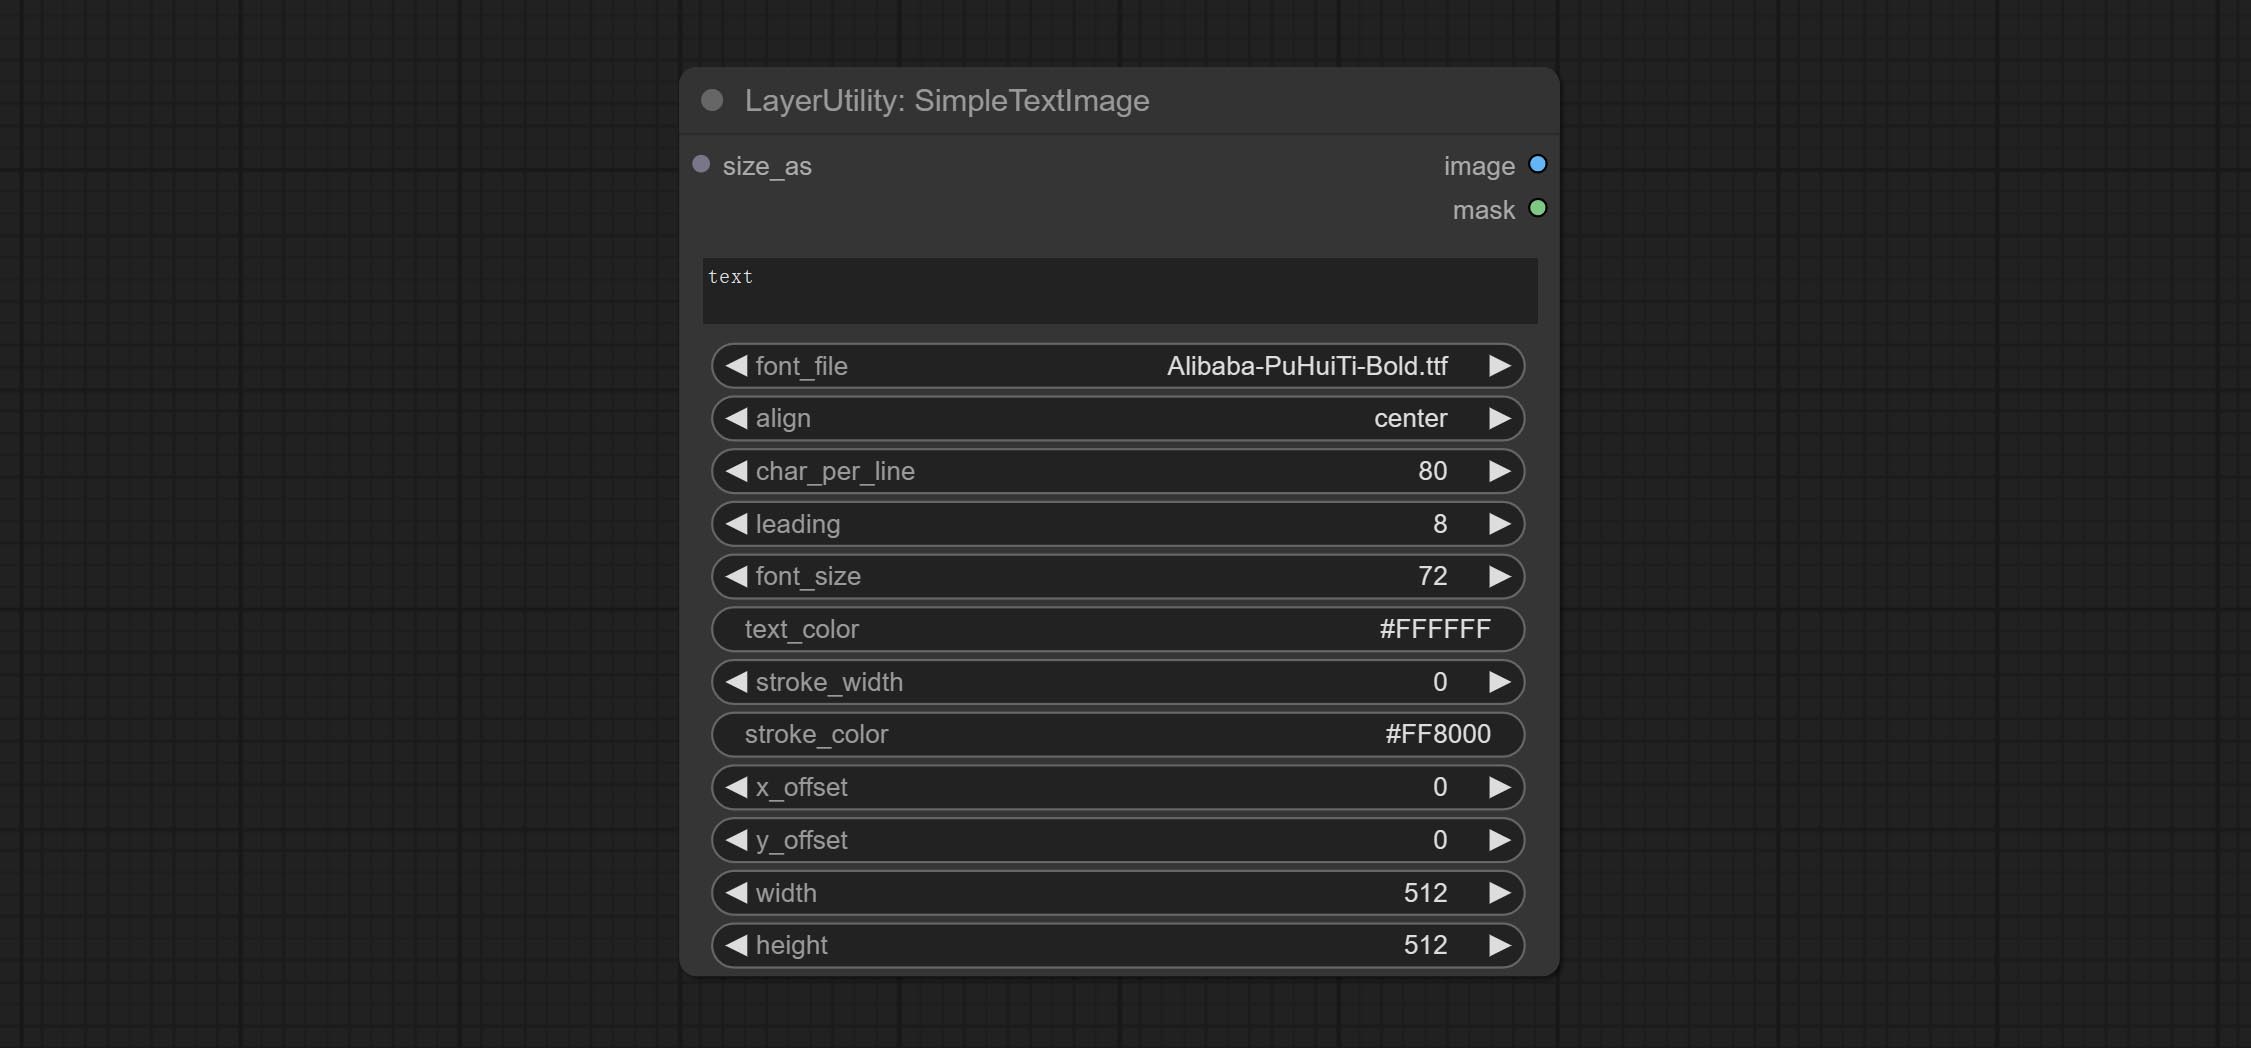
Node options:
* Only limited to input image and mask. forcing the integration of other types of inputs will result in node errors.
** The font folder is defined in resource_dir.ini , this file is located in the root directory of the plug-in, and the default name is resource_dir.ini.example . to use this file for the first time, you need to change the file suffix to .ini . Open the text editing software and find the line starting with "FONT_dir=", after "=", enter the custom folder path name. support defining multiple folders in resource-dir.ini , separated by commas, semicolons, or spaces. all font files in this folder will be collected and displayed in the node list during ComfyUI initialization. If the folder set in ini is invalid, the font folder that comes with the plugin will be enabled.
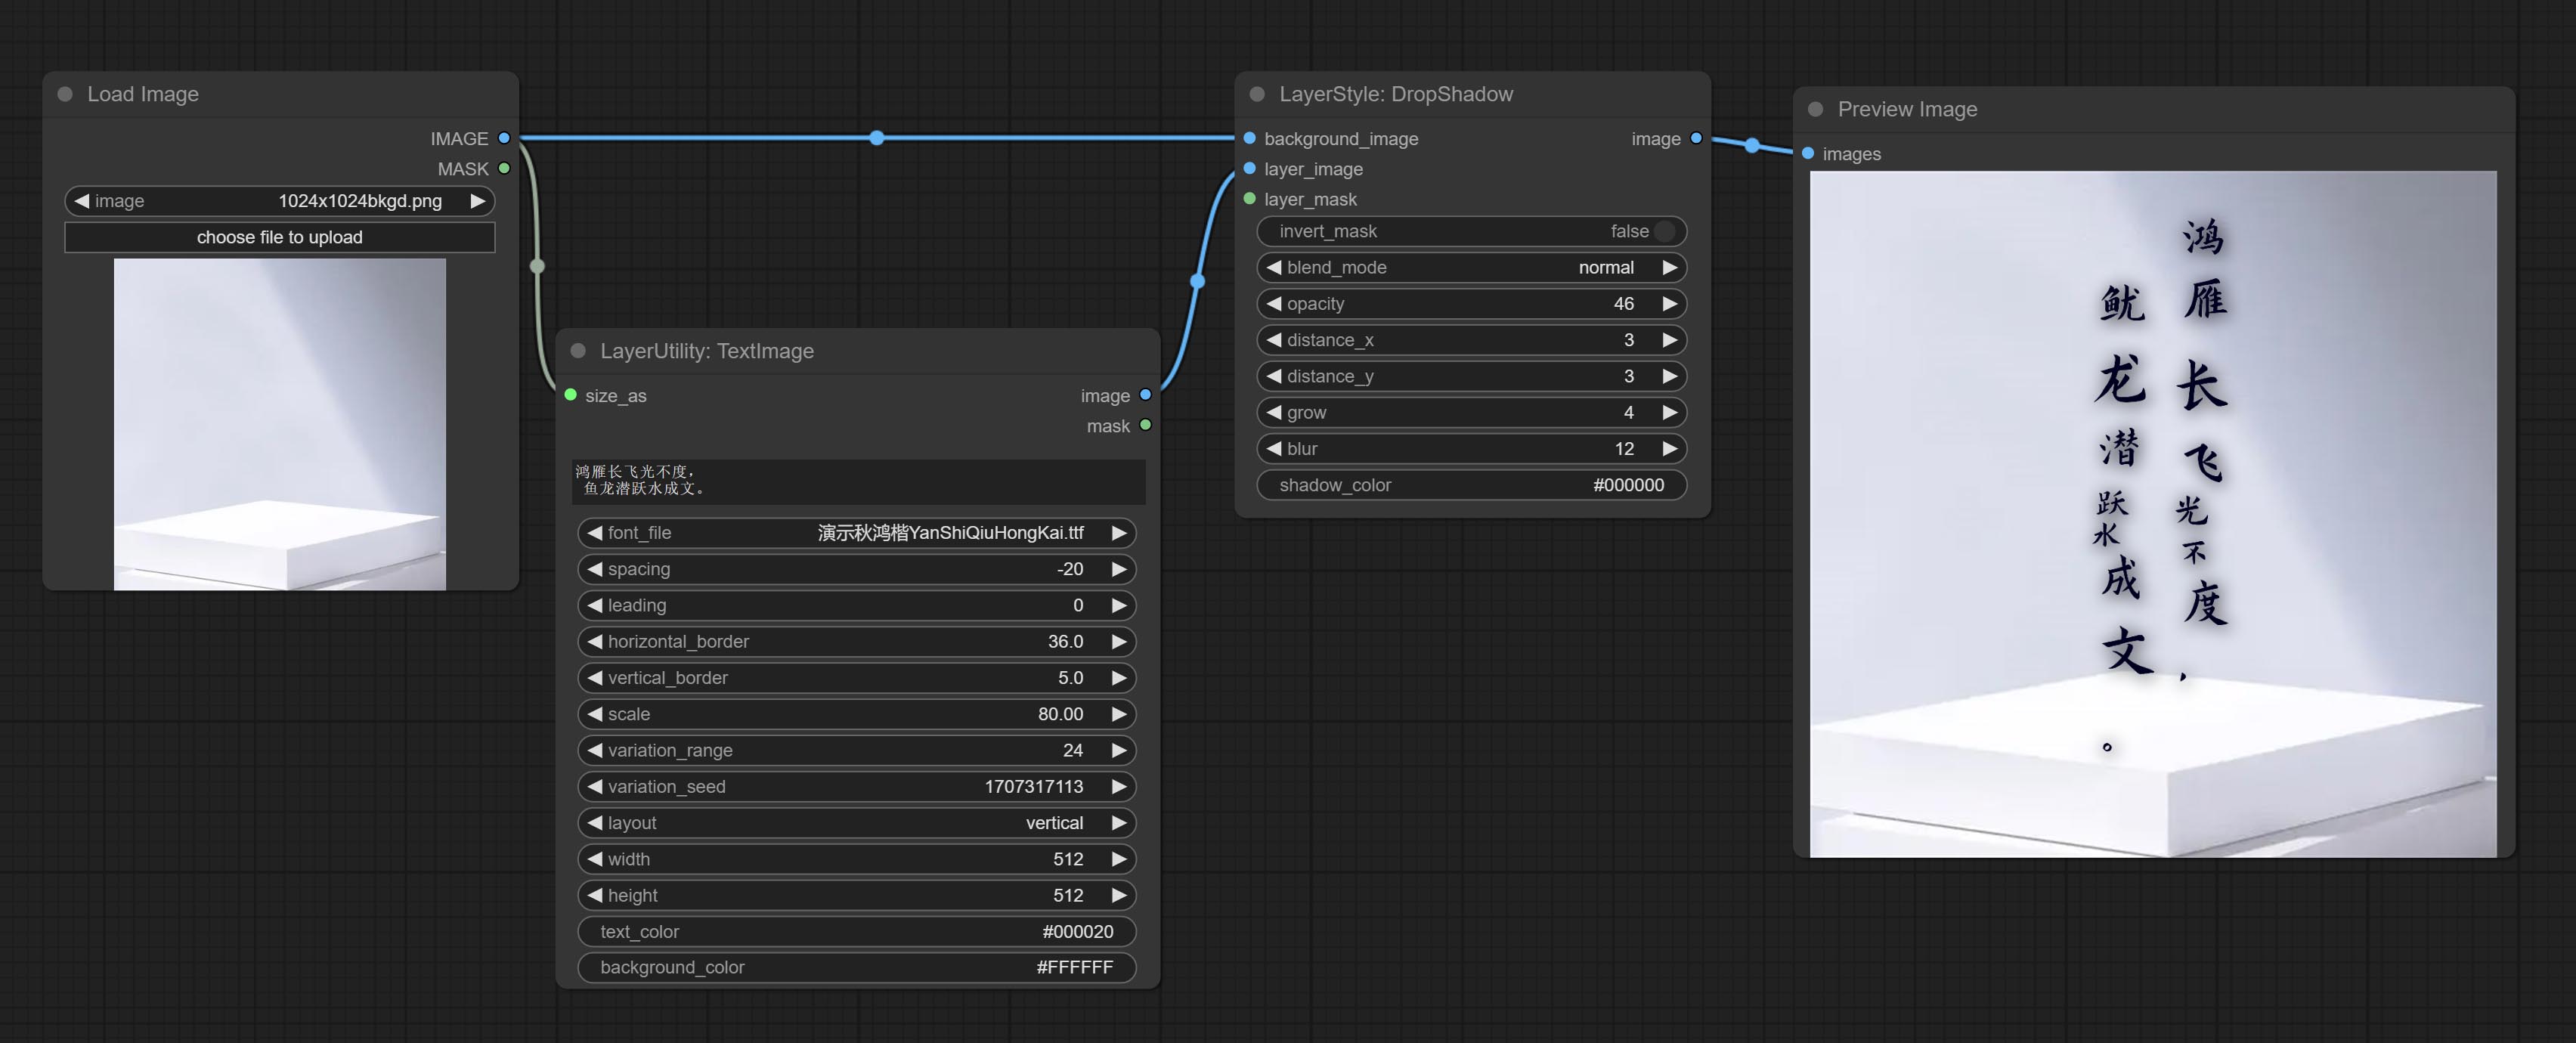
Generate images and masks from text. support for adjusting the spacing between words and lines, horizontal and vertical adjustments, it can set random changes in each character, including size and position.
Node options:
* Only limited to input image and mask. forcing the integration of other types of inputs will result in node errors.
** The font folder is defined in resource_dir.ini , this file is located in the root directory of the plug-in, and the default name is resource_dir.ini.example . to use this file for the first time, you need to change the file suffix to .ini . Open the text editing software and find the line starting with "FONT_dir=", after "=", enter the custom folder path name. support defining multiple folders in resource-dir.ini , separated by commas, semicolons, or spaces. all font files in this folder will be collected and displayed in the node list during ComfyUI initialization. If the folder set in ini is invalid, the font folder that comes with the plugin will be enabled.
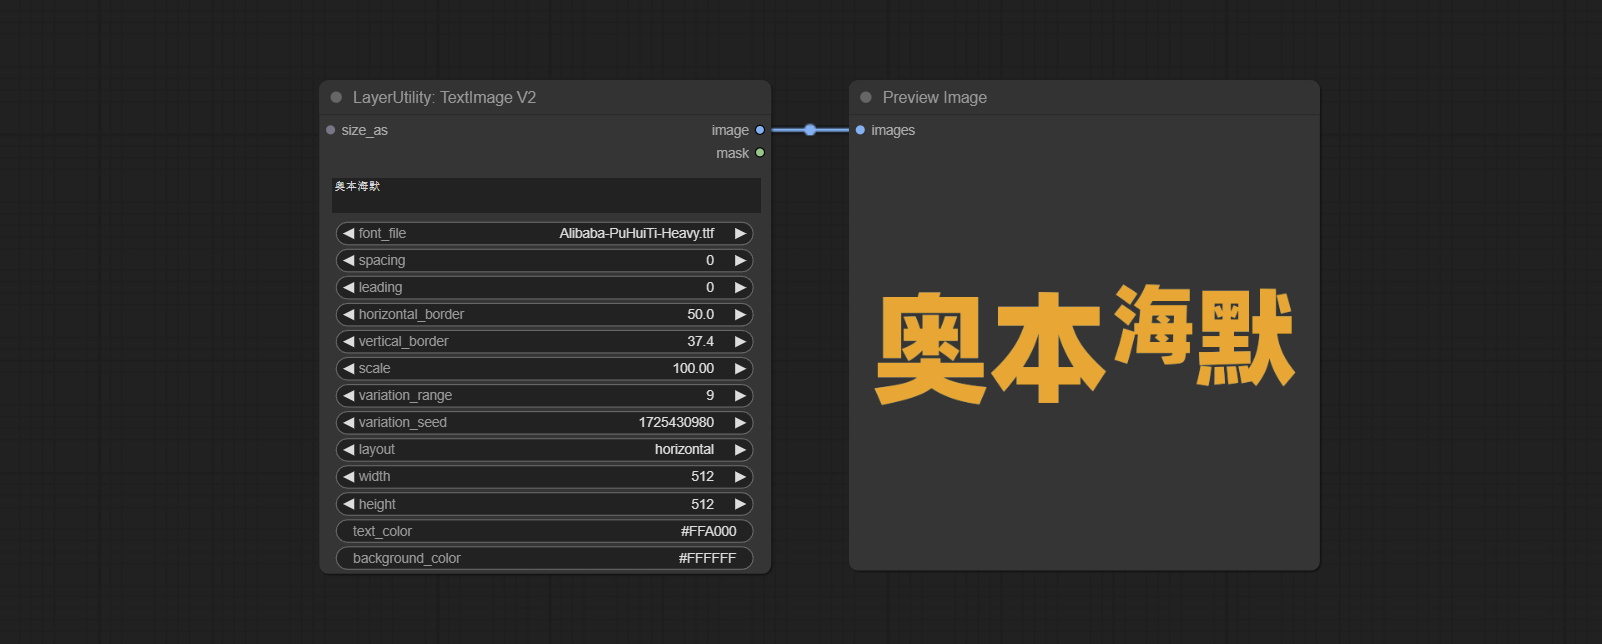
This node is merged from heshengtao. The PR modifies the scaling of the image text node based on the TextImage node. The font spacing follows the scaling, and the coordinates are no longer based on the top left corner of the text, but on the center point of the entire line of text. Thank you for the author's contribution.
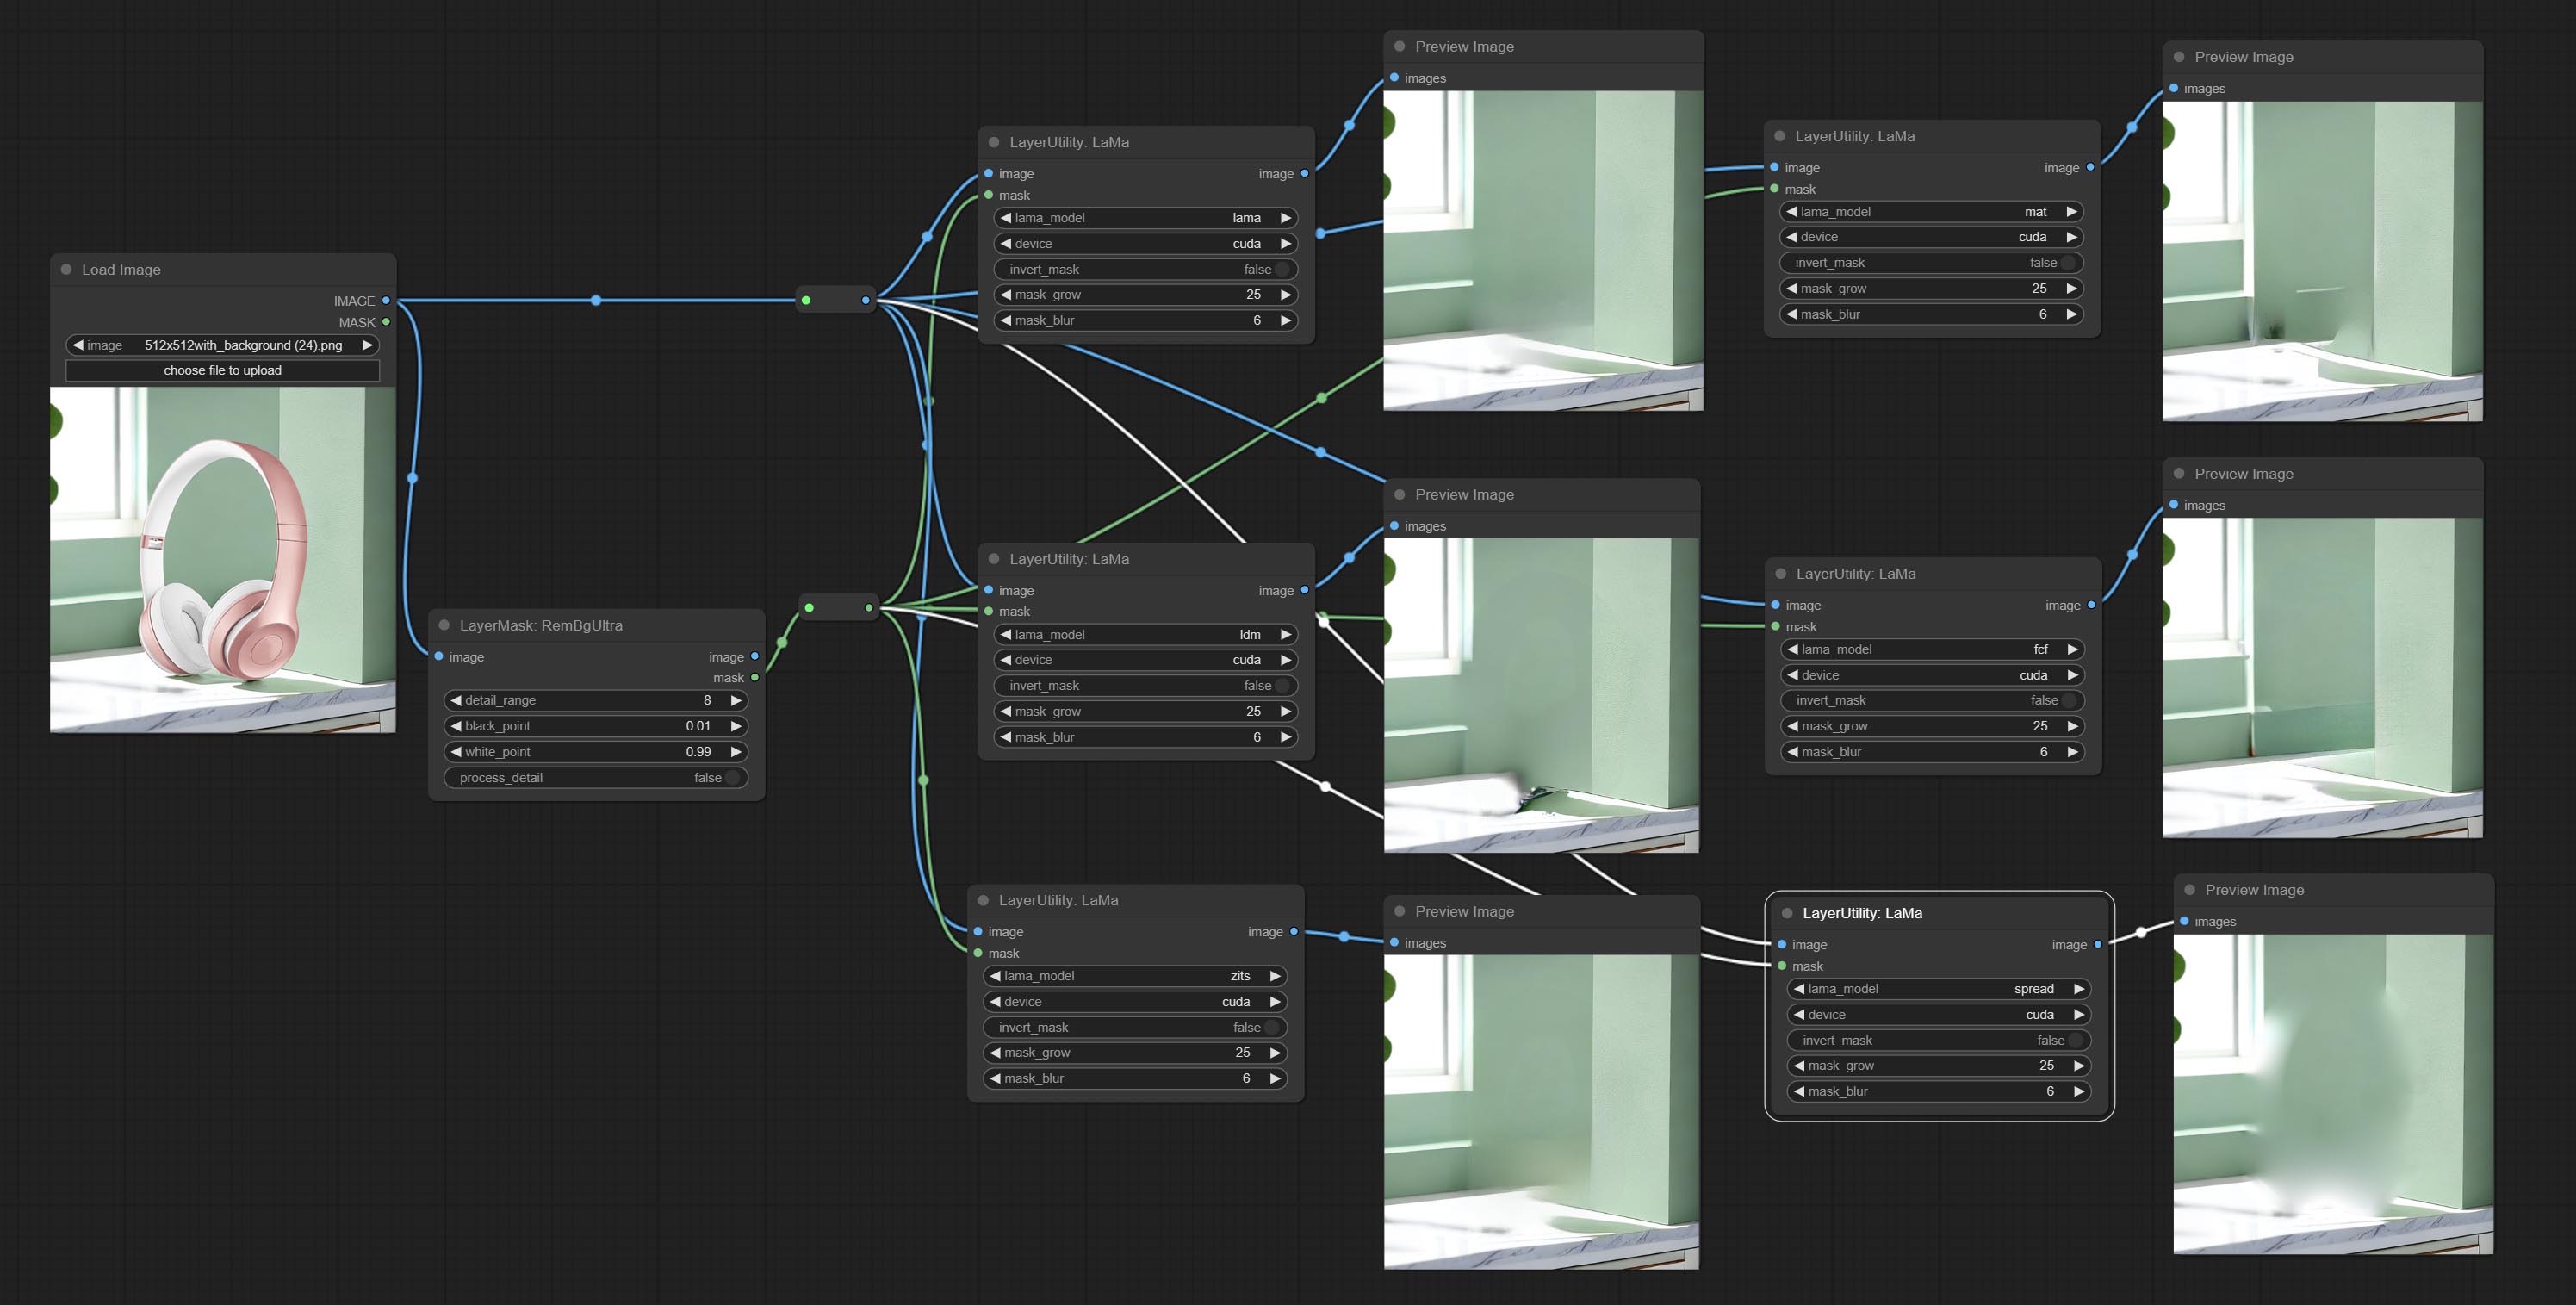
Erase objects from the image based on the mask. this node is repackage of IOPaint, powered by state-of-the-art AI models, thanks to the original author.
It is have LaMa, LDM, ZITS,MAT, FcF, Manga models and the SPREAD method to erase. Please refer to the original link for the introduction of each model.
Please download the model files from lama models(BaiduNetdisk) or lama models(Google Drive) to ComfyUI/models/lama folder.
Node optons: 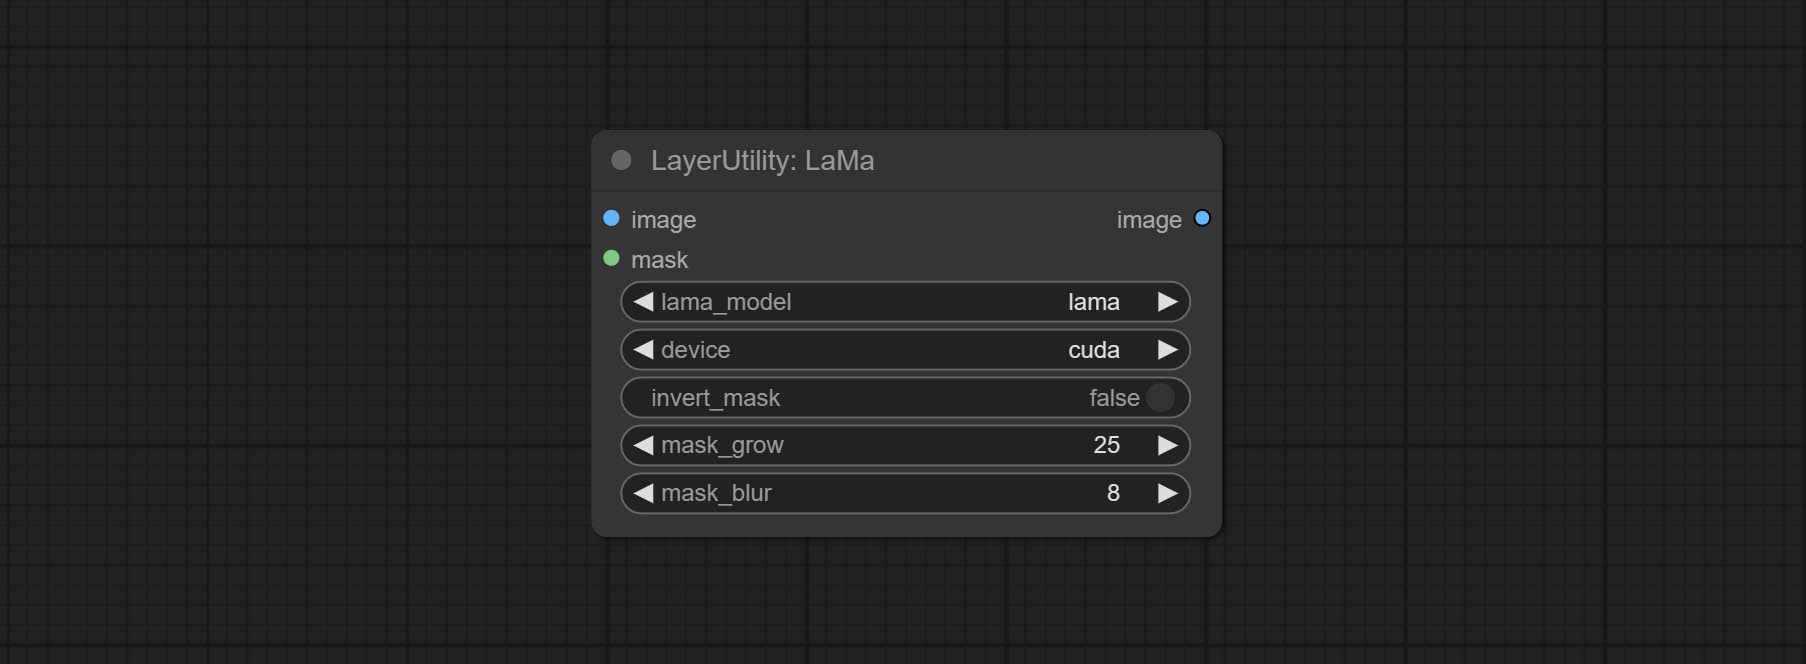
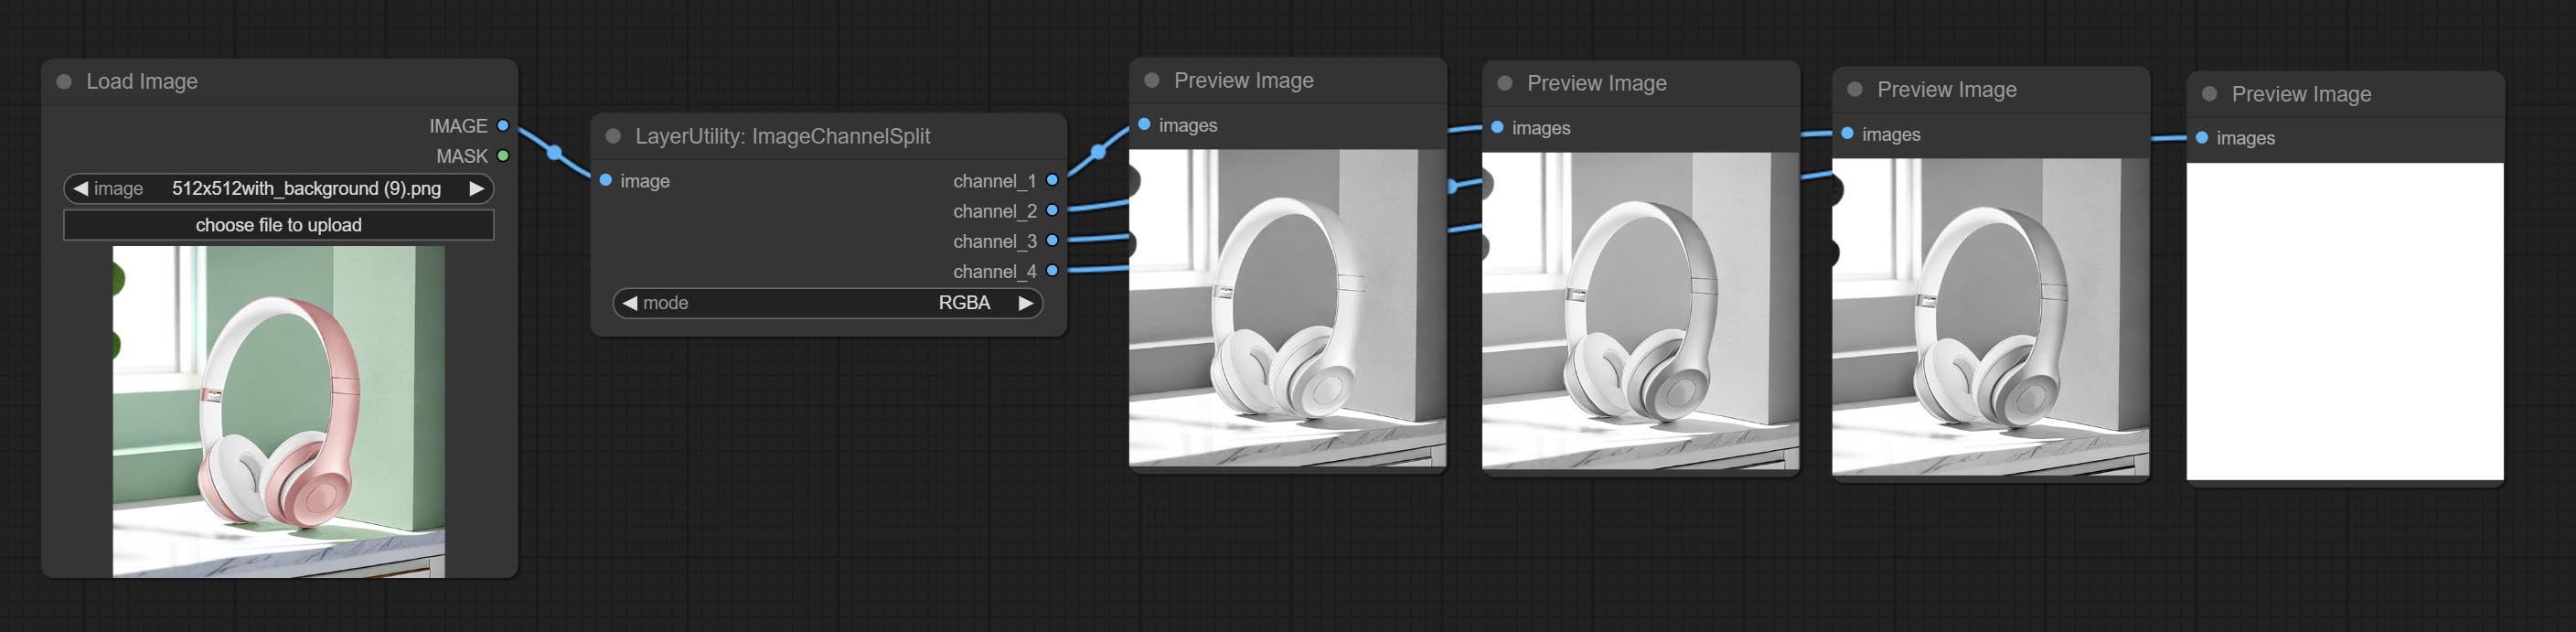
Split the image channel into individual images.
Node options: 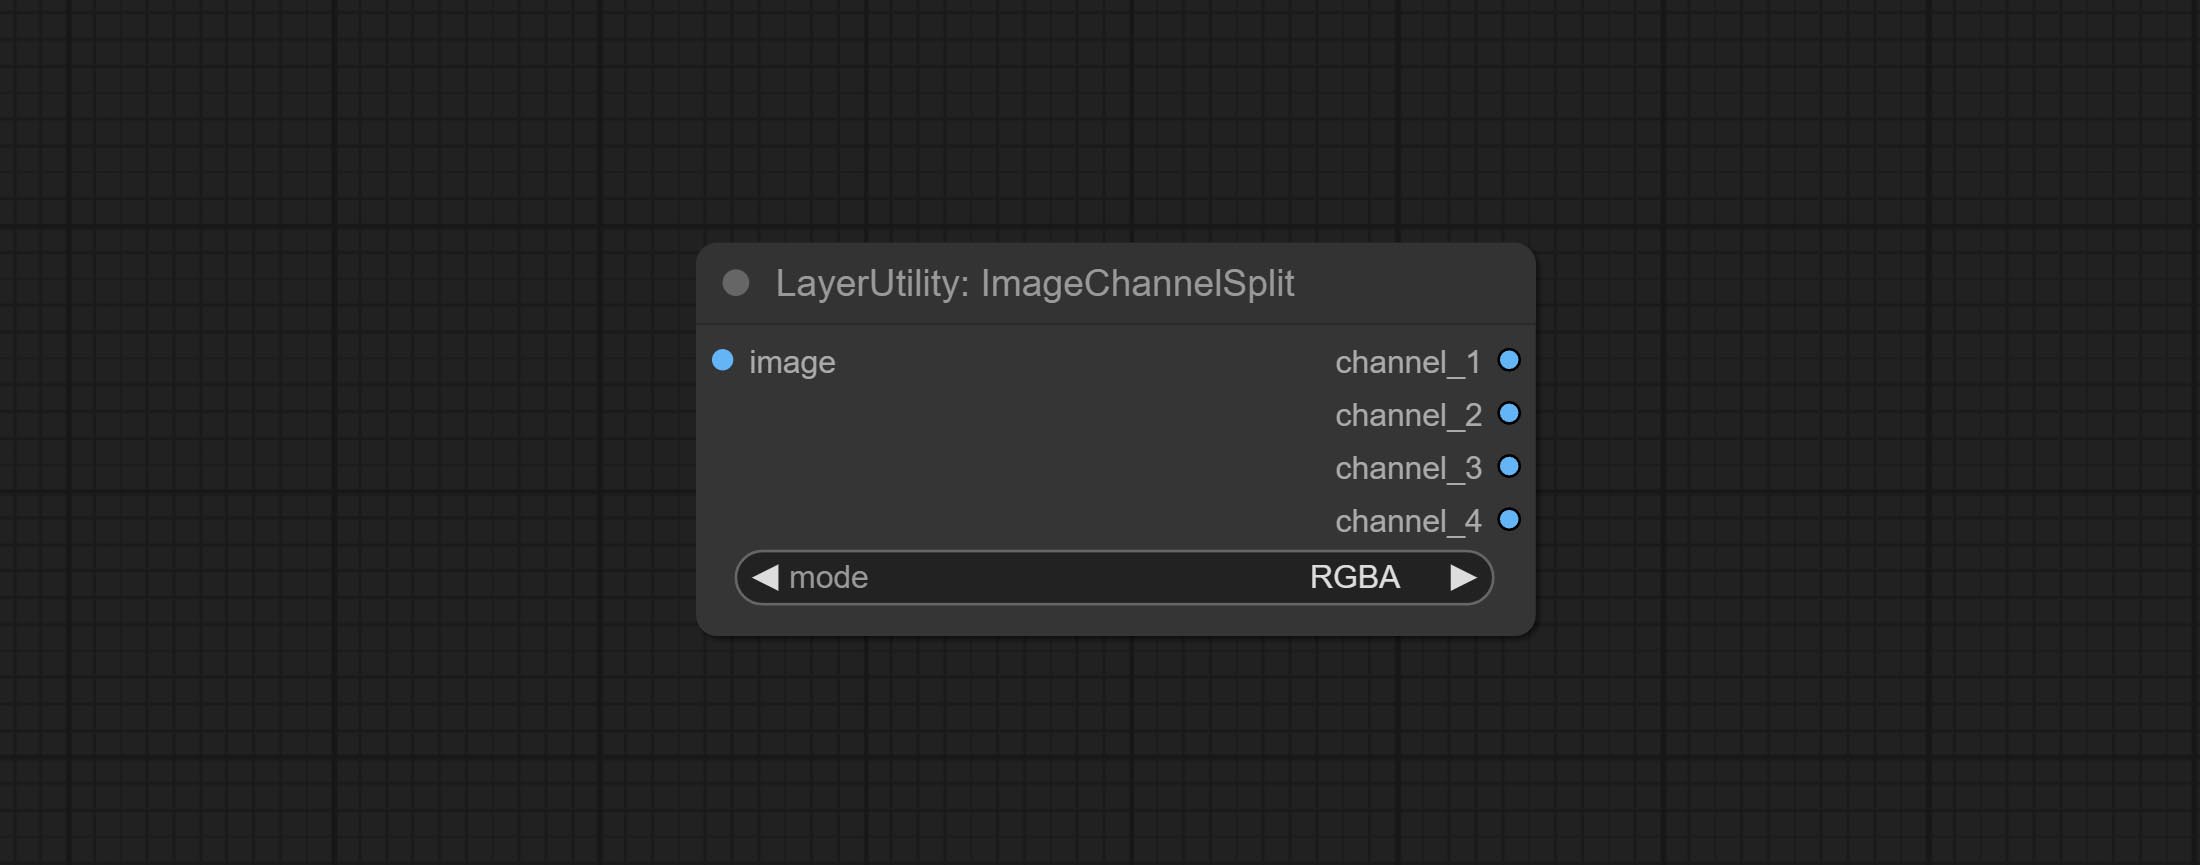
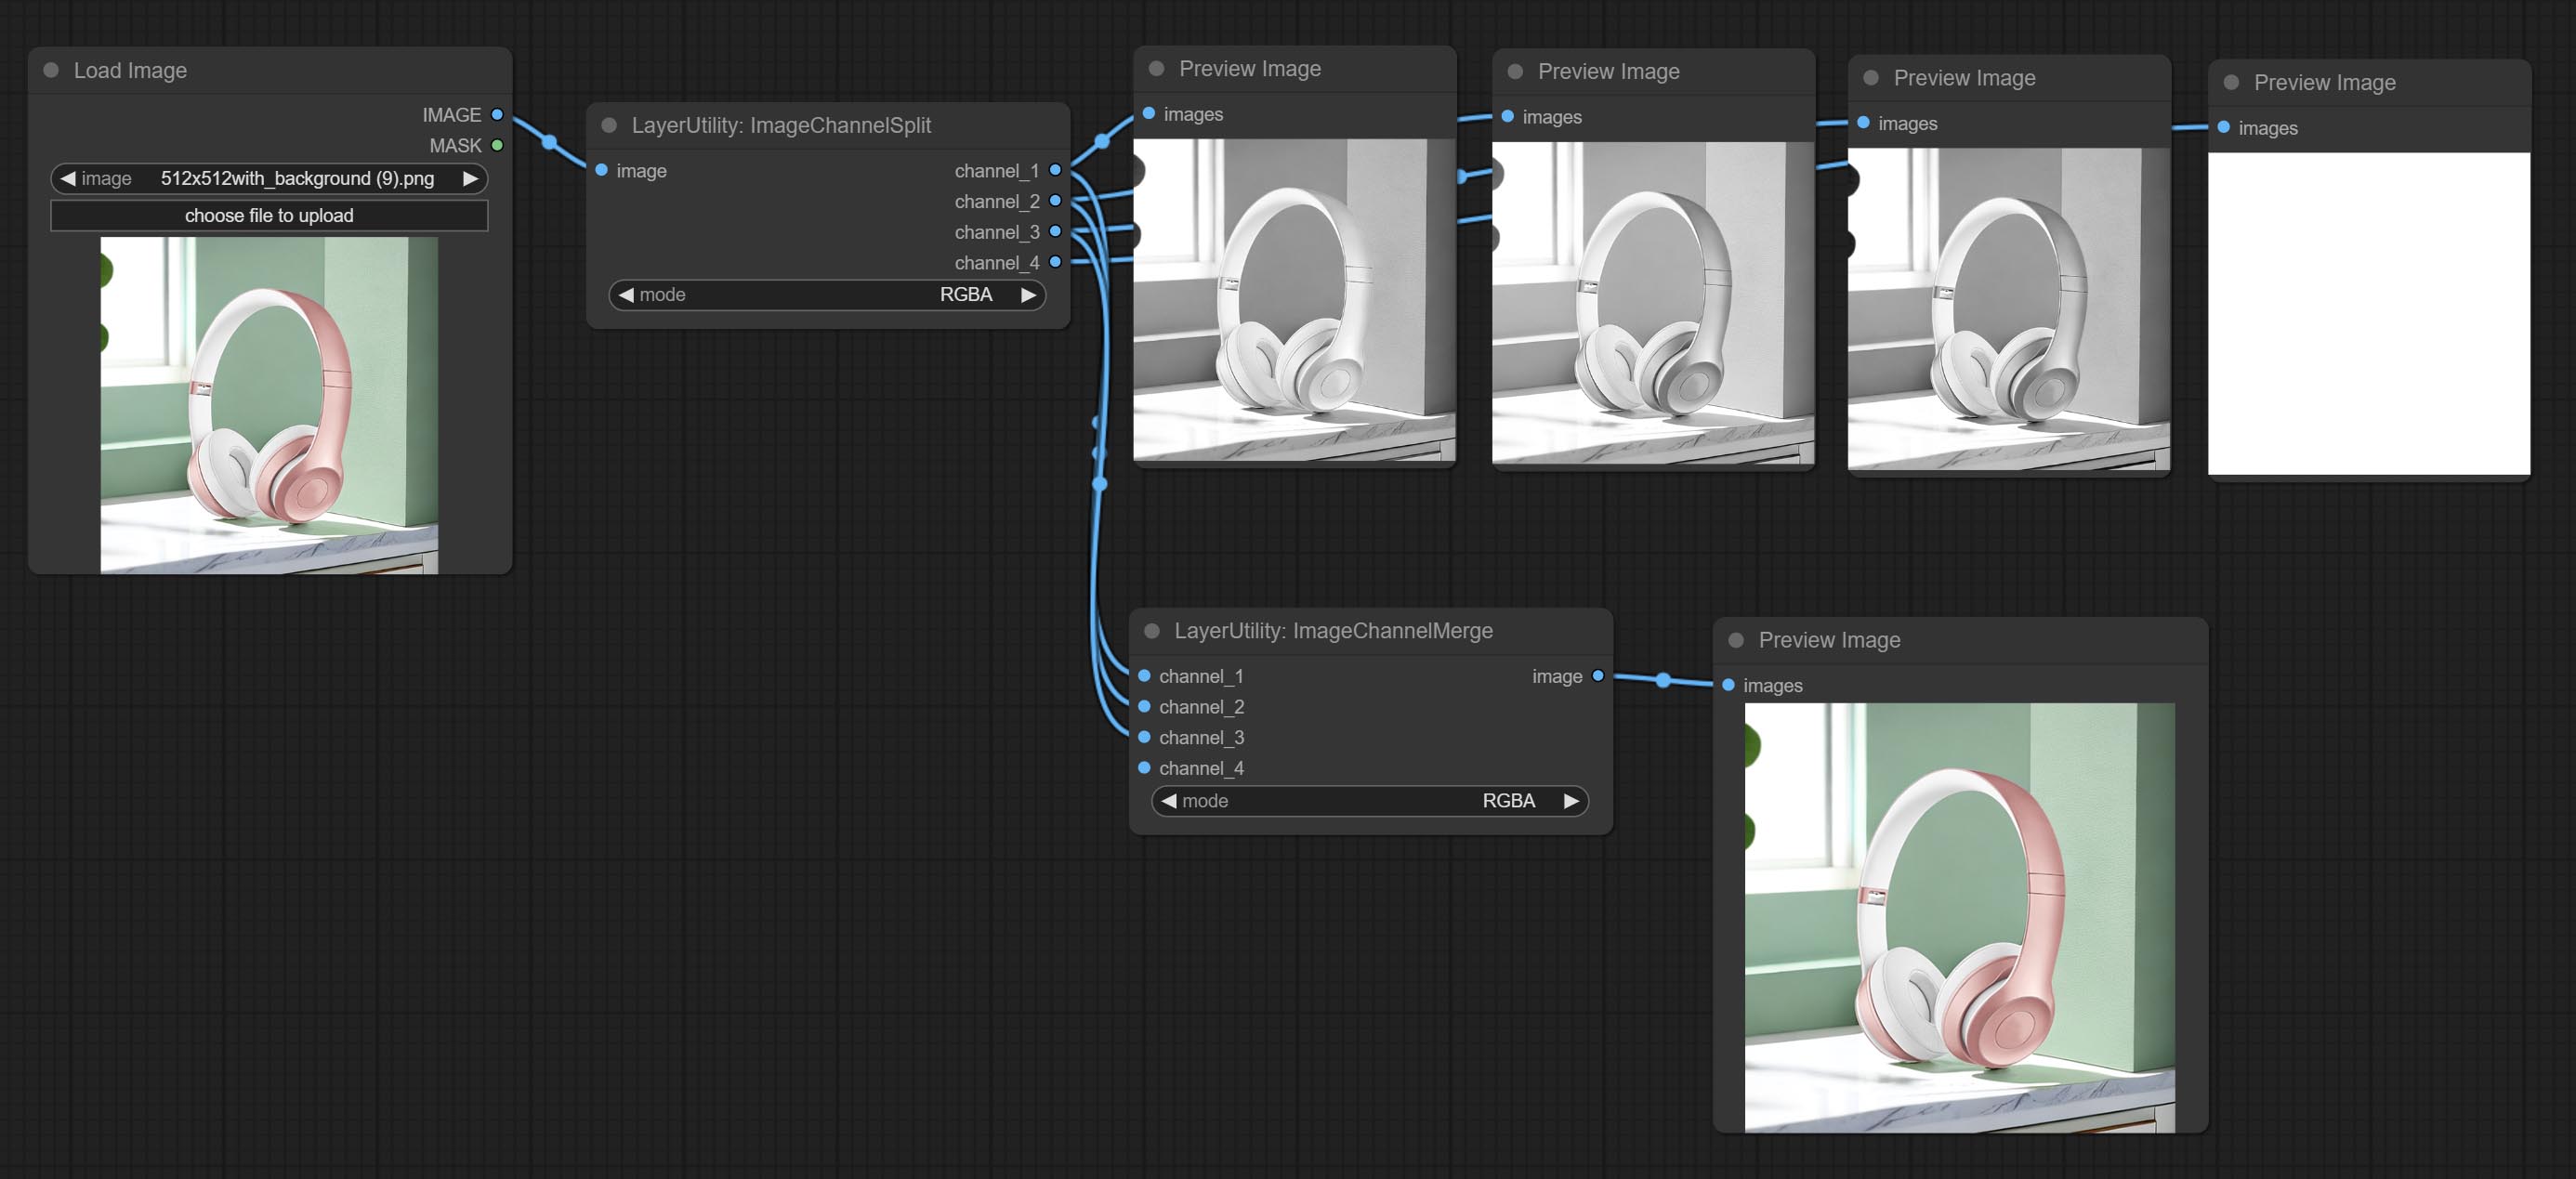
Merge each channel image into one image.
Node options: 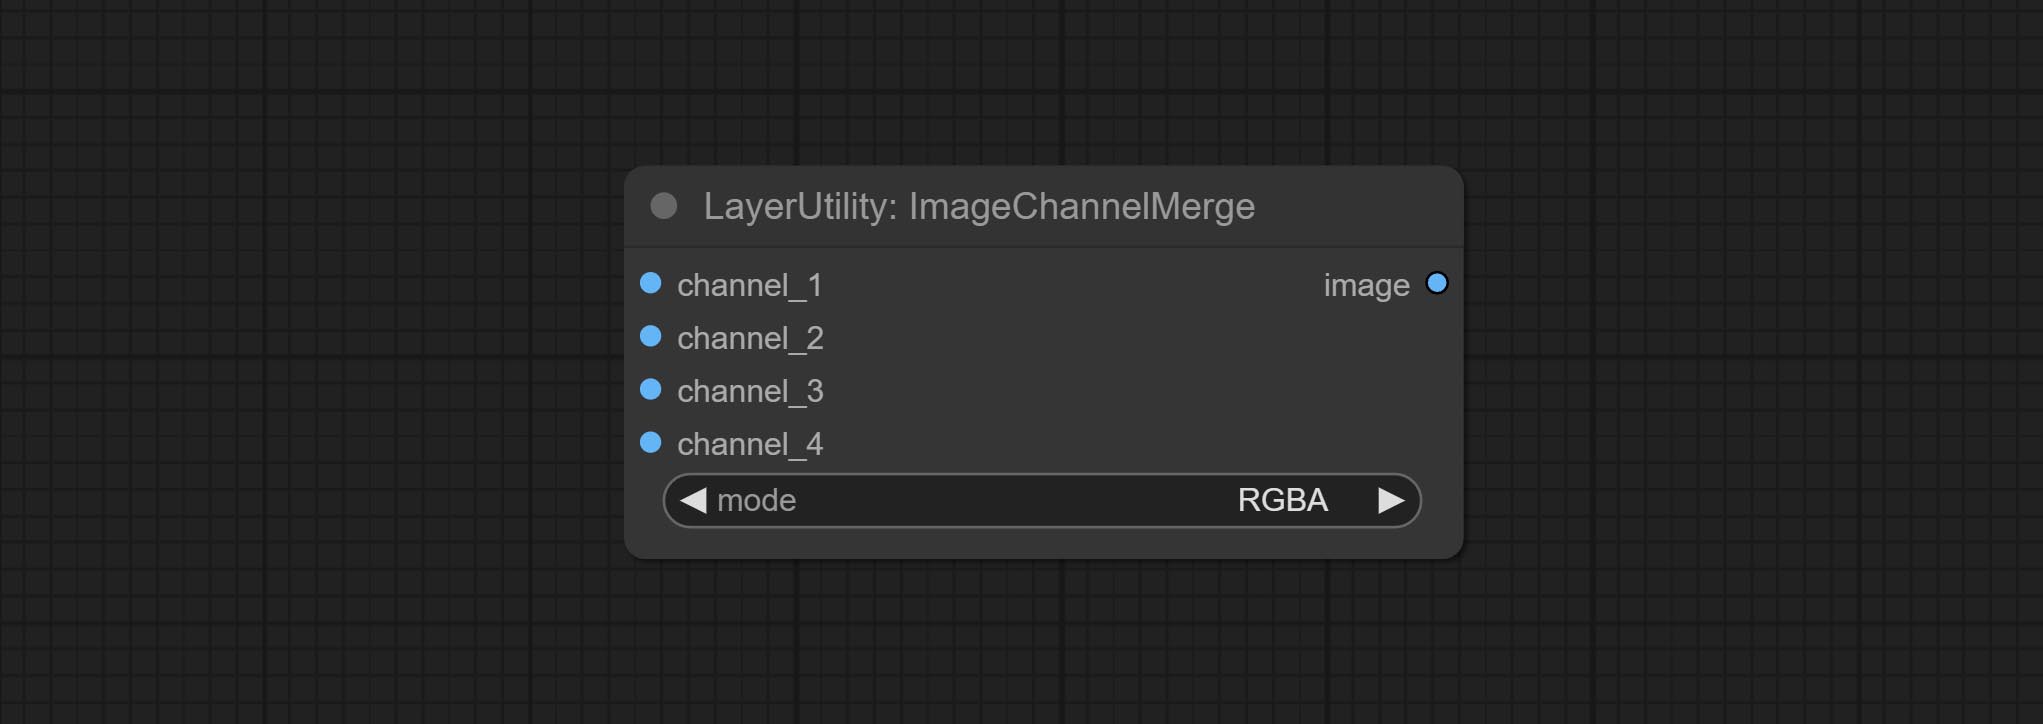
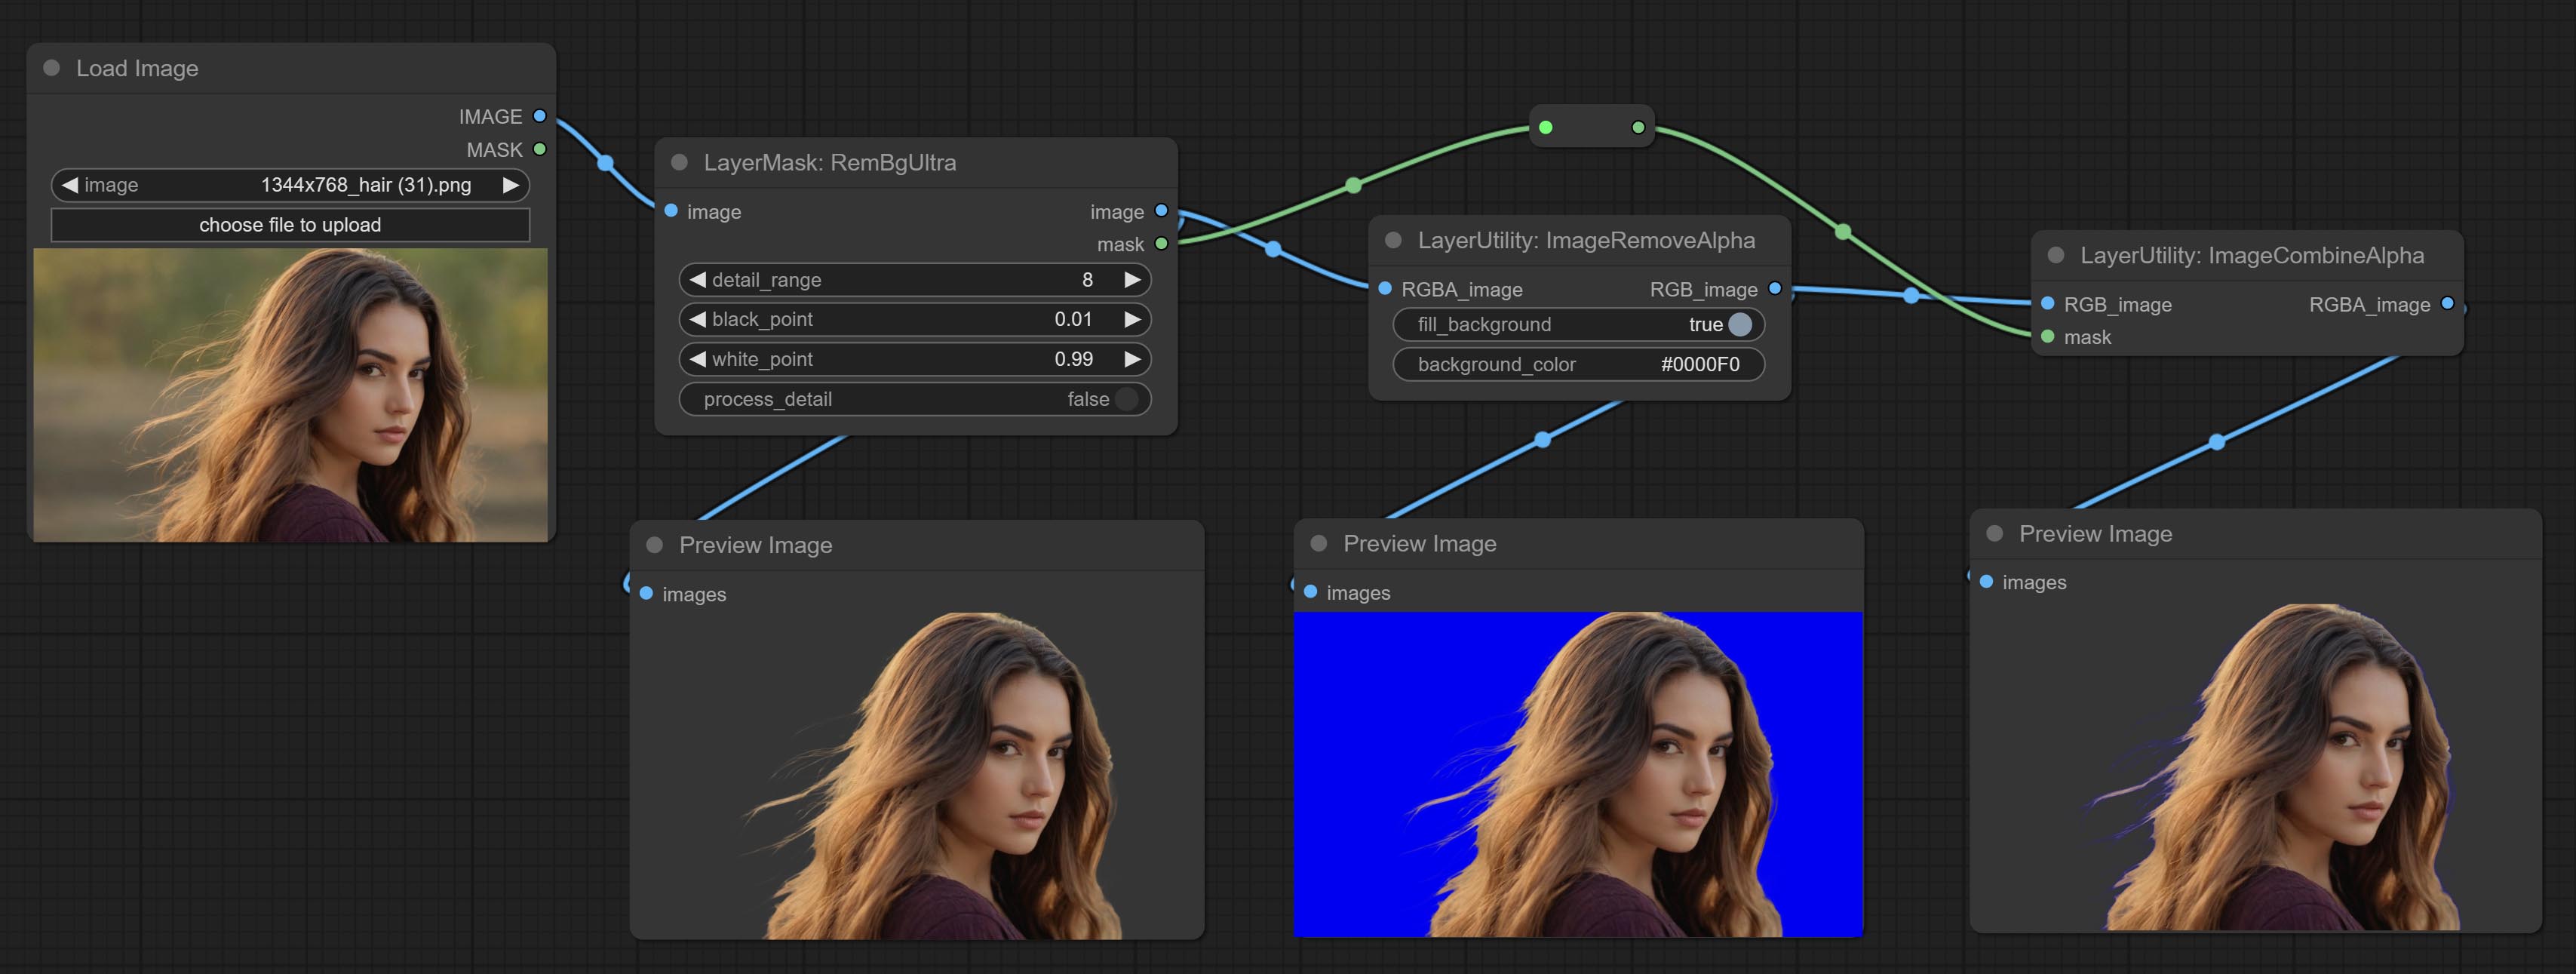
Remove the alpha channel from the image and convert it to RGB mode. you can choose to fill the background and set the background color.
Node options: 
Merge the image and mask into an RGBA mode image containing an alpha channel.
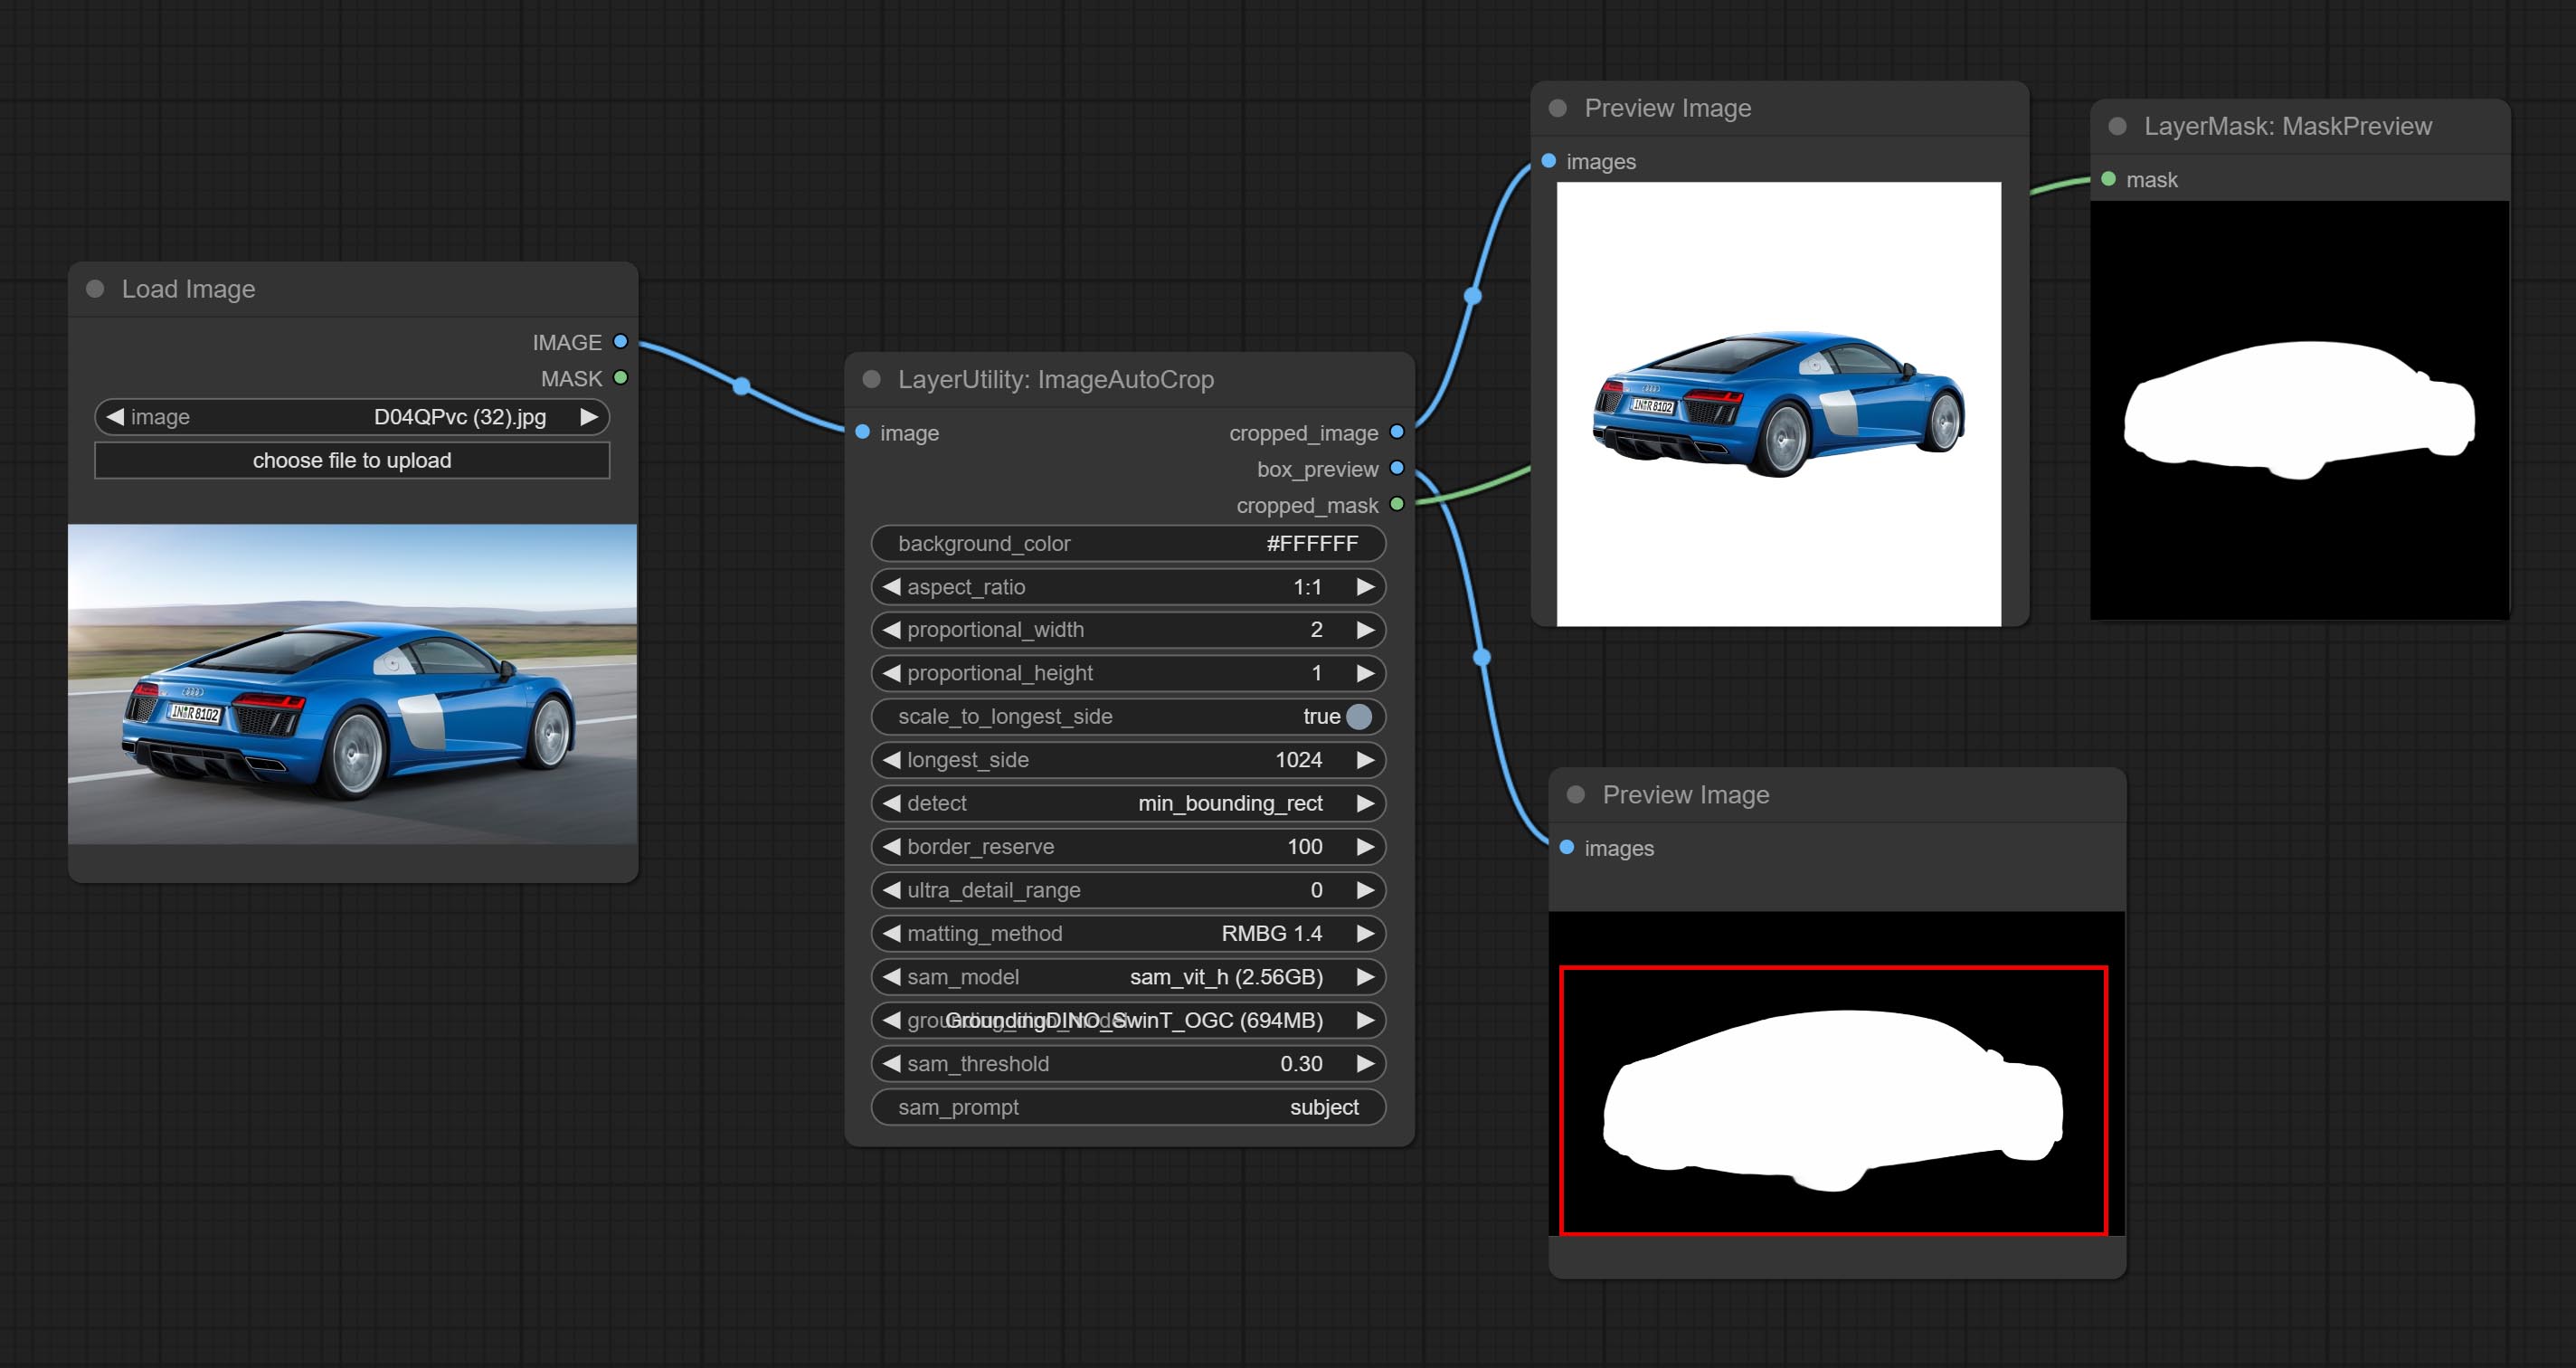
Automatically cutout and crop the image according to the mask. it can specify the background color, aspect ratio, and size for output image. this node is designed to generate the image materials for training models.
*Please refer to the model installation methods for SegmentAnythingUltra and RemBgUltra.
Node options: 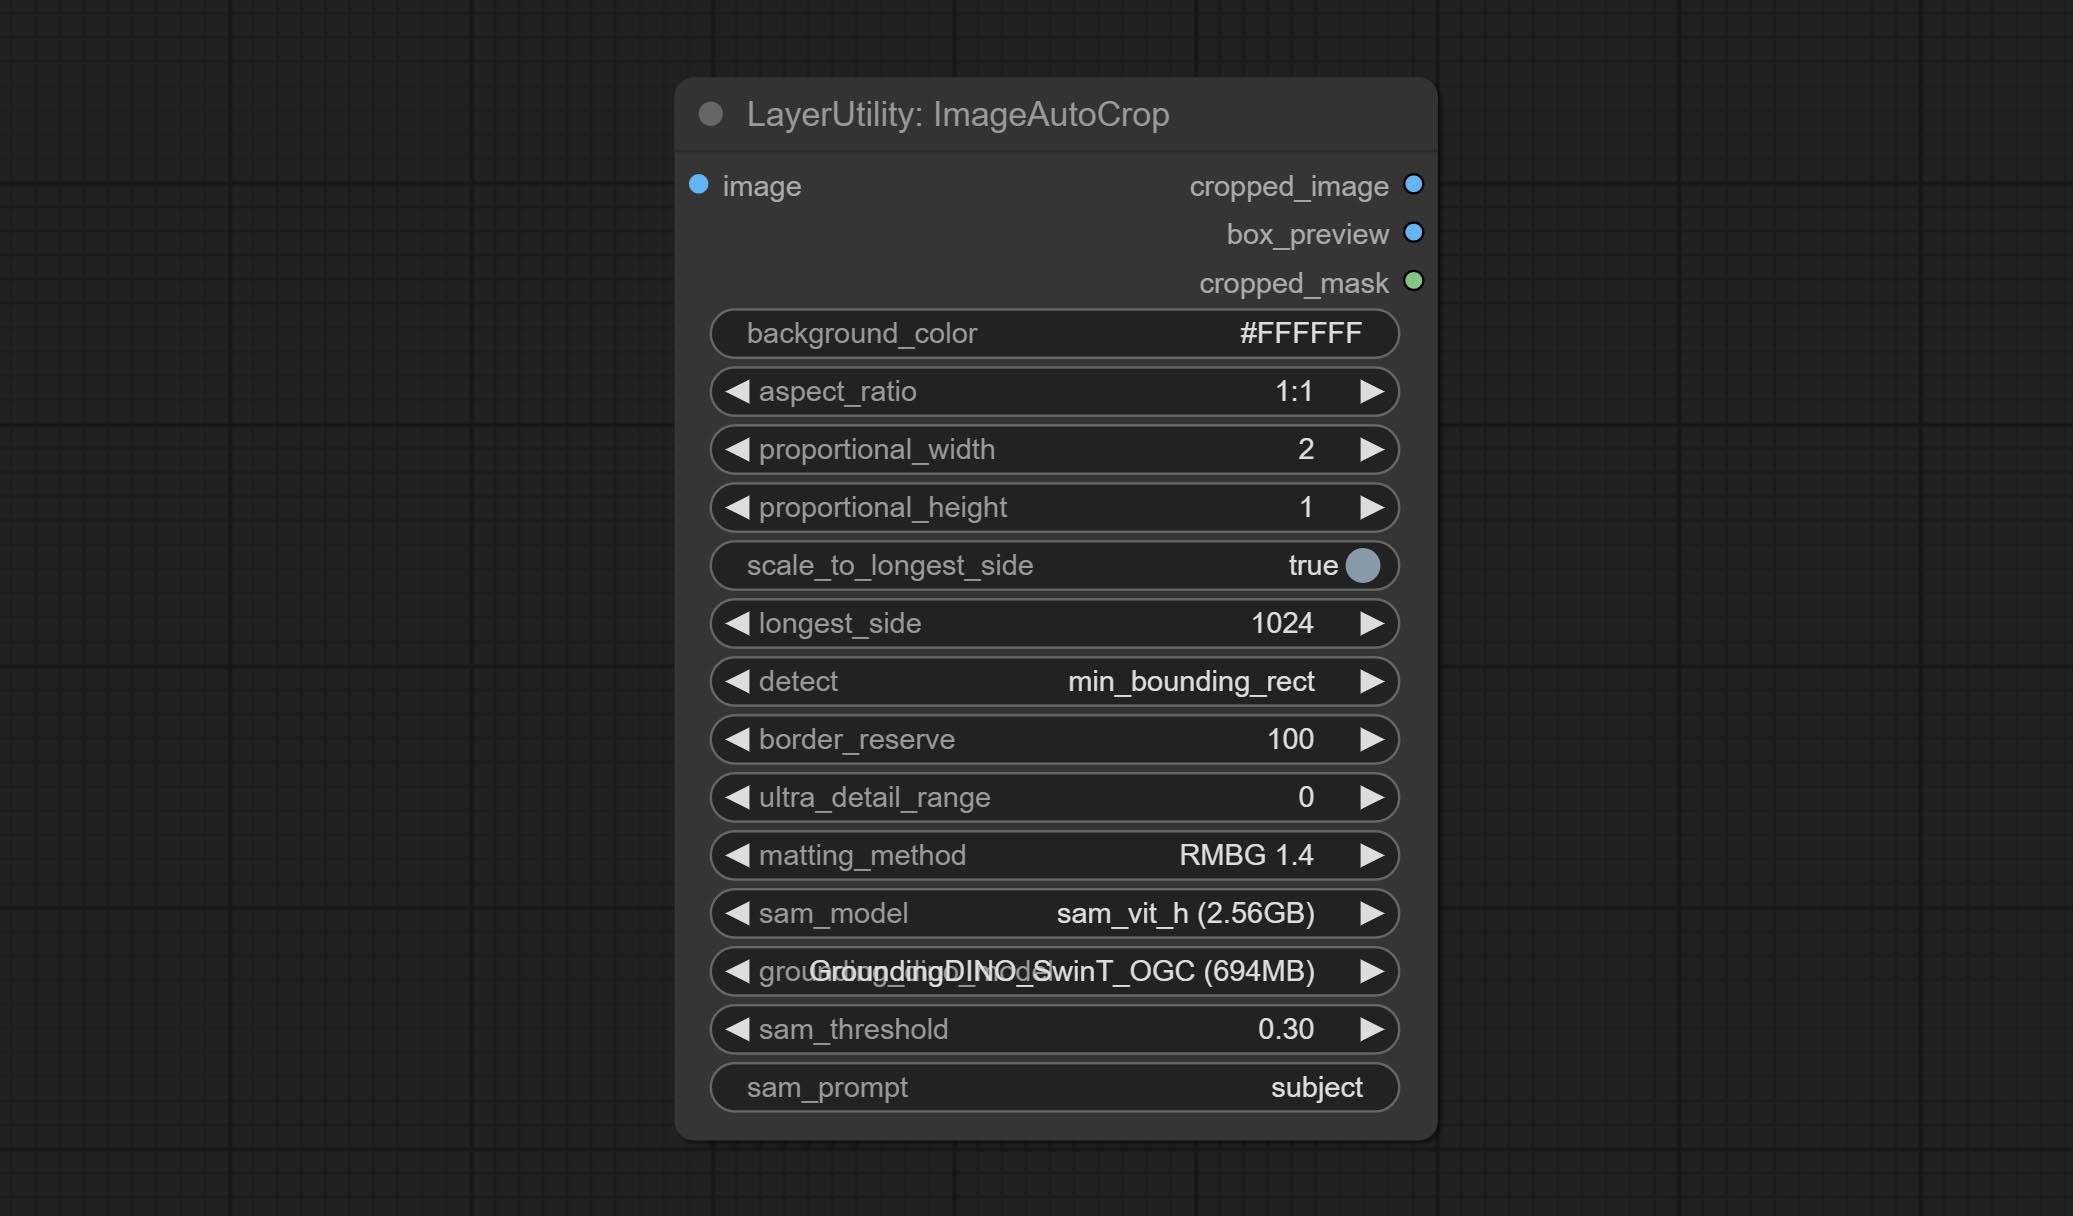
Output: cropped_image: Crop and replace the background image. box_preview: Crop position preview. cropped_mask: Cropped mask.
The V2 upgrad version of ImageAutoCrop , it has made the following changes based on the previous version: 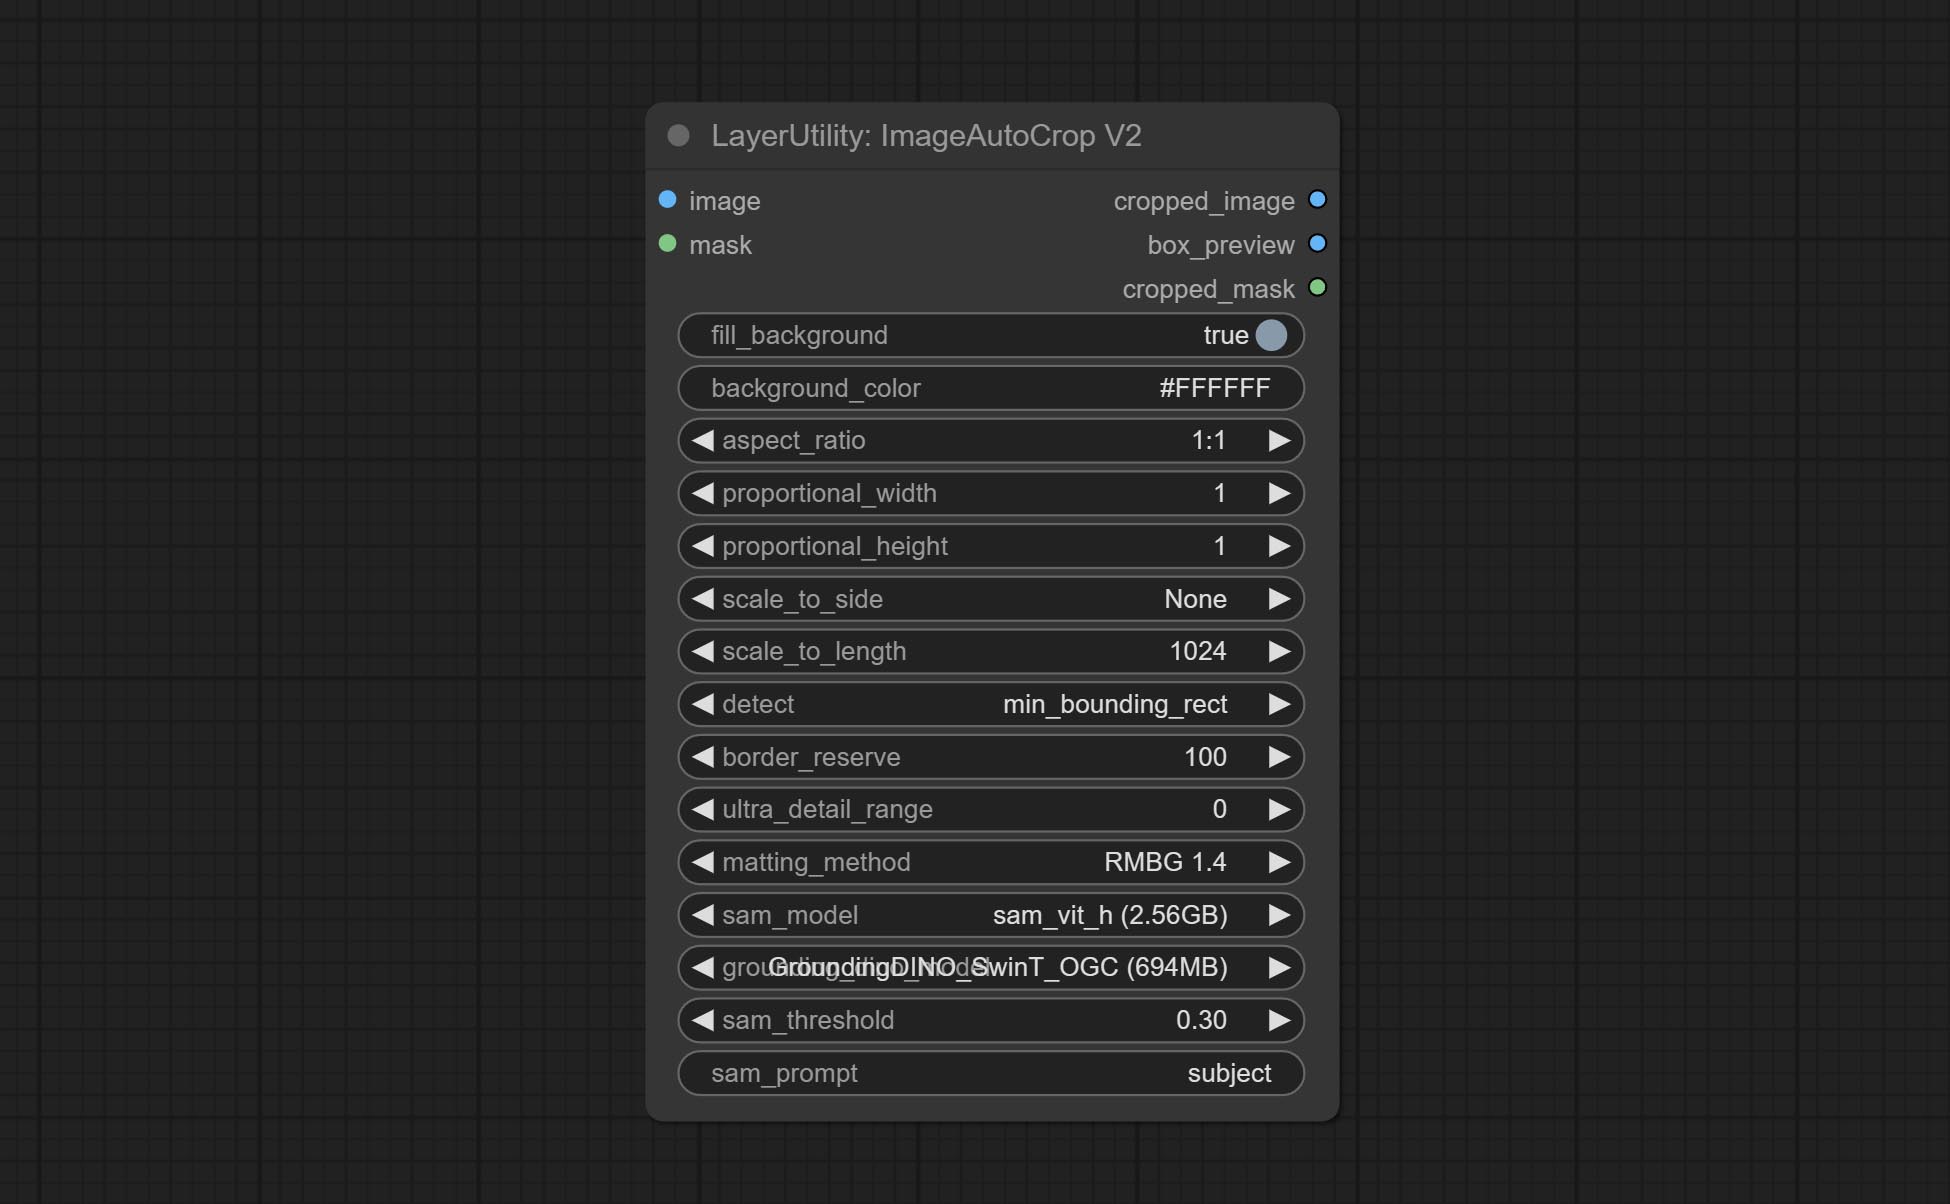
fill_background . When set to False, the background will not be processed and any parts beyond the frame will not be included in the output range.aspect_ratio adds the original option.scale_by to specify the length of the edge.Automatically crop the image to the specified size. You can input a mask to preserve the specified area of the mask. This node is designed to generate image materials for training the model.
Node Options: 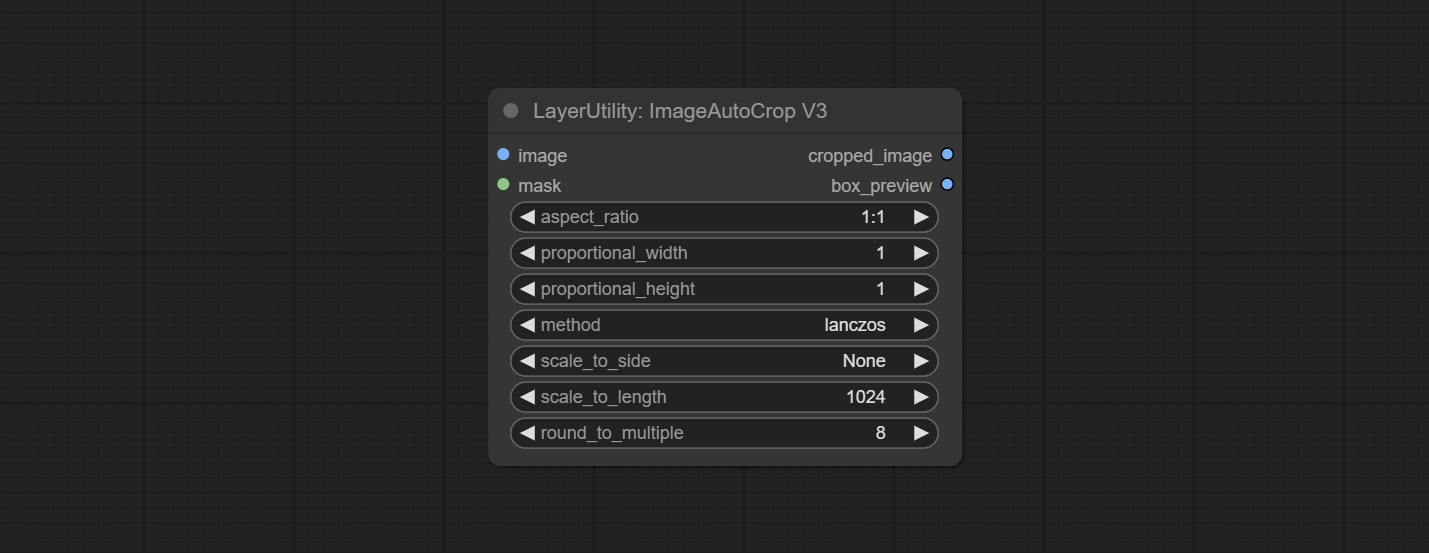
Outputs: cropped_image: The cropped image. box_preview: Preview of cutting position.
Using low frequency filtering and retaining high frequency to recover image details. Compared to kijai's DetailTransfer, this node is better integrated with the environment while retaining details. 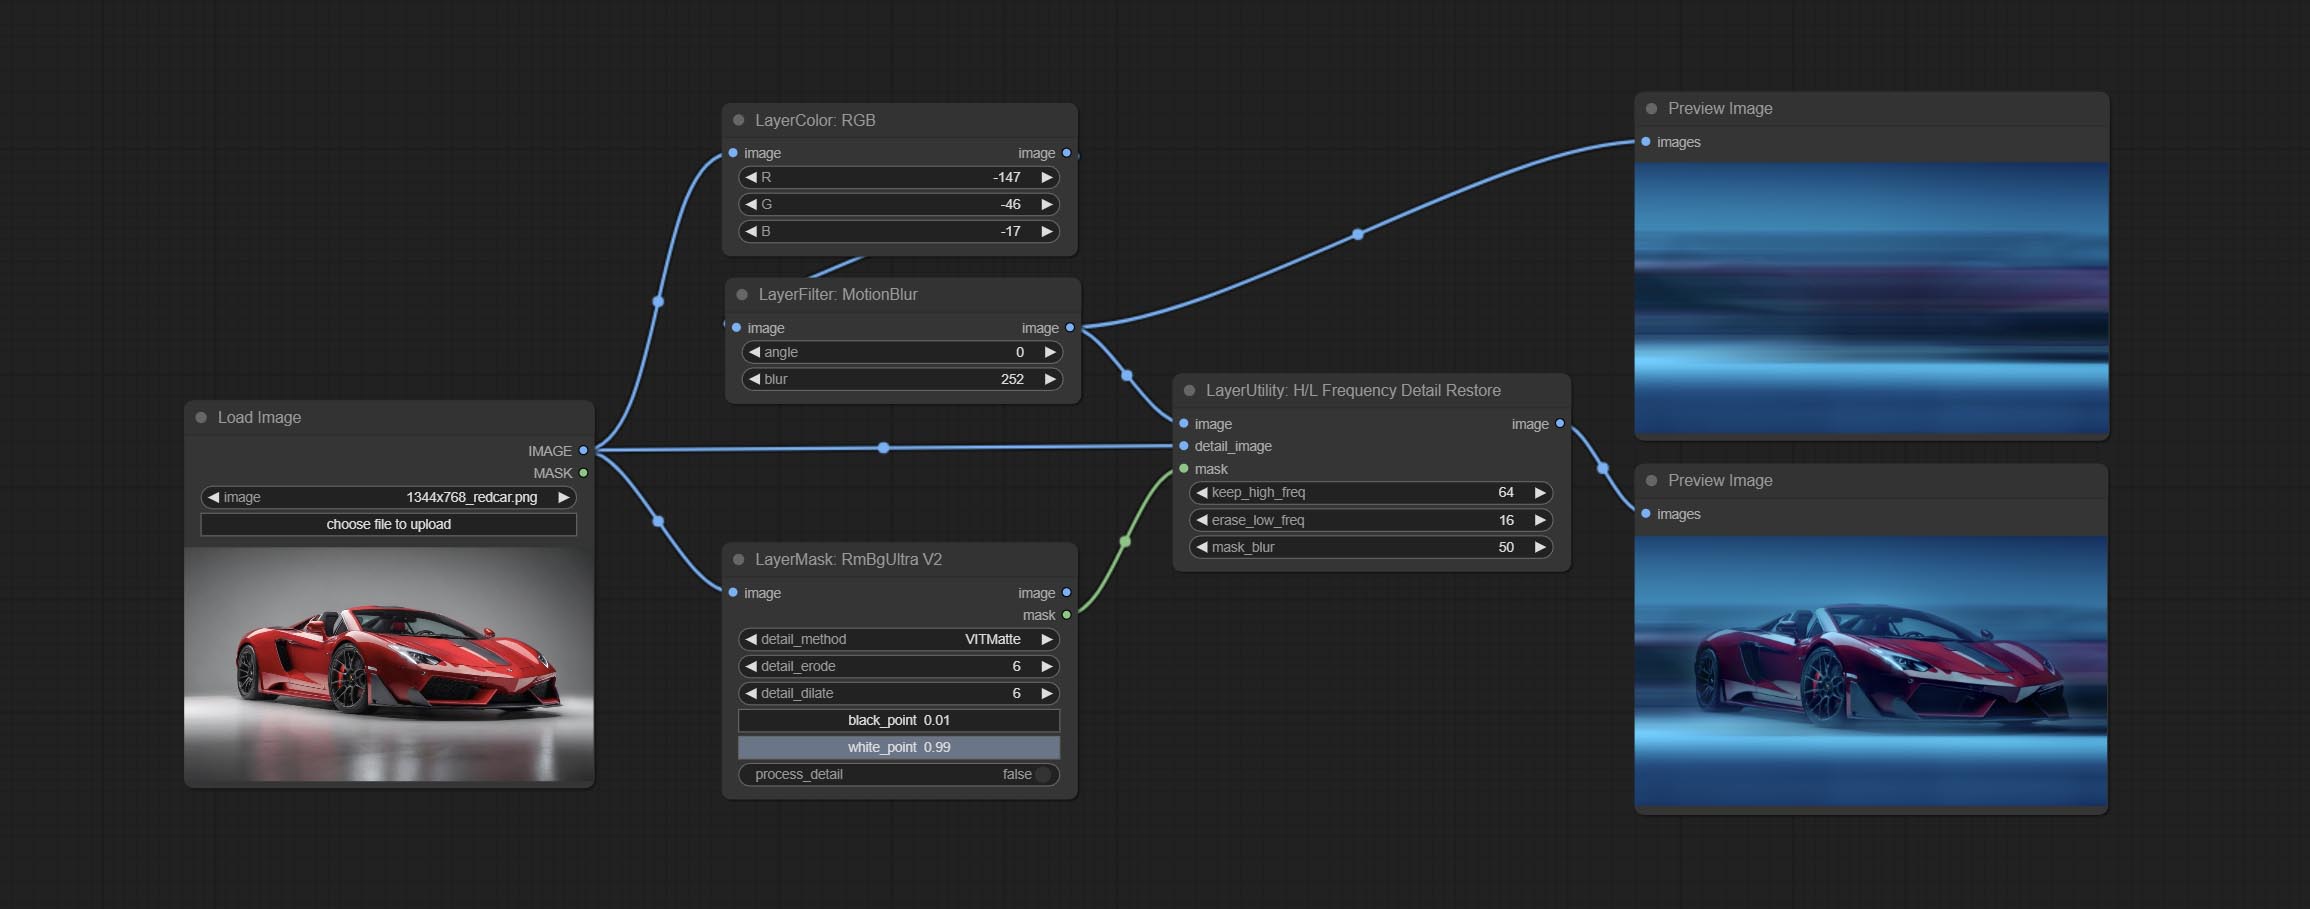
Node Options: 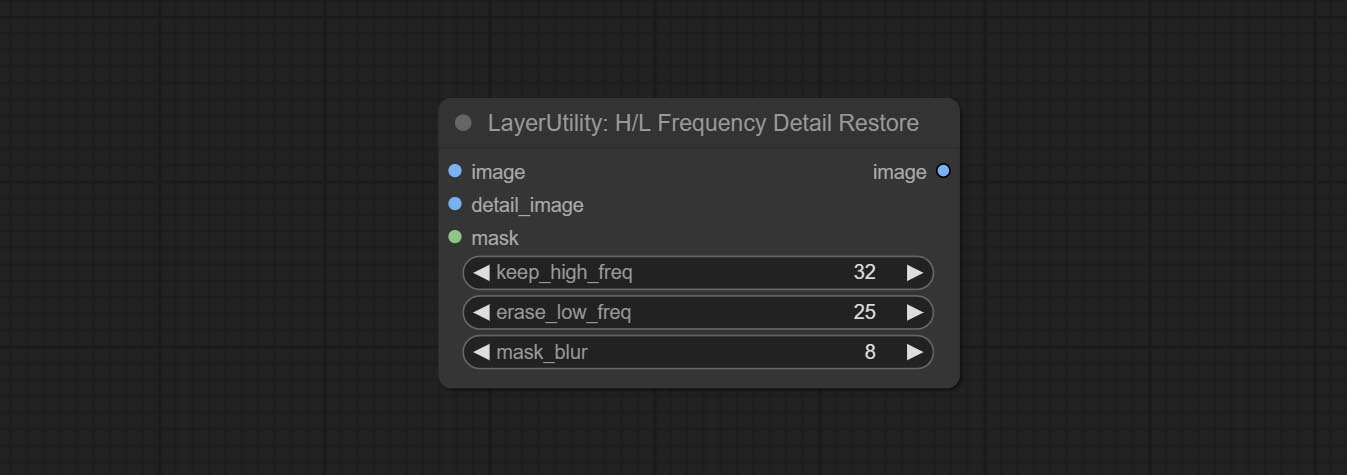
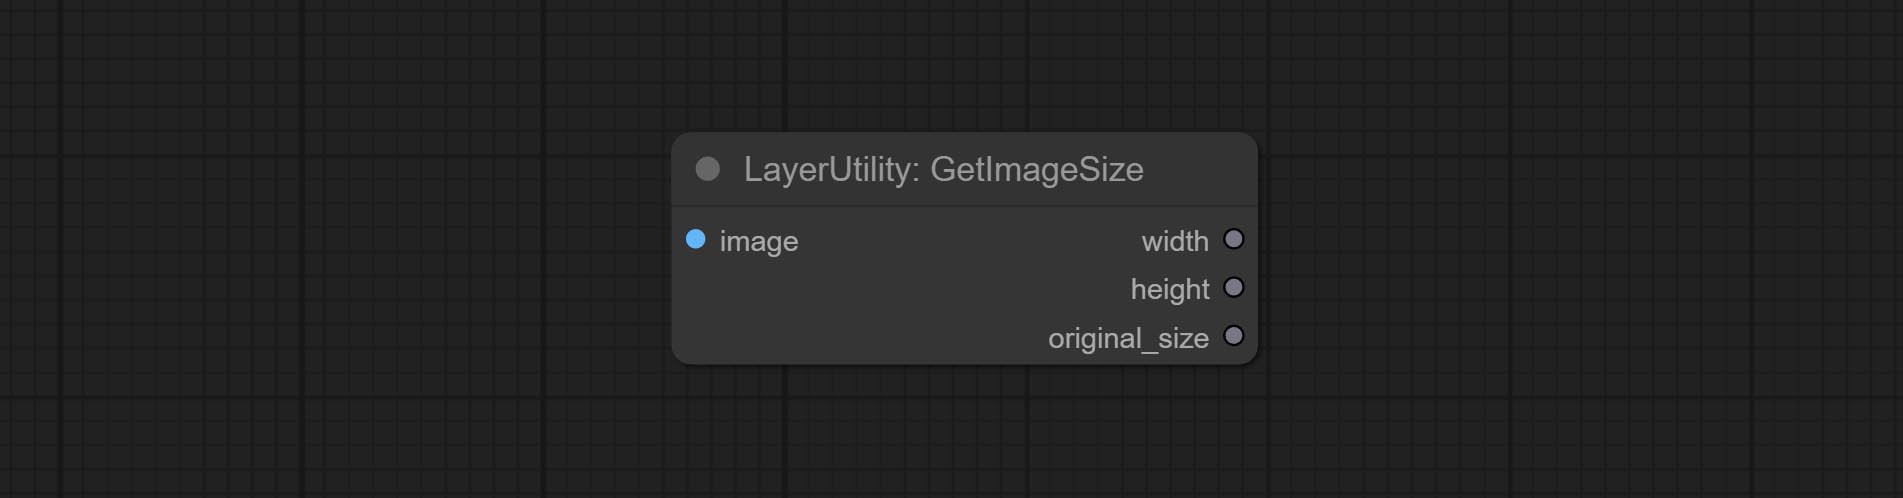
Obtain the width and height of the image.
Ausgabe:
Switch output from multiple input images and masks, supporting 9 sets of inputs. All input items are optional. if there is only image or mask in a set of input, the missing item will be output as None. 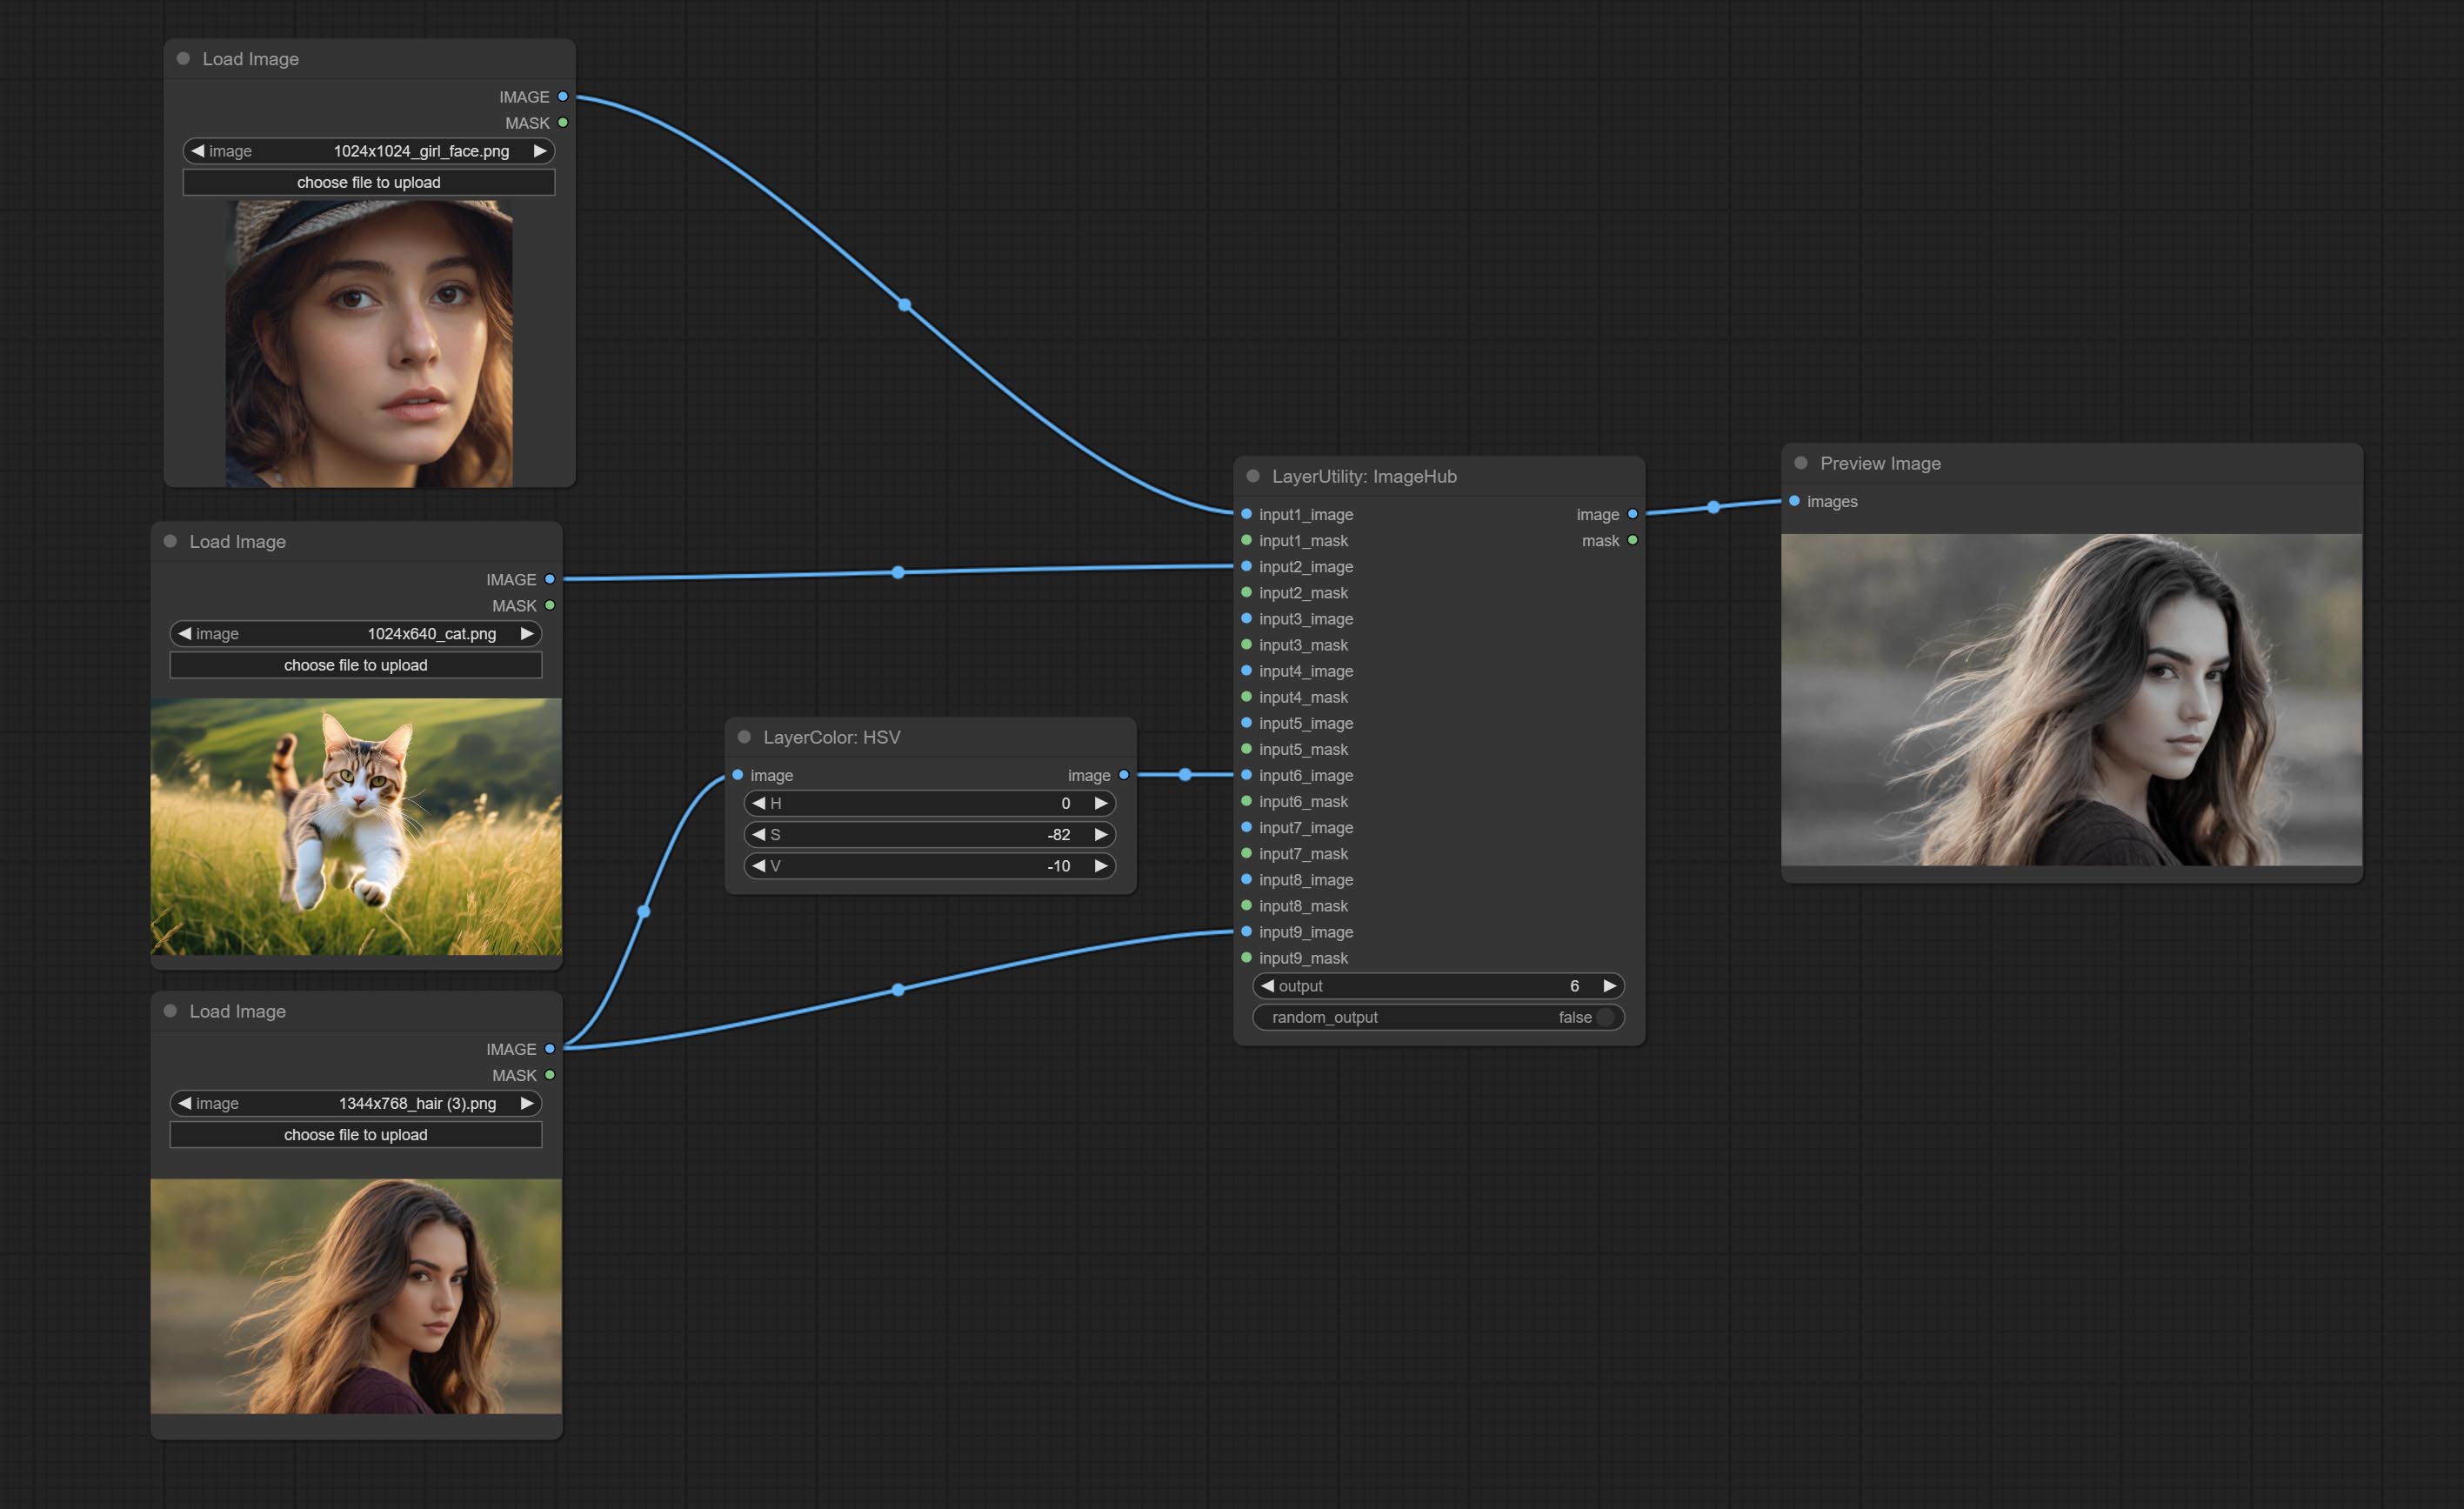
Node options: 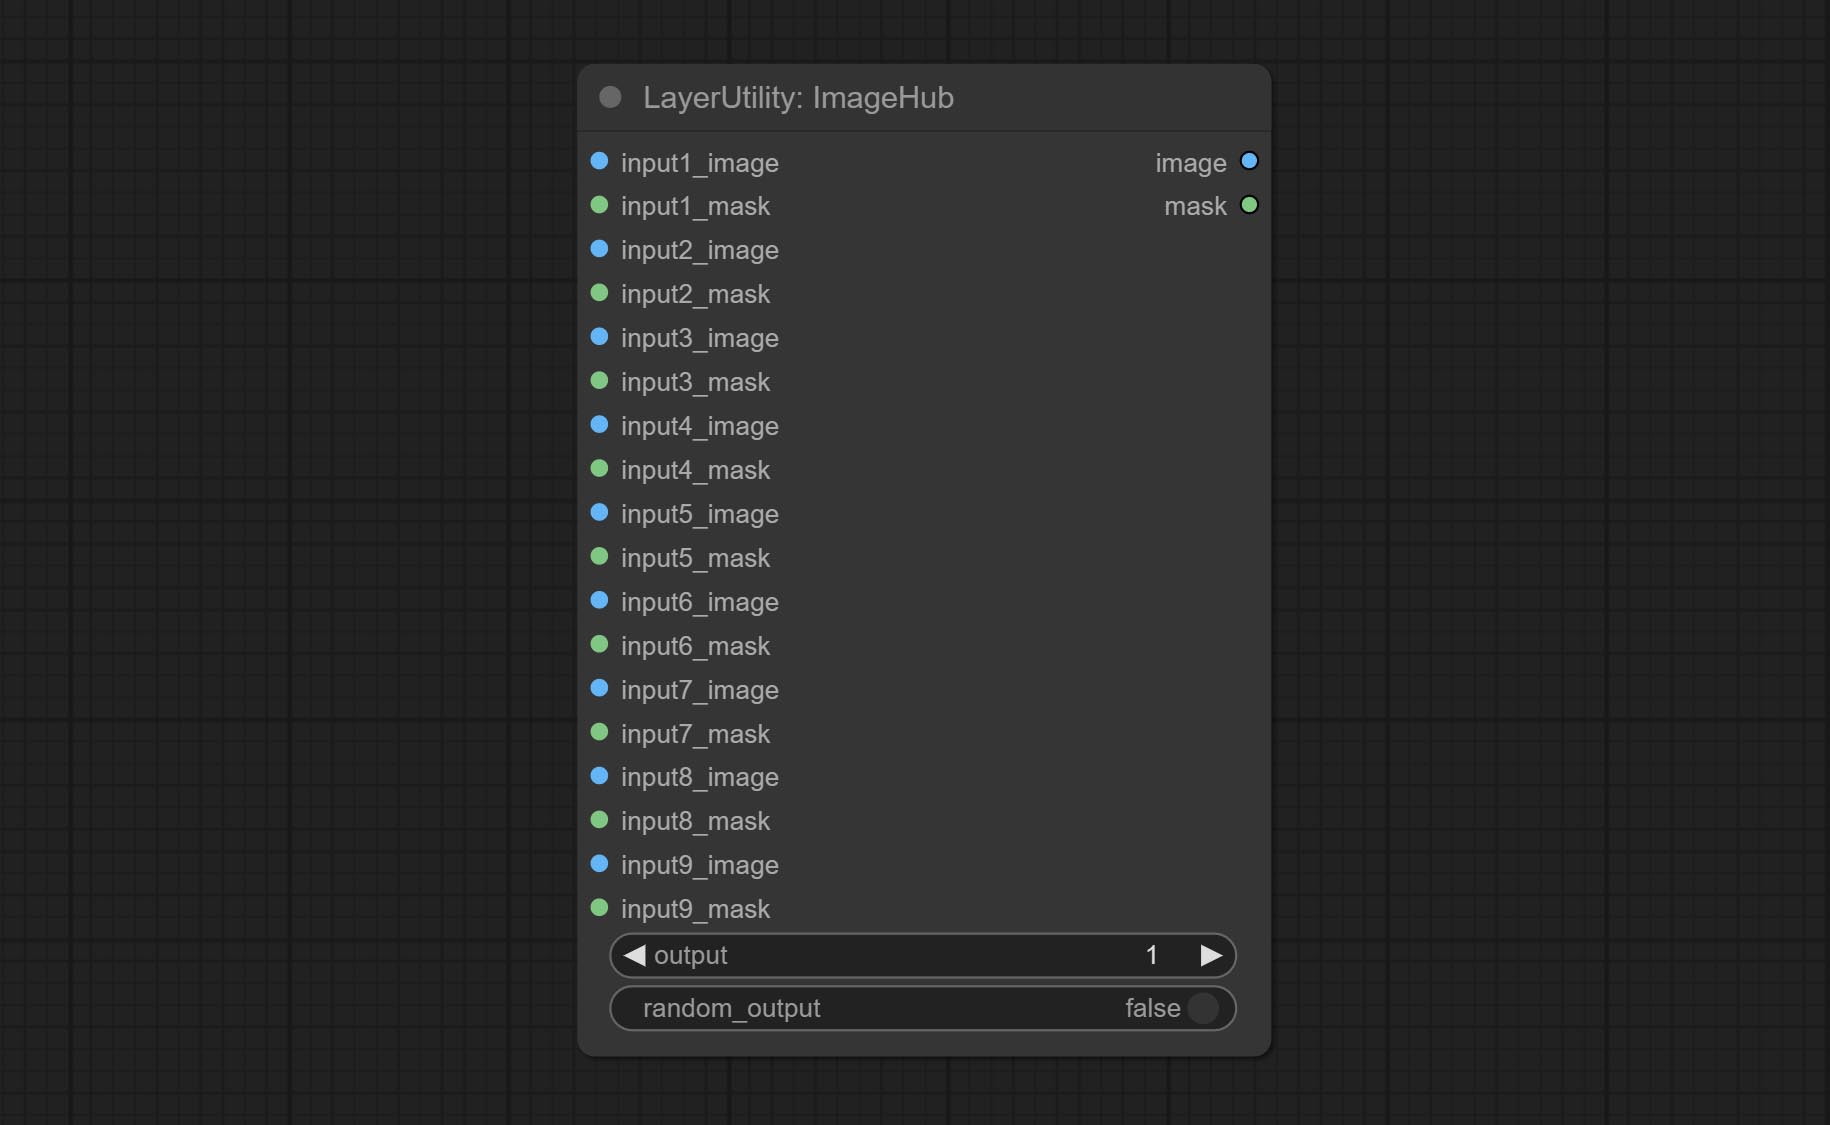
random-output option is True, this setting will be ignored.output setting will be ignored and a random set will be output among all valid inputs. Retrieve specified images or masks from batch images or masks. 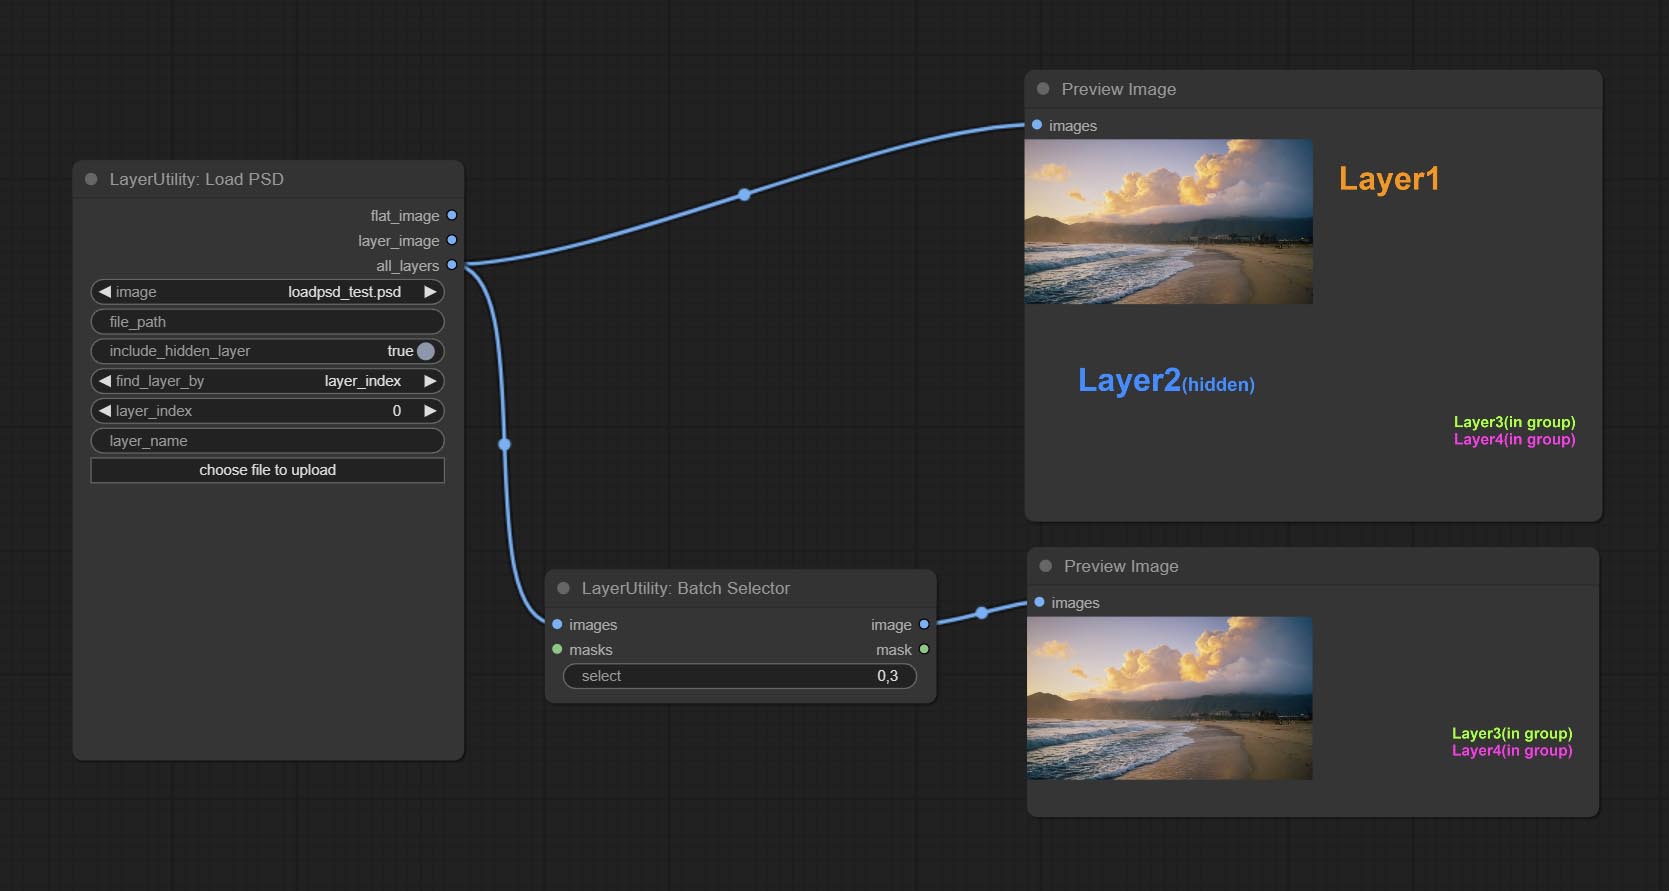
Node Options: 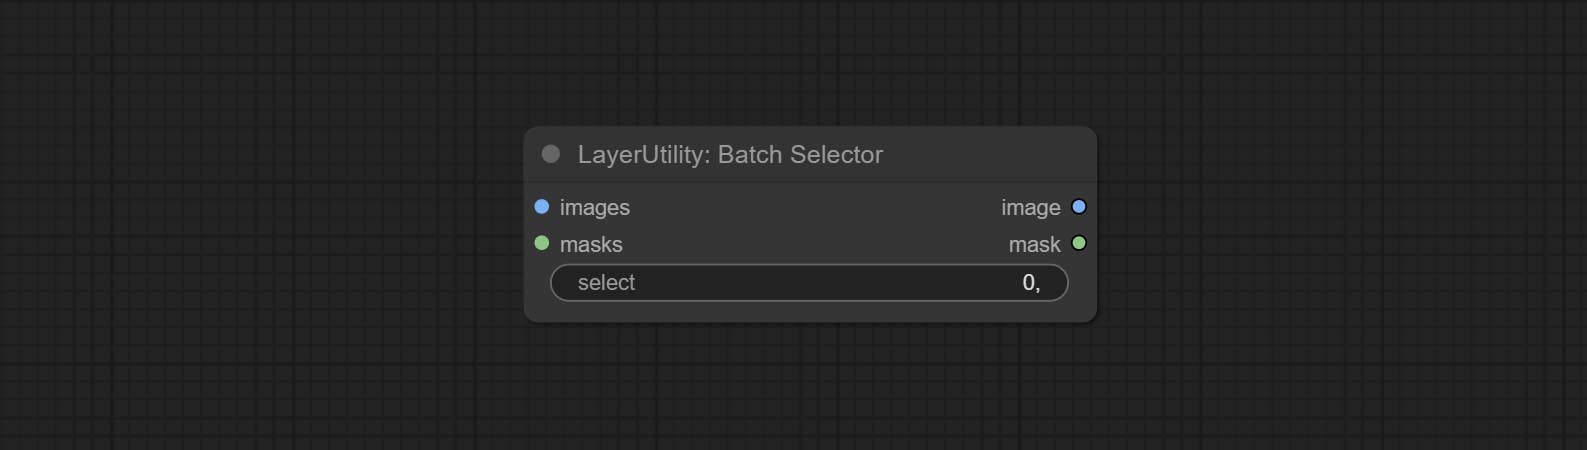
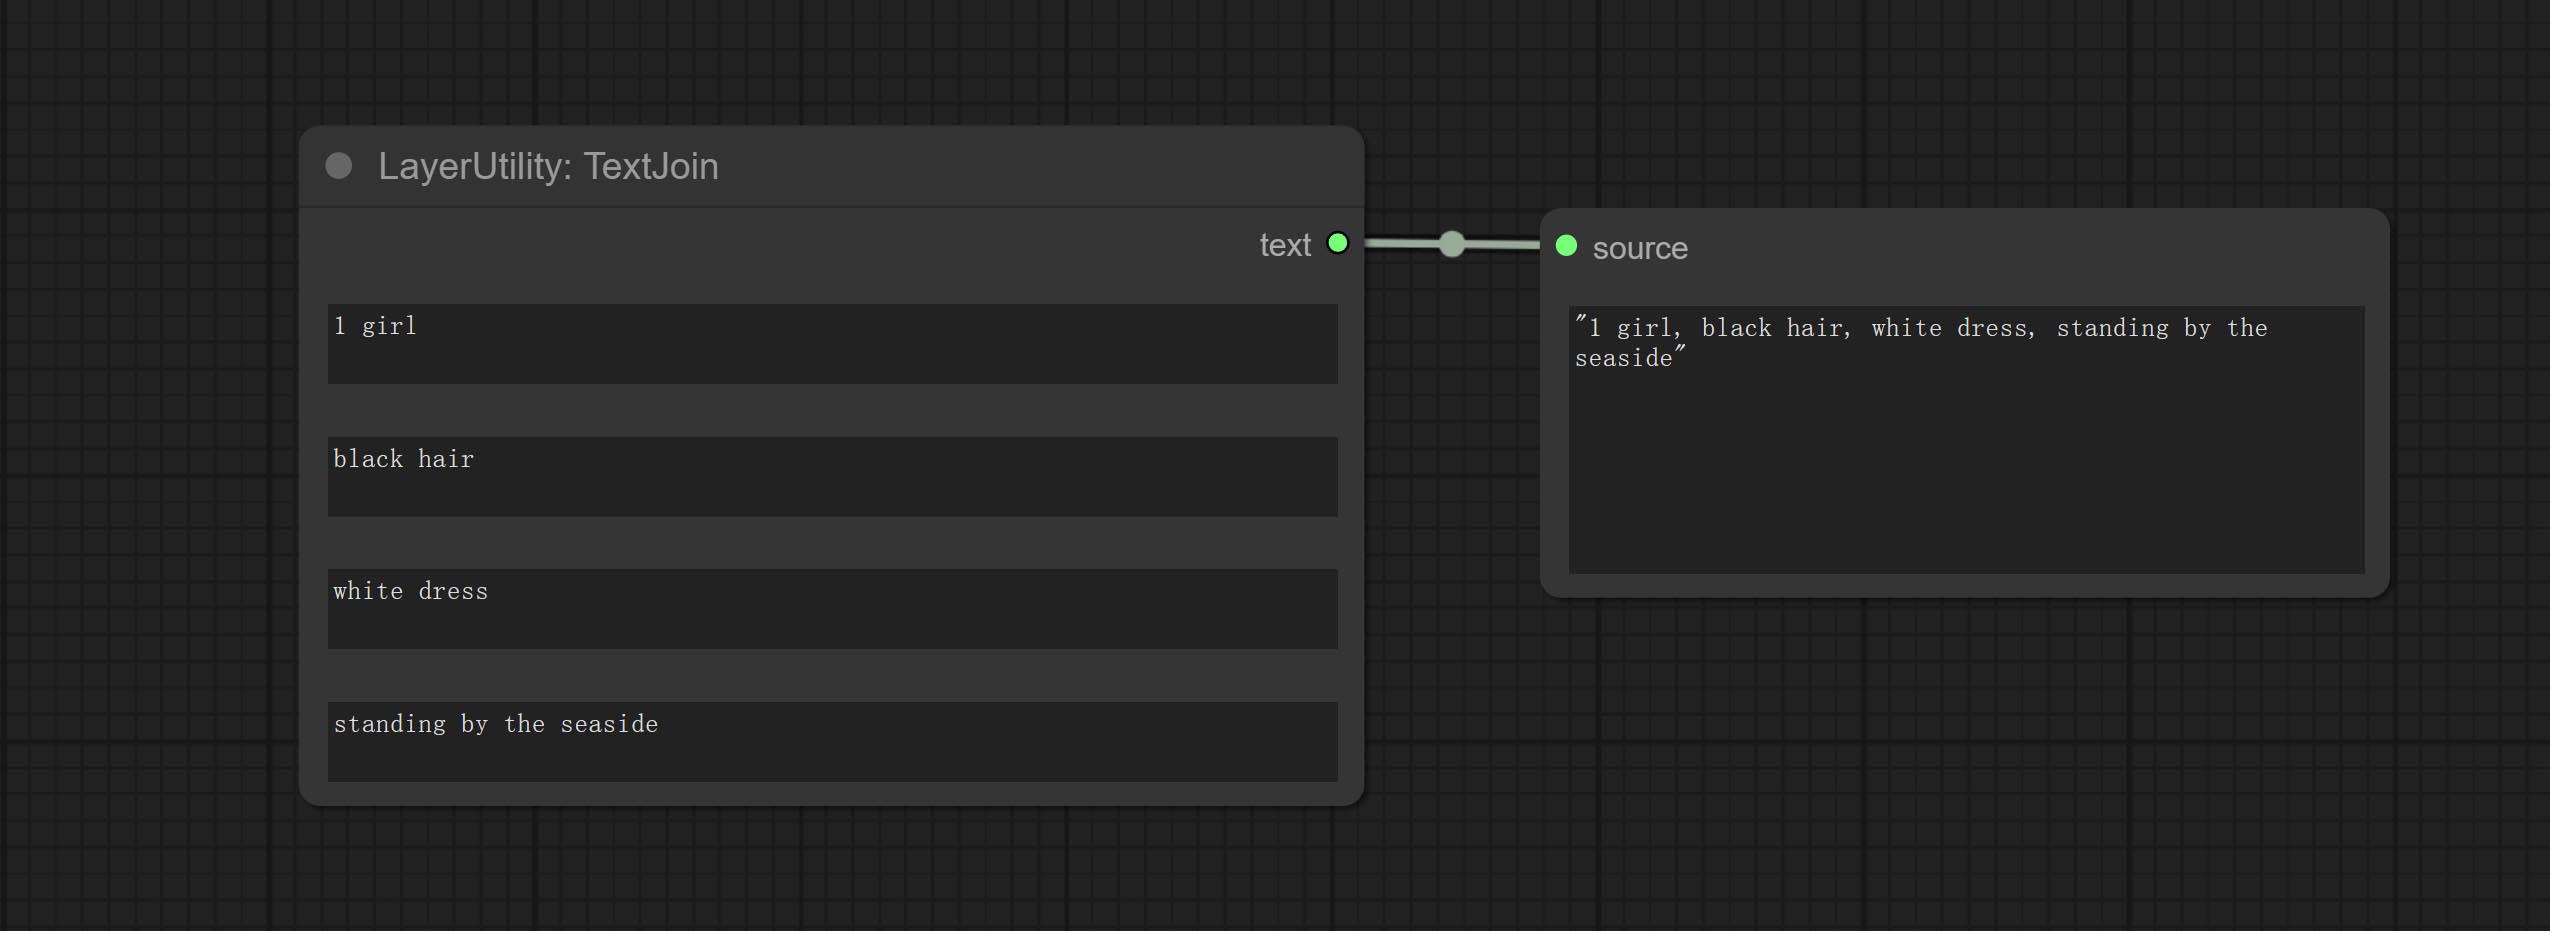
Combine multiple paragraphs of text into one.
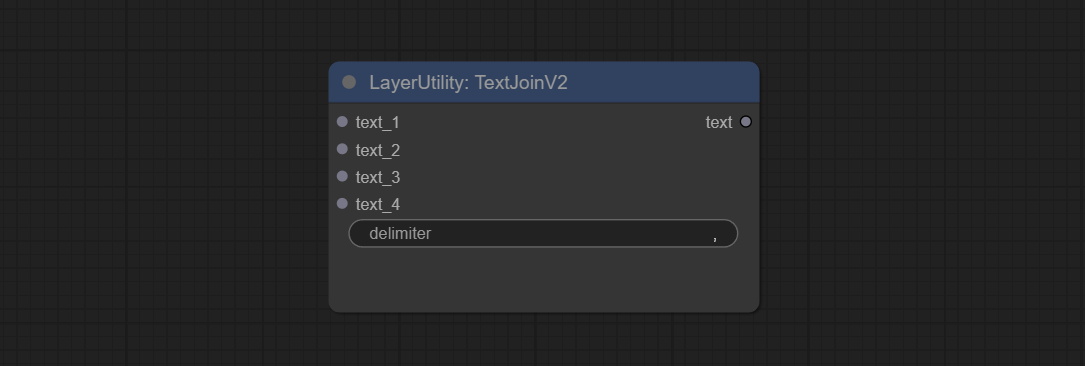
Added delimiter options on the basis of TextJoin.
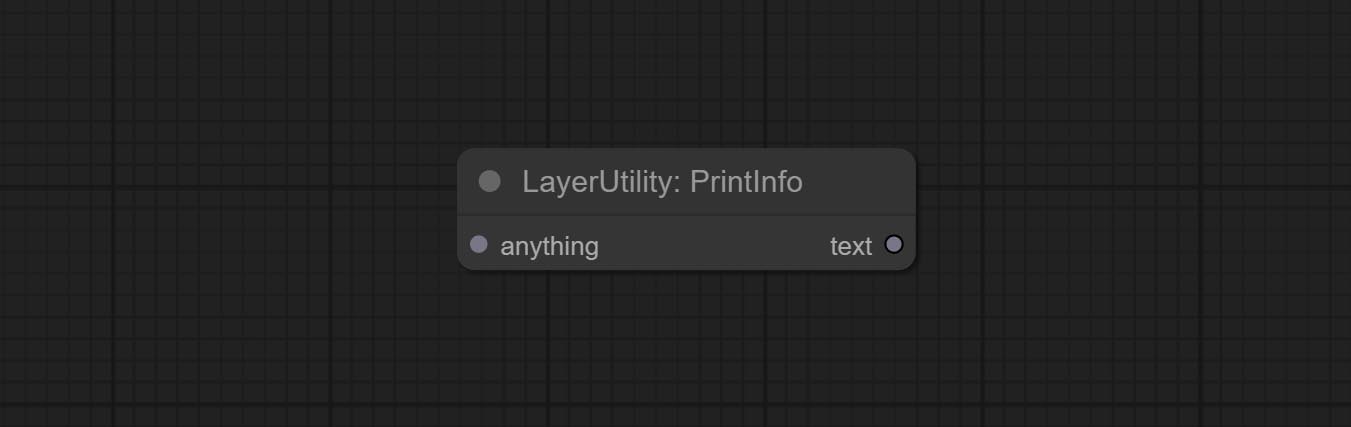
Used to provide assistance for workflow debugging. When running, the properties of any object connected to this node will be printed to the console.
This node allows any type of input.
Output a string.
Output a string. same as TextBox.
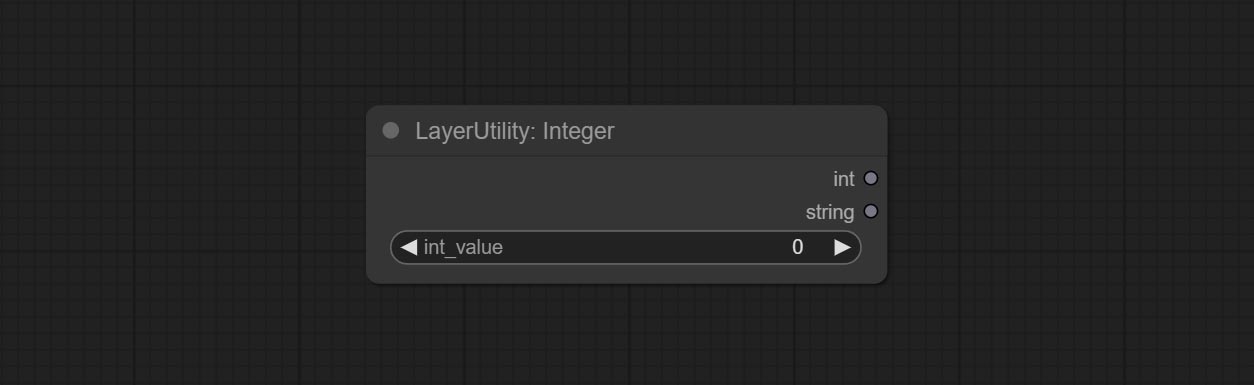
Output a integer value.
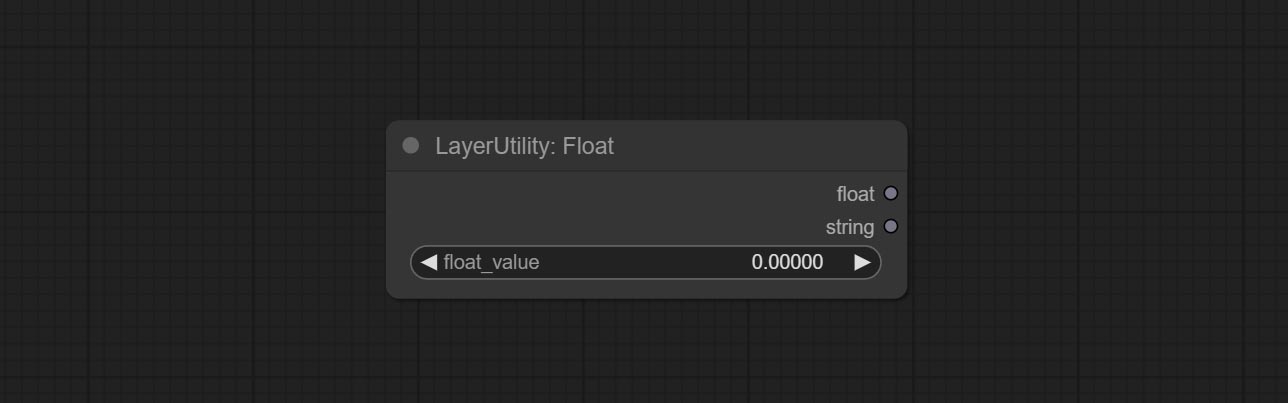
Output a floating-point value with a precision of 5 decimal places.

Output a boolean value.
Used to generate random value within a specified range, with outputs of int, float, and boolean. Supports batch and list generation, and supports batch generation of a set of different random number lists based on image batch. 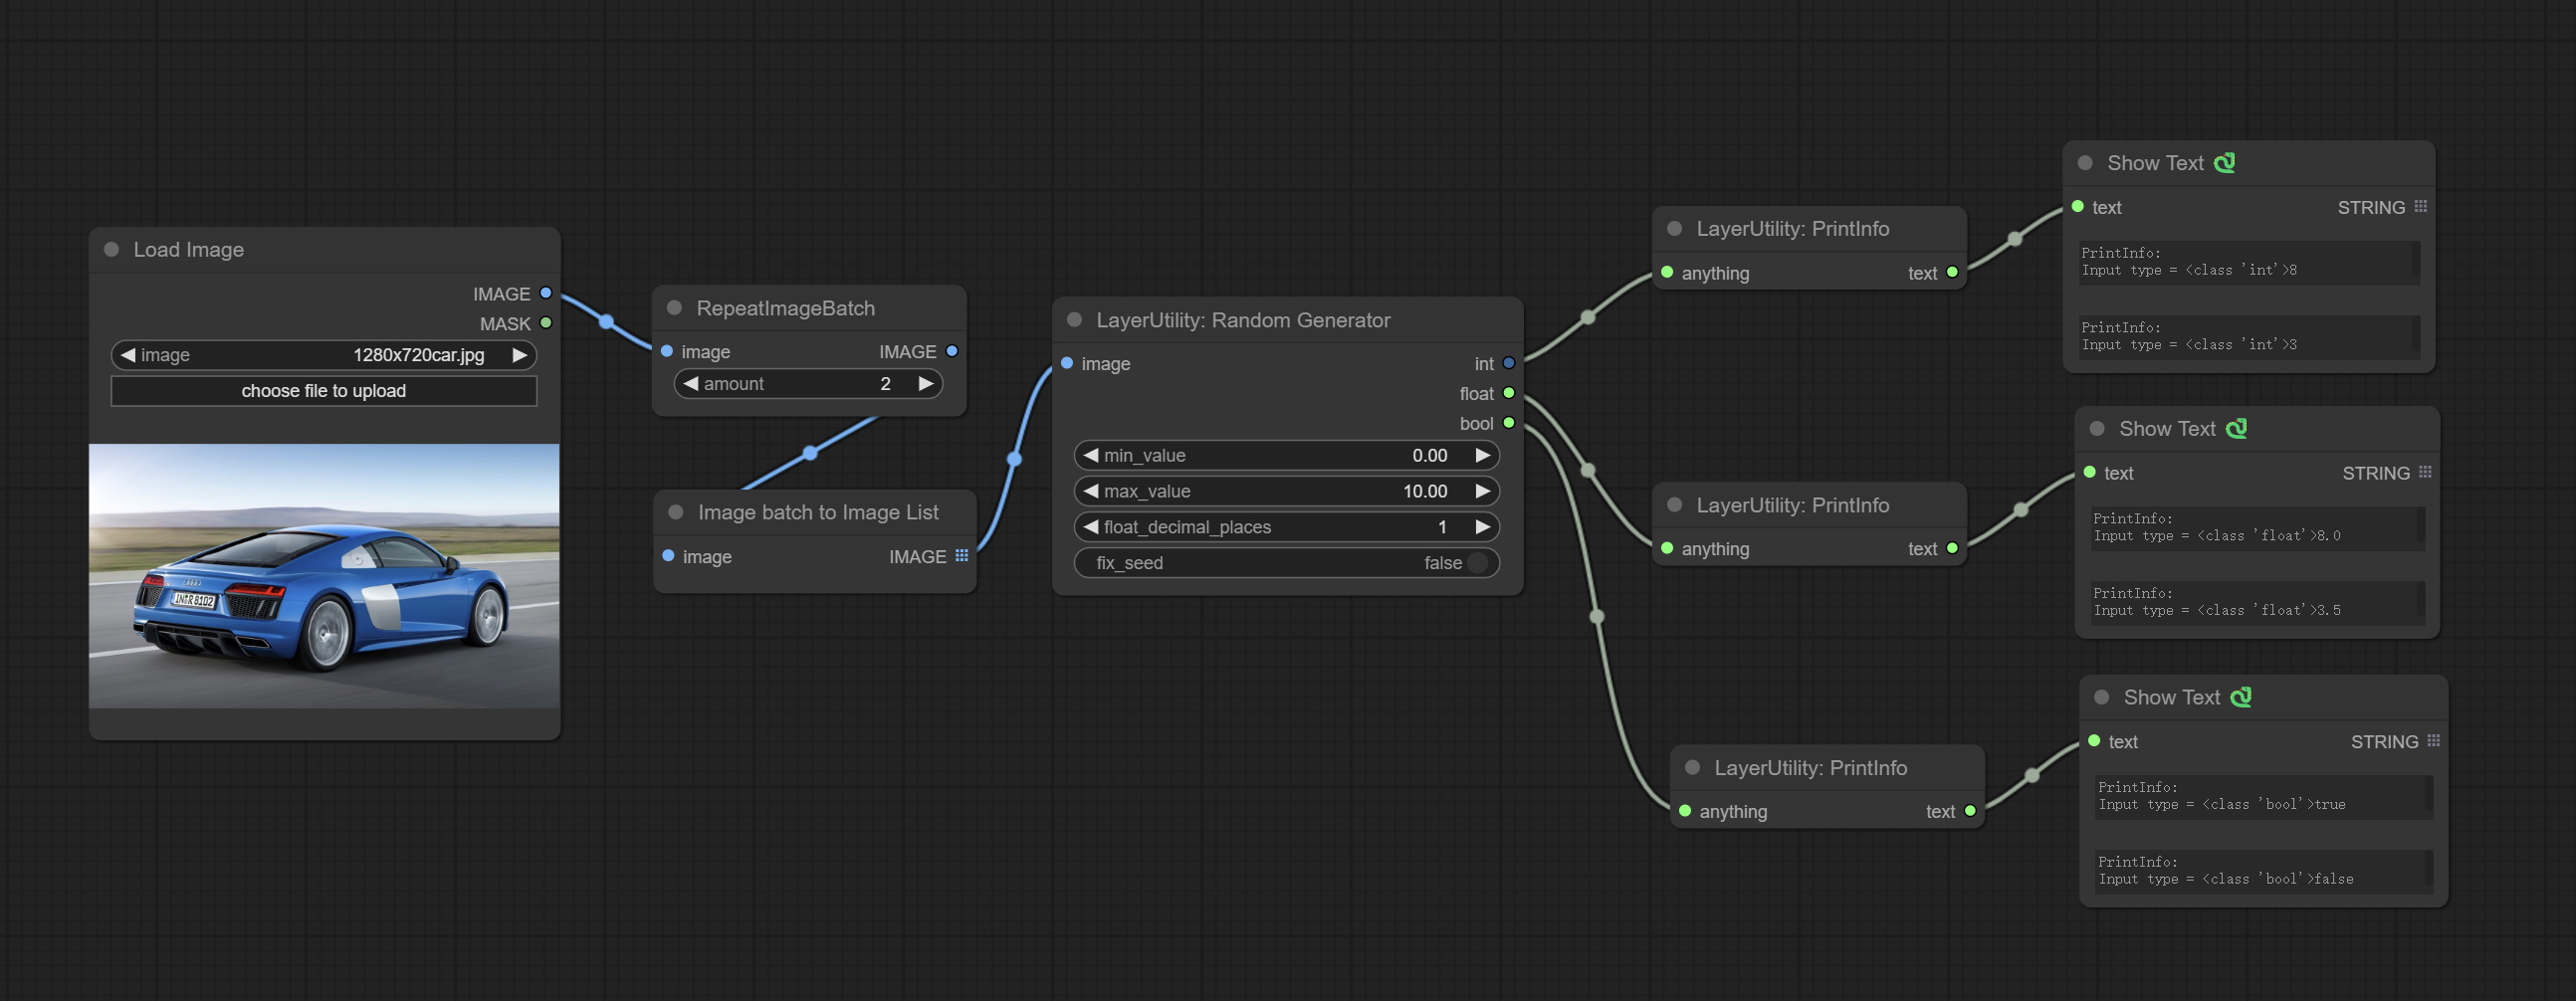
Node Options: 
Outputs: int: Integer random number. float: Float random number. bool: Boolean random number.
On the based of RandomGenerator, add the least random range and seed options.
Node Options: 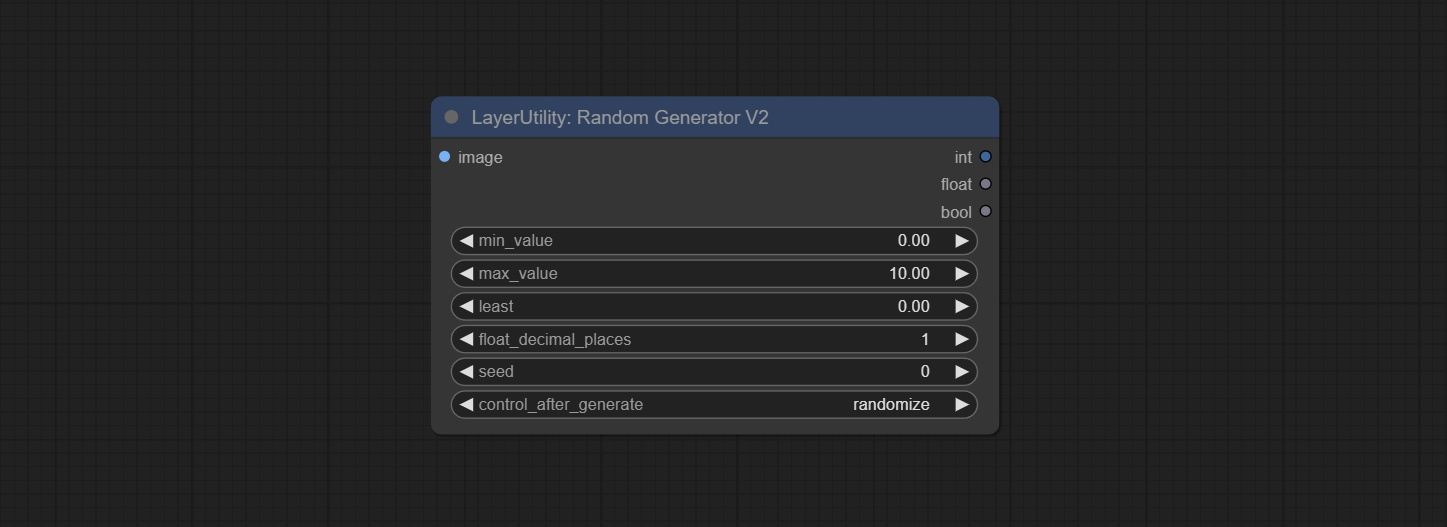
Outputs: int: Integer random number. float: Float random number. bool: Boolean random number.
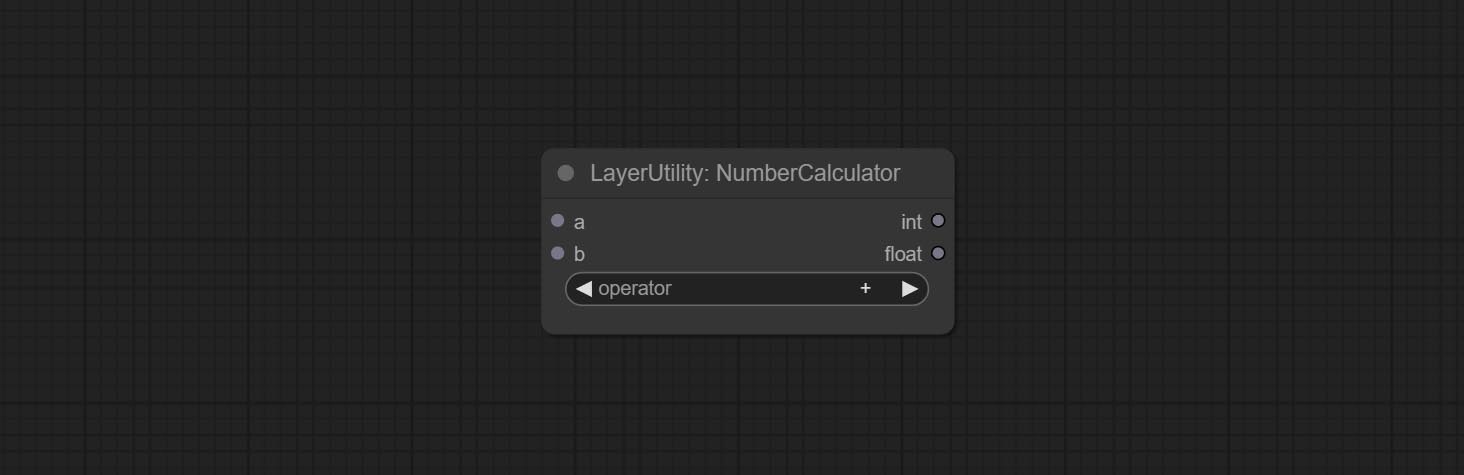
Performs mathematical operations on two numeric values and outputs integer and floating point results * . Supported operations include + , - , * , / , ** , // , % .
* The input only supports boolean, integer, and floating point numbers, forcing in other data will result in error.
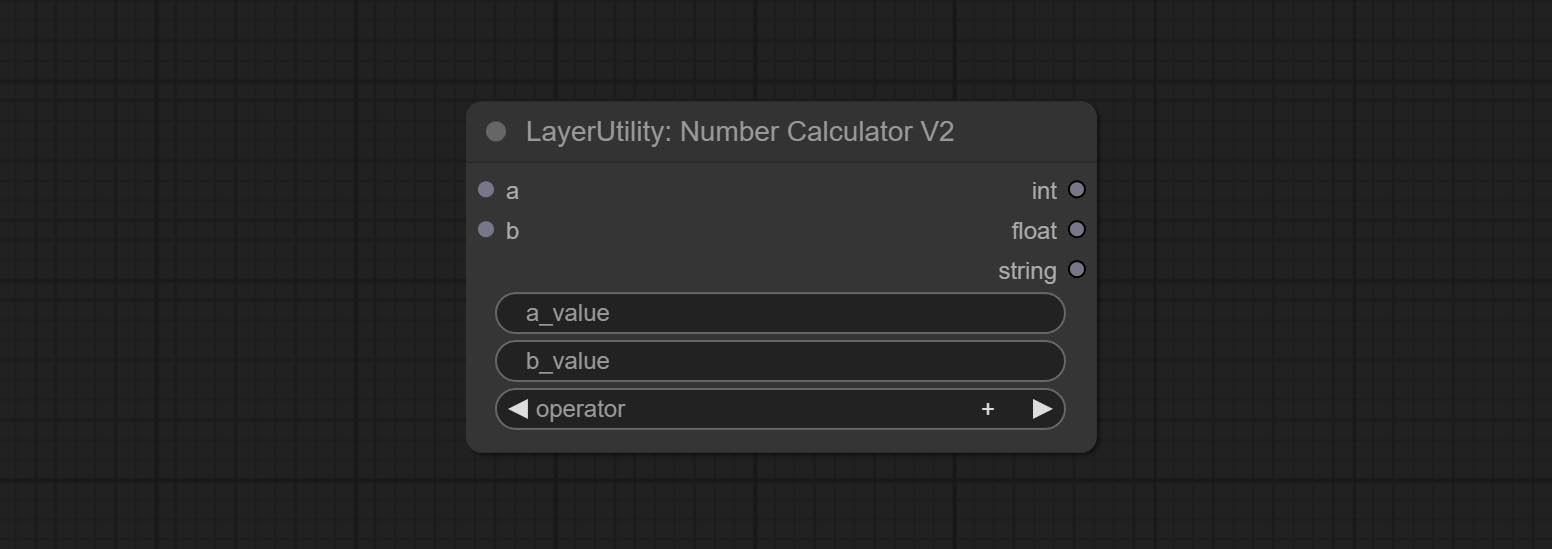
The upgraded version of NumberCalculator has added numerical inputs within nodes and square root operations. The square root operation option is nth_root Note: The input takes priority, and when there is input, the values within the node will be invalid.
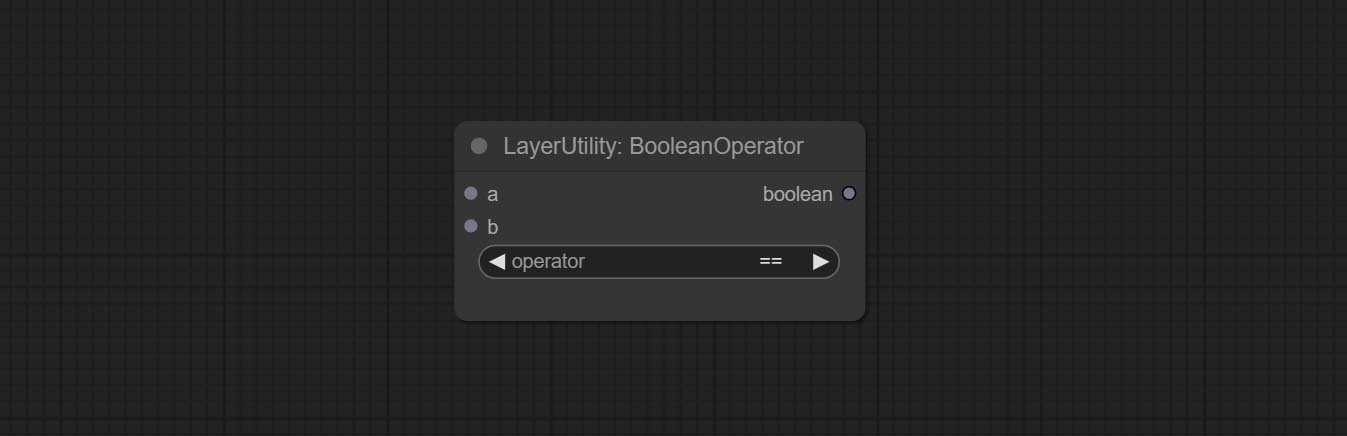
Perform a Boolean operation on two numeric values and output the result * . Supported operations include == , != , and , or , xor , not , min , max .
* The input only supports boolean, integer, and floating point numbers, forcing in other data will result in error. The and operation between the values outputs a larger number, and the or operation outputs a smaller number.
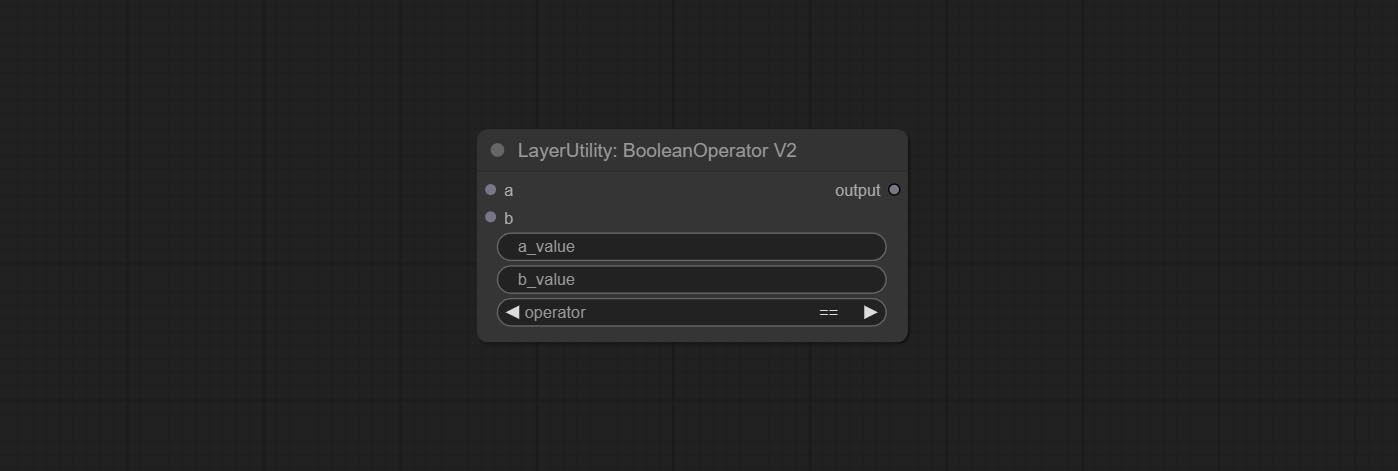
The upgraded version of Boolean Operator has added numerical inputs within nodes and added judgments for greater than, less than, greater than or equal to, and less than or equal to. Note: The input takes priority, and when there is input, the values within the node will be invalid.
Determine whether the text contains or does not contain substrings, and output a Boolean value.
Node Options: 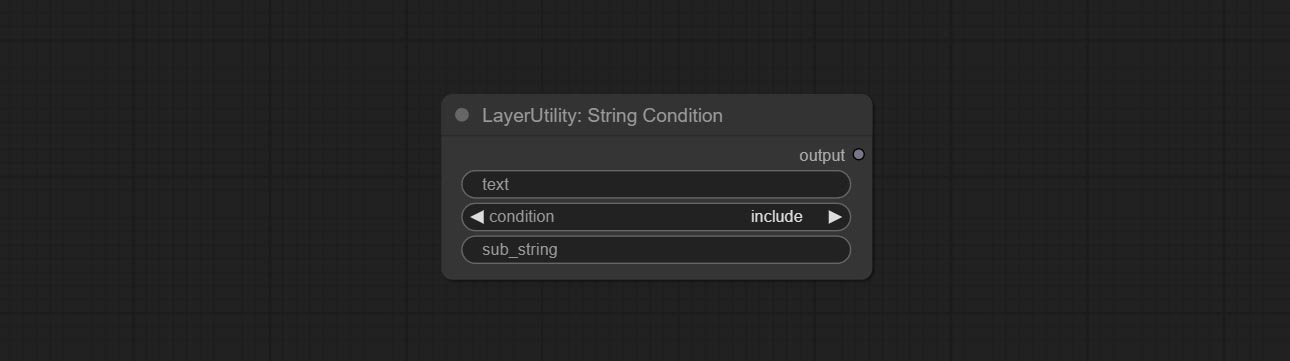
include determines whether it contains a substring, and exclude determines whether it does not.Check if the mask contains enough valid areas and output a Boolean value.
Node Options: 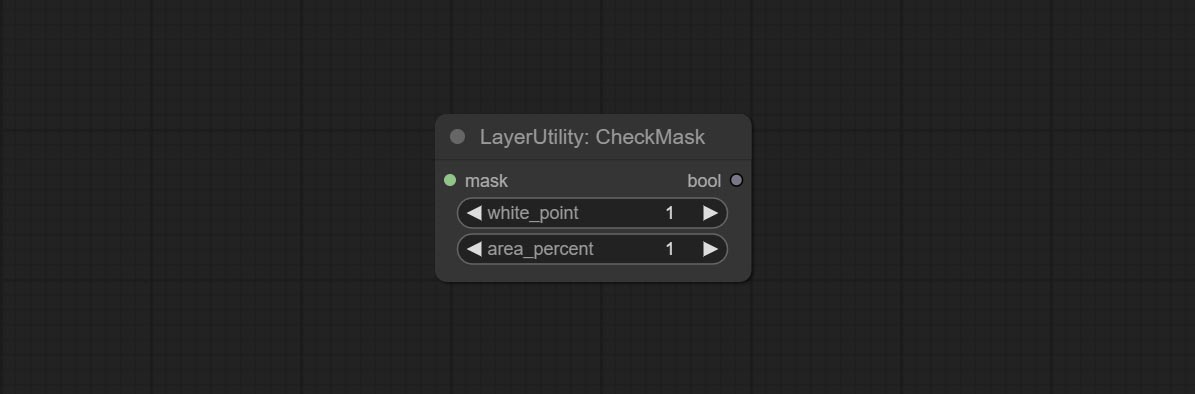
On the basis of CheckMask, the method option has been added, which allows for the selection of different detection methods. The area_percent is changed to a floating point number with an accuracy of 2 decimal places, which can detect smaller effective areas.
Node Options: 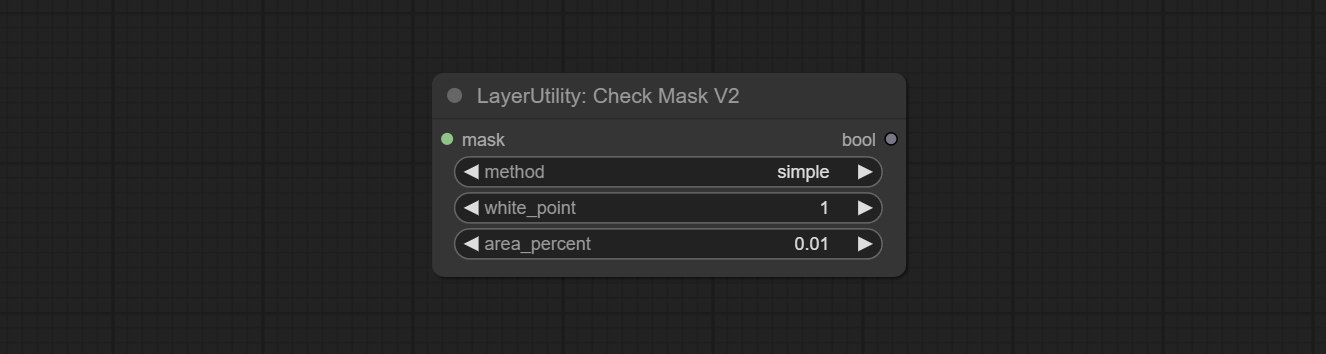
simple and detectability . The simple method only detects whether the mask is completely black, while the detect_percent method detects the proportion of effective areas.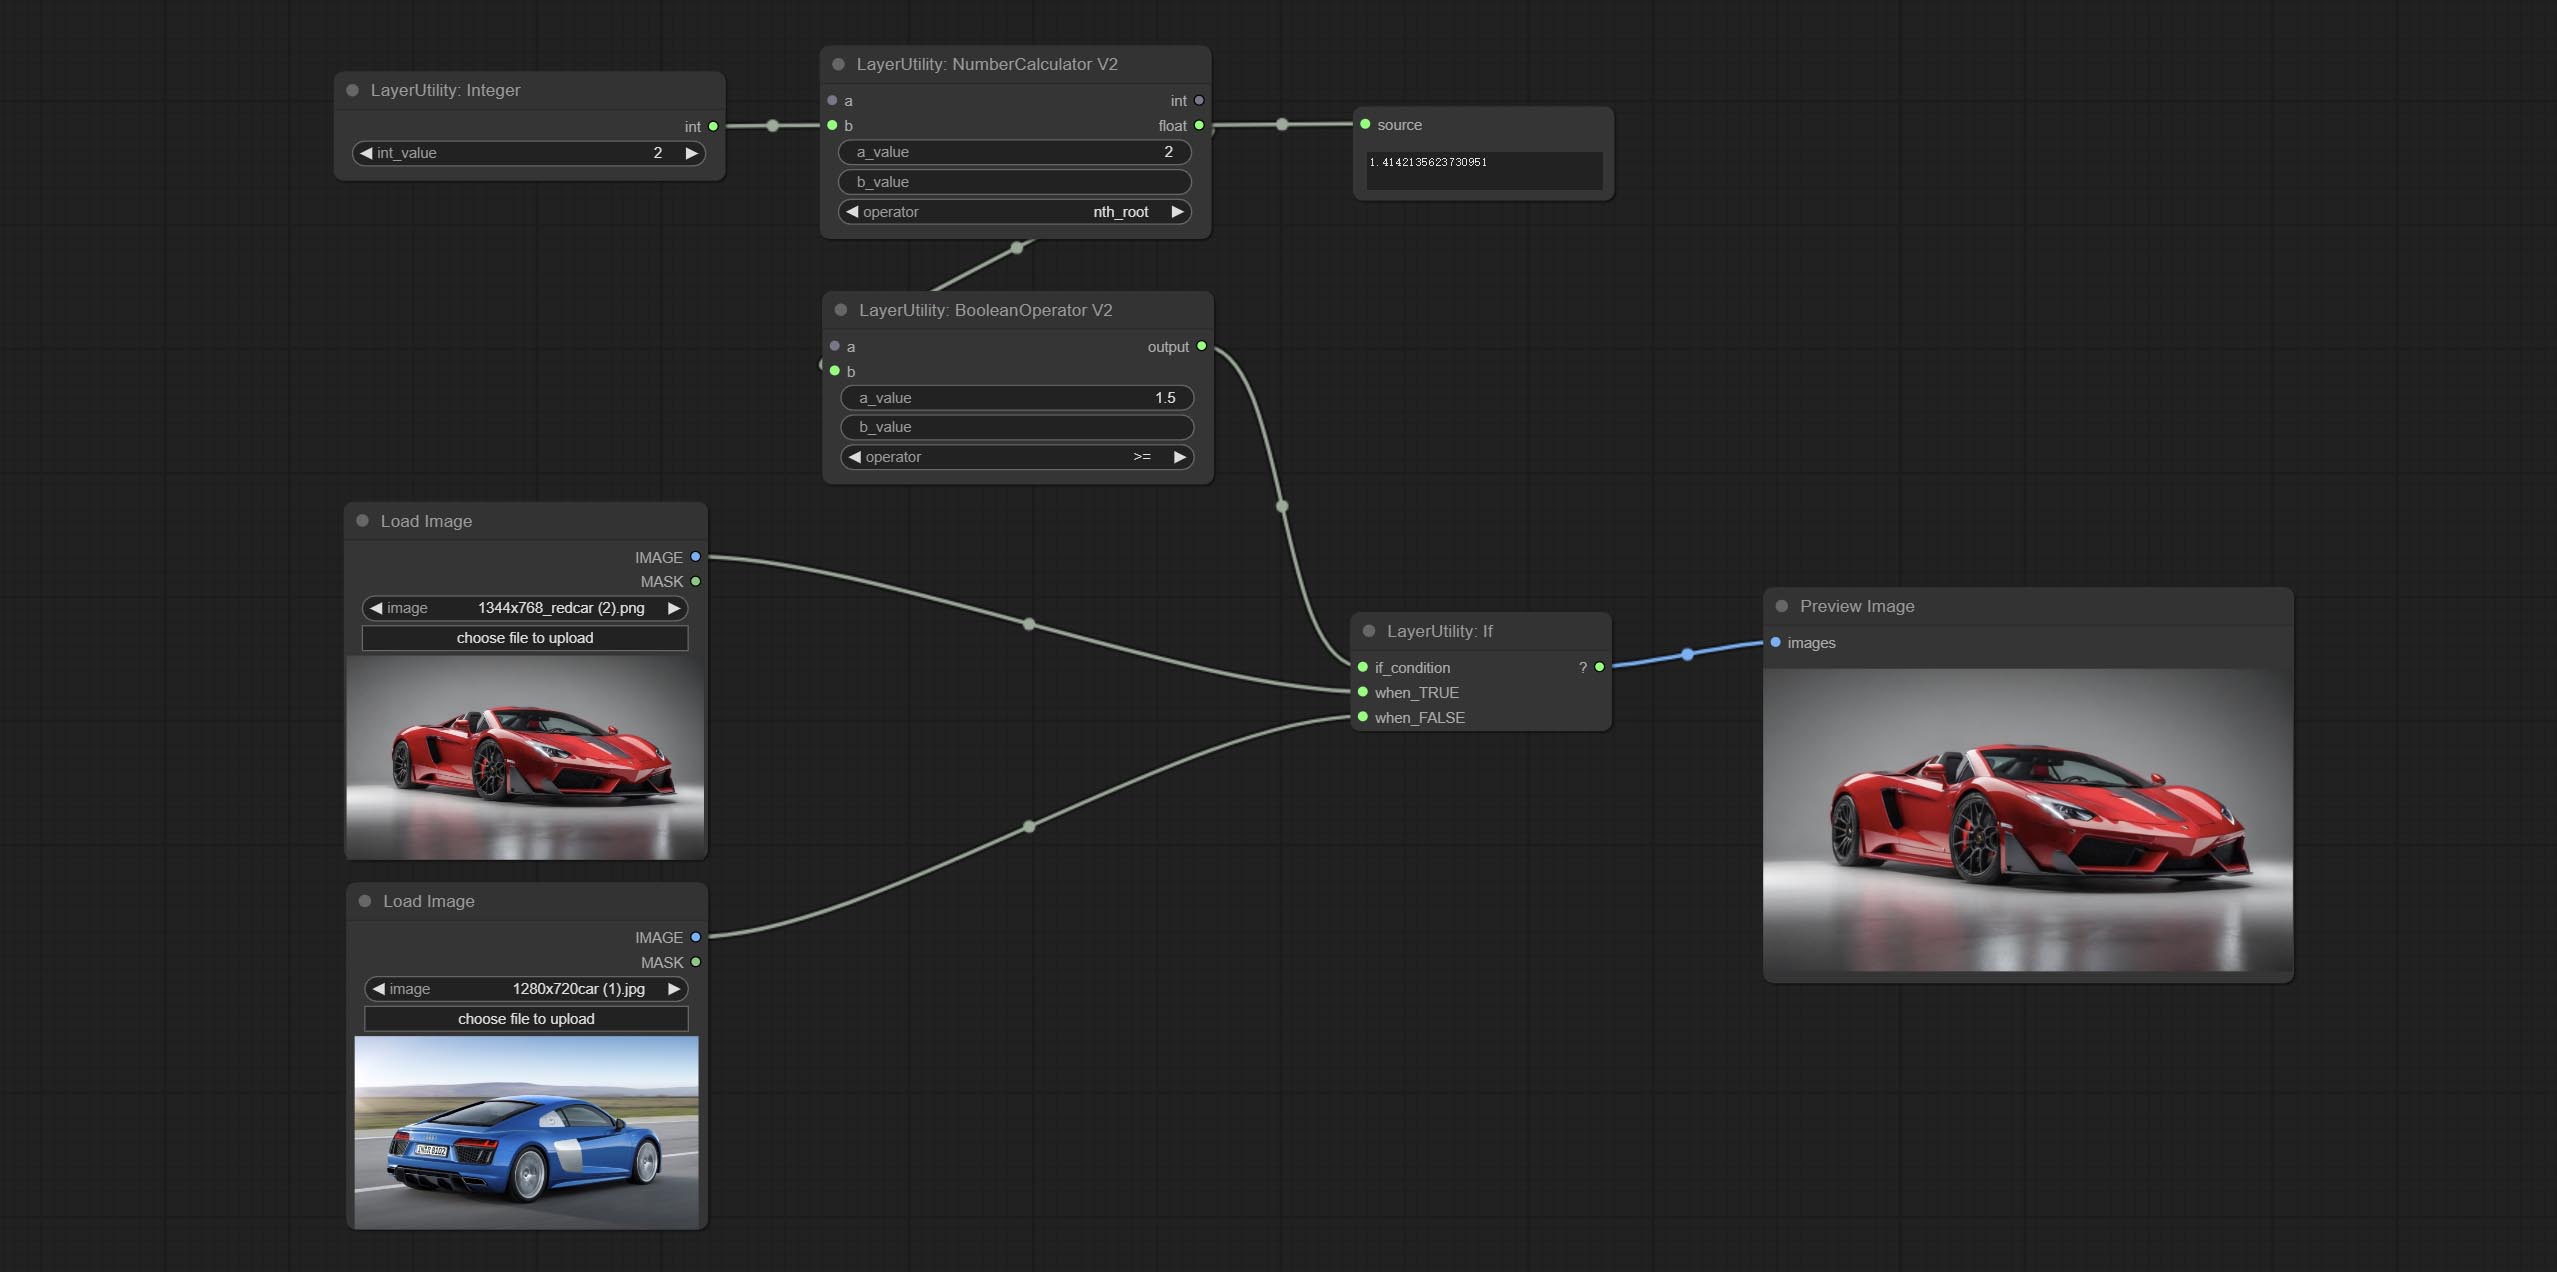
Switches output based on Boolean conditional input. It can be used for any type of data switching, including but not limited to numeric values, strings, pictures, masks, models, latent, pipe pipelines, etc.
Node Options: 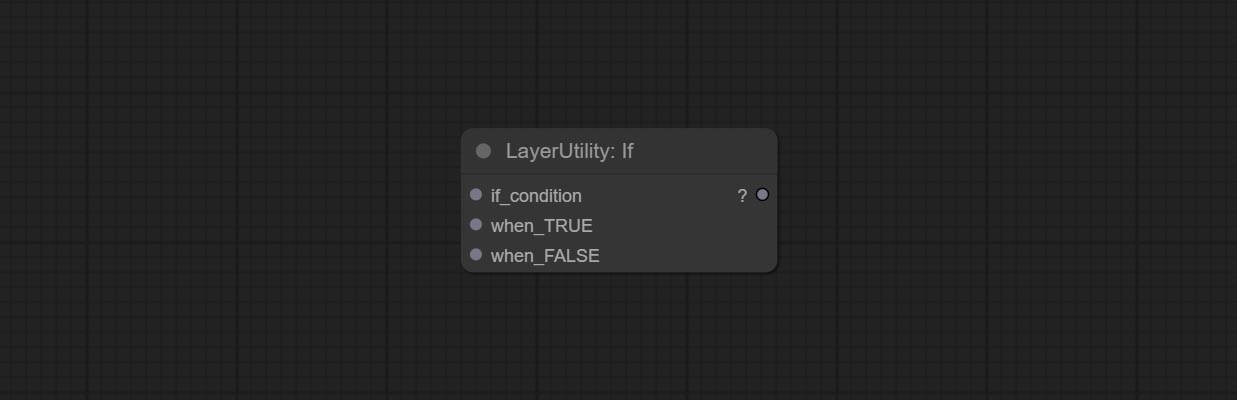

Switches the output based on the matching string. It can be used for any type of data switching, including but not limited to numeric values, strings, pictures, masks, models, latent, pipe pipelines, etc. Supports up to 3 sets of case switches. Compare case to switch_condition , if the same, output the corresponding input. If there are the same cases, the output is prioritized in order. If there is no matching case, the default input is output. Note that the string is case sensitive and Chinese and English full-width and half-width.
Node Options: 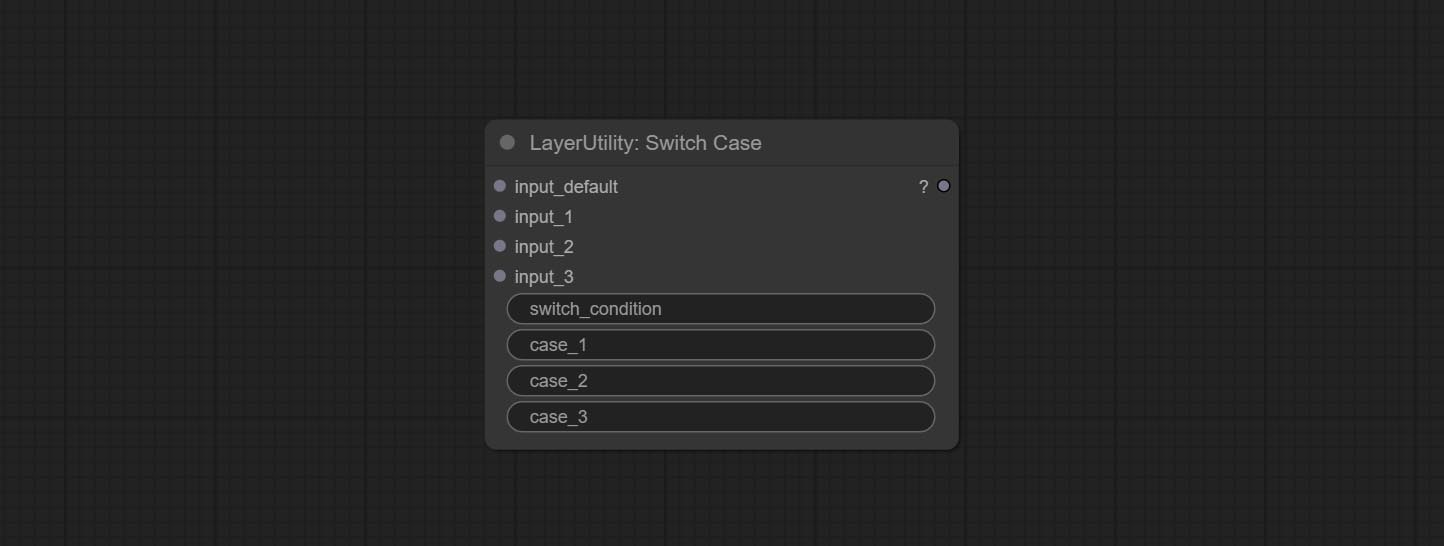
case_1 . This input is optional.case_2 . This input is optional.case_3 . This input is optional.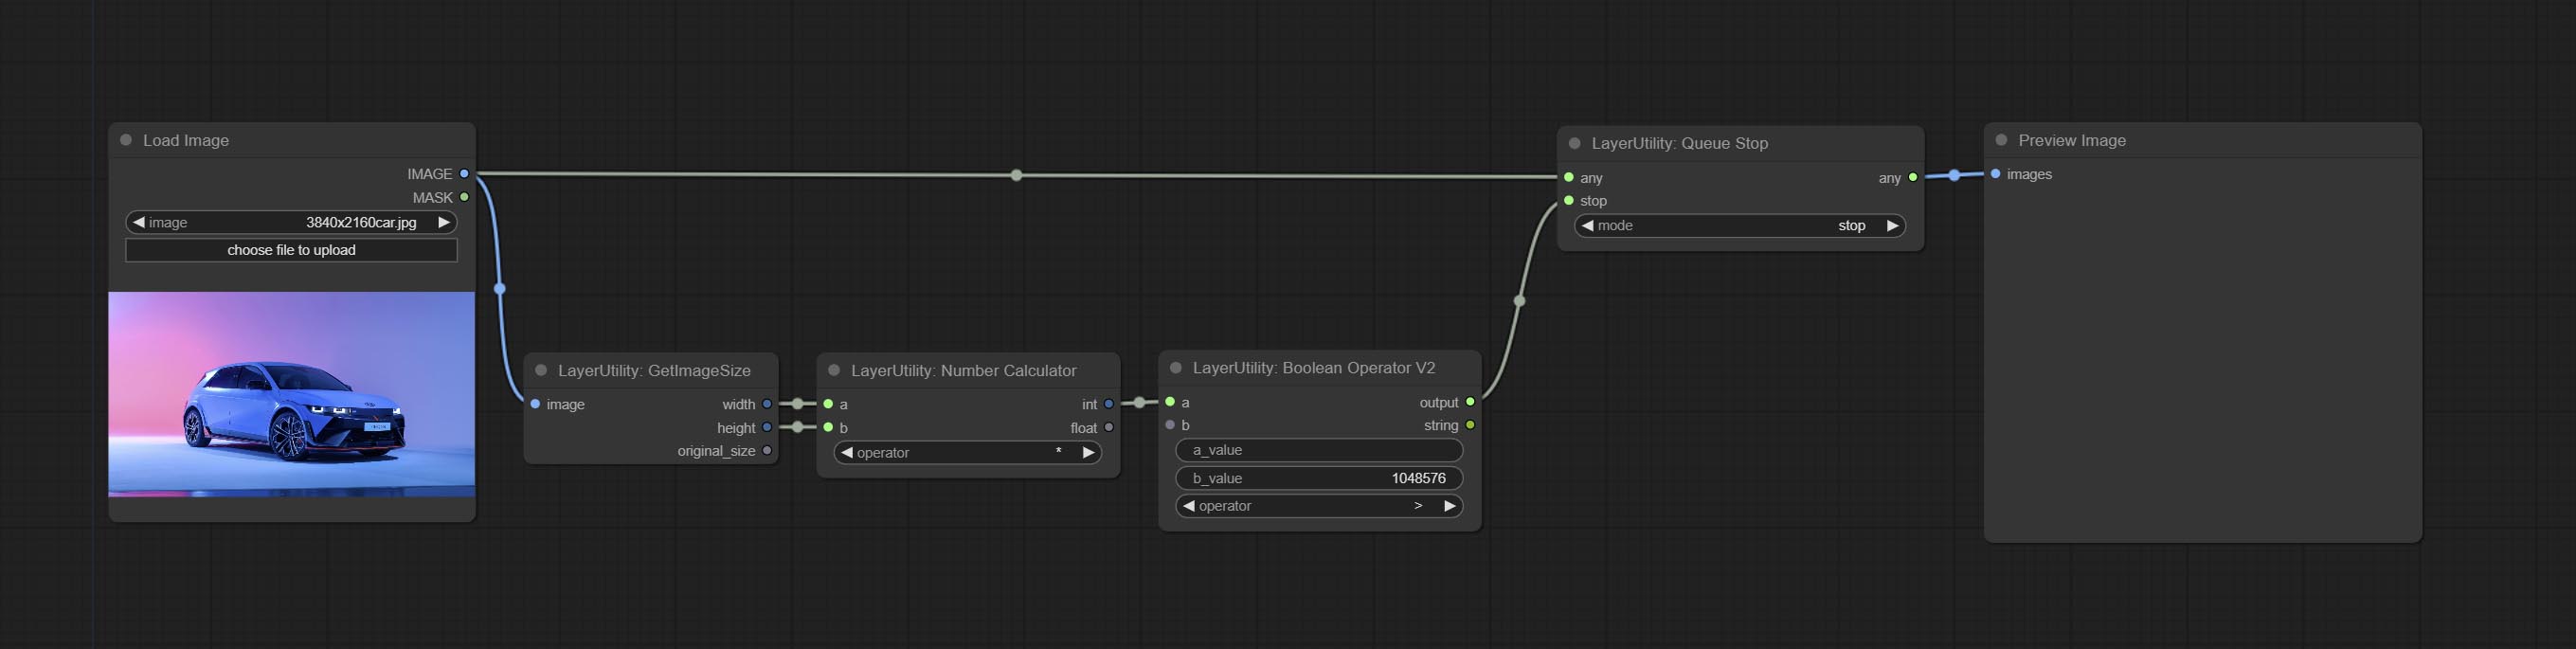
Stop the current queue. When executed at this node, the queue will stop. The workflow diagram above illustrates that if the image is larger than 1Mega pixels, the queue will stop executing.
Node Options: 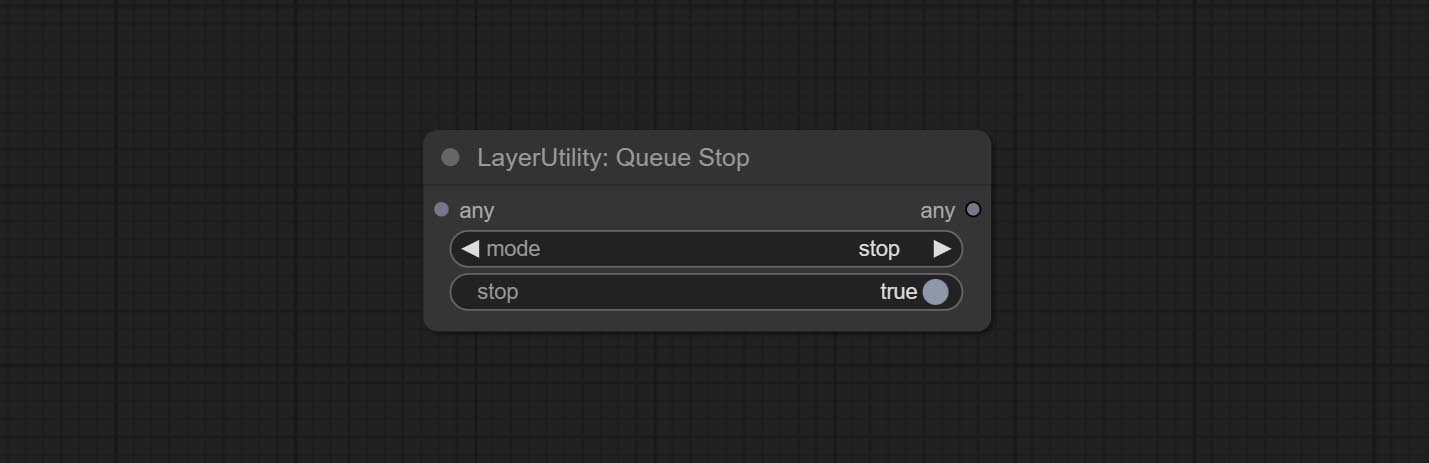
stop , it will be determined whether to stop based on the input conditions. If you choose continue , ignore the condition to continue executing the queue.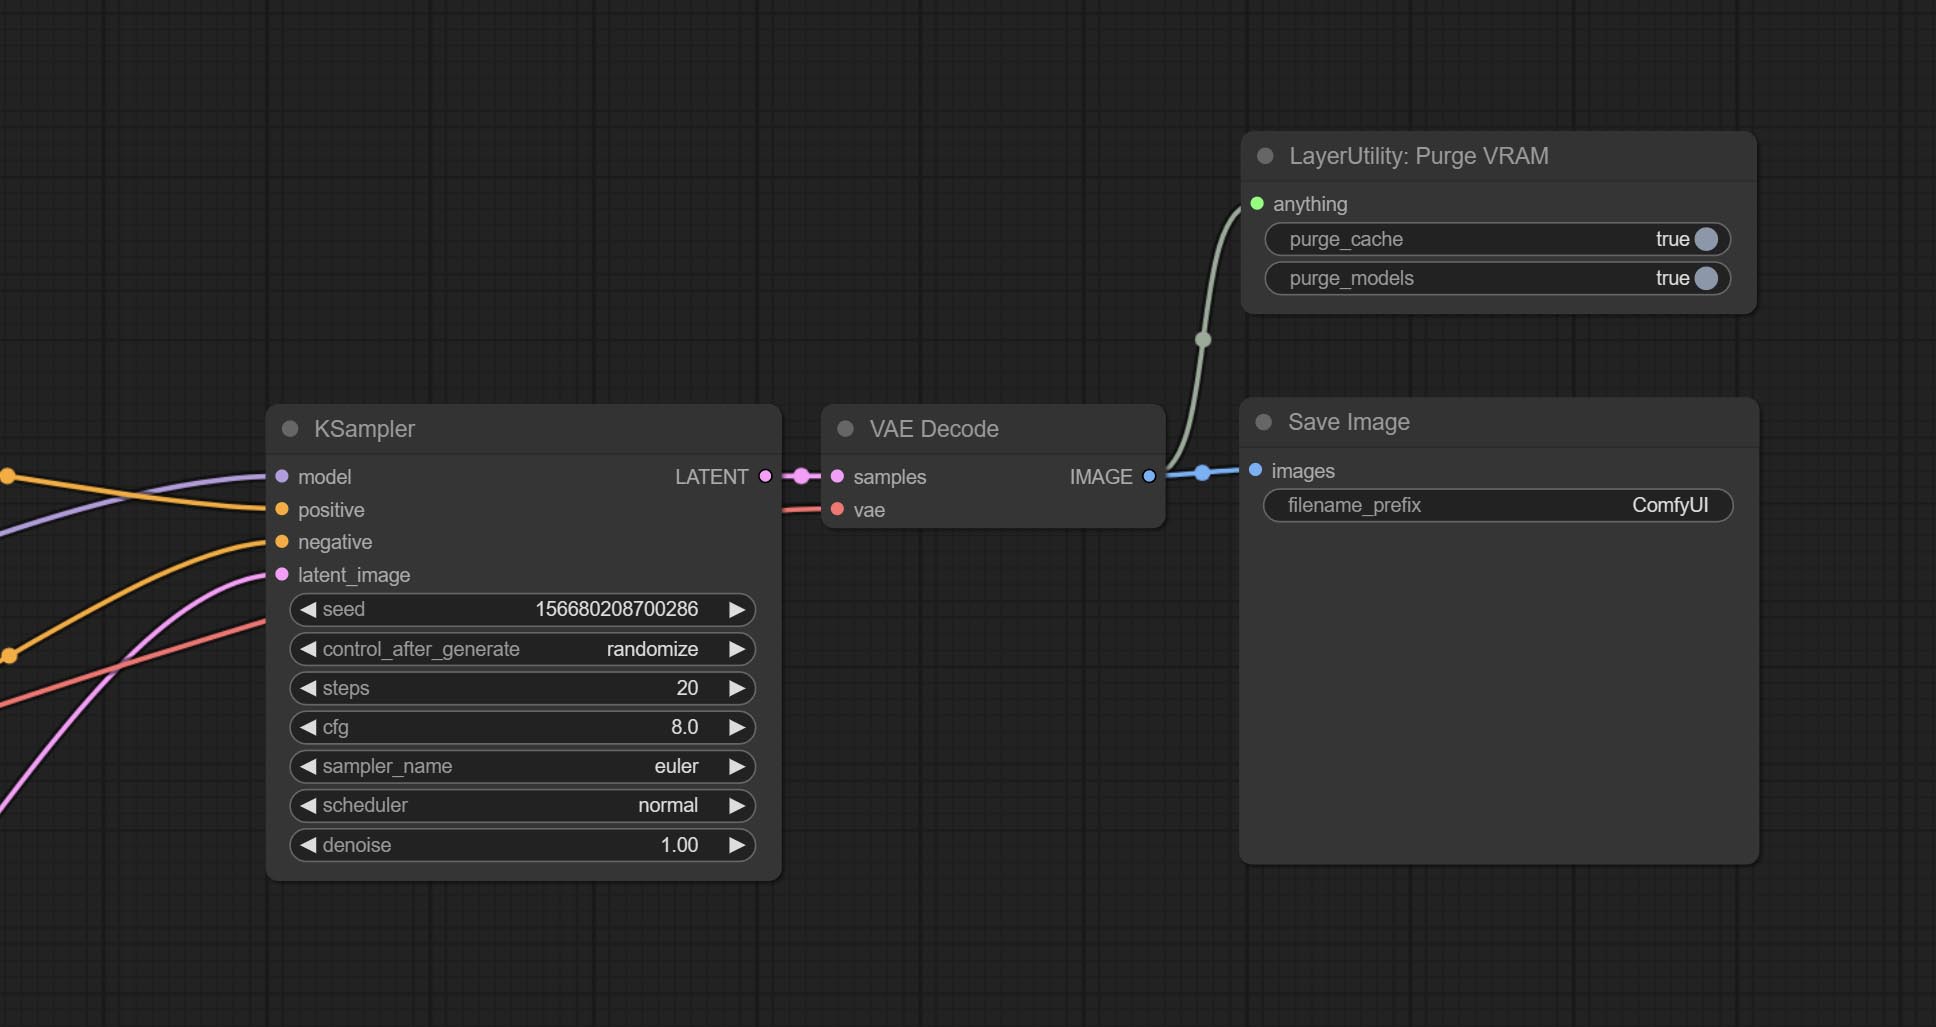
Clean up GPU VRAM and system RAM. any type of input can be accessed, and when executed to this node, the VRAM and garbage objects in the RAM will be cleaned up. Usually placed after the node where the inference task is completed, such as the VAE Decode node.
Node Options:
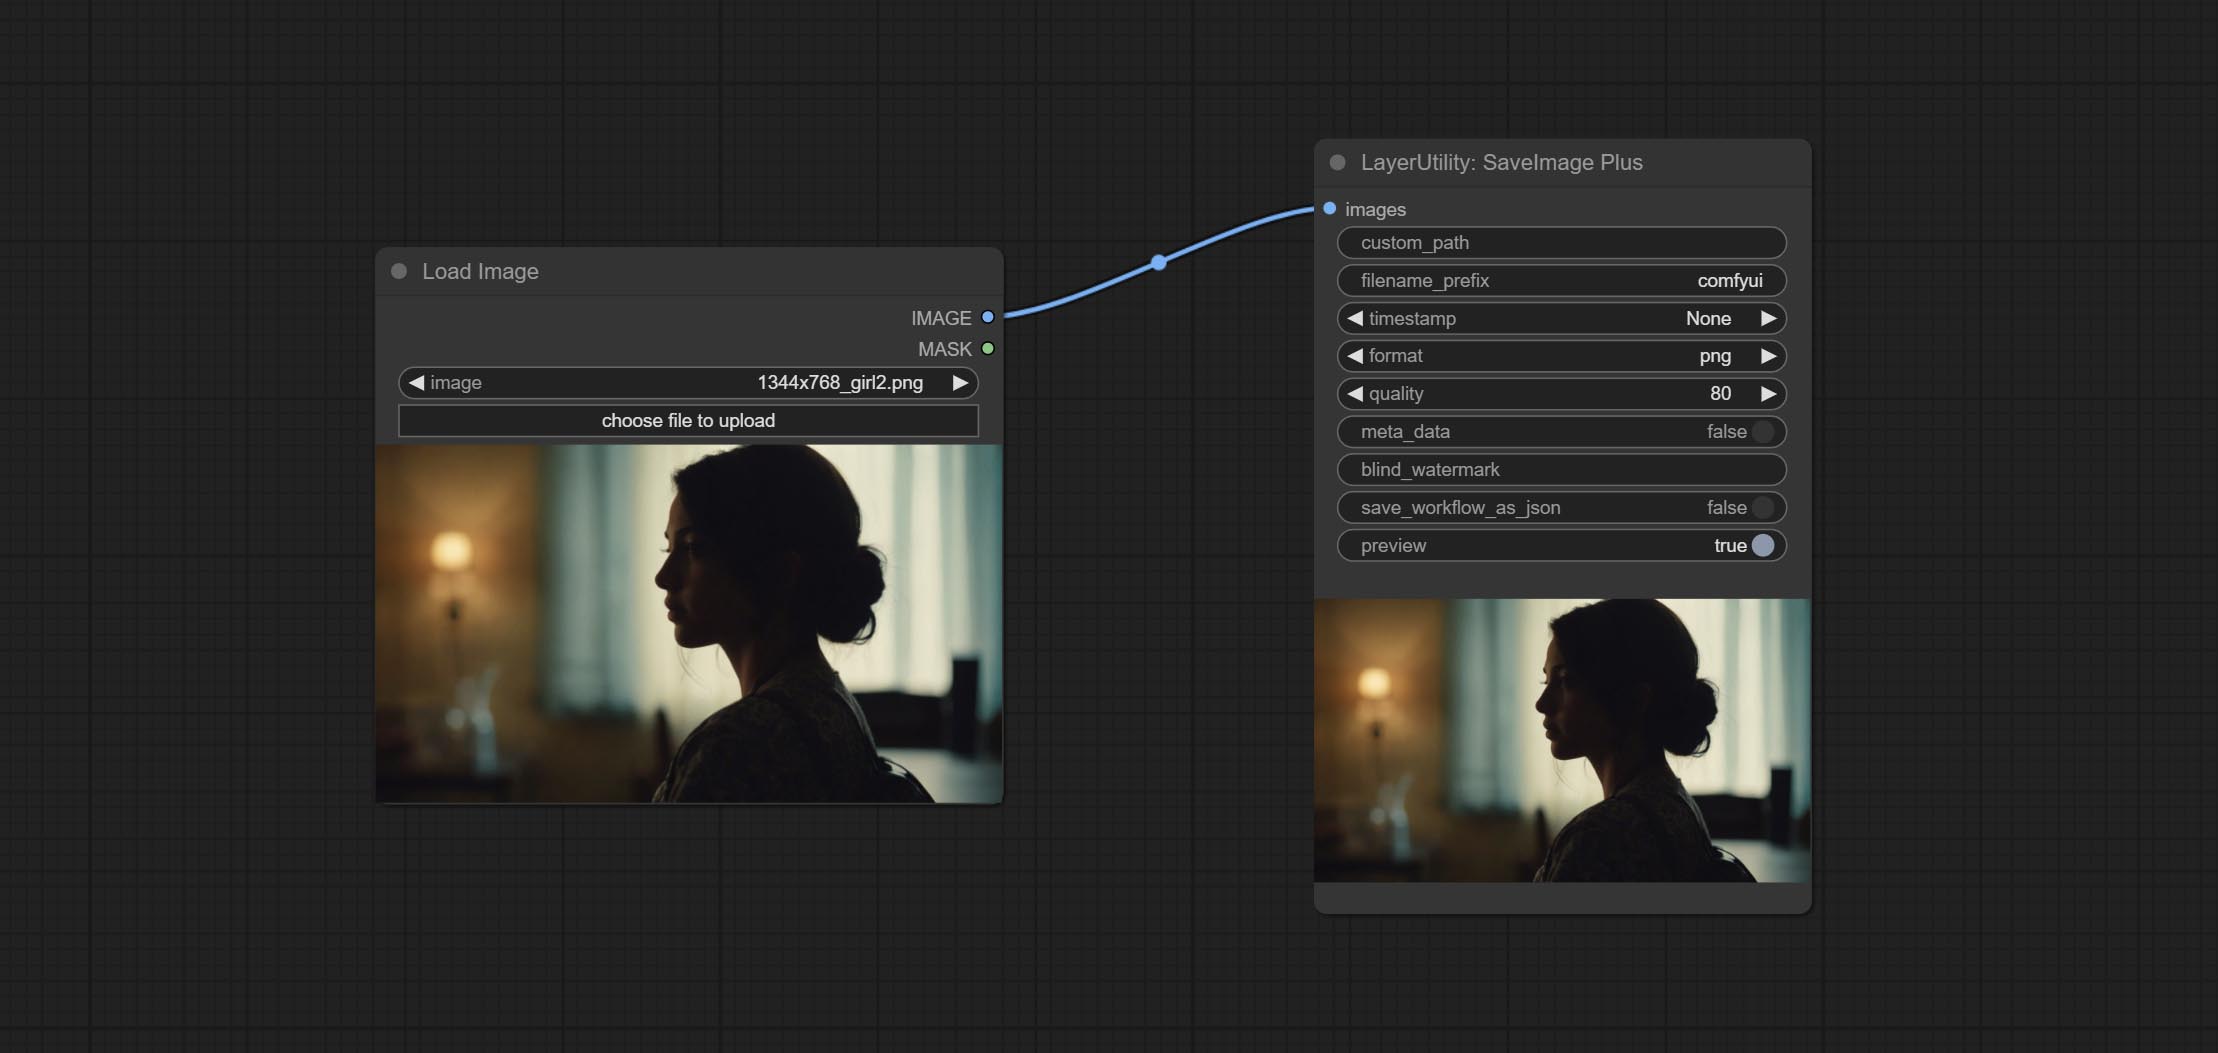
Enhanced save image node. You can customize the directory where the picture is saved, add a timestamp to the file name, select the save format, set the image compression rate, set whether to save the workflow, and optionally add invisible watermarks to the picture. (Add information in a way that is invisible to the naked eye, and use the ShowBlindWaterMark node to decode the watermark). Optionally output the json file of the workflow.
Node Options: 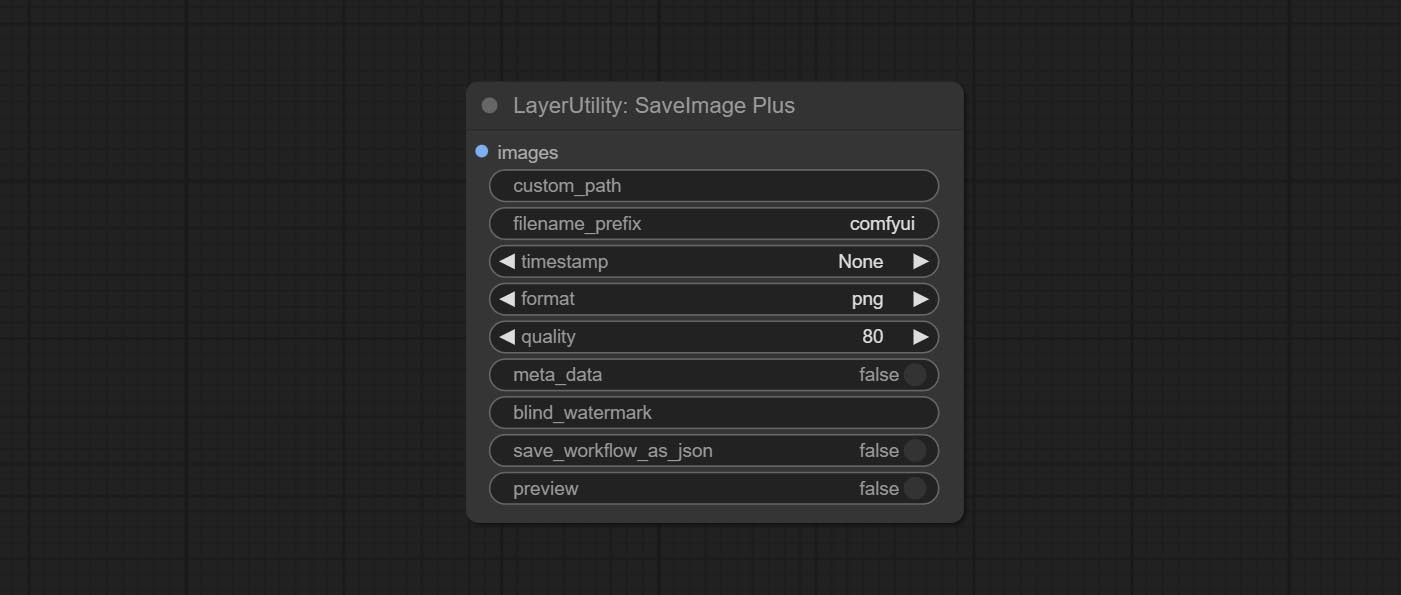
png and jpg . Note that only png format is supported for RGBA mode pictures.ShowBlindWaterMark node can decode watermarks. Note that pictures with watermarks are recommended to be saved in png format, and lower-quality jpg format will cause watermark information to be lost. * Enter %date for the current date (YY-mm-dd) and %time for the current time (HH-MM-SS). You can enter / for subdirectories. For example, %date/name_%tiem will output the image to the YY-mm-dd folder, with name_HH-MM-SS as the file name prefix.
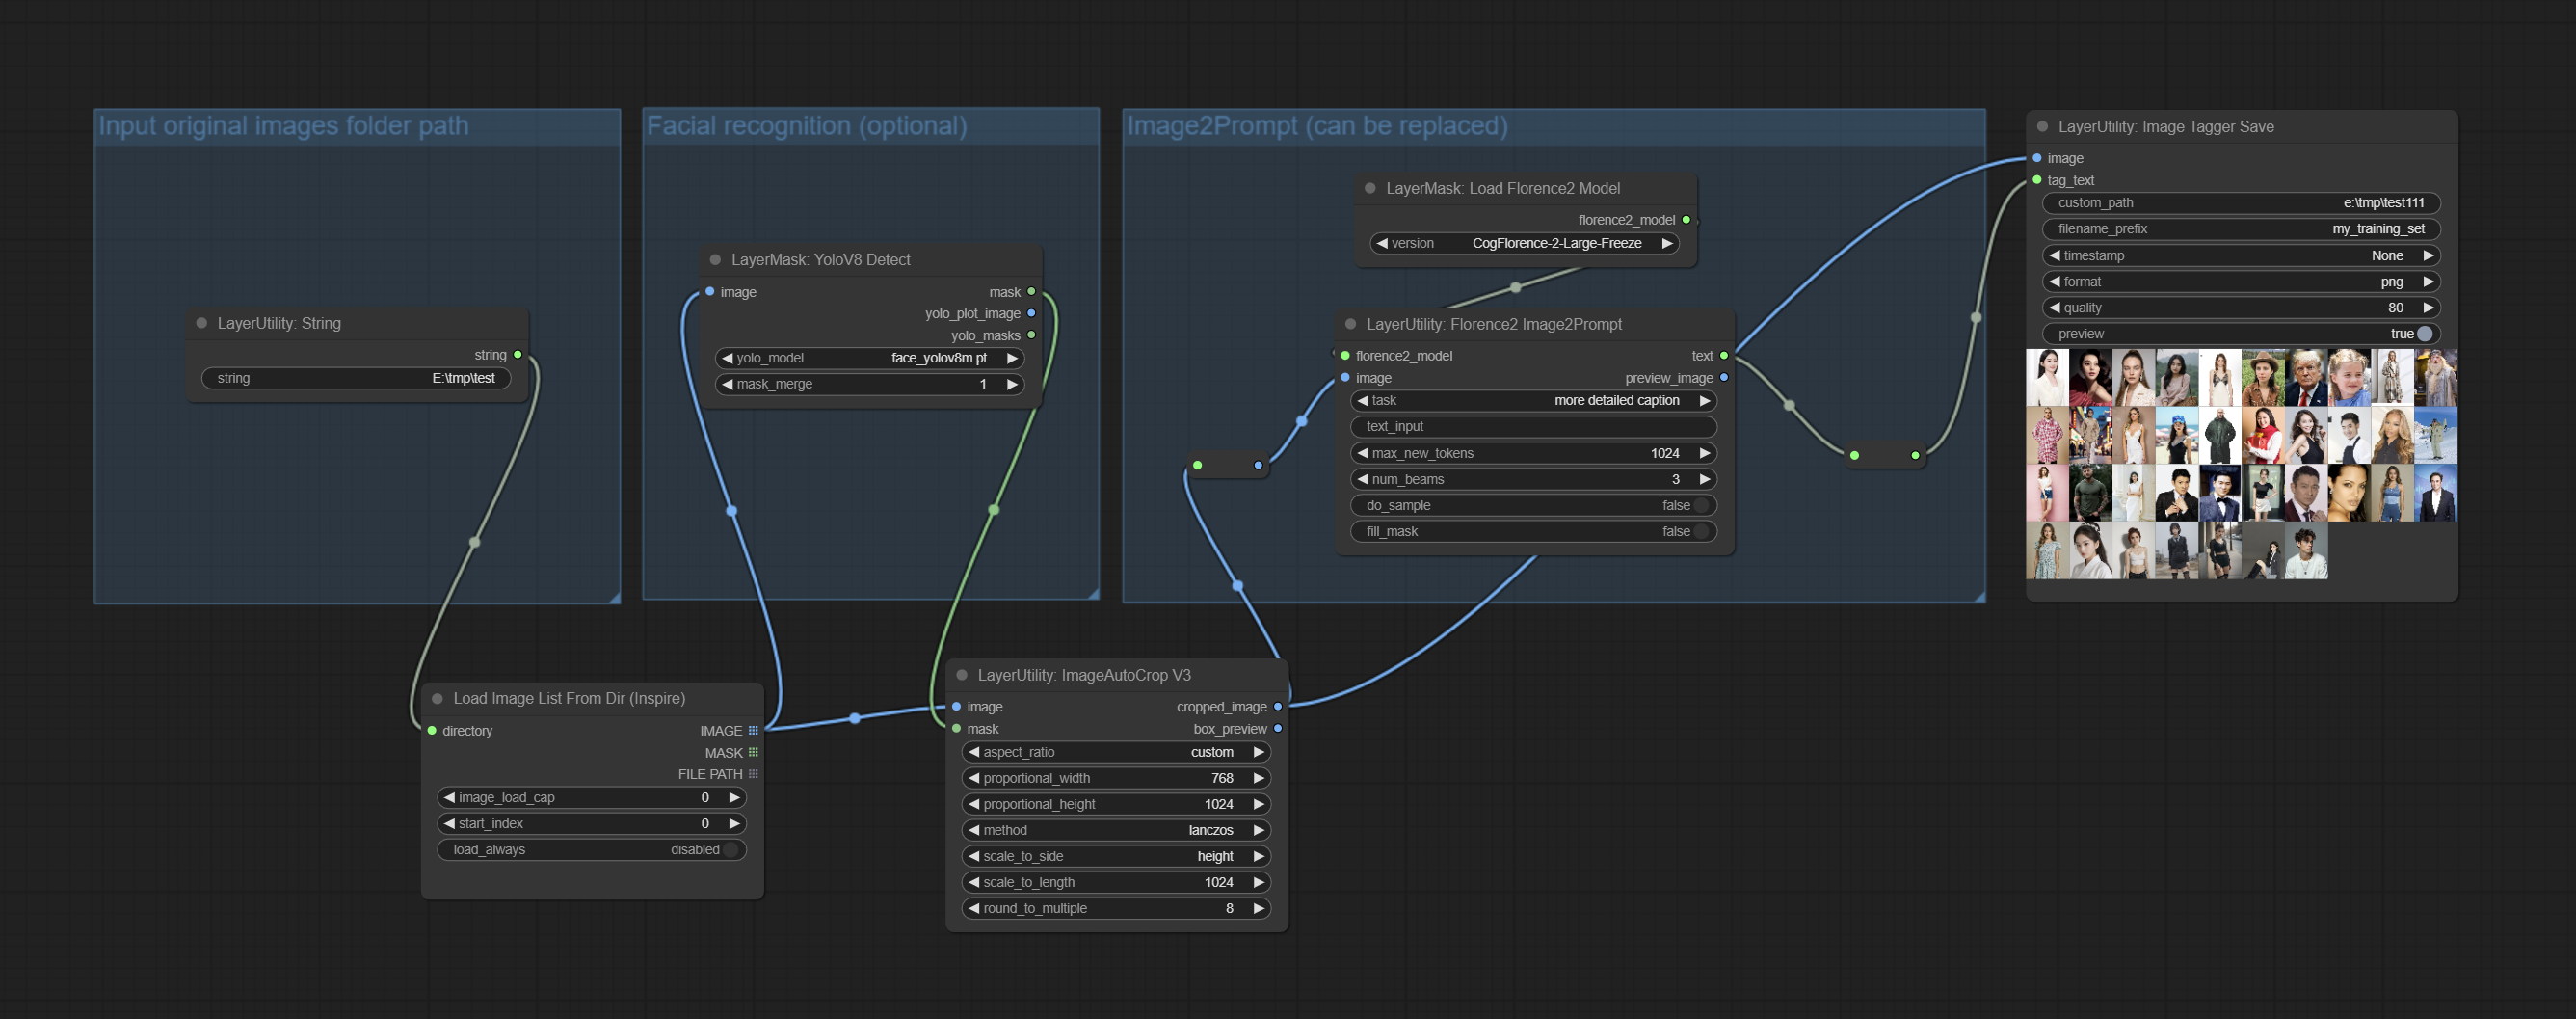
The node used to save the training set images and their text labels, where the image files and text label files have the same file name. Customizable directory for saving images, adding timestamps to file names, selecting save formats, and setting image compression rates. *The workflow image_tagger_stave.exe is located in the workflow directory.
Node Options: 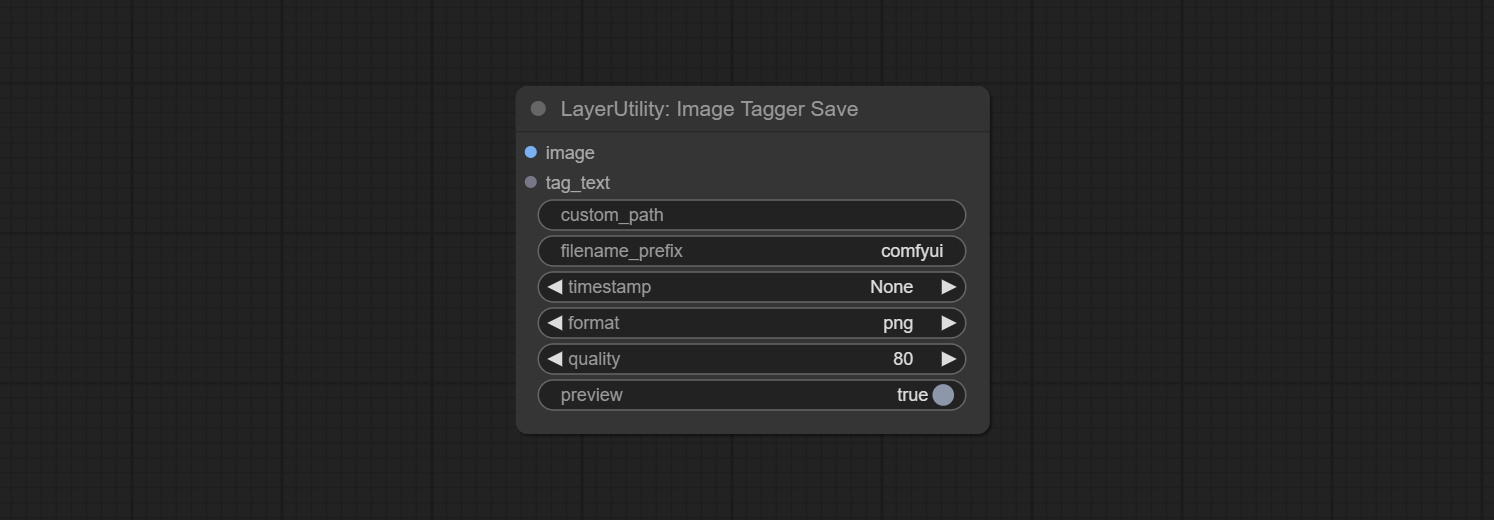
png and jpg . Note that only png format is supported for RGBA mode pictures. * Enter %date for the current date (YY-mm-dd) and %time for the current time (HH-MM-SS). You can enter / for subdirectories. For example, %date/name_%tiem will output the image to the YY-mm-dd folder, with name_HH-MM-SS as the file name prefix.
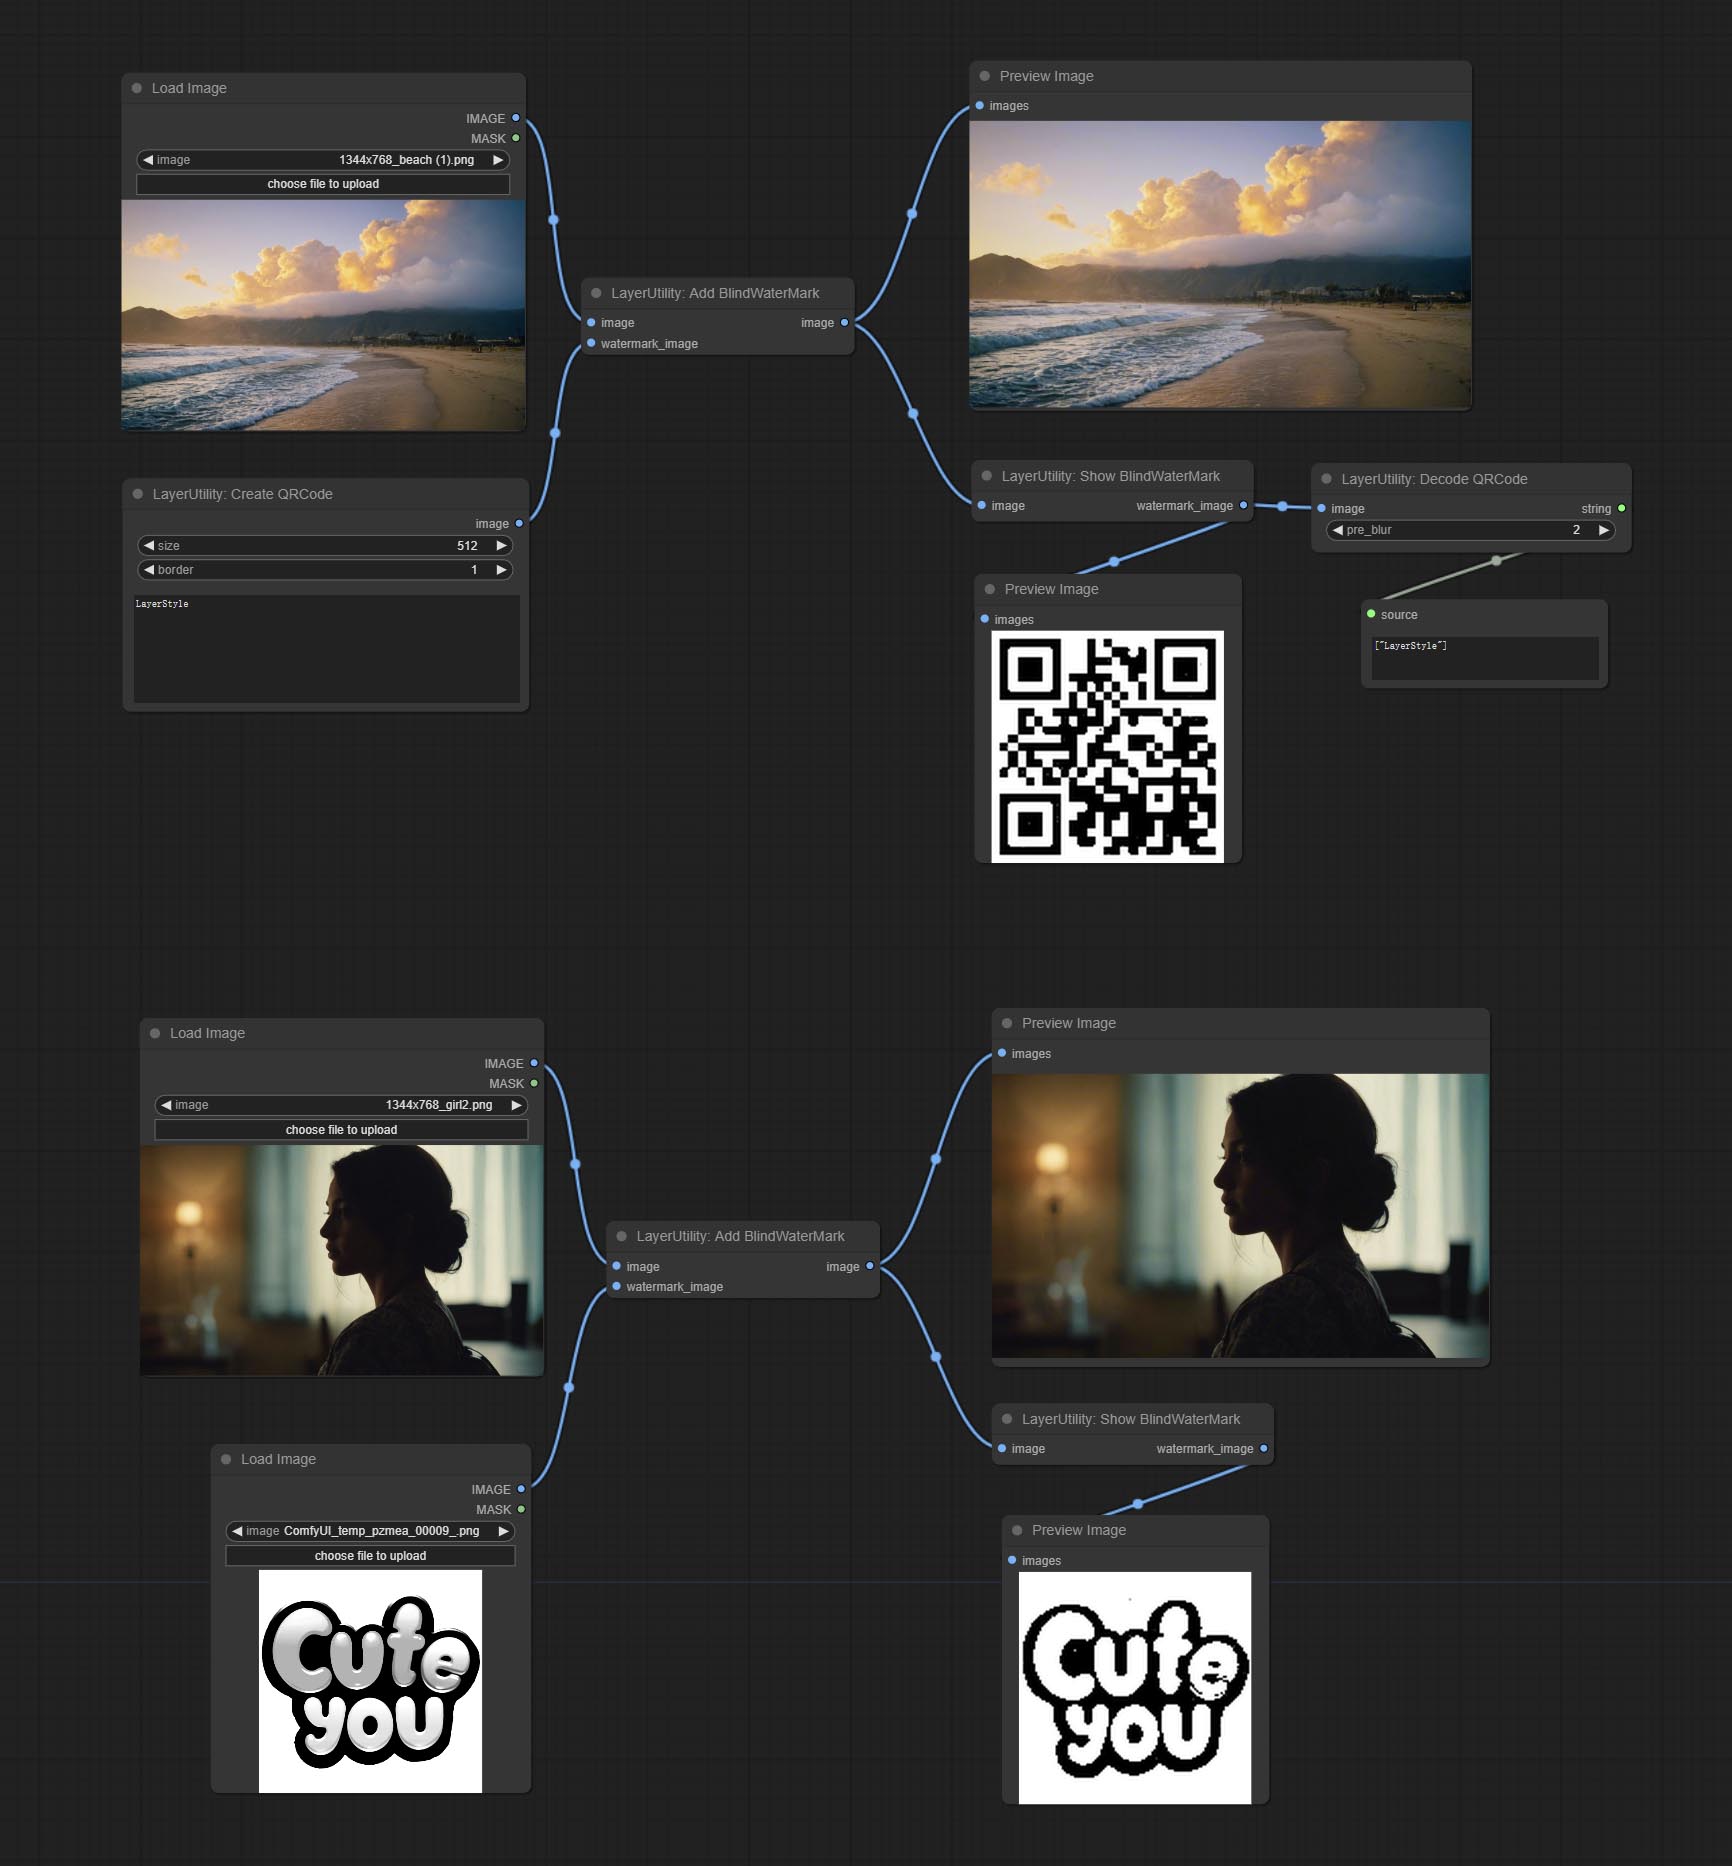
Add an invisible watermark to a picture. Add the watermark image in a way that is invisible to the naked eye, and use the ShowBlindWaterMark node to decode the watermark.
Node Options: 
Decoding the invisible watermark added to the AddBlindWaterMark and SaveImagePlus nodes. 
Generate a square QR code picture.
Node Options: 
Decoding the QR code.
Node Options: 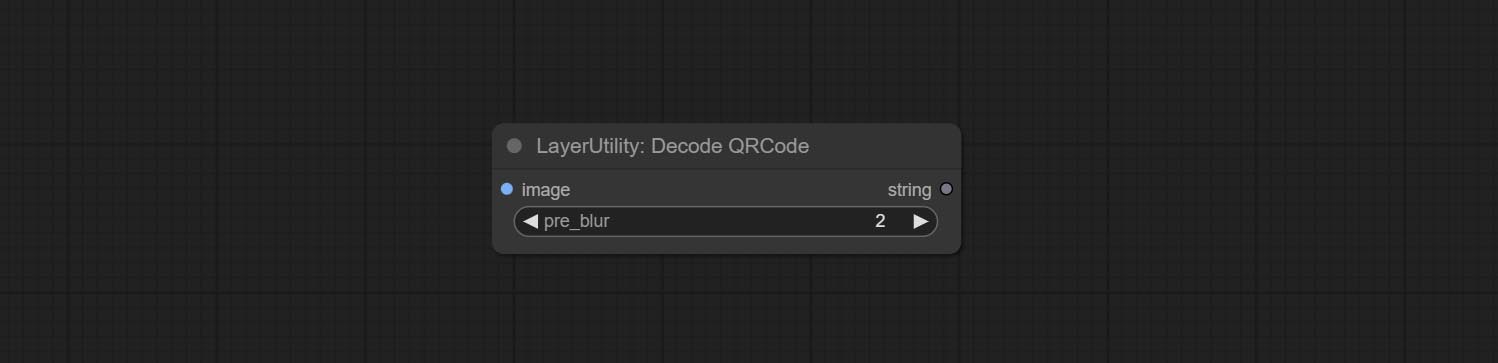
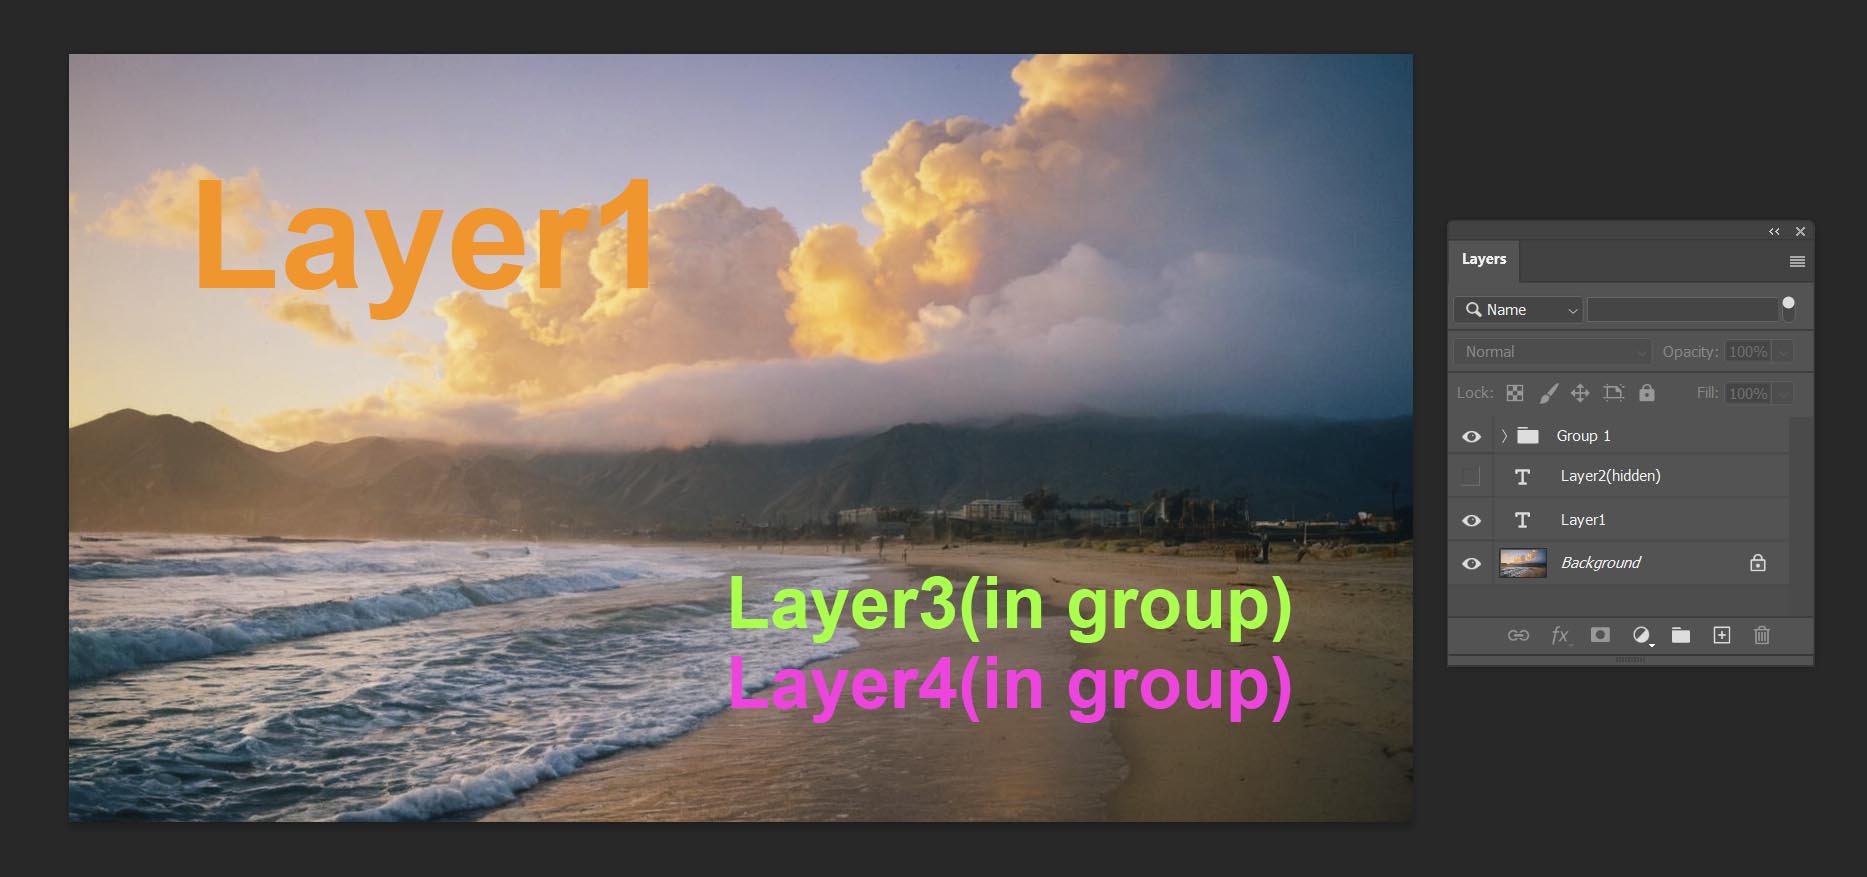
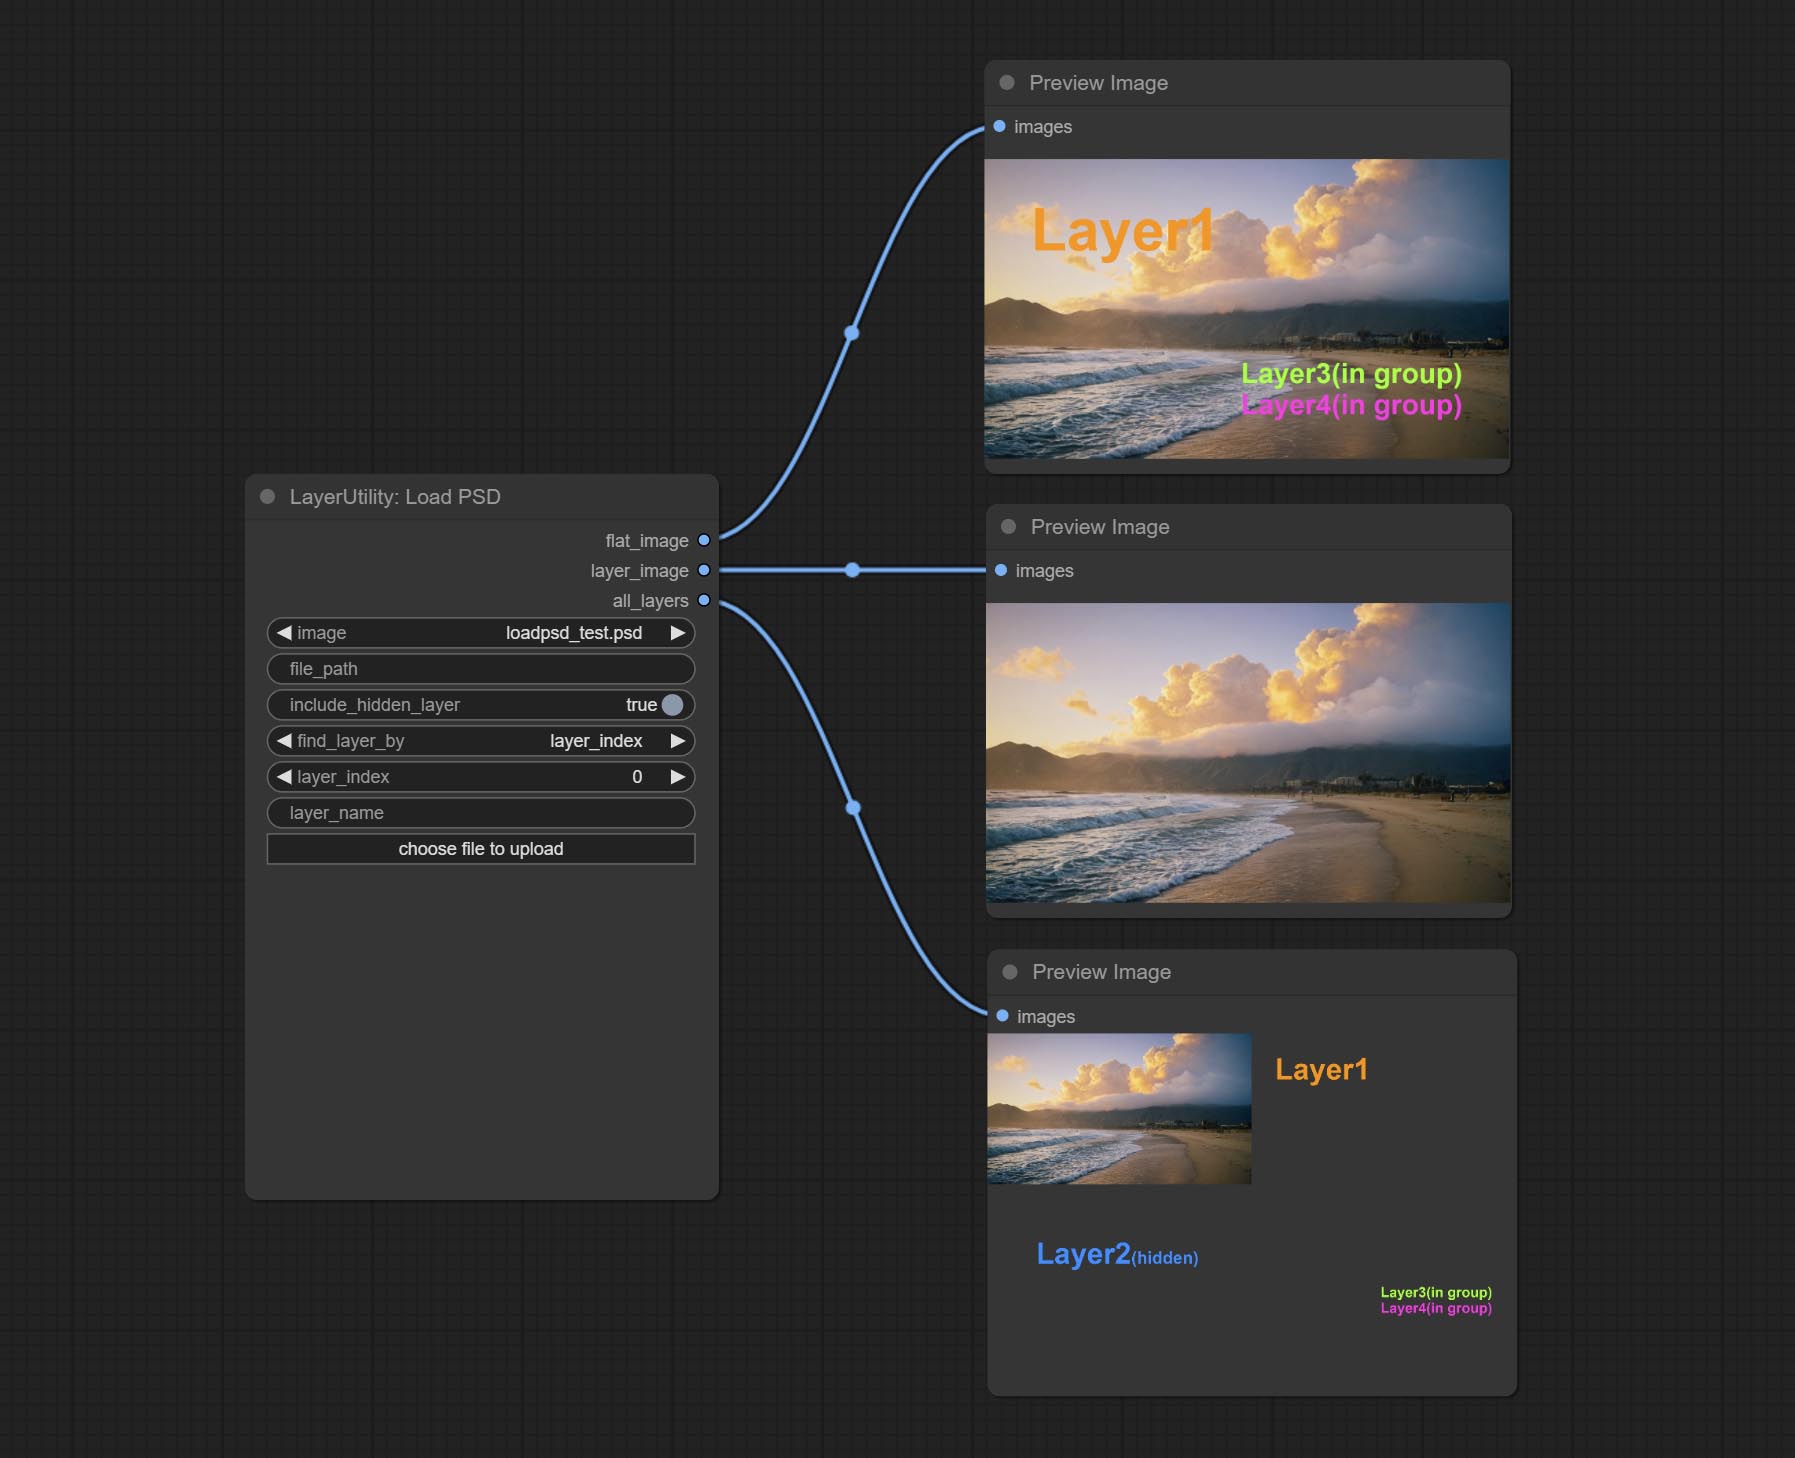
Load the PSD format file and export the layers. Note that this node requires the installation of the psd_tools dependency package, If error occurs during the installation of psd_tool, such as ModuleNotFoundError: No module named 'docopt' , please download docopt's whl and manual install it.
Node Options: 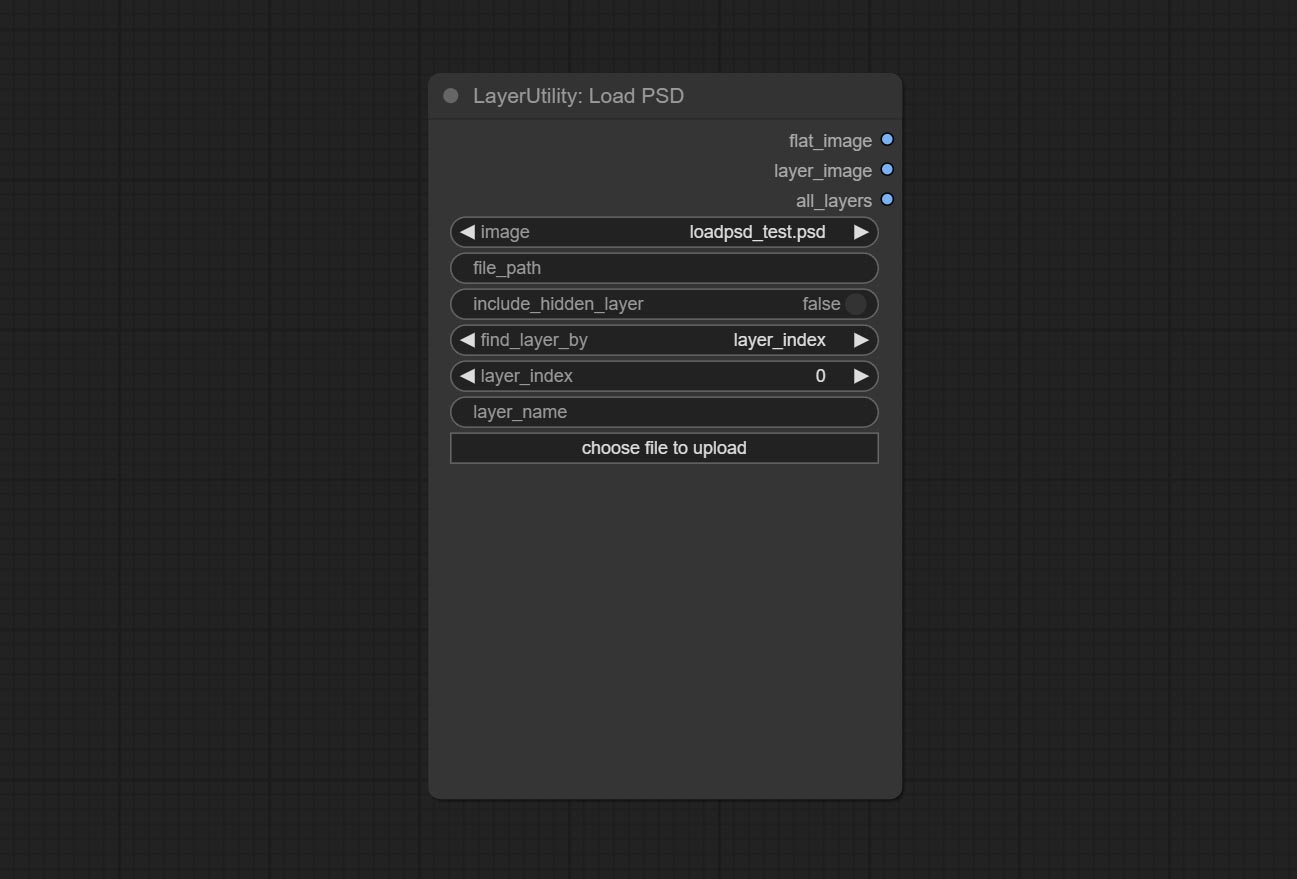
ComfyUI/input , where previously loaded psd images can be selected.Outputs: flat_image: PSD preview image. layer_iamge: Find the layer output. all_layers: Batch images containing all layers.
Encapsulate the four nodes of Negative Condition in SD3 into a separate node.
Node Options: 
Reproduction of Photoshop's layer Style - Blend If function. This node outputs a mask for layer composition on the ImageBlend or ImageBlendAdvance nodes. mask is an optional input, and if you enter a mask here, it will act on the output. 
Node Options: 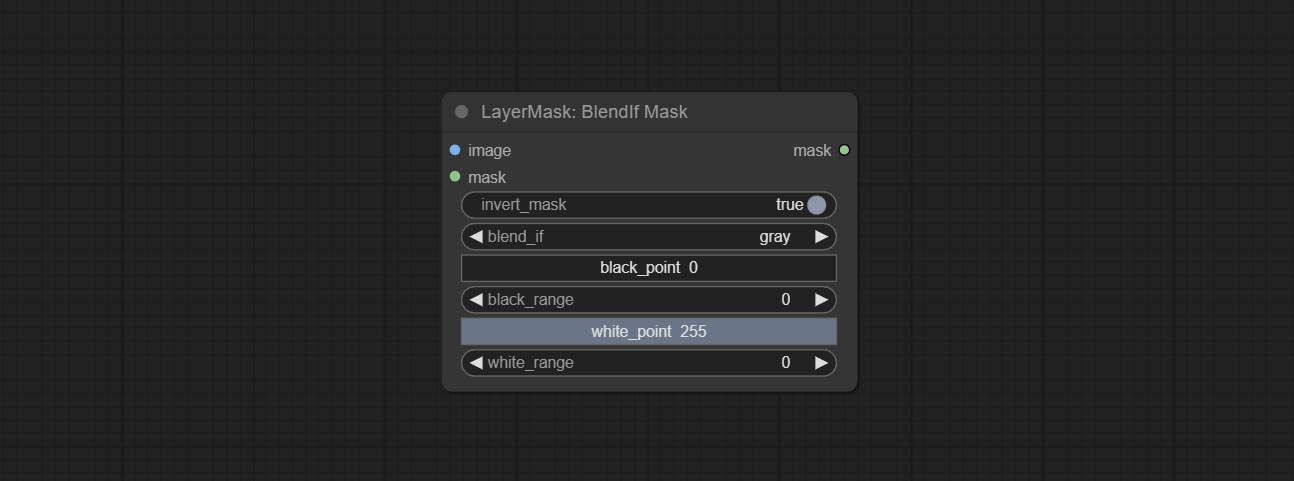
gray , red , green , and blue . Detect the area where the mask is located and output its position and size. 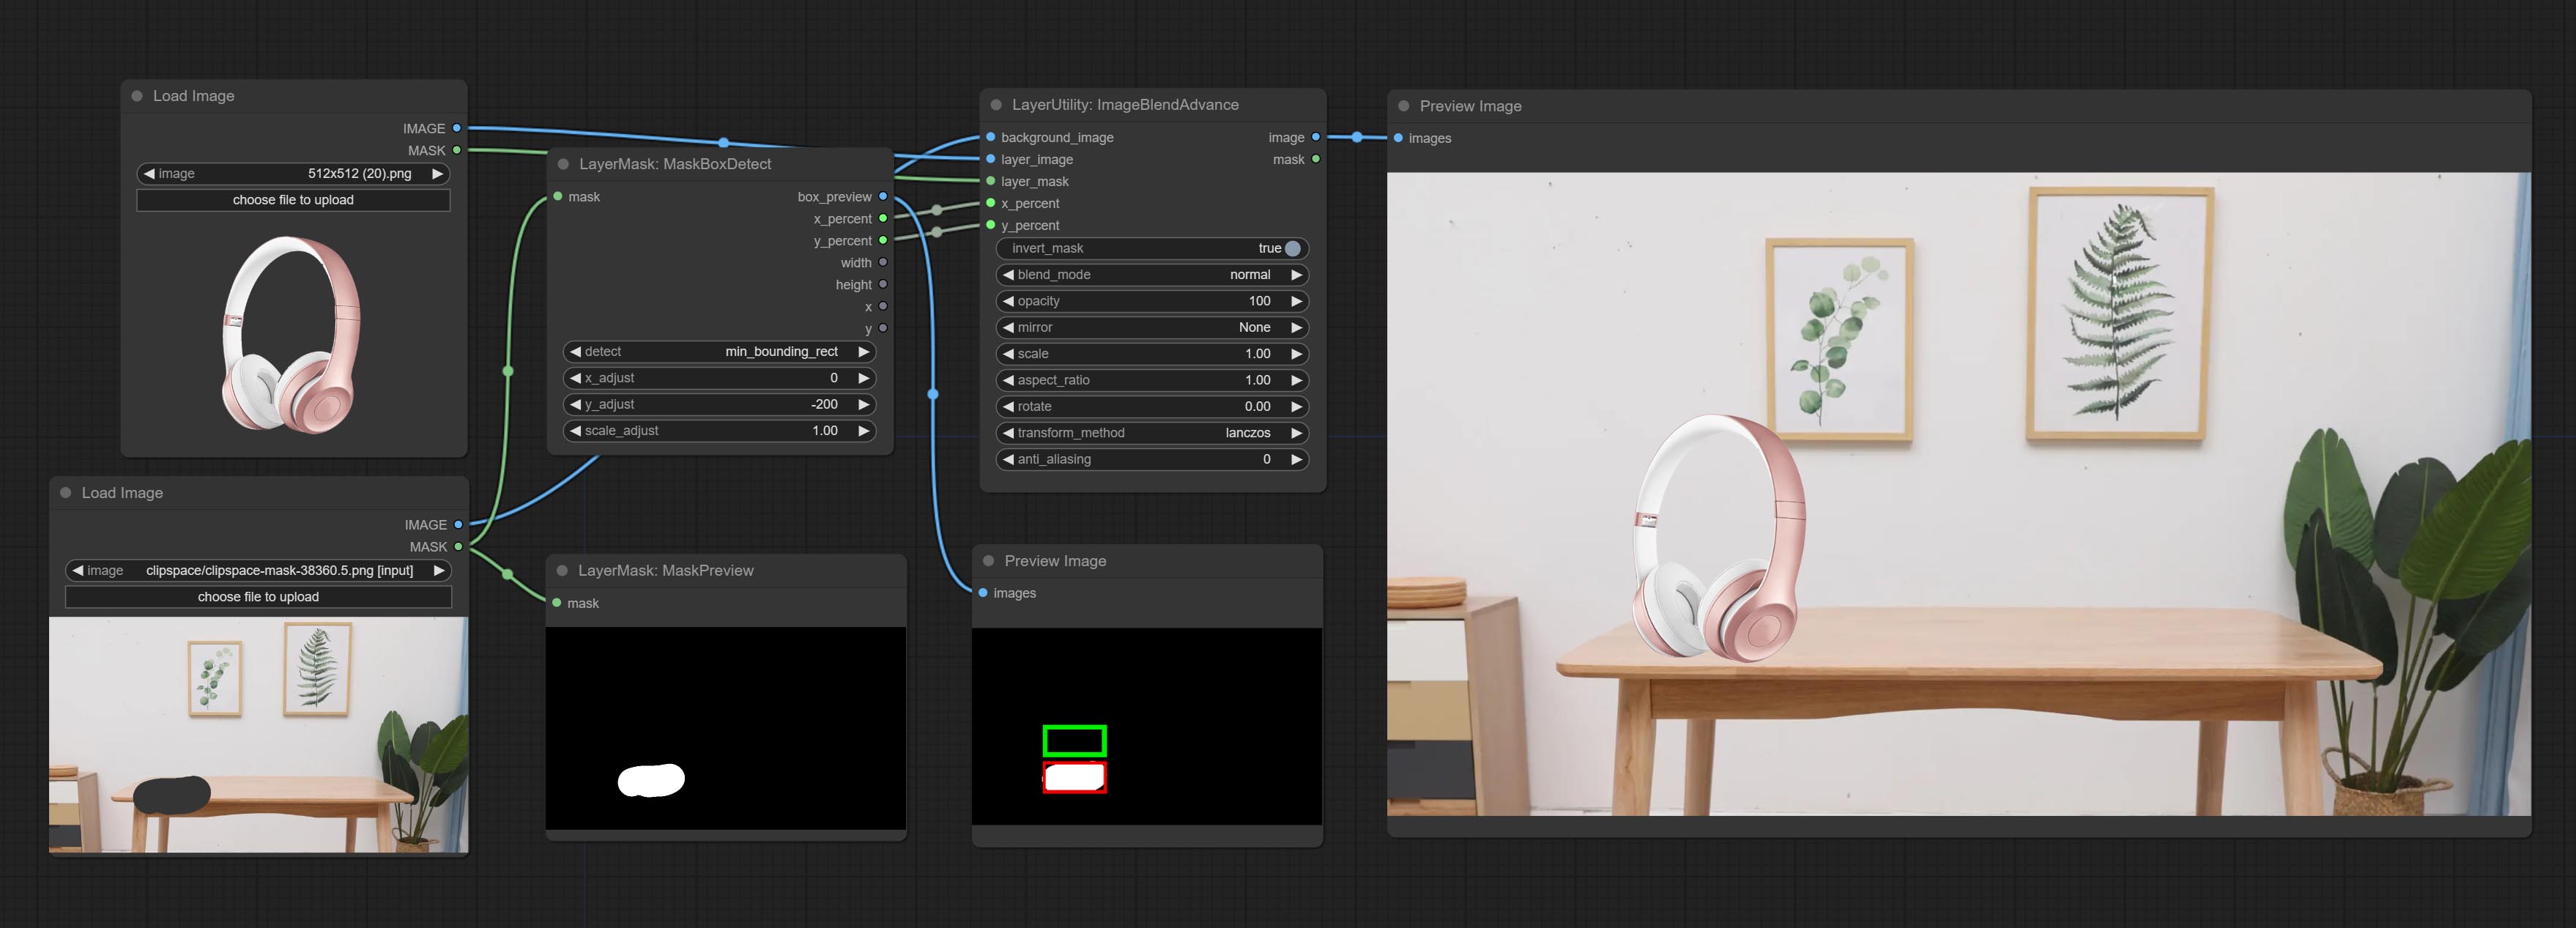
Node options: 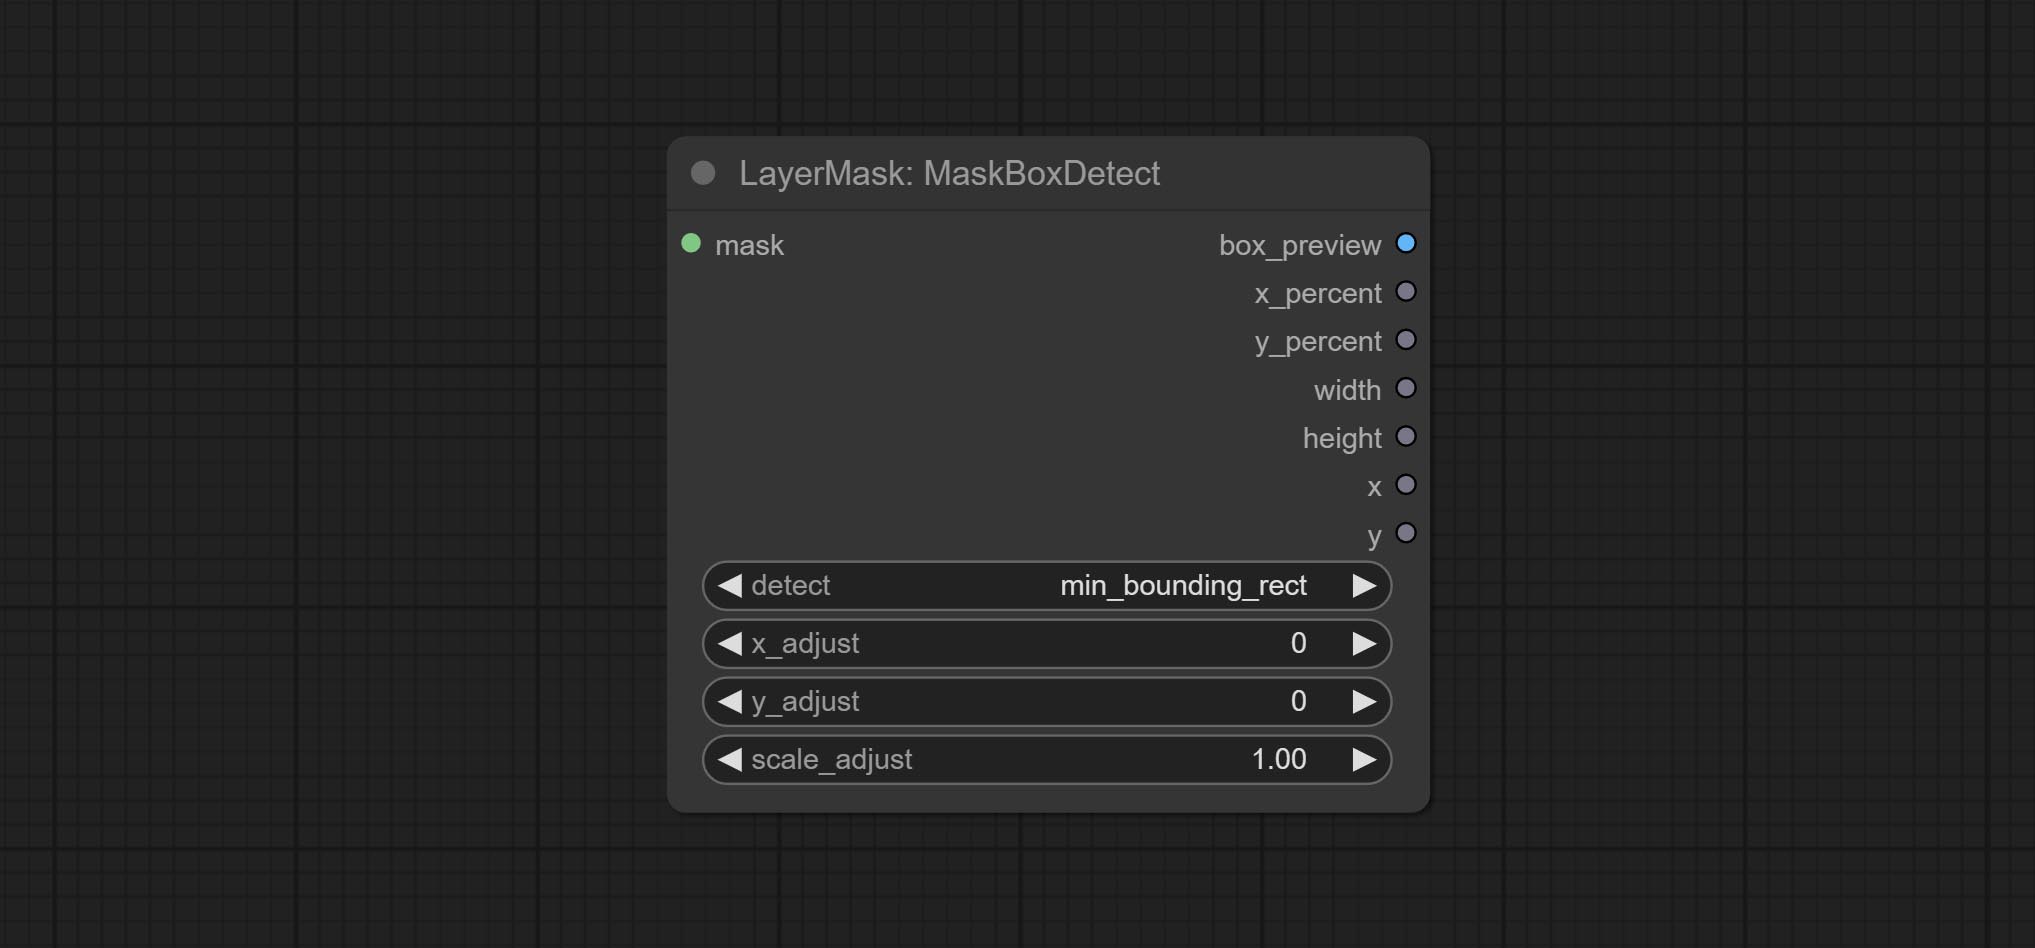
min_bounding_rect is the minimum bounding rectangle of block shape, max_inscribed_rect is the maximum inscribed rectangle of block shape, and mask-area is the effective area for masking pixels.Ausgabe:
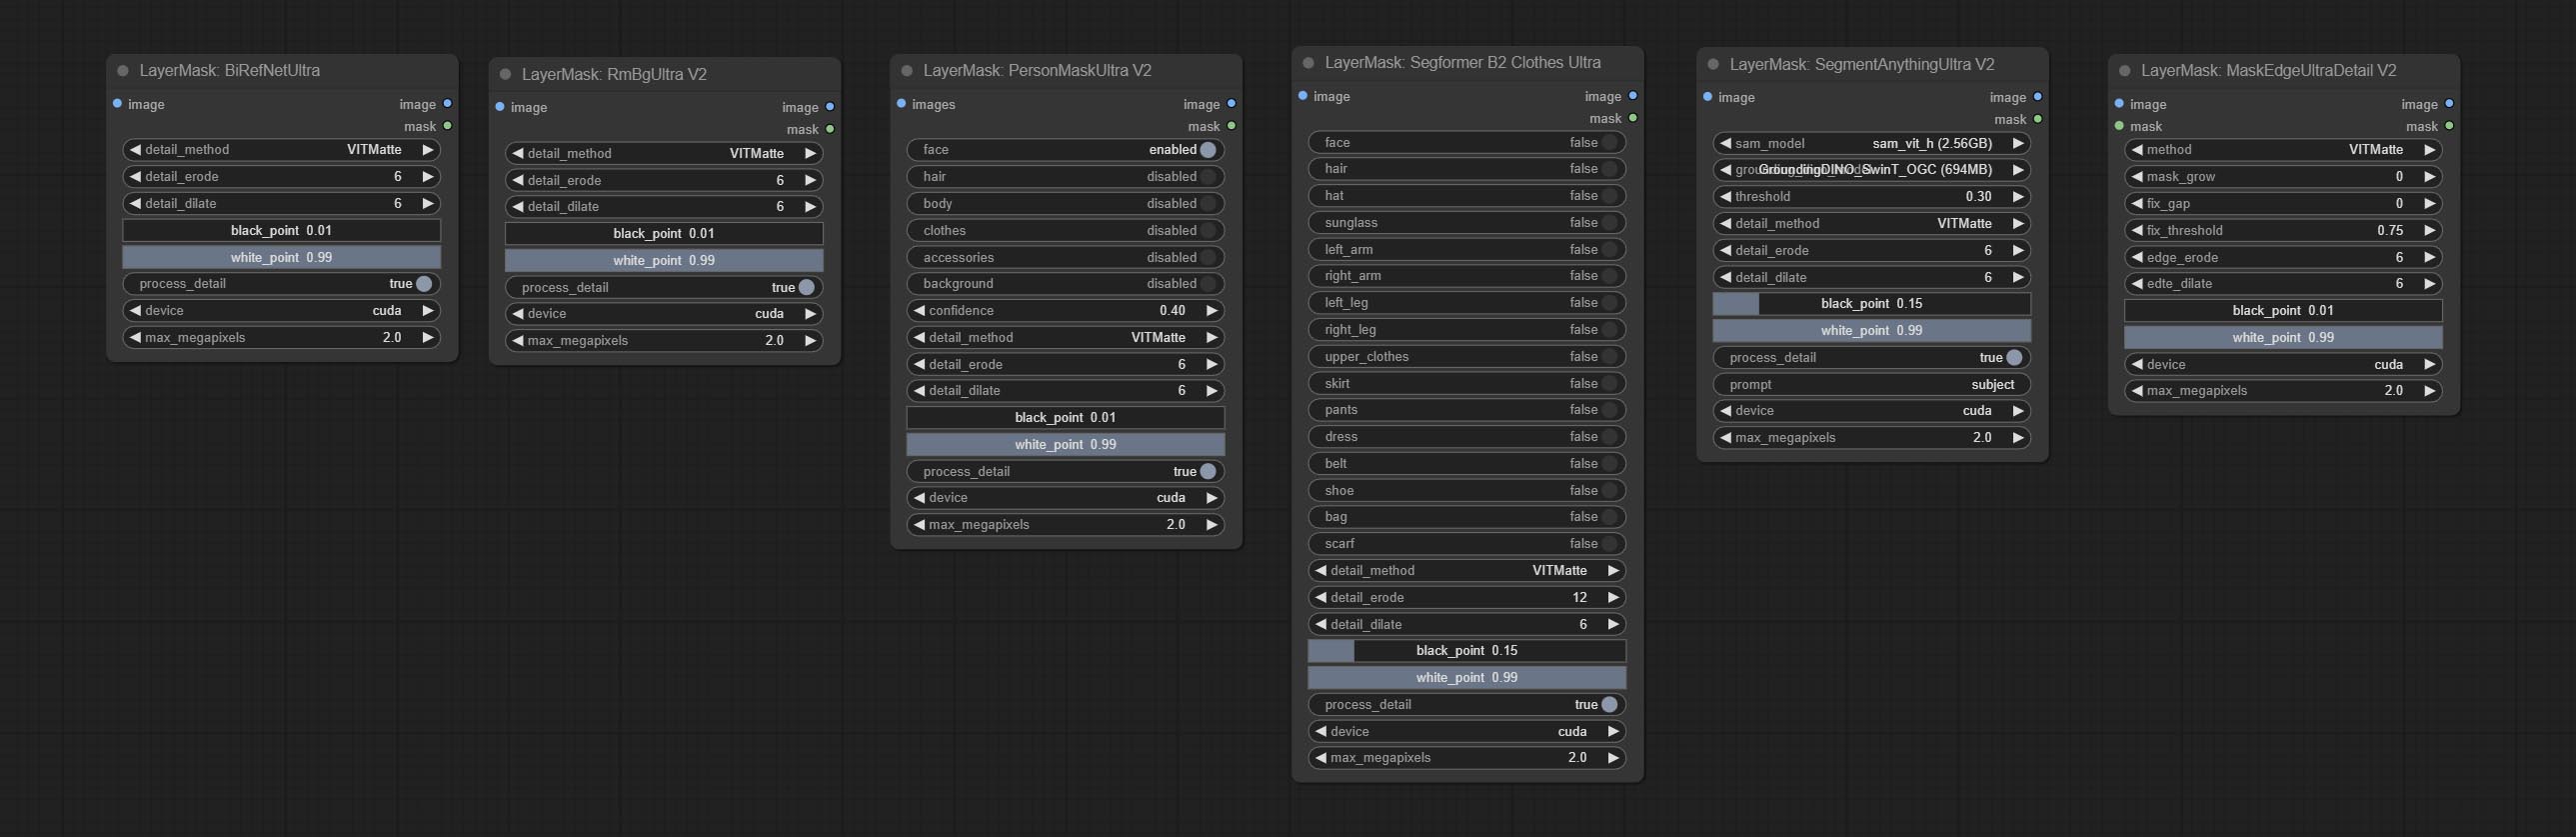
Nodes that use ultra fine edge masking processing methods, the latest version of nodes includes: SegmentAnythingUltraV2, RmBgUltraV2, BiRefNetUltra, PersonMaskUltraV2, SegformerB2ClothesUltra and MaskEdgeUltraDetailV2. There are three edge processing methods for these nodes:
PyMatting optimizes the edges of the mask by using a closed form matching to mask trimap.GuideFilter uses opencv guidedfilter to feather edges based on color similarity, and performs best when edges have strong color separation.VitMatte uses the transformer vit model for high-quality edge processing, preserving edge details and even generating semi transparent masks. Note: When running for the first time, you need to download the vitmate model file and wait for the automatic download to complete. If the download cannot be completed, you can run the command huggingface-cli download hustvl/vitmatte-small-composition-1k to manually download. After successfully downloading the model, you can use VITMatte(local) without accessing the network.device set whether to use CUDA for vitimate operations, which is about 5 times faster than CPU. max_megapixels set the maximum image size for vitmate operation, and oversized images will be reduced in size. For 16G VRAM, it is recommended to set it to 3. *Download all model files from BaiduNetdisk or Huggingface to ComfyUI/models/vitmatte folder.
The following figure is an example of the difference in output between three methods. 
Improvements to ComfyUI Segment Anything, thanks to the original author.
*Please refer to the installation of ComfyUI Segment Anything to install the model. If ComfyUI Segment Anything has been correctly installed, you can skip this step.
ComfyUI/models/bert-base-uncased folder.ComfyUI/models/grounding-dino folder.ComfyUI/models/sams folder. *Or download them from GroundingDino models on BaiduNetdisk and SAM models on BaiduNetdisk . 
Node options: 
The V2 upgraded version of SegmentAnythingUltra has added the VITMatte edge processing method.(Note: Images larger than 2K in size using this method will consume huge memory) 
On the basis of SegmentAnythingUltra, the following changes have been made: 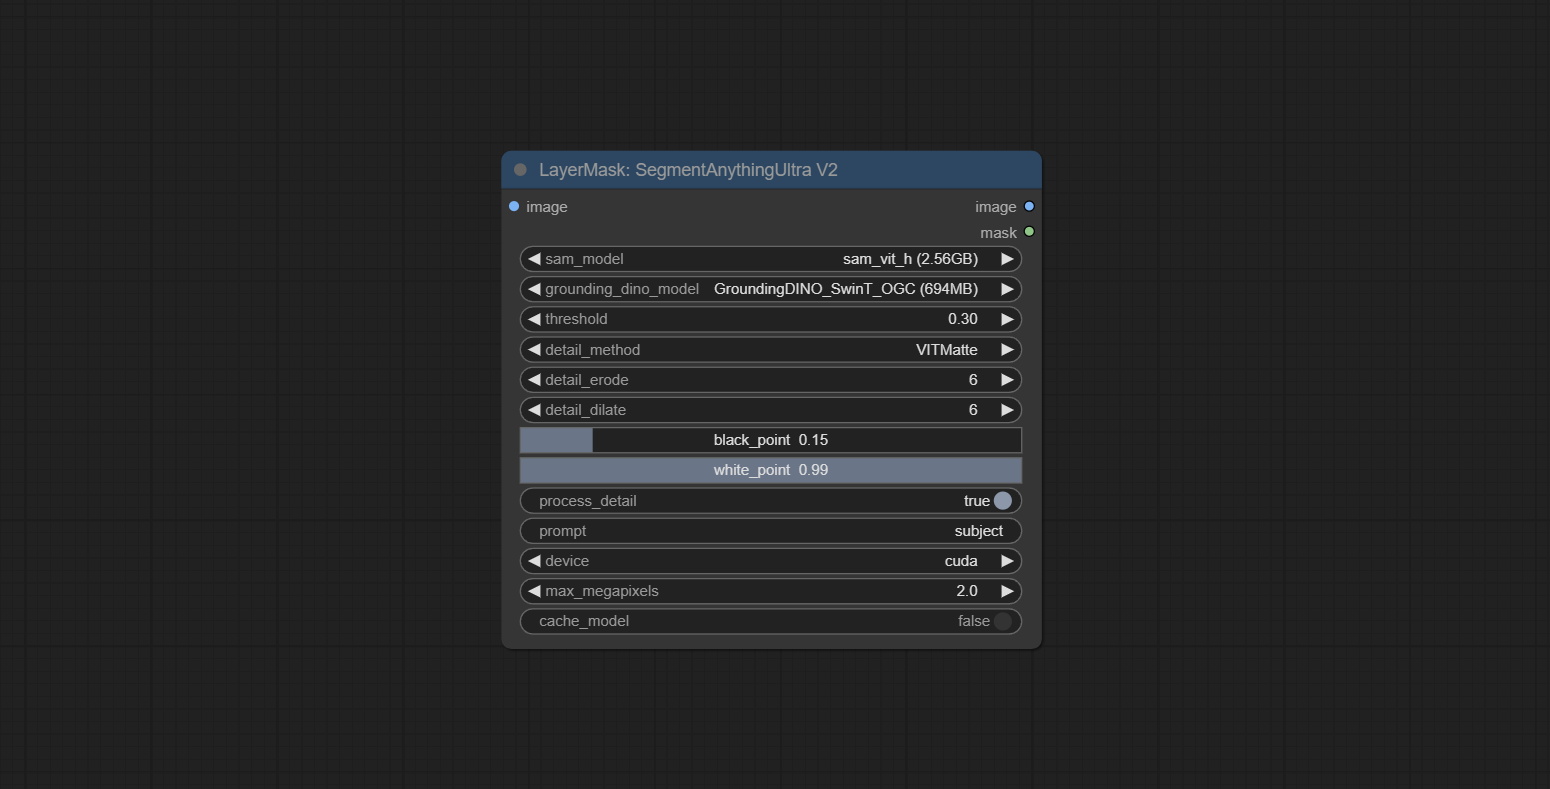
This node is modified from kijai/ComfyUI-segment-anything-2. Thank to kijai for making significant contributions to the Comfyui community.
SAM2 Ultra node only support single image. If you need to process multiple images, please first convert the image batch to image list.
*Download models from BaiduNetdisk or huggingface.co/Kijai/sam2-safetensors and copy to ComfyUI/models/sam2 folder.
Node Options: 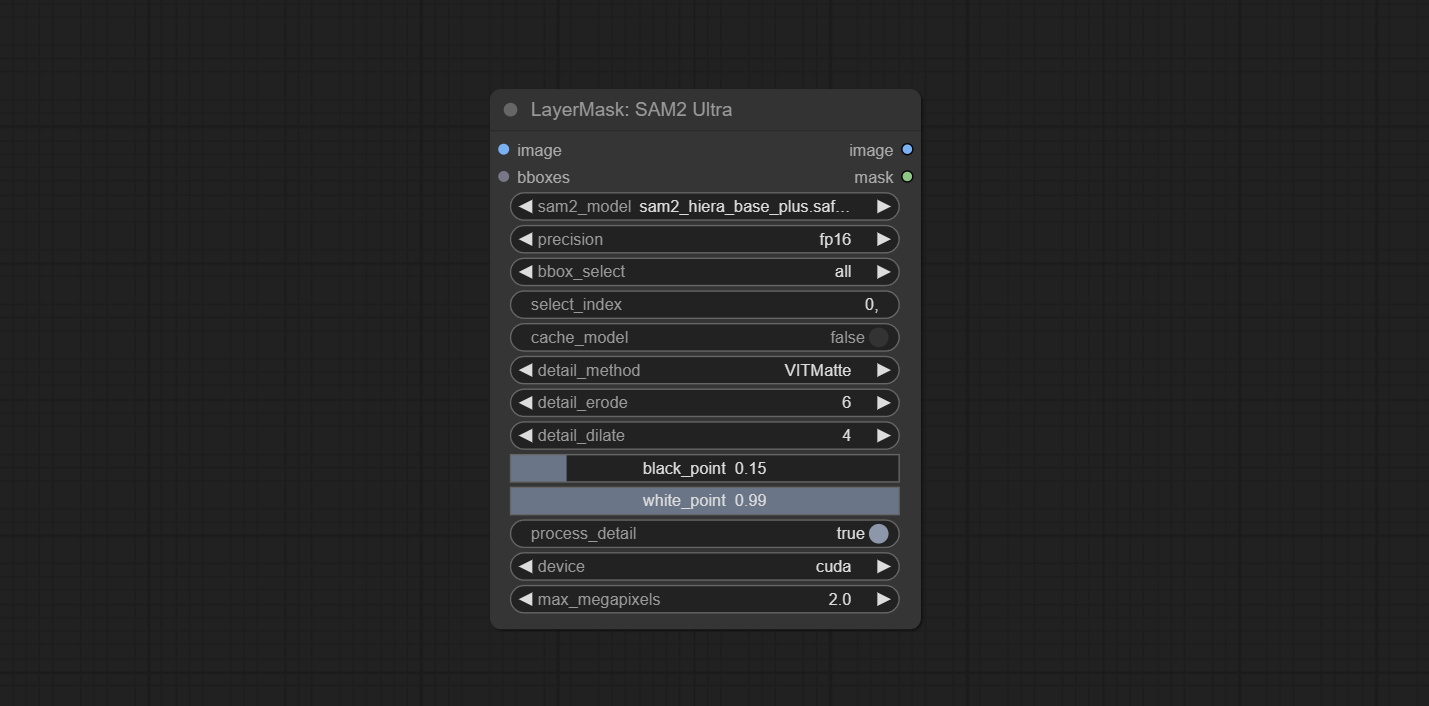
SAM2 Video Ultra node support processing multiple frames of images or video sequences. Please define the recognition box data in the first frame of the sequence to ensure correct recognition.
Node Options: 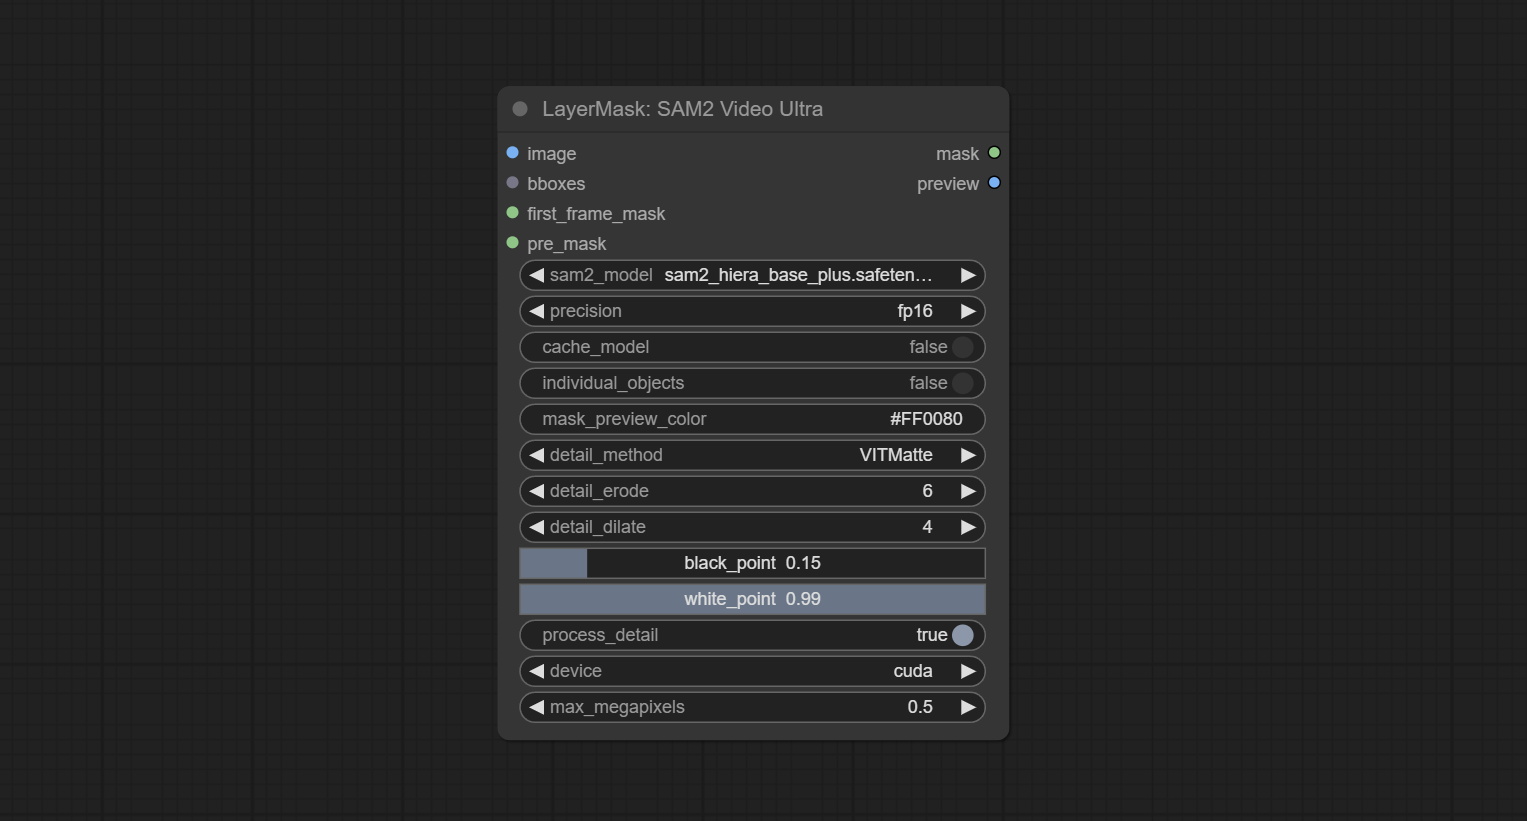
bboxes and first_frame_mask must have least one input. If first_frame_mask inputed, bbboxes will be ignored.bboxes and first_frame_mask must have least one input. If first_frame_mask inputed, bbboxes will be ignored. Use the Florence2 model to identify objects in images and output recognition box data.
*Download models from BaiduNetdisk and copy to ComfyUI/models/florence2 folder.
Node Options: 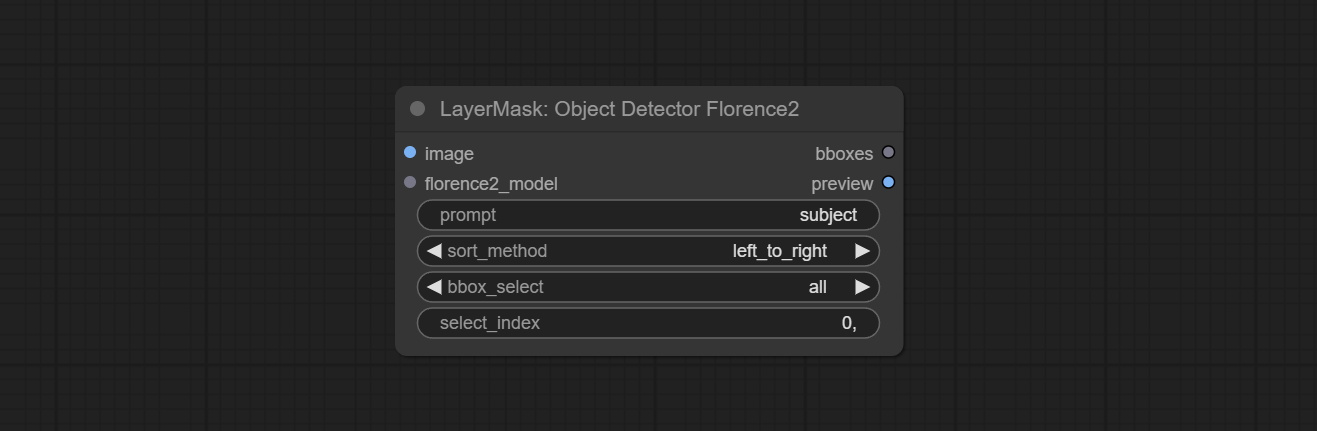
Use the YOLO-World model to identify objects in images and output recognition box data.
*Download models from BaiduNetdisk or GoogleDrive and copy to ComfyUI/models/yolo-world folder.
Node Options: 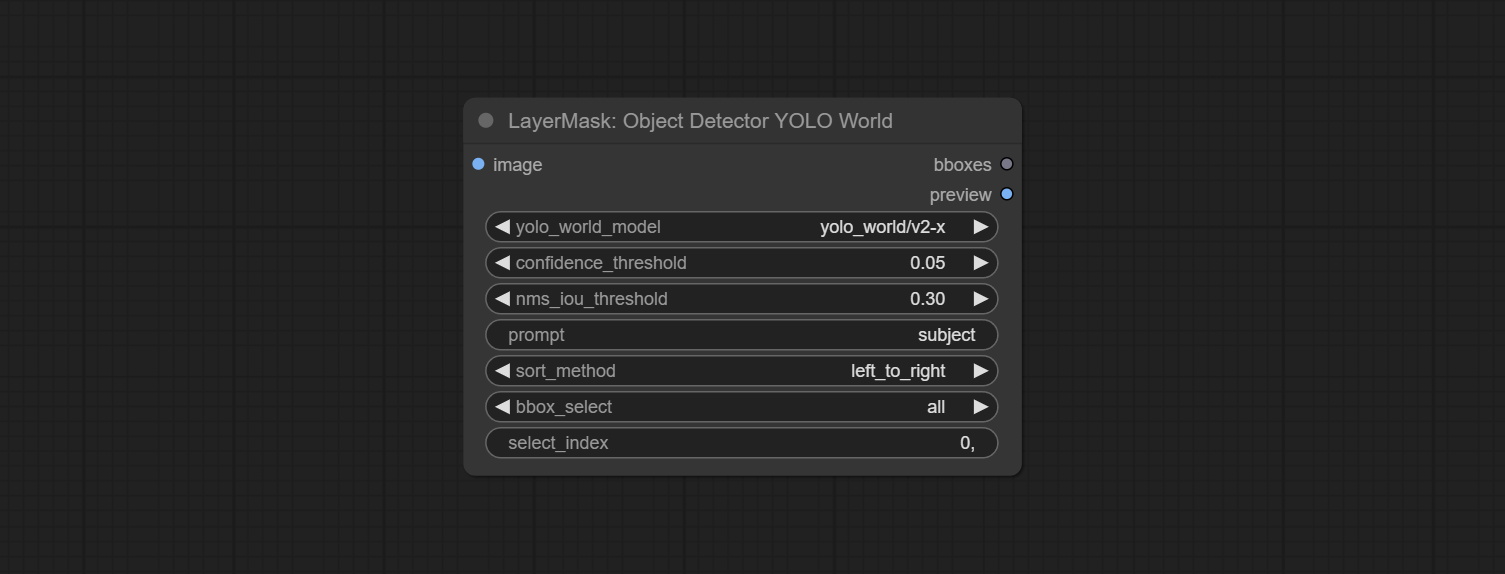
Use the YOLO-8 model to identify objects in images and output recognition box data.
*Download models from GoogleDrive or BaiduNetdisk and copy to ComfyUI/models/yolo folder.
Node Options: 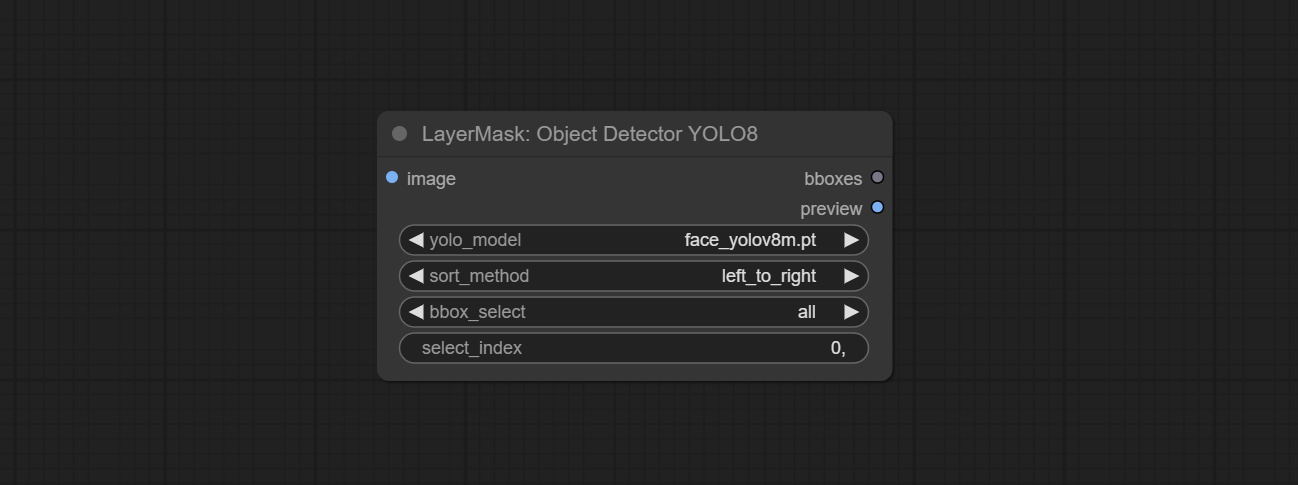
Use mask as recognition box data. All areas surrounded by white areas on the mask will be recognized as an object. Multiple enclosed areas will be identified separately.
Node Options: 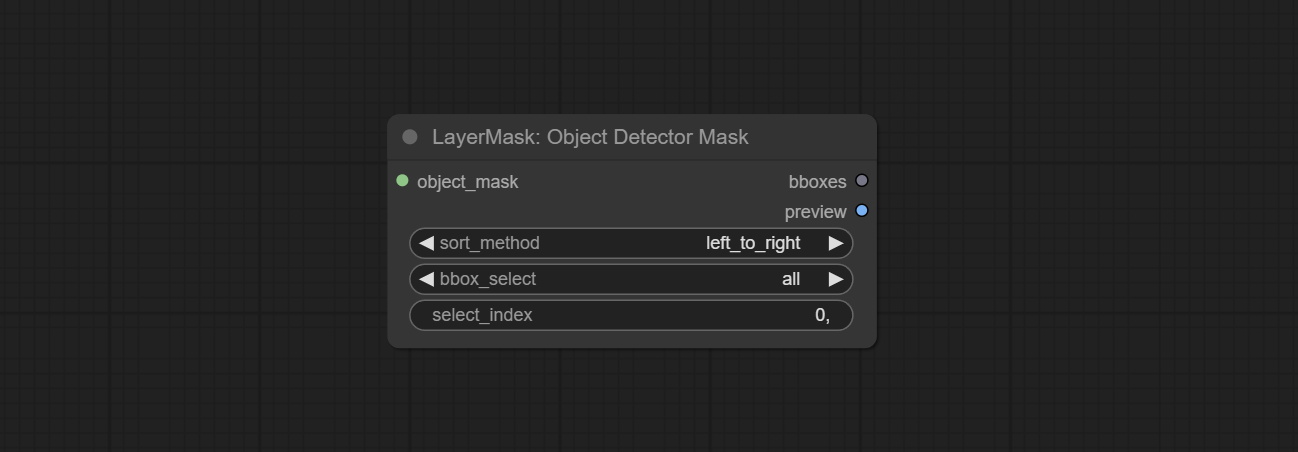
Merge recognition box data.
Node Options: 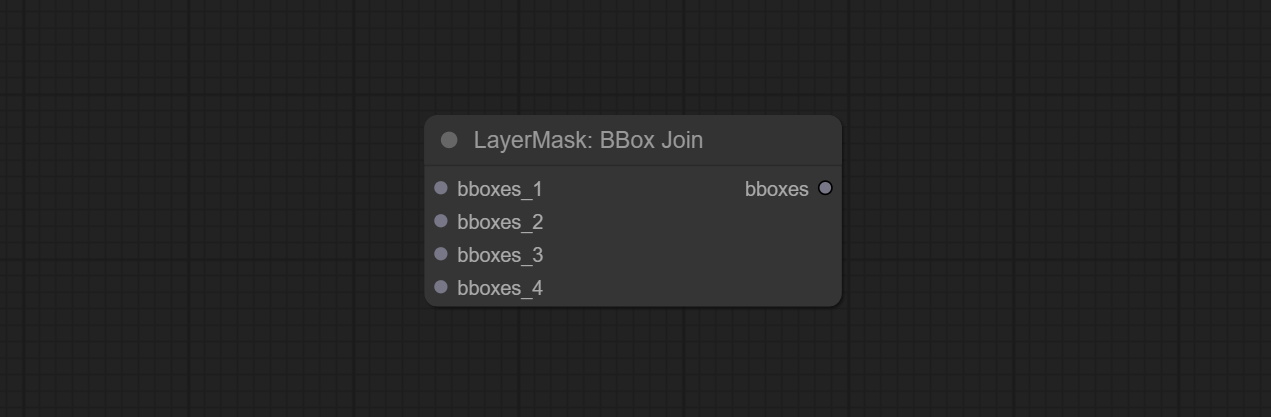
Draw the recognition BBoxes data output by the Object Detector node as a mask. 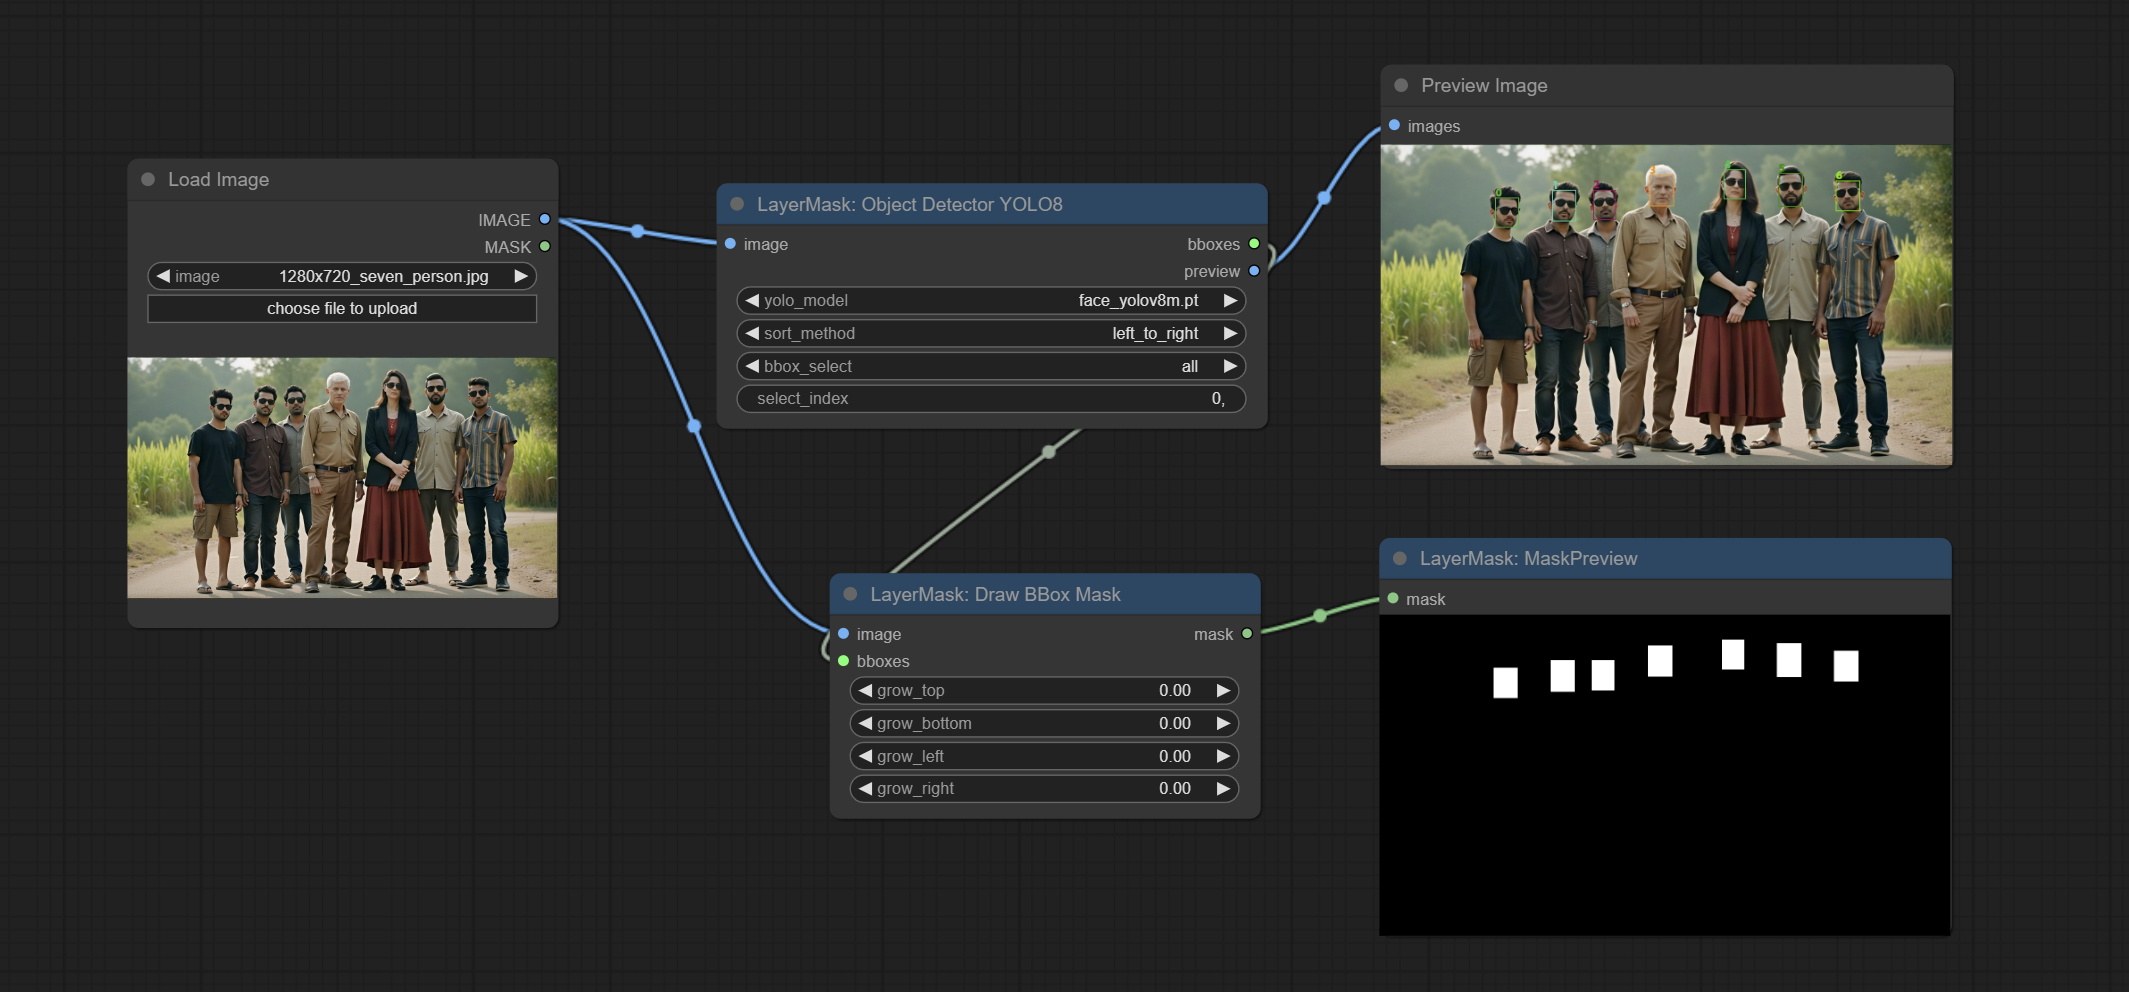
Node Options: 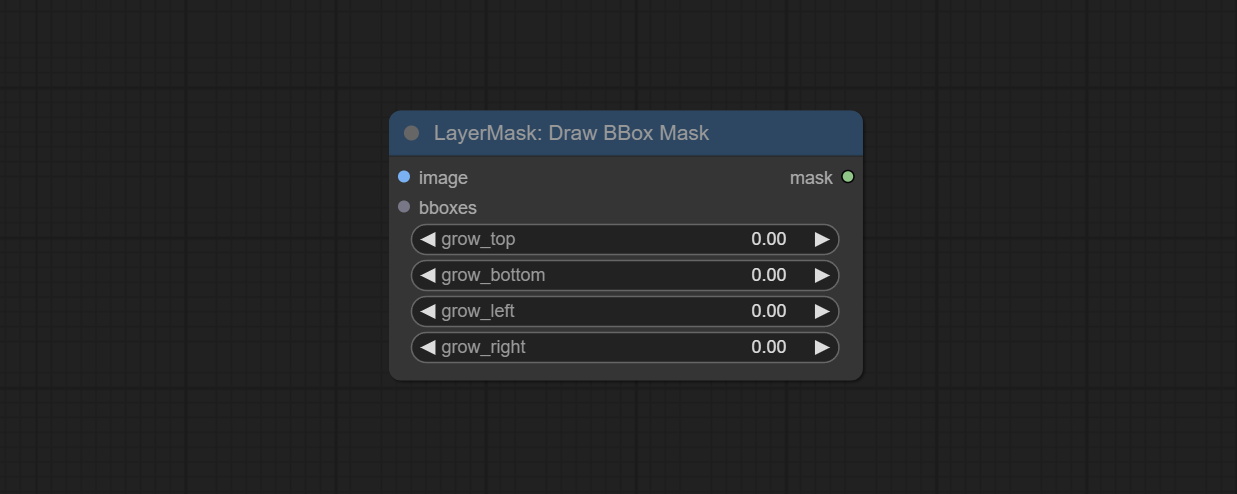
This node is implementation of EVF-SAM in ComfyUI.
*Please download model files from BaiduNetdisk or huggingface/EVF-SAM2, huggingface/EVF-SAM to ComfyUI/models/EVF-SAM folder(save the models in their respective subdirectories). 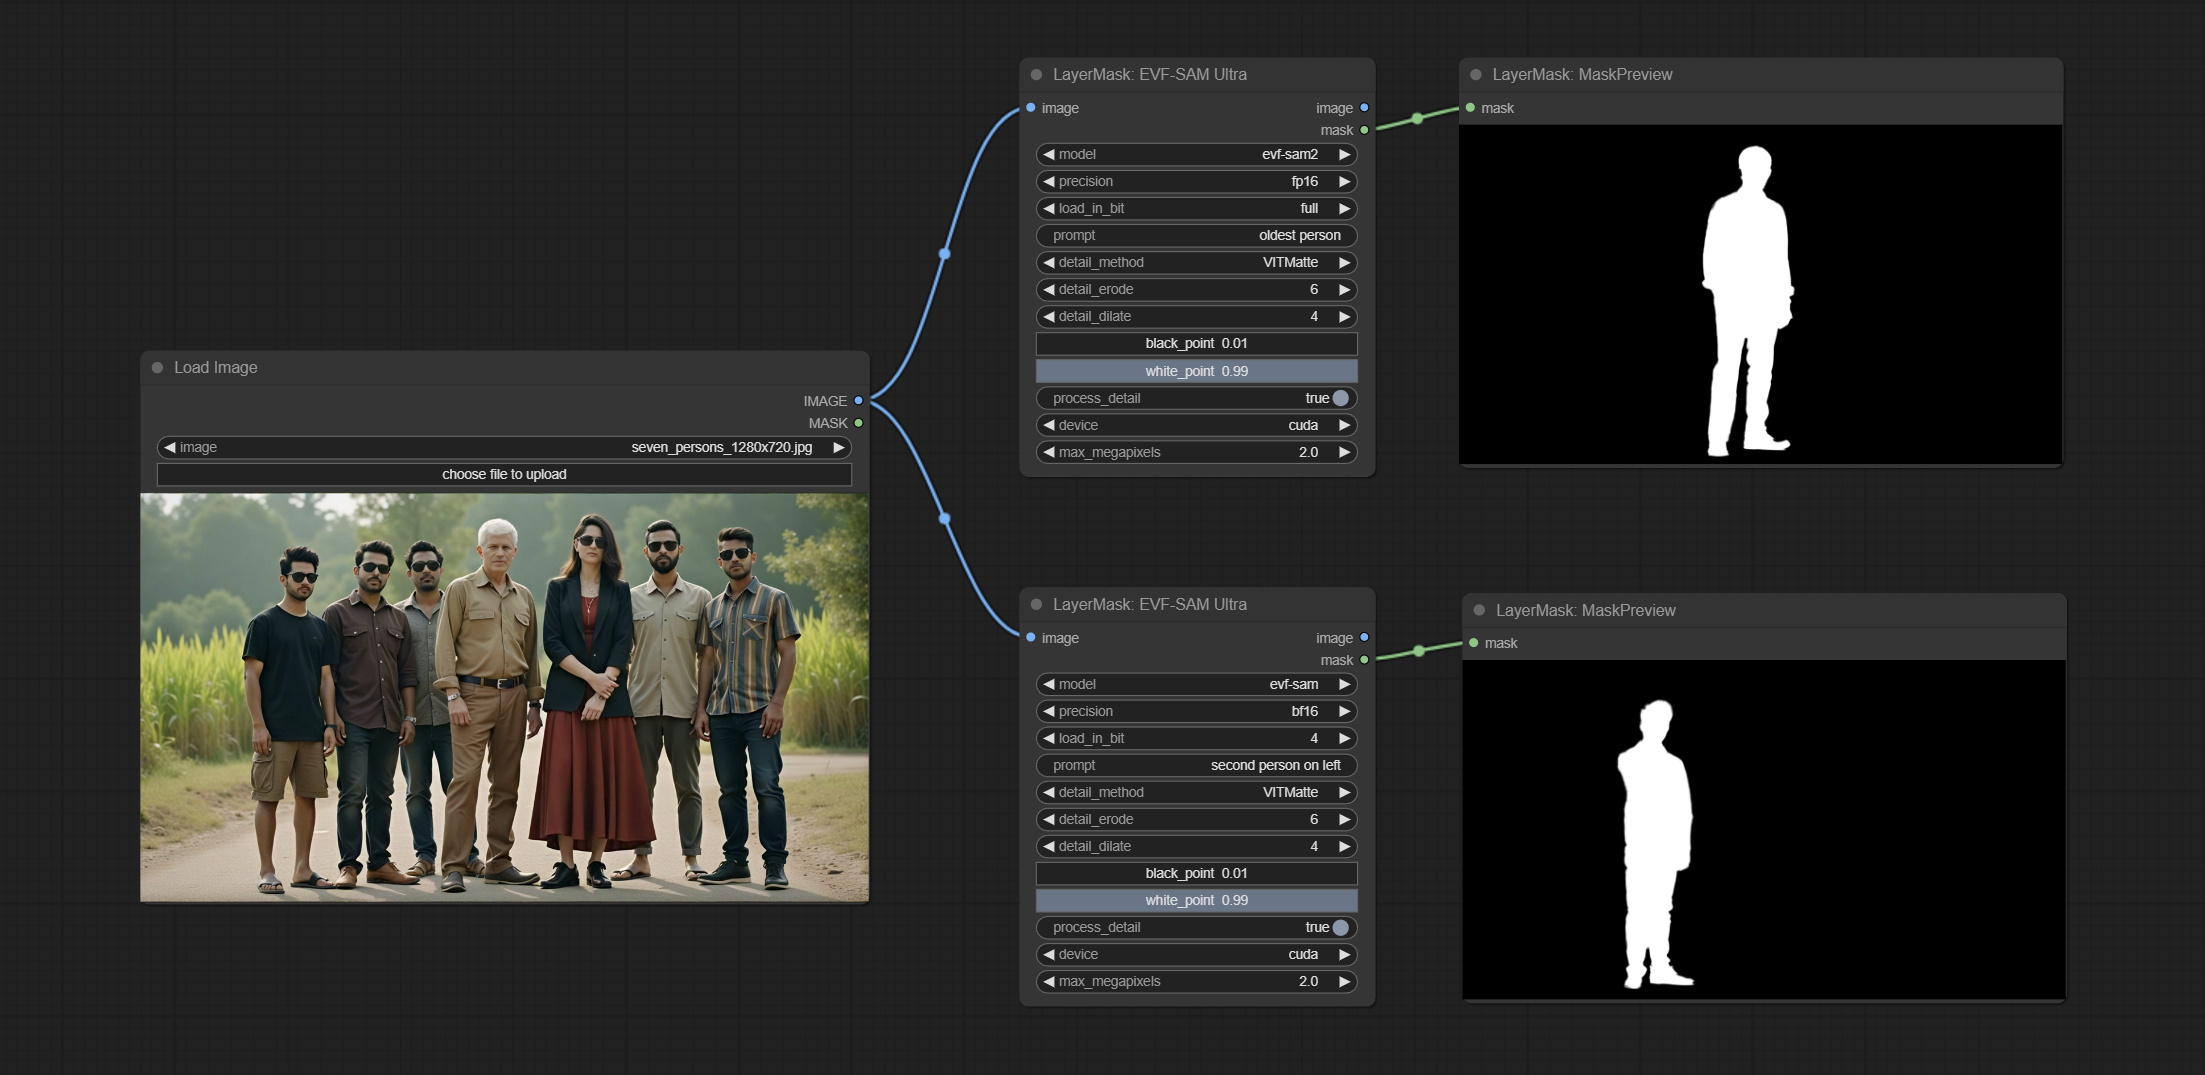
Node Options: 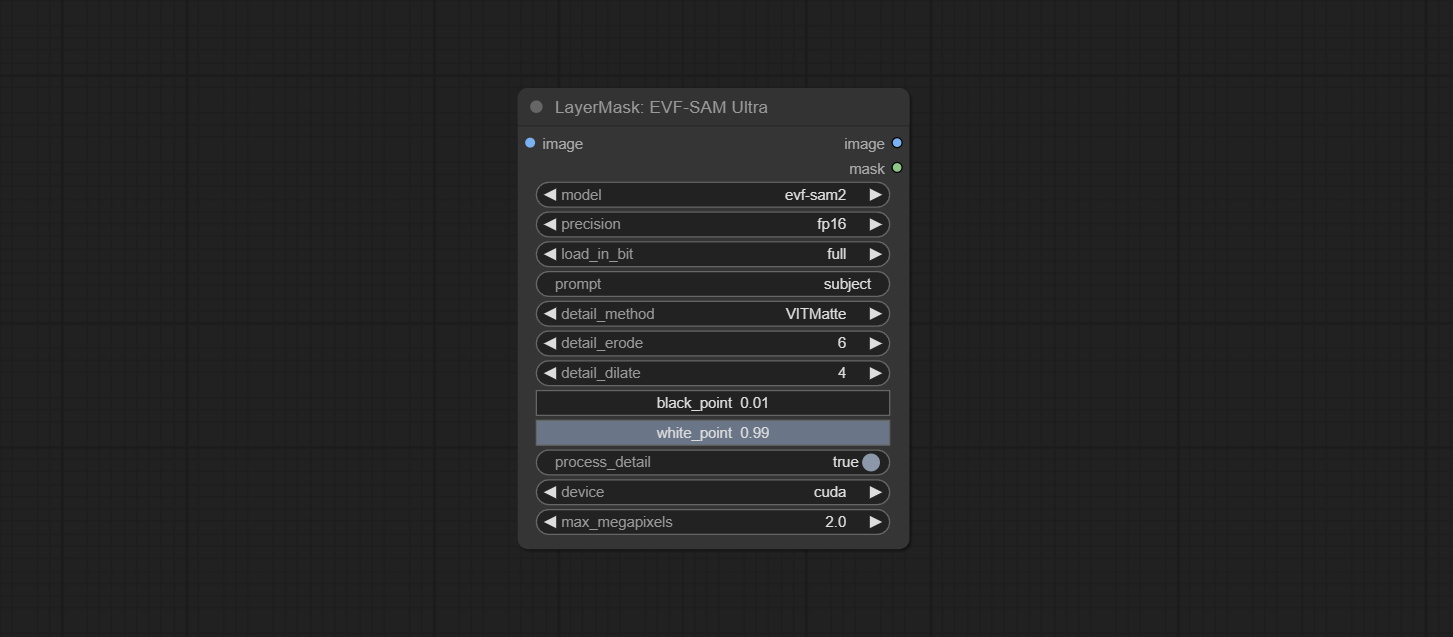
Using the segmentation function of the Florence2 model, while also having ultra-high edge details. The code for this node section is from spacepxl/ComfyUI-Florence-2, thanks to the original author. *Download the model files from BaiduNetdisk to ComfyUI/models/florence2 folder.
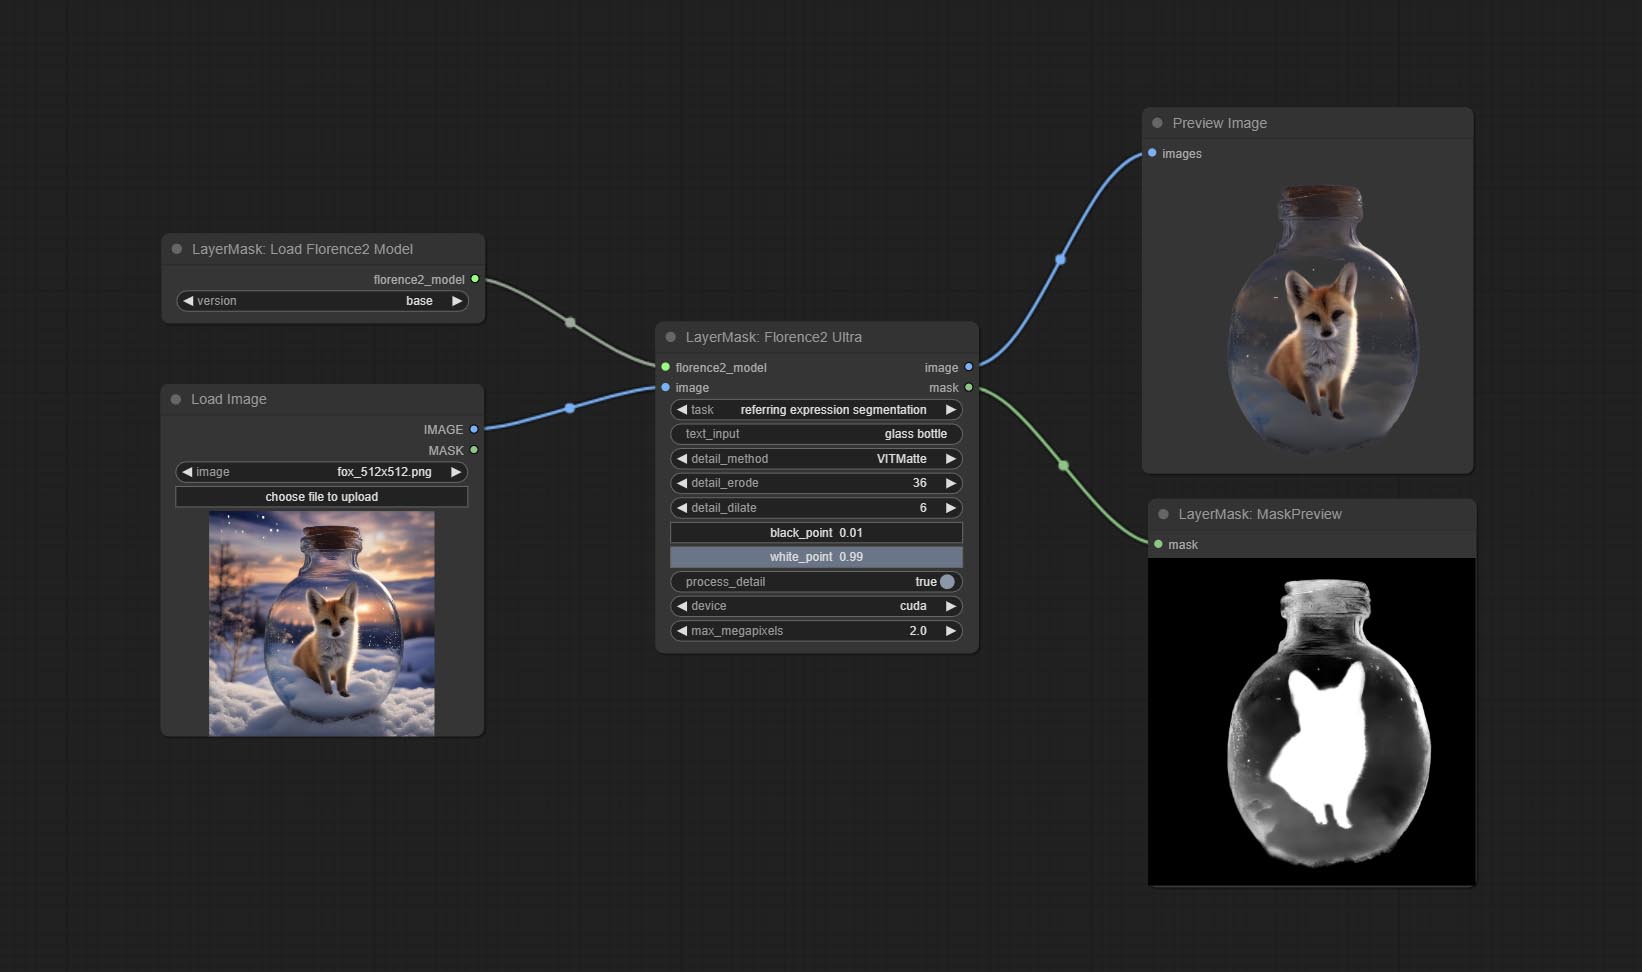
Node Options: 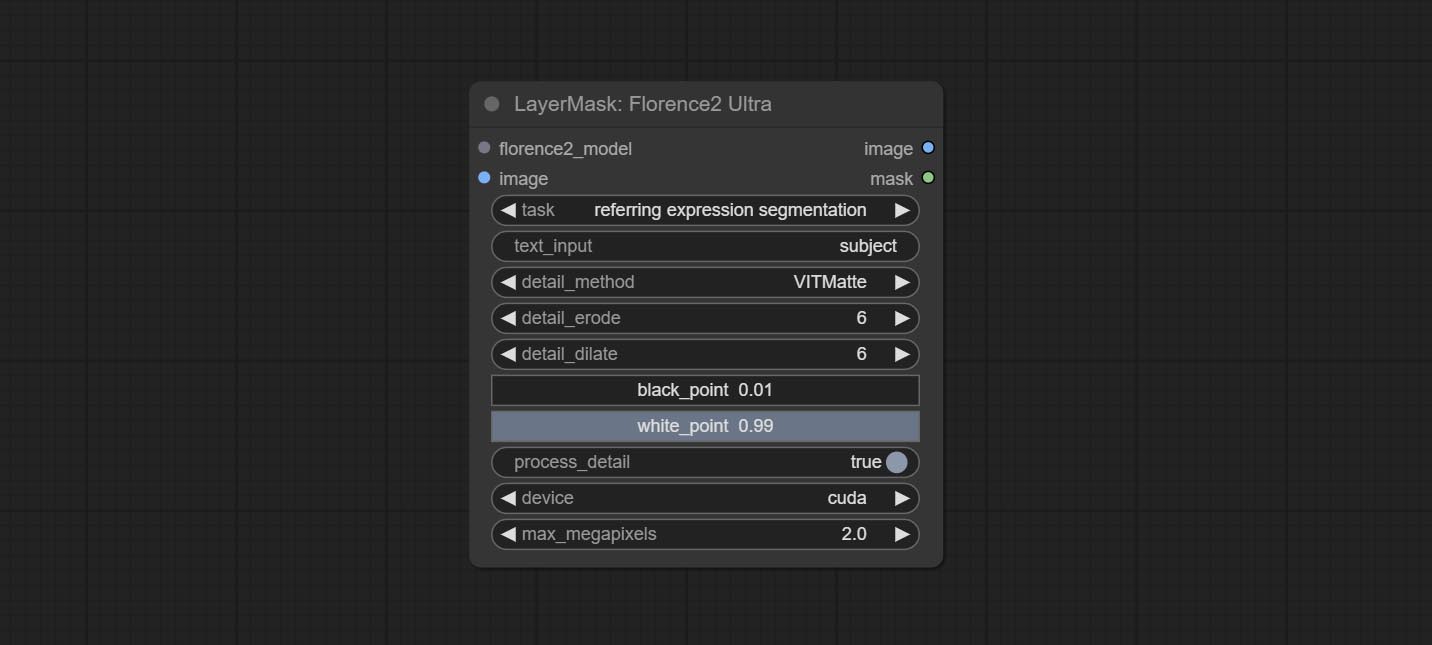
Florence2 model loader. *When using it for the first time, the model will be automatically downloaded.
At present, there are base, base-ft, large, large-ft, DocVQA, SD3-Captioner and base-PromptGen models to choose from.
Remove background. compared to the similar background removal nodes, this node has ultra-high edge details.
This node combines the Alpha Matte node of Spacepxl's ComfyUI-Image-Filters and the functionality of ZHO-ZHO-ZHO's ComfyUI-BRIA_AI-RMBG, thanks to the original author.
*Download model files from BRIA Background Removal v1.4 or BaiduNetdisk to ComfyUI/models/rmbg/RMBG-1.4 folder. This model can be used for non-commercial purposes.
Node options: 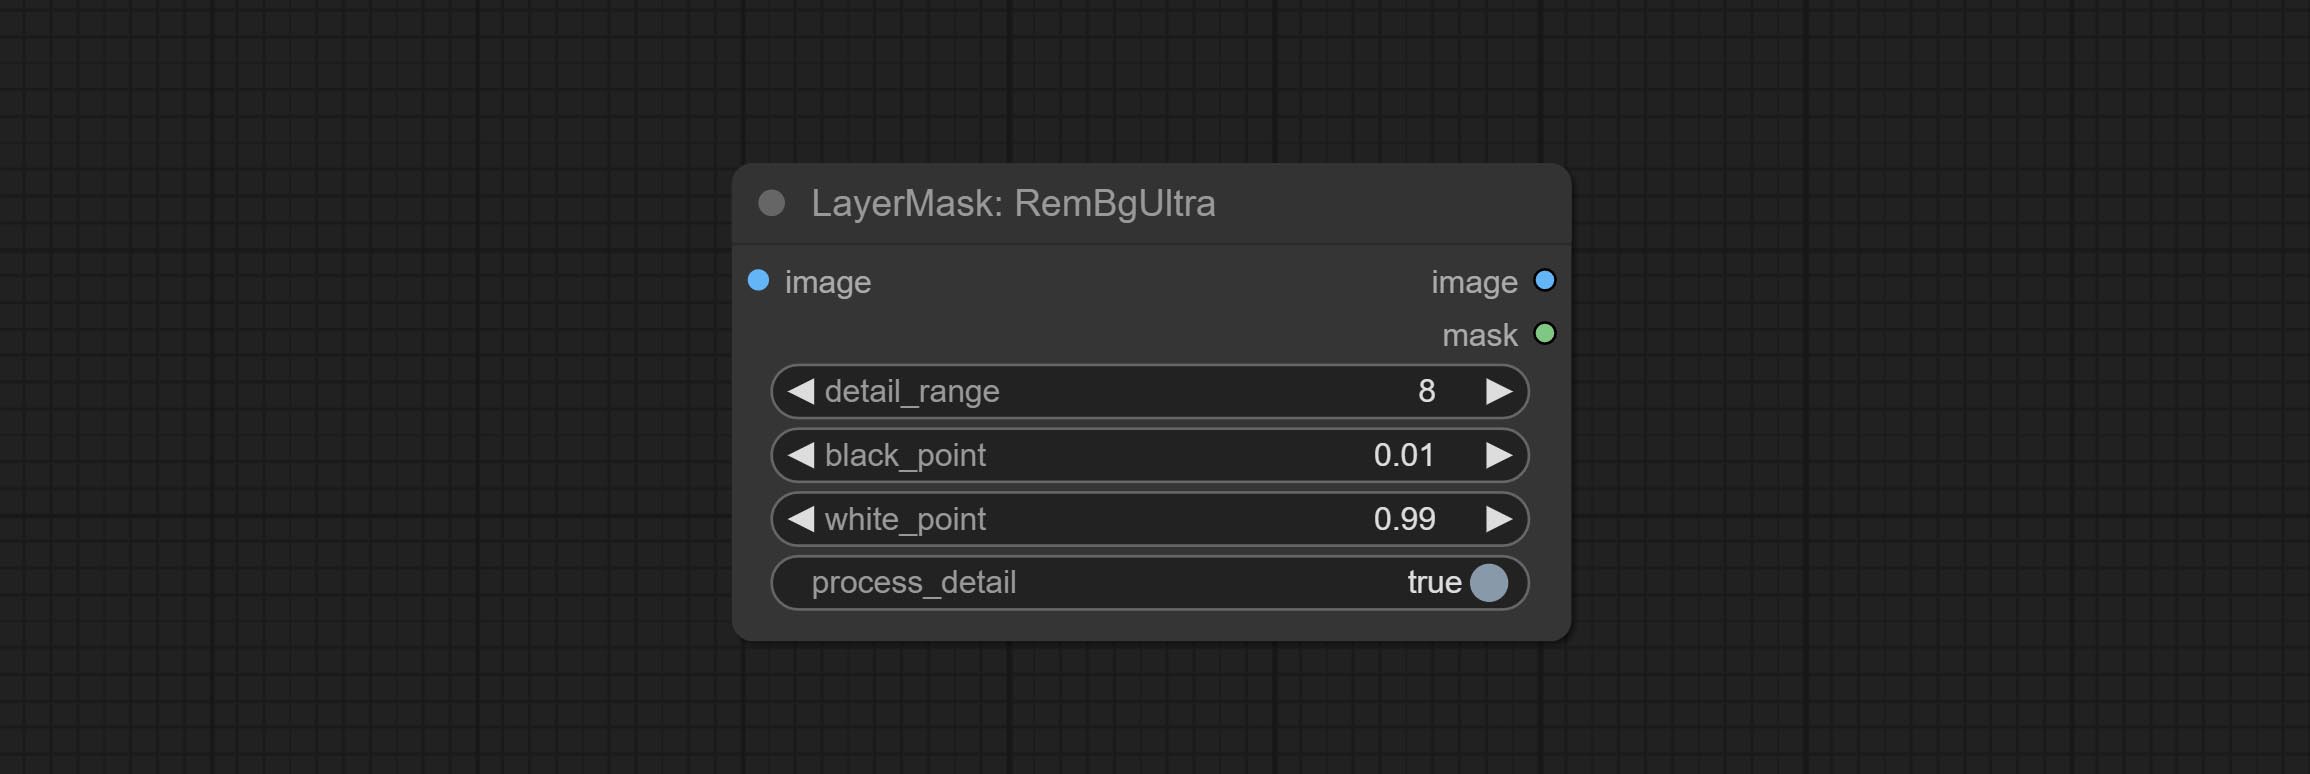
The V2 upgraded version of RemBgUltra has added the VITMatte edge processing method.(Note: Images larger than 2K in size using this method will consume huge memory)
On the basis of RemBgUltra, the following changes have been made: 
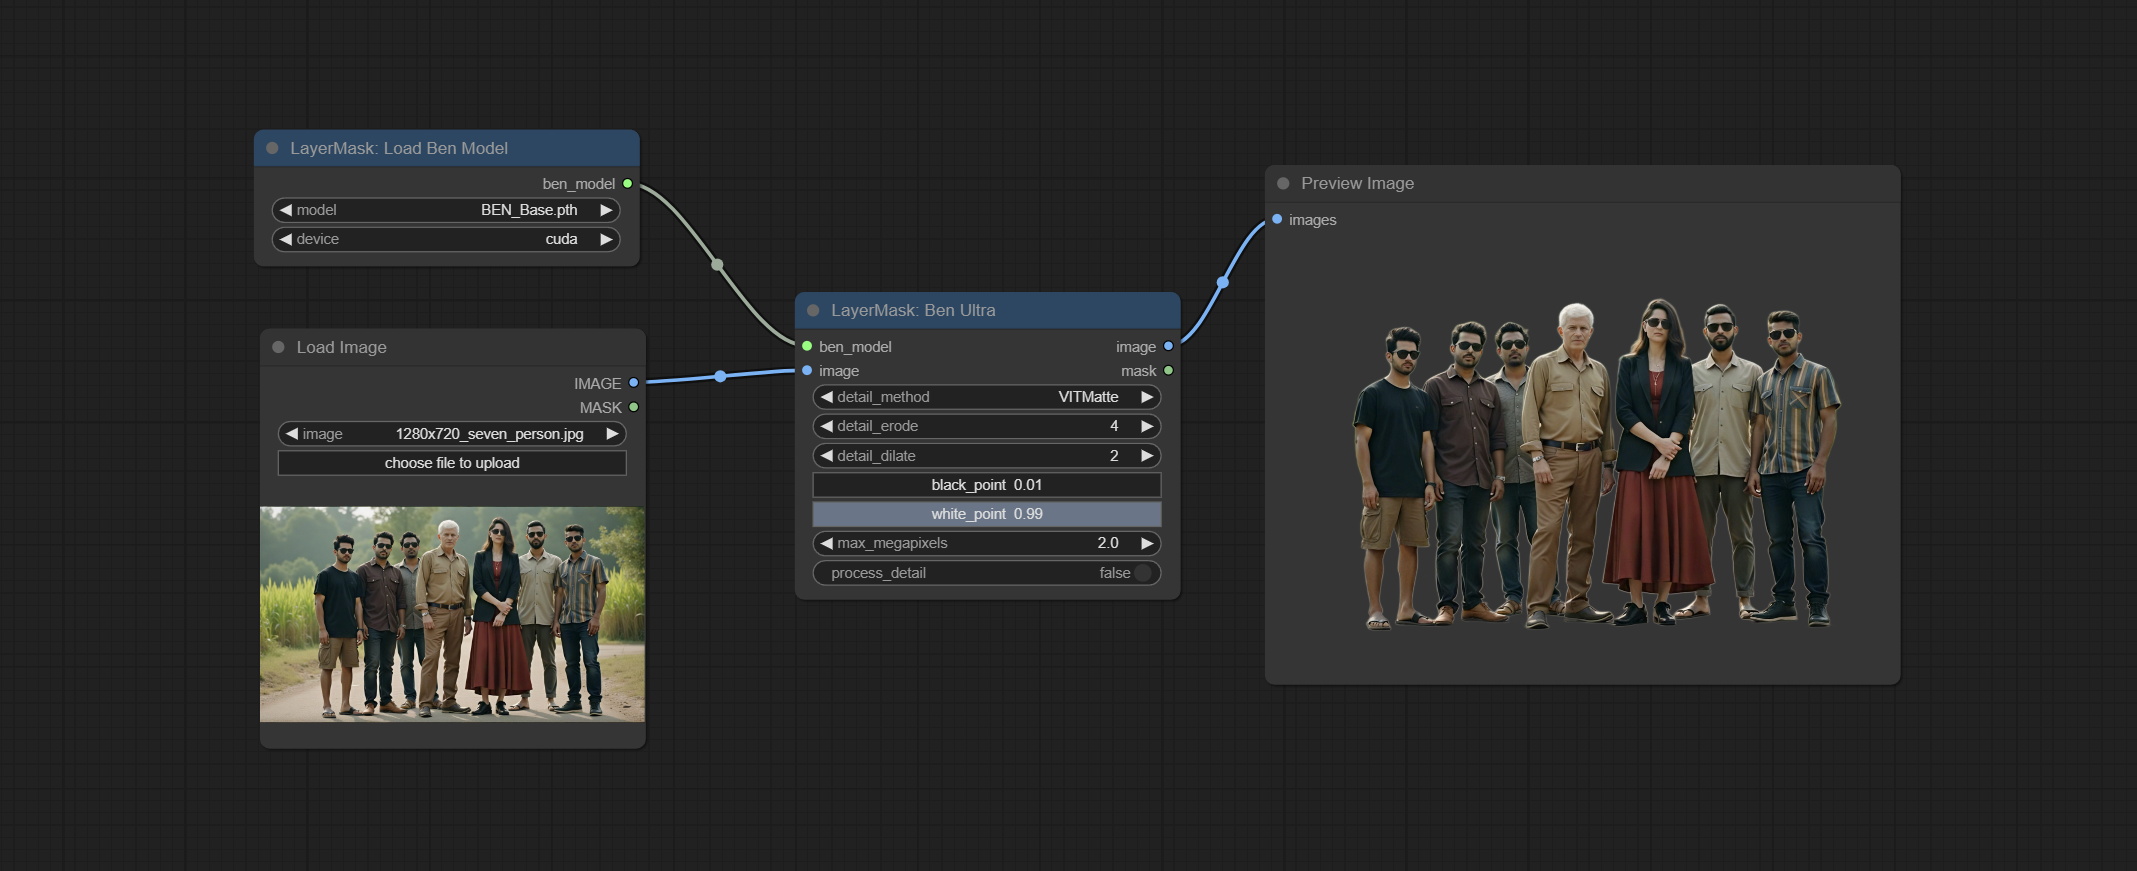
It is the implementation of PramaLLC/BEN project in ComfyUI. Thank you to the original author.
Download the BEN_Base.pth and config.json from huggingface or BaiduNetdisk and copy to ComfyUI/models/BEN folder.
Node Options: 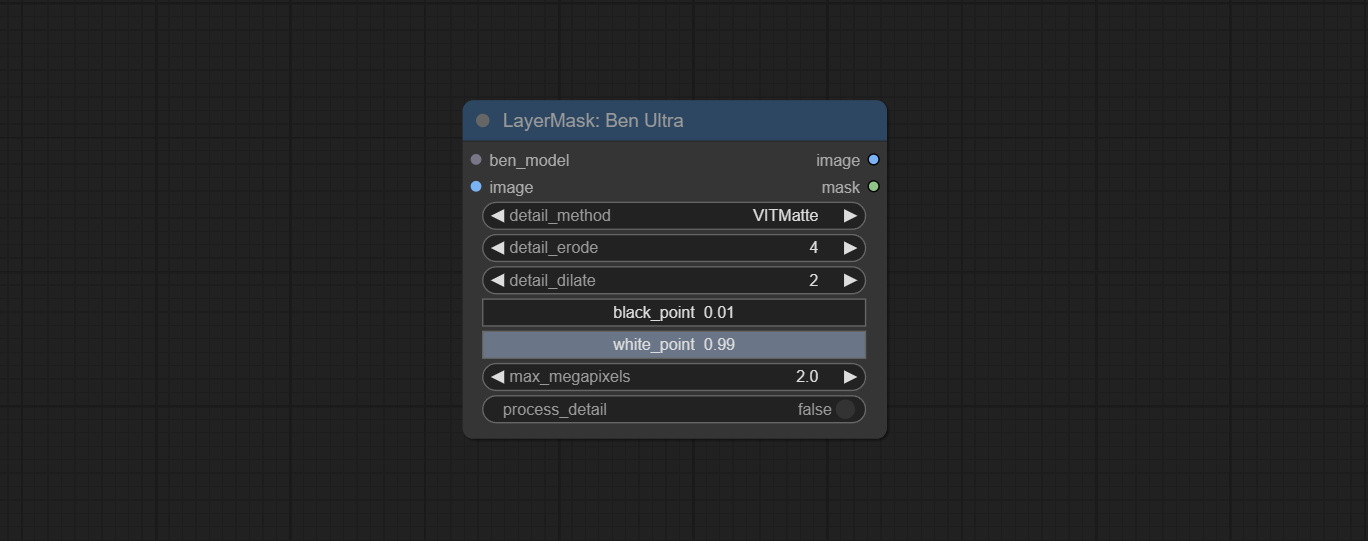
Load the BEN model.
Node Options: 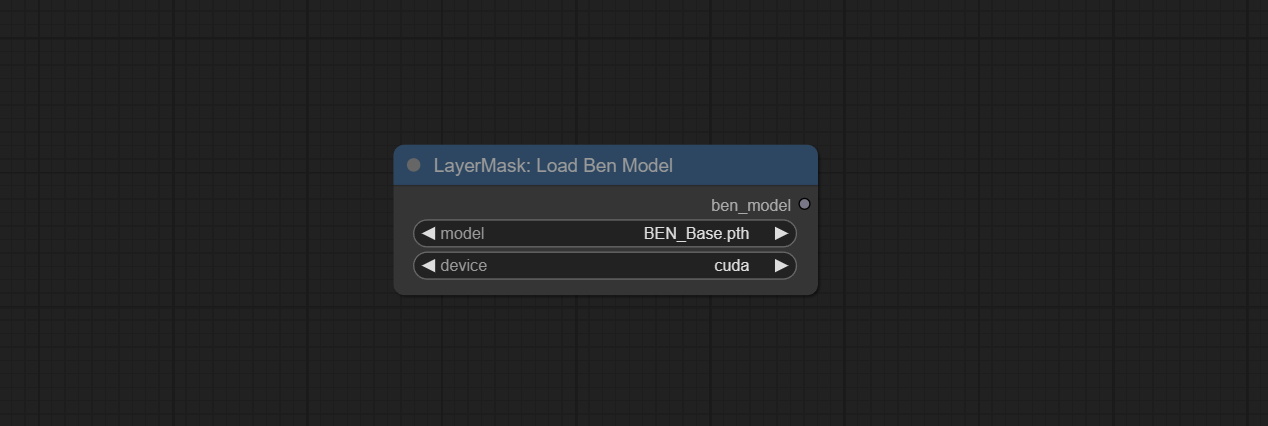
Using the BiRefNet model to remove background has better recognition ability and ultra-high edge details. The code for the model part of this node comes from Viper's ComfyUI-BiRefNet,thanks to the original author.
*From https://huggingface.co/ViperYX/BiRefNet or BaiduNetdisk download the BiRefNet-ep480.pth , pvt_v2_b2.pth , pvt_v2_b5.pth , swin_base_patch4_window12_384_22kto1k.pth , swin_large_patch4_window12_384_22kto1k.pth 5 files to ComfyUI/models/BiRefNet folder.
Node options: 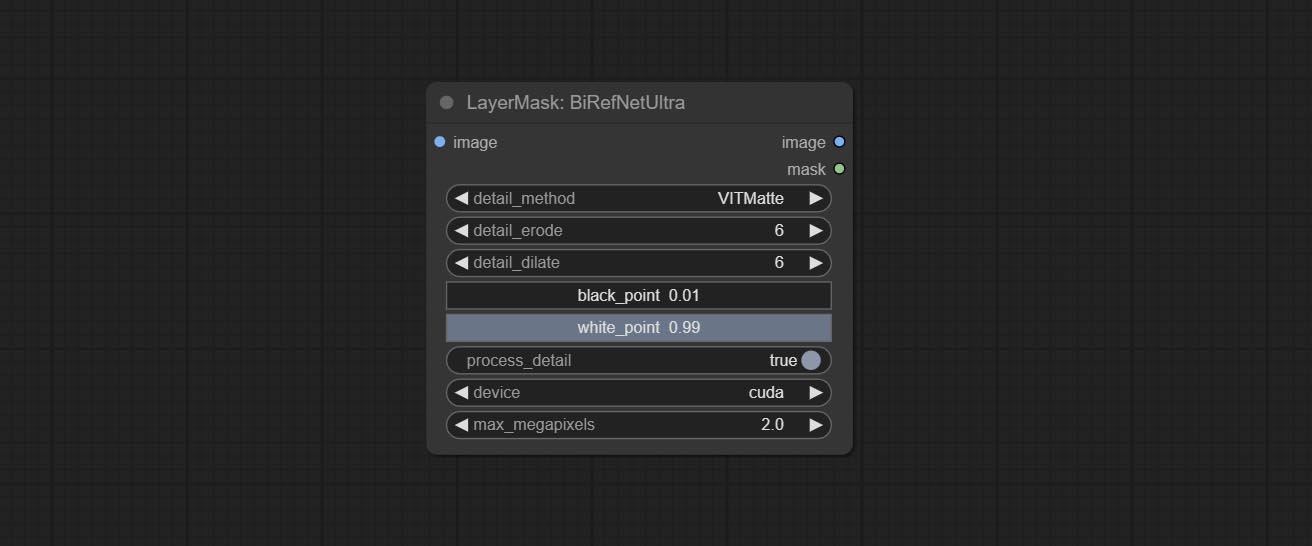
This node supports the use of the latest BiRefNet model. *Download model file from BaiduNetdisk or GoogleDrive named BiRefNet-general-epoch_244.pth to ComfyUI/Models/BiRefNet/pth folder. You can also download more BiRefNet models and put them here.
Node Options: 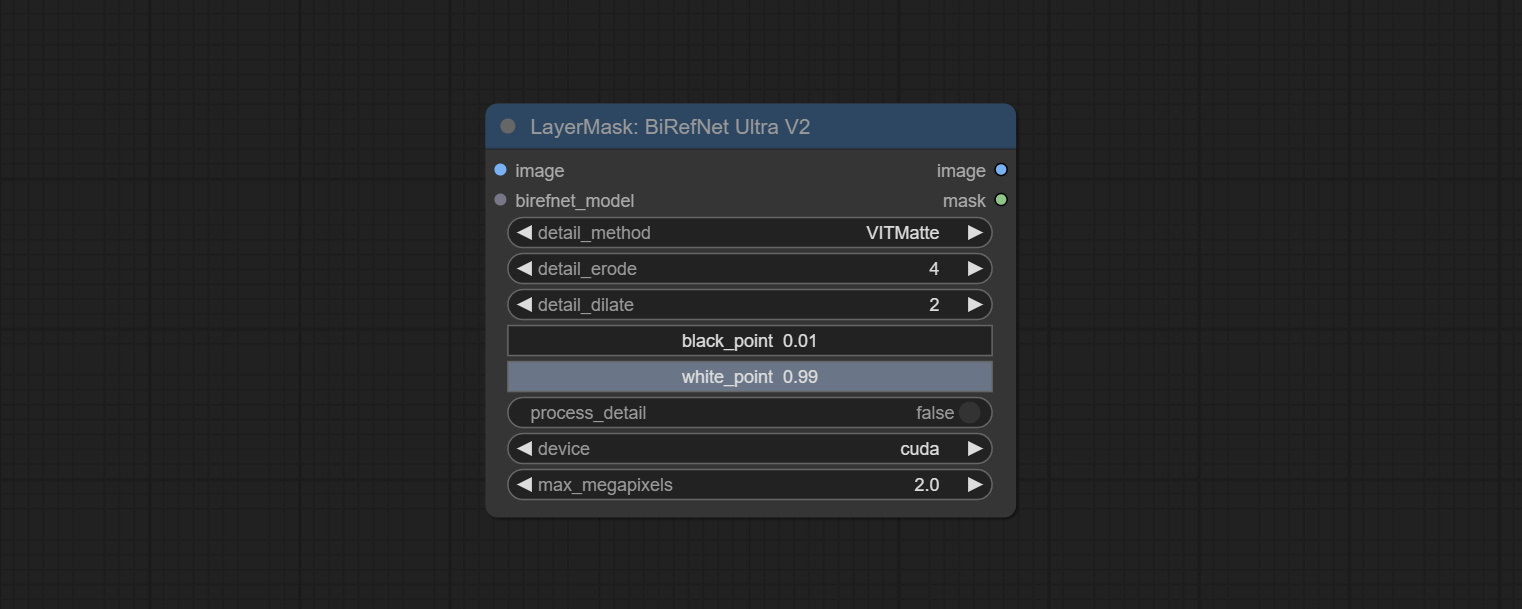
Load the BiRefNet model.
Node Options: 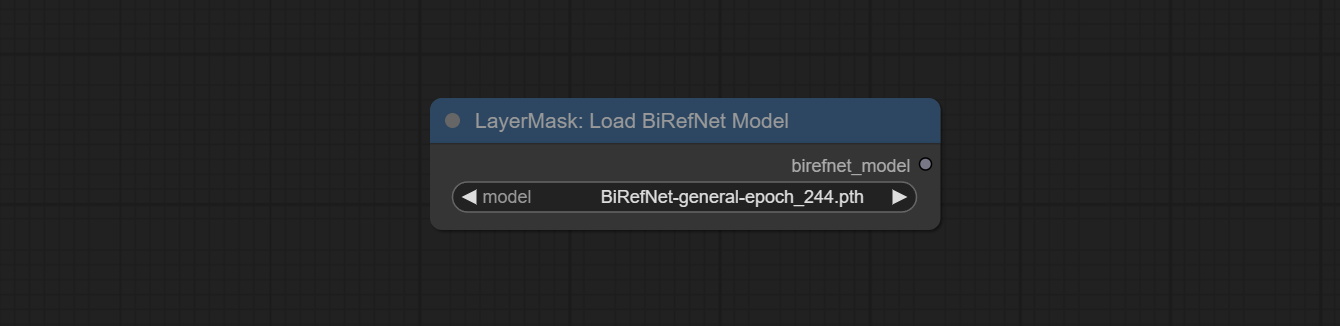
CoomfyUI/models/BiRefNet/pth folder for selection.This node is a PR submitted by jimlee2048 and supports loading RMBG-2.0 models.
Download model files from huggingface or 百度网盘 and copy to ComfyUI/models/BiRefNet/RMBG-2.0 folder.
Node Options: 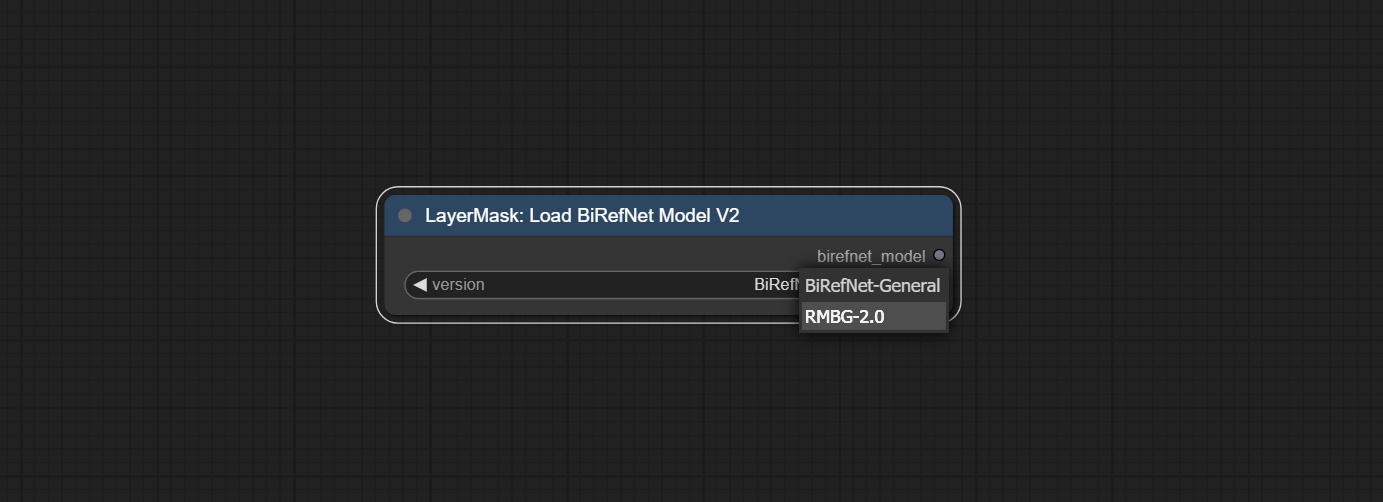
BiRefNet-General and RMBG-2.0 .Using the transparent-background model to remove background has better recognition ability and speed, while also having ultra-high edge details.
*From googledrive or BaiduNetdisk download all files to ComfyUI/models/transparent-background folder.
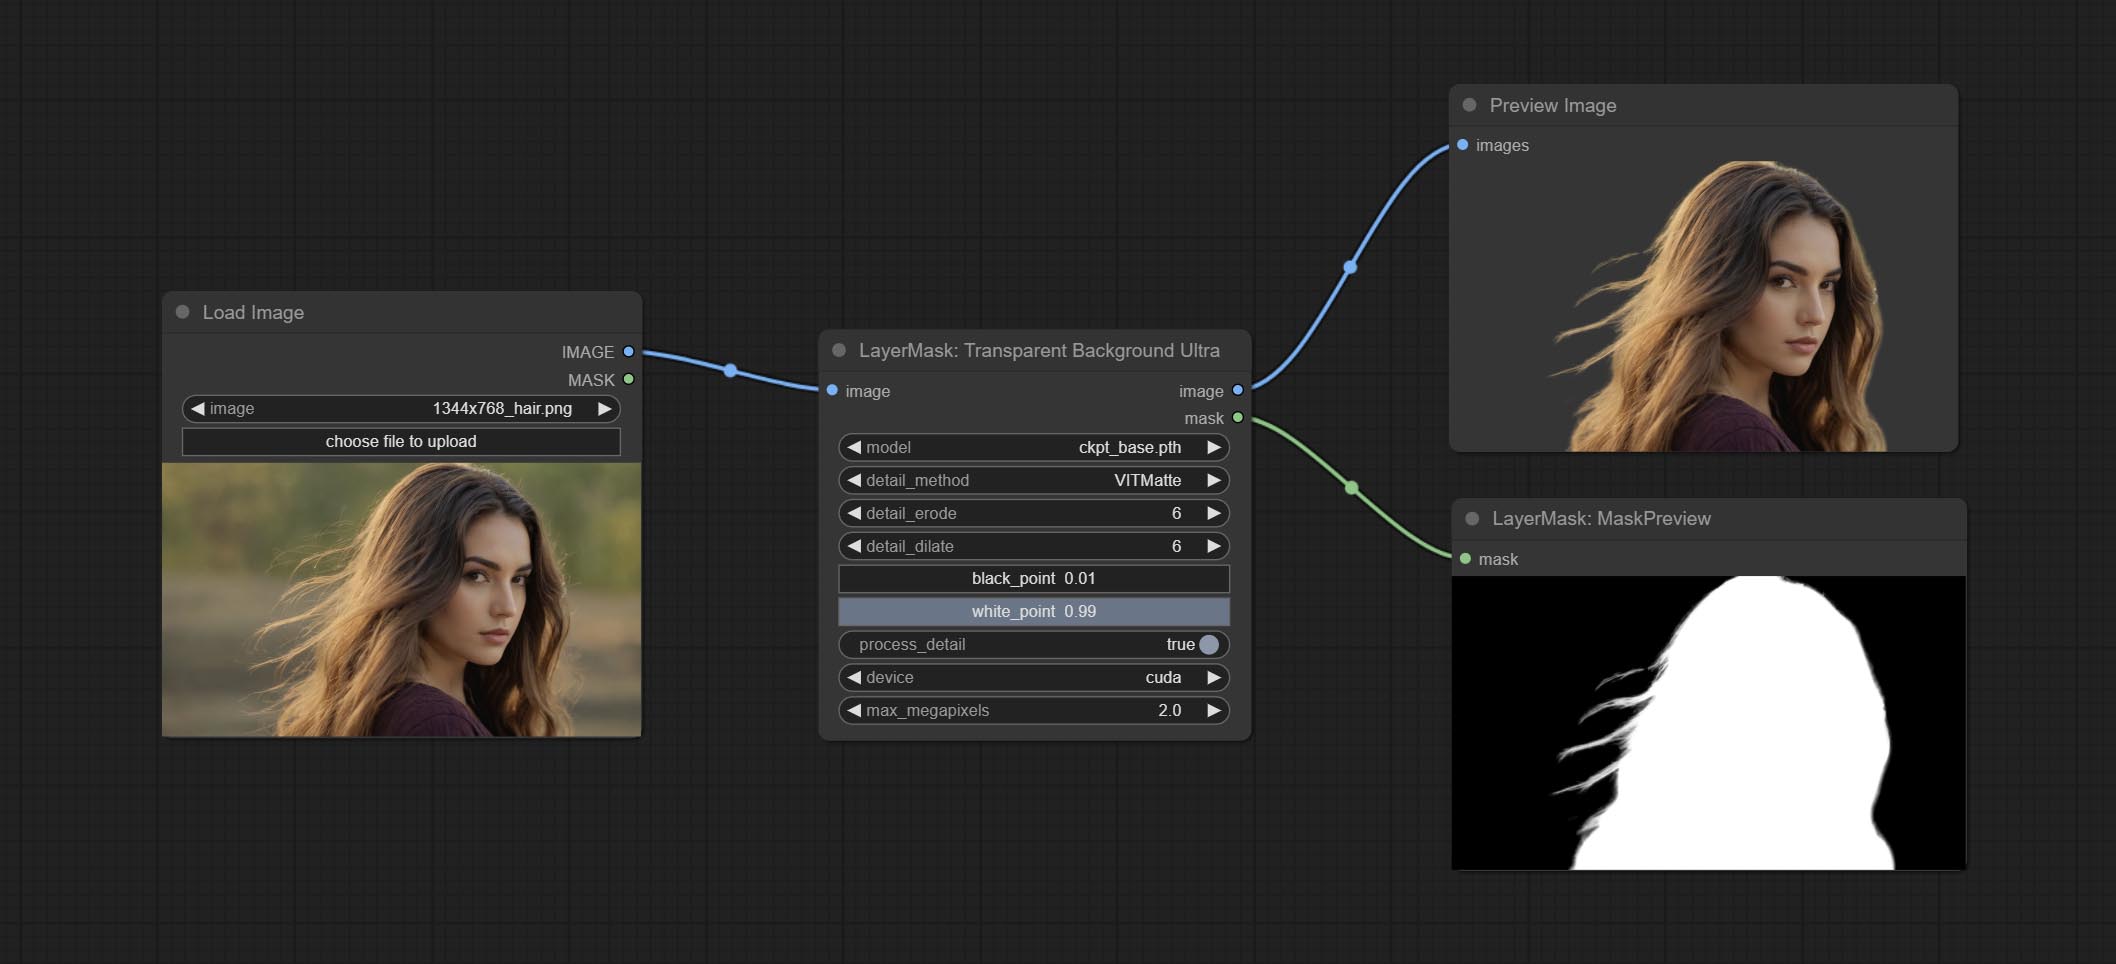
Node Options: 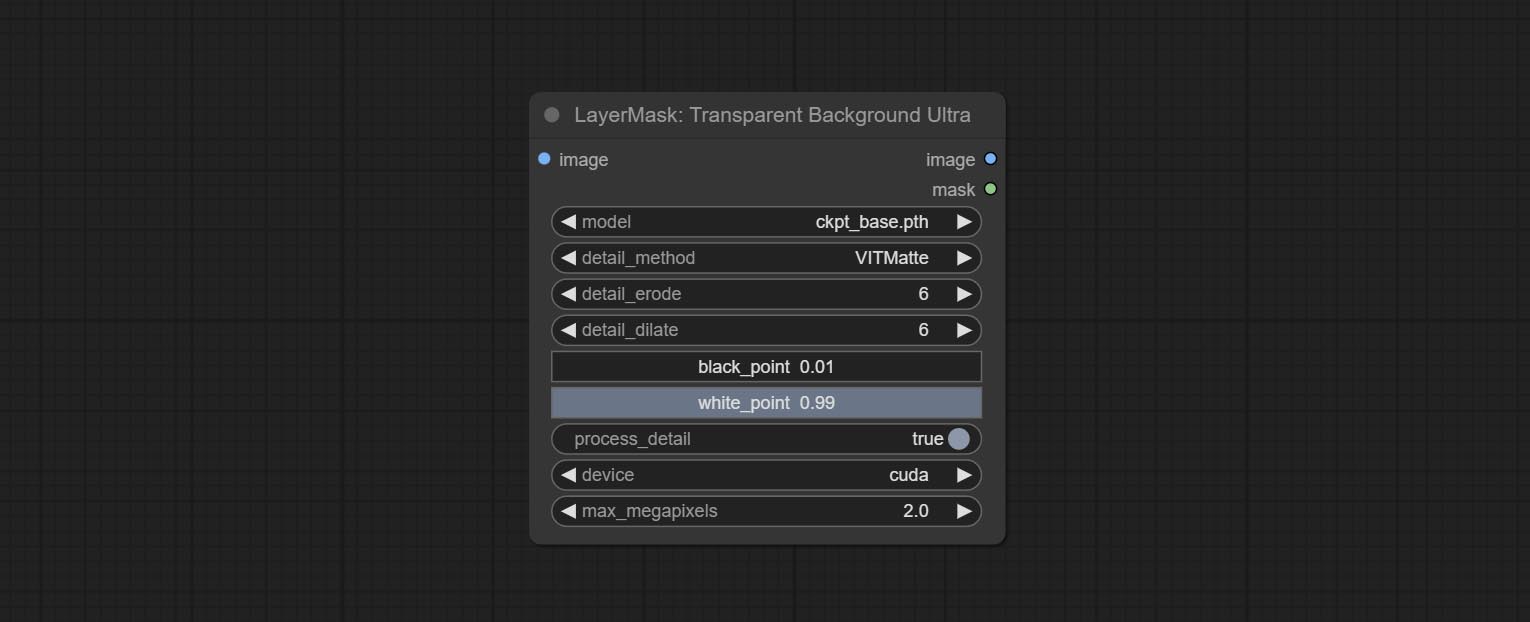
Generate masks for portrait's face, hair, body skin, clothing, or accessories. Compared to the previous A Person Mask Generator node, this node has ultra-high edge details. The model code for this node comes from a-person-mask-generator, edge processing code from ComfyUI-Image-Filters,thanks to the original author. *Download model files from BaiduNetdisk to ComfyUI/models/mediapipe folder.
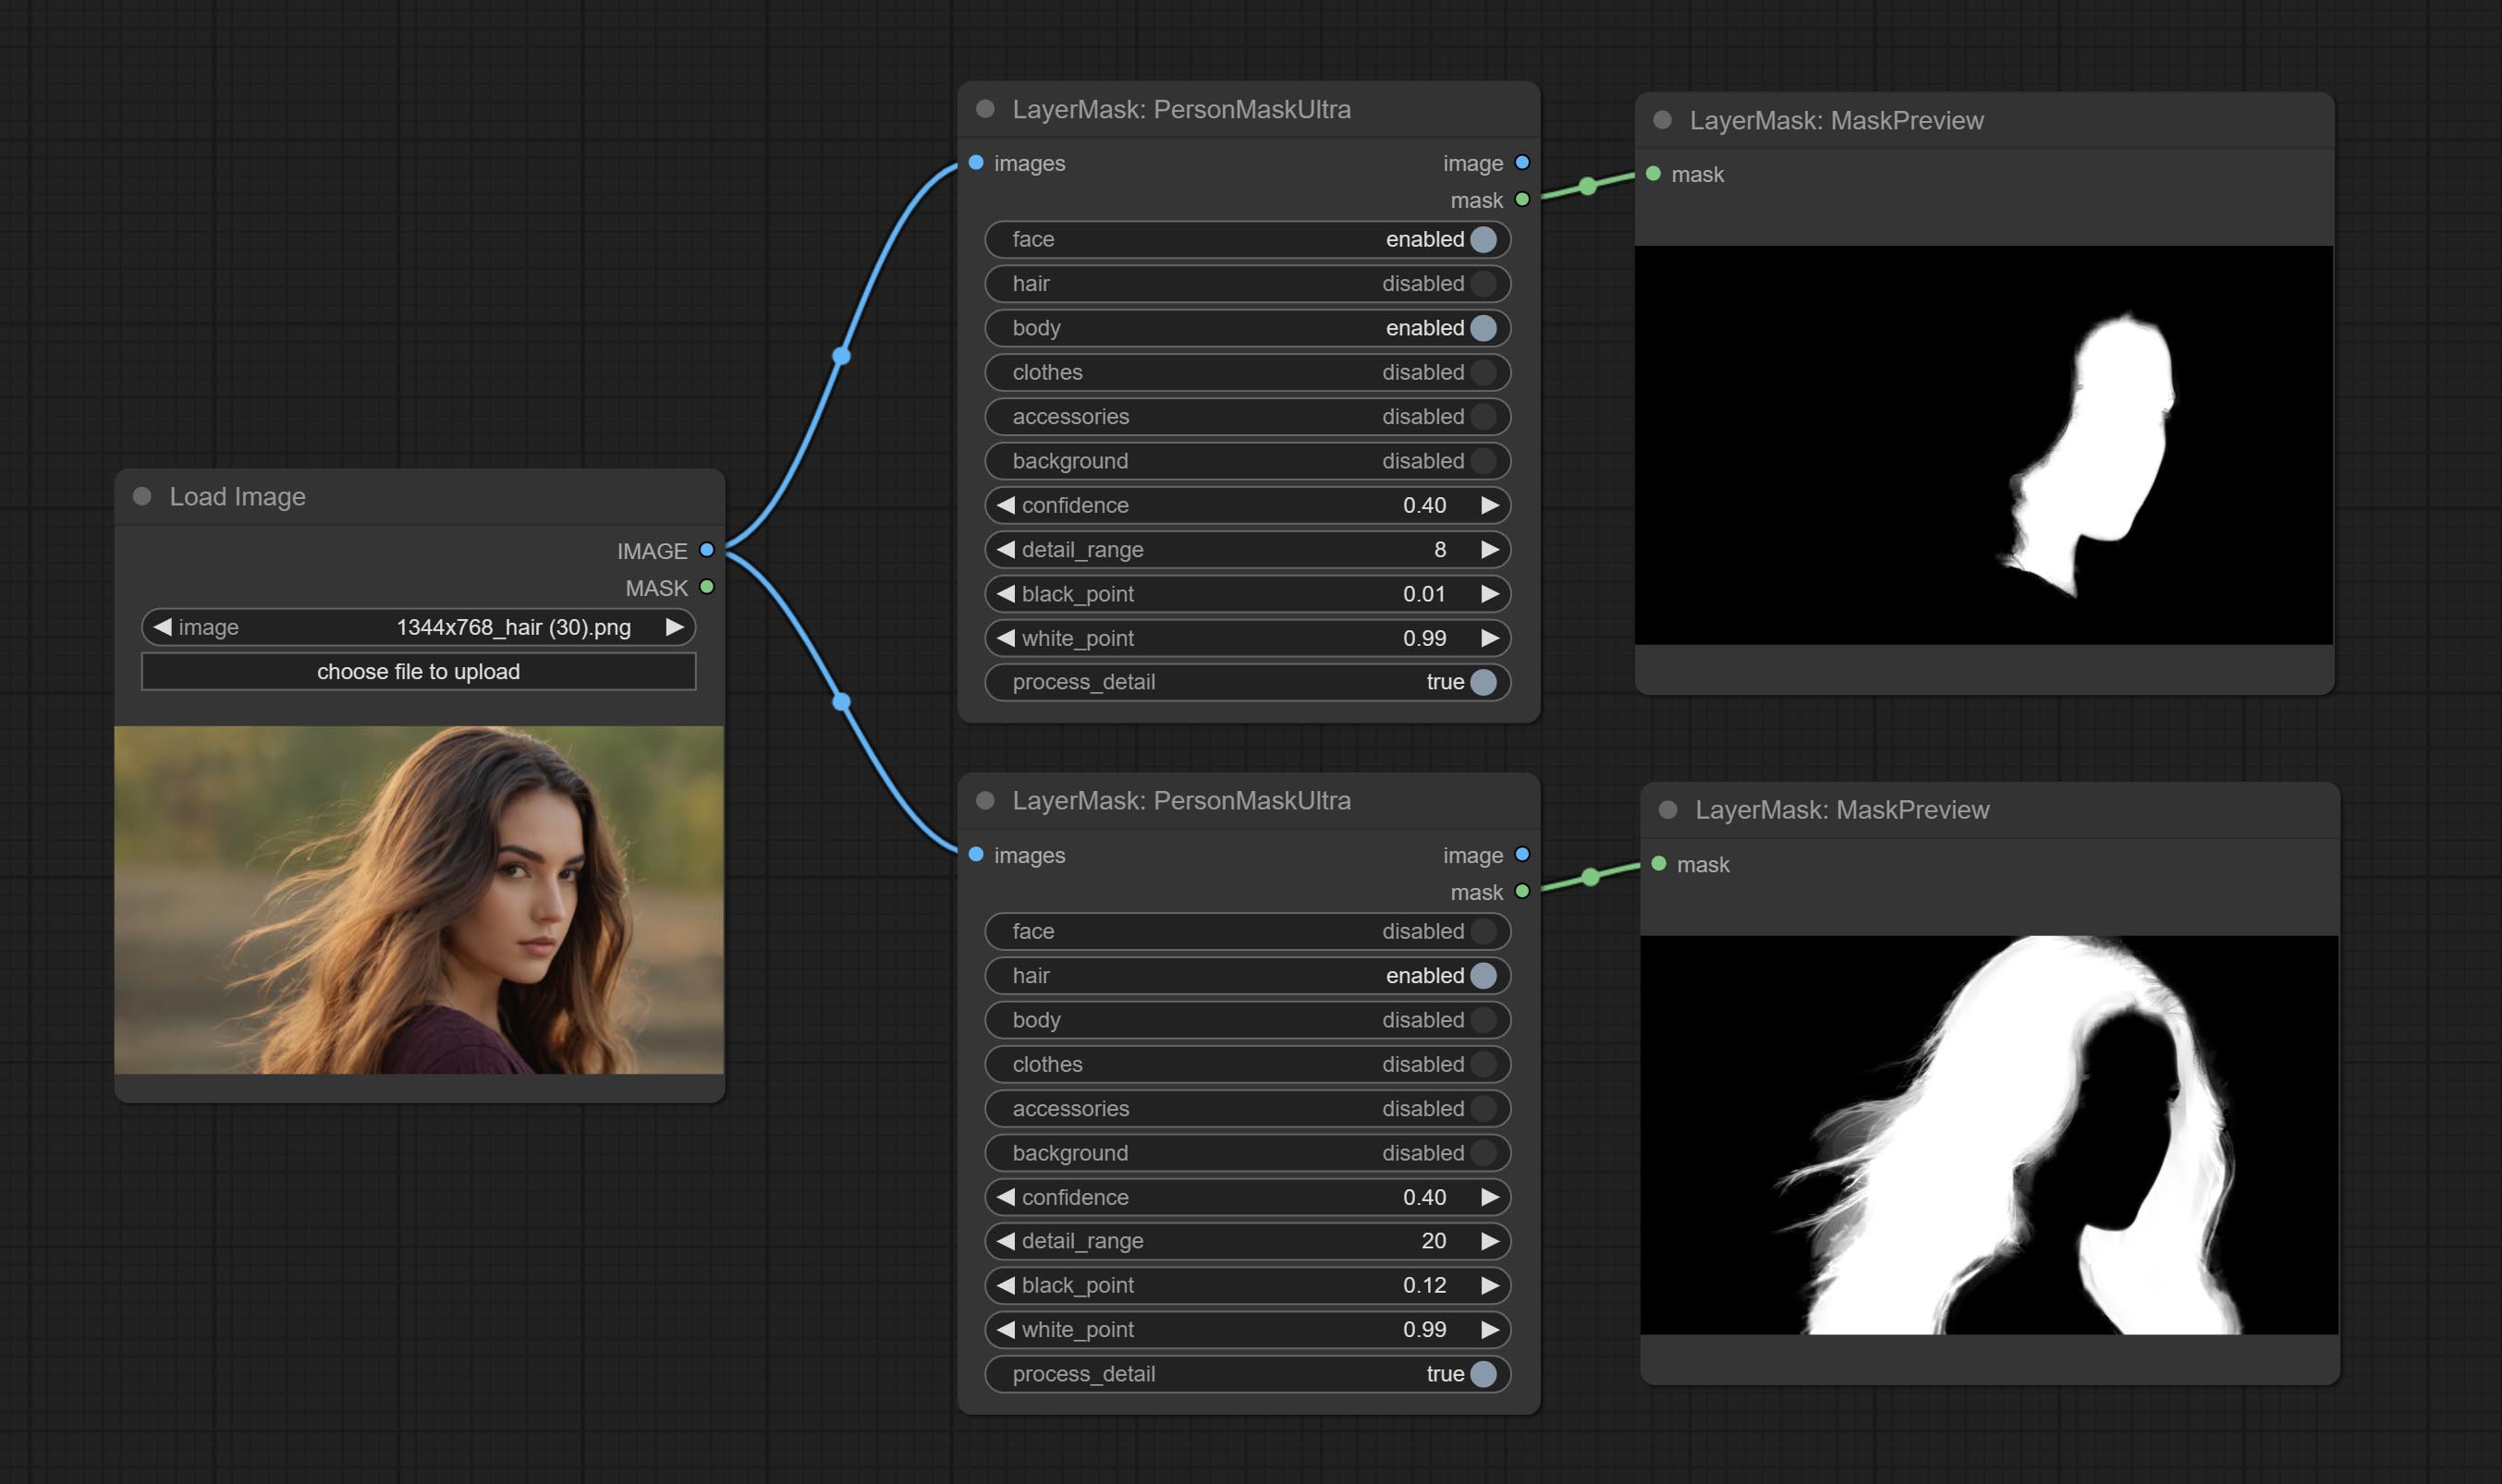
Node options: 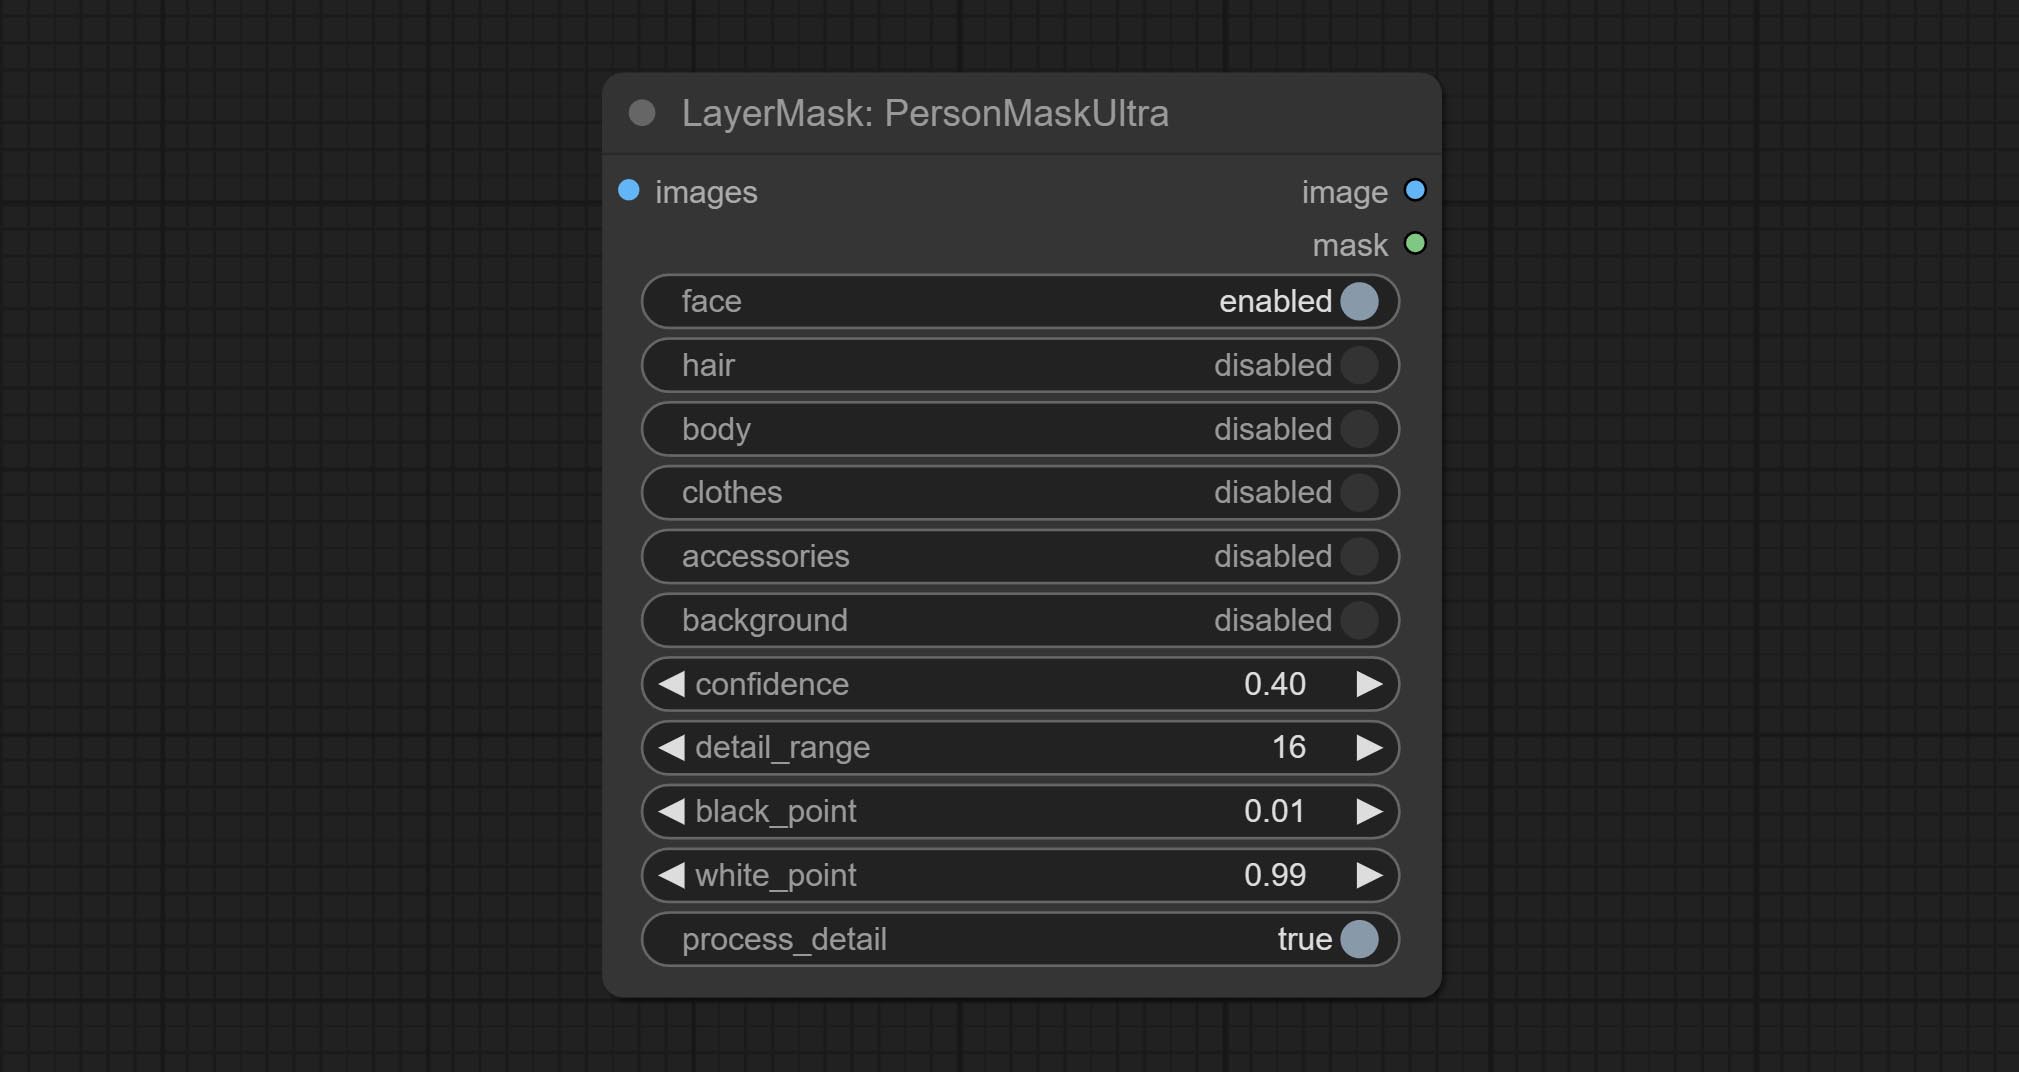
The V2 upgraded version of PersonMaskUltra has added the VITMatte edge processing method.(Note: Images larger than 2K in size using this method will consume huge memory)
On the basis of PersonMaskUltra, the following changes have been made: 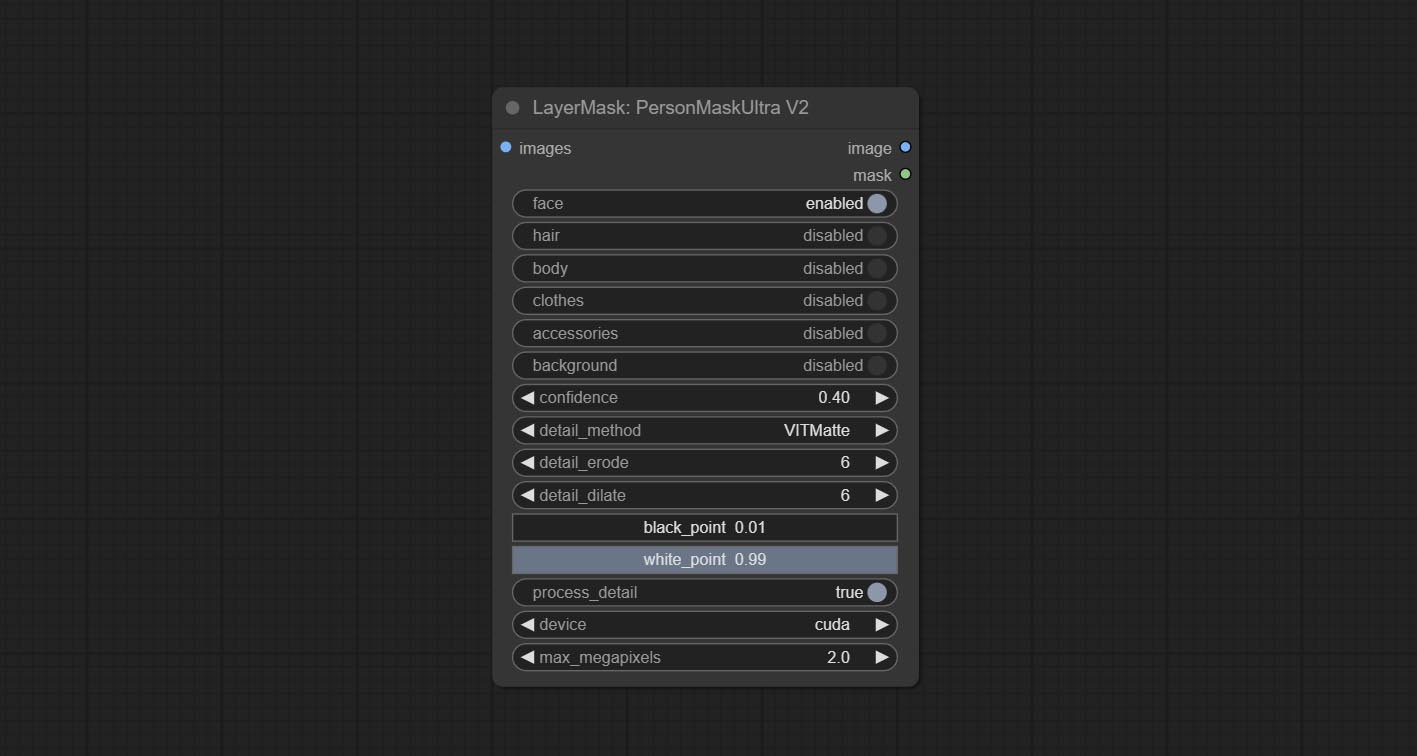
detail_method: Edge processing methods. provides VITMatte, VITMatte(local), PyMatting, GuidedFilter. If the model has been downloaded after the first use of VITMatte, you can use VITMatte (local) afterwards.
detail_erode: Mask the erosion range inward from the edge. the larger the value, the larger the range of inward repair.
detail_dilate: The edge of the mask expands outward. the larger the value, the wider the range of outward repair.
device: Set whether the VitMatte to use cuda.
max_megapixels: Set the maximum size for VitMate operations.

Generate masks for characters' faces, hair, arms, legs, and clothing, mainly used for segmenting clothing. The model segmentation code is fromStartHua,thanks to the original author. Compared to the comfyui_segformer_b2_clothes, this node has ultra-high edge details. (Note: Generating images with edges exceeding 2K in size using the VITMatte method will consume a lot of memory)
*Download all model files from huggingface or BaiduNetdisk to ComfyUI/models/segformer_b2_clothes folder.
Node Options: 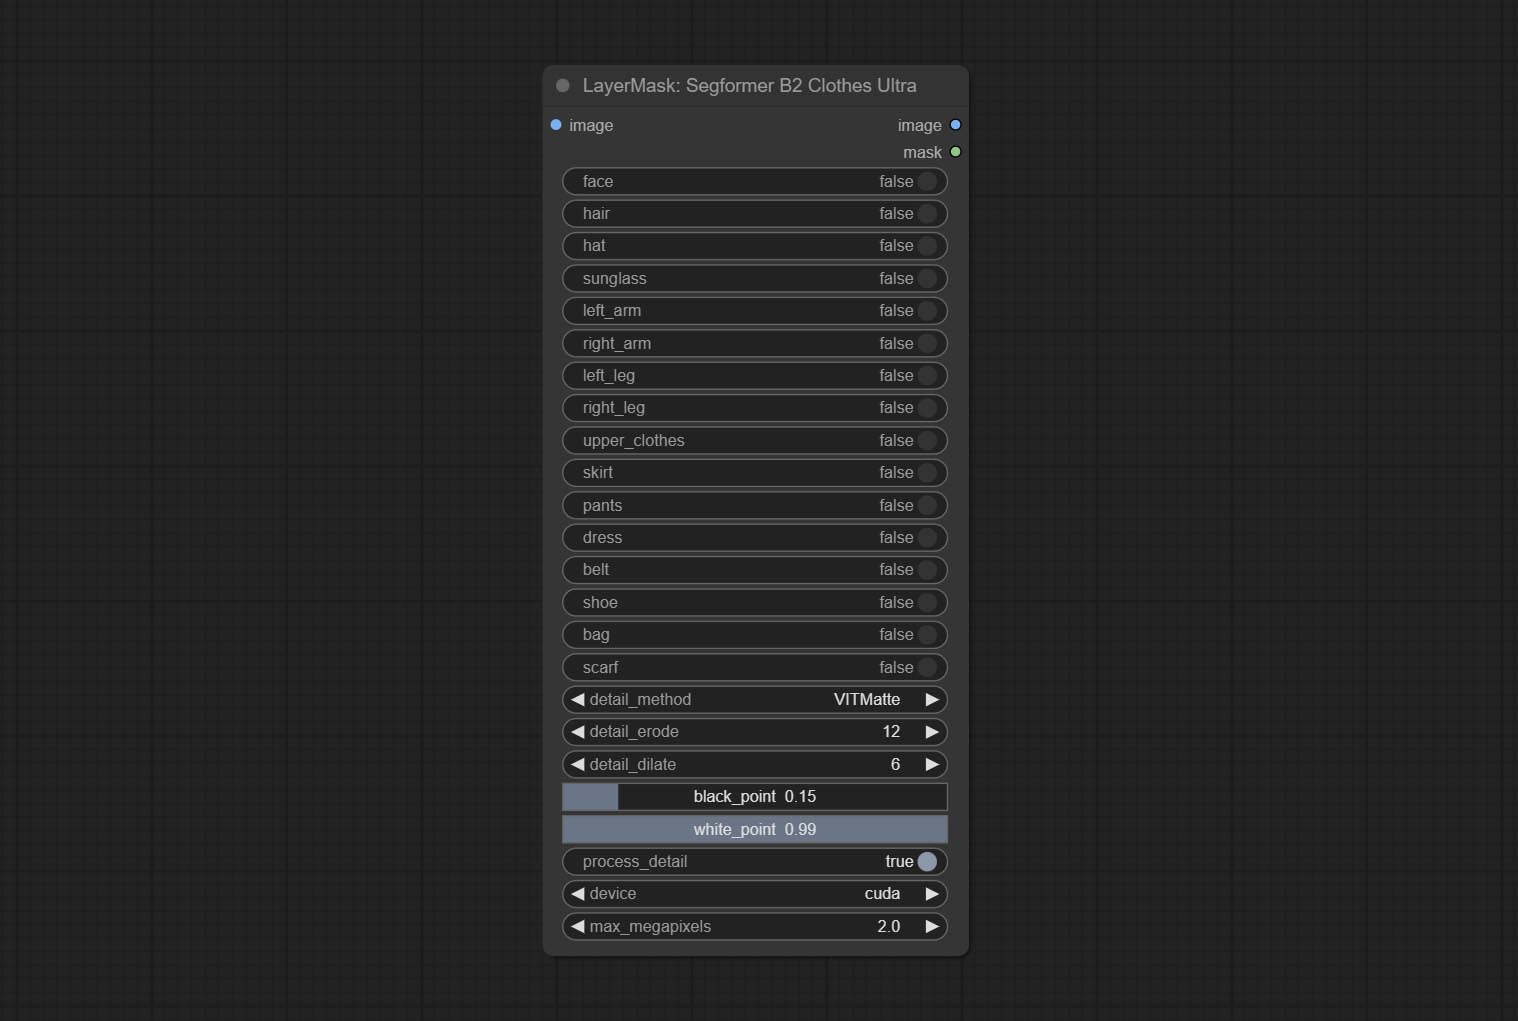
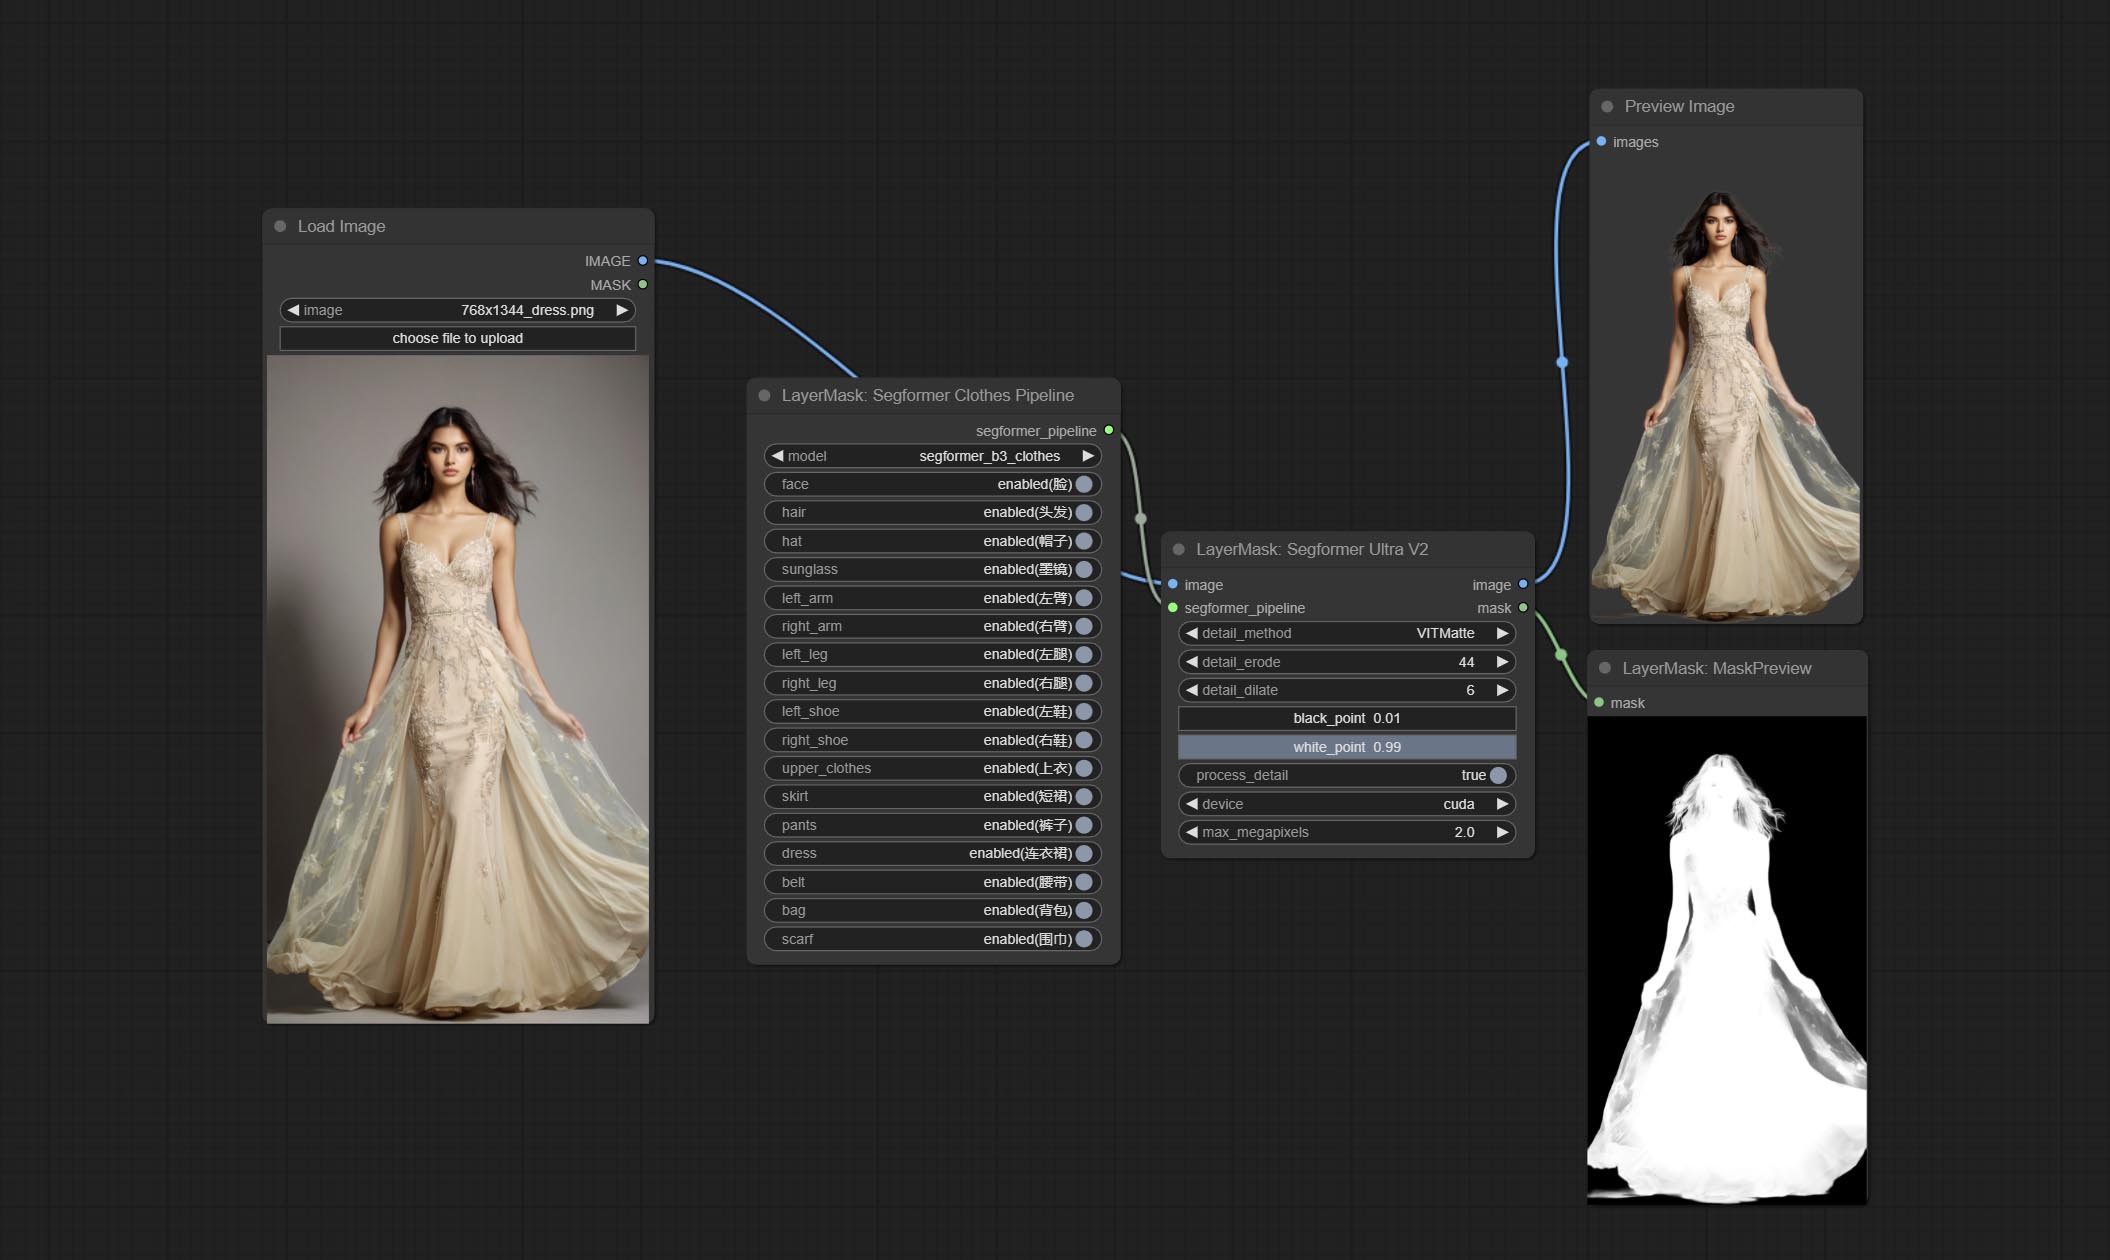
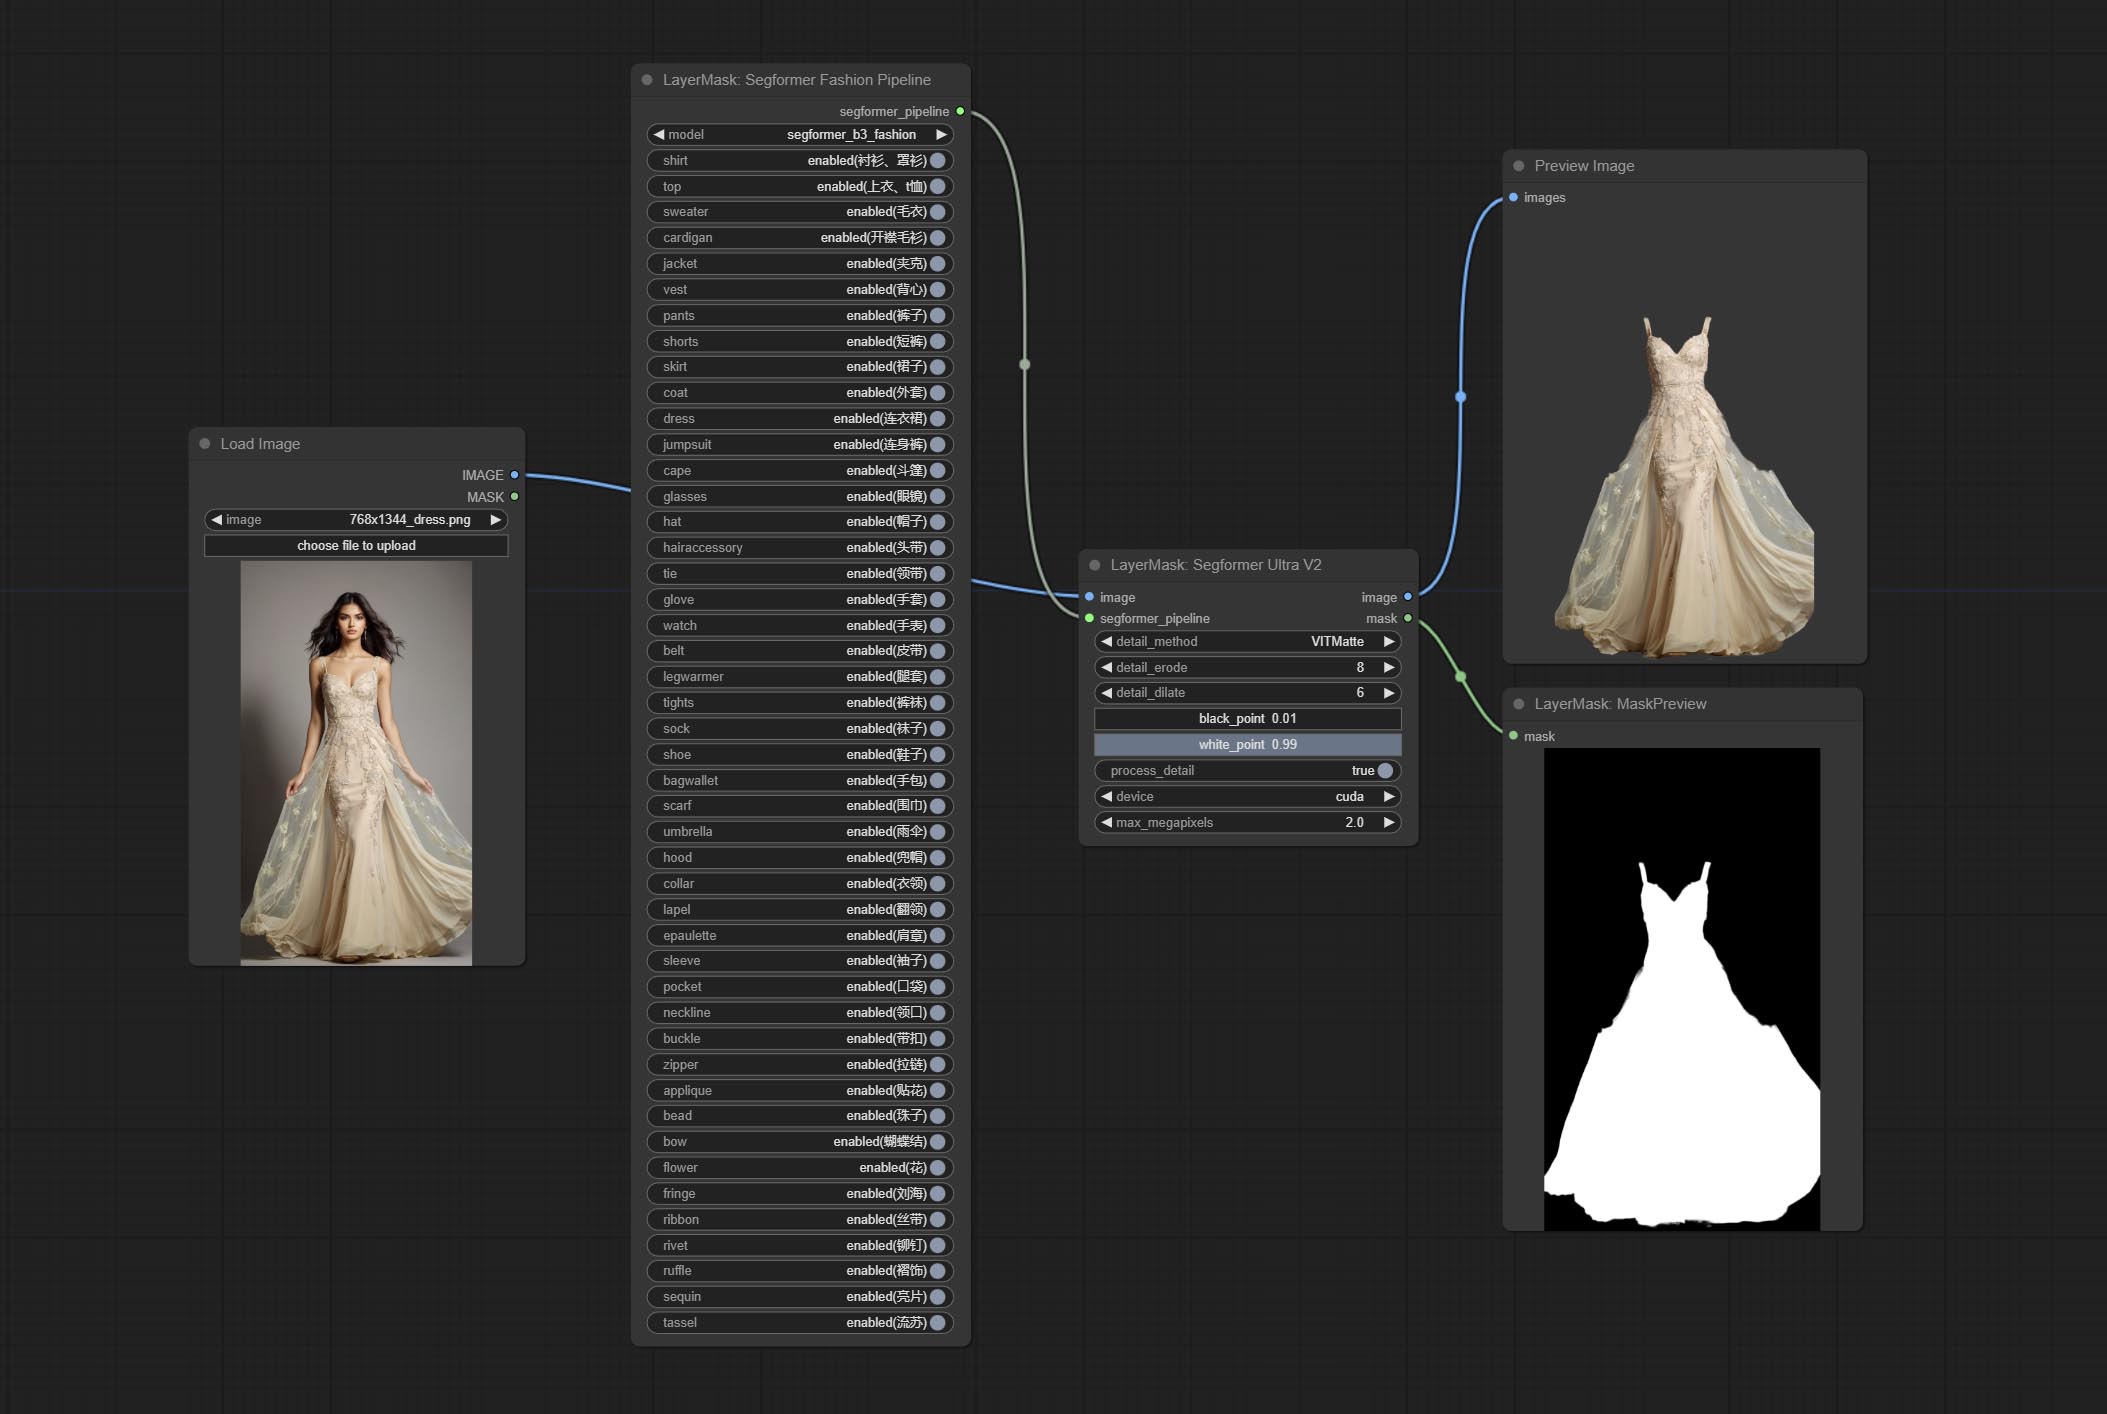
Using the segformer model to segment clothing with ultra-high edge details. Currently supports segformer b2 clothes, segformer b3 clothes and segformer b3 fashion。
*Download modelfiles from huggingface or BaiduNetdisk to ComfyUI/models/segformer_b2_clothes folder.
*Download modelfiles from huggingface or BaiduNetdisk to ComfyUI/models/segformer_b3_clothes folder.
*Download modelfiles from huggingface or BaiduNetdisk to ComfyUI/models/segformer_b3_fashion folder.
Node Options: 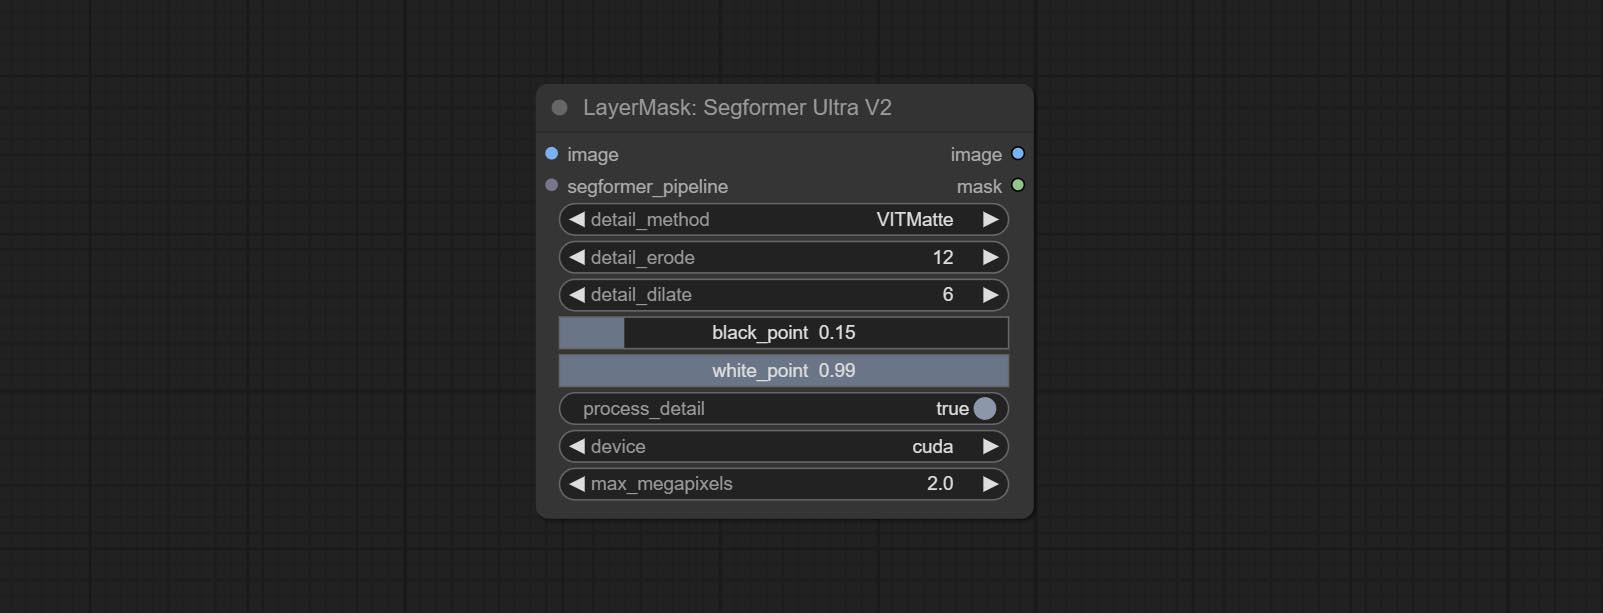
Select the segformer clothes model and choose the segmentation content.
Node Options: 
Select the segformer fashion model and choose the segmentation content.
Node Options: 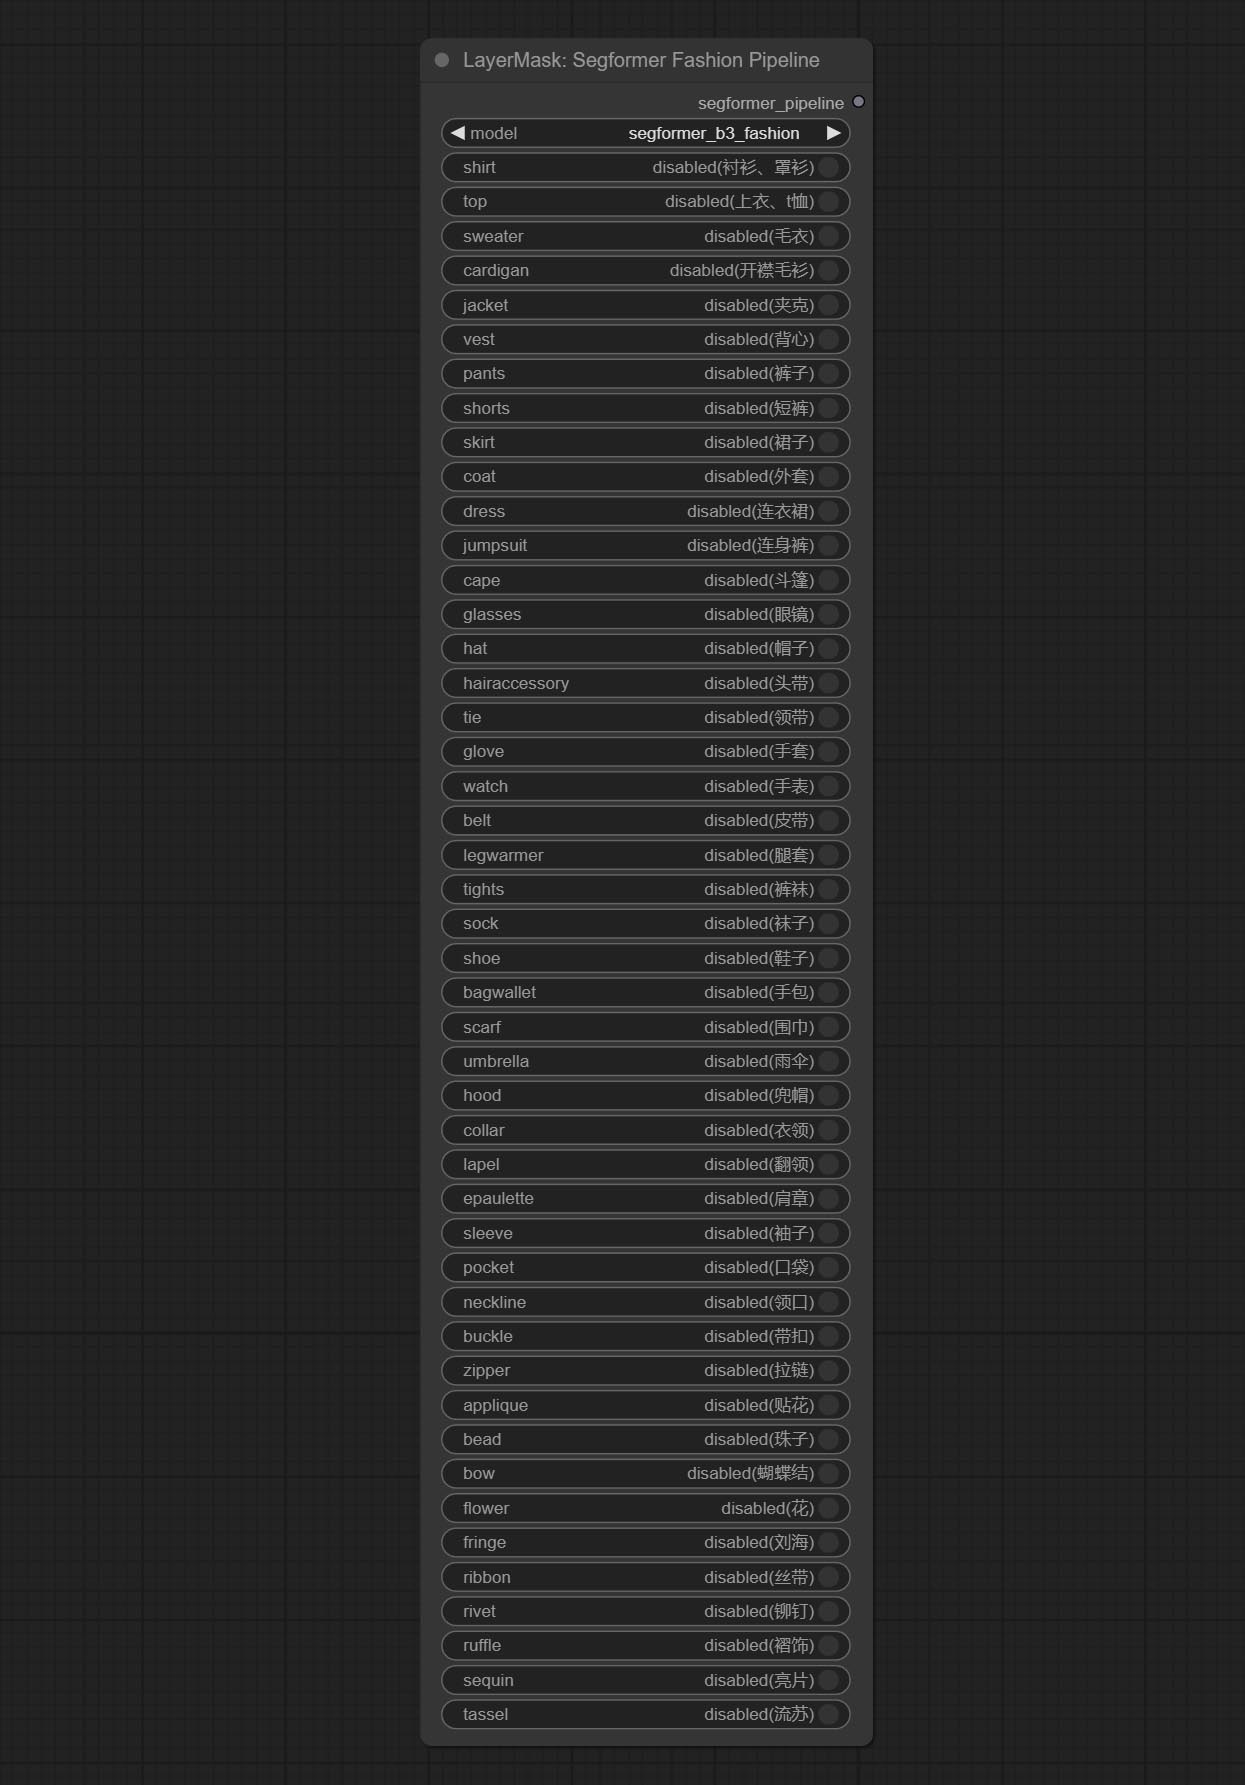
Used for generate human body parts masks, it is based on the warrper of metal3d/ComfyUI_Human_Parts, thank the original author. This node has added ultra-fine edge processing based on the original work. Download model file from BaiduNetdisk or huggingface and copy to ComfyUImodelsonnxhuman-parts folder. 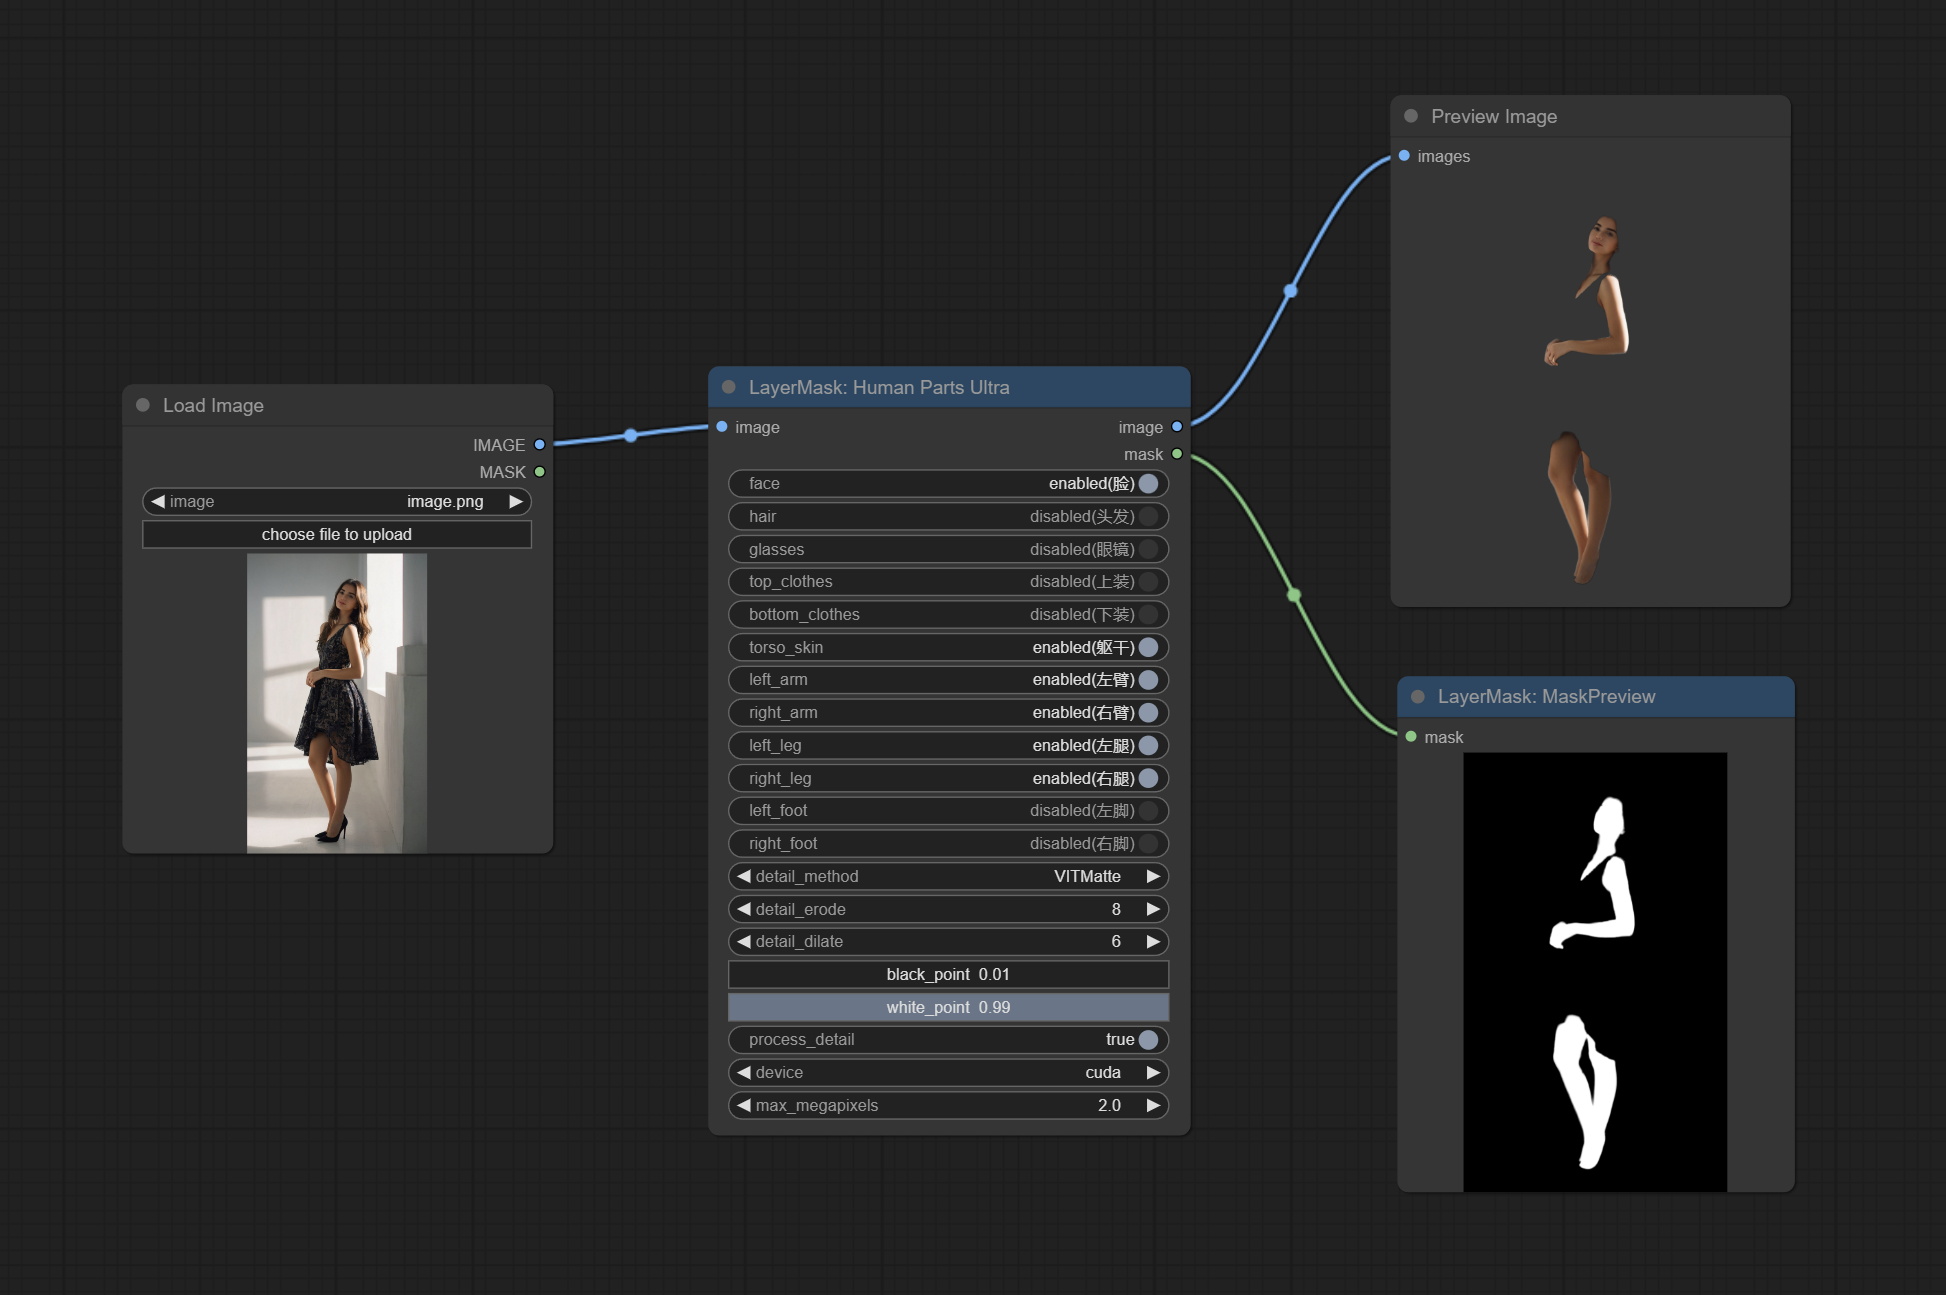
Node Options: 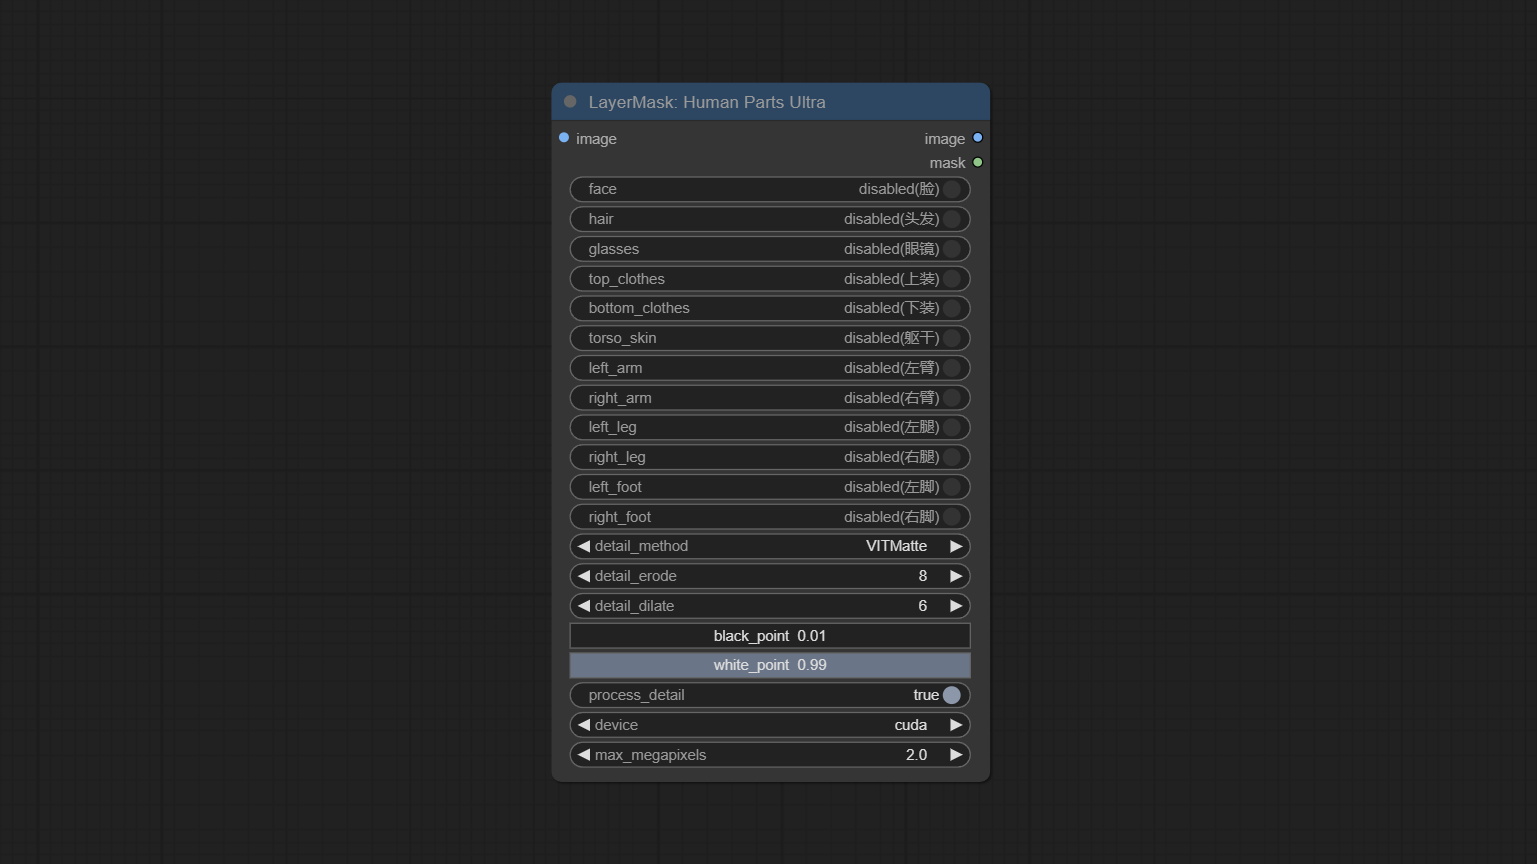
Process rough masks to ultra fine edges. This node combines the Alpha Matte and the Guided Filter Alpha nodes functions of Spacepxl's ComfyUI-Image-Filters, thanks to the original author. 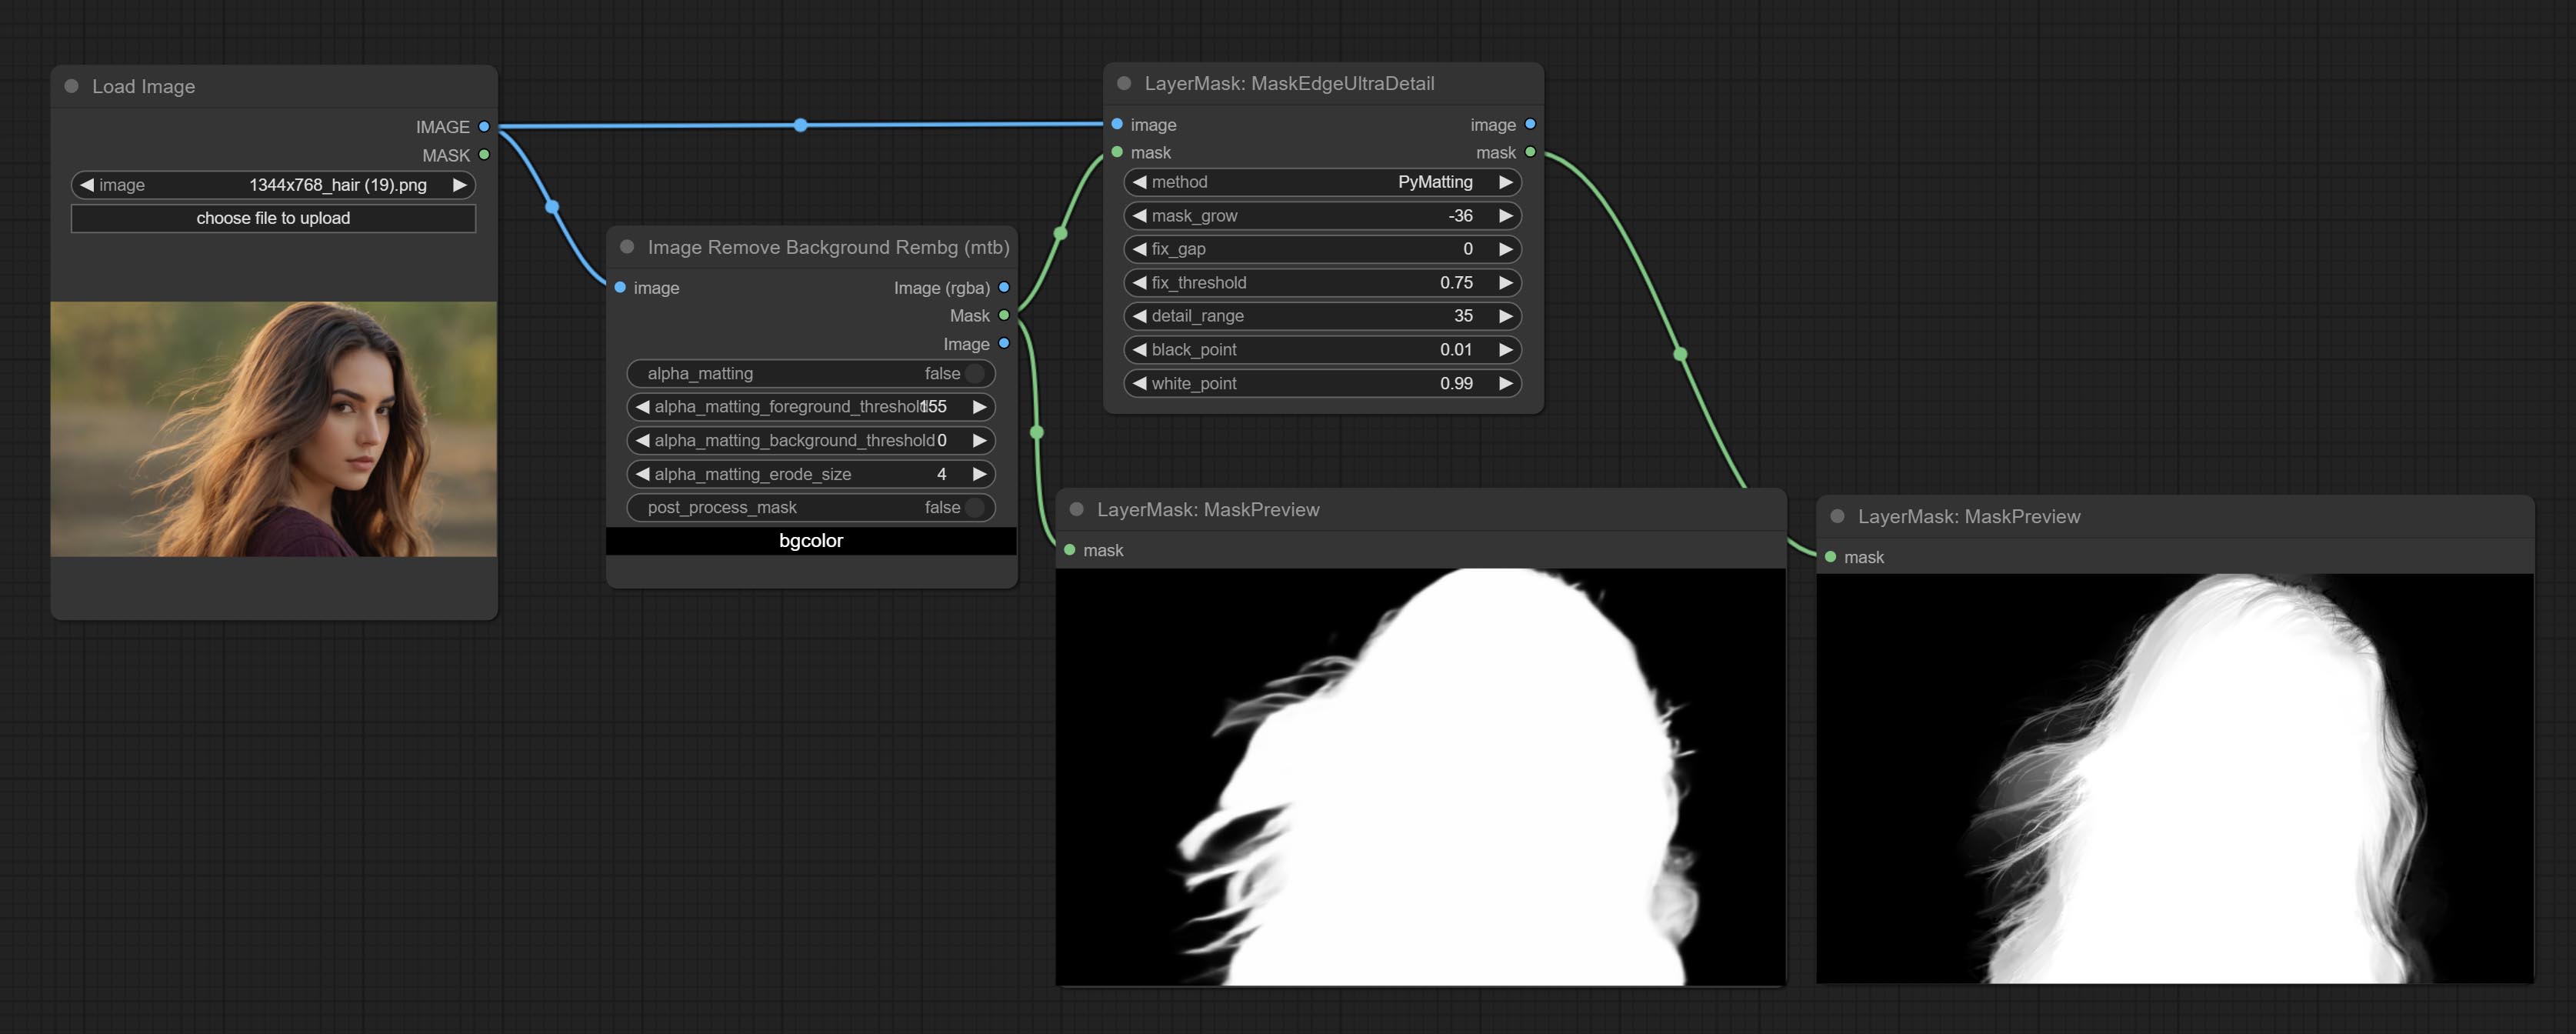
Node options: 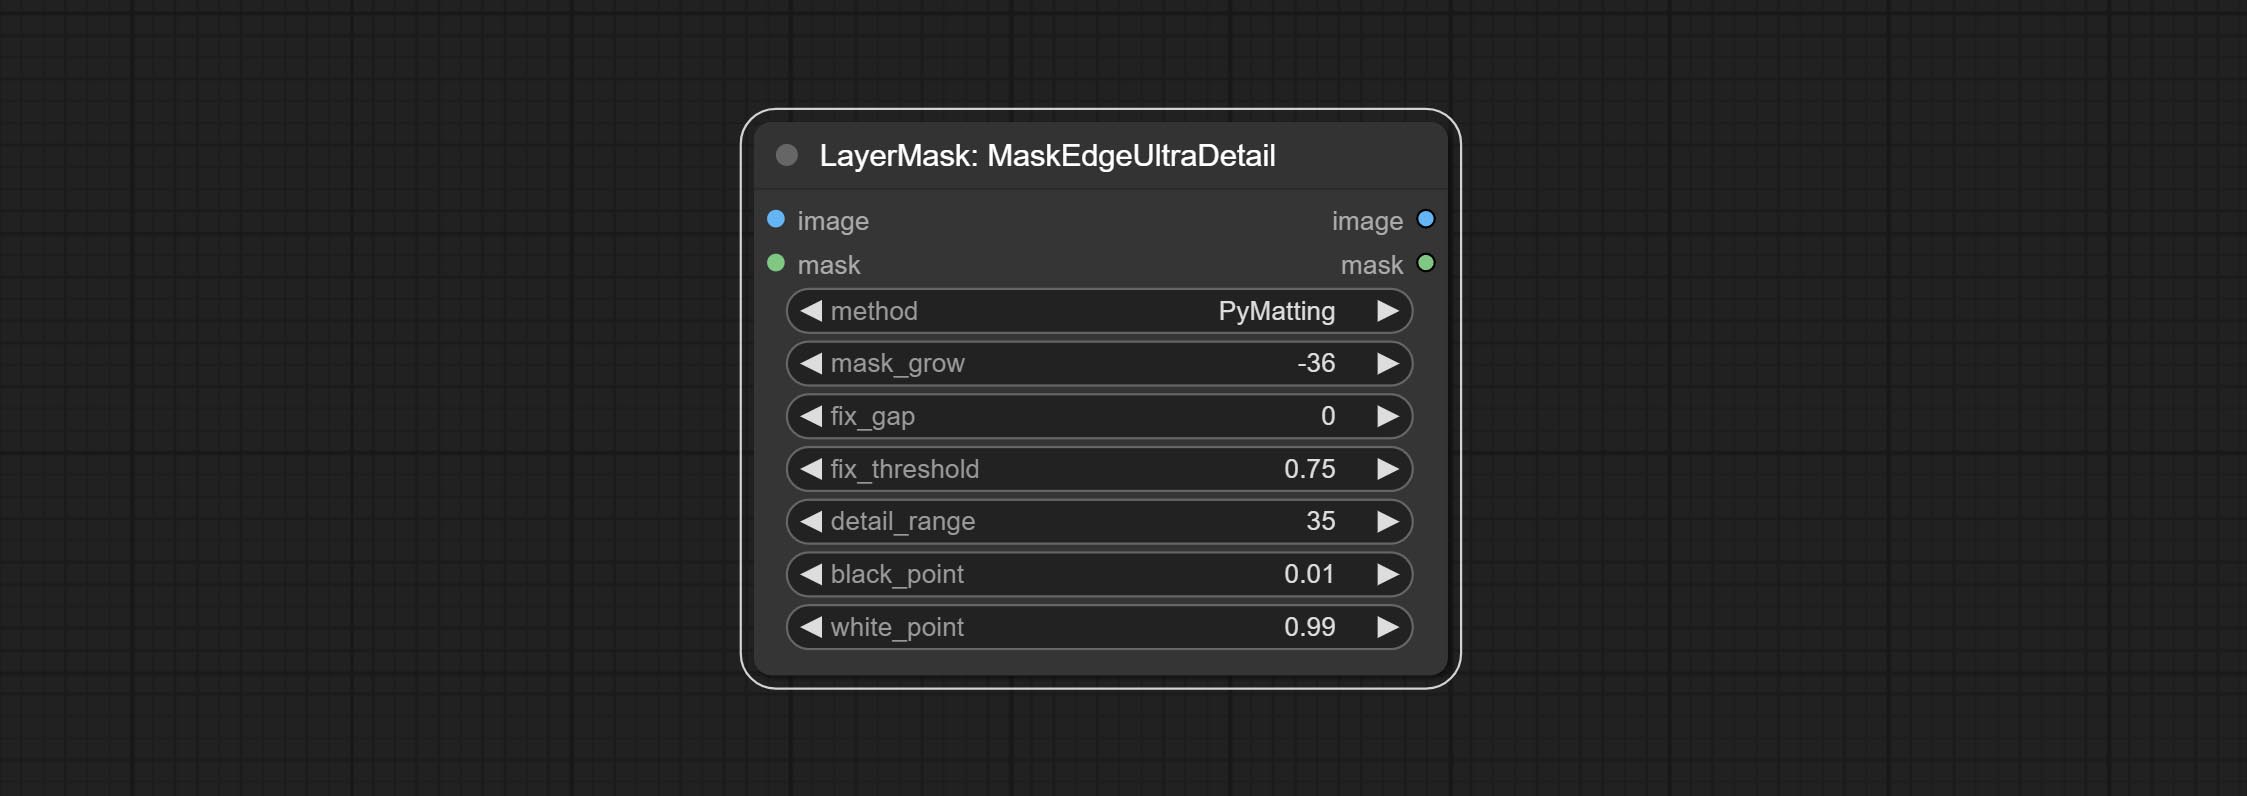
The V2 upgraded version of MaskEdgeUltraDetail has added the VITMatte edge processing method.(Note: Images larger than 2K in size using this method will consume huge memory)
This method is suitable for handling semi transparent areas.
On the basis of MaskEdgeUltraDetail, the following changes have been made: 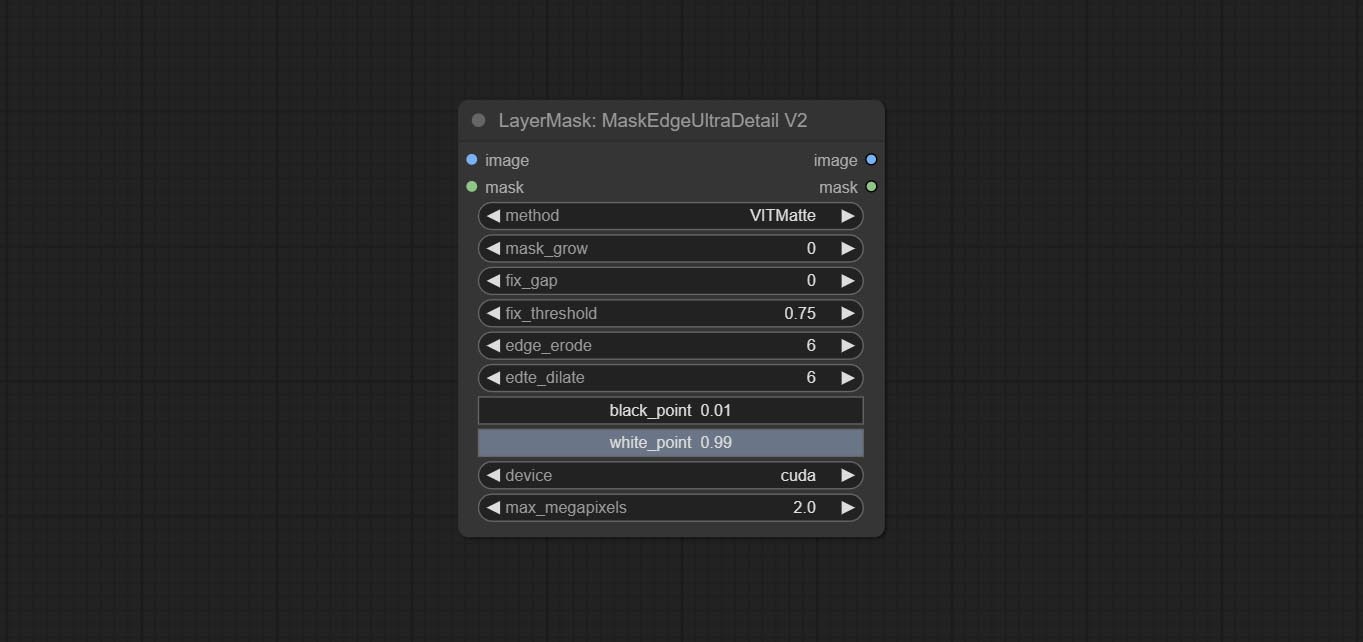
Use the YoloV8 model to detect faces, hand box areas, or character segmentation. Supports the output of the selected number of channels. Download the model files from GoogleDrive or BaiduNetdisk to ComfyUI/models/yolo folder.
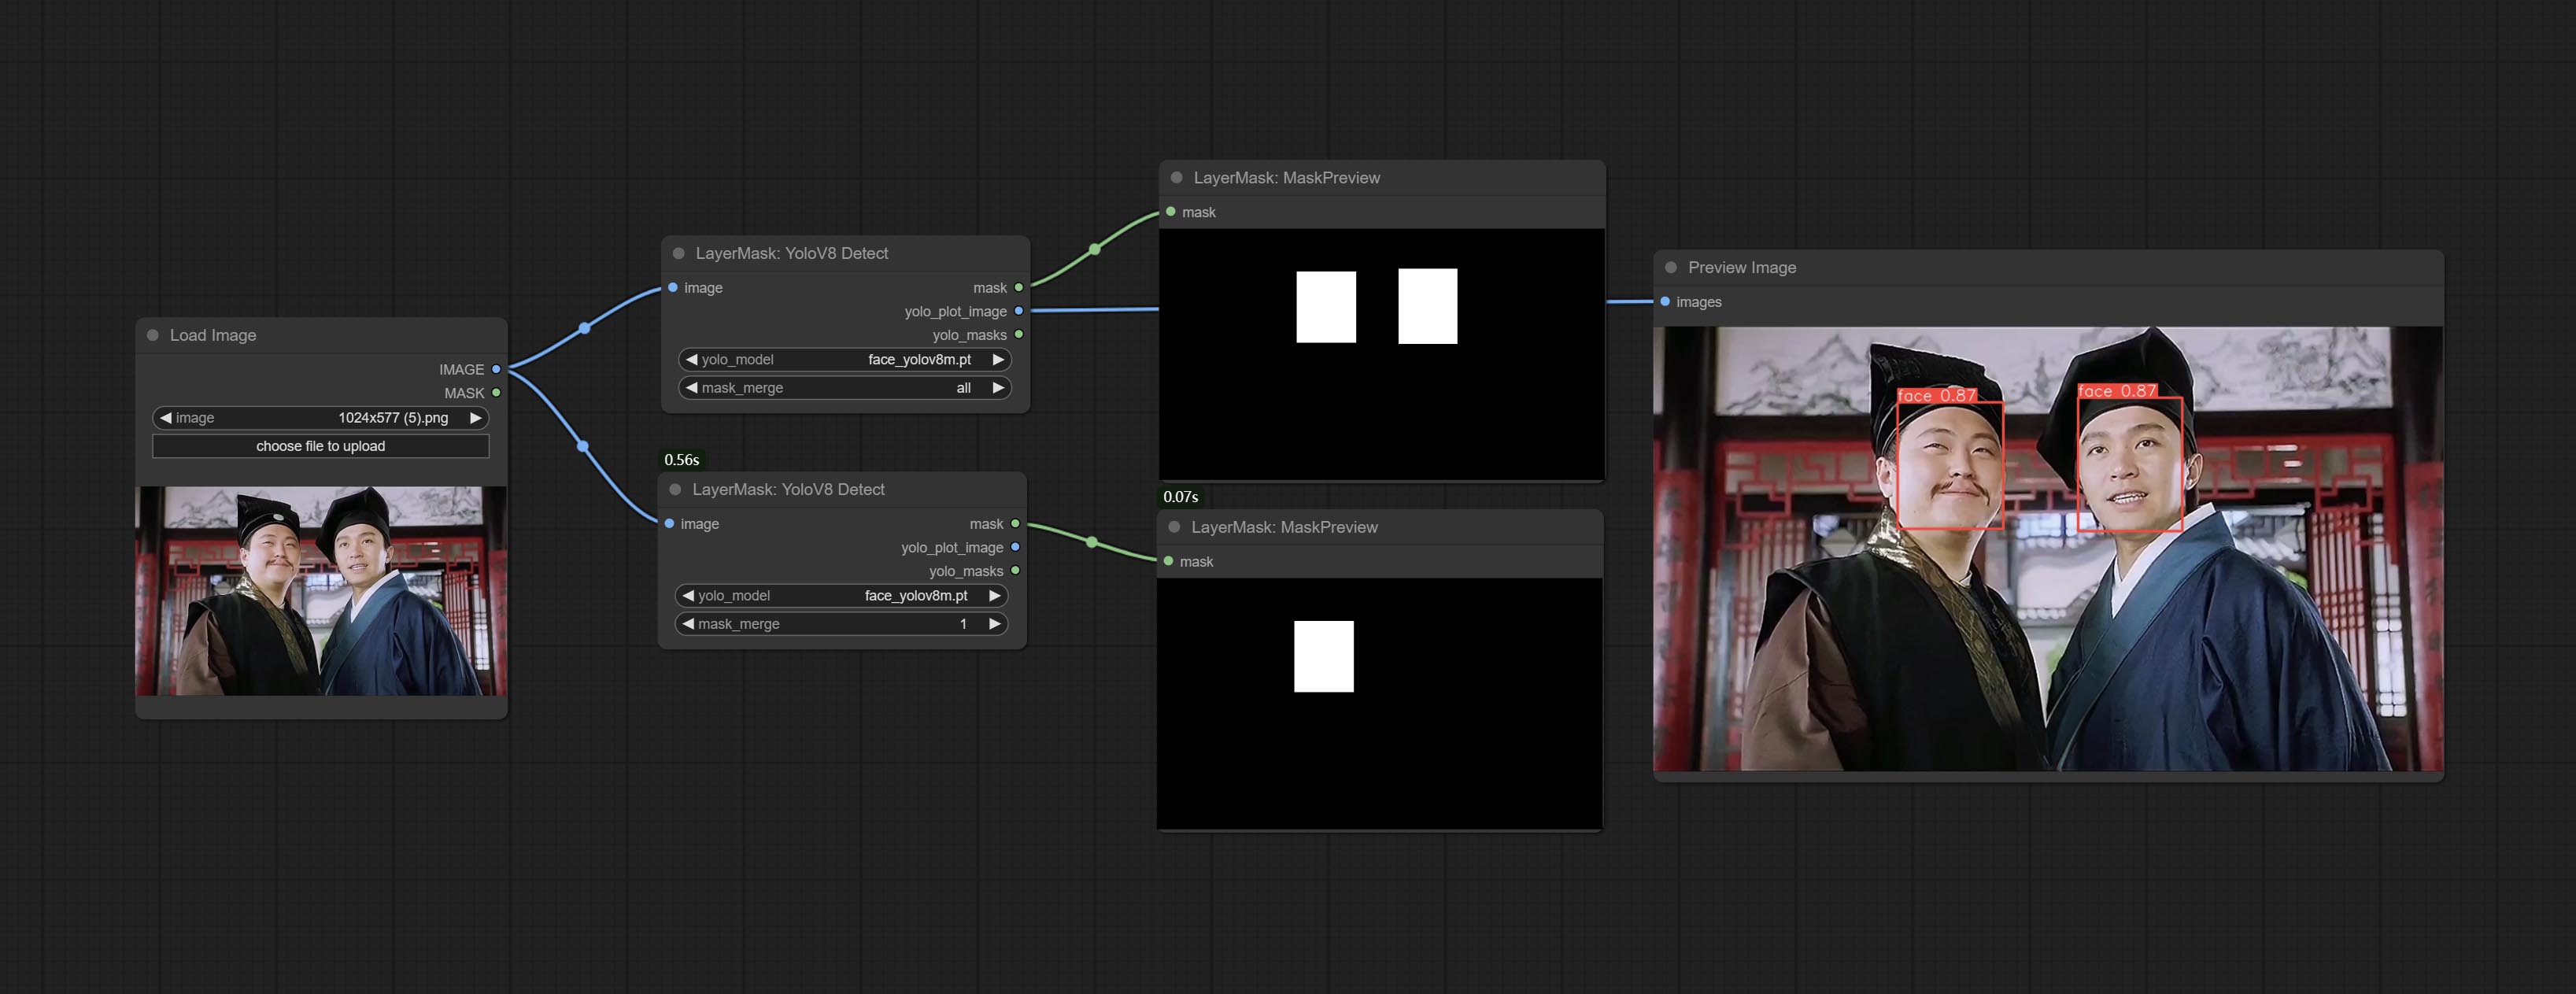
Node Options: 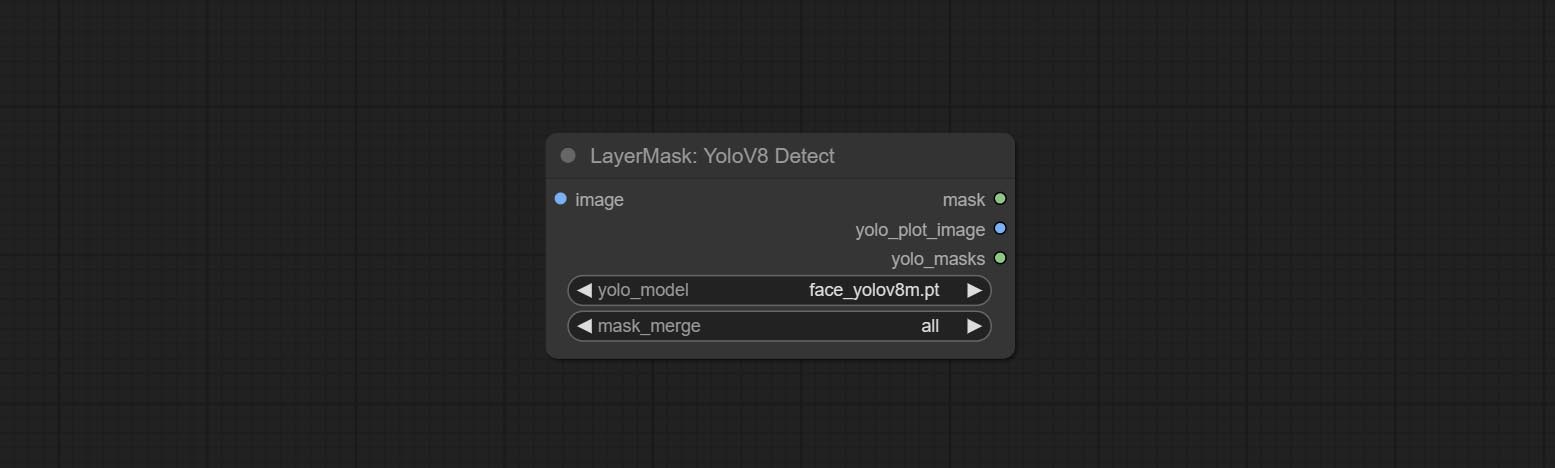
seg name can output segmented masks, otherwise they can only output box masks.all is to merge all mask outputs. The selected number is how many masks to output, sorted by recognition confidence to merge the output.Outputs:
Use the Mediapipe model to detect facial features, segment left and right eyebrows, eyes, lips, and tooth. *Download the model files from BaiduNetdisk to ComfyUI/models/mediapipe folder.
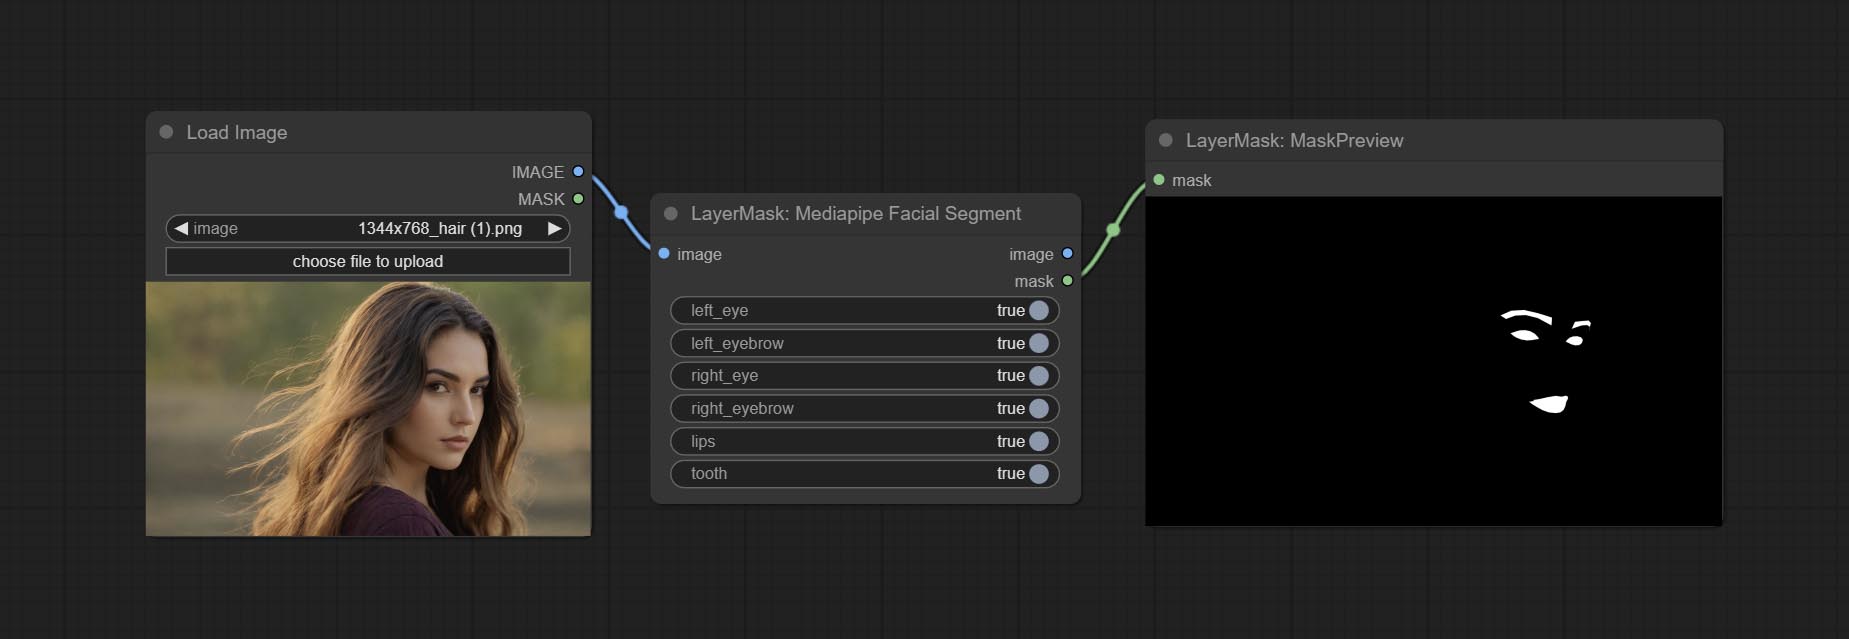
Node Options: 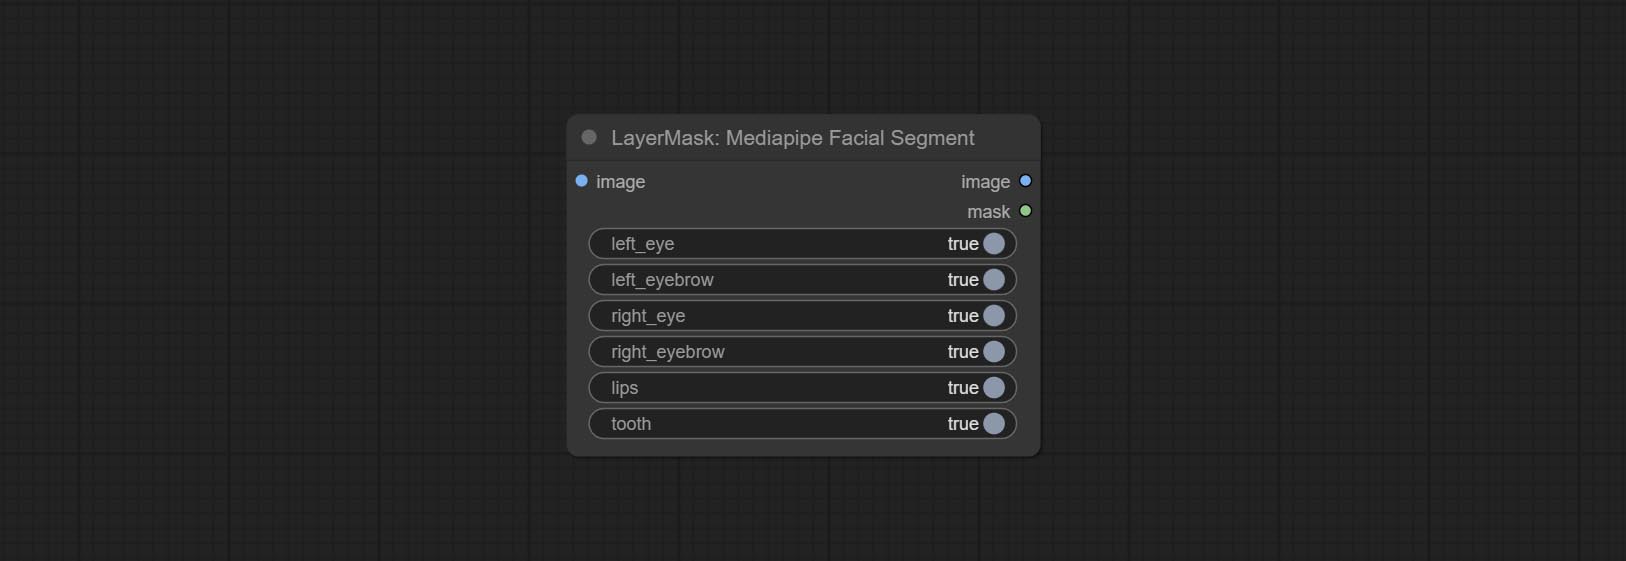
Generate a mask based on the selected color. 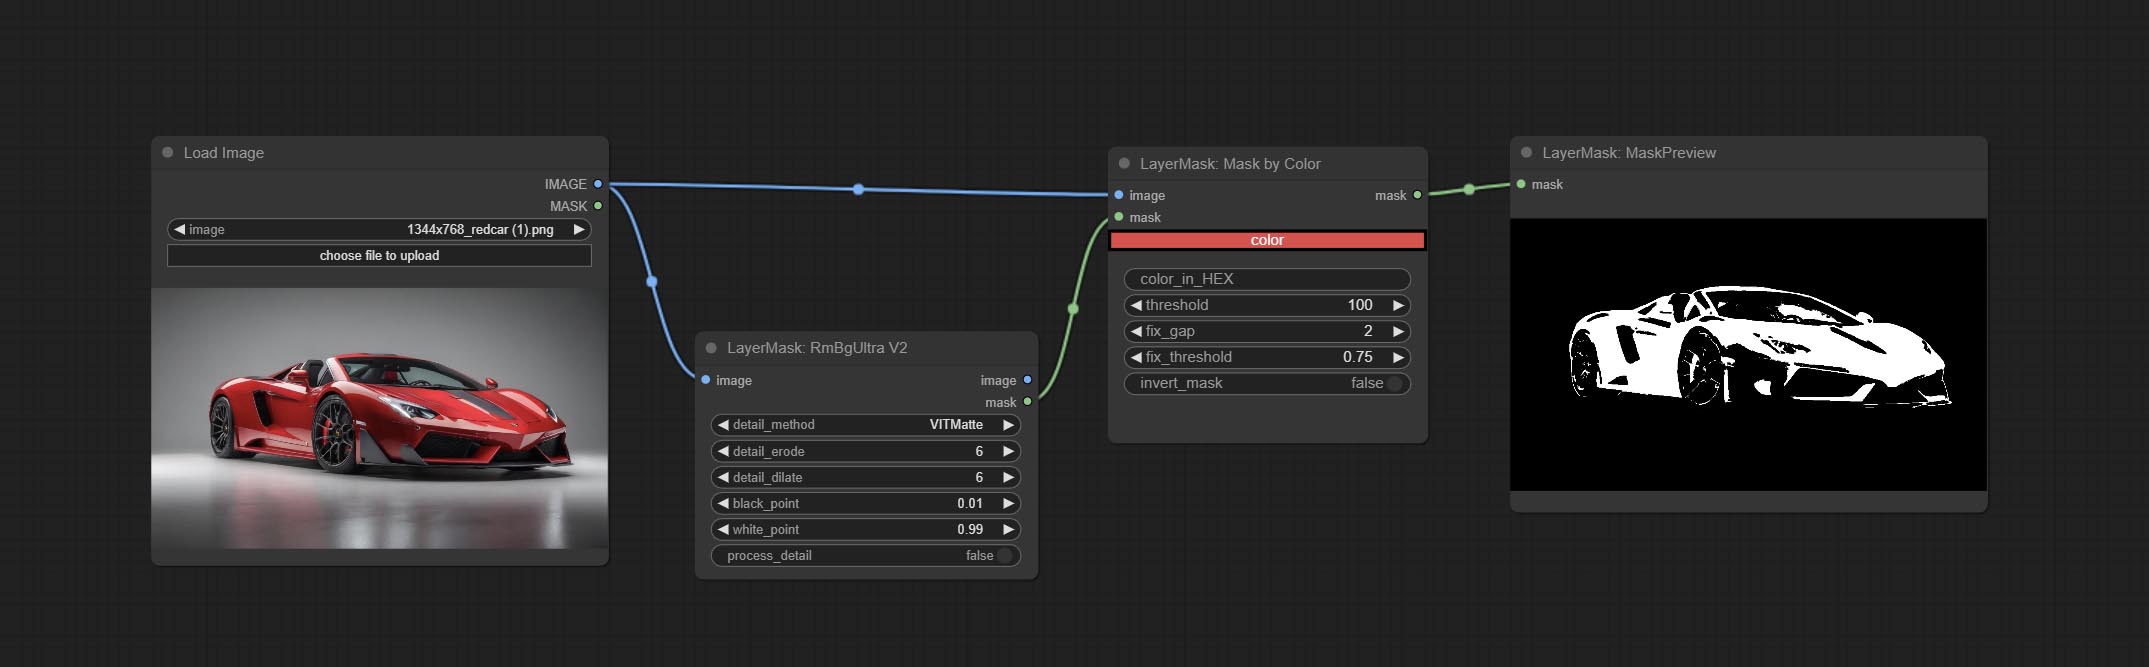
Node Options: 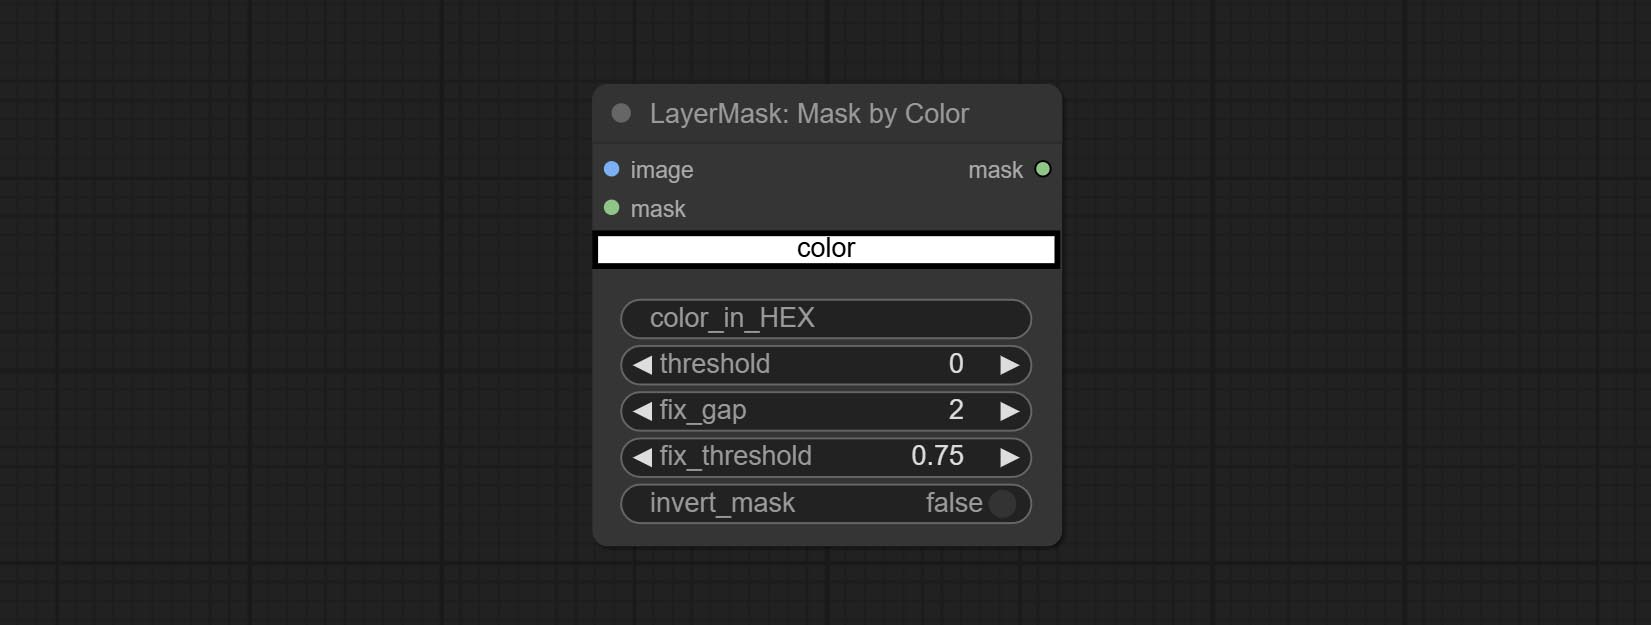
color . Convert the image to a mask. Supports converting any channel in LAB, RGBA, YUV, and HSV modes into masks, while providing color scale adjustment. Support mask optional input to obtain masks that only include valid parts. 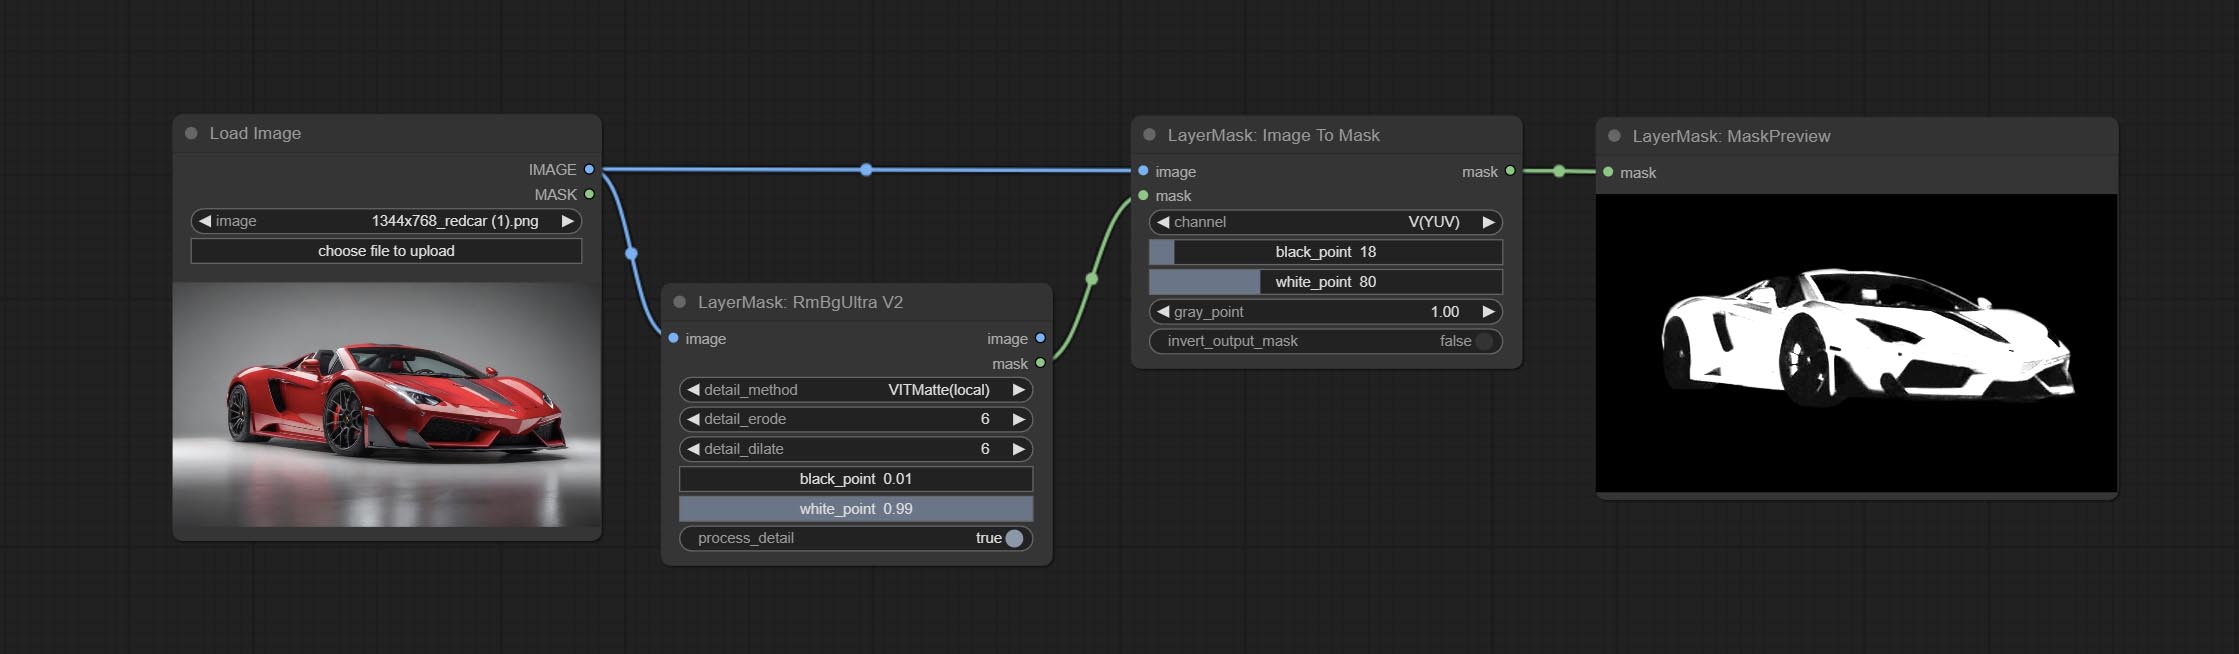
Node Options: 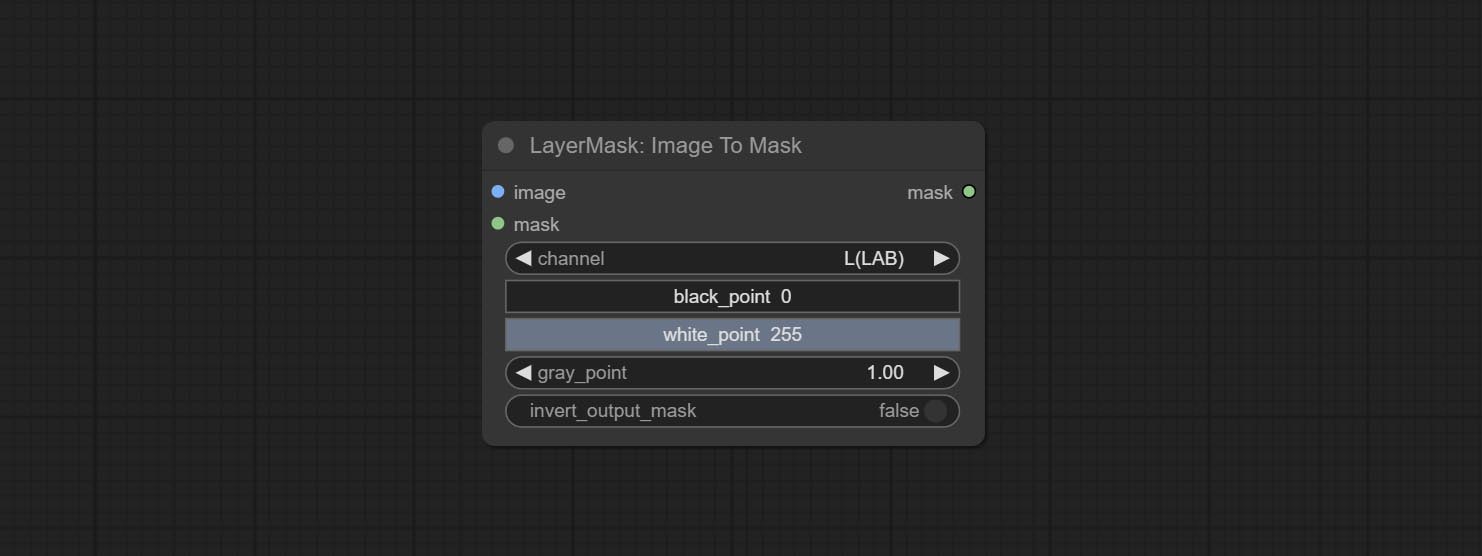
* If the black_point or output_black_point value is greater than white_point or output_white_point, the two values are swapped, with the larger value used as white_point and the smaller value used as black_point.
Generate masks for the dark and bright parts of the image. 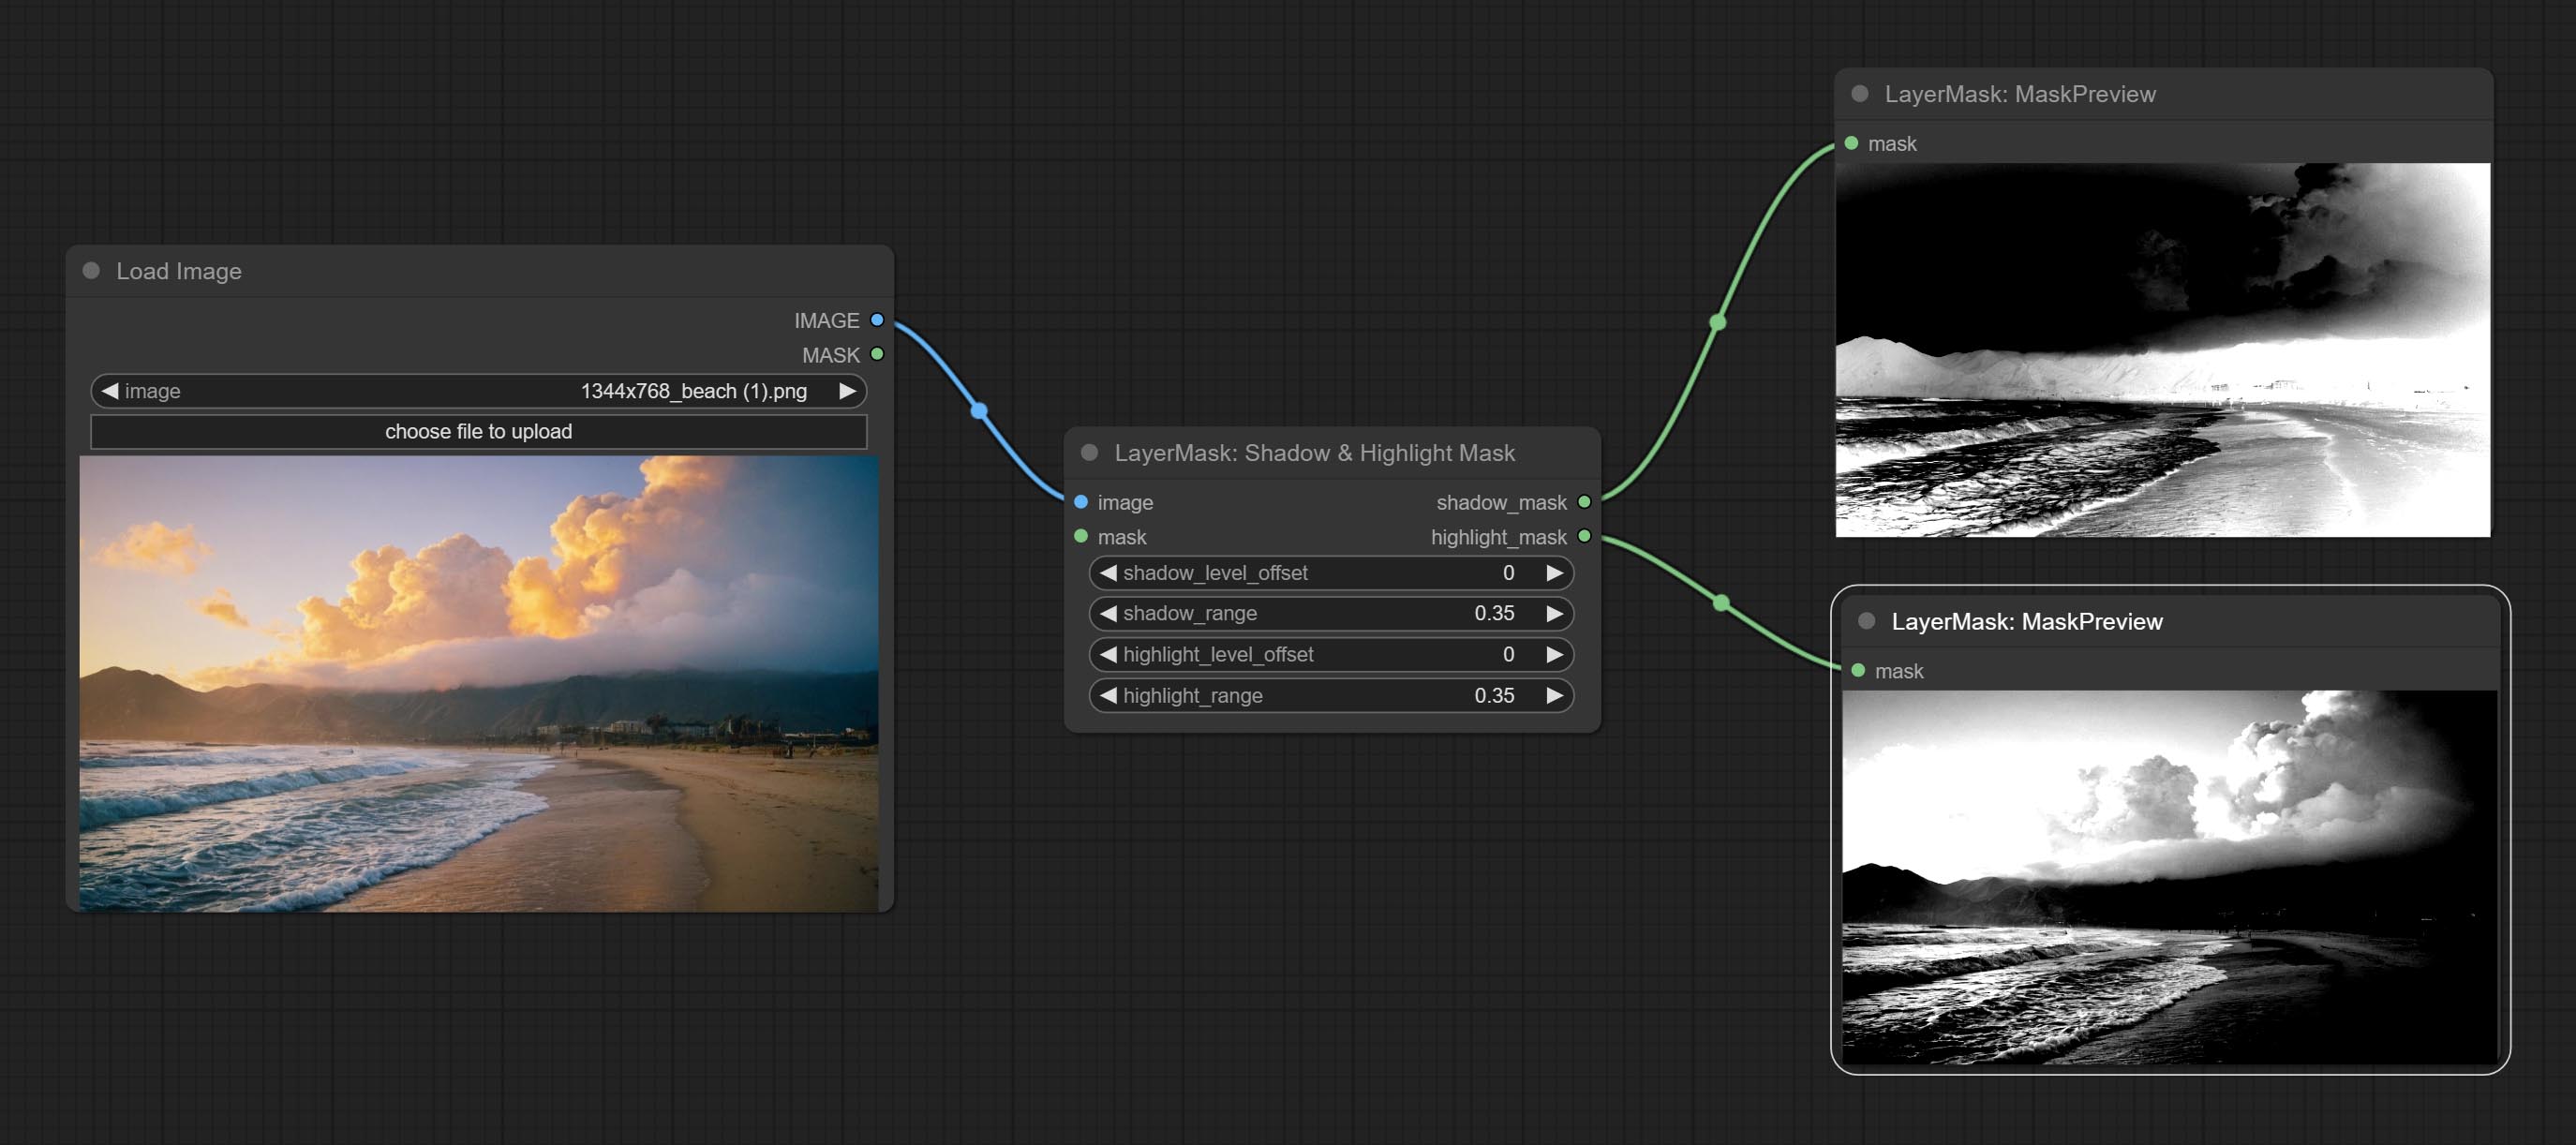
Node options: 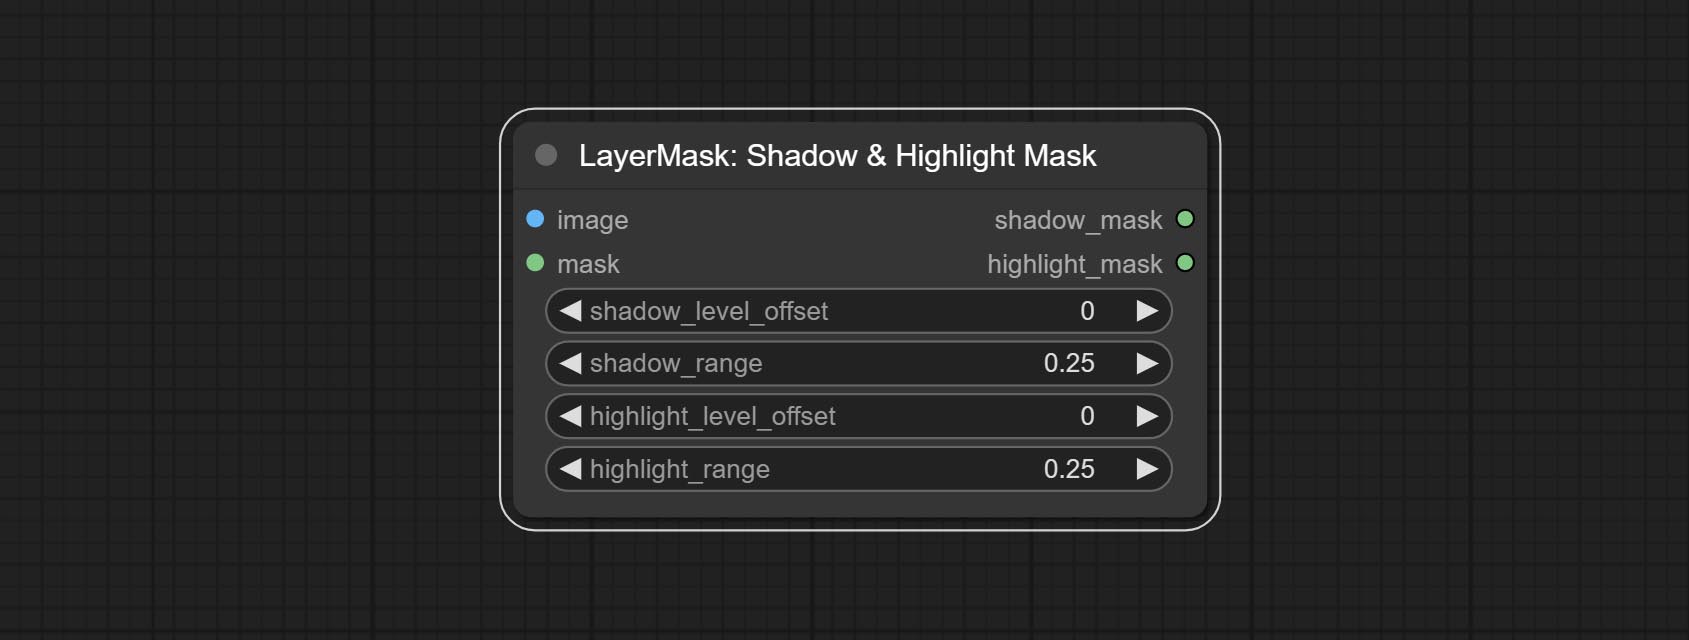
A replica of the Shadow & Highlight Mask node, with the "&" character removed from the node name to avoid ComfyUI workflow parsing errors.
Pixel expansion preprocessing on the masked edge of an image can effectively improve the edges of image composit. 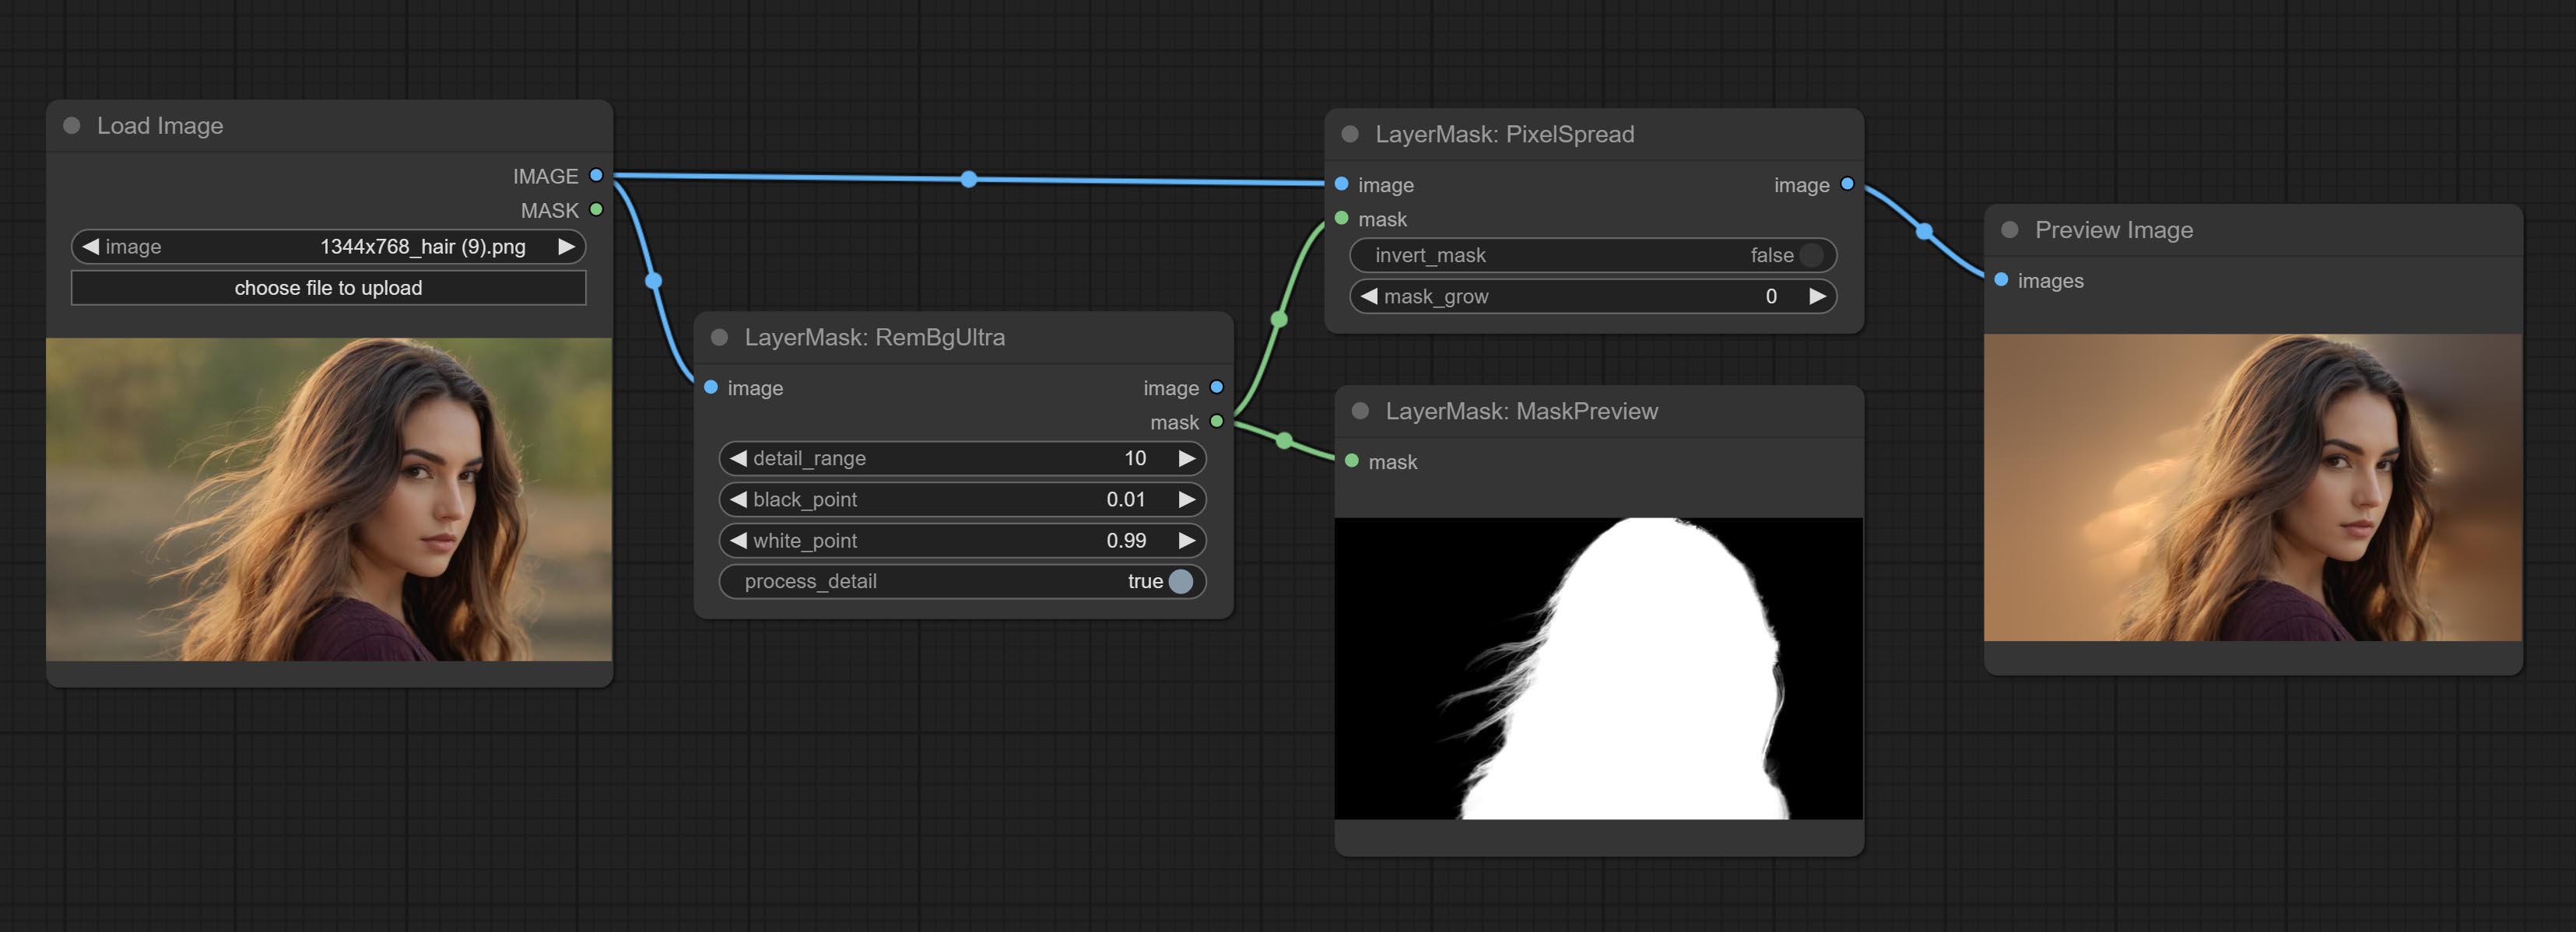
Node options: 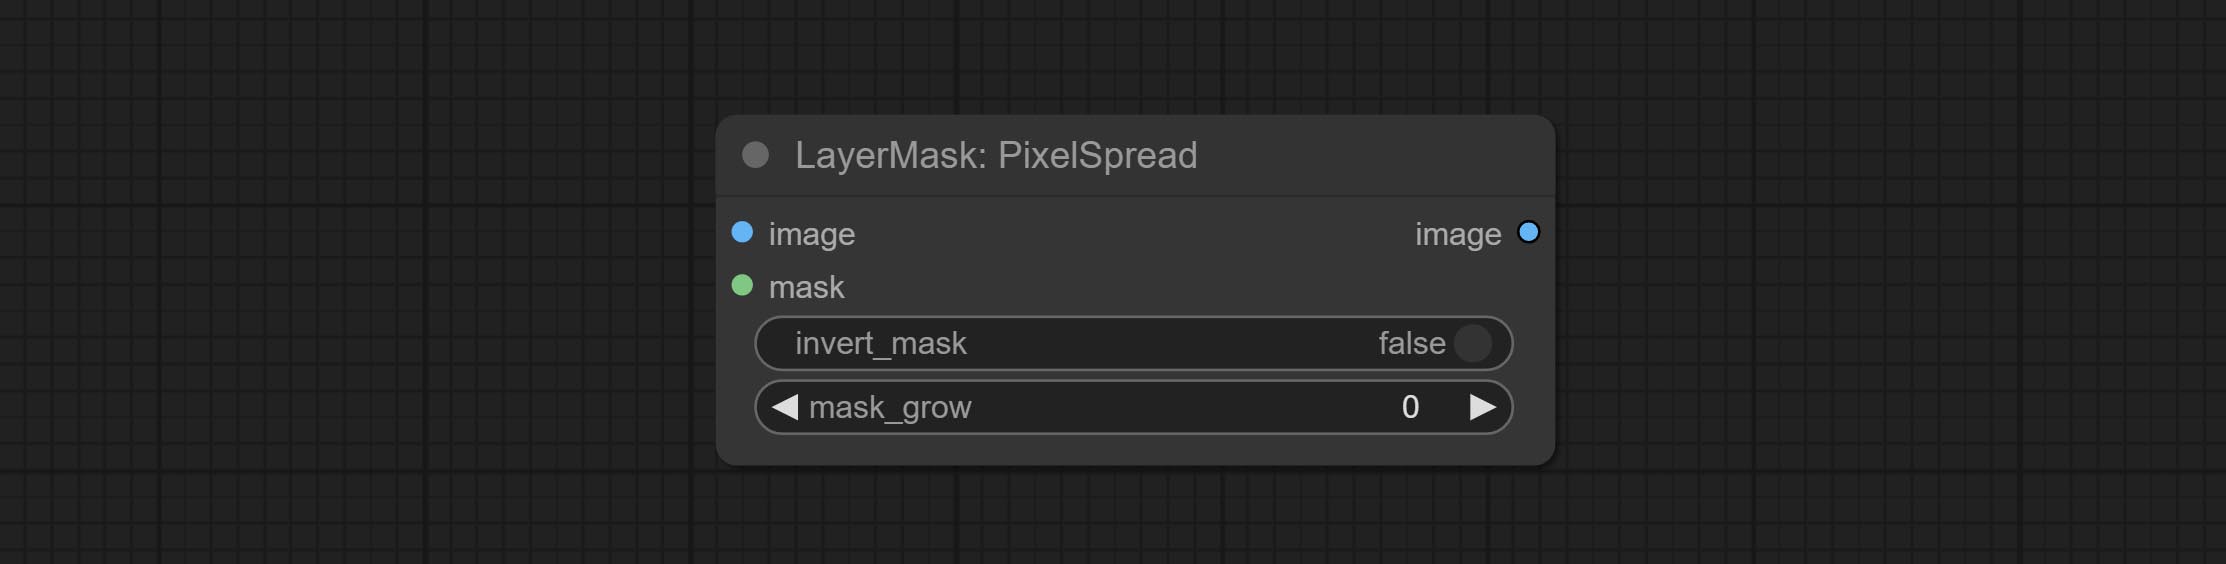
Calculate the differences between two images and output them as mask. 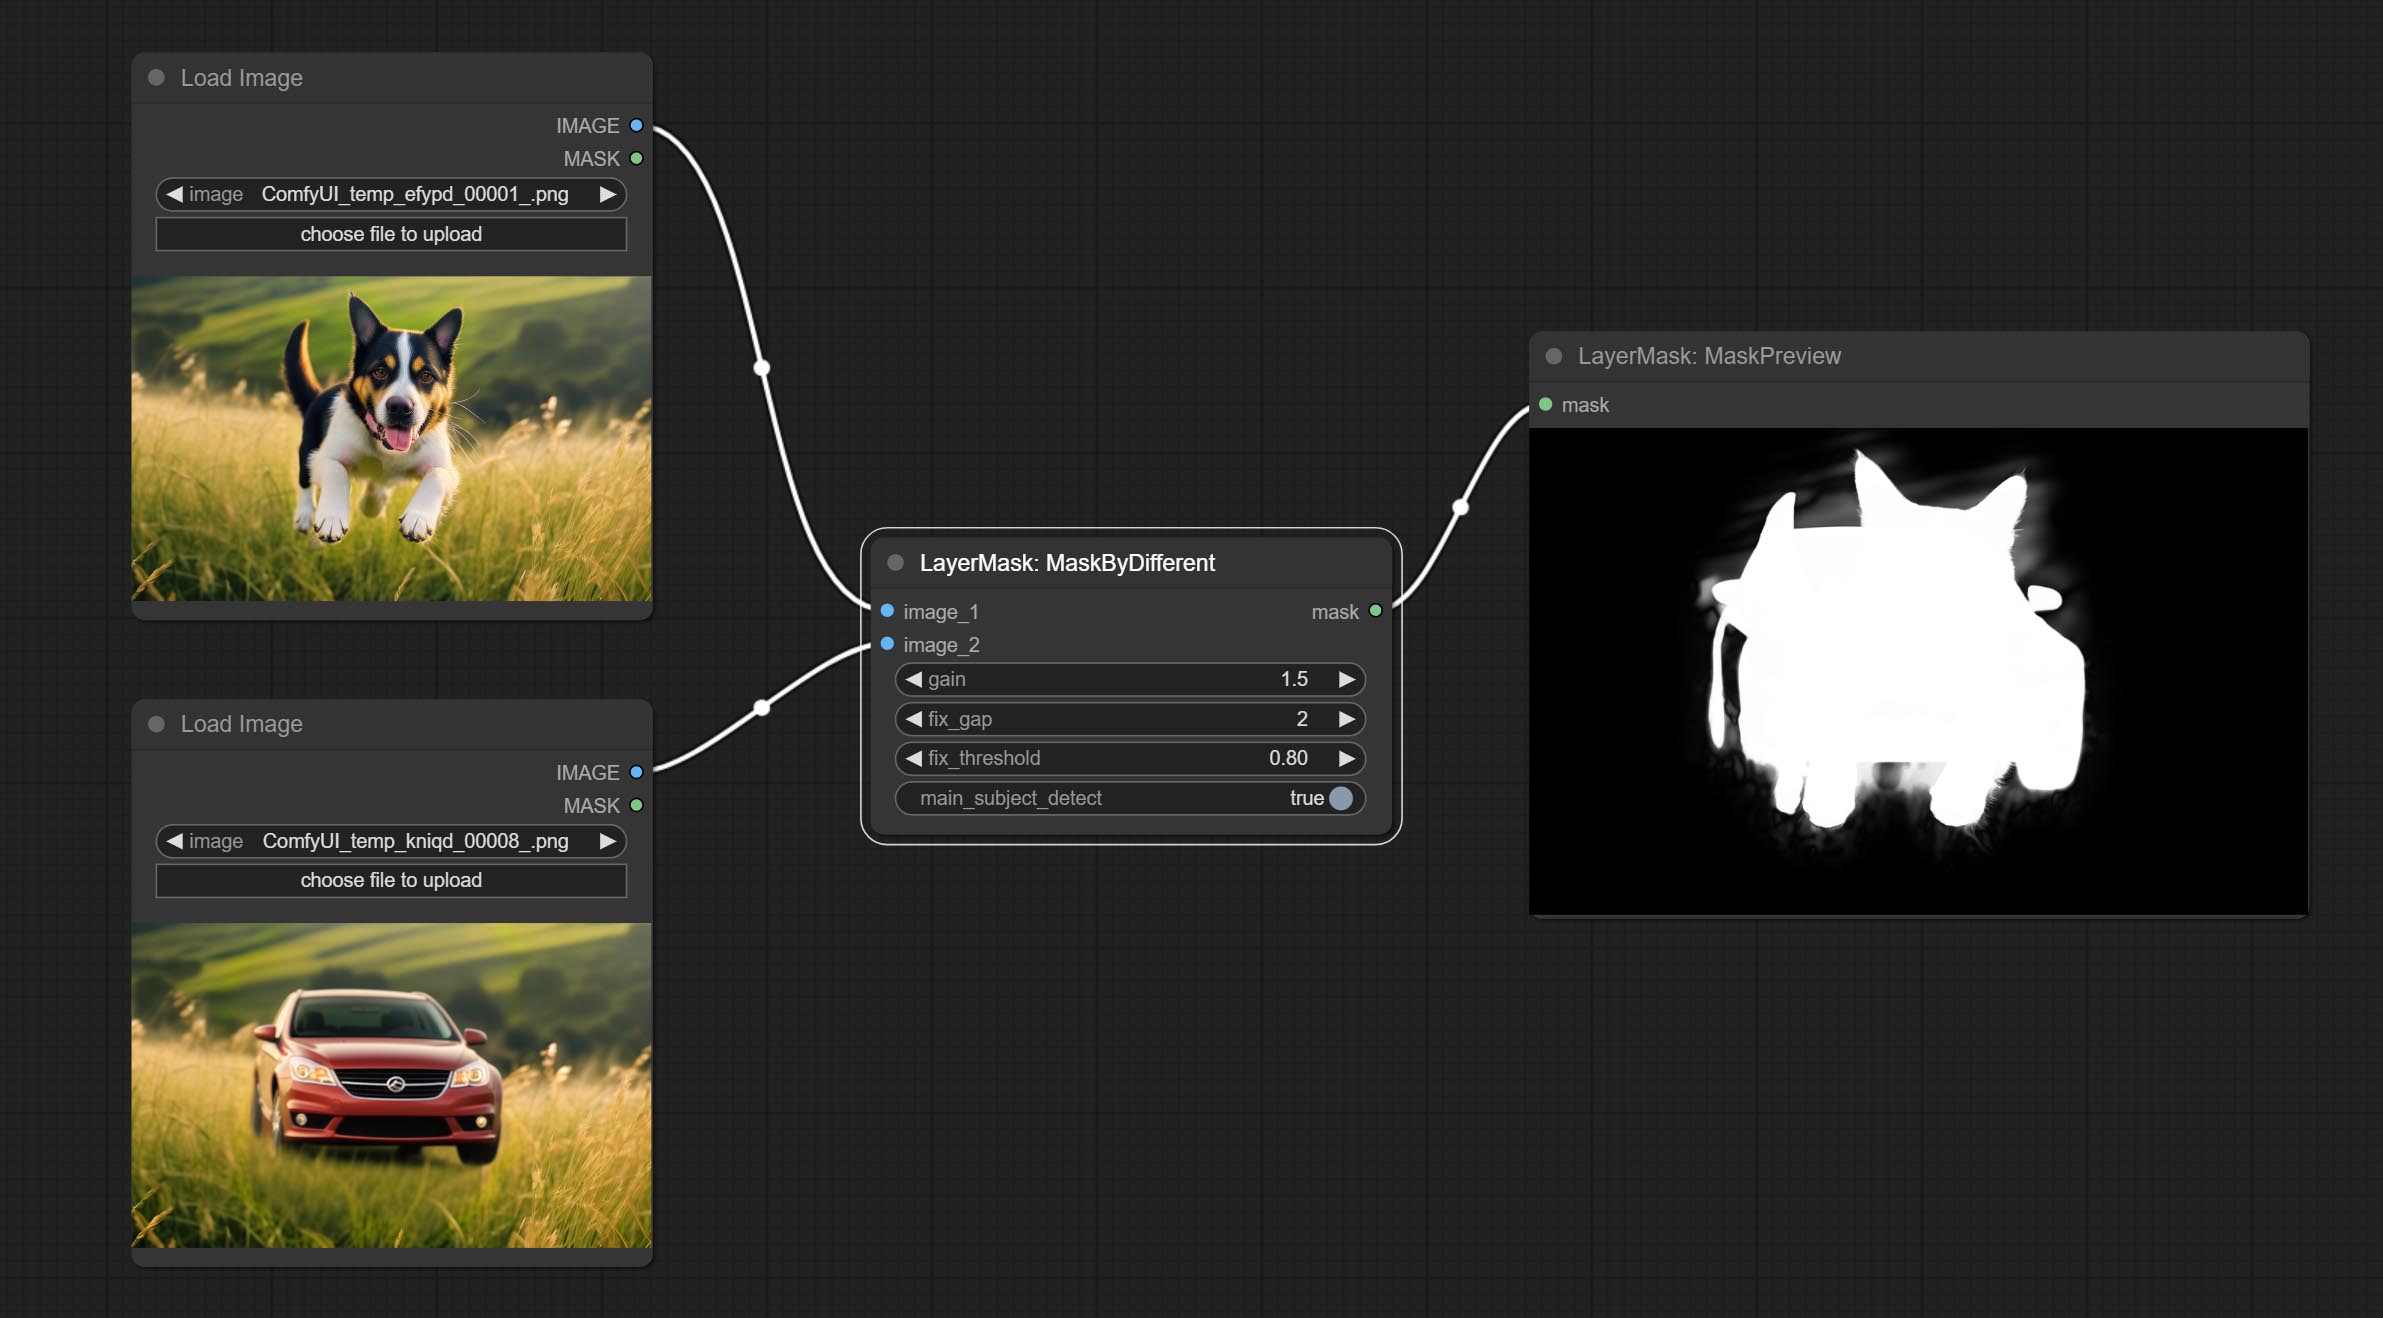
Node options: 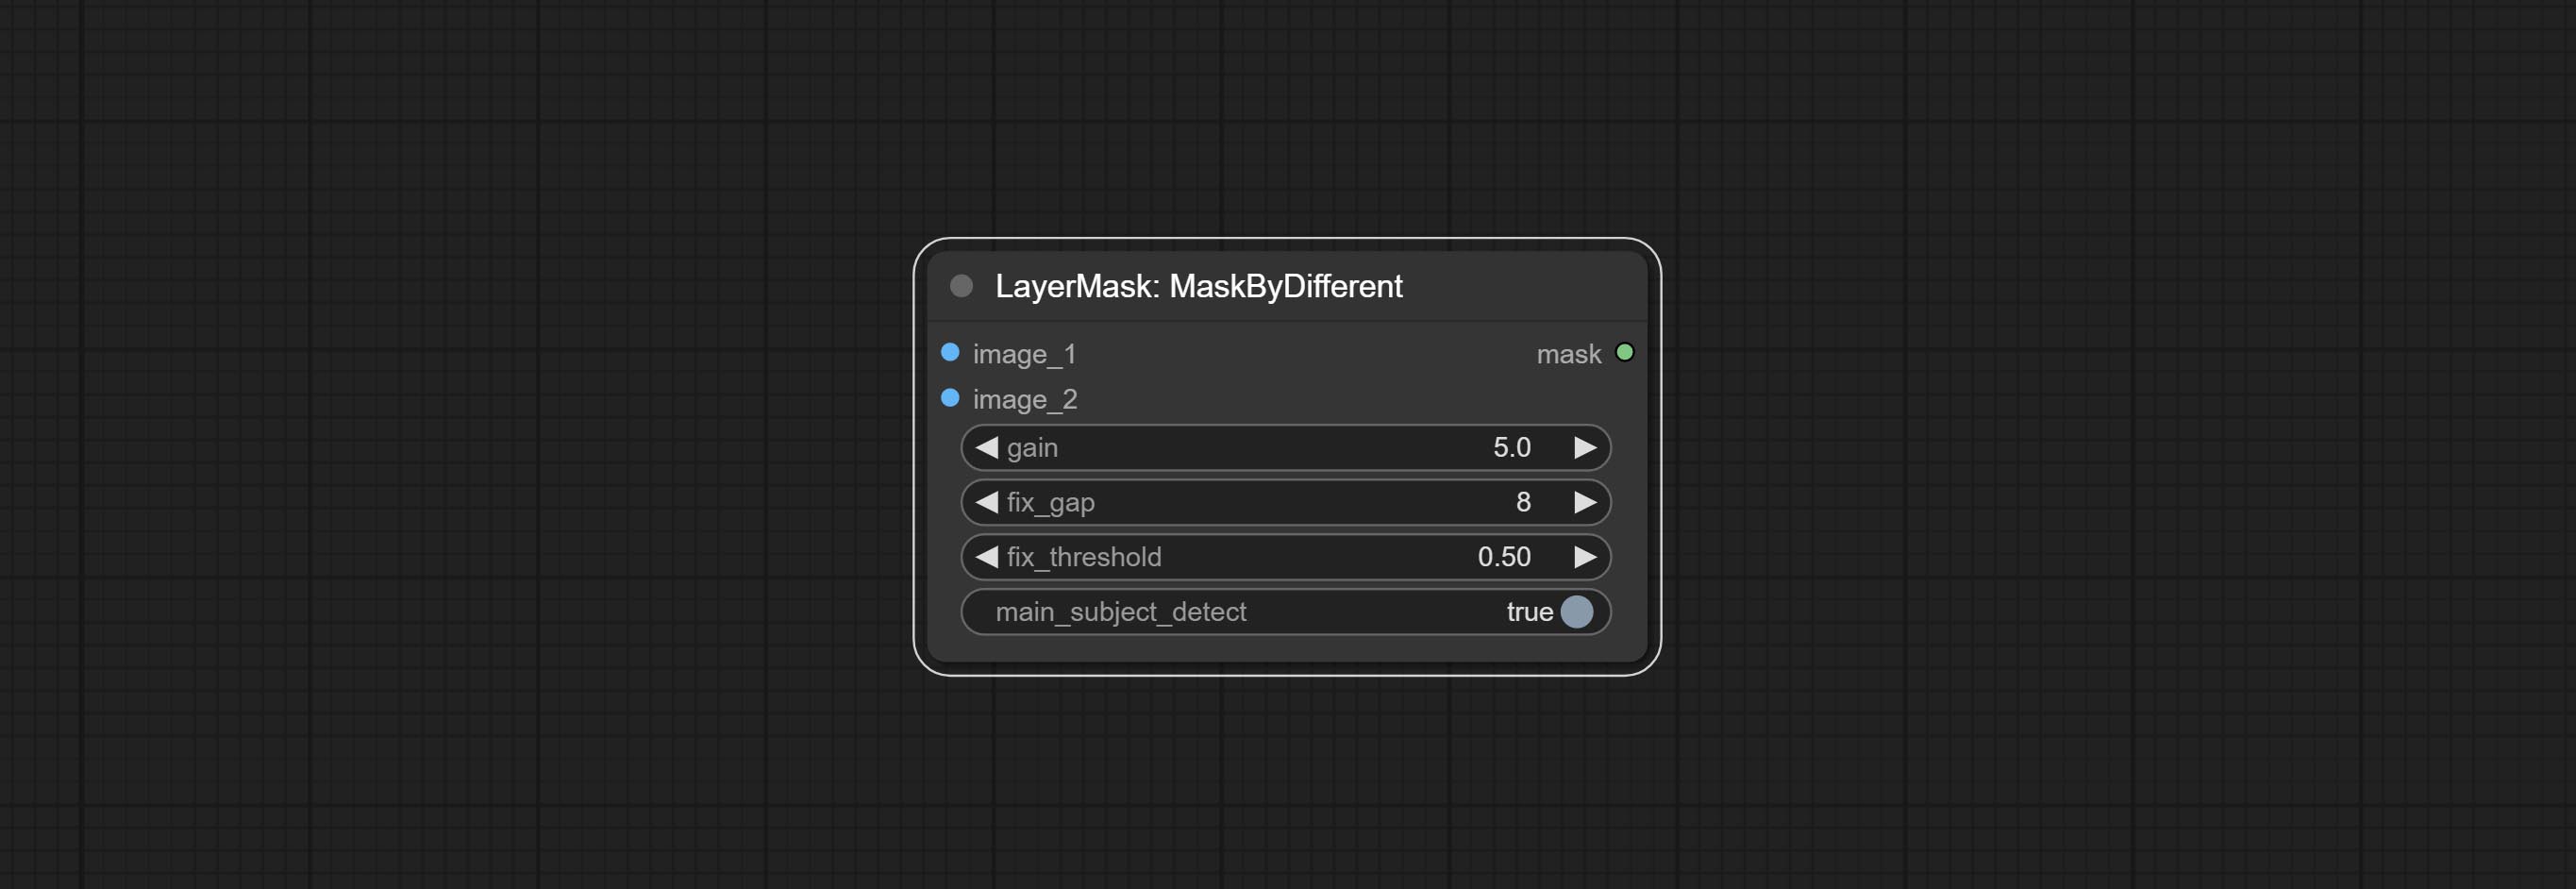
Grow and shrink edges and blur the mask 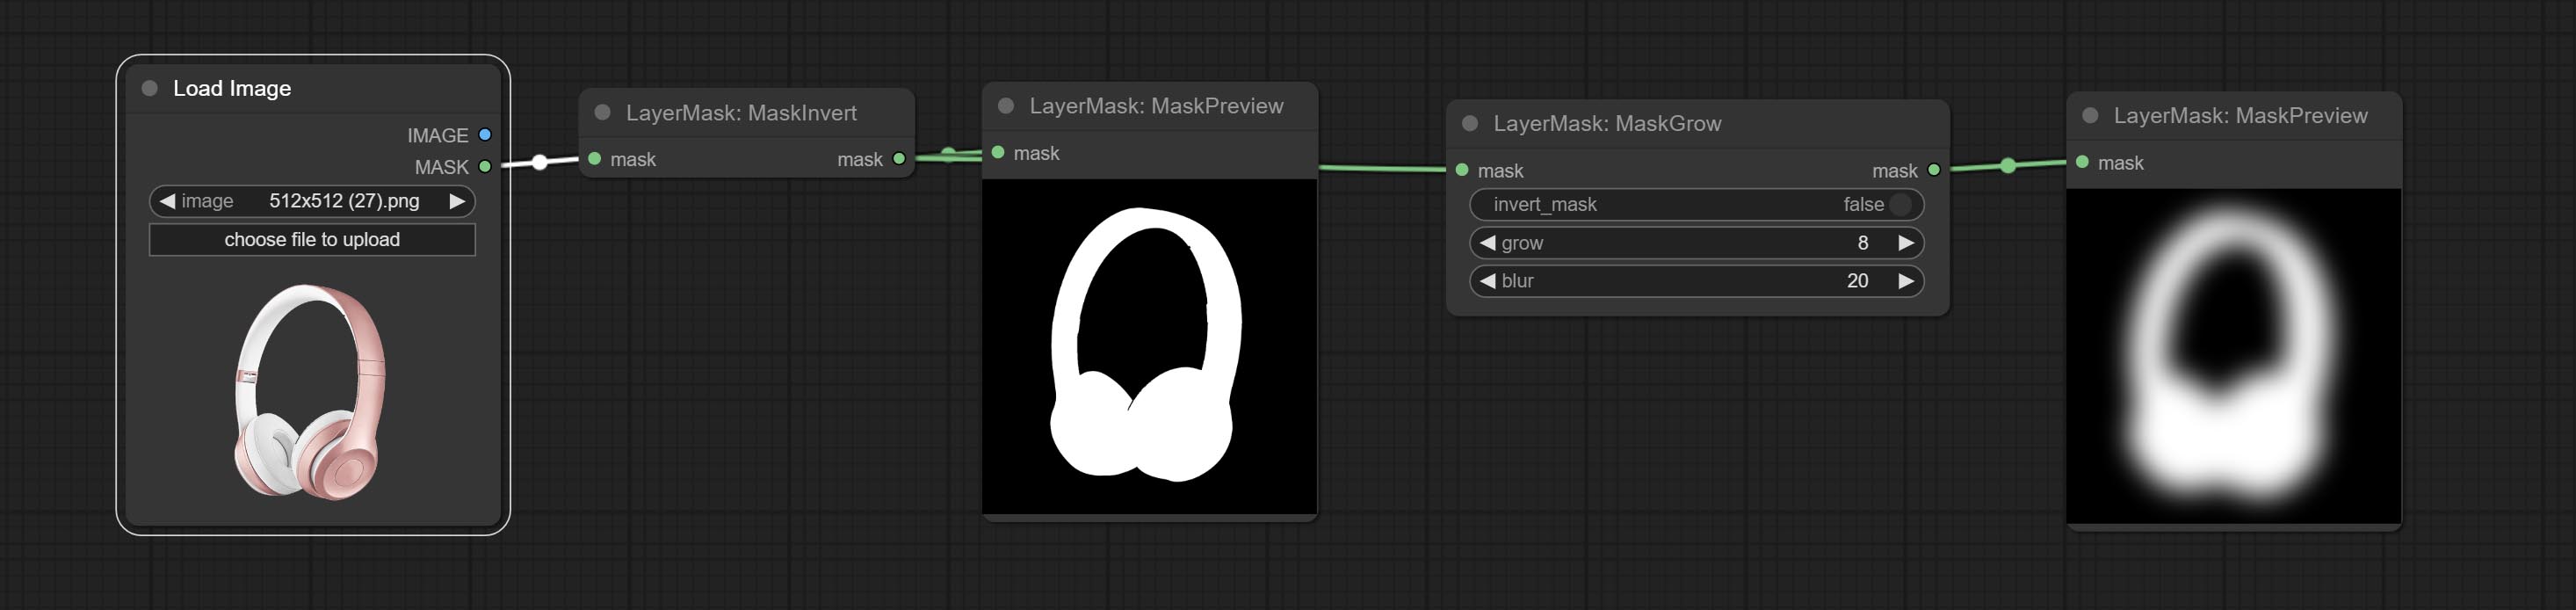
Node options: 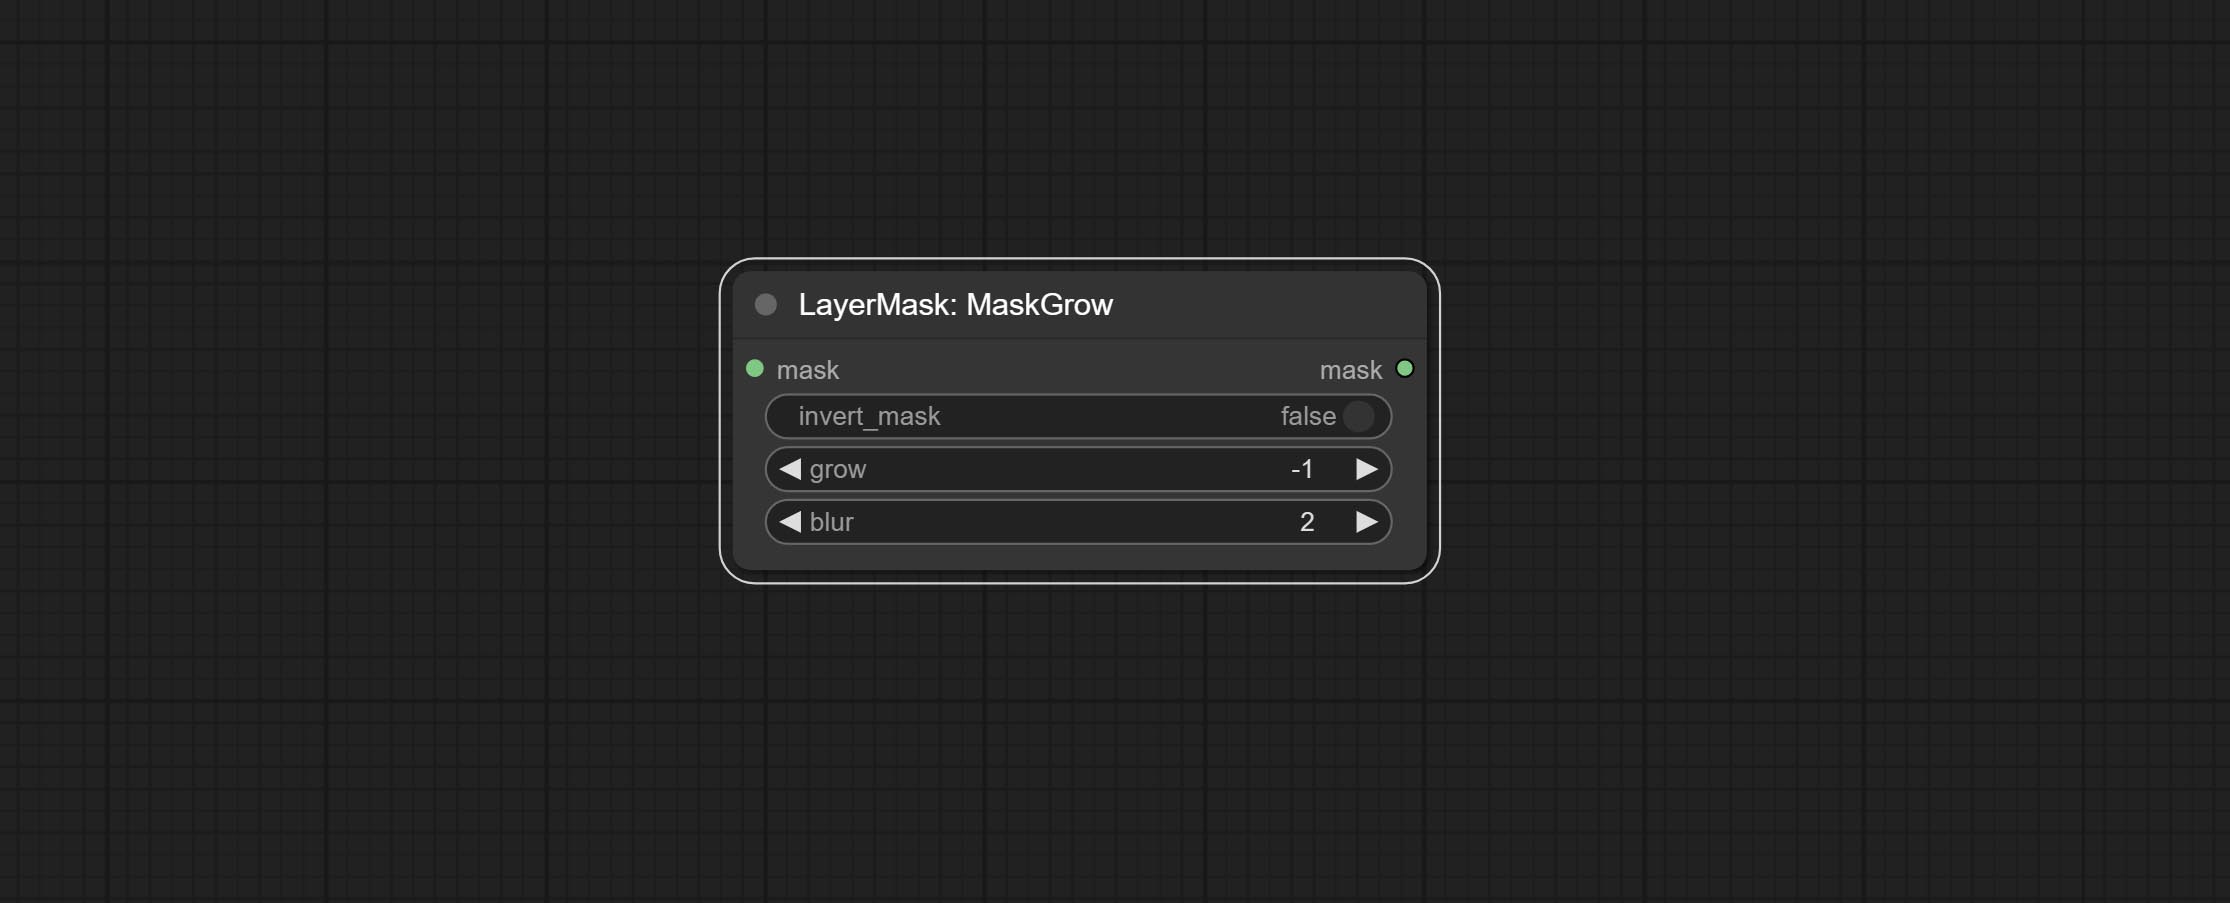
Smooth transition and shrink the mask edges while preserving edge details. 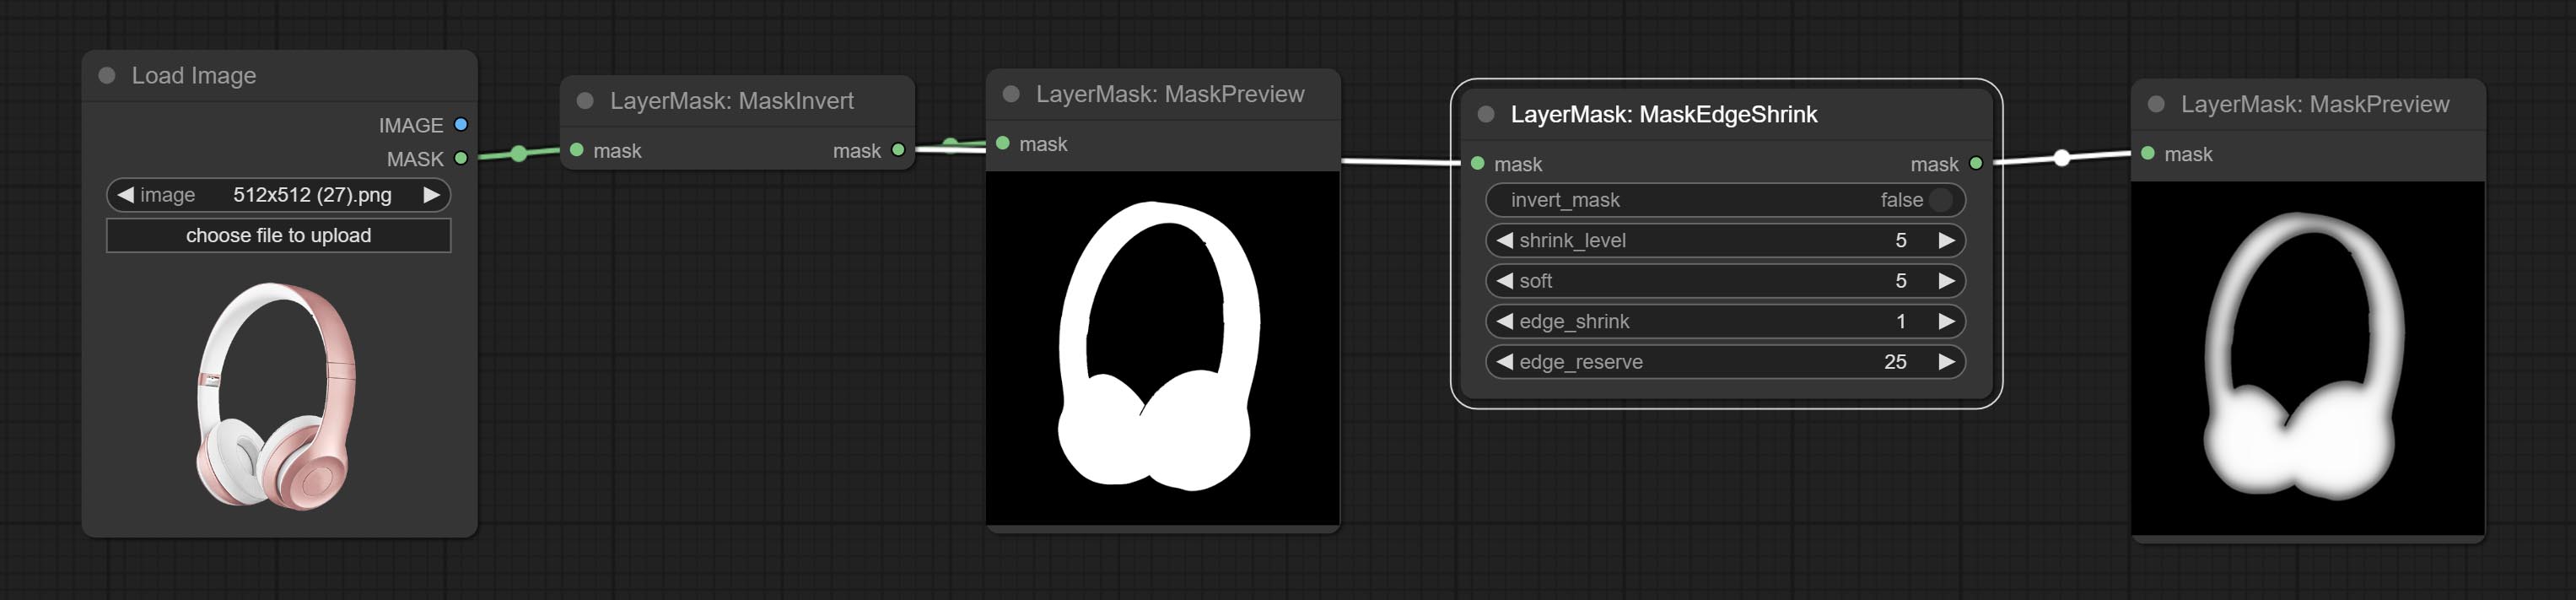
Node options: 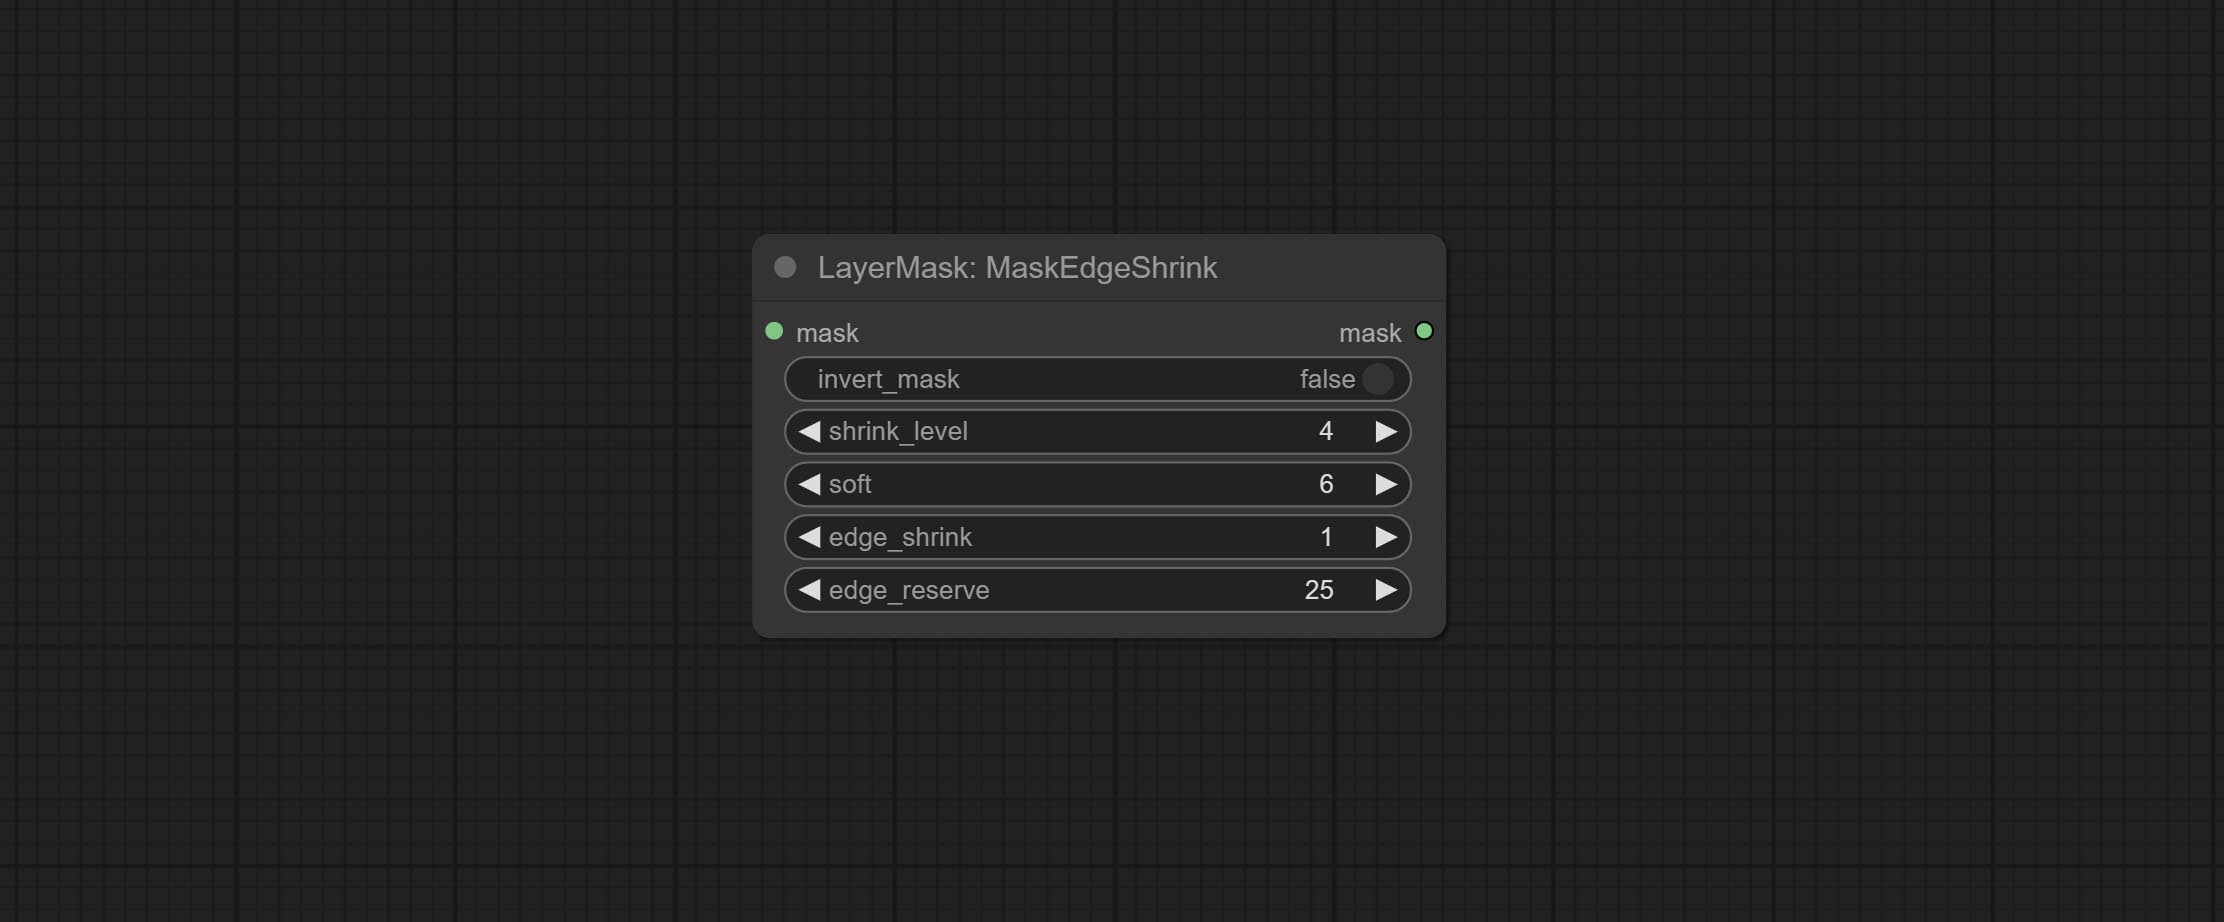
Comparison of MaskGrow and MaskEdgeShrink 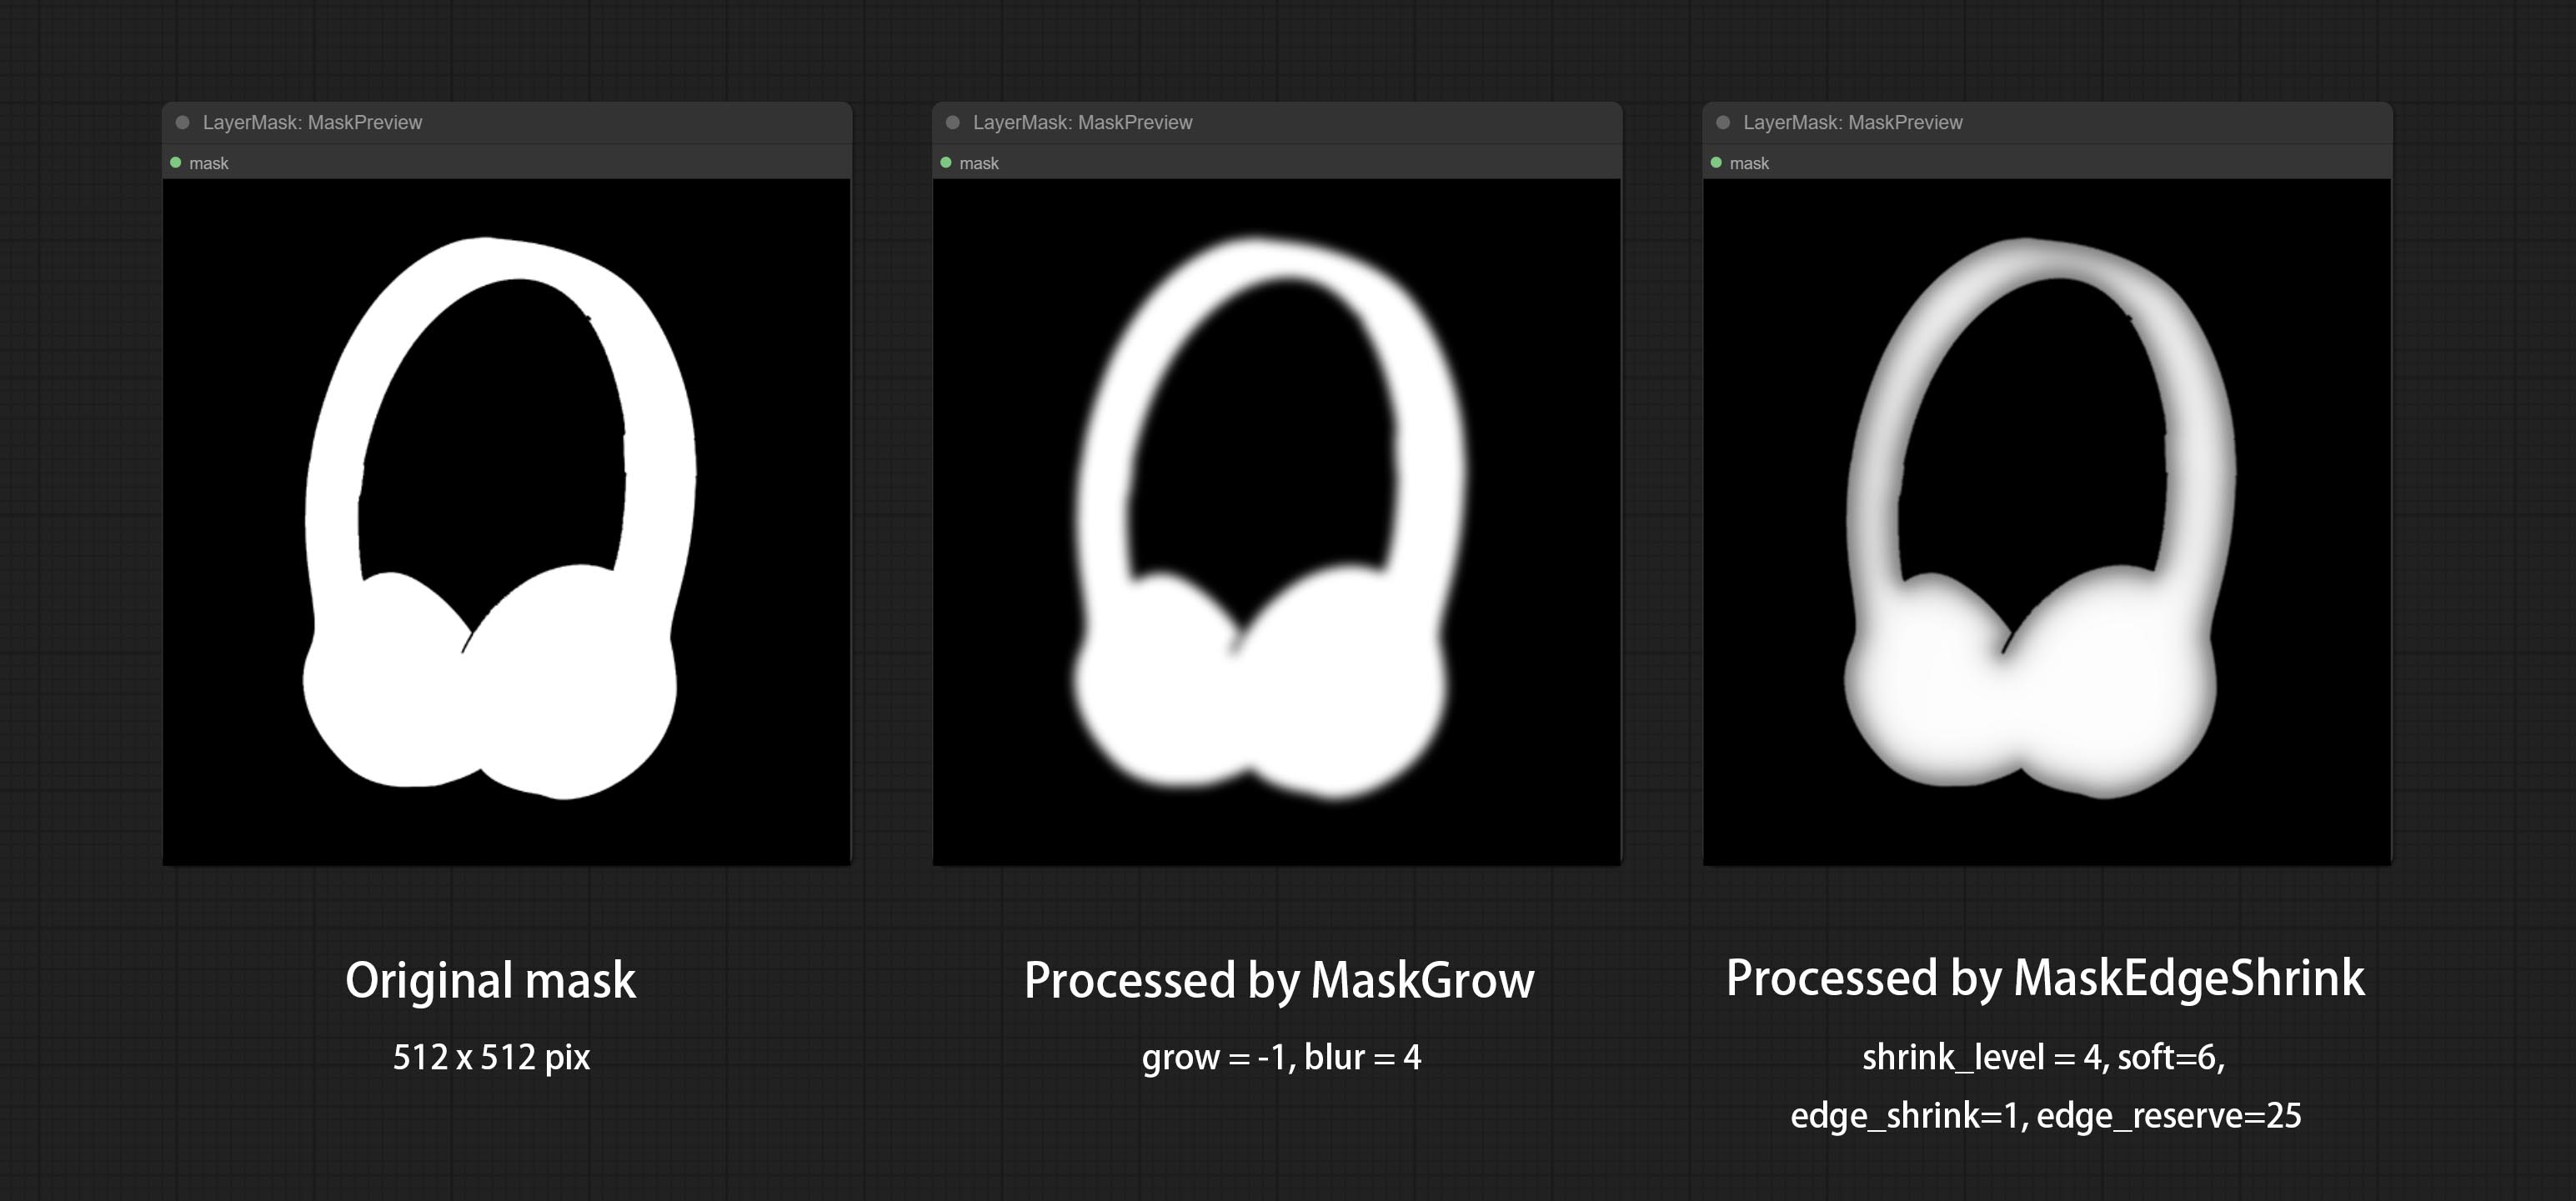
Create motion blur on the mask. 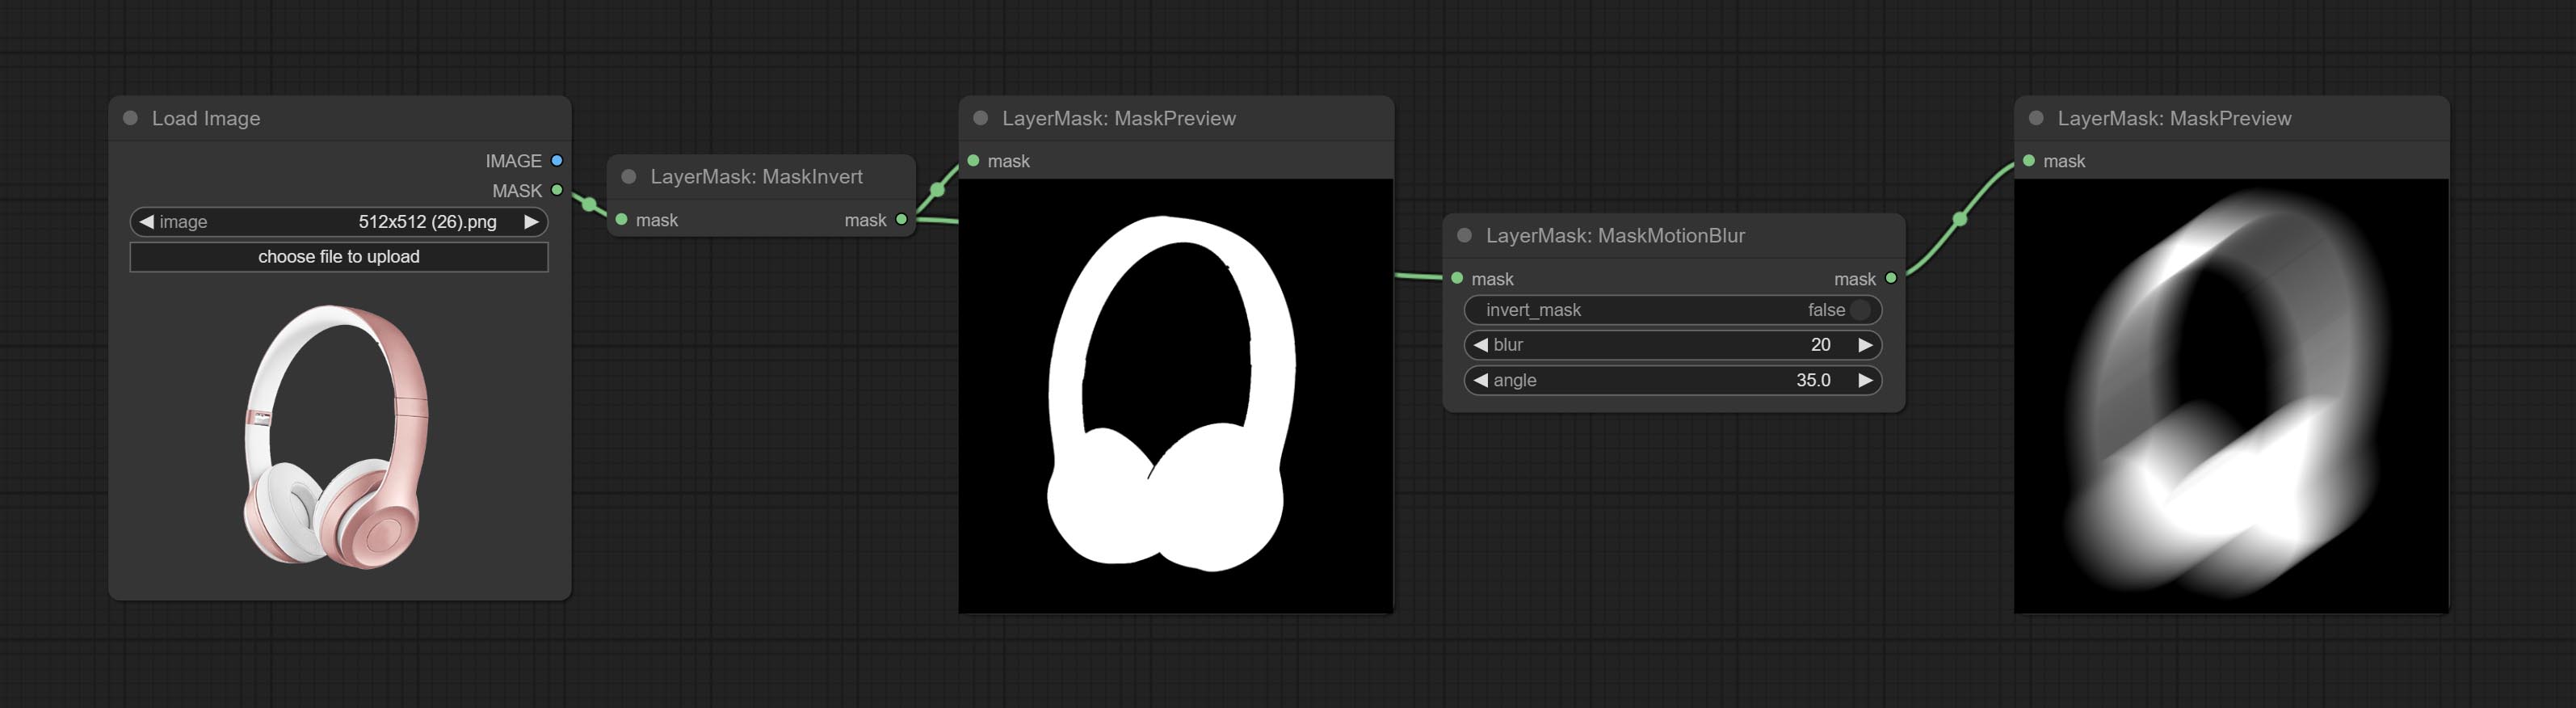
Node options: 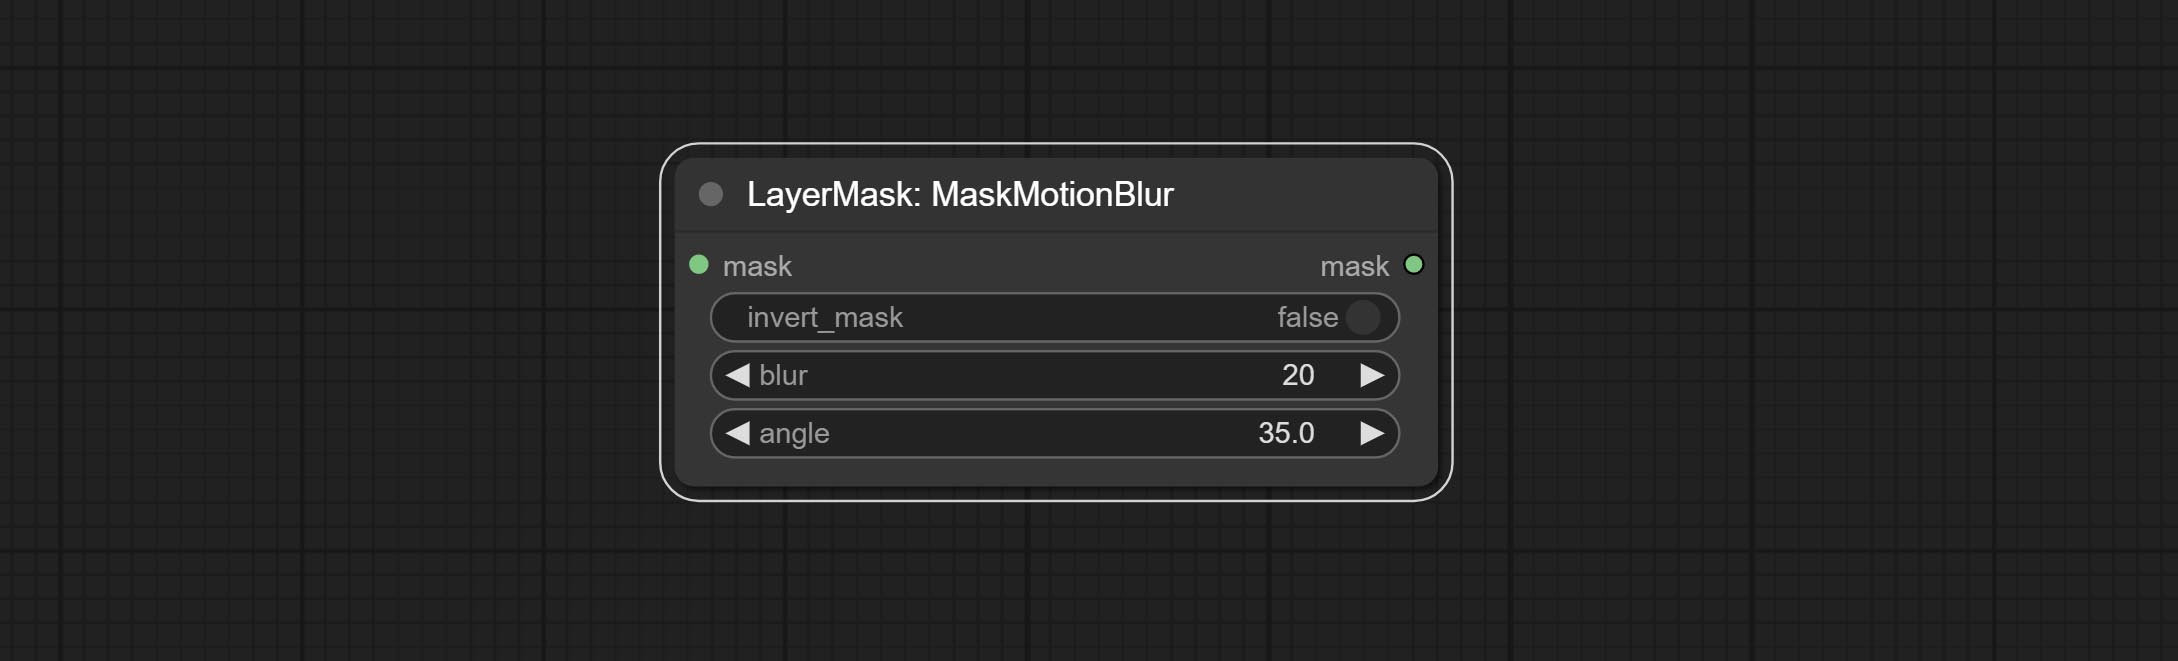
Create a gradient for the mask from one side. please note the difference between this node and the CreateGradientMask node. 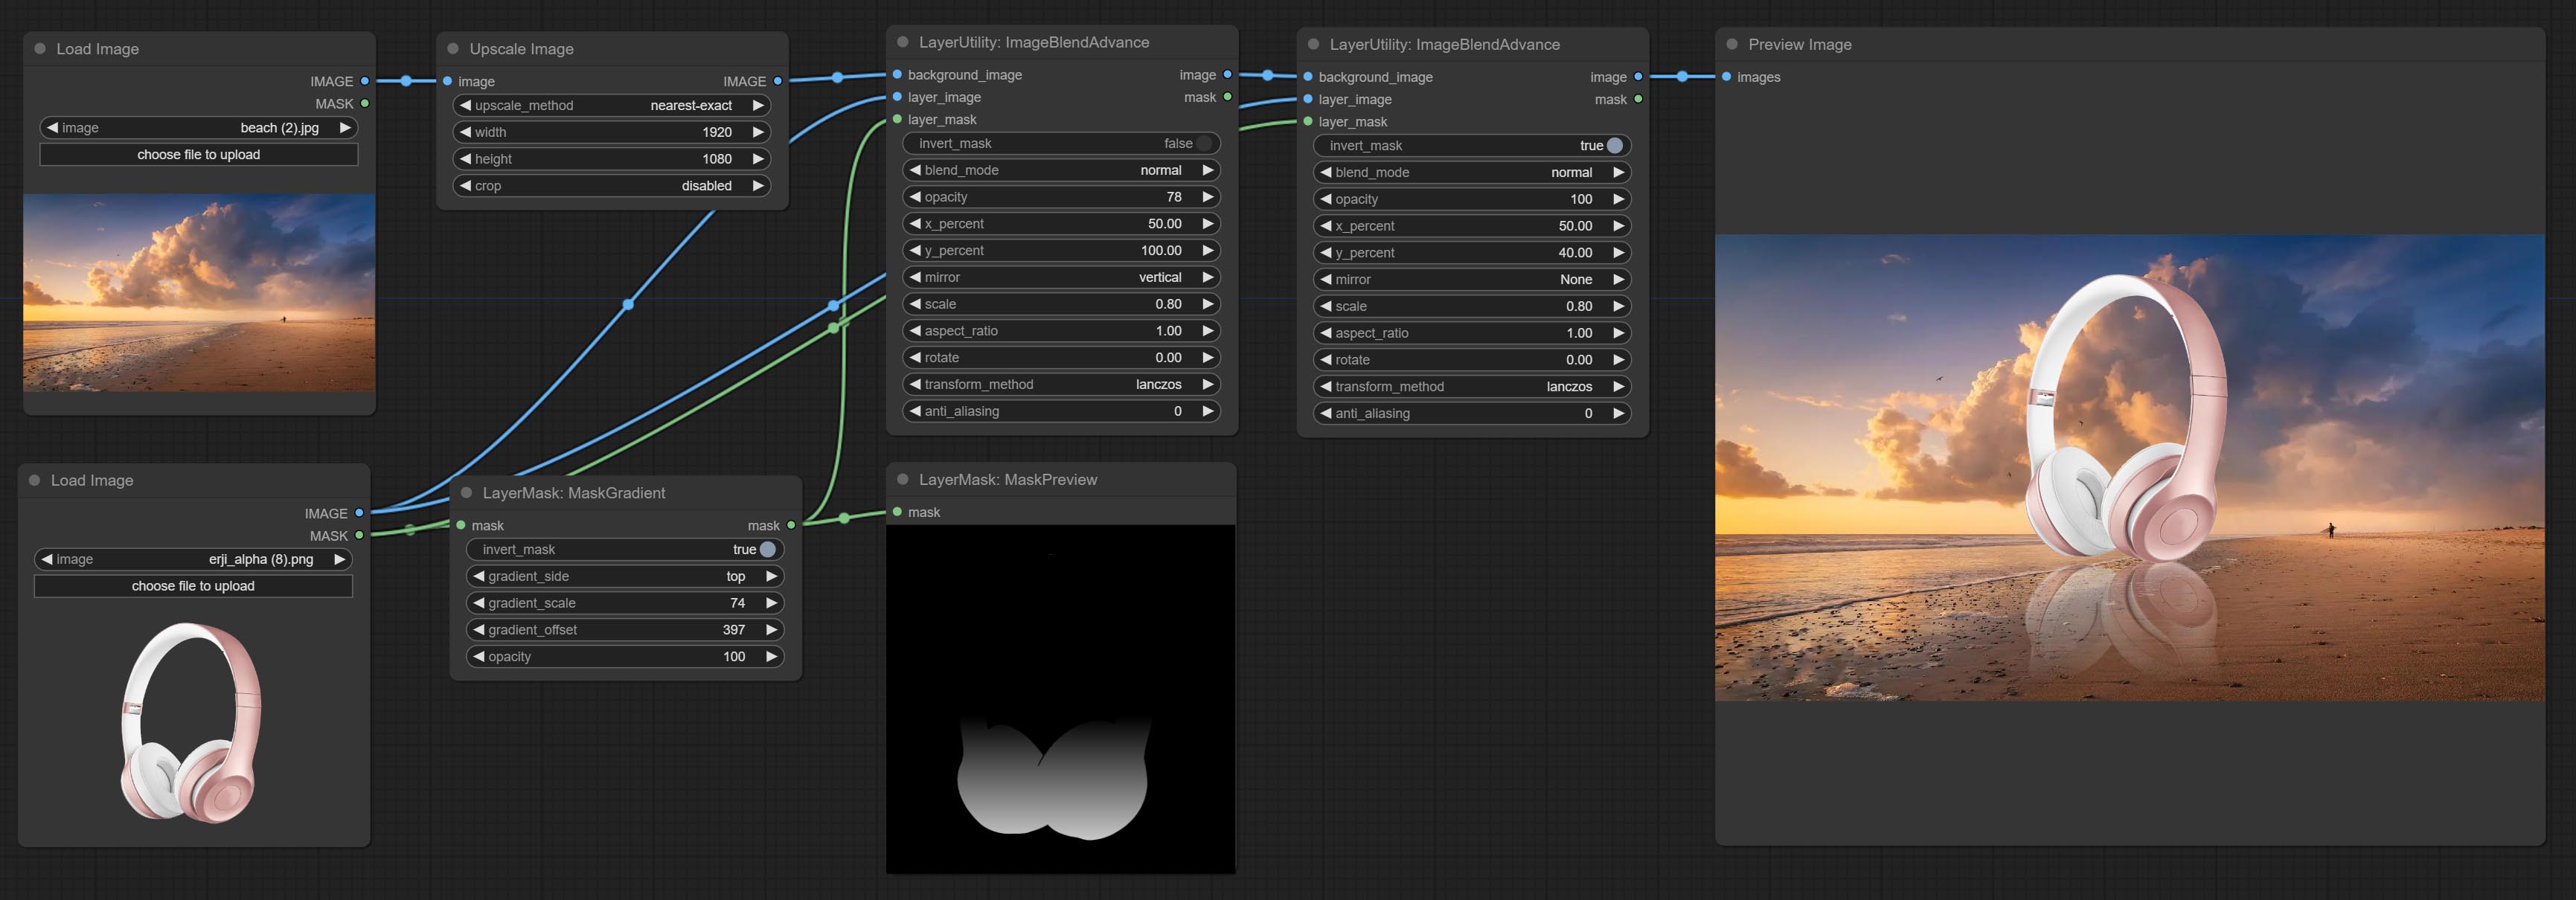
Node options: 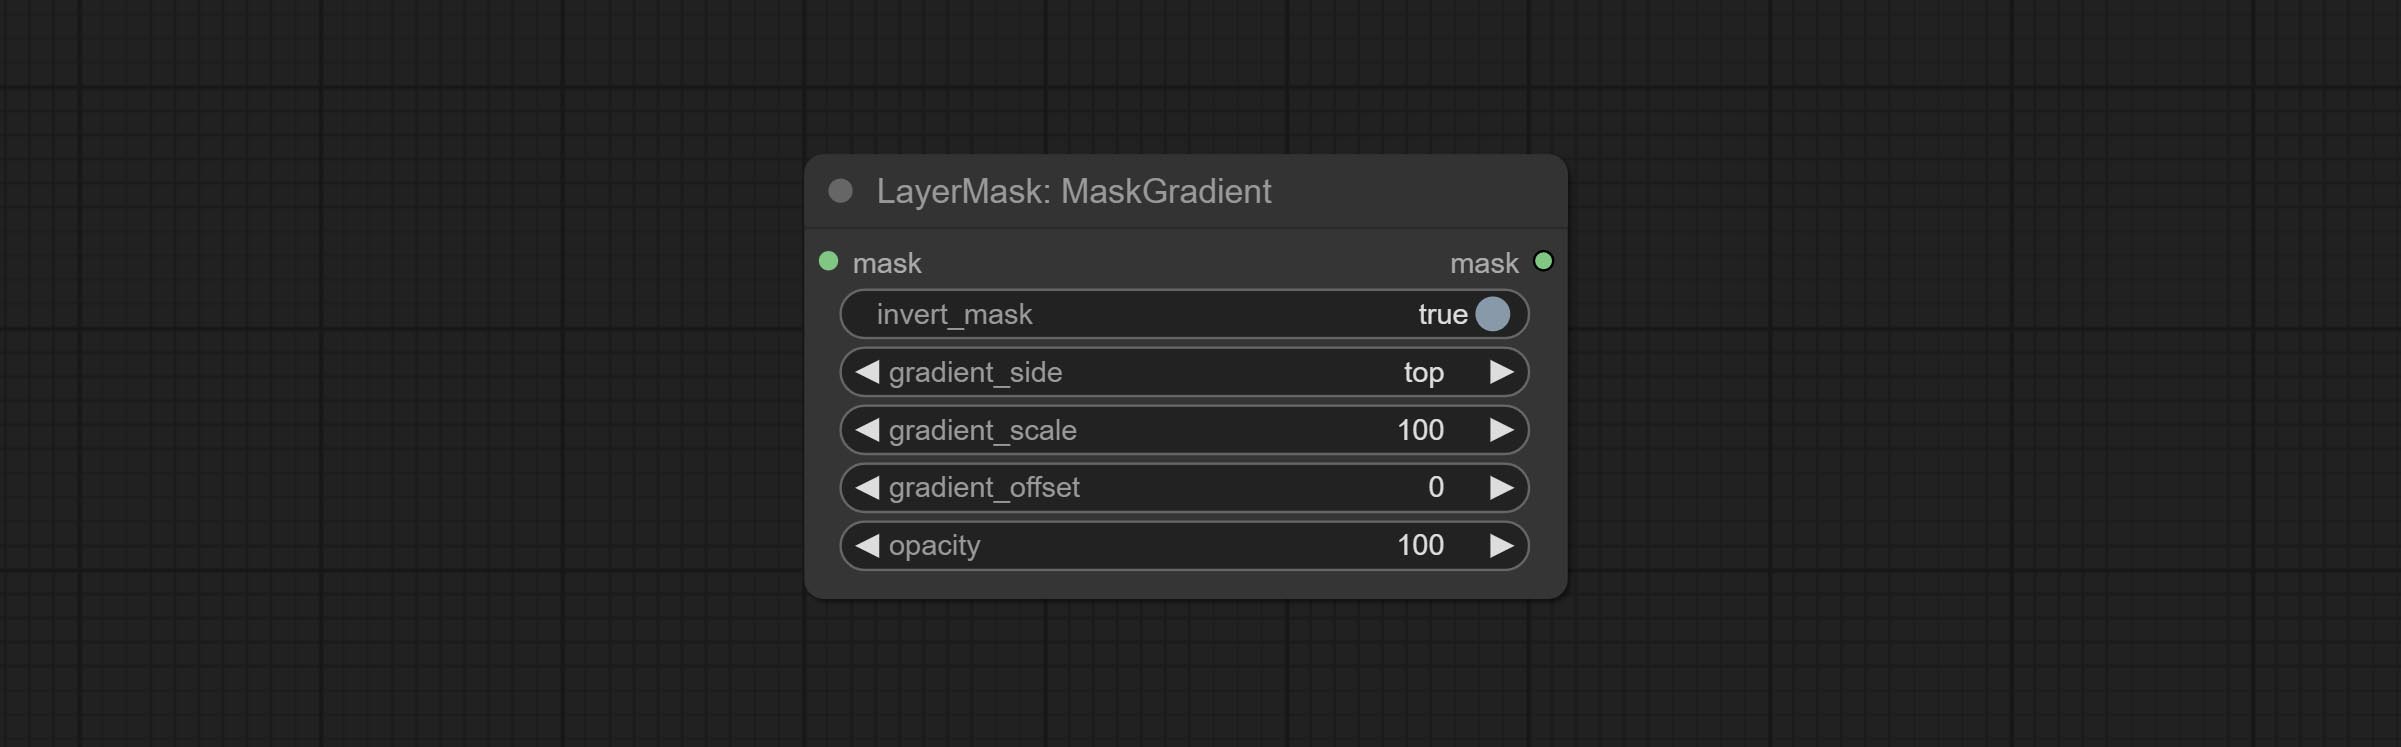
Create a gradient mask. please note the difference between this node and the MaskGradient node. 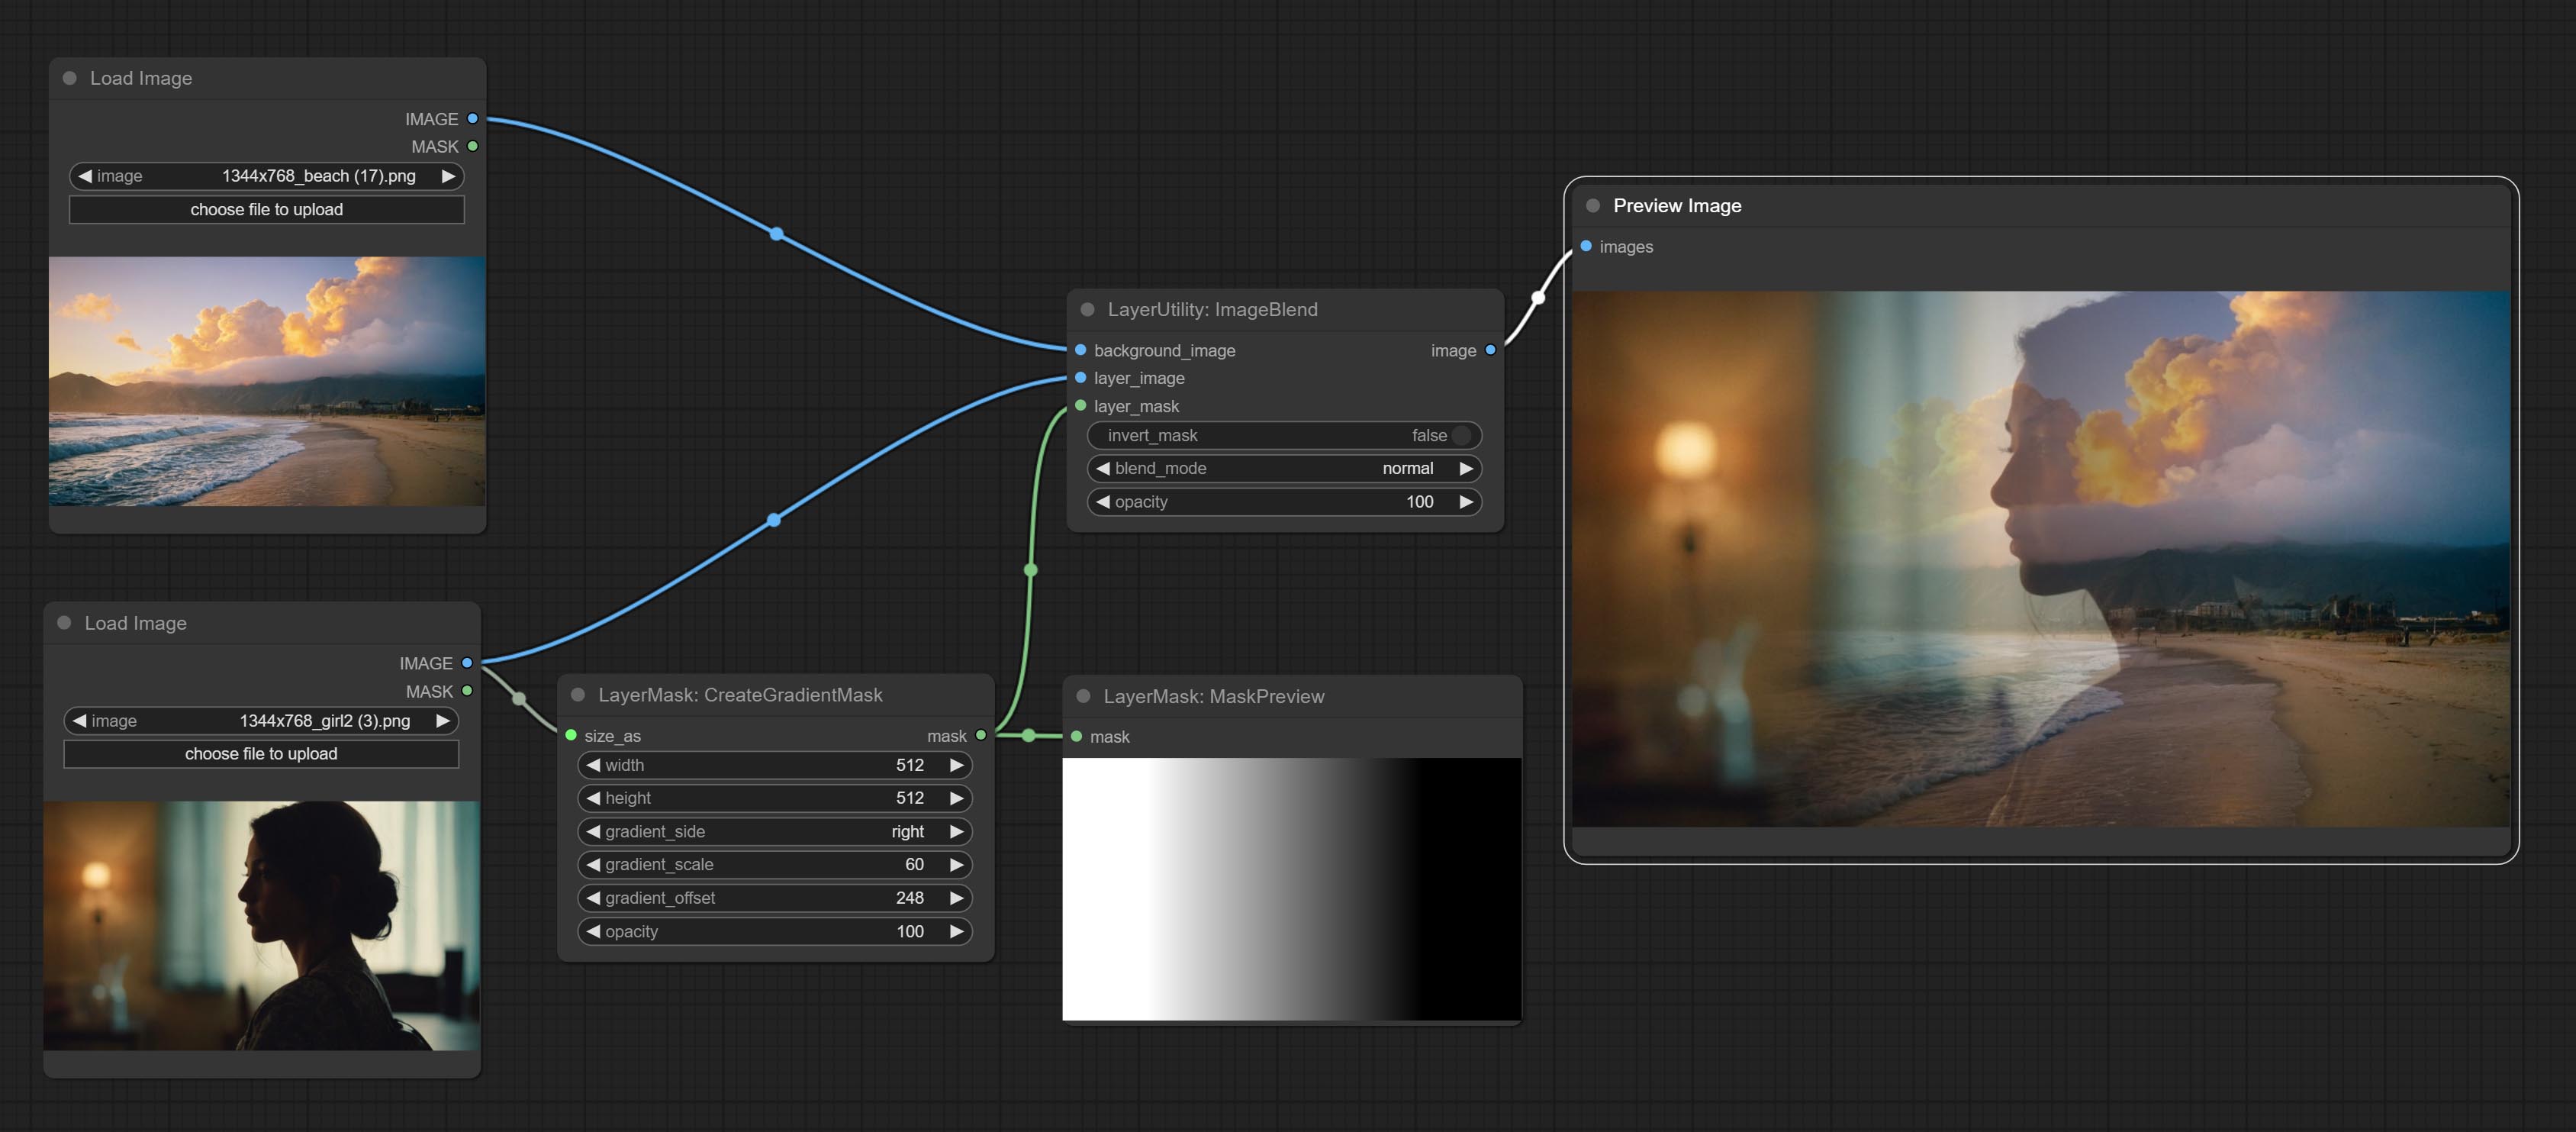
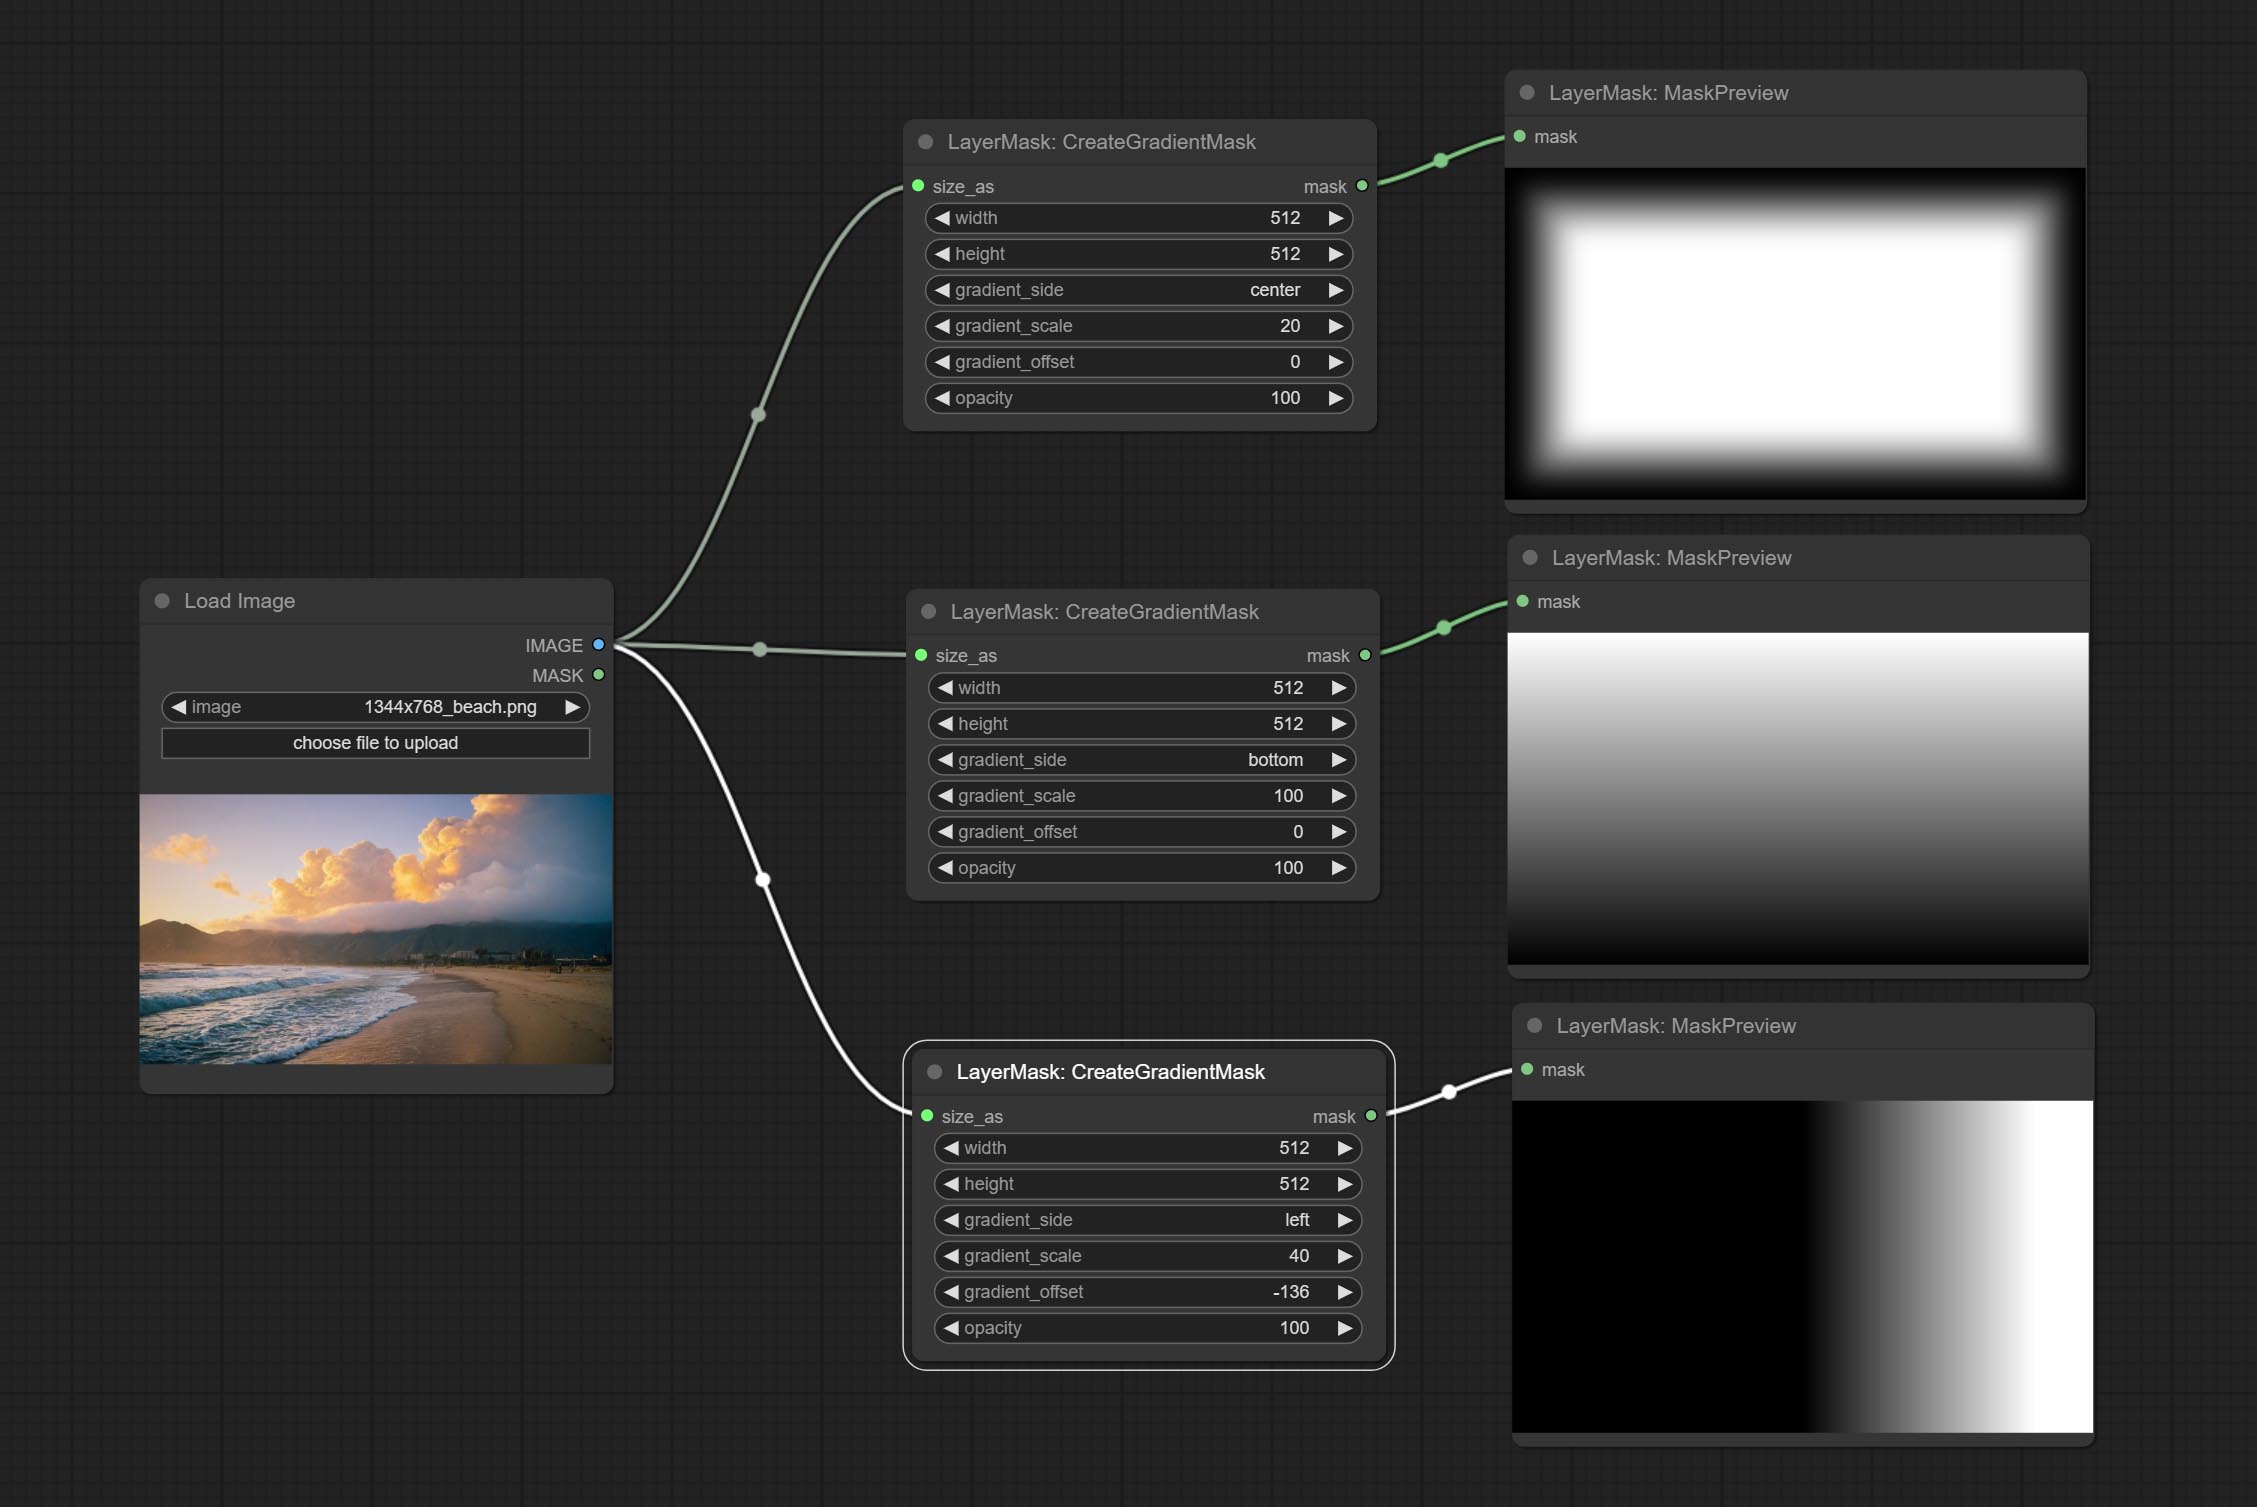
Node options: 
gradient_side is center, the size of the gradient area is adjusted here, positive values are smaller, and negative values are enlarged.* Only limited to input image and mask. forcing the integration of other types of inputs will result in node errors.
Generate mask contour strokes. 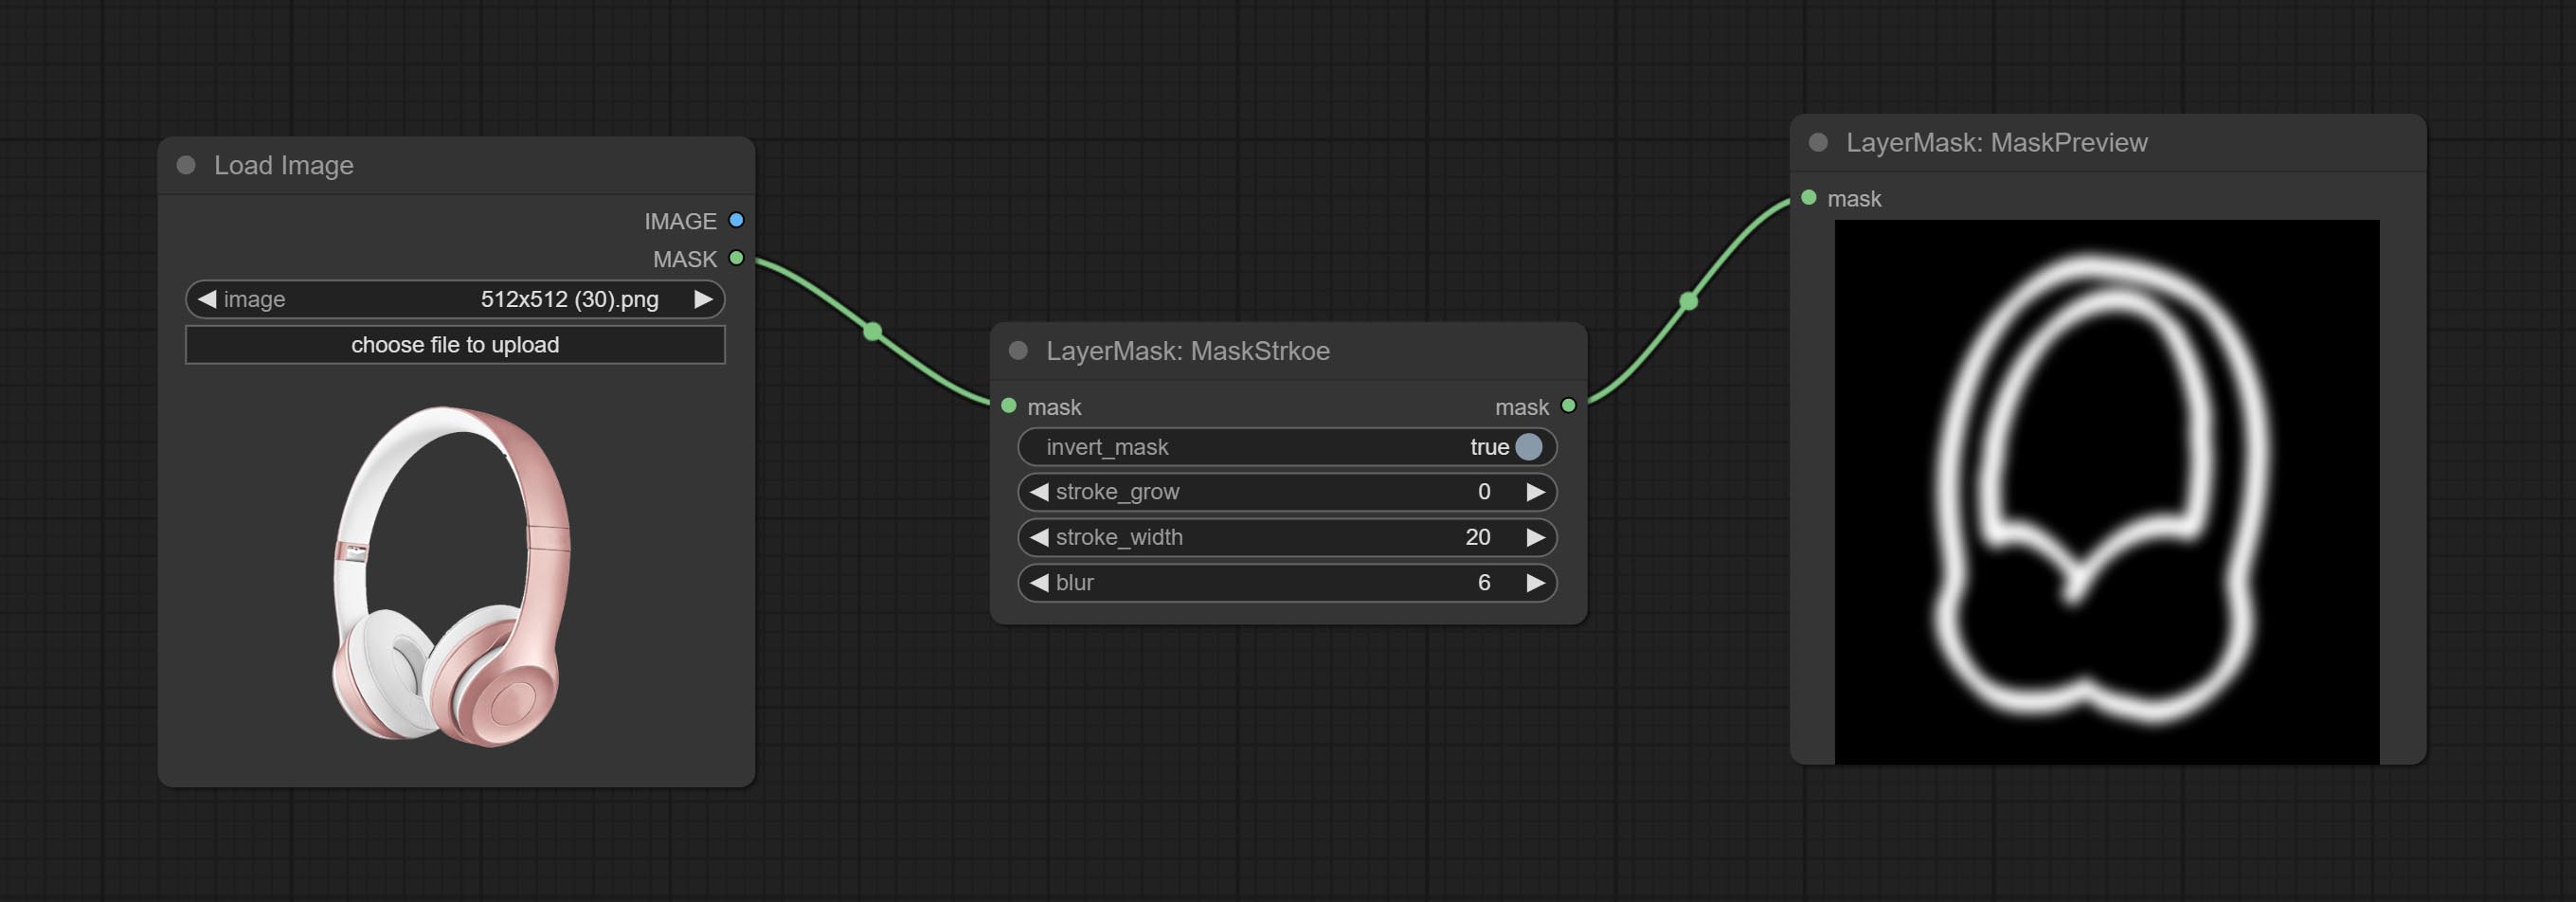
Node options: 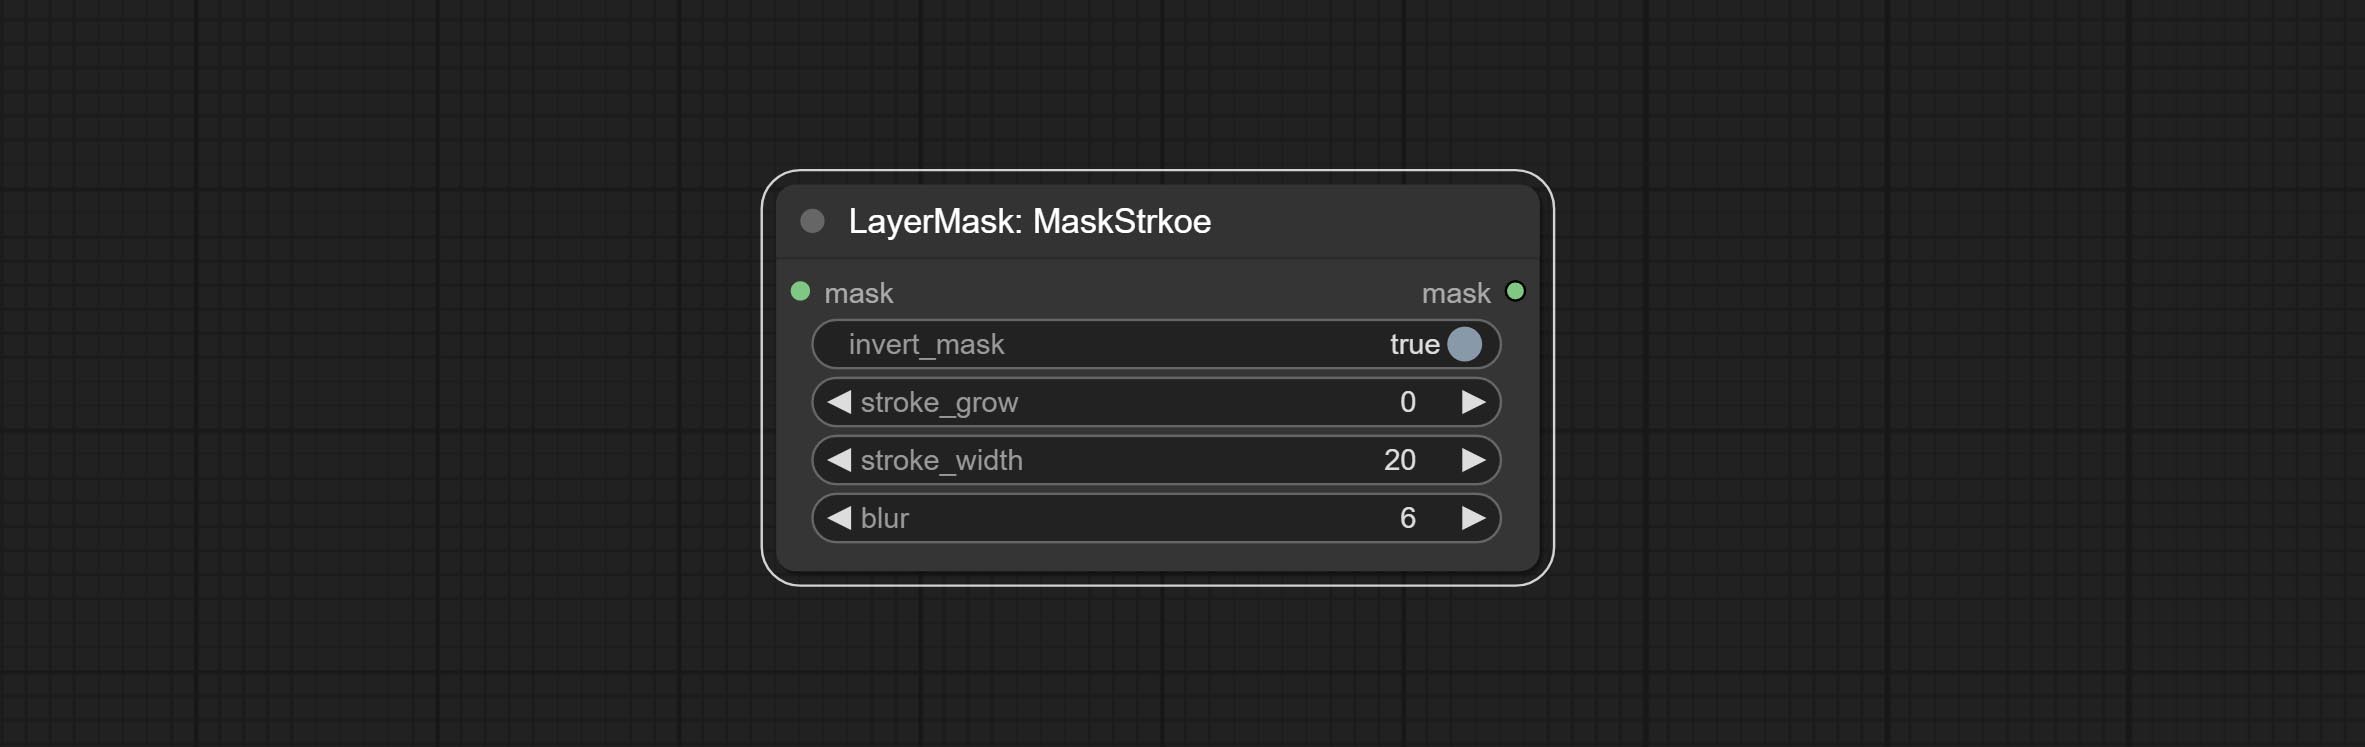
Generates noise for the mask. 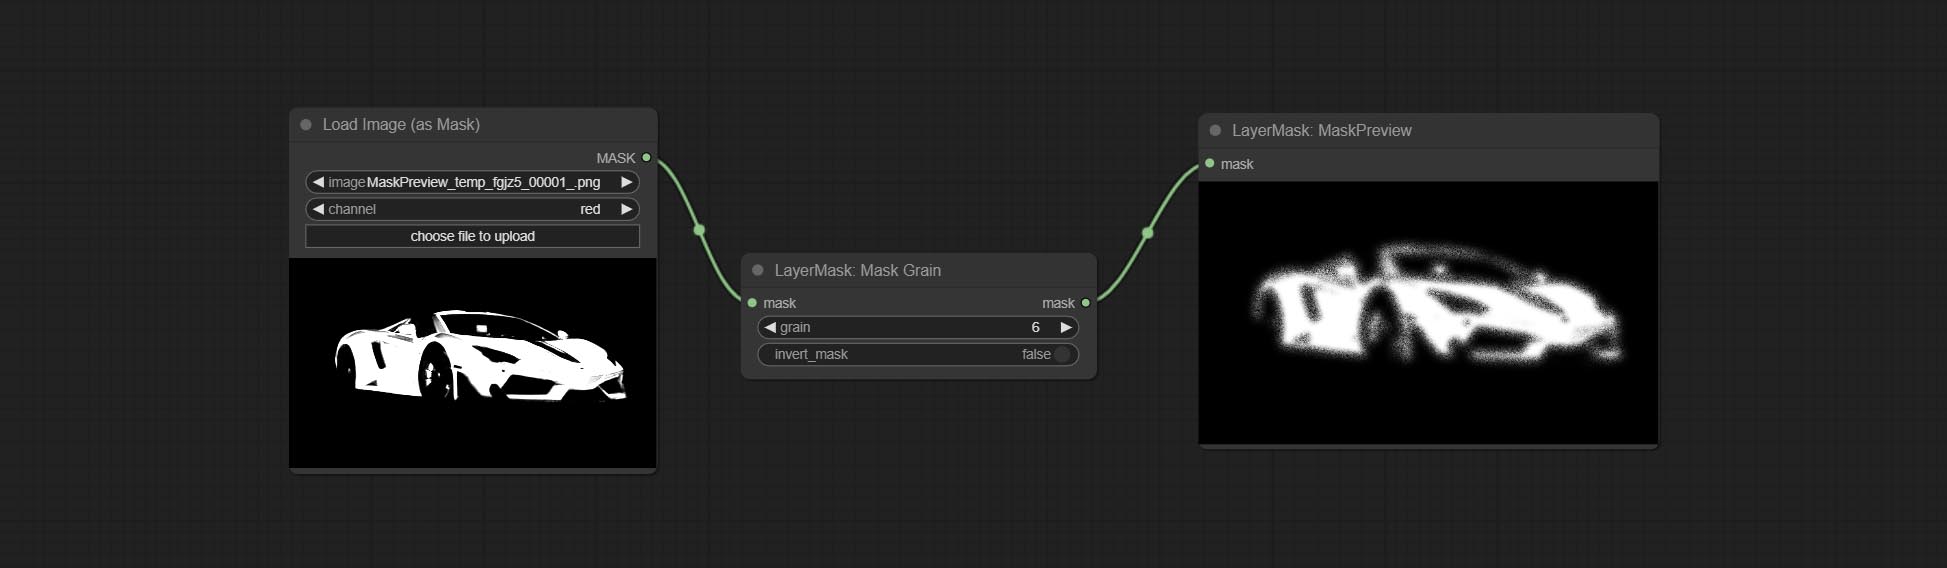
Node Options: 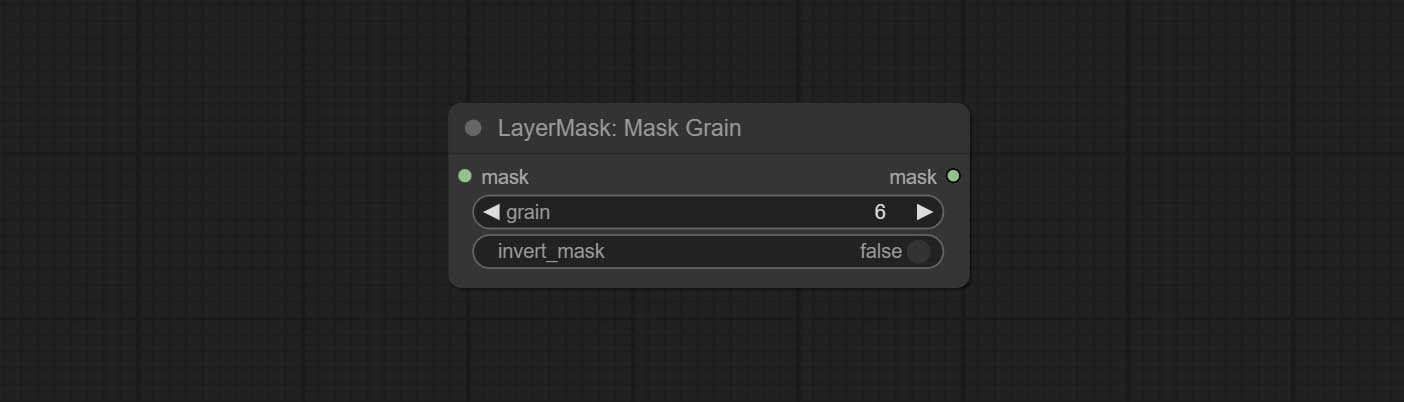
Preview the input mask 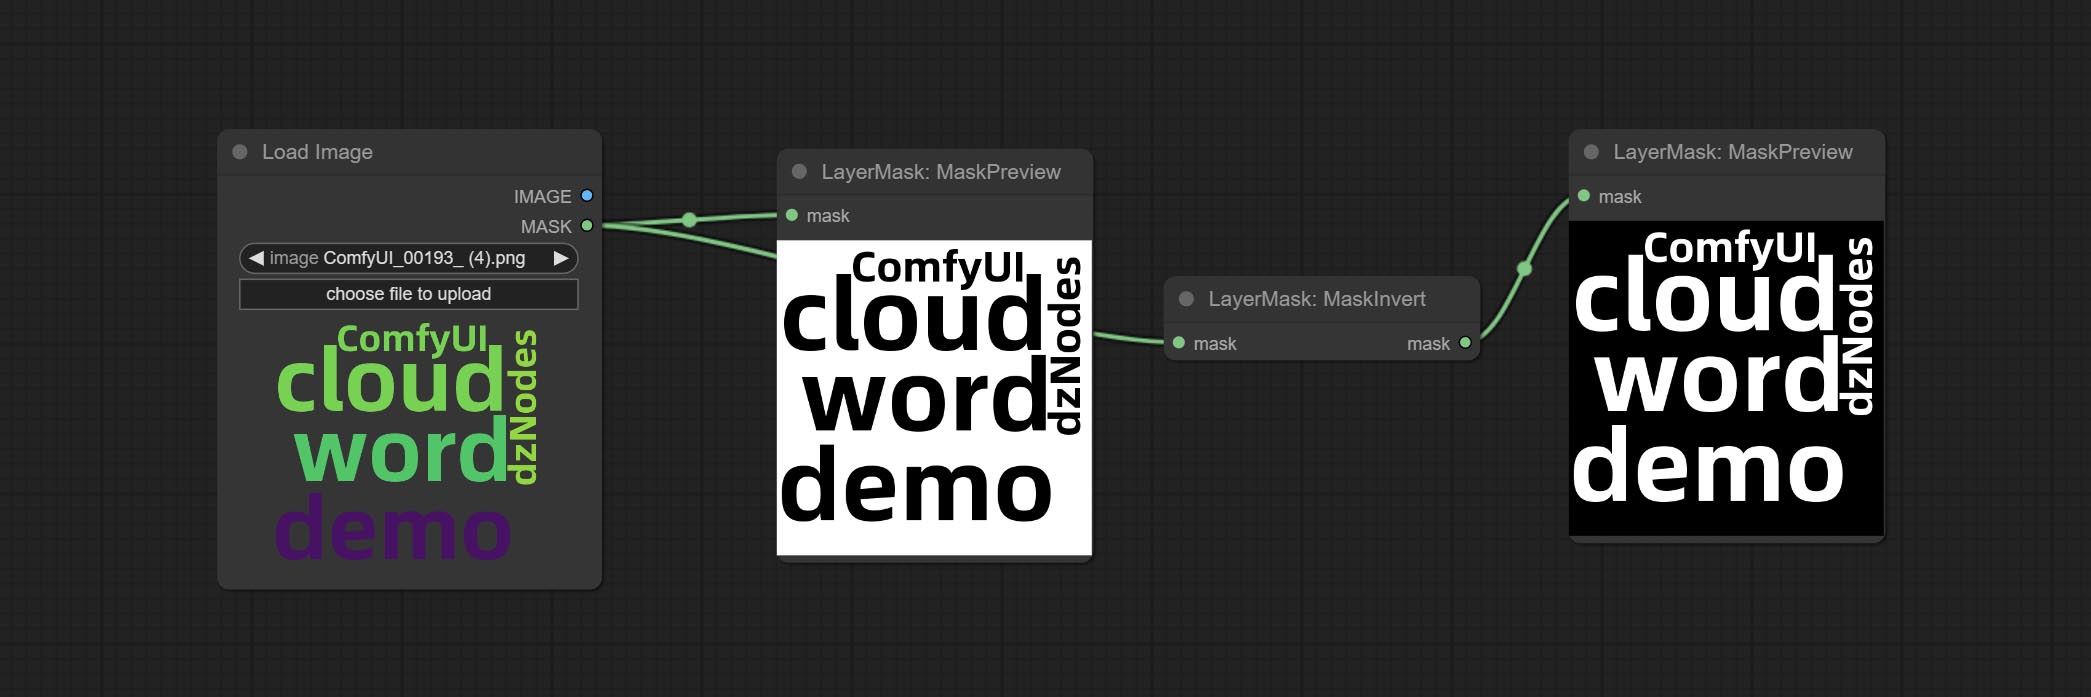
Invert the mask 
Enhance or smooth out details for image. 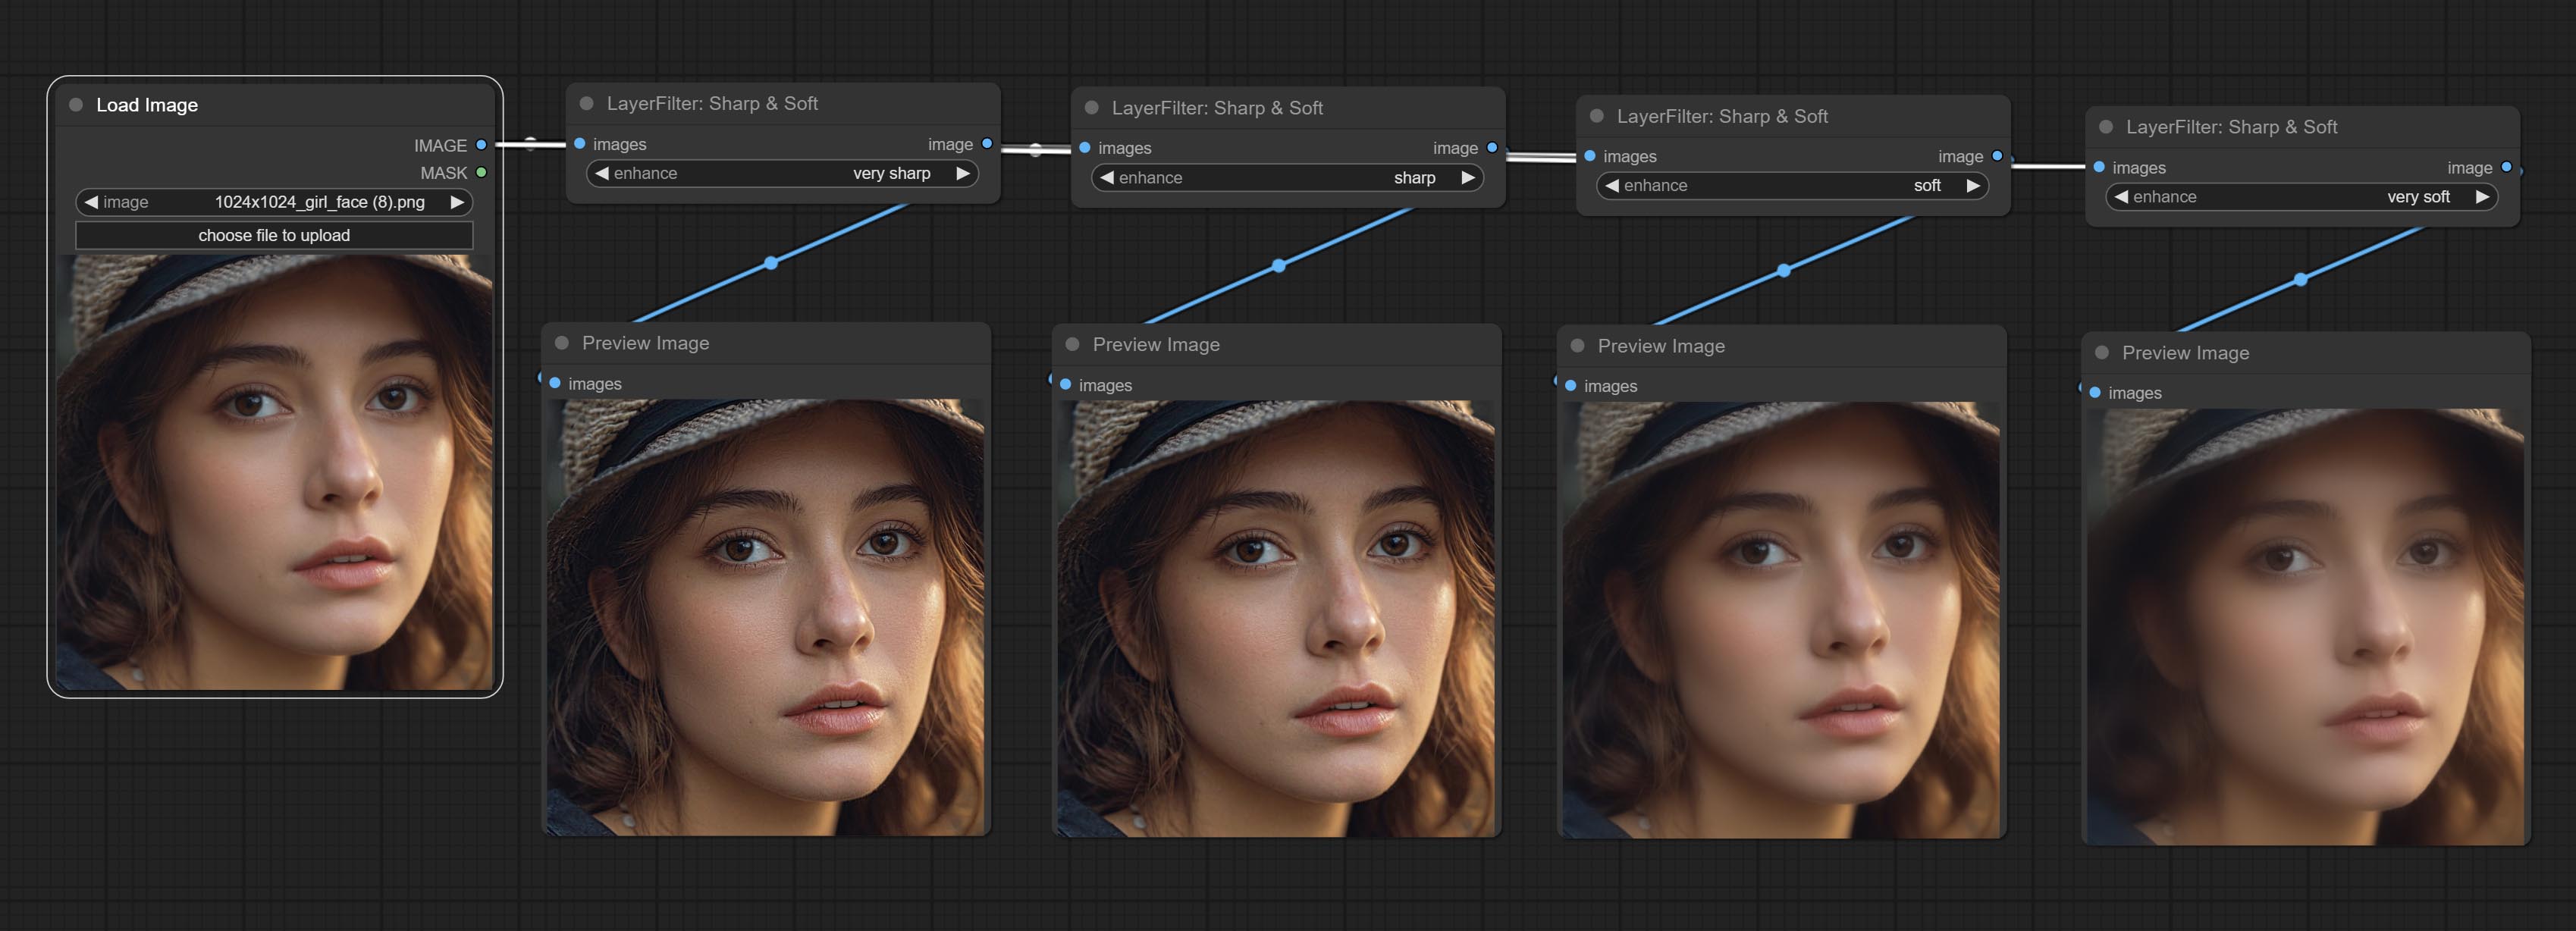
Node options: 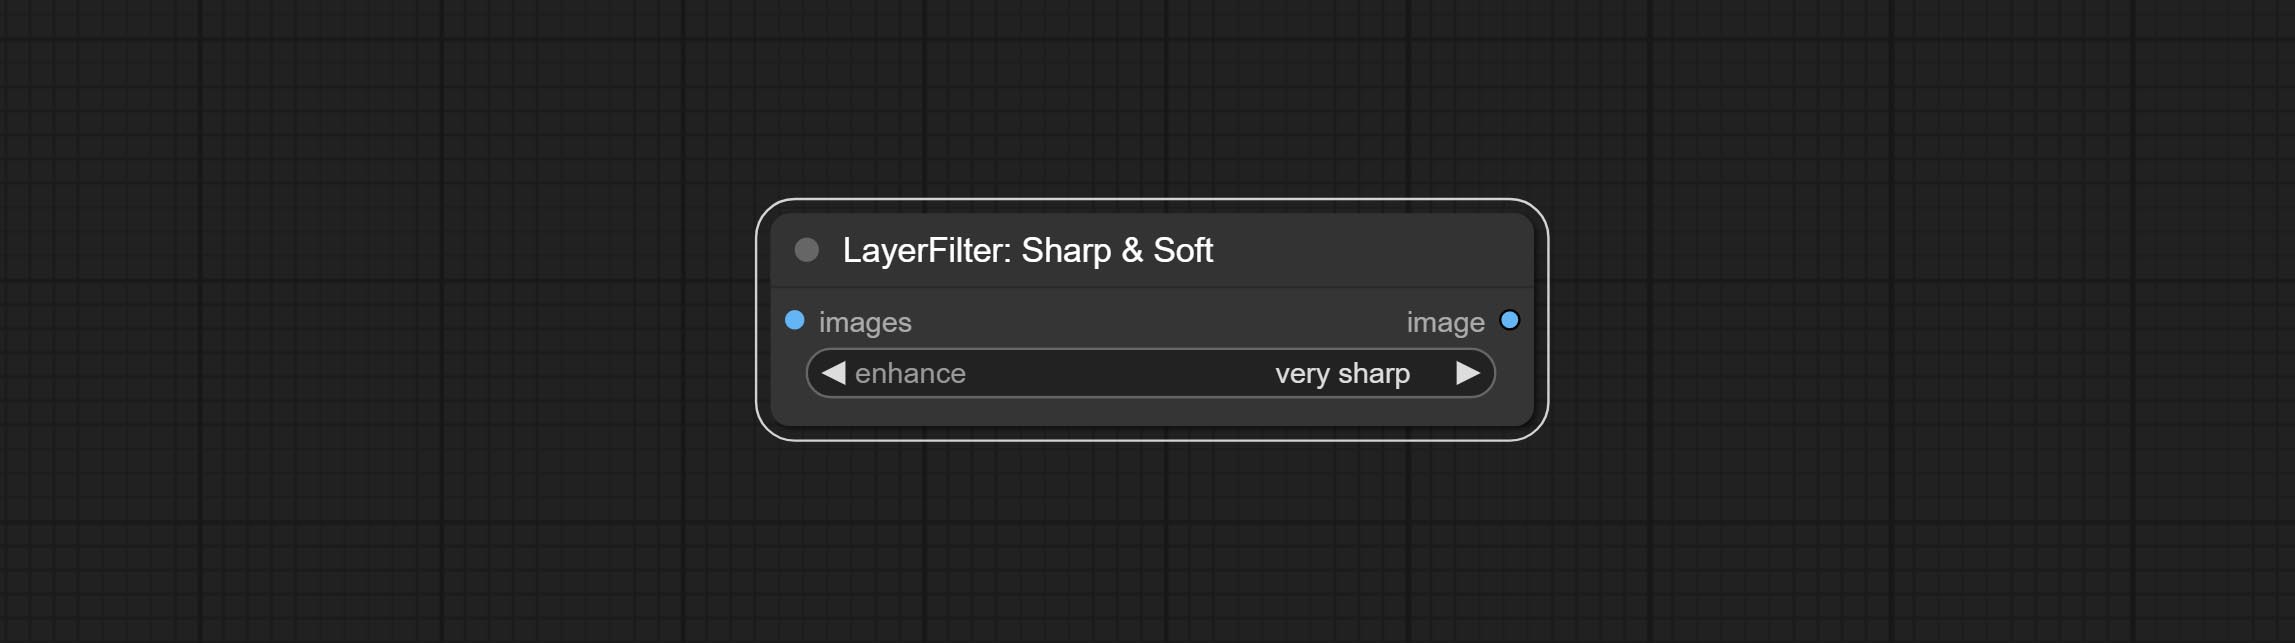
Make the skin look smoother. 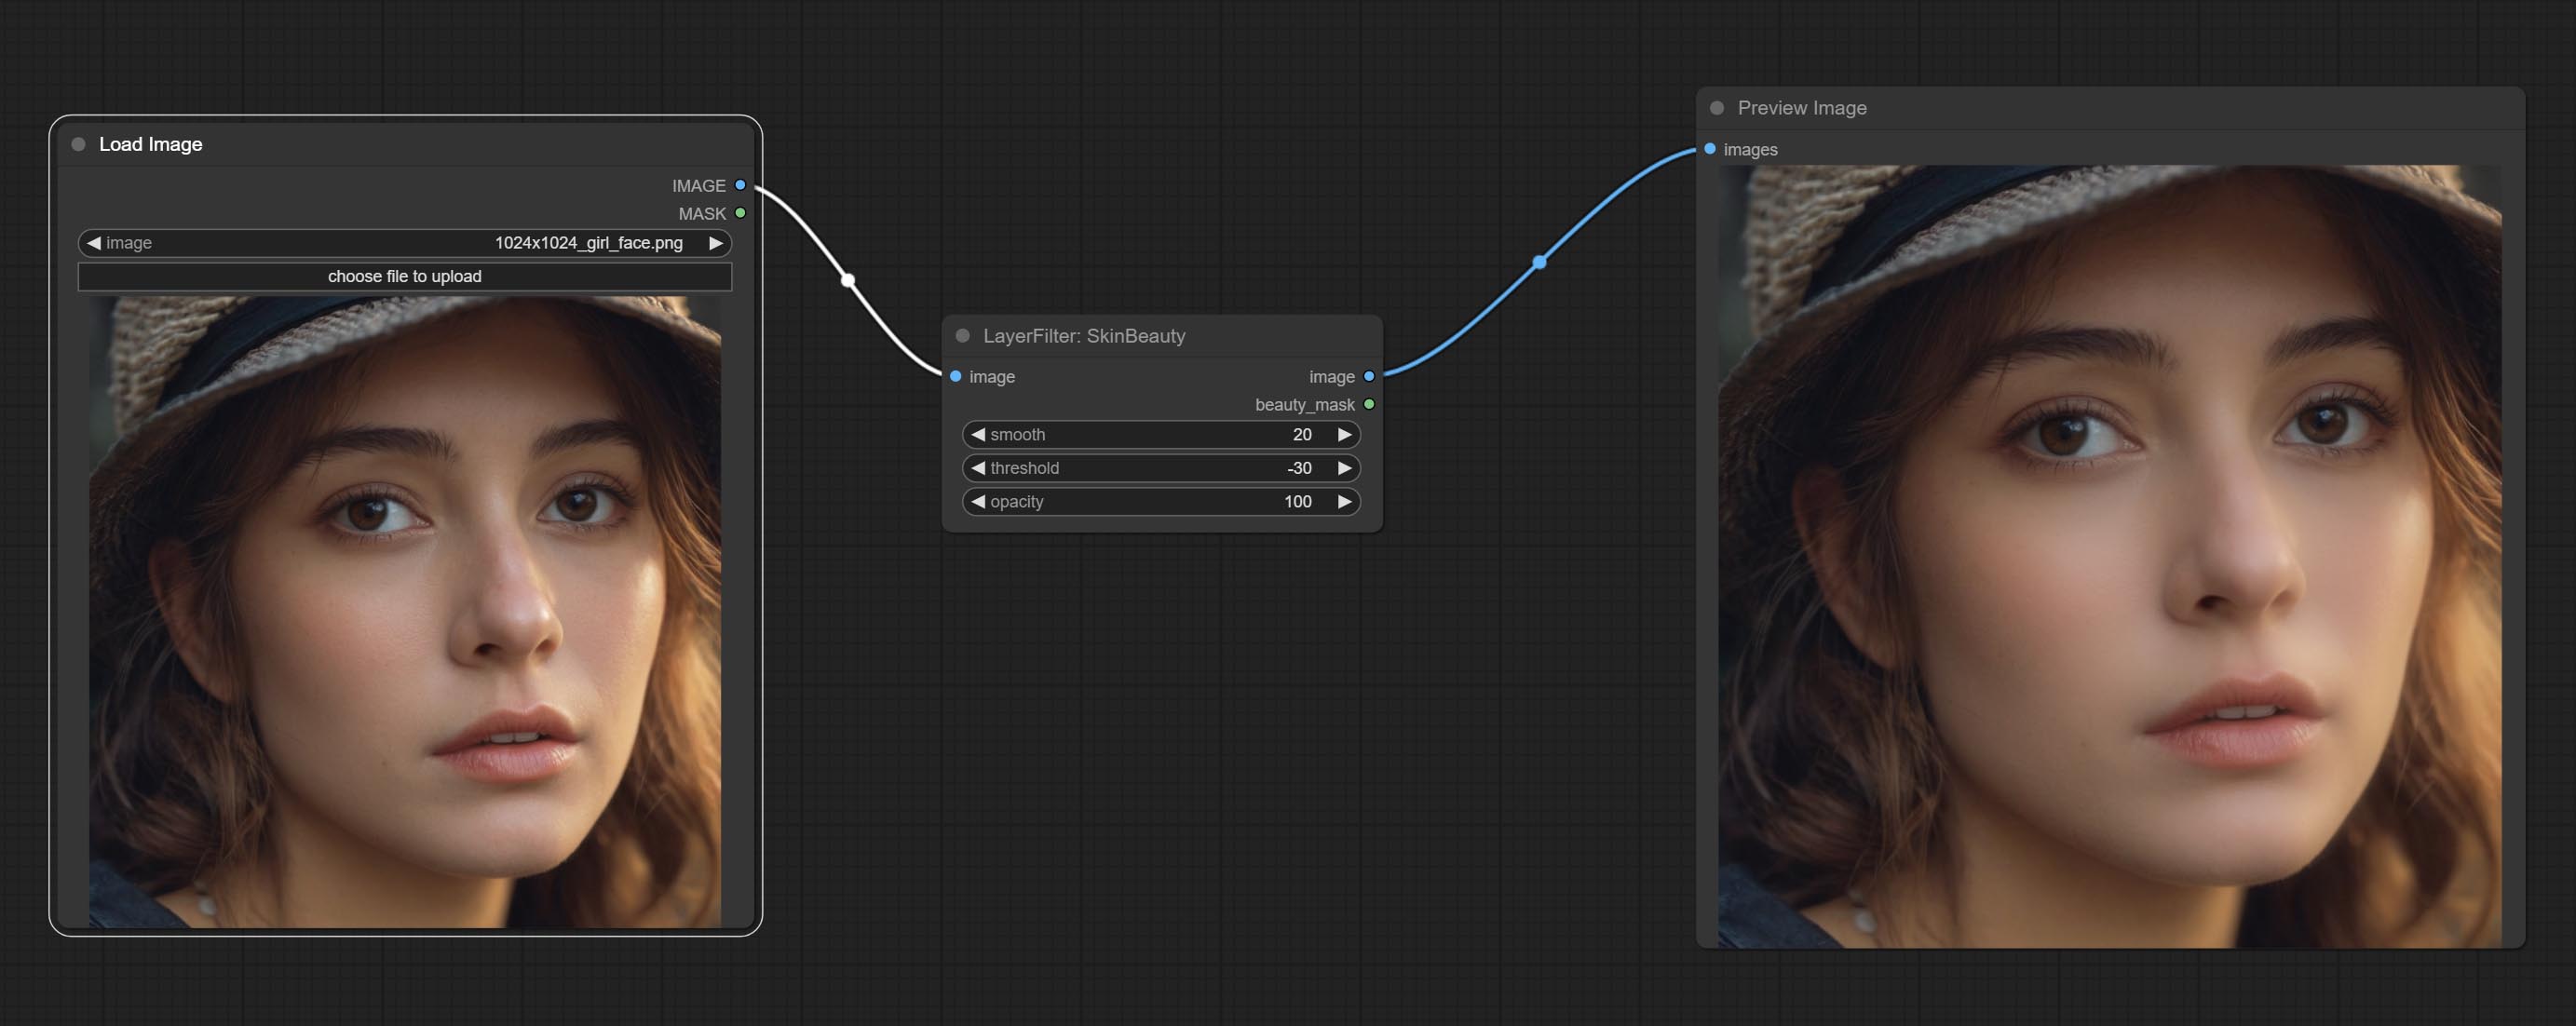
Node options: 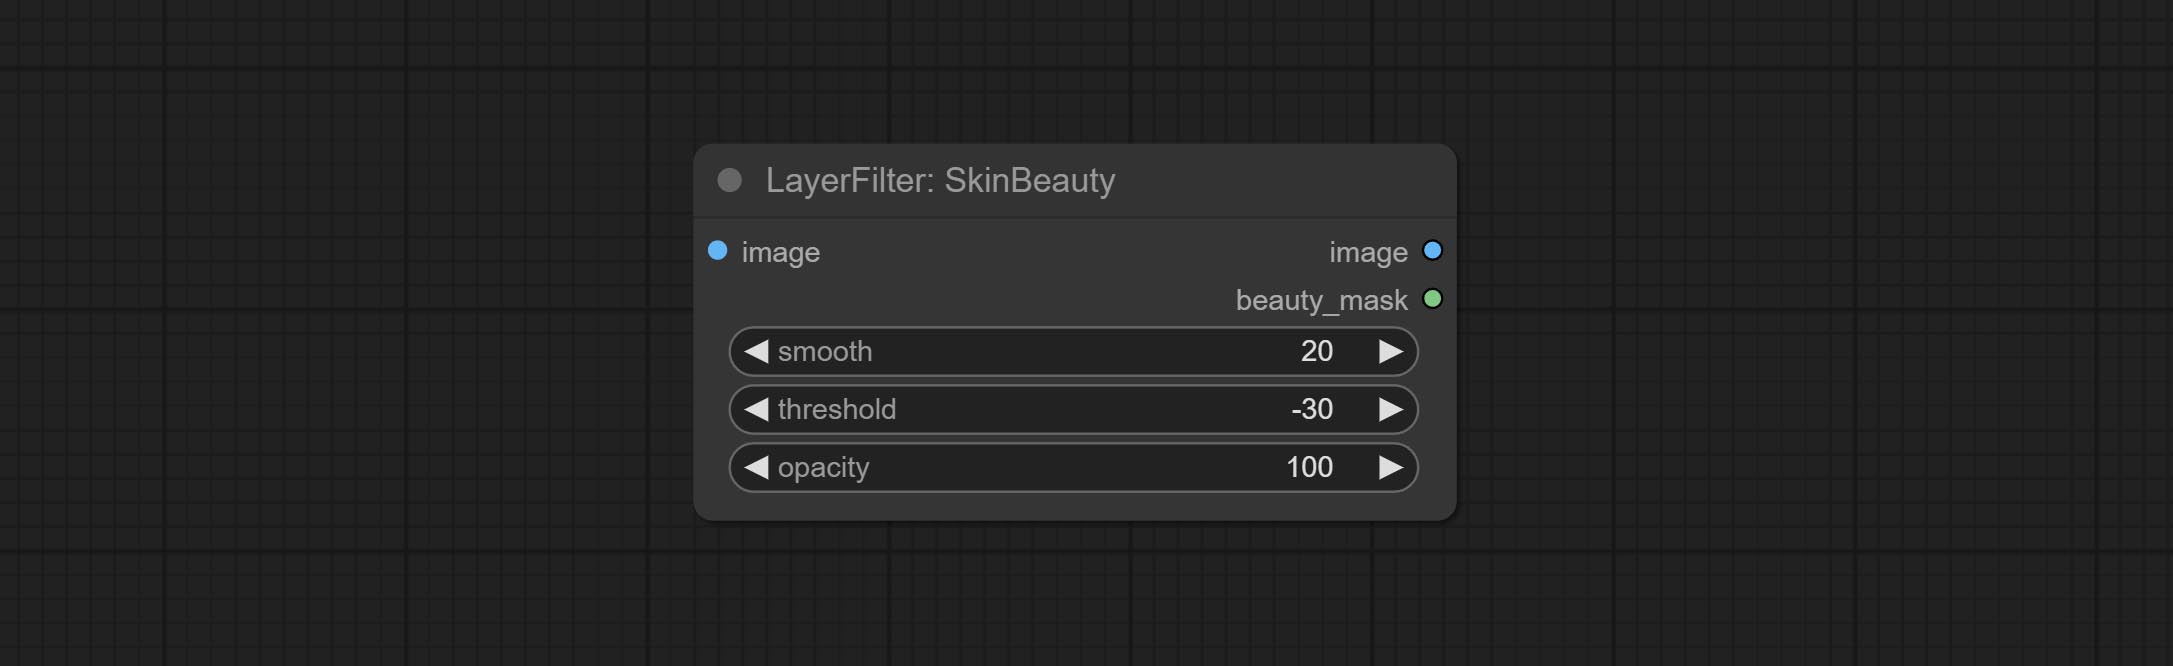
Watercolor painting effect 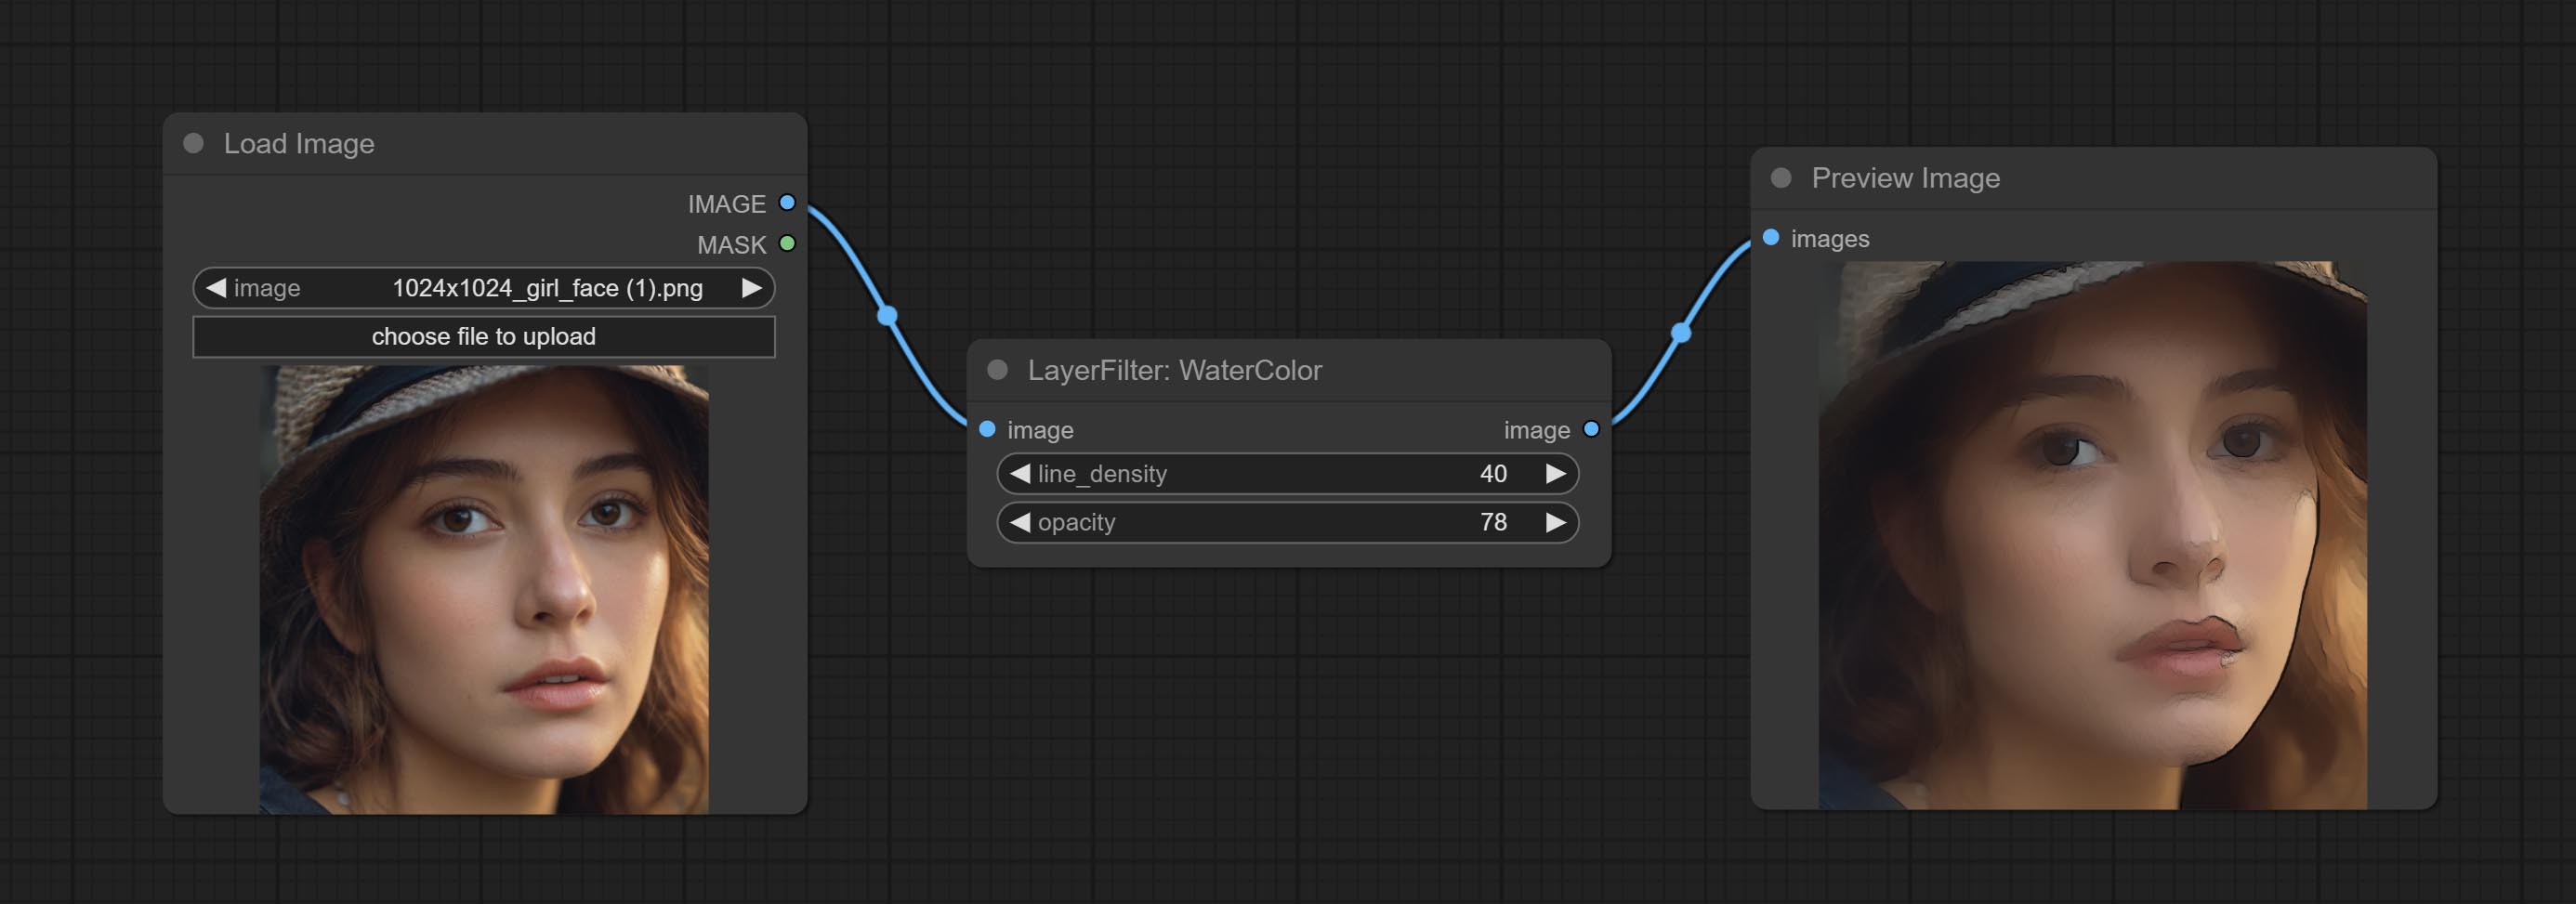
Node option: 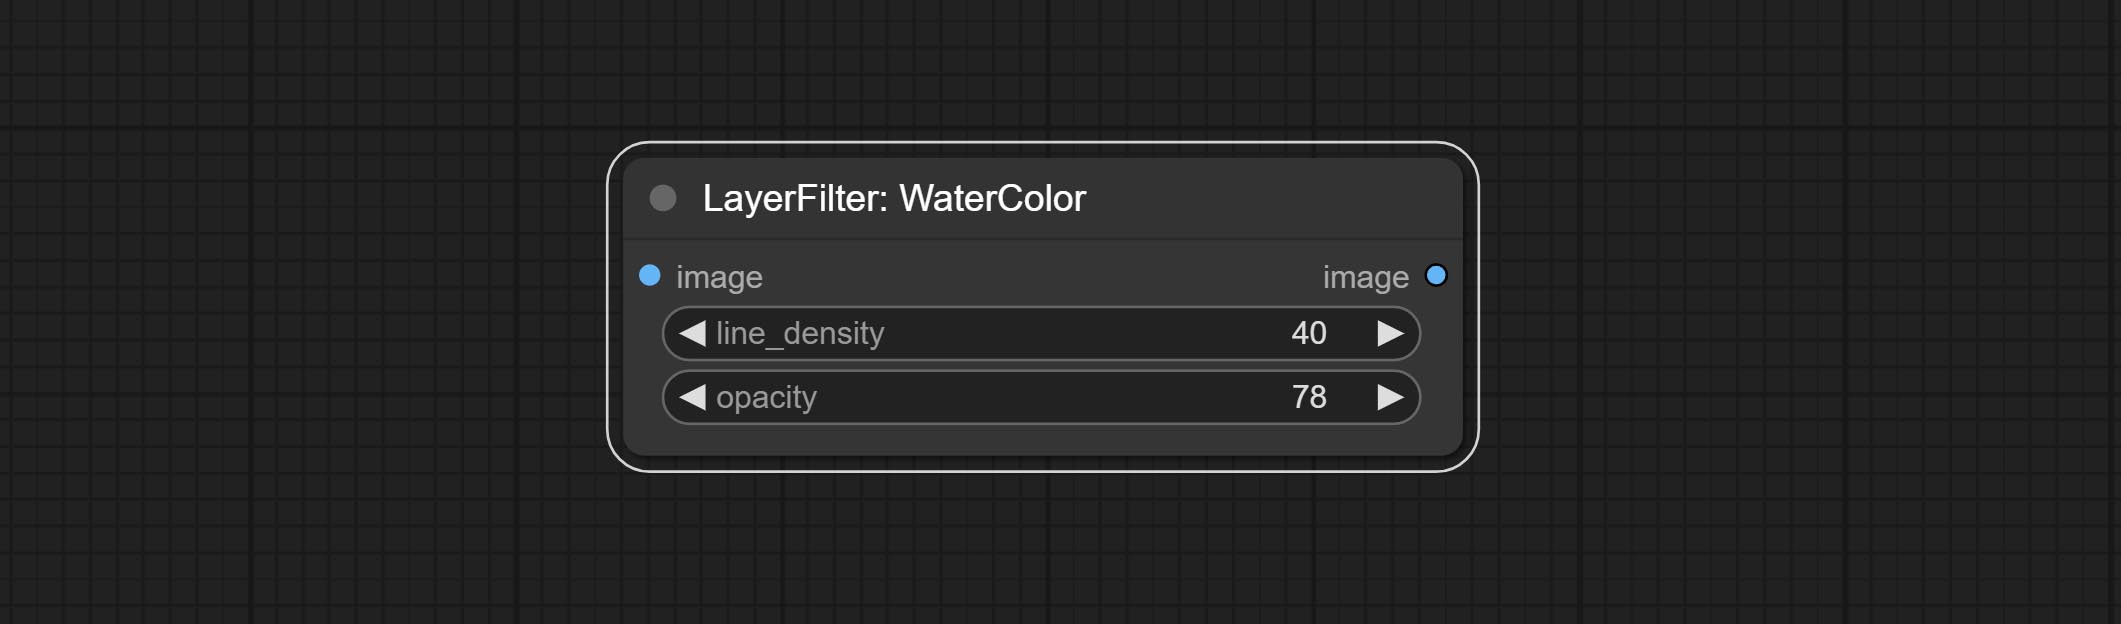
Soft light effect, the bright highlights on the screen appear blurry. 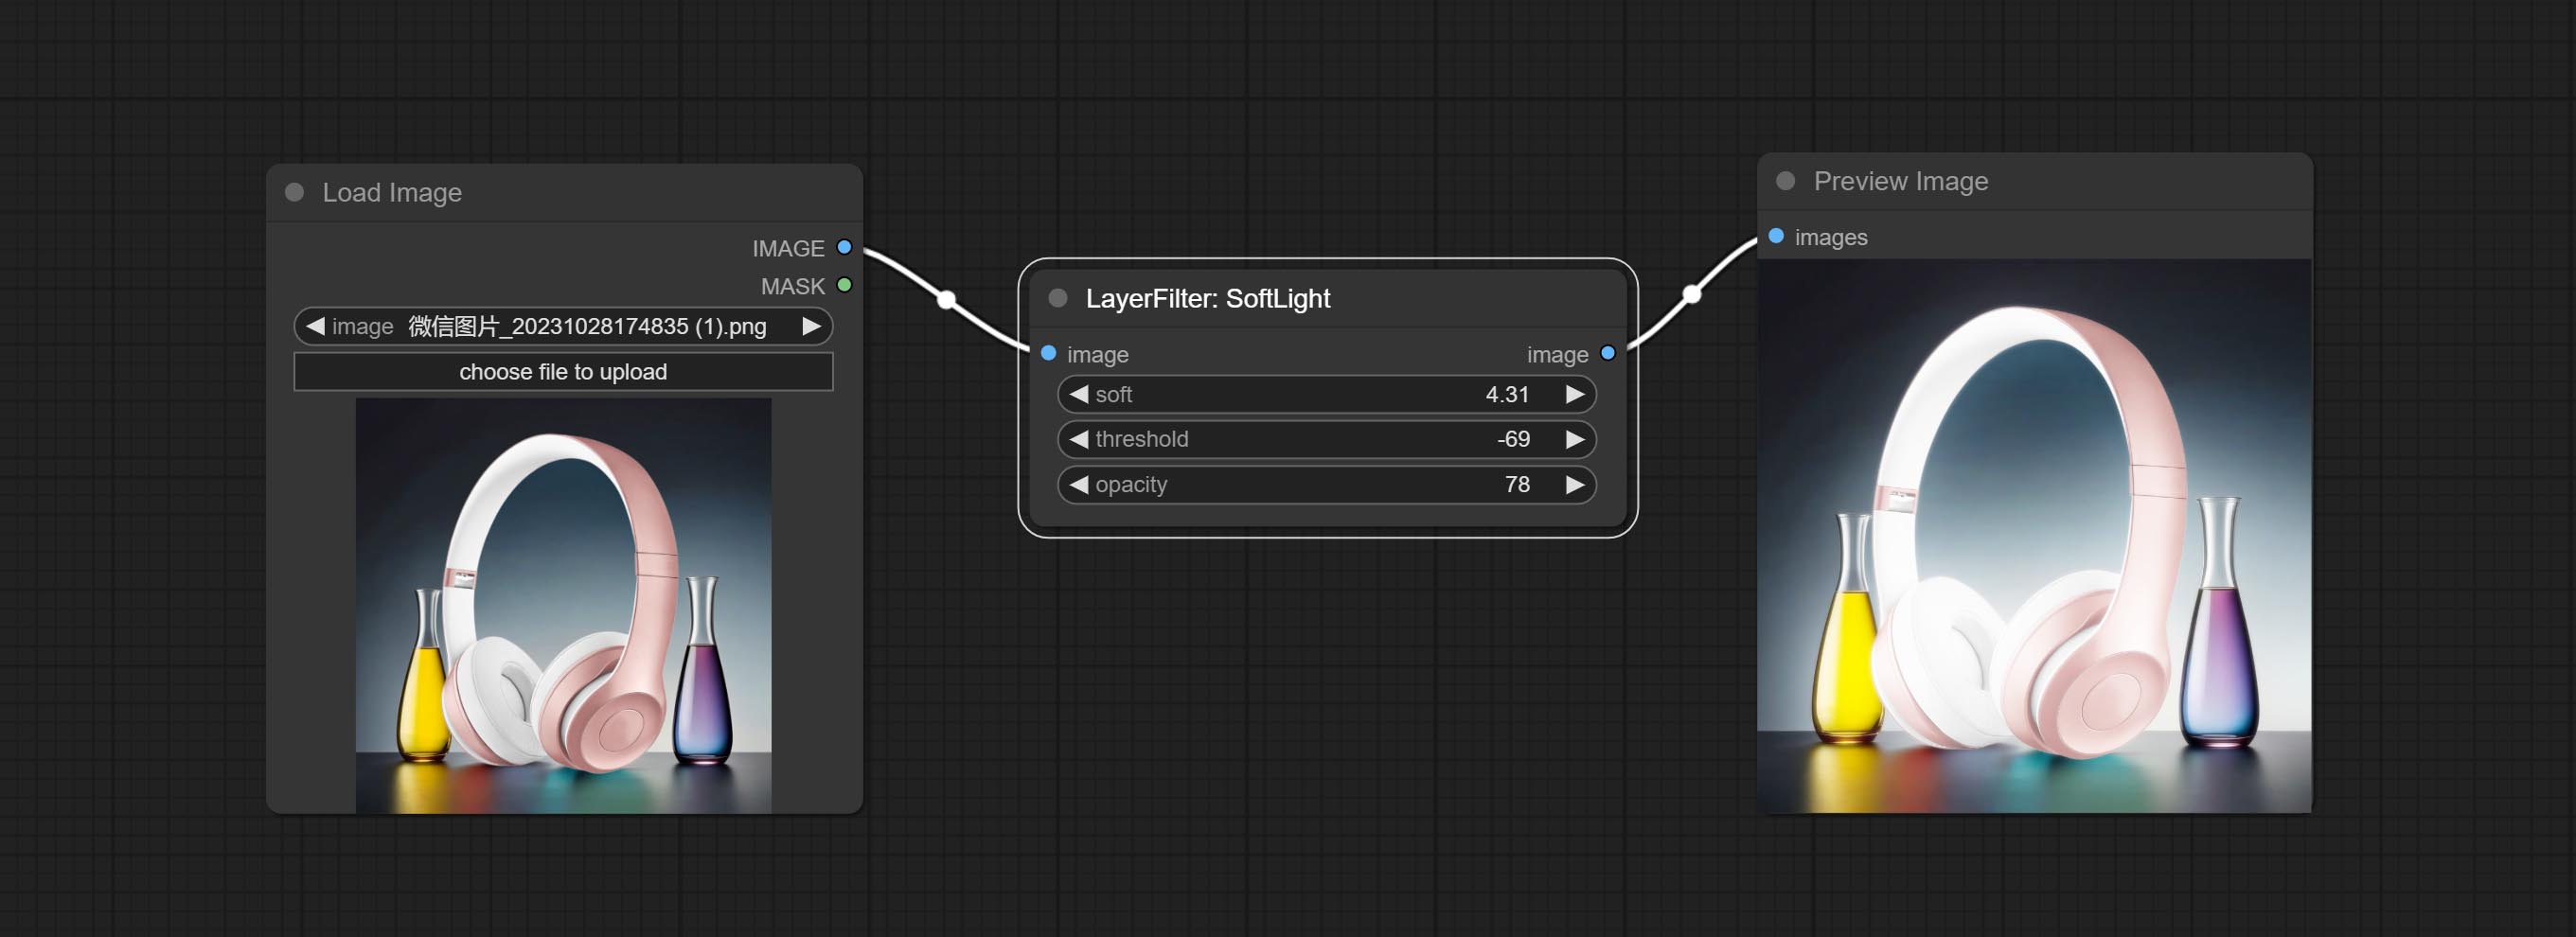
Node options: 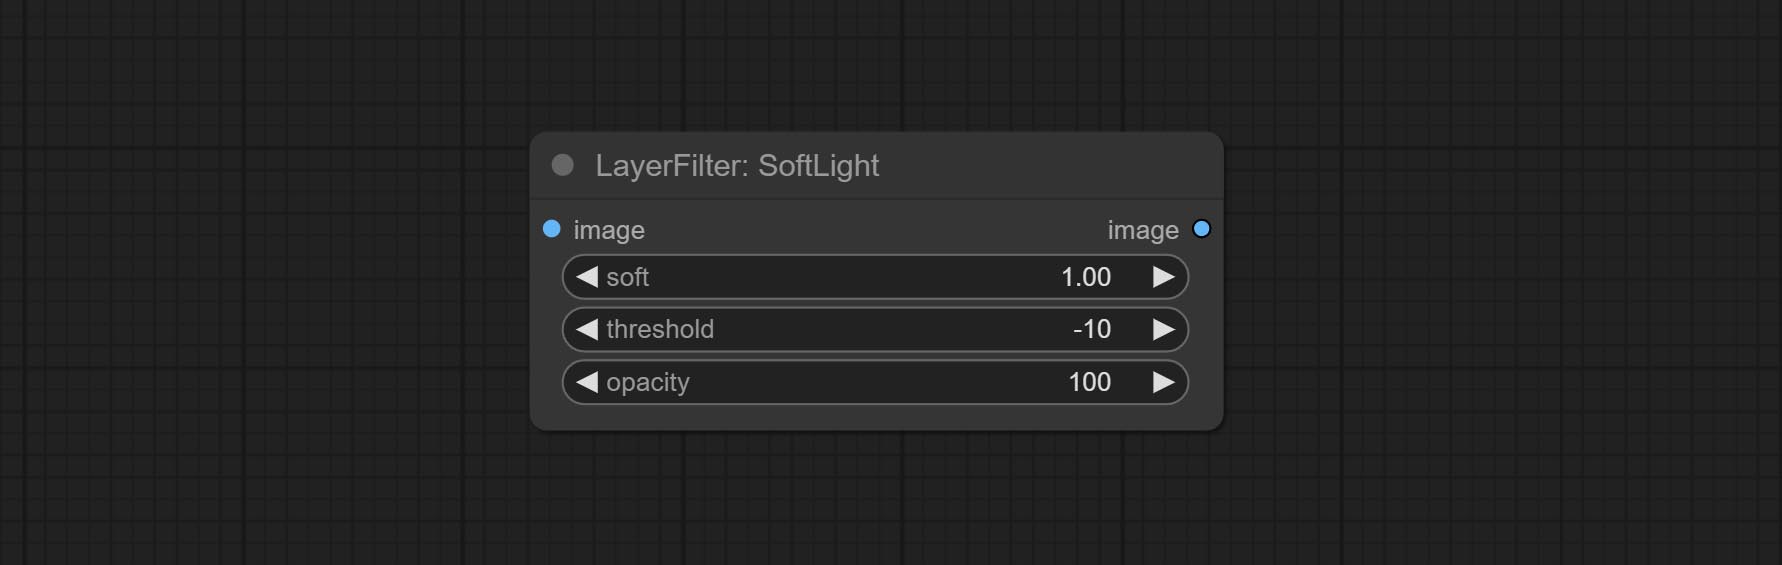
Channel misalignment. similar to the effect of Tiktok logo. 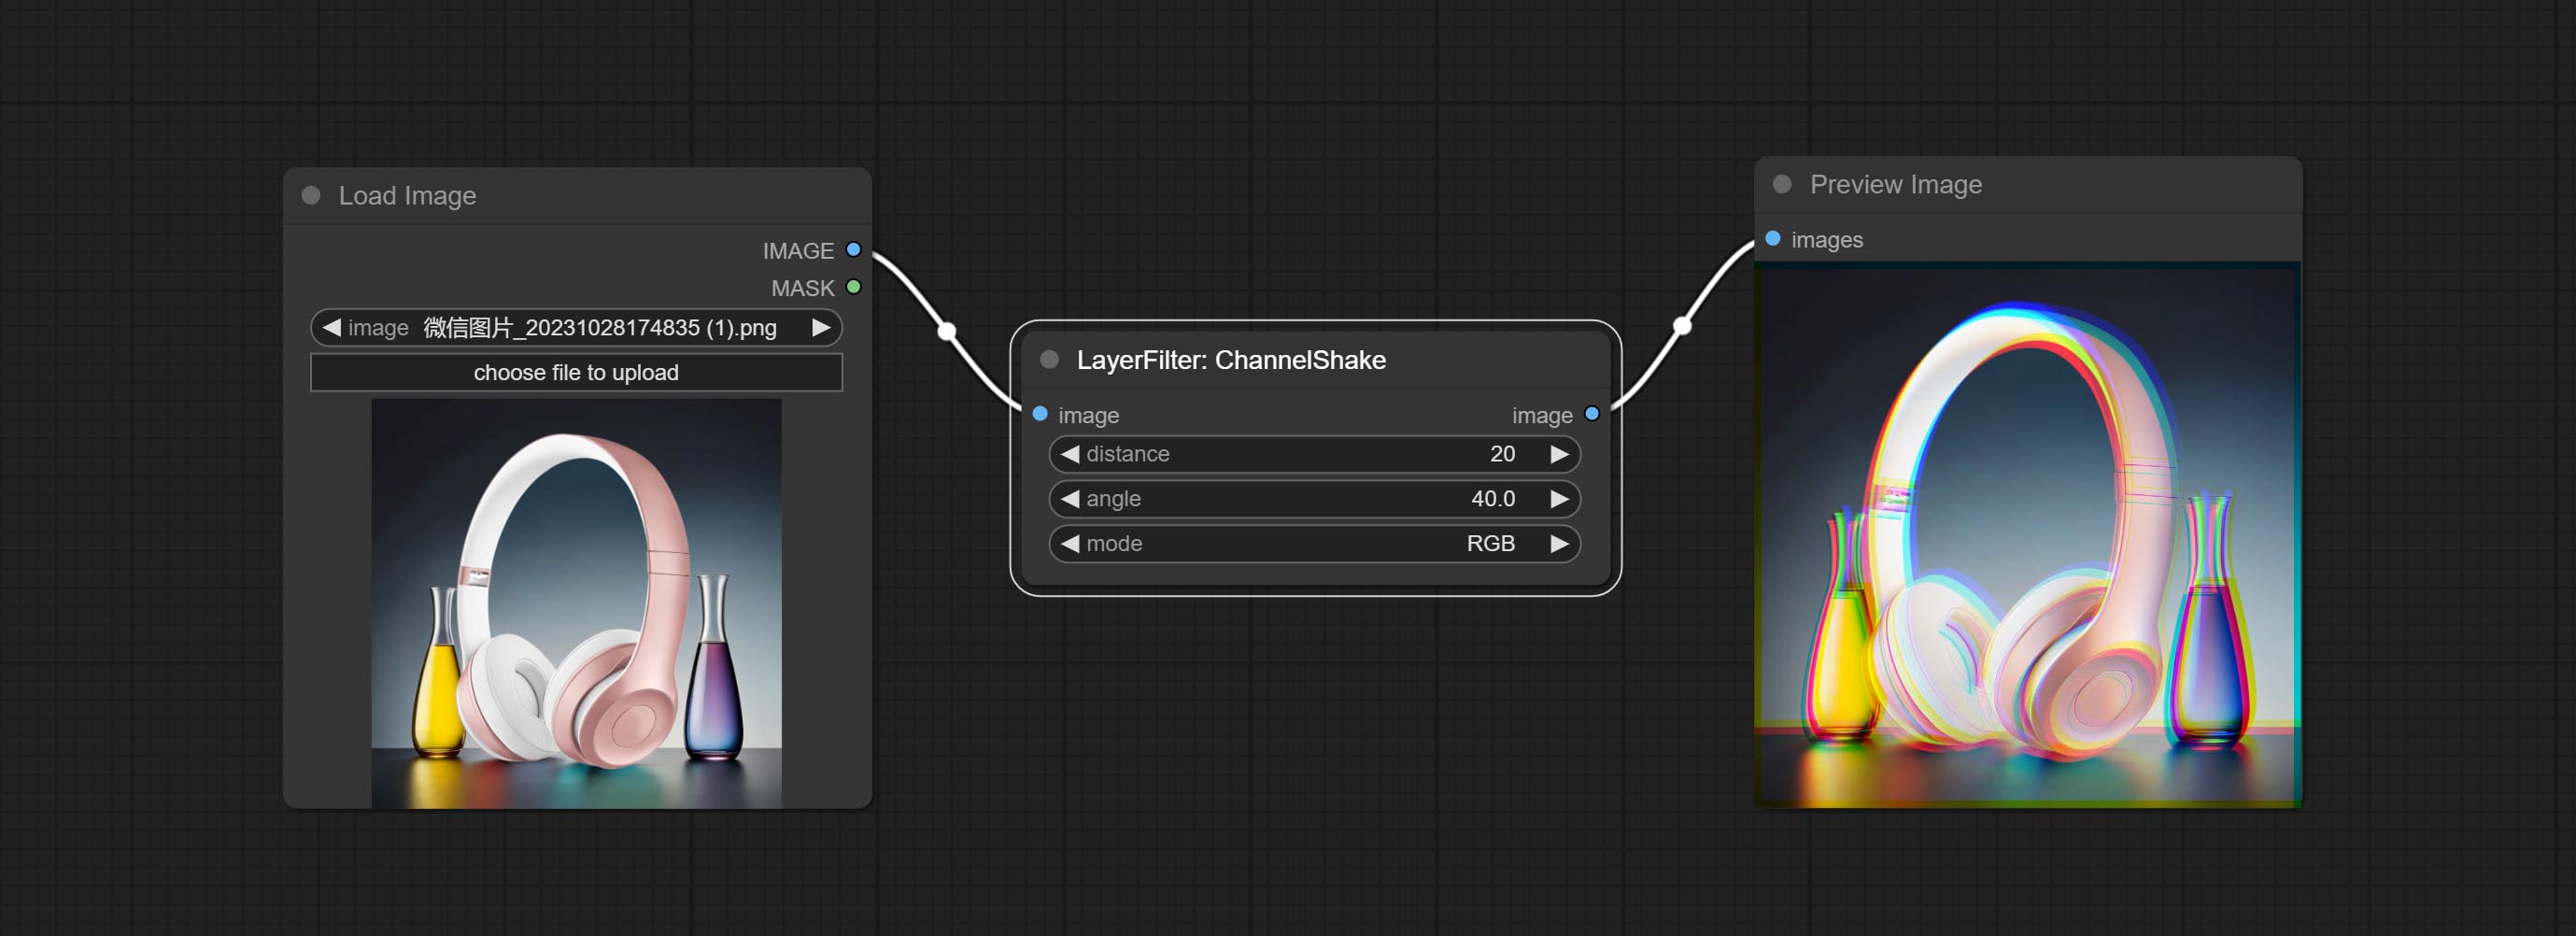
Node options: 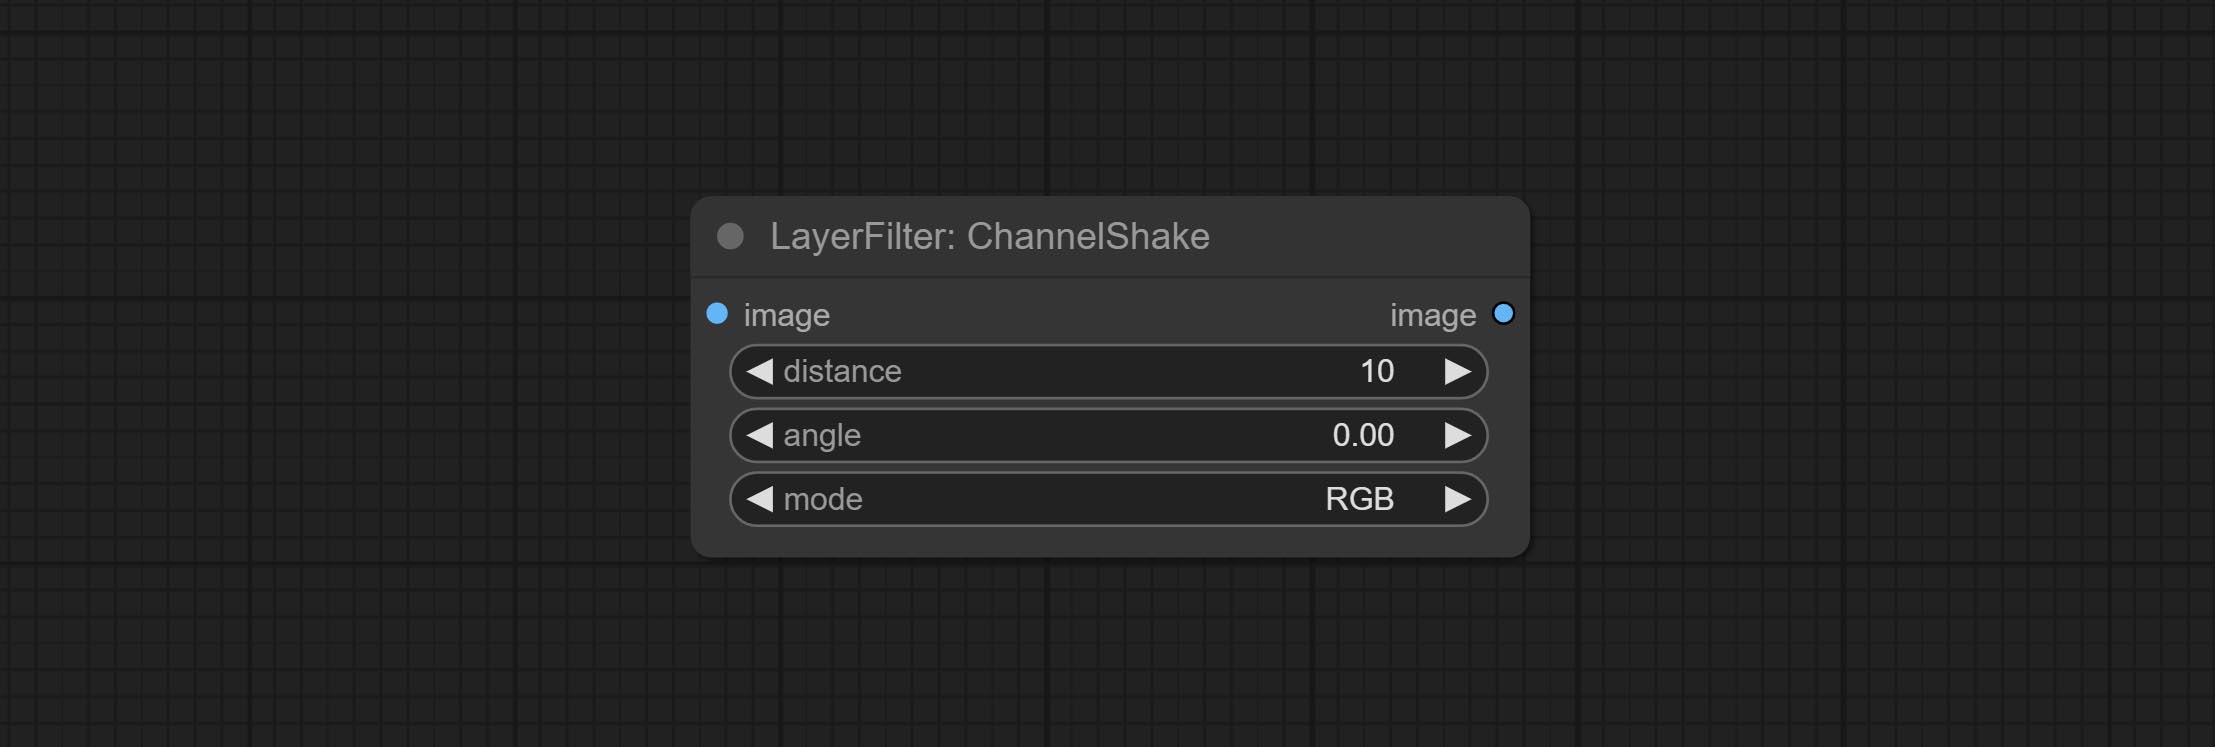
enhances the dynamic range and visual appeal of input images. This node is reorganize and encapsulate of HDR Effects (SuperBeasts.AI), thanks to the original author. 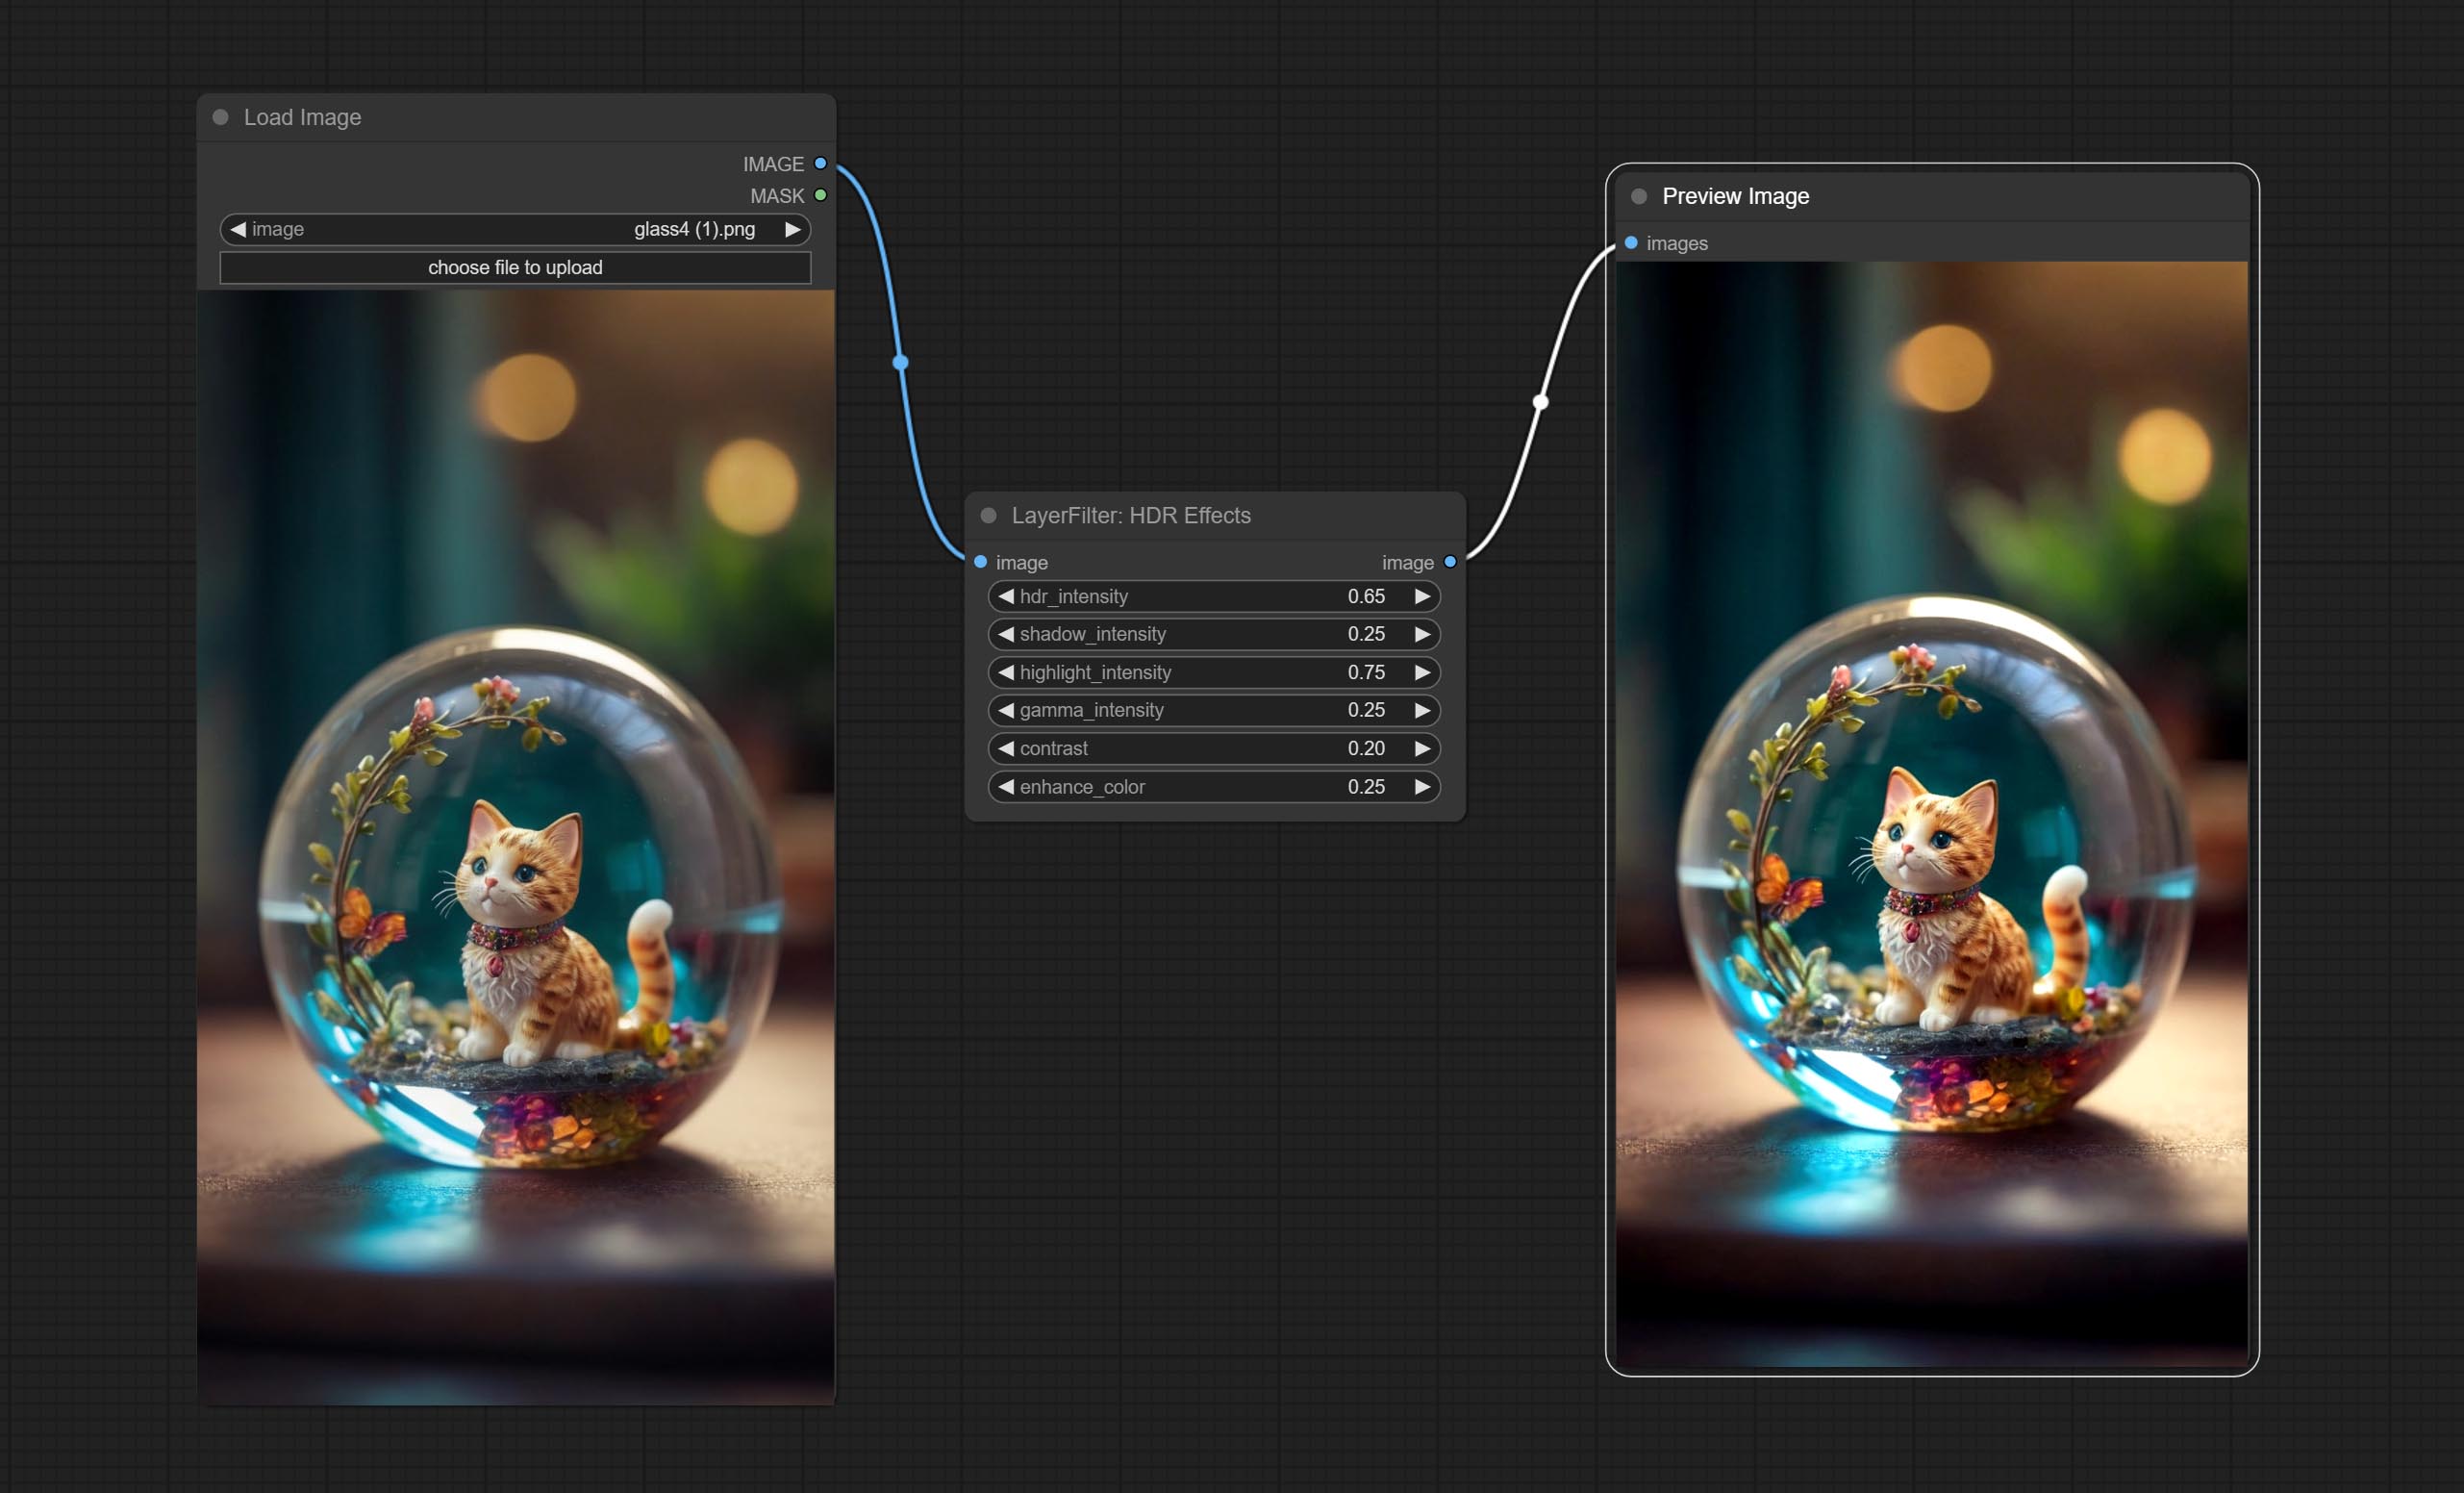
Node options: 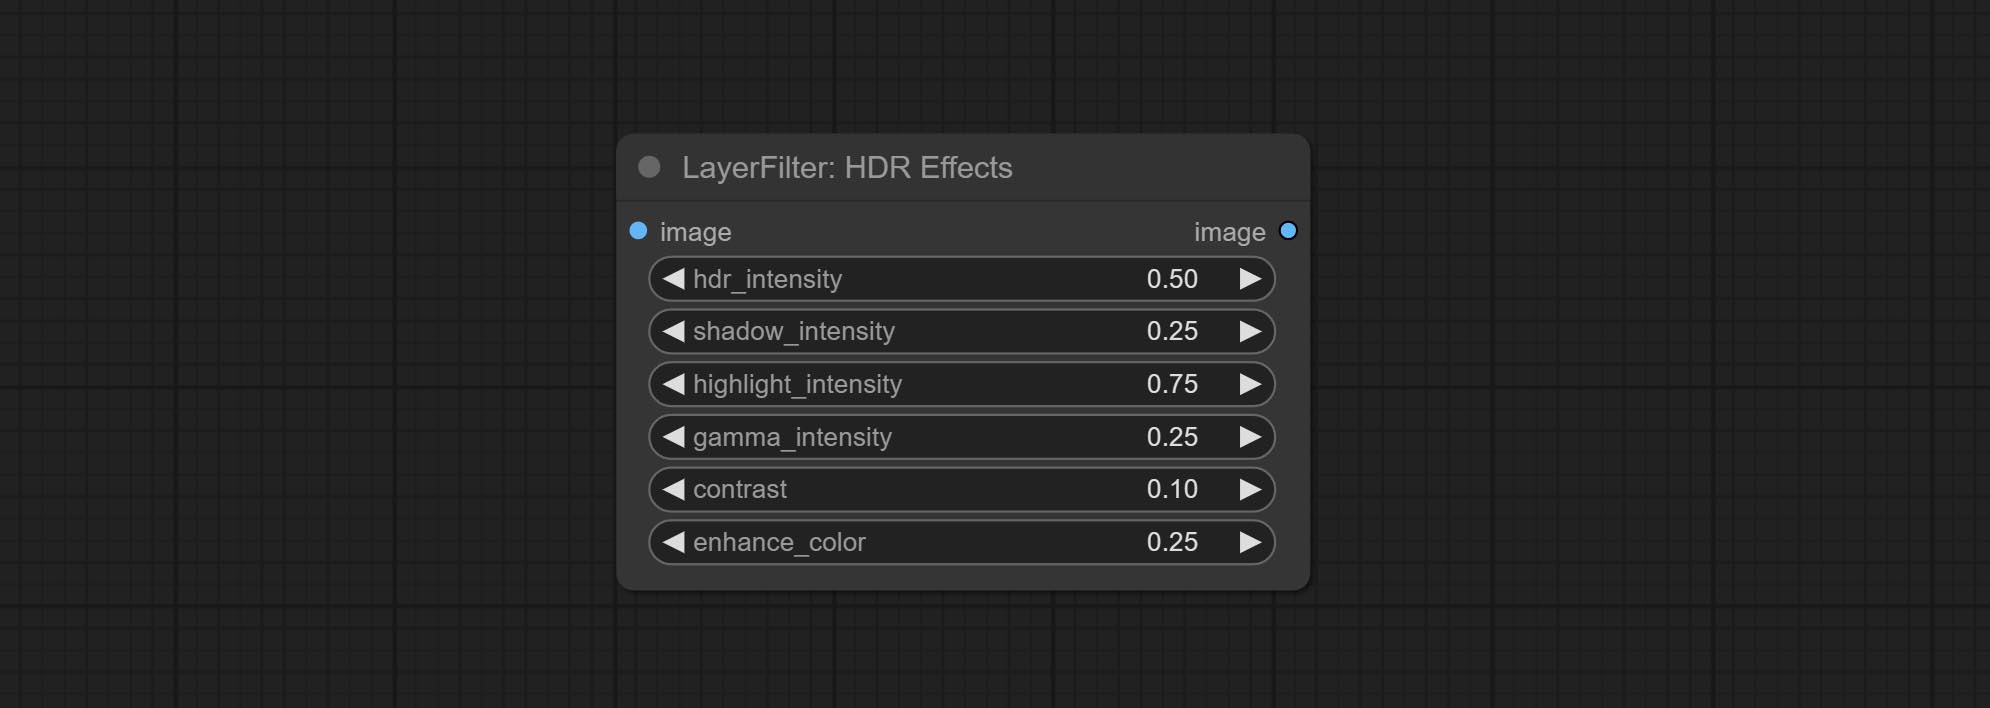
Simulate the grain, dark edge, and blurred edge of the film, support input depth map to simulate defocus.
This node is reorganize and encapsulate of digitaljohn/comfyui-propost, thanks to the original author. 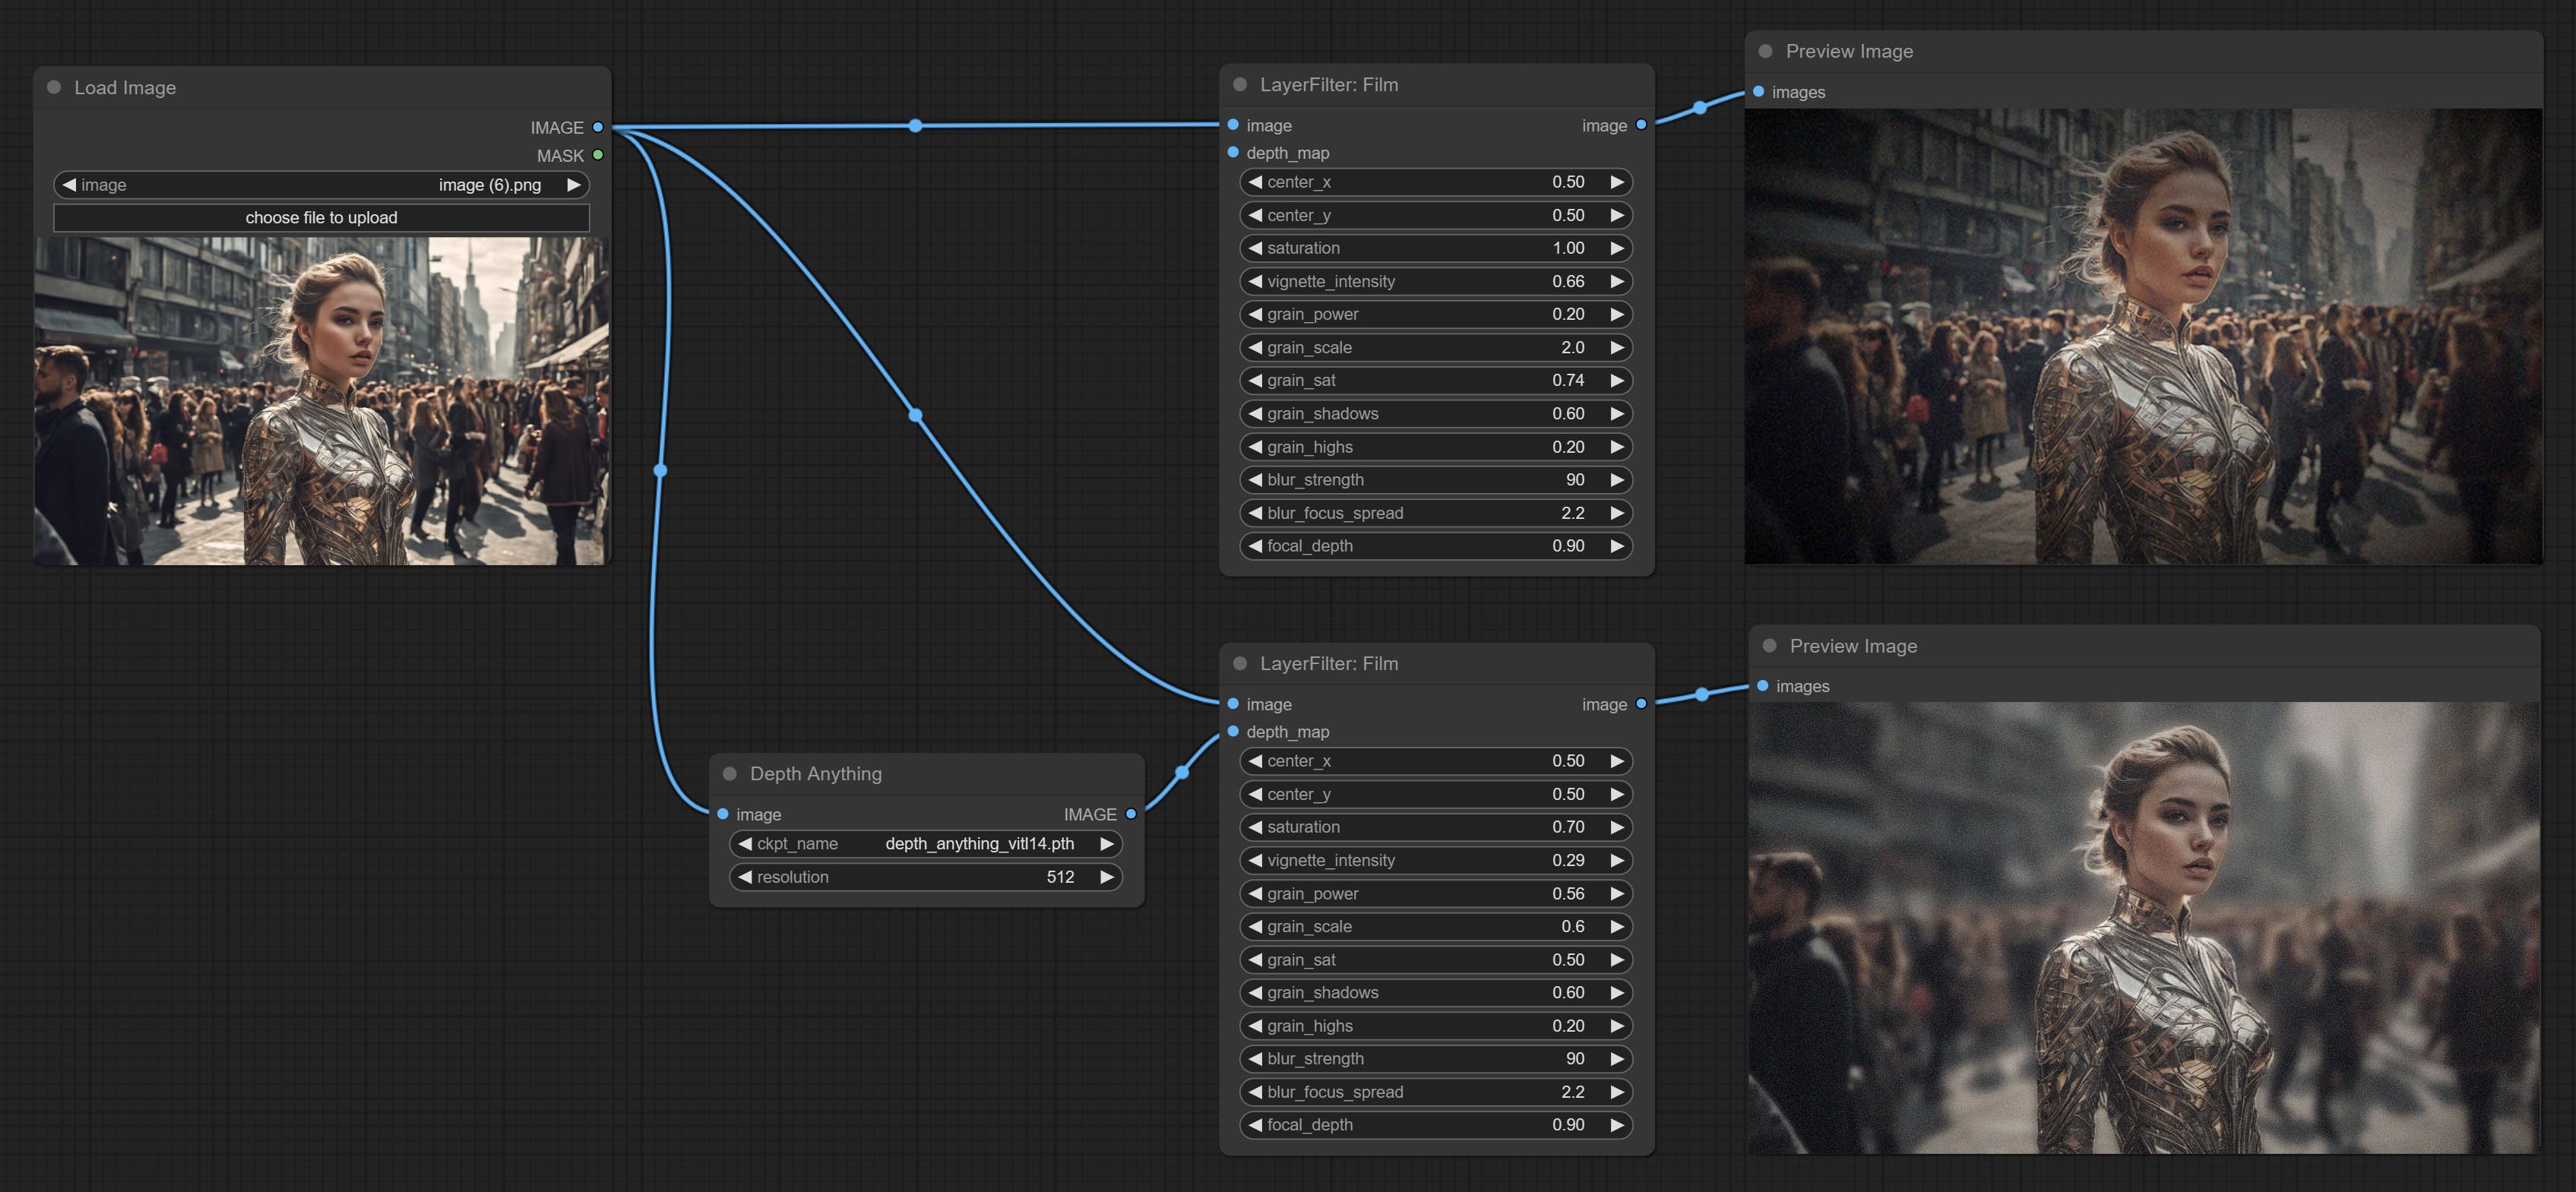
Node options: 
The upgraded version of the Film node adds the fastgrain method on the basis of the previous one, and the speed of generating noise is accelerated by 10 times. The code for fastgrain is from github.com/spacepxl/ComfyUI-Image-Filters BetterFilmGrain node, thanks to the original authors. 
Simulate the light leakage effect of the film. please download model file from Baidu Netdisk or [Google Drive]([light_leak.pkl(Google Drive)(https://drive.google.com/file/d/1DcH2Zkyj7W3OiAeeGpJk1eaZpdJwdCL-/view?usp=sharing)) and copy to ComfyUI/models/layerstyle folder. 
Node options: 
Pseudo color heat map effect. 
Node options: 
Make the image motion blur 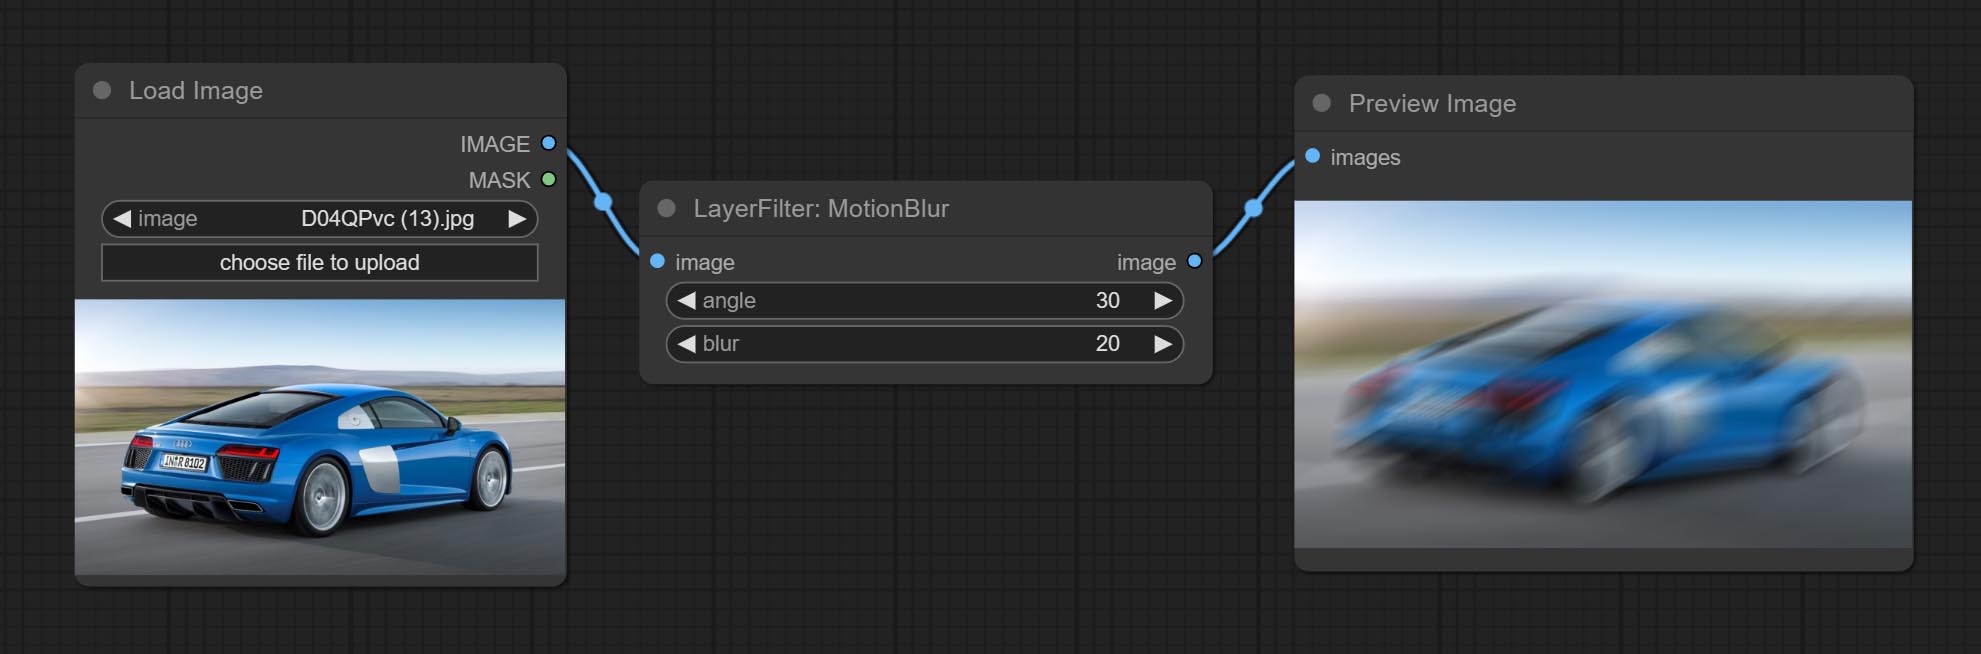
Node options:
Make the image gaussian blur 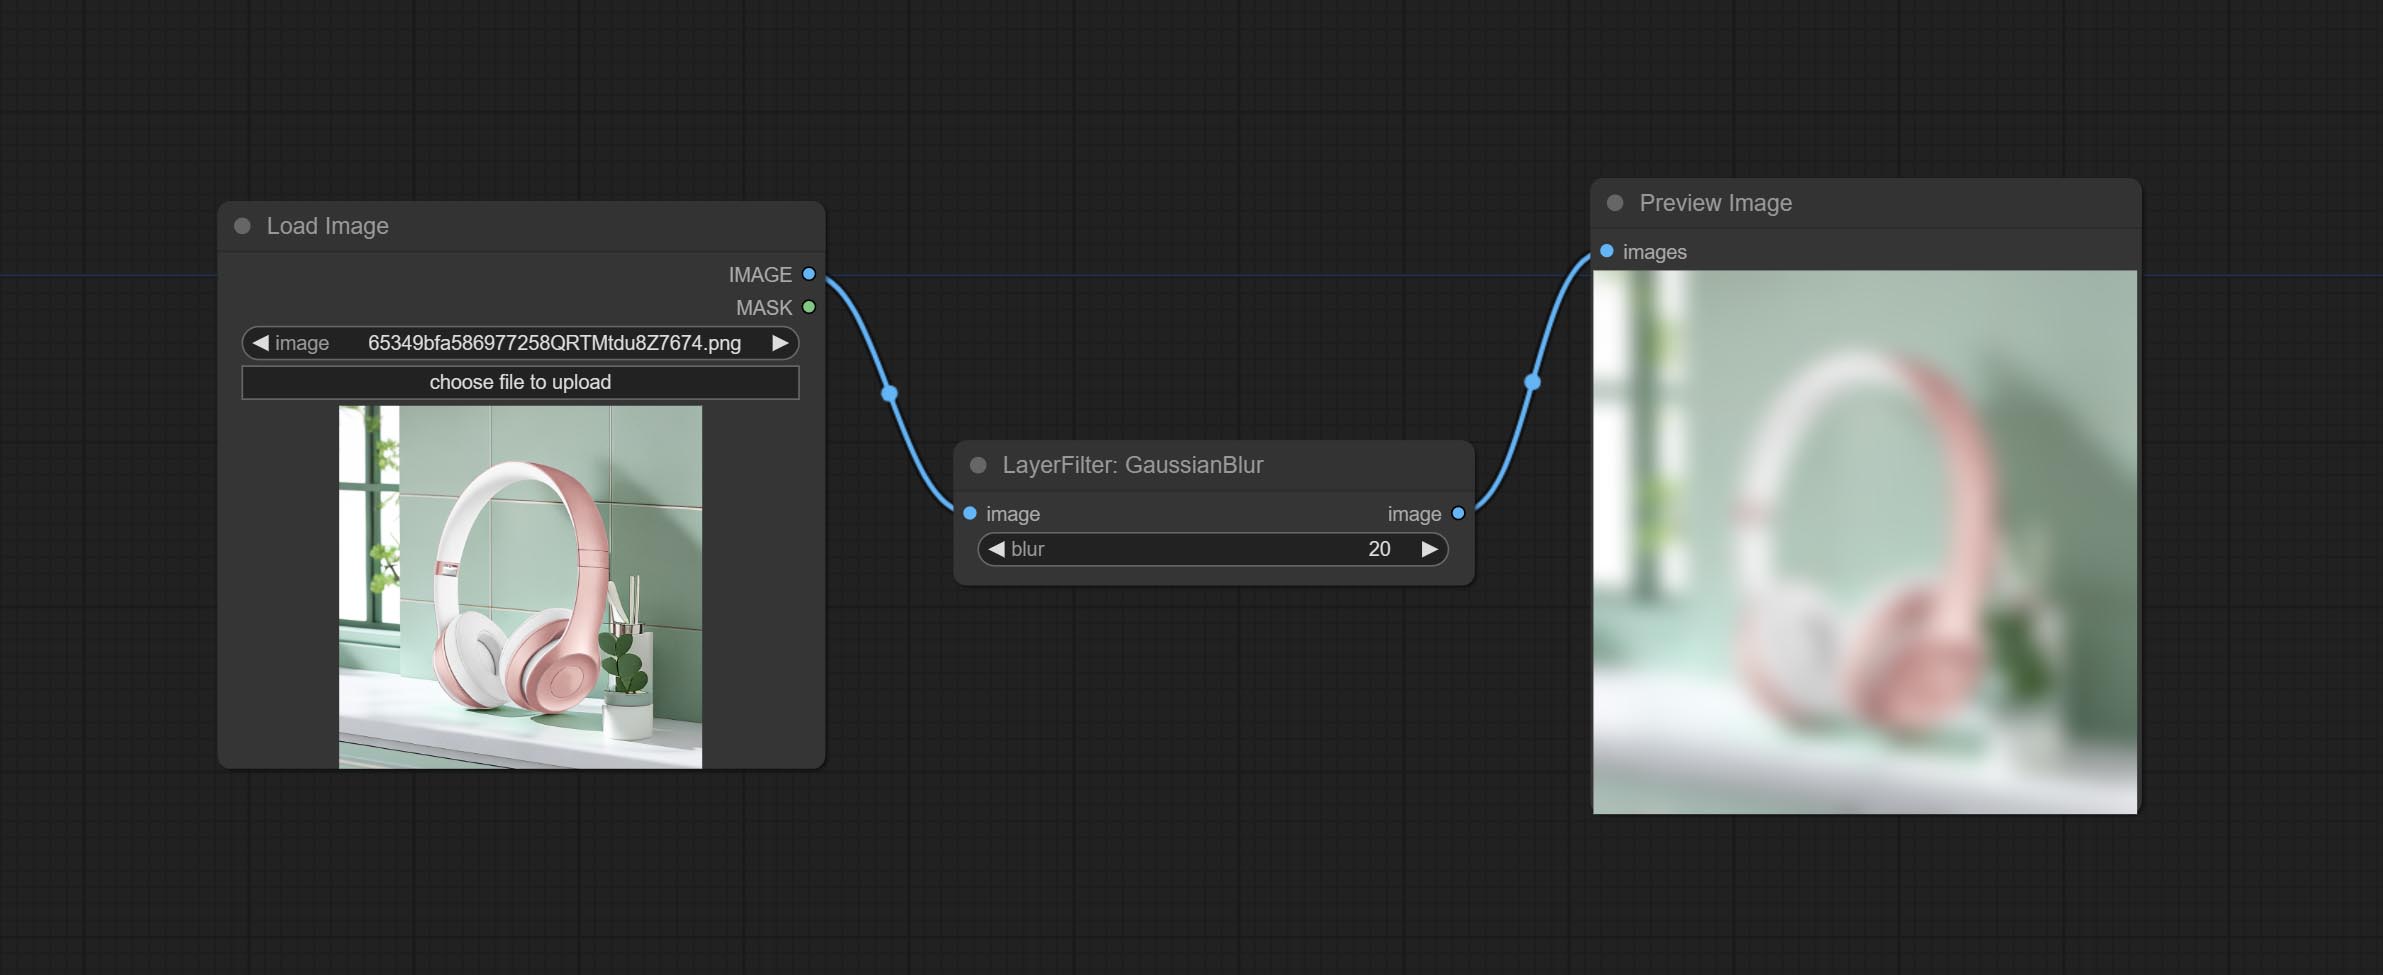
Node options:
Gaussian blur. Change the parameter precision to floating-point number, with a precision of 0.01
Node options: 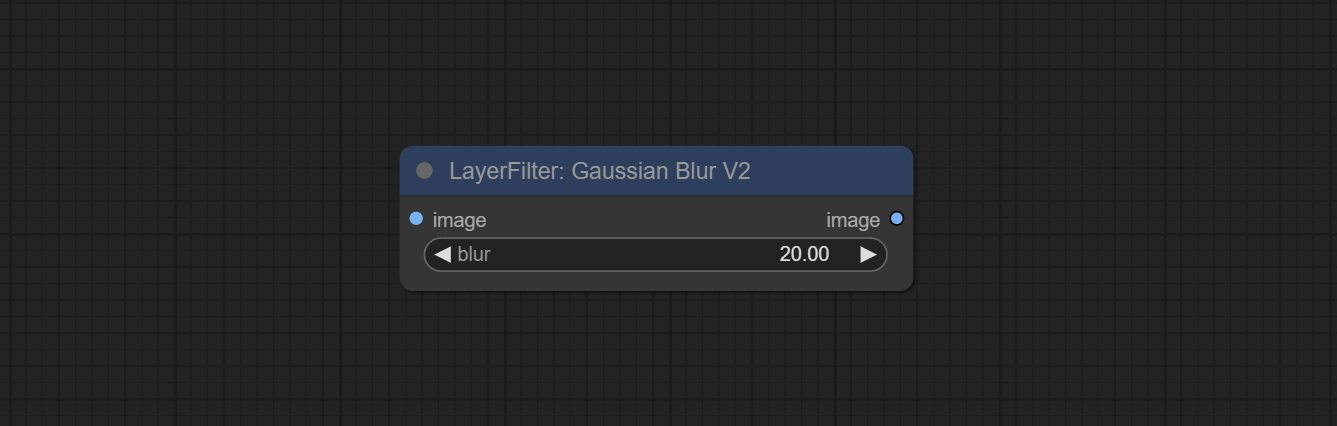
Add noise to the picture. 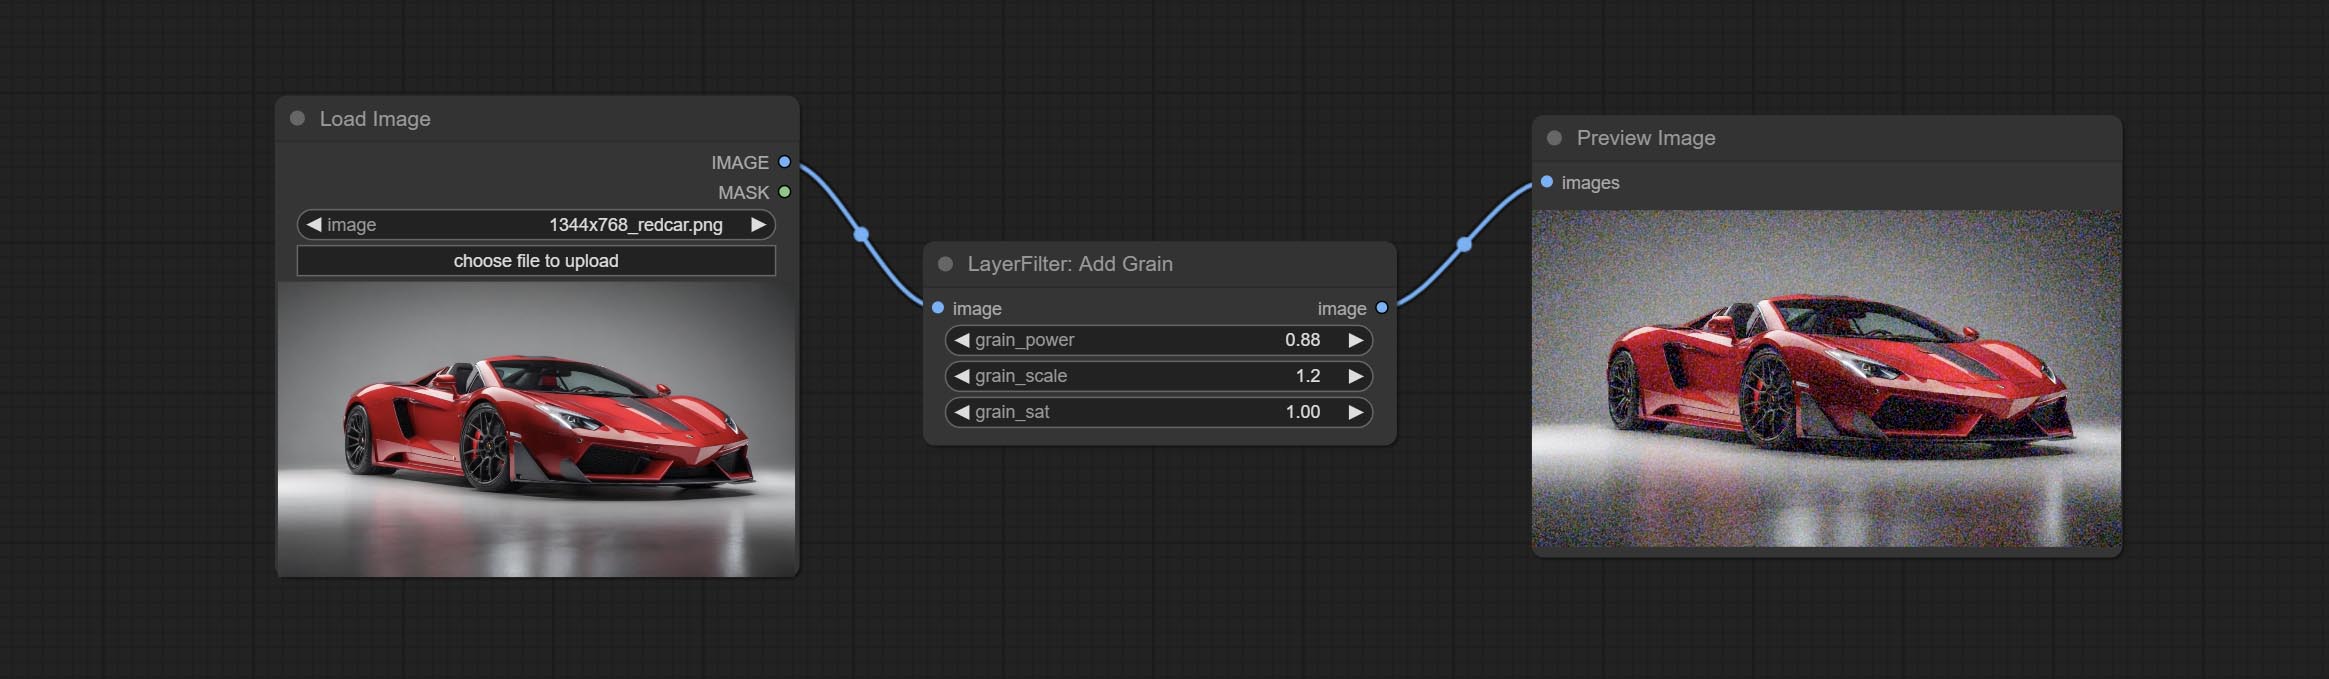
Node Options: 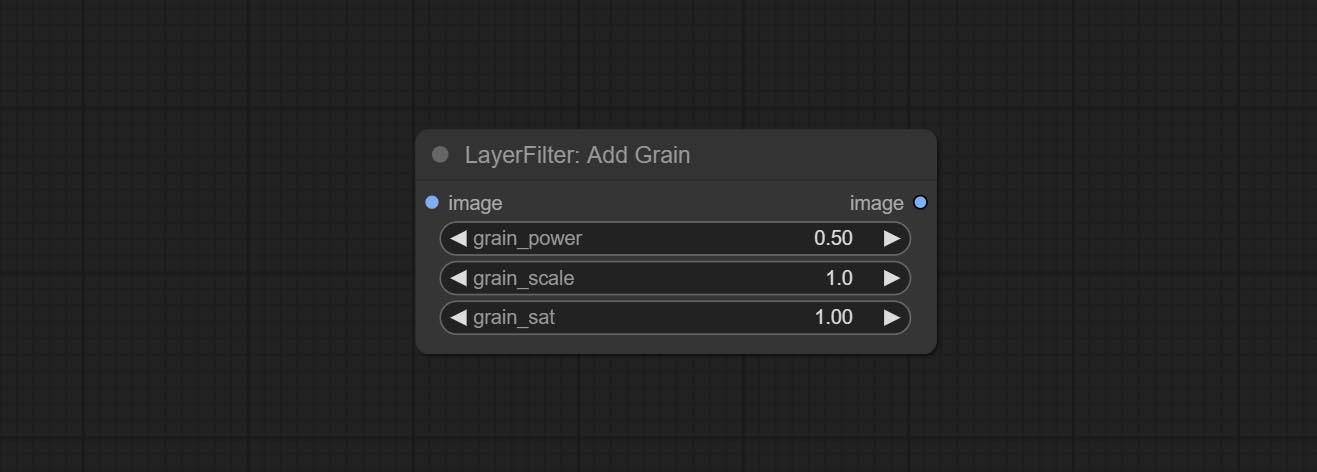
1 The layer_image, layer_mask and the background_image(if have input), These three items must be of the same size.
2 The mask not a mandatory input item. the alpha channel of the image is used by default. If the image input does not include an alpha channel, the entire image's alpha channel will be automatically created. if have masks input simultaneously, the alpha channel will be overwrite by the mask.
3 The Blend Mode include normal, multply, screen, add, subtract, difference, darker, color_burn, color_dodge, linear_burn, linear_dodge, overlay, soft_light, hard_light, vivid_light, pin_light, linear_light, and hard_mix. all of 19 blend modes in total.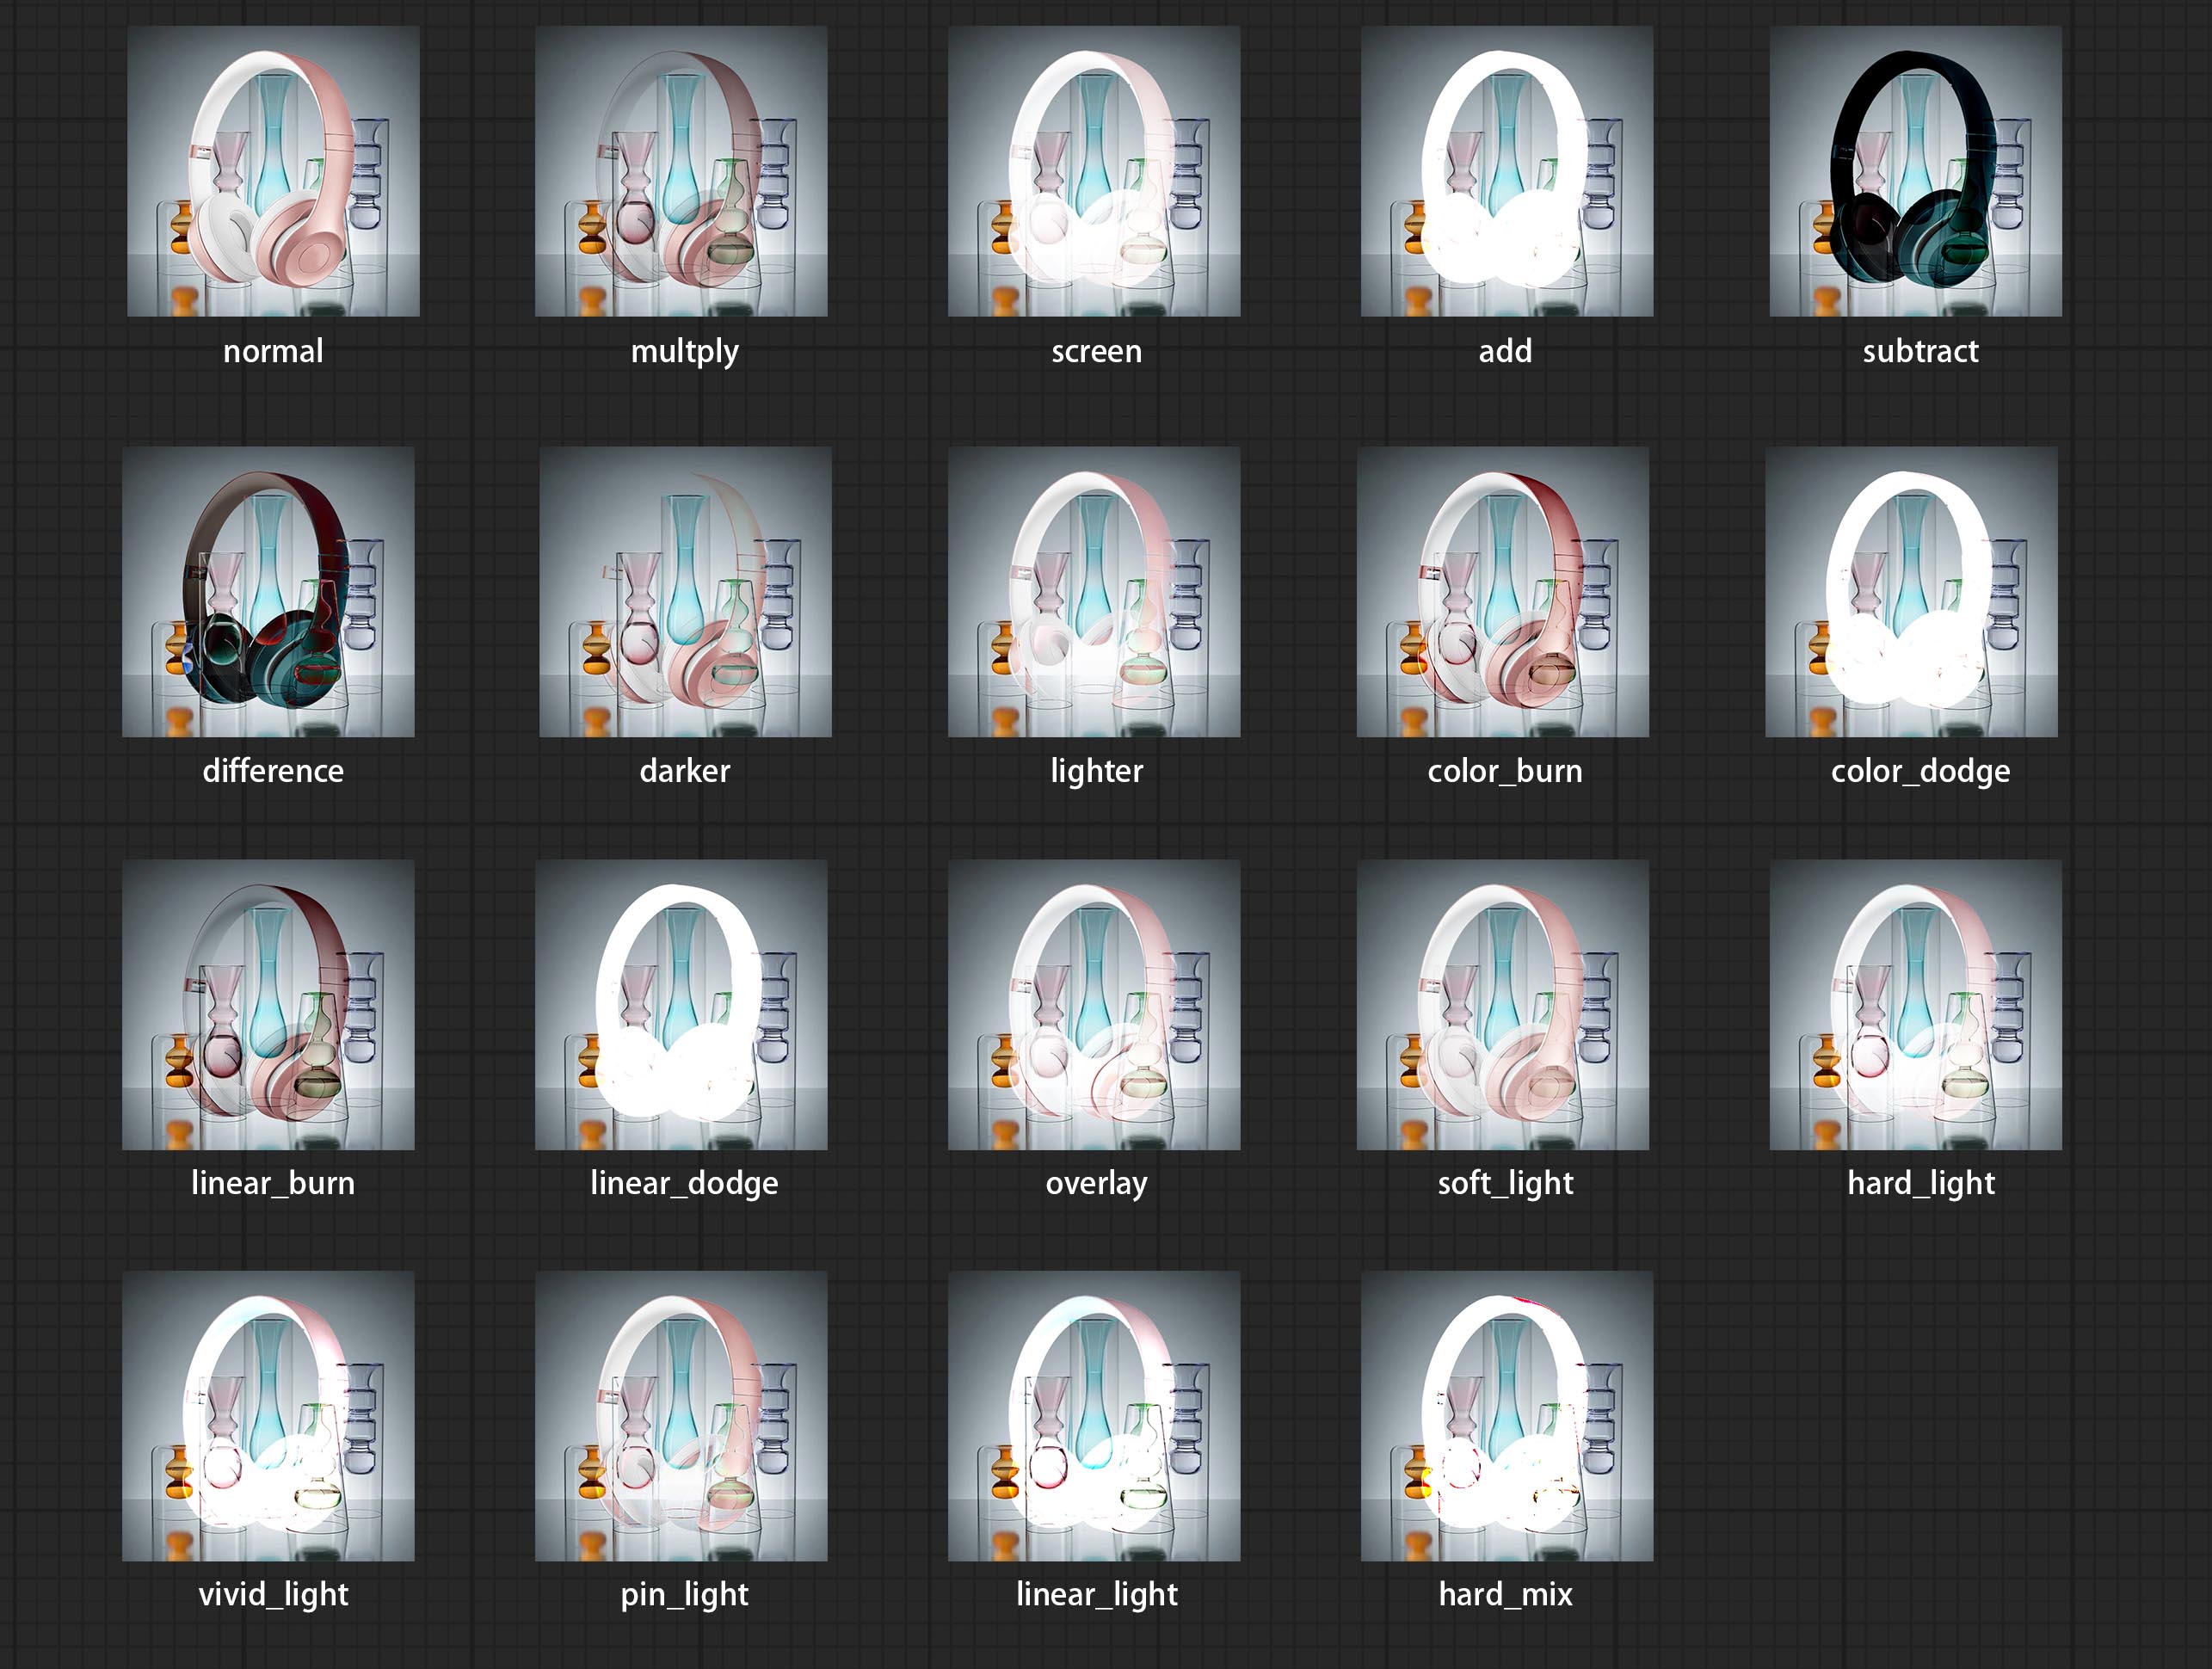
*Preview of the blend mode
3 The BlendModeV2 include normal, dissolve, darken, multiply, color burn, linear burn, darker color, lighten, screen, color dodge, linear dodge(add), lighter color, dodge, overlay, soft light, hard light, vivid light, linear light, pin light, hard mix, difference, exclusion, subtract, divide, hue, saturation, color, luminosity, grain extract, grain merge all of 30 blend modes in total.
Part of the code for BlendMode V2 is from Virtuoso Nodes for ComfyUI. Thanks to the original authors.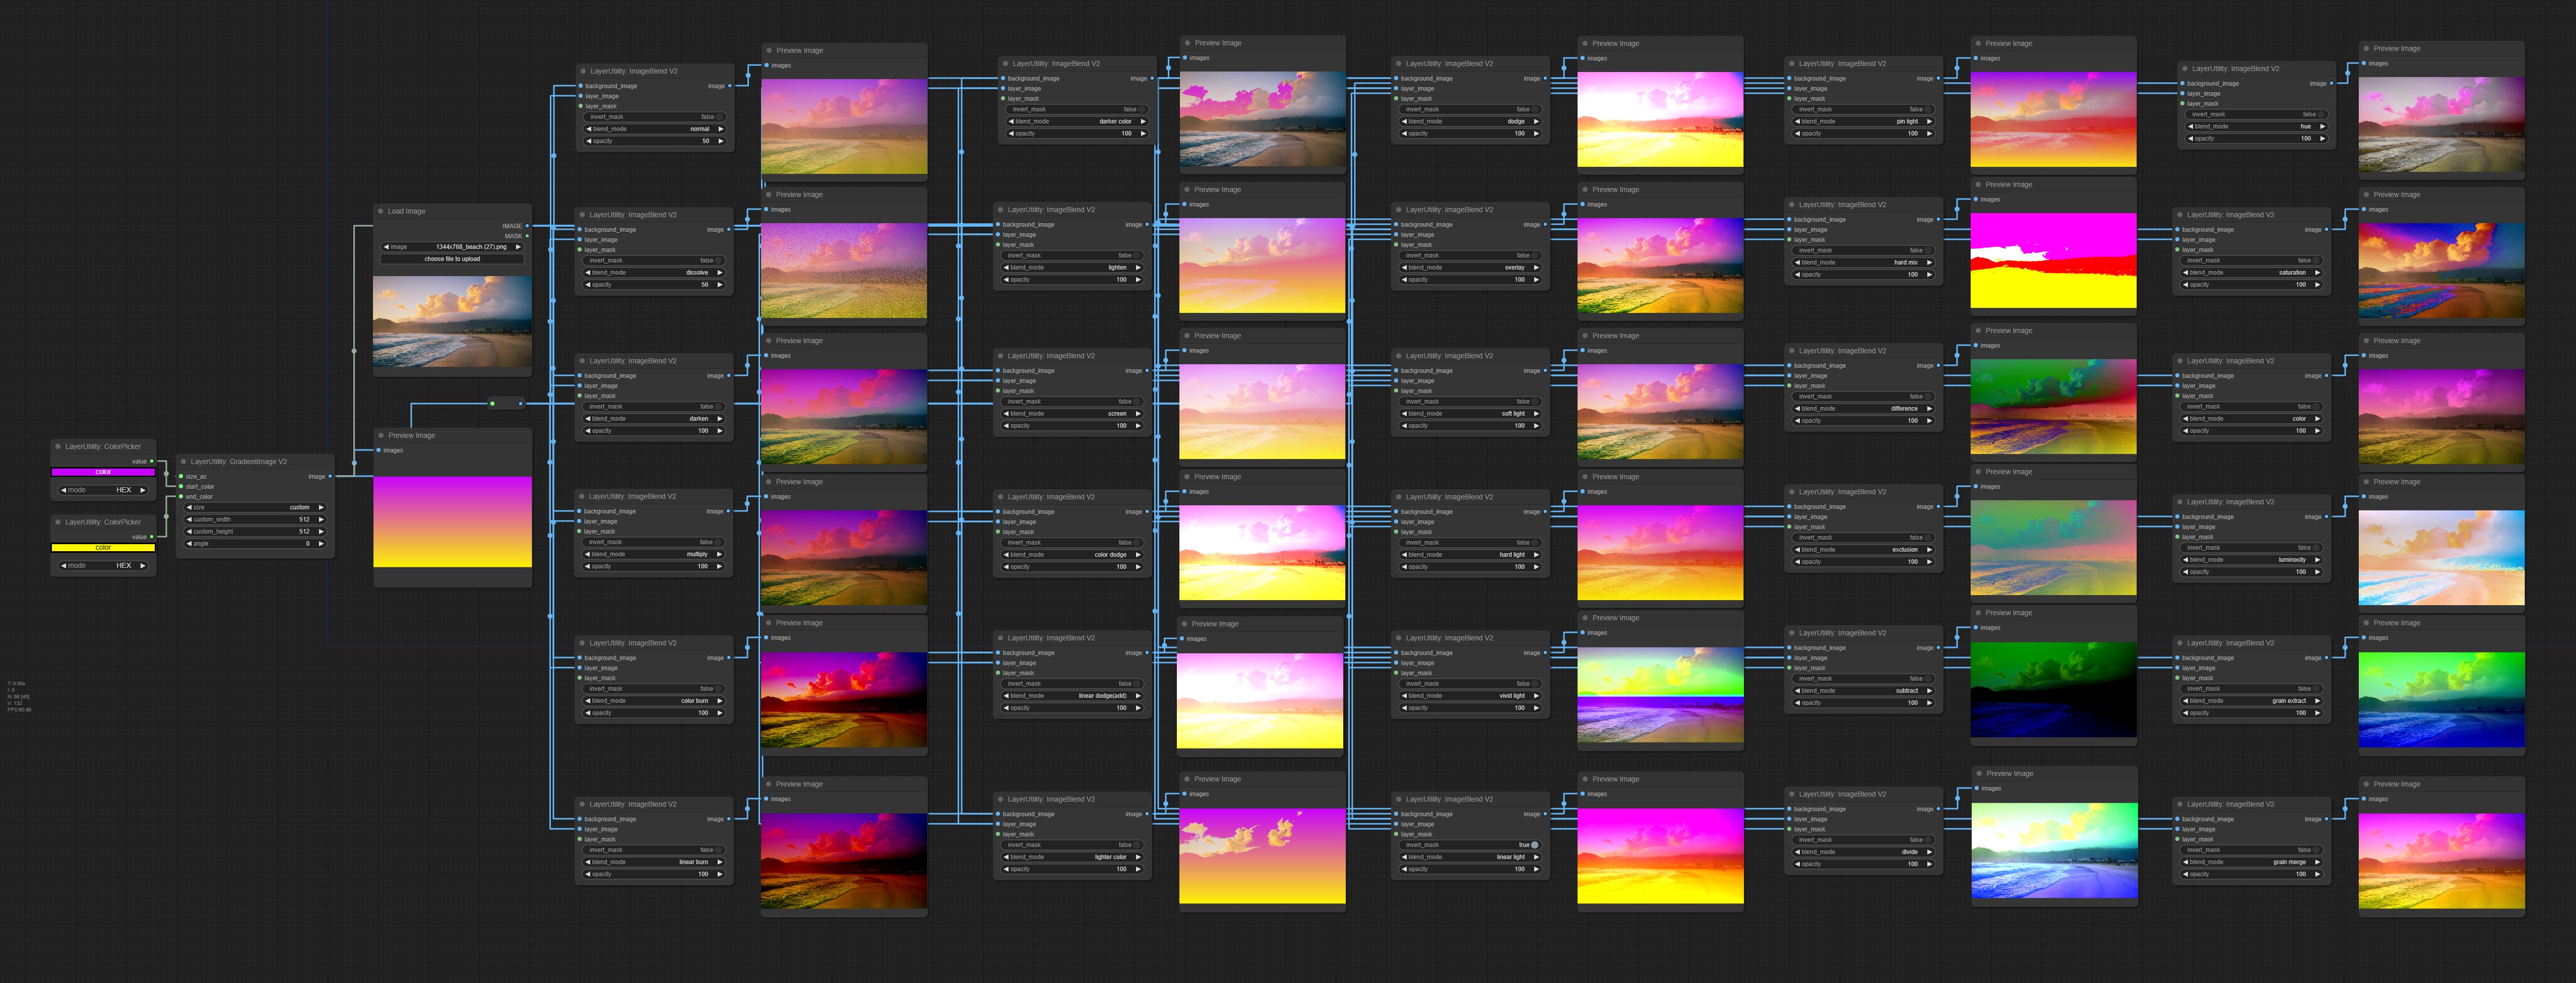
*Preview of the Blend Mode V2
4 The RGB color described by hexadecimal RGB format, like '#FA3D86'.
5 The layer_image and layer_mask must be of the same size.
LayerStyle nodes follows the MIT license, Some of its functional code comes from other open-source projects. Thanks to the original author. If used for commercial purposes, please refer to the original project license to authorization agreement.


