all in one
v9.8.0
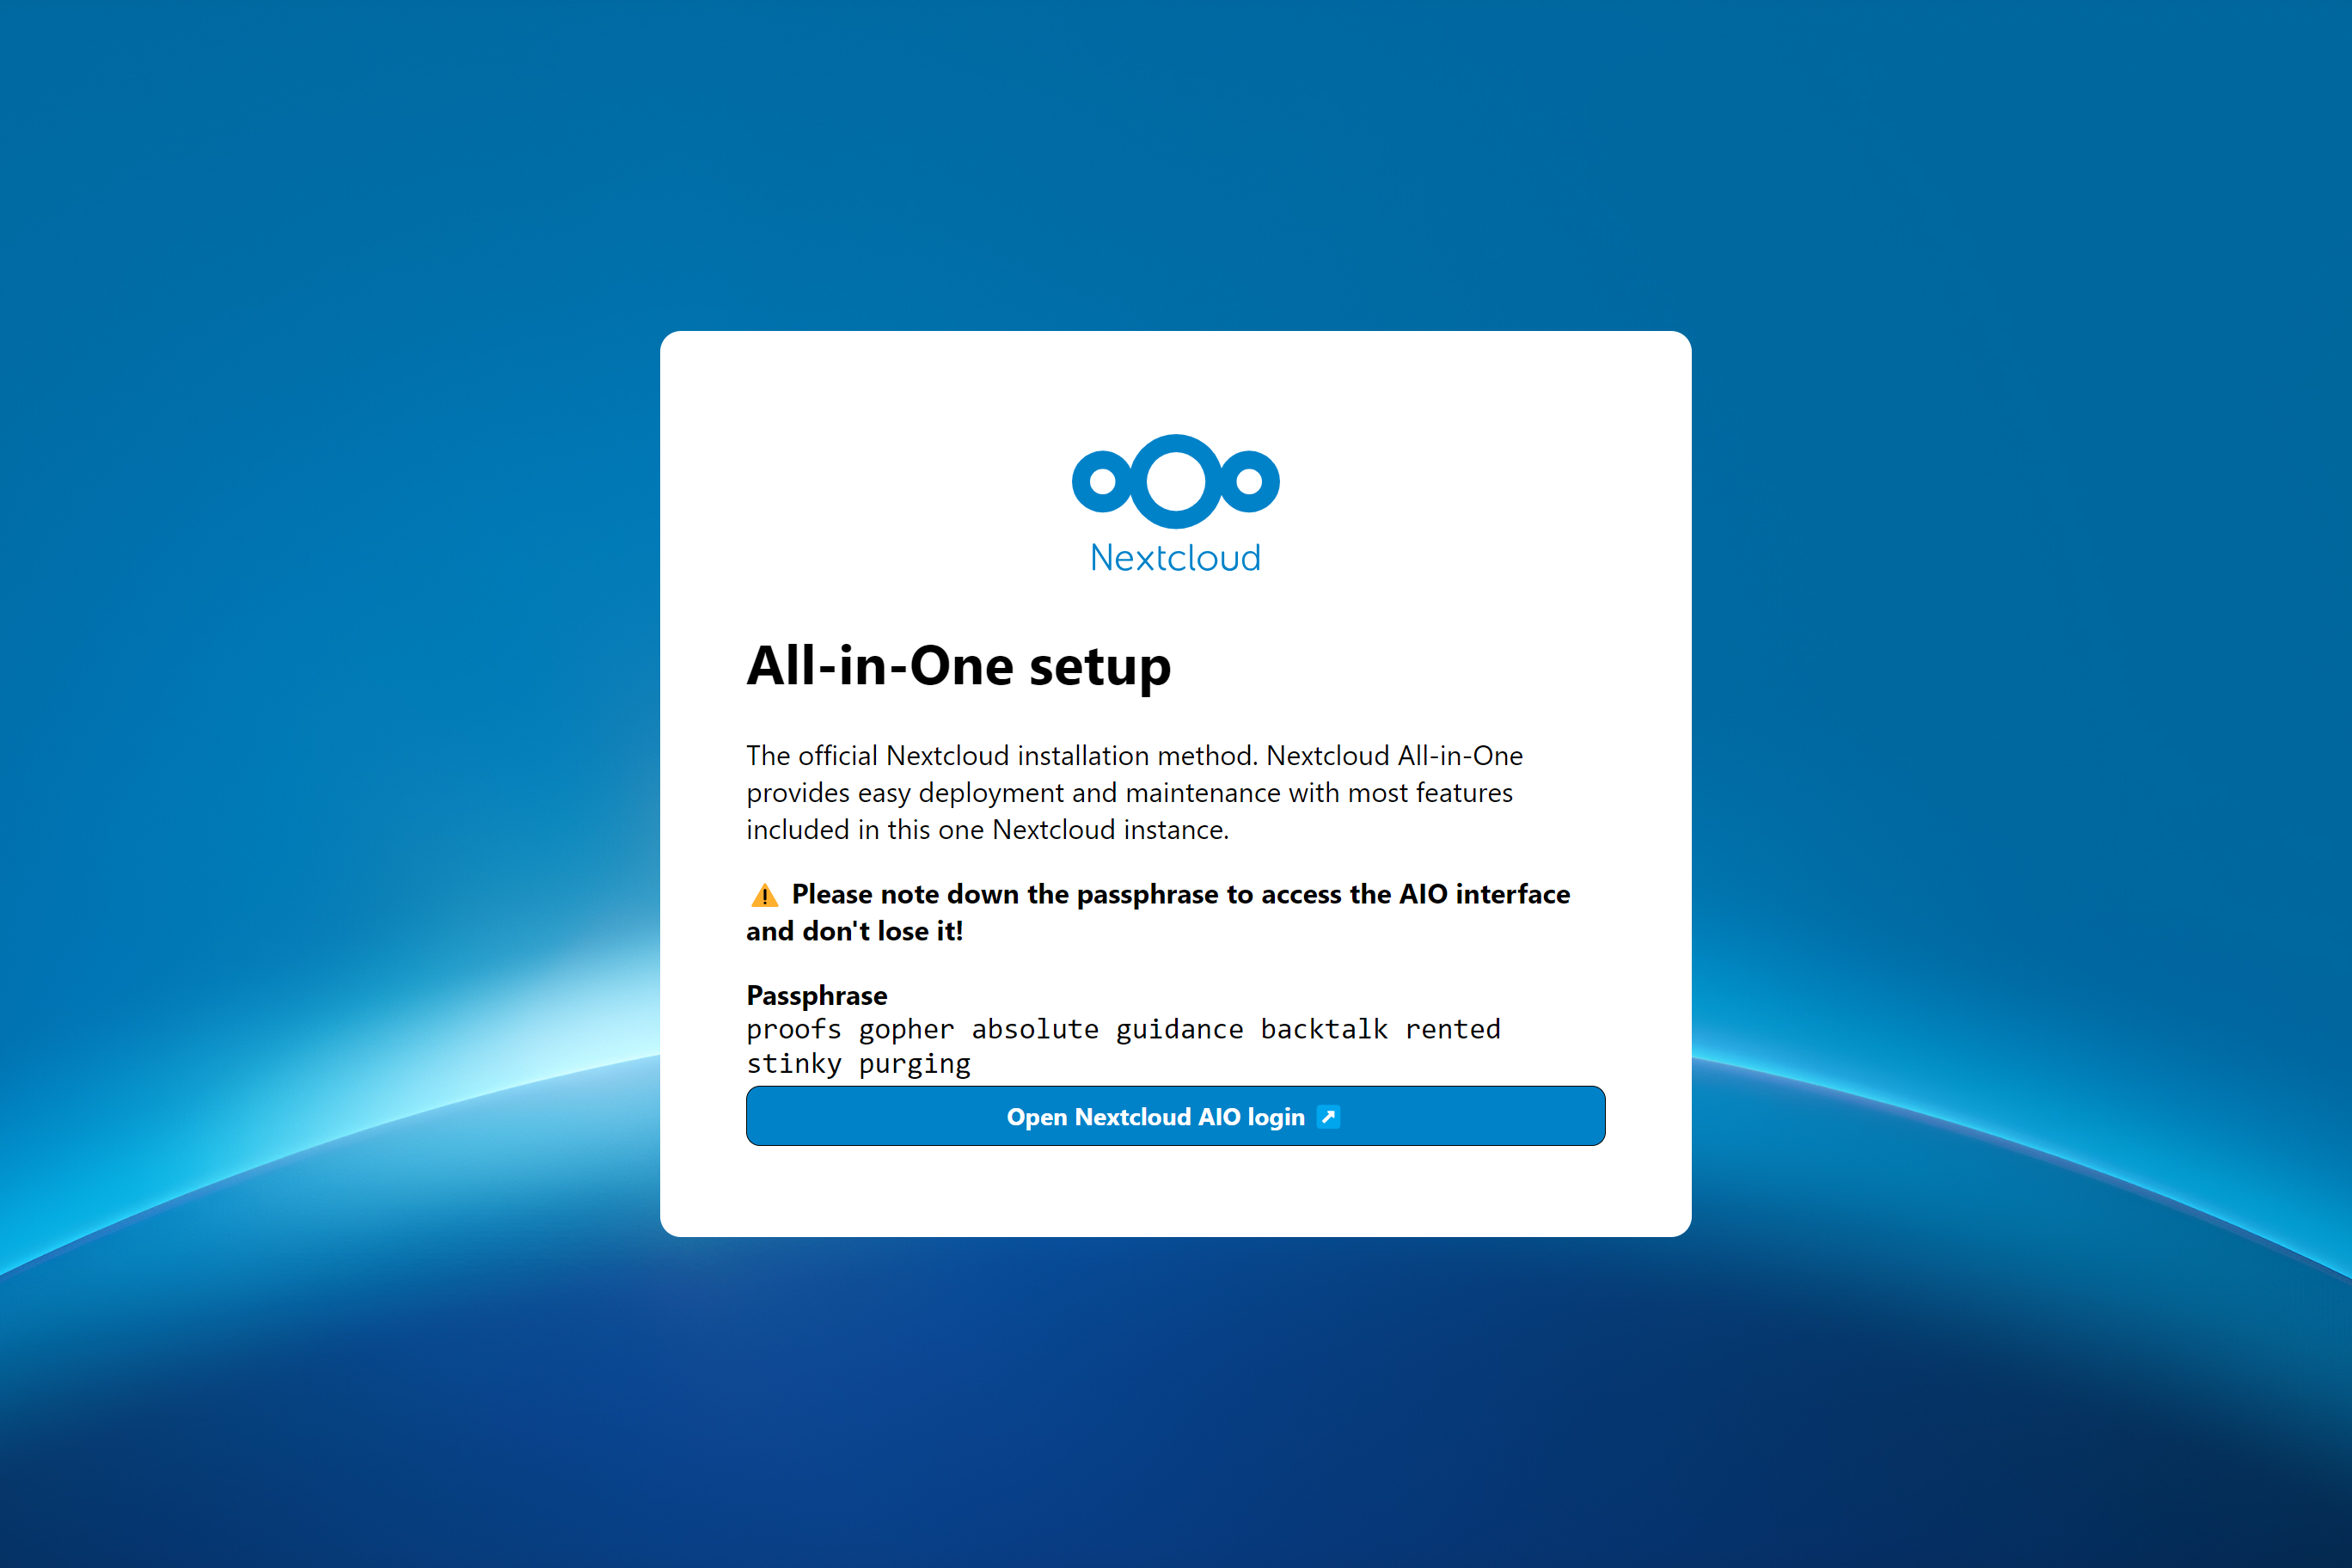
Metode instalasi resmi NextCloud. NextCloud AIO menyediakan penyebaran dan pemeliharaan yang mudah dengan sebagian besar fitur yang termasuk dalam instance NextCloud yang satu ini.
Termasuk adalah:
ffmpeg , smbclient , libreoffice dan nodejs disertakan secara default| Pengaturan pertama | Setelah instalasi |
|---|---|
 |  |
Instruksi berikut dimaksudkan untuk instalasi tanpa server web atau proxy terbalik (seperti Apache, Nginx, Caddy, Cloudflare Tunnel dan lainnya) sudah ada. Jika Anda ingin menjalankan AIO di belakang server web atau proxy terbalik (seperti Apache, nginx, caddy, cloudflare terowongan dan lainnya), lihat dokumentasi proxy terbalik. Juga, instruksi di bawah ini terutama dimaksudkan untuk Linux. Untuk MacOS lihat ini, untuk Windows lihat ini dan untuk Synology lihat ini.
Peringatan
Anda dapat menggunakan skrip kenyamanan di bawah ini untuk menginstal Docker. Namun kami merekomendasikan untuk tidak mengunduh secara membabi buta dan menjalankan skrip sebagai sudo. Tetapi jika Anda merasa seperti itu, tentu saja Anda bisa menggunakannya. Lihat di bawah:
curl -fsSL https://get.docker.com | sudo shJika Anda memerlukan dukungan IPv6, Anda harus mengaktifkannya dengan mengikuti https://github.com/nextcloud/all-in-one/blob/main/docker-ipv6-support.md.
Jalankan perintah di bawah ini untuk memulai wadah di Linux dan tanpa server web atau proxy terbalik (seperti Apache, nginx, caddy, cloudflare terowongan dan yang lain) sudah ada:
 # For Linux and without a web server or reverse proxy (like Apache, Nginx, Caddy, Cloudflare Tunnel and else) already in place:
sudo docker run
--init
--sig-proxy=false
--name nextcloud-aio-mastercontainer
--restart always
--publish 80:80
--publish 8080:8080
--publish 8443:8443
--volume nextcloud_aio_mastercontainer:/mnt/docker-aio-config
--volume /var/run/docker.sock:/var/run/docker.sock:ro
nextcloud/all-in-one:latest
sudo docker run perintah ini memutar wadah Docker baru. Perintah Docker secara opsional dapat digunakan tanpa sudo jika pengguna ditambahkan ke grup Docker (ini tidak sama dengan Docker tanpa akar, lihat FAQ di bawah).--init opsi ini memastikan bahwa tidak ada proses zombie yang dibuat. Lihat dokumentasi Docker.--sig-proxy=false Opsi ini memungkinkan untuk keluar dari shell wadah yang terpasang secara otomatis saat menggunakan docker run dengan menggunakan [CTRL] + [C] tanpa mematikan wadah.--name nextcloud-aio-mastercontainer Ini adalah nama wadah. Baris ini tidak diperbolehkan diubah, karena pembaruan MasterContainer akan gagal.--restart always ini adalah "Kebijakan Restart". always berarti wadah harus selalu memulai dengan Docker Daemon. Lihat Dokumentasi Docker untuk detail lebih lanjut tentang kebijakan restart: https://docs.docker.com/config/containers/start-containers-toutomaty/--publish 80:80 Ini berarti bahwa port 80 dari wadah harus diterbitkan pada host menggunakan port 80. Ini digunakan untuk mendapatkan sertifikat yang valid untuk antarmuka AIO jika Anda ingin menggunakan port 8443. Tidak diperlukan jika Anda berjalan AIO di belakang server web atau proxy terbalik dan dapat dihapus dalam kasus itu karena Anda dapat menggunakan port 8080 untuk antarmuka AIO kemudian.--publish 8080:8080 Ini berarti bahwa port 8080 dari wadah harus diterbitkan pada host menggunakan port 8080. Port ini digunakan untuk antarmuka AIO dan menggunakan sertifikat yang ditandatangani sendiri secara default. Anda juga dapat menggunakan port host yang berbeda jika port 8080 sudah digunakan pada host Anda, misalnya --publish 8081:8080 (hanya port pertama yang dapat diubah untuk host, port kedua adalah untuk wadah dan harus tetap di 8080 ).--publish 8443:8443 Ini berarti bahwa port 8443 dari wadah harus diterbitkan pada host menggunakan port 8443. Jika Anda mempublikasikan port 80 dan 8443 ke internet publik, Anda dapat mengakses antarmuka AIO melalui port ini dengan sertifikat yang valid. Tidak diperlukan jika Anda menjalankan AIO di belakang server web atau proxy terbalik dan dapat dihapus dalam hal ini karena Anda dapat menggunakan port 8080 untuk antarmuka AIO kemudian.--volume nextcloud_aio_mastercontainer:/mnt/docker-aio-config Ini berarti bahwa file yang dibuat oleh mastercontainer akan disimpan dalam volume buruh pelabuhan yang disebut nextcloud_aio_mastercontainer . Baris ini tidak diperbolehkan diubah, karena cadangan bawaan akan gagal nanti.--volume /var/run/docker.sock:/var/run/docker.sock:ro Soket Docker dipasang ke dalam wadah yang digunakan untuk memutar semua wadah lainnya dan untuk fitur lebih lanjut. Perlu disesuaikan pada windows/macOS dan pada Docker tanpa akar. Lihat dokumentasi yang berlaku tentang ini. Jika menyesuaikan, jangan lupa untuk juga mengatur WATCHTOWER_DOCKER_SOCKET_PATH ! Jika Anda tidak menyukai ini, lihat https://github.com/nextcloud/all-in-one/tree/main/manual-install.nextcloud/all-in-one:latest ini adalah gambar wadah Docker yang digunakan.--env NEXTCLOUD_DATADIR="/mnt/ncdata" (ini adalah contoh untuk linux. Lihat ini untuk OS lain 'dan untuk penjelasan tentang apa yang dilakukan nilai ini. Yang dibutuhkan spesifik ini ini untuk ditentukan pada startup pertama jika Anda ingin mengubahnya ke jalur tertentu alih -alih volume Docker default). Untuk melihat penjelasan dan contoh untuk variabel lebih lanjut (seperti mengubah lokasi DataDir NextCloud atau memasang beberapa lokasi sebagai penyimpanan eksternal ke dalam wadah NextCloud), baca melalui readme ini dan lihat file Compose Docker: https://github.com/ nextcloud/all-in-one/blob/main/compose.yamlCatatan: Anda mungkin tertarik untuk menyesuaikan Datadir NextCloud untuk menyimpan file di lokasi yang berbeda dari volume Docker default. Lihat dokumentasi ini tentang cara melakukannya.
Setelah startup awal, Anda harus dapat membuka antarmuka AIO NextCloud sekarang di port 8080 dari server ini.
Misalnya https://ip.address.of.this.server:8080
Jika firewall/router Anda memiliki port 80 dan 8443 terbuka/diteruskan dan Anda mengarahkan domain ke server Anda, Anda bisa mendapatkan sertifikat yang valid secara otomatis dengan membuka antarmuka AIO NextCloud melalui:
https://your-domain-that-points-to-this-server.tld:8443
Tolong jangan lupa untuk membuka port 3478/TCP dan 3478/UDP di firewall/router Anda untuk wadah bicara!
NextCloud AIO terinspirasi oleh proyek -proyek seperti Portainer yang mengelola daemon Docker dengan berbicara dengannya melalui soket Docker secara langsung. Konsep ini memungkinkan pengguna untuk menginstal hanya satu wadah dengan satu perintah yang melakukan pengangkatan berat untuk membuat dan mengelola semua wadah yang diperlukan untuk menyediakan instalasi NextCloud dengan sebagian besar fitur yang disertakan. Ini juga membuat pembaruan menjadi mudah dan tidak terikat pada sistem host (dan pembaruannya yang lambat) karena semuanya ada di dalam wadah. Selain itu, sangat mudah ditangani dari perspektif pengguna karena antarmuka sederhana untuk mengelola instalasi AIO NextCloud Anda disediakan.
Lihat masalah ini untuk daftar permintaan fitur yang membutuhkan bantuan oleh kontributor.
Ya. Silakan merujuk ke dokumentasi berikut tentang ini: Reverse-Proxy.md
Anda dapat memeriksa ini di Linux dengan menjalankan: uname -m
Hanya itu (jika Anda mengakses antarmuka MasterContainer secara internal melalui port 8080):
443/TCP untuk wadah Apache443/UDP Jika Anda ingin mengaktifkan HTTP3 untuk wadah Apache3478/TCP dan 3478/UDP untuk wadah bicara8080/TCP : Antarmuka MasterContainer dengan sertifikat yang ditandatangani sendiri (bekerja selalu, juga jika hanya akses melalui IP-address dimungkinkan, misalnya https://ip.address.of.this.server:8080/ )80/TCP : Redirect ke NextCloud (digunakan untuk mendapatkan sertifikat melalui ACME HTTP-Challenge untuk MasterContainer)8443/TCP : Antarmuka MasterContainer dengan sertifikat yang valid (hanya berfungsi jika port 80 dan 8443 terbuka/diteruskan di firewall/router Anda dan Anda mengarahkan domain ke server Anda. Ini menghasilkan sertifikat yang valid kemudian secara otomatis dan mengakses melalui EG https://public.domain.com:8443/ adalah mungkin.)443/TCP : Akan digunakan oleh wadah Apache nanti dan perlu dibuka/diteruskan di firewall/router Anda443/UDP : akan digunakan oleh wadah Apache nanti dan perlu dibuka/diteruskan di firewall/router Anda jika Anda ingin mengaktifkan http33478/TCP dan 3478/UDP : Akan digunakan oleh Turningerver di dalam wadah bicara dan perlu dibuka/diteruskan di firewall/router Anda Di macOS, hanya ada satu hal yang berbeda dibandingkan dengan Linux: alih -alih menggunakan --volume /var/run/docker.sock:/var/run/docker.sock:ro , Anda perlu menggunakan --volume /var/run/docker.sock.raw:/var/run/docker.sock:ro untuk menjalankannya setelah Anda menginstal Docker Desktop (dan jangan lupa untuk mengaktifkan IPv6 jika Anda membutuhkannya). Selain itu, itu harus bekerja dan berperilaku sama seperti di Linux.
Juga, Anda mungkin tertarik untuk menyesuaikan Datadir NextCloud untuk menyimpan file pada sistem host. Lihat dokumentasi ini tentang cara melakukannya.
Di Windows, instal Docker Desktop (dan jangan lupa untuk mengaktifkan IPv6 jika Anda membutuhkannya) dan jalankan perintah berikut di prompt perintah:
 docker run ^
--init ^
--sig-proxy=false ^
--name nextcloud-aio-mastercontainer ^
--restart always ^
--publish 80:80 ^
--publish 8080:8080 ^
--publish 8443:8443 ^
--volume nextcloud_aio_mastercontainer:/mnt/docker-aio-config ^
--volume //var/run/docker.sock:/var/run/docker.sock:ro ^
nextcloud/all-in-one:latest
Juga, Anda mungkin tertarik untuk menyesuaikan Datadir NextCloud untuk menyimpan file pada sistem host. Lihat dokumentasi ini tentang cara melakukannya.
Catatan
Hampir semua perintah dalam dokumentasi proyek ini menggunakan sudo docker ... Karena sudo tidak tersedia di Windows, Anda cukup menghapus sudo dari perintah dan mereka harus berfungsi.
Pada Synology, ada dua hal yang berbeda dibandingkan dengan Linux: alih -alih menggunakan --volume /var/run/docker.sock:/var/run/docker.sock:ro , Anda perlu menggunakan --volume /volume1/docker/docker.sock:/var/run/docker.sock:ro untuk menjalankannya. Anda juga perlu menambahkan --env WATCHTOWER_DOCKER_SOCKET_PATH="/volume1/docker/docker.sock" ke perintah run docker dari mastercontainer (tetapi sebelum baris terakhir nextcloud/all-in-one:latest ). Selain itu, itu harus bekerja dan berperilaku sama seperti di Linux. Jelas Synology Docker GUI tidak akan bekerja dengan itu sehingga Anda harus menggunakan SSH atau membuat tugas skrip yang ditentukan pengguna dalam penjadwal tugas sebagai pengguna 'root' untuk menjalankan perintah.
Catatan
Ada kemungkinan bahwa soket Docker pada Synology Anda terletak di /var/run/docker.sock seperti default di Linux. Kemudian Anda bisa menggunakan perintah Linux tanpa harus mengubah apa pun - Anda akan melihat ini ketika Anda mencoba memulai wadah dan dikatakan bahwa bind mount gagal. EG docker: Error response from daemon: Bind mount failed: '/volume1/docker/docker.sock' does not exists.
Juga, Anda mungkin tertarik untuk menyesuaikan Datadir NextCloud untuk menyimpan file pada sistem host. Lihat dokumentasi ini tentang cara melakukannya.
Anda juga harus menyesuaikan firewall Synology, lihat di bawah:
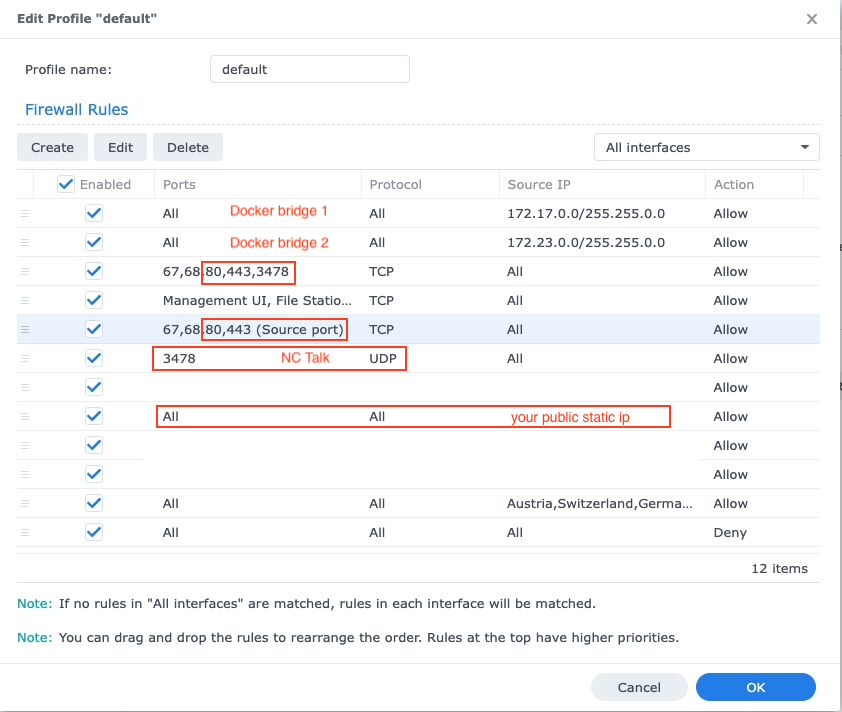
Synology DSM rentan terhadap serangan dengan port terbuka dan antarmuka login, itulah sebabnya pengaturan firewall selalu direkomendasikan. Jika firewall diaktifkan, perlu memiliki pengecualian untuk port 80.443, subnet jembatan Docker yang mencakup wadah NextCloud, IP statis publik Anda (jika Anda tidak menggunakan DDN) dan jika berlaku NC-Talk Ports 3478 TCP +UDP:
Jika Anda memiliki pengaturan NAS di jaringan lokal Anda (yang paling sering terjadi), Anda perlu mengatur Synology DNS untuk dapat mengakses NextCloud dari jaringan Anda melalui domainnya. Juga jangan lupa untuk menambahkan DNS baru ke server DHCP Anda dan pengaturan IP tetap Anda:

Cara termudah untuk menjalankannya dengan Portainer di Linux adalah dengan menggunakan fitur Stacks Portainer dan menggunakan file komposisi Docker ini untuk memulai AIO dengan benar.
Dengan Rilis Skala Truenas 24.10.0 (yang secara resmi dirilis pada 29 Oktober 2024 sebagai rilis yang stabil) IX Systems membuang integrasi Kubernetes dan menerapkan lingkungan Docker yang sepenuhnya bekerja.
Untuk panduan yang lebih lengkap, lihat panduan ini oleh @zybster: #5506
Pada rilis skala Truenas yang lebih tua dengan lingkungan Kubernetes, ada dua cara untuk menjalankan AIO. Yang disukai adalah menjalankan AIO di dalam VM. Ini diperlukan karena mereka tidak mengekspos soket buruh pelabuhan untuk wadah pada host, Anda juga tidak dapat menggunakan komposisi Docker di atasnya dan juga tidak mungkin untuk menjalankan helm-chart khusus yang tidak ditulis secara eksplisit untuk skala Truenas.
Cara lain tapi belum teruji adalah memasang portainer pada skala truenas Anda dari sini https://truecharts.org/charts/stable/portainer/installation-notes dan tambahkan helm-chart repositori https://nexcloud.github.io/all- In-One/Into Portainer dengan mengikuti https://docs.portainer.io/user/kubernetes/helm. Lebih banyak dokumen di grafik AIOS Helm tersedia di sini: https://github.com/nextcloud/all-in-one/tree/main/nextcloud-aio-helm-chart#nextcloud-aio-helm-chart.
https://yourdomain.com/settings/admin/richdocumentshttps://yourdomain.com/settings/admin/talk .Meskipun sepertinya tidak terjadi tetapi dari perspektif AIO terowongan Cloudflare berfungsi seperti proxy terbalik. Jadi silakan ikuti dokumentasi proxy terbalik di mana didokumentasikan bagaimana membuatnya berjalan di belakang terowongan cloudflare. Namun silakan lihat peringatannya sebelum melanjutkan.
Untuk panduan contoh proxy terbalik untuk tailscale, lihat panduan ini oleh @flll: #5439
/proc/user_beancounters dan batas numproc rendah di dalamnya server Anda kemungkinan besar akan berperilaku buruk setelah mencapai batas ini yang sangat cepat dicapai oleh AIO, lihat di sini.Secara umum VP yang direkomendasikan adalah yang kvm/non-virtual karena Docker harus bekerja paling baik pada mereka.
Anda dapat menginstal AIO dalam mode proxy terbalik di mana juga didokumentasikan cara menjalankannya menggunakan ACME DNS-Challenge untuk mendapatkan sertifikat yang valid untuk AIO. Lihat dokumentasi proxy terbalik. (Maksudnya adalah Caddy with ACME DNS-challenge ). Juga lihat https://github.com/dani-garcia/vaultwarden/wiki/running-a-ptivate-vaultwarden-instance-with-let%27s-encrypt-certs#getting-a-custom-caddy-build untuk tambahan dokumen tambahan tentang topik ini.
Jika Anda tidak ingin membuka NextCloud ke internet publik, Anda mungkin melihat dokumentasi berikut tentang cara mengaturnya secara lokal: lokal-instance.md, tetapi perlu diingat bahwa Anda masih harus memiliki HTTP yang berfungsi dengan baik .
Tidak dan itu tidak akan ditambahkan. Jika Anda hanya ingin menjalankannya secara lokal, Anda mungkin melihat dokumentasi berikut: lokal-instance.md untuk konfigurasi tanpa domain tradisional. Atau, pertimbangkan untuk menggunakan NextCloudpi untuk akses alamat IP secara lokal (itu menggabungkan lebih sedikit fitur daripada AIO).
Tidak. Ini tidak mungkin dan tidak akan ditambahkan karena beberapa alasan: Perbarui cek, pemasangan aplikasi melalui App-store, mengunduh gambar Docker tambahan sesuai permintaan dan banyak lagi.
Tidak dan mereka tidak akan. Jika Anda ingin menjalankannya secara lokal, tanpa membuka NextCloud ke internet publik, silakan lihat dokumentasi instance lokal.
Tidak dan itu tidak akan ditambahkan. Namun Anda dapat menggunakan fitur ini untuk membuat beberapa instance AIO, satu untuk setiap domain.
Tidak dan mereka tidak akan. Harap gunakan domain khusus untuk NextCloud dan atur dengan benar dengan mengikuti dokumentasi proxy terbalik. Jika Port 443 dan/atau 80 diblokir untuk Anda, Anda dapat menggunakan terowongan Cloudflare jika Anda ingin mempublikasikannya secara online. Anda juga bisa menggunakan ACME DNS-Challenge untuk mendapatkan sertifikat yang valid. Namun dalam semua kasus antarmuka NextCloud akan mengarahkan Anda ke Port 443.
Tidak dan itu tidak akan ditambahkan. Harap gunakan domain (sub-) khusus untuk NextCloud dan atur dengan benar dengan mengikuti dokumentasi proxy terbalik.
Harap dicatat bahwa akses lokal tidak dimungkinkan jika Anda menjalankan AIO di belakang Cloudflare Tunnel karena proksi TLS dalam kasus itu dibongkar ke infrastruktur CloudFlares. Anda dapat memperbaikinya dengan menyiapkan proxy terbalik Anda sendiri yang menangani proxy tls secara lokal dan akan membuat langkah -langkah di bawah berfungsi.
Pastikan bahwa jika Anda menjalankan AIO di belakang proxy terbalik, proxy terbalik dikonfigurasi untuk menggunakan port 443 di server yang menjalankannya. Kalau tidak, langkah -langkah di bawah ini tidak akan berhasil.
Sekarang setelah ini, cara yang disarankan cara mengakses NextCloud secara lokal, adalah dengan mengatur server DNS lokal seperti pi-hole dan mengatur catatan DNS khusus untuk domain yang menunjuk ke IP internal- Adddress dari server Anda yang menjalankan AIO NextCloud. Di bawah ini adalah beberapa pemandu:
Jika Anda benar -benar yakin bahwa Anda telah mengonfigurasi semuanya dengan benar dan tidak dapat melewati validasi domain, Anda dapat melewatkan validasi domain dengan menambahkan --env SKIP_DOMAIN_VALIDATION=true untuk perintah run docker dari mastercontainer (tetapi sebelum baris terakhir nextcloud/all-in-one:latest !
Diketahui bahwa distro Linux yang menggunakan firewalld sebagai daemon firewall mereka memiliki masalah dengan jaringan Docker. Jika wadah tidak dapat berkomunikasi satu sama lain, Anda dapat mengubah firewalld Anda untuk menggunakan backend ptables dengan menjalankan:
 sudo sed -i 's/FirewallBackend=nftables/FirewallBackend=iptables/g' /etc/firewalld/firewalld.conf
sudo systemctl restart firewalld docker
Setelah itu harus berhasil.
Lihat https://dev.to/ozorest/fedora-32-how-to-solve-docker-ternal-network-issue-22me untuk detail lebih lanjut tentang ini. Keterbatasan ini bahkan disebutkan di situs web resmi firewalld: https://firewalld.org/#who-is-using-it
Ya. Jika Selinux diaktifkan, Anda mungkin perlu menambahkan --security-opt label:disable opsi ke perintah Run Docker Run dari MasterContainer untuk memungkinkannya mengakses soket Docker (atau security_opt: ["label:disable"] di compose.yaml). Lihat #485
occ ? Cukup jalankan yang berikut: sudo docker exec --user www-data -it nextcloud-aio-nextcloud php occ your-command . Tentu saja your-command perlu ditukar dengan perintah yang ingin Anda jalankan.
Security & setup warnings displays the "missing default phone region" after initial install ? Cukup jalankan perintah berikut: sudo docker exec --user www-data nextcloud-aio-nextcloud php occ config:system:set default_phone_region --value="yourvalue" . Tentu saja Anda perlu memodifikasi yourvalue berdasarkan lokasi Anda. Contohnya adalah DE , US dan GB . Lihat daftar ini untuk lebih banyak kode: https://en.wikipedia.org/wiki/iso_3166-1_alpha-2#official_assigned_code_elements
Lihat Multiple-Instances.md untuk beberapa dokumentasi tentang ini.
NextCloud menampilkan perlindungan bruteforce bawaan yang dapat dipicu dan akan memblokir IP-Address atau menonaktifkan pengguna. Anda dapat membuka blokir IP-Address dengan menjalankan sudo docker exec --user www-data -it nextcloud-aio-nextcloud php occ security:bruteforce:reset <ip-address> dan aktifkan pengguna yang dinonaktifkan dengan menjalankan sudo docker exec --user www-data -it nextcloud-aio-nextcloud php occ user:enable <name of user> . Lihat https://docs.nextcloud.com/server/latest/admin_manual/configuration_server/occ_command.html#security untuk informasi lebih lanjut.
Proyek ini menghargai stabilitas atas fitur -fitur baru. Itu berarti bahwa ketika pembaruan mayor NextCloud baru diperkenalkan, kami akan menunggu setidaknya sampai rilis patch pertama, misalnya 24.0.1 keluar sebelum meningkatkannya. Kami juga akan menunggu dengan peningkatan sampai semua aplikasi penting kompatibel dengan versi utama baru. Rilis kecil atau tambalan untuk NextCloud dan semua dependensi serta semua kontainer akan diperbarui ke versi baru sesegera mungkin tetapi kami mencoba memberikan semua pembaruan terlebih dahulu tes putaran yang baik sebelum mendorongnya. Itu berarti dapat memakan waktu sekitar 2 minggu sebelum pembaruan baru mencapai saluran latest . Jika Anda ingin membantu pengujian, Anda dapat beralih ke saluran beta dengan mengikuti dokumentasi ini yang juga akan memberi Anda pembaruan sebelumnya.
Anda dapat beralih ke saluran yang berbeda seperti misalnya saluran beta atau dari saluran beta kembali ke saluran terbaru dengan menghentikan mastercontainer, menghapusnya (tidak ada data yang akan hilang) dan menciptakan kembali wadah menggunakan perintah yang sama yang Anda gunakan pada awalnya untuk membuat awal MasterContainer. Anda hanya perlu mengubah baris terakhir nextcloud/all-in-one:latest ke nextcloud/all-in-one:beta dan sebaliknya.
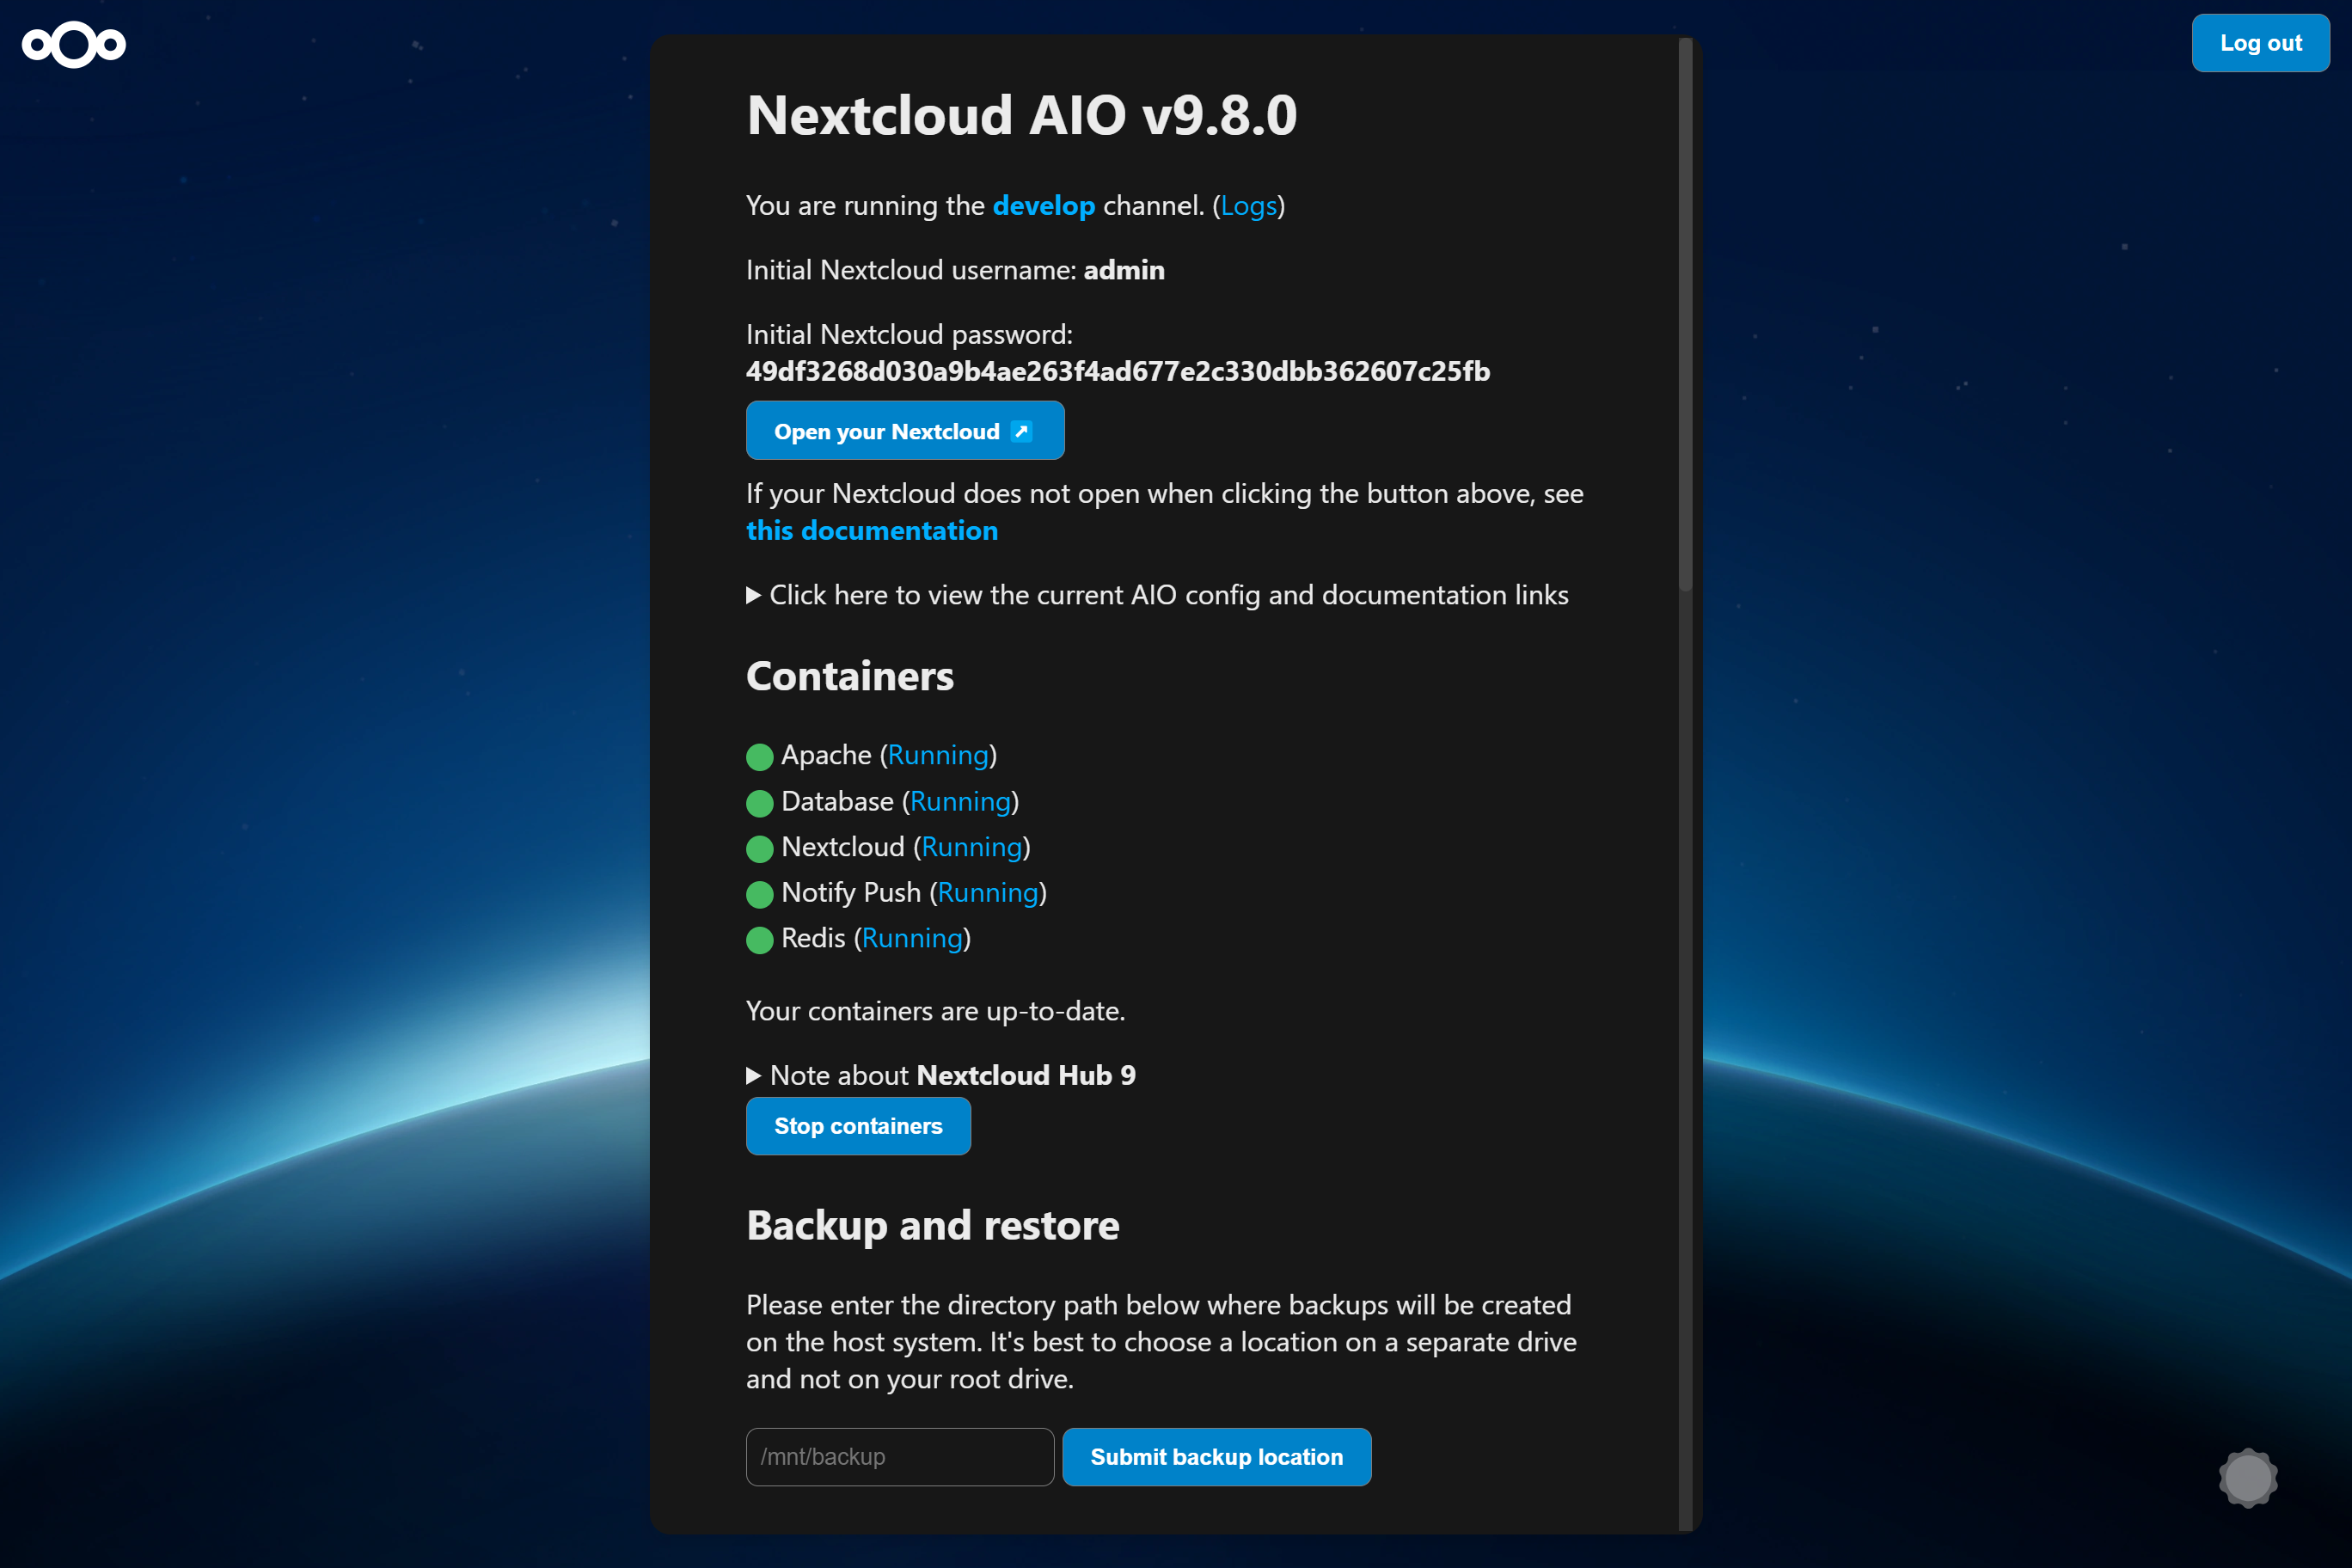
Jika kami mendorong wadah baru ke latest , Anda akan melihat di antarmuka AIO di bawah bagian containers yang ditemukan pembaruan wadah baru. Dalam hal ini, cukup tekan Stop containers dan Start and update containers untuk memperbarui kontainer. MasterContainer memiliki prosedur pembaruan sendiri. Lihat di bawah. Dan jangan lupa untuk mencadangkan keadaan instance saat ini menggunakan solusi cadangan bawaan sebelum memulai wadah lagi! Kalau tidak, Anda tidak akan dapat mengembalikan instance Anda dengan mudah jika sesuatu harus rusak selama pembaruan.
If a new mastercontainer update was found, you'll see a note below the Stop containers button that allows to show the changelog. If you click that button and the containers are stopped, you will see a new button that allows to update the mastercontainer. After doing so and after the update is gone through, you will have the option again to Start and update containers . It is recommended to create a backup before clicking the Start and update containers button.
Additionally, there is a cronjob that runs once a day that checks for container and mastercontainer updates and sends a notification to all Nextcloud admins if a new update was found.
AIO ships its own update notifications implementation. It checks if container updates are available. If so, it sends a notification with the title Container updates available! on saturdays to Nextcloud users that are part of the admin group. If the Nextcloud container image should be older than 90 days (~3 months) and thus badly outdated, AIO sends a notification to all Nextcloud users with the title AIO is outdated! . Thus admins should make sure to update the container images at least once every 3 months in order to make sure that the instance gets all security bugfixes as soon as possible.
If your Nextcloud is running and you are logged in as admin in your Nextcloud, you can easily log in to the AIO interface by opening https://yourdomain.tld/settings/admin/overview which will show a button on top that enables you to log in to the AIO interface by just clicking on this button.
Catatan
You can change the domain/ip-address/port of the button by simply stopping the containers, visiting the AIO interface from the correct and desired domain/ip-address/port and clicking once on Start containers .
Catatan
Editing the configuration.json manually and making a mistake may break your instance so please create a backup first!
If you set up a new AIO instance, you need to enter a domain. Currently there is no way to change this domain afterwards from the AIO interface. So in order to change it, you need to edit the configuration.json manually using sudo docker run -it --rm --volume nextcloud_aio_mastercontainer:/mnt/docker-aio-config:rw alpine sh -c "apk add --no-cache nano && nano /mnt/docker-aio-config/data/configuration.json" , substitute each occurrence of your old domain with your new domain and save and write out the file. Afterwards restart your containers from the AIO interface and everything should work as expected if the new domain is correctly configured.
If you are running AIO behind a web server or reverse proxy (like Apache, Nginx, Caddy, Cloudflare Tunnel and else), you need to obviously also change the domain in your reverse proxy config.
Additionally, after restarting the containers, you need to open the admin settings and update some values manually that cannot be changed automatically. Here is a list of some known places:
https://your-nc-domain.com/settings/admin/talk for Turn/Stun server and Signaling Server if you enabled Talk via the AIO interfacehttps://your-nc-domain.com/settings/admin/theming for the theming URLhttps://your-nc-domain.com/settings/admin/app_api for the deploy daemon if you enabled the App API via the AIO interfaceIf something goes unexpected routes during the initial installation, you might want to reset the AIO installation to be able to start from scratch.
Catatan
If you already have it running and have data on your instance, you should not follow these instructions as it will delete all data that is coupled to your AIO instance.
Here is how to reset the AIO instance properly:
sudo docker stop nextcloud-aio-mastercontainersudo docker stop nextcloud-aio-domainchecksudo docker ps --format {{.Names}} . If no nextcloud-aio containers are listed, you can proceed with the steps below. If there should be some, you will need to stop them with sudo docker stop <container_name> until no one is listed anymore.sudo docker ps --filter "status=exited"sudo docker container prunesudo docker network rm nextcloud-aiosudo docker volume ls --filter "dangling=true"sudo docker volume prune --filter all=1 (on Windows you might need to remove some volumes afterwards manually with docker volume rm nextcloud_aio_backupdir , docker volume rm nextcloud_aio_nextcloud_datadir ).NEXTCLOUD_DATADIR to a path on your host instead of the default volume, you need to clean that up as well. (Eg by simply deleting the directory).sudo docker volume ls --format {{.Name}} . If no nextcloud-aio volumes are listed, you can proceed with the steps below. If there should be some, you will need to remove them with sudo docker volume rm <volume_name> until no one is listed anymore.sudo docker image prune -a .Nextcloud AIO provides a backup solution based on BorgBackup. These backups act as a restore point in case the installation gets corrupted. By using this tool, backups are incremental, differential, compressed and encrypted – so only the first backup will take a while. Further backups should be fast as only changes are taken into account.
It is recommended to create a backup before any container update. By doing this, you will be safe regarding any possible complication during updates because you will be able to restore the whole instance with basically one click.
For local backups, the restore process should be pretty fast as rsync is used to restore the chosen backup which only transfers changed files and deletes additional ones. For remote borg backups, the whole backup archive is extracted from the remote, which depending on how clever borg extract is, may require downloading the whole archive.
If you connect an external drive to your host, and choose the backup directory to be on that drive, you are also kind of safe against drive failures of the drive where the docker volumes are stored on.
/mnt/backup ./mnt/backup .Create Backup which should create the first backup on the external disk.If you want to back up directly to a remote borg repository:
Create backup , this will create an ssh key pair and fail because the remote doesn't trust this key yet. Copy the public key shown in AIO and add it to your authorized keys on the remote. Backups can be created and restored in the AIO interface using the buttons Create Backup and Restore selected backup . Additionally, a backup check is provided that checks the integrity of your backups but it shouldn't be needed in most situations.
The backups themselves get encrypted with an encryption key that gets shown to you in the AIO interface. Please save that at a safe place as you will not be able to restore from backup without this key.
Daily backups can get enabled after the initial backup is done. Enabling this also allows to enable an option that allows to automatically update all containers, Nextcloud and its apps.
Be aware that this solution does not back up files and folders that are mounted into Nextcloud using the external storage app - but you can add further Docker volumes and host paths that you want to back up after the initial backup is done.
Backed up will get all important data of your Nextcloud AIO instance like the database, your files and configuration files of the mastercontainer and else. Files and folders that are mounted into Nextcloud using the external storage app are not getting backed up. There is currently no way to exclude the data directory because it would require hacks like running files:scan and would make the backup solution much more unreliable (since the database and your files/folders need to stay in sync). If you still don't want your datadirectory to be backed up, see https://github.com/nextcloud/all-in-one#how-to-enable-automatic-updates-without-creating-a-backup-beforehand for options (there is a hint what needs to be backed up in which order).
The built-in borg-based backup solution has by default a retention policy of --keep-within=7d --keep-weekly=4 --keep-monthly=6 . See https://borgbackup.readthedocs.io/en/stable/usage/prune.html for what these values mean. You can adjust the retention policy by providing --env BORG_RETENTION_POLICY="--keep-within=7d --keep-weekly=4 --keep-monthly=6" to the docker run command of the mastercontainer (but before the last line nextcloud/all-in-one:latest ! If it was started already, you will need to stop the mastercontainer, remove it (no data will be lost) and recreate it using the docker run command that you initially used) and customize the value to your fitting.
Backing up directly to a remote borg repository is supported. This avoids having to store a local copy of your backups, supports append-only borg keys to counter ransomware and allows using the AIO interface to manage your backups.
Some alternatives, which do not have all the above benefits:
If you are running AIO in a LXC container, you need to make sure that FUSE is enabled in the LXC container settings. Also, if using Alpine Linux as host OS, make sure to add fuse via apk add fuse . Otherwise the backup container will not be able to start as FUSE is required for it to work.
As stated in the AIO interface, it is possible to use a docker volume as backup target. Before you can use that, you need to create it first. Here is an example how to create one on Windows:
 docker volume create ^
--driver local ^
--name nextcloud_aio_backupdir ^
-o device="/host_mnt/e/your/backup/path" ^
-o type="none" ^
-o o="bind"
In this example, it would mount E:yourbackuppath into the volume so for a different location you need to adjust /host_mnt/e/your/backup/path accordingly. Afterwards enter nextcloud_aio_backupdir in the AIO interface as backup location.
You can open the BorgBackup archives on your host by following these steps:
(instructions for Ubuntu Desktop)
 # Install borgbackup on the host
sudo apt update && sudo apt install borgbackup

# In any shell where you use borg, you must first export this variable
# If you are using the default backup location /mnt/backup/borg
export BORG_REPO= ' /mnt/backup/borg '
# or if you are using a remote repository
export BORG_REPO= ' user@host:/path/to/repo '

# Mount the archives to /tmp/borg
sudo mkdir -p /tmp/borg && sudo borg mount " $BORG_REPO " /tmp/borg

# After entering your repository key successfully, you should be able to access all archives in /tmp/borg
# You can now do whatever you want by syncing them to a different place using rsync or doing other things
# E.g. you can open the file manager on that location by running:
xhost +si:localuser:root && sudo nautilus /tmp/borg

# When you are done, simply close the file manager and run the following command to unmount the backup archives:
sudo umount /tmp/borg You can delete BorgBackup archives on your host manually by following these steps:
(instructions for Debian based OS' like Ubuntu)
 # Install borgbackup on the host
sudo apt update && sudo apt install borgbackup

# In any shell where you use borg, you must first export this variable
# If you are using the default backup location /mnt/backup/borg
export BORG_REPO= ' /mnt/backup/borg '
# or if you are using a remote repository
export BORG_REPO= ' user@host:/path/to/repo '

# List all archives (if you are using the default backup location /mnt/backup/borg)
sudo borg list

# After entering your repository key successfully, you should now see a list of all backup archives
# An example backup archive might be called 20220223_174237-nextcloud-aio
# Then you can simply delete the archive with:
sudo borg delete --stats --progress " ::20220223_174237-nextcloud-aio "

# If borg 1.2.0 or higher is installed, you then need to run borg compact in order to clean up the freed space
sudo borg --version
# If version number of the command above is higher than 1.2.0 you need to run the command below:
sudo borg compact
After doing so, make sure to update the backup archives list in the AIO interface!
You can do so by clicking on the Check backup integrity button or Create backup button.
For increased backup security, you might consider syncing the local backup repository regularly to another drive.
To do that, first add the drive to /etc/fstab so that it is able to get automatically mounted and then create a script that does all the things automatically. Here is an example for such a script:
 #! /bin/bash

# Please modify all variables below to your needings:
SOURCE_DIRECTORY= " /mnt/backup/borg "
DRIVE_MOUNTPOINT= " /mnt/backup-drive "
TARGET_DIRECTORY= " /mnt/backup-drive/borg "

# #######################################
# Please do NOT modify anything below! #
# #######################################

if [ " $EUID " -ne 0 ] ; then
    echo " Please run as root "
    exit 1
fi

if ! [ -d " $SOURCE_DIRECTORY " ] ; then
    echo " The source directory does not exist. "
    exit 1
fi

if [ -z " $( ls -A " $SOURCE_DIRECTORY / " ) " ] ; then
    echo " The source directory is empty which is not allowed. "
    exit 1
fi

if ! [ -d " $DRIVE_MOUNTPOINT " ] ; then
    echo " The drive mountpoint must be an existing directory "
    exit 1
fi

if ! grep -q " $DRIVE_MOUNTPOINT " /etc/fstab ; then
    echo " Could not find the drive mountpoint in the fstab file. Did you add it there? "
    exit 1
fi

if ! mountpoint -q " $DRIVE_MOUNTPOINT " ; then
    mount " $DRIVE_MOUNTPOINT "
    if ! mountpoint -q " $DRIVE_MOUNTPOINT " ; then
        echo " Could not mount the drive. Is it connected? "
        exit 1
    fi
fi

if [ -f " $SOURCE_DIRECTORY /lock.roster " ] ; then
    echo " Cannot run the script as the backup archive is currently changed. Please try again later. "
    exit 1
fi

mkdir -p " $TARGET_DIRECTORY "
if ! [ -d " $TARGET_DIRECTORY " ] ; then
    echo " Could not create target directory "
    exit 1
fi

if [ -f " $SOURCE_DIRECTORY /aio-lockfile " ] ; then
    echo " Not continuing because aio-lockfile already exists. "
    exit 1
fi

touch " $SOURCE_DIRECTORY /aio-lockfile "

if ! rsync --stats --archive --human-readable --delete " $SOURCE_DIRECTORY / " " $TARGET_DIRECTORY " ; then
    echo " Failed to sync the backup repository to the target directory. "
    exit 1
fi

rm " $SOURCE_DIRECTORY /aio-lockfile "
rm " $TARGET_DIRECTORY /aio-lockfile "

umount " $DRIVE_MOUNTPOINT "

if docker ps --format " {{.Names}} " | grep " ^nextcloud-aio-nextcloud$ " ; then
    docker exec -it nextcloud-aio-nextcloud bash /notify.sh " Rsync backup successful! " " Synced the backup repository successfully. "
else
    echo " Synced the backup repository successfully. "
fi
You can simply copy and paste the script into a file eg named backup-script.sh eg here: /root/backup-script.sh . Do not forget to modify the variables to your requirements!
Afterwards apply the correct permissions with sudo chown root:root /root/backup-script.sh and sudo chmod 700 /root/backup-script.sh . Then you can create a cronjob that runs eg at 20:00 each week on Sundays like this:
sudo crontab -u root -e (and choose your editor of choice if not already done. I'd recommend nano).0 20 * * 7 /root/backup-script.sh which will run the script at 20:00 on Sundays each week.Ctrl + o -> Enter and close the editor with Ctrl + x ).Peringatan
The below script will only work after the initial setup of AIO. So you will always need to first visit the AIO interface, type in your domain and start the containers the first time or restore an older AIO instance from its borg backup before you can use the script.
You can do so by running the /daily-backup.sh script that is stored in the mastercontainer. It accepts the following environment variables:
AUTOMATIC_UPDATES if set to 1 , it will automatically stop the containers, update them and start them including the mastercontainer. If the mastercontainer gets updated, this script's execution will stop as soon as the mastercontainer gets stopped. You can then wait until it is started again and run the script with this flag again in order to update all containers correctly afterwards.DAILY_BACKUP if set to 1 , it will automatically stop the containers and create a backup. If you want to start them again afterwards, you may have a look at the START_CONTAINERS option.START_CONTAINERS if set to 1 , it will automatically start the containers without updating them.STOP_CONTAINERS if set to 1 , it will automatically stop the containers.CHECK_BACKUP if set to 1 , it will start the backup check. This is not allowed to be enabled at the same time like DAILY_BACKUP . Please be aware that this option is non-blocking which means that the backup check is not done when the process is finished since it only start the borgbackup container with the correct configuration. One example for this would be sudo docker exec -it --env DAILY_BACKUP=1 nextcloud-aio-mastercontainer /daily-backup.sh , which you can run via a cronjob or put it in a script.
Catatan
None of the option returns error codes. So you need to check for the correct result yourself.
If you already have a backup solution in place, you may want to hide the backup section. You can do so by adding --env AIO_DISABLE_BACKUP_SECTION=true to the docker run command of the mastercontainer (but before the last line nextcloud/all-in-one:latest ! If it was started already, you will need to stop the mastercontainer, remove it (no data will be lost) and recreate it using the docker run command that you initially used).
Peringatan
Do not set or adjust this value after the initial Nextcloud installation is done! If you still want to do it afterwards, see this on how to do it.
You can configure the Nextcloud container to use a specific directory on your host as data directory. You can do so by adding the environmental variable NEXTCLOUD_DATADIR to the docker run command of the mastercontainer (but before the last line nextcloud/all-in-one:latest ! If it was started already, you will need to stop the mastercontainer, remove it (no data will be lost) and recreate it using the docker run command that you initially used). Allowed values for that variable are strings that start with / and are not equal to / . The chosen directory or volume will then be mounted to /mnt/ncdata inside the container.
--env NEXTCLOUD_DATADIR="/mnt/ncdata" ./mnt/ncdata , make sure to choose a subfolder like eg /mnt/ncdata/nextcloud as datadir, since the root folder is not suited as datadir in that case . See #2696.--env NEXTCLOUD_DATADIR="/var/nextcloud-data"--env NEXTCLOUD_DATADIR="/volume1/docker/nextcloud/data" .--env NEXTCLOUD_DATADIR="/run/desktop/mnt/host/c/ncdata" . (This path is equivalent to C:ncdata on your Windows host so you need to translate the path accordingly. Hint: the path that you enter needs to start with /run/desktop/mnt/host/ . Append to that the exact location on your windows host, eg c/ncdata which is equivalent to C:ncdata .)--env NEXTCLOUD_DATADIR="nextcloud_aio_nextcloud_datadir" . This volume needs to be created beforehand manually by you in order to be able to use it. eg on Windows with: docker volume create ^
--driver local ^
--name nextcloud_aio_nextcloud_datadir ^
-o device="/host_mnt/e/your/data/path" ^
-o type="none" ^
-o o="bind"
E:yourdatapath into the volume so for a different location you need to adjust /host_mnt/e/your/data/path accordingly. Tentu. Add this to the /etc/fstab file on the host system:
<your-storage-host-and-subpath> <your-mount-dir> cifs rw,mfsymlinks,seal,credentials=<your-credentials-file>,uid=33,gid=0,file_mode=0770,dir_mode=0770 0 0
(Of course you need to modify <your-storage-host-and-subpath> , <your-mount-dir> and <your-credentials-file> for your specific case.)
One example could look like this:
//your-storage-host/subpath /mnt/storagebox cifs rw,mfsymlinks,seal,credentials=/etc/storage-credentials,uid=33,gid=0,file_mode=0770,dir_mode=0770 0 0
and add into /etc/storage-credentials :
 username=<smb/cifs username>
password=<password>
(Of course you need to modify <smb/cifs username> and <password> for your specific case.)
Now you can use /mnt/storagebox as Nextcloud's datadir like described in the section above this one.
By default, the Nextcloud container is confined and cannot access directories on the host OS. You might want to change this when you are planning to use local external storage in Nextcloud to store some files outside the data directory and can do so by adding the environmental variable NEXTCLOUD_MOUNT to the docker run command of the mastercontainer (but before the last line nextcloud/all-in-one:latest ! If it was started already, you will need to stop the mastercontainer, remove it (no data will be lost) and recreate it using the docker run command that you initially used). Allowed values for that variable are strings that start with / and are not equal to / .
--env NEXTCLOUD_MOUNT="/mnt/" and --env NEXTCLOUD_MOUNT="/media/" .--env NEXTCLOUD_MOUNT="/Volumes/your_drive/"--env NEXTCLOUD_MOUNT="/volume1/" .--env NEXTCLOUD_MOUNT="/run/desktop/mnt/host/d/your-folder/" . (This path is equivalent to D:your-folder on your Windows host so you need to translate the path accordingly. Hint: the path that you enter needs to start with /run/desktop/mnt/host/ . Append to that the exact location on your windows host, eg d/your-folder/ which is equivalent to D:your-folder .) After using this option, please make sure to apply the correct permissions to the directories that you want to use in Nextcloud. Eg sudo chown -R 33:0 /mnt/your-drive-mountpoint and sudo chmod -R 750 /mnt/your-drive-mountpoint should make it work on Linux when you have used --env NEXTCLOUD_MOUNT="/mnt/" . On Windows you could do this eg with docker exec -it nextcloud-aio-nextcloud chown -R 33:0 /run/desktop/mnt/host/d/your-folder/ and docker exec -it nextcloud-aio-nextcloud chmod -R 750 /run/desktop/mnt/host/d/your-folder/ .
You can then navigate to https://your-nc-domain.com/settings/apps/disabled , activate the external storage app, navigate to https://your-nc-domain.com/settings/admin/externalstorages and add a local external storage directory that will be accessible inside the container at the same place that you've entered. Eg /mnt/your-drive-mountpoint will be mounted to /mnt/your-drive-mountpoint inside the container, etc.
Be aware though that these locations will not be covered by the built-in backup solution - but you can add further Docker volumes and host paths that you want to back up after the initial backup is done.
Catatan
If you can't see the type "local storage" in the external storage admin options, a restart of the containers from the AIO interface may be required.
By default will the talk container use port 3478/UDP and 3478/TCP for connections. You can adjust the port by adding eg --env TALK_PORT=3478 to the docker run command of the mastercontainer (but before the last line nextcloud/all-in-one:latest ! If it was started already, you will need to stop the mastercontainer, remove it (no data will be lost) and recreate it using the docker run command that you initially used) and adjusting the port to your desired value. Best is to use a port over 1024, so eg 3479 to not run into this: #2517
By default, public uploads to Nextcloud are limited to a max of 10G (logged in users can upload much bigger files using the webinterface or the mobile/desktop clients, since chunking is used in that case). You can adjust the upload limit by providing --env NEXTCLOUD_UPLOAD_LIMIT=10G to the docker run command of the mastercontainer (but before the last line nextcloud/all-in-one:latest ! If it was started already, you will need to stop the mastercontainer, remove it (no data will be lost) and recreate it using the docker run command that you initially used) and customize the value to your fitting. It must start with a number and end with G eg 10G .
By default, uploads to Nextcloud are limited to a max of 3600s. You can adjust the upload time limit by providing --env NEXTCLOUD_MAX_TIME=3600 to the docker run command of the mastercontainer (but before the last line nextcloud/all-in-one:latest ! If it was started already, you will need to stop the mastercontainer, remove it (no data will be lost) and recreate it using the docker run command that you initially used) and customize the value to your fitting. It must be a number eg 3600 .
By default, each PHP process in the Nextcloud container is limited to a max of 512 MB. You can adjust the memory limit by providing --env NEXTCLOUD_MEMORY_LIMIT=512M to the docker run command of the mastercontainer (but before the last line nextcloud/all-in-one:latest ! If it was started already, you will need to stop the mastercontainer, remove it (no data will be lost) and recreate it using the docker run command that you initially used) and customize the value to your fitting. It must start with a number and end with M eg 1024M .
If you get an error during the domain validation which states that your ip-address is an internal or reserved ip-address, you can fix this by first making sure that your domain indeed has the correct public ip-address that points to the server and then adding --add-host yourdomain.com:<public-ip-address> to the docker run command of the mastercontainer (but before the last line nextcloud/all-in-one:latest ! If it was started already, you will need to stop the mastercontainer, remove it (no data will be lost) and recreate it using the docker run command that you initially used) which will allow the domain validation to work correctly. And so that you know: even if the A record of your domain should change over time, this is no problem since the mastercontainer will not make any attempt to access the chosen domain after the initial domain validation.
Ya. For that to work, you need to use and follow the manual-install documentation.
Ya. For that to work, you need to use and follow the helm-chart documentation.
You can run AIO also with docker rootless. How to do this is documented here: docker-rootless.md
Since Podman is not 100% compatible with the Docker API, Podman is not supported (since that would add yet another platform where the maintainer would need to test on). However you can use and follow the manual-install documentation to get AIO's containers running with Podman or use Docker rootless, as described in the above section. Also there is this now: #3487
You might want to adjust the Nextcloud apps that are installed upon the first startup of the Nextcloud container. You can do so by adding --env NEXTCLOUD_STARTUP_APPS="deck twofactor_totp tasks calendar contacts notes" to the docker run command of the mastercontainer (but before the last line nextcloud/all-in-one:latest ! If it was started already, you will need to stop the mastercontainer, remove it (no data will be lost) and recreate it using the docker run command that you initially used) and customize the value to your fitting. It must be a string with small letters az, 0-9, spaces and hyphens or '_'. You can disable shipped and by default enabled apps by adding a hyphen in front of the appid. Eg -contactsinteraction .
Some Nextcloud apps require additional external dependencies that must be bundled within Nextcloud container in order to work correctly. As we cannot put each and every dependency for all apps into the container - as this would make the project quickly unmaintainable - there is an official way in which you can add additional dependencies into the Nextcloud container. However note that doing this is disrecommended since we do not test Nextcloud apps that require external dependencies.
You can do so by adding --env NEXTCLOUD_ADDITIONAL_APKS="imagemagick dependency2 dependency3" to the docker run command of the mastercontainer (but before the last line nextcloud/all-in-one:latest ! If it was started already, you will need to stop the mastercontainer, remove it (no data will be lost) and recreate it using the docker run command that you initially used) and customize the value to your fitting. It must be a string with small letters az, digits 0-9, spaces, dots and hyphens or '_'. You can find available packages here: https://pkgs.alpinelinux.org/packages?branch=v3.20. By default imagemagick is added. If you want to keep it, you need to specify it as well.
Some Nextcloud apps require additional php extensions that must be bundled within Nextcloud container in order to work correctly. As we cannot put each and every dependency for all apps into the container - as this would make the project quickly unmaintainable - there is an official way in which you can add additional php extensions into the Nextcloud container. However note that doing this is disrecommended since we do not test Nextcloud apps that require additional php extensions.
You can do so by adding --env NEXTCLOUD_ADDITIONAL_PHP_EXTENSIONS="imagick extension1 extension2" to the docker run command of the mastercontainer (but before the last line nextcloud/all-in-one:latest ! If it was started already, you will need to stop the mastercontainer, remove it (no data will be lost) and recreate it using the docker run command that you initially used) and customize the value to your fitting. It must be a string with small letters az, digits 0-9, spaces, dots and hyphens or '_'. You can find available extensions here: https://pecl.php.net/packages.php. By default imagick is added. If you want to keep it, you need to specify it as well.
The facerecognition app requires the pdlib PHP extension to be installed. Unfortunately, it is not available on PECL nor via PHP core, so there is no way to add this into AIO currently. However you can use this community container in order to run facerecognition.
Peringatan
This only works if the /dev/dri device is present on the host! If it does not exists on your host, don't proceed as otherwise the Nextcloud container will fail to start! If you are unsure about this, better do not proceed with the instructions below.
The memories app allows to enable hardware transcoding for videos. In order to use that, you need to add --env NEXTCLOUD_ENABLE_DRI_DEVICE=true to the docker run command of the mastercontainer (but before the last line nextcloud/all-in-one:latest ! If it was started already, you will need to stop the mastercontainer, remove it (no data will be lost) and recreate it using the docker run command that you initially used) which will mount the /dev/dri device into the container. There is now a community container which allows to easily add the transcoding container of Memories to AIO: https://github.com/nextcloud/all-in-one/tree/main/community-containers/memories
In certain situations you might want to keep Nextcloud apps that are disabled in the AIO interface and not uninstall them if they should be installed in Nextcloud. You can do so by adding --env NEXTCLOUD_KEEP_DISABLED_APPS=true to the docker run command of the mastercontainer (but before the last line nextcloud/all-in-one:latest ! If it was started already, you will need to stop the mastercontainer, remove it (no data will be lost) and recreate it using the docker run command that you initially used).
Peringatan
Doing this might cause unintended problems in Nextcloud if an app that requires an external dependency is still installed but the external dependency not for example.
If you should run into issues with huge docker logs, you can adjust the log size by following https://docs.docker.com/config/containers/logging/local/#usage. However for the included AIO containers, this should usually not be needed because almost all of them have the log level set to warn so they should not produce many logs.
The files and folders that you add to Nextcloud are by default stored in the following docker directory: nextcloud_aio_nextcloud:/mnt/ncdata/ (usually /var/lib/docker/volumes/nextcloud_aio_nextcloud_data/_data/ on linux host systems). If needed, you can modify/add/delete files/folders there but ATTENTION : be very careful when doing so because you might corrupt your AIO installation! Best is to create a backup using the built-in backup solution before editing/changing files/folders in there because you will then be able to restore your instance to the backed up state.
After you are done modifying/adding/deleting files/folders, don't forget to apply the correct permissions by running: sudo docker exec nextcloud-aio-nextcloud chown -R 33:0 /mnt/ncdata/ and sudo docker exec nextcloud-aio-nextcloud chmod -R 750 /mnt/ncdata/ and rescan the files with sudo docker exec --user www-data -it nextcloud-aio-nextcloud php occ files:scan --all .
You can move the whole docker library and all its files including all Nextcloud AIO files and folders to a separate drive by first mounting the drive in the host OS (NTFS is not supported and ext4 is recommended as FS) and then following this tutorial: https://www.guguweb.com/2019/02/07/how-to-move-docker-data-directory-to-another-location-on-ubuntu/
(Of course docker needs to be installed first for this to work.)
docker rm nextcloud-aio-collabora ) AND the Collabora image ( docker image rm nextcloud/aio-collabora ).docker system prune ) (no data will be lost).This should solve the problem.
You can edit Nextclouds config.php file directly from the host with your favorite text editor. Eg like this: sudo docker run -it --rm --volume nextcloud_aio_nextcloud:/var/www/html:rw alpine sh -c "apk add --no-cache nano && nano /var/www/html/config/config.php" . Make sure to not break the file though which might corrupt your Nextcloud instance otherwise. In best case, create a backup using the built-in backup solution before editing the file.
All users see a set of default files and folders as dictated by Nextcloud's configuration. To change these default files and folders a custom skeleton directory must first be created; this can be accomplished by copying your skeleton files sudo docker cp --follow-link /path/to/nextcloud/skeleton/ nextcloud-aio-nextcloud:/mnt/ncdata/skeleton/ , applying the correct permissions with sudo docker exec nextcloud-aio-nextcloud chown -R 33:0 /mnt/ncdata/skeleton/ and sudo docker exec nextcloud-aio-nextcloud chmod -R 750 /mnt/ncdata/skeleton/ and setting the skeleton directory option with sudo docker exec --user www-data -it nextcloud-aio-nextcloud php occ config:system:set skeletondirectory --value="/mnt/ncdata/skeleton" . Further information is available in the Nextcloud documentation on configuration parameters for the skeleton directory.
You can configure your server to block certain ip-addresses using fail2ban as bruteforce protection. Here is how to set it up: https://docs.nextcloud.com/server/stable/admin_manual/installation/harden_server.html#setup-fail2ban. The logpath of AIO is by default /var/lib/docker/volumes/nextcloud_aio_nextcloud/_data/data/nextcloud.log . Do not forget to add chain=DOCKER-USER to your nextcloud jail config ( nextcloud.local ) otherwise the nextcloud service running on docker will still be accessible even if the IP is banned. Also, you may change the blocked ports to cover all AIO ports: by default 80,443,8080,8443,3478 (see this). Apart from that there is now a community container that can be added to the AIO stack: https://github.com/nextcloud/all-in-one/tree/main/community-containers/fail2ban
It is possible to connect to an existing LDAP server. You need to make sure that the LDAP server is reachable from the Nextcloud container. Then you can enable the LDAP app and configure LDAP in Nextcloud manually. If you don't have a LDAP server yet, recommended is to use this docker container: https://hub.docker.com/r/nitnelave/lldap. Make sure here as well that Nextcloud can talk to the LDAP server. The easiest way is by adding the LDAP docker container to the docker network nextcloud-aio . Then you can connect to the LDAP container by its name from the Nextcloud container. There is now a community container which allows to easily add LLDAP to AIO: https://github.com/nextcloud/all-in-one/tree/main/community-containers/lldap
Netdata allows you to monitor your server using a GUI. You can install it by following https://learn.netdata.cloud/docs/agent/packaging/docker#create-a-new-netdata-agent-container. Apart from that there is now a way for the community to add containers: #392 (comment)
If you want to use the user_sql app, the easiest way is to create an additional database container and add it to the docker network nextcloud-aio . Then the Nextcloud container should be able to talk to the database container using its name.
It is possible to install any of these to get a GUI for your AIO database. The pgAdmin container is recommended. You can get some docs on it here: https://www.pgadmin.org/docs/pgadmin4/latest/container_deployment.html. For the container to connect to the aio-database, you need to connect the container to the docker network nextcloud-aio and use nextcloud-aio-database as database host, oc_nextcloud as database username and the password that you get when running sudo docker exec nextcloud-aio-nextcloud grep dbpassword config/config.php as the password. Apart from that there is now a way for the community to add containers: #3061 (comment)
You can configure one yourself by using either of these four recommended projects: Docker Mailserver, Mailu, Maddy Mail Server, Mailcow or Stalwart. There is now a community container which allows to easily add Stalwart Mail server to AIO: https://github.com/nextcloud/all-in-one/tree/main/community-containers/stalwart
Please see the following documentation on this: migration.md
For integrating new containers, they must pass specific requirements for being considered to get integrated in AIO itself. Even if not considered, we may add some documentation on it. Also there is this now: https://github.com/nextcloud/all-in-one/tree/main/community-containers#community-containers
What are the requirements?
For some applications it might be necessary to establish a secure connection to another host/server which is using a certificate issued by a Certification Authority that is not trusted out of the box. An example could be configuring LDAPS against a domain controller (Active Directory or Samba-based) of an organization.
You can make the Nextcloud container trust any Certification Authority by providing the environmental variable NEXTCLOUD_TRUSTED_CACERTS_DIR to the docker run command of the mastercontainer (but before the last line nextcloud/all-in-one:latest ! If it was started already, you will need to stop the mastercontainer, remove it (no data will be lost) and recreate it using the docker run command that you initially used). The value of the variables should be set to the absolute paths of the directory on the host, which contains one or more Certification Authorities certificates. You should use X.509 certificates, Base64 encoded. (Other formats may work but have not been tested!) All the certificates in the directory will be trusted.
When using docker run , the environmental variable can be set with --env NEXTCLOUD_TRUSTED_CACERTS_DIR=/path/to/my/cacerts .
In order for the value to be valid, the path should start with / and not end with / and point to an existing directory . Pointing the variable directly to a certificate file will not work and may also break things.
The Collabora container enables Seccomp by default, which is a security feature of the Linux kernel. On systems without this kernel feature enabled, you need to provide --env COLLABORA_SECCOMP_DISABLED=true to the initial docker run command in order to make it work.
If you have an external backup solution, you might want to enable automatic updates without creating a backup first. However note that doing this is disrecommended since you will not be able to easily create and restore a backup from the AIO interface anymore and you need to make sure to shut down all the containers properly before creating the backup, eg by stopping them from the AIO interface first.
But anyhow, is here a guide that helps you automate the whole procedure:
 #! /bin/bash

# Stop the containers
docker exec --env STOP_CONTAINERS=1 nextcloud-aio-mastercontainer /daily-backup.sh

# Below is optional if you run AIO in a VM which will shut down the VM afterwards
# poweroff
You can simply copy and paste the script into a file eg named shutdown-script.sh eg here: /root/shutdown-script.sh .
Afterwards apply the correct permissions with sudo chown root:root /root/shutdown-script.sh and sudo chmod 700 /root/shutdown-script.sh . Then you can create a cronjob that runs it on a schedule eg runs the script at 04:00 each day like this:
sudo crontab -u root -e (and choose your editor of choice if not already done. I'd recommend nano).0 4 * * * /root/shutdown-script.sh which will run the script at 04:00 each day.Ctrl + o and then Enter to save, and close the editor with Ctrl + x ).After that is in place, you should schedule a backup from your backup solution that creates a backup after AIO is shut down properly. Hint: If your backup runs on the same host, make sure to at least back up all docker volumes and additionally Nextcloud's datadir if it is not stored in a docker volume.
Afterwards, you can create a second script that automatically updates the containers:
 #! /bin/bash

# Run container update once
if ! docker exec --env AUTOMATIC_UPDATES=1 nextcloud-aio-mastercontainer /daily-backup.sh ; then
    while docker ps --format " {{.Names}} " | grep -q " ^nextcloud-aio-watchtower$ " ; do
        echo " Waiting for watchtower to stop "
        sleep 30
    done

    while ! docker ps --format " {{.Names}} " | grep -q " ^nextcloud-aio-mastercontainer$ " ; do
        echo " Waiting for Mastercontainer to start "
        sleep 30
    done

    # Run container update another time to make sure that all containers are updated correctly.
    docker exec --env AUTOMATIC_UPDATES=1 nextcloud-aio-mastercontainer /daily-backup.sh
fi
You can simply copy and paste the script into a file eg named automatic-updates.sh eg here: /root/automatic-updates.sh .
Afterwards apply the correct permissions with sudo chown root:root /root/automatic-updates.sh and sudo chmod 700 /root/automatic-updates.sh . Then you can create a cronjob that runs eg at 05:00 each day like this:
sudo crontab -u root -e (and choose your editor of choice if not already done. I'd recommend nano).0 5 * * * /root/automatic-updates.sh which will run the script at 05:00 each day.Ctrl + o then Enter to save, and close the editor with Ctrl + x ).By design, Caddy that runs inside the mastercontainer, which handles automatic TLS certificate generation for the AIO interface, is vulnerable to receiving DNS challenges for arbitrary hostnames from anyone on the internet. While this does not compromise your server's security, it can result in cluttered logs and rejected certificate renewal attempts due to rate limit abuse. To mitigate this issue, it is recommended to place the AIO interface behind a VPN and/or limit its public exposure.


