Agently
v3.4.0.5
[Important] Agently AI 개발 프레임워크의 중국어 홈페이지 개정이 완료되었으며, 모델 전환, AgenticRequest 및 Workflow에 대한 새로운 튜토리얼 문서가 완전히 업데이트되었습니다. Agently.cn을 방문하여 확인하세요.
[Important] 최근 작업에 대해 더 자세히 알려드리기 위해 곧 repo 홈페이지를 다시 작성할 예정이니 기다려 주세요.
[쇼케이스 레포]Agently Daily News Collector: English 뉴스 요약 보고서 생성기 오픈 소스 프로젝트
[hot] 얕은 것부터 깊은 것까지 개발 문서의 중국어 버전: 여기를 클릭하여 복잡한 LLM 응용 프로그램 개발 기술에 단계별로 액세스하고 잠금을 해제하세요.
? 사용 방법:
pip install -U Agently아이디어/버그 신고: 여기에서 문제를 신고하세요.
? 이메일을 보내주세요:[email protected]
? 디스코드 그룹:
가입하려면 여기를 클릭하거나 아래 QR 코드를 스캔하세요.
위챗 그룹(위챗 그룹 가입):
아래 QR 코드를 적용하거나 스캔하려면 여기를 클릭하세요.
이 프로젝트가 마음에 드셨다면 ️, 감사합니다.
Colab 문서:
코드 예:
다양한 분야에서 에이전트를 구축하려면 다음을 수행하세요.
또는 코드 로직에서 에이전트 인스턴스 기능을 호출하여 도움을 받으려면 다음을 수행하세요.
자세히 살펴보기: Demostration Playground 방문
Agently Python 패키지를 설치합니다.
pip install -U Agently그러면 우리는 갈 준비가 되었습니다!
Agently는 개발자가 AI 에이전트 기본 애플리케이션을 매우 빠르게 구축하는 데 도움이 되는 개발 프레임워크입니다.
매우 간단한 방법으로 코드에서 AI 에이전트를 사용하고 구축할 수 있습니다.
AI 에이전트 인스턴스를 생성한 다음 아래와 같이 매우 적은 코드로 함수를 호출하는 것처럼 상호 작용할 수 있습니다.
아래의 실행 버튼을 클릭하고 마술을 경험해 보세요. 아주 간단합니다.
 # Import and Init Settings
import Agently
agent = Agently . create_agent ()
agent
    . set_settings ( "current_model" , "OpenAI" )
    . set_settings ( "model.OpenAI.auth" , { "api_key" : "" })

# Interact with the agent instance like calling a function
result = agent
    . input ( "Give me 3 words" )
    . output ([( "String" , "one word" )])
    . start ()
print ( result )
['apple', 'banana', 'carrot']
그리고 result 값을 인쇄할 때 그 값은 .output() 에 넣은 매개변수 형식과 같은 list 이라는 것을 알 수 있습니다.
Agently 프레임워크에서는 애플리케이션 개발자가 Agent 인스턴스를 비즈니스 코드에 더 쉽게 통합할 수 있도록 이와 같은 많은 작업을 수행했습니다. 이를 통해 애플리케이션 개발자는 서비스 제공 방법을 파악하는 대신 비즈니스 로직을 구축하는 방법에 집중할 수 있습니다. 언어 모델 또는 모델 만족을 유지하는 방법.
비즈니스 로직을 처리하기 위해 코드에서 AI 에이전트를 사용하기 시작하면 기존 소프트웨어 개발 방식과 몇 가지 차이점이 있음을 쉽게 느낄 수 있습니다. 그러나 정확히 차이점은 무엇입니까?
사람이 만든 코드 논리 대신 AI 에이전트를 사용해 문제를 해결하는 것이 핵심이라고 생각합니다.
AI 에이전트 네이티브 애플리케이션에서는 AI 에이전트 인스턴스를 코드에 넣은 다음 자연어 또는 자연어와 유사한 표현으로 문제를 실행/해결하도록 요청합니다.
"질문-응답 받기"는 전통적인 "문제 정의 - 프로그램 - 발생을 위한 코드"를 대신합니다.
그것이 사실이고 우리가 말하는 것처럼 쉬울 수 있습니까?
물론입니다! Agently 프레임워크는 AI 에이전트 인스턴스와 상호 작용하는 쉬운 방법을 제공하여 애플리케이션 모듈 개발을 빠르고 쉽게 만듭니다.
아래에는 완전히 다른 두 도메인에 있지만 둘 다 Agently에서 제공하는 64줄의 코드로 구축된 두 개의 CLI 애플리케이션 데모가 있습니다.
데모 비디오
암호
 import Agently
agent_factory = Agently . AgentFactory ( is_debug = False )

agent_factory
    . set_settings ( "current_model" , "OpenAI" )
    . set_settings ( "model.OpenAI.auth" , { "api_key" : "" })

agent = agent_factory . create_agent ()

meta_data = {
    "table_meta" : [
        {
            "table_name" : "user" ,
            "columns" : [
                { "column_name" : "user_id" , "desc" : "identity of user" , "value type" : "Number" },
                { "column_name" : "gender" , "desc" : "gender of user" , "value type" : [ "male" , "female" ] },
                { "column_name" : "age" , "desc" : "age of user" , "value type" : "Number" },
                { "column_name" : "customer_level" , "desc" : "level of customer account" , "value type" : [ 1 , 2 , 3 , 4 , 5 ] },
            ]
        },
        {
            "table_name" : "order" ,
            "columns" : [
                { "column_name" : "order_id" , "desc" : "identity of order" , "value type" : "Number" },
                { "column_name" : "customer_user_id" , "desc" : "identity of customer, same value as user_id" , "value type" : "Number" },
                { "column_name" : "item_name" , "desc" : "item name of this order" , "value type" : "String" },
                { "column_name" : "item_number" , "desc" : "how many items to buy in this order" , "value type" : "Number" },
                { "column_name" : "price" , "desc" : "how much of each item" , "value type" : "Number" },
                { "column_name" : "date" , "desc" : "what date did this order happend" , "value type" : "Date" },
            ]
        },
    ]
}

is_finish = False
while not is_finish :
    question = input ( "What do you want to know: " )
    show_thinking = None
    while str ( show_thinking ). lower () not in ( "y" , "n" ):
        show_thinking = input ( "Do you want to observe the thinking process? [Y/N]: " )
    show_thinking = False if show_thinking . lower () == "n" else True
    print ( "[Generating...]" )
    result = agent
        . input ({
            "table_meta" : meta_data [ "table_meta" ],
            "question" : question
        })
        . instruct ([
            "output SQL to query the database according meta data:{table_meta} that can anwser the question:{question}" ,
            "output language: English" ,
        ])
        . output ({
            "thinkings" : [ "String" , "Your problem solving thinking step by step" ],
            "SQL" : ( "String" , "final SQL only" ),
        })
        . start ()
    if show_thinking :
        thinking_process = " n " . join ( result [ "thinkings" ])
        print ( "[Thinking Process] n " , thinking_process )
    print ( "[SQL] n " , result [ "SQL" ])
    while str ( is_finish ). lower () not in ( "y" , "n" ):
        is_finish = input ( "Do you want to quit?[Y to quit / N to continue]: " )
is_finish = False if is_finish . lower () == "n" else True import Agently
agent_factory = Agently . AgentFactory ( is_debug = False )
agent_factory
. set_settings ( "current_model" , "OpenAI" )
. set_settings ( "model.OpenAI.auth" , { "api_key" : "" })
writer_agent = agent_factory . create_agent ()
roleplay_agent = agent_factory . create_agent ()
# Create Character
character_desc = input ( "Describe the character you want to talk to with a few words: " )
is_accepted = ""
suggestions = ""
last_time_character_setting = {}
while is_accepted . lower () != "y" :
is_accepted = ""
input_dict = { "character_desc" : character_desc }
if suggestions != "" :
input_dict . update ({ "suggestions" : suggestions })
input_dict . update ({ "last_time_character_setting" : last_time_character_setting })
setting_result = writer_agent
. input ( input_dict )
. instruct ([
"Design a character based on {input.character_desc}." ,
"if {input.suggestions} exist, rewrite {input.last_time_character_setting} followed {input.suggestions}."
])
. output ({
"name" : ( "String" ,),
"age" : ( "Number" ,),
"character" : ( "String" , "Descriptions about the role of this character, the actions he/she likes to take, his/her behaviour habbits, etc." ),
"belief" : ( "String" , "Belief or mottos of this character" ),
"background_story" : [( "String" , "one part of background story of this character" )],
"response_examples" : [{ "Question" : ( "String" , "question that user may ask this character" ), "Response" : ( "String" , "short and quick response that this character will say." ) }],
})
. on_delta ( lambda data : print ( data , end = "" ))
. start ()
while is_accepted . lower () not in ( "y" , "n" ):
is_accepted = input ( "Are you satisfied with this character role setting? [Y/N]: " )
if is_accepted . lower () == "n" :
suggestions = input ( "Do you have some suggestions about this setting? (leave this empty will redo all the setting): " )
if suggestions != "" :
last_time_character_settings = setting_result
print ( "[Start Loading Character Setting to Agent...]" )
# Load Character to Agent then Chat with It
for key , value in setting_result . items ():
roleplay_agent . set_role ( key , value )
print ( "[Loading is Done. Let's Start Chatting](input '#exit' to quit)" )
roleplay_agent . active_session ()
chat_input = ""
while True :
chat_input = input ( "YOU: " )
if chat_input == "#exit" :
break
print ( f" { setting_result [ 'name' ] } : " , end = "" )
roleplay_agent
. input ( chat_input )
. instruct ( "Response {chat_input} follow your {ROLE} settings. Response like in a CHAT not a query or request!" )
. on_delta ( lambda data : print ( data , end = "" ))
. start ()
print ( "" )
print ( "Bye~" )OpenAI의 Lilian Weng이 작성한 LLM Powered Autonomous Agents에 대한 게시물은 AI 에이전트의 기본 구조에 대한 훌륭한 개념을 제공했지만 AI 에이전트를 구축하는 방법에 대한 설명은 제공하지 않았습니다.
LangChain 및 Camel-AI와 같은 일부 멋진 프로젝트에서는 AI 에이전트를 구축하는 방법에 대한 아이디어를 제시합니다. 이러한 프로젝트에서 에이전트는 에이전트의 작업이나 에이전트의 사고 과정에 따라 다양한 유형으로 분류됩니다.
그러나 에이전트를 구축하기 위해 이러한 아이디어를 따른다면 이는 모든 프로젝트가 ChatAgent 기본 클래스 또는 이와 유사한 것을 제공하더라도 새 에이전트를 갖기를 원한다면 완전히 새로운 에이전트를 구축해야 함을 의미합니다. 새로운 에이전트 하위 클래스가 구축되고 점점 더 구체적인 유형의 에이전트가 생성될 예정입니다. 에이전트 유형의 수가 늘어나면 언젠가는 개발자가 선택할 수 있는 에이전트 유형과 에이전트 플랫폼이 너무 많아질 것입니다. 관리하기가 어려울 것입니다. 선택도 어렵고, 관리도 어렵고, 업데이트도 어렵습니다.
따라서 Agently 팀은 에이전트를 향상하고 모든 개발자가 쉽게 참여할 수 있는 더 나은 방법이 있는지 궁금해하지 않을 수 없습니다.
또한 현재 AI 에이전트의 구조와 구성 요소는 간단하고 쉽게 구축할 수 있는 것처럼 보이지만, 앞으로 내다보면 각 구성 요소는 더 복잡해지고(예: 메모리 관리) 점점 더 많은 새로운 구성 요소가 추가될 것입니다(예: 센서). .
분할되지 않은 전체처럼 에이전트 구축을 중단하고 런타임 컨텍스트 데이터 및 런타임 프로세스를 관리하는 중앙 구조로 분리하고 다른 플러그인과 연결하여 런타임 프로세스에서 기능을 향상시켜 다양한 사용 시나리오에 적합하게 만들면 어떻게 될까요? 유명한 엔지니어링 모토처럼 "분할하고 정복하라".
우리는 Agently 3.0에서 이를 실현했으며 Agently 3.0의 알파 테스트에서 이 플러그인-강화 디자인이 완전히 새로운 에이전트를 재구축하는 문제를 해결할 뿐만 아니라 각 구성 요소 개발자가 대상에 집중하는 데 도움이 되는 것을 보고 기뻤습니다. 주의가 산만해지지 않고 해당 구성 요소에만 관심이 있는 질문을 하면 구성 요소 플러그인 개발이 정말 쉽고 코드가 단순해집니다.
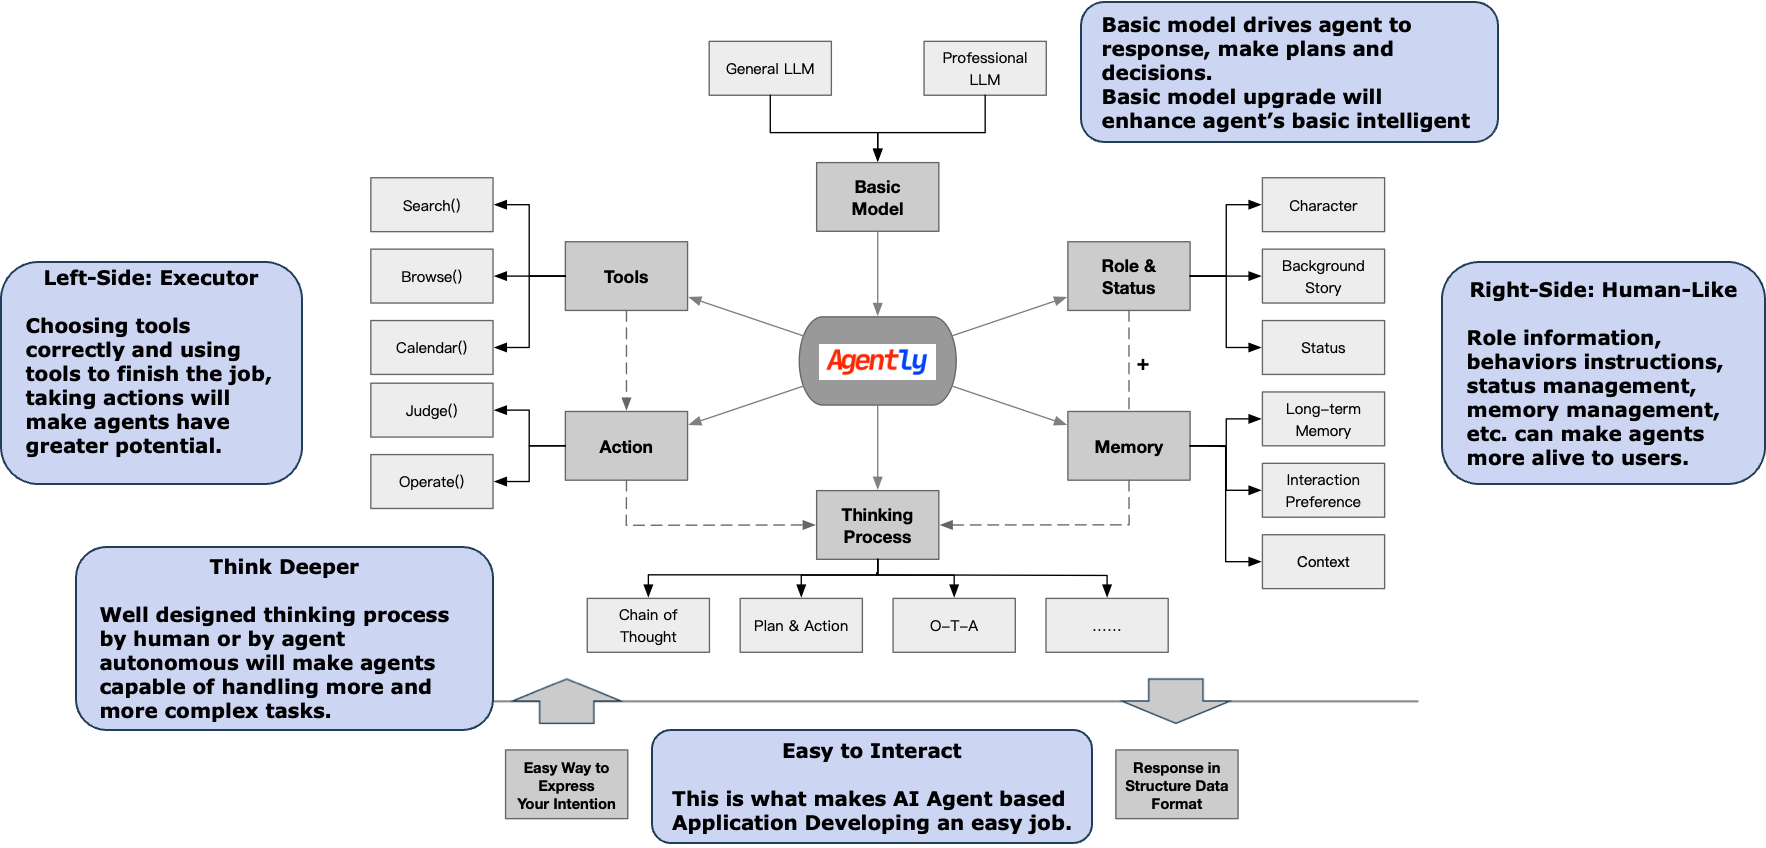
다음은 Agently 프레임워크에서 에이전트 구성 요소 플러그인을 개발하는 방법을 보여주는 예입니다. 런타임 컨텍스트 데이터 관리 작업이 프레임워크에 의해 수행되었기 때문에 플러그인 개발자는 에이전트 구성 요소 플러그인 구축을 돕기 위해 많은 런타임 도구를 사용할 수 있습니다. 꽤 쉽습니다.
️ : 아래 코드는 플러그인 코드 예시로, 프레임워크에서 작동하므로 별도로 실행할 수 없습니다.
 from . utils import ComponentABC
from Agently . utils import RuntimeCtxNamespace

# Create Plugin Class comply with Abstract Basic Class
class Role ( ComponentABC ):
    def __init__ ( self , agent : object ):
        self . agent = agent
        # Framework pass runtime_ctx and storage through and component can use them
        self . role_runtime_ctx = RuntimeCtxNamespace ( "role" , self . agent . agent_runtime_ctx )
        self . role_storage = self . agent . global_storage . table ( "role" )

    # Defined methods of this component
    # Update runtime_ctx which follow the agent instance lifetime circle
    def set_name ( self , name : str , * , target : str ):
        self . role_runtime_ctx . set ( "NAME" , name )
        return self . agent

    def set ( self , key : any , value : any = None , * , target : str ):
        if value is not None :
            self . role_runtime_ctx . set ( key , value )
        else :
            self . role_runtime_ctx . set ( "DESC" , key )
        return self . agent

    def update ( self , key : any , value : any = None , * , target : str ):
        if value is not None :
            self . role_runtime_ctx . update ( key , value )
        else :
            self . role_runtime_ctx . update ( "DESC" , key )
        return self . agent

    def append ( self , key : any , value : any = None , * , target : str ):
        if value is not None :
            self . role_runtime_ctx . append ( key , value )
        else :
            self . role_runtime_ctx . append ( "DESC" , key )
        return self . agent

    def extend ( self , key : any , value : any = None , * , target : str ):
        if value is not None :
            self . role_runtime_ctx . extend ( key , value )
        else :
            self . role_runtime_ctx . extend ( "DESC" , key )
        return self . agent

    # Or save to / load from storage which keep the data in file storage or database
    def save ( self , role_name : str = None ):
        if role_name == None :
            role_name = self . role_runtime_ctx . get ( "NAME" )
        if role_name != None and role_name != "" :
            self . role_storage
                . set ( role_name , self . role_runtime_ctx . get ())
                . save ()
            return self . agent
        else :
            raise Exception ( "[Agent Component: Role] Role attr 'NAME' must be stated before save. Use .set_role_name() to specific that." )

    def load ( self , role_name : str ):
        role_data = self . role_storage . get ( role_name )
        for key , value in role_data . items ():
            self . role_runtime_ctx . update ( key , value )
        return self . agent

    # Pass the data to request standard slots on Prefix Stage
    def _prefix ( self ):
        return {
            "role" : self . role_runtime_ctx . get (),
        }

    # Export component plugin interface to be called in agent runtime process
    def export ( self ):
        return {
            "early" : None , # method to be called on Early Stage
            "prefix" : self . _prefix , # method to be called on Prefix Stage
            "suffix" : None , # mothod to be called on Suffix Stage
            # Alias that application developers can use in agent instance
            # Example:
            # "alias": { "set_role_name": { "func": self.set_name } }
            # => agent.set_role_name("Alice")
            "alias" : {
                "set_role_name" : { "func" : self . set_name },
                "set_role" : { "func" : self . set },
                "update_role" : { "func" : self . update },
                "append_role" : { "func" : self . append },
                "extend_role" : { "func" : self . extend },
                "save_role" : { "func" : self . save },
                "load_role" : { "func" : self . load },
            },
        }

# Export to Plugins Dir Auto Scaner
def export ():
return ( "Role" , Role )또한 Agently 프레임워크를 사용하면 플러그인 개발자가 프레임워크의 기본 패키지 외부에 플러그인을 압축하고 플러그인 패키지를 다른 개발자와 개별적으로 공유할 수 있습니다. 플러그인을 쉽게 설치하세요.
아래 코드는 이 설치가 얼마나 쉬운지 보여줍니다.
️ : 아래 코드는 플러그인 설치 예시로, 작업 폴더에 플러그인 폴더의 압축을 풀어야 작동합니다.
 import Agently
# Import install method from plugin folder
from session_plugin import install
# Then install
install ( Agently )
# That's all
# Now your agent can use new abilities enhanced by new plugin
Agently v3.0.1에서 세션 구성 요소를 사용할 수 없게 만드는 문제가 발생한 실제 사례도 있습니다. 우리는 플러그인 패키지 업데이트를 사용하여 전체 프레임워크 패키지를 업데이트하지 않고도 버그를 수정할 수 있습니다.
이상으로 Agently AI 에이전트 개발 프레임워크에 대한 일반적인 소개였습니다.
더 자세히 알아보고 싶다면 다음 문서/링크를 방문할 수도 있습니다.
우리 작업이 마음에 드신다면 이 저장소를 잊지 마세요.
감사합니다. 즐거운 코딩 되세요!