conda create -n pixart python=3.9
conda activate pixart
pip install torch==2.1.1 torchvision==0.16.1 torchaudio==2.1.1 --index-url https://download.pytorch.org/whl/cu118

git clone https://github.com/PixArt-alpha/PixArt-alpha.git
cd PixArt-alpha
pip install -r requirements.txt모든 모델이 자동으로 다운로드됩니다. 이 URL에서 수동으로 다운로드하도록 선택할 수도 있습니다.
| 모델 | #Params | URL | OpenXLab에서 다운로드 |
|---|---|---|---|
| T5 | 4.3B | T5 | T5 |
| VAE | 80M | VAE | VAE |
| PixArt-α-SAM-256 | 0.6B | PixArt-XL-2-SAM-256x256.pth 또는 디퓨저 버전 | 256-샘 |
| PixArt-α-256 | 0.6B | PixArt-XL-2-256x256.pth 또는 디퓨저 버전 | 256 |
| PixArt-α-256-MSCOCO-FID7.32 | 0.6B | PixArt-XL-2-256x256.pth | 256 |
| PixArt-α-512 | 0.6B | PixArt-XL-2-512x512.pth 또는 디퓨저 버전 | 512 |
| PixArt-α-1024 | 0.6B | PixArt-XL-2-1024-MS.pth 또는 디퓨저 버전 | 1024 |
| PixArt-δ-1024-LCM | 0.6B | 디퓨저 버전 | |
| ControlNet-HED-인코더 | 30M | ControlNetHED.pth | |
| PixArt-δ-512-ControlNet | 0.9B | PixArt-XL-2-512-ControlNet.pth | 512 |
| PixArt-δ-1024-ControlNet | 0.9B | PixArt-XL-2-1024-ControlNet.pth | 1024 |
또한 OpenXLab_PixArt-alpha에서 모든 모델을 찾으세요.
가장 먼저.
@kopyl 덕분에 노트북을 사용하여 HugginFace의 Pokemon 데이터세트에 대한 전체 미세 조정 훈련 흐름을 재현할 수 있습니다.
그럼 자세한 내용은 다음과 같습니다.
여기서는 SAM 데이터 세트 훈련 구성을 예로 들지만, 물론 이 방법에 따라 자체 데이터 세트를 준비할 수도 있습니다.
config의 구성 파일과 데이터 세트의 dataloader 만 변경하면 됩니다.
python -m torch.distributed.launch --nproc_per_node=2 --master_port=12345 train_scripts/train.py configs/pixart_config/PixArt_xl2_img256_SAM.py --work-dir output/train_SAM_256SAM 데이터세트의 디렉터리 구조는 다음과 같습니다.
 cd ./data

SA1B
├──images/  (images are saved here)
│  ├──sa_xxxxx.jpg
│  ├──sa_xxxxx.jpg
│  ├──......
├──captions/    (corresponding captions are saved here, same name as images)
│  ├──sa_xxxxx.txt
│  ├──sa_xxxxx.txt
├──partition/   (all image names are stored txt file where each line is a image name)
│  ├──part0.txt
│  ├──part1.txt
│  ├──......
├──caption_feature_wmask/   (run tools/extract_caption_feature.py to generate caption T5 features, same name as images except .npz extension)
│  ├──sa_xxxxx.npz
│  ├──sa_xxxxx.npz
│  ├──......
├──img_vae_feature/  (run tools/extract_img_vae_feature.py to generate image VAE features, same name as images except .npy extension)
│  ├──train_vae_256/
│  │  ├──noflip/
│  │  │  ├──sa_xxxxx.npy
│  │  │  ├──sa_xxxxx.npy
│  │  │  ├──......
여기서는 더 나은 이해를 위해 data_toy를 준비합니다.
 cd ./data

git lfs install
git clone https://huggingface.co/datasets/PixArt-alpha/data_toy
그런 다음 partition/part0.txt 파일의 예는 다음과 같습니다.
게다가 json 파일 안내 교육을 위해 더 나은 이해를 위한 장난감 json 파일이 있습니다.
Pixart + DreamBooth 교육 지침을 따르세요.
PixArt + LCM 교육 지침을 따르세요.
PixArt + ControlNet 교육 지침을 따르십시오.
pip install peft==0.6.2

accelerate launch --num_processes=1 --main_process_port=36667  train_scripts/train_pixart_lora_hf.py --mixed_precision= " fp16 "
  --pretrained_model_name_or_path=PixArt-alpha/PixArt-XL-2-1024-MS
  --dataset_name=lambdalabs/pokemon-blip-captions --caption_column= " text "
  --resolution=1024 --random_flip
  --train_batch_size=16
  --num_train_epochs=200 --checkpointing_steps=100
  --learning_rate=1e-06 --lr_scheduler= " constant " --lr_warmup_steps=0
  --seed=42
  --output_dir= " pixart-pokemon-model "
  --validation_prompt= " cute dragon creature " --report_to= " tensorboard "
  --gradient_checkpointing --checkpoints_total_limit=10 --validation_epochs=5
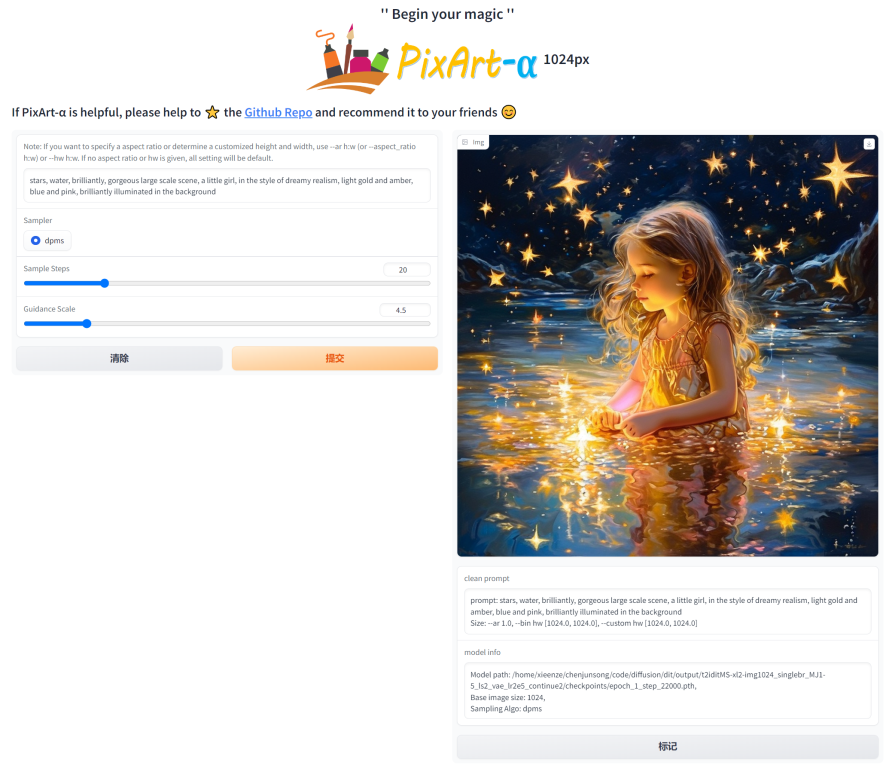
--rank=16 추론에는 이 리포지토리를 사용하는 데 최소 23GB 의 GPU 메모리가 필요하고, ?를 사용하려면 11GB and 8GB 필요합니다. 디퓨저.
현재 지원되는 것:
시작하려면 먼저 필요한 종속성을 설치하세요. 모델을 출력/pretrained_models 폴더에 다운로드했는지 확인한 후 로컬 머신에서 실행하세요.
DEMO_PORT=12345 python app/app.py대안으로 Gradio 앱을 시작하는 런타임 컨테이너를 만들기 위한 샘플 Dockerfile이 제공됩니다.
docker build . -t pixart
docker run --gpus all -it -p 12345:12345 -v < path_to_huggingface_cache > :/root/.cache/huggingface pixart
또는 docker-compose를 사용하세요. 앱의 컨텍스트를 1024에서 512 또는 LCM 버전으로 변경하려면 docker-compose.yml 파일에서 APP_CONTEXT env 변수를 변경하면 됩니다. 기본값은 1024입니다.
docker compose build
docker compose up
http://your-server-ip:12345 사용한 간단한 예를 살펴보겠습니다.
다음 라이브러리의 업데이트된 버전이 있는지 확인하세요.
pip install -U transformers accelerate diffusers SentencePiece ftfy beautifulsoup4그런 다음:
 import torch
from diffusers import PixArtAlphaPipeline , ConsistencyDecoderVAE , AutoencoderKL
device = torch . device ( "cuda:0" if torch . cuda . is_available () else "cpu" )

# You can replace the checkpoint id with "PixArt-alpha/PixArt-XL-2-512x512" too.
pipe = PixArtAlphaPipeline . from_pretrained ( "PixArt-alpha/PixArt-XL-2-1024-MS" , torch_dtype = torch . float16 , use_safetensors = True )

# If use DALL-E 3 Consistency Decoder
# pipe.vae = ConsistencyDecoderVAE.from_pretrained("openai/consistency-decoder", torch_dtype=torch.float16)

# If use SA-Solver sampler
# from diffusion.sa_solver_diffusers import SASolverScheduler
# pipe.scheduler = SASolverScheduler.from_config(pipe.scheduler.config, algorithm_type='data_prediction')

# If loading a LoRA model
# transformer = Transformer2DModel.from_pretrained("PixArt-alpha/PixArt-LCM-XL-2-1024-MS", subfolder="transformer", torch_dtype=torch.float16)
# transformer = PeftModel.from_pretrained(transformer, "Your-LoRA-Model-Path")
# pipe = PixArtAlphaPipeline.from_pretrained("PixArt-alpha/PixArt-LCM-XL-2-1024-MS", transformer=transformer, torch_dtype=torch.float16, use_safetensors=True)
# del transformer

# Enable memory optimizations.
# pipe.enable_model_cpu_offload()

pipe . to ( device )

prompt = "A small cactus with a happy face in the Sahara desert."
image = pipe ( prompt ). images [ 0 ]
image . save ( "./catcus.png" )
SA-Solver Sampler에 대한 자세한 내용은 설명서를 확인하세요.
이 통합을 통해 11GB GPU VRAM에서 4배치 크기로 파이프라인을 실행할 수 있습니다. 자세한 내용은 설명서를 확인하세요.
PixArtAlphaPipeline 실행이제 8GB 미만의 GPU VRAM 소비가 지원됩니다. 자세한 내용은 설명서를 참조하세요.
시작하려면 먼저 필요한 종속성을 설치한 후 로컬 머신에서 실행하세요.
 # diffusers version
DEMO_PORT=12345 python app/app.py
http://your-server-ip:12345 사용한 간단한 예를 살펴보겠습니다.
여기를 클릭하여 Google Colab 무료 평가판을 사용해 볼 수도 있습니다.
python tools/convert_pixart_alpha_to_diffusers.py --image_size your_img_size --multi_scale_train (True if you use PixArtMS else False) --orig_ckpt_path path/to/pth --dump_path path/to/diffusers --only_transformer=True
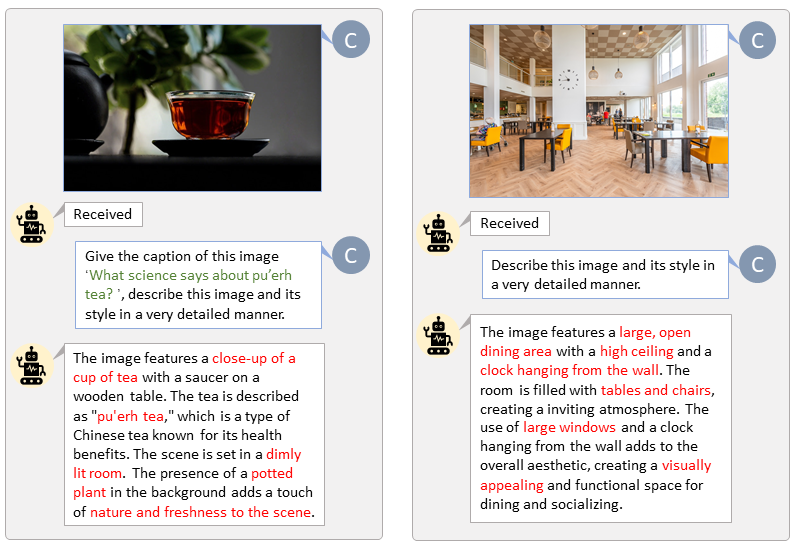
LLaVA-Lightning-MPT의 코드 베이스 덕분에 다음 실행 코드를 사용하여 LAION 및 SAM 데이터세트에 캡션을 추가할 수 있습니다.
python tools/VLM_caption_lightning.py --output output/dir/ --data-root data/root/path --index path/to/data.jsonLAION(왼쪽) 및 SAM(오른쪽)에 대한 사용자 지정 프롬프트를 사용하여 자동 라벨링을 제공합니다. 녹색으로 강조된 단어는 LAION의 원본 캡션을 나타내고, 빨간색으로 표시된 단어는 LLaVA에서 라벨링한 세부 캡션을 나타냅니다.

T5 텍스트 기능과 VAE 이미지 기능을 미리 준비하면 훈련 프로세스 속도가 빨라지고 GPU 메모리가 절약됩니다.
python tools/extract_features.py --img_size=1024
    --json_path " data/data_info.json "
    --t5_save_root " data/SA1B/caption_feature_wmask "
    --vae_save_root " data/SA1B/img_vae_features "
    --pretrained_models_dir " output/pretrained_models "
--dataset_root " data/SA1B/Images/ " 우리는 PixArt를 현재 가장 강력한 Text-to-Image 모델과 비교하는 비디오를 만듭니다.
 @misc{chen2023pixartalpha,
      title={PixArt-$alpha$: Fast Training of Diffusion Transformer for Photorealistic Text-to-Image Synthesis},
      author={Junsong Chen and Jincheng Yu and Chongjian Ge and Lewei Yao and Enze Xie and Yue Wu and Zhongdao Wang and James Kwok and Ping Luo and Huchuan Lu and Zhenguo Li},
      year={2023},
      eprint={2310.00426},
      archivePrefix={arXiv},
      primaryClass={cs.CV}
}
@misc{chen2024pixartdelta,
      title={PIXART-{delta}: Fast and Controllable Image Generation with Latent Consistency Models},
      author={Junsong Chen and Yue Wu and Simian Luo and Enze Xie and Sayak Paul and Ping Luo and Hang Zhao and Zhenguo Li},
      year={2024},
      eprint={2401.05252},
      archivePrefix={arXiv},
      primaryClass={cs.CV}
}