loopgpt
v0.1.1
L♾️pGPT
모듈식 자동 GPT 프레임워크
L♾️pGPT는 인기 있는 Auto-GPT 프로젝트를 모듈성과 확장성을 염두에 두고 작성된 적절한 Python 패키지로 다시 구현한 것입니다.
? L♾️pGPT의 최신 안정 버전이 설치됩니다. 이는 대부분의 사용자에게 권장됩니다.
pip install loopgpt아래 두 가지 방법으로 최신 개발 버전의 L♾️pGPT를 설치합니다. 이 버전은 불안정할 수 있습니다.
pip install git+https://www.github.com/farizrahman4u/loopgpt.git@maingit clone https://www.github.com/farizrahman4u/loopgpt.git
cd loopgpt
pip install -e .git clone https://www.github.com/farizrahman4u/loopgpt.git
cd loopgpt
docker build -t loopgpt:local-dev . .env 파일을 통해 현재 작업 디렉터리(L♾️pGPT를 실행할 위치)에 .env 파일을 만들고 다음 줄을 추가합니다.
OPENAI_API_KEY= " <your-openai-api-key> "? 중요한 ?
Windows 사용자는 파일 탐색기에서 "파일 확장자 표시"가 활성화되어 있는지 확인하십시오. 그렇지 않으면 파일 이름이 .env 대신 .env.txt 로 지정됩니다.
OpenAI API 키에 OPENAI_API_KEY 라는 환경 변수를 설정합니다.
환경 변수를 설정하는 방법:
새 Python 스크립트에서 에이전트를 만들어 보겠습니다.
 from loopgpt . agent import Agent

agent = Agent ()
L♾️pGPT는 기본적으로 gpt-3.5-turbo 사용하며 여기에 표시된 모든 출력은 이를 사용하여 만들어졌습니다. GPT-4 사용자는 대신 model="gpt-4" 설정할 수 있습니다.
agent = Agent ( model = "gpt-4" ) agent . name = "ResearchGPT"
agent . description = "an AI assistant that researches and finds the best tech products"
agent . goals = [
"Search for the best headphones on Google" ,
"Analyze specs, prices and reviews to find the top 5 best headphones" ,
"Write the list of the top 5 best headphones and their prices to a file" ,
"Summarize the pros and cons of each headphone and write it to a different file called 'summary.txt'" ,
]그리고 우리는 출발합니다! 에이전트의 CLI를 실행해 보겠습니다.
agent . cli () Python 파일을 research_gpt.py 로 저장하고 실행합니다.
python research_gpt.py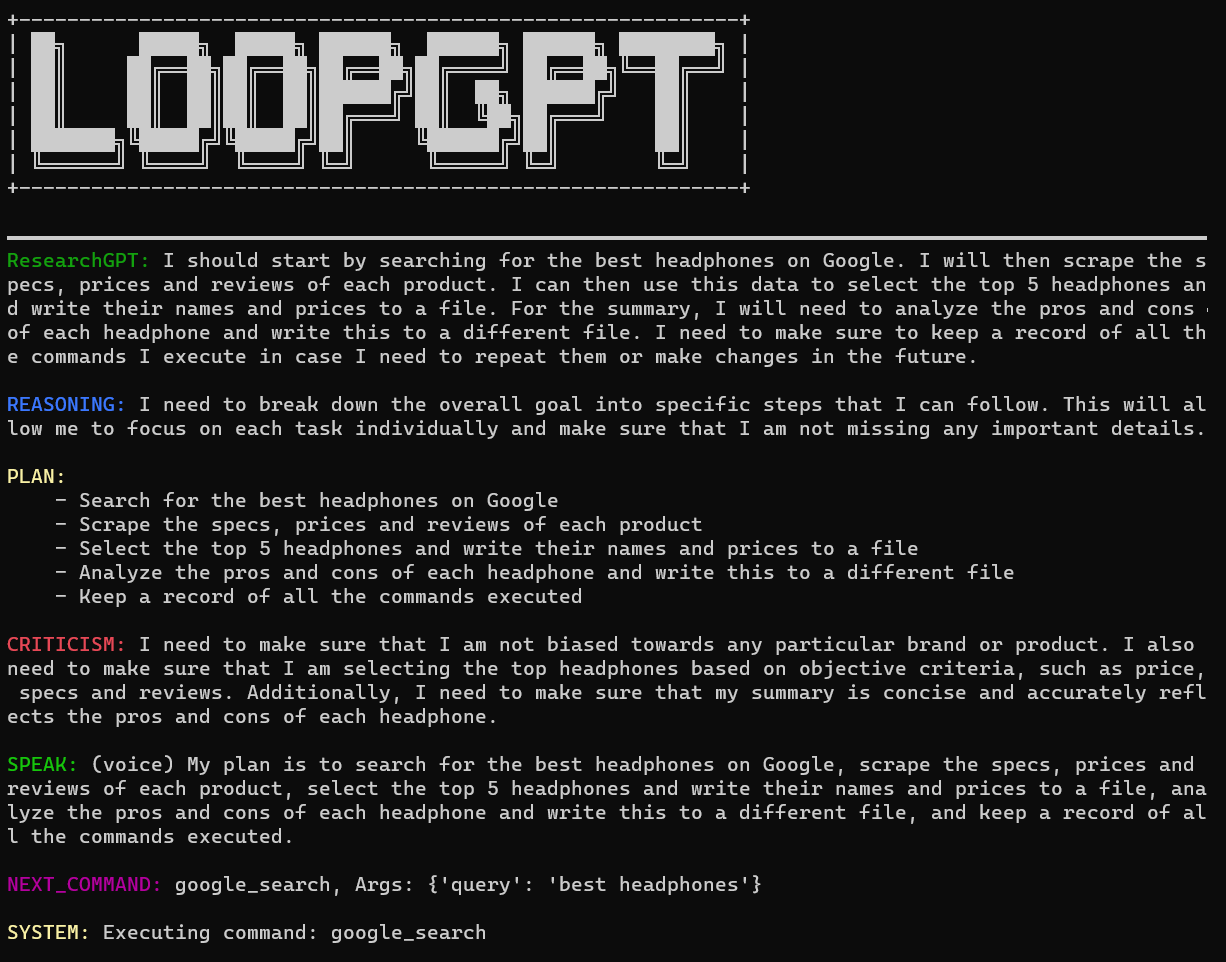
"exit"를 입력하여 CLI를 종료할 수 있습니다.
continuous True 로 설정된 경우 에이전트는 명령 실행을 위해 사용자에게 권한을 요청하지 않습니다. 무한 루프에 빠질 수 있으니 사용에 따른 책임은 본인에게 있습니다!
agent . cli ( continuous = True )Python 코드를 작성할 필요 없이 명령줄에서 직접 L♾️pGPT를 실행할 수 있습니다.
loopgpt run 사용 가능한 모든 옵션을 보려면 loopgpt --help 실행하세요.
Docker를 사용하여 앞서 언급한 모드에서 L♾️pGPT를 실행할 수 있습니다.
 # CLI mode
docker run -i --rm loopgpt:local-dev loopgpt run

# Script mode example
docker run -i --rm -v " $( pwd ) /scripts:/scripts " loopgpt:local-dev python /scripts/myscript.py
L♾️pGPT 에이전트에는 웹 검색, 파일 시스템 작업 등과 같은 다양한 기본 작업을 수행할 수 있는 도구 세트가 내장되어 있습니다. 이러한 도구는 print(agent.tools) 로 볼 수 있습니다.
이러한 기본 제공 도구 외에도 에이전트 도구 상자에 고유한 도구를 추가할 수도 있습니다.
날씨에 관한 모든 것을 위한 AI 도우미인 WeatherGPT를 만들어 보겠습니다.
도구는 BaseTool 에서 상속되며 도구를 시작하고 실행하려면 독스트링만 작성하면 됩니다!
 from loopgpt . tools import BaseTool

class GetWeather ( BaseTool ):
    """Quickly get the weather for a given city

    Args:
        city (str): name of the city

    Returns:
        dict: The weather report for the city
    """

    def run ( self , city ):
        ...
L♾️pGPT는 도구에 기본 ID를 제공하지만 원하는 경우 이를 재정의할 수 있습니다.
 class GetWeather ( BaseTool ):
    """Quickly get the weather for a given city

    Args:
        city (str): name of the city

    Returns:
        dict: The weather report for the city
    """

    @ property
    def id ( self ):
        return "get_weather_command"
이제 우리 도구가 run 메소드에서 수행할 작업을 정의해 보겠습니다.
 import requests

# Define your custom tool
class GetWeather ( BaseTool ):
    """Quickly get the weather for a given city

    Args:
        city (str): name of the city

    Returns:
        dict: The weather report for the city
    """

    def run ( self , city ):
        try :
            url = "https://wttr.in/{}?format=%l+%C+%h+%t+%w+%p+%P" . format ( city )
            data = requests . get ( url ). text . split ( " " )
            keys = ( "location" , "condition" , "humidity" , "temperature" , "wind" , "precipitation" , "pressure" )
            data = dict ( zip ( keys , data ))
            return data
        except Exception as e :
            return f"An error occurred while getting the weather: { e } ."
그게 다야! 첫 번째 사용자 정의 도구를 만들었습니다. 새 에이전트에 등록하고 실행해 보겠습니다.
 from loopgpt . tools import WriteToFile
import loopgpt

# Register custom tool type
# This is actually not required here, but is required when you load a saved agent with custom tools.
loopgpt . tools . register_tool_type ( GetWeather )

# Create Agent
agent = loopgpt . Agent ( tools = [ GetWeather , WriteToFile ])
agent . name = "WeatherGPT"
agent . description = "an AI assistant that tells you the weather"
agent . goals = [
    "Get the weather for NewYork and Beijing" ,
    "Give the user tips on how to dress for the weather in NewYork and Beijing" ,
    "Write the tips to a file called 'dressing_tips.txt'"
]

# Run the agent's CLI
agent . cli ()
WeatherGPT가 작성한 dressing_tips.txt 파일을 살펴보겠습니다.
드레싱_팁.txt
 - It's Clear outside with a temperature of +10°C in Beijing. Wearing a light jacket and pants is recommended.
- It's Overcast outside with a temperature of +11°C in New York. Wearing a light jacket, pants, and an umbrella is recommended.
Auto-GPT와 달리 사용자가 명령 실행을 거부해도 에이전트는 종료되지 않습니다. 대신 사용자에게 과정을 수정하기 위한 피드백을 요청합니다.
에이전트의 과정을 수정하려면 실행을 거부하고 피드백을 제공하세요.

에이전트는 조치 과정을 업데이트했습니다.

다음을 사용하여 에이전트 상태를 json 파일에 저장할 수 있습니다.
agent . save ( "ResearchGPT.json" ) 이렇게 하면 에이전트의 구성(모델, 이름, 설명 등)과 내부 상태(대화 상태, 메모리, 도구 상태 등)가 저장됩니다. include_state=False agent.save() 에 전달하여 구성만 저장할 수도 있습니다.
agent . save ( "ResearchGPT.json" , include_state = False )그런 다음 중단한 부분부터 다시 시작하세요.
 import loopgpt
agent = loopgpt . Agent . load ( "ResearchGPT.json" )
agent . cli ()
또는 명령줄에서 저장된 에이전트를 실행하여:
loopgpt run ResearchGPT.json파일에 쓰는 대신 에이전트 상태를 json 호환 Python 사전으로 변환할 수 있습니다.
agent_config = agent . config ()내부 상태 없이 구성만 가져오려면 다음 안내를 따르세요.
agent_config = agent . config ( include_state = False )구성에서 에이전트를 다시 로드하려면 다음을 사용하세요.
 import loopgpt

agent = loopgpt . Agent . from_config ( agent_config ) 공식 Google 검색 지원을 위해서는 두 개의 환경 변수 키 GOOGLE_API_KEY 및 CUSTOM_SEARCH_ENGINE_ID 를 설정해야 합니다. 이를 얻는 방법은 다음과 같습니다.
CUSTOM_SEARCH_ENGINE_ID 환경 변수에 사용됩니다.GOOGLE_API_KEY 환경 변수를 채웁니다.이러한 항목이 없는 경우 L♾️pGPT는 DuckDuckGo 검색을 사용하게 됩니다.
우리는 많은 도움이 필요합니다! 기여하고 싶다면 이슈나 PR을 열어주세요.
도움이 필요하신가요? 우리의 디스코드에 참여하세요.


