빠른 시작 | 구성 | 맥OS | 노트북 예시 | FAQ
AirLLM은 추론 메모리 사용을 최적화하여 700억 개의 대규모 언어 모델이 양자화, 증류 및 정리 없이 단일 4GB GPU 카드에서 추론을 실행할 수 있도록 합니다. 이제 8GB vram 에서 405B Llama3.1을 실행할 수 있습니다.
[2024/08/20] v2.11.0: Qwen2.5 지원
[2024/08/18] v2.10.1 CPU 추론을 지원합니다. 비샤딩 모델을 지원합니다. 훌륭한 작업을 해주신 @NavodPeiris에게 감사드립니다!
[2024/07/30] Llama3.1 405B (예제 노트북)를 지원합니다. 8bit/4bit 양자화를 지원합니다.
[2024/04/20] AirLLM은 이미 기본적으로 Llama3를 지원합니다. 4GB 단일 GPU에서 Llama3 70B를 실행하세요.
[2023/12/25] v2.8.2: 70B 대규모 언어 모델을 실행하는 MacOS를 지원합니다.
[2023/12/20] v2.7: AirLLMMixtral을 지원합니다.
[2023/12/20] v2.6: AutoModel이 추가되었습니다. 모델 유형을 자동으로 감지하며, 모델을 초기화하기 위해 모델 클래스를 제공할 필요가 없습니다.
[2023/12/18] v2.5: 모델 로드 및 계산을 겹치기 위해 프리페치를 추가했습니다. 10% 속도 향상.
[2023/12/03] ChatGLM , QWen , Baichuan , Mistral , InternLM 지원이 추가되었습니다!
[2023/12/02] safetensor에 대한 지원이 추가되었습니다. 이제 공개 LLM 리더보드에서 상위 10개 모델을 모두 지원합니다.
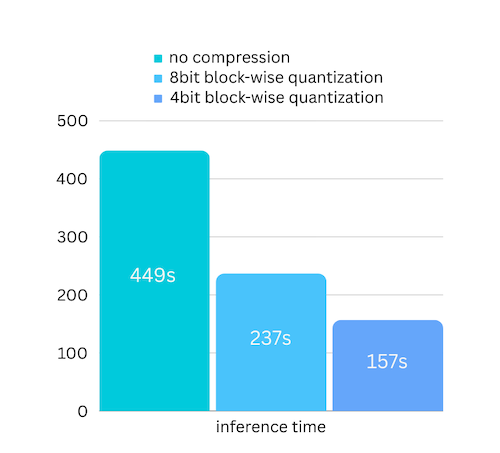
[2023/12/01] airllm 2.0. 압축 지원: 실행 시간이 3배 빨라졌습니다!
[2023/11/20] airllm 초기버전!
먼저 airllm pip 패키지를 설치합니다.
pip install airllm그런 다음 AirLLMLlama2를 초기화하고 사용 중인 모델의 허깅페이스 저장소 ID 또는 로컬 경로를 전달하면 일반 변환기 모델과 유사하게 추론을 수행할 수 있습니다.
( AirLLMLlama2를 초기화할 때 layer_shards_saving_path를 통해 분할된 계층 모델을 저장할 경로를 지정할 수도 있습니다.
 from airllm import AutoModel

MAX_LENGTH = 128
# could use hugging face model repo id:
model = AutoModel . from_pretrained ( "garage-bAInd/Platypus2-70B-instruct" )

# or use model's local path...
#model = AutoModel.from_pretrained("/home/ubuntu/.cache/huggingface/hub/models--garage-bAInd--Platypus2-70B-instruct/snapshots/b585e74bcaae02e52665d9ac6d23f4d0dbc81a0f")

input_text = [
        'What is the capital of United States?' ,
        #'I like',
    ]

input_tokens = model . tokenizer ( input_text ,
    return_tensors = "pt" ,
    return_attention_mask = False ,
    truncation = True ,
    max_length = MAX_LENGTH ,
    padding = False )

generation_output = model . generate (
    input_tokens [ 'input_ids' ]. cuda (),
    max_new_tokens = 20 ,
    use_cache = True ,
    return_dict_in_generate = True )

output = model . tokenizer . decode ( generation_output . sequences [ 0 ])

print ( output )
참고: 추론 중에는 원본 모델이 먼저 분해되어 레이어별로 저장됩니다. Huggingface 캐시 디렉터리에 충분한 디스크 공간이 있는지 확인하세요.
방금 블록별 양자화 기반 모델 압축을 기반으로 모델 압축을 추가했습니다. 거의 무시할 수 있는 정확도 손실 로 추론 속도를 최대 3배 까지 높일 수 있습니다! (더 많은 성능 평가와 이 문서에서 블록 단위 양자화를 사용하는 이유를 확인하세요)

pip install -U bitsandbytes 로 비트앤바이트가 설치되어 있는지 확인하세요.pip install -U airllm model = AutoModel . from_pretrained ( "garage-bAInd/Platypus2-70B-instruct" ,
compression = '4bit' # specify '8bit' for 8-bit block-wise quantization
)양자화는 일반적으로 작업 속도를 높이기 위해 가중치와 활성화를 모두 양자화해야 합니다. 이로 인해 정확성을 유지하고 모든 종류의 입력에서 이상값의 영향을 피하기가 더 어려워졌습니다.
우리의 경우 병목 현상은 주로 디스크 로딩에 있지만 모델 로딩 크기만 더 작게 만들면 됩니다. 그래서 우리는 가중치 부분만 양자화하게 되므로 정확도를 더 쉽게 보장할 수 있습니다.
모델을 초기화할 때 다음 구성을 지원합니다.
airllm을 설치하고 Linux에서와 동일한 코드를 실행하면 됩니다. 빠른 시작에서 자세한 내용을 확인하세요.
예 [파이썬 노트북] (https://github.com/lyogavin/airllm/blob/main/air_llm/examples/run_on_macos.ipynb)
Colab 예시:
 from airllm import AutoModel
MAX_LENGTH = 128
model = AutoModel . from_pretrained ( "THUDM/chatglm3-6b-base" )
input_text = [ 'What is the capital of China?' ,]
input_tokens = model . tokenizer ( input_text ,
    return_tensors = "pt" ,
    return_attention_mask = False ,
    truncation = True ,
    max_length = MAX_LENGTH ,
    padding = True )
generation_output = model . generate (
    input_tokens [ 'input_ids' ]. cuda (),
    max_new_tokens = 5 ,
    use_cache = True ,
    return_dict_in_generate = True )
model . tokenizer . decode ( generation_output . sequences [ 0 ]) from airllm import AutoModel
MAX_LENGTH = 128
model = AutoModel . from_pretrained ( "Qwen/Qwen-7B" )
input_text = [ 'What is the capital of China?' ,]
input_tokens = model . tokenizer ( input_text ,
return_tensors = "pt" ,
return_attention_mask = False ,
truncation = True ,
max_length = MAX_LENGTH )
generation_output = model . generate (
input_tokens [ 'input_ids' ]. cuda (),
max_new_tokens = 5 ,
use_cache = True ,
return_dict_in_generate = True )
model . tokenizer . decode ( generation_output . sequences [ 0 ]) from airllm import AutoModel
MAX_LENGTH = 128
model = AutoModel . from_pretrained ( "baichuan-inc/Baichuan2-7B-Base" )
#model = AutoModel.from_pretrained("internlm/internlm-20b")
#model = AutoModel.from_pretrained("mistralai/Mistral-7B-Instruct-v0.1")
input_text = [ 'What is the capital of China?' ,]
input_tokens = model . tokenizer ( input_text ,
return_tensors = "pt" ,
return_attention_mask = False ,
truncation = True ,
max_length = MAX_LENGTH )
generation_output = model . generate (
input_tokens [ 'input_ids' ]. cuda (),
max_new_tokens = 5 ,
use_cache = True ,
return_dict_in_generate = True )
model . tokenizer . decode ( generation_output . sequences [ 0 ])많은 코드는 Kaggle 시험 대회에서 SimJeg의 훌륭한 작업을 기반으로 합니다. SimJeg에게 큰 감사를 드립니다:
GitHub 계정 @SimJeg, Kaggle의 코드, 관련 토론.
safetensors_rust.SafetensorError: 헤더를 역직렬화하는 중 오류 발생: MetadataIncompleteBuffer
이 오류가 발생하는 경우 가장 가능한 원인은 디스크 공간이 부족하기 때문입니다. 모델 분할 프로세스는 디스크를 많이 소모합니다. 이것을 보세요. 디스크 공간을 확장하고, Huggingface .cache를 지우고 다시 실행해야 할 수도 있습니다.
아마도 Llama2 클래스를 사용하여 QWen 또는 ChatGLM 모델을 로드하고 있을 것입니다. 다음을 시도해 보세요:
QWen 모델의 경우:
 from airllm import AutoModel #<----- instead of AirLLMLlama2
AutoModel . from_pretrained (...)
ChatGLM 모델의 경우:
 from airllm import AutoModel #<----- instead of AirLLMLlama2
AutoModel . from_pretrained (...)일부 모델은 게이트 모델이므로 Huggingface API 토큰이 필요합니다. hf_token을 제공할 수 있습니다.
model = AutoModel . from_pretrained ( "meta-llama/Llama-2-7b-hf" , #hf_token='HF_API_TOKEN')일부 모델의 토크나이저에는 패딩 토큰이 없으므로 패딩 토큰을 설정하거나 간단히 패딩 구성을 끌 수 있습니다.
 input_tokens = model . tokenizer ( input_text ,
   return_tensors = "pt" ,
   return_attention_mask = False ,
   truncation = True ,
   max_length = MAX_LENGTH ,
   padding = False  #<-----------   turn off padding
)AirLLM이 귀하의 연구에 유용하다고 생각하고 이를 인용하고 싶다면 다음 BibTex 항목을 사용하십시오.
 @software{airllm2023,
  author = {Gavin Li},
  title = {AirLLM: scaling large language models on low-end commodity computers},
  url = {https://github.com/lyogavin/airllm/},
  version = {0.0},
  year = {2023},
}
기여, 아이디어 및 토론을 환영합니다!
도움이 되셨다면, 커피 한 잔 사주세요!