딥 러닝 애플리케이션을 위해 GPU로 구동되는 후성 트랙 데이터와 해당 시퀀스가 포함된 BigWig 파일의 빠른 일괄 데이터 로딩.
Bigwig-loader는 주로 rapidsai kvikio 라이브러리와 cupy에 의존하며 둘 다 conda/mamba를 사용하여 설치하는 것이 가장 좋습니다. 이제 conda/mamba를 사용하여 Bigwig-loader를 설치할 수도 있습니다. bigwig-loader가 설치된 새 환경을 만들려면 다음 안내를 따르세요.
mamba create -n my-env -c rapidsai -c conda-forge -c bioconda -c dataloading bigwig-loader또는 다음을 Environment.yml 파일에 추가하세요.
 name : my-env
channels :
  - rapidsai
  - conda-forge
  - bioconda
  - dataloading
dependencies :
    - bigwig-loader
그리고 업데이트하세요:
mamba env update -f environment.ymlBigwig-loader는 rapidsai kvikio 라이브러리와 cupy가 이미 설치된 환경에서 pip를 사용하여 설치할 수도 있습니다.
pip install bigwig-loader우리는 BigWigDataset를 직접 사용할 수 있는 PyTorch 반복 가능 데이터 세트에 래핑했습니다.
 # examples/pytorch_example.py
import pandas as pd
import torch
from torch . utils . data import DataLoader
from bigwig_loader import config
from bigwig_loader . pytorch import PytorchBigWigDataset
from bigwig_loader . download_example_data import download_example_data

# Download example data to play with
download_example_data ()
example_bigwigs_directory = config . bigwig_dir
reference_genome_file = config . reference_genome

train_regions = pd . DataFrame ({ "chrom" : [ "chr1" , "chr2" ], "start" : [ 0 , 0 ], "end" : [ 1000000 , 1000000 ]})

dataset = PytorchBigWigDataset (
    regions_of_interest = train_regions ,
    collection = example_bigwigs_directory ,
    reference_genome_path = reference_genome_file ,
    sequence_length = 1000 ,
    center_bin_to_predict = 500 ,
    window_size = 1 ,
    batch_size = 32 ,
    super_batch_size = 1024 ,
    batches_per_epoch = 20 ,
    maximum_unknown_bases_fraction = 0.1 ,
    sequence_encoder = "onehot" ,
    n_threads = 4 ,
    return_batch_objects = True ,
)

# Don't use num_workers > 0 in DataLoader. The heavy
# lifting/parallelism is done on cuda streams on the GPU.
dataloader = DataLoader ( dataset , num_workers = 0 , batch_size = None )


class MyTerribleModel ( torch . nn . Module ):
    def __init__ ( self ):
        super (). __init__ ()
        self . linear = torch . nn . Linear ( 4 , 2 )

    def forward ( self , batch ):
        return self . linear ( batch ). transpose ( 1 , 2 )


model = MyTerribleModel ()
optimizer = torch . optim . SGD ( model . parameters (), lr = 0.01 )

def poisson_loss ( pred , target ):
    return ( pred - target * torch . log ( pred . clamp ( min = 1e-8 ))). mean ()

for batch in dataloader :
    # batch.sequences.shape = n_batch (32), sequence_length (1000), onehot encoding (4)
    pred = model ( batch . sequences )
    # batch.values.shape = n_batch (32), n_tracks (2) center_bin_to_predict (500)
    loss = poisson_loss ( pred [:, :, 250 : 750 ], batch . values )
    print ( loss )
    optimizer . zero_grad ()
    loss . backward ()
optimizer . step () 프레임워크에 구애받지 않는 Dataset 객체는 bigwig_loader.dataset 에서 가져올 수 있습니다. 이 데이터 세트 객체는 cupy 텐서를 반환합니다. Cupy 텐서는 cuda 배열 인터페이스를 준수하며 JAX 또는 tensorflow 텐서로 제로 복사 변환될 수 있습니다.
 from bigwig_loader . dataset import BigWigDataset

dataset = BigWigDataset (
    regions_of_interest = train_regions ,
    collection = example_bigwigs_directory ,
    reference_genome_path = reference_genome_file ,
    sequence_length = 1000 ,
    center_bin_to_predict = 500 ,
    window_size = 1 ,
    batch_size = 32 ,
    super_batch_size = 1024 ,
    batches_per_epoch = 20 ,
    maximum_unknown_bases_fraction = 0.1 ,
    sequence_encoder = "onehot" ,
)
더 많은 예제를 보려면 예제 디렉터리를 참조하세요.
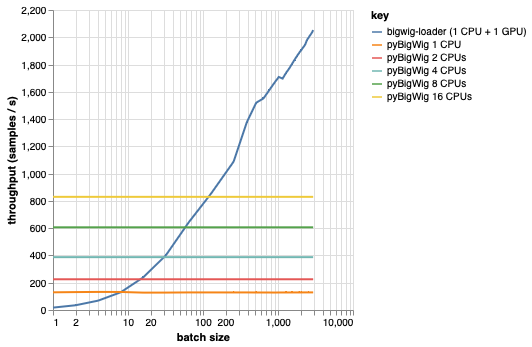
이 라이브러리는 동일한 차원의 데이터 배치를 로드하기 위한 것으로, 로드 프로세스 속도를 높일 수 있는 몇 가지 가정을 허용합니다. 아래 플롯에서 볼 수 있듯이 소량의 데이터를 로드할 때 pyBigWig는 매우 빠르지만 기계 학습을 위해 데이터 로드의 일괄 처리 특성을 활용하지 않습니다.
아래 벤치마크에서는 GPU당 여러 CPU가 사용되는 현실적인 시나리오와 비교하기 위해 pyBigWig를 사용하여 PyTorch 데이터로더(set_start_method('spawn') 포함)를 만들었습니다. CPU 데이터로더의 처리량은 CPU 수에 따라 선형적으로 증가하지 않으므로 학습 단계에서 GPU를 유지하고 신경망을 훈련하며 포화 상태로 유지하는 데 필요한 처리량을 얻기가 어려워집니다.

이것이 bigwig-loader가 해결하는 문제입니다. 다음은 bigwig-loader를 사용하는 방법의 예입니다.
git clone [email protected]:pfizer-opensource/bigwig-loadercd bigwig-loaderconda env create -f environment.yml 이 환경에서는 pytest -v 실행하여 테스트가 성공하는지 확인할 수 있습니다. 참고: bigwig-loader를 사용하려면 GPU가 필요합니다!
이 섹션에서는 새로운 기능을 추가하는 데 필요한 단계를 안내합니다. 불분명한 점이 있으면 문제를 열어주세요.
git clone [email protected]:pfizer-opensource/bigwig-loadercd bigwig-loaderconda env create -f environment.ymlpip install -e '.[dev]'pre-commit install 실행하여 사전 커밋 후크를 설치합니다.테스트는 테스트 디렉토리에 있습니다. 가장 중요한 테스트 중 하나는 pyBigWIg에 실수가 있으면 bigwig-loader에도 있는지 확인하는 test_against_pybigwig입니다.
pytest -vv .GPU가 탑재된 github 실행기를 사용할 수 있게 되면 CI에서도 이러한 테스트를 실행하고 싶습니다. 하지만 지금은 로컬에서 실행할 수 있습니다.
이 라이브러리를 사용하는 경우 다음을 인용하는 것을 고려하세요.
Retel, Joren Sebastian, Andreas Poehlmann, Josh Chiou, Andreas Steffen 및 Djork-Arné Clevert. “BigWig 파일의 후성유전학 트랙을 위한 빠른 기계 학습 데이터로더.” 생물정보학 40, 아니오. 1(2024년 1월 1일): btad767. https://doi.org/10.1093/bioinformatics/btad767.
 @article {
    retel_fast_2024,
    title = { A fast machine learning dataloader for epigenetic tracks from {BigWig} files } ,
    volume = { 40 } ,
    issn = { 1367-4811 } ,
    url = { https://doi.org/10.1093/bioinformatics/btad767 } ,
    doi = { 10.1093/bioinformatics/btad767 } ,
    abstract = { We created bigwig-loader, a data-loader for epigenetic profiles from BigWig files that decompresses and processes information for multiple intervals from multiple BigWig files in parallel. This is an access pattern needed to create training batches for typical machine learning models on epigenetics data. Using a new codec, the decompression can be done on a graphical processing unit (GPU) making it fast enough to create the training batches during training, mitigating the need for saving preprocessed training examples to disk.The bigwig-loader installation instructions and source code can be accessed at https://github.com/pfizer-opensource/bigwig-loader } ,
    number = { 1 } ,
    urldate = { 2024-02-02 } ,
    journal = { Bioinformatics } ,
    author = { Retel, Joren Sebastian and Poehlmann, Andreas and Chiou, Josh and Steffen, Andreas and Clevert, Djork-Arné } ,
    month = jan,
    year = { 2024 } ,
    pages = { btad767 } ,
}