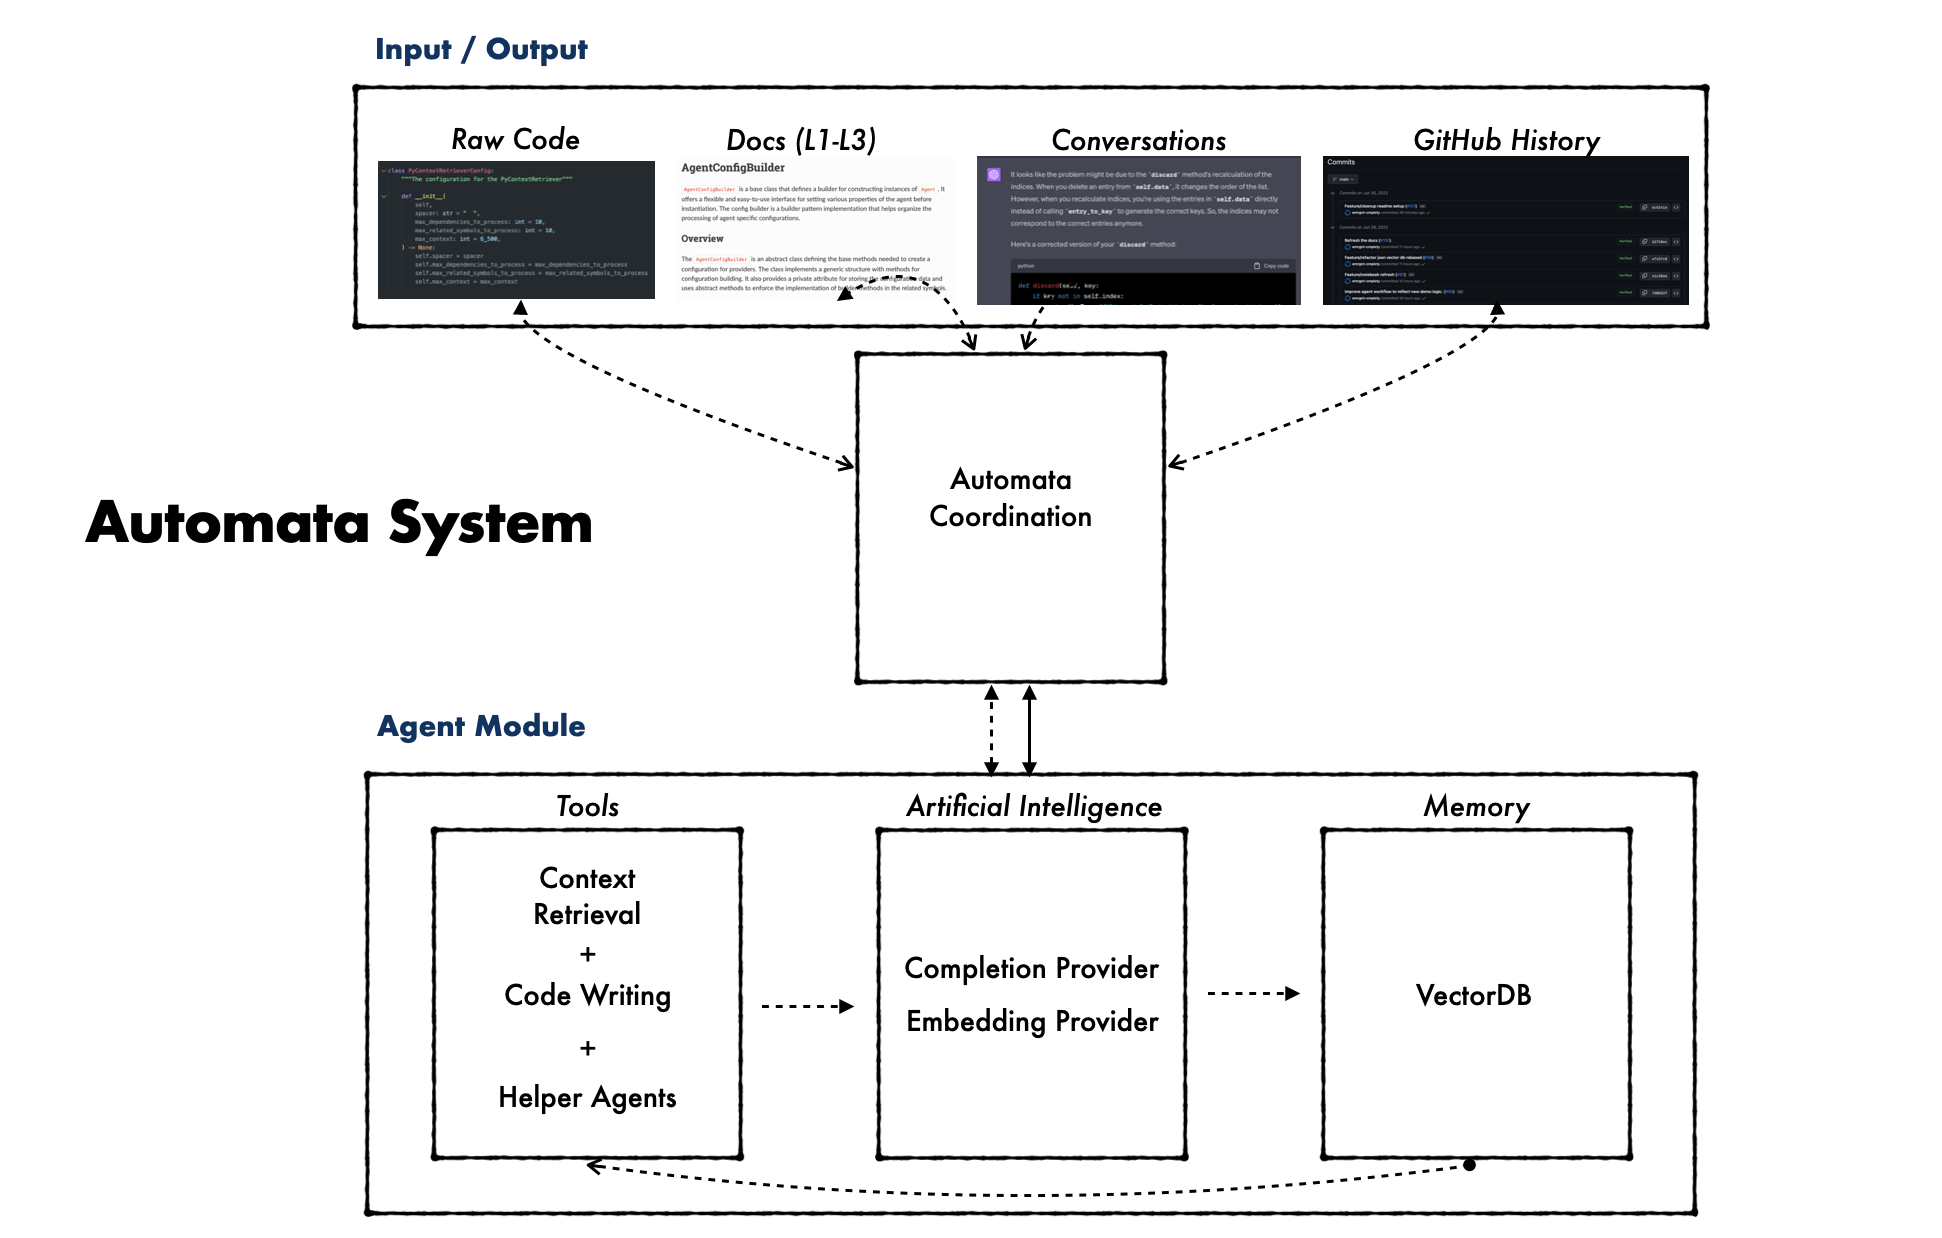
automata 코드가 본질적으로 메모리의 한 형태라는 이론에서 영감을 얻었으며, 올바른 도구가 제공되면 AI는 잠재적으로 AGI 생성으로 이어질 수 있는 실시간 기능을 발전시킬 수 있습니다. automata 단어는 "스스로 행동하고, 스스로 의지하고, 스스로 움직이는"을 의미하는 그리스어 αὐτόματος에서 유래되었으며, automata 이론은 추상적 기계와 automata 및 이를 이용하여 해결할 수 있는 계산 문제에 대한 연구입니다. .
자세한 내용은 아래에 나와 있습니다.

automata 환경을 설정하려면 다음 단계를 따르세요.
 # Clone the repository
git clone [email protected]:emrgnt-cmplxty/ automata .git && cd automata /

# Initialize git submodules
git submodule update --init

# Install poetry and the project
pip3 install poetry && poetry install

# Configure the environment and setup files
poetry run automata configureDocker 이미지를 가져옵니다.
$ docker pull ghcr.io/emrgnt-cmplxty/ automata :latestDocker 이미지를 실행합니다.
$ docker run --name automata _container -it --rm -e OPENAI_API_KEY= < your_openai_key > -e GITHUB_API_KEY= < your_github_key > ghcr.io/emrgnt-cmplxty/ automata :latest그러면 automata 설치된 Docker 컨테이너가 시작되고 사용할 대화형 셸이 열립니다.
Windows 사용자는 특정 종속성에 대해 Visual Studio의 "C++를 사용한 데스크톱 개발"을 통해 C++ 지원을 설치해야 할 수 있습니다.
또한 gcc-11 및 g++-11로 업데이트해야 할 수도 있습니다. 이는 다음 명령을 실행하여 수행할 수 있습니다.
 # Adds the test toolchain repository, which contains newer versions of software
sudo add-apt-repository ppa:ubuntu-toolchain-r/test

# Updates the list of packages on your system
sudo apt update

# Installs gcc-11 and g++-11 packages
sudo apt install gcc-11 g++-11

# Sets gcc-11 and g++-11 as the default gcc and g++ versions for your system
sudo update-alternatives --install /usr/bin/gcc gcc /usr/bin/gcc-11 60 --slave /usr/bin/g++ g++ /usr/bin/g++-11automata 검색을 실행하려면 SCIP 인덱스가 필요합니다. 이러한 인덱스는 코드베이스 전체의 종속성에 따라 기호를 연결하는 코드 그래프를 만드는 데 사용됩니다. automata 코드베이스에 대해 정기적으로 새로운 인덱스가 생성되고 업로드되지만 로컬 개발에 필요한 경우 프로그래머는 수동으로 생성해야 합니다. 문제가 발생하면 여기 지침을 참조하는 것이 좋습니다.
 # Install dependencies and run indexing on the local codebase
poetry run automata install-indexing # Refresh the code embeddings (after making local changes)
poetry run automata run-code-embedding
# Refresh the documentation + embeddings
poetry run automata run-doc-embedding --embedding-level=2
다음 명령은 간단한 명령으로 시스템을 실행하는 방법을 보여줍니다. 시스템이 예상대로 작동하는지 확인하려면 초기 실행을 이와 같이 수행하는 것이 좋습니다.
 # Run a single agent w/ trivial instruction
poetry run  automata run-agent --instructions= " Return true " --model=gpt-3.5-turbo-0613

# Run a single agent w/ a non-trivial instruction
poetry run automata run-agent --instructions= " Explain what automata Agent is and how it works, include an example to initialize an instance of automata Agent. "
automata GPT-4와 같은 대규모 언어 모델을 벡터 데이터베이스와 결합하여 코드 문서화, 검색 및 작성이 가능한 통합 시스템을 형성함으로써 작동합니다. 절차는 포괄적인 문서 및 코드 인스턴스 생성으로 시작됩니다. 이는 검색 기능과 결합되어 automata 의 자체 코딩 잠재력의 기반을 형성합니다.
automata 다운스트림 도구를 사용하여 고급 코딩 작업을 실행하고 지속적으로 전문성과 자율성을 구축합니다. 이러한 셀프 코딩 접근 방식은 피드백과 축적된 경험을 바탕으로 도구와 기술을 지속적으로 개선하는 자율적인 장인의 작업을 반영합니다.
때때로 복잡한 시스템을 이해하는 가장 좋은 방법은 기본적인 예를 이해하는 것부터 시작하는 것입니다. 다음 예에서는 자체 automata 에이전트를 실행하는 방법을 보여줍니다. 에이전트는 간단한 명령으로 초기화된 다음 명령을 이행하기 위한 코드 작성을 시도합니다. 그러면 에이전트는 시도 결과를 반환합니다.
 from automata . config . base import AgentConfigName , OpenAI automata AgentConfigBuilder
from automata . agent import OpenAI automata Agent
from automata . singletons . dependency_factory import dependency_factory
from automata . singletons . py_module_loader import py_module_loader
from automata . tools . factory import AgentToolFactory

# Initialize the module loader to the local directory
py_module_loader . initialize ()

# Construct the set of all dependencies that will be used to build the tools
toolkit_list = [ "context-oracle" ]
tool_dependencies = dependency_factory . build_dependencies_for_tools ( toolkit_list )

# Build the tools
tools = AgentToolFactory . build_tools ( toolkit_list , ** tool_dependencies )

# Build the agent config
agent_config = (
    OpenAI automata AgentConfigBuilder . from_name ( " automata -main" )
    . with_tools ( tools )
    . with_model ( "gpt-4" )
    . build ()
)

# Initialize and run the agent
instructions = "Explain how embeddings are used by the codebase"
agent = OpenAI automata Agent ( instructions , config = agent_config )
result = agent . run () 이 코드베이스의 임베딩은 SymbolCodeEmbedding 및 SymbolDocEmbedding 과 같은 클래스로 표시됩니다. 이러한 클래스는 기호에 대한 정보와 고차원 공간에서 기호를 나타내는 벡터인 해당 임베딩을 저장합니다.
이러한 클래스의 예는 다음과 같습니다. SymbolCodeEmbedding 기호 코드와 관련된 삽입을 저장하는 데 사용되는 클래스입니다. SymbolDocEmbedding 기호 문서화와 관련된 삽입을 저장하는 데 사용되는 클래스입니다.
'SymbolCodeEmbedding' 인스턴스를 생성하는 코드 예:
 import numpy as np
from automata . symbol_embedding . base import SymbolCodeEmbedding
from automata . symbol . parser import parse_symbol

symbol_str = 'scip-python python automata 75482692a6fe30c72db516201a6f47d9fb4af065 ` automata .agent.agent_enums`/ActionIndicator#'
symbol = parse_symbol ( symbol_str )
source_code = 'symbol_source'
vector = np . array ([ 1 , 0 , 0 , 0 ])

embedding = SymbolCodeEmbedding ( symbol = symbol , source_code = source_code , vector = vector )
'SymbolDocEmbedding' 인스턴스를 생성하는 코드 예:
 from automata . symbol_embedding . base import SymbolDocEmbedding
from automata . symbol . parser import parse_symbol
import numpy as np

symbol = parse_symbol ( 'your_symbol_here' )
document = 'A document string containing information about the symbol.'
vector = np . random . rand ( 10 )

symbol_doc_embedding = SymbolDocEmbedding ( symbol , document , vector )automata 에 기여하고 싶다면 기여 지침을 반드시 검토하세요. 이 프로젝트는 automata 의 행동 강령을 준수합니다. 참여함으로써 귀하는 이 코드를 유지해야 합니다.
우리는 요청과 버그를 추적하기 위해 GitHub 문제를 사용합니다. 일반적인 질문과 토론은 automata 토론을 참조하고, 구체적인 질문은 직접 문의하시기 바랍니다.
automata 프로젝트는 오픈 소스 소프트웨어 개발에서 일반적으로 인정되는 모범 사례를 준수하기 위해 노력합니다.
automata 프로젝트의 궁극적인 목표는 복잡한 소프트웨어 시스템을 독립적으로 설계, 작성, 테스트 및 개선할 수 있는 숙련도 수준을 달성하는 것입니다. 여기에는 대규모 코드베이스를 이해 및 탐색하고, 소프트웨어 아키텍처에 대해 추론하고, 성능을 최적화하고, 필요한 경우 새로운 알고리즘이나 데이터 구조를 고안하는 능력이 포함됩니다.
이 목표의 완전한 실현은 복잡하고 장기적인 노력이 될 가능성이 높지만, 이를 향한 각 점진적인 단계는 인간 프로그래머의 생산성을 획기적으로 높일 수 있는 잠재력을 가질 뿐만 아니라 AI와 컴퓨터에 대한 근본적인 질문을 밝힐 수도 있습니다. 과학.
automata Apache License 2.0에 따라 라이센스가 부여됩니다.
이 프로젝트는 이 저장소로 시작된 emrgnt-cmplxty와 maks-ivanov 간의 초기 노력의 확장입니다.