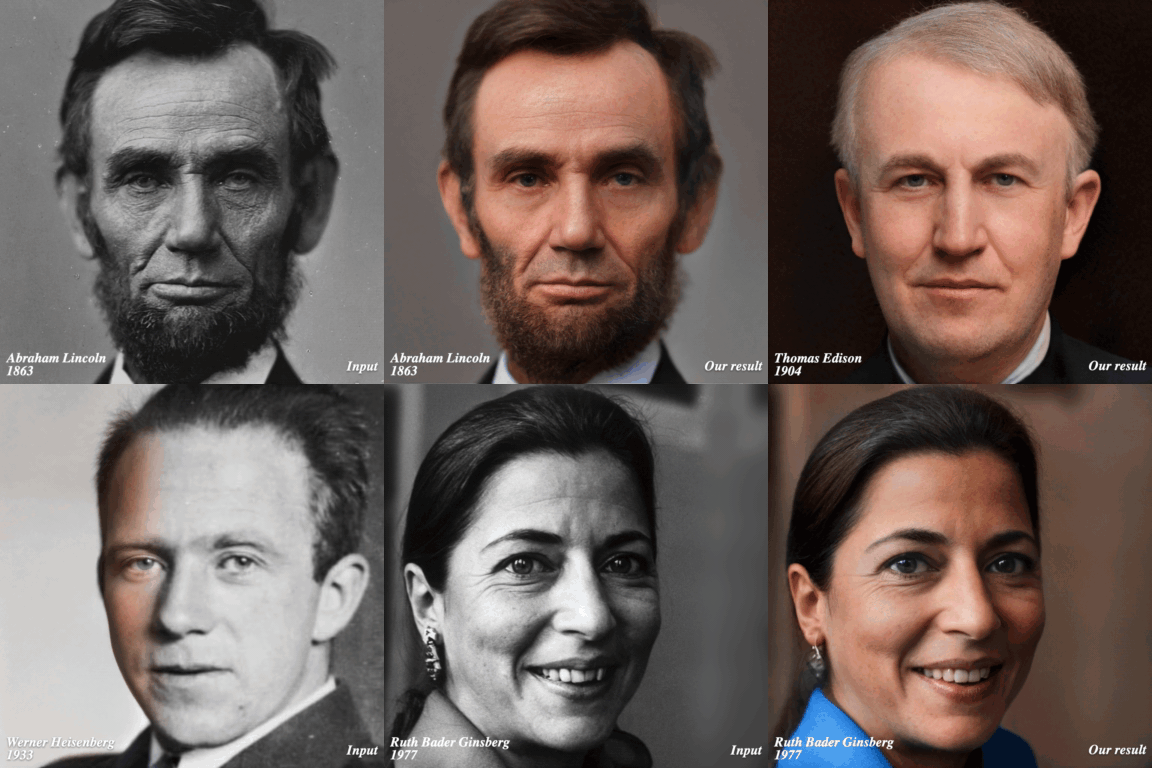
많은 역사적인 사람들은 초기 카메라의 한계와 시간의 흐름으로 인해 왜곡 된 오래되고 퇴색 된 흑백 사진으로 만 사로 잡혔습니다. 이 논문은 유명한 주제를 리포지토어하기 위해 현대 카메라로 제 시간에 여행을 시뮬레이션합니다. Denoising, Colorization 및 Superresolution과 같은 독립적 인 작업을 적용하는 기존 이미지 복원 필터와 달리 StyleGan2 프레임 워크를 활용하여 오래된 사진을 현대 고해상도 사진의 공간에 투사하여 통합 프레임 워크에서 이러한 모든 효과를 달성합니다. 이 접근법의 독특한 도전은 원본 사진에서 피사체의 정체성과 자세를 유지하는 동시에 저품질 골동품 사진에서 자주 볼 수있는 많은 유물을 버리는 것입니다. 현재의 최첨단 복원 필터와의 비교는 다양한 중요한 역사적 사람들에게 상당한 개선과 강력한 결과를 보여줍니다.
타임 트래블 리오피스 그래피
Xuan Luo, Xuaner Zhang, Paul Yoo, Ricardo Martin-Brualla, Jason Lawrence 및 Steven M. Seitz
Siggraph Asia 2021에서.
Google Colab을 사용하여 시작하기 쉬운 데모를 제공합니다! Colab을 사용하면 Google Colab에서 Cloud GPU를 사용하여 샘플 Abraham Lincoln 사진 또는 자신의 사진 에 대한 방법을 사용해 볼 수 있습니다.
또는 아래 지침에 따라 자신의 기계에서 방법을 실행할 수 있습니다.
타사 패키지를 당깁니다.
git submodule update --init --recursive
파이썬 패키지를 설치하십시오.
conda create --name rephotography python=3.8.5
conda activate rephotography
conda install pytorch==1.4.0 torchvision==0.5.0 cudatoolkit=10.1 -c pytorch
pip install -r requirements.txt
아브라함 링컨의 예제 사진에서 우리의 방법을 실행하십시오.
모델 다운로드 :
./scripts/download_checkpoints.sh
달리다:
./scripts/run.sh b "dataset/Abraham Lincoln_01.png" 0.75
최적화 프로세스를 검사 할 수 있습니다
tensorboard --logdir "log/Abraham Lincoln_01"
아래와 같이 결과를 찾을 수 있습니다.
results/
  Abraham Lincoln_01/       # intermediate outputs for histogram matching and face parsing
  Abraham Lincoln_01_b.png  # the input after matching the histogram of the sibling image
  Abraham Lincoln_01-b-G0.75-init(10,18)-s256-vgg1-vggface0.3-eye0.1-color1.0e+10-cx0.1(relu3_4,relu2_2,relu1_2)-NR5.0e+04-lr0.1_0.01-c32-wp(250,750)-init.png        # the sibling image
  Abraham Lincoln_01-b-G0.75-init(10,18)-s256-vgg1-vggface0.3-eye0.1-color1.0e+10-cx0.1(relu3_4,relu2_2,relu1_2)-NR5.0e+04-lr0.1_0.01-c32-wp(250,750)-init.pt         # the sibing latent codes and initialized noise maps
  Abraham Lincoln_01-b-G0.75-init(10,18)-s256-vgg1-vggface0.3-eye0.1-color1.0e+10-cx0.1(relu3_4,relu2_2,relu1_2)-NR5.0e+04-lr0.1_0.01-c32-wp(250,750).png             # the output result
  Abraham Lincoln_01-b-G0.75-init(10,18)-s256-vgg1-vggface0.3-eye0.1-color1.0e+10-cx0.1(relu3_4,relu2_2,relu1_2)-NR5.0e+04-lr0.1_0.01-c32-wp(250,750).pt              # the final optimized latent codes and noise maps
  Abraham Lincoln_01-b-G0.75-init(10,18)-s256-vgg1-vggface0.3-eye0.1-color1.0e+10-cx0.1(relu3_4,relu2_2,relu1_2)-NR5.0e+04-lr0.1_0.01-c32-wp(250,750)-rand.png        # the result with the final latent codes but random noise maps
이미지의 헤드 영역을 자르고 정렬하십시오.
python -m tools.data.align_images <input_raw_image_dir> <aligned_image_dir>
달리다:
./scripts/run.sh <spectral_sensitivity> <input_image_path> <blur_radius>
spectral_sensitivity 는 b (청색에 민감성), gb (직교) 또는 g (panchromatic) 일 수 있습니다. 다음과 같이 사진의 spectral_sensitivity 대략 추정 할 수 있습니다. 1873 년 이전의 사진에 청색에 민감한 모델을 사용하십시오. 1873 년에서 1906 년까지의 이미지에 대한 청색에 민감한 것과 직교 화학을 수동으로 선택하고 나중에 찍은 사진의 모든 모델 중에서 선택하십시오.
blur_radius 는 입력 포토 모트가 1024x1024로 크기가 커지면 픽셀의 가우시안 블러 반경 추정입니다.
| 길 | 크기 | 설명 |
|---|---|---|
| 역사적인 위키 페이스 Dataset.zip | 148 MB | 이미지 |
| spectral_sensitivity.json | 6 KB | 스펙트럼 감도 ( b , gb 또는 g ). |
| blur_radius.json | 6 KB | 픽셀의 반경 흐름 |
json S는 입력 이름을 해당 스펙트럼 감도 또는 블러 반경에 매핑하는 사전입니다. 저작권 제약으로 인해 Historical Wiki Face Dataset.zip Mao Zedong의 사진을 제외하고 사용자 연구에 사용 된 Historical Wiki Face 데이터 세트 의 모든 이미지가 포함되어 있습니다. 별도로 다운로드하여 위와 같이자를 수 있습니다.
우리의 코드가 유용하다고 생각되면, 우리의 논문을 인용하는 것을 고려하십시오.
@article{Luo-Rephotography-2021,
  author    = {Luo, Xuan and Zhang, Xuaner and Yoo, Paul and Martin-Brualla, Ricardo and Lawrence, Jason and Seitz, Steven M.},
  title     = {Time-Travel Rephotography},
  journal = {ACM Transactions on Graphics (Proceedings of ACM SIGGRAPH Asia 2021)},
  publisher = {ACM New York, NY, USA},
  volume = {40},
  number = {6},
  articleno = {213},
  doi = {https://doi.org/10.1145/3478513.3480485},
  year = {2021},
  month = {12}
}이 작업은 MIT 라이센스에 따라 라이센스가 부여됩니다. 자세한 내용은 라이센스를 참조하십시오.
Stylegan2 모델의 코드는 https://github.com/rosinality/stylegan2-pytorch에서 나옵니다.
드라이 플레이트 사진을 캡처 한 Nick Brandreth에게 감사드립니다. 통찰력있는 조언에 대해 Bo Zhang, Qingnan Fan, Roy Or-El, Aleksander Holynski 및 Keunhong Park에게 감사드립니다. Colab 데모에 대한 그의 기여에 대해 Xiaojie Feng에게 감사드립니다.