conda create -n pixart python=3.9
conda activate pixart
pip install torch==2.1.1 torchvision==0.16.1 torchaudio==2.1.1 --index-url https://download.pytorch.org/whl/cu118

git clone https://github.com/PixArt-alpha/PixArt-alpha.git
cd PixArt-alpha
pip install -r requirements.txtทุกรุ่นจะถูกดาวน์โหลดโดยอัตโนมัติ คุณสามารถเลือกดาวน์โหลดด้วยตนเองได้จาก URL นี้
| แบบอย่าง | #พารามส์ | URL | ดาวน์โหลดใน OpenXLab |
|---|---|---|---|
| T5 | 4.3B | T5 | T5 |
| วีเออี | 80ม | วีเออี | วีเออี |
| PixArt-α-SAM-256 | 0.6B | PixArt-XL-2-SAM-256x256.pth หรือเวอร์ชันดิฟฟิวเซอร์ | 256-ซ |
| PixArt-α-256 | 0.6B | PixArt-XL-2-256x256.pth หรือเวอร์ชันดิฟฟิวเซอร์ | 256 |
| PixArt-α-256-MSCOCO-FID7.32 | 0.6B | PixArt-XL-2-256x256.pth | 256 |
| PixArt-α-512 | 0.6B | PixArt-XL-2-512x512.pth หรือเวอร์ชันดิฟฟิวเซอร์ | 512 |
| PixArt-α-1024 | 0.6B | PixArt-XL-2-1024-MS.pth หรือเวอร์ชัน diffusers | 1,024 |
| PixArt-δ-1024-LCM | 0.6B | รุ่นดิฟฟิวเซอร์ | |
| ControlNet-HED-ตัวเข้ารหัส | 30ม | ControlNetHED.pth | |
| PixArt-δ-512-ControlNet | 0.9B | PixArt-XL-2-512-ControlNet.pth | 512 |
| PixArt-δ-1024-ControlNet | 0.9B | PixArt-XL-2-1024-ControlNet.pth | 1,024 |
ค้นหาทุกรุ่นใน OpenXLab_PixArt-alpha
ก่อนอื่นเลย.
ขอบคุณ @kopyl คุณสามารถสร้างโฟลว์การฝึกแบบละเอียดเต็มรูปแบบบนชุดข้อมูล Pokemon จาก HugginFace ด้วยโน้ตบุ๊ก:
จากนั้นเพื่อดูรายละเอียดเพิ่มเติม
ที่นี่เราใช้การกำหนดค่าการฝึกชุดข้อมูล SAM เป็นตัวอย่าง แต่แน่นอนว่า คุณยังสามารถเตรียมชุดข้อมูลของคุณเองตามวิธีนี้ได้
คุณจะต้องเปลี่ยนไฟล์ ปรับแต่ง ใน config และ dataloader ในชุดข้อมูล เท่านั้น
python -m torch.distributed.launch --nproc_per_node=2 --master_port=12345 train_scripts/train.py configs/pixart_config/PixArt_xl2_img256_SAM.py --work-dir output/train_SAM_256โครงสร้างไดเร็กทอรีสำหรับชุดข้อมูล SAM คือ:
 cd ./data

SA1B
├──images/  (images are saved here)
│  ├──sa_xxxxx.jpg
│  ├──sa_xxxxx.jpg
│  ├──......
├──captions/    (corresponding captions are saved here, same name as images)
│  ├──sa_xxxxx.txt
│  ├──sa_xxxxx.txt
├──partition/   (all image names are stored txt file where each line is a image name)
│  ├──part0.txt
│  ├──part1.txt
│  ├──......
├──caption_feature_wmask/   (run tools/extract_caption_feature.py to generate caption T5 features, same name as images except .npz extension)
│  ├──sa_xxxxx.npz
│  ├──sa_xxxxx.npz
│  ├──......
├──img_vae_feature/  (run tools/extract_img_vae_feature.py to generate image VAE features, same name as images except .npy extension)
│  ├──train_vae_256/
│  │  ├──noflip/
│  │  │  ├──sa_xxxxx.npy
│  │  │  ├──sa_xxxxx.npy
│  │  │  ├──......
ที่นี่เราเตรียม data_toy เพื่อความเข้าใจที่ดีขึ้น
 cd ./data

git lfs install
git clone https://huggingface.co/datasets/PixArt-alpha/data_toy
จากนั้น นี่คือตัวอย่างของไฟล์ partition/part0.txt
นอกจากนี้ สำหรับการฝึกอบรมพร้อมคำแนะนำเกี่ยวกับไฟล์ json นี่คือไฟล์ toy json เพื่อความเข้าใจที่ดียิ่งขึ้น
ปฏิบัติตามคำแนะนำในการฝึกอบรม Pixart + DreamBooth
ปฏิบัติตามคำแนะนำในการฝึกอบรม PixArt + LCM
ปฏิบัติตามคำแนะนำในการฝึกอบรม PixArt + ControlNet
pip install peft==0.6.2

accelerate launch --num_processes=1 --main_process_port=36667  train_scripts/train_pixart_lora_hf.py --mixed_precision= " fp16 "
  --pretrained_model_name_or_path=PixArt-alpha/PixArt-XL-2-1024-MS
  --dataset_name=lambdalabs/pokemon-blip-captions --caption_column= " text "
  --resolution=1024 --random_flip
  --train_batch_size=16
  --num_train_epochs=200 --checkpointing_steps=100
  --learning_rate=1e-06 --lr_scheduler= " constant " --lr_warmup_steps=0
  --seed=42
  --output_dir= " pixart-pokemon-model "
  --validation_prompt= " cute dragon creature " --report_to= " tensorboard "
  --gradient_checkpointing --checkpoints_total_limit=10 --validation_epochs=5
--rank=16 การอนุมานต้องใช้หน่วยความจำ GPU อย่างน้อย 23GB โดยใช้ repo นี้ ในขณะที่ 11GB and 8GB ใช้ใน ? เครื่องกระจายกลิ่น
การสนับสนุนในปัจจุบัน:
ในการเริ่มต้น ให้ติดตั้งการขึ้นต่อกันที่จำเป็นก่อน ตรวจสอบให้แน่ใจว่าคุณได้ดาวน์โหลดโมเดลไปยังโฟลเดอร์ output/pretrained_models แล้วจึงรันบนเครื่องของคุณ:
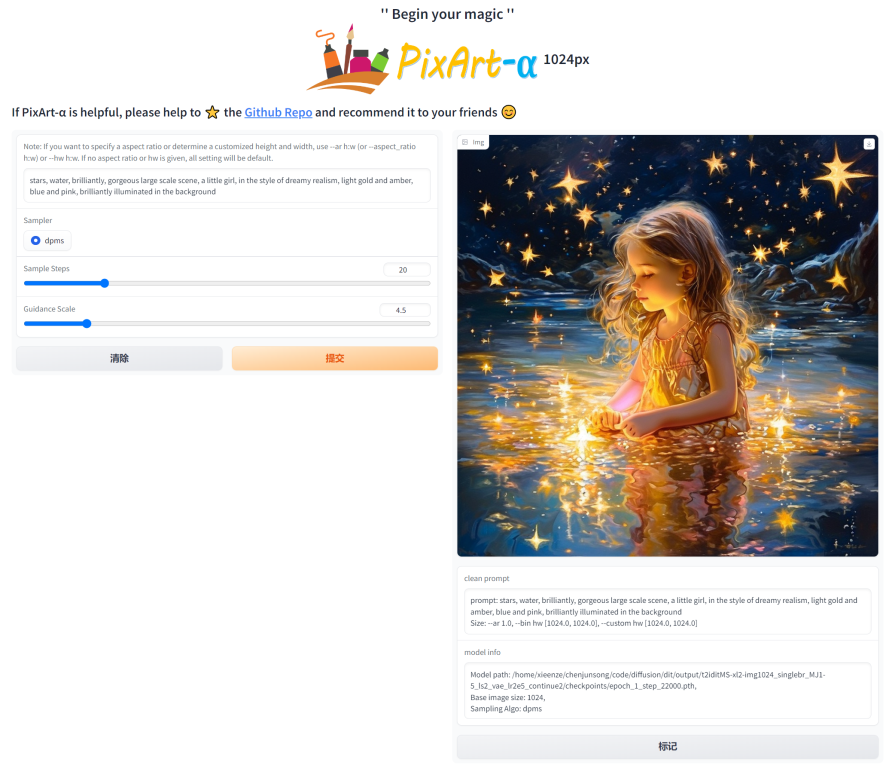
DEMO_PORT=12345 python app/app.pyอีกทางเลือกหนึ่ง คือ มีการจัดเตรียม Dockerfile ตัวอย่างไว้เพื่อสร้างคอนเทนเนอร์รันไทม์ที่เริ่มแอป Gradio
docker build . -t pixart
docker run --gpus all -it -p 12345:12345 -v < path_to_huggingface_cache > :/root/.cache/huggingface pixart
หรือใช้นักเทียบท่าเขียน โปรดทราบว่าหากคุณต้องการเปลี่ยนบริบทจากแอปเวอร์ชัน 1024 เป็น 512 หรือ LCM เพียงเปลี่ยนตัวแปร env APP_CONTEXT ในไฟล์ docker-compose.yml ค่าเริ่มต้นคือ 1024
docker compose build
docker compose up
มาดูตัวอย่างง่ายๆ โดยใช้ http://your-server-ip:12345 กัน
ตรวจสอบให้แน่ใจว่าคุณมีไลบรารีต่อไปนี้เวอร์ชันอัปเดตแล้ว:
pip install -U transformers accelerate diffusers SentencePiece ftfy beautifulsoup4แล้ว:
 import torch
from diffusers import PixArtAlphaPipeline , ConsistencyDecoderVAE , AutoencoderKL
device = torch . device ( "cuda:0" if torch . cuda . is_available () else "cpu" )

# You can replace the checkpoint id with "PixArt-alpha/PixArt-XL-2-512x512" too.
pipe = PixArtAlphaPipeline . from_pretrained ( "PixArt-alpha/PixArt-XL-2-1024-MS" , torch_dtype = torch . float16 , use_safetensors = True )

# If use DALL-E 3 Consistency Decoder
# pipe.vae = ConsistencyDecoderVAE.from_pretrained("openai/consistency-decoder", torch_dtype=torch.float16)

# If use SA-Solver sampler
# from diffusion.sa_solver_diffusers import SASolverScheduler
# pipe.scheduler = SASolverScheduler.from_config(pipe.scheduler.config, algorithm_type='data_prediction')

# If loading a LoRA model
# transformer = Transformer2DModel.from_pretrained("PixArt-alpha/PixArt-LCM-XL-2-1024-MS", subfolder="transformer", torch_dtype=torch.float16)
# transformer = PeftModel.from_pretrained(transformer, "Your-LoRA-Model-Path")
# pipe = PixArtAlphaPipeline.from_pretrained("PixArt-alpha/PixArt-LCM-XL-2-1024-MS", transformer=transformer, torch_dtype=torch.float16, use_safetensors=True)
# del transformer

# Enable memory optimizations.
# pipe.enable_model_cpu_offload()

pipe . to ( device )

prompt = "A small cactus with a happy face in the Sahara desert."
image = pipe ( prompt ). images [ 0 ]
image . save ( "./catcus.png" )
ตรวจสอบเอกสารประกอบสำหรับข้อมูลเพิ่มเติมเกี่ยวกับ SA-Solver Sampler
การผสานรวมนี้ทำให้สามารถรันไปป์ไลน์ด้วยขนาดแบตช์ 4 ที่ต่ำกว่า 11 GB ของ GPU VRAM ตรวจสอบเอกสารเพื่อเรียนรู้เพิ่มเติม
PixArtAlphaPipeline ใน GPU VRAM ที่มีขนาดต่ำกว่า 8GBขณะนี้รองรับการใช้ GPU VRAM ต่ำกว่า 8 GB โปรดดูข้อมูลเพิ่มเติมในเอกสารประกอบ
ในการเริ่มต้น ให้ติดตั้งการขึ้นต่อกันที่จำเป็นก่อน จากนั้นจึงเรียกใช้บนเครื่องภายในของคุณ:
 # diffusers version
DEMO_PORT=12345 python app/app.py
มาดูตัวอย่างง่ายๆ โดยใช้ http://your-server-ip:12345 กัน
คุณสามารถคลิกที่นี่เพื่อทดลองใช้ฟรีบน Google Colab
python tools/convert_pixart_alpha_to_diffusers.py --image_size your_img_size --multi_scale_train (True if you use PixArtMS else False) --orig_ckpt_path path/to/pth --dump_path path/to/diffusers --only_transformer=True
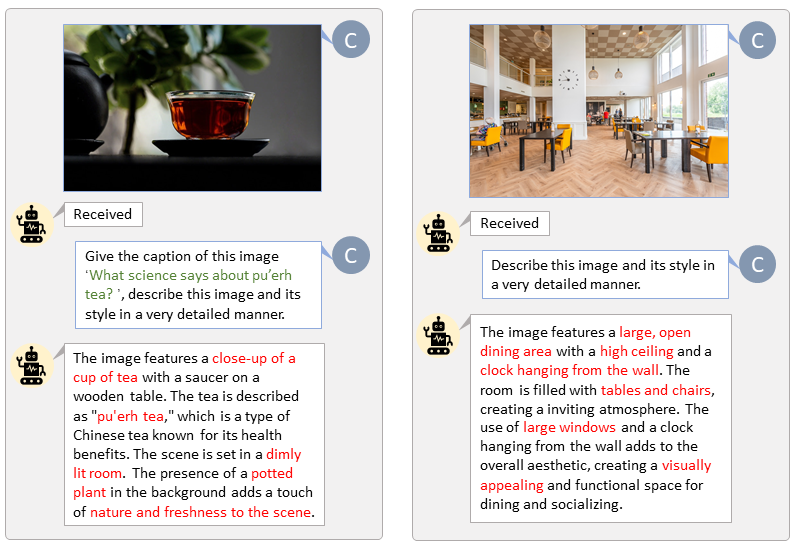
ด้วยฐานโค้ดของ LLaVA-Lightning-MPT เราจึงสามารถใส่คำอธิบายชุดข้อมูล LAION และ SAM ด้วยโค้ดเริ่มต้นต่อไปนี้:
python tools/VLM_caption_lightning.py --output output/dir/ --data-root data/root/path --index path/to/data.jsonเรานำเสนอการติดป้ายกำกับอัตโนมัติพร้อมข้อความแจ้งที่กำหนดเองสำหรับ LAION (ซ้าย) และ SAM (ขวา) คำที่ไฮไลต์ด้วยสีเขียวแสดงถึงคำบรรยายต้นฉบับใน LAION ในขณะที่คำที่ทำเครื่องหมายด้วยสีแดงหมายถึงคำบรรยายโดยละเอียดที่ LLaVA กำกับไว้

เตรียมฟีเจอร์ข้อความ T5 และฟีเจอร์รูปภาพ VAE ล่วงหน้าจะช่วยเร่งกระบวนการฝึกอบรมและประหยัดหน่วยความจำ GPU
python tools/extract_features.py --img_size=1024
    --json_path " data/data_info.json "
    --t5_save_root " data/SA1B/caption_feature_wmask "
    --vae_save_root " data/SA1B/img_vae_features "
    --pretrained_models_dir " output/pretrained_models "
--dataset_root " data/SA1B/Images/ " เราสร้างวิดีโอเปรียบเทียบ PixArt กับโมเดลการแปลงข้อความเป็นรูปภาพที่ทรงพลังที่สุดในปัจจุบัน
 @misc{chen2023pixartalpha,
      title={PixArt-$alpha$: Fast Training of Diffusion Transformer for Photorealistic Text-to-Image Synthesis},
      author={Junsong Chen and Jincheng Yu and Chongjian Ge and Lewei Yao and Enze Xie and Yue Wu and Zhongdao Wang and James Kwok and Ping Luo and Huchuan Lu and Zhenguo Li},
      year={2023},
      eprint={2310.00426},
      archivePrefix={arXiv},
      primaryClass={cs.CV}
}
@misc{chen2024pixartdelta,
      title={PIXART-{delta}: Fast and Controllable Image Generation with Latent Consistency Models},
      author={Junsong Chen and Yue Wu and Simian Luo and Enze Xie and Sayak Paul and Ping Luo and Hang Zhao and Zhenguo Li},
      year={2024},
      eprint={2401.05252},
      archivePrefix={arXiv},
      primaryClass={cs.CV}
}