all in one
v9.8.0
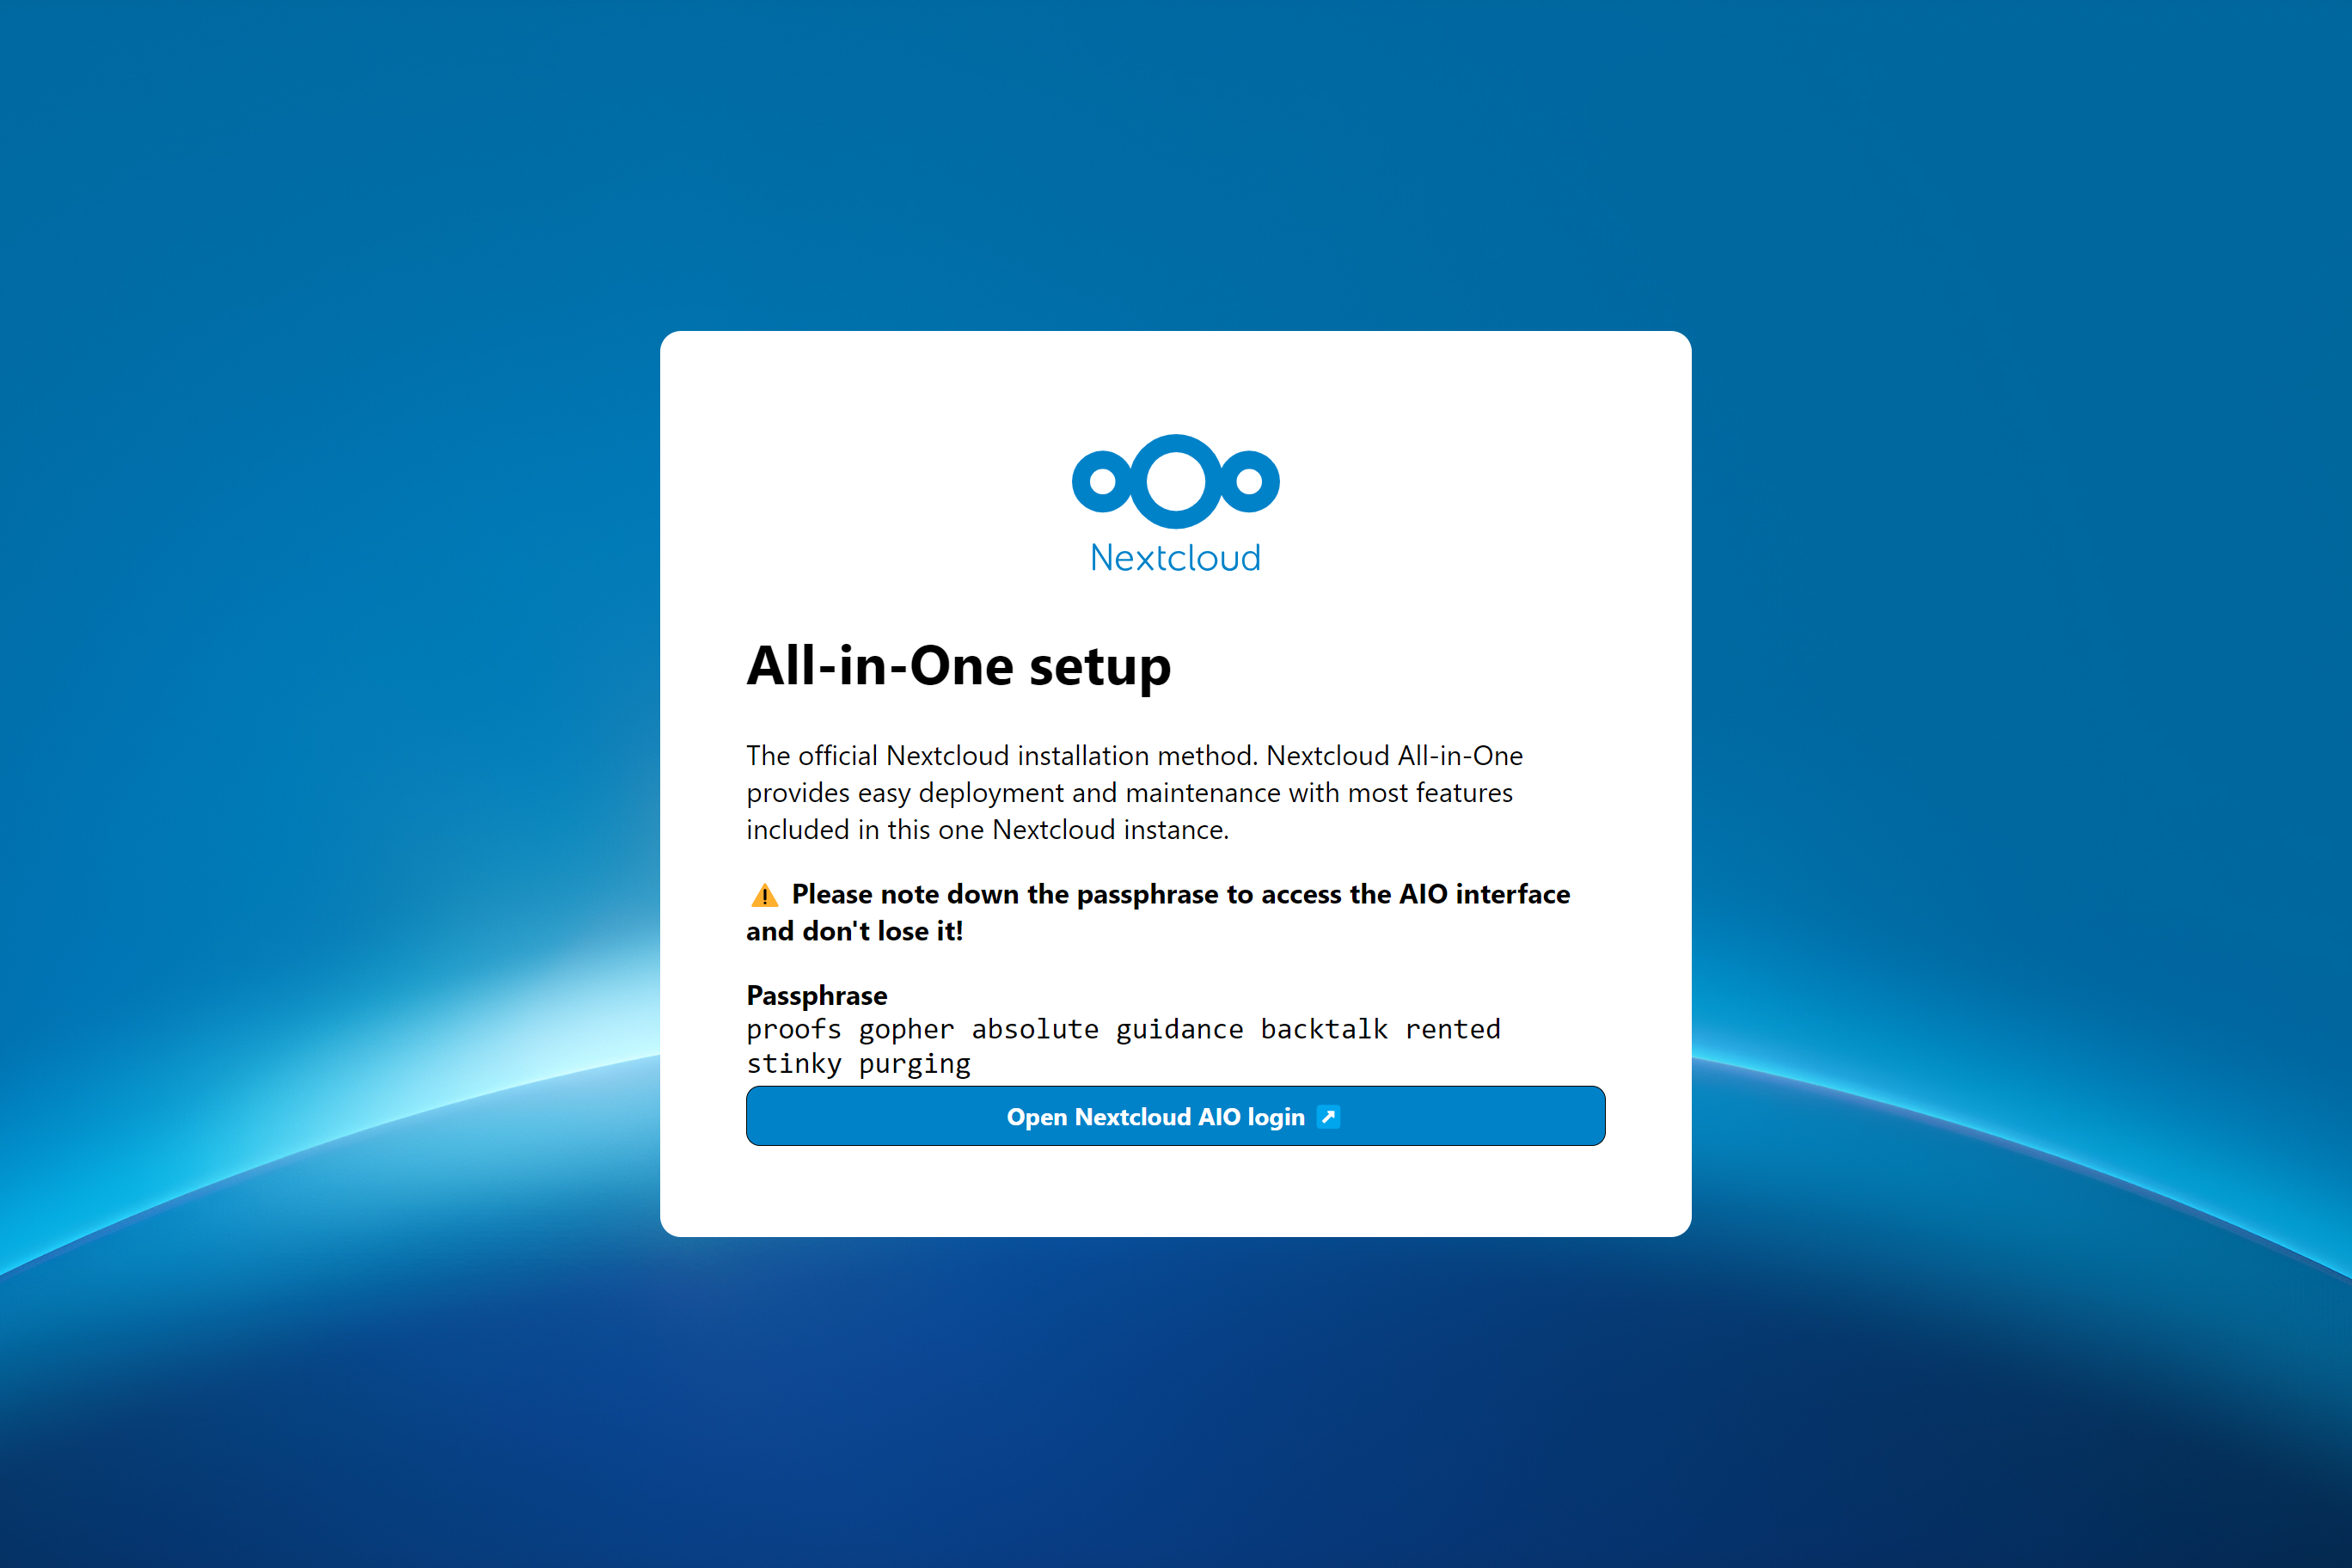
วิธีการติดตั้งอย่างเป็นทางการ NextCloud NextCloud AIO ให้การปรับใช้และการบำรุงรักษาที่ง่ายด้วยคุณสมบัติส่วนใหญ่ที่รวมอยู่ในอินสแตนซ์ NextCloud อันนี้
รวมอยู่ใน:
ffmpeg , smbclient , libreoffice และ nodejs รวมอยู่ในค่าเริ่มต้น| การตั้งค่าแรก | หลังการติดตั้ง |
|---|---|
 |  |
คำแนะนำต่อไปนี้มีไว้สำหรับการติดตั้งโดยไม่มีเว็บเซิร์ฟเวอร์หรือพร็อกซีย้อนกลับ (เช่น Apache, Nginx, Caddy, CloudFlare Tunnel และอื่น ๆ ) อยู่แล้ว หากคุณต้องการเรียกใช้ AIO ที่อยู่เบื้องหลังเว็บเซิร์ฟเวอร์หรือย้อนกลับพร็อกซี (เช่น Apache, Nginx, Caddy, CloudFlare Tunnel และอื่น ๆ ) ดูเอกสารประกอบ Reverse Proxy นอกจากนี้คำแนะนำด้านล่างนี้มีความหมายโดยเฉพาะอย่างยิ่งสำหรับ Linux สำหรับ macOS ดูสิ่งนี้สำหรับ Windows ให้ดูสิ่งนี้และสำหรับ Synology ดูสิ่งนี้
คำเตือน
คุณสามารถใช้สคริปต์ความสะดวกสบายด้านล่างเพื่อติดตั้ง Docker อย่างไรก็ตามเราขอแนะนำให้ไม่ดาวน์โหลดและเรียกใช้สคริปต์เป็น sudo แต่ถ้าคุณรู้สึกว่าคุณสามารถใช้มันได้แน่นอน ดูด้านล่าง:
curl -fsSL https://get.docker.com | sudo shหากคุณต้องการการสนับสนุน IPv6 คุณควรเปิดใช้งานโดยติดตาม https://github.com/nextcloud/all-in-one/blob/main/docker-ipv6-support.md
เรียกใช้คำสั่งด้านล่างเพื่อเริ่มคอนเทนเนอร์บน Linux และไม่มีเว็บเซิร์ฟเวอร์หรือพร็อกซีย้อนกลับ (เช่น Apache, Nginx, Caddy, CloudFlare Tunnel และอื่น ๆ ) อยู่แล้ว:
 # For Linux and without a web server or reverse proxy (like Apache, Nginx, Caddy, Cloudflare Tunnel and else) already in place:
sudo docker run
--init
--sig-proxy=false
--name nextcloud-aio-mastercontainer
--restart always
--publish 80:80
--publish 8080:8080
--publish 8443:8443
--volume nextcloud_aio_mastercontainer:/mnt/docker-aio-config
--volume /var/run/docker.sock:/var/run/docker.sock:ro
nextcloud/all-in-one:latest
sudo docker run คำสั่งนี้หมุนคอนเทนเนอร์ Docker ใหม่ คำสั่ง Docker สามารถใช้งานได้โดยไม่มี sudo หากผู้ใช้ถูกเพิ่มเข้าไปในกลุ่ม Docker (นี่ไม่เหมือนกับ Docker Rootless โปรดดูคำถามที่พบบ่อยด้านล่าง)--init ตัวเลือกนี้ทำให้แน่ใจว่าไม่มีการสร้างซอมบี้กระบวนการใด ๆ ดูเอกสารเกี่ยวกับนักเทียบท่า--sig-proxy=false ตัวเลือกนี้อนุญาตให้ออกจากเปลือกคอนเทนเนอร์ที่ติดอยู่โดยอัตโนมัติเมื่อใช้ docker run โดยใช้ [CTRL] + [C] โดยไม่ต้องปิดคอนเทนเนอร์--name nextcloud-aio-mastercontainer นี่คือชื่อของคอนเทนเนอร์ บรรทัดนี้ไม่ได้รับอนุญาตให้เปลี่ยนแปลงเนื่องจากการอัปเดต MasterContainer จะล้มเหลว--restart always หมายถึง always ว่าคอนเทนเนอร์ควรเริ่มต้นด้วย Docker Daemon เสมอ ดูเอกสาร Docker สำหรับรายละเอียดเพิ่มเติมเกี่ยวกับนโยบายรีสตาร์ท: https://docs.docker.com/config/containers/start-containers-automatically/--publish 80:80 ซึ่งหมายความว่าพอร์ต 80 ของคอนเทนเนอร์ควรได้รับการเผยแพร่บนโฮสต์โดยใช้พอร์ต 80 มันใช้สำหรับการรับใบรับรองที่ถูกต้องสำหรับอินเตอร์เฟส AIO หากคุณต้องการใช้พอร์ต 8443 AIO ที่อยู่เบื้องหลังเว็บเซิร์ฟเวอร์หรือพร็อกซีย้อนกลับและสามารถลบออกได้ในกรณีนั้นเนื่องจากคุณสามารถใช้พอร์ต 8080 สำหรับอินเทอร์เฟซ AIO ได้--publish 8080:8080 ซึ่งหมายความว่าพอร์ต 8080 ของคอนเทนเนอร์ควรได้รับการเผยแพร่บนโฮสต์โดยใช้พอร์ต 8080 พอร์ตนี้ใช้สำหรับอินเทอร์เฟซ AIO และใช้ใบรับรองที่ลงนามด้วยตนเองโดยค่าเริ่มต้น นอกจากนี้คุณยังสามารถใช้พอร์ตโฮสต์ที่แตกต่างกันได้หากพอร์ต 8080 ถูกใช้กับโฮสต์ของคุณแล้ว --publish 8081:8080 (เฉพาะพอร์ตแรกเท่านั้นที่สามารถเปลี่ยนได้สำหรับโฮสต์พอร์ตที่สองสำหรับคอนเทนเนอร์และต้องอยู่ที่ 8080 ).--publish 8443:8443 ซึ่งหมายความว่าพอร์ต 8443 ของคอนเทนเนอร์ควรได้รับการเผยแพร่บนโฮสต์โดยใช้พอร์ต 8443 หากคุณเผยแพร่พอร์ต 80 และ 8443 ไปยังอินเทอร์เน็ตสาธารณะคุณสามารถเข้าถึงอินเทอร์เฟซ AIO ผ่านพอร์ตนี้ด้วยใบรับรองที่ถูกต้อง ไม่จำเป็นถ้าคุณเรียกใช้ AIO หลังเว็บเซิร์ฟเวอร์หรือพร็อกซีย้อนกลับและสามารถลบออกได้ในกรณีนั้นเนื่องจากคุณสามารถใช้พอร์ต 8080 สำหรับอินเทอร์เฟซ AIO ได้--volume nextcloud_aio_mastercontainer:/mnt/docker-aio-config หมายความว่าไฟล์ที่สร้างโดย MasterContainer จะถูกเก็บไว้ในเล่ม Docker ที่เรียกว่า nextcloud_aio_mastercontainer บรรทัดนี้ไม่ได้รับอนุญาตให้เปลี่ยนแปลงเนื่องจากการสำรองข้อมูลในตัวจะล้มเหลวในภายหลัง--volume /var/run/docker.sock:/var/run/docker.sock:ro ซ็อกเก็ต Docker ติดตั้งไว้ในภาชนะซึ่งใช้สำหรับการหมุนภาชนะอื่น ๆ ทั้งหมดและคุณสมบัติเพิ่มเติม It needs to be adjusted on Windows/macOS and on docker rootless. ดูเอกสารที่เกี่ยวข้องเกี่ยวกับเรื่องนี้ หากปรับตัวอย่าลืมตั้งค่า WATCHTOWER_DOCKER_SOCKET_PATH ด้วย! หากคุณไม่ชอบสิ่งนี้ให้ดูที่ https://github.com/nextcloud/all-in-one/tree/main/manual-installnextcloud/all-in-one:latest นี่คือภาพคอนเทนเนอร์ Docker ที่ใช้--env NEXTCLOUD_DATADIR="/mnt/ncdata" (นี่คือตัวอย่างสำหรับ Linux ดูสิ่งนี้สำหรับระบบปฏิบัติการอื่น ๆ และสำหรับคำอธิบายว่าค่านี้ทำอย่างไร ที่จะระบุไว้เมื่อเริ่มต้นครั้งแรกหากคุณต้องการเปลี่ยนเป็นพา ธ เฉพาะแทนที่จะเป็นระดับเสียง Docker เริ่มต้น) หากต้องการดูคำอธิบายและตัวอย่างสำหรับตัวแปรเพิ่มเติม (เช่นการเปลี่ยนตำแหน่งของ Datadir ของ NextCloud หรือติดตั้งสถานที่บางแห่งเป็นที่เก็บข้อมูลภายนอกลงในคอนเทนเนอร์ NextCloud) อ่านผ่าน readme นี้และดูไฟล์ compose docker: https://github.com/ NextCloud/All-in-one/blob/main/pospose.yamlNote: You may be interested in adjusting Nextcloud's datadir to store the files in a different location than the default docker volume. ดูเอกสารนี้เกี่ยวกับวิธีการทำ
หลังจากการเริ่มต้นเริ่มต้นคุณควรจะสามารถเปิดอินเทอร์เฟซ NextCloud AIO ได้ในขณะนี้บนพอร์ต 8080 ของเซิร์ฟเวอร์นี้
เช่น https://ip.address.of.this.server:8080
หากไฟร์วอลล์/เราเตอร์ของคุณมีพอร์ต 80 และ 8443 เปิด/ส่งต่อและคุณชี้โดเมนไปยังเซิร์ฟเวอร์ของคุณคุณสามารถรับใบรับรองที่ถูกต้องโดยอัตโนมัติโดยเปิดอินเทอร์เฟซ AIO NextCloud ผ่าน:
https://your-domain-that-points-to-this-server.tld:8443
โปรดอย่าลืมเปิดพอร์ต 3478/TCP และ 3478/UDP ในไฟร์วอลล์/เราเตอร์ของคุณสำหรับคอนเทนเนอร์พูดคุย!
NextCloud AIO ได้รับแรงบันดาลใจจากโครงการเช่น Portainer ที่จัดการ Docker Daemon โดยพูดคุยกับมันผ่านช่องเสียบ Docker โดยตรง แนวคิดนี้ช่วยให้ผู้ใช้สามารถติดตั้งคอนเทนเนอร์เดียวที่มีคำสั่งเดียวที่ยกการสร้างและจัดการคอนเทนเนอร์ทั้งหมดที่จำเป็นเพื่อให้การติดตั้ง NextCloud มีคุณสมบัติส่วนใหญ่รวมอยู่ด้วย นอกจากนี้ยังทำให้การอัปเดตสายลมและไม่ผูกพันกับระบบโฮสต์ (และการอัปเดตที่ช้า) อีกต่อไปเนื่องจากทุกอย่างอยู่ในคอนเทนเนอร์ นอกจากนี้ยังง่ายมากที่จะจัดการจากมุมมองของผู้ใช้เนื่องจากมีอินเทอร์เฟซแบบง่าย ๆ สำหรับการจัดการการติดตั้ง NextCloud AIO ของคุณ
ดูปัญหานี้สำหรับรายการคำขอคุณสมบัติที่ต้องการความช่วยเหลือจากผู้มีส่วนร่วม
ใช่. โปรดดูเอกสารต่อไปนี้เกี่ยวกับเรื่องนี้: reverse-proxy.md
คุณสามารถตรวจสอบสิ่งนี้บน Linux โดย Running: uname -m
เฉพาะ (ถ้าคุณเข้าถึง MasterContainer Interface ภายในผ่านพอร์ต 8080):
443/TCP สำหรับคอนเทนเนอร์ Apache443/UDP ถ้าคุณต้องการเปิดใช้งาน HTTP3 สำหรับคอนเทนเนอร์ Apache3478/TCP และ 3478/UDP สำหรับคอนเทนเนอร์พูดคุย8080/TCP : อินเทอร์เฟซ MasterContainer พร้อมใบรับรองการลงนามด้วยตนเอง (ใช้งานได้เสมอหากเข้าถึงได้เฉพาะผ่าน IP-address เท่านั้นเช่น https://ip.address.of.this.server:8080/ )80/TCP : เปลี่ยนเส้นทางไปยัง NextCloud (ใช้เพื่อรับใบรับรองผ่าน ACME HTTP-Challenge สำหรับ MasterContainer)8443/TCP : อินเทอร์เฟซ MasterContainer พร้อมใบรับรองที่ถูกต้อง https://public.domain.com:8443/ ใช้งานได้เฉพาะพอร์ต 80 และ 8443 จะเปิด/ส่งต่อในไฟร์วอลล์/เราเตอร์ของคุณ https://public.domain.com:8443/ is possible.)443/TCP : จะใช้โดยคอนเทนเนอร์ Apache ในภายหลังและจำเป็นต้องเปิด/ส่งต่อในไฟร์วอลล์/เราเตอร์ของคุณ443/UDP : จะใช้โดยคอนเทนเนอร์ Apache ในภายหลังและจำเป็นต้องเปิด/ส่งต่อในไฟร์วอลล์/เราเตอร์ของคุณหากคุณต้องการเปิดใช้งาน HTTP33478/TCP และ 3478/UDP : จะใช้โดย Turnserver ภายในคอนเทนเนอร์ Talk และจำเป็นต้องเปิด/ส่งต่อในไฟร์วอลล์/เราเตอร์ของคุณ บน MacOS มีเพียงสิ่งเดียว --volume /var/run/docker.sock.raw:/var/run/docker.sock:ro แตกต่างกันเมื่อเทียบกับ Linux: แทนที่จะใช้ --volume /var/run/docker.sock:/var/run/docker.sock:ro --volume /var/run/docker.sock.raw:/var/run/docker.sock:ro เพื่อเรียกใช้หลังจากที่คุณติดตั้งเดสก์ท็อป Docker (และอย่าลืมเปิดใช้งาน IPv6 หากคุณต้องการ) นอกเหนือจากนั้นมันควรทำงานและประพฤติตนเหมือนใน Linux
นอกจากนี้คุณอาจสนใจที่จะปรับ Datadir ของ NextCloud เพื่อจัดเก็บไฟล์ในระบบโฮสต์ ดูเอกสารนี้เกี่ยวกับวิธีการทำ
บน Windows ให้ติดตั้ง Docker Desktop (และอย่าลืมเปิดใช้งาน IPv6 หากคุณต้องการสิ่งนั้น) และเรียกใช้คำสั่งต่อไปนี้ในพรอมต์คำสั่ง:
 docker run ^
--init ^
--sig-proxy=false ^
--name nextcloud-aio-mastercontainer ^
--restart always ^
--publish 80:80 ^
--publish 8080:8080 ^
--publish 8443:8443 ^
--volume nextcloud_aio_mastercontainer:/mnt/docker-aio-config ^
--volume //var/run/docker.sock:/var/run/docker.sock:ro ^
nextcloud/all-in-one:latest
Also, you may be interested in adjusting Nextcloud's Datadir to store the files on the host system. ดูเอกสารนี้เกี่ยวกับวิธีการทำ
บันทึก
คำสั่งเกือบทั้งหมดในเอกสารของโครงการนี้ใช้ sudo docker ... เนื่องจาก sudo ไม่สามารถใช้งานได้บน Windows คุณเพียงแค่ลบ sudo ออกจากคำสั่งและพวกเขาควรทำงาน
เกี่ยวกับ Synology มีสองสิ่งที่แตกต่างกันเมื่อเปรียบเทียบกับ Linux --volume /volume1/docker/docker.sock:/var/run/docker.sock:ro แทนที่จะใช้ --volume /var/run/docker.sock:/var/run/docker.sock:ro --volume /volume1/docker/docker.sock:/var/run/docker.sock:ro เพื่อเรียกใช้ คุณต้องเพิ่ม --env WATCHTOWER_DOCKER_SOCKET_PATH="/volume1/docker/docker.sock" ไปยังคำสั่ง Docker Run ของ MasterContainer (แต่ก่อนบรรทัดสุดท้าย nextcloud/all-in-one:latest ) นอกเหนือจากนั้นมันควรทำงานและประพฤติตนเหมือนใน Linux เห็นได้ชัดว่า Synology Docker GUI จะไม่ทำงานกับสิ่งนั้นดังนั้นคุณจะต้องใช้ SSH หรือสร้างงานสคริปต์ที่ผู้ใช้กำหนดในตัวกำหนดตารางเวลาเป็น 'รูท' ของผู้ใช้เพื่อเรียกใช้คำสั่ง
บันทึก
เป็นไปได้ว่าซ็อกเก็ต Docker ใน Synology ของคุณอยู่ใน /var/run/docker.sock เช่นค่าเริ่มต้นบน Linux จากนั้นคุณสามารถใช้คำสั่ง Linux ได้โดยไม่ต้องเปลี่ยนอะไร - คุณจะสังเกตเห็นสิ่งนี้เมื่อคุณพยายามเริ่มต้นคอนเทนเนอร์และมันบอกว่าการติดตั้ง BIND ล้มเหลว เช่น docker: Error response from daemon: Bind mount failed: '/volume1/docker/docker.sock' does not exists.
นอกจากนี้คุณอาจสนใจที่จะปรับ Datadir ของ NextCloud เพื่อจัดเก็บไฟล์ในระบบโฮสต์ ดูเอกสารนี้เกี่ยวกับวิธีการทำ
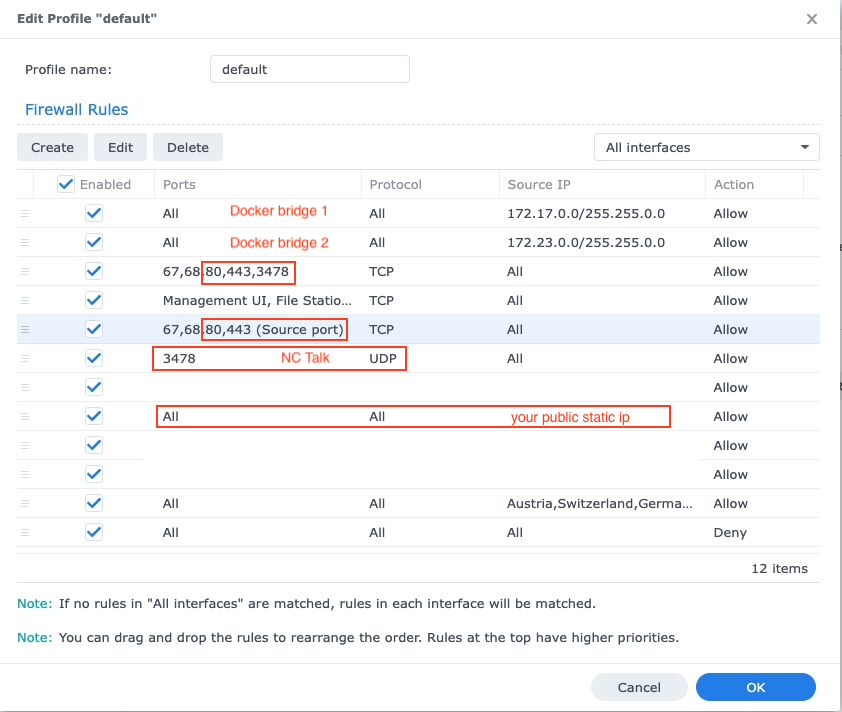
คุณจะต้องปรับไฟร์วอลล์ของ Synology ดูด้านล่าง:
Synology DSM มีความเสี่ยงที่จะโจมตีด้วยพอร์ตเปิดและอินเทอร์เฟซเข้าสู่ระบบซึ่งเป็นสาเหตุที่แนะนำให้ตั้งค่าไฟร์วอลล์เสมอ หากเปิดใช้งานไฟร์วอลล์จำเป็นต้องมีข้อยกเว้นสำหรับพอร์ต 80,443, ซับเน็ตของสะพาน Docker ซึ่งรวมถึงคอนเทนเนอร์ NextCloud, IP แบบคงที่สาธารณะของคุณ (ถ้าคุณไม่ใช้ DDNS) +UDP:
หากคุณมีการตั้งค่า NAS บนเครือข่ายท้องถิ่นของคุณ (ซึ่งมักจะเป็นกรณี) คุณจะต้องตั้งค่า Synology DNS เพื่อให้สามารถเข้าถึง NextCloud จากเครือข่ายของคุณผ่านโดเมน อย่าลืมเพิ่ม DNS ใหม่ลงในเซิร์ฟเวอร์ DHCP ของคุณและการตั้งค่า IP คงที่ของคุณ:

วิธีที่ง่ายที่สุดในการเรียกใช้กับ Portainer on Linux คือการใช้คุณสมบัติสแต็กของ Portainer และใช้ไฟล์ compose docker นี้เพื่อเริ่ม AIO อย่างถูกต้อง
ด้วยการเปิดตัวสเกล Truenas 24.10.0 (ซึ่งได้รับการปล่อยตัวอย่างเป็นทางการเมื่อวันที่ 29 ตุลาคม 2567 เป็นรุ่นที่มีเสถียรภาพ) IX Systems ได้ทำการรวมการรวม Kubernetes และดำเนินการสภาพแวดล้อมที่ทำงานได้อย่างเต็มที่
สำหรับคำแนะนำที่สมบูรณ์ยิ่งขึ้นดูคู่มือนี้โดย @zybster: #5506
ในระดับ Truenas ที่มีอายุมากกว่าจะมีสภาพแวดล้อม Kubernetes มีสองวิธีในการเรียกใช้ AIO สิ่งที่ต้องการคือเรียกใช้ AIO ภายใน VM สิ่งนี้มีความจำเป็นเนื่องจากพวกเขาไม่ได้เปิดเผยซ็อกเก็ต Docker สำหรับตู้คอนเทนเนอร์บนโฮสต์คุณยังไม่สามารถใช้ compose นักเทียบท่ากับมันได้และมันก็เป็นไปไม่ได้ที่จะเรียกใช้ชาร์ต Helm ที่กำหนดเองที่ไม่ได้เขียนไว้อย่างชัดเจนสำหรับมาตราส่วน Truenas
อีกวิธีที่ยังไม่ทดลองคือการติดตั้ง Portainer ในระดับ Truenas ของคุณจากที่นี่ https://truecharts.org/charts/stable/portainer/installation-notes และเพิ่มที่เก็บ helm- chart https://nextcloud.github.io/all- In-one/เข้าสู่ Portainer โดยติดตาม https://docs.portainer.io/user/kubernetes/helm เอกสารเพิ่มเติมเกี่ยวกับแผนภูมิ AIOS Helm มีอยู่ที่นี่: https://github.com/nextcloud/all-in-one/tree/main/nextcloud-aio-helm-chart#nextcloud-aio-helm-chart
https://yourdomain.com/settings/admin/richdocumentshttps://yourdomain.com/settings/admin/talkแม้ว่ามันจะไม่เป็นเช่นนั้น แต่จากมุมมองของ AIO อุโมงค์ CloudFlare ทำงานเหมือนพร็อกซีย้อนกลับ ดังนั้นโปรดติดตามเอกสารพร็อกซีย้อนกลับที่มีการบันทึกวิธีการทำให้มันทำงานอยู่หลังอุโมงค์ CloudFlare อย่างไรก็ตามโปรดดูคำเตือนก่อนดำเนินการ
สำหรับคู่มือตัวอย่างพร็อกซีย้อนกลับสำหรับ tailscale ดูคู่มือนี้โดย @flll: #5439
/proc/user_beancounters และขีด จำกัด numproc ต่ำที่ตั้งไว้ในเซิร์ฟเวอร์ของคุณจะทำงานผิดพลาดเมื่อถึงขีด จำกัด นี้ซึ่ง AIO ถึงอย่างรวดเร็วดูที่นี่โดยทั่วไป VPS ที่แนะนำคือสิ่งที่เป็น KVM/ไม่ใช่เสมือนจริงเนื่องจาก Docker ควรทำงานได้ดีที่สุด
คุณสามารถติดตั้ง AIO ในโหมดพร็อกซีย้อนกลับซึ่งมีการบันทึกวิธีการทำงานโดยใช้ ACME DNS-Challenge เพื่อรับใบรับรองที่ถูกต้องสำหรับ AIO See the reverse proxy documentation. (Meant is the Caddy with ACME DNS-challenge section). ดู https://github.com/dani-garcia/vaultwarden/wiki/running-a-private-vaultwarden-instance-with-let%27s-encrypt-certs#getting-a-custom-caddy-build สำหรับเอกสารเพิ่มเติม on this topic.
หากคุณไม่ต้องการเปิด NextCloud ไปยังอินเทอร์เน็ตสาธารณะคุณอาจดูเอกสารต่อไปนี้เกี่ยวกับวิธีการตั้งค่าในพื้นที่: local-instance.md แต่โปรดจำไว้ว่าคุณยังคงต้องทำงาน HTTPS อย่างถูกต้อง .
No and it will not be added. หากคุณต้องการเรียกใช้ในเครื่องเท่านั้นคุณอาจดูเอกสารต่อไปนี้: local-instance.md สำหรับการกำหนดค่าโดยไม่มีโดเมนดั้งเดิม หรือพิจารณาใช้ NextCloudPi สำหรับการเข้าถึงที่อยู่ IP ในพื้นที่ (มันรวมคุณสมบัติน้อยกว่า AIO)
ไม่ได้เป็นไปไม่ได้และจะไม่ถูกเพิ่มเนื่องจากเหตุผลหลายประการ: การตรวจสอบอัปเดต, การติดตั้งแอพผ่านแอพ-ร้านค้าดาวน์โหลดรูปภาพ Docker เพิ่มเติมตามความต้องการและอื่น ๆ
ไม่และพวกเขาจะไม่เป็น หากคุณต้องการเรียกใช้ในพื้นที่โดยไม่เปิด NextCloud ไปยังอินเทอร์เน็ตสาธารณะโปรดดูเอกสารอินสแตนซ์ท้องถิ่น
ไม่และจะไม่เพิ่ม อย่างไรก็ตามคุณสามารถใช้คุณสมบัตินี้เพื่อสร้างอินสแตนซ์ AIO หลายรายการหนึ่งรายการสำหรับแต่ละโดเมน
ไม่และพวกเขาจะไม่เป็น โปรดใช้โดเมนเฉพาะสำหรับ NextCloud และตั้งค่าอย่างถูกต้องโดยทำตามเอกสารพร็อกซีย้อนกลับ หากพอร์ต 443 และ/หรือ 80 ถูกบล็อกสำหรับคุณคุณสามารถใช้อุโมงค์ CloudFlare หากคุณต้องการเผยแพร่ออนไลน์ คุณสามารถใช้ Acme DNS-Challenge เพื่อรับใบรับรองที่ถูกต้อง อย่างไรก็ตามในทุกกรณีอินเตอร์เฟส NextCloud จะนำคุณไปยังพอร์ต 443
ไม่และจะไม่เพิ่ม โปรดใช้โดเมน (ย่อย) เฉพาะสำหรับ NextCloud และตั้งค่าอย่างถูกต้องโดยทำตามเอกสารพร็อกซีย้อนกลับ
โปรดทราบว่าการเข้าถึงในพื้นที่เป็นไปไม่ได้หากคุณใช้ AIO หลังอุโมงค์ CloudFlare เนื่องจากพร็อกซีการ TLS อยู่ในกรณีนั้นปิดท้ายโครงสร้างพื้นฐาน CloudFlares คุณสามารถแก้ไขได้โดยการตั้งค่าพร็อกซีย้อนกลับของคุณเองซึ่งจัดการกับพร็อกซ์ TLS ในพื้นที่และจะทำตามขั้นตอนด้านล่าง
โปรดตรวจสอบให้แน่ใจว่าหากคุณใช้งาน AIO หลังพร็อกซีย้อนกลับว่าพร็อกซีย้อนกลับจะถูกกำหนดค่าให้ใช้พอร์ต 443 บนเซิร์ฟเวอร์ที่ทำงาน มิฉะนั้นขั้นตอนด้านล่างจะไม่ทำงาน
ตอนนี้สิ่งนี้ไม่อยู่แล้ววิธีที่แนะนำวิธีการเข้าถึง NextCloud ในพื้นที่คือการตั้งค่า DNS-Server ในท้องถิ่นเช่น Pi-Hole และตั้งค่า DNS-record ที่กำหนดเองสำหรับโดเมนที่ชี้ไปที่ IP- ภายใน adddress ของเซิร์ฟเวอร์ของคุณที่เรียกใช้ NextCloud AIO ด้านล่างนี้เป็นคำแนะนำบางอย่าง:
หากคุณแน่ใจว่าคุณได้กำหนดค่าทุกอย่างอย่างถูกต้องและไม่สามารถผ่านการตรวจสอบโดเมนได้คุณอาจข้ามการตรวจสอบโดเมนโดยการเพิ่ม --env SKIP_DOMAIN_VALIDATION=true กับคำสั่ง Docker Run ของ MasterContainer (แต่ก่อนบรรทัดสุดท้าย nextcloud/all-in-one:latest !
เป็นที่ทราบกันดีว่า Linux distros ที่ใช้ไฟร์วอลล์เป็น Daemon ไฟร์วอลล์ของพวกเขามีปัญหากับเครือข่ายนักเทียบท่า ในกรณีที่ตู้คอนเทนเนอร์ไม่สามารถสื่อสารกันได้คุณอาจเปลี่ยนไฟร์วอลล์ของคุณเพื่อใช้แบ็กเอนด์ iptables โดยการรัน:
 sudo sed -i 's/FirewallBackend=nftables/FirewallBackend=iptables/g' /etc/firewalld/firewalld.conf
sudo systemctl restart firewalld docker
หลังจากนั้นก็ควรทำงาน
See https://dev.to/ozorest/fedora-32-how-to-solve-docker-internal-network-issue-22me for more details on this. ข้อ จำกัด นี้ยังกล่าวถึงในเว็บไซต์ Firewalld อย่างเป็นทางการ: https://firewalld.org/#who-is-using-it
ใช่. หากเปิดใช้งาน Selinux คุณอาจต้องเพิ่ม --security-opt label:disable งานตัวเลือกลงในคำสั่ง Docker Run ของ MasterContainer เพื่อให้สามารถเข้าถึงซ็อกเก็ต Docker (หรือ security_opt: ["label:disable"] PISCOSE.YAML) ดู #485
occ ? เพียงเรียกใช้สิ่งต่อไปนี้: sudo docker exec --user www-data -it nextcloud-aio-nextcloud php occ your-command แน่นอนว่า your-command จะต้องมีการแลกเปลี่ยนกับคำสั่งที่คุณต้องการเรียกใช้
Security & setup warnings displays the "missing default phone region" after initial install เพียงเรียกใช้คำสั่งต่อไปนี้: sudo docker exec --user www-data nextcloud-aio-nextcloud php occ config:system:set default_phone_region --value="yourvalue" แน่นอนคุณต้องปรับเปลี่ยน yourvalue ตามตำแหน่งของคุณ ตัวอย่างคือ DE , US และ GB ดูรายการนี้สำหรับรหัสเพิ่มเติม: https://en.wikipedia.org/wiki/iso_3166-1_alpha-2#officialy_assigned_code_elements
ดู Multiple-instances.md สำหรับเอกสารบางอย่างเกี่ยวกับเรื่องนี้
NextCloud มีการป้องกัน bruteforce ในตัวซึ่งอาจถูกทริกเกอร์และจะบล็อกที่อยู่ IP หรือปิดการใช้งานผู้ใช้ คุณสามารถปลดบล็อกที่อยู่ IP ได้โดยเรียกใช้ sudo docker exec --user www-data -it nextcloud-aio-nextcloud php occ user:enable <name of user> sudo docker exec --user www-data -it nextcloud-aio-nextcloud php occ security:bruteforce:reset <ip-address> และเปิดใช้งานผู้ใช้ที่ปิดใช้งาน sudo docker exec --user www-data -it nextcloud-aio-nextcloud php occ user:enable <name of user> ดู https://docs.nextcloud.com/server/latest/admin_manual/configuration_server/occ_command.html#security สำหรับข้อมูลเพิ่มเติม
โครงการนี้ให้ความสำคัญกับคุณสมบัติใหม่ นั่นหมายความว่าเมื่อมีการแนะนำการอัปเดตครั้งใหญ่ NextCloud ใหม่เราจะรออย่างน้อยจนกว่าจะมีการเปิดตัวแพทช์ครั้งแรกเช่น 24.0.1 จะหมดก่อนที่จะอัพเกรดเป็น Also we will wait with the upgrade until all important apps are compatible with the new major version. การเผยแพร่เล็กน้อยหรือแพตช์สำหรับ NextCloud และการพึ่งพาทั้งหมดรวมถึงคอนเทนเนอร์ทั้งหมดจะได้รับการอัปเดตเป็นเวอร์ชันใหม่โดยเร็วที่สุด แต่เราพยายามให้การอัปเดตทั้งหมดเป็นรอบการทดสอบที่ดีก่อนที่จะผลักพวกเขา That means that it can take around 2 weeks before new updates reach the latest channel. หากคุณต้องการช่วยในการทดสอบคุณสามารถเปลี่ยนไปใช้ช่อง beta ได้โดยทำตามเอกสารนี้ซึ่งจะให้การอัปเดตก่อนหน้านี้
คุณสามารถเปลี่ยนเป็นช่องอื่นเช่นช่องเบต้าหรือจากช่องเบต้ากลับไปเป็นช่องล่าสุดโดยหยุด MasterContainer ลบออก (ไม่มีข้อมูลหายไป) และสร้างคอนเทนเนอร์ใหม่โดยใช้คำสั่งเดียวกับที่คุณใช้ในตอนแรกเพื่อสร้าง the mastercontainer. คุณเพียงแค่ต้องเปลี่ยนบรรทัดสุดท้าย nextcloud/all-in-one:latest เป็น nextcloud/all-in-one:beta และในทางกลับกัน
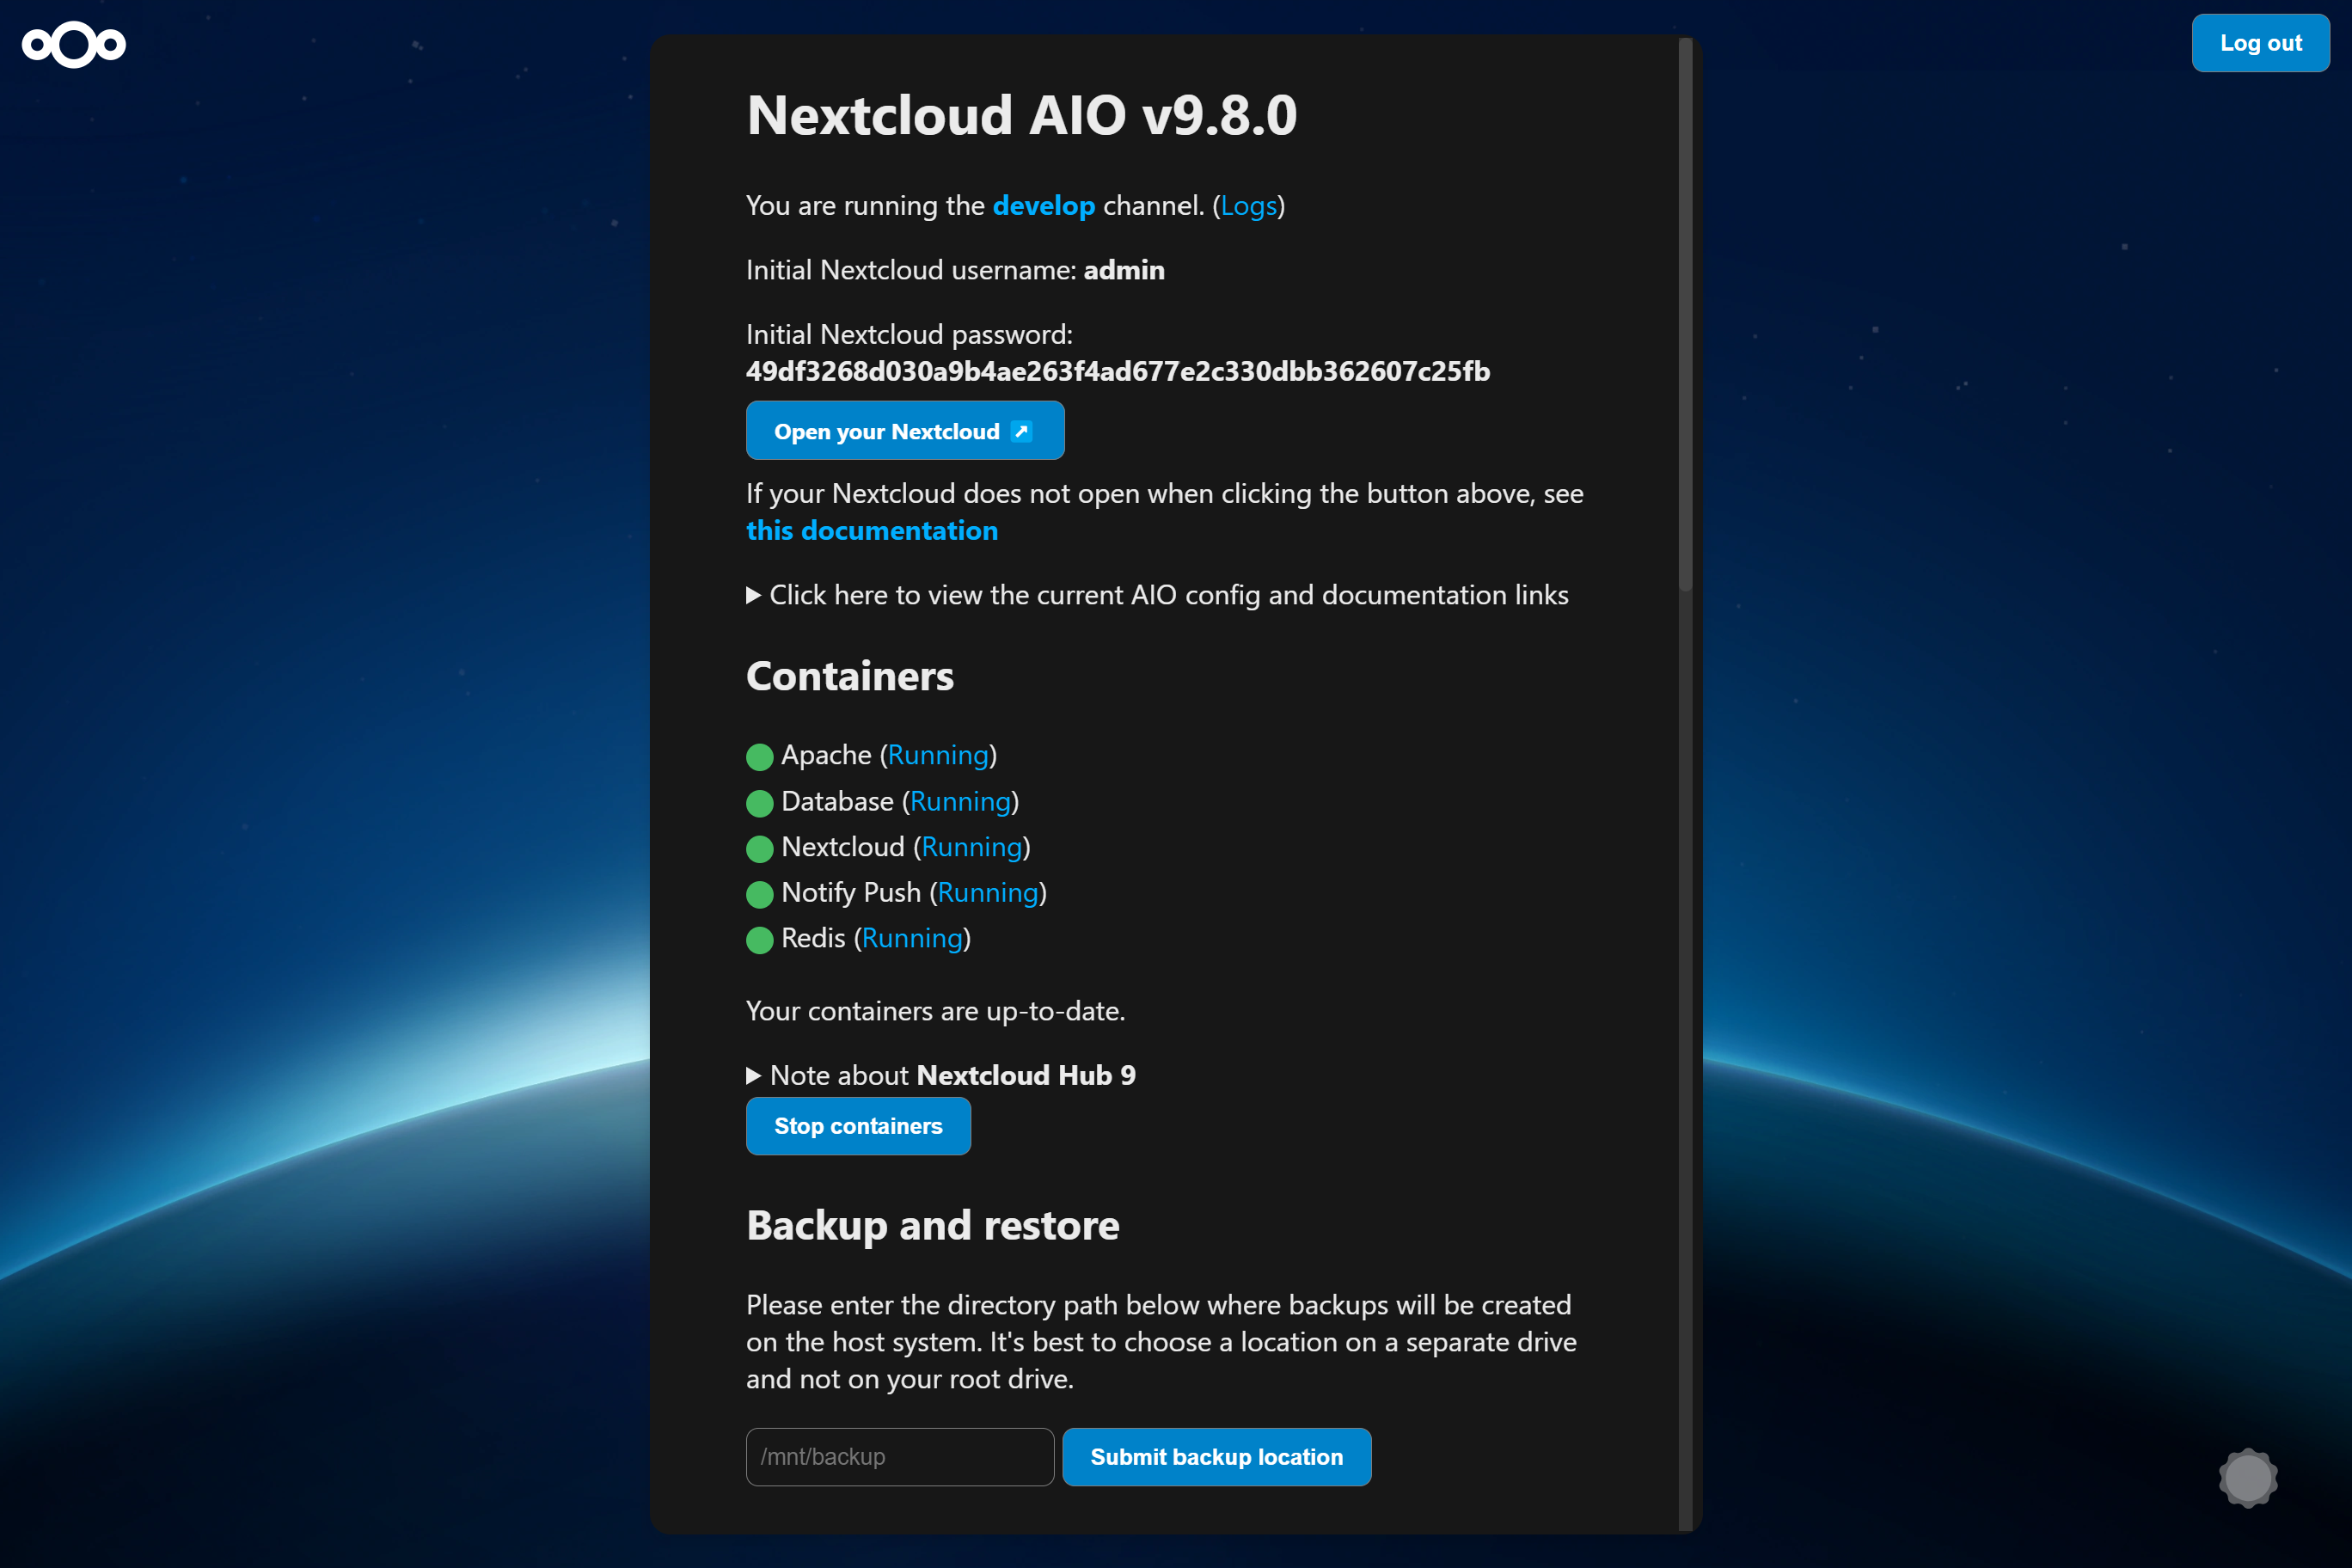
หากเราผลักดันคอนเทนเนอร์ใหม่ไปยัง latest คุณจะเห็นในส่วนต่อประสาน AIO ด้านล่างส่วน containers ที่พบการอัปเดตคอนเทนเนอร์ใหม่ ในกรณีนี้เพียงกด Stop containers และ Start and update containers เพื่ออัปเดตคอนเทนเนอร์ MasterContainer มีขั้นตอนการอัปเดตของตัวเอง ดูด้านล่าง And don't forget to back up the current state of your instance using the built-in backup solution before starting the containers again! มิฉะนั้นคุณจะไม่สามารถกู้คืนอินสแตนซ์ของคุณได้อย่างง่ายดายหากมีบางสิ่งที่ควรทำลายในระหว่างการอัปเดต
If a new mastercontainer update was found, you'll see a note below the Stop containers button that allows to show the changelog. If you click that button and the containers are stopped, you will see a new button that allows to update the mastercontainer. After doing so and after the update is gone through, you will have the option again to Start and update containers . It is recommended to create a backup before clicking the Start and update containers button.
Additionally, there is a cronjob that runs once a day that checks for container and mastercontainer updates and sends a notification to all Nextcloud admins if a new update was found.
AIO ships its own update notifications implementation. It checks if container updates are available. If so, it sends a notification with the title Container updates available! on saturdays to Nextcloud users that are part of the admin group. If the Nextcloud container image should be older than 90 days (~3 months) and thus badly outdated, AIO sends a notification to all Nextcloud users with the title AIO is outdated! - Thus admins should make sure to update the container images at least once every 3 months in order to make sure that the instance gets all security bugfixes as soon as possible.
If your Nextcloud is running and you are logged in as admin in your Nextcloud, you can easily log in to the AIO interface by opening https://yourdomain.tld/settings/admin/overview which will show a button on top that enables you to log in to the AIO interface by just clicking on this button.
บันทึก
You can change the domain/ip-address/port of the button by simply stopping the containers, visiting the AIO interface from the correct and desired domain/ip-address/port and clicking once on Start containers .
บันทึก
Editing the configuration.json manually and making a mistake may break your instance so please create a backup first!
If you set up a new AIO instance, you need to enter a domain. Currently there is no way to change this domain afterwards from the AIO interface. So in order to change it, you need to edit the configuration.json manually using sudo docker run -it --rm --volume nextcloud_aio_mastercontainer:/mnt/docker-aio-config:rw alpine sh -c "apk add --no-cache nano && nano /mnt/docker-aio-config/data/configuration.json" , substitute each occurrence of your old domain with your new domain and save and write out the file. Afterwards restart your containers from the AIO interface and everything should work as expected if the new domain is correctly configured.
If you are running AIO behind a web server or reverse proxy (like Apache, Nginx, Caddy, Cloudflare Tunnel and else), you need to obviously also change the domain in your reverse proxy config.
Additionally, after restarting the containers, you need to open the admin settings and update some values manually that cannot be changed automatically. Here is a list of some known places:
https://your-nc-domain.com/settings/admin/talk for Turn/Stun server and Signaling Server if you enabled Talk via the AIO interfacehttps://your-nc-domain.com/settings/admin/theming for the theming URLhttps://your-nc-domain.com/settings/admin/app_api for the deploy daemon if you enabled the App API via the AIO interfaceIf something goes unexpected routes during the initial installation, you might want to reset the AIO installation to be able to start from scratch.
บันทึก
If you already have it running and have data on your instance, you should not follow these instructions as it will delete all data that is coupled to your AIO instance.
Here is how to reset the AIO instance properly:
sudo docker stop nextcloud-aio-mastercontainersudo docker stop nextcloud-aio-domainchecksudo docker ps --format {{.Names}} . If no nextcloud-aio containers are listed, you can proceed with the steps below. If there should be some, you will need to stop them with sudo docker stop <container_name> until no one is listed anymore.sudo docker ps --filter "status=exited"sudo docker container prunesudo docker network rm nextcloud-aiosudo docker volume ls --filter "dangling=true"sudo docker volume prune --filter all=1 (on Windows you might need to remove some volumes afterwards manually with docker volume rm nextcloud_aio_backupdir , docker volume rm nextcloud_aio_nextcloud_datadir ).NEXTCLOUD_DATADIR to a path on your host instead of the default volume, you need to clean that up as well. (Eg by simply deleting the directory).sudo docker volume ls --format {{.Name}} . If no nextcloud-aio volumes are listed, you can proceed with the steps below. If there should be some, you will need to remove them with sudo docker volume rm <volume_name> until no one is listed anymore.sudo docker image prune -a .Nextcloud AIO provides a backup solution based on BorgBackup. These backups act as a restore point in case the installation gets corrupted. By using this tool, backups are incremental, differential, compressed and encrypted – so only the first backup will take a while. Further backups should be fast as only changes are taken into account.
It is recommended to create a backup before any container update. By doing this, you will be safe regarding any possible complication during updates because you will be able to restore the whole instance with basically one click.
For local backups, the restore process should be pretty fast as rsync is used to restore the chosen backup which only transfers changed files and deletes additional ones. For remote borg backups, the whole backup archive is extracted from the remote, which depending on how clever borg extract is, may require downloading the whole archive.
If you connect an external drive to your host, and choose the backup directory to be on that drive, you are also kind of safe against drive failures of the drive where the docker volumes are stored on.
/mnt/backup ./mnt/backup .Create Backup which should create the first backup on the external disk.If you want to back up directly to a remote borg repository:
Create backup , this will create an ssh key pair and fail because the remote doesn't trust this key yet. Copy the public key shown in AIO and add it to your authorized keys on the remote. Backups can be created and restored in the AIO interface using the buttons Create Backup and Restore selected backup . Additionally, a backup check is provided that checks the integrity of your backups but it shouldn't be needed in most situations.
The backups themselves get encrypted with an encryption key that gets shown to you in the AIO interface. Please save that at a safe place as you will not be able to restore from backup without this key.
Daily backups can get enabled after the initial backup is done. Enabling this also allows to enable an option that allows to automatically update all containers, Nextcloud and its apps.
Be aware that this solution does not back up files and folders that are mounted into Nextcloud using the external storage app - but you can add further Docker volumes and host paths that you want to back up after the initial backup is done.
Backed up will get all important data of your Nextcloud AIO instance like the database, your files and configuration files of the mastercontainer and else. Files and folders that are mounted into Nextcloud using the external storage app are not getting backed up. There is currently no way to exclude the data directory because it would require hacks like running files:scan and would make the backup solution much more unreliable (since the database and your files/folders need to stay in sync). If you still don't want your datadirectory to be backed up, see https://github.com/nextcloud/all-in-one#how-to-enable-automatic-updates-without-creating-a-backup-beforehand for options (there is a hint what needs to be backed up in which order).
The built-in borg-based backup solution has by default a retention policy of --keep-within=7d --keep-weekly=4 --keep-monthly=6 . See https://borgbackup.readthedocs.io/en/stable/usage/prune.html for what these values mean. You can adjust the retention policy by providing --env BORG_RETENTION_POLICY="--keep-within=7d --keep-weekly=4 --keep-monthly=6" to the docker run command of the mastercontainer (but before the last line nextcloud/all-in-one:latest ! If it was started already, you will need to stop the mastercontainer, remove it (no data will be lost) and recreate it using the docker run command that you initially used) and customize the value to your fitting.
Backing up directly to a remote borg repository is supported. This avoids having to store a local copy of your backups, supports append-only borg keys to counter ransomware and allows using the AIO interface to manage your backups.
Some alternatives, which do not have all the above benefits:
If you are running AIO in a LXC container, you need to make sure that FUSE is enabled in the LXC container settings. Also, if using Alpine Linux as host OS, make sure to add fuse via apk add fuse . Otherwise the backup container will not be able to start as FUSE is required for it to work.
As stated in the AIO interface, it is possible to use a docker volume as backup target. Before you can use that, you need to create it first. Here is an example how to create one on Windows:
 docker volume create ^
--driver local ^
--name nextcloud_aio_backupdir ^
-o device="/host_mnt/e/your/backup/path" ^
-o type="none" ^
-o o="bind"
In this example, it would mount E:yourbackuppath into the volume so for a different location you need to adjust /host_mnt/e/your/backup/path accordingly. Afterwards enter nextcloud_aio_backupdir in the AIO interface as backup location.
You can open the BorgBackup archives on your host by following these steps:
(instructions for Ubuntu Desktop)
 # Install borgbackup on the host
sudo apt update && sudo apt install borgbackup

# In any shell where you use borg, you must first export this variable
# If you are using the default backup location /mnt/backup/borg
export BORG_REPO= ' /mnt/backup/borg '
# or if you are using a remote repository
export BORG_REPO= ' user@host:/path/to/repo '

# Mount the archives to /tmp/borg
sudo mkdir -p /tmp/borg && sudo borg mount " $BORG_REPO " /tmp/borg

# After entering your repository key successfully, you should be able to access all archives in /tmp/borg
# You can now do whatever you want by syncing them to a different place using rsync or doing other things
# E.g. you can open the file manager on that location by running:
xhost +si:localuser:root && sudo nautilus /tmp/borg

# When you are done, simply close the file manager and run the following command to unmount the backup archives:
sudo umount /tmp/borg You can delete BorgBackup archives on your host manually by following these steps:
(instructions for Debian based OS' like Ubuntu)
 # Install borgbackup on the host
sudo apt update && sudo apt install borgbackup

# In any shell where you use borg, you must first export this variable
# If you are using the default backup location /mnt/backup/borg
export BORG_REPO= ' /mnt/backup/borg '
# or if you are using a remote repository
export BORG_REPO= ' user@host:/path/to/repo '

# List all archives (if you are using the default backup location /mnt/backup/borg)
sudo borg list

# After entering your repository key successfully, you should now see a list of all backup archives
# An example backup archive might be called 20220223_174237-nextcloud-aio
# Then you can simply delete the archive with:
sudo borg delete --stats --progress " ::20220223_174237-nextcloud-aio "

# If borg 1.2.0 or higher is installed, you then need to run borg compact in order to clean up the freed space
sudo borg --version
# If version number of the command above is higher than 1.2.0 you need to run the command below:
sudo borg compact
After doing so, make sure to update the backup archives list in the AIO interface!
You can do so by clicking on the Check backup integrity button or Create backup button.
For increased backup security, you might consider syncing the local backup repository regularly to another drive.
To do that, first add the drive to /etc/fstab so that it is able to get automatically mounted and then create a script that does all the things automatically. Here is an example for such a script:
 #! /bin/bash

# Please modify all variables below to your needings:
SOURCE_DIRECTORY= " /mnt/backup/borg "
DRIVE_MOUNTPOINT= " /mnt/backup-drive "
TARGET_DIRECTORY= " /mnt/backup-drive/borg "

# #######################################
# Please do NOT modify anything below! #
# #######################################

if [ " $EUID " -ne 0 ] ; then
    echo " Please run as root "
    exit 1
fi

if ! [ -d " $SOURCE_DIRECTORY " ] ; then
    echo " The source directory does not exist. "
    exit 1
fi

if [ -z " $( ls -A " $SOURCE_DIRECTORY / " ) " ] ; then
    echo " The source directory is empty which is not allowed. "
    exit 1
fi

if ! [ -d " $DRIVE_MOUNTPOINT " ] ; then
    echo " The drive mountpoint must be an existing directory "
    exit 1
fi

if ! grep -q " $DRIVE_MOUNTPOINT " /etc/fstab ; then
    echo " Could not find the drive mountpoint in the fstab file. Did you add it there? "
    exit 1
fi

if ! mountpoint -q " $DRIVE_MOUNTPOINT " ; then
    mount " $DRIVE_MOUNTPOINT "
    if ! mountpoint -q " $DRIVE_MOUNTPOINT " ; then
        echo " Could not mount the drive. Is it connected? "
        exit 1
    fi
fi

if [ -f " $SOURCE_DIRECTORY /lock.roster " ] ; then
    echo " Cannot run the script as the backup archive is currently changed. Please try again later. "
    exit 1
fi

mkdir -p " $TARGET_DIRECTORY "
if ! [ -d " $TARGET_DIRECTORY " ] ; then
    echo " Could not create target directory "
    exit 1
fi

if [ -f " $SOURCE_DIRECTORY /aio-lockfile " ] ; then
    echo " Not continuing because aio-lockfile already exists. "
    exit 1
fi

touch " $SOURCE_DIRECTORY /aio-lockfile "

if ! rsync --stats --archive --human-readable --delete " $SOURCE_DIRECTORY / " " $TARGET_DIRECTORY " ; then
    echo " Failed to sync the backup repository to the target directory. "
    exit 1
fi

rm " $SOURCE_DIRECTORY /aio-lockfile "
rm " $TARGET_DIRECTORY /aio-lockfile "

umount " $DRIVE_MOUNTPOINT "

if docker ps --format " {{.Names}} " | grep " ^nextcloud-aio-nextcloud$ " ; then
    docker exec -it nextcloud-aio-nextcloud bash /notify.sh " Rsync backup successful! " " Synced the backup repository successfully. "
else
    echo " Synced the backup repository successfully. "
fi
You can simply copy and paste the script into a file eg named backup-script.sh eg here: /root/backup-script.sh . Do not forget to modify the variables to your requirements!
Afterwards apply the correct permissions with sudo chown root:root /root/backup-script.sh and sudo chmod 700 /root/backup-script.sh . Then you can create a cronjob that runs eg at 20:00 each week on Sundays like this:
sudo crontab -u root -e (and choose your editor of choice if not already done. I'd recommend nano).0 20 * * 7 /root/backup-script.sh which will run the script at 20:00 on Sundays each week.Ctrl + o -> Enter and close the editor with Ctrl + x ).คำเตือน
The below script will only work after the initial setup of AIO. So you will always need to first visit the AIO interface, type in your domain and start the containers the first time or restore an older AIO instance from its borg backup before you can use the script.
You can do so by running the /daily-backup.sh script that is stored in the mastercontainer. It accepts the following environment variables:
AUTOMATIC_UPDATES if set to 1 , it will automatically stop the containers, update them and start them including the mastercontainer. If the mastercontainer gets updated, this script's execution will stop as soon as the mastercontainer gets stopped. You can then wait until it is started again and run the script with this flag again in order to update all containers correctly afterwards.DAILY_BACKUP if set to 1 , it will automatically stop the containers and create a backup. If you want to start them again afterwards, you may have a look at the START_CONTAINERS option.START_CONTAINERS if set to 1 , it will automatically start the containers without updating them.STOP_CONTAINERS if set to 1 , it will automatically stop the containers.CHECK_BACKUP if set to 1 , it will start the backup check. This is not allowed to be enabled at the same time like DAILY_BACKUP . Please be aware that this option is non-blocking which means that the backup check is not done when the process is finished since it only start the borgbackup container with the correct configuration. One example for this would be sudo docker exec -it --env DAILY_BACKUP=1 nextcloud-aio-mastercontainer /daily-backup.sh , which you can run via a cronjob or put it in a script.
บันทึก
None of the option returns error codes. So you need to check for the correct result yourself.
If you already have a backup solution in place, you may want to hide the backup section. You can do so by adding --env AIO_DISABLE_BACKUP_SECTION=true to the docker run command of the mastercontainer (but before the last line nextcloud/all-in-one:latest ! If it was started already, you will need to stop the mastercontainer, remove it (no data will be lost) and recreate it using the docker run command that you initially used).
คำเตือน
Do not set or adjust this value after the initial Nextcloud installation is done! If you still want to do it afterwards, see this on how to do it.
You can configure the Nextcloud container to use a specific directory on your host as data directory. You can do so by adding the environmental variable NEXTCLOUD_DATADIR to the docker run command of the mastercontainer (but before the last line nextcloud/all-in-one:latest ! If it was started already, you will need to stop the mastercontainer, remove it (no data will be lost) and recreate it using the docker run command that you initially used). Allowed values for that variable are strings that start with / and are not equal to / . The chosen directory or volume will then be mounted to /mnt/ncdata inside the container.
--env NEXTCLOUD_DATADIR="/mnt/ncdata" ./mnt/ncdata , make sure to choose a subfolder like eg /mnt/ncdata/nextcloud as datadir, since the root folder is not suited as datadir in that case . See #2696.--env NEXTCLOUD_DATADIR="/var/nextcloud-data"--env NEXTCLOUD_DATADIR="/volume1/docker/nextcloud/data" .--env NEXTCLOUD_DATADIR="/run/desktop/mnt/host/c/ncdata" . (This path is equivalent to C:ncdata on your Windows host so you need to translate the path accordingly. Hint: the path that you enter needs to start with /run/desktop/mnt/host/ . Append to that the exact location on your windows host, eg c/ncdata which is equivalent to C:ncdata .)--env NEXTCLOUD_DATADIR="nextcloud_aio_nextcloud_datadir" . This volume needs to be created beforehand manually by you in order to be able to use it. eg on Windows with: docker volume create ^
--driver local ^
--name nextcloud_aio_nextcloud_datadir ^
-o device="/host_mnt/e/your/data/path" ^
-o type="none" ^
-o o="bind"
E:yourdatapath into the volume so for a different location you need to adjust /host_mnt/e/your/data/path accordingly. แน่นอน. Add this to the /etc/fstab file on the host system:
<your-storage-host-and-subpath> <your-mount-dir> cifs rw,mfsymlinks,seal,credentials=<your-credentials-file>,uid=33,gid=0,file_mode=0770,dir_mode=0770 0 0
(Of course you need to modify <your-storage-host-and-subpath> , <your-mount-dir> and <your-credentials-file> for your specific case.)
One example could look like this:
//your-storage-host/subpath /mnt/storagebox cifs rw,mfsymlinks,seal,credentials=/etc/storage-credentials,uid=33,gid=0,file_mode=0770,dir_mode=0770 0 0
and add into /etc/storage-credentials :
 username=<smb/cifs username>
password=<password>
(Of course you need to modify <smb/cifs username> and <password> for your specific case.)
Now you can use /mnt/storagebox as Nextcloud's datadir like described in the section above this one.
By default, the Nextcloud container is confined and cannot access directories on the host OS. You might want to change this when you are planning to use local external storage in Nextcloud to store some files outside the data directory and can do so by adding the environmental variable NEXTCLOUD_MOUNT to the docker run command of the mastercontainer (but before the last line nextcloud/all-in-one:latest ! If it was started already, you will need to stop the mastercontainer, remove it (no data will be lost) and recreate it using the docker run command that you initially used). Allowed values for that variable are strings that start with / and are not equal to / .
--env NEXTCLOUD_MOUNT="/mnt/" and --env NEXTCLOUD_MOUNT="/media/" .--env NEXTCLOUD_MOUNT="/Volumes/your_drive/"--env NEXTCLOUD_MOUNT="/volume1/" .--env NEXTCLOUD_MOUNT="/run/desktop/mnt/host/d/your-folder/" . (This path is equivalent to D:your-folder on your Windows host so you need to translate the path accordingly. Hint: the path that you enter needs to start with /run/desktop/mnt/host/ . Append to that the exact location on your windows host, eg d/your-folder/ which is equivalent to D:your-folder .) After using this option, please make sure to apply the correct permissions to the directories that you want to use in Nextcloud. Eg sudo chown -R 33:0 /mnt/your-drive-mountpoint and sudo chmod -R 750 /mnt/your-drive-mountpoint should make it work on Linux when you have used --env NEXTCLOUD_MOUNT="/mnt/" . On Windows you could do this eg with docker exec -it nextcloud-aio-nextcloud chown -R 33:0 /run/desktop/mnt/host/d/your-folder/ and docker exec -it nextcloud-aio-nextcloud chmod -R 750 /run/desktop/mnt/host/d/your-folder/ .
You can then navigate to https://your-nc-domain.com/settings/apps/disabled , activate the external storage app, navigate to https://your-nc-domain.com/settings/admin/externalstorages and add a local external storage directory that will be accessible inside the container at the same place that you've entered. Eg /mnt/your-drive-mountpoint will be mounted to /mnt/your-drive-mountpoint inside the container, etc.
Be aware though that these locations will not be covered by the built-in backup solution - but you can add further Docker volumes and host paths that you want to back up after the initial backup is done.
บันทึก
If you can't see the type "local storage" in the external storage admin options, a restart of the containers from the AIO interface may be required.
By default will the talk container use port 3478/UDP and 3478/TCP for connections. You can adjust the port by adding eg --env TALK_PORT=3478 to the docker run command of the mastercontainer (but before the last line nextcloud/all-in-one:latest ! If it was started already, you will need to stop the mastercontainer, remove it (no data will be lost) and recreate it using the docker run command that you initially used) and adjusting the port to your desired value. Best is to use a port over 1024, so eg 3479 to not run into this: #2517
By default, public uploads to Nextcloud are limited to a max of 10G (logged in users can upload much bigger files using the webinterface or the mobile/desktop clients, since chunking is used in that case). You can adjust the upload limit by providing --env NEXTCLOUD_UPLOAD_LIMIT=10G to the docker run command of the mastercontainer (but before the last line nextcloud/all-in-one:latest ! If it was started already, you will need to stop the mastercontainer, remove it (no data will be lost) and recreate it using the docker run command that you initially used) and customize the value to your fitting. It must start with a number and end with G eg 10G .
By default, uploads to Nextcloud are limited to a max of 3600s. You can adjust the upload time limit by providing --env NEXTCLOUD_MAX_TIME=3600 to the docker run command of the mastercontainer (but before the last line nextcloud/all-in-one:latest ! If it was started already, you will need to stop the mastercontainer, remove it (no data will be lost) and recreate it using the docker run command that you initially used) and customize the value to your fitting. It must be a number eg 3600 .
By default, each PHP process in the Nextcloud container is limited to a max of 512 MB. You can adjust the memory limit by providing --env NEXTCLOUD_MEMORY_LIMIT=512M to the docker run command of the mastercontainer (but before the last line nextcloud/all-in-one:latest ! If it was started already, you will need to stop the mastercontainer, remove it (no data will be lost) and recreate it using the docker run command that you initially used) and customize the value to your fitting. It must start with a number and end with M eg 1024M .
If you get an error during the domain validation which states that your ip-address is an internal or reserved ip-address, you can fix this by first making sure that your domain indeed has the correct public ip-address that points to the server and then adding --add-host yourdomain.com:<public-ip-address> to the docker run command of the mastercontainer (but before the last line nextcloud/all-in-one:latest ! If it was started already, you will need to stop the mastercontainer, remove it (no data will be lost) and recreate it using the docker run command that you initially used) which will allow the domain validation to work correctly. And so that you know: even if the A record of your domain should change over time, this is no problem since the mastercontainer will not make any attempt to access the chosen domain after the initial domain validation.
ใช่. For that to work, you need to use and follow the manual-install documentation.
ใช่. For that to work, you need to use and follow the helm-chart documentation.
You can run AIO also with docker rootless. How to do this is documented here: docker-rootless.md
Since Podman is not 100% compatible with the Docker API, Podman is not supported (since that would add yet another platform where the maintainer would need to test on). However you can use and follow the manual-install documentation to get AIO's containers running with Podman or use Docker rootless, as described in the above section. Also there is this now: #3487
You might want to adjust the Nextcloud apps that are installed upon the first startup of the Nextcloud container. You can do so by adding --env NEXTCLOUD_STARTUP_APPS="deck twofactor_totp tasks calendar contacts notes" to the docker run command of the mastercontainer (but before the last line nextcloud/all-in-one:latest ! If it was started already, you will need to stop the mastercontainer, remove it (no data will be lost) and recreate it using the docker run command that you initially used) and customize the value to your fitting. It must be a string with small letters az, 0-9, spaces and hyphens or '_'. You can disable shipped and by default enabled apps by adding a hyphen in front of the appid. Eg -contactsinteraction .
Some Nextcloud apps require additional external dependencies that must be bundled within Nextcloud container in order to work correctly. As we cannot put each and every dependency for all apps into the container - as this would make the project quickly unmaintainable - there is an official way in which you can add additional dependencies into the Nextcloud container. However note that doing this is disrecommended since we do not test Nextcloud apps that require external dependencies.
You can do so by adding --env NEXTCLOUD_ADDITIONAL_APKS="imagemagick dependency2 dependency3" to the docker run command of the mastercontainer (but before the last line nextcloud/all-in-one:latest ! If it was started already, you will need to stop the mastercontainer, remove it (no data will be lost) and recreate it using the docker run command that you initially used) and customize the value to your fitting. It must be a string with small letters az, digits 0-9, spaces, dots and hyphens or '_'. You can find available packages here: https://pkgs.alpinelinux.org/packages?branch=v3.20. By default imagemagick is added. If you want to keep it, you need to specify it as well.
Some Nextcloud apps require additional php extensions that must be bundled within Nextcloud container in order to work correctly. As we cannot put each and every dependency for all apps into the container - as this would make the project quickly unmaintainable - there is an official way in which you can add additional php extensions into the Nextcloud container. However note that doing this is disrecommended since we do not test Nextcloud apps that require additional php extensions.
You can do so by adding --env NEXTCLOUD_ADDITIONAL_PHP_EXTENSIONS="imagick extension1 extension2" to the docker run command of the mastercontainer (but before the last line nextcloud/all-in-one:latest ! If it was started already, you will need to stop the mastercontainer, remove it (no data will be lost) and recreate it using the docker run command that you initially used) and customize the value to your fitting. It must be a string with small letters az, digits 0-9, spaces, dots and hyphens or '_'. You can find available extensions here: https://pecl.php.net/packages.php. By default imagick is added. If you want to keep it, you need to specify it as well.
The facerecognition app requires the pdlib PHP extension to be installed. Unfortunately, it is not available on PECL nor via PHP core, so there is no way to add this into AIO currently. However you can use this community container in order to run facerecognition.
คำเตือน
This only works if the /dev/dri device is present on the host! If it does not exists on your host, don't proceed as otherwise the Nextcloud container will fail to start! If you are unsure about this, better do not proceed with the instructions below.
The memories app allows to enable hardware transcoding for videos. In order to use that, you need to add --env NEXTCLOUD_ENABLE_DRI_DEVICE=true to the docker run command of the mastercontainer (but before the last line nextcloud/all-in-one:latest ! If it was started already, you will need to stop the mastercontainer, remove it (no data will be lost) and recreate it using the docker run command that you initially used) which will mount the /dev/dri device into the container. There is now a community container which allows to easily add the transcoding container of Memories to AIO: https://github.com/nextcloud/all-in-one/tree/main/community-containers/memories
In certain situations you might want to keep Nextcloud apps that are disabled in the AIO interface and not uninstall them if they should be installed in Nextcloud. You can do so by adding --env NEXTCLOUD_KEEP_DISABLED_APPS=true to the docker run command of the mastercontainer (but before the last line nextcloud/all-in-one:latest ! If it was started already, you will need to stop the mastercontainer, remove it (no data will be lost) and recreate it using the docker run command that you initially used).
คำเตือน
Doing this might cause unintended problems in Nextcloud if an app that requires an external dependency is still installed but the external dependency not for example.
If you should run into issues with huge docker logs, you can adjust the log size by following https://docs.docker.com/config/containers/logging/local/#usage. However for the included AIO containers, this should usually not be needed because almost all of them have the log level set to warn so they should not produce many logs.
The files and folders that you add to Nextcloud are by default stored in the following docker directory: nextcloud_aio_nextcloud:/mnt/ncdata/ (usually /var/lib/docker/volumes/nextcloud_aio_nextcloud_data/_data/ on linux host systems). If needed, you can modify/add/delete files/folders there but ATTENTION : be very careful when doing so because you might corrupt your AIO installation! Best is to create a backup using the built-in backup solution before editing/changing files/folders in there because you will then be able to restore your instance to the backed up state.
After you are done modifying/adding/deleting files/folders, don't forget to apply the correct permissions by running: sudo docker exec nextcloud-aio-nextcloud chown -R 33:0 /mnt/ncdata/ and sudo docker exec nextcloud-aio-nextcloud chmod -R 750 /mnt/ncdata/ and rescan the files with sudo docker exec --user www-data -it nextcloud-aio-nextcloud php occ files:scan --all .
You can move the whole docker library and all its files including all Nextcloud AIO files and folders to a separate drive by first mounting the drive in the host OS (NTFS is not supported and ext4 is recommended as FS) and then following this tutorial: https://www.guguweb.com/2019/02/07/how-to-move-docker-data-directory-to-another-location-on-ubuntu/
(Of course docker needs to be installed first for this to work.)
docker rm nextcloud-aio-collabora ) AND the Collabora image ( docker image rm nextcloud/aio-collabora ).docker system prune ) (no data will be lost).This should solve the problem.
You can edit Nextclouds config.php file directly from the host with your favorite text editor. Eg like this: sudo docker run -it --rm --volume nextcloud_aio_nextcloud:/var/www/html:rw alpine sh -c "apk add --no-cache nano && nano /var/www/html/config/config.php" . Make sure to not break the file though which might corrupt your Nextcloud instance otherwise. In best case, create a backup using the built-in backup solution before editing the file.
All users see a set of default files and folders as dictated by Nextcloud's configuration. To change these default files and folders a custom skeleton directory must first be created; this can be accomplished by copying your skeleton files sudo docker cp --follow-link /path/to/nextcloud/skeleton/ nextcloud-aio-nextcloud:/mnt/ncdata/skeleton/ , applying the correct permissions with sudo docker exec nextcloud-aio-nextcloud chown -R 33:0 /mnt/ncdata/skeleton/ and sudo docker exec nextcloud-aio-nextcloud chmod -R 750 /mnt/ncdata/skeleton/ and setting the skeleton directory option with sudo docker exec --user www-data -it nextcloud-aio-nextcloud php occ config:system:set skeletondirectory --value="/mnt/ncdata/skeleton" . Further information is available in the Nextcloud documentation on configuration parameters for the skeleton directory.
You can configure your server to block certain ip-addresses using fail2ban as bruteforce protection. Here is how to set it up: https://docs.nextcloud.com/server/stable/admin_manual/installation/harden_server.html#setup-fail2ban. The logpath of AIO is by default /var/lib/docker/volumes/nextcloud_aio_nextcloud/_data/data/nextcloud.log . Do not forget to add chain=DOCKER-USER to your nextcloud jail config ( nextcloud.local ) otherwise the nextcloud service running on docker will still be accessible even if the IP is banned. Also, you may change the blocked ports to cover all AIO ports: by default 80,443,8080,8443,3478 (see this). Apart from that there is now a community container that can be added to the AIO stack: https://github.com/nextcloud/all-in-one/tree/main/community-containers/fail2ban
It is possible to connect to an existing LDAP server. You need to make sure that the LDAP server is reachable from the Nextcloud container. Then you can enable the LDAP app and configure LDAP in Nextcloud manually. If you don't have a LDAP server yet, recommended is to use this docker container: https://hub.docker.com/r/nitnelave/lldap. Make sure here as well that Nextcloud can talk to the LDAP server. The easiest way is by adding the LDAP docker container to the docker network nextcloud-aio . Then you can connect to the LDAP container by its name from the Nextcloud container. There is now a community container which allows to easily add LLDAP to AIO: https://github.com/nextcloud/all-in-one/tree/main/community-containers/lldap
Netdata allows you to monitor your server using a GUI. You can install it by following https://learn.netdata.cloud/docs/agent/packaging/docker#create-a-new-netdata-agent-container. Apart from that there is now a way for the community to add containers: #392 (comment)
If you want to use the user_sql app, the easiest way is to create an additional database container and add it to the docker network nextcloud-aio . Then the Nextcloud container should be able to talk to the database container using its name.
It is possible to install any of these to get a GUI for your AIO database. The pgAdmin container is recommended. You can get some docs on it here: https://www.pgadmin.org/docs/pgadmin4/latest/container_deployment.html. For the container to connect to the aio-database, you need to connect the container to the docker network nextcloud-aio and use nextcloud-aio-database as database host, oc_nextcloud as database username and the password that you get when running sudo docker exec nextcloud-aio-nextcloud grep dbpassword config/config.php as the password. Apart from that there is now a way for the community to add containers: #3061 (comment)
You can configure one yourself by using either of these four recommended projects: Docker Mailserver, Mailu, Maddy Mail Server, Mailcow or Stalwart. There is now a community container which allows to easily add Stalwart Mail server to AIO: https://github.com/nextcloud/all-in-one/tree/main/community-containers/stalwart
Please see the following documentation on this: migration.md
For integrating new containers, they must pass specific requirements for being considered to get integrated in AIO itself. Even if not considered, we may add some documentation on it. Also there is this now: https://github.com/nextcloud/all-in-one/tree/main/community-containers#community-containers
What are the requirements?
For some applications it might be necessary to establish a secure connection to another host/server which is using a certificate issued by a Certification Authority that is not trusted out of the box. An example could be configuring LDAPS against a domain controller (Active Directory or Samba-based) of an organization.
You can make the Nextcloud container trust any Certification Authority by providing the environmental variable NEXTCLOUD_TRUSTED_CACERTS_DIR to the docker run command of the mastercontainer (but before the last line nextcloud/all-in-one:latest ! If it was started already, you will need to stop the mastercontainer, remove it (no data will be lost) and recreate it using the docker run command that you initially used). The value of the variables should be set to the absolute paths of the directory on the host, which contains one or more Certification Authorities certificates. You should use X.509 certificates, Base64 encoded. (Other formats may work but have not been tested!) All the certificates in the directory will be trusted.
When using docker run , the environmental variable can be set with --env NEXTCLOUD_TRUSTED_CACERTS_DIR=/path/to/my/cacerts .
In order for the value to be valid, the path should start with / and not end with / and point to an existing directory . Pointing the variable directly to a certificate file will not work and may also break things.
The Collabora container enables Seccomp by default, which is a security feature of the Linux kernel. On systems without this kernel feature enabled, you need to provide --env COLLABORA_SECCOMP_DISABLED=true to the initial docker run command in order to make it work.
If you have an external backup solution, you might want to enable automatic updates without creating a backup first. However note that doing this is disrecommended since you will not be able to easily create and restore a backup from the AIO interface anymore and you need to make sure to shut down all the containers properly before creating the backup, eg by stopping them from the AIO interface first.
But anyhow, is here a guide that helps you automate the whole procedure:
 #! /bin/bash

# Stop the containers
docker exec --env STOP_CONTAINERS=1 nextcloud-aio-mastercontainer /daily-backup.sh

# Below is optional if you run AIO in a VM which will shut down the VM afterwards
# poweroff
You can simply copy and paste the script into a file eg named shutdown-script.sh eg here: /root/shutdown-script.sh .
Afterwards apply the correct permissions with sudo chown root:root /root/shutdown-script.sh and sudo chmod 700 /root/shutdown-script.sh . Then you can create a cronjob that runs it on a schedule eg runs the script at 04:00 each day like this:
sudo crontab -u root -e (and choose your editor of choice if not already done. I'd recommend nano).0 4 * * * /root/shutdown-script.sh which will run the script at 04:00 each day.Ctrl + o and then Enter to save, and close the editor with Ctrl + x ).After that is in place, you should schedule a backup from your backup solution that creates a backup after AIO is shut down properly. Hint: If your backup runs on the same host, make sure to at least back up all docker volumes and additionally Nextcloud's datadir if it is not stored in a docker volume.
Afterwards, you can create a second script that automatically updates the containers:
 #! /bin/bash

# Run container update once
if ! docker exec --env AUTOMATIC_UPDATES=1 nextcloud-aio-mastercontainer /daily-backup.sh ; then
    while docker ps --format " {{.Names}} " | grep -q " ^nextcloud-aio-watchtower$ " ; do
        echo " Waiting for watchtower to stop "
        sleep 30
    done

    while ! docker ps --format " {{.Names}} " | grep -q " ^nextcloud-aio-mastercontainer$ " ; do
        echo " Waiting for Mastercontainer to start "
        sleep 30
    done

    # Run container update another time to make sure that all containers are updated correctly.
    docker exec --env AUTOMATIC_UPDATES=1 nextcloud-aio-mastercontainer /daily-backup.sh
fi
You can simply copy and paste the script into a file eg named automatic-updates.sh eg here: /root/automatic-updates.sh .
Afterwards apply the correct permissions with sudo chown root:root /root/automatic-updates.sh and sudo chmod 700 /root/automatic-updates.sh . Then you can create a cronjob that runs eg at 05:00 each day like this:
sudo crontab -u root -e (and choose your editor of choice if not already done. I'd recommend nano).0 5 * * * /root/automatic-updates.sh which will run the script at 05:00 each day.Ctrl + o then Enter to save, and close the editor with Ctrl + x ).By design, Caddy that runs inside the mastercontainer, which handles automatic TLS certificate generation for the AIO interface, is vulnerable to receiving DNS challenges for arbitrary hostnames from anyone on the internet. While this does not compromise your server's security, it can result in cluttered logs and rejected certificate renewal attempts due to rate limit abuse. To mitigate this issue, it is recommended to place the AIO interface behind a VPN and/or limit its public exposure.


