OneForAll
1.0.0
กระดาษ: https://arxiv.org/abs/2310.00149
ผู้เขียน: Hao Liu, Jiarui Feng, Lecheng Kong, Ningyue Liang, Dacheng Tao, Yixin Chen, Muhan Zhang
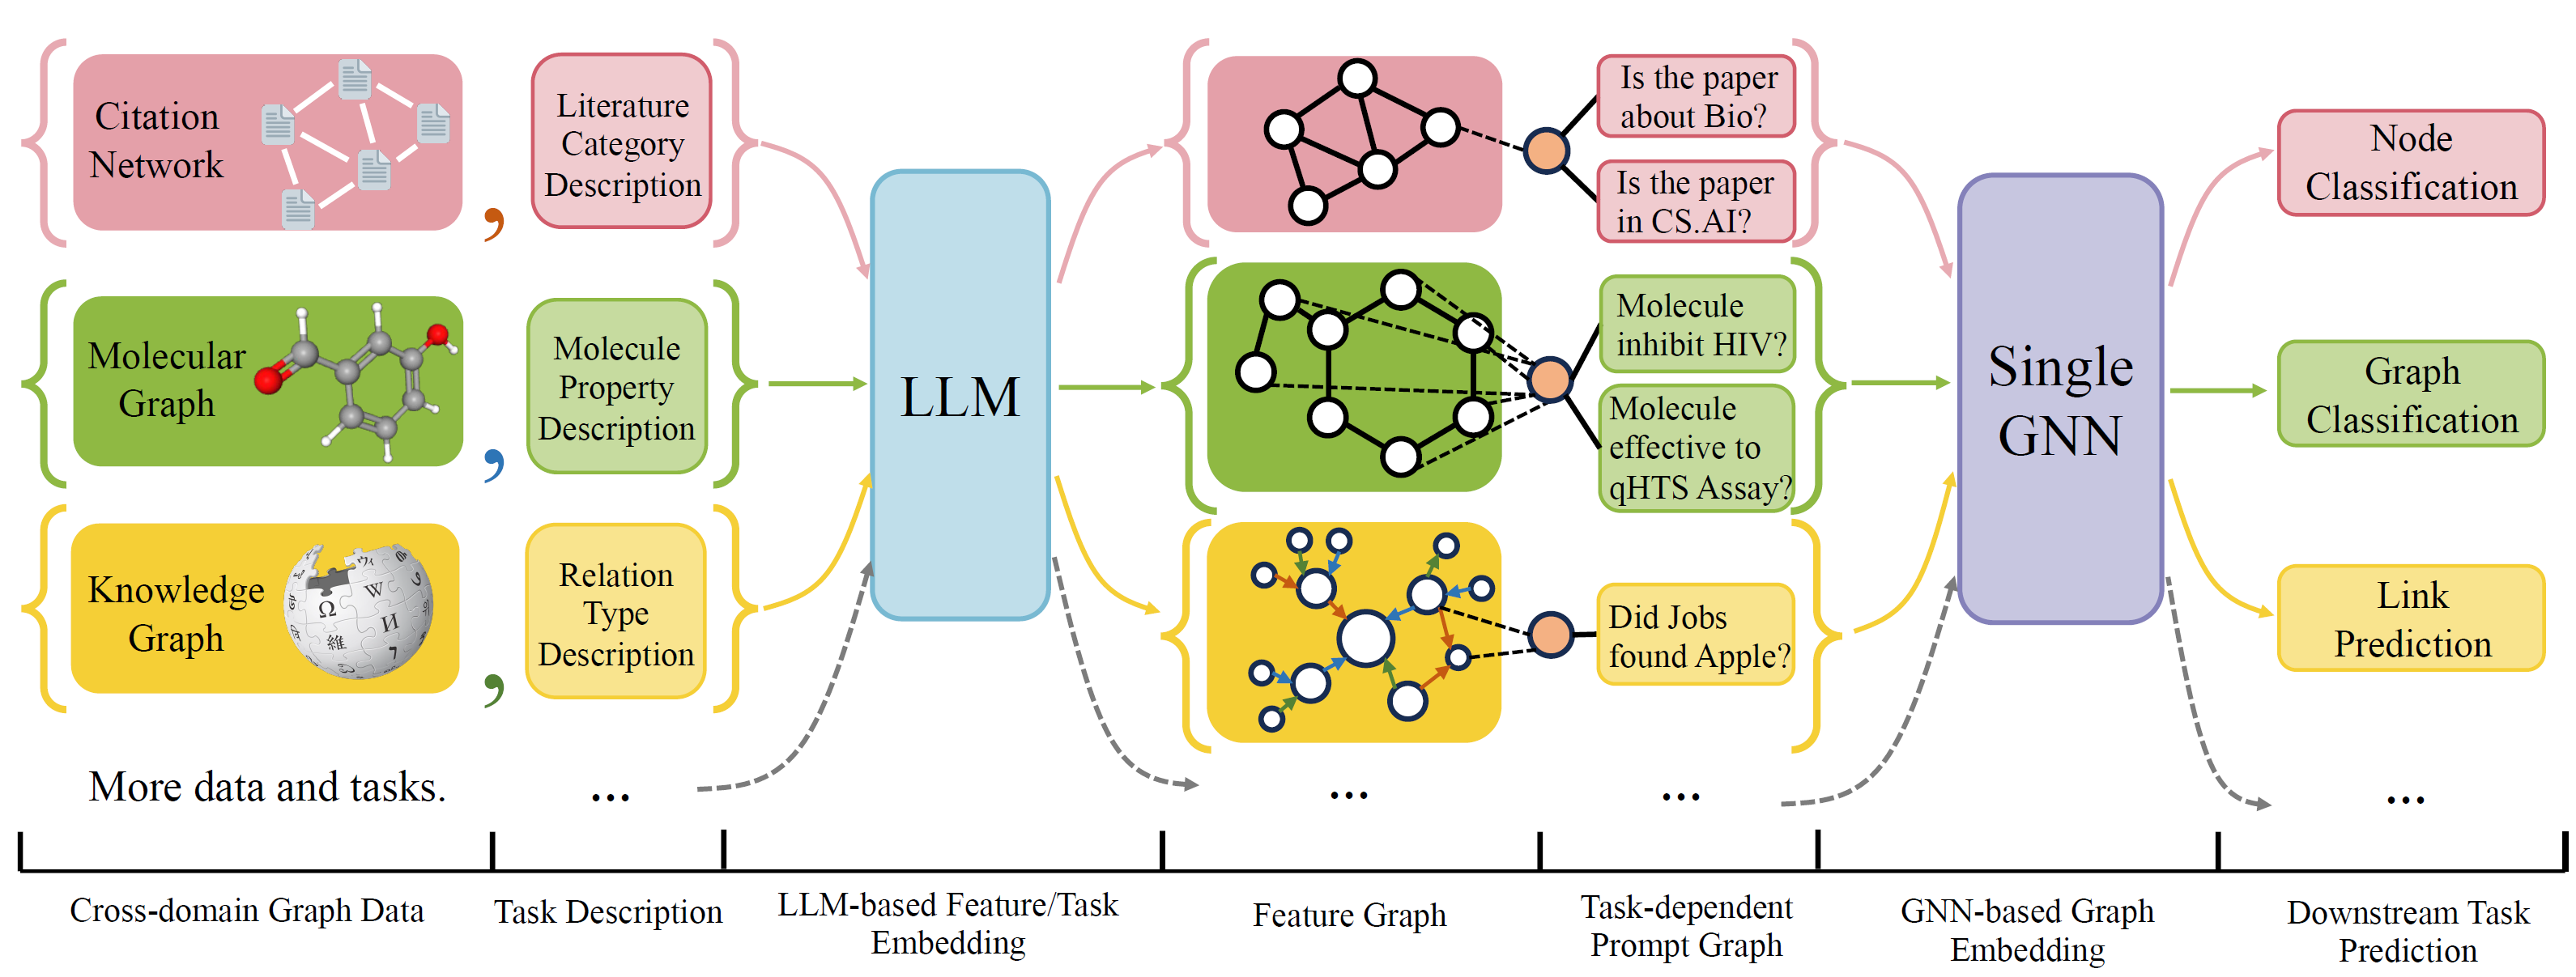
OFA เป็นเฟรมเวิร์กการจำแนกกราฟทั่วไปที่สามารถแก้ปัญหาการจำแนกกราฟที่หลากหลายได้ด้วยรุ่นเดียวและพารามิเตอร์ชุดเดียว งานนี้คือ cross-domain (เช่นเครือข่ายการอ้างอิง, กราฟโมเลกุล, ... ) และข้ามงาน (เช่นไม่กี่นัด, zero-shot, ระดับกราฟ, โหนด-Leve, ... )
OFA ใช้ภาษาธรรมชาติเพื่ออธิบายกราฟทั้งหมดและใช้ LLM เพื่อฝังคำอธิบายทั้งหมดในพื้นที่ฝังตัวเดียวกันซึ่งเปิดใช้งานการฝึกอบรมข้ามโดเมนโดยใช้โมเดลเดียว
OFA เสนอ paradiagm ที่แจ้งเตือนว่าข้อมูลงานทั้งหมดจะถูกแปลงเป็นกราฟที่แจ้ง ดังนั้นโมเดลที่ตามมาจึงสามารถอ่านข้อมูลงานและทำนายเป้าหมายที่สัมพันธ์กันได้โดยไม่ต้องปรับพารามิเตอร์แบบจำลองและสถาปัตยกรรม ดังนั้นรุ่นเดียวสามารถข้ามงานได้
OFA ดูแลรายการชุดข้อมูลกราฟจากแหล่งข้อมูลและโดเมนที่แตกต่างกันและอธิบายโหนด/ขอบในกราฟด้วยโปรโตคอลการลดลงอย่างเป็นระบบ เราขอขอบคุณงานก่อนหน้านี้รวมถึง OGB, Gimlet, Moleculenet, Graphllm และ Villmow สำหรับการให้ข้อมูลกราฟ/ข้อความดิบที่ยอดเยี่ยมที่ทำให้งานของเราเป็นไปได้
Oneforall ได้รับการแก้ไขครั้งใหญ่ซึ่งเราทำความสะอาดรหัสและแก้ไขข้อบกพร่องหลายรายงาน การอัปเดตที่สำคัญคือ:
หากก่อนหน้านี้คุณใช้ที่เก็บข้อมูลของเราโปรดดึงและลบไฟล์คุณสมบัติ/ข้อความที่สร้างขึ้นเก่าและสร้างใหม่ ขออภัยในความไม่สะดวก
ในการติดตั้งข้อกำหนดสำหรับโครงการโดยใช้ Conda:
conda env create -f environment.yml
สำหรับการทดลองแบบ end-to-end ร่วมกันในชุดข้อมูลที่รวบรวมทั้งหมด Run
python run_cdm.py --override e2e_all_config.yaml
อาร์กิวเมนต์ทั้งหมดสามารถเปลี่ยนแปลงได้โดยค่าพื้นที่ที่คั่นด้วยพื้นที่เช่น
python run_cdm.py --override e2e_all_config.yaml num_layers 7 batch_size 512 dropout 0.15 JK none
ผู้ใช้สามารถแก้ไขตัวแปร task_names ใน ./e2e_all_config.yaml เพื่อควบคุมชุดข้อมูลใดที่รวมอยู่ในระหว่างการฝึกอบรม ความยาวของ task_names , d_multiple และ d_min_ratio ควรเหมือนกัน พวกเขายังสามารถระบุได้ในอาร์กิวเมนต์บรรทัดคำสั่งโดยค่าคั่นด้วยเครื่องหมายจุลภาค
เช่น
python run_cdm.py task_names cora_link,arxiv d_multiple 1,1 d_min_ratio 1,1
OFA-IND สามารถระบุได้โดย
python run_cdm.py task_names cora_link d_multiple 1 d_min_ratio 1
ในการเรียกใช้การทดลองไม่กี่นัดและเป็นศูนย์-ช็อต
python run_cdm.py --override lr_all_config.yaml
เรากำหนดค่าการกำหนดค่าสำหรับแต่ละงานแต่ละการกำหนดค่างานมีการกำหนดค่าชุดข้อมูลหลายชุด
การกำหนดค่างานจะถูกเก็บไว้ใน ./configs/task_config.yaml งานมักจะประกอบด้วยชุดข้อมูลแยกต่างหาก (ไม่จำเป็นต้องเป็นชุดข้อมูลเดียวกัน) ตัวอย่างเช่นงานการจำแนกโหนด CORA แบบ end-to-end ปกติจะมีการแยกรถไฟของชุดข้อมูล CORA เป็นชุดข้อมูลรถไฟการแยกที่ถูกต้องของชุดข้อมูล CORA เป็นหนึ่งในชุดข้อมูลที่ถูกต้องและเช่นเดียวกันสำหรับการแยกการทดสอบ นอกจากนี้คุณยังสามารถมีการตรวจสอบความถูกต้อง/การทดสอบเพิ่มเติมโดยการระบุการแยกรถไฟของ CORA เป็นหนึ่งในชุดข้อมูลการตรวจสอบ/ทดสอบ โดยเฉพาะการกำหนดค่างานดูเหมือน
 arxiv :
  eval_pool_mode : mean
  dataset : arxiv             # dataset name
  eval_set_constructs :
    - stage : train           # a task should have one and only one train stage dataset
      split_name : train
    - stage : valid
      split_name : valid
      dataset : cora          # replace the default dataset for zero-shot tasks
    - stage : valid
      split_name : valid
    - stage : test
      split_name : test
    - stage : test
      split_name : train      # test the train split
การกำหนดค่าชุดข้อมูลจะถูกเก็บไว้ใน ./configs/task_config.yaml การกำหนดค่าชุดข้อมูลกำหนดวิธีการสร้างชุดข้อมูล โดยเฉพาะ
 arxiv :
  task_level : e2e_node
  preprocess : null                       # name of the preprocess function defined in task_constructor.py
  construct : ConstructNodeCls            # name of the dataset construction function defined in task_constructor.py
  args : # additional arguments to construct function
    walk_length : null
    single_prompt_edge : True
  eval_metric : acc                       # evaluation metric
  eval_func : classification_func         # evaluation function that process model output and batch to input to evaluator
  eval_mode : max                         # evaluation mode (min/max)
  dataset_name : arxiv                    # name of the OFAPygDataset
  dataset_splitter : ArxivSplitter        # splitting function defined in task_constructor.py
  process_label_func : process_pth_label  # name of process label function that transform original label to the binary labels
num_classes : 40 หากคุณกำลังใช้ชุดข้อมูลเช่น CORA/PubMed/Arxiv เราขอแนะนำให้เพิ่มไดเรกทอรีข้อมูลของคุณ $ customized_data $ ภายใต้ Data/Single_Graph/$ contivity_data $ และใช้งาน gen_data.py ภายใต้ไดเรกทอรีคุณสามารถใช้ข้อมูล/cora/gen_data PY เป็นตัวอย่าง
หลังจากสร้างข้อมูลแล้วคุณจะต้องลงทะเบียนชื่อชุดข้อมูลของคุณในที่นี่และใช้ ตัวแยก เช่นที่นี่ หากคุณกำลังทำภารกิจ Zero-shot/ไม่กี่ shot คุณสามารถสร้าง zero-shot/shot split ไม่กี่ที่นี่เช่นกัน
สุดท้ายลงทะเบียนรายการ config ใน configs/data_config.yaml ตัวอย่างเช่นสำหรับการจำแนกโหนดแบบครบวงจร
 $data_name$ :
  << : *E2E-node
  dataset_name : $data_name$
  dataset_splitter : $splitter$
  process_label_func : ... # usually processs_pth_label should work
  num_classes : $number of classes$
process_label_func แปลงป้ายกำกับเป้าหมายเป็นป้ายไบนารีและแปลงการฝังคลาสหากงานเป็นศูนย์-ช็อต/ไม่กี่นัดโดยที่จำนวนโหนดคลาสไม่ได้รับการแก้ไข รายการของ avalailable process_label_func อยู่ที่นี่ ใช้ในการฝังคลาสทั้งหมดและฉลากที่ถูกต้อง เอาต์พุตเป็น tuple: (label, class_node_embedding, ป้ายไบนารี/หนึ่งร้อน)
หากคุณต้องการความยืดหยุ่นมากขึ้นการเพิ่มชุดข้อมูลที่กำหนดเองจะต้องมีการใช้งานคลาสย่อยที่กำหนดเองของ OfapygDataset. แม่แบบอยู่ที่นี่:
 class CustomizedOFADataset ( OFAPygDataset ):
    def gen_data ( self ):
        """
        Returns a tuple of the following format
        (data, text, extra)
        data: a list of Pyg Data, if you only have a one large graph, you should still wrap it with the list.
        text: a list of list of texts. e.g. [node_text, edge_text, label_text] this is will be converted to pooled vector representation.
        extra: any extra data (e.g. split information) you want to save.
        """

    def add_text_emb ( self , data_list , text_emb ):
        """
        This function assigns generated embedding to member variables of the graph

        data_list: data list returned in self.gen_data.
        text_emb: list of torch text tensor corresponding to the returned text in self.gen_data. text_emb[0] = llm_encode(text[0])


        """
        data_list [ 0 ]. node_text_feat = ...     # corresponding node features
        data_list [ 0 ]. edge_text_feat = ...      # corresponding edge features
        data_list [ 0 ]. class_node_text_feat = ...      # class node features
        data_list [ 0 ]. prompt_edge_text_feat = ...     # edge features used in prompt node
        data_list [ 0 ]. noi_node_text_feat = ...       # noi node features, refer to the paper for the definition
        return self . collate ( data_list )

    def get_idx_split ( self ):
        """
        Return the split information required to split the dataset, this optional, you can further split the dataset in task_constructor.py

        """

    def get_task_map ( self ):
        """
        Because a dataset can have multiple different tasks that requires different prompt/class text embedding. This function returns a task map that maps a task name to the desired text embedding. Specifically, a task map is of the following format.

        prompt_text_map = {task_name1: {"noi_node_text_feat": ["noi_node_text_feat", [$Index in data[0].noi_node_text_feat$]],
                                    "class_node_text_feat": ["class_node_text_feat",
                                                             [$Index in data[0].class_node_text_feat$]],
                                    "prompt_edge_text_feat": ["prompt_edge_text_feat", [$Index in data[0].prompt_edge_text_feat$]]},
                       task_name2: similar to task_name 1}
        Please refer to examples in data/ for details.
        """
        return self . side_data [ - 1 ]

    def get_edge_list ( self , mode = "e2e" ):
        """
        Defines how to construct prompt graph
        f2n: noi nodes to noi prompt node
        n2f: noi prompt node to noi nodes
        n2c: noi prompt node to class nodes
        c2n: class nodes to noi prompt node
        For different task/mode you might want to use different prompt graph construction, you can do so by returning a dictionary. For example
        {"f2n":[1,0], "n2c":[2,0]} means you only want f2n and n2c edges, f2n edges have edge type 1, and its text embedding feature is data[0].prompt_edge_text_feat[0]
        """
        if mode == "e2e_link" :
            return { "f2n" : [ 1 , 0 ], "n2f" : [ 3 , 0 ], "n2c" : [ 2 , 0 ], "c2n" : [ 4 , 0 ]}
        elif mode == "lr_link" :
            return { "f2n" : [ 1 , 0 ], "n2f" : [ 3 , 0 ]}

