还可以直接从配置生成可运行的 Python 代码:
 from discoart . config import export_python

export_python ( da )如果您是免费版 Google Colab 用户,一件恼人的事情就是时不时地丢失会话。或者有时您只是提前停止运行,因为第一个图像不够好,并且键盘中断将阻止.create()返回任何结果。无论哪种情况,您都可以通过拉取最后一个会话 ID 轻松恢复结果。
查找会话 ID。它出现在图像的顶部。 
随时在任何机器上通过该 ID 提取结果,不一定是在 Google Colab 上:
 from docarray import DocumentArray

da = DocumentArray . pull ( 'discoart-3205998582' )将文档视为具有配置和图像的独立数据,可以将其用作未来运行的初始状态。它的.tags将被用作初始参数; .uri如果存在,将用作初始图像。
 from discoart import create
from docarray import DocumentArray

da = DocumentArray . pull ( 'discoart-3205998582' )

create (
    init_document = da [ 0 ],
    cut_ic_pow = 0.5 ,
    tv_scale = 600 ,
    cut_overview = '[12]*1000' ,
    cut_innercut = '[12]*1000' ,
    use_secondary_model = False ,
)
如果您只想从已知的 DocArray ID 进行初始化,那么只需:
 from discoart import create

create ( init_document = 'discoart-3205998582' )您可以设置环境变量来控制 DiscoArt 的元行为。必须在导入 DiscoArt 之前设置环境变量,无论是在 Bash 中还是在 Python 中通过os.environ 。
DISCOART_LOG_LEVEL= ' DEBUG ' # more verbose logs
DISCOART_OPTOUT_CLOUD_BACKUP= ' 1 ' # opt-out from cloud backup
DISCOART_DISABLE_IPYTHON= ' 1 ' # disable ipython dependency
DISCOART_DISABLE_RESULT_SUMMARY= ' 1 ' # disable result summary after the run ends
DISCOART_DEFAULT_PARAMETERS_YAML= ' path/to/your-default.yml ' # use a custom default parameters file
DISCOART_CUT_SCHEDULES_YAML= ' path/to/your-schedules.yml ' # use a custom cut schedules file
DISCOART_MODELS_YAML= ' path/to/your-models.yml ' # use a custom list of models file
DISCOART_OUTPUT_DIR= ' path/to/your-output-dir ' # use a custom output directory for all images and results
DISCOART_CACHE_DIR= ' path/to/your-cache-dir ' # use a custom cache directory for models and downloads
DISCOART_DISABLE_REMOTE_MODELS= ' 1 ' # disable the listing of diffusion models on Github, remote diffusion models allows user to use latest models without updating the codebase.
DISCOART_REMOTE_MODELS_URL= ' https://yourdomain/models.yml ' # use a custom remote URL for fetching models list
DISCOART_DISABLE_CHECK_MODEL_SHA= ' 1 ' # disable checking local model SHA matches the remote model SHA
DISCOART_DISABLE_TQDM= ' 1 ' # disable tqdm progress bar on diffusion DiscoArt 提供了两个命令create和config ,允许您从 CLI 运行 DiscoArt。
python -m discoart create my.yml它从 YAML 配置文件my.yml创建艺术品。您还可以这样做:
cat config.yml | python -m discoart create那么我怎样才能拥有自己的my.yml以及它是什么样子的呢?这是第二个命令:
python -m discoart config my.yml它分叉默认的 YAML 配置并将它们导出到my.yml 。现在您可以修改它并使用python -m discoart create命令运行它。
如果未指定输出路径,则python -m discoart config会将默认配置打印到标准输出。
要获取命令的帮助,请在末尾添加--help ,例如:
python -m discoart create --help usage: python -m discoart create [-h] [YAML_CONFIG_FILE]
positional arguments:
YAML_CONFIG_FILE The YAML config file to use, default is stdin.
optional arguments:
-h, --help show this help message and exit
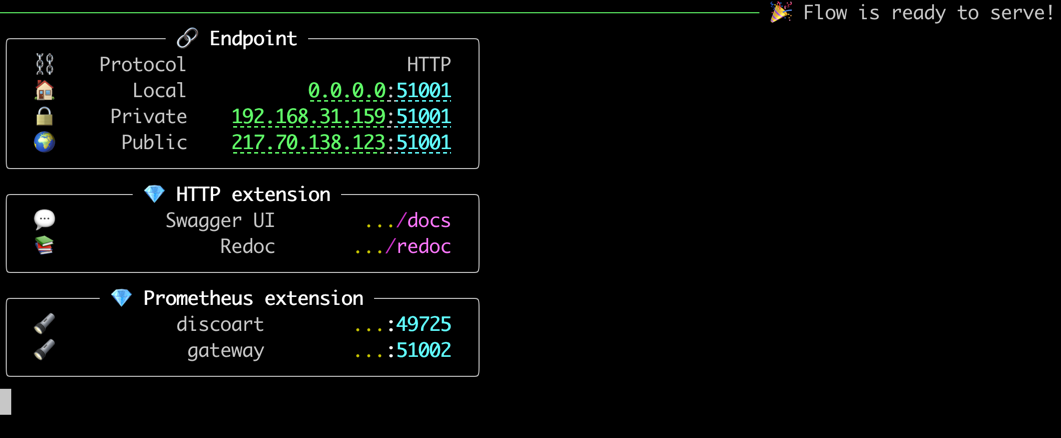
服务迪斯科艺术非常简单。只需运行以下命令:
python -m discoart serve你将会看到:

现在通过curl/Javascript向服务器发送请求,例如
curl
-X POST http://0.0.0.0:51001/post
-H ' Content-Type: application/json '
-d ' {"execEndpoint":"/create", "parameters": {"text_prompts": ["A beautiful painting of a singular lighthouse", "yellow color scheme"]}} '
就是这样。
当然,您可以在 JSON 中传递create()函数接受的所有参数。
我们已经知道,即使在 GPU 上, create函数也很慢,可能需要 10 分钟才能完成一幅作品。这意味着发送上述请求后,客户端需要等待10分钟才能得到响应。鉴于一切都是同步运行的,这种行为没有任何问题。然而,在实践中,客户可能期望中间有进展或中间结果,而不是等待结束。
/result端点就是为此目的而设计的。一旦中间结果可用,它将立即返回。您所需要做的就是在请求参数中指定name_docarray ,如您在/create端点中指定的那样。这是一个例子:
让我们通过向/create端点发送以下请求来创建mydisco-123 :
curl
-X POST http://0.0.0.0:51001/post
-H ' Content-Type: application/json '
-d ' {"execEndpoint":"/create", "parameters": {"name_docarray": "mydisco-123", "text_prompts": ["A beautiful painting of a singular lighthouse", "yellow color scheme"]}} '现在服务器正在处理上述请求,您可以通过向/result端点发送以下请求来定期检查mydisco-123进度:
curl
-X POST http://0.0.0.0:51001/post
-H ' Content-Type: application/json '
-d ' {"execEndpoint":"/result", "parameters": {"name_docarray": "mydisco-123"}} '
将返回一个带有最新进度的 JSON,其中图像为 DataURI、丢失、步骤等。此处描述了 Document/DocumentArray 的 JSON 模式。
请注意,由于 Jina Gateway 的智能路由, /result不会被/create阻止。要了解/了解有关这些端点的更多信息,您可以检查服务器中嵌入的 ReDoc 或 Swagger UI。
发送到/skip ,跳过当前运行并移至n_batches中定义的下一次运行:
curl
-X POST http://0.0.0.0:51001/post
-H ' Content-Type: application/json '
-d ' {"execEndpoint":"/skip"} '发送到/stop ,停止当前运行取消所有运行n_batches :
curl
-X POST http://0.0.0.0:51001/post
-H ' Content-Type: application/json '
-d ' {"execEndpoint":"/stop"} '/create请求可以有一个畅通无阻的/create端点:对/create客户端请求将立即返回,而无需等待结果完成。您现在必须完全依赖/result来轮询结果。
要启用此功能:
flow.yml文件复制粘贴到myflow.yml ;discoart执行器部分下将floating: false更改为floating: true ;python -m discoart serve myflow.yml请注意,请求速度现在由您控制。也就是说,如果客户端在一秒内发送10个/create请求,那么服务器就会并行启动10个create() !这很容易导致OOM。因此,建议仅当您确定客户端没有发送太多请求时才启用此功能,例如您控制客户端请求速率;或者您在 BFF(前端的后端)后面使用 DiscoArt。
如果您有多个 GPU,并且希望通过以时间复用方式利用 GPU 来并行运行多个 DiscoArt 实例,您可以复制粘贴默认的flow.yml文件并进行如下修改:
 jtype : Flow
with :
  protocol : http
  monitoring : true
  port : 51001
  port_monitoring : 51002  # prometheus monitoring port
  env :
    JINA_LOG_LEVEL : debug
    DISCOART_DISABLE_IPYTHON : 1
    DISCOART_DISABLE_RESULT_SUMMARY : 1
executors :
  - name : discoart
    uses : DiscoArtExecutor
    env :
      CUDA_VISIBLE_DEVICES : RR0:3  # change this if you have multiple GPU
    replicas : 3  # change this if you have larger VRAM
  - name : poller
uses : ResultPoller这里的replicas: 3表示生成三个DiscoArt实例, CUDA_VISIBLE_DEVICES: RR0:3确保它们以循环方式使用前三个GPU。
将其命名为myflow.yml然后运行
python -m discoart serve myflow.yml感谢 Jina,您可以定制很多东西!您可以更改端口号;将协议更改为 gRPC/Websockets;添加TLS加密;启用/禁用 Prometheus 监控;您还可以通过以下方式将其导出到 Kubernetes 部署包:
jina export kubernetes myflow.yml有关更多功能和 YAML 配置,请查看 Jina 文档。
从 HTTP 网关切换到 gRPC 网关很简单:
 jtype : Flow
with :
  protocol : grpc
...
然后重新启动服务器。
使用 gRPC 网关有多个优点:
一般来说,如果您在 BFF(前端的后端)后面使用 DiscoArt 服务器,或者您的 DiscoArt 服务器不直接服务来自最终用户的 HTTP 流量,那么您应该使用 gRPC 协议。
要与 gRPC DiscoArt 服务器通信,可以使用 Jina 客户端:
 # !pip install jina
from jina import Client

c = Client ( host = 'grpc://0.0.0.0:51001' )

da = c . post (
    '/create' ,
    parameters = {
        'name_docarray' : 'mydisco-123' ,
        'text_prompts' : [
            'A beautiful painting of a singular lighthouse' ,
            'yellow color scheme' ,
        ],
    },
)

# check intermediate results
da = c . post ( '/result' , parameters = { 'name_docarray' : 'mydisco-123' })
要使用现有的 Document/DocumentArray 作为 init Document 来create :
 from jina import Client

c = Client ( host = 'grpc://0.0.0.0:51001' )

old_da = create (...)

da = c . post (
    '/create' ,
    old_da ,  # this can be a DocumentArray or a single Document
    parameters = {
        'width_height' : [ 1024 , 768 ],
    },
)这相当于在服务器上运行create(init_document=old_da, width_height=[1024, 768]) 。笔记:
init_document中的参数。init_document是 DocumentArray,则数组中的第一个 Document 将用作 init Document。尽管不推荐,但也可以使用 Google Colab 托管 DiscoArt 服务器。请查看以下教程:
我们提供了一个预构建的 Docker 映像,用于开箱即用地运行 DiscoArt。要将 Docker 镜像更新到最新版本:
docker pull jinaai/discoart:latest默认入口点是启动 Jupyter 笔记本
 # docker build . -t jinaai/discoart  # if you want to build yourself
docker run -p 51000:8888 -v $( pwd ) :/home/jovyan/ -v $HOME /.cache:/root/.cache --gpus all jinaai/discoart现在您可以访问http://127.0.0.1:51000来访问笔记本
您可以在 Windows Subsystem for Linux (WSL) 上使用它,请在此处查看官方指南。
 # Make sure you install Windows 11 or Windows 10, version 21H2
docker run -p 8888:8888 -v $HOME /.cache:/root/.cache --gpus all jinaai/discoart # docker build . -t jinaai/discoart # if you want to build yourself
docker run --entrypoint " python " -p 51001:51001 -v $( pwd ) :/home/jovyan/ -v $HOME /.cache:/root/.cache --gpus all jinaai/discoart -m discoart serve您的 DiscoArt 服务器现在正在运行http://127.0.0.1:51001 。
Docker 镜像是在每个版本上构建的,因此可以将其锁定到特定版本,例如0.5.1 :
docker run -p 51000:8888 -v $( pwd ) :/home/jovyan/ -v $HOME /.cache:/root/.cache --gpus all jinaai/discoart:0.5.1接下来是创建。
?如果您已经是 DD 用户:您就可以开始了!无需额外学习,DiscoArt 遵循与 DD5.6 相同的参数语义。所以尽情发挥你的创造力吧!在这里详细了解它们的差异。
你总是可以from discoart import cheatsheet; cheatsheet()检查所有新的/修改的参数。
?如果您是 DALL·E Flow 或新用户:您可能需要逐步进行,因为 Disco Diffusion 的工作方式与 DALL·E 非常不同。它更加先进和强大:例如,Disco Diffusion 可以采用加权和结构化文本提示;它可以从噪声受控的图像进行初始化;并且还有更多参数可以调整。像"armchair avocado"这样不耐烦的提示只会给你带来困惑和沮丧。我强烈建议您在尝试自己的提示之前先查看以下资源:
DiscoArt 由 Jina AI 支持,并根据 MIT 许可证获得许可。我们正在积极招聘人工智能工程师、解决方案工程师,以开源方式构建下一个神经搜索生态系统。