Asp.Net Core Web API ile React te Resim Yukleme Guncelleme ve Silme
1.0.0
我讨论了如何使用 Asp.Net Core WebAPI 在 Reactjs 中加载图像。我们正在创建 Asp.Net Core Web API 并创建带有实体框架核心的 SQL Server 数据库。然后我创建了一个用于图像加载的 asp.net Core API 控制器。
我们在 Reactjs 中创建了客户端应用程序。为此设计了带有图像上传器的表单。单独显示所选图像预览。在表单提交事件中,我将所选图像加载到 Asp.Net Web API 中。
工具: VS Code、Visual Studio、SSMS、Postman
客户端: Reactjs
API: Asp.Net Core WebAPI
该控制器连接到数据库连接,并通过处理 HTTP GET、POST、PUT 和 DELETE 请求来提供列出、插入、更新和删除员工记录的方法。
该控制器通过与员工表单交互来工作,员工可以在其中上传图像。该表单是在React端设计的,是使用项目根目录下的npx create-react-app命令创建的。
为GET、POST、PUT和DELETE操作提供了相关方法。通过 GET 请求,将列出所有现有员工记录。 PUT 请求更新指定的员工记录,还用于更改员工的个人资料图片。 POST 请求添加新的员工记录并上传员工的个人资料照片。 DELETE 请求删除指定的员工记录。
此外,还提供了两个特殊方法 SaveImage() 和 DeleteImage(),用于加载和删除员工记录中的图像。这些方法处理员工个人资料图像的上传和删除。
 using System ;
using System . Collections . Generic ;
using System . Linq ;
using System . Threading . Tasks ;
using Microsoft . AspNetCore . Http ;
using Microsoft . AspNetCore . Mvc ;
using Microsoft . EntityFrameworkCore ;
using EmployeeRegisterAPI . Models ;
using System . IO ;
using Microsoft . AspNetCore . Hosting ;

namespace EmployeeRegisterAPI . Controllers
{
    [ Route ( "api/[controller]" ) ]
    [ ApiController ]
    public class EmployeeController : ControllerBase
    {
        private readonly EmployeeDbContext _context ;
        private readonly IWebHostEnvironment _hostEnvironment ;

        public EmployeeController ( EmployeeDbContext context , IWebHostEnvironment hostEnvironment )
        {

            _context = context ;
            this . _hostEnvironment = hostEnvironment ;
        }

        // GET: api/EmployeeModels
        [ HttpGet ]
        public async Task < ActionResult < IEnumerable < EmployeeModel > > > GetEmployees ( )
        {

            return await _context . Employees
                . Select ( x => new EmployeeModel ( )
                {
                    EmployeeID = x . EmployeeID ,
                    EmployeeName = x . EmployeeName ,
                    Occupation = x . Occupation ,
                    ImageName = x . ImageName ,
                    ImageSrc = String . Format ( "{0}://{1}{2}/Images/{3}" , Request . Scheme , Request . Host , Request . PathBase , x . ImageName )
                } )
                . ToListAsync ( ) ;
        }
        // GET: api/Employee/5
        [ HttpGet ( "{id}" ) ]
        public async Task < ActionResult < EmployeeModel > > GetEmployeeModel ( int id )
        {
            var employeeModel = await _context . Employees . FindAsync ( id ) ;

            if ( employeeModel == null )
            {
                return NotFound ( ) ;
            }

            return employeeModel ;
        }

        // PUT: api/Employee/5
        // To protect from overposting attacks, enable the specific properties you want to bind to, for
        // more details, see https://go.microsoft.com/fwlink/?linkid=2123754.
        [ HttpPut ( "{id}" ) ]
        public async Task < IActionResult > PutEmployeeModel ( int id , [ FromForm ] EmployeeModel employeeModel )
        {
            if ( id != employeeModel . EmployeeID )
            {
                return BadRequest ( ) ;
            }

            if ( employeeModel . ImageFile != null )
            {
                DeleteImage ( employeeModel . ImageName ) ;
                employeeModel . ImageName = await SaveImage ( employeeModel . ImageFile ) ;
            }

            _context . Entry ( employeeModel ) . State = EntityState . Modified ;

            try
            {
                await _context . SaveChangesAsync ( ) ;
            }
            catch ( DbUpdateConcurrencyException )
            {
                if ( ! EmployeeModelExists ( id ) )
                {
                    return NotFound ( ) ;
                }
                else
                {
                    throw ;
                }
            }

            return NoContent ( ) ;
        }

        // POST: api/Employee
        // To protect from overposting attacks, enable the specific properties you want to bind to, for
        // more details, see https://go.microsoft.com/fwlink/?linkid=2123754.
        [ HttpPost ]
        public async Task < ActionResult < EmployeeModel > > PostEmployeeModel ( [ FromForm ] EmployeeModel employeeModel )
        {
            employeeModel . ImageName = await SaveImage ( employeeModel . ImageFile ) ;
            _context . Employees . Add ( employeeModel ) ;
            await _context . SaveChangesAsync ( ) ;

            return StatusCode ( 201 ) ;
        }

        // DELETE: api/Employee/5
        [ HttpDelete ( "{id}" ) ]
        public async Task < ActionResult < EmployeeModel > > DeleteEmployeeModel ( int id )
        {
            var employeeModel = await _context . Employees . FindAsync ( id ) ;
            if ( employeeModel == null )
            {
                return NotFound ( ) ;
            }
            DeleteImage ( employeeModel . ImageName ) ;
            _context . Employees . Remove ( employeeModel ) ;
            await _context . SaveChangesAsync ( ) ;

            return employeeModel ;
        }

        private bool EmployeeModelExists ( int id )
        {
            return _context . Employees . Any ( e => e . EmployeeID == id ) ;
        }

        [ NonAction ]
        public async Task < string > SaveImage ( IFormFile imageFile )
        {
            string imageName = new String ( Path . GetFileNameWithoutExtension ( imageFile . FileName ) . Take ( 10 ) . ToArray ( ) ) . Replace ( ' ' , '-' ) ;
            imageName = imageName + DateTime . Now . ToString ( "yymmssfff" ) + Path . GetExtension ( imageFile . FileName ) ;
            var imagePath = Path . Combine ( _hostEnvironment . ContentRootPath , "Images" , imageName ) ;
            using ( var fileStream = new FileStream ( imagePath , FileMode . Create ) )
            {
                await imageFile . CopyToAsync ( fileStream ) ;
            }
            return imageName ;
        }

        [ NonAction ]
        public void DeleteImage ( string imageName )
        {
            var imagePath = Path . Combine ( _hostEnvironment . ContentRootPath , "Images" , imageName ) ;
            if ( System . IO . File . Exists ( imagePath ) )
                System . IO . File . Delete ( imagePath ) ;
        }
    }
}该表单允许用户添加或编辑员工。该组件提供了一个表单,您可以在其中上传图像并输入有关员工姓名和工作的信息。该表单由一个图像上传区域和两个文本输入字段组成。
使用了许多变量。 defaultImageSrc 变量保存默认图像路径。 initialFieldValues变量包含组件初始状态下要使用的初始值。使用 useState,可以在组件内跟踪值的状态。
useEffect函数在组件加载过程中使用,当recordForEdit变量发生变化时,会触发组件重新加载,并使用setValues函数更新values变量。
当文本输入字段更改时,将调用handleInputChange 函数。该函数使用e.target.name和e.target.value捕获更改字段的名称和值,并使用setValues函数更新values变量。
如果图片上传区域发生变化,就会调用showPreview函数。此函数将所选文件的路径保存在 imageFile 变量中,并使用 FileReader 对象创建文件预览并更新 imageSrc 变量。
验证函数验证表单的正确性。该函数用于确保正确填充values变量。 setErrors 函数更新错误变量,resetForm 函数重置表单并清除错误变量。
提交表单时调用handleFormSubmit 函数。该函数使用 FormData 对象检索表单数据,并通过调用 addOrEdit 函数将数据发送到服务器。
applyErrorClass 函数将无效字段类应用于错误字段,从而导致这些字段显示错误。
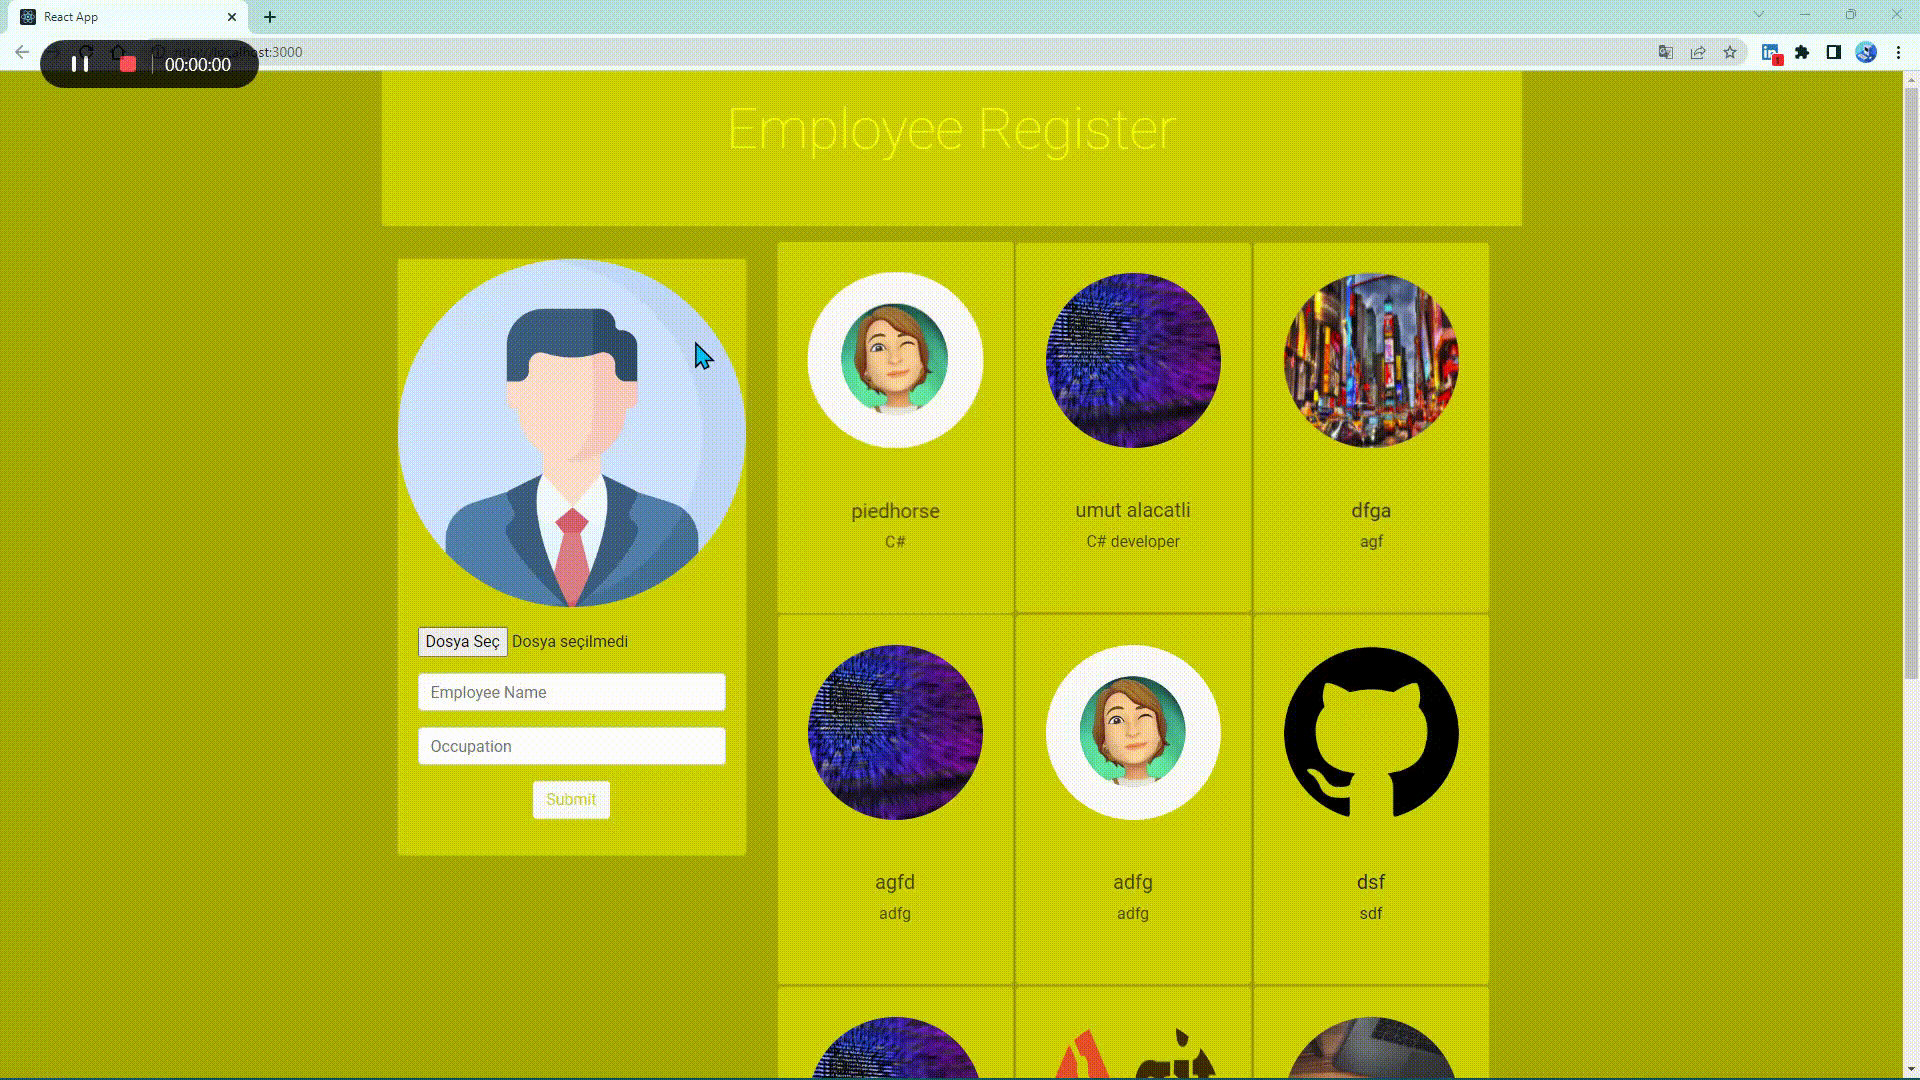
该组件提供了一个表单,您可以在其中上传图像并输入有关员工姓名和工作的信息。该表单由一个图像上传区域和两个文本输入字段组成。
 import React , { useState , useEffect } from 'react'

const defaultImageSrc = '/img/3135715.png'

const initialFieldValues = {
    employeeID : 0 ,
    employeeName : '' ,
    occupation : '' ,
    imageName : '' ,
    imageSrc : defaultImageSrc ,
    imageFile : null
}

export default function Employee ( props ) {

    const { addOrEdit , recordForEdit } = props

    const [ values , setValues ] = useState ( initialFieldValues )
    const [ errors , setErrors ] = useState ( { } )


    useEffect ( ( ) => {
        if ( recordForEdit != null )
            setValues ( recordForEdit ) ;
    } , [ recordForEdit ] )

    const handleInputChange = e => {
        const { name , value } = e . target ;
        setValues ( {
            ... values ,
            [ name ] : value
        } )
    }

    const showPreview = e => {
        if ( e . target . files && e . target . files [ 0 ] ) {
            let imageFile = e . target . files [ 0 ] ;
            const reader = new FileReader ( ) ;
            reader . onload = x => {
                setValues ( {
                    ... values ,
                    imageFile ,
                    imageSrc : x . target . result
                } )
            }
            reader . readAsDataURL ( imageFile )
        }
        else {
            setValues ( {
                ... values ,
                imageFile : null ,
                imageSrc : defaultImageSrc
            } )
        }
    }

    const validate = ( ) => {
        let temp = { }
        temp . employeeName = values . employeeName == "" ? false : true ;
        temp . imageSrc = values . imageSrc == defaultImageSrc ? false : true ;
        setErrors ( temp )
        return Object . values ( temp ) . every ( x => x == true )
    }

    const resetForm = ( ) => {
        setValues ( initialFieldValues )
        document . getElementById ( 'image-uploader' ) . value = null ;
        setErrors ( { } )
    }

    const handleFormSubmit = e => {
        e . preventDefault ( )
        if ( validate ( ) ) {
            const formData = new FormData ( )
            formData . append ( 'employeeID' , values . employeeID )
            formData . append ( 'employeeName' , values . employeeName )
            formData . append ( 'occupation' , values . occupation )
            formData . append ( 'imageName' , values . imageName )
            formData . append ( 'imageFile' , values . imageFile )
            addOrEdit ( formData , resetForm )
        }
    }

    const applyErrorClass = field => ( ( field in errors && errors [ field ] == false ) ? ' invalid-field' : '' )

    return (
        < >
            < div className = "container text-center" >
                < p className = "lead" > </ p >
            </ div >
            < form autoComplete = "off" noValidate onSubmit = { handleFormSubmit } >
                < div className = "card" style = { { backgroundColor : '#ced114' } } >
                    < img src = { values . imageSrc } className = "card-img-top" />
                    < div className = "card-body" >
                        < div className = "form-group" >
                            < input type = "file" accept = "image/*" className = { "form-control-file" + applyErrorClass ( 'imageSrc' ) }
                                onChange = { showPreview } id = "image-uploader" />
                        </ div >
                        < div className = "form-group"  style = { { backgroundColor : '#ced114' } } >
                            < input className = { "form-control" + applyErrorClass ( 'employeeName' ) } placeholder = "Employee Name" name = "employeeName"
                                value = { values . employeeName }
                                onChange = { handleInputChange } />
                        </ div >
                        < div className = "form-group" >
                            < input className = "form-control" placeholder = "Occupation" name = "occupation"
                                value = { values . occupation }
                                onChange = { handleInputChange } />
                        </ div >
                        < div className = "form-group text-center" >
                            < button type = "submit" className = "btn btn-light" style = { { color : '#ced114' } } > Submit </ button >
                        </ div >
                    </ div >
                </ div >
            </ form >
        </ >
    )
}该 React 组件处理创建、编辑、删除和查看员工记录。
它使用 useState 和 useEffect React 挂钩。 useState 为组件的状态定义一个状态变量并返回 setState。 useEffect 运行一个函数来响应加载或重绘组件等事件。
Axios 用于进行 RESTful Web 服务调用。名为employeeAPI 的辅助函数实例化RESTful 调用,并可以使用Axios 的功能更改资源URL。
freshEmployeeList 函数从服务器检索员工记录,并使用 setEmployeeList 将其设置为组件的状态。
addOrEdit 函数处理创建或更新员工记录。 FormData 对象包含员工记录的用户条目。
onDelete 函数要求用户确认是否要删除记录,然后向服务器发送 DELETE 请求。
imageCard 函数用于显示员工名片。该卡包含员工的照片、姓名、工作描述和删除按钮。
最后,该组件包括一个大屏幕标题、一个员工表单和一个员工卡表。该表显示具有三列的员工卡以及第三列未被占用的附加行。
 import React , { useState , useEffect } from 'react'
import Employee from './Employee'
import axios from "axios" ;

export default function EmployeeList ( ) {
    const [ employeeList , setEmployeeList ] = useState ( [ ] )
    const [ recordForEdit , setRecordForEdit ] = useState ( null )

    useEffect ( ( ) => {
        refreshEmployeeList ( ) ;
    } , [ ] )

    const employeeAPI = ( url = 'https://localhost:44334/api/Employee/' ) => {
        return {
            fetchAll : ( ) => axios . get ( url ) ,
            create : newRecord => axios . post ( url , newRecord ) ,
            update : ( id , updatedRecord ) => axios . put ( url + id , updatedRecord ) ,
            delete : id => axios . delete ( url + id )
        }
    }

    function refreshEmployeeList ( ) {
        employeeAPI ( ) . fetchAll ( )
            . then ( res => {
                setEmployeeList ( res . data )
            } )
            . catch ( err => console . log ( err ) )
    }

    const addOrEdit = ( formData , onSuccess ) => {
        if ( formData . get ( 'employeeID' ) == "0" )
            employeeAPI ( ) . create ( formData )
                . then ( res => {
                    onSuccess ( ) ;
                    refreshEmployeeList ( ) ;
                } )
                . catch ( err => console . log ( err ) )
        else
            employeeAPI ( ) . update ( formData . get ( 'employeeID' ) , formData )
                . then ( res => {
                    onSuccess ( ) ;
                    refreshEmployeeList ( ) ;
                } )
                . catch ( err => console . log ( err ) )

    }

    const showRecordDetails = data => {
        setRecordForEdit ( data )
    }

    const onDelete = ( e , id ) => {
        e . stopPropagation ( ) ;
        if ( window . confirm ( 'Are you sure to delete this record?' ) )
            employeeAPI ( ) . delete ( id )
                . then ( res => refreshEmployeeList ( ) )
                . catch ( err => console . log ( err ) )
    }

    const imageCard = data => (
        < div className = "card" onClick = { ( ) => { showRecordDetails ( data ) } } >
            < img src = { data . imageSrc } className = "card-img-top rounded-circle" />
            < div className = "card-body" >
                < h5 > { data . employeeName } </ h5 >
                < span > { data . occupation } </ span > < br />
                < button className = "btn btn-light delete-button" onClick = { e => onDelete ( e , parseInt ( data . employeeID ) ) } >
                    < i className = "far fa-trash-alt" > </ i >
                </ button >
            </ div >
        </ div >
    )


    return (
        < div className = "row" >
            < div className = "col-md-12" style = { { backgroundColor : '#ced114' } } >
                < div className = "jumbotron jumbotron-fluid py-4" style = { { backgroundColor : '#ced114' } } >
                    < div className = "container text-center" style = { { backgroundColor : '#ced114' } } >
                        < h1 className = "display-4" style = { { backgroundColor : '#ced114' , color : 'yellow' } } > Employee Register </ h1 >
                    </ div >
                </ div >
            </ div >
            < div className = "container text-center" >
                < p className = "lead" > </ p >
            </ div >
            < div className = "col-md-4" >
                < Employee
                    addOrEdit = { addOrEdit }
                    recordForEdit = { recordForEdit }
                />
            </ div >

            < div className = "col-md-8" >
                < table >
                    < tbody >
                        {
                            //tr > 3 td
                            [ ... Array ( Math . ceil ( employeeList . length / 3 ) ) ] . map ( ( e , i ) =>
                                < tr key = { i } >
                                    < td > { imageCard ( employeeList [ 3 * i ] ) } </ td >
                                    < td > { employeeList [ 3 * i + 1 ] ? imageCard ( employeeList [ 3 * i + 1 ] ) : null } </ td >
                                    < td > { employeeList [ 3 * i + 2 ] ? imageCard ( employeeList [ 3 * i + 2 ] ) : null } </ td >
                                </ tr >
                            )
                        }
                    </ tbody >
                </ table >
            </ div >
        </ div >
    )
}
我在我的项目中使用.Net Core 6.0。下面列出了项目中需要下载的Nuget包。
Microsoft.VisualStudio.Web.CodeGeneration.Design
PM > NuGet I nstall-Package Microsoft.VisualStudio.Web.CodeGeneration.Design -Version 6.0.13Microsoft.EntityFrameworkCore
PM > NuGet I nstall-Package Microsoft.EntityFrameworkCore -Version 7.0.4Microsoft.EntityFrameworkCore.SqlServer
PM > NuGet I nstall-Package Microsoft.EntityFrameworkCore.SqlServer -Version 7.0.4Microsoft.EntityFrameworkCore.Tools
PM > NuGet I nstall-Package Microsoft.EntityFrameworkCore.Tools -Version 7.0.4微软.AspNetCore.Cors
PM > NuGet I nstall-Package Microsoft.AspNetCore.Cors -Version 2.2.0首先,让我们向 Models 文件夹中添加一个类。我将其命名为 EmployeeModel。
 public class EmployeeModel
    {
        [ Key ]
        public int EmployeeID { get ; set ; }

        [ Column ( TypeName = "nvarchar(50)" ) ]
        public string EmployeeName { get ; set ; }

        [ Column ( TypeName = "nvarchar(50)" ) ]
        public string Occupation { get ; set ; }

        [ Column ( TypeName = "nvarchar(100)" ) ]
        public string ImageName { get ; set ; }
    }
让我们在 Models 文件夹中创建一个 Context 类。
  using Microsoft . EntityFrameworkCore ;


namespace EmployeeRegisterAPI . Models
{
    public class EmployeeDbContext : DbContext //burada ef Dbcontext den kalitim aldirdik
    {

        public EmployeeDbContext ( DbContextOptions < EmployeeDbContext > options ) : base ( options )
        {


        }

        public DbSet < EmployeeModel > Employees { get ; set ; }
    }
}
让我们转到 Startup.cs 文件夹并为 ConfigureServices 方法创建一个连接字符串。
 public void ConfigureServices ( IServiceCollection services )
        {
            services . AddControllers ( ) ;

            //Baglanti dizesini olusturduk ve bu kodda sql server icin bir ConnectionString olusturduk "DevConnection" diye bunula baglanti bilgilerimizi appsettings de belirtecegiz
            services . AddDbContext < EmployeeDbContext > ( options => options . UseSqlServer ( Configuration . GetConnectionString ( "DevConnection" ) ) ) ;
        }
我们来到appsettings.json,这里我们将连接信息写入到json文件中,如下所示
  "Logging" : {
    "LogLevel" : {
      "Default" : "Information" ,
      "Microsoft" : "Warning" ,
      "Microsoft.Hosting.Lifetime" : "Information"
    }
  } ,
  "AllowedHosts" : "*" ,
  //buradan sonraki kod satirlaridir
  "ConnectionStrings" : {
    "DevConnection" : "Server=LAPTOP-6OAEM3JA; Database=EmployeeDB; Trusted_Connection=True; MultipleActiveResultSets=True;"
  }
}
然后,我们构建项目,转到包管理器并执行迁移操作。
PM > Add-Migration " InitialCreate "让我们使用该命令创建迁移并构建我们的项目,然后给出此命令。
PM > update-database然后让我们检查数据库是否已从MSSQL 创建。
然后让我们为我们的模型创建一个控制器,我将使用 API 控制器以及使用 EF 控制器的操作。
图片将在这里,其中 2 张
我们创建了控件,指定了模型和上下文文件,并指定了控制器名称。
5 这些服务称为 AddDb.AddDbContext(options => options.UseSqlServer(Configuration.GetConnectionString("DevConnection")));每次我们向该 EmployeeController 发出请求时,该函数都会为该员工控制器创建一个请求。 EmployeeController的构造函数是 public EmployeeController(EmployeeDbContext context) 这段代码中的EmployeeDbContext值就是这个asp.net依赖注入方法,它是由框架本身自动管理的,所以这个控制器中的请求现在将与db通信。
现在,让我们设计客户端,使其与员工表单反应以上传员工个人资料图片。我们需要从该项目的目录中打开命令提示符。
npx create-react-app employee-register-client用于客户端的 Oxios 命令
$ npm install react-axios从现在开始,我们已经创建了项目的结构,我希望您在我的存储库中查看我的代码。祝你好运 :)
GET /api/Employee| 范围 | 药品 | 解释 |
|---|---|---|
api_key | string | 必要的。您的 API 密钥。 |
GET /api/Employee/${id}| 范围 | 药品 | 解释 |
|---|---|---|
id | string | 必要的。被调用的item的key值 |
{ "employeeID" : 3 , "employeeName" : " piedhorse " , "occupation" : " C# " , "imageName" : " capture_20231646962.jpeg " , "imageFile" : null , "imageSrc" : " https://localhost:44334/Images/capture_20231646962.jpeg " }


