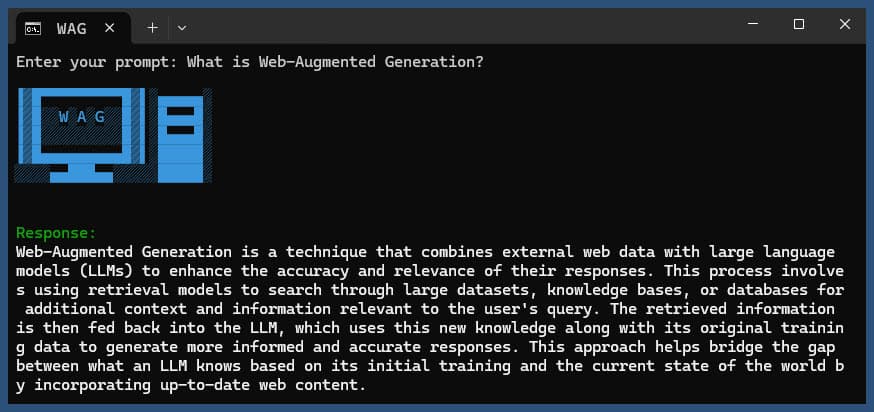
web augmented generation
v1.2.1 - ? Semantic Chunk Matching
此 Node.js 应用程序使用各种 LLM 提供商和 SearXNG 的 Web 搜索结果执行 Web 增强生成。
克隆存储库:
 git clone https://github.com/jparkerweb/web-augmented-generation.git
cd web-augmented-generation
安装依赖项:
npm ci
将.env.example文件复制到.env :
cp .env.example .env
编辑.env文件并根据需要更新值:
 # #####################
# # General Settings ##
# #####################
NUM_URLS = 10                                                           # Number of URLs to fetch
SEARXNG_URL = https://searx.be/                                         # URL of the SearXNG server
SEARXNG_URL_EXTRA_PARAMETER = "key=optional_auth_key_here&language=en"  # Extra parameter for SearXNG URL
SEARXNG_FORMAT = html                                                   # Format for SearXNG results (html or json)
FETCH_TIMEOUT_MS = 5000                                                 # Timeout for fetching URLs
DISABLE_SSL_VALIDATION = true                                           # Whether to disable SSL validation

# #################
# # LLM Settings ##
# #################
LLM_STREAM_RESPONSE = true                             # Whether to stream the LLM response

# Ollama Local Configuration
LLM_BASE_URL = http://localhost:11434/v1               # Base URL for the LLM API (OpenAI format)
LLM_API_KEY = ollama!!!                                # API key for the LLM (use 'ollama' for Ollama)
LLM_MODEL = llama3.2:1b                                # Model to use with the LLM API

# ###################################
# # Scraped Page Content Settings ##
# ###################################

# Semantic Chunking Settings
CHUNK_CONTENT = true                                   # Enable semantic chunking for better quality answers
CHUNK_CONTENT_USE_HYBRID_FALLBACK = true               # Enable hybrid mode to fallback to summarization if no chunks found
# # The following parameters are only used by the `chunk-match` library (if CHUNK_CONTENT is set to true)
CHUNK_CONTENT_MAX_RESULTS = 10
CHUNK_CONTENT_MIN_SIMILARITY = 0.375
CHUNK_CONTENT_MAX_TOKEN_SIZE = 500
CHUNK_CONTENT_SIMILARITY_THRESHOLD = 0.4
CHUNK_CONTENT_DYNAMIC_THRESHOLD_LOWER_BOUND = 0.3
CHUNK_CONTENT_DYNAMIC_THRESHOLD_UPPER_BOUND = 0.5
CHUNK_CONTENT_NUM_SIMILARITY_SENTENCES_LOOKAHEAD = 3
CHUNK_CONTENT_COMBINE_CHUNKS = true
CHUNK_CONTENT_COMBINE_CHUNKS_SIMILARITY_THRESHOLD = 0.5
CHUNK_CONTENT_ONNX_EMBEDDING_MODEL = " Xenova/all-MiniLM-L6-v2 "
CHUNK_CONTENT_DTYPE = " q8 "

# Raw Content Settings (used when CHUNK_CONTENT=false)
WEB_PAGE_CONTENT_MAX_LENGTH = 1000                     # Maximum length of raw page content to send to LLM
替代 LLM 提供商配置:
 # together.ai Configuration
LLM_BASE_URL = https://api.together.xyz/v1
LLM_API_KEY = xxxxxxxxxxxxxxxxxxxxxxxxxxxxxxxxxxxxx
LLM_MODEL = meta-llama/Llama-3.2-3B-Instruct-Turbo

# llama.cpp Configuration
LLM_BASE_URL = http://localhost:8080/v1
LLM_API_KEY = not-needed
LLM_MODEL = not-needed

# OpenRouter Configuration
LLM_BASE_URL = https://openrouter.ai/api/v1
LLM_API_KEY = xxxxxxxxxxxxxxxxxxxxxxxxxxxxxxxxxxxxx
LLM_MODEL = google/gemini-pro-1.5-exp

# Google AI Studio Configuration
LLM_BASE_URL = https://generativelanguage.googleapis.com/v1beta/openai/
LLM_API_KEY = xxxxxxxxxxxxxxxxxxxxxxxxxxxxxxxxxxxxx
LLM_MODEL = gemini-exp-1121
配置包括:
该应用程序使用 OpenAI API 格式进行语言模型交互。您可以将其配置为与 Ollama 或其他 OpenAI 兼容的 API 一起使用。设置方法如下:
.env文件中指定的 URL 上运行。.env文件中设置以下变量: LLM_BASE_URL=http://localhost:11434/v1
LLM_API_KEY=ollama
LLM_MODEL=llama3.2:1b
llama3.2:1b替换为您要在 Ollama 中使用的模型的名称。.env文件中设置以下变量: LLM_BASE_URL=https://api.openai.com/v1
LLM_API_KEY=your_api_key_here
LLM_MODEL=gpt-3.5-turbo
your_api_key_here替换为您的实际 API 密钥,并将gpt-3.5-turbo替换为您要使用的模型。应用程序将使用这些设置对语言模型进行 API 调用,以执行重新表述查询和生成响应等任务。
使用或不使用查询运行应用程序:
node main.js "Your question or prompt here"
或者使用询问脚本以获得更具交互性的体验:
node ask.js
如果您不提供查询,应用程序将提示您输入查询。
该应用程序将:
log.txt生成的响应将显示在控制台中并附加到日志文件中。
如果执行过程中出现错误,则会记录到项目目录下的error_log.txt中。
main.js :主要应用程序逻辑.env :配置文件(从.env.example创建)log.txt :每次运行的详细日志error_log.txt :错误日志(发生错误时创建)completion_flag.txt :进程成功完成时创建该应用程序使用网络抓取和人工智能生成的内容。确保您遵守您正在访问的网站和您正在使用的 AI 模型的服务条款。
如果您想使用 Docker 在本地运行 SearXNG,请按照以下步骤操作:
拉取最新的 SearXNG Docker 镜像:
docker pull searxng/searxng
为 SearXNG 配置创建一个目录:
mkdir searxng-config
在searxng-config目录中创建settings.yml文件:
touch searxng-config/settings.yml
编辑 settings.yml 文件以确保“json”包含在“格式”列表中:
nano searxng-config/settings.yml
添加或修改以下行:
 search :
  formats :
    - html
    - json
运行 SearXNG Docker 容器:
 docker run -d
  -v $(pwd)/searxng-config:/etc/searxng
  -p 8787:8080
  -e BASE_URL=http://localhost:8787/
  -e INSTANCE_NAME=my-searxng
  searxng/searxng
通过http://localhost:8787访问本地 SearXNG 实例
更新您的 .env 文件以使用本地 SearXNG 实例:
SEARXNG_URL=http://localhost:8787
现在,您有一个在端口 8787 上运行并启用了 JSON 输出的本地 SearXNG 实例,您可以将其与此应用程序一起使用。
SEARXNG_URL_EXTRA_PARAMETER :此字段允许您向 SearXNG 搜索 URL 添加额外参数。它可用于多种目的:
key=your_auth_key_herelanguage=en&time_range=year&组合多个参数。例如: key=your_auth_key_here&language=en SEARXNG_FORMAT :此字段确定 SearXNG 搜索结果的格式。它可以设置为“html”或“json”:
.env 文件中的用法示例:
 SEARXNG_URL_EXTRA_PARAMETER="key=abcdef123456&language=en"
SEARXNG_FORMAT=json
这会将&key=abcdef123456&language=en附加到 SearXNG 搜索 URL,并且应用程序将期望并解析来自 SearXNG 的 JSON 响应。
DISABLE_SSL_VALIDATION :设置为“true”以禁用 SSL 证书验证(默认值:false,谨慎使用)
LLM_STREAM_RESPONSE :此字段确定 LLM 响应是否应实时流式传输或作为单个响应返回:
.env 文件中的用法示例:
LLM_STREAM_RESPONSE=true
这将使 LLM 回复流式传输,提供更具互动性的体验。
(在端口 8787 上提供 SearXNG 的示例)
    server {
        listen       80 ;
        listen       443 ssl;
        server_name  searxng.acme.org;
        ssl_certificate         C:/some-path/fullchain.pem;
        ssl_certificate_key     C:/some-path/privkey.pem;

        # Define a variable to store the API key
        set $api_key "eXamPle__Key!!!" ;

        # Use a secure cookie to store the key
        set $key_cookie "searxng_key" ;

        # Add resolver directive
        resolver 127.0.0.1 ;

        # Debug logging
        error_log  logs/error.log debug ;

        # Check if the key is valid
        set $key_valid 0 ;
        if ( $arg_key = $api_key ) {
            set $key_valid 1 ;
        }
        if ( $cookie_searxng_key = $api_key ) {
            set $key_valid 1 ;
        }

        # Allow access to static files without key
        location /static/ {
            proxy_pass http://127.0.0.1:8787;
            proxy_buffering off ;
        }

        # Redirect all requests without a valid key to a default error page or login page
        location = / {
            if ( $key_valid = 0) {
                return 403 ;
            }
            proxy_pass http://127.0.0.1:8787;
            proxy_buffering off ;
        }

        location / {
            # Debug headers (always add these for debugging)
            add_header X-Debug-Key-Valid $key_valid always;
            add_header X-Debug-Arg-Key $arg_key always;
            add_header X-Debug-Cookie-Key $cookie_searxng_key always;

            # If the key is not valid, return 403
            if ( $key_valid = 0) {
                return 403 ;
            }

            # Set the cookie if the key is provided in the URL
            if ( $arg_key = $api_key ) {
                add_header Set-Cookie "${key_cookie}= $arg_key ; HttpOnly; Secure; SameSite=Strict; Path=/;" always;
            }

            # Proxy headers
            proxy_set_header Host $host ;
            proxy_set_header X-Real-IP $remote_addr ;
            proxy_set_header X-Forwarded-For $proxy_add_x_forwarded_for ;
            proxy_set_header X-Forwarded-Proto $scheme ;

            # Preserve the key parameter during redirects
            proxy_redirect ~^(https?://[^/]+)(.*)$ $1$2$is_args$args ;

            # Pass the request to the upstream server
            proxy_pass http://127.0.0.1:8787;
            proxy_buffering off ;
        }
}该项目包含用于从命令行运行应用程序的便捷脚本。这些脚本位于ask-scripts目录中:
ask :适用于类 Unix 系统和 Windows 的通用脚本ask.sh :类 Unix 系统的 Bash 脚本ask.bat :Windows 命令提示符的批处理脚本ask.ps1 :Windows PowerShell 的 PowerShell 脚本要全局使用这些脚本,您需要将ask-scripts目录添加到系统的PATH 中。以下是针对不同操作系统的说明:
ask-scripts目录~/.bashrc 、 ~/.zshrc或~/.bash_profile )/path/to/ask-scripts替换为实际路径: export PATH="$PATH:/path/to/ask-scripts"
source ~/.bashrc (或您编辑的相应文件)一旦ask-scripts目录位于您的 PATH 中,您只需键入以下内容即可从任何地方运行该应用程序:
ask
然后,脚本将提示您输入问题或提示。
此命令将自动使用适合您的系统的脚本:
您不需要提供问题或提示作为命令行参数。该脚本将以交互方式询问您的输入。
这些脚本提供了一种与应用程序交互的便捷方式,而无需每次导航到项目目录或手动运行node main.js
如果您想在 NGINX 反向代理后面托管 Ollama,可以使用以下配置作为起点。此设置包括 SSL 和基本 API 密钥身份验证。
 # -------------------------
# -- ollama.yourdomain.com --
# -------------------------
upstream ollama {
    server               127.0.0.1:11434;
}
server {
    listen 80 ;
    listen 443 ssl;
    server_name ollama.yourdomain.com;
    ssl_certificate         C:/Certbot/live/ollama.yourdomain.com/fullchain.pem;
    ssl_certificate_key     C:/Certbot/live/ollama.yourdomain.com/privkey.pem;

    location / {
        # Check if the Authorization header is present and has the correct Bearer token / API Key
        set $token "Bearer MY_PRIVATE_API_KEY" ;
        if ( $http_authorization != $token ) {
            return 401 "Unauthorized" ;
        }

        # The localhost headers are to simulate the forwarded request as coming from localhost
        # so we dont have to set the Ollama origins as *
        proxy_set_header  Host "127.0.0.1" ;
        proxy_set_header  X-Real-IP "127.0.0.1" ;
        proxy_set_header  X-Forwarded-For "127.0.0.1" ;
        proxy_set_header  X-Forwarded-Proto $scheme ;
        proxy_pass        http://ollama;  # Forward request to the actual web service
    }
}
此配置执行以下操作:
请记住将MY_PRIVATE_API_KEY替换为您的实际 API 密钥,并确保 SSL 证书路径对于您的系统来说是正确的。
使用此配置时,更新.env文件以指向 NGINX 代理的 Ollama 实例:
 LLM_BASE_URL=https://ollama.yourdomain.com/v1
LLM_API_KEY=MY_PRIVATE_API_KEY
LLM_MODEL=llama3.2:1b
此设置允许您安全地将 Ollama 实例公开到互联网,同时通过 API 密钥身份验证保持对访问的控制。
如果您喜欢这个项目,请考虑给我一个小费来支持我的工作?


