loopgpt
v0.1.1
L♾️pGPT
模組化 Auto-GPT 框架
L♾️pGPT 是流行的 Auto-GPT 專案的重新實現,作為一個適當的 python 包,編寫時考慮了模組化和可擴展性。
?這將安裝 L♾️pGPT 的最新穩定版本。建議大多數用戶這樣做:
pip install loopgpt以下兩種方法安裝L♾️pGPT的最新開發版本。請注意,此版本可能不穩定:
pip install git+https://www.github.com/farizrahman4u/loopgpt.git@maingit clone https://www.github.com/farizrahman4u/loopgpt.git
cd loopgpt
pip install -e .git clone https://www.github.com/farizrahman4u/loopgpt.git
cd loopgpt
docker build -t loopgpt:local-dev . .env文件在當前工作目錄(無論您要從何處運行 L♾️pGPT)中創建一個.env文件,並向其中添加以下行:
OPENAI_API_KEY= " <your-openai-api-key> "?重要的?
Windows 用戶,請確保您的檔案總管中啟用了「顯示檔案副檔名」。否則,您的檔案將被命名為.env.txt而不是.env 。
將名為OPENAI_API_KEY環境變數設定為您的 OpenAI API 金鑰。
如何設定環境變數:
讓我們在新的 Python 腳本中建立一個代理程式。
 from loopgpt . agent import Agent

agent = Agent ()
L♾️pGPT 預設使用gpt-3.5-turbo ,此處顯示的所有輸出都是使用它進行的。 GPT-4 使用者可以設定model="gpt-4"來代替:
agent = Agent ( model = "gpt-4" ) agent . name = "ResearchGPT"
agent . description = "an AI assistant that researches and finds the best tech products"
agent . goals = [
"Search for the best headphones on Google" ,
"Analyze specs, prices and reviews to find the top 5 best headphones" ,
"Write the list of the top 5 best headphones and their prices to a file" ,
"Summarize the pros and cons of each headphone and write it to a different file called 'summary.txt'" ,
]我們出發了!讓我們運行代理的 CLI:
agent . cli ()將您的 Python 檔案儲存為research_gpt.py並運行它:
python research_gpt.py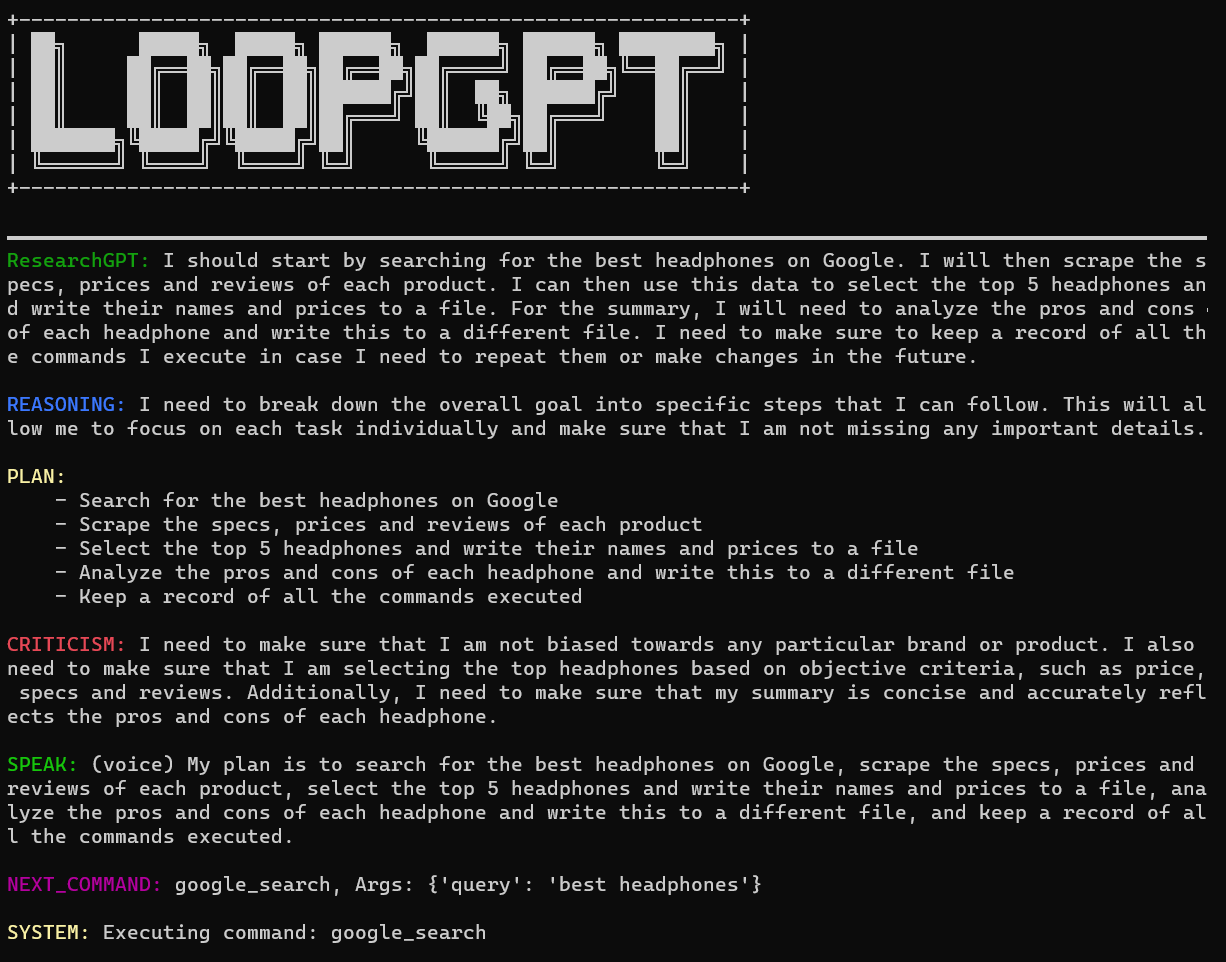
您可以鍵入“exit”退出 CLI。
如果continuous設定為True ,代理程式將不會請求使用者執行指令的權限。它可能會進入無限循環,因此使用它需要您自擔風險!
agent . cli ( continuous = True )您可以直接從命令列運行 L♾️pGPT,而無需編寫任何 python 程式碼:
loopgpt run運行loopgpt --help以查看所有可用選項。
您可以使用 Docker 以前面提到的模式運行 L♾️pGPT:
 # CLI mode
docker run -i --rm loopgpt:local-dev loopgpt run

# Script mode example
docker run -i --rm -v " $( pwd ) /scripts:/scripts " loopgpt:local-dev python /scripts/myscript.py
L♾️pGPT 代理程式附帶了一組內建工具,讓它們可以執行各種基本任務,例如搜尋網路、檔案系統操作等print(agent.tools)
除了這些內建工具之外,您還可以將自己的工具新增到代理程式的工具箱中。
讓我們創建 WeatherGPT,一個適用於所有天氣的人工智慧助理。
工具繼承自BaseTool ,您只需編寫文件字串即可啟動並運行您的工具!
 from loopgpt . tools import BaseTool

class GetWeather ( BaseTool ):
    """Quickly get the weather for a given city

    Args:
        city (str): name of the city

    Returns:
        dict: The weather report for the city
    """

    def run ( self , city ):
        ...
L♾️pGPT 為您的工具提供預設 ID,但如果您願意,您可以覆蓋它們:
 class GetWeather ( BaseTool ):
    """Quickly get the weather for a given city

    Args:
        city (str): name of the city

    Returns:
        dict: The weather report for the city
    """

    @ property
    def id ( self ):
return "get_weather_command"現在讓我們定義我們的工具將在其run方法中執行的操作:
 import requests

# Define your custom tool
class GetWeather ( BaseTool ):
    """Quickly get the weather for a given city

    Args:
        city (str): name of the city

    Returns:
        dict: The weather report for the city
    """

    def run ( self , city ):
        try :
            url = "https://wttr.in/{}?format=%l+%C+%h+%t+%w+%p+%P" . format ( city )
            data = requests . get ( url ). text . split ( " " )
            keys = ( "location" , "condition" , "humidity" , "temperature" , "wind" , "precipitation" , "pressure" )
            data = dict ( zip ( keys , data ))
            return data
        except Exception as e :
            return f"An error occurred while getting the weather: { e } ."
就是這樣!您已經建立了第一個自訂工具。讓我們用新代理註冊它並運行它:
 from loopgpt . tools import WriteToFile
import loopgpt

# Register custom tool type
# This is actually not required here, but is required when you load a saved agent with custom tools.
loopgpt . tools . register_tool_type ( GetWeather )

# Create Agent
agent = loopgpt . Agent ( tools = [ GetWeather , WriteToFile ])
agent . name = "WeatherGPT"
agent . description = "an AI assistant that tells you the weather"
agent . goals = [
    "Get the weather for NewYork and Beijing" ,
    "Give the user tips on how to dress for the weather in NewYork and Beijing" ,
    "Write the tips to a file called 'dressing_tips.txt'"
]

# Run the agent's CLI
agent . cli ()讓我們來看看WeatherGPT為我們寫的dressing_tips.txt檔案:
敷料提示.txt
 - It's Clear outside with a temperature of +10°C in Beijing. Wearing a light jacket and pants is recommended.
- It's Overcast outside with a temperature of +11°C in New York. Wearing a light jacket, pants, and an umbrella is recommended.
與 Auto-GPT 不同,當使用者拒絕執行命令時,代理不會終止。相反,它會要求用戶提供回饋來糾正其路線。
要糾正代理的行為,只需拒絕執行並提供回饋:

該代理程式已更新其行動方針:

您可以使用以下命令將代理程式的狀態儲存到 json 檔案中:
agent . save ( "ResearchGPT.json" )這保存了代理的配置(模型、名稱、描述等)及其內部狀態(對話狀態、記憶體、工具狀態等)。您也可以將include_state=False傳遞給agent.save()來僅儲存配置:
agent . save ( "ResearchGPT.json" , include_state = False )然後從上次停下的地方繼續:
 import loopgpt
agent = loopgpt . Agent . load ( "ResearchGPT.json" )
agent . cli ()
或從命令列運行已儲存的代理程式:
loopgpt run ResearchGPT.json您可以將代理狀態轉換為 json 相容的 python 字典,而不是寫入檔案:
agent_config = agent . config ()若要僅取得配置而不取得內部狀態:
agent_config = agent . config ( include_state = False )若要從配置重新載入代理,請使用:
 import loopgpt

agent = loopgpt . Agent . from_config ( agent_config )對於官方Google搜尋支持,您需要設定兩個環境變數鍵GOOGLE_API_KEY和CUSTOM_SEARCH_ENGINE_ID ,以下是取得它們的方法:
CUSTOM_SEARCH_ENGINE_ID環境變數的值。GOOGLE_API_KEY環境變數。如果缺少這些,L♾️pGPT 將轉而使用 DuckDuckGo 搜尋。
我們需要很多幫助!如果您想做出貢獻,請提出問題或 PR。
需要幫助嗎?加入我們的不和諧。


