web augmented generation
v1.2.1 - ? Semantic Chunk Matching
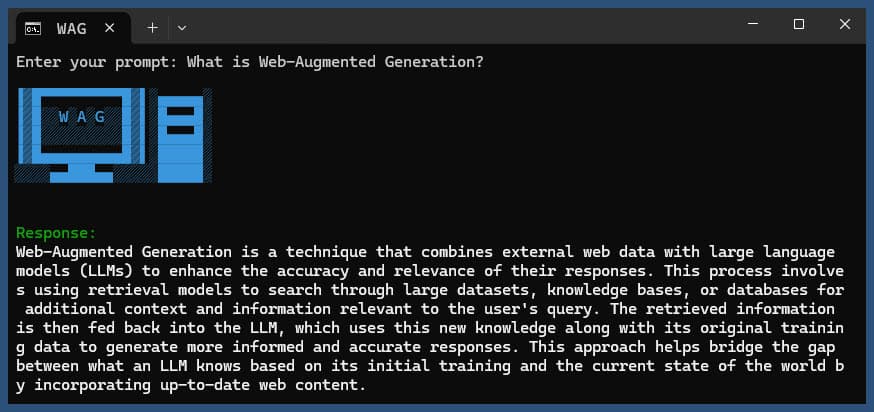
此 Node.js 應用程式使用各種 LLM 提供者和 SearXNG 的 Web 搜尋結果執行 Web 增強生成。
克隆儲存庫:
 git clone https://github.com/jparkerweb/web-augmented-generation.git
cd web-augmented-generation
安裝依賴項:
npm ci
將.env.example檔案複製到.env :
cp .env.example .env
編輯.env檔並根據需要更新值:
 # #####################
# # General Settings ##
# #####################
NUM_URLS = 10                                                           # Number of URLs to fetch
SEARXNG_URL = https://searx.be/                                         # URL of the SearXNG server
SEARXNG_URL_EXTRA_PARAMETER = "key=optional_auth_key_here&language=en"  # Extra parameter for SearXNG URL
SEARXNG_FORMAT = html                                                   # Format for SearXNG results (html or json)
FETCH_TIMEOUT_MS = 5000                                                 # Timeout for fetching URLs
DISABLE_SSL_VALIDATION = true                                           # Whether to disable SSL validation

# #################
# # LLM Settings ##
# #################
LLM_STREAM_RESPONSE = true                             # Whether to stream the LLM response

# Ollama Local Configuration
LLM_BASE_URL = http://localhost:11434/v1               # Base URL for the LLM API (OpenAI format)
LLM_API_KEY = ollama!!!                                # API key for the LLM (use 'ollama' for Ollama)
LLM_MODEL = llama3.2:1b                                # Model to use with the LLM API

# ###################################
# # Scraped Page Content Settings ##
# ###################################

# Semantic Chunking Settings
CHUNK_CONTENT = true                                   # Enable semantic chunking for better quality answers
CHUNK_CONTENT_USE_HYBRID_FALLBACK = true               # Enable hybrid mode to fallback to summarization if no chunks found
# # The following parameters are only used by the `chunk-match` library (if CHUNK_CONTENT is set to true)
CHUNK_CONTENT_MAX_RESULTS = 10
CHUNK_CONTENT_MIN_SIMILARITY = 0.375
CHUNK_CONTENT_MAX_TOKEN_SIZE = 500
CHUNK_CONTENT_SIMILARITY_THRESHOLD = 0.4
CHUNK_CONTENT_DYNAMIC_THRESHOLD_LOWER_BOUND = 0.3
CHUNK_CONTENT_DYNAMIC_THRESHOLD_UPPER_BOUND = 0.5
CHUNK_CONTENT_NUM_SIMILARITY_SENTENCES_LOOKAHEAD = 3
CHUNK_CONTENT_COMBINE_CHUNKS = true
CHUNK_CONTENT_COMBINE_CHUNKS_SIMILARITY_THRESHOLD = 0.5
CHUNK_CONTENT_ONNX_EMBEDDING_MODEL = " Xenova/all-MiniLM-L6-v2 "
CHUNK_CONTENT_DTYPE = " q8 "

# Raw Content Settings (used when CHUNK_CONTENT=false)
WEB_PAGE_CONTENT_MAX_LENGTH = 1000                     # Maximum length of raw page content to send to LLM
替代 LLM 提供者配置:
 # together.ai Configuration
LLM_BASE_URL = https://api.together.xyz/v1
LLM_API_KEY = xxxxxxxxxxxxxxxxxxxxxxxxxxxxxxxxxxxxx
LLM_MODEL = meta-llama/Llama-3.2-3B-Instruct-Turbo

# llama.cpp Configuration
LLM_BASE_URL = http://localhost:8080/v1
LLM_API_KEY = not-needed
LLM_MODEL = not-needed

# OpenRouter Configuration
LLM_BASE_URL = https://openrouter.ai/api/v1
LLM_API_KEY = xxxxxxxxxxxxxxxxxxxxxxxxxxxxxxxxxxxxx
LLM_MODEL = google/gemini-pro-1.5-exp

# Google AI Studio Configuration
LLM_BASE_URL = https://generativelanguage.googleapis.com/v1beta/openai/
LLM_API_KEY = xxxxxxxxxxxxxxxxxxxxxxxxxxxxxxxxxxxxx
LLM_MODEL = gemini-exp-1121
配置包括:
該應用程式使用 OpenAI API 格式進行語言模型互動。您可以將其配置為與 Ollama 或其他 OpenAI 相容的 API 一起使用。設定方法如下:
.env檔案中指定的 URL 上運行。.env檔中設定以下變數: LLM_BASE_URL=http://localhost:11434/v1
LLM_API_KEY=ollama
LLM_MODEL=llama3.2:1b
llama3.2:1b替換為您要在 Ollama 中使用的模型的名稱。.env檔中設定以下變數: LLM_BASE_URL=https://api.openai.com/v1
LLM_API_KEY=your_api_key_here
LLM_MODEL=gpt-3.5-turbo
your_api_key_here替換為您的實際 API 金鑰,並將gpt-3.5-turbo替換為您要使用的模型。應用程式將使用這些設定對語言模型進行 API 呼叫,以執行重新表述查詢和產生響應等任務。
使用或不使用查詢來執行應用程式:
node main.js "Your question or prompt here"
或使用詢問腳本以獲得更具互動性的體驗:
node ask.js
如果您不提供查詢,應用程式將提示您輸入查詢。
該應用程式將:
log.txt產生的回應將顯示在控制台中並附加到日誌檔案中。
如果執行過程中出現錯誤,則會記錄到專案目錄下的error_log.txt中。
main.js :主要應用程式邏輯.env :設定檔(從.env.example建立)log.txt :每次運行的詳細日誌error_log.txt :錯誤日誌(發生錯誤時建立)completion_flag.txt :進程成功完成時創建該應用程式使用網頁抓取和人工智慧生成的內容。確保您遵守您正在造訪的網站和您正在使用的 AI 模型的服務條款。
如果您想使用 Docker 在本機上執行 SearXNG,請依照下列步驟操作:
拉取最新的 SearXNG Docker 映像:
docker pull searxng/searxng
為 SearXNG 配置建立一個目錄:
mkdir searxng-config
在searxng-config目錄中建立settings.yml檔案:
touch searxng-config/settings.yml
編輯 settings.yml 檔案以確保「json」包含在「格式」清單中:
nano searxng-config/settings.yml
新增或修改以下行:
 search :
  formats :
    - html
    - json
運行 SearXNG Docker 容器:
 docker run -d
  -v $(pwd)/searxng-config:/etc/searxng
  -p 8787:8080
  -e BASE_URL=http://localhost:8787/
  -e INSTANCE_NAME=my-searxng
  searxng/searxng
透過http://localhost:8787存取本地 SearXNG 實例
更新您的 .env 檔案以使用本機 SearXNG 實例:
SEARXNG_URL=http://localhost:8787
現在,您有一個在連接埠 8787 上運行並啟用了 JSON 輸出的本機 SearXNG 實例,您可以將其與此應用程式一起使用。
SEARXNG_URL_EXTRA_PARAMETER :此欄位可讓您在 SearXNG 搜尋 URL 中新增額外參數。它可用於多種目的:
key=your_auth_key_herelanguage=en&time_range=year&組合多個參數。例如: key=your_auth_key_here&language=en SEARXNG_FORMAT :此欄位決定 SearXNG 搜尋結果的格式。它可以設定為“html”或“json”:
.env 檔案中的用法範例:
 SEARXNG_URL_EXTRA_PARAMETER="key=abcdef123456&language=en"
SEARXNG_FORMAT=json
這會將&key=abcdef123456&language=en附加到 SearXNG 搜尋 URL,並且應用程式將期望並解析來自 SearXNG 的 JSON 回應。
DISABLE_SSL_VALIDATION :設定為「true」以停用 SSL 憑證驗證(預設值:false,謹慎使用)
LLM_STREAM_RESPONSE :此欄位決定 LLM 回應是否應即時串流或作為單一回應傳回:
.env 檔案中的用法範例:
LLM_STREAM_RESPONSE=true
這將使 LLM 回應串流傳輸,提供更具互動性的體驗。
(在連接埠 8787 上提供 SearXNG 的範例)
    server {
        listen       80 ;
        listen       443 ssl;
        server_name  searxng.acme.org;
        ssl_certificate         C:/some-path/fullchain.pem;
        ssl_certificate_key     C:/some-path/privkey.pem;

        # Define a variable to store the API key
        set $api_key "eXamPle__Key!!!" ;

        # Use a secure cookie to store the key
        set $key_cookie "searxng_key" ;

        # Add resolver directive
        resolver 127.0.0.1 ;

        # Debug logging
        error_log  logs/error.log debug ;

        # Check if the key is valid
        set $key_valid 0 ;
        if ( $arg_key = $api_key ) {
            set $key_valid 1 ;
        }
        if ( $cookie_searxng_key = $api_key ) {
            set $key_valid 1 ;
        }

        # Allow access to static files without key
        location /static/ {
            proxy_pass http://127.0.0.1:8787;
            proxy_buffering off ;
        }

        # Redirect all requests without a valid key to a default error page or login page
        location = / {
            if ( $key_valid = 0) {
                return 403 ;
            }
            proxy_pass http://127.0.0.1:8787;
            proxy_buffering off ;
        }

        location / {
            # Debug headers (always add these for debugging)
            add_header X-Debug-Key-Valid $key_valid always;
            add_header X-Debug-Arg-Key $arg_key always;
            add_header X-Debug-Cookie-Key $cookie_searxng_key always;

            # If the key is not valid, return 403
            if ( $key_valid = 0) {
                return 403 ;
            }

            # Set the cookie if the key is provided in the URL
            if ( $arg_key = $api_key ) {
                add_header Set-Cookie "${key_cookie}= $arg_key ; HttpOnly; Secure; SameSite=Strict; Path=/;" always;
            }

            # Proxy headers
            proxy_set_header Host $host ;
            proxy_set_header X-Real-IP $remote_addr ;
            proxy_set_header X-Forwarded-For $proxy_add_x_forwarded_for ;
            proxy_set_header X-Forwarded-Proto $scheme ;

            # Preserve the key parameter during redirects
            proxy_redirect ~^(https?://[^/]+)(.*)$ $1$2$is_args$args ;

            # Pass the request to the upstream server
            proxy_pass http://127.0.0.1:8787;
            proxy_buffering off ;
        }
}此專案包含用於從命令列執行應用程式的便捷腳本。這些腳本位於ask-scripts目錄:
ask :適用於類別 Unix 系統和 Windows 的通用腳本ask.sh :類別 Unix 系統的 Bash 腳本ask.bat :Windows 命令提示字元的批次腳本ask.ps1 :Windows PowerShell 的 PowerShell 腳本要全域使用這些腳本,您需要將ask-scripts目錄新增到系統的PATH 中。以下是針對不同作業系統的說明:
ask-scripts目錄~/.bashrc 、 ~/.zshrc或~/.bash_profile )/path/to/ask-scripts替換為實際路徑: export PATH="$PATH:/path/to/ask-scripts"
source ~/.bashrc (或您編輯的對應檔案)一旦ask-scripts目錄位於您的 PATH 中,您只需鍵入以下內容即可從任何地方運行該應用程式:
ask
然後,腳本將提示您輸入問題或提示。
此命令將自動使用適合您的系統的腳本:
您不需要提供問題或提示作為命令列參數。該腳本將以互動方式詢問您的輸入。
這些腳本提供了一種與應用程式互動的便捷方式,而無需每次導航到專案目錄或手動執行node main.js
如果您想在 NGINX 反向代理程式後面託管 Ollama,可以使用下列配置作為起點。此設定包括 SSL 和基本 API 金鑰身份驗證。
 # -------------------------
# -- ollama.yourdomain.com --
# -------------------------
upstream ollama {
    server               127.0.0.1:11434;
}
server {
    listen 80 ;
    listen 443 ssl;
    server_name ollama.yourdomain.com;
    ssl_certificate         C:/Certbot/live/ollama.yourdomain.com/fullchain.pem;
    ssl_certificate_key     C:/Certbot/live/ollama.yourdomain.com/privkey.pem;

    location / {
        # Check if the Authorization header is present and has the correct Bearer token / API Key
        set $token "Bearer MY_PRIVATE_API_KEY" ;
        if ( $http_authorization != $token ) {
            return 401 "Unauthorized" ;
        }

        # The localhost headers are to simulate the forwarded request as coming from localhost
        # so we dont have to set the Ollama origins as *
        proxy_set_header  Host "127.0.0.1" ;
        proxy_set_header  X-Real-IP "127.0.0.1" ;
        proxy_set_header  X-Forwarded-For "127.0.0.1" ;
        proxy_set_header  X-Forwarded-Proto $scheme ;
        proxy_pass        http://ollama;  # Forward request to the actual web service
    }
}
此配置執行以下操作:
請記得將MY_PRIVATE_API_KEY替換為您的實際 API 金鑰,並確保 SSL 憑證路徑對於您的系統來說是正確的。
使用此配置時,更新.env檔案以指向 NGINX 代理程式的 Ollama 實例:
 LLM_BASE_URL=https://ollama.yourdomain.com/v1
LLM_API_KEY=MY_PRIVATE_API_KEY
LLM_MODEL=llama3.2:1b
此設定可讓您安全地將 Ollama 執行個體公開到互聯網,同時透過 API 金鑰驗證保持對存取的控制。
如果您喜歡這個項目,請考慮給我一個小費來支持我的工作?


