BladeOneHtml
2.4
它是一個 PHP 庫,允許輕鬆、乾淨地建立表單(視圖),並且不會影響效能。它使用 BladeOne 庫來渲染視圖。該庫僅使用單一依賴項、一個文件,僅此而已。
該庫以兩種方式工作:
作曲家需要 eftec/ BladeOneHtml
 include " vendor/autoload.php " ;

use eftec  bladeone  BladeOne ;
use eftec  BladeOneHtml  BladeOneHtml ;

class myBlade extends  BladeOne {
    use BladeOneHtml ;
}

$ blade = new myBlade ();

// for our example:
$ myvalue =@ $ _REQUEST [ ' myform ' ];
echo $ blade -> run ( " exampleview " , [ ' myvalue ' => $ myvalue ]); < body >
@form()
@input(type="text" name="myform" value=$myvalue)
@button(type="submit" value="Send")
@endform()
</ body >$blade=new myBlade();

該庫為模板新增了一組新標籤。這些標籤使用命名參數,因此很容易配置。
@<標籤>(參數1=“值” 參數2='值' 參數3=值 參數4=$變數 參數5=函數(),參數6=“aaa $aaa”)
該庫使用本機 html 參數,但有些參數是特殊的
| 爭論 | 描述 | 例子 |
|---|---|---|
| 文字 | 它在標籤之間添加內容。內部值始終不帶引號。 | @tag(text="hello") -> <tag>你好</tag> |
| 前 | 它在標籤之前添加內容 | @tag(pre="hello") -> 你好<tag></tag> |
| 郵政 | 它在標籤後面添加內容 | @tag(post="hello") -> <tag></tag>你好 |
| 之間 | 它在標籤之間添加內容(其工作方式與文字類似) | @tag(之間=“你好”) - > <標籤>你好</標籤> |
| 價值 | 通常它的運作方式與 html 的正常「值」相同,但它也可以以不同的方式運作(在 @textarea 中運作方式類似於text ) | @tag(value="hello") -> < 標籤 value="hello"></tag> |
| 價值觀 | 某些組件需要物件/陣列列表。此參數用於設定值列表 | @tag(值=$國家) |
| 別名 | 某些組件需要或使用物件/陣列列表。此參數用於引用清單內的任何行。如果設定了值並且缺少別名,則會建立名為值+「行」的新別名。 | @tag($值=$國家別名=$國家) @tag($values=$countries )它假設 alias=$countriesRow |
| 選擇組 | 標籤@select可以列出分組的元素。此參數用於設定分組 | @tag($值=$國家別名=$國家@optgroup=$國家->大陸) |
我們來說下一個例子
@input(value="hello world" type="text" )
它被渲染為
<input value="hello world" type="text" />
如果標籤使用函數變數,則此視圖
@input(value=$hello type="text" )
轉換成
<input value="<?php echo $this->e($hello);?>" type="text" />
$this->e 方法用於轉義該方法。
注意:該庫允許任何標籤,甚至是自訂標籤(但前提是它們不與特殊標籤衝突,請參見表格)
@input(value="hello world" type="text" mycustomtag="hi" )
轉換成
< input value =" hello world " type =" text " mycustomtag =" hi " /> 它顯示輸入的 HTML。
基本範例:
@input(id="id1" value="hello world$somevar" type="text" )
它產生一個隱藏字段
基本範例:
@hidden(name="id1" value="hello world$somevar" )
它顯示了一個標籤 html
@label(for="id1" text="hello world:")
它顯示了一個圖像
@image(src="https://via.placeholder.com/350x150")

它顯示了一個選擇(下拉列表)html對象
例子:
 @select(id="aaa" value=$selection values=$countries alias=$country)
    @item(value='aaa' text='hello world')
    @item(value='aaa' text='hello world')
    @item(value='aaa' text='hello world')
    @items( id="chkx" value=$country->id text=$country->name)
@endselect
註 1:@items 需要父級 (@select) 中的參數值以及參數值(可選擇值)和文字(可見值)註 2:@items 需要一個id ,在同一標記或父級中分配標記(在本例中,父級為@select) 註3:依照標準,參數id必須是唯一的。

@item是在其他標籤內使用的實用標籤。這取決於其父標籤的行為。它會為父物件添加一條簡單的線/行。
例子:
 @select()
    @item(value='aaa' text='hello world')
@endselect
它呈現
 <select>
<option value="aaa">hello world</option>
</select>
@items是一些標籤內使用的實用標籤。這取決於其父標籤的行為。它使用標籤值向父物件添加多行/行
注意:此標籤需要一些參數:
- 父級(或此標籤)需要標籤值
- 父級需要標籤值它指示當前選擇(如果有)
- 父級(或此標籤)需要標籤別名如果缺少別名,則它使用值的名稱+“行”,即值=產品->別名=產品行
- 父級(或此標籤)需要標籤ID
- 渲染的「id」將會使用這個id+「_」+「行的id」來產生。即 id="idproduct" => idproduct_0, idproduct_1
- 為什麼?這是因為id必須是唯一的(html規範)
例如,如果 $countries 是物件列表,則:
 @select(id="aaa" value=$selection values=$countries alias=$country)
    @items( id="chkx" value=$country->id text=$country->name)
@endselect
如果 $countries 是數組列表,則:
 @select(id="aaa" value=$selection values=$countries alias=$country)
    @items( id="chkx" value=$country['id'] text=$country['name'])
@endselect
在標籤項目內,您可以使用下列變數
| 變數(其中值是使用的變數) | 規格 |
|---|---|
| $values選項組 | 它儲存當前的 optgroup(如果有)。範例:$productOptGroup |
| $values鍵 | 它表示當前行的當前鍵。範例:$productKey |
| $alias(如果未設定別名,則使用$values行) | 變數的目前行。範例:$productRow |
它啟動一個可選組(選擇)
例子:
 @select(id="aaa" value=$selection values=$countries alias=$country)
    @optgroup(label="group1")
        @item(value='aaa' text='hello world')
        @item(value='aaa' text='hello world')
        @item(value='aaa' text='hello world')
    @endoptgroup
@endselect
注意:此標籤必須以標籤@endoptgroup結束

它添加了一個複選框
例子:
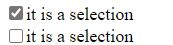
@checkbox(id="idsimple" value="1" checked="1" post="it is a selection")
它添加了一個單選按鈕
例子:
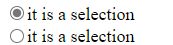
@radio(id="idsimple" value="1" checked="1" post="it is a selection")
它繪製一個文字區域。
例子:
@textarea(id="aaa" value="3333 3333 aaa3333 ")

它繪製了一個按鈕
例子:
@button(value="click me" type="submit" class="test" onclick='alert("ok")')

它添加了一個超鏈接
例子:
@link(href="https://www.google.cl" text="context")

它顯示複選框列表
 @checkboxes(id="checkbox1" value=$selection alias=$country)
    @item(id="aa1" value='aaa' text='hello world' post="<br>")
    @item(id="aa2" value='aaa' text='hello world2' post="<br>")
    @items(values=$countries value='id' text='name' post="<br>")
@endcheckboxes
它顯示單選按鈕列表
 @radios(id="radios1" name="aaa" value=$selection  alias=$country)
    @item(value='aaa' text='hello world' post="<br>")
    @item(value='aaa' text='hello world2' post="<br>")
    @items(values=$countries value='id' text='name' post="<br>")
@endradios
它產生一個檔案輸入值
@file(name="file" value="123.jpg" post="hello world")
注意:它還會渲染一個名為“name”+“_file”且具有原始值的隱藏文件

它會產生一個未排序的列表
 @ul(id="aaa" value=$selection values=$countries alias=$country)
    @item(value='aaa' text='hello world')
    @item(value='aaa' text='hello world')
    @item(value='aaa' text='hello world')
    @items(value=$country->id text=$country->name)
@endul

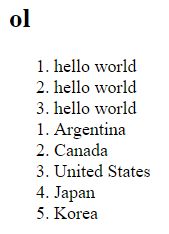
它會產生一個排序列表
 @ol(id="aaa" value=$selection values=$countries alias=$country)
    @item(value='aaa' text='hello world')
    @item(value='aaa' text='hello world')
    @item(value='aaa' text='hello world')
    @items(value=$country->id text=$country->name)
@endol
它產生一個分頁。它需要 bootstrap3、bootstrap4 或 bootstrap5。
您可以在 example/examplepagination.php 找到範例
PHP程式碼
 $ current = isset ( $ _GET [ ' _page ' ]) ? $ _GET [ ' _page ' ] : 1 ;
echo $ blade -> run ( " examplepagination " ,
    [ ' totalpages ' => count ( $ products )
     , ' current ' => $ current
     , ' pagesize ' => 10
     , ' products ' => $ items
    ]);
範本
@pagination(numpages=$totalpages current=$current pagesize=$pagesize urlparam='_page')注意:此頁面是基礎 1。
您可以更改上一個和下一個按鈕的名稱,如下所示:
$ this -> setTranslation ([ ' pagination ' =>[ ' prev ' => ' <<> ' , ' next ' => ' > ' ]]);
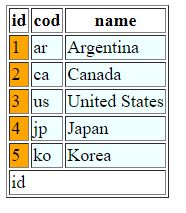
它呈現一個表格
 @table(class="table" values=$countries alias=$country border="1")
    @tablehead
        @cell(text="id")
        @cell(text="cod")
        @cell(text="name")
    @endtablehead
    @tablebody(id='hello world'  )
        @tablerows(style="background-color:azure")
            @cell(text=$country->id style="background-color:orange")
            @cell(text=$country->cod )
            @cell(text=$country->name)
        @endtablerows
    @endtablebody
    @tablefooter
        @cell(text="id" colspan="3")
    @endtablefooter
@endtable
它呈現表的標題(可選)。新增到其中的每個儲存格都會呈現為「th」HTML 標籤
它呈現表格的主體(可選)。表格內新增的每個單元格均呈現為「td」HTML 標記
它呈現表格的頁尾(可選)。新增到其中的每個儲存格都會呈現為「th」HTML 標籤
它在體內產生一行
它在表頭、表體(表行)或表頁腳內呈現一個單元格
它渲染並將 css 添加到框中
 < head >
	@cssbox
</ head > 使用方法 addCss($css,$name)
 $ this -> addCss ( ' <link rel="stylesheet" href="mystyle.css"> ' , ' mystyle ' );
$ this -> addCss ( ' css/stylename.css ' ); $css可以是連結或連結標籤
$name是可選的,但它避免添加重複項。如果我們新增一個與前一個 CSS 名稱相同的新 CSS,它將被忽略。
它呈現添加到框中的所有 JavaScript 鏈接
 < body >
    <!-- our page -->
	@jsbox
</ body > 使用方法 addJs($script,$name)
$ this -> addJs ( ' <script src="js/jquery.js"></script> ' , ' jquery ' ); < body >
<!-- our page -->
@jsbox <!-- we could load jquery here -->
@jscodebox(ready)
</ body >此程式碼自動新增標籤<script>。
參數ready顯示我們是否要在文件準備好時執行該函數。
如何將新的 JavaScript 程式碼加入jscodebox ?
$ blade -> addJsCode ( ' alert("hello"); ' );BladeOneHtml允許修改所使用的標籤並為每個類別設定預設類別。
您可以使用下一個方法(僅選擇一個)為 Bootstrap 3/4/5 設定預設類別和標籤。
 // if true then it loads the css and js from a cdn into the css and jsbox so it requires @cssbox and @jsbox
$ blade -> useBootstrap5 ( true );
// if true then it loads the css and js from a cdn into the css and jsbox so it requires @cssbox and @jsbox
$ blade -> useBootstrap4 ( true );
// if true then it loads the css and js from a cdn into the css and jsbox so it requires @cssbox and @jsbox
$ blade -> useBootstrap3 ( true );
或者您可以建立自己的標籤和類
$ blade -> defaultClass [ $ tagname ]= ' default class ' ; $ blade -> pattern [ ' nametag ' ]= ' pattern ' ;其中名稱標籤可以如下所示
| 姓名 | 描述 | 例子 | 程式碼 |
|---|---|---|---|
| 名牌 | 它使用標籤使用時使用的模式 | 輸入 | {{pre}}<輸入{{內部}} >{{之間}}</輸入>{{post}} |
| 姓名標籤_空 | 如果內容(之間/文字)為空或未設定(自關閉標記),系統將使用此模式。如果未設置,則即使內容為空,系統也會使用名稱標籤 | 輸入_空 | {{pre}}<輸入{{inner}} />{{post}} |
| 名牌_項目 | 系統將此模式用於標籤 @item 和 @items | 選擇項目 | <選項{{內部}} >{{之間}}</選項> |
| 姓名標籤結束 | 當標籤必須關閉時,它使用此模式 | 表單結束 | </表格> |
| 多變的 | 解釋 | 逃脫 (*) |
|---|---|---|
| {{前}} | 標籤前的程式碼: pre <tag></tag> | 不 |
| {{郵政}} | 標籤後的代碼:<tag></tag> post | 不 |
| {{內}} | 標籤內的屬性:<tag inside ></tag> | 是的 |
| {{之間}} | 標籤之間的內容:<tag>之間</tag> | 預設情況下該值被轉義 但它可能無法逃脫 |
| {{ID}} | id 屬性(它也包含在 {{inner}} 中): < tag id > </tag> | 是的 |
| {{姓名}} | name 屬性(也包含在 {{inner}} 中): < tag name > </tag> | 是的 |
普通標籤的範例:
$ blade -> pattern [ ' input ' ]= ' {{pre}}<input{{inner}} >{{between}}</input>{{post}} ' ;注意:(*) 什麼是轉義的?例如文字“”,如果轉義,則顯示為“<hello>”
可以新增可在模式內使用的自訂屬性。
例如,讓我們新增名為customtag 的自訂標籤
 $ blade -> customAttr [ ' customtag ' ]= ' This attr is missing! ' ;
$ blade -> pattern [ ' alert ' ]= ' {{pre}}<div {{inner}}><h1>{{customtag}}</h1>{{between}}</div>{{post}} ' ;
並且在視圖中
@alert(text="hi there" class="alert-danger" customtag="it is a custom tag") < br >
@alert(text="hi there" class="alert-danger" ) < br > 該庫有一些可用於初始化和配置庫的方法。它們是可選的。
它將模式和類別設定為與 bootstrap 4 相容。
如果參數為 true,則它將 CSS 從 CDN 添加到css 框中
我們的程式碼
$ blade -> useBootstrap5 ( true ); < header >
@cssbox
</ header >它將模式和類別設定為與 bootstrap 4 相容。
如果參數為 true,則它將 CSS 從 CDN 添加到css 框中
我們的程式碼
$ blade -> useBootstrap4 ( true ); < header >
@cssbox
</ header >它將模式和類別設定為與 bootstrap 3 相容。
如果參數為 true,則它將 CSS 從 CDN 添加到css 框中
$ blade -> useBootstrap3 ( true ); 它將 CSS 添加到css 框中
$ this -> addCss ( ' css/datepicker.css ' , ' datepicker ' ); 它將 javascript 連結加入到js 框
$ this -> addJs ( ' <script src="js/jquery.js"></script> ' , ' jquery ' );它將 javascript 程式碼加入到js 框中
$ blade -> addJsCode ( ' alert("hello"); ' );它是該類別的公共字段列表。這些字段是公共的,因為出於性能目的(而不是使用 setter 和 getter)
它儲存代碼使用的模式列表
$ this -> pattern [ ' sometag ' ]= ' {{pre}}<tag {{inner}}>{{between}}</tag>{{post}} ' ;注意:請參閱「程式碼內的模式變數」以查看模式變數列表
新增到特定標籤的預設 CSS 類別。
$ this -> defaultClass [ ' sometag ' ]= ' classred classbackgroundblue ' ;它添加了一個自訂添加,它可以與 $this->pattern 一起使用
$ this -> customAttr [ ' customtag ' ]= ' XXXXX ' ; // So we could use the tag {{customtag}}. 'XXXXX' is the default value自訂屬性總是刪除引號和雙引號,因此如果我們的值為“hello”-> hello
可以透過擴充 PHP 類別來新增模式。
$this->pattern['mynewtag']='<mycustomtag {{inner}}>{{between}}</mycustomtag>';
您可以建立一個新的 PHP 類別或特徵並擴展我們的類別。在這個新結構中,您必須使用下一個結構來添加一個新方法
使用新類別
 use eftec  bladeone  BladeOne ;
use eftec  BladeOneHtml  BladeOneHtml ;

class MyBlade extends  BladeOne {
    use BladeOneHtml ;
}
class MyClass extends MyBlade {
    protected function compileMyNewTag ( $ expression ) { // the method must be called "compile" + your name of tag.
        $ args = $ this -> getArgs ( $ expression ); // it separates the values of the tags
        $ result = [ '' , '' , '' , '' ]; // inner, between, pre, post
        // your custom code here
        return $ this -> render ( $ args , ' mynewtag ' , $ result ); // we should indicate to use our pattern.
    }
}
使用trait(推薦,為什麼?因為trait比較靈活)
 trait MyTrait {
    protected function compileMyNewTag ( $ expression ) { // the method must be called "compile" + your name of tag.
        $ args = $ this -> getArgs ( $ expression ); // it separates the values of the tags
        $ result = [ '' , '' , '' , '' ]; // inner, between, pre, post
        // your custom code here
        return $ this -> render ( $ args , ' mynewtag ' , $ result ); // we should indicate to use our pattern.
    }
}

class MyClass extends  BladeOne {
    use BladeOneHtml ;
    use MyTrait; // <-- our trait
}要建立父方法,您必須在 $this->htmlItem 中推送一個新值。您可以儲存任何您想要的內容。
$ this -> pattern [ ' mynewtag ' ]= ' <mycustomtag {{inner}}>{{between}} ' ; protected function compileMyNewTag ( $ expression ) {
$ args = $ this -> getArgs ( $ expression ); // it loads and separates the arguments.
$ this -> htmlItem [] = [ ' type ' => ' mynewtag ' , ' value ' => @ $ args [ ' value ' ]
];
$ result = [ '' , '' , '' , '' ]; // inner, between, pre, post
//unset($args['value']); // we could unset values that we don't want to be rendered.
return $ this -> render ( $ args , ' select ' , $ result );
}我們的目標是渲染 PHP 程式碼,而不是評估程式碼。例如,如果 $args['somearg']=$variable,那麼無論變數的實際值是什麼,我們的值都是 $variable(作為文字)。
您還必須建立一個方法來結束容器,我們還必須新增一個新模式。
$ this -> pattern [ ' mynewtag_end ' ]= ' </mycustomtag> ' ; protected function compileEndNewTag () {
$ parent = @ array_pop ( $ this -> htmlItem ); // remove the element from the stack
if ( is_null ( $ parent ) || $ parent [ ' type ' ]!== ' newtag ' ) { // if no element in the stack or it's a wrong one then error
$ this -> showError ( " @endnewtag " , " Missing @initial tag " , true );
}
// our code
return $ this -> pattern [ $ parent [ ' type ' ] . ' _end ' ]; // renders the element of the stack
}我們的物品可以透過下一步操作知道它們是否在標籤內
$ parent = end ( $ this -> htmlItem );我們可以建立一個需要 CSS 和 JavaScript 的元件。
例如日期選擇器。
 protected function compileDatePicker ( $ expression ) {
	$ args = $ this -> getArgs ( $ expression ); // it loads and separates the arguments.
    array_push ( $ this -> htmlItem , [ ' type ' => ' mynewtag ' , ' value ' => @ $ args [ ' value ' ]]);
    $ result = [ '' , '' , '' , '' ]; // inner, between, pre, post
    if (! isset ( $ args [ ' id ' ])) {
        $ this -> showError ( " @datepicker " , " Missing @id tag " , true );
    }
    $ this -> addJs ( ' <script src="js/jquery.js"></script> ' , ' jquery ' ); // our script needs jquery (if it is not loaded)
    $ this -> addCss ( ' css/datepicker.css ' , ' datepicker ' );
    $ this -> addjscode ( ' $(. ' . $ args [ ' id ' ]. ' ).datepicker(); ' );

    //unset($args['value']); // we could unset values that we don't want to be rendered.
    return $ this -> render ( $ args , ' select ' , $ result );
}
注意:最好在我們的程式碼中新增一次 jQuery 庫和日期選擇器


