中國頂級通訊應用程式微信推出了一些相當激進的東西:小程式。嵌入式應用程式無需下載、無需安裝。打開、使用、分享,完成!
關於這些應用程式的實用性,存在著廣泛的爭論和許多點擊誘餌……事實上,向開發人員提供的框架僅處於起步階段,仍然有限,而且老實說有點令人沮喪。儘管如此,騰訊正在投入前所未有的資源來採用這一管道,積聚動力,並為先行者提供機會。我們相信,如果這些駭客敢於嘗試,他們可能會找到快速獲勝的方法。
您有想要盡快在微信中部署的服務的想法嗎?具備 Javascript 基礎並想嘗試這個框架嗎?迷失在文檔的Google翻譯中?需要一點小小的提升來解密什麼是可能的或不可能的嗎?您好,歡迎光臨。
透過官方文件找到方法並不容易。事實上,它需要大量的試驗/錯誤、對開源程式碼的一些研究以及許多假設才能完成某件事。你一直在用頭撞牆。我們明白了。
我們的使命是幫助創意企業家打造出色的科技產品。我們將協助您採取小步驟。
下面的內容不是文件的翻譯,肯定很快就會過時。我們的貢獻就是幫助任何人快速入門並建立一個很酷的微信小程式。現在就做吧。
您正在開發小程式嗎?如果您想分享您的工作、與我們的工作人員見面、尋求協助,請與我們聯絡!
如果您想做出貢獻,可以在此處發送 Pull Request 或在 shanghai(at)lewagon.com 上向我們留言尋求建議!
這篇原始文章是由 Le Wagon 校友 Adrien Pelegri(第 30 批)在 Thibault Genaitay(中國車手)和 Stephane Delgado(第 61 批)的支持下撰寫的。
註冊過程確實很困難,尤其是如果您對中國的行政世界沒有任何經驗的話。微信驗證過程會比較長。保持冷靜。
從微信小程式註冊,直到開發發布,基本上需要經歷以下步驟:
以下是註冊小程式公司所需的材料清單:
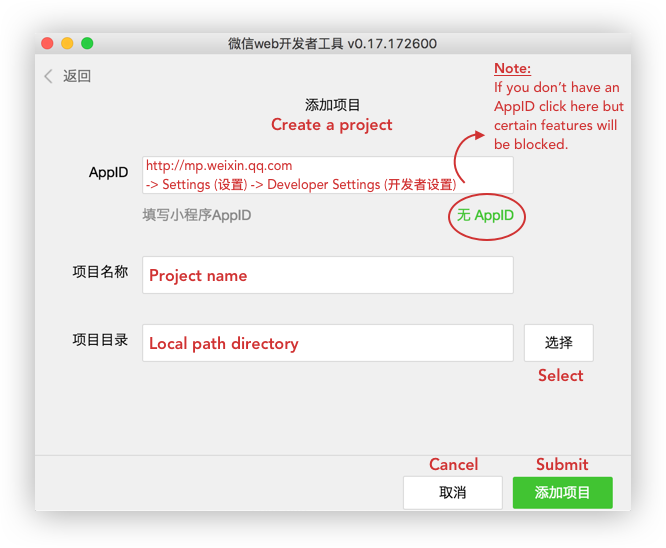
我們建議您按照這篇關於如何註冊和創建小程式專案的完整英文手冊:Medium 文章或查看此微信官方文件(最後更新:08/02/2017)。
IDE(整合開發環境)是一組用於編寫應用程式的程式設計工具。它由程式碼編輯器、編譯器和偵錯器組成,可透過單一圖形使用者介面存取。
在這裡下載微信IDE:Mac、Windows 64、Windows 32
這是一個快速教程,可幫助您掌握微信 IDE 並充分利用它。
程式碼編輯器,側面有文件樹,左側有模擬器,顯示應用程式的預覽。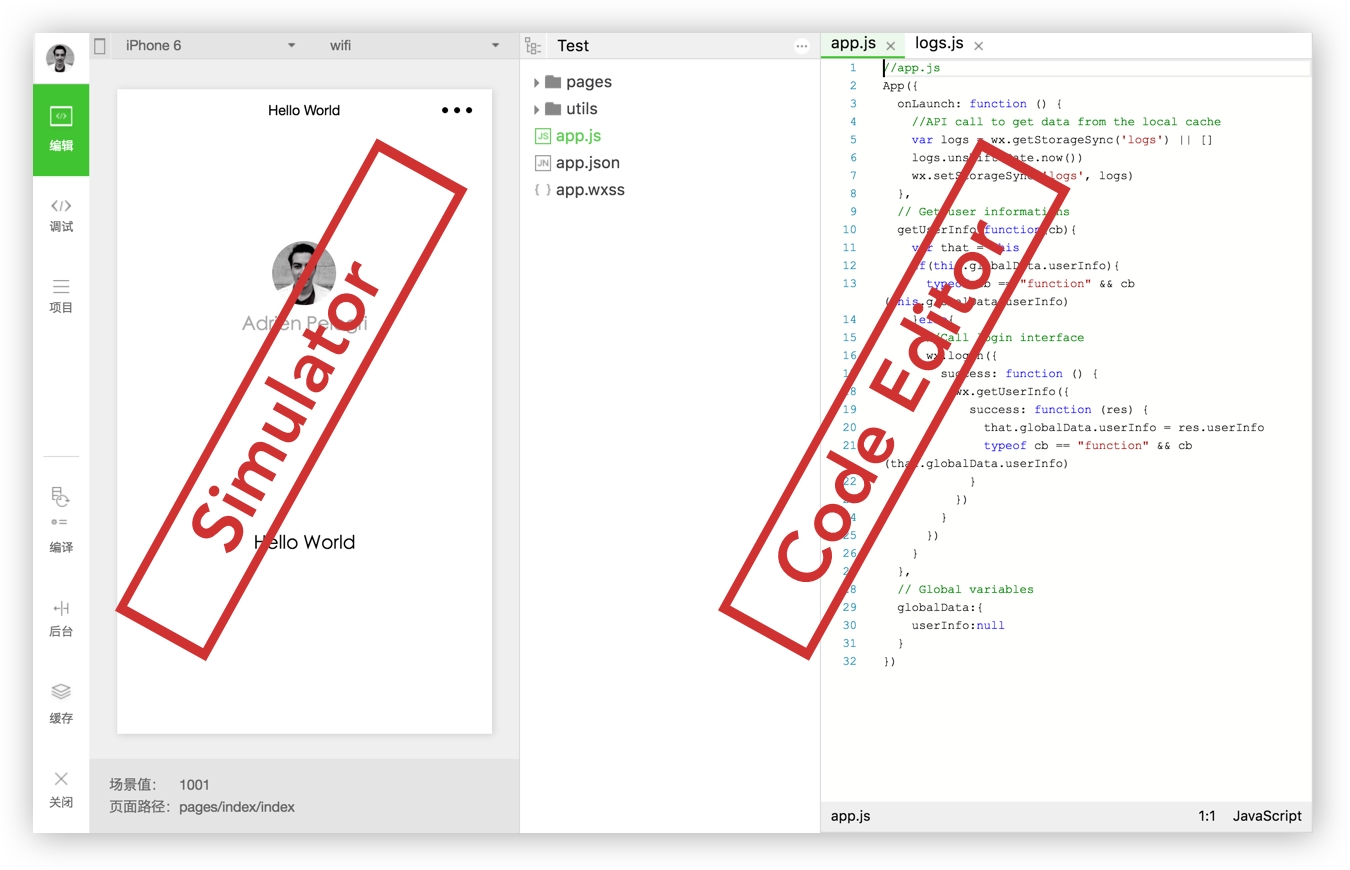
以下是在開發過程中執行任務的按鈕的完整清單:
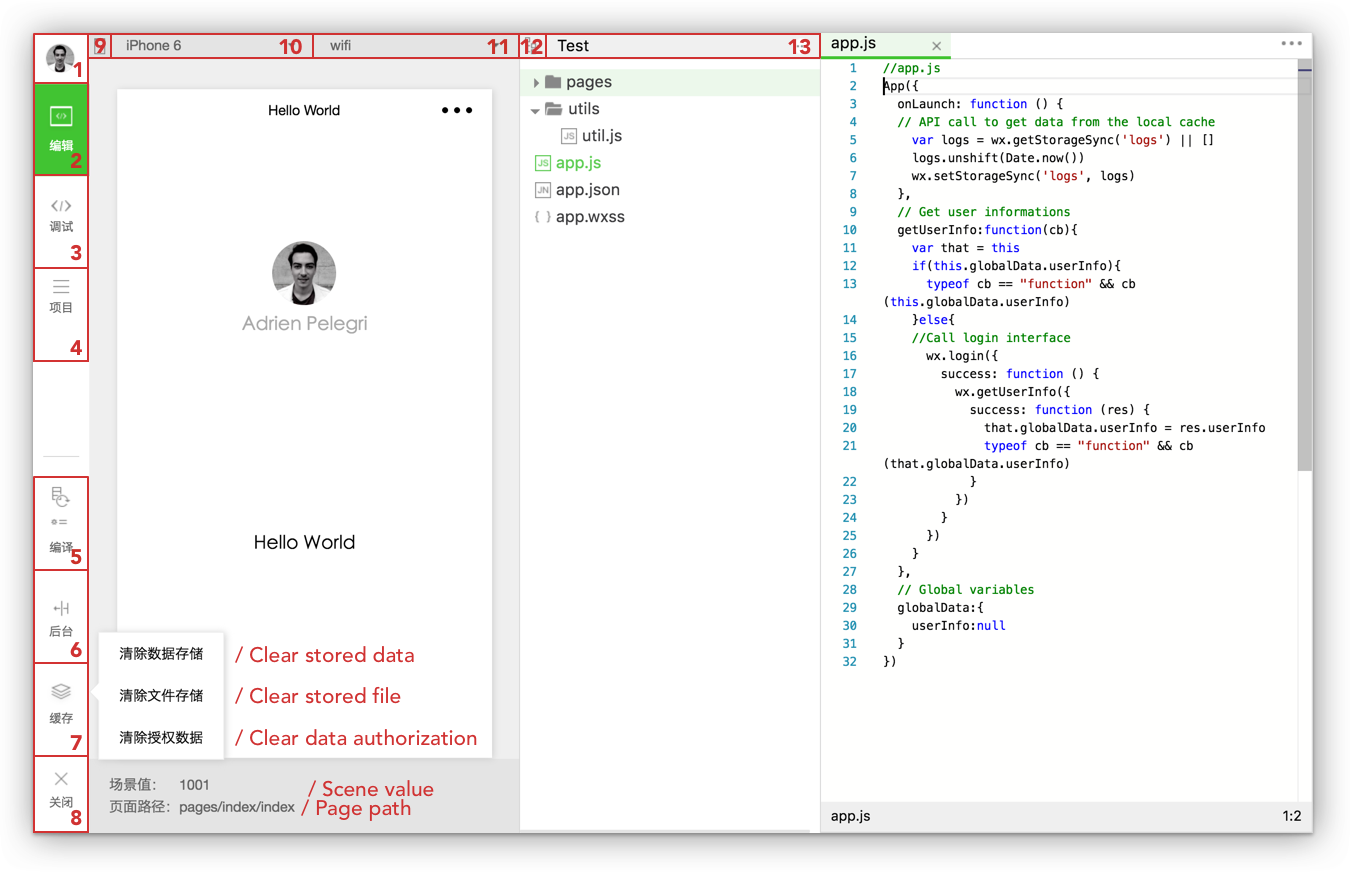
1. Profile:點選它可以從IDE中註銷。 2. 程式碼編輯3. 調試/檢查:見下文。 4、項目資訊:見下文。 5. 編譯器:當視圖的自動刷新不起作用時,可用於編譯應用程式。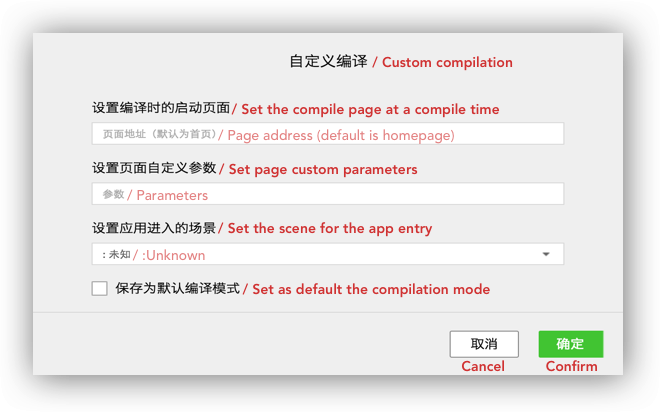
6. 場景值7. 快取8. 關閉:退出目前專案並轉到另一個專案。 9. 隱藏模擬器10. 設備:提供測試小程式回應能力的設備清單。 11.您可以使用: wifi、4G、3G、2G。 12. 隱藏樹狀結構13. 管理文件:搜尋、新增和刪除資料夾或檔案。
調試器/檢查器:這個工具是IDE的重要組成部分,它看起來像舊的Chrome DevTools 。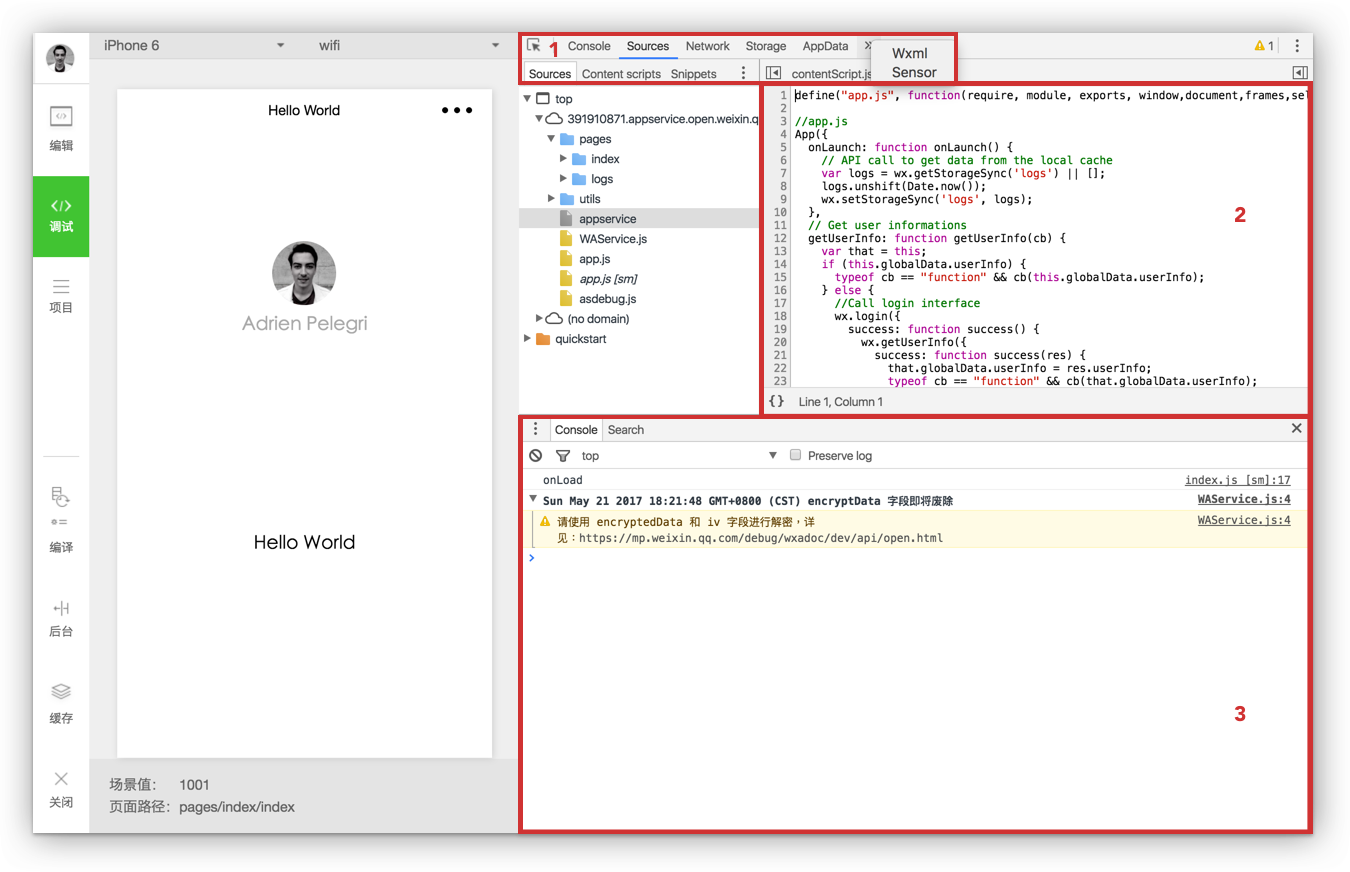
1. 頂欄網路:此面板用於調試請求和套接字問題或頁面載入效能。儲存:允許存取快取中的所有資料。 AppData:用於顯示目前項目資料。您可以直接在面板中編輯資料並預覽。 Wxml:讓您可以動態檢查和編輯頁面的每個元素。感測器:您可以模擬行動裝置的位置和性能來調試重力感應。
2. Sources 面板Sources 面板顯示目前專案腳本檔案。
3. 控制台控制台將透過記錄診斷資訊並與頁面中的 javascript 進行互動(如您放置的console.log() 等)來讓您了解程式碼中存在哪些錯誤。
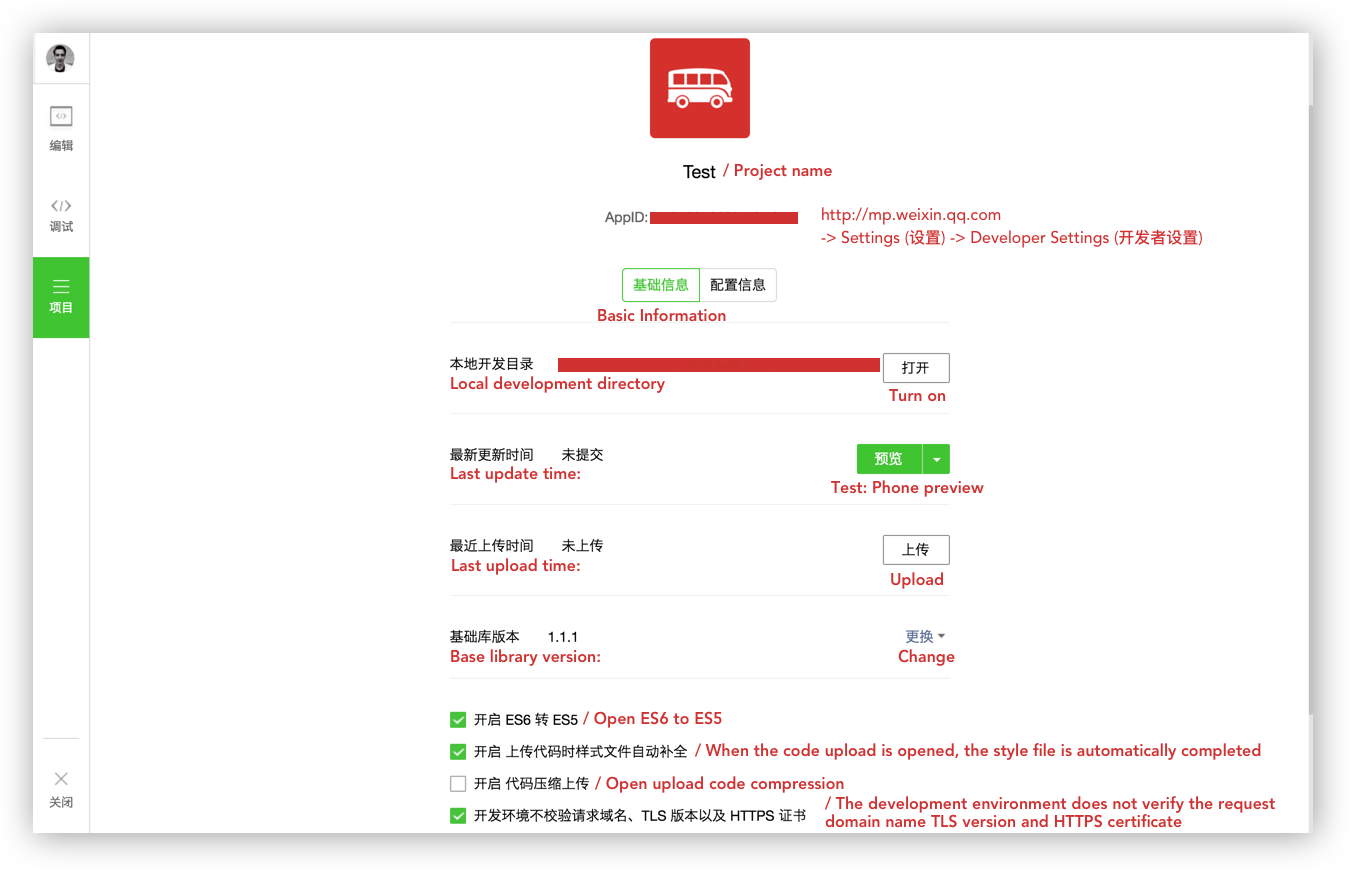
專案資訊:在此頁面中,您可以找到當前專案的詳細信息,例如您的 AppID、目錄資訊等。點擊預覽選項,您可以在掃描二維碼後直接在手機上測試小程式。
注意:當您在手機上測試小程式時,您可以直接在裝置上啟用偵錯器工具。
本節將介紹微信提供的「快速入門」的結構(樣板)以及遵守該框架所需的基礎知識。
下載微信快速入門.zip。
快速入門樹狀結構:
 。
├──應用程式.js
├──應用程式.json
├──應用程式.wxss
├──頁數
│ ├──索引
│ │ ├──index.js
│ │ ├──index.json
│ │ ├──index.wxml
│ │ └── 索引.wxss
│ └──日誌
│ ├── 日誌.js
│ ├── 日誌.json
│ ├── 日誌.wxml
│ └── 日誌.wxss
└──實用程式
    └── util.js
此樣板的索引頁面顯示一個歡迎頁面,其中包含目前使用者設定檔的資訊。點擊您的頭像將重定向到顯示您當前小程式日誌的新頁面。
微信小程式以「app」檔案開頭(見下圖)。這些檔案就是小程式的根目錄,也就是你的小程式的入口。 (這裡是微信官方文件)。
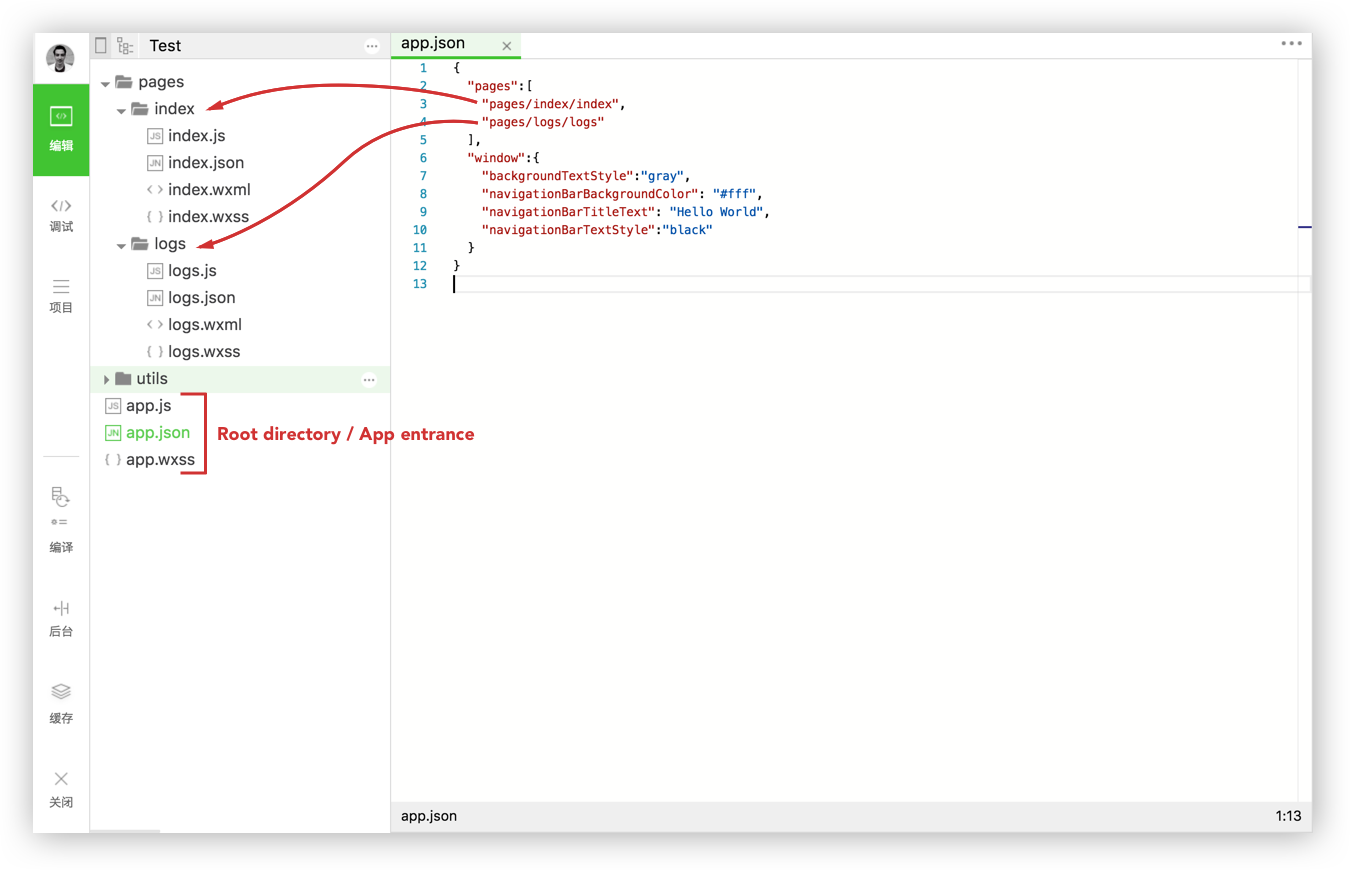 app.js是腳本程式碼,是小程式的全域邏輯。您可以設定和操作 MP 的生命週期函數、宣告全域變數或呼叫 API。
Code snippet of the "app.js" file.
 // app.js
App ( {
  onLaunch : function ( ) {
  // API call to get data from the local cache
    var logs = wx . getStorageSync ( 'logs' ) || [ ]
    logs . unshift ( Date . now ( ) )
    wx . setStorageSync ( 'logs' , logs )
  } ,
  // Get user information
  getUserInfo : function ( cb ) {
    var that = this
    if ( this . globalData . userInfo ) {
      typeof cb == "function" && cb ( this . globalData . userInfo )
    } else {
    // Call login interface
      wx . login ( {
        success : function ( ) {
          wx . getUserInfo ( {
            success : function ( res ) {
              that . globalData . userInfo = res . userInfo
              typeof cb == "function" && cb ( that . globalData . userInfo )
            }
          } )
        }
      } )
    }
  } ,
  // Global variable
  globalData : {
    userInfo : null
  }
} )app.json是整個小程式的全域配置。您可以設定MP(小程式)頁面的路徑、MP視窗樣式、設定網路逾時和偵錯配置。
Code snippet of the "app.json" file.
 {
  "pages" : [
    "pages/index/index" ,
    "pages/logs/logs"
  ] ,
  "window" : {
    "backgroundTextStyle" : "gray" ,
    "navigationBarBackgroundColor" : "#fff" ,
    "navigationBarTitleText" : "Hello World" ,
    "navigationBarTextStyle" : "black"
  }
}
注意: app.json檔案中不允許新增註解。
app.wxss是小程式的全域樣式表。您應該在此處聲明通用樣式規則。 號
微信快速入門的兩個頁面分別是:
Pages資料夾是您擁有或建立小程式頁面的位置。您創建的每個頁面都需要包含兩個文件:
您可以在創建的每個頁面中再新增兩個檔案:
用於頁面配置的.json檔案。
介面樣式表的.wxss檔。
規則:小程式的每個頁面可以由四種不同的檔案副檔名(js ; json ; wxml ; wxss)組成,但名稱必須相同。
更多詳細資訊:新頁面將始終至少包含一個.js檔案和一個.wxml檔案。 .json檔案副檔名僅用於您想要覆寫此特定頁面中的視窗配置的情況。如果您想為頁面新增樣式表,請新增.wxss 。
讓我們看看快速入門專案的每個頁面中發生了什麼。
Code snippet of the "index.js" file.
 // index.js
// Get application instance
var app = getApp ( )
Page ( {
  data : {
    motto : 'Hello World' ,
    userInfo : { }
  } ,
  // Event that redirect user to logs page
  Tapped : function ( ) {
    console . log ( "tapped" ) ;
    wx . navigateTo ( {
     url : '../logs/logs'
    } )
  } ,
  onLoad : function ( ) {
    console . log ( 'onLoad' )
    var that = this
    // Call the application instance to get data
    app . getUserInfo ( function ( userInfo ) {
      // Updates userInfo data
      that . setData ( {
        userInfo : userInfo
      } )
    } )
  }
} )
片段評論:
Page()函數中呼叫此應用程式實例來收集使用者資訊。Page()函數並設定data:將資料動態綁定到視圖。Tapped功能將當前使用者重新導向到他的日誌頁面。onLoad函數取得使用者資訊並更新userinfo資料。 Code snippet of the "logs.js" file.
 // logs.js
var util = require ( '../../utils/util.js' )
Page ( {
  data : {
    logs : [ ]
  } ,
  onLoad : function ( ) {
    console . log ( wx . getStorageSync ( 'logs' ) )
    this . setData ( {
      logs : ( wx . getStorageSync ( 'logs' ) || [ ] ) . map ( function ( log ) {
        return util . formatTime ( new Date ( log ) )
      } )
    } )
  }
} )
片段評論:
formatTime 。Page()函數並設定data: 。onLoad函數從快取中檢索目前使用者日誌wx.getStorageSync('logs') 。然後以util.js的 require 提供的formatTime呈現日誌。 Code snippet of the "utils.js" file.
 function formatTime ( date ) {
  var year = date . getFullYear ( )
  var month = date . getMonth ( ) + 1
  var day = date . getDate ( )

  var hour = date . getHours ( )
  var minute = date . getMinutes ( )
  var second = date . getSeconds ( )


  return [ year , month , day ] . map ( formatNumber ) . join ( '/' ) + ' ' + [ hour , minute , second ] . map ( formatNumber ) . join ( ':' )
}

function formatNumber ( n ) {
  n = n . toString ( )
  return n [ 1 ] ? n : '0' + n
}

module . exports = {
  formatTime : formatTime
}
筆記:
Utils 中儲存了您在其他地方可能需要的導入庫(在我們的範例中,log.js 中需要 util.js)。在上面的程式碼片段中, formatTime函數在util.js中定義,以正確顯示日誌的日期。
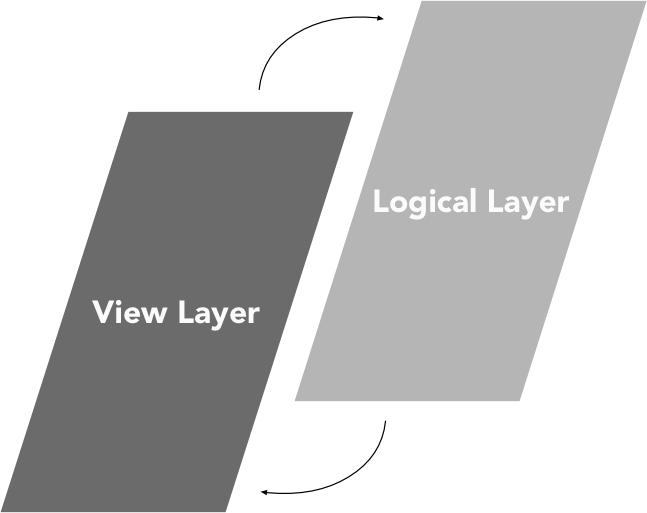
到目前為止,您已經發現每個頁面中有兩層:
邏輯層(.js):處理資料並傳送給視圖層,同時接收視圖層觸發的事件。
視圖層(.wxml/.wxss):將邏輯層處理後的資料顯示到視圖中,同時將視圖層的事件傳送給邏輯層。
我們可以把一個小程式的生命週期分解成兩個週期,應用週期和頁面週期。 App()生命週期是小程式的起點和終點,而Page()生命週期在使用者瀏覽小程式時啟動。
App()函數用於註冊小程式。它以一個物件作為參數,指定 MP 的生命週期函數。
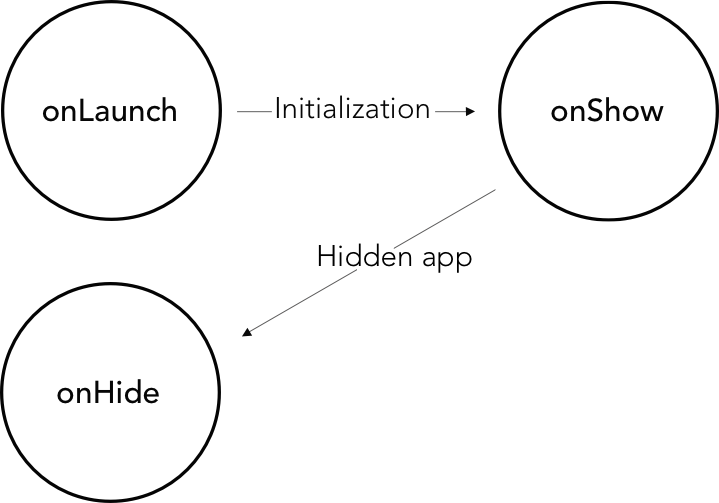
評論:
onLaunch函數並初始化MP。onShow函數。onHide函數在目前使用者退出小程式時觸發。 Code snippet of the "App()" life cycle functions.
 App ( {
  onLaunch : function ( ) {
    // Do something when launch.
  } ,
  onShow : function ( ) {
    // Do something when show.
  } ,
  onHide : function ( ) {
    // Do something when hide.
  } ,
  onError : function ( msg ) {
    console . log ( msg )
  } ,
  globalData : 'I am global data'
} )微信框架提供了一個名為getApp()全域函數,它是App()的一個實例。
Code snippet "getApp()" function.
 // .js
var appInstance = getApp ( )
console . log ( appInstance . globalData ) // I am global data getApp()函數很有用,原因很簡單,您無法在Page()函數內部定義App()函數。為了存取應用程式實例,您必須呼叫getApp()函數。
Page()函數用來註冊一個頁面。它接受一個物件作為參數,該參數指定頁面的初始資料、生命週期函數、事件處理程序等。
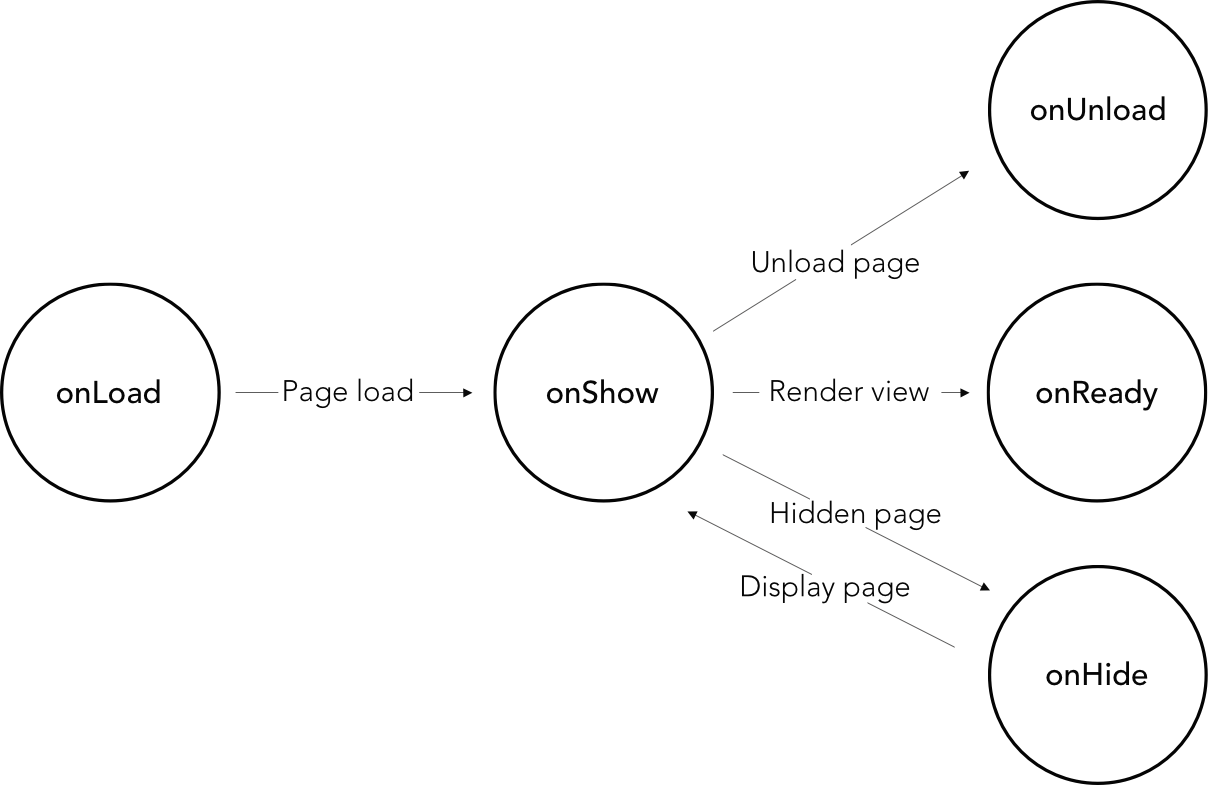
評論:
onLoad函數。onShow函數。onShow函數呼叫onReady來渲染視圖。onShow函數直接渲染視圖。onHide在小程式跳到其他頁面時觸發。wx.redirectTo()和wx.navigateBack()退出頁面時,將會呼叫onUnload函數。或噹噹前頁面重新啟動時, wx.reLaunch 。 Code snippet of "Page()" life cycle functions.
 Page ( {
  data : {
    text : "This is page data."
  } ,
  onLoad : function ( options ) {
    // Do some initializations when page load.
  } ,
  onReady : function ( ) {
    // Do something when page ready.
  } ,
  onShow : function ( ) {
    // Do something when page show.
  } ,
  onHide : function ( ) {
    // Do something when page hide.
  } ,
  onUnload : function ( ) {
    // Do something when page close.
  } ,
  // Event handler
  viewTap : function ( ) {
    this . setData ( {
      text : 'Set some data.'
    } )
  }
} )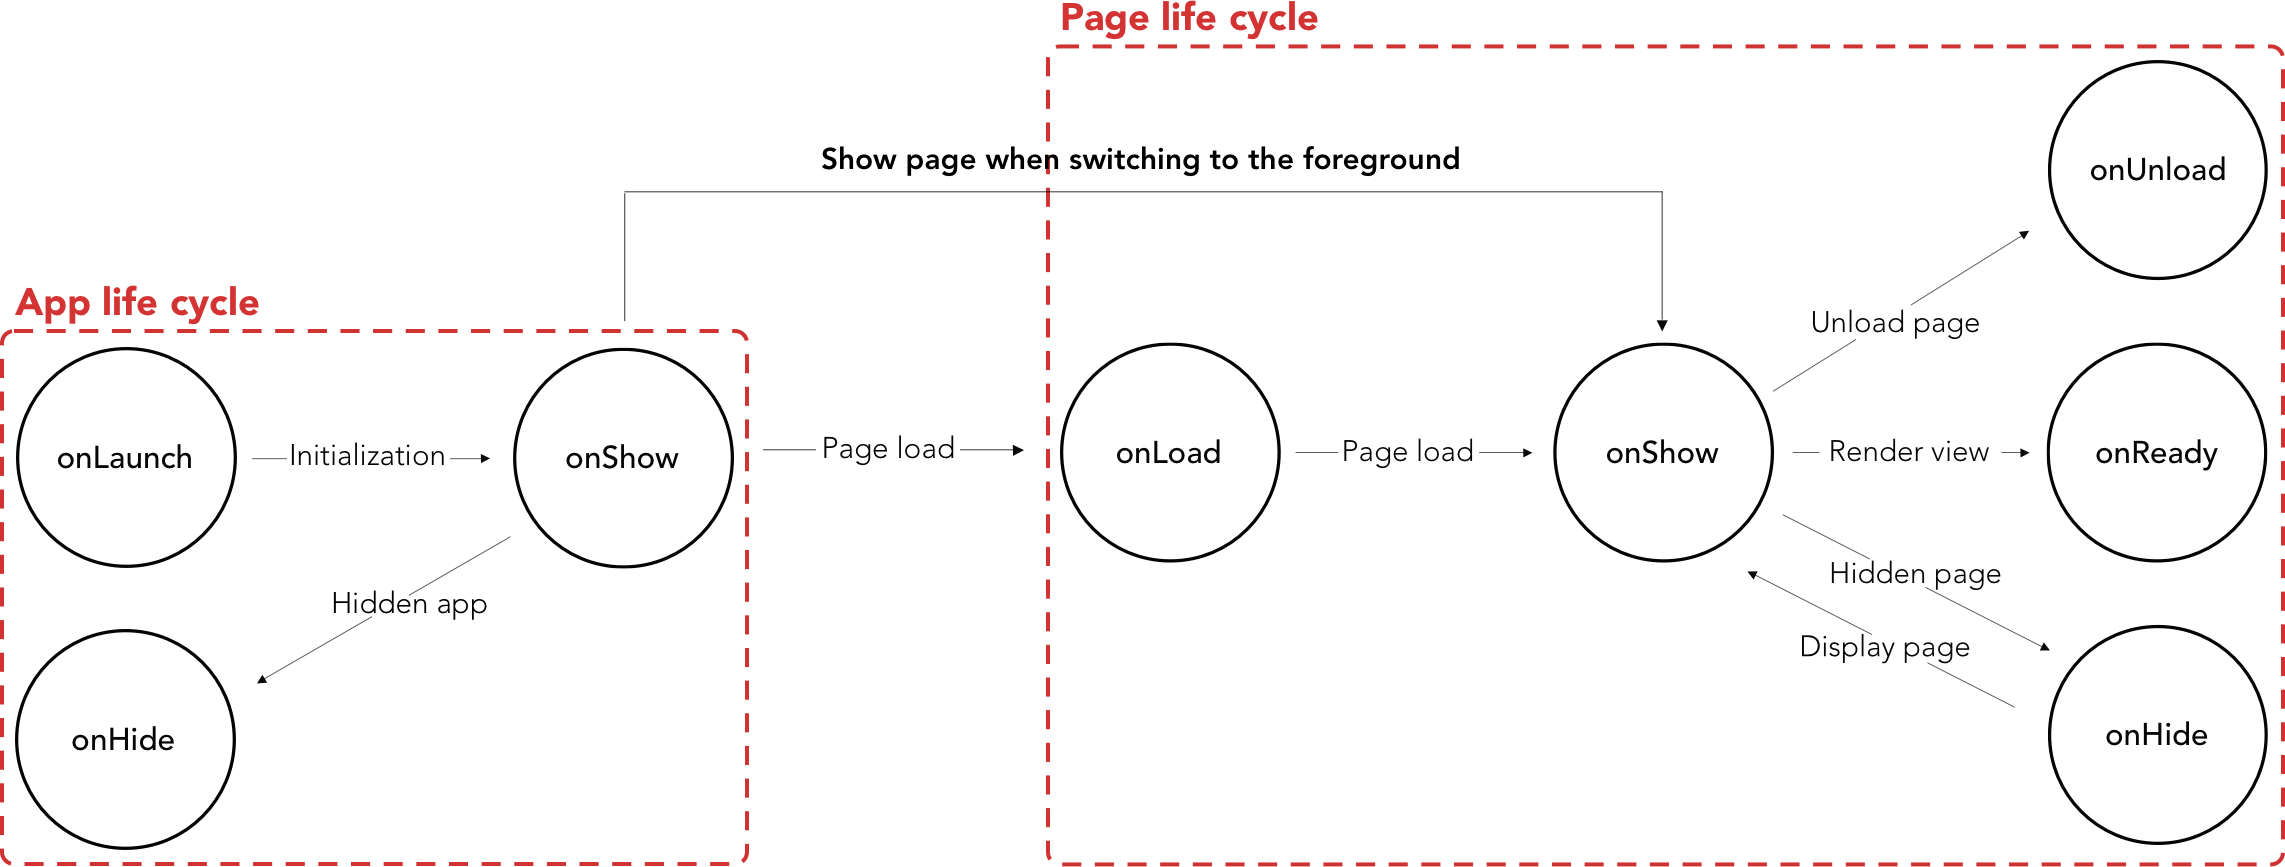
當App()生命週期完成後,頁面第一次透過呼叫onLoad加載,並且只會呼叫一次。
小程式從後台(app生命週期)運行到前台(頁面生命週期)時,首先呼叫App() onShow函數,切換到前台時再呼叫Page() onShow函數。
微信推薦:
App()函數不能重複使用,應在app.js中註冊一次。getCurrentPages()頁面尚未產生時,請勿呼叫onLaunch 。getApp()您可以獲得App() 的實例,但生命週期函數不會嘗試呼叫App()函數。 小程式的設定非常簡單,旨在為您節省時間並在有客製化需求時減少挫折感。
微信將app.json配置分為五個部分:
在這一部分中,我們將分解這個完整的app.json 設定範例。
Code snippet "app.json complete setup" example
 {
  "pages" : [
    "pages/index/index" ,
    "pages/form/form" ,
    "pages/wagon/wagon" ,
  ] ,
  "window" : {
    "navigationBarBackgroundColor" : "#D03232" ,
    "navigationBarTextStyle" : "white" ,
    "navigationBarTitleText" : "Le Wagon" ,
    "backgroundColor" : "#eeeeee" ,
    "backgroundTextStyle" : "light" ,
    "enablePullDownRefresh" : true
  } ,
  "tabBar" : {
    "backgroundColor" : "#FFFFFE" ,
    "borderStyle" : "#D3D3D3" ,
    "selectedColor" : "#D03232" ,
    "color" : "#131313" ,
    "list" : [ {
      "pagePath" : "pages/index/index" ,
      "iconPath" : "image/form.png" ,
      "selectedIconPath" : "image/form-hover.png" ,
      "text" : "Form"
    } , {
      "pagePath" : "pages/wagon/wagon" ,
      "iconPath" : "image/about.png" ,
      "selectedIconPath" : "image/about-hover.png" ,
      "text" : "About"
    } ]
  }
}app.json中pages作用是定義小程式的所有路由。該項目的配置是強制性的,它需要一個字串陣列。父頁面資料夾中的每個子資料夾和檔案都對應一個路由路徑。
Code snippet of the "app.json" file.
 {
  "pages" : [
    "pages/index/index" ,
    "pages/form/form" ,
    "pages/wagon/wagon"
  ]
}提示:每次新增路由路徑到"pages"時,IDE 都會自動建立與您剛剛建立的路徑對應的資料夾和檔案。
微信框架帶來了幾個路由邏輯:

路由模式說明:
初始化:小程式啟動後,透過onLoad和onShow函數載入第一頁。
開啟新頁面:開啟新頁面會隱藏目前頁面並使用wx.navigateTo跳到另一個頁面。在幕後,第一個頁面將透過呼叫onHide函數隱藏,並透過呼叫onLoad和onShow跳過另一個頁面。 
頁面重定向:透過呼叫onUnload關閉目前頁面,並使用wx.redirectTo跳到應用程式內的頁面,呼叫onLoad和onShow函數。
頁面返回: onUnload目前頁面,呼叫onLoad函數,然後呼叫onShow顯示目標頁面。
重新加載, wx.reLaunch :關閉所有頁面並重新加載當前頁面。 *不適用於某些 andriod 設備。
切換選項卡, wx.switchTab :從一個 tabBar 頁面跳到另一個頁面,並透過onUnload、onHide 和 onShow關閉或隱藏所有其他非 tabBar 頁面。發現選項卡切換的所有可能場景。
切換標籤、導航限制:
微信推薦:
navigateTo 、 redirectTo只能開啟非 tabBar 頁面。 - switchTab只能開啟並顯示tabBar頁面。 - reLaunch可用於每個頁面。 getCurrentPages() :此函數用於取得目前頁面堆疊的實例。它以頁面堆疊順序的數組形式給出。數組的第一項是第一頁,最後一項是目前頁。
tabBar顧名思義,是配置頂部或底部標籤欄的項目。 tabBar是一個數組,最多可容納 2 個選項卡,最多可容納 5 個選項卡。
Code snippet of the "app.json" file.
 {
"tabBar" : {
    "backgroundColor" : "#FFFFFE" ,
    "borderStyle" : "#D3D3D3" ,
    "selectedColor" : "#D03232" ,
    "color" : "#131313" ,
    "list" : [ {
      "pagePath" : "pages/index/index" ,
      "iconPath" : "image/form.png" ,
      "selectedIconPath" : "image/form-hover.png" ,
      "text" : "Form"
     } , {
      "pagePath" : "pages/wagon/wagon" ,
      "iconPath" : "image/about.png" ,
      "selectedIconPath" : "image/about-hover.png" ,
      "text" : "About"
    } ]
  }
}
屬性指示:
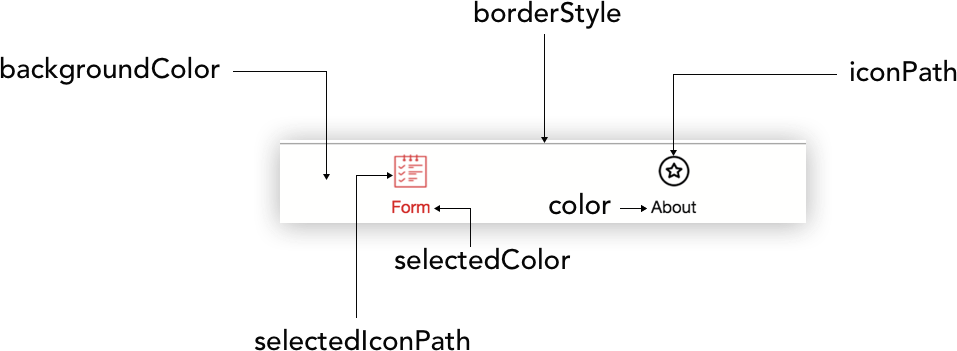
使用tabBar list鍵,需要數組的每個元素中都有一個物件。
List屬性值如下:

TabBar屬性說明: 
微信推薦:
tabBar位置設定為頂部無法顯示圖示。tabBar中的圖示大小限制為 40kb、81px*81px。視窗項目用於設定小程式標題和常用視窗樣式。
Code snippet of the "app.json" file.
 "window" : {
   "navigationBarBackgroundColor" : "#D03232" ,
   "navigationBarTextStyle" : "white" ,
   "navigationBarTitleText" : "Le Wagon" ,
   "backgroundColor" : "#eeeeee" ,
   "backgroundTextStyle" : "light" ,
   "enablePullDownRefresh" : true ,
  }
視窗屬性說明:
| 屬性 | 類型 | 預設值 | 描述 |
|---|---|---|---|
| 導覽列背景顏色 | 十六進位顏色 | #000000 | 導覽列背景顏色 |
| 導覽列文字樣式 | 細繩 | white | 導覽列標題顏色, black或white |
| 導覽列標題文本 | 細繩 | 導覽列標題 | |
| 導航樣式 | 細繩 | default | 導覽列樣式, default或custom 。使用custom自訂導覽列樣式。 |
| 背景色 | 十六進位顏色 | #ffffff | 應用程式背景顏色。例如:您在拉動刷新時看到的背景顏色不會影響<page>元素的顏色。 |
| 背景文字樣式 | 細繩 | dark | 拉動刷新文字樣式, dark或light |
| 背景顏色頂部 | 細繩 | #ffffff | 視窗頂部的背景顏色。僅支援 iOS |
| 背景顏色底部 | 細繩 | #ffffff | 視窗底部的背景顏色。僅支援 iOS |
| 啟用下拉刷新 | 布林值 | false | 啟用或停用拉動以刷新應用程式範圍。 |
| 到達底部距離時 | 數位 | 50 | 設定與頁面底部的距離,應觸發onReachBottom()回呼。 |
| 頁面方向 | 細繩 | portrait | 設定螢幕旋轉支援。支援auto 、 portrait和landscape 。 |
可以使用app.json設定檔中window中的pageOrientation來設定應用程式預設方向。此屬性支援 3 個值:
auto可讓小程式在縱向和橫向模式下運作。portrait ,強制小程式僅豎屏顯示landscape ,強制小程式僅橫向顯示需要在全域app.json中如上設定"enablePullDownRefresh": true ,然後才能在小程式頁面呼叫onPullDownRefresh() 。
Code snippet of the "Enable pull down refresh in a page" file.
 // .js
Page ( {
  // Pull down the trigger event
  onPullDownRefresh ( ) {
    // Stop the dropdown refresh
    wx . stopPullDownRefresh ( )
  }
} ) 微信提供了更改每個頁面頂部導覽列標題的可能性。
Code snippet of the "change navbar title" file.
 // .js
Page ( {
  // Loading spinner when page loads
  onload : function ( ) {
   wx . showNavigationBarLoading ( )
  } ,
  // Change navigation bar title
  onShow : function ( ) {
   wx . setNavigationBarTitle ( {
    title : 'My new navabar title' ,
    success : function ( res ) {
      console . log ( res )
    }
   } )
  }
} )網路超時可以在各種網路請求中提供。如果您想進一步了解,這裡是微信文件的連結。
這是微信文件的連結。
WXML是一種類似HTML的微信標記語言。它結合了基本的元件庫和事件系統來建立動態頁面。
微信事件系統的行為類似經典的 Javascript 事件,處理對視圖層的邏輯回應。
下表列出了 WXML / HTML 開發中將面臨的顯著差異:

關於<block>進一步解釋:
<block>不是一個元件,它只是一個包裝元素,它不會在頁面中做任何渲染,只接受控制項屬性。
注意:所有組件和屬性均為小寫。
小程式框架不允許開發者使用DOM來控制你的WXML元素。相反,您將透過資料綁定方法更新視圖層(.wxml 檔案):

為了符合微信的要求, data屬性必須在Page()函數中以 JSON 格式初始化。資料綁定技術允許在視圖層內動態更新資料。
一個好的做法是在Page()函數頂部初始化data 。
Code snippet "data binding" example.
 <!-- .wxml -->
< view > {{text}} </ view >
< view > {{array[0].msg}} </ view >
// .js
Page ( {
data : {
text : 'init data' ,
array : [ { msg : '1' } , { msg : '2' } ]
}
}傳遞給視圖層的動態data:取自對應Page()函數中的資料屬性。
資料綁定語法:資料綁定使用 Mustache 語法(雙括號)來包裝變數。此語法為無邏輯模板引擎分析。總之非常方便好用!
微信提供了很多關於資料綁定使用的可能性。您有機會在元件屬性、屬性、字串操作、算術操作、資料路徑和陣列上使用資料綁定。
wx:for項屬性綁定邏輯層(.js 檔案)中的數組,循環遍歷它並分配資料。
Code snippet "wx:for" example.
 <!-- .wxml -->
< view wx:for =" {{array}} " >
  {{index}}: {{item.message}}
</ view >
// .js
Page ( {
data : {
array : [ {
message : 'foo'
} , {
message : 'bar'
} ]
}
} )與<view wx:for>類似,您可以使用<block wx:for>來渲染多行區塊。 (請參閱上面 WXML 表中的區塊)。
Code snippet "block wx:for" example.
 <!-- .wxml -->
< block wx:for =" {{array}} " wx:for-item =" array-item " wx:key =" key " >
  < view class =" card " >
    < view class =" card-description " >
    </ view >
  </ view >
</ block >
有關上述程式碼的更多詳細信息,請參閱此 Github 儲存庫。
更多資源:
與wx:for類似, wx:if用於定義條件語句並決定是否應該渲染區塊。
Code snippet "wx:if" example.
 <!-- .wxml -->
<!-- Add additional conditions wx:elif ; wx:else -->
< view wx:if =" {{length > 5}} " > 1 </ view >
< view wx:elif =" {{length > 2}} " > 2 </ view >
< view wx:else > 3 </ view >
// .js
Page ( {
data : {
length : 10
}
} )如果您想要在條件語句區塊中顯示多個標籤,您可以使用<block wx:if> 。
 <!-- .wxml -->
< block wx:if =" {{true}} " >
 < view > view1 </ view >
 < view > view2 </ view >
</ block >進一步挖掘wx:if微信文件。
範本允許定義您想要在小程式的不同檔案中重複使用多次的程式碼片段。
WXML模板項目有自己的作用域,只能使用資料傳入。
首先,要聲明模板,您需要定義其名稱。
Code snippet "template" example.
 <!-- .wxml -->
< template name =" msgItem " >
  < view >
    < text > {{index}}: {{msg}} </ text >
    < text > Time: {{time}} </ text >
  </ view >
</ template >

<!-- Call the template -->
< template is =" msgItem " data =" {{item}} " />稍後,如果您想在同一文件中呼叫模板,請使用is屬性和模板名稱作為值來聲明所需的模板。並且不要忘記使用data屬性將資料傳遞到模板。
 // .js
Page ( {
  data : {
    item : {
      index : 0 ,
      msg : 'this is a template' ,
      time : '2017-05-18'
    }
  }
} ) 要聲明已在新文件中定義的模板,您首先需要匯入它。
Code snippet "define a template in a specific file" exemple
 <!-- item.wxml -->
< template name =" item " >
  < text > {{text}} </ text >
</ template >
Code snippet "import and call the template in index.wxml" exemple
 <!-- index.wxml -->
< import src =" item.wxml " />
< template is =" item " data =" {{text: 'forbar'}} " />
有關微信文檔的更多詳細信息,請參見此處。
除了資料初始化和生命週期函數之外,該框架還允許定義事件處理函數。
WXML 元素(事件處理程序)觸發事件,邏輯層綁定事件處理程序以接收事件物件作為參數。
Code snippet "event handler" example.
 <!-- .wxml -->
< button type =" primary " bindtap =" add " > Incrementation: {{count}} </ button >
// .js
Page ( {
data : {
count : 1
} ,
add : function ( e ) {
this . setData ( {
count : this . data . count + 1
} )
}
} ) setData() :此函數更新邏輯層內的數據,然後將其傳送到視圖層。 setData()函數接收一個物件作為參數,並使用this.data作為資料路徑來更新鍵值。
綁定事件有很多種,大多數元件都有自己的綁定事件定義。
組件綁定事件:
bindsubmit表單。bindinput用於輸入。bindscroll用於滾動視圖。 Code snippet "form binding event" example.
 <!-- form.wxml -->
< form bindsubmit =" bindFormSubmit " >
  <!-- Form inputs -->
  < button type =" primary " form-type =" submit " > Submit </ button >
</ form >
// form.js
// Form submission function
Page ( {
bindFormSubmit : function ( e ) {
// Treatment
}
} )經典綁定事件:
bind+event_typecatch+event_type Code snippet "data binding illustration" example.
< button bindtap =" ontap " type =" primary " > Tap < button /> Page ( {
ontap : function ( ) {
console . log ( 'tap' ) ;
}
} )使用的兩個常見綁定事件是bind+event_type和catch+event_type 。 catch 事件是防止冒泡事件的事件。
冒泡事件概念:對於非 JavaScript 人員來說,當嵌套在另一個元素中的元素中發生事件時,可以定義冒泡事件。父節點和巢狀元素都註冊為該特定事件的事件處理程序。巢狀元素的父節點應該使用catch+event_type ,這將阻止事件冒泡到祖先元素。
Code snippet "counteract bubbling effect with catchtap" example.
 <!-- .wxml -->
< view id =" outter " bindtap =" handleTap1 " >
  outer view
  < view id =" middle " catchtap =" handleTap2 " >
    middle view
    < view id =" inner " bindtap =" handleTap3 " >
      inner view
    </ view >
  </ view >
</ view >
// .js
Page ( {
handleTap1 : function ( e ) {
console . log ( 'outter' )
} ,
handleTap3 : function ( e ) {
console . log ( 'inner' )
} ,
handleTap2 : function ( e ) {
console . log ( 'middle' )
}
} )主要用於巢狀元素並且不想顯示綁定元素的父節點時。

Code snippet "tap and longtap event binding" example.
 <!-- index.wxml -->
< button bindtap =" ontap " type =" primary " > Tap < button />
< button bindlongtap =" onlongtap " type =" primary " > Long tap < button />
// index.js
Page ( {
ontap : function ( ) {
console . log ( 'tap' ) ;
} ,
onlongtap : function ( ) {
console . log ( 'longtap' ) ;
}
} )以下是實現小程式分享的實用技巧。微信開放了兩種分享小程式的方式:
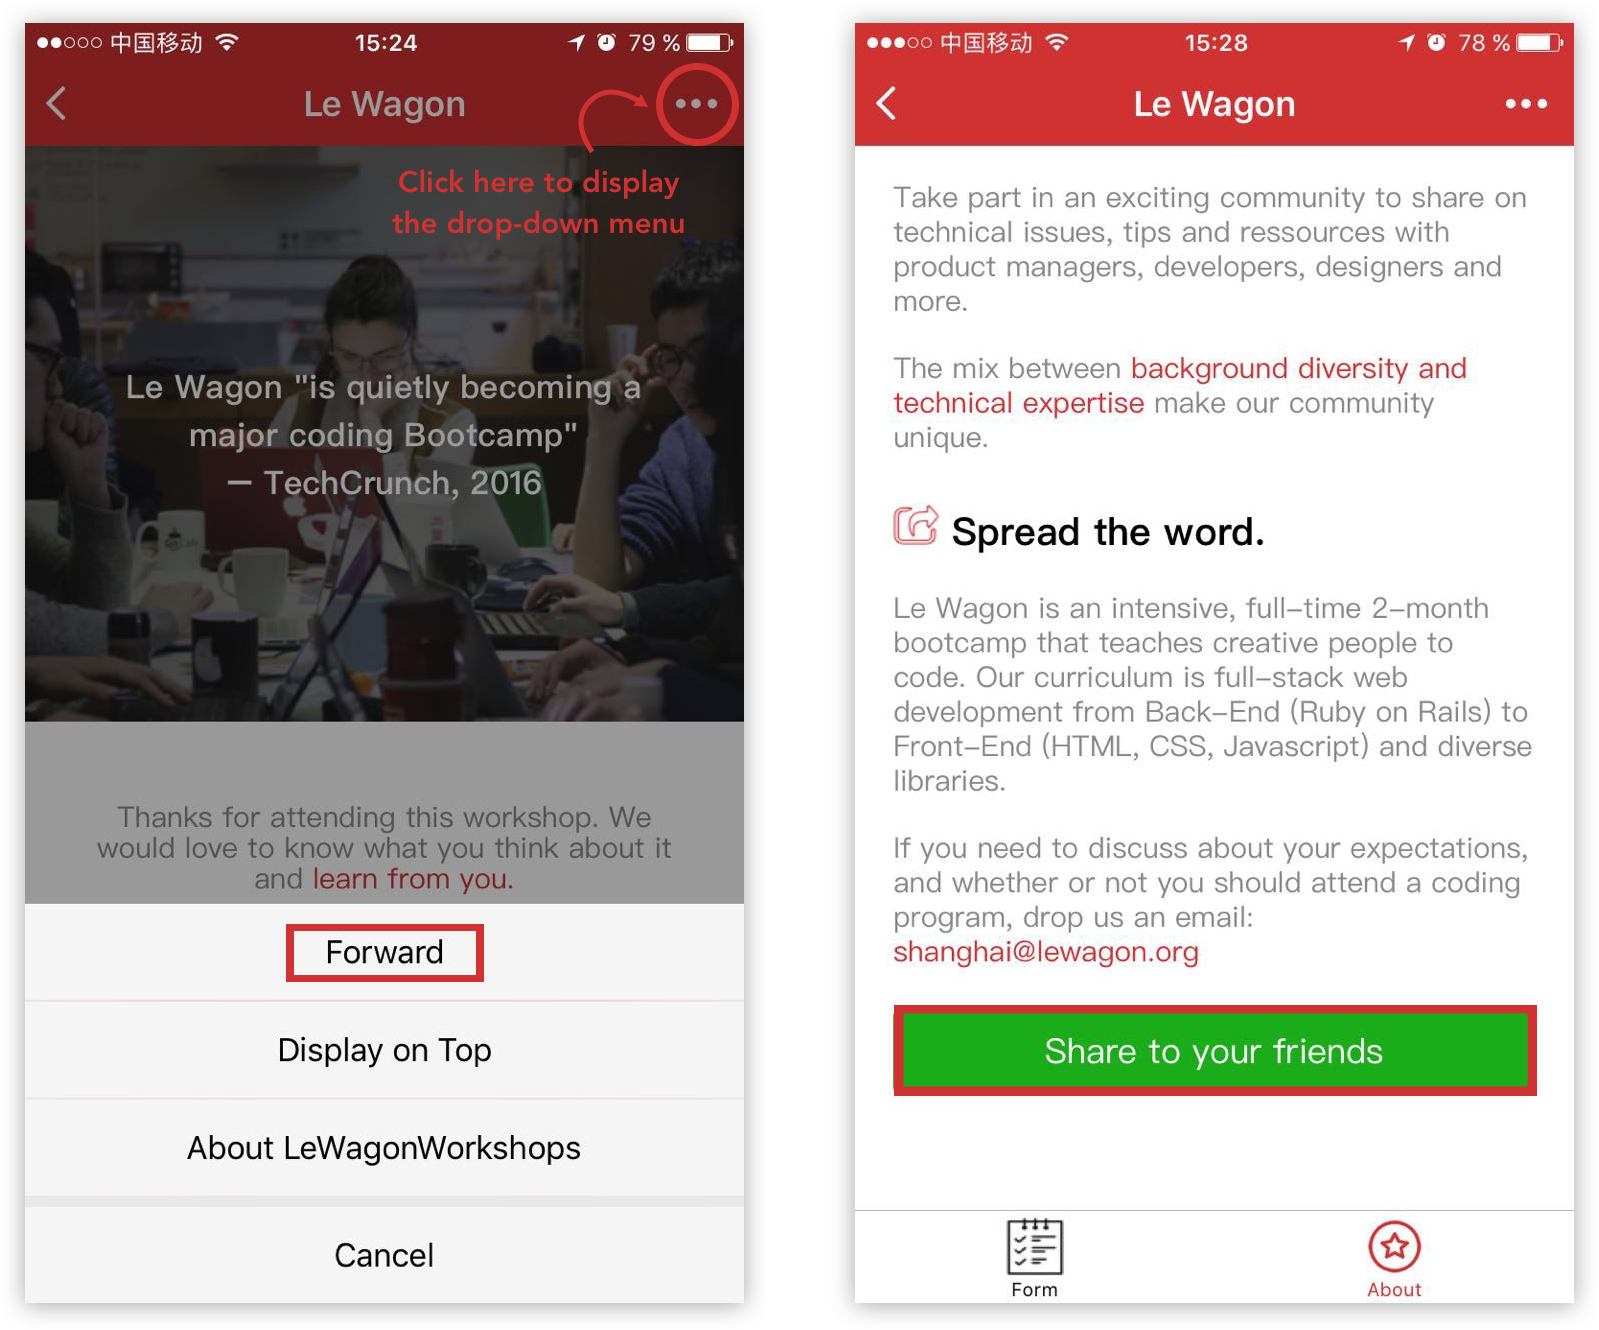
可以在點擊頁面右上角...出現的下拉式選單中啟用前進按鈕。
在小程式頁面中建立一個前進按鈕。它使共享過程更加用戶友好。
在這兩種變體中,框架都會自動轉發帶有 MP 標題螢幕截圖的小程式卡。
要啟用此按鈕,我們需要使用名為onShareAppMessage的Page()函數。
Code snippet "Enable the forward button of the drop-down menu" example.
 // index.js
onShareAppMessage : function ( ) {
    return {
      title : 'Le Wagon coding school' ,
      path : 'pages/index/index'
    }
} ,在此功能中,您必須定義將顯示在轉發卡頂部和目前頁面路徑的標題。如果您忘記新增標題,微信會預設新增一個(您的小程式名稱)。
限制:在這種情況下,您唯一可以定義的是onShareAppMessage事件。前進按鈕將由框架本身創建。
此功能允許開發人員使用按鈕屬性open-type及其值'share'在頁面內建立特定的前進按鈕。
Code snippet "Create a forward button within the page" example.
 <!-- about.wxml -->
< view bindtap =" onShareAppMessage " >
 < button class =" share-btn " open-type =" share " type =" primary " > Share </ button >
</ view >與第一種情況不同,我們必須建立觸發onShareAppMessage函數的事件處理程序。此函數呼叫wx.showShareMenu並傳遞withShareTicket作為參數。
 // about.js
Page ( {
  onShareAppMessage : function ( ) {
    console . log ( 'share' )
    wx . showShareMenu ( {
     withShareTicket : true
    } )
  }
} )注意:兩種變體都使用Page()函數,這表示您正在共用聲明該函數的特定頁面。
微信旨在打造友善、高效、一致的使用者體驗。為了實現這一目標,微信官方設計團隊提供了WeUI儲存庫。這個基礎前端函式庫(WeUI)與微信原生視覺體驗一致。 WeUI,可以理解為微信前端函式庫,類似Bootstrap 。它包括大量組件,例如按鈕、單元格、對話框、進度、toast、文章、操作表、圖標等。
有用的 Github 儲存庫:
透過npm將 WeUI 儲存庫下載到本機:
npm install weui-wxss
下載的程式碼包含WeUI原始碼和基於WeUI的小程式範例。
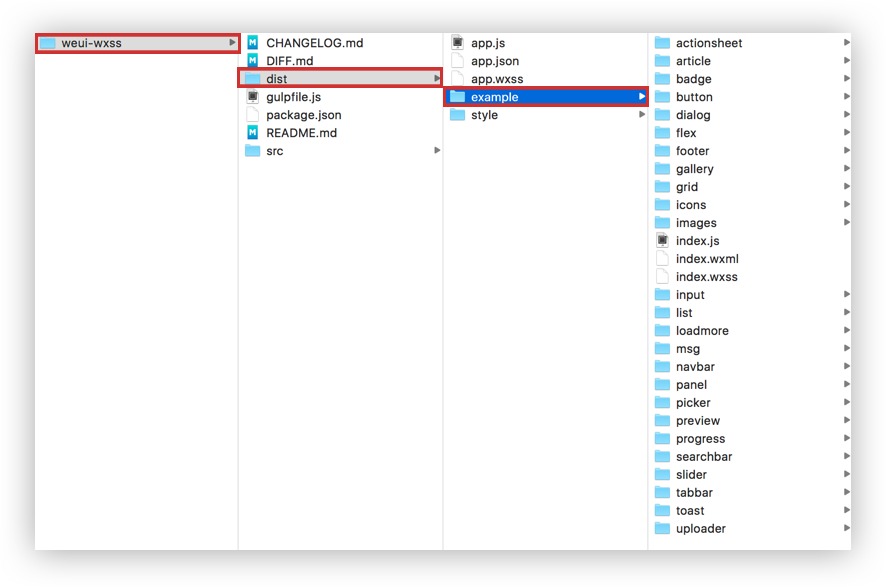
我們在微信IDE中開啟WeUI小程式範例:
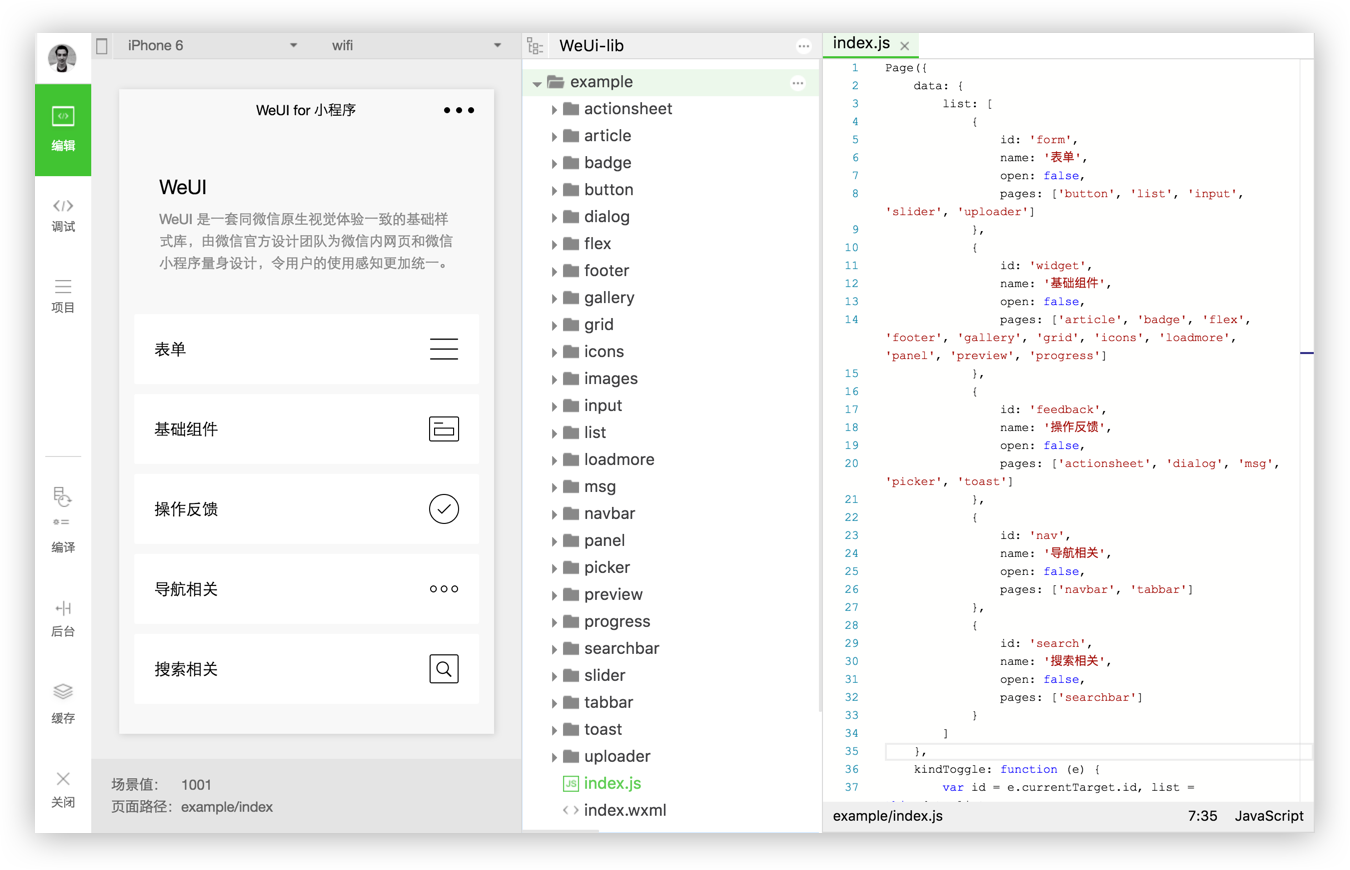
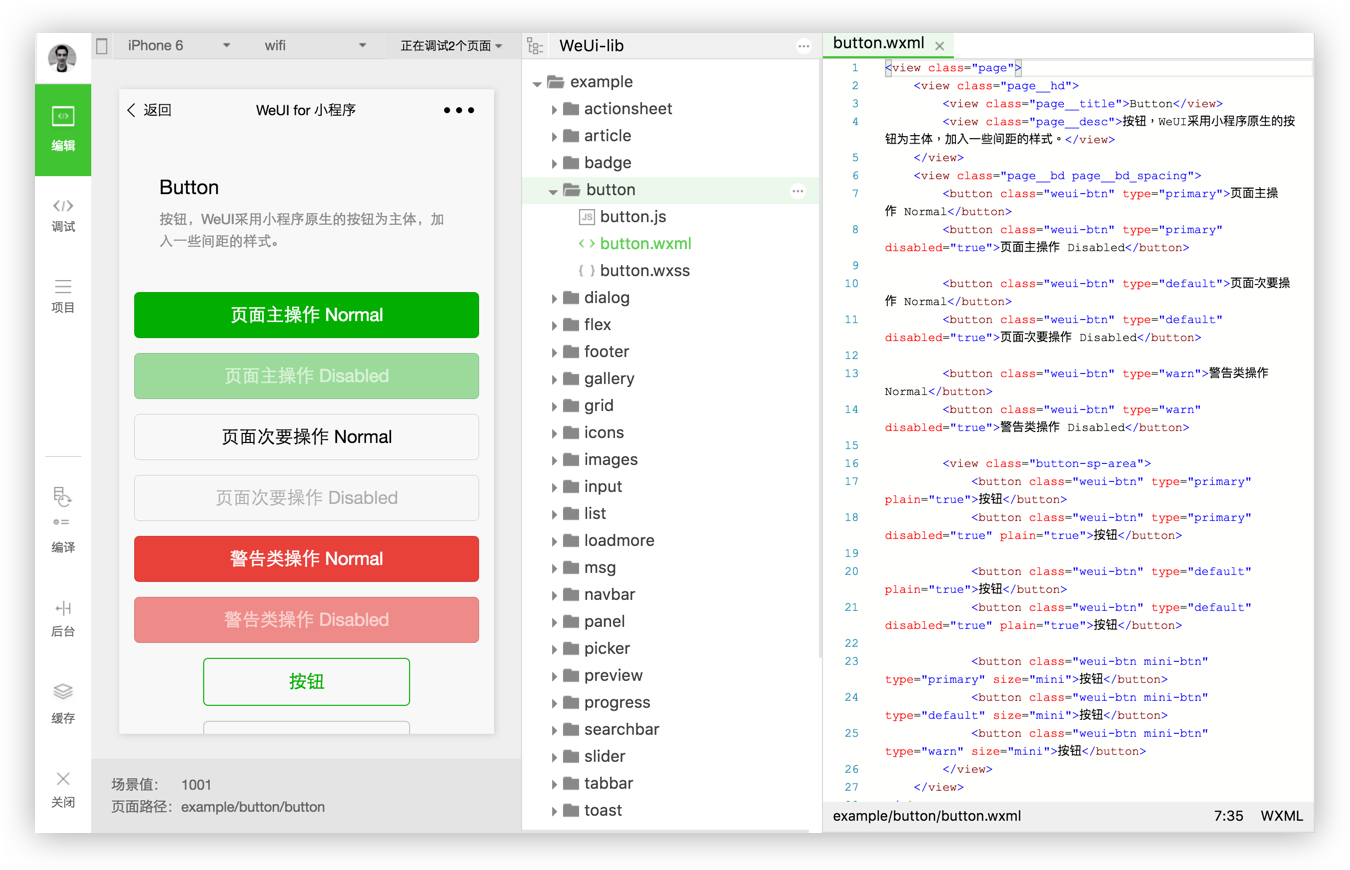
在app.wxss中匯入WeUI風格,即可在小程式中使用WeUI風格:
@import "style/weui.wxss" ;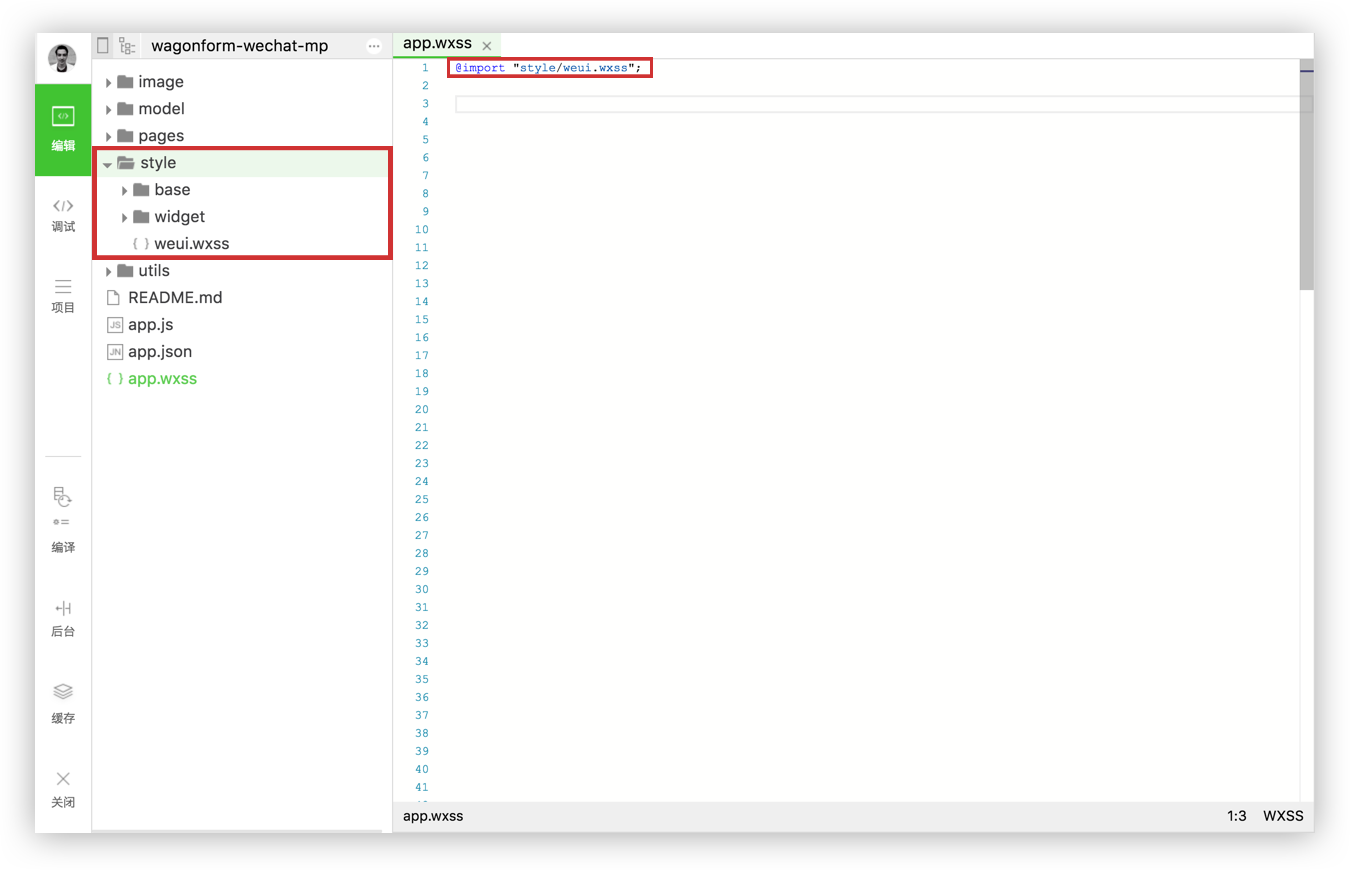
有關微信設計指南的更多詳細信息,您可以在此處找到完整文件。
WXSS 幾乎具有 CSS 的所有功能。 app.wxss中定義的樣式表是每個頁面上標識的通用樣式規則。特定頁面中定義的樣式表是本機樣式,僅作用於目前頁面,因此會覆寫app.wxss中使用的相同選擇器。 WXSS與CSS相比有兩個主要差異:
WXSS使用rpx (響應像素)作為單位。它允許根據螢幕的寬度調整像素。您可以繼續使用經典的px單位(只是不是微信的做事方式)。 (1rpx = 0.5px ; 1px = 2rpx)
若要匯入出站樣式表,請使用@import語句,後面接著相對路徑和;在聲明的末尾。
Code snippet "@import" example.
 /* app.wxss*/
@import "outbound.wxss" ;微信框架無法支援許多標準CSS選擇器,例如級聯選擇器。
支援的選擇器:

微信推薦:
微信框架為開發者提供了大量的基礎元件,詳盡的元件清單在這裡。
<navigator>是 html 中的錨點。它用於從一個頁面連結到另一個頁面。 navigator 元素最重要的屬性是open-type 。
Code snippet "navigator" example.
 <!-- .wxml -->
< view class =" btn-area " >
  < navigator url =" /pages/index/index " hover-class =" navigator-hover " > text </ navigator >
  < navigator url =" /pages/form/form " open-type =" redirect " hover-class =" other-navigator-hover " > text </ navigator >
  < navigator url =" /pages/index/index " open-type =" switchTab " hover-class =" other-navigator-hover " > tab switching </ navigator >
</ view >
導航器屬性說明:

Open 類型值說明:

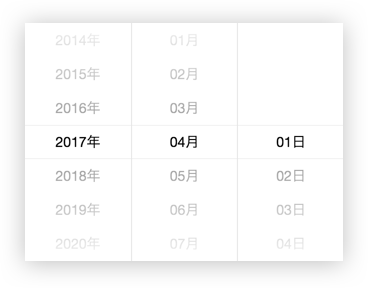
微信文件中的 Picker 元件分為三個選擇器,預設的經典選擇器,時間選擇器和日期選擇器。
下面的用例是基於日期選擇器,但另一個選擇器的邏輯保持不變。
Code snippet "date picker" example.
 <!-- .wxml -->
< picker mode =" date " value =" {{date}} " start =" 2015-09-01 " end =" 2020-09-01 " bindchange =" bindDateChange " >
  < view class =" picker " >
    Now the date is {{date}}
 </ view >
</ picker >
// .js
Page ( {
data : {
date : '2017-05-20'
} ,
bindDateChange : function ( e ) {
this . setData ( {
date : e . detail . value
} )
}
} )日期選擇器屬性:

開關是一種具有兩種狀態(開啟和關閉)的視覺切換。
 號
號
Code snippet "switch" example.
 <!-- .wxml -->
< view class =" body-view " >
  < switch checked bindchange =" switch1Change " />
  < switch bindchange =" switch2Change " />
</ view >
// .js
Page ( {
switch1Change : function ( e ) {
console . log ( 'switch1 a change event occurs with the value' , e . detail . value )
} ,
switch2Change : function ( e ) {
console . log ( 'switch2 a change event occurs with the value' , e . detail . value )
}
} )切換屬性:

Toast 是一種非模態元素,用於顯示簡短和自動過期的元件以通知使用者。

在下面的程式碼片段中,我們偽造了一個表單提交來展示 Toast 的工作和顯示方式。
Code snippet "spinner btn and toast" example.
 <!-- .wxml -->
< form bindsubmit =" bindFormSubmit " >
 < button type =" primary " form-type =" submit " loading =" {{loading}} " > Send </ button >
</ form >在上面的程式碼片段中,我們建立了一個動態按鈕,其目的是提交表單。當您單擊按鈕時,載入微調器會為該按鈕提供動畫效果。

然後我們使用wx.showToast API 顯示一個 toast 來通知使用者。
 Page ( {
  data : {
    loading : false
  } ,
  bindFormSubmit : function ( e ) {
    // Enable loading animation on send btn
    this . setData ( {
      loading : ! this . data . loading
    } )
    // Loading toast
    wx . showToast ( {
      title : 'Sending...' ,
      icon : 'loading' ,
      duration : 1500
    } )
  }
} )模態框允許在頁面上覆蓋一個小元素。模式框的主要好處是它們避免了使用傳統視窗彈出視窗或頁面重新載入的需要。
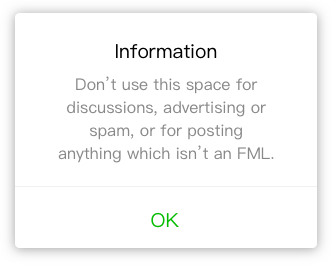
模態框常用的情境類別有五種:
Code snippet "modal to inform" example.
 wx . showModal ( {
   title : 'Modal title' ,
   content : 'Modal content ' ,
   confirmText : "Ok" ,
   showCancel : false ,
   success : function ( res ) {
      console . log ( 'success' )
   }
 } )
模態參數:

map元件是一個原生元件,它有很長的屬性列表,我們將介紹主要的屬性。這裡是微信文檔鏈接,了解更多詳情。
map屬性列表:

Code snippet "map component" example.
< map id =" map " longitude =" 113.324520 " latitude =" 23.099994 " scale =" 14 " controls =" {{controls}} " bindcontroltap =" controltap " markers =" {{markers}} " bindmarkertap =" markertap " polyline =" {{polyline}} " bindregionchange =" regionchange " show-location style =" width: 100%; height: 300px; " > </ map >如果您想了解微信透過 API 提供的基於位置的服務,請參閱 wiki 的基於位置的服務部分。
微信推薦:
wx.getLocation需要指定type為gcj02 本節旨在解釋如果您想要保留應用程式資料並在資料庫中取得數據,則必須遵循的不同步驟。我們選擇 Leancloud.cn 是因為它對於初學者來說安裝簡單。
首先介紹一些背景資訊:下面的範例基於一個小程序,旨在透過簡單的表單收集回饋。該小程式保存了Leancloud.cn上收集的數據。我們將解釋如何取得和顯示儲存在資料庫上的資料。為了說明第二部分(獲取資料),我們建立了一個新頁面,顯示 Leancloud 上儲存的所有評論。
以下是用於建立本教學的專案的 Github 儲存庫。
規格:
Code snippet "create a form" example.
 <!-- pages/form/form.wxml -->
< form bindsubmit =" bindFormSubmit " >
  < view > About the workshop </ view >
  < view > Generally how was this workshop? </ view >
  < text > Hints: takeaway, speed, time, location, people... </ text >
  < view >
   < textarea name =" review " maxlength =" -1 " />
  </ view >
  <!-- Refer to the Github repository above if you want the complete form -->
  < button type =" primary " form-type =" submit " > Send </ button >
</ form >當如上所述建立表單的結構後,接下來我們需要建立由表單提交觸發的事件。
 //pages/form/form.js
Page ( {
  data : {
    loading : false ,
  } ,
  // Form Submission
  bindFormSubmit : function ( e ) {
    // Local storage
    var review = e . detail . value . review
    // ...
  }
} )本機儲存:在bindFormSubmit函數中,我們將使用者的輸入分配給本機變量,目的是測試是否可以在本機收集表單的使用者輸入。
在開始安裝之前,如果您正在開發,請透過檢查微信 IDE 中專案介面的最後一個複選框將您的網域列入白名單。對於特定的調試需求,您可以遵循這個 Leancloud 教程。
要開始 Leancloud 設置,請先在 Leancloud 上建立一個帳戶。
現在您已準備好在小程式中安裝和初始化 Leancloud,您可以按照他們的文件進行操作,該文件將讓您完成兩個步驟的過程:
appId和appKey來初始化應用程式。 // app.js
// Require Leancloud library (the av-weapp-min.js file you just add).
const AV = require ( './utils/av-weapp-min.js' ) ;
// Initialization of the app
AV . init ( {
appId : 't6hUVJfOwjHuWXuD9OE06rxxxxxxxxxxxx' ,
appKey : 'HndT17mJ7wAIxsv8uxxxxxxxxxx' ,
} ) ;如果您迷路了,請參閱該專案的 Github 儲存庫。
首先,建立一個名為model 的新資料夾,並將form.js檔案新增至該資料夾。根據您想要保留的物件類型(在本例中為表單)命名您的檔案。此步驟不是必需的,但可以讓您的文件井井有條。
讓我們建立物件:在剛剛建立的form.js檔案中,需要您在util.js中安裝的av-weapp-min.js並將其指派給AV常數。然後實例化Form物件。
Code snippet "require Leancloud and create an object" example.
 // model/form.js
const AV = require ( '../utils/av-weapp-min.js' ) ;
class Form extends AV . Object {
}
// Register object
AV . Object . register ( Form , 'Form' ) ;

// Export object
module . exports = Form ;現在您已經實例化了Form對象,接下來建立表單物件以將資料封裝在邏輯層(此處為 form.js),並在表單提交後重定向使用者。
Code snippet "bindFormSubmit function" example.
 const AV = require ( '../../utils/av-weapp-min.js' ) ;
const form = require ( '../../model/form.js' ) ;

// pages/form/form.js
bindFormSubmit: function ( e ) {
   // Local storage
   console . log ( e )
   var review = e . detail . value . review
  // ...

   // Leancloud permissions
   var acl = new AV . ACL ( ) ;
   acl . setPublicReadAccess ( true ) ;
   acl . setPublicWriteAccess ( true ) ;

   // Leancloud storage
   setTimeout ( function ( ) {
     new Form ( {
       review : review
       // ...
     } ) . setACL ( acl ) . save ( ) . catch ( console . error ) ;

    // Redirect user
    wx . reLaunch ( {
      url : '/pages/wagon/wagon?form=1'
    } ) ;
    } , 2000 ) ;
  }
} )
程式碼片段報告:
binFormSubmit函數中,我們新增了權限,允許 Leancloud讀取和寫入我們建立的並希望保留的物件。setTimeout ,它將資料封裝在新的Form物件中,並在提交表單時重定向使用者。注意: setACL(acl)是 Leancloud 的內建屬性。
到目前為止,一切都在您的小程式中完成,剩下要做的就是對 Leancloud 儀表板中收集的資料進行投影。
Form類別),在此專案中建立一個表格。測試它以確保收集的資料持續存在於LeanCloud儀表板中。
首先,讓我提醒您本節的背景。我們想在新頁面中顯示我們在LeanCloud上收集和堅持的評論清單。我認為您遵循了本教程的第一部分(如果您錯過的話,請參見上文)。
規格:
review的新頁面。因此,讓我們建立一個新的評論頁面和一個重定向到查看頁面的按鈕。 (提示:只需將路由路徑新增至您的app.json ,框架將建立新的頁面資料夾和檔案)。
 <!-- index.wxml -->
<!-- CTA redirects to review page -->
< view class =" cta-margin " >
 < navigator url =" /pages/review/review " class =" btn-index " > Reviews </ navigator >
</ view >下一步是獲取儲存在LeanCloud上的資料並顯示它。
Code snippet "fetch data stored on Leancloud and displays it" example.
 <!-- review.wxml -->
< block wx:for =" {{forms}} " wx:for-item =" form " wx:key =" objectId " >
 < text data-id =" {{form.objectId}} " >
  {{form.review}}
 </ text >
 < text >
  - {{form.name}}
 </ text >
</ block >在上面,我們使用WX創建了一個列表渲染塊wx:for顯示創建評論的人的每個評論和名稱。
 // pages/review/review.js
// Require leancloud and object
const AV = require ( '../../utils/av-weapp-min.js' ) ;
const Form = require ( '../../model/form.js' ) ;

// Fetch data from Leancloud
Page ( {
  data : {
    forms : { }
  } ,
  onReady : function ( ) {
    new AV . Query ( 'Form' )
      . descending ( 'createdAt' )
      . find ( )
      . then ( forms => this . setData ( { forms } ) )
      . catch ( console . error ) ;
  } ,
} )
程式碼片段報告:
AV物件進行查詢。forms陣列來完成。在這種情況下,我們剛剛看到瞭如何儲存我們本地收集到LeanCloud的資料以及如何從LeanCloud獲取資料。
我們建議您閱讀LeanCloud文件或檢查Github儲存庫LeanCloud創建的LeanTodo迷你程式。
當您正在生產時,您必須在微信平台中配置LeanCloud域名。遵循本LeanCloud教程。
您可以透過wx.getUserInfo存取的所有使用者資訊:
 wx . getUserInfo ( {
  success : function ( res ) {
    var userInfo = res . userInfo
    var nickName = userInfo . nickName
    var avatarUrl = userInfo . avatarUrl
    var gender = userInfo . gender //sex => 0: unknown ; 1: male ; 2:female
    var province = userInfo . province
    var city = userInfo . city
    var country = userInfo . country
  }
} )
微信「 Quickstart」(微信樣板)為您在app.js檔案中提供了一個getUserInfo函數。顧名思義,此功能旨在獲取用戶資訊。讓我們逐步瀏覽此功能。
一般說明:
getUserInfo函數有一個參數CB ,這也是一個函數。globalData的userInfo不是null, If傳遞getUserInfo函數的IF區塊。userInfo為null, getUserInfo函數呼叫登入介面。 // app.js
App ( {
getUserInfo : function ( cb ) {
var that = this
if ( this . globalData . userInfo ) {
typeof cb == "function" && cb ( this . globalData . userInfo )
} else {
// Login interface call
wx . login ( {
success : function ( ) {
wx . getUserInfo ( {
success : function ( res ) {
that . globalData . userInfo = res . userInfo
typeof cb == "function" && cb ( that . globalData . userInfo )
}
} )
}
} )
}
} ,
globalData : {
userInfo : null
}
} )第一種情況, userInfo表單globalData不是null
IF條件語句旨在確定是否傳遞CB參數以取得getUserInfo是一種函數類型,如果是函數類型,則它將通過userInfo 。
他們如何決定CB參數是否為函數?
 // index.js
var app = getApp ( )
Page ( {
  data : {
    userInfo : { } ,
  } ,
  onLoad : function ( ) {
    console . log ( 'onLoad' )
    var that = this
    app . getUserInfo ( function ( userInfo ) {
      that . setData ( {
        userInfo : userInfo
      } )
    } )
  }
}讓我們瀏覽index.js的onLoad功能
onLoad函數在應用程式實例上呼叫getUserInfo函數。userInfo更新為目前使用者資訊的參數。userInfo更新到app.js檔案中的globalData 。第二種情況,UserInfo為null
userInfo為null getUserInfo函數,將傳回呼叫登入介面的else語句。getUserInfo被稱為並充當我們上面看到的if區塊。如果目前使用者已經登錄,則將使用者資訊透過index.js頁面指派給onLaod函數的globalData頁面。然後應用相同的邏輯。
微信小程式在其API中具有緩存機制。實際上,每個微型程式都有自己的本地快取儲存。
提醒:快取儲存用於儲存我們想要快速存取的資料。它減少了用戶的等待時間,因為與用於請求您的資料庫的原始伺服器相比,本地高速緩存可以滿足該請求的滿足。
快取儲存提供兩種將資料儲存在快取中的方法:
wx.setStorage : wx . setStorage ( { key : 'name' , data : 'Thibault' } ) ; wx.setStorage參數作為JSON,是指定儲存的金鑰和資料以指定要儲存的鍵值的鍵。
wx.setStorageSync : wx . setStorageSync ( 'name' , 'Thibault' ) ; wx.setStorageSync語法比較簡單,參數直接傳遞。並且可以透過傳入的回呼功能來取得資料。
微信在緩存上提供了三個主要動作:
wx.setStorage或wx.setStorageSync中。wx.getStorage或wx.getStorageSync讀取資料。wx.clearStorage或wx.clearStorageSync的清除資料。wx.removeStorage或wx.removeStorageSync中的資料。 Code snippet "set cache (synchronous method)" exemple 。
 <!-- index.wxml -->
< input style =" input " placeholder =" Input data " bindinput =" inputEvent " />
< button type =" warn " bindtap =" saveToCache " > Save data to cache </ button >
< button type =" primary " bindtap =" jumpToPage " > Jump to another page </ button >
// index.js
Page ( {
data : {
inputInfo : ''
} ,
jumpToPage : function ( ) {
wx . navigateTo ( {
url : "../show/show"
} ) ;
} ,
inputEvent : function ( e ) {
console . log ( e . detail . value )
this . setData ( {
inputInfo : e . detail . value
} )
} ,
saveToCache : function ( ) {
wx . setStorage ( { key : 'inputInfo' , data : this . data . inputInfo ,
success : function ( res ) {
console . log ( res )
}
} )
}
} ) Code snippet "Fetch data from the cache and display data in a new page (synchronous method)" exemple 。
 <!-- show.wxml -->
< view > Data you saved to cache:{{inputInfo}} </ view >
// show.js
Page ( {
data : {
inputInfo : ''
} ,
onLoad : function ( options ) {
var that = this ;
wx . getStorage ( {
key : 'inputInfo' ,
success : function ( res ) {
console . log ( res )
that . setData ( {
inputInfo : res . data ,
} )
}
} )
}
} )您可以使用wx.scanCode API呼叫客戶端程式碼掃描器UI 。它透過CTA按鈕直接存取微信掃描儀,目的是掃描QR碼。
Code snippet "call up client code scanner" example.
 <!-- .wxml -->
< view class =" btn-area " >
 < button bindtap =" bindScan " > Scan </ button >
</ view >
// .js
bindScan: function ( ) {
console . log ( 'scanner' )
wx . scanCode ( {
success : ( res ) => {
console . log ( res )
}
} )
}微信API提供了一套基於位置的服務:
wx.chooseLocation選擇要顯示的位置。wx.getLocation取得目前使用者位置。wx.openLocation在其貼上地圖視圖上顯示位置。wx.createMapContext個人化地圖。 Code snippet "get location" example.
 <!-- .wxml -->
< button type =" primary " bindtap =" listenerBtnGetLocation " > Get location </ button >
// .js
listenerBtnGetLocation: function ( ) {
wx . getLocation ( {
type : 'wgs84' ,
success : function ( res ) {
var latitude = res . latitude
var longitude = res . longitude
var speed = res . speed
var accuracy = res . accuracy
console . log ( res )
}
} )
}在上面,我們使用wx.getLocation透過獲得緯度和經度來檢索當前使用者位置。
wx.getLocation進一步詳細資料:如果使用者離開微型程序,但在他的聊天頂部顯示,您可以繼續致電wx.getLocation ,因此可以不斷地獲取使用者位置。
在微信中顯示目前使用者位置的內建地圖: wx.openLocation API調用,啟用Wechat內建地圖視圖的打開,以顯示您從listenerBtnGetLocation函數中獲得的位置。
注意: wx.openLocation API調用,將使用者重定向到新的地圖視窗。
Code snippet "display the current user location" example.
 // .js
listenerBtnGetLocation: function ( ) {
 wx . getLocation ( {
 type : 'wgs84' ,
 success : function ( res ) {
   var latitude = res . latitude
   var longitude = res . longitude
   wx . openLocation ( {
     latitude : latitude ,
     longitude : longitude ,
     scale : 28
   } )
  }
 } )
}微信圖像API提供四種可能性:
wx.chooseImage可以從專輯或相機中選擇影像。wx.previewImage在上傳應用程式之前預覽圖像。wx.getImageInfo取得影像資訊(高度,寬度,路徑,SRC)。wx.saveImageToPhotosAlbum可以將圖像從迷你程式儲存到您的專輯。在下面的範例中,我們建立了一個稱為listenerBtnChooseImage的函數,目的是使用wx.chooseImage呼叫使用者相簿或相機。然後,我們使用wx.getImageInfo來獲取圖像資訊。
Code snippet "upload an image from album or camera" example.
 <!-- .wxml -->
< button type =" primary " bindtap =" listenerBtnChooseImage " > Upload Image </ button >
<!-- Display the image user upload -->
< image src =" {{src}} " mode =" aspecFill "  bindlongtap =" imgLongTap " />
// .js
Page ( {
data : {
src : [ ]
} ,
listenerBtnChooseImage : function ( ) {
var that = this
// Upload an image
wx . chooseImage ( {
count : 1 ,
sizeType : [ 'original' , 'compressed' ] ,
sourceType : [ 'album' , 'camera' ] ,
success : function ( res ) {
console . log ( 'success' )
that . setData ( {
src : res . tempFilePaths
} )
// Get image info
wx . getImageInfo ( {
src : res . tempFilePaths [ 0 ] ,
success : function ( res ) {
console . log ( res . width )
console . log ( res . height )
console . log ( res . path )
}
} )
}
} )
}
} )現在,我們在頁面上有一個圖像,讓我們透過長時間敲擊圖像來將圖像從迷你程式中儲存到當前用戶相簿。
Code snippet "long tap the image to save it within user album" example.
 <!-- .wxml -->
< image src =" {{src}} " mode =" aspecFill "  bindlongtap =" imgLongTap " />
// .js
Page ( {
data : {
src : [ ]
} ,
listenerBtnChooseImage : function ( ) {
var that = this
// Upload an image
wx . chooseImage ( {
count : 1 ,
sizeType : [ 'original' , 'compressed' ] ,
sourceType : [ 'album' , 'camera' ] ,
success : function ( res ) {
console . log ( 'success' )
that . setData ( {
src : res . tempFilePaths
} )
// Get image info
wx . getImageInfo ( {
src : res . tempFilePaths [ 0 ] ,
success : function ( res ) {
console . log ( res . width )
console . log ( res . height )
console . log ( res . path )
}
} )
}
} )
} ,
// Longtap function
imgLongTap : function ( ) {
// Save image to album
wx . saveImageToPhotosAlbum ( {
filePath : this . data . src ,
success ( res ) {
wx . showToast ( {
title : 'Save' ,
icon : 'success' ,
duration : 1500
} )
console . log ( 'success' )
}
} )
}
} )微信網路API提供常見的HTTPS請求,Websocket,上傳和下載檔案。
wx.request提出標準的HTTPS請求。wx.uploadFile將檔案上傳到指定的伺服器。wx.downloadFile從指定的伺服器下載檔案。 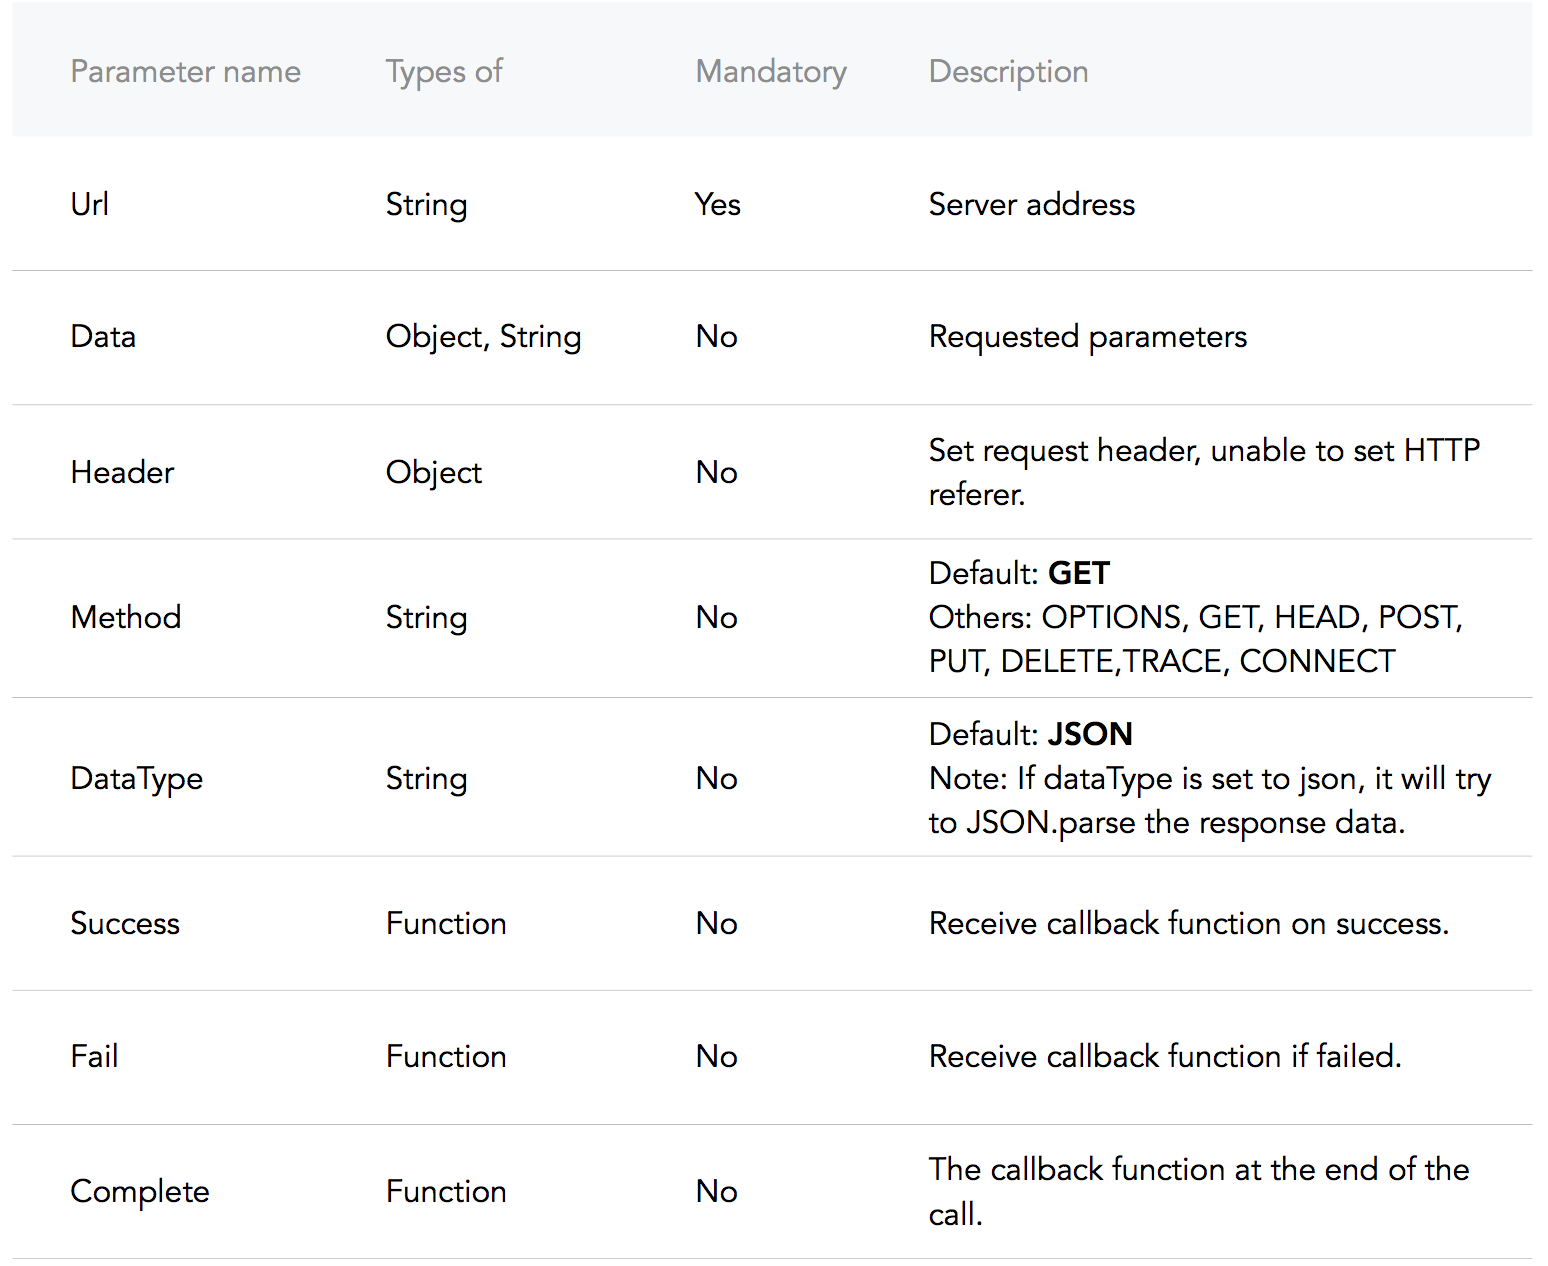
在下面的範例中,我們有一個功能和一個事件處理程序: addNewPost和onPullDownRefresh ,如他們的名字所述,您應該能夠添加新帖子並使用wx.request呼叫獲取帖子。
Code snippet "making a POST HTTPS request" example.
 <!-- .wxml -->
<!-- Add Posts -->
< input confirm-type =" send " bindconfirm =" addNewPost " placeholder =" Add a new post! " />
// .js
Page ( {
data : {
posts : [ ]
} ,
addNewPost : function ( e ) {
var that = this
var message = e . detail . value
// Add a new post
wx . request ( {
url : 'example.php' , // just an example address
method : 'post' ,
data : {
post : {
content : message
}
} ,
header : {
'content-type' : 'application/json'
}
} )
}
} )現在我們已經發布了,讓我們將其顯示到視圖圖層。為簡單起見,我們將利用Onpulldownrefresh重新載入新貼文。
Code snippet "making a GET HTTPS request" example.
 <!-- .wxml -->
<!-- Display Posts -->
< block wx:for =" {{posts}} " wx:for-item =" post " >
	< text > {{post.content}} </ text >
</ block >

<!-- Add Posts -->
< input confirm-type =" send " bindconfirm =" addNewPost " placeholder =" Add a new post! " />
// .js
Page ( {
data : {
posts : [ ]
} ,
addNewPost : function ( e ) {
var that = this
var message = e . detail . value
// Add a new post
wx . request ( {
url : 'example.php' , // just an example address
method : 'post' ,
data : {
post : {
content : message
}
}
} )
} ,
// onPullDownRefresh must first be enabled in the config.
onPullDownRefresh : function ( ) {
var that = this
// by default the request is a GET.
wx . request ( {
url : 'example.php' ,
header : {
'content-type' : 'application/json'
} ,
success : {
that . setData ( {
posts : res . data // Set the Page data for posts to the response data.
} )
}
} )
}
} ) 沿著我們的微型編程創建路徑,我們遇到了問題和問題,我們想與您分享。如果您有一些想分享的問題,請與我們聯絡。
微信僅允許擁有ICP許可證的API,因此您可以忘記西方國家熟悉的大多數API。
這是中國可用的API目錄,請檢查一下。
background-image:屬性影像無法透過CSS背景影像取得background-image: url(../../images/banner.png); 。我知道這很可怕,但是我們必須處理。
有兩種繞過這種挫敗感的方法:
您可以使用CSS background-image:但是您不能使用房地產路徑,必須在base64中編碼圖像,然後將其傳遞給background-image: url(base64 image); 。這是在基本64中編碼影像的工具。
或者,您可以使用<image>標籤並使用<image>標籤屬性像mode一樣處理映像。微信有13個模式,9個是切割模式,而4個是縮放模式。這是指向文檔的連結。
RPX代表響應式像素,這是微信小程式的單位。根據官方定義, rpx基於自適應螢幕寬度。
實際上,RPX單元是基於代表「 root em」的rem單元。為什麼不em單位?
em單元相對於父母的字體大小,這會導致複合問題。 rem單元相對於Conteract的根部元素(字體尺寸職責)。
但是,要返回rpx單元, RPX的優勢是:
您正在製作微型程式嗎?如果您想分享您的工作,與我們的工作人員見面,請尋求協助,請與我們聯絡!
如果您想貢獻,可以在此處發送拉動請求,也可以在上海(AT)Lewagon.com上大喊大叫!