amazon chime sdk ios
v0.26.2
Amazon Chime SDK項目委員會
注意:如果使用SDK源代碼進行構建,則
development分支包含可能無法使用公開可用的Chime Media庫構建的出血邊緣更改,或者可能不像公共發行版那樣穩定。
iOS的Amazon Chime SDK通過使用相同的基礎架構服務來添加協作音頻通話,視頻呼叫和屏幕共享查看功能,從而輕鬆添加與Amazon Chime Service供電的基礎架構服務。
這款Amazon Chime SDK適用於iOS,通過連接到您在AWS帳戶中創建的會話資源。 SDK擁有在iOS應用程序中構建自定義呼叫和協作體驗所需的一切隨著音量的變化並管理會議功能,例如音頻靜音和視頻瓷磚綁定。
我們還擁有一個Amazon Chime SDK項目委員會,您可以在其中找到社區請求及其狀態。
首先,請參閱以下資源:
並查看以下指南:
您可以通過github釋放將Amazon Chime SDK從SPM,Cocoapods或二進製文件中集成到您的項目中。
為了設置,您的項目的根文件夾(您可以找到.xcodeproj文件)將被稱為root 。
Amazon Chime SDK可通過Cocoapods獲得。如果您尚未安裝Cocoapods,請通過運行命令來安裝Cocoapods:
 $ gem install cocoapods
$ pod setup
根據您的系統設置,您可能必須使用sudo來安裝可可腳架,如下所示:
 $ sudo gem install cocoapods
$ pod setup
在root Directory(您的 *.xcodeproj文件的目錄)中,運行以下內容以在項目中創建一個podfile:
$ pod init
編輯Podfile以將AmazonChimeSDK包括在您的項目中:
 target 'YourTarget' do
    pod 'AmazonChimeSDK'
    ...
end
如果您不需要視頻和內容共享功能或軟件視頻編解碼器支持,則可以使用AmazonChimeSDKNoVideoCodecs來減少尺寸:
 target 'YourTarget' do
    pod 'AmazonChimeSDKNoVideoCodecs'
    ...
end
(可選)如果要使用背景模糊和替換功能,請添加:
 target 'YourTarget' do
  pod 'AmazonChimeSDKMachineLearning'
  ...
end
然後運行以下命令以安裝POD:
$ pod install --repo-update
要打開您的項目,請使用Xcode在根目錄中打開新生成的*.xcworkspace文件。您可以通過在項目文件夾中發出以下命令來執行此操作
$ xed .
注意:請勿使用 *.xcodeproj打開項目。
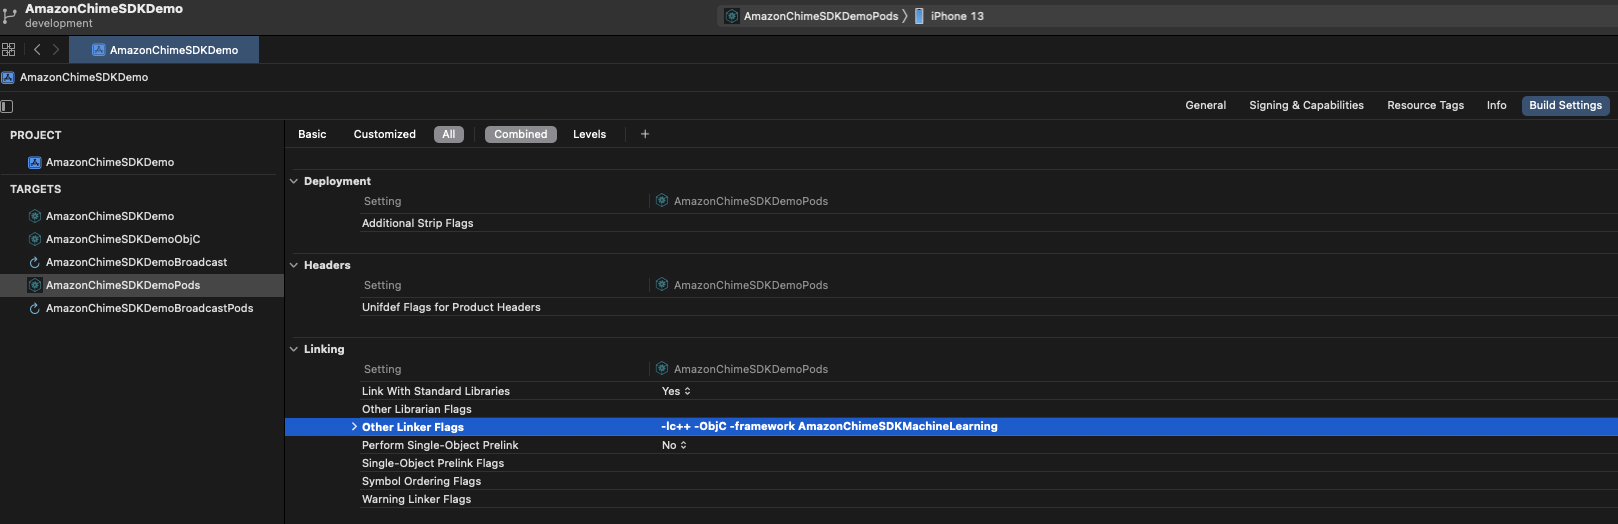
如果您使用的是背景模糊和替換功能,則在Linking部分下方的Build Settings選項卡下,將-framework AmazonChimeSDKMachineLearning添加到Other Linker Flags中。
Amazon Chime SDK可通過SPM獲得。如果您不需要視頻和內容共享功能或軟件視頻編解碼器支持,則可以選擇不使用視頻編解碼器SPM。
在Xcode中打開您的項目
轉到文件> Swift軟件包>添加軟件包依賴關係...
在字段中,輸入軟件包存儲庫URL ,請輸入“ https://github.com/aws/amazon-chime-sdk-ios-pm”。要使用不使用視頻編解碼器媒體模塊,請輸入“ https://github.com/aws/amazon-chime-sdk-ios-no-video-codecs-spm”。
輸入最新版本(例如0.23.1 ),然後單擊下一步。
選擇項目的軟件包,然後單擊完成。需要AmazonChimeSDK和AmazonChimeSDKMedia 。如果您想使用背景模糊和背景更換,請檢查AmazonChimeSDKMachineLearning 。
AmazonChimeSDK和AmazonChimeSDKMedia二進製文件。AmazonChimeSDKMachineLearning二進製文件。否則,您可以在下面的說明中忽略對AmazonChimeSDKMachineLearning的所有參考。AmazonChimeSDKMediaNoVideoCodecs二進制代替AmazonChimeSDKMedia ,並將所有參考作為AmazonChimeSDKMedia作為AmazonChimeSDKMediaNoVideoCodecs在下面的說明中。注意:我們不支持來自不同版本的混合和匹配二進製文件。
.framework s或.xcframework s複製為root ,這取決於您的項目使用的框架。對於Xcode12.3及以後,如果您有編譯問題,請使用.xcframework 。 .xcframework可在Amazon Chime SDK iOS V0.15.0之後獲得。 在XCode中打開您的.xcodeproj文件,然後單擊您的構建目標。
在Build Settings卡下,
將$(PROJECT_DIR)添加到Framework Search Path中。
將@executable_path/Frameworks添加到Runpath Search Paths 。
在Linking部分下,在Other Linker Flags中添加以下兩個標誌:
-lc++-ObjC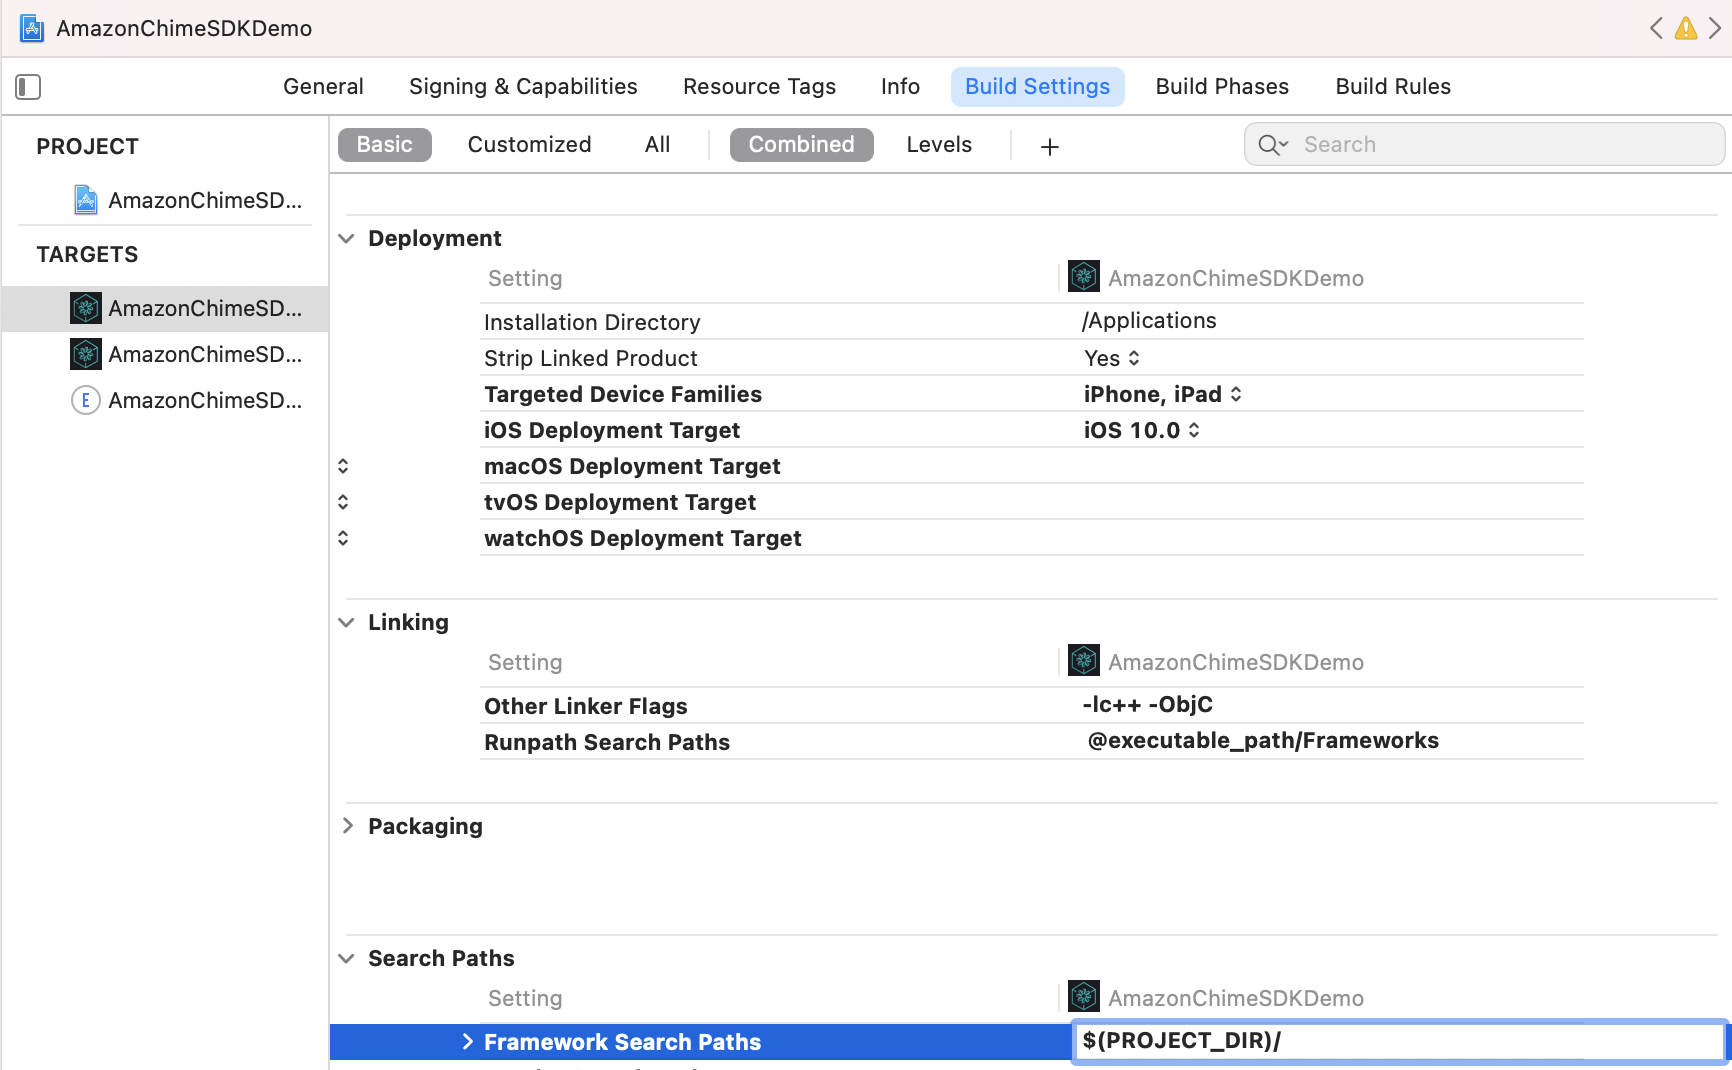
在General選項卡下,查找Frameworks, Libraries, and Embedded Content部分。單擊 +,然後Add Others ,然後Add Files 。
.framework ,請指定AmazonChimeSDK.framework , AmazonChimeSDKMedia.framework和AmazonChimeSDKMachineLearning.framework的位置。如果您在使用傳統的.framework時出現編譯錯誤,則在Xcode 12.3中發生在XCode 12.3中,請使用.xcframework ,可以在Amazon Chime SDK IOS V0.15.0之後獲得。.xcframework ,請指定AmazonChimeSDK.xcframework , AmazonChimeSDKMedia.xcframework和AmazonChimeSDKMachineLearning.xcframework的位置。AmazonChimeSDK.framework AmazonChimeSDKMedia.framework和Frameworks,請在Embed選項下驗證Embed & Sign 。對於AmazonChimeSDKMachineLearning.framework ,選擇Do Not Embed 。 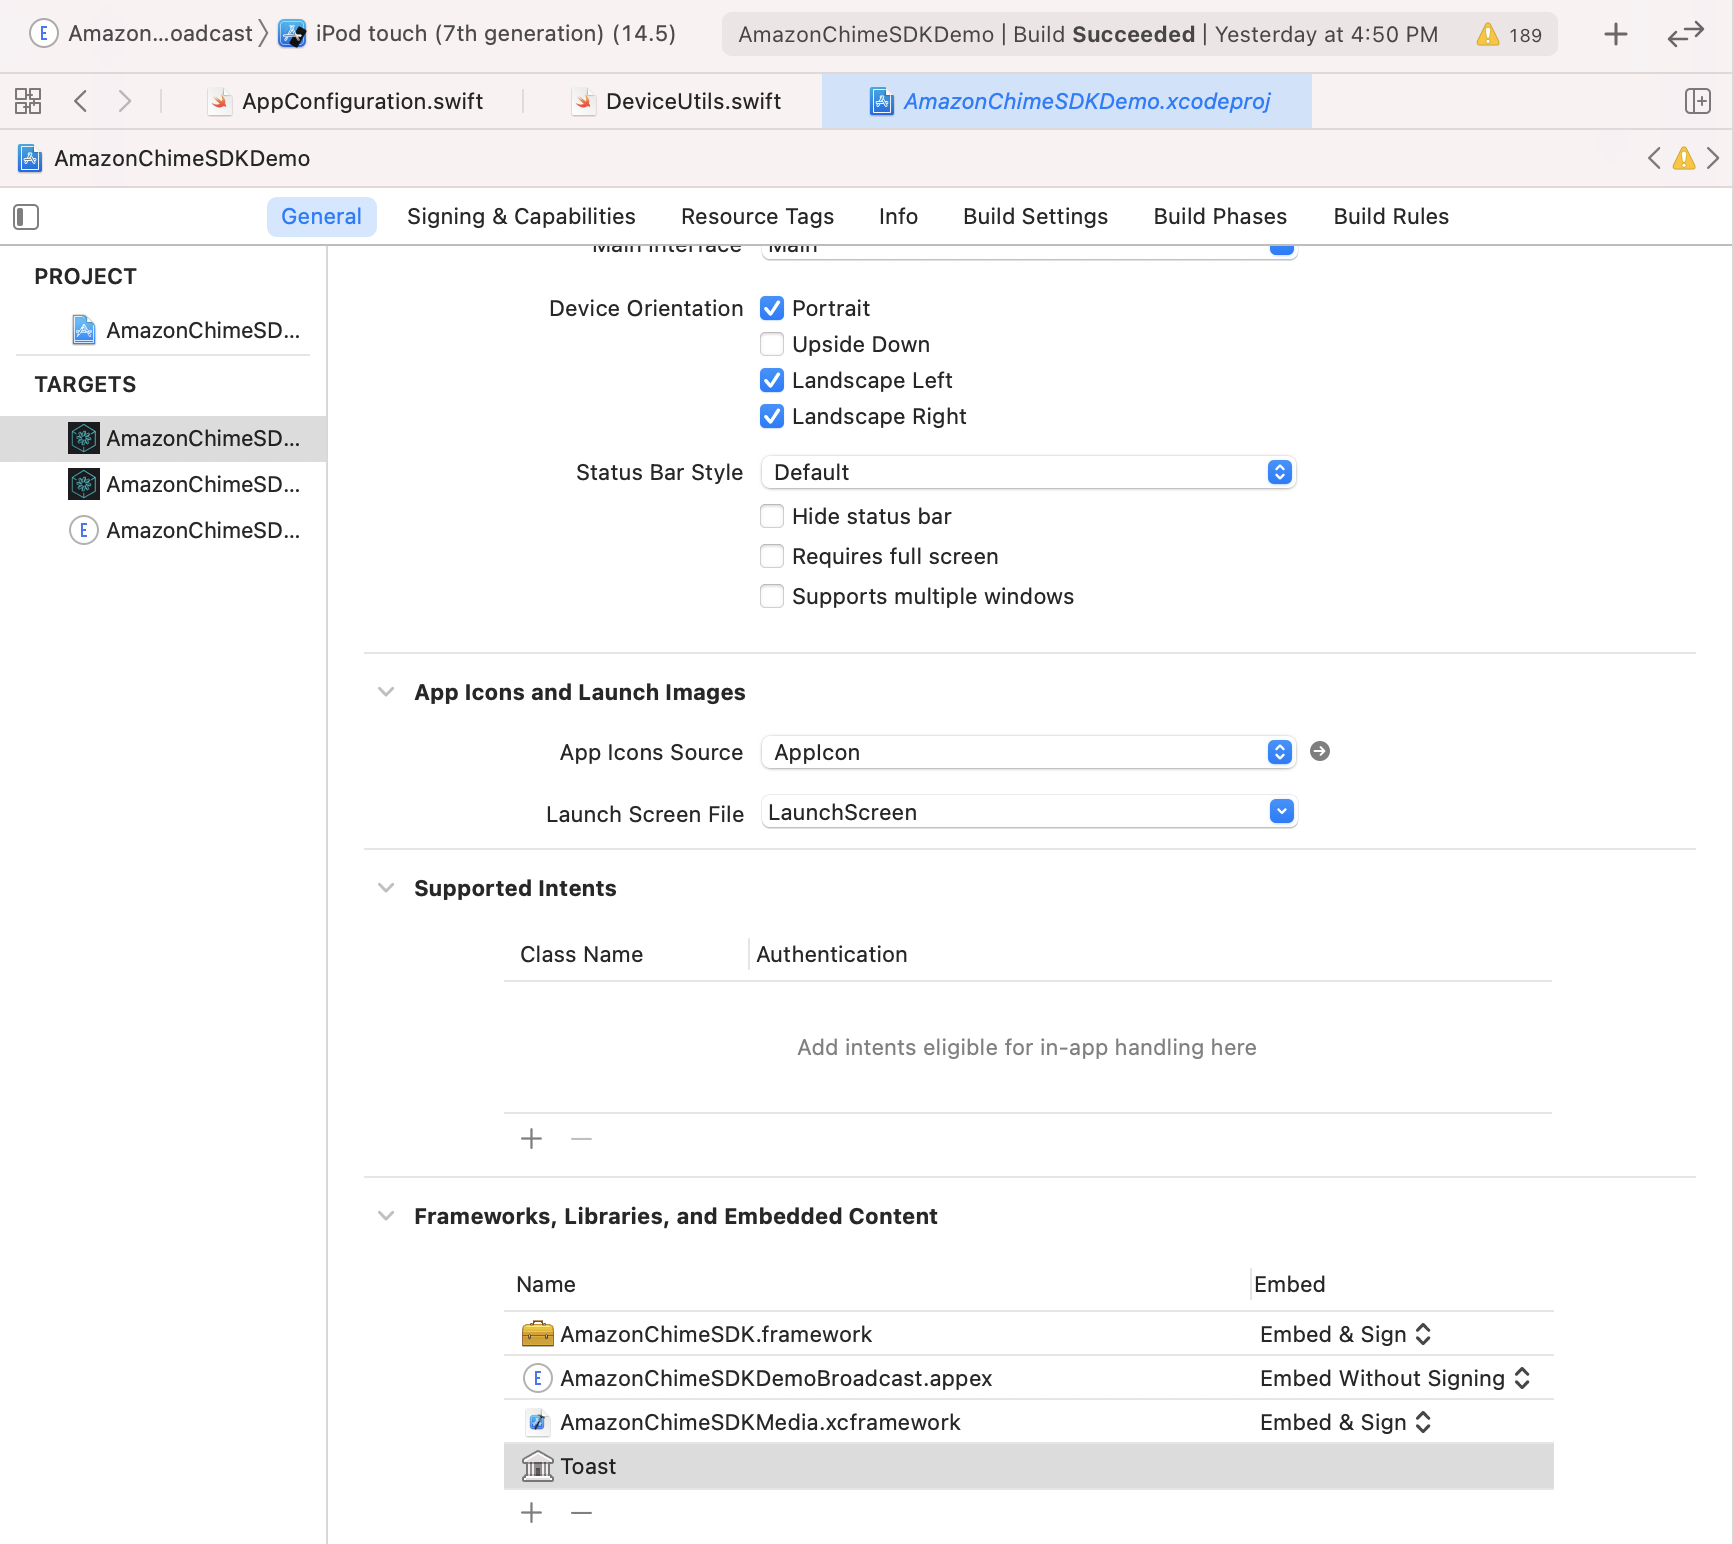
要運行演示應用程序,請按照以下步驟操作。
git clone [email protected]:aws/amazon-chime-sdk-ios.git
對於/AmazonChimeSDKDemo/Podfile中的兩個目標,請用特定的SDK版本替換AMAZON_CHIME_SDK_VERSION ,例如0.19.3 ,如果使用了最新版本的Amazon Chime SDK,則將其刪除。
Unewer /AmazonChimeSDKDemo ,運行以下命令以安裝POD:
$ pod install --repo-update
從最新版本中下載AmazonChimeSDKMedia和AmazonChimeSDKMachineLearning二進製文件。
unzip並將AmazonChimeSDKMedia.xcframework複製到amazon-chime-sdk-ios/AmazonChimeSDK文件夾和AmazonChimeSDKMachineLearning.xcframework到amazon-chime-sdk-ios/AmazonChimeSDKDemo folder。
從Amazon-Chime-SDK-JS部署無服務器演示
AmazonChimeDemoSDKBroadcast.appex是AmazonChimesDkdeMo使用的設備級別屏幕共享的廣播擴展,驗證在Embed選項下選擇Embed without Signing 。如果您不希望對此進行測試,請將其從Frameworks, Libraries, and Embedded Content部分中刪除。
對於每個目標,在Signing & Capabilities卡下,
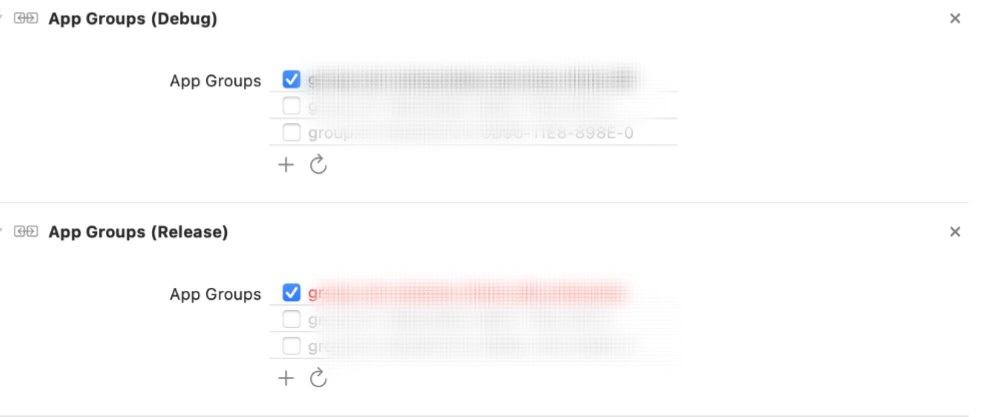
Signing部分,使用您自己的Apple開發人員團隊和捆綁標識符。App Groups部分,如果您想測試共享設備級別的屏幕捕獲,請選擇自己的應用程序組。有關更多詳細信息,請參見內容共享。 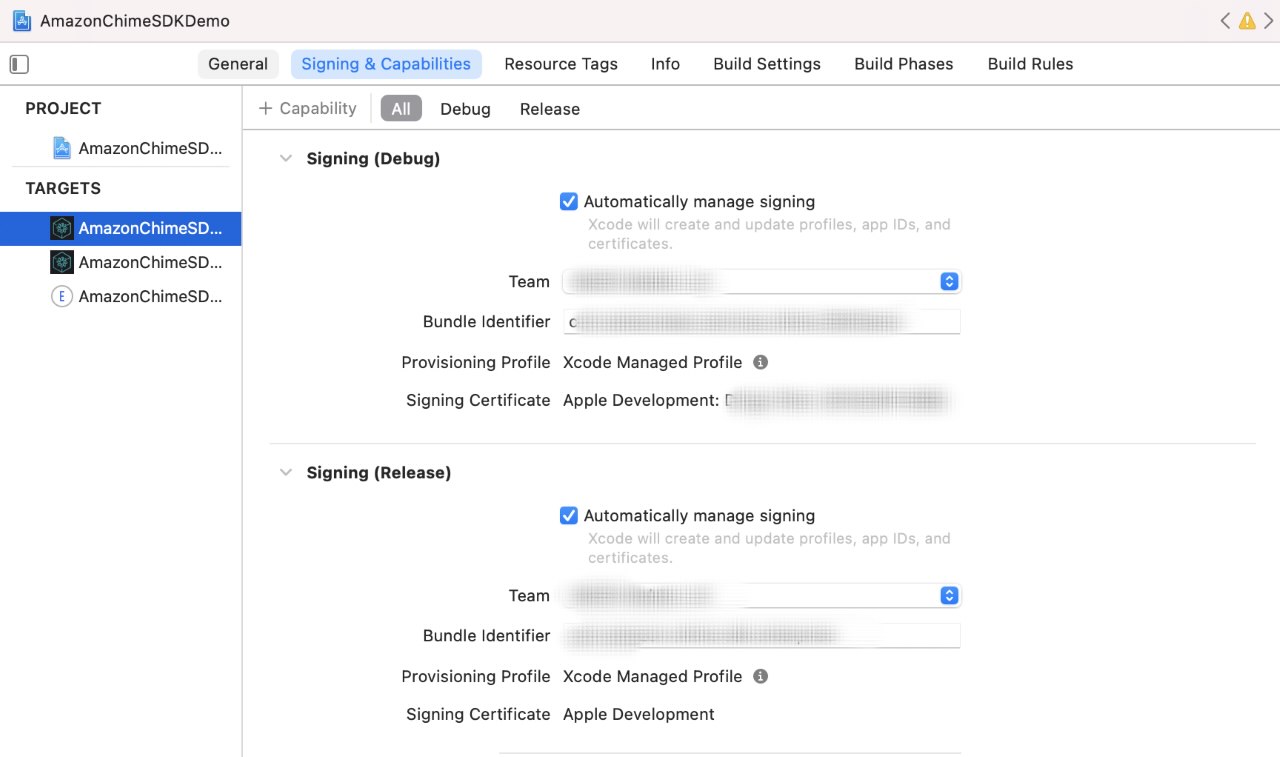
更新服務器URL和區域:
AppConfiguration.swift使用服務器URL和無服務器演示的區域。ViewControllerObjC.h 。 (可選)在AppConfiguration.swift和SampleHandler.swift中更新broadcastBundleId和appGroupId 。有關更多詳細信息,請參見內容共享。
在AmazonChimeSDKDemo/使用Xcode中打開AmazonChimeSDKDemo.xcworkspace文件,從Xcode IDE頂部的方案下拉列表中選擇AmazonChimeSDKDemoPods ,選擇構建設備,然後單擊“跑步”按鈕。
在AmazonChimeSDKDemo/使用Xcode中打開AmazonChimeSDKDemo.xcworkspace文件,從Xcode IDE頂部的方案下拉列表中選擇AmazonChimeSDKDemo ,選擇一個構建設備,然後單擊“運行”按鈕。
在加入屏幕上,選擇無CallKit加入會議或通過CallKit傳入/發出呼叫加入。由於演示應用程序沒有推動通知,因此它通過傳入呼叫加入10秒鐘,以使用戶有足夠的時間背景應用程序或鎖定屏幕以模仿行為。
如果您在此項目中發現潛在的安全問題,我們要求您通過我們的漏洞報告頁面通知AWS/Amazon Security。請不要創建公共GitHub問題。
您需要開始會議會議才能開始發送和接收音頻。
meetingSession . audioVideo . start ( )默認配置是:
.outputOnly或.none以免避免需要音頻記錄權限)您可以在AudioVideoConfiguration中指定非默認選項,然後開始會議會議。
 var audioVideoConfig = AudioVideoConfiguration (
    audioMode : . mono48k ,
    audioDeviceCapabilities : . outputOnly ,
    callKitEnabled : true ,
    enableAudioRedundancy : false ,
    reconnectTimeoutMs : 180 * 1000 )
meetingSession . audioVideo . start ( audioVideoConfiguration : audioVideoConfig ) 注意:要避免丟失任何事件,請在會話開始之前添加觀察者。您可以通過致電會議來刪除觀察者。audiovideo.removeaudiovideoobserver(觀察者)。
 class MyAudioVideoObserver : AudioVideoObserver {
    func audioSessionDidStartConnecting ( reconnecting : Bool ) {
        if ( reconnecting ) {
            // e.g. the network connection is dropped.
        }
    }
    func audioSessionDidStart ( reconnecting : Bool ) {
        // Meeting session starts.
        // Can use realtime, devices APIs.
    }
    func audioSessionDidDrop ( ) { }
    func audioSessionDidStopWithStatus ( sessionStatus : MeetingSessionStatus ) {
         // See the "Stopping a session" section for details.
    }
    func audioSessionDidCancelReconnect ( ) { }
    func connectionDidRecover ( ) { }
    func connectionDidBecomePoor ( ) { }
    func videoSessionDidStartConnecting ( ) { }
    func videoSessionDidStartWithStatus ( sessionStatus : MeetingSessionStatus ) {
        // Video session starts.
        // Can use video APIs.
    }
    func videoSessionDidStopWithStatus ( sessionStatus : MeetingSessionStatus ) { }

    meetingSession . audioVideo . addAudioVideoObserver ( observer : self )
}列出會議的可用音頻設備。
 // An list of MediaDevice objects
let audioDevices = meetingSession . audioVideo . listAudioDevices ( )

for device in audioDevices {
    logger . info ( msg : " Device type: ( device . type ) , label: ( device . label ) " )
} MediaDevice對象選擇音頻設備。注意:您應該在會話開始後打電話給這個,否則將是無效的。您應該使用從ListAudiodevices()返回的設備之一調用ChooSeaudiOdevice。
 let audioDevices = audioVideo . listAudioDevices ( )
val device = /* An item from audioDevices */
meetingSession . audioVideo . chooseAudioDevice ( mediaDevice : device ) 注意:如果您使用自定義攝像機捕獲源,則switchCamera()是無效的。請參閱自定義視頻以獲取更多詳細信息。
切換到設備上的前攝像頭或後置攝像頭(如果有)。
meetingSession . audioVideo . switchCamera ( ) 添加DeviceChangeObserver以接收新音頻設備或音頻設備斷開連接時接收回調。 audioDeviceDidChange包含更新的設備列表。
 class MyDeviceChangeObserver : DeviceChangeObserver {
    func audioDeviceDidChange ( freshAudioDeviceList : [ MediaDevice ] ) {
        // A list of updated MediaDevice objects
        for device in freshAudioDeviceList {
            logger . info ( msg : " Device type: ( device . type ) , label: ( device . label ) " )
        }
    }

    meetingSession . audioVideo . addDeviceChangeObserver ( observer : self )
} let activeAudioDevice = meetingSession . audioVideo . getActiveAudioDevice ( )加入會議時,支持Mono/16KHz , Mono/48kHz和立體聲/48KHz 。立體聲/48kHz如果在啟動音頻會話時未明確指定的話,將設置為默認音頻模式。
meetingSession . audioVideo . start ( ) // starts the audio video session with Stereo/48KHz audio, audio input and output devices enabled, callkit disabled, and audio redundancy enabled

meetingSession . audioVideo . start ( audioVideoConfiguration ) // starts the audio video session with the specified [AudioVideoConfiguration]
注意:到目前為止,您已經添加了觀察者來接收設備和會話生命週期事件。在以下用例中,您將使用實時API方法發送和接收卷指標並控制靜音狀態。
 let muted = meetingSession . audioVideo . realtimeLocalMute ( ) // returns true if muted, false if failed

let unmuted = meetingSession . audioVideo . realtimeLocalUnmute // returns true if unmuted, false if failed 您可以使用它來構建實時指標UI並將其更新以進行數組提供的更改。
注意:這些回調僅包括上一個回調中的三角洲。
 class MyRealtimeObserver : RealtimeObserver {
    func volumeDidChange ( volumeUpdates : [ VolumeUpdate ] ) {
        for currentVolumeUpdate in volumeUpdates {
            // Muted, NotSpeaking, Low, Medium, High
            logger . info ( msg : " ( currentVolumeUpdate . attendeeInfo . attendeeId ) 's volume changed: ( currentVolumeUpdate . volumeLevel ) " )
        }
    }
    func signalStrengthDidChange ( signalUpdates : [ SignalUpdate ] ) {
        for currentSignalUpdate in signalUpdates {
            // None, Low, High
            logger . info ( msg : " ( currentSignalUpdate . attendeeInfo . attendeeId ) 's signal strength changed: ( currentSignalUpdate . signalStrength ) " )
        }
    }
    func attendeesDidJoin ( attendeeInfo : [ AttendeeInfo ] ) {
        for currentAttendeeInfo in attendeeInfo {
            logger . info ( msg : " ( currentAttendeeInfo . attendeeId ) joined the meeting " )
        }
    }
    func attendeesDidLeave ( attendeeInfo : [ AttendeeInfo ] ) {
        for currentAttendeeInfo in attendeeInfo {
            logger . info ( msg : " ( currentAttendeeInfo . attendeeId ) left the meeting " )
        }
    }
    func attendeesDidDrop ( attendeeInfo : [ AttendeeInfo ] ) {
        for currentAttendeeInfo in attendeeInfo {
            logger . info ( msg : " ( currentAttendeeInfo . attendeeId ) dropped from the meeting " )
        }
    }
    func attendeesDidMute ( attendeeInfo : [ AttendeeInfo ] ) {
        for currentAttendeeInfo in attendeeInfo {
            logger . info ( msg : " ( currentAttendeeInfo . attendeeId ) muted " )
        }
    }
    func attendeesDidUnmute ( attendeeInfo : [ AttendeeInfo ] ) {
        for currentAttendeeInfo in attendeeInfo {
            logger . info ( msg : " ( currentAttendeeInfo . attendeeId ) unmuted " )
        }
    }

    meetingSession . audioVideo . addRealtimeObserver ( observer : self )
} 您可以使用activeSpeakerDidDetect事件來放大或強調最活躍的揚聲器的視頻瓷磚。通過設置scoreCallbackIntervalMs並實現activeSpeakerScoreDidChange ,您可以定期收到數分活躍的揚聲器。
 class MyActiveSpeakerObserver : ActiveSpeakerObserver {
    let activeSpeakerObserverId = UUID ( ) . uuidString

    var observerId : String {
        return activeSpeakerObserverId
    }

    func activeSpeakerDidDetect ( attendeeInfo : [ AttendeeInfo ] ) {
        if !attendeeInfo . isEmpty {
            logger . info ( msg : " ( attendeeInfo [ 0 ] . attendeeId ) is the most active speaker " )
        }
    }

    var scoresCallbackIntervalMs : Int {
        return 1000 // 1 second
    }

    func activeSpeakerScoreDidChange ( scores : [ AttendeeInfo : Double ] ) {
       let scoresInString = scores . map { ( score ) -> String in
            let ( key , value ) = score
            return " ( key . attendeeId ) : ( value ) "
       } . joined ( separator : " , " )
       logger . info ( msg : " Scores of active speakers are: ( scoresInString ) " )
    }

    // Calculating the active speaker base on the SDK provided policy, you can provide any custom algorithm
    meetingSession . audioVideo . addActiveSpeakerObserver ( policy : DefaultActiveSpeakerPolicy ( ) , observer : self )
}注意:您需要將視頻綁定到
VideoRenderView才能顯示視頻。可以使用
isLocalTile屬性識別本地視頻瓷磚。可以使用
isContent屬性確定內容視頻圖塊。請參閱屏幕和內容共享。當相同的遠程與會者重新啟動視頻時,創建具有新瓷磚ID的瓷磚。
您可以通過使用Amazon Chime SDK在iOS上構建會議應用程序來找到有關添加/刪除/查看視頻的更多詳細信息。
您可以致電startRemoteVideo開始接收遠程視頻,因為默認情況下不會發生這種情況。
meetingSession . audioVideo . startRemoteVideo ( ) stopRemoteVideo停止接收遠程視頻和onVideoTileRemoved以獲取現有的遠程視頻。
meetingSession . audioVideo . stopRemoteVideo ( ) class MyVideoTileObserver : VideoTileObserver {
func videoTileDidAdd ( tileState : VideoTileState ) {
// Ignore local video (see View local video), content video (see Screen and content share)
if tileState . isLocalTile || tileState . isContent {
return
}
let videoRenderView = /* a VideoRenderView object in your application to show the video */
meetingSession . audioVideo . bind ( videoView : videoRenderView , tileId : tileState . tileId )
}
func videoTileDidRemove ( tileState : VideoTileState ) {
// unbind video view to stop viewing the tile
meetingSession . audioVideo . unbindVideoView ( tileId : tileState . tileId )
}
meetingSession . audioVideo . addVideoTileObserver ( observer : self )
} // Use internal camera capture for the local video
meetingSession . audioVideo . startLocalVideo ( )
// Use internal camera capture and set configuration for the video, e.g. simulcastEnabled, maxBitRateKbps
// If maxBitRateKbps is not set, it will be self adjusted depending on number of users and videos in the meeting
// This can be called multiple times to enable/disable simulcast and adjust video max bit rate on the fly
let localVideoConfig = LocalVideoConfiguration ( simulcastEnabled : true, maxBitRateKbps : 600 )
meetingSession . audioVideo . startLocalVideo ( config : localVideoConfig )
// You can switch camera to change the video input device
meetingSession . audioVideo . switchCamera ( )
// Or you can inject custom video source for local video, see custom video guide meetingSession . audioVideo . stopLocalVideo ( ) 注意:應該鏡像本地視頻。設置videorenderview.mirror = true
 class MyVideoTileObserver : VideoTileObserver {
    func videoTileDidAdd ( tileState : VideoTileState ) {
            if tileState . isLocalTile {
                let localVideoView = /* a VideoRenderView object in your application to show the video */
                meetingSession . audioVideo . bind ( videoView : localVideoView , tileId : tileState . tileId )
            }
        }
    }

    func videoTileDidRemove ( tileState : VideoTileState ) {
        // unbind video view to stop viewing the tile
        meetingSession . audioVideo . unbindVideoView ( tileId : tileState . tileId )
    }

    meetingSession . audioVideo . addVideoTileObserver ( observer : self )
}
有關更高級的視頻瓷磚管理,請查看視頻分頁。
注意:當您或其他參與者共享內容(例如屏幕截圖或任何其他視頻程序對象)時,內容參與者(與會者ID#內容)會加入會話並共享內容,就好像常規參與者共享視頻一樣。
例如,您的與會者ID是“ my-id”。當您致電
meetingSession.audioVideo.startContentShare時,內容與會者“ my-id#content”將加入會議並共享您的內容。
 class MyContentShareObserver : ContentShareObserver {
    func contentShareDidStart ( ) {
        logger . info ( msg : " Content Share has started " )
    }

    func contentShareDidStop ( status : ContentShareStatus ) {
        logger . info ( msg : " Content Share has stopped " )
    }

    meetingSession . audioVideo . addContentShareObserver ( observer : self )
    let contentShareSource = /* a ContentShareSource object, can use InAppScreenCaptureSource for screen share or any subclass with custom video source */
    // ContentShareSource object is not managed by SDK, builders need to start, stop, release accordingly
    meetingSession . audioVideo . startContentShare ( source : contentShareSource )
}
您可以為內容共享設置配置,例如maxbitratekbps。在整個呼叫中,取決於系統和網絡可以提供的實際質量可能會有所不同。
 let contentShareConfig = LocalVideoConfiguration ( maxBitRateKbps : 200 )
meetingSession . audioVideo . startContentShare ( source : contentShareSource , config : contentShareConfig )
有關更多詳細信息,請參見內容共享。
meetingSession . audioVideo . stopContentShare ( ) Chime SDK允許每次會議同時共享兩份內容。遠程內容共享將觸發onVideoTileAdded ,而本地股份不會。要渲染視頻進行預覽,請在ContentShareSource中的VideoSource中添加一個VideoSink 。
 class MyVideoTileObserver : VideoTileObserver {
    func videoTileDidAdd ( tileState : VideoTileState ) {
        if ( tileState . isContent ) {
            // tileState.attendeeId is formatted as "attendee-id#content"
            let attendeeId = tileState . attendeeId
            // Get the attendee ID from "attendee-id#content"
            let baseAttendeeId = DefaultModality ( attendeeId ) . base ( )
            logger . info ( msg : " $baseAttendeeId is sharing screen " )

            let screenVideoView = /* a VideoRenderView object in your application to show the video */
            meetingSession . audioVideo . bindVideoView ( videoView : screenVideoView , tileId : tileState . tileId )
        }
    }

    func videoTileDidRemove ( tileState : VideoTileState ) {
        meetingSession . audioVideo . unbindVideoView ( tileId : tileState . tileId )
    }

    meetingSession . audioVideo . addVideoTileObserver ( observer : self )
}有關更多可用的指標,請參見ObservableMetric ,並監視音頻,視頻和內容共享質量。
 class MyMetricsObserver : MetricsObserver {
    func metricsDidReceive ( metrics : [ AnyHashable : Any ] ) {
        logger . info ( msg : " Media metrics have been received: ( metrics ) " )
    }

    meetingSession . audioVideo . addMetricsObserver ( observer : self )
}開始會議後,您可以從多個主題中接收實時消息。
 class MyDataMessageObserver : DataMessageObserver {
    let dataMessageTopic = " chat "
    // A throttled message is returned by backend from local sender
    func dataMessageDidReceived ( dataMessage : DataMessage ) {
        logger . info ( msg : " ( dataMessage . timestampMs ) ( dataMessage . text ( ) ) ( dataMessage . senderAttendeeId ) " )
    }

    // You can also subscribe to multiple topics.
    meetingSession . audioVideo . addRealtimeDataMessageObserver ( topic : dataMessageTopic , observer : self )
} 您可以將實時消息發送到任何主題,將通知已訂閱的觀察者。
注意:主題必須是alpha-numeric,它可以包括連字符和下劃線。數據不能超過2KB,壽命是可選的,但整數為正。
 let dataMessageTopic = " chat "
let dataMessageLifetimeMs = 1000

do {
    // Send "Hello Chime" to any subscribers who are listening to "chat" topic with 1 seconds of lifetime
    try meetingSession
        . audioVideo
        . realtimeSendDataMessage ( topic : dataMessageTopic ,
                                 data : " Hello Chime " ,
                                 lifetimeMs : dataMessageLifetimeMs )
} catch let err as SendDataMessageError {
    logger . error ( msg : " Failed to send message! ( err ) " )
} catch {
    logger . error ( msg : " Unknown error ( error . localizedDescription ) " )
}注意:確保刪除所有觀察者並發布您添加的資源,以避免任何內存洩漏。
 class MyAudioVideoObserver : AudioVideoObserver {
    func audioSessionDidStopWithStatus ( sessionStatus : MeetingSessionStatus ) {
        // This is where meeting ended.
        // You can do some clean up work here.
    }

    func videoSessionDidStopWithStatus ( sessionStatus : MeetingSessionStatus ) {
        // This will be invoked as well.
    }

    meetingSession . audioVideo . addAudioVideoObserver ( observer : self )
    meetingSession . audioVideo . stop ( )
}亞馬遜語音焦點減少了會議中的背景噪音,以獲得更好的會議體驗。有關更多詳細信息,請參見Amazon語音焦點。
 let enabled = audioVideo . realtimeSetVoiceFocusEnabled ( enabled : true ) // enabling Amazon Voice Focus successful

let disabled = audioVideo . realtimeSetVoiceFocusEnabled ( enabled : false ) // disabling Amazon Voice Focus successful自定義視頻源允許您控制視頻,例如應用視頻過濾器。有關更多詳細信息,請參見自定義視頻。
從0.23.3版本開始,SDK開始向我們的服務器發送冗餘音頻數據,以檢測數據包丟失,以幫助降低其對音頻質量的影響。冗餘音頻數據包僅用於包含活動音頻,IE語音或音樂的數據包。根據檢測到的數據包損耗的數量,這可能會增加音頻消耗的帶寬最高正常量的3倍。如果SDK在5分鐘內未檢測到任何數據包丟失,則將自動停止發送冗餘數據。
如果需要禁用此功能,則可以在開始會話之前通過AudiovideOconfiguration進行。
meetingSession . audioVideo . start ( AudioVideoConfiguration ( enableAudioRedundancy : false ) )雖然可以選擇禁用該功能,但我們建議將其啟用以提高音頻質量。禁用您的客戶有非常嚴格的帶寬限制的可能原因。
請參閱Amazon Chime SDK將軍。
應用程序在創建會議時可以通過記錄器實例從chime SDK獲取日誌。 Amazon Chime SDK具有您的應用程序可以使用的Logger的一些默認實現,例如將登錄到控制台的ConsoleLogger。默認情況下, ConsoleLogger設置為INFO級別。因此,為了獲取所有日誌,包括媒體日誌,請通過以下方式創建記錄器:
logger = ConsoleLogger ( name : " logger " , level : . DEFAULT ) 您和您的最終用戶負責上傳的所有內容(包括任何圖像),並必須確保該內容不會違反法律,侵犯或濫用任何第三方的權利,或者以其他方式違反了物質術語您與亞馬遜的協議(包括文檔,AWS服務條款或可接受的使用政策)。
版權所有Amazon.com,Inc。或其分支機構。版權所有。


