$ updatedb
Find scsi related drivers
$ locate scsi*.ko
Find USB related drivers
$ locate usb*.ko
These drivers are
.kois a suffix and is compiled into a module by default when installing the system. In fact, they can be compiled as part of the kernel, you just need to choose to be when compiling the kernel.
[*]That’s it. However, in many cases they are compiled as modules, which reduces the size of the kernel and provides the flexibility to load and unload them as needed. The following briefly demonstrates how to unload a module, load a module and view the status of a loaded module.
Passable
/procfile system
modulesfile to check the status of various modules loaded in the kernel, or by
lsmodcommand to view them directly.
$ cat /proc/modules
or
$lsmod
Check scsi and usb related drivers, the results are listed as module name, module size, referenced by other modules (number of references, modules that reference them)
$ lsmod | egrep scsi|usbusbhid 29536 0hid 28928 1 usbhidusbcore 138632 4 usbhid,ehci_hcd,ohci_hcdscsi_mod 147084 4 sg,sr_mod,sd_mod,libata
Uninstall below
usbhidTake a look at the module (don’t uninstall the scsi driver! Because your system may run on it. If you really want to play with it, remember to save the data before uninstalling), pass
rmmodThis can be achieved by running the command, first switch to the Root user:
$ sudo -s# rmmod usbhid
Check the module information again. You can no longer see it.
$ lsmod | grep ^usbhid
If you have a USB mouse, move it and find that you can't move it? Because the device drivers are no longer available, the device cannot be used. But don’t be nervous. Now that you know the reason, you can just reload the driver. Use the following
insmodBundle
usbhidThe module is reloaded.
$ sudo -s# insmod `locate usbhid.ko`
locate usbhid.kois to find out
usbhid.koThe path to the module, if there was none before
updatedb, I guess you can’t find it using it, but you can also go directly to
/lib/modulesUsed in directory
findBundle
usbhid.koFile found.
# insmod $(find /lib/modules -name *usbhid.ko* | grep `uname -r`)
Now the mouse can be used again. If you don’t believe it, move the mouse again:-)
At this point, the relationship between hardware devices and device drivers should be relatively clear. If not, then continue below.
Linux device drivers are associated with corresponding device files, and device files correspond to hardware devices one-to-one. These device files are uniformly stored in the system
/dev/directory.
For example, the scsi device corresponds to
/dev/sda,
/dev/sda1,
/dev/sda2...View these device information below.
$ ls -l /dev/sda*brw-rw---- 1 root disk 8, 0 2007-12-28 22:49 /dev/sdabrw-rw---- 1 root disk 8, 1 2007-12- 28 22:50 /dev/sda1brw-rw---- 1 root disk 8, 3 2007-12-28 22:49 /dev/sda3brw-rw---- 1 root disk 8, 4 2007-12-28 22:49 /dev/sda4brw-rw---- 1 root disk 8, 5 2007-12-28 22: 50 /dev/sda5brw-rw---- 1 root disk 8, 6 2007-12-28 22:50 /dev/sda6brw-rw---- 1 root disk 8, 7 2007-12-28 22:50 /dev/sda7brw-rw---- 1 root disk 8, 8 2007-12-28 22: 50/dev/sda8
You can see that the first character in the first column is
b, the fifth column is the number 8.
bIndicates that the file is a block device file, correspondingly, if it is
cIt means character device (such as `/dev/ttyS0). Regarding the difference between block device and character device, you can see here:
Character device: A character device is a device that can be accessed like a byte stream. Character terminals and serial ports are character devices.
Block devices: File systems can be accommodated on block devices. Unlike character devices, block devices can only transfer one or more complete blocks at a time when reading or writing. In the Linux operating system, applications can read and write block devices just like character devices (reading or writing arbitrary bytes of data at a time). Therefore, the difference between block devices and character devices is only the management of data in the kernel.
The number 8 is the device number corresponding to the hardware device in the kernel. It can be found in the kernel's
Documentation/devices.txtand
/proc/devicesFind the device number assignment in the file. But why does the same device correspond to different device files (
/dev/sdaWhy are there different numbers at the end, and
lsColumn 6 in the result corresponds to them). This is actually to differentiate between different parts of different devices. For hard drives, this handles different partitions inside the hard drive. As far as the kernel is concerned, it only needs to find the corresponding hardware device through the device number in column 5, but for the driver module, it also needs to know how to handle different partitions, so there is an additional auxiliary device number, that is The content corresponding to column 6. In this way, a device has a major device number (column 5) and an auxiliary device number (column 6), thereby facilitating the management of various hardware devices.
Because the device file corresponds to the hardware, you can directly access the
/dev/sda(in the case of
IDEhard drive, then the corresponding device is
/dev/hda(la) Read the hard disk information from the device, for example:
use
ddThe command copies the first 512 bytes of the hard disk and requires Root user
$ sudo dd if=/dev/sda of=mbr.bin bs=512 count=1
use
fileCommand to view the corresponding information
$ file mbr.binmbr.bin: x86 boot sector, LInux i386 boot LOader; partition 3: ID=0x82, starthead 254, startsector 19535040, 1959930 sectors; partition 4: ID=0x5, starthead 254, startsector 21494970, 56661255 sectors, code offset 0x48
Can also be used
odThe command is read in hexadecimal format and analyzed.
$ od -x mbr.bin
bsis the size of the block (in bytes
bytesas unit),
countis the number of blocks
Because this information is not intuitive (and will be analyzed further below), let's take a look at another device file first, which will be able to demonstrate the correspondence between the device file and the hardware very intuitively. Let's take the mouse as an example. Let's read the information of the device file corresponding to the mouse.
$ sudo -s# cat /dev/input/mouse1 | od -x
Your mouse driver may be different, so the device file may be other, but it will all be in
/dev/inputDown.
Move the mouse and see if you find different information output. Based on this principle, we often read the device file on one end by
/dev/ttyS0content in the device file on the other end
/dev/ttyS0Write content in to check whether the serial port line is damaged.
At this point, you should be more impressed by the relationship between device drivers, device files and hardware devices. If you want to have an in-depth understanding of the working principle of device drivers and the writing of device drivers, then take a look at the relevant information listed below and start the process of writing device drivers.
References:
Compile linux kernel 2.6
Principles of writing hardware drivers for Linux systems
Principles, configurations, and common problems of USB devices under Linux
The Linux Kernel Module Programming Guide
Linux device driver development
In fact, memory, USB disk, etc. can be used as the underlying "storage" device of the file system, but here we only use the hard disk as an example to introduce the relationship between disks and partitions.
At present, Linux partitioning still adopts the partitioning principle used by the first PC hard disk. This partitioning principle is analyzed and demonstrated step by step below.
Let’s take a look at a few concepts first:
Device management and partitioning
Under Linux, each storage device corresponds to a system device file. For hard disks, etc.
IDEand
SCSIdevice, in the system
/devThe corresponding containing characters can be found in the directory
hdand
sddevice files. Depending on the motherboard device interface and data cable interface to which the hard disk is connected,
hdor
sdAfter the character, you can add a character from
aarrive
zcharacters, for example
hda,
hdb,
hdcand
sda,
sdb,
sdcetc. In addition, in order to distinguish different partitions of the same hardware device, a number can be added at the end, for example
hda1,
hda2,
hda3and
sda1,
sda2,
sda3, so in
/devdirectory, you can see many similar device files.
The role of each partition
When partitioning, we often encounter the problem of primary partitions and logical partitions. This is actually to facilitate the expansion of partitions. Just as the introduction of logical volumes later is to better manage multiple hard disks, the introduction of primary partitions and logical partitions can be easily carried out. Partition management.
Each hard disk device in the Linux system consists of up to 4 primary partitions (including extended partitions).
The primary partition is used by the computer to start the operating system, so the startup program of each operating system, or boot program, should be stored on the primary partition. Linux stipulates that the primary partition (or extended partition) occupies the first 4 partition numbers. So you will see that the device file corresponding to the primary partition is
/dev/hda1-4or
/dev/sda1-4, rather than
hda5or
sda5.
Extended partitions are used to expand more logical partitions. Under Linux, logical partitions occupy
hda5-16or
sda5-16Wait for 12 numbers.
Partition type
It specifies the type of file system on this partition. Linux supports many file system types such as msdoc, vfat, ext2, ext3, etc. More information will be further introduced in the next section.
Next, by analyzing the first 512 bytes of the hard disk (i.e.
MBR) to analyze and understand partitions.
Let’s take a look at this picture first:
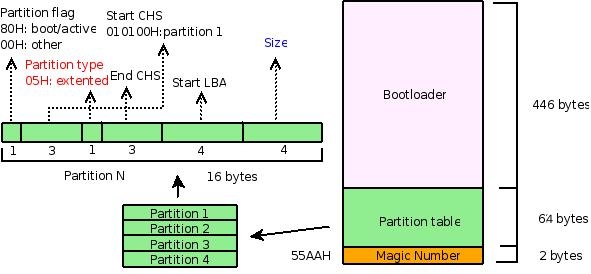
it is used to describe
MBRstructure.
MBRIncluding the boot part, partition table, and end mark `(55AAH), respectively occupy 446 bytes, 64 bytes and 2 bytes of 512 bytes. Here we only focus on the partition table part, that is, the middle 64 bytes and the left part in the figure.
Since I am using
SCSIhard drive, the following is from
/dev/sdaCopy the first 512 bytes of the hard disk to the file in the device
mbr.binmiddle.
$ sudo -s# dd if=/dev/sda of=mbr.bin bs=512 count=1
Use below
file,
od,
fdiskWait for the command to analyze this paragraph
MBRdata, and compare it with the graph above for a deeper understanding.
$ file mbr.binmbr.bin: x86 boot sector, LInux i386 boot LOader; partition 3: ID=0x82, starthead 254, startsector 19535040, 1959930 sectors; partition 4: ID=0x5, starthead 254, startsector 21494970, 56661255 sectors, code offset 0x48$ od -x mbr.bin | tail -6 #Only focus on the middle 64 bytes, so the last 6 lines in the result are intercepted 0000660 0000 0000 0000 0000 a666 a666 0000 01800000700 0001 fe83 ffff 003f 0000 1481 012a 00000000720 0000 0000 0000 0000 0000 0000 0000 fe000000740 ffff fe82 ffff 14c0 012a e7fa 001d fe000000760 ffff fe05 ffff fcba 0147 9507 0360 aa55$ sudo -s# fdisk -l | grep ^/ #Only analyze the MBR related parts, do not analyze the logical partition part /dev/sda1 * 1 1216 9767488+ 83 Linux/dev/sda3 1217 1338 979965 82 Linux swap / Solaris/dev/sda4 1339 4865 28330627+ 5 Extended
fileThe result of the command shows that the 512 bytes just copied are the boot sector, and the parts separated by semicolons are
bootloader, partition 3 and partition 4. The type of partition 3 is 82, that is
swapPartition (can be done via
fdiskcommanding
lcommand to list relevant information), which corresponds to
fdiskin the results of
/dev/sda3In the 5th column of the row, the number of sectors in partition 3 is 1959930, which converted into bytes is
1959930*512(Currently, the default sector size for hard drives is 512 bytes), while
swapThe default block size for a partition is 1024 bytes, so the number of blocks is
:
$ echo 1959930*512/1024 | bc979965
Exactly
fdiskResult in
/dev/sda3The number of blocks corresponding to the fourth column of the row, similarly, can be compared
fdiskand
fileThe results are analyzed for partition 4.
Let’s see again
odThe result of the command is displayed in hexadecimal. Also consider partition 3. After calculation, it is found that partition 3 corresponds to
odThe result of the command is:
fe00 ffff fe82 ffff 14c0 012a e7fa 001d
The first is the partition mark,
00H, from the picture above, you can see that it is not a boot partition (
80HThe marked one is the boot partition), and what about the partition type? for
82H,and
fileThe display results are consistent. Now let’s pay attention to the partition size, that is
fileThe number of sectors in the result.
$ echo ibase=10;obase=16;1959930 | bc1DE7FA
Just corresponds
e7fa 001d, similarly consider the results of the boot partition:
0180 0001 fe83 ffff 003f 0000 1481 012a
Partition tag:
80H, which just reflects that this partition is a boot partition, followed by the disk sector situation where the boot partition is located, 010100, that is, 1 side, 0 tracks, and 1 sector. Other content can be compared and analyzed.
Considering the time constraint, please refer to the information below or the relevant manual of the system for more details.
Supplement: When installing the system, you can use
fdisk,
cfdiskWait for the command to partition. If you want to boot from a certain partition, you need to type
80Htag, for example via
cfdiskSet a partition to
bootableto achieve.
References:
Inside the linux boot process
Develop your own OS: booting
Introduction to Redhat9 disk partition
Linux partition HOWTO
Before the introduction of logical volumes, partition types and file system types were treated almost equally. The process of setting the partition type was the process of formatting the partition and establishing the corresponding file system type.
The following mainly introduces how to establish the relationship between partitions and file system types, that is, how to format partitions as specified file system types.
Let’s first take a look at the common types of file systems under Linux (if you want to view all file types supported by Linux, you can use
fdiskcommanding
lcommand to view, or pass
man fsTo view, you can also use
/proc/filesystemsCheck the file system types supported by the current kernel)
ext2,
ext3,
ext4: These three are the types commonly used by Linux root file systems.
swap: This is a file system used to implement Linux virtual memory. During installation, it is generally necessary to create a special partition and format it as
swapfile system (if you want to add more
swapFor partitioning, you can refer to the reference materials in this section to become familiar with
dd,
mkswap,
swapon,
swapoffUsage of other commands)
proc: This is a relatively special file system that exists as an interface between the kernel and users and is built in memory (can be accessed through
catCommand view
/procFiles under the system can even be modified by
/proc/sysThe file below can adjust the kernel configuration in real time. The current premise is that you need to
procOn the file system mount:
mount -t proc proc /proc
In addition to the above file system types, Linux support includes
vfat,
iso,
xfs,
nfsAmong various common file system types, under Linux, you can freely view and operate file systems used by other operating systems such as Windows.
So how do you establish the association between disks and these file system types? format.
The formatting process is actually the process of reorganizing the partition, which can be
mkfsCommand to achieve, of course, you can also pass
fdiskWait for the command to be implemented. Here we only introduce
mkfs,
mkfsIt can be used to format an existing partition, but cannot perform partition operations (if you want to partition and format a disk, you can use
fdisk). After formatting, the data on the corresponding partition is organized by a special file system type.
For example: put
/dev/sda9The partition is formatted as
ext3file system.
$ sudo -s# mkfs -t ext3 /dev/sda9
If you want to list the file system types of each partition, you can use
fdisk -lOrder.
Please refer to the following materials for more information.
References:
Steps to load swap partition under Linux
Production and burning of ISO image files under Linux
RAM disk partition explanation:[1],[2]
Advanced File System Implementer's Guide
The previous section directly formatted the partition as a certain file system type, but considering the need to expand new storage devices, developers introduced logical volumes between the file system and the partition. Taking into account time constraints, I will not go into details here. Please refer to the reference: Detailed explanation of Linux logical volume management
What the file system finally presents is a visual structure, which can be presented using commands such as ls, find, and tree. It is like an upside-down "tree", and new "trees" can be mounted on the nodes of the tree.
The following is a brief introduction to mounting the file system.
A file system can be mounted via a device (
mount) to a directory, which is called a mount point. Interestingly, under Linux, a directory itself can be mounted to another directory, and a formatted file can also be mounted through a special device.
/dev/loopto mount (e.g.
isodocument). In addition, as far as file systems are concerned, Linux not only supports local file systems, but also supports remote file systems (such as
nfs).
The following briefly introduces several examples of file system mounting.
Mounting the root file system
Mounting requires Root permissions, for example, mounting the system root file system
/dev/sda1arrive
/mnt
$ sudo -s# mount -t ext3 /dev/sda1 /mnt/
Check
/dev/sda1As you can see from the mounting situation, a device can be mounted multiple times.
$ mount | grep sda1/dev/sda1 on / type ext3 (rw,errors=remount-ro)/dev/sda1 on /mnt type ext3 (rw)
For an already mounted file system, it can be remounted to support different attributes.
$ mount -n -o remount, rw /
Mount a new device
If the kernel already supports the USB interface, then when inserting the USB flash drive, you can pass
dmesgCommand to view the corresponding device number and mount it.
Check
dmesgFor the last few lines in the results, find something like
/dev/sdNinformation to find out the device number corresponding to the USB disk
$dmesg
It is assumed here that the USB disk is
vfatformat so that it can also be used on Windows in some print shops
# mount -t vfat /dev/sdN /path/to/mountpoint_directory
Mount an iso file or CD
For some iso files or iso format discs, you can also use
mountCommand to mount.
For iso files:
# mount -t iso9660 /path/to/isofile /path/to/mountpoint_directory
For CD:
# mount -t iso9660 /dev/cdrom /path/to/mountpoint_directory
Mount a remote file system
# mount -t nfs remote_ip:/path/to/share_directory /path/to/local_directory
Mount a proc file system
# mount -t proc proc /proc
procThe file system is organized in memory, but it can be mounted to a directory. Usually mount it in
/procdirectory so that some system management and configuration tools can use it. For example
topThe command uses it to analyze memory usage (read
/proc/meminfoand
/proc/statetc. files);
lsmodcommand through which to obtain the status of the kernel module (read
/proc/modules);
netstatcommand to get the status of the network through it (read
/proc/net/devand other documents). Of course, related tools can also be written. In addition, by adjusting
/proc/sysThe files in the directory can dynamically adjust the system configuration, such as going to
/proc/sys/net/ipv4/ip_forwardWriting the number 1 to the file enables the kernel to support packet forwarding. (For more information please refer to
prochelp,
man``proc)
Mount a directory
$ mount --bind /path/to/needtomount_directory /path/to/mountpoint_directory
This is very interesting. For example, you can mount a directory to the root directory of the ftp service, and provide the resources in the corresponding directory for others to share without copying the content.
The above only mentioned mounting, so how to uninstall? use
umountJust follow the command with the source address or mount point (device, file, remote directory, etc.) of the mount. For example:
$ umount /path/to/mountpoint_directory
or
$ umount /path/to/mount_source
If you want to manage a large number of or frequent mounted services, manually mounting each time is a bad idea. You can use it now
mountconfiguration file
/etc/fstab,Bundle
mountThe corresponding parameters are written as
/etc/fstabBatch mounting can be achieved in the column corresponding to the file (
mount -a) and uninstall (
umount -a).
/etc/fstabThe columns are file system, mount point, type, and related options. For more information please refer to
fstabhelp (
man fstab).
References:
Linux hard disk partition and its mounting principle
Looking at Linux virtual file system from file I/O
Source code analysis: static analysis C program function call diagram
There are some basic directories under the Linux file system, and various files with different functions are stored in different directories. The most basic directories are
/etc,
/lib,
/dev,
/binetc., which store system configuration files, library files, device files and executable programs respectively. These directories are generally necessary. When doing embedded development, you need to manually or use
busyboxWait for tools to create such a basic file system. Here we only make a very simple file system and perform various conventional operations on the file system to deepen our understanding of the file system.
still remember
ddAn order? Just use it to generate a fixed size file, this is
1M(1024*1024 bytes)files
$ dd if=/dev/zero of=minifs bs=1024 count=1024
View file types here
minifsis a full
\0file without any specific data structure
$ file minifsminifs: data
illustrate:
/dev/zerois a very special device, if you read it, you can get any number of
\0.
The file is then formatted into a file system of a specified file type. (Does it seem incredible that files can also be formatted? Yes, not only devices can, files can also be organized in certain file system types, but it should be noted that some file systems (such as
ext3) requires the target to be formatted to have at least
64Mspace).
$ mkfs.ext2 minifs
Check the file type at this time. At this time, the file
minifsJust take
ext2File system format organized
$ file minifsminifs: Linux rev 1.0 ext2 filesystem data
Because the file is organized by file system type, you can use
mountcommand to mount and use it.
Please switch to
rootThe user mounts it and passes
-o loopoption to associate it with a specific device
/dev/loop
$ sudo -s# mount minifs /mnt/ -o loop
View the file system information and only see one directory file
lost+found
$ ls /mnt/lost+found
Perform various regular operations under this file system, including reading, writing, deleting, etc. (Before each operation, please
minifsSave a copy of the file for comparison. Combined with relevant information, you can conduct an in-depth analysis of the changes to the file system caused by various operations, thereby in-depth understanding of the implementation principles of the file system as a way to organize data, etc.)
$ cp minifs minifs.bak$ cd /mnt$ touch hello$ cd -$ cp minifs minifs-touch.bak$ od -x minifs.bak > orig.od$ od -x minifs-touch.bak > touch.od
After creating a file, compare the similarities and differences between the current file system and the previous file system.
$ diff orig.od touch.oddiff orig.od touch.od61,63c61,64< 0060020 000c 0202 2e2e 0000 000b 0000 03e8 020a< 0060040 6f6c 7473 662b 756f 646e 0000 0000 0000< 0060060 0000 0000 0000 0000 0000 0000 0000 0000---> 0060020 000c 0202 2e2e 0000 000b 0000 0014 020a> 0060040 6f6c 7473 662b 756f 646e 0000 000c 0000> 0060060 03d4 0105 6568 6c6c 006f 0000 0000 0000> 0060100 0000 0000 0000 0000 0000 0000 0000 0000
Through comparison, it was found that when a file is added, the corresponding location of the file system has changed significantly.
$ echo hello, world > /mnt/hello
implement
synccommand to ensure that the data in the cache has been written to disk (remember Figure 1 of this section
buffer cacheWell, here it is
cacheThe data in is written to disk)
$ sync$ cp minifs minifs-echo.bak$ od -x minifs-echo.bak > echo.od
After writing the file content, compare the similarities and differences between the file system and the previous one.
$ diff touch.od echo.od
View strings in the file system
$ strings minifslost+foundhellohello, world
delete
helloFile, view file system changes
$ rm /mnt/hello$ cp minifs minifs-rm.bak$ od -x minifs-rm.bak > rm.od$ diff echo.od rm.od
By looking at the strings in the file system, we found that the file content was not overwritten when the file was deleted, so theoretically the content is still recoverable at this time.
$ strings minifslost+foundhellohello, world
The above only demonstrates some common tools for analyzing file systems and analyzes several common operations. If you want to have a very in-depth understanding of the implementation principles of file systems, please be familiar with using the above tools and read relevant materials.
References:
Build a mini filesystem in linux from scratch
Build a mini filesystem in linux with BusyBox
ext2 file system
along with
fuseWith the emergence of fuse, it has become possible to develop file systems in user space. If you want to develop your own file system, it is recommended to read: Use fuse to develop your own file system.
On December 22, 2007, I collected a lot of information and wrote the overall framework.
The first draft was completed on the afternoon of December 28, 2007. Considering the time constraints, many details were not further analyzed. In addition, there may be problems in understanding in some parts. Criticisms and corrections are welcome.
On the evening of December 28, 2007, some information was modified and the document was officially published.
No. 29, add a section on device drivers and hardware devices