ai chat accelerator
1.0.0
使用 AWS 上的 AI 聊天應用程式快速啟動並運行,該應用程式提供了建置基礎。
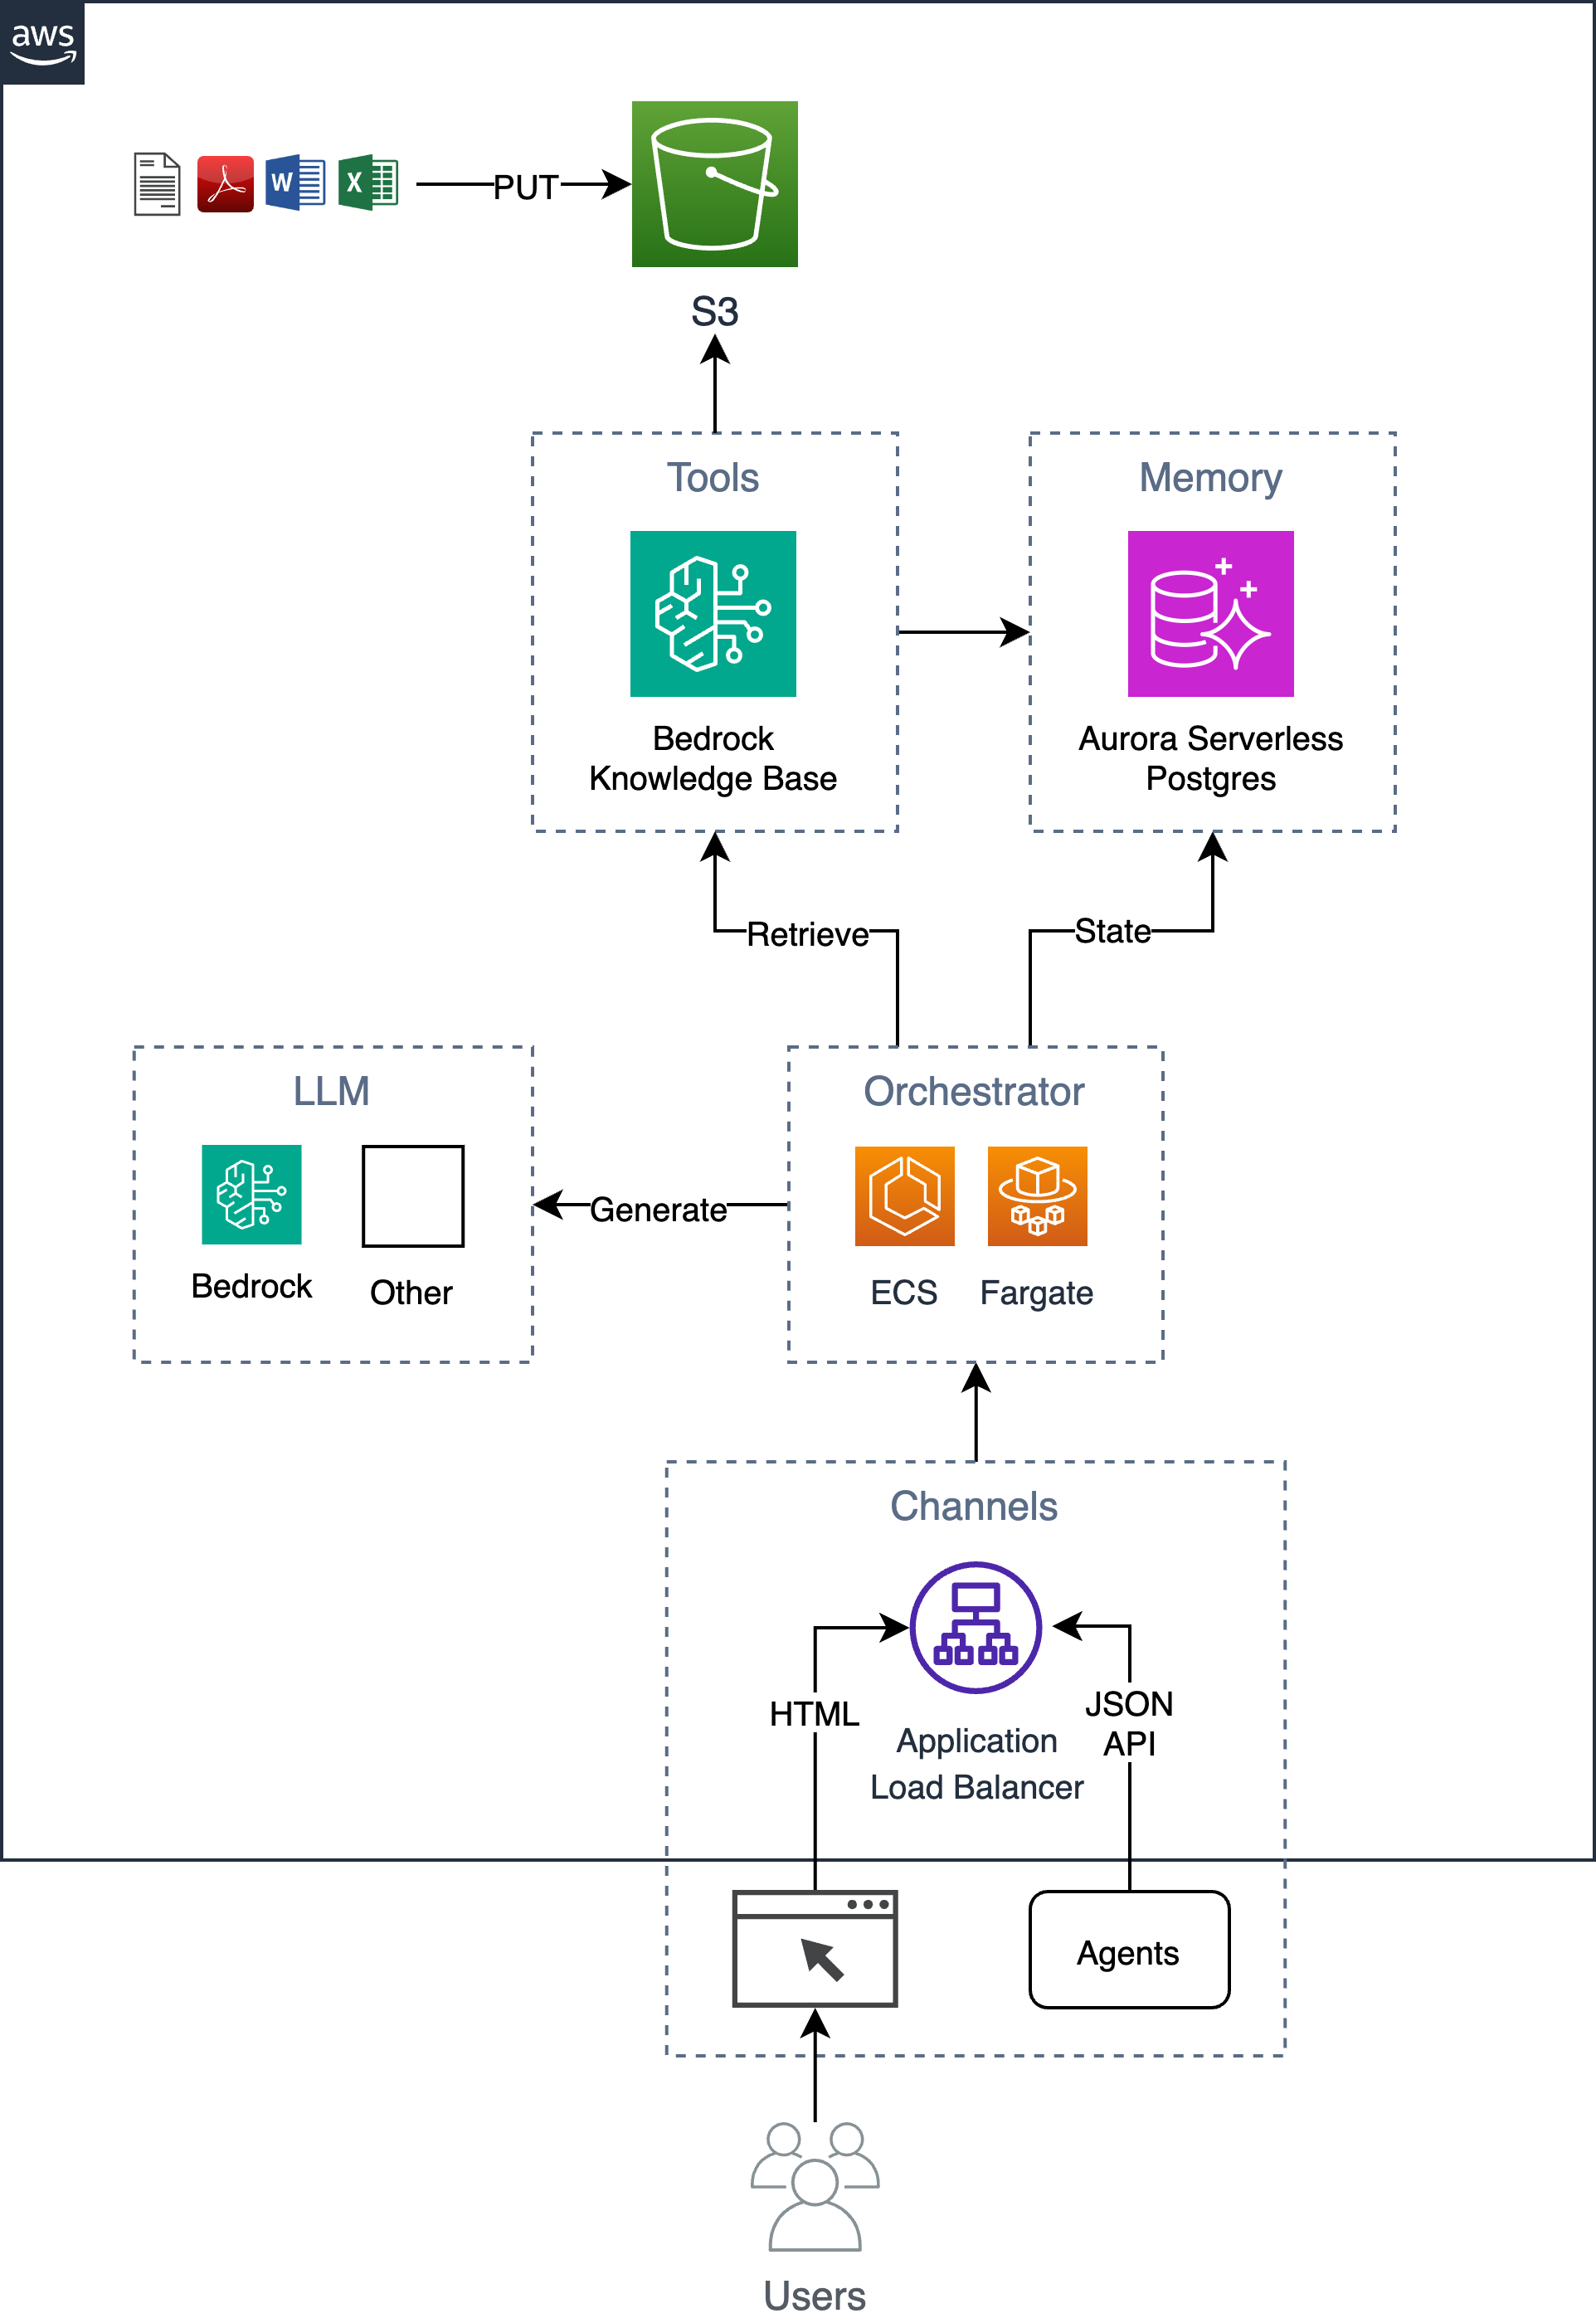
這是一個簡單但可擴展、企業級聊天機器人的範例,它實現檢索增強生成 (RAG) 模式,而不依賴任何 Python 框架/庫。它使用 Bedrock 知識庫來提取 S3 儲存桶中的文檔,並將索引向量儲存在 Aurora Serverless 託管的 Postgres 資料庫中。該資料庫也用作儲存用戶對話歷史等資訊的應用程式資料庫。該應用程式實作了 Web GUI 和 HTTP JSON API,並作為容器託管在 ECS Fargate 上,並以 ALB 為前端。該應用程式是使用 Flask 和 HTMX 建置的。
請依照以下 6 個步驟流程將此解決方案部署到您的 AWS 帳戶。
導出所需的環境變數。
 export AWS_REGION= $( aws configure get region || echo " us-east-1 " )
export ACCOUNT= $( aws sts get-caller-identity --query Account --output text )
export BUCKET=tf-state- ${ACCOUNT}
或者,建立一個 s3 儲存桶來儲存 terraform 狀態(建議這樣做,因為初始資料庫密碼將儲存在狀態中)。如果您已有 s3 儲存桶,則可以使用儲存桶的名稱更新BUCKET變數(例如, export BUCKET=my-s3-bucket )。
aws s3 mb s3:// ${BUCKET}設定模板輸入參數,例如terraform.tfvars中的應用程式name 。
 cd iac
cat << EOF > terraform.tfvars
name = "ai-chatbot"
tags = {
  app = "ai-chatbot"
}
EOF
使用 terraform 進行部署。
terraform init -backend-config= " bucket= ${BUCKET} " -backend-config= " key=ai-chatbot.tfstate "
terraform apply現在基礎架構已經部署完畢,您可以建立應用程式容器並將其部署在基礎架構之上。
如果您將應用程式名稱從ai-chatbot更改為其他名稱,則需要使用app參數將其傳遞給 make 命令(或在Makefile頂部更改它)。
在部署之前,您應該考慮更改系統和使用者提示以滿足您的特定要求。
第一次部署時,您可以執行以下命令來一起建立基礎映像和應用程式映像。
 cd ../
make baseimage && make deploy
初始部署後,您只需重建程式碼層並重新部署即可更快地迭代程式碼變更。
make deploy
# OR
# make deploy app=my-cool-chatbot cd iac
export DOCS_BUCKET= $( terraform output -raw s3_bucket_name )
aws s3 cp /path/to/docs/ s3:// ${DOCS_BUCKET} / --recursive cd iac
make sync請注意,此腳本呼叫bedrock-agent start-ingestion-job API。這項工作需要成功完成,聊天機器人才能回答有關您文件的問題。
open $( terraform output -raw endpoint ) 除了簡單的 HTMX GUI 之外,還有一個支援以下操作的 HTTP JSON API。
export endpoint= $( terraform output -raw endpoint )提出問題並得到答案。
curl -s -X POST -H " Content-Type: application/json " $endpoint /api/ask
-d ' { "question": "Who are you?" } ' | jq{
"answer" : " ... " ,
"conversationId" : " 46ac5045-49b4-487c-b3a0-64d82462ad76 "
}若要在對話中提出後續問題,請在 URL 中包含對話 ID。
curl -s -X POST -H " Content-Type: application/json " $endpoint /api/ask/46ac5045-49b4-487c-b3a0-64d82462ad76 -d ' { "question": What are you capable of?" } ' | jq{
"answer" : " ... " ,
"conversationId" : " 46ac5045-49b4-487c-b3a0-64d82462ad76 "
}返回最近10條對話
curl -s $endpoint /api/conversations | jq[
{
  "conversationId" : " d61e143c-a32d-4b4f-aa4e-a0fe94082e77 " ,
  "created" : " 2024-04-10T22:04:36.813819+00:00 " ,
  "questions" : [
    {
      "a" : " ... " ,
      "created" : " 2024-04-10 22:04:40.657402+00:00 " ,
      "q" : " ... "
    }
  ],
  "userId" : " 1 "
},
{
"conversationId" : " aaddc6aa-7c51-4b0a-800d-53e72b05524f " ,
"created" : " 2024-04-10T22:01:16.071982+00:00 " ,
"questions" : [
{
"a" : " ... " ,
"created" : " 2024-04-10 22:01:18.500971+00:00 " ,
"q" : " ... "
},
{
"a" : " ... " ,
"created" : " 2024-04-10 22:01:27.328482+00:00 " ,
"q" : " ... "
}
],
"userId" : " 1 "
}
]傳回指定會話的信息
curl -s $endpoint /api/conversations/d61e143c-a32d-4b4f-aa4e-a0fe94082e77 | jq{
"conversationId" : " d61e143c-a32d-4b4f-aa4e-a0fe94082e77 " ,
"created" : " 2024-04-10T22:04:36.813819+00:00 " ,
"questions" : [
{
"a" : " ... " ,
"created" : " 2024-04-10 22:04:40.657402+00:00 " ,
"q" : " ... "
}
],
"userId" : " 1 "
}返回用戶最近 10 則對話
curl -s $endpoint /api/conversations/users/1 | jq[
{
"conversationId" : " d61e143c-a32d-4b4f-aa4e-a0fe94082e77 " ,
"created" : " 2024-04-10T22:04:36.813819+00:00 " ,
"questions" : [
{
"a" : " ... " ,
"created" : " 2024-04-10 22:04:40.657402+00:00 " ,
"q" : " ... "
}
],
"userId" : " 1 "
},
{
"conversationId" : " aaddc6aa-7c51-4b0a-800d-53e72b05524f " ,
"created" : " 2024-04-10T22:01:16.071982+00:00 " ,
"questions" : [
{
"a" : " ... " ,
"created" : " 2024-04-10 22:01:18.500971+00:00 " ,
"q" : " ... "
},
{
"a" : " ... " ,
"created" : " 2024-04-10 22:01:27.328482+00:00 " ,
"q" : " ... "
}
],
"userId" : " 1 "
}
] Choose a make command to run
init run this once to initialize a new python project
install install project dependencies
start run local project
baseimage build base image
deploy build and deploy container
up run the app locally using docker compose
down stop the app
start-docker run local project using docker compose
為了在本地運行應用程序,請使用以下變數建立一個名為.env的本機檔案。變數KNOWLEDGE_BASE_ID來自 Terraform 輸出( cd iac && terraform output )。
POSTGRES_DB=postgres
POSTGRES_USER=postgres
POSTGRES_PASSWORD=xyz
KNOWLEDGE_BASE_ID=設定.env檔案後,您可以在 docker 中本機執行該應用程序,以迭代程式碼更改,然後再部署到 AWS。在本地運行該應用程式時,它會與本地 postgres 資料庫通訊並使用遠端 Amazon Bedrock 知識庫 API。確保您擁有有效的 AWS 憑證。執行make up指令將啟動一個 postgres 資料庫實例和一個 Web 容器。
make up要停止環境,只需運作:
make down

